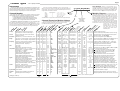
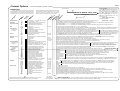
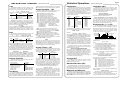
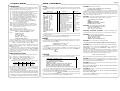
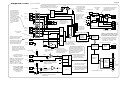
1
User’s Manual
Datataker Manual
A Concise Reference
for Datataker Models
DT50
DT500, DT600
DT505, DT605
DT515, DT615
and the
Channel Expansion Module
Series 2
EUROPE
This product complies with the requirements of European Directives
89/336/EEC and 73/23/EEC, and conforms with EN55022 Class A
(emissions) and EN50082-1 (susceptibility).
Mains adaptors used to power this product must comply with
EN60950, EN60742 or EN61010.
AUSTRALIA & NEW ZEALAND
ACN
006 134 863
This product complies with the requirements of Australian and
New Zealand standard for EMC emissions AS/NZS 3548:1992
Class A.
USA
This device complies with Part 15 of the FCC rules. Operation is
subject to the following two conditions: (1) this device may not
cause harmful interference, and (2) this device must accept any
interference received, including interference that may cause
undesired operation.
CANADA
This digital apparatus does not exceed the Class A limits for
radio noise emissions from digital apparatus as set out in the
Radio Interference Regulations of the Canadian Department of
Communications.
Le présent appareil numérique n’émet pas de bruits
radioélectriques dépassant les limites applicables aux appreils
numériques de la Classe A prescrites dans les règlements sur le
brouillage radioélectrique édictés par le Ministère des
Communications du Canada.
CAUTION — USE APPROVED ANTI-STATIC PROCEDURES
The input circuitry of this device is extremely sensitive and therefore
susceptible to damage by static electricity. Always follow approved antistatic procedures when working with this device.
CV-0002-A0.S02
Data Electronics
Contents
Page 1 Getting Started
Warranty
Data Electronics warrants the instruments it manufactures against defects in either the materials or the
workmanship for a period of 3 years from the date of delivery to the original customer. This warranty is
limited to the replacement or repair of such defects, without charge, when the instrument is returned to
Data Electronics or to one of its authorized dealers.
This warranty excludes all other warranties, either express or implied, and is limited to a value not
exceeding the purchase price of the instrument.
2 More Getting Started
3 Schedules
4 Channel Types
5 Channel Options
Data Electronics shall not be liable for any incidental or consequential loss or damages resulting from
the use of the instrument, or for damage to the instrument resulting from accident, abuse, improper
implementation, lack of reasonable care, or loss of parts.
6 Time and Other Channels, Statistical Operations
Where Data Electronics supplies to the customer equipment or items manufactured by a third party,
then the warranty provided by the third party manufacturer remains.
8 Data Logging and Retrieval, Memory Cards and Programs
7 Scaling Data and Calculations
9 Alarms
Warning
10 Output Format, More Commands
Data Electronics products are not authorized for use as critical components in any life support system
where failure of the product is likely to effect its safety or effectiveness.
11 Parameters, Switches
12 Display Panel Operation
Trademarks
13 COMMS Port
Datataker is a trademark of Data Electronics (Aust.) Pty. Ltd.
IBM PC, IBM XT, IBM AT and IBM PS/2 are trademarks of International Business Machines Corp.
Macintosh is a trademark of Apple Computer, Inc.
Windows is a trademark of Microsoft Corp.
PC Card and PCMCIA are trademarks of the Personal Computer Memory Card Industry Association.
14 Networking
15 Power and Battery Connection
16 Sensors 1 — Thermocouples, Thermistors, RTDs
17 Sensors 2 — Hints, IC Temperature Sensors, Bridges
Firmware (ROM) Versions
This manual is applicable to the Series 2
Datataker data loggers fitted with firmware
version 5.xx.
The version number is returned in the first
line of the TEST command — see “More
Commands”.
See “Firmware Change History” for
compatibility with the earlier firmware
versions.
Related Documents:
Getting Started with Datataker
Reference Manual
Advanced Communications Manual
Data Electronics (Aust.) Pty Ltd
7 Seismic Court
Rowville, VIC, 3178
Australia
Tel
+61 (3) 9764-8600
Fax
+61 (3) 9764-8997
E-mail [email protected]
19 Analog Input Configurations 1
20 Analog Input Configurations 2, Digital Configurations
21 Error Messages
22 Simplified Circuit
Data Electronics USA Inc
22961 Triton Way, Suite E,
Laguna Hills, CA92653
USA
Tel
+1 (714) 452-0750
Fax
+1 (714) 452-1170
E-mail [email protected]
Related Products:
Data Electronics (UK)
DeTerminal for DOS
Unit 26, Business Centre West
DeTerminal for Windows
Avenue One
DeLogger
Letchworth Garden City
DeLogger Pro
Hertfordshire SG6 2HB
DeCopy / DeImage
England, UK
DeLink DDE Server
Panel Mount Display
Tel
+44 (1462) 481 291
Sensor Simulation Panel
Fax
+44 (1462) 481 375
Memory Cards
E-mail.
Memory Card Interface
Internet Home Page: http://www.datataker.com/~dtaker
Datataker Manual — A Concise Reference UM-0046-A0
18 Sensors 3, Other Subjects
© Data Electronics (Aust.) Pty. Ltd. 1991–1996
23 Glossary
24 Appendix — Datataker DT50
25 Appendix — Datataker DT500 and DT600
26 Appendix — Datataker DT505 and DT605
27 Appendix — Geologger DT515 and DT615
28 Appendix — Channel Expansion Module
29 Appendix — Memory Card Processing (Flow Chart)
30 Appendix — Datataker Specifications
34 Appendix — Firmware Change History, Notes
35 Appendix — Accuracy of the Datataker Data Loggers
36 Index
Getting Started
Page 1
... also see the Getting Started with Datataker User’s Guide
The Datataker ....
The Datataker data logger is a tool to measure and
record a wide variety of parameters in the real world.
With the Datataker simple tasks are easy. For example
entering in the command line:
RA5S 1..5TJ LOGON
[return]
declares a reporting schedule (RA5S) which is to report
every five seconds (RA 5S) the temperatures on five Type J
thermocouples ( 1..5TJ), and to log or store the results in
memory (LOGON). Programs are executed only after the
receipt of a (carriage) return character.
Recovering the logged data is even simpler:
U [return]
returns the data in the default format:
1TJ 384.7 Deg C
2TJ 335.2 Deg C
3TJ 367.1 Deg C
etc.
If you want to do more complex tasks, you'll need to
learn about the Datataker commands. You can be sure that
the Datataker has the flexibility to handle very complex
situations, once you become familiar with the full command
set. The more familiar you are with the Datataker's features,
the better you'll be able to use it. Explore in detail the
features that are of most interest.
First Time
The Getting Started with Datataker User’s Guide
included with your logger is recommended reading for
first-time users. The manual will quickly teach you how to
program the Datataker. Alternatively you may read on!
The first task in preparing the Datataker is to establish a
communications link with your computer. Connect the
communications cable supplied between the Datataker and
to any IBM or compatible computer. Load and run either
DeTerminal for DOS or DeTerminal for Windows, which will
configure your computer's RS232 port (COM1 by default) to
match the Datataker's communications parameters. These
programs also provide a terminal type interface for
programming the Datataker and for receiving data.
If you are using a different computer type, construct or
purchase a communications cable – see "COMS Port" on
page 13 for wiring details. Load and run a terminal
emulation or communications program, and ensure that the
computer's communications parameters are set to the
Datataker's default settings:
Baud rate
Data bits
Stop bits
Parity
Protocol
4800
8
1
none
XON - XOFF
The second task is to connect power. Connect the
output from the power adaptor (240 or 110 Vac to 12Vdc) to
the two screw terminals marked "~ ~" or "AC/DC" depending
on the Datataker model. Polarity is not important.
A word of caution – do not connect external power to the
terminals labelled "Bat". These are reserved for an external
battery, and have a limit of 9 volts DC. See "Power and
Battery Connection" on page 15 for information on power
connection and power consumption.
When power is switched on, the red Convert Lamp
flashes for about half a second. The following message
appears on the computer display:
Datataker 0 Version 5.xx
Initializing ... Done
If a charged internal or external battery is already
connected to the logger, then this will not occur as the unit is
already powered and does not perform another "cold start".
If communications are OK, then typing an upper case T
followed by the Enter key (or Alt L in DeTerminal) returns
the current time (this may be different to your local time):
Time 09:10:55
Analog Input Channels
The Datataker only responds to upper case characters,
except for the Switch command (see Switches on page 11).
Use lower case characters to document and add clarity
to commands. For example Time is the same as T and
Report_schedule_A_every_15_Minutes is the same as
RA15M, (using the underscore character to improve the
readability as a "space" character is a command separator).
If communication is not successful, check the COMS
cable and COMS port parameters. Change the Datataker's
DIP switches (see the Appendix for your Datataker) or the
computer's parameters so that both are the same.
Successful Data Logging
Data logging is an orderly process and should be
undertaken in a systematic way. Clearly define the purpose
for data logging so that the data you collect maximises the
knowledge gained. Consider the following:
• identify the parameters to be measured
• select sensors and number of channels
• determine sensor output scaling
• determine how data is to be processed and reported
• decide on sample frequency - minimise redundancy
• calculate volume of data to be collected
• decide method of data recovery and archiving
• consider power consumption
When you have defined the task, you can connect sensors
and program the Datataker.
Sensor Connection
... pages 4, 19, 20
You must know the output signal for each sensor. Make
sure that the input to the Datataker does not exceed ratings.
As a general rule, the voltage on any analog input terminal
should be within –3.5 to +3.5 volts relative to Datataker
ground. Datataker models with a relay multiplexer and
attenuator can accept higher input levels.
Select the most appropriate channel type for each
sensor from the table on page 4. The second last column
shows appropriate wiring configurations from pages 19
and 20. Connect the sensors accordingly.
Use channel options to modify channel function. In a
channel definition these are listed in brackets immediately
after the channel type. The table on page 5 describes the
channel options.
Test each sensor by declaring a simple schedule. For
example
RA1S 2PT385(4W)
will return every 1 second (RA1S – see page 3) the
temperature of a platinum resistance temperature sensor
(PT385 – see page 4) connected as a four wire resistance
(4W channel option – see page 5) on channel 2.
Channel Type
An analog input channel on a Datataker is a four wire
connection that allows voltage, current, resistance and
frequency to be measured. These are the fundamental
signals output by most sensors. It is not necessary to use all
four connections - two are often adequate.
As can be seen in the simplified drawing of a Datataker
channel below, there is a multiplexer and a programmable
instrumentation amplifier between the screw terminals and
the analog to digital converter.
The multiplexer is essentially a patch board that directs
signals from the channel screw terminals to the amplifier
inputs. Many different connections are possible.
.. see page 4
The input channels are very versatile, however the
Datataker is not smart enough to know what type of sensor
is connected. It must be told. A channel is defined by a
channel type that determines how the multiplexer is patched
and how the readings are to be processed. There are more
than thirty different channel types.
The same channel may be read using different channel
types. For example a thermocouple may be read as a
thermocouple or as a voltage. The command
1TK 1V
will return both a temperature and a voltage based on two
readings of the same sensor.
Datataker Channel
Sensor excitation:
250µA, 2.50mA or 4V
excite ✶
+ input +
+
– input –
return R
Four input screw
terminals for one of
many analog input
channels
–
100.0Ω
0.1%
To 15 bit analog to
digital converter
Instrumentation amplifier
(gain x1, x10 or x100)
Analog multiplexer and signal router
showing connection for a differential
input with sensor excitation (solid lines),
and a single ended input (broken lines)
Ground
(shared)
A Standard Datataker Analog Input Channel
Differential Input
Sensor Excitation
A differential input is one in which the signal is the
voltage between two wires, and neither wire is necessarily at
ground potential. On the Datataker the + and – terminals
provide for differential input. The multiplexer patches the
channel's + terminal to the amplifier's + input and the
– terminal to the amplifier's – input. This patching is
achieved by defining the channel number and type (see
page 4). For example a differential voltage on channel one
is patched by the channel definition 1V.
Many sensors require power (or excitation) to enable
them to output a signal. For example to read the
temperature of a thermistor (a temperature dependent
resistor), excitation current is passed through the thermistor
to generate a voltage drop that can be measured.
The Datataker has three different excitation sources –
250µA, 2.50mA and 4V. These are output on the excite ( ✶)
terminal of each channel, when the channel is read. This
action is automatic for most sensor types, but may also be
evoked as a channels option.
Single Ended Input
A single ended input also provides a signal voltage
between two wires, except that one of the wires must be at
ground potential. On the Datataker this "grounded" wire is
connected to the channel's R terminal (R for return). The
other signal wire is connected to any one of the other three
terminals.
To patch a single ended channel the channel number is
given a suffix indicating the terminal to which the second
wire is connected. For example a single ended voltage input
applied to channel one between the R and + terminals
would be patched by the channel definition 1+V.
You can apply three single ended inputs to each
Datataker channel. These use the suffix's +, – and ✶
(asterisk). Thus the three single ended voltage inputs on
channel one would be 1+V, 1–V and 1✶V. Note that the
✶ single ended input in not supported on the DT50.
Analog to Digital Conversion
The Datataker converts its input signals to a frequency,
and then measures the frequency over one line cycle period
(20.00mS or 16.67mS). This method provides high noise
rejection and good signal averaging over the sample period.
Many sampling parameters can be adjusted by means of
channel options (page 5), switches and parameters (page
11). These include calibration, settling time, sampling time
and extended or multiple sampling. The default values of
these parameters are suited to the majority of sensors. See
"ADC Details" page on 18.
For the Technically Minded
To gain an understanding of how your Datataker works,
study the "Simplified Circuit" on page 22. This will help you
to exploit many of Datataker's features.
Page 2
More Getting Started ... more compulsory reading !
Channel Setup
Schedules .. page 3
Managing Power ... page 15
A schedule is a list of channels preceded by a scan
trigger specification. As a general rule don't read channels
more frequently than is really necessary (for example,
temperatures generally change slowly, so rapid reading
does not provide extra information).
You can declare up to four different schedules, each
with a different scan trigger based on a time interval or a
digital input event. The schedule's trigger can be changed
at any time. This allows the trigger to be modified under
program control (see "Alarm - Action Text" on page 9).
A list of channels without a trigger specification may be
entered at any time. These are scanned immediately,
without affecting other schedules which may be operating.
A schedule's channel list cannot be altered without
re-entering all schedules. In fact all schedules must be
entered at the same time, either all on one line or between
BEGIN and END keywords (see "Schedules" on page 3).
In applications where power consumption is critical, the
Datataker has a sleep mode which reduces battery current
draw from 120 – 400mA to less than 0.4mA.
The Datataker will automatically wake from sleep mode
when input channels are to be scanned. Plan your program
to ensure that the Datataker does not wake more often than
is necessary. This particularly applies to the Statistical
Sub-schedules (see page 3) and Alarms (see page 9).
Scaling and Calculations ... page 7
The Datataker can scale the channel input data to
engineering units by applying polynomials, spans or intrinsic
functions. Arithmetic expressions provide cross channel
and other calculations. Various statistical functions including
averaging and histograms can be applied.
Data Reduction ... pages 3, 6, 9
In many instances you can reduce the volume of the
data recorded by taking averages, maximums, minimums,
standard deviations, histograms or integrals. Use conditional
statements to determine when data is logged (see "Trigger
While" on page 3 and "Alarms" on page 9).
Alarms
... page 9
The Alarm facility of the Datataker is flexible and
powerful. Alarms are used to warn of error conditions and to
control the Datataker's operation. The key words ALARM
and IF have identical meaning. Alarms allow:
• logical comparisons with set points
• control of digital output on the alarm condition
• issuing of messages to the host computer and Display
• execution of Datataker commands
Executing Datataker commands from an alarm can be
particularly useful in modifying the Datataker's program in
response to changes in input(s).
Programming .. see Sample Program opposite
You program the Datataker by entering schedules and
other commands. Entered commands are not processed
until a carriage return is received. The input buffer is 254
characters, so command lines must not exceed this length.
Each command must be separated by one or more spaces,
tabs or carriage returns. All schedules must be entered on
one line or placed between the BEGIN and END keywords.
The BEGIN END construct is also very useful for
enhancing program clarity. When the BEGIN keyword is
encountered the Datataker is halted and prepared to receive
a new program. As each line of the program is entered it is
compiled into a new task. The END keyword indicates that
all schedules have been entered.
While the BEGIN – END construct is necessary only for
the entry of multi-line schedules, it can contain any other
commands. Placing switches, parameter definitions, and
alarms in the construct gives a program a more structured
and easy to read appearance, especially if indenting is used.
Data Logging
- first check the sensors
2TT
a channel (in this case channel 2 as a thermocouple) can be
read once, or read multiple times as in the next example:
2TT 449.3 DegC
RA1S 2..4TT
returns data in the default format (in this case every one
second (RA1S) for three thermocouple type T channels).
2TT 451.5
3TT 563.2
4TT 487.8
2TT 451.9
...
Channels (page 4).
Sensors can be wired to channels, calibrated and tested
prior to full program entry.
... page 8
The Datataker stores data internally (13,650 readings)
and in a Memory Card (up to 340,000 readings). The internal
memory acts as a buffer for the Memory Card, so that data
is not lost during card changes.
By default the Datataker stops logging when both
memories are full. An overwrite mode allows continued
logging, with the oldest data being overwritten by new
readings. See "Data Logging and Retrieval" on page 8 and
"Switches - /O" on page 11.
You can selectively log channels (see "Channel Options
- Output format" on page 5). Logging begins only after you
issue the LOGON command. Time and date stamping is
automatic.
The Datataker does everything possible to avoid data
loss caused by careless use. However it does respond to the
RESET, CLEAR, CLAST, CTEST and CDATA commands,
which will erase data from memory, without question. Be
very careful.
/n/u P22=44
Data Retrieval ... page 8
Polynomials and Calculations.
ALARM1(1V>2.25)3DSO
ALARM2(4TT>110.0)3DSO,1DSO"Over temp. ?[RB5S]"
ALARM3(4TT<100.0)" [RB1M]"
Data stored in the internal memory or in a Memory Card
is retrieved via the COMS or Network ports. You can retrieve
data for an individual schedule or for all schedules merged.
The Operating Environment
The Datataker is an electronic instrument. Electronics
and water do not mix! Condensation can be a serious
problem in the tropics and in cooler areas where wide
temperature variations are possible. Use a sealed case, and
include sachets of silica jell, to avoid problems.
If your Datataker becomes wet, immediately disconnect
the power and batteries, and dry the logger in a warm place.
If the Datataker has come into contact with salt water, rinse
thoroughly in fresh water, then distilled water, then dry. Salt
must not be allowed to remain on the circuit boards.
The Datataker will operate over a wide temperature
range, however the accuracy can be reduced. While the
electrical zero is stable with temperature, the scale factor
can drift slightly. Endeavour to minimise the Datataker's
exposure to temperature extremes.
changes the output format (in this case channel number and
units are disabled, and data separator is ASCII 44 – the comma)
Deg
Deg
Deg
Deg
C
C
C
C
452.0,565.4,451.0
452.3,566.2,450.5
Sample Program
' Boiler monitoring program for the Datataker 600
' Author: Henry Higgins 23/4/95
Comments can follow the
apostrophe character, up to a
carriage return.
Commands. Only upper case characters are accepted.
CSCANS CALARMS CLEAR CDATA
Switches (page 11) determine system function (upper case is ON and lower case is OFF) .
/n/u/S/e
Parameters (page 11) are internal system settings which
P22=44
determine system function. Most can be set and all can be read.
Y10=4.5,0.213"KPa"
S1=0,50,0,100"L/m"
Scaling (page 7). Various methods can be used to scale output data to
engineering units. These are the Channel Factors, Functions, Spans,
BEGIN & END see
Schedules on page 3
BEGIN
RB1M 2..4TT ("Temp")
RC15M 1V(AV,Y10) 6L(AV,S1)
END
LOGON
G
Commands must be separated by one or more spaces or carriage
returns, and are not processed until a carriage return is received.
Alarms (page 9) detect out of
range conditions. Can also be used
to change logger function, schedule
timing, control outputs and event
annunciation.
Schedules (page 3). Four general purpose schedules
(RA, RB, RC and RD), each a list of channels to be scanned
at programmable time intervals or on events. A special
schedule (RX) allows polling from a host computer.
Logging (page 8)
Global data logging is activated
by the LOGON command.
Disable logging of particular
channels by the NL channel
option.
Channels (page 4). A wide range of channel types provide
sensor support. Options allow custom configuration. Channel
lists entered without a schedule ID return data immediately
and cannot be logged to memory.
Scan control commands – see page 3
Operating Scenarios ...
You can deploy the Datataker in many ways depending
on factors such as location, data volume, power availability:
• on-line to a host computer with Datataker as a front end
• periodic down loading to an on-line host
• periodic down loading to a portable computer
• periodic down loading via modem to a host, initiated
either by the host computer or by the Datataker
• data recovery (and programming) using the removable
memory cards
The method of deployment influences the fine tuning of the
Datataker's program. As a general rule it is better to recover
data as often as reasonably possible. In this way sensor
failures, program faults, etc. will be detected earlier.
Data Retrieval
/n/u P22=32
Disables channel identification and units, and sets the output format to ASCII 32 (i.e. space)
delimited data.
U
Begins to unload stored data, oldest data first (if a memory card is fitted, card data is unloaded first).
Q
Terminates unload.
CLEAR
Clears data from the Datataker’s internal memory and disables logging.
CDATA
Clears data from the memory card (if fitted). Logging is not disabled. Data from the logger’s internal
memory is copied to the card.
Schedules
Page 3
... what to do, when to do it
Introduction
Schedule A
Schedules have three parts: a schedule identification, a
scan trigger, and a list of channels to scan.
RA10M
This Example has two schedules:
Schedule B
• Schedule A which scans every 10
1..5V RB1H:2W 1..4DS 6..9PT385(AV)(MX) 2C(R)
minutes (RA10M), reporting channels 1
through 5 as voltage data.
• Schedule B which scans every hour
(RB1H) while digital input 2 is true
(:2W), reporting the state of digital
inputs 1 through 4 (1..4DS), the average
and maximum temperatures from RTDs
connected to channels 6 through 9
(6..9PT385(AV)(MX)), and the interval
count on the resetting counter channel 2
(2C(R)). The statistical sampling is as
fast as possible.
RA2M:1W 1V 2R 3..5TT
Schedule ID
Trigger
Channel List
Schedule ID
Datataker provides four distinct types of schedules which
are identified by their schedule ID:
RA, RB, RC, RD triggered schedules
RX
polled schedule. (X from host)
RS
statistical sub-schedule
RZ
alarm schedule - see page 9
The schedule identifier (except for the RX schedule) is
followed by a trigger – a Time Interval or an Event, and
optionally a While condition. If there is no schedule ID or
trigger, then the channel list (up to the next carriage return) is
scanned once immediately. If the trigger is omitted, then the
channel list is scanned as rapidly as possible until halted.
Channel Lists
Statistical Sub-schedule
Any set of channels (see page 4) separated by at least
one space character is a Channel List. For example:
Channels can be read frequently to produce a statistical
data summary at longer intervals. This summary is returned,
logged and displayed at intervals determined by RA, RB, RC,
RD or RX schedules.
The statistical scan is a sub-schedule. Channels that
require statistical scanning must include a channel option to
indicate the statistical information required (see "Channel
Options" on page 5, and "Statistical Channels" on page 6). If
more than one statistical data is required for a channel, then
each statistical option must be placed in a separate option list
(see Multiple Reports on page 4):
1..5V 6TK("Boiler Temp") 1DSO=1
where 1..5V is a voltage channel sequence 1 through 5
inclusive, 6TK is a type K thermocouple channel named
"Boiler Temp" and 1DSO=1 sets digital output channel 1 ON.
Channels are processed left to right.
Triggered Schedules
Trigger by Time Interval
Triggered schedules begin with the schedule identifiers
RA, RB, RC or RD. They scan their channel lists at intervals
and times determined by the trigger (see left).
An integer number of seconds, minutes, hours or days
defines a schedule scan interval:
Polled Schedule
nS
nM
none
seconds
minutes
as rapidly as possible
nD
nH
days
hours
where n is in the range 1 to 65535. For example RA5S will
scan every 5 seconds. The first scan occurs on the next
multiple of the interval since last midnight (see "Synchronise
to Midnight" below).
OR
Trigger on Events
Digital inputs n DS (excluding CEM), low speed counters
n C and high speed counters nHCS can also trigger scans:
nE
n +E
n –E
n C(c )
n HSC
trigger on + and – transitions of a digital input
trigger on + transition of a digital input
trigger on – transition of a digital input
trigger after c counts on a low speed counter
trigger after ANY counts on a high speed counter
where n is a digital channel number (can also be a channel
sequence n..m ). For example RA1+E will scan every 0 to 1
transition of digital input 1, and RA2..3-E will scan every 1 to
0 transition of digital input channels two OR three. These
transitions could be generated by an ALARM (see "Action
Commands" on page 9).
Note: If a counter input is preset outside of the trigger range
(eg. 2C(10)=15), then a trigger will not occur.
AND OPTIONALLY
Trigger While
(condition is true)
A schedule's trigger can be enabled or disabled by the
state of one or more digital input channels ( n DS), by
appending a While to either a Time Interval or an Event.
:n W
enable while digital input n is high
: n..m W enable if ANY digital input n to m is high.
Note that the colon is required. An example of a conditional
event triggered schedule is RA1E:2W which will scan on
every transition of digital input one (1DS) while digital input
two (2DS) is high.
NOTE: Digital inputs are not read while the logger is asleep,
and so nE, nC and :nW triggers will not be detected. High
speed counter triggers ( nHSC) will be detected on next wake.
Channels entered in the RX schedule are scanned and
reported only when the host computer or an ALARM (see
"Action Commands" on page 9) issues the "X" command. The
RX schedule will not accept a trigger.
Entering Schedules ... BEGIN & END
The reporting schedules (RA, RB, RC, RD and RX) must
be entered as a group. If extending over more than one line,
they must be between the keywords BEGIN and END, as in:
BEGIN
RA10S 4TT("Oven Temp")
5TK("Flue Temp")
RB1S 1C("Gas Flow")
2C("Water Flow")
END
Each line can be up to 254 characters long. Channels on
lines without a schedule header are included in the previous
schedule. A carriage return must terminate each line, and
separate last channel definition and next schedule header.
When the BEGIN keyword is received then all schedules
(including alarms) are Halted, and previous RA, RB, RC, RD
and RX schedules are deleted unless data logging is enabled
(see " Data Logging" on page 8), the scan schedules are
locked (see "/F" on page 11), or the memory contains data.
The BEGIN - END construct may contain blank lines, and
any other of the Datataker commands (these are executed on
entry). When the END is received, the original Halt - Go
state is restored. You cannot append additional channels to a
schedule once it has been entered. Instead you must re-enter
the full set of schedules, including the additional channels.
Immediate Scans
A channel list with no schedule ID or trigger is scanned
once immediately. The channel list can be scanned again by
the ✶ (asterisk) command. Immediate scans are not logged.
Note: An immediate scan should be given time to execute
before a BEGIN command is issued. If this is not done the
immediate scan's data may not be returned.
If requests for immediate scans are too rapid, then the
channels may be appended as if they were part of a single
channel list. Setting P22=13 can overcome this by ensuring a
return character is placed after each reading.
1TT(AV)(SD)(MX)
The trigger for the statistical sub-schedule is defined in
the same way as for the main scan schedule (see Triggers ...
beside), using the RS identification. If you do not specify the
RS schedule's trigger, the sample rate will be as fast as
possible. You may change the RS schedule at any time:
RS10S
RS30M
RS1-E
RS
sample every 10 seconds
sample every 30 minutes
sample on each 1 to 0 transition of digital input 1
sample as rapidly as possible
If the statistical sub-schedule is halted by a HS command,
then statistical sampling of channels is stopped and the
reported statistical summaries do not include data from this
halt period. This is most significant for the integral summary.
If statistical channels have not been scanned before they
are reported, then these channels report error E53 (see page
21) and data is set to 99999.9. This condition can occur when
the RS trigger is an event, the statistical sub-schedule has
been halted, or a statistical scan interval is longer than the
reporting time interval.
An example of a schedule including statistical sampling is:
RA1H RS10S 1TT 2TT(AV)(MX)
which returns three temperature readings – a spot reading
each hour of channel 1, and the average and maximum over
the hour from 10 second samplings of channel 2.
Synchronize to Midnight - /S
By default all scan timing is synchronized to the previous
midnight. Schedules with a time trigger will scan on every
multiple of the time interval since last midnight. For example
the schedule RA10H will scan at 10:00:00, 20:00:00, 10:00:00
(on the next day), and so on.
If synchronization is disabled by /s switch (see page 11),
scanning is then relative to the time that the schedules are
entered. RA10H entered at 09:30:00 will scan at 19:30:00 on
the first day, at 05:30:00 and 15:30:00 on the next day, at
01:30:00 and 11:30:00 on the following day, and so on.
Returning Entered Schedules
The STATUS2 command returns the currently entered
scan schedules and channel lists up to a maximum of 512
characters. See "Other Commands" on page 10.
Scan and Sample Order
When different schedules are due to scan at the same
time, the schedules are scanned in the order of RA, RB, RC,
RD and RZ. When there are statistical channels in a
schedule, and the statistical sub-schedule is due at the same
time as the reporting schedule, the channels are scanned
statistically prior to reporting. You cannot change this order.
Channels within schedules are sampled in the order of entry.
The RX polled schedule is scanned after the receipt of
each X command.
Changing a Schedule Trigger
You can change a schedule's trigger at any time simply
by entering a new schedule ID and trigger without a channel
list as follows:
RC10M:2W
If you include a channel list, then a new schedule is
created which replaces all previous schedules unless these
previous schedules have logged data into memory, or logging
is enabled by the LOGON command (see page 8), or the
schedules are locked by the /F switch (see "Switches" on
page 11).
Halting & Resuming Schedules
Schedules can be halted individually or as a group:
H
HA, HB, HC, HD
HS
HZ
Halt all schedules including alarms
Halt RA, RB, RC or RD schedule
Halt the statistical sub-schedule
Halt the alarm schedule
The polled schedule RX cannot be halted. HX will generate an error
message.
Corresponding commands for resuming (or Going) the
schedules are G, GA, GB, GC, GD, GS and GZ.
Locking Schedules
Schedules can be locked by the /F switch command, to
prevent them from being accidentally changed or deleted.
The schedules can be unlocked by the /f switch command.
Clearing Schedules
The command:
CSCANS
erases all schedules. However if any schedule(s) has stored
data into memory, or data logging is enabled by LOGON, or
schedules are locked by /F, then the Datataker will issue the
error message E4 or E48 (see page 21). You cannot erase
individual schedules.
Channel Types
Page 4
... how to specify channels
Introduction
This Example
Two channel numbers separated by two or more points (ie. "..")
defines a continuous sequence of channels. If the first label indicates a
single ended channel, then the channels included depends on the first
single ended channel label as follows:
1..5
1+..3–
1–..4+
1✶..2+
1#..4#
Channel Number
Each input and output channel has a channel number. Each single
ended analog input has a suffix label corresponding to a screw terminal:
Excite output or positive single ended input terminal
Positive differential or positive single ended input terminal
Negative differential or positive single ended input terminal
Return common or single ended current input terminal
1 2 3 4 5
1+ 1– 2+ 2– 3+ 3–
1– 2+ 2– 3+ 3– 4+
1 ✶ 1+ 1– 2✶ 2+
1# 2# 3# 4#
Multiple Reports
Channel
Number
The DT50 does not support the excite terminal as a single ended input.
Thus 5V defines a differential input between the + and – terminals, while
5✶V, 5+V and 5–V defines single ended inputs between the ✶, + or –
terminals respectively and the R terminal. Similarly 5#I defines a single
ended current input between the R terminal and a GND (ground) terminal.
The DT50 does not support the excite terminal as a single ended input.
are possible from each
channel by adding additional sets of channel options. The
Datataker samples the channel (eg. 5+TJ) only once every
scan, however the second and subsequent sets of (channel
options) generate additional reports. This is particularly
useful for statistical reports (see "Schedules" on page 3) and
display formatting (see "Channel Options" on page 5).
The first channel option set determines how the channel
is sampled, and must include all sampling options required
for the channel. These channel options are listed above the
"Config Line" in the Channel
Options table on page 5. If
statistical options are included,
then each option list in the
multiple report MUST hold a
statistical option.
Channel Type
Label
Channel Options
(see page 5)
and default
options column
Channel Expansion Module Address
The Channel Expansion Module (CEM) channels are addressed by
prefixing the module number and colon to the channel number.
eg. 2:5V indicates channel 5 on the second CEM.
Si
n
C gle
ha E
n n
C nel ded
ha
La
La nne be
be l T l
l yp
e
✶
+
–
#
is equivalent to
➾
➾
➾
➾
declares a thermocouple type J,
connected to channel 5 as a single ended input. The channel
option NL indicates that the channel is not to be logged. The
logger returns two values: the average reading (AV) at report
time and the maximum (MX) since the previous report time.
5+TJ(AV,NL)(MX,NL)
so
lu
tio
n
O
ut
pu
tU
ni
W
ts
iri
n
C g
on
(S fig
ee
u
pa ra
ge ti
on
s
C
om 19, 2
0)
m
en
ts
All analog and digital channels on the Datataker are multipurpose. The
channel specification determines internal signal and excitation routing,
sampling method and data processing. A channel is defined by its channel
number, channel type, and possibly one or more channel options.
10 / 40 5 / 15 10 / 40 ✶, +, –, # I
10 / 40 5 / 15 10 / 40 ✶, +, –, # L
Resistance
Resistance by 2, 3 or 4 wire methods, 7KΩ max.
10 / 20 5 / 10 10 / 20
4R(II)
(I)
–
1mΩ
Ohms
9, 10, 11, 12
Bridge
3 & 4 wire, 1/4, 1/2 & full bridge, current excitation. 10 / 30 5 / 10 10 / 30
Ratiometric, 4 & 6 wire bridges, voltage excitation. 10 / 30 5 / 10 10 / 30
✶, +, –
✶, +, –
BGI
BGV
1BGI(60)
1BGV
(350.0, II )
(0.0, V, 4W)
arm resistance Ω
offset in ppm
1ppm
0.1ppm
ppm
ppm
13,14, 15
16, 17
Frequency
Frequency (analog channels, 0.102Hz to 20KHz). 10 / 30 5 / 10 10 / 30
Period (analog channels, 50µS to 9.8S).
10 / 30 5 / 10 10 / 30
Vibrating wire sensor - frequency **
10 / 30
10 / 30
✶, +, –
✶, +, –
✶, +, –
F
P
FW **
2F(F2)
2–P(X)
3+FW
(30.0, T*)
(30.0, T*)
( ES9, 200.0 )
longest period mS
longest period mS
delay in mS
1mHz
1µS
0.01Hz
Hz
uS
Hz
Time
Time of day.
Day or date.
System timers (for program control etc).
T
D
1ST
()
()
(60),(60),(24),(7)
–
–
range
1S
1D
1
Time
Day
Counts
–
–
internal
3TJ
5PT392
1NI(50)
CU(135)
2YS04
4AD590
3LM335
5LM35
(1.0, T*)
(100.0, II )
(1000.0, I )
( 100, II )
( 1e10, I )
(100.0, V)
(2.0, V)
(1.0, V)
attenuation factor
0°C resistance Ω
0°C resistance Ω
0°C resistance Ω
parallel resistor Ω
shunt resistor Ω
attenuation factor
calibration factor
0.1°C
0.1°C
0.1°C
0.1°C
0.1°C
0.1°C
0.1°C
0.1°C
DegC***
DegC***
DegC***
DegC***
DegC***
DegC***
DegC***
DegC***
1, 2, 3, 4, 5
9, 10, 11,12
9, 10, 11,12
9, 10, 11,12
9, 10, 11,12
18, 7, 8
18, 4, 5
20, 21, 1, 2, 3
See "Thermocouples" on page 16.
Three wire is the default connection (see "RTDs"
on page 16), however a 4 wire connection (4W)
can be used for greater measurement accuracy.
See "Thermistors" on page 16.
Calibrate by variation of shunt value channel factor.
Slope correction via attenuation factor relative to 0°K.
Calibration slope correction relative to 0°C or 0°F.
1
1
4
10 / 30
10 / 20
10 / 20
10 / 20
10 / 20
10 / 40
10 / 30
10 / 30
5 / 10
5 / 10
5 / 10
5 / 10
5 / 10
5 / 15
5 / 10
5 / 10
–
–
–
10 / 30 ✶, +, –
+, –
10 / 20
+, –
10 / 20
+, –
10 / 20
+, –
10 / 20
10 / 40 ✶, +, –, #
10 / 30 ✶, +, –
10 / 30 ✶, +, –
Digital
State input on a digital channel.
4
5
20
Byte input on a group of digital channels.
1 (4 bit) 1 (5 bit) 2 (8 bit)
Digital state input on an analog channel.
10 / 30 5 / 10 10 / 30
Output on a single digital channel. "1" = ON & low
4
5
10
Byte output on a group of digital channels.
1 (4 bit) 1 (5 bit) 1 (8 bit)
Display (if present) backlight, LED's and beeper.
6
6
–
Counts
Up counter (10Hz maximum).
Phase encoder up-down counter (connect 3D,4D).
High speed counter (1KHz maximum).
High speed counter prescaler output.
4
1
3
1
none
none
none
R
T
D
ST
TB, TC .. TT
PT385, PT392
NI
CU
YS01..07,16,17
AD590
LM335
LM34, LM35
Ex
am
pl
es
De
f
C aul
ha t
O nn
pt e
io l
n
C
ha s
n
Fa ne
ct l
(C or
Si
Temperature Thermocouples B, C, D, E, G, J, K, N, R, S and T.
Platinum RTD's (α = 0.00385, 0.00392).
Nickel RTD's (α = 0.005001).
Copper RTD (α = 0.0039)
Thermistors (Yellow Springs 400XX series).
AD590 & AD592 (Analog Devices).
LM335 (National Semiconductor Corp.).
LM34 & LM35 (National Semiconductor Corp.).
1
1
4
+, –
ha
fo nn
r s el
ca op
lin tio
g, n
et
R
c)
e
Current, internal 100Ω shunt or external shunt.
4-20mA current loop.
D
T5
xx
,
DT 6xx
50
CE
M
Current
gn
a
or l
Se
n
D sor
et
ai
ls
Voltage ±25mV, ±250mV and ±2.5V ranges
High voltage ±7V, ±70V and ±100V ranges *
Si
g
C nal
at
eg
or
y
Voltage
)
E)
E)
SE
/S
/S
ff/
iff
iff
Di
D
D
ls
ls
ls
ne
ne
ne
an
an
an
h
h
h
(C
(C
(C
10 / 30 5 / 10 10 / 30 ✶, +, – V
10 / 30 5 / 10 10 / 30 ✶, +, – HV *
1V 1+V
2HV
(1.0, T*)
(1.0, A)
attenuation factor
attenuation factor
1µV
250µV
mV
V
1, 2, 3, 4, 5, 6 Common mode range ±3.5V.
1, 2, 3, 4, 5, 6 Common mode range ±100V (DT505, 515, 605, 615 only).
3#I
1#..5#L
(100.0, T* )
(100.0, T*or A )
current shunt Ω
current shunt Ω
10nA
0.01%
mA
Percent
7, 8, 8a
7, 8, 8a
The internal 100.0Ω shunts are between Return ( #) and
Ground Terminals. eg. 3#I, 5#L(S2).
Four wire configuration requires ( 4W) option.
Four wire full bridge use (4W) option (see Bridges page 17)
External completion required for 1/2 & 1/4 bridges.
1, 2, 3, 4, 5, 6 0.102Hz to 20kHz, use (2V) option for 0 – 5 volt single
1, 2, 3, 4, 5, 6 ended inputs, but for low level (100mV) input to 300kHz.
2
Geologger DT515 and DT615 models only.
See "Time" and "Date" sections on page 6.
Increment every sec (1ST), min (2ST), hr (3ST), day (4ST).
none
none
✶, +, –
none
none
none
DS
DB
AS
DSO
DBO
WARN
4DS
1DB(7)
5–AS
3DSO=1
1DBO=0
3WARN=1
()
(255)
(2500, T*)
(0)
(255)
( 0)
–
bit mask (decimal)
threshold (mV)
delay or width (mS)
bit mask (decimal)
delay or width (mS)
1
1
1
–
–
–
State
Byte
State
–
–
–
22
22
1, 2, 3, 4, 25
23,24
23,24
internal
If averaging, increase precision with FF n option.
Result is 0 to 15 (or 32). Channel No. = LSB of byte.
If averaging, increase precision with the FF n option.
Delay < 65,535mS, nDSO(delay,R) will generate pulses.
0's in mask not modified. Channel No. = LSB of byte
Display panel, 1-3=LED, 4=beep, 5-6=backlight (page 12)
1..4C
1PE
3HSC
1HSCO(0)
(65536)
(65536)
(65536)
(2)
range
range
range
prescaler mode
1
1
1
1
Counts
Counts
Counts
none
22
22
22
CMOS level
Count range is 0-65535. eg. 1C(3) counts 0,1,2,0,1 etc.
Presetting a counter outside of the maximum count
range (eg. 1C(5)=8) will cause an error (99999.9).
Set high speed counter 1HSC output mode (see page 18).
5
1
3
1
–
–
–
–
none
none
none
none
C
PE
HSC
HSCO
System Data System variable.
14
14
–
none
SV
3..5SV
()
–
1
none
–
See "System Variables" on page 6.
Variables
General purpose variables for calculations etc.
100
100
–
none
CV
5CV
()
–
6 digits
none
–
Assigned via Channel Options, return as for a channel.
Text
General purpose text for heading etc
1
1
–
none
$
$
()
*differential only
–
–
* Relay multiplexer models only
** Geologger models only
Indicates the capacity for each model
The ✶ terminal not available for input on DT50
–
–
***also °F, °K, °R - see P36 on page 11
See Channel Options
Assigned by $="text" maximum 80 characters, see page 6.
Page 5
Channel Options
... in brackets, separated by commas, no spaces
Introduction
Channel Number
Channel Options allow the tailoring of channels for
input configuration, sensor excitation, statistical reporting,
variable assignment, and output format. Enclose options
in brackets after the channel type label. Options are
comma separated (no spaces allowed) and in any order.
When the same channel is listed more than once, each
listing is treated as a separate entity, with options
applying only to the listing in which they are placed.
This example configures the logger for
Channel Type
5PT385(4W,200.0,"Steam Temp",FF0)
Input termination
Resistance
Single ended input
Gain
Excite terminal
(output current
or voltage)
Special
Resetting (to zero)
Scaling
Data manipulation
(cannot be used
in Alarms)
Reference channel
(not logged or
displayed)
Statistical
(cannot be used
in Alarms)
Variables
Output format
T
U
4W
X
2V
GL n
A, NA
G
V
I
II
N
Mx:y all above
ESn
R
f.f
Yn
Sn
Fn
DF
RC
RS
IB
TR
TZ
BR
AV
SD
MX
MN
TMX
TMN
DMX
DMN
INT
Hx: y:n.. mCV
=nCV
+= nCV
–=n CV
✶=nCV
/= nCV
FFn
FE n
FMn
"text"
NR
NL
ND
W
BG x:y
Ra
n
O ge
pt o
io f
O n(
rd
)
A er o
pp f
li
Co cat
m ion
m
en
ts
Fu
nc
tio
n
an
d
ex mu
cl tu
us a
io l
ns
O
pt
io
n
Ca
te
go
ry
Channel Options
n
Terminates +, – inputs with 1MΩ to ground
Un-terminates +, – inputs
Configures input for a 4 wire measurement
Use SE Ref terminal as common
Use internal 2.500 Vref as common
Gain Lock
Attenuation, No Attenuation
Guard signal
Voltage source approx. 4.5V via 1KΩ
Current source 250.0µA
Current source 2.500mA
Open circuit excite terminal (no excitation)
Special input signal routing
Extra samples
Reset counter, timer, variable after reading
Channel factor
Polynomial
Span
Intrinsic functions
Difference ∆x = (current - previous reading)
Rate of change (per second) ∆x/∆t
Reading / time difference in seconds x/∆t
"Integrate" ( x_units.seconds) (x - ∆x/2)*∆t
Thermocouple reference temperature
Thermocouple reference zero channel
Bridge excitation voltage channel
Average of channel readings
Standard deviation of channel readings
Maximum channel reading
Minimum channel reading
Time of maximum channel reading
Time of minimum channel reading
Date of maximum channel reading
Date of minimum channel reading
Integral for channel
Histogram x = lower limit, y = upper limit
Assign channel reading to variable
Add channel reading to variable
Subtract channel reading from variable
Multiply variable by channel reading
Divide variable by channel reading
Fixed point n = decimal places
Exponential, n = significant digits
Mixed FF and FE, n = decimal places
User defined channel name text
No return
No log (cannot be used in Alarms)
No display
Working or intermediate channel
Bar graph
1,10,100
0 to 255
0 to 15
±1e18
1 to 20
1 to 20
1 to 7
*
x,y ±1e18
1 to 100
1 to 100
1 to 100
1 to 100
1 to 100
0 to 6
0 to 6
0 to 6
ascii text
±1e18
* Poly & Span
Options grouped by a bar are mutually exclusive. If more than one of a mutual
exclusion group is placed in a channel list, then only the last is applied.
index shared, a
total of 20 allowed
1
1
1
1
1
1
1
1
1
1
1
1
1
1
2
2
3
3
3
4
4
4
4
5
5
5
6
6
6
6
6
6
6
6
6
6
7
7
7
7
7
8
8
8
8
8
8
8
8
8
4 wire ( 4W) resistance measurement of an
RTD temperature sensor. The sensor is a
platinum temperature sensor (PT385) which
has a 200Ω resistance at 0°C. The channel
is labelled "Steam Temp" for output, and
FF0 sets the output resolution to 1°C. The
data is returned as:
Steam Temp 266 DegC
instead of the default:
5PT385 265.7 DegC
Provides input bias current path. Defaults ON for most differential inputs and off for single-ended types.
Input impedance >100MΩ. Signal source must provide input bias current path (approx. 5nA).
Default resistance & constant current bridge (BGI) measurement method is by a three wire method. Four wire method is usually more accurate.
Input applied between + or – or ✶ and SE Ref. (Single Ended Reference) terminals.
Input applied between + or – or ✶ and GND or R. The Datataker applies a 2.500V offset to GND. Ground currents can cause small errors.
Inhibits auto-ranging and presets amplifier gain to 1, 10 or 100 respectively.
Controls attenuator on DT5x5/6x5 models – A switches attenuator in and NA switches attenuator out. See Appendices re DT505/605 and DT515/615.
Provides a voltage equal to the input common mode voltage via approx. 3KΩ. For high impedance signal sources where cable leakage is a problem.
Useful for powering some sensors, however it is not regulated and is likely to drift with temperature.
Default current source for Resistance measurement. Very stable over environmental temperature range. These conditions are established 10mS before
the channel is sampled. This settling time can be
Default source for RTD and bridge measurement. Very stable over environmental temperature range.
changed by 7SV and P10 - see pages 6 and 11.
Excite terminal may be used as a single ended input channel. (Not available on DT50).
e.g. 0%V(M18:156, 101.0) returns battery voltage and 0%I(M17:188, –0.22) returns battery current (positive indicates charging, negative discharging).
Allows addition sequential samples to be taken at scan time and averages the results. Results in reduced noise and increased resolution.
Valid only for counters, system timers, variables e.g. nCV(R) and for pulsing digital outputs (e.g. 1DSO(1000,R)=1 pulses output on for 1000mS).
Generally a scale factor specific to channel type (see "Channel Factor" column on page 4).
Applies a previously defined polynomial of form Yn =a,b,c,d,f,g "text" (see "Polynomials" on page 7).
Applies a previously defined span of form Sn =physical low, physical upper, signal lower, signal upper"text " (see "Spans" on page 7).
1 = 1/x, 2 = √x, 3 = Ln(x), 4 = Log(x), 5 = Absolute(x), 6 = x**2, 7 = Grey code to binary conversion (8 bit).
Returns the difference between latest reading and the previous reading.
These options cannot be used directly in alarms. The channel must
Rate of change based on latest and previous readings and their respective times.
be included in a scan schedule where the channel value is assigned
Useful when the sensor reading is already a difference (e.g. resetting counters).
to a variable which can then be tested in alarm statements.
"Integration" with respect to time between two readings - the latest and previous.
e.g. RA2S 1V(RC,=1CV) RZ2S ALARM1(1CV>0.45)1DSO
Any non-thermocouple temperature sensor measuring isothermal block temperature. If already compensated use 11SV(TR) as reference channel.
An electrical zero as measured at isothermal block (see "Thermocouples" on page 16)
Used to nominate a voltage channel as reference for ratiometric bridge measurements (see "Bridges" on page 17)
Config Line – see "Multiple
Reports" on page 4
Average
Standard deviation
These channel options link the channel to the statistical sub-schedule RS. The channel will be
Maximum
sampled at times determined by the RS trigger (which defaults to continuous rapid scanning). At the report
Minimum
time as determined by the RA, RB, RC, RD or RX schedules, the statistical summary will be reported. If no
Time of maximum
sample has been taken before the reporting time, then an error (9999.9) is reported.
Time of minimum
NOTE: Statistical options are not valid in alarms. If you want to alarm on a statistical value then use a
Date of maximum
channel variable (i.e. n CV) to pass the statistical value to the alarm.
Date of minimum
Integral
The time integral's time base is seconds. For other time bases apply a Span or Polynomial e.g. Y1=0,2.778e-4"AHrs" for hours.
Report time sampling, the results are place in variables n..(m-3) CV classes, (m-2) CV under range, (m-1) CV overange, m CV total counts (see page 6)
Assign
The variables are like memory registers in a calculator. You can assign them directly (e.g. 1CV =2.5) or assign a channel reading to
Add
the variable at scan time (e.g. 1V(=7CV) ). You can read the contents of a variable, modify it and then replace it with the modified
Subtract
value. For example 1V(/=7CV) means the value of 7CV is divided by the reading on channel 1 and the result is returned to 7CV.
Multiply
NOTE: These actions occur only at report times and not during statistical sampling.
Divide
e.g. FF2 returns 71.46 mV
e.g. FE2 returns 7.14e1 mV
Uses exponential format if exponent is less than – 4 or greater than n
Replaces the channel type text returned to host (when enabled by /C, /U, /N), and on the top line of the display (if present).
Channels tagged with NR are not returned to the host computer. Useful for display channels (e.g. Bar Graphs) that need special formatting.
Channels tagged with NL are not logged, but they are returned to the host computer.
Channels tagged with ND cannot be displayed on the LCD screen (if present) in either normal or display list modes.
Channels declared as intermediate working channels are not reported or displayed unless the working switch is on (/W). They are not logged.
Plots a bar graph on display. x = lower limit and y = upper limit. (see "Bar Graph" on page 12).
Order of Application
- this column indicates the order in which the options are applied. This order is independent of the order you list the
options. For example the table shows that the logger evaluates a polynomial (Yn ) before a difference (DF).
Statistical Operations ... great for reducing data
Time and Other Channels ... channels on the inside
Time
The Datataker hardware clock has a resolution of one
second, based on a 24 hour clock. The Time is read in the
same way as any channel, but without a channel number:
T
returns
Time 11:45:10
Time can be in several formats, selected by P39 as follows:
P39=
Format
0 (default)
1
2
Example
hours:minute:seconds
seconds since midnight
decimal hours
11:45:10
42310
11.7528
System Variable 12SV returns Day.Time as decimal days.
P40 defines the separator in the hh:mm:ss format,
which defaults to ASCII 58 (colon). When setting the clock
you must use the Time format defined by P39 and P40. For
example if P39=2 (in this case P40 does not matter), then
the clock Time must be set as a decimal value:
T=11.7528
Time is maintained during a RESET or power down. Time
and Date stamp can be added to real time data and to
logged data (see "Switches /T and /D" on page 11). Time
and Date are automatically logged whenever data is stored.
Date
The clock also maintains the Date which is read in the
same way as a channel, but without a channel number:
D
Date 25/12/1991
returns
Date can be in several formats, selected by P31 as follows:
P31=
0
1
2
Format
Day number
European
N America
Example
ddddd
dd/mm/yyyy
mm/dd/yyyy
724
25/12/1991
12/25/1991
System Variable 12SV returns Day.Time as decimal days.
System Variable 15SV returns the day of the current year.
The default Date format depends on the Country DIP
switch (see the Appendices for your model). Set the Date
format by P31, for example P31=0 sets day number format.
The clock Date must be set in the current Date format, for
example if P31=1 (European format) then Date is set by:
D=25/12/1995
or
D=25/12/95
In the day number format P31=0 day number 0 is 1/1/1989.
The Date is maintained during a RESET or power down.
Time and Date stamp can be added to real time data and to
logged data (see "Switches /T and /D" on page 11). Time
and Date are automatically logged whenever data is stored.
Internal Channels
There are several internal channels which are read in
the same way as normal channels:
Internal Channel
Command
Logger temperature
Expander Module ( n) temperature
Electrical zero at multiplexer
Precision 100.0Ω ±0.1%
Precision 4700Ω ±0.1%
Battery voltage
Battery current
1%LM35
n :1%LM35
2%V
2%R
3%R (DTxx5 models)
0%V(M17:156,101)
0%I(M17:188,- 0.22)
Text String
A Text channel of 80 characters is available for labelling,
data headings, site identification, logger identification, etc.
The string is defined by $="my text string", and the current
string is returned (or Unloaded) whenever $ is included in a
channel list. Control characters are entered as for example
^M for carriage return, ^J for line feed (see list on page 23).
System Variables - nSV
System Variables provide various system values. These
are used in the same way as channels (See page 5).
1SV
2SV
3SV
4SV
5SV
6SV
7SV
8SV
9SV
10SV
0
1
2
3
Data points free in internal memory
Data points stored in internal memory
Data points free in card memory
Data points stored in card memory
Number of statistical scans in last schedule
Number of remote network errors (also P9)
ADC settling time in mS ( P10), defaults to 10mS
Mains frequency in Hz (P11), defaults to 50/60Hz
=1 if memory card inserted, =0 if card not inserted
Returns the schedule ID from which it is returned
for
for
for
for
RX (poll by host)
RA schedule
RB schedule
RC schedule
4 for RD schedule
5 for Immediate scan
6 for RZ (alarm schedule)
Introduction
Integration (INT)
Channels can be sampled frequently and a statistical
summary returned at longer intervals (see "Statistical Sub
-schedule" on page 3). Statistical channels are sampled for
the period between report times, and the statistical
summary is generated and returned at report time.
Channels that require statistical sampling must include
a channel option to indicate the statistical information to
generate. These options are:
The integration option returns the integral (or "area
under the curve") with respect to time in seconds using a
trapezoidal approximation. The units of an integration are
those of the original reading multiplied by seconds.
When applied to a flow rate sensor:
Option
Description
AV
SD
MX
MN
TMX
TMN
DMX
DMN
INT
( Hx:y:n ..mCV
average
standard deviation
maximum
minimum
time of maximum
time of minimum
date of maximum
date of minimum
integral
histogram
Appended to Units
(Ave)
(SD)
(Max)
(Min)
(Tmx)
(Tmn)
(Dmx)
(Dmn)
(Int)
none )
11SV Returns 0.0 (useful as a reference channel)
12SV Decimal day.time e.g. 56.5 is midday of day 56.
Use formatting for more precision e.g. 12SV(FF4)
13SV Returns the logger's address
14SV System attenuation factor (default = 214.61)
15SV Returns date as day number of the current year
The statistical option is defined by including it as a channel
option in parentheses after the channel type. For example:
Note: System Variables normally have no decimal places.
Use the FFn option to increase the resolution.
Values or expressions can be assigned to the System
Variables 7SV and 8SV. For example
which is the average (AV) temperature returned every one
minute ( RA1M) for the type T thermocouple (3TT) which is
connected to channel 3. The text "(Ave)" is appended to
the units to indicate that the data is an average.
If statistical channels have not been sampled before
they are reported, then these channels report error E53
(see page 20) and data returned as 99999.9. This condition
is likely to occur when the RS trigger is an event, the
statistical sub-schedule has been halted or a statistical
scan interval (RS) is longer than the reporting time interval.
If statistical options are part of a Multiple Report
channel (see page 4), then each option list must contain a
statistical option. For example:
7SV=15
which sets the ADC settling time to 15mS (see "ADC
Details" on page 18 for more information). Assignments to
7SV and 8SV can be within a schedule and the assignment
is executed each time the schedule scans. Assignments
outside of a schedule are executed immediately.
System Timers - nST
There are four internal reloading System Timers, which
are read in the same way as channels. The four Timers
increment at different rates as follows, and reset to zero
when their range (maximum value) is reached.
Timer
Rate
1ST
2ST
3ST
4ST
1 second
1 minute
1 hour
1 day
Default Range
60
60
24
7
(1 minute)
(1 hour)
(1 day)
(1 week)
The System Timers are synchronised to previous midnight
or Sunday, and increment at the beginning of each second,
minute, hour or day. The Timers are initialised to new
values corresponding to the new time and date if the
Datataker clock time or date is changed. For example if the
time and date are set to 13:45:53 and 25/12/92, the Timers
are set to 1ST=53, 2ST=45, 3ST=13 and 4ST=5 (Friday).
System Timers have channel options (see page 4):
nST( range, R)=initial
The channel factor range is set between 1 - 65535, and if
the R option is included then the Timer resets to zero after
it is scanned (read) in a schedule. If a range other than the
default is specified, then the timer is initialised to a value
calculated from the previous midnight or Sunday.
Timers can be assigned an initial value or expression
e.g. 2ST=3. If the initial value is greater than the range,
then the timer is set to zero when the next increment is due.
Page 6
RA1M 3TT(AV)
will return
3TT 103.7 Deg C (Ave)
4PT385(I,500,AV)(MX)(TMX)(MN)(TMN)
Note the first option list (I,500,AV) must include all of the
options required for managing and sampling the channel.
This rule applies to any options above the "Config Line" in
the "Channel Options" table (page 5), because the channel
is sampled and scaled according to the first option list.
Statistical results are tested in alarms by first assigning
them to Channel Variables (see page 7).
Average (AV)
The average or mean is the sum of all the channel
readings divided by the number of readings. It is very
useful in reducing sensor noise.
Standard Deviation (SD)
The standard deviation is a measure of the variability of
the data about the average or mean. The variation may be
due to electrical noise or process changes. The units of
standard deviation are the same as the channel reading.
Maximum and Minimum
Maximum and minimum of a set of channel readings
can be reported with the MX and MN options. Similarly the
time and date of these can be reported with the TMX, TMN,
DMX and DMN options. (Also see /X switch on page 11).
S5=0,0.1,0,1000"litres"
3F("Fuel Consumption",S5,INT)
integration returns the volume of the flow:
Fuel Consumption 34.54 litres (Int)
The flow rate sensor with a frequency output (3F) is scaled
by a span ( S5 - see "Spans" on page 7) and then
integrated. Note that the span units have been declared as
litres, which is the result after integration, although the
span calibration is actually to litres per second.
Histogram (H x :y :n..m CV)
You can use the Datataker to generate a histogram
(frequency distribution) of channel samples. When you
attach the histogram option to a channel, the channel value
is returned at report time and the respective channel
variables are incremented. Then you use another schedule
to read, log and clear the channel variables.
classes
Number of
class interval
occurrences
(counts)
x
Channel reading
y
A histogram is specified as a channel option with the
following format:
Hx :y :n .. m CV
where
x is the lowest channel reading of interest
y is the highest channel reading of interest ( y > x)
n is the first Channel Variable (n CV) to store counts
m is the last Channel Variable ( m CV) to store counts
Three other counts are also stored as follows:
(m -2)CV = number of readings under range (<x)
(m -1)CV = number of readings over range (>y)
m CV = total number of readings including those
out of range
For example, to histogram a temperature channel over 5
classes requires 8 Channel Variables as follows:
RA1S 1TT(H25.0:35.0:1..8CV)
This generates a histogram with 5 temperature classes
with intervals of 2°C as follows:
1CV
2CV
3CV
4CV
5CV
6CV
7CV
8CV
first class (25 to 27°C interval) counts
second class (27 to 29°C interval) counts
third class (29 to 31°C interval) counts
fourth class (31 to 33°C interval) counts
fifth class (33 to 35°C interval) counts
number of samples under range (< 25°C)
number of samples over range (>35°C)
total counts or sum of 1..7CV
Then, for example, you can log the channel variables using
another schedule:
RB1H 1..13CV(R)
The histogram channel option does not affect the usual
reporting or logging of the channel's readings.
Note: There are only 100 Channel Variables, so the
number of channels that can be histogrammed is limited.
Page 7
Scaling Data and Calculations ... getting sophisticated !
Introduction
The Datataker provides many different methods for
scaling and manipulating channel readings. Often a
combination of methods is the most effective:
Automatic Scaling
Channel Factor .. a floating point number
Many input channel types include a channel factor as an
option. This usually provides a linear scaling. For example in
1V 1V(101.0)
1V 2.543 mV
1V 256.84 mV
Intrinsic Functions - F n
The Datataker has seven inbuilt and mutually exclusive
intrinsic functions. An Intrinsic Function is applied as a
channel option. The Intrinsic Functions available are:
Polynomials are used to define calibrations for non-linear
sensors using the formula:
∑ kn x n = k 0 + k1 x + k2 x 2 + k3 x 3 + k4 x 4 + k5 x 5
n =5
where x is the channel reading, and the k's are coefficient
terms. The polynomial is defined by the coefficient terms:
where n is the polynomial number between 1 and 20. A total
of 20 Spans and Polynomials can be defined.
Only the coefficient terms up to the required order need to
be entered. Simple scale and offset corrections are also
possible (internally the Datataker treats Spans as a first order
polynomial). The text replaces the channels default units text.
Polynomials are applied to channels as a channel option:
Y18= 25.5,0.345,0.0452"Deg C"
1V(Y18)
Text Modifier
F1
1/x inverse
(Inv)
F2
√x square root
(Sqrt)
F3
Ln(x) natural logarithm
(Ln)
F4
Log(x) logarithm base ten
(Log)
F5
Absolute(x) absolute value
(Abs)
F6
x ✱ x square
(Squ)
F7
Grey code conversion (8 bit) (Gc)
Channels with an Intrinsic Function applied will return data
appended with the text in the right-hand column of the table.
For example 1V(F2) will return the square root of the reading:
1V 455.6 mV (Sqrt)
If you place more than one Intrinsic Function in a
channel's option list, only the last will be applied.
Spans - Sn
Spans are used to define calibrations for linear sensors.
Spans are particularly suited to 4–20mA loop inputs.
Physical "Output"
e.g. °C
Calibration
upper physical b
a
c
Polynomials - Yn
Y n = k 0 , k1 , k2 ,k 3 , k4 ,k 5 " text "
In this example the channel factor could for example be
the attenuation of an input voltage attenuator network.
lower physical
As a rule it is best to define Spans (and Polynomials) in a
program before the schedules and alarms are entered.
y=
d
Signal
Input
e.g. mV
lower signal
upper signal
A total of 20 Spans and Polynomials can be defined.
A span is defined with the following syntax:
Sn =a,b,c,d "text "
where n = 1 to 20, the text replaces the channel units text.
The physical ( a, b) and signal ( c, d) limits define any two
points on the calibration line, not necessarily the end points.
Note: c and d default to 0 and 100 if not specified, which is
useful for 4-20mA current loop channels.
A single Span definition may be applied to any number of
channels in any schedules or alarms.
When a Channel Variable is included as a channel option
for a statistically scanned channel, the statistical result is
stored in the Channel Variable and not the individual
readings. For example the program
evaluates the expression and assigns the result to 3CV.
Note: The trigonometric functions require arguments in
radians, where 1 radian = 57.296 degrees.
The operator precedence is (), ^, ✶, /, %, +, –, <, <=, =,
>=, >, AND, OR, XOR and NOT. The underlined operators
have equal precedence. Expressions evaluate left to right,
however parentheses can be used to define a particular order
of evaluation. Parentheses can be nested.
The total number of expressions in a program is limited to
100, and collectively are limited to 3848 characters.
Expressions are evaluated at the report time of the
embracing schedule, and in the order in which they occur
within the schedule.
Using Channel Variables
Conditional Calculations
RS5S
Boiler pressure 239.12 KPa
0
the first item 1V returns true millivolts, and second item
1V(101.0) returns the Datataker reading multiplied by 101.0
in units of millivolts as follows
Description
S17= 0,300,100,1000"KPa"
1V(S17,"Boiler pressure")
returns
All channel types return data in engineering units: volts,
amps, ohms, hertz and °C (see "Channel Types" on page 4).
Most sensors output one of these basic signals.
Function
The defined span is applied to a channel as a channel
option. For example
will return
1V 44.35 Deg C
The coefficient terms of a polynomial are evaluated by a
least square regression. Various statistical programs are
available for this purpose. Some nonlinear sensors are
supplied with their calibration polynomial.
A single Polynomial definition may be applied to any
number of channels in any schedules or alarms.
Channel Variables - n CV
Channel Variables are floating point data registers. The
Datataker has 100 Channel Variables, identified as 1CV to
100CV, which can store channel readings and the result of
expressions. Channel Variables can be used within
expressions (see "Calculations" below), and can be included
in schedules to return, store and display their current values.
Channel Variables are assigned the current value of any
input channel by including the Channel Variable in a channel
option list. For example
1V(=2CV)
returns the voltage for channel 1 AND stores (overwrites) the
value into the channel variable 2CV.
You can also use one of four basic arithmetic operations
(+=, –=, ✶= and /=) when storing input channel data into
channel variables. For example:
5V(+=1CV) - scans channel 5V
- sets 1CV=1CV+5V
- reports the value of 5V
5V(S1, /=1CV) - scans channel 5V
- applies span 1 (S1)
- sets 1CV=1CV/5V(S1)
- reports the value of 5V(S1)
The assignments are made at the report time of the
embracing RA, RB, RC, RD, RX schedule. Channel Variable
assignments are not made at the Statistical Sub-schedule
scan time.
RA10M
3V(AV,=1CV)(MX,=2CV)(MN,=3CV)
will store the 10 minute average, maximum and minimum into
Channel Variables 1CV, 2CV and 3CV respectively.
Channel variables can also be assigned the results of
expressions (see "Calculations" below). For example
3CV=(1+COS(2CV))✶1.141
Channel Variables are used in the same way as input
channels within schedules and alarms. Channel options can
be used to modify the function and data format of Channel
Variables. For example
5CV(BG-5.0:5.0,NL,NR)=6CV+7CV
assigns to 5CV the sum of 6CV + 7CV, and displays the
result as a bar graph (BG). Data is not logged or returned.
Channel Variables are not normally returned with units
text, however you can define units using polynomials:
Y20=0,1.0"KPa"
11CV(Y20)=SQRT(4CV/6CV)
Channel Variables can be used in alarms both as the test
value and as the setpoint(s). For example
ALARM1(4CV< >2CV,3CV)"[5CV=20]"
Channel Variables are useful when comparing an input
channel against several thresholds. For example
IF1(1V(=1CV)>0.5)"Over 0.5 Volts"
IF2(1CV>0.6)"Over 0.6 Volts"
IF3(1CV>0.7)"Over 0.7 Volts"
where channel 1V is sampled once (rather than risking
different values) and tested against a number of setpoints.
Where statistical results are to be tested, then Channel
Variables provide the only means of using statistical results in
alarms. For example the program
RZ1M RS1S RA1M 3TT(SD,=1CV,W)
ALARM1(1CV>0.1)"Excessive variability"
tests the standard deviation of the temperatures read over
each minute.
When input channels or Channel Variables are used in
intermediate steps of a program, then the W channel option
can declare these as working channels and prevent data
being returned, logged or displayed. During program
debugging the W option can be over-ridden by the /W switch
(see page 11) to return and display intermediate data.
Calculations
Boolean logic within expressions can be used to return a
result which is dependent on a condition being true or false
as follows:
2CV=(1CV✶2✶(1CV<1000))+(1CV ✶4✶(1CV>=1000))
which returns a value of 2✶1CV if 1CV is less than 1000, or a
value of 4✶1CV if 1CV is greater than or equal to 1000.
Combining Methods
The different scaling and calculation methods can be
used together. Comprehensive examples are the best way to
demonstrate. In the following program, a vector average is
calculated. The inputs are wind speed and direction:
'Wind speed calibration 0 – 50 m/s = 0 –1000mV
S1 = 0,50,0,1000"m/s"
'Wind direction 0 – 2π radians (0 – 360 deg) = 0 –1000mV
S2 = 0,6.2832,0,1000"radians"
Y3 = 0, 1"m/s"
' Units text for wind speed report
Y4 = 0, 1"Deg"
' Units text for wind direction report
BEGIN
RA5S ' Schedule to scan every 5 seconds
1V( S1, = 1CV, W) ' Sample wind speed
2V( S2, = 2CV,W) ' Sample wind direction
3CV( W ) = 3CV + 1CV ✶ COS( 2CV ) ' Sum x comp‘s
4CV( W ) = 4CV + 1CV ✶ SIN( 2CV ) ' Sum y comp‘s
5CV( W ) = 5CV+1.0 ' Number of scans
RB1M 'Calculate, report and log every minute
'calculate mean magnitude
6CV(W) = SQRT(( 3CV ✶ 3CV ) + ( 4CV ✶ 4CV )) / 5CV
6CV("Mean Wind Mag.",Y3,FF1)
'calculate direction
7CV(W) = ATAN ( 4CV / 3CV ) ✶ 57.29
'determine direction quadrant
7CV(W) = 7CV + (( 3CV > 0 ) AND (4CV < 0 )) ✶ 360
7CV(W) = 7CV + (( 3CV < 0 ) AND (4CV < 0 )) ✶ 180
7CV(W) = 7CV + (( 3CV < 0 ) AND ( 4CV > 0)) ✶ 180
'if wind speed is zero, return -1.0
7CV(W) = 7CV – ( 6CV < = 0 ) ✶ ( 7CV + 1 )
7CV("Mean Wind Dir.",Y4,FF0)
.. only at report time
The Datataker has a powerful expression evaluation
capability. Results can be assigned to Channel Variables,
output channels, System Timers and System Variables.
Expressions can ONLY contain Channel Variables and
constants. Data from input channels must first be assigned to
Channel Variables to be used in expressions.
Expressions can contain the following operators
1..5CV(W) = 0
END
LOGON G
The following program scans ten channels and calculates
a cross channel average:
Arithmetic +, –, ✶, /, % (modulus) and ^ (exponent)
Relational <, <=, =, >=, > (result 1 is true, 0 is false)
Logical
AND, OR, XOR, NOT (>0 is true, result 0 or 1)
Functions ABS(), LOG(), LN(), SIN(), COS(), TAN(),
ASIN(), ACOS(), ATAN(), SQRT(), Yn (), S n()
Other
Parentheses ()
BEGIN
RA10S
1CV(W) = 0
1..10V(+ = 1CV, W)
1CV = 1CV / 10
END
' clear 1CV
' sum 10 voltages into 1CV
' divide by 10 for average
Data Logging and Retrieval
Introduction
Unloading Data
The Datataker has two locations in which to store data:
- the internal memory, which stores13,650 data points
- PC Card (PCMCIA) memory cards, which store up to
343,980 data points in a 1Mbyte memory card
The management for the internal memory and memory card
varies according to the state of an inserted card as follows:
• If an empty memory card is inserted, the Datataker will
transfer any data in the internal memory to the memory
card, and then will continue logging to the card.
• If a memory card containing data from the same program
is inserted, the Datataker will append any data in the
internal memory to the memory card, and then continue
logging to the card.
• If a memory card containing the data from a different
program is inserted, the Datataker will not transfer data from
internal memory to the card, but will continue logging to the
internal memory. If you issue a CDATA command to clear
the memory card, then data will be transfered after clearing.
Data Logging Commands
Data logging is globally enabled by LOGON and is
disabled by LOGOFF. By default data logging is disabled.
How Data is Stored
All data is logged as 24 bit (16 bit mantissa) floating
point numbers. Internal calculations are 32 bit floating point.
Each schedule stores a three byte header per scan for
identification, scan time and scan date. When logged data is
unloaded this header and the original schedule are used to
interpret the data. Schedules cannot be replaced when data
has been logged, until data is cleared by CLEAR & CDATA.
Stop When Full Mode - /o
By default, data logging stops when the memory is full –
the earliest data is retained and the most recent discarded.
If a memory card is used, the internal memory is used only
after the memory card is full.
Overwrite Mode - /O
Alternatively the oldest data may be overwritten when
the memory is full. This is invoked by the /O switch. The
internal memory is not used in overwrite mode when a
memory card is used. You can change the /O mode switch
at any time, however the internal memory does not become
available if a memory card is in use.
Storage Capacity
Data storage capacity is difficult to calculate because of
the three byte header per schedule per scan. If the three
byte header is considered as a channel, then the following
figures are reasonably accurate:
Memory
Internal
512K PC Card
1M PC Card
Capacity (readings)
... go for quality not quantity
Total (card+internal)
13,650
169,260
343,980
13,650
182,910
357,630
Time and date in a channel list are handled as any other
channels, i.e. three bytes each. It is more efficient to use the
/T and /D switch commands - see pages 6 and 11.
Not Logging Channels
All input channels in RA, RB, RC, RD and RX schedules
are logged after the LOGON command is issued. The NL
(No Log) channel option prevents logging of individual
channels. The W (Work) channel option prevents logging,
return and display of the channel data.
Logged data is unloaded from internal or card memory by:
U source schedule (start point )( end point)
source
I - from internal memory
M - from memory card
none - unload from the memory card then
if same data set, internal memory
schedule
A, B, C, D, or X - schedule
none - unloads all schedules logged
(start point ) (time,date) or (time)
BEGIN - from beginning of stored data
LAST - from end of last unload
none - from beginning of stored data
(end point ) (time,date) or (time)
END - to end of stored data
LAST - to end of last unload
none - to end of stored data
All are optional, however an (end point ) can only be
included if a (start point ) is included. Some examples are:
U
unload all data, oldest first
U(LAST)
unload most recent unloaded data
UA(BEGIN)(LAST) unload schedule A from beginning to
the same point as previous unload
UMB(12:00,19/1/91)(12:00,20/1/91) unload B schedule
data from memory card between the two times
The oldest data is returned first and the schedules are
merged chronologically in X, A, B, C, then D order. The
format of unloaded data is the same as for real-time data
(see page 5). During an Unload the /r (return), /e (echo) and
/m (error messages) switches are disabled. These are
returned to their previous state on completion of unload.
Data is not cleared from memory by Unload operations.
Quitting an Unload
An Unload operation is aborted by the Q quit command.
Time and Date Stamping
The scan Time and Date can be prefixed to the data
unloaded from each schedule by enabling the /T and /D
switches. This can be done even after the data is logged.
Time and Date prefixing defaults to OFF ( /t /d).
Logging Status
You can check the number of data points stored and
the free space with commands and system variables:
STATUS
1SV
2SV
3SV
4SV
lines 5, 6 and 7 (or STATUS5 STATUS6 etc.)
Internal data points free
Internal data points stored
Memory Card data points free
Memory Card data points stored
Clearing Stored Data
You can clear logged data anytime with the commands:
CLEAR clears all data logged in the internal memory
and disables logging ( LOGOFF)
CLAST clears data in internal memory or memory card
card that has been unloaded by U command
i.e. only if all schedules were unloaded.
CDATA clears all data logged in memory card
RESET clears internal memory (and program)
but not memory card data (or program)
The CLEAR command may appear to fail if logging is
enabled, because new data is logged soon after the clear.
The solution is to first stop the logging with LOGOFF or H.
Memory Cards and Programs ...added convenience
Introduction
The Datatakers support PC Card memory cards which
conform to the PCMCIA Type II standard. PC Card memory
cards of up to 1Mbyte in capacity can be used.
The memory cards increase the storage capacity of the
Datataker, and because the cards are removable they are
also a reliable media for transporting data and programs.
For maximum reliability, do not expose the memory card
to temperatures over 45°C for extended periods, to ionising
radiation or to static electricity discharge.
Replace the lithium battery annually, using the same
cell or another cell recommended by the card manufacturer.
Card Specific Commands
There are seven commands specifically for managing
memory card operation:
CDATA
CPROG
COPY
NOCOPY
CARDID="text "
CARDID
RUNPROG
CTEST
clears card data
clears program space on a card
transfer internal data to the card
disables transfer of data to the card
assigns a card ID
returns the card ID
forces running of card program
clears data and program, and tests
the entire card
Card Identification
You can name a memory card with the command:
CARDID="label text "
The label text can be up to 40 characters, of which the
first 16 are displayed. This text is shown on the lower line of
the display when you insert the memory card. It is also
returned in response to the command CARDID.
Card Formatting
New Cards are automatically formatted when inserted
into the logger, and are given the default CARDID="xxxKB"
where xxx is the size of the memory card.
Card Processing Flow Chart
When a memory card is inserted into the Datataker, the
subsequent processing and actions depends on the status
of the memory card and the status of the logger.
The tests performed on the memory card by the logger,
and the actions taken as a result the tests, is detailed in
Appendix - "Memory Card Processing Flow Chart".
Programming from Cards
A memory card can hold a Datataker program of up to
4090 characters. Commands are entered into the Datataker
in the normal way, except that each line must begin with a
semi-colon. The logger copies lines prefixed by a colon into
the program area of an inserted memory card. For example:
;CSCANS CALARMS
;/m /n /u P22=44 P24=13
;ALARM1(1V>55.0)4DSO
;ALARM2(5TJ>107.0)"Temp. Alarm"
;RA5M 1V 5TJ 2HSC
;LOGON
Note: If a program in a write protected PC Card memory
card includes a RESET command, then the Datataker will
suspend operation until the card is removed, or the write
protect switch is moved to the disabled position.
Page 8
When the commands are copied into the program area of
the memory card, these are appended to the current
contents of the program area. If there was a previously
stored program on the memory card, then the new program
is appended to the old program. The old program must first
be cleared by a CPROG command if not required.
The STATUS command returns the used and available
space in the program area of the memory card, and
STATUS8 also shows the full program listing.
NOTE: The syntax of the card program is not checked
until the program is actually run. Check the program by
executing the RUNPROG command while the card is
inserted, or by removing and re-inserting the card. Inserting
a card causes immediate program execution (if /Q is set to
the default in the Datataker – see below).
When is a Card Program Run ?
When you insert a memory card into the Datataker, any
program on the card is normally loaded into the logger,
compiled and run immediately. Datatakers with a display
will show the message Prog . You can stop automatic
loading of card programs by setting the /Q switch to /q.
The program on an inserted memory card can be
loaded and run by the RUNPROG command. This executes
a card program immediately, irrespective of the setting of
the /Q switch. Only the /F switch will prevent the execution
of the RUNPROG command (see "Switches" on page 11).
Transferring Data to the Card
Normally data in the internal memory is transferred to
the memory card after any card program is executed. The
transfer can take up to 100mS.
Datatakers with a display module will show the message
Append, depending on whether the data is appended to
existing compatible data, and shows the message Xfer
when the transfer occurs.
If the card already holds data from a different program,
then no transfer occurs and Datatakers with a display will
show the message Can't Copy Data .
When a single memory card is to be used to recover
data, and to reprogram the logger, you must transfer the
logged data before reprogramming. This is done by using
the COPY command in the program to force data transfer
before the logger is reprogrammed:
;COPY
;LOGOFF CLEAR CSCANS
;RA10M 1..5V LOGON
Automatic data transfer from the internal memory to card
can be prevented by placing a ;NOCOPY command on the
first line of the card program. The NOCOPY action is
automatically cleared when the card is removed.
Clearing the Memory Card
The data storage and program areas on a memory card
can be separately erased as follows:
CDATA
CPROG
CTEST
clears all data
clears the card program
clears data and program, and tests
the entire card
CDATA and CPROG commands can be executed from a
card program. However CPROG must be the last command
in the card program, since any commands after it will be
cleared from the card before execution.
Removing the memory card's battery for more than two
minutes also clears the card.
Alarms
Page 9
... limits and tests
Introduction
The Datataker Alarm allows you to make decisions about
input channels, timers, the clock, variables, etc. If an Alarm
condition is true you can set digital outputs, issue messages
or execute commands to change Datataker function. There
are two basic types of Alarm:
- ALARM or IF command which acts once on the transition
from false to true.
- ALARMR and IFR command which acts repeatedly while
the alarms tests true.
ALARM5(4#L(S3)<>110.0,150.0/10S)1DSO,4DSO"Boiler Temp ?[RA2S]"
Alarm Number
Alarms share an internal scan table of up to 110 entries
with the data acquisition schedules. The scan table must be
partitioned before any schedules or alarms are defined, with
the P30 command. For example P30=40 will allow the entry of
40 alarms, and 110 – 40 = 70 data acquisition channels. P30
defaults to 20 alarms.
The Alarm Number identifies the alarm. If you
enter two alarms with the same number the second
overwrites the first.
The Alarm Number must not be greater than the
P30 value (see Number of Alarms). The Alarm
Number is also used to poll for current alarm
data values with the ?n command (see Polling
Alarm Data), and in the HZ n, GZ n and CALARMn
commands.
The Scanning of Alarms
Channel Definition
By default the Datataker scans alarms as fast as possible.
The actual rate depends on the number of Alarms and data
channels defined. As a rule, allow 40mS for each analog input
and 10mS for each Channel Variable, time and digital input.
The Alarms schedule is triggered in the same way as
schedules for data acquisition (see"Schedules" on page 3):
Any input channel type with options (see
"Channel Types" on page 4), or Channel Variable,
or System Timer, System Variable, etc. can be the
input to Alarm commands.
The Number of Alarms
RZ
RZ n S
RZ n M
RZ n H
RZ n D
RZ n E
RZ n+E
RZ n-E
RZ nC( count )
RZ nHSC
HZ, GZ
HZ n, GZ n
rapidly as possible (default)
seconds
minutes
where n is an integer
hours
in range 1 to 65535
days
event on either transition
where n is
event on positive transition
a digital
event on negative transition
channel
counter event after count
number
event on any HSC counts
Halt and Go for all Alarm scanning
Disable and enable Alarm number n
Note: an Alarm disabled by an HZn command will not be
enabled by the global GZ command. Only the GZ n command
will re-enable individually disabled alarms, and then only if
alarm scanning is enabled (GZ).
The Listing of Alarms
The STATUS3 command (see page 10) returns a list of all
defined alarms. The keyword "ALARM" is in upper case for
enabled alarms and in lower case for disabled alarms.
Channels in the alarm list do not show their channel options.
Erasing Alarms
Erase all defined Alarms with the CALARMS command,
and erase individual alarms with the CALARMn command,
where n is the Alarm number.
Polling Alarm Data
Return the most recent data from the Alarm input channel
to the host by using the Alarm query command:
?n
?ALL
returns Alarm number n data
returns data for all defined Alarms
The data format is the same as for channel data, except
that the channel number is replaced by the Alarm Number.
For example ?5 will return:
A5 123.4 Deg C .
Conditional Test
The input channel or Channel Variable is compared with
one or two (comma separated) set points. The set points can
be a floating point constant or a Channel Variable. The
number of set points depends on the logical operator:
Operator Set Points
<
>
<>
1
1
2
><
2
(optional)
When the Alarm's conditional test changes state (i.e. false
to true or true to false) no action is taken until the delay period
has expired AND the state has not changed during this
period. The format is:
/nS
/ nM
/nH
/nD
ALARM3(2V>660.0)4DSO
When the voltage on channel 2 equals or exceeds 660.0mV,
the digital output channel 4 is turned ON. When the voltage
drops below 660.0mV the output is turned OFF.
Output Channels
(optional)
One or two (comma separated) output channels (see
"Channel Types" on page 4) can be declared for each Alarm
to reflect the alarm condition. These outputs are set on
transitions of the Alarm condition and after all Alarms have
been scanned. Only two output channel types are permitted:
General purpose digital output
LEDs (1..3), Beeper (4) etc. (see page 12)
If multiple alarms use the same output channel, then the
effects are OR'ed. Any active alarm will set the output to ON,
but all alarms must be false to reset the shared output OFF.
The output channel can be cleared at any time by digital
assignment (e.g. 1DSO=0). Unlike Action Commands (see
right), the Output Channels are set or cleared on both the
positive and negative transitions of the Alarm condition.
Seconds
Minutes
Hours
Days
True
False
Timing
Delay timing Reset
True
Full Delay
Periods
Action Text and
Commands issued
Adaptive scheduling is a common use for managing the
Datataker from the Alarm command. In the example:
time
Note that the output channels (if any) reflect the state of the
Alarm Action line in the above diagram. This line changes
state only after the full delay period has expired.
Action Text
(optional)
Text placed in quotes is sent to the host computer and
display whenever an ALARMn or an IF n alarm transits from
false to true, or repeatedly at the RZ rate while an ALARMR
or IFR alarm remains true, and any delay period has expired.
The action text may be up to 200 characters, however the
total text space reserved for all Alarms is 4000 characters.
Note: There is no garbage collection in this text space.
Each new action text is appended to the list, and superseded
text is only removed by a RESET or CALARMS command.
Control characters can be embedded in the Action Text
such as ^G (bell), ^M (CR), ^L (LF), ^b (quotes), etc.
Various data can be placed into the Action Text by
including special substitution characters:
!
?
#
@
(optional)
The Action Text can include a group of one or more
Datataker commands enclosed by square brackets. These
are Action Commands, and are executed once when an
ALARM or IF alarm transits from false to true, or repeatedly
at the RZ rate while an ALARMR or IFR alarm remains true.
Action commands are a very powerful programming
facility for the Datataker. You can use any Datataker
command in this context, so many things become possible:
• re-programming on events
• adaptive schedules
• programmed calibration cycles
• control of digital outputs
Conditional
Test
Alarm action False
Alarm number 5 is defined
(or replaces any previous definition). A current
loop on single ended channel 4 (4#L) scaled by a
span ( S3) is monitoring a boiler temperature. If
the temperature drops below 110.0 or rises to or
above 150.0, for more than 10 seconds (/10S),
digital outputs 1 and 4 ( 1DSO, 4DSO) are set
ON, the message "Boiler Temp 152.0" is sent to
the host and to the display (if present), and
schedule " RA" is re-programmed to scan at two
second intervals ([RA2S]).
Action Commands
where n is an integer in the range 1 to 255
When the state changes during the delay period the delay
counter is reset and will not count again until the next state
change. The result is a filtering action that ensures that input
noise will not cause unwanted or rapid output actions.
Operation
less than set-point
greater than or equal to set-point
less than first set-point, OR greater
than or equal to second set-point
greater than or equal to first set-point
AND less than second set-point
The following example shows use of a conditional test:
n DSO
n WARN
Delay Period
This Example :
insert Datataker address and alarm number ( a: n )
insert current data value
insert day or date (in P31 format)
insert time (in P39 and P40 format)
e.g. the Action Text "Boiler Pressure = ? MPa" will return:
Boiler Pressure = 1.563 MPa
on each false to true transition of the Alarm. No Action Text is
issued on the true to false transition.
Setting the /Z switch to /z will stop the return of the Action
Text to the host (see "Switches" on page 11). This is useful
when the Action Text is only required for the display.
RA15M 1V(AV,"Wind speed",S1,=1CV)
IF1(1CV>5.0)"[RA2M]"
IF2(1CV<4.5)"[RA15M]"
the average wind speed is recorded every 15 minutes and
assigned to a variable (1CV). If the average exceeds 5.0 m/s,
the schedule's report interval is reduced to 2 minutes by the
first alarm (IF1) command. When the 2 minute average drops
below 4.5m/s the report interval is returned to 15 minutes by
the second alarm command ( IF2). Note the deliberate 0.5
hysteresis to prevent an "oscillation" around the switch over
point. Adaptive scheduling can reduce total data volume
while giving greater time resolution when required.
Instead of changing the report interval as in the above
example, data logging could have been enabled or other
schedules modified. The possibilities are endless!
Combining Alarms
Alarms can be logically combined to yield a single result
by replacing the action text / action commands of all except
the last Alarm in the group with a logical operator for example
IF1(3TK>100)OR
IF2(2TK>100)OR
IF3(5TK>100)AND
ALARM4(1DS>0/10S)"Temp. Error [RA5S]"
where the message is output 10 seconds after digital input 1
is high and any one of the three temperatures exceeds and
stays above 100 degrees. Note the substitution of the
keyword IF to improve readability of the program. Only the
delay period, output channels and action text of the last
Alarm are performed.
Available logical operators are AND, OR and XOR. You
must order the Alarm numbers from low to high, as evaluation
is sequentially from low to high. Missing Alarm numbers are
allowed provided you do not define them elsewhere.
Output Format
Page 10
More Commands
Introduction
TEST
The Datataker has many ways to format data returned to the host
computer and display. Data format is controlled globally by the
following Parameters and Switches (see also page 11):
The TEST command forces a calibration, and checks the functionality of the hardware.
The TESTR command will force continuous calibrations. The information returned to the host
computer is:
/H
/U
/N
/L
/C
/D
/T
P22
P24
P31
P32
P33
P38
P39
P40
fixed format mode - defaults off (see Advanced Coms. Manual).
include units text appended to the data - defaults on
include channel number and type (ID) before data - defaults on
include logger number before scan data - defaults off
include channel type (/C) or number only ( /c) - defaults on
include scan date at beginning of returned data - defaults off
include scan time at beginning of returned data - defaults off
data delimiter in /u mode (default 32, a Space )
scan delimiter in /u mode (default 13, a Carriage Return)
Note: A Line Feed character (ASCII 10) is always added
to a Carriage Return (ASCII 13)
date format - see "Date" on page 6
maximum number of significant digits - 0 to 9, default is 5
defines a fixed field width for output data - default 0, variable
decimal point locator character for floating point numbers
- default is ASCII 46, a period " ."
time format - see "Time" on page 6
time separator character - default is 58, a colon " : ")
The default data format is verbose and descriptive, for example:
RA5S 1V 3PT385 1C("Widgets") /T /D
returns
STATUS2
Returned Data
Datataker 52 Ver 5.xx 0
Vos (mV) 0.009
1
Vfo (V) 7.308
2
Fc (kHz) 18.200
3
CMRR(db) 99.6
4
Vos3(mV) 0.238
5
Tos
1.0023
6
Ios (nA) -3
7
Ibia(nA) 15
8
Ibat(mA) 0.5
9
Vbat (V) 6.6
10
Vos*(uV) -95
11
Vos+(uV) 33
12
Vos-(uV) 10
13
Vos#(uV) 66
14
Vosd(uV) 5
15
Ics1(mA) 2.4994
16
Ics2(uA) 250.31
17
PASS
where the Switches default to /U/N/C. Parameters P22 and P24 are
not used as delimiters while units text is enabled (/U). However the
data format can be condensed the to a form more useful for computers
where the Switches are set to /u/n and the Parameters are set to
P22=44 (a comma), P24=13 (a return), P31=0 (day number) and
P39=2 (decimal hours).
Data format control is global and is applied to real-time data,
unloaded data and the data returned by the TEST and STATUS
commands. Note: All data is kept internally as 3 byte data, and is
formatted when returned. Data format can be changed between
successive memory Unloads.
Data Numeric Format
The numeric format of data is set for channels by channel options:
Fixed point, n = number of decimal places (n = 0 - 7)
Exponential, n = number of significant digits ( n = 0 - 7)
Mixed FF or FE formats. Uses FE format if exponent
is less than –4 or greater than n. ( n = 0 - 7)
Examples of the numeric format channel options for returned data:
Default
FF1
23.5
–0.0
1034.6
FE3
FM1
2.346e1
–2.542e–2
1.035e3
23.5
–0.0
1e3
configuration & ROM version
input offset voltage
input voltage for VCO = 0Hz
VCO centre frequency
common mode rejection ratio
three wire input offset voltage
terminator attenuation
input bias current offset
input bias current
battery current (– for discharge)
battery voltage
✶ single ended offset voltage
+ single ended offset voltage
– single ended offset voltage
# single ended offset voltage
differential offset voltage
current source 1 current
current source 2 current
test pass or fail
Valid Range
—
±1 mV
6.0 to 8.50V
11.46 to 23.87kHz
>90db
-1.9 to 3.1mV
0.99 to 1.01
±30nA
±90nA
-500 to +600mA
5.4 to 13.0V
–600 to +110µV
±180µV
±180µV
–110µV to 600µV
±180µV
0.5mA to 10mA
1µA to 500µA
–
RESET
The RESET command clears the Datataker of all data and programs. Use it carefully, or
risk losing valuable data. The RESET command also initiates a calibration, and a sign-on
message is returned to the host computer:
1453, 12.7500, 2.490, 395.0, 3498
23.456
–0.025
1034.6
Description
Test data that is out of range is flagged with a "fail" message. Use the /u switch to make
test results less verbose.
TESTn returns line n of the test results and TEST nR produces continuous test cycles of
line n . Continuous reporting is stopped by the next carriage return.
Date 25/12/92
Time 12:45:00
1V 2.490 Volts
3PT385 395.0 Deg C
Widgets 3498 Counts
FFn
FE n
FMn
n
FM2
23.46
–0.03
1034.64
Note that the default format depends on the channel type returning the
data. See the "Channel Types" table on page 4, especially the
resolution column. Formatting options are not applied to the 99999.9
error data code (see "Errors" on page 20).
Parameter P33 allows returned data to be in fixed fields. All data is
placed into fields of the same width defined by P33, by space padding
to the left. If the field width is not sufficient, least significant characters
are truncated from the right. Fixed fields are useful when returned data
is to be tabulated, or forwarded to software with a simple string parser.
Datataker 0 Version 5.xx
Initializing ... Done
The RESET command does not clear the Datataker clock, or clear data or program from
a memory card.
Do not send any other commands to the Datataker for five seconds after you have
entered the RESET command. Use \Wn in DeTerminal to force a pause after RESET in a
command file, for example: RESET
\W5
CDATA
returns the scan schedules:
A, none Scan Schedules Active,Halted
RA15M 1TT("Room Temp")
If a memory card containing data is present, then the schedules returned are
appropriate to the card's data. The X schedule is not given an active or halted state.
Note: For this status report the schedules are simply stored as text in a buffer of 512
bytes. If your program exceeds 512 characters, the remaining program text is not
returned and is replaced by three periods ("...").
STATUS3
returns alarms (without channel options). The keyword "alarm" is in
lower case if the alarm is halted (by the HZn command - see page 9):
2,1 Alarms Active,Halted
RZ5S
ALARM1(3V>105)1DS0
ALARMR2(4V<75)2DSO"[1DSO=0]"
alarmr3(5TT<72.0)3DS
STATUS4
returns defined polynomials and spans:
2 Polynomials/Spans Defined
Y1=3.54,1.009"Deg C"
S7=0.0,100,0.0,1.0"KPa"
STATUS5
STATUS6 STATUS7 returns the data logging status,
and the data stored and free in the internal memory and card memory respectively.
STATUS8
returns the memory card program:
4015,75 Program Characters Free/Stored
;Y1=0.0382,14.4"kPa"
;RA15S T 1V(Y1,=1CV)
;ALARM1(1CV>150)2DSO"Boiler"
STATUS9 returns the Datataker's current switch settings
/a/C/d/E/f/h/J/K/l/M/N/o/Q/R/S/t/U/v/w/x/y/Z
STATUS10 returns further information about the current program in the logger.
27113,1989,1,0,"",<A,"2S",H,<"Dry bulb","",0,0,5,4,3>,
<"Wet bulb","",0,0,5,4,3>,<"Humidity","%RH",0,0,5,4,
3>>,<B>,<C>,<D>,<X>
This report is a list of comma separated items providing details about the Datatakers
program. In order, they are Program ID, Base year, Time resolution, Card status,
Current $ string, followed by Schedule fields that identify individual channels, their
format and their units. If there is no program the following is returned:
STATUS
0,0,0,0,"",<A>,<B>,<C>,<D>,<X>
The STATUS command returns the status of the Datataker's schedules, channels,
alarms, memory and logging to the host computer. Typical returned information:
n
Datataker 0 Version 5.xx
A,none Scan Schedules Active,Halted
0,0 Alarms Active,Halted
0 Polynomials/Spans Defined
Logging is OFF
13650,0 Internal Data Points Free,Stored
169260,0 Card Data Points Free,Stored
4090,0 Program Characters Free,Stored
/A/C/d/E/f/h/J/K/l/M/N/o/Q/r/S/t/U/v/w/x/y/Z
1
2
3
4
5
6
7
8
9
The first line shows the Datataker's address (see "Networking" on page 14) and ROM
version. The line of switches indicates the current switch settings (see "Switches" on page
11). Use the /u switch to make STATUS results less verbose.
The remaining lines are described below. Each STATUS line can be returned individually:
STATUS n
where n is the line number. STATUS2, 3, 4 and 8 return extra information. There are also
other status levels that are not returned by the general STATUS command.
Refer to the "Datataker Advanced Communications Manual" for detailed description.
STATUS11 returns information about the program on an inserted memory card.
The format is the same as for STATUS10. Refer to the "Datataker Advanced
Communications Manual" for a detailed description.
STATUS12
returns the time and date of the first and last data points stored in
the Datataker's internal memory:
00:11:33 on 05/11/1992,00:13:00 on 19/01/1993 Internal
data Start,End times
STATUS13
returns the time and date of the first and last data points stored in
an inserted memory card:
00:11:33 on 05/11/1992,00:13:00 on 19/01/1993 External
data Start,End times
These and other STATUS n commands are described fully in the "Datataker
Advanced Communications Manual".
Page 11
Parameters are internal system
settings. They are global in their effect,
and let you set a variety of options. As a
general rule, set the parameters that
require changing before you program
schedules and alarms.
Setting Parameters
Parameters can be set at any time,
and new settings generally take effect
immediately. For example
P22=44 set Parameter 22 to 44
Note that in fixed format mode (see
below) three parameters are forced:
P22=44,
P24=13 and P38=46. The
original values for these are restored on
leaving the fixed format mode.
Reading Parameters
Entering the command:
P22
will return the setting of parameter 22.
Parameters are not the same as
channels or variables. If you include a
parameter in a schedule, it does not
become part of the schedule. Instead it
is processed immediately.
You can set or read parameters from
the host computer, from a memory card
program or from Alarm Actions.
C
om
m
en
t
R
an
Va ge
lu of
es
Calibration interval
2.500 volt reference trim
Temperature trim
Reference resistor trim
Lost count flag
Network turnaround time
Remote network error
ADC settling period
µV
10µV
0.001°C
mΩ
count
# 14mS
# errors
mS
4µV
0µV
0°C
0mΩ
0
1
0
10mS
0 to 10,000
-30,000 to 30,000
-30,000 to 30,000
-30,000 to 30,000
read only
1 to 30,000
0 to 30,000
0 to 30,000
P11
P12
P13
P14
P15
P16
P17
P18
Mains frequency
Transmit errors
Digital input sample period
Password timeout
Low power operation
ADC warm up time
Delay to low power mode
Auto scroll time
Hz
# errors
mS
seconds
mode
100mS
seconds
seconds
50/60Hz
0
50mS
300S
0
1 (100mS)
30S
2S
48 to 1000
0 to 30,000
0, 10 to 100
1 to 30,000
0 to 2
1 to 255
1 to 255
1 to 255
Sets ADC sample duration to 1/Hz seconds. Default value read from the country DIP switch (see "8SV" on page 6).
Transmission errors in protocol mode (see the "Datataker Advanced Communications Manual").
Sample interval on digital inputs (and keys on display), determines minimum detectable pulse width. P13=0 disables digital input.
When a password is defined the Datataker will automatically SIGNOFF after this period of inactivity (see "COMS Port", page 13).
0 = auto, 1 = force low power, 2 = force normal power mode (see"Setting the Power Mode" page 15).
Minimum time from wake-up to first ADC in 100's of milliseconds, useful for sensors with a long power-up settling time.
Delay to low power mode from last communications, external wake, or keypad input (see "Setting Power Modes" page 15).
Time in seconds to display each screen when Display is in scroll mode (see "Scroll Keys" on page 12).
P19
P20
P21
P22
P23
P24
P25
P26
P30
Status screens to display
Wake schedules
Return data to address
Data delimiter character
Calibration samples
Scan delimiter
Unload completed character
XOFF timeout before XON
Number of alarms permitted
bit map
bit map
address
ASCII
count
ASCII
ASCII
seconds
count
255
0
128
32 (space)
3
13 (CR,LF)
0 (none)
30
20
0 to 255
0 to 255
0 to 128
1 to 127
1 to 10
1 to 127
0 to 127
1 to 254
0 to 110
Bit map of status screens to display on Display (see "Status Screens" on page 12).
Bit mask of schedules that are not to wake the logger – D C B A S X Z (see "Low Power Operation" on page 15).
Logger address to which returned data is to be sent. P21= address . P21 defaults to 128 which means normal addressing.
ASCII character (as decimal number) between data points in /u mode (see "Output Format" on page 10). Forced to 44 by /H.
Determines calibration "noise", a compromise between calibration speed & accuracy.
ASCII character (as decimal number) between groups of data points in a scan in /u mode (see "Output Format" on page 10).
ASCII character (as decimal number) that is placed at the end of an Unload dump in /u mode (see "Output Format" on page 10).
Timeout before XOFF is automatically switched to XON. P26=0 disables timeout, and P26=255 ignores received XOFFs.
Number of alarms that can be entered. Must be set before any schedules or alarms are entered (see "Introduction" on page 9).
P31
P32
P33
P36
P38
P39
P40
Date format
Number of significant digits
Field width
Temperature units
Decimal point character
Time format
Time separator
mode
# digits
# characters
mode
ASCII
mode
ASCII
1 or 2
5
0 (variable)
0 (°C)
46 (.)
0 (hh:mm:ss)
58 (:)
0 to 2
1 to 9
0 to 200
0 to 3
0 to 127
0 to 2
1 to 127
0 = day number, 1 = dd/mm/yy (European), 2 = mm/dd/yy (N American) (see "Date" on page 6 for default value).
Sets significant digits of output data. Note: logged data is always stored to 5 digits, so P32>5 is only useful for realtime data.
If P33>0 this defines fixed field width for all output data (right justified, space padded or least significant digits truncated).
0 = °C, 1 = °F, 2 = °K, 3 = °R. Data is converted before being placed into store and cannot be converted at Unload time.
The character used as a decimal point in floating point numbers (see "Output Format" on page 10).
0 = hh:mm:ss, 1 = seconds, 2 = decimal hours (hh.hhhh) (see "Time" on page 6).
ASCII character (as decimal number) separator character for hh:mm:ss time format (see "Time" on page 6).
UPPER CASE "ON", lower case "off"
Introduction
Switches are analogous to electrical switches,
and are turned on by upper case and off by lower
case. Switches are internal system settings, and
generally global in effect. Switch commands can
be issued at any time, and most take effect
immediately. Delay in effect may occur if data is
buffered in the Datataker or in the host computer.
Viewing Switch Settings
The STATUS9 command returns the current
switch settings to the host e.g.
/a/C/d/E/f/h/J/K/l/M/N
/o/Q/r/S/t/U/v/w/x/y/Z
Fixed Format Mode /H
The fixed format mode is recommended for
those writing drivers to interface host software with
the Datataker. In this mode the /u/n/e/r switches
are forced to ensure a fixed format. These
switches are restored to their original values when
the Datataker receives /h. (See the "Datataker
Advanced Communications Manual" for a complete
description. For advanced users only).
De
fa
ul
t
C
om
m
en
t
....
Input zero drift allowed before re-calibration (see "Accuracy" on page 17).
Software trim of 2.5000 volt reference for calibration (see "Accuracy" on page 17).
Trims internal LM35 temperature sensor. For thermocouple reference junction temperature calibration (see page 16).
Trims the internal 100.0Ω ±0.1% reference resistor (see "Accuracy" on page 17).
If this is greater than zero, then counts may have been missed by the low speed counters.
Set as number of 14mS intervals. Useful for use with radio modem network. Typically would set P7=22 corresponding to 300mS
Network errors have occurred if P9>0.
Time between channel selection and beginning of ADC (see also "7SV" on page 6 and "ADC Details" on page 18).
P0
P1
P2
P3
P4
P7
P9
P10
Sw
i
En tch
ab
Sw led
i
D tch
is
ab
Fu led
nc
tio
n
Switches
Un
its
Introduction
De
Va fau
lu lt
e
... internal settings
Pa
r
N am
um .
b
Fu er
nc
tio
n
Parameters
/A
/C
/D
/E
/F
/H
/a
/c
/d
/e
/f
/h
Display alarms
Channel identification
Prefix date to data
Echo
Fix schedules
Formatted mode
/a
/C
/d
/E
/f
/h
Enable the display of displayable alarms (see "Displaying Alarms" on page 12)
Channel type is included with channel number with returned data e.g. "5PT392" instead of "5" (see "Output Formats" on page 10).
Prefix date to logged data – equivalent to a D at beginning of a schedules channel list.
Enables echo of commands to host. Useful in terminal mode communications with the Datataker.
Prevents a logger's scan schedules (trigger or channel list) being modified (see "Schedules" on page 3). A RESET will still erase schedules.
Fixed format mode of data output. Switches and Parameters are saved by /H and restored by /h. See the "Datataker Communications Manual".
/J
/K
/L
/M
/N
/O
/j
/k
/l
/m
/n
/o
Over range error carry
Calibration
Logger number prefix
Messages
Channel numbers
Overwrite memory
/J
/K
/l
/M
/N
/o
Errors are carried through expressions so that expression will return 99999.9. If disabled, 99999.9 is substituted for reading in the expression.
Enables auto-calibration. Issuing a /K forces an immediate calibration. Datataker always calibrates during a RESET.
Prefixes the logger number to a schedule's returned data e.g. Datataker 19 5PT385 232.5 indicating the data is from logger 19.
Enables error and warning messages to be returned to host (see "Errors" page 21).
Includes channel number (and type if /C switch is on) with returned data (see "Output Formats" on page 10).
Oldest data is over-written (/O), otherwise logging stops when memory is full (see "Logging and Data Retrieval" on page 8).
/Q
/R
/S
/T
/U
/V
/q
/r
/s
/t
/u
/v
Program from card
Return data
Synchronise
Prefix data with time
Units text
Speaker enable
/Q
/R
/S
/t
/U
/v
Allows the logger to be programmed using a memory card (see "Memory Card" on page 8). /q will prevent a logger executing a card program.
Allows real-time data to be returned to the host via the COMS port. Switching returns off (/r) can reduce power consumption.
Synchronises all schedules' time intervals to midnight (e.g. RA1M will scan on the minute), otherwise schedules run from entry time (see page 3).
Prefix time to logged data – equivalent to a T at beginning of a schedules channel list.
Measurement units are appended to returned data (see "Output Formats" on page 10), and error messages are verbose (see "Errors" on page 21).
Enable speaker and headphone output by Geologger.
/W
/X
/Y
/Z
//
/w
/x
/y
/z
–
Intermediate channels
Progressive max, min
Priority to return data
Stops alarm messages
Default switches
/w
/x
/y
/Z
–
Allows working channels (see channel option "W" on page 5) to be reported and displayed but not logged (see also "Calculations" on page 7).
Allows the display of progressive maximum and minimum values for statistical channels on a Datataker display.
If real-time data has not been returned before next scan becomes due, the returning of data is given priority and the scan may be omitted.
Enables alarms to issue action text to host computer or printer. See "Action Text" on page 9.
Sets all switches to default state.
Page 12
Display Panel Operation ...
Introduction
The Datataker display panel has a 2 line by
16 character back-lit liquid crystal display, 5
keys, 3 warning LEDs and a buzzer. The
display provides information about Datataker
status, channel data, alarms and memory card
operation.
You cannot program the Datataker from the
display panel, however you can issue
pre-defined commands by pressing a panel key
combination (function key).
List Key:
While the key is held down
the display is in list edit mode. In this mode you
can access all displayable items using the
Scroll keys. Items that are not normally
displayed will become visible, and will be seen
to be flashing on and off. Pressing the Light key
while the List key is held down toggles the
display / non-display (flashing) state of the
selected item.
Function Shift Key: Pressing
this key in conjunction with one of the other
keys (F1 to F4) executes a user defined
command sequence. When pressed, the
display shows the four function key labels:
LED On
LEDOff
These are the default assignments. When a
function key is pressed, the display identifies
the key and its label:
Function 2
ÐÐ> LEDOff <ÐÐ
Pressing List and Function Shift keys together
will reinitialize the display controller if affected
by noise or otherwise corrupted. Setting
6WARN to any value has the same effect.
Function Keys
Assign function keys by the command:
Kn =" label ",[ command sequence]
where n is the function key number, label is the
text (up to six characters) that appears on the
display and command sequence is any set of
space separated commands. For example:
K2="Scan 1",[ /r/s RA10S 1..5TT]
places the /r/s RA10S 1..5TT program on
function key F2. Each command sequence
may be up to 255 characters, and must be
entered in a single line.
The default function key assignments are:
K1="LED On", [1..3WARN=1]
K2="LEDOff", [1..3WARN=0]
K3="", [ ]
K4="", [ ]
The function keys can be very useful. For
example, they can be used to completely
reprogram the Datataker. A different program
could be assigned to each key. They can be
assigned by ALARMS. Remember however
that stored data must be cleared before a new
program can be loaded.
Light Key:
Toggles the back-light on
and off. Setting 6WARN=1 turns the back-light
on and 5WARN=1 flashes it. When the
Datataker sleeps the back-light is switched off.
In conjunction with List key, the Light key
enables or disables items for display. Disabled
screens are flashed while the List key is
pressed, but are not visible when the key is
released.
K3
Logging to
Internal Memory
K1
K2
K4
1
F
2
3
Datataker
Label Area:
You can label the
warning LEDs with a felt tipped pen.
Status Screens
There are 8 status screens (see Scrolling
through the Status Screens) which display
system information. By default all screens are
available for display and enabled. They can be
disabled using the List and Light keys.
Status screens can be made unavailable for
display by P19. Each bit in this parameter value
represents a status screen. A "1" enables and
"0" disables. The bit mapping is:
msb
P19 bit map
7 6 5 4 3 2 1 0
Sign on (128)
Time & Date (64)
Schedules Active (32)
Schedules Halted (16)
lsb
Bat. (1)
Card (2)
Memory (4)
Logging (8)
To make screens available set P19 to the
sum of the numbers following the required
screens, e.g. for Battery Condition and Logging
Status screens only set P19=9 (i.e. 1 + 8). By
default P19=255 and all screens are available.
If P19=0 and there are no channels or alarms
to display then the Sign On Screen is
displayed.
Any status screens disabled by this method
are not available for display by the List key.
Power Consumption
The Datataker Display Panel draws less
than 3mA while the back-light is off. However
with the back-light switched on the current draw
increases to approximately 80mA. This is very
significant and represents a 70% increase in
the logger's normal power consumption. The
result can be that battery life is reduced when
the back-light is left on.
However if the power mode is left at the
default (see "Setting the Power Mode" on
page 15) the display power consumption should
not be an issue.
Scroll Keys: Allow scrolling through
Controlling The Screens
the displayable screens. Holding a scroll key
down for more than three seconds starts
auto-scrolling in that direction. The scroll speed
is set by P18 in seconds. By default P18=2
seconds. Pressing either scroll key stops the
auto-scroll.
On first power-up or after a RESET, the
display shows the Sign On Screen. There are two
levels of display control:
Warning LEDs & Buzzer:
Three LEDs may be illuminated under program
control, for example:
First level – the programmer uses:
W (intermediate working channel) option
P19 (status screen enable)
ND (no display) channel option.
These controls determine if a channel is available
for display. By default data channels and alarms
are available. The screen is then displayed only if
enabled at the second level.
Second level – the operator using the keys:
List (hold down for edit list mode)
Scroll (select screen)
Light (enable – disable display item)
This process enables or disables available
screens for display. By default, status and channel
data screens are displayed. Alarm screens must
be manually enabled for display, or by setting /A.
1..2WARN=1 3WARN=0
switches LEDs 1 and 2 ON and LED 3 OFF.
The buzzer is controlled by 4WARN and the
display back-light by 5WARN. These both
pulse about twice per second when ON.
6WARN controls the display back-light but
without flashing.
0
Displaying Channels
1
When you display channel data, the top line
of the display shows the channel identification.
The default is the channel number and type. If
a channel identification text has been entered
as a channel option, then the first 16 characters
of that text is displayed.
The bottom line on the display shows the
most recent reading as a numeric value or bar
graph. See examples to the right.
If the channel has not been sampled, the
display shows " – – – ". Normally displayed
channels are only up-dated at report time. The
/X switch allows the progressive display of
statistical channels at the statistical scan time.
By default all scheduled channels are
available for display and are displayed. To stop
display of a channel, include the ND option in
the channel's option list. For example:
Scrolling above the top status screen moves to the last alarm screen or the last
data channel screen if no alarms.
Battery:
90% ↓.
-123mA 6.8V 26¡C
Card Memory Used
45234 =
54%
2
Int. Memory Used
10456 =
73%
Approximate percent charge, charging ↑
or discharging ↓, battery current, battery voltage, battery temperature.
Battery Condition.
or
Memory Card Data The number of
Card Not Present
data points logged, and the percentage of
memory card used, if present.
Memory Data
points logged and percentage of internal memory
used. If logging to a card, internal memory is used when the card is
full if in stop when full mode (/o).
3
Logging is OFF
Status
Screens
or
Logging to
Memory Card
or
ÊLogging to
Internal Memory
Logging
Condition
and destination
4
Schedules Halted
C D X
Schedules Halted and defined.
Schedules Active
A B Z
Schedules Active and defined (i.e. not halted).
5
6
Time
Date
12:53:12
21/02/91
Time and date in the formats specified by
P39 and P31.
1V(ND)
7
won't display data in normal or list edit modes.
You can declare channels as intermediate
working channels with the W option. This
makes those channels unavailable for display,
logging or returning to the host computer while
the /W/w switch is set to the default /w. Setting
the switch to /W allows normal display and
returning to host, but not logging.
Displaying Alarms
When you display alarms, the top line of the
display identifies the alarm and the state of the
alarm – ON or OFF. If the alarm channel
definition includes identification text, then this is
displayed when the alarm is not true. If the
alarm contains action text, this is displayed
when the alarm is true.
The bottom line of the display shows the
most recent reading as a numeric value or bar
graph. See the examples to the right.
Alarms are available for display by default,
but are not automatically displayed. They can
be enabled for display using the List and Light
keys. The /A switch forces display of alarms if
entered before the alarm commands. The ND
channel option can be used to make alarm
channels unavailable for display.
Datataker 0
4800 50Hz V5.xx
Channel 5LM35
20.1¡C
Channel
Screens
Thermopile O/P
25.751 mV
showing address, baud rate, line
frequency and firmware version. Displayed on power-up or RESET.
Default Channel Display
format e.g. 5LM35. The value is
of the most recent scan.
Channel with Identification Text as a channel option
e.g. 5V("Thermopile O/P")
Bar Graph:
Low...Fuel..High
Alarm
Screens
Sign On Screen
Alarm 35 OFF
350.47 MPa
Channel with Identification Text and bar graph
channel options e.g. 3#L(ND)(NR,NL,BG0:100,"Low...Fuel..High")
where channel 3 is a 4 to 20mA loop returning reading between 0 and
100%. Note that the Identification Text is used as a scale label, and
the NR and NL options ensure that it is used for no other purpose. This
example also shows how the multiple report facility (the two option
lists) can be used to separate report and display functions. You can
use bar graphs in alarms.
Default Alarm Display . The alarm state is indicated by ON
or OFF.
Oven OK
105.3¡C
or
Oven Temp High
120.6¡C
Alarm with Text:
Identification
Text is displayed in the OFF state, and
Action Text displayed in the ON state e.g.
Scrolling down below the last
data channel or alarm moves ALARM7(4TT("Oven OK")>107)"Oven Temp High"
to the top status screen.
Page 13
COMMS Port ... let’s talk
Introduction
Special Commands
All Datataker models have a 9 pin female (DE9)
connector for RS232 or RS423 communications to a
computer. This interface, referred to as the COMMS port,
is the means by which you program the Datataker (or a
network of Datatakers) from a host computer.
The COMMS port of all models of the Datataker is
electrically isolated. Refer to the Appendix for details of
the COMMS port of your Datataker .
The Datataker has three serial interface commands
to assist in managing communications.
COMMS Port Parameters
The COMMS port parameters are fixed except for the
baud rate as follows
Baud rate
Data bits
Parity
Stop bits
300, 1200, 2400, 4800 or 9600
8
none
fixed
1
The baud rate is set by a DIP switch which is
accessed by removing the Datataker top cover. Refer to
the Appendix for your Datataker for details of the location
of the switch, and the settings. The Datatakers are
shipped with the baud rate set to 4800 baud.
Operation
All communications with the Datataker are with the
ASCII character set. The eighth bit is normally a "0",
however an extension to the character set (for the text
strings and for special display characters) is possible if
this bit is set to a "1". For all commands other than
switches and text strings, the Datataker ignores lower
case characters.
By default most characters that are received by the
Datataker are echoed (transmitted back to the host).
This action is disabled by the echo switch /e.
The last two commands allow remote loggers to be
XOFF'ed and XON'ed without modems in the link
"consuming" the commands.
Waking From Sleep Mode
Special Characters
XOFF
XON
BS (backspace)
Password Protection
XOFF – XON
If the Datataker returns data faster than the host is
able to receive, then the host can transmit an XOFF
character. Within two character periods the Datataker will
stop data transmission, giving the host time to process
its buffered data. When the host is again ready to receive
data, it should transmit the XON character allowing the
Datataker to resume transmission. A logger in XOFF
mode can also auto-XON (see P26 on page 11).
The Datataker also issues an XOFF when its input
buffer is 50%, 75% and 90% full and an XON when the
input buffer is empty.
N/C
9
N/C
8
N/C
7
N/C
6
Loading a Program
If characters are received while the Datataker is in
Sleep Mode, the Datataker wakes. Characters received
in the first 75mS are lost. Characters received between
25 and 75mS after the first character may generate
communications errors and should be avoided.
To reliably wake and communicate with a Datataker
that may be in sleep mode, send a carriage return or line
feed and wait 300mS before sending commands.
stops Datataker transmitting
allows Datataker to transmit
deletes previous character
(echoes BS space BS)
DEL (delete, Alt 127) clears command input buffer
(echoes < < CR LF)
CR (return)
terminates a command line
(echoed as CR LF)
LF (line feed)
ignored
Space and tab
command separator
# (hatch)
network address identifier
; (semicolon)
directs command to memory card
' (single quote)
comment character (up to a CR)
@
message to remote COMS port
in a network
The Datataker COMMS port connector is detailed below
^ZCMSRST will clear the input and output buffers,
and set XON.
^ZSXOFF will XOFF the Datataker
^ZQXON
will XON the Datataker
The Datataker's input buffer is 250 characters long,
and a burst of 250 characters without a pause between
characters is possible. A single command line must be
less than 250 characters. The Datataker begins to
process the input buffer when the first carriage return is
received. A full 250 characters of program takes up to
500mS to compile if the Datataker is not scanning, and
up to 5 seconds if it is running long schedules and many
alarms. Any digital assignment delay periods such as
1DSO(1000)=0 add to this time.
The host must ensure that the Datataker has
sufficient time to process a down-loaded program. This
can be achieved by using the XOFF – XON protocol, or
by time delays between transmissions.
COMMS Port Isolation
The COMMS Port
5
N/C
4
RxD
3
TxD
2
N/C
1
Interface Ground
Using Modems with Datataker
The following comments relate to the Remote Modem (at the
Datataker end). Settings for the Local Modem (at the computer
end) are not critical, and the manufacturers defaults can be used.
Enter the following commands into the Datataker using a
computer running DeTerminal or other communications program,
before connecting the Remote Modem
The configuration of communications cables for connecting the
Datatakers to various computers and modems are detailed below.
IBM and Compatibles - 25 pin
FG
TxD
1
2
RxD 3
GND 7
RTS 4
CTS
5
9
Yellow
4
8
Blue
3
7
Green
2
Shield
DCD
6
1
5
DSR 6
8
DTR 20
Computer
DB25 Female
Datataker
DE9 Male
IBM and Compatibles - 9 pin
5
The Datataker has a password protection scheme on
the COMS port. When enabled, communications through
the COMS port is only possible after the user defined
password is entered. Password protection is particularly
useful when the Datataker is connected to a modem.
This eliminates the situation where line noise may be
interpreted as commands during call establishment.
Unauthorised access also becomes more difficult. The
password is set by assignment:
PASSWORD="password text "
where the password text may be any string (except for
command keywords) up to 10 case sensitive characters.
Assigning a null string (i.e. PASSWORD="") removes a
password.
To establish communications, enter the password
followed by a carriage return at any time. This signs the
user on. The COMS port stays open until the SIGNOFF
command is issued, or while there is communications
activity. If there is no communications for a period of time
defined by P14 (in seconds), the COMS port will timeout
and is closed. The default timeout period is 300 seconds
(5 minutes).
The Datataker will respond to the DEL character with
<< CR LF regardless of the password state. This can be
used to identify a Datataker.
9
Yellow
TxD 3
Blue
RxD 2
GND 5
RTS
7
CTS
8
4
8
3
7
Green
2
Shield
DSR 6
DCD
1
DTR
4
Computer
DE9 Female
6
1
Datataker
DE9 Male
9
3
5
4
8
GND 4
Shield
Male 8 Pin
Mini DIN
It is suggested that a PASSWORD (see opposite) be used for
link security, and to protect the logger from "garbage" characters
created when the link between the modems is disconnected.
The DTR input to the Remote Modem must be asserted. This
is done in the cabling by tying DTR high, by a DIP switch setting
on some modems, or by using the AT&D0 command.
Enter the following commands into the Remote Modem with a
computer running DeTerminal or other communications program.
These commands are typical, however some modems may need
different commands for some of these settings. (The text in the
brackets are comments, and should not be entered).
AT&F
(Set factory defaults)
AT&D0 (Ignore the DTR signal )
AT$F0
(Xon/Xoff flow control - CTS/RTS cannot be used)
ATS0=2 (Auto Answer after two rings - other values are OK)
ATQ1
(Disable response codes - CONNECT , OK etc.)
ATE0
(Disable echo)
ATY1
(Enable Break disconnect)
AT&W0 (Save settings in User Profile 0 - sometimes AT&W)
It is important that the RS232 port of the Remote Modem is
locked to a baud rate. 4800 baud is recommended. Two command
possibilities are shown below. Please consult your modem manual
for the exact commands
AT&L7
(Sets modem to the Datataker default of 4800 baud)
or
ATN0
(Set baud rate to that nominated by S37)
ATS37=8 (S37 defines 4800 baud )
For a more comprehensive discussion about use of modems,
refer to the "Datataker Advanced Communications Manual".
If the Remote Modem has a "dumb" mode, use it! This mode is
manufacturer specific, and usually means that the modem is
preconfigured to a known state, and will not respond to
commands. Consult the modem's manual for details.
RxD
TxD
1
2
GND 7
2
RTS
4
CTS
5
6
1
Datataker
DE9 Male
DCD
5
9
3 Yellow
3
7
Frame
Gnd
'Datataker echoes OFF
'Datataker messages OFF
'Datataker returns OFF
Frame
Ground
5
Rx–
/e
/m
/r
Modem (DCE) Cable
Apple Macintosh
Tx–
The COMMS port of all models of the Datataker Series 2 data
loggers are electrically isolated to 500V.
8
DTR 20
4
8
Blue
3
7
Green
2
Shield
Modem
(DCE)
DB25 Male
6
1
Datataker
DE9 Male
Page 14
Networking ... distributed processing
Introduction
Datataker models with an RS485 network port can be
connected in a local area network (LAN) with up to to 32
Datatakers. A total of 1000 meters of cable is allowed in the
network.
The proprietary network protocol has error detection and
correction, and operates at 1200 baud over a single twisted
pair of polarised wires. Datatakers are wired in parallel so
that all "NET+" screw terminals are connected to one wire
and all "NET–" screw terminals are connected to the second
wire. Ideally, the network cable should have a shield that is
grounded at a single point.
Network - a Twisted Pair of Wires (note polarity)
+ –
Net
+ –
Net
+ –
Net
COM
COM
COM
Datatakers
+ –
Net
+ –
Net
COM
COM
"Local Logger"
RS232 or
RS423
interface
Host Computer
The host computer may be connected to any of the
Datatakers (referred to as the local logger) in the network
through its COMS port. Data is returned to the COMS port of
the local logger. P21 will allow this return address to be over
ridden - see "Parameters" on page 11.
You can connect host computers to different Datatakers
in a network. If each host is simply polling for data with
immediate schedules (see page 3), operation is predictable.
If you enter repeating schedule types ( RA, RB, RC or RD),
then the data generated by these schedules will only be
available to the host that issued them.
Addressing Datatakers
The host may issue commands to any Datataker by
placing an address prefix at the beginning of a command
line:
#n commands send commands to logger n
## commands send commands to all loggers
e.g.
#5 RA1M 3V
will command logger 5 to return to the host the voltage on
channel 3 every minute.
Take care in using the global address ## when the
command returns data, as the data from the loggers may be
mixed and not easily separated. The global address is
particularly useful for setting the time, switches and
parameters on all loggers:
## T=11:23:30
## /N/c/u/L P22=44
The address is optional for commands to the local
logger. Remote loggers must be addressed.
Identifying the Data Source /L
Data returns by to the COMS port that made the request,
unless changed by P21. To identify the data source, it is
recommended that all loggers in the network are issued with
the /L switch so that all Datataker responses have the logger
address at the beginning of each schedule's returned data.
For example, for channels 1..3TT with switches set to
/n/c/u/L and P22=32 (i.e. "space" - the default), the returned
data will have the following format:
19 25.6 45.8 32.7
Messages to COMS Ports
Real-Time Network
You can connect other devices to the remaining Datataker
COMS ports. These may be a printer, a terminal or another
computer.
Where the emphasis is on rapid response or tracking
conditions, network speed becomes vital. There are many
ways the network can be managed, however as a general
rule more speed leads to more complexity in host software.
If the /N switch is enabled (default), then the word
"Datataker" is added to the logger address and the channels
are identified:
Network - a Twisted Pair of Wires (note polarity)
Datataker 19 1TT 25.6 2TT 45.8 3TT 32.7
If the units text switch is also on /U then the returned data
will look like the following:
+ –
Net
+ –
Net
+ –
Net
COMS
COMS
COMS
Datatakers
+ –
Net
+ –
Net
COMS
COMS
Datataker 19
1TT 25.6 Deg C
2TT 45.8 Deg C
3TT 32.7 Deg C
Note that the logger address is placed at the beginning of
each schedule's scan report. Data unloaded from the data
memory is treated identically.
An alternative method to identify the Datataker from which
the data is being sent is to load the Datataker with an
identifying string (e.g. $="Logger 19"), which is then included
in a schedule. For example the program:
#19 $="Logger 19"
#19 $ 1..3TT P22=44 /n/u
will return data to the host:
Logger 19,25.6,45.8,32.7
This method allows any string of up to 80 characters to be
used as the logger identification. Special control characters
may be included to assist in identification. See "Text String"
on page 6 and "ASCII-Decimal Equivalents" on page 23.
Host Computer
Printer
Second Host
The following commands allow text to be sent to these
ports from the network host:
@ n text
@@ text
sends text to COMS port of logger n
sends text to all COMS ports
e.g.
@27 Hello there^M^J
will direct the message to the COMS port of logger 27. The
text string may be up to 250 characters long, and can include
control characters in the text as illustrated above (e.g. see
also "ASCII Characters" on page 23).
Networking and Power Down
The Datataker address is set by a DIP switch in a binary
code. The DIP switch is accessed by removing the Datataker
top cover. Refer to the Appendix for your model Datataker for
location and setting details. Datatakers are shipped with the
address set to 0.
If you give two loggers the same address, then network
errors will occur when commands are directed to them.
The Datataker models without network support also
have an address, however it only serves for Datataker
identification.
Normally when a logger is asleep, it will not wake when
network activity begins. To ensure proper operation the
loggers must be kept awake by setting P15=2. Alternatively
loggers can be programmed to be awake (by ALARMs) when
network communications are expected.
The network can be extended by modems or radio
modems that can operate at 1200 baud and can automatically
"turn-around" (change direction of data transfer). This is an
important issue with radio modems, where changing from
transmit mode to receive mode can take as long as 500mS.
The network turn-around time can be adjusted by
parameter P7 in increments of 14mS. For example setting
P7=22 would set the turn-around time to 300mS.
There is no electrical signal to indicate turn-around. The
modem must detect when the Datataker is sending network
data and rapidly switch to transmit mode. The Datataker
does not issue any message preamble. See the "Datataker
Advanced Communications Manual" for details.
Network modems must be "dumb". As the Datataker
already provides an error correcting protocol, the modem
must not overlay an additional protocol layer. This applies
particularly to radio modems where it is common to find error
correction built-in.
poll (assume /n/u)
receive
poll
receive
#21 2V
156.54
#29 5TT
105.1
The polling speed can be as low as one channel every two
seconds.
Setting the Address
Network and Modems
1. Poll channels one at a time. This method is simple but
slow. Any polling over a network can take up to two seconds
before a reply is received. As only one operation is
undertaken at a time, there can be no confusion about the
source of the data. For example:
Programming a Network
The main difference between operating a single logger
and a network of loggers is that the task of managing the
returned data and alarms becomes more complex. The best
method for managing the network will depend on the goals:
• data logging
• monitoring for alarm conditions
• rapid real-time response
• simplicity of programming
• telemetry or modem connection
Don't underestimate the complexity of managing a large
volume of data. Unloading a Datataker with a large memory
card over a network link can take over an hour.
There are two distinct class of networks: part-time and
real-time networks.
Part-Time Network
If the main task is data logging, then communications
between the network and the host computer can be
infrequent (hours, days or weeks) and so you can program
and unload each logger in the network individually. This is the
same as using a single logger, except that you must address
each logger.
2. Poll by alarms one at a time using the ?n command
(see "Polling Alarm Data" on page 9). This is similar to
method 1, but is slightly faster as it returns the last reading of
the alarm channel rather than initiating a new scan.
3. Poll channel groups using the RX schedule (see
"Polled Schedule" on page 3). For example:
program logger 21
logger 29
poll logger 21
receive
poll logger 29
receive
#21 RX 2V 3..4TT(FF1) /u/n
#29 RX 1..4DS /u/n
#21 X
156.54 23.5 28.9
#29 X
0 1 1 0
This method retains most of the simplicity of method 1, but is
faster - up to 20 channels every two seconds.
4. Poll all alarms on a logger by the ?ALL command
(see "Polling Alarm Data" on page 9). This is similar to the
previous method but is faster at 30 channels every two
seconds.
5. By frequent Unloads (see "Data Logging and Retrieval"
on page 8). This method uses the Datataker's store as an
expanded output buffer, that is cleared after each unload by
the CLAST command. For example
program all loggers
program logger 21
logger 29
unload logger 21
receive
receive
##
#21
#29
#21
/u/n P25=36
RA10S 2V 3..4TT LOGON
RA10S 3TT 1..4DS LOGON
U
1 56.54 23.5 28.9
1 57.33 23.3 29.7
clear data
unload logger 29
receive
receive
#21 CLAST
#29 U
clear data
#29 CLAST
$
105.6 0 1 1 0
104.4 0 0 1 0
$
The unload steps are repeated for the duration of the
monitoring task. This method ensures regular sampling by
normal schedules.
6. By synchronous returns from all loggers that have been
programmed by standard schedules (RA, RB, RC and RD see page 3). This is the most flexible method, as it allows
each logger full control of the schedule scanning. However in
order to work, it requires that the host software use more
complicated data routing and time stamping techniques.
7. The use of the fixed format mode /H is recommended
for real-time networks. (See "Fixed Format Mode" and the
"Datataker Advanced Communications Manual").
Page 15
... take care
Battery Life
AC/DC
Power
6.9V
Protection
Circuit
0.22Ω
Bat +
Gnd
Bat. –
Powering the Multiplexer
Gnd.
Caution: If a DC supply is grounded, it MUST be a negative
ground. An AC supply MUST NOT be grounded.
If an external battery is connected to a Datataker 500,
600, 505, 605, 515 or 615 data logger which has an internal
6V gel cell battery, then the external battery must also be a
6V gel cell battery, and MUST be connected with the correct
polarity, or damage WILL occur.
Low Power Operation
The Datataker uses little power, and a set of six alkaline
D cells can power the logger for over one year. However
precautions must be taken to avoid excessive current draw.
The Datataker has two states - wake and sleep. While in
the wake state the logger is fully active and draws up to
500mA, but typically 120mA. In the sleep state only the
counters ( nHSC), clock and the wake circuit remain active,
and current draw is reduced to less than 0.4mA.
The Datataker will wake when:
• any scheduled scan becomes due
• a memory card is inserted
• characters are received at the COMMS port
• the wake terminal is grounded
• a key is pressed on display versions
The Datataker will sleep unless the program inhibits
sleeping by setting P15=2, or by rapid scanning. Make sure
that input channels (for alarms or data logging) are not being
sampled more frequently than is necessary.
Setting the Power Mode
P15 is used to set the power mode, as follows:
P15
0
1
2
RZ - alarms (1)
X - polled (2)
RS - statistical (4)
RA - schedule (8)
Lead +
Alkaline +
Bat –
lsb
The default is P20=0, which means that all schedules
can wake the logger when they become due. If for example,
P20=65 (i.e. 64 + 1), then the RD and alarm RZ schedules
will not wake the Datataker. P20 does not disable schedules
if the Datataker is already awake.
1000µF
External Battery
Connections
P20 bit map
7 6 5 4 3 2 1 0
Immediate (128)
RD - schedule (64)
RC - schedule (32)
RB - schedule (16)
6.9V Switch Mode
Regulator
(–9.2mV/°C)
~
~
msb
Sleep entry condition
Sleep only if battery powered (default)
Sleep if not busy
Disable Sleep mode
When logger is awake, and P15=0, the battery current is
measured every second. If less than 20mA is drawn from the
battery (because the battery is being charged from an
external supply), then sleep mode is not entered. P15=1
allows sleep mode without testing battery current.
Power consumption can be minimised by powering down
the input multiplexers of some models of Datataker while the
logger is in the sleep state. The factory preset for these
models is to power down the multiplexers in the sleep state.
The current saving is approximately 150µA. Refer to the
Appendix for your Datataker for precise details.
The disadvantage of powering down the multiplexer is
that it may cause problems with some sensors. For inputs
over about 0.5 volts, the input impedance drops from tens of
megohms to hundreds of ohms. This may cause draw of
current from sensors, and possibly inject some of this
current into other sensors.
Datatakers with relay multiplexers do not require these
considerations, since the relays are open circuit when off.
The Wake Terminal
A low state (less than 0.7 volts) on the Wake Terminal
will wake the logger within 300mS. The signal can be
generated by a relay closure, or an open collector NPN
transistor to ground. The Wake signal line has an internal
1800Ω pull-up resistor to +5 Volts and requires a signal level
of less than 0.7 Volts.
A permanent low state on the wake terminal will not
prevent short periods (~100mS) of sleep if there is no
scheduled activity! Only P15=2 keeps the Datataker
permanently awake.
A Low Power Program!
You may find this framework useful when designing low
power programs. After RESETing the Datataker, enter the
following program:
P15=1
'sleep if not busy
P17=5
'go to sleep quickly
/u/n
'disable channel ID and units
S1=0,100,0,1"%RH"
'define spans, etc. here
BEGIN
RS15M
'scan as infrequently as possible,
RA1H
'especially for statistical schedules
1V("Humidity",S1,AV)
'define channels
2PT385("Air temp.",4W,AV,=1CV)
RZ1H
'set alarm rate if using alarms
IF(1CV>25)"[LOGON]"
IF(1CV<20)"[LOGOFF]"
END
The COMS port activity could be reduced to save power
by setting the /r switch, but this can cause confusion!
all channels are scanned at the same rate
alarms are scanned at same rate as channels
default switch and parameter settings
sensor current draw is less than 5mA and is switched
80% of battery energy is available
battery shelf life is long
baud rate is 1200
If your operation arrangements vary greatly from these
assumptions, then refer to "Some Details" (below) to calculate
average current draw and battery life.
A precise calculation is very involved, but the chart
below gives a conservative estimation of battery life for
different operational conditions.
Battery Life for DT50 and DT500/600 models by
Number of Channels Scanned at Regular Intervals
10000
10K
1 year
1 month
1 week
100K
year
10K
10 channels
1000
17
Refer to the Appendix for details of your Datataker. The
following diagram shows a simplified power circuit:
•
•
•
•
•
•
•
scan interval (including alarm and statistical scans)
number of analog channels
number of digital channels
number of alarms
sensor excitation power draw
complexity of any calculations
baud rate
20 channels
(example)
10K
month
10 channel line
(example)
220hrs
1K
week
100
10
10year
year
1K
1 channel
1 day
(a A
lk h
al r
in
e)
~AC/DC and ~AC/DC
~AC/DC and GND
+ Bat and –Bat
•
•
•
•
•
•
•
A
hr
9 – 18Vac
11 – 28Vdc
6 – 9 Vdc
Connection Terminals
4.
0
AC
DC
Battery
Typical Range
The chart makes certain assumptions:
The battery life that can be achieved by the Datataker
depends on:
30 second interval
(example)
Source
P17 sets the delay period in seconds that the Datataker
remains awake after a COMS, network, keypad or wake
terminal activity ceases. The default is 30 seconds.
P20 prevents nominated schedules from waking a
sleeping logger. This is done using a disabling bit mask:
Battery Life per Amp-Hour in Hours
The Datataker data loggers can be powered from:
A
hr
Powering the Datataker
1.
2
Power and Battery Connection
year
month
100
30 channels
1K
week
day
100
month
week
10
day
100
10
day
1
1 minute
1
10
1 hour
100
1000
1 day
10000
100000
Scan Interval In Seconds
(log scale)
Using the Battery Life Chart
Establish the scan interval and locate it on the Scan
Interval axis. The chart shows an example of 30 seconds.
Project a vertical line to the curves. The curves
correspond to different numbers of channels. Interpolate if
necessary. The channels are assumed to be analog. For this
estimation a digital channel is equivalent to one quarter of an
analog channel.
Project a horizontal line from the curve intersect to the
right, across the three scales that correspond to standard
Datataker battery sizes. From the appropriate scale read the
battery life. For the example on the chart, the battery lives
are 300, 800 and 4000 hours for 1.2, 4 and 17 Ah batteries.
If you use a non-standard battery, then look at the chart
axis on the left. The battery life is equal to the scale value
(220 hrs. for the example) multiplied by the battery's
amp-hour rating.
Some Details
The Datataker takes approximately 300mS to wake up,
40mS for each analog channel, 10mS for each digital
channel, and 10 to 50mS for each calculation. Also the
Datataker must wake at least once every 18 minutes for time
keeping, and will not sleep unless it can sleep for at least
1
Battery Life in
Hours for Three
Battery Sizes
one full second. Current draw is 120mA while awake
and 0.4mA while asleep.
Solar Charging
Sealed gel cell batteries may be charged via a 12V solar
panel. The Datataker provides current and voltage limiting to
protect both the panel and battery, provided that the panel is
connected to the AC/DC Power input. Do not attempt to
charge alkaline battery packs.
The size of the solar panel required depends on the
hours of full sunlight that can be expected. As a general rule
only one day in seven should be regarded as a "charge day",
and the charge must be able to fully replenish the batteries
on that day. The solar panel rating is calculated as follows:
Iw
Panel Rating = –––––––
Amps (in full sunlight)
Tw x η
where
I w is the amp-hours per week consumed by the logger
Tw is the hours per week of full sunlight
η is the efficiency - a combination of battery charge
absorption and the cosine effect. Typical 0.65.
Setting P15=1 ensures that the Datataker sleeps whenever
possible to conserve power.
Page 16
Sensors 1 ... understanding helps
Thermocouples
The Datataker supports all of the commonly
recognised thermocouple types:
Type
Positive
Negative
Range °C
Measurement
Junction
Reference Junction
(Isothermal block)
metal 1
copper
metal 2
To
microvolt
copper meter
Temperature
Prime
Sensor
temperature
gradient
Ref. Junction
Temperature
A small voltage is produced when the two
junctions are at different temperatures. This voltage
is produced by the temperature gradient along the
wires and not by the junctions.
It is important that the purity of the thermocouple
wire be maintained where significant temperature
gradients occur. Because high purity wire can be
expensive it is common practice to use thermocouple
extension wire to cover long distances where
temperatures are within the normal environmental
range. Such wire can be used for measurement
junctions, but only over a restricted temperature
range of typically -20°C to 120°C.
Making the Measurement Junction
The measurement junction can be made by
welding, brazing, soldering or crimping the two wires
together. Take care to ensure that the wire material
is not contaminated where the temperature gradient
is to occur.
The junction can be insulated or left bare for a
more rapid response. If left bare, ensure that the
junction does not make intermittent contact with
metal objects. This can introduce electrical noise
(see "Grounded Thermocouples" below).
Reference Junction Compensation
Conventionally the reference junction is held at
0°C, and thermocouple responses are determined
with a 0°C reference. This is inconvenient in most
situations, and so in practice the reference junction is
allowed to follow to ambient temperature. However
this non-zero reference junction temperature must be
compensated for by measuring the reference
temperature with a different type of temperature
sensor.
This correction can be made in hardware or, as
with the Datataker, in software. The software
approach allows support for any thermocouple type
without hardware dependence.
Isothermal Block
Generally the reference junctions are held at the
same temperature by a physical arrangement that
ensures good thermal conductivity between the
junctions. This structure is called an "isothermal
block". It is advisable to insulate the isothermal block
from rapid ambient temperature changes.
B
Pt, 30%Rh
Pt, 6%Rh
C
W, 5%Re
W, 26%Re
D
W, 3%Re
W, 25%Re
E
Ni, 10%Cr
Cu, 45%Ni
G
W
W, 26%Re
J
Fe
Cu, 45%Ni
K
Ni, 10%Cr
Ni, 2%Mn, 2%Al
N Ni,14%Cr,1%Si Ni,4%Si,0.1%Mg
R
Pt, 13%Rh
Pt
S
Pt, 10%Rh
Pt
T
Cu
Cu, 45%Ni
+300 to 1700
0 to 2320
0 to 2320
-200 to 900
0 to 2320
-200 to 750
-200 to 1250
-200 to 1350
0 to 1450
0 to 1450
-200 to 350
Each type has characteristics (sensitivity,
stability, temperature range, robustness and cost)
that make it appropriate for particular applications.
Thermocouples on the Datataker
Thermocouples are wired to the Datataker as
for any voltage signal. The channel type is a Tt
where t is the thermocouple type (TB,TC...TT).
Using the thermocouple channel type reads the
channel as a voltage and automatically applies cold
junction compensation and linearisation.
Reference Junction Support
The Datataker by default uses the internal
temperature sensor (channel 1%LM35 on the
Datataker and n:1%LM35 on Expansion Modules)
as the reference junction sensor. The internal sensor
has an accuracy of ±0.5°C, and may be trimmed by
P2 (in units of 0.001°C).
However you can also use any channel as the
reference junction temperature sensor channel. This
is done by including the TR option in the channel's
option list. The channel must return its value in the
current temperature units. The following are valid:
4LM35(TR)
3V(Y1,TR)
11SV(TR)
an external LM35 as a reference
polynomial Y1 would convert to temp.
use when thermocouple is externally
compensated (Note 11SV=0.00).
A second compensation facility lets you correct
for voltage offset errors that may occur on all
channels of an external isothermal block. This is the
TZ channel option. The channel must return its value
in the units of mV. e.g. 1V(TZ).
This arrangement of reference channels provides
the flexibility to use multiple external isothermal
blocks. Each isothermal block can have its own set
of reference channels.
The reference temperature and reference zero
channel readings remain current until the reference
channels are scanned again. They should be placed
in the same schedule before the thermocouple
channels to which they apply, as in the following
example:
RB15M 1PT395(TR) 2V(TZ) 3..5TT
which assumes an external isothermal block with its
temperature measured on channel 1, and electrical
zero on channel 2.
Grounded Thermocouples
Frequently, thermocouple measurement junctions
are electrically connected (by welding, brazing,
soldering or by contact) to the object being
measured. This is only possible if the object is
grounded to the Datataker's ground, however this
may introduce a troublesome ground loop that can
allow significant series mode noise to affect readings.
This effect can be minimised by using differential
connection (eg. 1TK) or single ended connection with
the S.E.Ref. terminal connected to the grounded
object (eg. 1TK(X) ).
A ground loop via the COMS port and host
computer is the most common cause. This can be
prevented by isolating the interface (see "COMS
Port" on page 13). Ideally all grounds should be
connected to a single common point.
Accuracy
The accuracy of temperature measurement with
thermocouples is dependent on the:
•
•
•
•
•
•
•
reference junction isothermal characteristics
reference temperature sensor accuracy
induced electrical noise
quality of the thermocouple wire
drift in the wire, especially at high temperatures.
basic measurement accuracy of the Datataker
linearisation accuracy of the Datataker
The most significant source of error is the
reference junction. The Datataker must not be
exposed to differential heating as a single reference
temperature sensor is used to measure the
temperature of the screw terminals of all channels.
Should a temperature gradient occur along the
terminal strip, then errors of the magnitude of the
temperature difference will occur.
The Datataker's basic measurement accuracy
can be a source of error. The zero error is ±4µV for
inputs up to 30mV (±40µV for inputs up to 300mV),
while the scale factor error is ±0.1%. For a T type
thermocouple at 100°C this can result in an error of
±0.2°C, climbing to ±0.5°C at 400°C. Note also that
the error is dependent on thermocouple sensitivity.
For example the K type thermocouple at 1200°C the
error can be as high as 2.1°C.
The Datataker's linearisation errors are much
lower than other error sources.
These errors are additive and are generally
contained within the error bounds as shown in the
following diagram (the reference junction error is
assumed to have been trimmed out):
r
2.0
rro t)
r e d ou
o
t
amplifier
fac me
1.5 gain change
ale trim
sc be
n
(ca
zero error
1.0
it
rror lim
ation e
linearis
0.5
-200
0
500
1000
Temperature °C
1500
YS01 100 44001A, 44101A
YS02 300 44002A,44102A
YS03 1000 44003A,44101A
44035
YS04 2252 44004, 44104
44033
45004, 46004
46033, 46043
44901
44902
YS05 3000 44005, 44105
44030
45005, 46005
46030, 46040
44903
44904
YS07 5000 44007, 44107
44034
45007, 46007
46034, 46044
44905
44906
YS17 6000 44017
45017
46017
46037, 46047
YS16 10K 44016
44036
46036
YS06 10K 44006, 44106
44031
45006
46006
46031, 46041
44907
44908
M
ax
.T
M em
in
p
(w . Te °C
ith m
ou p °
tR C
p)
A thermocouple is two wires of dissimilar metals
that are electrically connected at one end (the
measurement junction) and thermally connected at
the other end (the reference junction).
Error °C
Thermocouple Types
C
ha
Ty nn
pe el
R
Ω
at
YS 25
°C
I
Se
ns
or
Thermistors
Introduction
Introduction
100
100
100
100
150
75
200
200
90
70
150
75
200
200
90
70
150
75
250
250
90
70
150
250
200
200
150
75
200
150
75
250
200
200
90
70
-65
-45
-20
-20
1
1
1
1
1
1
7
7
7
7
7
7
18
18
18
18
18
18
22
22
22
22
34
34
34
35
35
35
35
35
35
35
Thermistors are semiconductor
devices that change their electrical
resistance with temperature. Thermistors measure temperatures from
–80°C up to 250°C. They are
sensitive but highly nonlinear. Datatakers support all two wire YSI*
thermistors. The response is:
1
T = –––––––––––––––––––––
a + b.Ln(R) + c.Ln(R)3
The constant terms are those
recommended by YSI*.
As the Datataker is unable to
measure resistances over about 7KΩ,
a resistor should be connected in
parallel when a thermistor is expected
to exceed 7KΩ:
Thermistor
Rp
Parallel
Resistor
and
7000 x R max
R p = ––––––––––––
Ohms
Rmax – 7000
where Rmax is the maximum value of
the thermistor's resistance at the
lowest expected temperature. The
value of Rp is placed in the channel
option list e.g.
5YS07(10000)
The resistor quality should be 1% and
50 ppm/°C or better.
* YSI Incorporated
Yellow Springs, Ohio 45387 USA
Fax 513 767-9353
RTDs
The Alpha is defined by:
Introduction
Resistance Temperature Detectors
or RTDs are sensors generally made
from a pure (or lightly doped) metal
whose electrical resistance increases
with temperature. Provided that the
element is not mechanically stressed,
and is not contaminated by impurities,
the devices are stable, reliable and
accurate.
Datatakers support four RTD types
PT385, PT392, NI and CU:
Metal
Alpha
Standard
Platinum
Platinum
Nickel
Copper
α = 0.003850
α = 0.003916
α = 0.005001
α = 0.00390
(DIN43760)
(JIS C1604)
R100 – R 0
α = ––––––––––
Ω/Ω/°C
100 x R0
where R 0 and R100 are the resistances
at 0° and 100°C.
The three RTD channel types are
connected as for a resistance. The 0°C
resistance is assumed to be 100Ω for
platinum, and 1000Ω for nickel types.
Other values can be specified as a
channel option. The default connection
is for a 3 wire measurement, but 4 wire
can be specified as a channel option
for greater accuracy. For example:
PT385(4W,50.0)
will read a 4 wire 50Ω (at 0°C) device.
Page 17
Sensors 2 ... understanding helps
Hints for Successful Measurement
Ground Loops
Ground loops are a common cause of many
measurement problems, including noise, offsets and
erratic behaviour. Ground loops occur when a circular
conduction path is established between grounds in a
system. The use of differential inputs instead of single
ended inputs overcomes most ground loop problems.
Fundamental to the condition is the incorrect
assumption that there is a single ground potential in a
measurement system. In practice, two grounds in a
system are rarely at the same potential. The result is
that ground currents are very common, and if allowed to
flow through the sensor wiring then measurement errors
are inevitable.
The communications cable often creates a ground
loop. If disconnecting the COMS cable has an effect on
logged data, this suggests a poor wiring arrangement.
Isolating the COMS port normally solves the problem
(see "COMS Port Isolation" on page 13).
Noise Pick-up
There are two main ways in which noise can be
introduced into signal wiring: by capacitive coupling and
by magnetic induction. There are different counter
measures for each.
Shielding signal wiring will minimise capacitive noise
pick-up. Signal wiring that is close to line voltage cable
should always be shielded (see "Config 1" on page 19).
Magnetic induction of noise from current carrying
cables or from electrical machines (especially motors
and transformers) is a greater problem. Shielded cable
Bridges
Self Heating of Sensors
Sensors that need excitation power to be read are
heated by power dissipation. This can be particularly
acute with temperature sensors and some sensitive
bridges. Minimise error by minimising the excitation
power, exciting only when needed (by using the excite
terminal), or by calibrating out steady state errors.
Accuracy
The basic accuracy of the Datataker is 0.1% of
reading (not full scale) plus a small offset error (4µV,
40µV and 400µV) for each voltage measurement range
at 25°C. The temperature coefficient for the scale factor
is 20ppm/°C max. Any one of the three basic ranges
may be trimmed to 0.003% by trim-pot or P1. The
Datataker self calibrates its measurement circuits
whenever its input voltage offset drifts by more than a
value set by P0 in microvolts (defaults to 4µV).
The calibration procedure employs two standards - a
2.500V (20ppm/°C) voltage reference and a 100.0Ω
(10ppm/°C) reference resistor. You can trim these with
P1 and P3 (see "Parameters" on page 11).
Introduction
Integrated Circuit (IC) temperature sensors are devices
that are constructed on small silicon chips. These are linear,
sensitive and available in both voltage and current output
configurations. They share the thermistor's disadvantage of
limited temperature range (generally –40°C to +150°C) and
self-heating from power dissipation caused by the excitation
current needed to read the sensor.
Datataker supports the four most commonly available
IC sensor types:
Sensor
Output
Channel Type Wiring Config.
AD590*
& AD592*
LM34**
LM35**
LM335**
1µA/°K
nAD590
18, (7, 8)
10mV/°F
10mV/°C
10mV/°K
n LM34
n LM35
nLM335
20, 21, (1, 2, 3)
20, 21, (1, 2, 3)
19, (4, 5, 6)
Sensor
Slope Pivot Tp
Channel Factor
Formula
AD590
LM335
LM34
LM35
0°K (-273.15°C)
0°K (-273.15°C)
0°F (-17.78°C)
0°C
Series resistor R (Ω)
Attenuation factor A
Calibration factor
Calibration factor
=RxC
=AxC
= C
= C
The calibration factor is calculated from the pivot
temperature T p, the temperature error ∆T and the
temperature T of the calibration.
∆T
C = 1 – –––––
T – Tp
All temperatures must be of the same units.
Calibration
IC temperature sensors have different calibration
grades. The lowest grades typically have an error of up to
±2°C at 25°C. More expensive sensors have an error of
±0.25°C. This error is a combination of an offset (or zero)
error and a slope error.
The Datataker provides a slope (or scale) correction
capability on a per sensor basis using the channel factor.
See "Channel Types" on page 4 and "Channel Options" on
page 5). Frequently, a slope correction based on a single
point calibration point is enough for reasonable accuracy.
The pivot point for the slope correction is dependent on the
sensor type.
Example
For the AD590 sensor, the channel factor represents the
value of the series resistor used to measure the output
current (the default value is 100.0Ω). Without changing the
actual resistor, this channel factor is adjusted. If the
temperature error is determined to be 1.7°C higher than
actual at 100°C, the channel factor correction is:
∆T )
Channel factor = R x ( 1 – ––––––
T – Tp
1.7
= 100 x ( 1 – –––––––––––––
)
100 – (–273.15)
= 99.544
The correction can be applied e.g. 5AD590(99.544).
* Analog Devices
** National Semiconductor Corp.
... wiring configs 13, 14, 15, 16, 17
Introduction
Because of its sensitivity, the Wheatstone bridge circuit
is a commonly used circuit for the measurement of small
changes in electrical resistance. Applications include load
cells, pressure sensors and strain gauges.
Bridge
Excitation
Voltage
is not an effective counter-measure. The only practical
measures are to avoid magnetic fields, and to use close
twisted conductors for the signal wiring. Shielding in
steel pipe can be effective, but is generally not economic
or convenient.
The influence of noise can be minimised using the
ESn channel option (see "Extra Samples" on page 5)
and averaging (see "Statistical Channels" on page 6).
IC Temperature Sensors ... wiring configs. 18, 19, 20, 21
R1
Vex
R4
R2
Bridge
R3 Vout Output
Voltage
When one of the four resistors in a bridge is active
(sensitive to the parameter being measured) the circuit is
called a quarter bridge, and the remaining three resistors
are called bridge completion resistors. Similarly, half and full
bridges imply two and four active gauges.
The bridge is a ratiometric circuit where the output
sensitivity is proportional to the excitation voltage.
Unfortunately the excitation voltage is reduced by resistive
cable and connector voltage drops. There are two ways the
Datataker can resolve this problem.
Voltage Excitation
The Datataker can measure the excitation voltage at the
bridge and compensate numerically for the voltage loss.
This requires a six wire connection (see wiring configs. 16
and 17 on page 20) with the BGV channel type. This is
termed "voltage excitation". BGV channels expect the
bridge excitation voltage V ex to have been previously
sampled in the same schedule by a voltage channel with a
BR (bridge reference) channel option e.g. nV(BR). If this is
not done, the excitation voltage is assumed to be 5.0 volts.
The BGV channel type lets you declare an offset for
each channel, e.g. n BGV(–325) which will subtract 325 ppm
from the reading. This is useful for zeroing out initial offsets.
connection is by three wires as seen in wiring configs. 13
and 14 on page 19. One or both of the external resistors
can be active with full lead resistance compensation.
Constant Current Excitation
where the V out term is measured as a voltage while the V ex
term is measured by a reference channel for voltage
excitation but is calculated for constant current excitation.
To convert to other engineering units apply a
Polynomial, Span or use calculations (see page 7).
The alternative lead compensation method is to apply a
constant current (defaults to 2.50mA) to the bridge,
assuming the bridge resistance is known and constant, and
then calculate the excitation voltage V ex.
For full and half bridge constant current excitation use
the n BGI(Ra ) channel type where Ra is the bridge arm
resistance in ohms. If the arm resistances are not equal
then a correction must be applied.
For the full bridge, all four resistors are external to the
Datataker (see wiring config. 15 on page 19). One or more
of these resistors may be active, and the remainder are
completion resistors. Four connection wires are required so
that the 4W channel option is required. For example
n BGI(4W,120) defines a four wire constant current bridge
with an arm resistance of 120 ohms.
For the half bridge, two resistors are external and the
bridge completion is internal to the Datataker. The
Scaling
The Datataker scales all bridge channel types to a
ratiometric form with units of parts per million:
Vout . 106
Reading (B out ) = ––––––––
ppm
Vex
Strain Gauges
Strain gauges change resistance when stretched or
compressed, and are commonly wired in a bridge. The
strain to resistance relationship is:
∆L
1 ∆R
strain = –– = –– . ––
L
G R
where ∆L and L are the length change and initial length, and
∆R and R are the gauge resistance change and initial
resistance. G is the Gauge Factor, a measure of the
sensitivity of the gauge. Typical foil gauges have a Gauge
Factor of 2.0 which means that if they are stretched by 1%
their resistance will change by 2%.
To convert the Datataker's ppm bridge readings to strain
use the following formula:
2
µS = k . B out
where k = –––––
G.N
and µS is micro-strain, B out is the Datataker's bridge
channel ( BGV or BGI) result, G is the Gauge Factor and N
is the number of active gauges in the bridge.
The conversion can be done in the Datataker by
applying a polynomial (see page 7) as a channel option:
Y1=0, k"uStrain"
2V(BR)
3BGV(Y1)
'Polynomial definition
'Reference Vex channel
'Bridge channel
where k is defined above.
The following table indicates the Datataker performance
for different bridge inputs:
Arrangement
BGV full bridge
quarter bridge
BGI full Bridge
quarter bridge
BGI full Bridge
quarter bridge
Excitation
5V
5V
2.5mA
2.5mA
2.5mA
2.5mA
Gauge Resolution Range*
ohms
µS
µS
120
120
120
120
350
350
0.07
0.26
0.6
2.2
0.2
0.7
±1,500
±6,000
±12,500
±50,000
±4,300
±17,000
*Note: Exceeding the Range causes a gain change and
resolution to be reduced by factor of ten.
Page 18
Sensors 3, Other Subjects
Humidity Measurement
Relative humidity is commonly measured by wet bulb
depression. Two temperature sensors are required, one to
measure air temperature and the other the cooling effect of
a wetted surface. Usually a temperature sensor is encased
in a wick extending into a reservoir of distilled water. The
temperature difference between the two sensors is the "wet
bulb depression".
The following program will read two RTD's and compute
the relative humidity with an accuracy of a few percent for
temperature above 5°C and over most of the relative
humidity range. The algorithm assumes that the sensors are
ventilated but not aspirated.
Y1=6.1,0.44,0.014,2.71E-4,2.73E-6,2.75E-8
'SVP poly
Y2=0,100"%RH"
BEGIN
RA5S
1PT385("Dry bulb",4W,=1CV)
2PT385("Wet bulb",4W,=2CV)
3CV(Y1,W)=1CV
4CV(Y1,W)=2CV
5CV("Humidity",Y2,FF1)=(4CV-0.8*(1CV-2CV))/3CV
END
The choice of temperature sensors is critical if
reasonable accuracy is required at high relative humidity
where the wet bulb depression is small. If platinum RTD's
are used as in the above example, then they should have
good accuracy or matching (0.2°C).
Good accuracy can also be achieved by use of a
temperature difference sensor such as a thermocouple or
thermopile. Measure the dry bulb with a standard grade
temperature sensor and subtract the difference sensor
reading to obtain the wet bulb temperature.
The sensors are normally placed within a radiation
screen to prevent radiant heat affecting the readings. This is
particularly important for out door applications.
Counters
Program "Branching"
ADC Details
The Datataker uses a precision voltage controlled
oscillator as an analog to digital converter (ADC). An input
voltage is converted to a frequency and the resulting
frequency is measured digitally. This method of conversion
provides high linearity, true signal integration and excellent
50/60 Hz noise rejection.
There are three programmable parameters of the ADC:
settling period, conversion time and number of samples per
reading.
For maximum line hum rejection the conversion time
defaults to one line period, i.e. 16.67 or 20.0mS depending
on the DIP switch country setting (see the Appendix).
Reducing the value of 7SV and 8SV forces the
Datataker to sample channels more rapidly. 8SV can be
any value between 48 and 1000 hertz. The penalty for
increasing the line frequency setting is that it reduces input
resolution proportionally.
The Datataker has no formal branching or alternative
processing commands to control program flow. However
some flow control is possible using Boolean logic and/or
alarms.
Boolean expressions can be used to return a result
which is dependent on a condition being true or false as
follows:
Extra Samples
Settling Period
The number of samples per reading is controlled by the
ESn channel option, where n (0 to 15) indicates the
number of Extra Samples required. For most channels
types n defaults to 0 indicating no extra samples. The
vibrating wire channel type defaults to 9, indicating a
reading of 10 samples (1 plus 9 extra samples).
The extra samples are averaged to calculate the
reading. This process is different to the statistical averaging
function in that the additional samples are taken
immediately, before moving on to the next channel. Both
averaging methods can yield similar results - significant
improvement in resolution and noise performance.
which returns a value of 2✳1CV if 1CV is less than 1000, or
a value of 4✳1CV if 1CV is greater than or equal to 1000.
The Boolean expressions (1CV<1000) and (1CV>=1000)
will result in 1.0 if true or 0.0 if false. The BASIC language
equivalent of this expression is
The settling period (the time allowed for the input signal
to stabilise before it is measured) is set by 7SV or P10 in
units of milliseconds. This defaults to 10 milliseconds, but
can range from 0 to 30,000mS.
There are two main reasons for adjusting the settling
period. One is to speed up scanning by reducing the
settling period. The other is to allow additional time for
sensor signals to stabilise. Some sensors require this time
because of thermal or electrical effects after excitation. It is
best to change the settling period only for the sensors that
need it by framing the channels in 7SV assignments:
RA10M 1V 7SV=5000 2V 3V 7SV=10 4V
where channels 1V and 4V are sampled with the default
10mS settling period, while channels 2V and 3V with a
settling period of 5000mS or 5 seconds.
Note that during the settling period no other Datataker
activity can take place other than some communications.
Even new commands will not be processed until the
settling period and the scan are complete. For long settling
periods this can create the disturbing impression of a
"hung" Datataker.
Conversion Time
The conversion time (the time during which the
Datataker measures the input signal) can be set by 8SV or
P11 in terms of a frequency. The conversion time is one full
cycle of this frequency i.e. the conversion time = 1000/P11
milliseconds.
How Fast?
The net sampling speed of the Datataker is dependent
on the parameters discussed above, and a number of other
factors over which control is limited:
Delay
40mS
5mS
~2mS
35mS
1000mS
15mS
Cause
To remove
overhead per scan
overhead in channel selection
data return to host (per chn.)
checking input offset voltage
auto-calibration
checking battery current
fixed
fixed
/r
/k
/k or P0=1000
P15=1 or 2
For the fastest possible scanning, it is best to create a
schedule in which the channels are repeated, for example:
RA 1V 1V 1V 1V 1V 1V 1V 1V 1V 1V 1V 1V 1V 1V 1V
combined with above methods will allow up to 75Hz rates.
0 to 65535 and back
The Datataker has two types of 16 bit counters: low
speed ( nC channel type) and high speed (n HSC channel
type). Both counter types behave in a similar way.
The counters have a settable range count after which
they reset to zero. The range is set as a channel option and
has a maximum value of 65,535. For example 1C(3) sets
the range of low speed counter one to 3. On the third input
pulse the counter will be reset to zero:
Input pulse no. 0 1 2 3 4 5
Counter reading 0 1 2 0 1 2
6 7 8 9 10 11
0 1 2 0 1 2
The resetting channel option R may be used with
counters. This will cause the counter to be reset to zero
after it is read in a schedule. For example 3HSC(R) will
cause high speed counter three to be set to zero after being
read.
Counters may be assigned a value or the result of an
expression:
1C=15
2HSC(10)=1CV/100*SIN(2CV/3CV)
Such assignment (as with all assignments) may be included
in a schedule to be executed on each scan.
Low Speed Counters n C
High Speed Counter Output 1HSCO(mode )
The low speed counters are software counters that
share input terminals with the digital inputs (labelled D1, D2,
D3, etc). They increment on negative going transitions. The
digital inputs are sampled (to detect transitions) at a rate
determined by P13. The default is once every 50mS, but the
allowable range is 10mS to 100mS. If the value of P13 is set
towards the lower end of the range, the Datataker can
become slow in executing other tasks.
The shortest pulse that can be counted reliably is equal
to the P13 value in milliseconds. Shorter pulses are not
counted reliably. Being software counters, low speed
counters only operate while the Datataker is awake.
High speed counter one has an output terminal that
allows the counter to be used as a programmable prescaler
or frequency divider (mode 3), pulse generator (mode 0), or
even a crude analog output (mode 2 with low pass filter).
Note: using high speed counter output interferes with the
operation of the counter as a counter.
The high speed counter output is set up by:
High Speed Counters n HSC
The high speed counters are implemented in hardware
and will continue to function when the Datataker sleeps. The
high speed counters have dedicated input terminals
(labelled C1, C2 and C3) and increment on a positive going
transition. They can count at rates of up to about 500Hz.
The maximum count speed is limited by the 1mS debounce
circuit. The high speed counter inputs have a 100KΩ pull up
resistor to 5 volts.
1HSCO( mode )= N
where mode is the counter mode and N is the counter
range (a constant or expression). The following timing
diagram shows how the output is dependent on the mode :
Input
pulses
mode = 0
mode = 2*
mode = 3
mode = 4
1 2 3 4
5 6 7 8 9 10 11 12 13 14
N
N –1
1
N/ 2
N/ 2
N
command issued here
1
* default: 1HSCO(2)=65535
e.g. 1HSC0(mode)= N where N =4
2CV=(1CV✳2✳(1CV<1000))+(1CV ✳4✳(1CV>=1000))
IF 1CV<1000 THEN 2CV=1CV✳2 ELSE 2CV=1CV✳4
The same branch can also be effected by a pair of
alarms as follows:
IF1(1CV<1000)"[2CV=1CV ✳2]"
IF2(1CV>1000)"[2CV=1CV ✳4]"
However alarms must be used with care when
controlling branching or alternative processing:
• two alarms are required.
• the alarm schedule scan rate must be the same as any
other schedules which use the result.
• the alarms are executed after other schedules, and so
the result will not be available until the next scan of the
other schedules.
• the standard alarms (e.g. ALARM2 or IF2) execute the
action commands each time that the alarm becomes true,
and not while the alarm remains true.
• the repeat alarm (e.g. ALARMR2 or IFR2) continues to
execute the action commands while the alarm is true.
Alarms can also be used to activate scan schedules if
test conditions are true. For example the RX schedule can
be activated to log data if one of the temperatures exceeds
a threshold as follows
RX 1..2TK
RZ1M
IFR1(1TK>100.0)OR
IFR2(2TK>100.0)"[X]"
LOGON
The out of range temperatures will be logged at the alarm
scan rate (RZ1M) whenever either temperature exceeds 100
Deg.
Placing Program in EPROM
A Datataker program can be permanently loaded into
the internal EPROM. The logger will execute the program
whenever it is powered up or RESET, behaving as a
dedicated instrument.
This is a process best undertaken by a technician with the
equipment and experience in burning EPROM's. An
application note is available.
Page 19
Analog Input Configurations 1
Config 1
Config 5
Config 8a
✱
Shield
✱
V
R
R1
Examples
1V
5F
The optional Shield is necessary when the signal
source has a high output impedance or when noise
pick-up from other (especially power) cables is a
problem. A Guard (not shown) connected to the
excite (✱) terminal can help reduce the effects of
cable leakage and capacitance (see "Glossary" on
page 23).
V
R2
this line common R2
to other channels
attenuation = (R1+R2)/R2
V1
V2
V3
R
Examples
1+V
3✱AS
1-..3+TK
The excite terminal (✱ )cannot be used as a single
ended input on the DT50.
Single Ended Inputs
G
Ground
✱
V
V3
R
SE
SE Ref
The excite terminal (✱) cannot be used as a single
ended input on the DT50.
Single Ended Inputs with
External Reference
R2
✱
+
Examples
1#I
1#..10#I
5#L
I
G
Single Ended Current Input with
Internal Shunt
Config 8
I2
R2
R
✱
-
"bus bar"
Attenuated voltage inputs let you measure large
voltages, extend the common mode range and
provides greater input protection. Differential or
single ended measurement is possible.
For sensors with built-in amplification the
attenuation factor can be less than unity, or
negative for a sign reversal.
Attenuated Input
R
R
Examples
2R(4W)
3R(4W,I)
5PT392(4W)
R
Three Wire, Half and
Quarter Bridge Input
Config 14
link
✱
R
link
R
✱
Examples
1R
2R(I)
3PT385
R
Three Wire Resistance Input
Config 11
link
R
✱
R
Examples
3R
1..5R
4PT385
Examples
1BGI(120.0)
3BGI(I,350)
Rc can be a bridge completion resistor (for the
same value as the active arm) located near the
logger, or preferably an active arm of the bridge.
This configuration compensates for lead
resistance, and in the case of a half bridge,
temperature compensation. For quarter bridge 120Ω
foil strain gauge the resolution is 2µStrain. The
configuration is also useful to read the position of
the wiper of a potentiometer. The channel factor is
set to the potentiometer's resistance ( ≤ 5KΩ) eg
2BGI(I,2000).
Four Wire Resistance Input
lower link with a resistor of value equal to the total
lead resistance. This configuration is recommended
only for resistances > 500Ω
I3
Shunt
R1
R2
attenuation = (R1+R2)/R2
✱
Rc
✱
Examples
1..5BGI(350)
4BGI
2BGI(Y1)
✱
Rc
To other
bridges
R
To other channel
R terminals
The bridge completion resistor is shared between
channels. Its value is equal to the nominal value of
the "unknown" resistor. The configuration is similar
to Config 11 - no reference channel is needed.
Multiple Three Wire,
Quarter Bridge Inputs
* You can get lead compensation by replacing the
Power
Supply
Examples
1V(10)
3TJ(2)
5+V(100)
R
link *
Shunt
V
shunt
(10 to 100Ω)
Differential Current Input with
External Shunt
Ground
You can combine this arrangement with the
External Shunts arrangement to give four single
ended current channels for each full differential
channel
Shunt
✱
✱
2.500mA
active
arm
Config 10
Config 7
+
R1
Examples
2I
1..10I
5L(10)
Half Attenuated Differential Input
I1
Config 4
I
Note: Common mode voltage limits must be adhered
to for correct operation. For models with CMOS
multiplexers this is ±4 volts relative to the Datataker's
ground.
close to GND
R
atten. = (R1+R2)/R2
Attenuated voltage inputs for situations where one
signal line is always close to ground potential.
Power
Supply
Examples
1-V(X)
2+..5-F(X)
5+LM35(X)
+
–
Examples
1V(10)
5V(100)
R
✱
Config 13
Config 9
R1
–
V2
SE Ref
Power
Supply
Attenuated Input with
External Reference
Config 3
V1
SE
This configuration is useful for high voltage
differential input and situations where high accidental
voltages are likely. For maximum common mode
rejection match the attenuator pads.
Config 6
Config 2
R
R1
Differential Input
✱
Examples
1+V(11,X)
3+TJ(X,2)
5-V(X,100)
R
Examples
1*..1-I(X)
5+L(X)
6-AD590(X)
G
Ground
SE
SE Ref
To avoid cross channel coupling, connect the
bottom of the shunts with the minimum of shared
resistance to the SE ref. take-off point.
The excite terminal ( ✱ ) cannot be used as a
single ended input on the DT50.
Single Ended Current with
External Shunt
Config 15
Two Wire Resistance Input
Config 12
R1
R2
✱
Bridge
✱
n R(4W)
n -R
2.500mA
R
Examples
5R(4W)
5-R(II)
The measurement current passes through both
resistors. By definition nR(4W) and n -R will
measure R1 and R2 respectively. This configuration
does not provide lead compensation for R2.
Mixed Resistance Input
R
Examples
3BGI(4W)
4BGI(120,4W)
5V(II,Y3)
The bridge is powered by the 2.500mA constant
current source, resulting in readings independent of
lead length (resistance). This arrangement has a
sensitivity of approximately 1 ppm per active arm.
Full Bridge, Constant Current
Excitation
Analog Input Configurations 2
Config 16
Digital Configurations
Config 19
Bridge Supply
✱
LM335
Reference
channel
e.g.
3V(BR,N)
R
Bridge
✱
Measurement
channel e.g.
5BGV(N)
2BGV(108)
R
G
Config 22
Ground
The (external) bridge supply should not exceed
2.5V unless the reference channel input is
attenuated.
The difference between six and four wire
connection is the location of the reference channel
measurement point - at the bridge or at the logger.
10K
50K
adj
+
-
✱
Cal.
10K
Bottom view
link
R
3D
Examples
2LM335
2+LM335
2V(2,V)
optional potentiometer
With internal sensor power as illustrated, the
upper response is limited to approx. 70°C. External
power should be current limited.
Be aware of self heating effects - a 500µA sensor
current can cause 1.5°C error. A fourth wire to the
sensor's negative pin in place of the link will improve
accuracy. Single ended input as in Config's 2 & 3.
Rc
5V switched
SE
SE Ref
✱
R
Reference
channel
e.g.
1V(BR,2)
G
Ground
✱
Measurement
channels
e.g.
2*BGV(N,X,23)
3+BGV(N,X)
Bridges
Rc
R
Config 23
+
Power
Supply
LM34 out+
LM35
Bottom view
of TO92 case
✱
10mV/°F or
10mV/°C
link
R
Examples
5LM35
5+LM35
This configuration limits the sensor's lower range
to approx. 10°F and 10°C for the LM34 and LM35
respectively due to the lack of a pull-down capacity.
Accuracy is improved if the link is replaced by a
fourth wire to the sensor's negative pin. Without the
link the sensor is read as a single ended input as in
Config's 2 & 3. Sensor power may be externally
derived (eg 5V) to free the Excite terminal.
LM34 & LM35 Temperature Input
This is a combination of Config 1 for the reference
channel and Config 3 for measurement channels.
The half bridge completion resistors Rc are best
located near the active bridge arms, however they can
be located at the logger
Half and Quarter Bridge,
Ratiometric Input with Shared Half
Bridge Completion
LM34 out+
LM35 1N914's
✱
AD590
AD592
Examples
2#AD590
2#I(V)
1µA/°K
Bottom view of
R
metal can version
Note: Sensor power can be any 4 to 12 volt source.
The above arrangement is equivalent to Config 7.
Differential and single ended wiring (Config's 1 & 2)
with external shunts may be used.
AD590 Temperature Input
-
2K2*
✱
10K
R
This arrangement allows full range measurement.
Multiple single ended sensor connection (Config 3)
is possible by connecting the LM35 negative pins to
SE ref. The diodes can be shared. Sensor power
can also be derived from external sources.
* This
resistor may be needed to prevent sensor
oscillation with long leads. See manufacturer's data
(National Semiconductor Corp.) for more details.
LM34 & LM35 Temperature Input
Bridge - 3 wire, Half and Quarter 13, 14
Bridge - 4 wire, Full, Constant Current 15
Bridge - 6 wire, Full, Voltage Excitation 16, 17
Copper RTD 9, 10, 11, 12
Counter Input - Low Speed 22
Counter Input - High Speed 22
Current Input with External Shunt 8, 8a
Current Input with Internal Shunt 7
Current Loop 4 - 20mA , External Shunt 8, 8a
Current Loop 4 - 20mA , Internal Shunt 7
Digital
Output /
Input
Differential Voltage Input 1, 4
Digital Input 22
Digital Input on an Analog Input
Digital Output 23, 24
G
Ground
Frequency Input
1, 2, 3, 4, 5, 6, 25
Guard Screening
1
The bidirectional digital channels can sink 200mA
from up to a 30 volt supply. The solid state switch is
not protected against sustained over currents.
For inductive loads parallel reverse diodes are
recommended although not essential as the
Datataker has internal transient protection.
LED on Digital Output
LM34, LM35 20
LM335 19
25
24
Relay Connection - Externally Powered
Nickel RTD
Config 24
5V
330Ω
1
2
3
4
LED
5V switched
Digital
I/O
Example
3DSO=1
Relay and LED Connection
Internally Powered
Examples
2LM35
5V(V)
AD590, AD592 18
Attenuated Differential Voltage Input 4, 6
Attenuated Single Ended Voltage Input 5
1
2
3
4
The internal 5V switched (off in sleep mode) supply
is limited to approximately 100mA. The saturation
ON voltage drop of the switches is 1 volt so the relays
must be able to activate at 4 volts over the expected
temperature range.
Config 21
Bottom view
Config 18
Ground
Digital and Counter Input
LM335 Temperature Input
Config 20
5V
G
Examples
1..4DS
3C(R)
1PE
The digital and counter inputs both employ
10KΩ pull-up resistors to 5 volts, allowing the use of
voltage free contacts. The thresholds are <1.5V for
a "0" and >3.5V for a "1". During sleep mode the
digital inputs are inoperative, however the high
speed counters remain active.
Example above also shows wiring for the one
phase encoder up-down counter.
Six (& Four) Wire, Ratiometric
Bridge Input
Config 17
4D
Digital
inputs
Page 20
Wiring Index
✱
R
Phase (with AC Option) 2, 4
Phase Encoder 22
Platinum RTD 9, 10, 11
Potentiometer 13
Relay on Digital Output 24
Resistance Input - 2 wire 11,12
Resistance Input - 3 wire 10
Resistance Input - 4 wire 9
Single Ended Voltage Input 2, 4
Single Ended Voltage, External Ref.
3, 5
Thermistor 9, 10, 11,12
Thermocouple 1, 2, 3
Config 25
1KΩ
9, 10, 11, 12
Examples
5+AS(II)
5–AS
3AS(1500)
Externally
Internally
powered
powered
The power source must be able to provide
sufficient voltage to exceed the Analog States's
threshold which defaults to 2500mV. Ensure input
voltages do not exceed Datataker's common mode
range.
Digital Input via Analog Inputs
Vibrating Wire Sensors 1, 2
Voltage Input 1, 2, 3, 4, 5, 6
Note: the number references relate to the
wiring configuration.
Page 21
Error Messages ... help!
Introduction
E1–time set error ————————————————
Error messages can be switched off by the /m switch. The
default is for errors to be reported ( /M). During an Unload
operation (see "Data Logging and Retrieval" page 8), error
reporting is disabled until the Unload is complete. In a Network,
errors in remote Datatakers are reported back to the host
computer.
✶
✶
✶
✶
✶
✶
✶
Sy
n
O tax
pe
M rat
em io
R or n
ea y
H din
ar g
dw
ar
e
Er
ro
an r No
C d .
au
se
Sy
n
O tax
pe
M rat
em io
R or n
ea y
H din
ar g
dw
ar
e
• RS485 Network interface hardware has failed
• return logger for service
✶
✶
✶
• illegal day number entered
✶
E24–Unload command error ————————
• parameter index out of range
• parameter value out of range
✶
E45–remote logger not found or
network failure —————————————
✶
✶
E26–Halt command error ——————————
✶
E47–user string error ———————————
✶
E48–channel list fixed ——————————
E27–TEST command error ——————————
• TEST incorrectly entered
• TEST n where n is outside the range 1 to 2
✶
E11–input(s) out of range ————————
✶
• one or more analog inputs is over range
• check common mode voltage
E28–Go command error ————————————
E29–poly/span declaration error —
✶
✶
E51–ALARM command error —————————
✶
E30–calibration failure nn —————— ✶
✶
• internal error during self calibration
• nn identifies the cause of the failure
✶
• return logger for service
✶
E32–battery sample failure ——————
✶
✶
• return logger for service
• CEM or Display cable too long
• return logger for service
✶
• baud rate, parity or stop bit errors
• framing errors due to noise on COMS port
E34–function key command error ——
✶
✶
• due to use of schedule UNLOAD
E38–address error ———————————————
✶
——————————————
•No logged data to unload in specified time interval
✶
✶
✶
• syntax error
• expression too complex
✶
✶
✶
✶
✶
✶
• RAM number n has failed self test
• may cause strange behaviour and data loss
• return logger for service
✶
E61–memory card failure —————————
✶
• replace battery
• replace card (memory card is not serviceable)
•Network address out of range (0 to 31)
E40–no data found
✶
• no statistical sample taken so cannot
calculate statistical function
E60–RAM n failure ———————————————
• card may have an electrical fault
E36–CLAST not valid —————————————
✶
• total expression(s) text > 3847 characters
• reduce number of expressions
E35–Card Faulty —————————————————
✶
E53–no statistical samples ——————
E55–expression memory full ——————
✶
• bad declaration of function key
✶
• channel number too large
• output channel or system variable out of range
• counter preset to value greater than maximum
count i.e. 1C(25)=30
✶
✶
E52–alarm text memory full ——————
E54–expression error ————————————
✶
E33–CSIO bus failure ————————————
E14–communications error —————————
✶
• memory for storage of alarms text is filled
• cannot specify additional alarm strings
E31–test channel failure nn —————
• digital input – output circuit has failed
• return logger for service
✶
• alarm number out of range defined by P30
• setpoint character <, >, <> or >< missing
• AND, OR, XOR incorrectly entered
• setpoint not specified or too large
• delay incorrectly specified
• polynomial or span index out of range (1 to 20)
• individual terms not separated by a comma
• range of terms outside 1.0e–18 to 1.0e18
E13–digital failure ——————————————
✶
• channel list has been secured (fixed) by /F
• enter /f to enable changes
• Schedule ID not A, B, C, D or Z
• channel number outside the legal range
• diff. and SE channels mixed in sequence
• options invalid for channel type
• incomplete channel sequence
• invalid channel type
• single ended channels illegally specified
• polynomials or spans specified for day or time
• polynomials or spans index out of range
✶
• incorrect declaration $=“text”
• Schedule ID not A, B, C, D or Z
• CARDID, CLEAR, CLAST, CDATA, CSCANS,
CALARMS, CPROG, LOGOFF, LOGON or
RESET incorrectly entered
✶
• ROM has failed checksum test
• Datataker may behave strangely
• return logger for service
• internal acquisition and alarm table filled
• additional channels cannot be declared
✶
✶
E46–ROM checksum error ——————————
✶
E25–channel table full ——————————
• missing switch command character
• illegal switch command character
✶
• there is no logger with address specified
• logger at address specified has failed
• local logger not connected to the network
• network cable is broken or wiring error
• Schedule ID is not one of A, B, C, D or X
✶
✶
• network integrity is failing
• a logger on the network has failed
• network traffic heavy
• Schedule ID not A, B, C, D, S , X or Z
• scan time interval too large (i.e. >65535)
• scan interval type invalid (i.e. S, M, H, D)
• event or counter channels invalid
• no data in internal or card memory
✶
✶
E44–network transmission error ——
✶
• statistical option not in each multiple report
E23–scan schedule error —————————
E6–data memory empty —————————————
• thermocouple outside range
• RTD or thermistor outside linearization range
✶
E43–RS485 chip failure ——————————
E22–statistical option error ————
• internal data storage memory is full
• overwrite switch not enabled ( /O)
E16–linearization error —————————
✶
• Move card write protect switch to unprotected
• invalid characters in the command
✶
✶
✶
• no memory card inserted into card socket
• memory card not fully inserted
• memory card battery discharged
• memory card failure
• commands not separated by spaces or return
✶
✶
• attempt to store >4090 program char’s in card
E20–illegal character(s) ————————
E21–illegal separator(s) ————————
E5–data memory full ——————————————
E15–assignment error —————————————
Er
ro
an r No
C d .
au
se
E19–Card Write Protected ————————
• attempt to enter new Schedule while the
store contains data, or LOGON is enabled
E12–channel list error ———————————
E41–program area full ———————————
• STATUS incorrectly entered
• STATUS n outside the range 1 to 9
E4–clear data memory —————————————
E10–command error ————————————————
✶
E18–STATUS command error ————————
• illegal channel option used – see page 5
• mutually exclusive options used
E9–Switch error ——————————————————
Error Category
E42–no card inserted ————————————
• command too long (maximum 250 characters)
• successive commands input too quickly
E8–Parameter read/set error ——————
✶
• inserted card has data in data area
E2–input buffer full —————————————
E7–day set error —————————————————
Errors that occur as a result of reading an alarm channel
are reported in the same way as data channels, and the alarm
condition automatically becomes true.
The table below lists all of the Datataker errors, and an
explanation of their likely cause and correction.
Error Category
E17–clear card data —————————————
• must be in format defined by P39 and P40
• illegal separator or non-digits entered
E3–channel option error ——————————
Errors that are a result of reading a channel will cause a
value of 99999.9 to be returned or logged as the reading. This
value is not modifiable by format channel options. Channel
errors are normally carried through calculations and statistical
evaluations so that they also return 99999.9. The carry through
can be disabled by the / j switch (see "Switches" on page 11).
Error Category
Sy
n
O tax
pe
M rat
em io
R or n
ea y
H din
ar g
dw
ar
e
Er
ro
an r No
C d .
au
se
The Datataker returns a message when it detects an error
in a command, an error in an input channel, or an operational
difficulty. The form of the error report is controlled by the /U
switch. The default is the verbose form shown in the table
below. If the switch is set to /u the error message is reduced to
an error number (e.g. E3). (Note this Switch also reduces the
verbosity of other returned data).
Page 22
Simplified Circuit ... the guts of the Datataker
Sensor Excitation Selector. Selection is
generally automatic but can be forced by the
I, II, V or G channel options (see page 5)
3 volts
Input multiplexer
2.5mA (II)
Selector
Input channels are a
four wire connection
with five switched lines.
Each channel can be
split into 2 to 4 single
ended channels.
The maximum voltage
allowed on any terminal
is ±3.5 volts relative to
ground. Exceeding
these limits is likely to
cause measurement
errors.
5 volts
excite ✶
+ input +
250µA ( I)
1kΩ
guard (G)
return R
Input termination
resistors can be
switched in by the T
channel option or out
by the U option
1M
1M
– input –
return R
–5V
Special signal
conditioning
connector (for
Vibrating Wire
support etc)
100.0Ω
0.1%
Selector
Ground
+
R
The ground terminals should not
be used for signal referencing
except for current return paths.
Grounds can be electrically noisy
and have an offset relative to the
Return terminals.
Av=1
–
0.1%
Instrumentation Amplifier
with auto gain select (the
GL n channel option
allows manual selection 1,10 &100 – see page 5)
R
Pull-up resistor
Schmitt input buffer
with threshold approx.
2 volts
100KΩ
Precision three wire
compensation circuit for
resistance measurement and
half bridge completion for
bridge measurements
Counter 1
2.2KΩ
Pull-up resistor
Counter 2
This capacitor provides input
filtering and limits count rate to
approx. 1KHz. (If it is removed
500KHz is possible).
5V
Counter 3
82C54 style counters
100KΩ
1HSC has a square wave overflow
output that can be applied to the
input of another counter. The
1HSCO=n output channel
assignment sets the counter's
divisor to n (with n = 1 to 65,535).
15KΩ
100KΩ
30V
+5V
Zener protection
on outputs
Ground
Output driver -200mA at 30V max,
1.0V saturation
6.9V
AC/DC
1mF
0.22Ω
External Battery
Protection
Circuit
+Lead
+
Alkaline
–
Digital interface
circuit
–5V
Switched 6.9 volt line
(off in sleep mode)
+5V
Three 16 bit counters. These
are fully operational while the
logger sleeps although
rollovers are not detected.
5Vsw
5V switched for
sensor power
Programmable
Time-base &
Frequency
Counters
VFC by-pass for direct
frequency measurement
Not shown in the simplified circuit
are the calibration facilities and
hardware testing arrangements.
These compensate for all offsets,
leakages, component tolerances
and drifts due to aging and
temperature changes
0.1%
5V
High Speed Counter
Channels ~ 2V threshold
(see HSC on page 4)
Digital Input ( DS and DB)
- Output (DSO and DBO)
and (low speed) Counter
(C and UDC) Channels
~ 2V threshold for input
(see page 4)
Precision
Voltage to
Frequency
Converter
+
SE ref.
6.9V Regulator with temperature
compensation to match the
charging requirements of 6V
lead-acid gel cells.
Gnd.
Selector
+ input +
The SE Ref. terminal can be
internally routed to the negative
input of the instrumentation
amplifier by using the X
channel option for single ended
inputs. This can provide many
of the benefits of differential
input for single ended input.
+5V
Guard signal combat
the effects of cable
capacitance and
+5V
+5V
leakage on high
impedance signal
sources
Com.
excite ✶
Ground is locally
sampled
Power Supply
Internal battery
on some
models
5V (V) or custom
– input –
100.0Ω
0.1%
Two precision current
sources are available
for resistance and
bridge measurements
as well as for
powering sensors
Caution - To avoid damage use 6 Volt
lead acid battery only, ensure correct
polarity before connecting the battery
The VFC frequency is measured over
one line period (16.67 or 20mS) to
maximise "hum" and noise rejection
(see "8SV" etc. on page 6)
Network is not on all models
64180
Microprocessor
with 9MHz clock
Network
+
–
Network
RS485
interface
7
8
9
COMMS Port
Interface
6
5
COMS Port
RS232
Interface
The digital inputs are sampled
every debounce period (see
"P13" on page 11) which
defaults to 50mS. No sampling
occurs while the logger sleeps.
The (low speed) Counters are
implemented in software.
4 Rx
3 Tx
Common
Isolation
Electrical isolation to 500V
1 Interface
ground
2
COMMS
Port
Glossary
Page 23
... what it means!
PID – Proportional, Integral, Derivative. A three mode
ASCII - Decimal Equivalents
to a system ground and is essentially floating.
control algorithm commonly used in industrial control. A PID
loop with two state output can be programmed on the
Datataker using the difference, integration and calculation
facilities.
(special characters only)
Analog to Digital Converter (ADC) – a device which
V in
converts a smoothly varying signal to a quantised digital
value. Linearity, resolution, noise rejection and speed are
important characteristics.
+
–
V out
Port – a communications connector on a computer or
Ground
other device.
Auto-Ranging – the process of changing amplifier gain
The common mode range limits must considered.
automatically so that the signal is amplified as much as is
possible without exceeding output limits.
Ground Loop – more often that not, grounds in a system
Auto-Zero – a stabilisation method for removing errors
due to a drift in the input offset of a measuring system.
Bridge – providing input offset and potentially temperature
compensation, bridges are a sensitive and stable means to
measure small changes in resistances. They are particularly
useful when applied to strain gauges as found in pressure
sensors and load cells. Four elements connected in a circular
fashion.
Z1
Z2
Z4
Z3
Excitation
V out
Arms of the bridge may be "active" sensors or "passive" for
bridge "completion" and "nulling".
Common Mode Rejection Ratio (CMRR) – a
measure of the influence of common mode voltage on the
output of the instrumentation amplifier.
V cm
CMRR = 20 log (––––––––)
V out x Av
where V cm is an applied common mode voltage
Vout is the resulting output voltage
Av
is the amplifier's voltage gain
Common Mode Voltage – is the average of the
voltages between the measurement system's ground and the
two input terminals:
+
V in
(= V 2 – V1)
–
V out
V1 V2
1 + V2
V CM = V
———
Ground
2
are not at the same electrical potential. Differences may be
from microvolts to many volts. If signal wires are used to
connect grounds, then ground currents will flow and
unpredictable errors will occur. This situation is referred to as
a ground loop. See page 18.
Guard – an actively driven shield around input signal
conductors that is maintained at the common mode voltage
of the input signal. Signal guarding is used when a sensor
has a high output impedance and cable capacitance and
insulation leakage are significant. The diagram below is an
extension to Config. 1 on page 18 and shows a full guard
and shield implementation:
Guard
RAM – Random Access Memory - Memory that allows data
to be read or written at a particular location without having to
pass sequentially through preceding locations.
ROM – Read Only Memory - Memory that can be randomly
read but not written.
Settling Time – The time allowed for an input signal to
stabilise after selection and gain changing. (See P10 on
page 10 and 7SV on page 6).
Single-ended Input – the input is referenced to a
system ground or other signal common.
V in
Shield
✱
V
Examples
2V(G)
5F(G)
R
+
–
V out
Ground
In a multi-channel system only one input terminal is needed
in addition to the shared common terminal
Input Bias Current – The input terminals of the
RTD – Resistance Temperature Detector - A resistive
instrumentation amplifier require a very small current. This
current can be sourced via input termination resistors or by
the signal source. If a source for this current is not provided
then measurement errors will occur.
sensor that changes resistance with changes in temperature
- see page 15.
Resolution – is defined as the number of bits that the
an AC component superimposed on the wanted signal.
ADC uses to represent the analog signal. The greater the
resolution the smaller the changes in the input signal that
can be resolved.
LED – Light Emitting Diode.
Sample Speed – is the maximum rate at which analog to
LSB – least significant bit in a byte.
digital conversions can be done. This must include any
channels selection time, settling time (for the signal to
stabilise) and processing time (if required).
Input Noise – unwanted voltage or current generally with
Monolithic Sensors – sensors that are constructed on
The term only has meaning for differential inputs.
Data Acquisition – the process of scanning a range of
MSB – most significant bit in a byte.
analog and digital channels, converting to digital format and
forwarding to a host system.
Multiplexer – is a device used to increase the number of
constructed from dissimilar metals. See page 15.
Data Logging – is a data acquisition system with
channels by sequentially routing multiple channels to a single
signal processing system.
Transducer – a device which converts a physical
Phase Encoder – a position sensor with two digital
Datataker – the best little data-logger in the world! First
appeared in 1983 as the Datataker DT100, then the DT200 in
1987 and the current generation of DT500 , DT600 and
DT50's in 1990.
output lines with a quadrature phase relationship that provide
distance and direction information.
3D
4D
count +
+
–
–
+
The Datataker uses an up-down counter to provide the
position indication.
0
1
2
3
4
5
6
7
8
9
10
11
12
13
14
15
16
17
18
19
20
21
22
23
24
25
26
27
28
29
30
31
32
33
34
35
36
37
38
&
39
'
40
(
41
)
42
*
43
+
44
,
45
–
46
.
47
/
48
0
49
1
50
2
51
3
52
4
53
5
54
6
55
7
56
8
57
9
58
:
59
;
60
<
61
=
62
>
63
?
64
@
91
[
92
\
93
]
94
^
95
_
96
`
98
b
123 {
124 |
125 }
126 ~
127 DEL
NUL
SOH
STX
EXT
EOT
ENQ
ACK
BEL
BS
HT
LF
VT
FF
CR
SO
SI
DLE
DC1
DC2
DC3
DC4
NAK
SYN
ETB
CAN
EM
SUB
ESC
FS
GS
RS
US
null
^A
^B
^C
^D
^E
^F
^G
^H
^I
^J
^K
^L
^M
^N
^O
^P
^Q
^R
^S
^T
^U
^V
^W
^X
^Y
^Z
^[
^|
^]
^^
^_
acknowledge
bell
backspace
tab
line feed
vertical tab
form feed
carriage return
xon
xoff
not acknowledge
escape
space
!
"
#
$
%
comma
period
colon
semicolon
underline
" (alarms)
delete
Shield – a conductor surrounding input signal wires that is
a single piece of silicon using integrated circuit fabrication
techniques. Available sensors include those for measuring
temperature (see page 16), pressure, acceleration and
concentration of various compounds in gases and liquids.
on-board data storage facilities.
D
ec
im
al
A
SC
II
D
es
cr
ip
tio
n
Differential Input – the two wire input is not referenced
input into a mechanical output.
D
ec
im
al
A
SC
II
C
on
tro
D
es l
cr
ip
tio
n
Actuator – a device which converts a voltage or current
generally connected to a data logger's ground. The purpose
is to shield the input signal from capacitively coupled
electrical noise. Such a shield provides little protection from
magnetically induced noise.
Thermocouple – a temperature sensing device
parameter such as temperature into an electrical voltage or
current. It is usually a sensor with additional electronics for
signal conditioning and scaling.
Voltage to Frequency Converter – a device which
converts an analog voltage into a train of digital pulses with a
frequency proportional to the input voltage. The frequency is
then measured digitally. This method (which is used by the
Datataker) provides integration over the sampling time and
good noise rejection.
4-20mA Loop – a common measurement standard in
industry. A transmitter controls a current in the range of 4 to
20mA as a function of a measurement parameter. Any
receiver(s) or indicator(s) placed in series can output a
reading of the parameter. Prime advantage is two wire
connection and high immunity to noise pick-up. Generally
powered from a 24 volts supply.
50 / 60 Hz Rejection – The most common source of
noise is that induced by AC power cables. This noise is
periodic at the line frequency. Datatakers are able to reject
most of this type of noise by integrating the input for exactly
one line cycle period (20.0 or 16.7mS).
Page 24
Appendix — Datataker DT50
COMMS Port
• 5 differential or 10 single ended, can be used in any mix.
• Sampling rate 25 samples/sec
• Input impedance 1MΩ, or >100 MΩ selectable
• Common mode range ±3.5 VDC
• Common mode rejection >90 db (110 db typical)
• Series mode line rejection >35 db
• Sensor excitation of 4.5V, 250.0µA or 2.500mA each channel.
• Full, half and quarter bridges, voltage or current excitation.
• Multiplexer type: solid state (CMOS)
DC Voltage
DC Current
Resistance
Frequency
5 10
5 15
5
5
10
10
Resolution
Analog Input
Channels 1 to 4
0.11%
0.11%
0.11%
0.21%
0.21%
0.21%
0.20%
0.10%
0.20%
0.30%
0.05%
N/C
*+
–
*+
1
–
R
*+
–
N/C
8
N/C
7
N/C
*+
–
–
3
4
Source
AC
DC
9V Alkaline Battery
6V Gel Cell Battery
Range
SE ref
AC/DC~
Gnd
Bat. –
Bat. –
The external 6 Volt gel cell connection provides temperature
compensated charging with voltage (6.90V) and current (1A)
limiting for a three cell battery, when an external AC or DC power
supply is also connected.
When the Datataker 50 is powered by a 9V alkaline battery
and an external AC or DC source, the 6.9V regulator's (see
schematic) output is increased to 10V so that power is drawn
from the external source in preference to the battery.
N/C
Interface
Ground
6
Baud Rate s2
off
1200
off
9600
off
300
on
2400
on
4800
ON
Memory Card Socket
– see page 8
5 Analog Input
AC/DC
Power
Input
Convert
Lamp
Single Ended
Reference
Dip switch
Alkaline
9V
1
Lead Acid
6V
Display
Connector
270 mm
AC/DC
Power
Wiring Power
~
~
6.9V
~
1000µF
9–18Vac
External Battery
Connections
Protection
Circuit
0.22Ω
~
~
Gnd
External AC Power
Wiring Battery
Alkaline +
Bat. –
–
6.2–10V
Lead +
External Alkaline Battery
+
DC
Alkaline +
Gnd
Simplified Power Supply Schematic
–
Gnd.
11-24 Vdc
Alkaline +
~
~
Gnd
External DC Power
The Country Setting determines the
default integration period (16.7mS
for US and 20mS for others) for the
analog to digital converter, and the
default date format (see "Time and
Other Channels" on page 6).
Baud Rate
The Datataker 50 COMMS port
baud rate must match that of the
host computer. See "COMMS Port"
on page 13. Note that if either 300
or 9600 baud is selected, the logger
address range is reduced to 0 -7.
Multiplexer Power
Address s5
0 off
1 off
2 off
3 off
4 off
5 off
6 off
7 off
8 on
9 on
10 on
11 on
12 on
13 on
14 on
15 on
s6 s7
off off
off off
off on
off on
on off
on off
on on
on on
off off
off off
off on
off on
on off
on off
on on
on on
s8
off
on
off
on
off
on
off
on
off
on
off
on
off
on
off
on
Datataker 50 Address
The Datataker 50 can be given
an address, however it is not
particularly useful because the
logger does not support networking.
The only use for an address on
a Datataker 50 is for identification
using the STATUS or STATUS1
commands. The first line returned
by these commands includes the
address. See "STATUS" command
on pages 10 and 22.
Note: The Dip switch position
five is unavailable if 300 or 9600
baud rates are selected. This
halves the address range to 0 - 7.
+
Lead +
Bat –
s5 Add. Range
x
0 - 15
off
0-7
on
0-7
x
0 - 15
x
0 - 15
x = don't care
Country Setting
The power consumption of the
Datataker 50 can be kept to a
minimum if the input multiplexer is
powered down while the logger is in the sleep state. For
the Datataker 50 this is set using DIP switch s4.
The factory preset is for the multiplexers to power
down while the Datataker 50 asleep. The current saving
is approximately 150µA, which is the current draw of the
4 CMOS multiplexer integrated circuits (CD4052).
See "Multiplexer Powering" on page 15 for more
details on the this subject.
75 mm
Caution - To avoid damage use 6 Volt
lead acid battery only, ensure correct
polarity before connecting the battery
6.9V Switch Mode
Regulator
(–9.2mV/°C)
s3
off
on
on
off
on
Mux Power s4
permanent on
switched off
250 mm
+ Terminal – Terminal
9 – 18Vac AC/DC~
11 – 24Vdc AC/DC~
6.2 – 10Vdc Alkaline +
5.6 – 8Vdc
Lead +
TxD
2
~~
R
Range
0 or 1 State
0 to 31 State
65535 Counts
65535 Counts
The Datataker 50 can be powered from a variety of sources:
3
+5 volts switched
1
2
Height: without memory card 50mm
3 Digital I/O
with memory card 105mm
4
Weight: 1.5kg
5
Ground
1
1(out)
Power
Counters
2
AC/DC
Battery
3
Ground
G
+–+
Wake
2
R
*+
• 5 TTL/CMOS compatible digital input channels for digital state,
digital events, low speed counters (10 Hz, 16 bit, presettable).
Digital input terminals are shared with digital output channels
• 5 Digital open collector outputs rated to 200mA at 30V
• 3 high speed counters, (1KHz or 1MHz, 16 bit, presettable).
• All analog channels may also be used as digital inputs, with a
user definable threshold.
Power Supply and Battery also page 15
RxD
1
Digital Inputs and Outputs
Channels
5
1
5
3
N/C
4
R
R
110 mm
DE refers to double ended or differential channels and SE refers
to single ended channels (see Glossary on page 23). Accuracy is
expressed as percentage of reading at 25°C (see page 17).
Input Type
Digital Bit
Digital Nibble
LS counter
HS counter
5
9
RS232 COMMS
Port (Isolated)
Accuracy
at 25°C
±25 mV
1µV
±250 mV
10µV
±2500 mV
100µV
±0.25 mA
200nA
±2.5 mA
1µA
±25. mA
10µA
10 Ohms
0.5mΩ
100 Ohms
5mΩ
500 Ohms
50mΩ
7000 Ohms 500mΩ
0.1-20,000 Hz 0.01%
Country s1
US (60Hz) on
Other (50Hz) off
Shown set to the
factory setting.
1 23 45 67 8
For each analog input type, the Datataker 50 provides three
decade ranges which are selected automatically:
Input Type Channels Range Units
DE SE
Dip Switch
See text to right
Analog Inputs
RS232 COMMS
also page 13
The Datataker 50's COMMS Port is serial RS232
compatible. The output signal level is approximately
±4 Volts, allowing communications over distances in
access 100 meters at 1200 baud. Greater distances
are possible at 300 baud. The maximum practical
distance is also dependent on the host computer's
RS232 characteristics. (Note: the RS232 "standard"
specifies 2000pF maximum cable capacitance, and
no maximum distance).
The Datataker 50's COMMS Port is electrically
isolated to 500V.
ON
Each model in the Datataker data logger range has a number
of characteristics that differentiate it from the other models. This
page describes these characteristics for the Datataker 50.
1 23 45 67 8
Introduction
–
5.6–8V
+
Bat. –
Lead +
External Gel Cell Battery
Power Consumption
The Datataker 50 will consume very little power if it
is allowed to sleep. Less power is consumed if the
Datataker 50 is powered through the battery terminals,
rather than through the AC/DC terminals, because the
battery charger circuit draws additional current,
especially if it needs to charge a depleted battery.
Power Source
battery
battery
AC/DC
AC/DC
AC/DC
AC/DC
Condition
awake
sleep
awake
awake & charging
sleep
sleep & charging
Current (typical)
100mA
0.36mA
105mA
600mA
5mA
500mA
Page 25
Appendix — Datataker DT500 and DT600
RS232 COMMS Connector
N/C
For each analog input type, the Datataker 500 and Datataker
600 provides three decade ranges that are selected
automatically:
Channels
DE SE
DC Voltage
10 30
DC Current
10 40
Resistance
10 20
Frequency
10 30
Range Units
Resolution
±25 mV
1µV
±250 mV
10µV
±2500 mV
100µV
±0.25 mA
200nA
±2.5 mA
1µA
±25. mA
10µA
10 Ohms
0.5mΩ
100 Ohms
5mΩ
500 Ohms
50mΩ
7000 Ohms 500mΩ
0.1-20,000 Hz 0.01%
0.11%
0.11%
0.11%
0.21%
0.21%
0.21%
0.20%
0.10%
0.20%
0.3%
0.05%
Digital Inputs and Outputs
• 4 TTL/CMOS compatible digital input channels for digital state,
digital events, low speed counters (10 Hz, 16 bit, presettable).
Digital input terminals are shared with digital output channels
• 4 Digital open collector outputs rated to 200mA at 30V
• 3 high speed counters, (1KHz or 1MHz, 16 bit, presettable).
• All analog channels may also be used as digital inputs, with a
user definable threshold.
Channels
4
1
4
3
4
RxD
N/C
8
N/C
7
3
TxD
N/C
6
1
Accuracy
at 25°C
DE refers to double ended or differential channels and SE refers
to single ended channels (see Glossary on page 23). Accuracy is
expressed as percentage of reading at 25°C (see page 17).
Input Type
Digital Bit
Digital Nibble
LS counter
HS counter
N/C
Range
0 or 1 State
0 to 15 State
65535 Counts
65535 Counts
Network
The Datataker 500 and Datataker 600 both have an RS485
network. A proprietary network protocol supports error free
communications between up to thirty two Datataker 500 and
Datataker 600 series data loggers. See page 14 for more details.
9 – 18Vac AC/DC~
11 – 24Vdc AC/DC~
6.2 – 10Vdc Alkaline +
5.6 – 8Vdc
Lead +
+
+
1 Alkaline +
2 Bat. –
–
9V
2 Bat. –
+
3 Lead +
–
11-24Vdc
Gnd
~
9-18Vac
Gnd
Address s4 s5
0 off off
1 off off
2 off off
3 off off
4 off off
5 off off
6 off off
7 off off
8 off on
9 off on
10 off on
11 off on
12 off on
13 off on
14 off on
15 off on
16 on off
17 on off
18 on off
19 on off
20 on off
21 on off
22 on off
23 on off
24 on on
25 on on
26 on on
27 on on
28 on on
29 on on
30 on on
31 on on
s6 s7
off off
off off
off on
off on
on off
on off
on on
on on
off off
off off
off on
off on
on off
on off
on on
on on
off off
off off
off on
off on
on off
on off
on on
on on
off off
off off
off on
off on
on off
on off
on on
on on
s8
off
on
off
on
off
on
off
on
off
on
off
on
off
on
off
on
off
on
off
on
off
on
off
on
off
on
off
on
off
on
off
on
1 23 456 7 8
Dip Switch
RS232 COMMS
Port (Isolated)
Shown set to the
factory setting
~~ – +
Gnd.
The DT500 and 600 will use little power if allowed to sleep.
Less power is consumed if the logger is powered via the battery
terminals, rather than the AC/DC terminals, because the battery
charger circuit draws additional current.
Power Source
battery
battery
AC/DC
AC/DC
AC/DC
AC/DC
Bat. –
–+
Alkaline +
Power Consumption
Digital
I/O
43 21
Condition
Counters
s3
off
on
on
off
on
s4 Add. Range 110 mm
x
0 - 31
off
0 - 15
on
0 - 15
x
0 - 31
x
0 - 31
x = don't care
Country Setting
The Country Setting determines the
default integration period (16.7mS for US
and 20mS for others) for the analog to
digital converter, and the default date
format (see "Date" on page 6).
Baud Rate and Address
Dip switch position four (s4) is not
available for setting the address if 300 or
9600 baud rate is selected. This reduces
the address range to 0 – 15.
100mA
0.36mA
105mA
600mA
5mA
500mA
32 1
Analog Channels
4
3
2
1
R - + R- + R - + R - +
*
*
*
*
Country s1
US (60Hz) on
Other (50Hz) off
Baud Rate s2
off
1200
default
off
9600
off
300
on
2400
on
4800
Current (typical)
awake
sleep
awake
awake & charging
sleep
sleep & charging
Caution - To avoid damage use 6Volt
lead acid battery only, ensure correct
polarity before connecting the battery
External AC Power (6-9V Gel Cell or 9V Alkaline)
ON
Bat. –
Gnd
External Battery
External DC Power
Lead +
0.22Ω
Bat –
Bat. +
–
Protection
Circuit
Bat +
3 Lead +
+
6.9V
External Battery
Connections
Internal Alkaline Battery
~
~
~
~
1000µF
1 Alkaline +
~
~
DC
AC/DC~
Gnd
Bat. –
Bat. –
6V
–
Internal Gel Cell Battery
N/C
Interface
Ground
AC/DC
Power
–Terminal
The gel cell connection provides temperature compensated
charging with voltage (6.90V) and current (1A) limiting for a
three cell battery, when an AC or DC supply is also connected.
It is not recommended to connect both an internal and an
external battery. If two batteries are required it is better that the
external battery is a larger capacity 12V battery, and is
connected as External DC Power.
9
2
See "Baud Rate and Address"
Input Type
5
AC
DC
9V Alkaline Battery
6V Gel Cell Battery
+Terminal
Channel Expansion
Connector
Internal Battery
Connector
Height: without memory card 85mm
with memory card 105mm
123
ON
1 23 4 5 6 7 8
+ -R + -R
Memory Card Socket
10
9
Convert
+5 volts
Lamp
(switched) Single Ended Ref.
250 mm
270 mm
*
*
Powering the Multiplexer
The Datataker 500 and 600 have an option to maintain multiplexer
power in low power mode. This is achieved by moving the Mux. Power
link located under the top cover near channel 9, as shown on the right.
* + - R * + - R* + - R* + - R
8
7
6
5
Analog Channels
SW USW
Mux Power
Power-down
Position
Display
Connector
SW USW
Mux Power
Power maintained
Position
75mm
• 10 differential or 30 single ended, can be used in any mix.
• Sampling rate 25 samples/sec
• Linearity <0.05%
• Input impedance 1MΩ, or >100 MΩ selectable
• Common mode range ±3.5 Vdc
• Common mode rejection >90 db (110 db typical)
• Series mode line rejection >35 db
• Sensor excitation of 4.5V, 250.0µA or 2.500mA each channel.
• Full, half and quarter bridges, voltage or current excitation.
• Multiplexer type: solid state (CMOS)
Range
Ground
Analog Inputs
The Datataker 500 and 600 can be powered as follows:
Source
Wake
• 10 analog and 7 digital channels
• Network support
• Channel expansion socket
6.9V Switch Mode
Regulator
(–9.2mV/°C)
Power Supply and Battery
External
Battery
Each model in the Datataker data logger range has a number
of characteristics that differentiate it from the other models. This
page describes the characteristics for the Datataker 500 and the
Datataker 600:
also page 13
The Datataker 500 and Datataker 600 COMMS Port is serial
RS232 compatible. The output signal level is approximately ±4
Volts, allowing communications over distances in access 100
meters at 1200 baud. Greater distances are possible at 300
baud. The maximum practical distance is also dependent on the
host computer's RS232 characteristics. (Note: the RS232
"standard" specifies 2000pF maximum cable capacitance, and
no maximum distance).
The Datataker 500 and Datataker 600 COMMS Port is
electrically isolated to 500V.
1(out)
COMMS Port
Net.
Ground
AC/DC
Introduction
Page 26
Appendix — Datataker DT505 and DT605
DC Current
10 30
10 40
Resistance
10 20
Frequency
10 30
±25 mV
±250 mV
±2500 mV
±7 V
±70V
±100V
±0.25 mA
±2.5 mA
±25. mA
10 Ohms
100 Ohms
500 Ohms
7000 Ohms
0.1-20,000 Hz
Resolution
Accuracy
at 25°C
1µV
10µV
100µV
250µV
2.5mV
25mV
200nA
1µA
10µA
0.5mΩ
5mΩ
50mΩ
500mΩ
0.01%
0.11%
0.11%
0.11%
0.31%
0.31%
0.31%
0.21%
0.21%
0.21%
0.20%
0.10%
0.20%
0.30%
0.05%
DE refers to double ended or differential channels and SE refers
to single ended channels (see Glossary on page 23). Accuracy is
expressed as percentage of reading at 25°C (see page 17).
All analog input channel terminals except for the Return (R)
terminals are capable of withstanding 1.5KV for 10µS, 500V for
50mS and 100V indefinitely. The return terminal can withstand
only 5 % of these voltages.
These withstanding voltages only apply to unselected
channels. While a channel is actually being read (a process that
typically takes 30mS), these withstanding voltages are reduced
to that of the return terminal.
Digital Inputs and Outputs
• 4 TTL/CMOS compatible digital input channels for digital state,
digital events, low speed counters (10 Hz, 16 bit, presettable).
Digital input terminals are shared with digital output channels
• 4 Digital open collector outputs rated to 200mA at 30V
• 3 high speed counters, (1KHz or 1MHz, 16 bit, presettable).
• All analog channels may also be used as digital inputs, with a
user definable threshold.
Input Type
Digital Bit
Digital Nibble
LS counter
HS counter
Channels
Range
4
0 or 1 State
1
0 to 15 State
4
65535 Counts
3
65535 Counts
9
N/C
8
N/C
7
N/C
6
N/C
4
RxD
+
3
TxD
DC
2
N/C
Interface
Ground
1
–
11-24Vdc
s6 s7
off off
off off
off on
off on
on off
on off
on on
on on
off off
off off
off on
off on
on off
on off
on on
on on
off off
off off
off on
off on
on off
on off
on on
on on
off off
off off
off on
off on
on off
on off
on on
on on
9 – 18Vac AC/DC~
11 – 24Vdc AC/DC~
6.2 – 10Vdc Alkaline +
5.6 – 8Vdc
Lead +
AC/DC~
Gnd
Bat. –
Bat. –
Power Source
The gel cell connection provides temperature compensated
charging with voltage (6.90V) and current (1A) limiting for a
three cell battery, when an AC or DC supply is also connected.
It is not recommended to connect both an internal and an
external battery. If two batteries are required it is better that the
external battery is a larger capacity 12V battery, and is
connected as External DC Power.
The simplified schematic on page 25 for the Datataker 500
and 600 is also applicable to the Datataker 505 and 605.
~
~
Gnd
External DC Power
ON
Address s4 s5
0 off off
1 off off
2 off off
3 off off
4 off off
5 off off
6 off off
7 off off
8 off on
9 off on
10 off on
11 off on
12 off on
13 off on
14 off on
15 off on
16 on off
17 on off
18 on off
19 on off
20 on off
21 on off
22 on off
23 on off
24 on on
25 on on
26 on on
27 on on
28 on on
29 on on
30 on on
31 on on
AC
DC
9V Alkaline Battery
6V Gel Cell Battery
The Datataker 505 and 605 will consume very little power if
it is allowed to sleep. Less power is consumed if the logger is
powered via the battery terminals rather than the AC/DC Power
terminals. This is because the battery charger circuit draws
additional current.
+ Terminal – Terminal
Dip switch
~
9–18Vac
~
~
battery
battery
AC/DC
AC/DC
AC/DC
AC/DC
External AC Power
RS232 COMMS
Port (Isolated)
Bat. –
–
External Battery
–+
~~ – +
Current (typical)
awake
sleep
awake
awake & charging
sleep
sleep & charging
220mA
0.36mA
230mA
600mA
5mA
400mA
Battery life for the Datataker 505 and 605 is about one third
longer than that of the Datataker 500 and 600 for slow scan
rates (i.e. >30 minutes). See "Battery Life" on page 15.
6V Gel Cell or
9V Alkaline)
+
Bat. +
Gnd
Condition
1 Alkaline +
+
1 Alkaline +
6V
–
2 Bat. –
–
9V
2 Bat. –
+
3 Lead +
3 Lead +
Internal Gel Cell Battery
Digital
I/O
43 21
Counters
32 1
R
Internal Alkaline Battery
Headphone Socket
(Geologger versions)
Analog Channels
4
3
2
1
- +* R- +* R - +* R - +*
Shown set to the
1 23 456 7 8
factory setting
s8
off
on default
off
Country s1
Channel Expansion
on
Connector
US (60Hz) on default
off
Internal Battery
on
Other (50Hz) off
Connector
110
mm
off
Height: without memory card 85mm
on
with memory card 105mm
Baud Rate s2 s3 s4 Add. Range
off
on
off off x
1200
0 - 31
ON 1 2 3
ON
off default
off on off
9600
0 - 15
1 23 4 5 6 7 8
12 3 4
on
off on on
300
0 - 15
off
on off x
2400
0 - 31
on
on on x
4800
0 - 31
off
+ -R + -R + -R + - R + - R + -R
x = don't care
on
Memory Card Socket
off
10
9
8
7
6
5 Display
Convert
+5 volts
Country Setting
on
Analog Channels
Connector
Lamp
(switched) Single Ended Ref.
off
The Country Setting determines the
250 mm
on
default integration period (16.7mS for US
off
and 20mS for others) for the analog to
270 mm
on
digital converter, and the default date
High Voltage Measurement
Auxiliary Dip Switch
off
format (see "Date" on page 6).
The Datataker 505 and 605 models have a switchable
The four way Auxilliary Dip Switch provides
on
four wire (on the ★, +, – and SERef. lines) attenuator after additional versatility.
off
Reserved: must be set in
Baud Rate and Address
the input multiplexer. In each case attenuation is relative to
on
default position otherwise
Dip switch position four (s4) is not
ground.
The
attenuators
on
the
differential
inputs
(+
and
–)
ON
off
network operation will be
available for setting the address if 300 or
are matched to ensure high common mode rejection.
on
impaired.
9600 baud rate is selected. This reduces
By default two channel types automatically switch in the
off
1
2
3
4
the address range to 0 – 15.
With s4 in the ON position a
attenuators – n HV and n L. See "Channel Types" on page
on
19200 Hz frequency signal is
4 for more details. For other channel types use the A
off
Default positions
applied to the High Speed
channel option to switch in the attenuators e.g 2AS(A). See
on
for
SW2
dip
switch
Counter (1HSC) input.
"Channel Options" on page 5.
75mm
DC Voltage
Channels Range Units
DE SE
N/C
5
Range
1(out)
Input Type
RS232 COMMS Connector
Source
Ground
• 10 differential or 30 single ended, or any mix.
• Switchable attenuator that allows high voltage measurement.
• Sampling rate 25 samples/sec.
• Channels have 500 volt isolation while not being read.
• Input impedance 1MΩ, or >100 MΩ selectable.
• Common mode range ±3.5 Vdc, ±100 Vdc attenuators on.
• Common mode rejection >90 db (110 db typical).
• Series mode line rejection >35 db.
• Sensor excitation of 4.5V, 250.0µA or 2.500mA each channel.
• Full, half and quarter bridges, voltage or current excitation.
• Multiplexer type: relay
Power Consumption
The Datataker 505 and 605 can be powered as follows:
Wake
Analog Inputs
Power Supply and Battery
External
Battery
• 10 analog and 7 digital channels
• Relay Multiplexer (±100V input)
• Network support (as for DT500/600)
• Channel expansion socket
also page 13
The Datataker 505 and Datataker 605 COMMS Port is serial
RS232 compatible. The output signal level is approximately ±4
Volts, allowing communications over distances in access 100
meters at 1200 baud. Greater distances are possible at 300
baud. The maximum practical distance is also dependent on the
host computer's RS232 characteristics. (Note: the RS232
"standard" specifies 2000pF maximum cable capacitance, and
no maximum distance).
The Datataker 505 and Datataker 605 COMMS Port is
electrically isolated to 500V.
Net.
Ground
AC/DC
COMMS Port
Each model in the Datataker data logger range has a number
of characteristics which differentiates it from theeother models.
This page describes the characteristics for the Datataker 505 and
the Datataker 605:
See "Baud Rate and Address"
Introduction
*
*
*
*
*
*
Page 27
Appendix — Geologger DT515 and DT615
Introduction
Single Ended Connection
Trouble Shooting
Measuring Gauge Temperature
The Geologger is functionally similar to the Datataker 505
or Datataker 605 (see "Appendix – Datataker DT505 and
DT605" on page 26) with the addition of an internal vibrating
wire sensor support module. All electrical and programming
characteristics are identical except the Geologger models
have an extra channel type – n FW (Frequency of Wire) and
a software speaker switch /V. The Geologger supports most
vibrating wire gauges with resonances between 600Hz and
4.5KHz.
Vibrating wire gauges may also be connected single
endedly – that is they can share a common terminal. A
channels return terminal becomes the "common", and each
of the channel's remaining three terminals become single
ended input terminals. It is now possible to connect three
sensors to each channel.
By design, most vibrating wire gauges are very reliable. If
a gauge fails to return sensible results it can be due to:
Most vibrating wire gauges are sensitive to temperature
fluctuations. Where a gauge's temperature is likely to change
significantly, its temperature is usually measured. The
Geologger supports all sensor types normally used including
Thermistors (Yellow Springs 400XX series), platinum, nickel,
and copper RTDs. See "Channel Types" on page 4 and
"RTDs" on page 16 for more information.
Shield
Vibrating Wire Support
The Geologgers use a pulse to pluck the wire in a
vibrating wire gauge. The advantage of the pulse pluck
method is that a fixed pulse is able to stimulate a wide range
of gauges. This greatly simplifies channel programming for
the user.
The balanced pluck pulse is approximately 150µS long
and up to 36 volts in amplitude. The pulse has a current
source characteristic that provides automatic cable length
compensation. Sensors on long cable will be pulsed with the
same energy as those on shorter cables.
The Geologger has a high gain low noise signal amplifier
with transformer coupling on the input. The amplified signal is
filtered using band pass filters (500Hz to 5KHz) and a phase
lock loop (PLL) to reduce frequency noise before the
frequency is measured by a precision frequency counter.
to input multiplexer
pluck
circuit
amp
phase
lock loop
filter
frequency
measurement
circuit
Signals in the order of tens of microvolts can provide
useful reading. Transformer coupling ensures very high
common mode rejection, a characteristic that is needed to
reject 50/60 hertz and other interfering noise.
Differential Connection
The preferred method of vibrating wire sensor connection
is differentially between the "+" and "–" inputs of a channel.
✱
R
Channel
Terminals
G
Single Ended VW Connection
As can be seen in the diagram, shielding is the same as
for the differential connection.
The single ended input arrangement functions best
where:
• cable lengths are relatively short (say < 100 meters)
• gauges have good sensitivity (signal to pluck ratio)
Because of the great range in gauge sensitivity it is difficult to
predict the operating limits. We suggest that for cable lengths
in excess of 100 meters that test be conducted with the
gauges to be deployed.
Programming VW Channels
Channels connected to vibrating wire gauges are
supported by the nFW channel type (see "Channel Types" on
page 4). This channel type tells the logger to configure the
channel for vibrating wire, pluck the sensor, and to measure
the frequency returned. For example the following differential
channel specifications:
Vibrating wire
sensor
1FW
Example
1FW
R
Channel
Terminals
G
Ground
Differential VW Connection
While the shield is optional it will often be found
necessary when noise pick-up is a problem. The preferred
shield connection point is one of the Geologger's ground
terminals or a case ground terminal strip.
If the channels return terminal (R) is not used for other
purposes it can be used as a shield terminal. However as the
return terminal is internally connected to ground via a 100Ω
resistor, its effectiveness is not as great as a direct connect
to ground. Also, if lightning strike is possible, then the resistor
may be destroyed.
Ground
Vibrating wire
sensors
Shield
✱
Examples
1✱FW
1+FW
1–FW
5..8FW
will return
1FW
5FW
6FW
7FW
8FW
3056.7
1896.4
2035.7
1705.5
1769.2
Hz
Hz
Hz
Hz
Hz
as data on channels 1, 5, 6, 7 and 8. Single ended channels
are specified by adding a terminal identifier:
2+FW 2–FW 2 ✱FW
•
•
•
•
•
•
•
•
•
•
an open circuit
a short circuit
excessive cable leakage
very high induced common mode noise levels
direct noise pick up by gauge coil
failed gauge
excessive cable length for gauge sensitivity
inappropriate use of single ended input.
gauge frequency outside 500Hz to 5KHz range
mechanical vibration of gage by external forces
Measuring Frequency and Temperature
on one Channel
Depending on the gauge wiring, it is usually possible to
measure the vibrating wire differentially and a resistance
(temperature sensor) on a single channel.
The Speaker /V /v
The Geologger has a built in speaker and headphone
jack (3.5mm mono or stereo, 8Ω) specifically for fault
diagnosis. The speaker is enabled by the /V switch (see
"Switches" on page 11). The speaker is connected to the high
gain amplifiers output. Note that the frequency response of
the small speaker is far from flat – the use of headphones is
preferred.
For a good gauge and correct installation, the sound is a
clean "ping", decaying over a period of a few seconds. Note
the full decay can only be heard for the last channel in a
channel list. Embedded channels can be heard but only for
about half a second.
If there is no tone but only noise, check the channel type,
wiring and resistance (below).
If a note can be heard but it is faint or buried in the noise,
then the cable is too long or "leaky", or the gauge insensitive.
If the note is not clean and pure then the gauge is
suspect. It may have been damaged during installation.
If you can hear a low frequency "hum", then noise pick is
a problem. If the gauge is placed near a transformer, electric
motor, high current power cables etc., either re-site or
orientate gauge for minimum pickup. Ensure cable is shielded
to prevent capacitive pickup.
Measure Resistance
Gauge and cable integrity is best determined by
measuring the circuit resistance. This can be done using a
multimeter or the Geologger (see "Resistance" on page 4).
This resistance should be stable and not drift with time.
Channel
Terminals
R
1FW
1+YS04
Vibrating wire sensor with two wire RTD
Temperature channel is read single endedly as for
example 1+YS04 (a YSI 44004 sensor - see page 16) and
the vibrating wire as 1FW. Note the RTD sensor type must
be of a relatively high resistance type (say >1000Ω) if errors
due to cable resistance are to be avoided.
Similarly other configurations are possible. If the
temperature sensor is of a low resistance type then the
following is recommended:
✱
Channel
Terminals
R
1–FW
1PT392
RTD
>50Ω
Single ended vibrating wire with three wire RTD
However this configuration has the disadvantages of a single
ended vibrating wire connection. If the temperature sensor is
of high resistance type then the following is preferred:
Measurement Delay n FW(200)
If returned data is unstable to the extent that it varies by
perhaps ±20Hz yet the speaker indicates a strong signal, the
signal may contain harmonics. The harmonics generally
decay more rapidly than the fundamental, so increasing the
time between stimulation and frequency measurement can
improve the results. The measurement delay can be adjusted
by setting the channel factor in milliseconds (see "Channel
Options" on page 5). For example 1FW(500) will increase the
delay from the default 200mS to 500mS.
✱
RTD
>1KΩ
✱
Channel
Terminals
R
1FW
1–NI(2000)
RTD
>1KΩ
Differential vibrating wire with two wire RTD
It is possible to use the copper coil in the vibrating wire
gauge as a temperature sensor provided a three wire
connection is used:
will return
2+FW 4597.8 Hz
2–FW 4445.2 Hz
2✱FW 3909.7 Hz
where the " +", "–" and "✱" indicate gauges connected single
endedly between the return terminal and "+", "–" and "✱"
terminals respectively.
Readings can be scaled into engineering units using the
Geologgers functions, spans, polynomials and calculation
facilities. See "Scaling and Calculations" on page 7.
Extra Samples n FW(ES9)
By default the Geologger measures a vibrating wire
frequency over a period of 10 line periods (167mS in 60Hz
countries and 200mS in 50Hz countries). This has been
found optimal for most gauge types. However for gauges with
a rapid signal decay, this period can be reduced so that the
measurement window does not extend into the noise. For
example 1FW(ES4,100) will allow sampling over 5 line
periods and reduce the measurement delay to 100mS.
VW
coil
>50Ω
✱
Channel
Terminals
R
1FW
1CU(135)
Differential vibrating wire with three wire copper RTD
The gauge is read as 1FW and the temperature as 1CU(135)
where the 135 channel factor is the coils resistance at 0°C.
Page 28
Appendix — Channel Expansion Module
Power Consumption
Internal Channels
• 20 TTL/CMOS/Voltage free contact compatible digital input
channels for digital state and byte input
• 10 Digital output for digital state and byte output
5 contact closures rated 110Vac/dc at 5A
5 open collector outputs rated to 200mA at 30V
• All analog channels may also be used as digital inputs,
with a user definable voltage threshold.
Note: the expansion module digital inputs do not support any
counter channel types.
Module Installation
The expansion module is connected to the Datataker via
the 25 way expansion connector on the end of the logger's
case. A 50 cm (1.6 feet) ribbon cable is provided. Additional
expansion modules can be chained end to end:
where e is the expander number and the percent symbol
indicates an internal channel.
The Channel Expansion Module does not include built in
energy absorbing lightning protection. However with certain
important conditions, all analog channel terminals except for
the return (R) terminals are capable of withstanding 1.5KV
for 10µS, 500V for 50mS and 100V indefinitely. The return
terminal can withstand only 5 % of these voltages.
The above withstanding voltages apply only to
unselected channels. While a channel is being read (a
process that typically takes 30mS), these withstanding
voltages are reduced to those of the Datataker. For
non-isolated Datatakers this can be as low as 5 volts relative
to ground.
In applications where scanning is infrequent (say not
more than every 3 hours), the probability of a scan being
co-incident with a lightning strike is very low.
Where lightning is frequent, we strongly recommend that
external energy absorbing lightning protection be wired to
each sensor line. Further, we recommend that Datatakers
with higher withstanding voltages be used.
Expander 2
Expander 1
Datataker
Channel Addressing
Channel addressing on the expander follows the normal
Datataker conventions except that an expander prefix is
added. The prefix is the module number and a colon. The
module connected to the Datataker is module number one,
the next module in the chain is number two. Some examples
are:
1:5V
2:1..3DS
2:4DSO=1
module 1, analog channel 5 (voltage)
module 2, digital channels 1 to 3
module 2, digital output channel 4
The Channel Expansion Module has been designed to
function with thermocouples. The module's temperature
sensor is located so that it senses the temperature of the
analog channel screw terminals. These terminals become
the reference junction.
The Datataker will automatically measure the module's
temperature and electrical zero when scanning a
thermocouple channel on the module. These values are
used for reference junction compensation.
The accuracy of thermocouple measurement is
dependent on the isothermal condition of the reference
junction. If a temperature gradient develops between the
modules temperature sensor and the input terminals, the
error will approximately equal the temperature difference.
The module utilises relays for channel selection and
digital output. These are a source of heat as each relay
dissipates 150mW when switched on. For maximum
thermocouple accuracy, you should ensure that these relays
are not left on unnecessarily.
A not so obvious reason that a relay may be left on is
that the last channel in a schedule remains selected if P15
is set to 1 or 2. This can be resolved if P15 is set to zero or a
dummy channel is placed at the end of the schedule. A good
choice would be 1 %V(M18:156,W).
Relay
Output
Terminal
Pair
100K
logic
Ground
High Voltage Protection
Thermocouples
Up to 2 Channel Expansion Modules may be connected
to a Datataker. The total cable length must be less than 2
meters (6 feet).
Before you install an expansion module, disconnect
mains power and all batteries from the Datataker. After
module connection, power up the Datataker and the new
channels will become available. The first line returned by the
TEST command will reflect the new hardware configuration.
A "6" indicates a Channel Expansion Module.
Digital
Input
expander temperature channel
electrical zero channel
Module
Digital
Output
Ground
Digital Inputs 1 to 20
Digital Outputs 6 to 10
Digital Outputs 1 to 5
270 mm
250 mm
Digital Output Channels
Digital Input Channels
G 6 7 8 G 9 10 G 1 2 3 G 4 5 6 G 7 8 9 G10 1112 G 131415 G 161718 G 19 20 G
Open Collector O/Ps
Digital State Inputs
Digital Inputs and Outputs
e :1 %LM35
e :2 %V
Module
5 volts
15K
5
• 10 differential or 30 single ended, or any mix.
• Channel characteristics identical to Datataker to which the
module is attached.
• Channels have 500 volt isolation while not being read.
• Input impedance 1MΩ, or >100 MΩ selectable.
• Sensor excitation of 4.5V, 250.0µA, 2.500mA or
externally supplied source, to each channel.
• Full, half and quarter bridges, voltage or current excitation.
• Multiplexer type: relay
100µA
100µA
4mA
60mA
175mA
240mA
Module
Each Channel Expansion Module has two internal
channels: a temperature and an electrical zero channel.
4
Analog Inputs
3
As with all data returned by the Datataker, the channel
identification can be switched off using the /n switch.
Current
sleep
awake, no scanning or digital I/O
digital inputs grounded
scanning module's channels
relay outputs set ( 1..5DSO=1)
worst case maximum
2
1:5V 23.452mV
2:1DS 1 State
2:2DS 0 State
2:3DS 1 State
Condition
The Expansion Module will consume very little power if
the Datataker to which it is attached is allowed to sleep.
While scanning channels on the expander, the current drawn
from the Datataker will increase to 60mA. Additional current
is required if the digital output relays are switched on. Each
of the five relays will draw 35mA, however these relays are
automatically switched off when the Datataker sleeps. A
summary of current draw is tabulated to the right:
1
The module number is also attached to data returned by
the Datataker. The above channels will return data as:
Normally Open Relay Outputs
The Channel Expansion Module provides increased
channel capacity for Datatakers fitted with an expansion
connector. The channel measurement specifications of the
Datataker also apply to the Channel Expansion Module. This
particularly applies to the analog input voltage ranges.
While the expansion module has a relay multiplexer
capable of withstanding voltages in excess of 500 volts, if for
example it is connected to a Datataker 500 and 600, the
maximum allowable input voltage remains ±4 volts.
G
Introduction
Expansion connector
(to previous module or
Datataker)
Expansion connector
(to next module)
110 mm
75 mm
GG
Ex
✱ + 1 – R ✱ + 2 – R ✱ + 3 – R ✱ + 4 – R ✱ + 5 – R ✱ + 6 – R ✱ + 7 – R ✱ + 8 – R ✱ + 9 – R ✱ + 10 – R G G
Analog Input Channels
SE Ref
Analog Channels
External Excitation
input terminal
Jumper shown in
normal position
Ground Terminals
Single Ended Reference Terminal
External Excitation (EE)
Single Ended Reference
For sensors that require non-standard powering or
excitation, an External Excitation input terminal is able to
direct power to the Excite (✽) terminal of a selected channel.
This option can be enabled by moving a jumper to the outer
two pins on a three pin header. The jumper is accessed by
removing the module's top cover.
The normal position of the jumper (between the inner
two pins) provides the standard Datataker 250µA, 2.5mA or
4.5V excitation. If the external excitation option is selected
these are not available on any channel of the module. Care
must be taken in assigning channels. If for example an
Expansion Module is wired with a four wire RTD and several
bridges requiring 12V excitation, then the 12V would be
applied to the RTD when it is scanned. The RTD would
probably be damaged.
The Channel Expansion Module has a SE Ref input
terminal with an identical function to that found on the
Datatakers. It provides a floating common for single ended
input (see the "X" channel option on page 5).
The SE Ref input is switched on each module, but not on
most Datatakers. (The DTxx5 series are the exception). This
means that if the SE Ref terminal is used on one or more
modules, it should not be used on the Datataker. The
selected module's SE Ref input will appear as an output on
the Datataker's SE Ref terminal.
The input voltage range of the SE Ref input is identical to
that of the Datataker to which the Channel Expansion
Module is attached. This ranges from ± 3.5V for the
Datataker 500 and 600 models to ±100V for the Datataker
505 and 605 and Datataker 515 and 615 models.
Page 29
Appendix — Memory Card Processing (Flow Chart)
Memory card
inserted
NOTES:
UNFORMATTED (NEW)
CARD
New card?
Is card
writeprotected?
YES
NO
NO
YES
FORMATTED
CARD
(may contain
data and/or
program)
Display card ID
Card ID is
Boiler Room
Beep once and display:
Issue E19 message
to serial port
Does card
contain program
and is /Q switch ON
in Datataker?
2. If the write-protect switch is set to
Write-Enabled and writing/appending
to the card is allowed, then any
internal data will be transferred to the
card as the switch is switched.
Display card ID:
Write-Protected
unable to format
and beep once
NO
1. Display of messages and sounding
of beeper only occur on Datatakers
fitted with a keypad/display unit (for
example, DT600, DT605, DT615 and
Panel-Mount Display).
Format card
Card ID is
512KB card
and beep once
YES
Run card program.
Add to Display:
TRANSFER DATA FROM DATATAKER TO CARD
Prog
Is card
writeprotected?
Does
card contain NO
data?
YES
YES
Do
Datataker and
card programs match
and is NOCOPY
not in card
program?
YES
NO
Transfer data
to card.
Add to display:
YES
Allow new data
to be appended.
Add to display:
Append
Is
transfer
blocked by
NOCOPY in card
program?
YES
NO
Direct
logging
to
card
Xfer
Will
all internal
data fit into free
space on
card?
Resume
normal
operation
NO
NO
YES
Sound one extra beep and display:
Can’t Copy Data
DATA
DECISIONS
Does
Datataker
contain
data?
YES
NO
Does
Datataker
contain
data?
NO
Issue E17 message to serial port
Continue
logging
to
internal
memory
Page 30
Appendix — Specifications
Introduction
Alarms can be set for all input channels, and can be annunciated by
switching of digital outputs, returning alarm messages to a host computer, and
displaying alarm states.
The Datataker range of data loggers are all microprocessor-based
battery powered or mains powered data loggers which can measure all of the
fundamental signal types, and have direct support built in for a wide range of
commonly used sensors.
The Datataker data loggers can be installed locally and communicate
directly with a local host computer, or can be installed in remote locations and
communicate to a base host computer by various telemetry options including
PSTN, cellular networks and radio.
The Datataker models differ only in the number of input channels, the
type of analog channel multiplexing, and expansion and display options.
The Geologger 515 and 615 data loggers have the same specification as
the Datataker series. However, these loggers also support vibrating wire strain
gauges, which are the active elements of a wide range of pressure sensors,
load sensors, displacement sensors, etc. that are commonly used in
geotechnical, mining and structural applications.
All models support the same signal types and sensors, and have the
same capabilities for acquiring, manipulating and logging data.
Data manipulation includes sensor calibrations, real-time statistical
functions, and real-time calculations. The acquired data can either be returned
to a host computer in real time, or can be logged into memory for later
recovery. Data can be stored in battery backed internal memory, or in PC Card
(PCMCIA) memory cards which can be periodically removed from the logger
to transport the data.
The Datataker data loggers are suitable for applications in industry,
science, agriculture, the environment, hydrography, and the public utilities.
Features Comparison of the Datataker Data Loggers
Datataker 50
Datataker 500
Datataker 600
Datataker 505
Datataker 605
Geologger 515
Geologger 615
5
10
10
10
10
10
10
10
30
30
30
30
30
30
Multiplexer
Solid State
Solid State
Solid State
Relay
Relay
Relay
Relay
Resolution
15 bit/1µV
15 bit/1µV
15 bit/1µV
15 bit/1µV
15 bit/1µV
15 bit/1µV
15 bit/1µV
±3.5V
±3.5V
±3.5V
±100V
±100V
±100V
±100V
Volts, Current, 4-20mA, Resistance
✔
✔
✔
✔
✔
✔
✔
Frequency, Period
✔
✔
✔
✔
✔
✔
✔
11 types
11 types
11 types
11 types
11 types
11 types
11 types
RTD Support (Pt, Cu, Ni)
✔
✔
✔
✔
✔
✔
✔
Bridges, Strain Gauge Support
✔
✔
✔
✔
✔
✔
✔
Analog Channels - Differential
or - Single Ended
Common Mode Range
Thermocouple Support
Vibrating Wire Support
✖
✖
✖
✖
✖
✔
✔
Digital Channels - Input/Output
5/5
4/4
4/4
4/4
4/4
4/4
4/4
Counter Channels - Fast/Slow
3/5
3/4
3/4
3/4
3/4
3/4
3/4
Channel Expansion
✖
✔
✔
✔
✔
✔
✔
Isolated RS232
✔
✔
✔
✔
✔
✔
✔
Max Baud Rate
9600
9600
9600
9600
9600
9600
9600
Supports Datataker Network
✖
✔
✔
✔
✔
✔
✔
Integral Display
✖
✖
✔
✖
✔
✖
✔
Panel Mount Display Option
✔
✔
✖
✔
✖
✔
✖
Internal Battery
✖
✔
✔
✔
✔
✔
✔
DT50
DT500
DT600
DT505
DT605
DT515
DT615
Page 31
Appendix — Specifications (cont.)
Analog Input Channels
Analog Sensor Support
Datataker 50
• 5 differential or 10 single-ended, can be used in any mix.
• Solid state multiplexers.
• Common mode range ±3.5VDC.
Geologger 515, 615
• Vibrating wire sensor support:
30V for 100µS pulse excitation
50 to 300Ω coils
0.5 to 5KHz frequency range
phase lock loop filtering
loudspeaker for troubleshooting
Datataker 500, 600
• 10 differential or 30 single-ended, can be used in any mix.
• Solid state multiplexers.
• Common mode range ±3.5VDC.
• Expansion by Channel Expansion Modules (CEMs) with 10 differential or
30 single-ended analog channels. Maximum of two CEMs.
Datataker 505, 605 and Geologger 515, 615
• 10 differential or 30 single-ended, can be used in any mix.
• Relay multiplexers.
• Common mode range ±100VDC.
• Input withstanding voltages for analog channels:
Unselected channels
±1.5KVDC for 10µS
±500VDC for 50mS
±100VDC continuously
Selected channels
±100VDC continuously
• Expansion by Channel Expansion Modules with 10 differential or 30
single-ended analog channels. Maximum of two CEMs.
Analog to Digital Conversion
All Models
• Autocalibrating
• Autoranging over 3 decades.
• Resolution 15 bit plus sign, 1 µV.
• Sampling rate 25 samples/second.
• Accuracy better than 0.15% of full scale.
• Linearity better than 0.05%
• Input impedance 1MΩ, or >100MΩ selectable.
• Common mode rejection >90db, 110db typical.
• Series mode line rejection >35db
• Floating common input for single-ended measurements.
Analog Sensor Support
All Models
• 4, 3 and 2 wire resistance, RTD and thermistor measurement.
• Sensor excitation of 4.5V, 250.0µA or 2.500mA each channel.
• Full, half and quarter bridges, voltage or current excitation.
• 4-20 mA current loops, internal or external shunts
• Thermocouple types B, C, D, E, G, J, K, N, R, S and T, with cold
junction compensation and linearization.
• Platinum RTDs, a=0.003850Ω/Ω/°C, any resistance.
• Platinum RTDs, a=0.003916Ω/Ω/°C, any resistance.
• Nickel RTDs, a=0.005001Ω/Ω/°C, any resistance.
• Copper RTDs, a=0.0039Ω/Ω/°C, any resistance.
• Thermistors, Yellow Springs YSI 400xx series.
• Semiconductors, AD590, LM335, LM34 and LM35.
Digital Channels
Datataker 50
• 5 digital input/output channels.
Datataker 500, 600, 505, 605 and Geologger 515, 615
• 4 digital input/output channels.
• Expansion by Channel Expansion Modules with 20 digital input and 10
digital output channels. Maximum of two CEMs.
Digital Input Channels
• Accept voltage-free contact closure inputs (inbuilt 15K pullups) and
TTL/CMOS inputs.
• Measure the logic state of individual channels (bit) or of groups of
channels (byte).
• Generate digital transition events to trigger data acquisition.
• Also provide low speed counter functions to 10Hz sensitivity,
0 to 65535 range, presettable (not available on CEM).
• Digital input channels share with the digital output channels.
• Analog channels can be used to read digital state, with user definable
state threshold.
Digital Output Channels
• TTL/CMOS-compatible digital output channels.
• Open collector lines, rated to +30VDC @ 200mA.
• Used for switching logic states, for relay control, for alarm annunciation,
and sensor support.
• Digital output channels share with the digital input channels.
Counter Channels
• 3 separate high speed counter channels on all models.
• Count at up to 1KHz normally, or up to 500KHz optionally.
• 0 to 65535 range, presettable.
• Count even when logger is asleep
Time and Date
• Hardware clock, independent 10 year lithium battery.
• Resolution 1 second, accuracy 2 seconds/day (0 to 50°C).
• Date in formats
Date
DD/MM/YYYY
Date
MM/DD/YYYY
Day number
DDDDD
Decimal day
DDDDD.DDD
• Time in HH:MM:SS, decimal hour HH.HHHH and seconds SSSSS
• 4 auto-incrementing internal timers (second, minute, hour and
day of week) for use in sequencing, alarms, calculations, etc.
• Real-time clock used for scan scheduling, date and time stamping of data,
alarm timing and within calculations.
Measuring Ranges
Accuracy
Input Type
DC Voltage
Range
Units
Resolution
±25.000
mV
1µV
±250.00
mV
10µV
±2500.0
mV
100µV
±7.000
V
250µV
Note 1
±70.00
V
2.5mV
Note 1
±100.00
V
10mV
Note 1
Attenuated DC Voltage Any range
DC Current
Internal Shunts
External Shunts
mV
±0.2500
mA
±2.500
mA
200nA
1µA
±25.00
mA
10µA
Any range
mA
4-20mA Loop
0 to 100
Percent
0.01%
Resistance
10.000
Ohms
1mΩ
100.00
Ohms
1mΩ
500.0
Ohms
5mΩ
7000.0
Ohms
50mΩ
0.1 to 300,000.0
Hz
0.01Hz
30,000 to 3
µSec
1µS
Vibrating Wire
500.00 to 5000.00
Hz
0.01Hz
Temperature
–250.0 to 1800.0 Deg C
0.1%
Strain Gauges
-420.0 to 3200.0 Deg F
–104 to 104
ppm
–105 to 105
ppm
1ppm
Frequency
Period
and Bridges
Digital Bit
Digital Byte (4/5 bits)
Digital Average
Counter
Phase Encoder
Analog State
Polynomials
Linear Spans
Calculations
at 25°C
0.1%
10ppm
–106 to 106
ppm
100ppm
1
0 or 1
State
0-15/0-31
State
1
0.00 to 1.00
State
0.01
0 to 65535
Counts
1
–32768 to 32767 Counts
1
0 or 1
State
±9.9e-18 to ±9.9e18 User
±9.9e-18 to ±9.9e18 User
±9.9e-18 to ±9.9e18 User
1
0.0001
0.0001
0.0001
Note 1: Datataker 505, 605 and Geologger 515, 615 only
Note 2: Geologger 515, 615 only
Note 2
Page 32
Appendix — Specifications (cont.)
Scanning of Input Channels
Data Compatibility
• 1 immediate scan schedule, can include one or more channels.
• 4 repetitive scan schedules, can include one or more channels.
• Time based scanning in increments of 1 sec, 1 min, 1 hour, 1 day.
• Event based scanning on digital channel events.
• Event based scanning on counter channel events.
• Poll based scanning initiated by direct host requests.
• Conditional scanning when inputs exceed setpoint values.
• Conditional scanning while any digital input is high.
• Compatible with spreadsheets, graphics and statistical packages.
• Compatible with most computers, modems, radio, and satellite.
Data Scaling
Display and Keypad
• Data read from the input channels in electrical units can be automatically
scaled to engineering units. All subsequent data manipulation is performed
on this scaled data.
• Calibrations for individual sensors can be declared by
- up to 20 definable linear spans, declared as span co-ordinates.
- up to 20 definable polynomials, from 1st to 5th order.
- mathematical expressions.
• LCD type, 2 line x 16 character, backlit, alphanumeric.
• Displays the most recent channel data, alarm status and system information
including time, battery status, amount of data stored.
• 5 key keypad for display selection, scrolling, and backlight.
• Keypad also used as 4 user definable function keys.
• 3 LEDs, a beeper and a flashing LCD backlight provide for local warnings by
alarms, etc.
• Operating temperature range for LCD is –5 to 65°C.
• Integral in the Datataker 600 and 605, and Geologger 615.
• Also available as a separate Panel Mount Display for mounting into
instrument panels and enclosure doors, which connects to the Datataker
50, 500 and 505, and the Geologger 515.
Data Manipulation
• Statistical data including average, standard deviation, minimum and
maximum with date and time of min and max, and integral.
• Delta, rate of delta (differential) and integral between scans.
• Histogram, with definable number of classes.
• Expression evaluation using channel data and constants, with arithmetic,
logical and relational operators, log, trig, and other intrinsic functions.
Alarms
• Alarms for monitoring channels and variables for high and low alarm, inside
and outside of range alarm, with definable setpoints.
• Alarms can be combined by AND, OR and XOR operators.
• Optional delay period before an out of range condition is considered a true
alarm, or recovery considered a true recovery.
• Alarms can switch digital outputs, control display panel LEDs, return alarm
messages to the host, trigger scanning, and execute Datataker commands.
Data Storage
• Battery backed internal RAM, stores up to 13,650 readings.
• Supports removable PC Card (PCMCIA) memory cards
- 512Kbyte stores up to 170,000 readings
- 1Mbyte stores up to 340,000 readings.
• Stack and circular buffer (overwrite) data storage modes.
• No data loss when memory cards are exchanged.
• Stored data can be returned for individual scanning schedules,
and for selectable date and time periods.
Data Format
• All data in ASCII floating point, fixed point or exponential formats.
• Data format is user configurable for channel identification, data resolution,
units text and delimiters.
• Selectable host computer data format with bi-directional error detection
protocol.
Programming
• All programming is by simple descriptive commands, which are entered from
a host computer via the host serial interface.
• Commands can be pre-recorded into a memory card, and these
are automatically executed whenever a memory card is inserted.
Host Communications
• RS232, full duplex, isolated to 500Volt.
• 300, 1200, 2400, 4800 and 9600 baud, switch selectable.
• Bi-directional XON/XOFF protocol.
• Selectable high level protocol with 16 bit CRC checking.
• Compatible with computers, terminals, modems, satellite ground terminals,
serial printers, etc.
Network Communications (Not DT50)
• RS485, with error correcting protocol.
• Connected via a twisted pair, maximum 1000 metres.
• Up to 32 loggers can be in a Datataker network, with one host.
Power Supply
• Voltage 9 – 18VAC or 11 – 24VDC external power.
• Mains powered from 12VAC/DC mains adaptor.
• Automatically selects low power standby (sleep) mode.
• Current draw 120mA normal power mode, 400mA when charging internal
battery, <350µA low power (sleep) mode.
Datataker 500, 600, 505, 605 and Geologger 515, 615
• A 1.2Ah gel cell battery is installed in the logger chassis, and is recharged
whenever external power is available.
All Models
• An external 6V gel cell battery can be connected to the logger, and is
recharged whenever external power is available.
• A 9V alkaline battery pack can be used to power the loggers.
Battery Life
Sampling 10
1.2Ah Gel Cell
17 Ah Alkaline
channels every
Battery
Battery
Continuously
5 hours
3 days
1 minute
12 days
160 days
15 minutes
60 days
800 days
1 hour
90 days
900 days
Mechanical Specification
• Robust modular construction using powder-coated steel.
• Can be used directly, or housed in fixed or portable enclosures.
• Signal input/output connection by screw terminals.
• Operating temperature –20 to 70°C, humidity 95%.
• LCD display –5 to 65°C
Datataker 50
• Length 270mm (10.5 inches), Width 110mm (4.3 inches).
• Height 50mm (2.0 inches) with no memory card inserted.
• Height 105mm (4.2 inches) with a memory card inserted.
• Weight 1.5kg.
Datataker 500, 600, 505, 605 and Geologger 515, 615
• Length 270mm (10.5 inches), Width 110mm (4.3 inches).
• Height 85mm (3.3 inches) with no memory card inserted.
• Height 105mm (4.2 inches) with a memory card inserted.
• Weight 2.4kg.
Accessories Included
• 110/240VAC mains/line power adaptor.
• RS232 communications cable for IBM™ and compatibles.
• Getting Started Manual and User’s Manual.
• DeTerminal for Windows, DeTerminal for DOS and DeLogger software
packages for IBM™ and compatibles.
Options
• Panel-Mount Display (for Datataker 50, 500, 505, 515 only)
• Channel Expansion Module (see page 33)
• Enclosures (see page 33)
• 4Ah rechargeable gel cell battery.
• 17Ah alkaline battery.
• Solar panels for remote site powering.
• 512Kbyte and 1Mbyte PC Card (PCMCIA) memory cards.
• Memory card reader; connects to computer via serial port.
• Memory card reader; connects to computer via parallel port.
• Modem Manager for intelligent supervision of remote modems.
• Telephone, cellular and spread spectrum radio modems
• DeLogger Pro software package for IBM and compatibles.
• DASYLab software package for IBM and compatibles.
• DeCopy/DeImage software package to read PC Card (PCMCIA) memory
cards via PC Card ports in IBM and compatibles.
Page 33
Appendix — Specifications (cont.)
Channel Expansion Module
The Channel Expansion Module (CEM) connects to the Datataker 500, 505, 600, 605 and Geologger 515, 615 to increase
the number of analog and digital channels. One or two Channel Expansion Modules can be connected to these loggers.
All input signal types and sensors supported by the Datataker are also supported by the Channel Expansion Module.
Analog Inputs
• 10 differential or 30 single-ended, can be used in any mix.
• Relay multiplexer.
• Common mode range is dependent on the Datataker model.
• Input withstanding voltage is dependent on the Datataker model.
• Sensor excitation of 4.5V, 250.0µA, 2.500mA each channel.
• Provision for externally-supplied sensor excitation.
• Sensor support is dependent on the Datataker model.
• Local internal temperature sensor monitors CEM temperature for thermocouple reference junction compensation.
Digital Channels
Digital Inputs
• 20 TTL/CMOS-compatible digital inputs for digital state and digital byte (the digital inputs do not count).
• Accept voltage-free contact closure inputs.
Digital Outputs
• 5 normally-open relay outputs, rated to 110VAC/DC at 5A.
• 5 open collector outputs, rated to 30VDC @ 200mA.
Power Supply
• Powered directly from the Datataker power supply.
• Enters low power mode (sleeps) when Datataker sleeps.
• Current draw 100µA when asleep, 60mA when scanning, 175mA when all output relays activated.
Connection to the Datataker
• One or two modules can be daisy-chained to a single Datataker.
• Interconnection by screened cable, 500mm (20 inches) length
• Maximum total cable length 2 metres (6 feet).
Mechanical Specification
• Robust modular construction using powder-coated steel.
• Can be used directly, or housed in fixed or portable enclosures.
• Length 270mm (10.5 inches), width 110mm (4.3 inches), height 50mm (2.0 inches), weight 1.0kg.
• Signal input/output connection by screw terminals.
• Operating temperature –20 to 70 Deg C, humidity 95%.
Datataker Enclosures
Four standard enclosures are available for housing Datataker data loggers and/or Channel Expansion Modules. The
enclosures are suitable for industrial, weatherproof and portable applications.
Industrial Enclosures
• The industrial enclosures are constructed of powder-coated sheet steel, have a polyurethane door seal, and are rated
to IP-65 or NEMA 5.
• The capacity of each enclosure is
SIE - 1 Datataker or 1 CEM.
LIE - 1 Datataker plus 1 CEM, or two Datatakers.
SIC - 1 Datataker plus 2 CEMs, or three Datatakers.
• Each enclosure also houses a 4Ah gel cell or 17Ah alkaline battery.
• Panel-Mount Display modules can be factory installed into the door of any enclosure by special order.
• Cable entry is completed by the user by drilling holes and fitting cable glands.
• Three sizes of industrial enclosures are available
Dimensions (mm)
Height
Width
Depth
Weight
Small Indust Enclosure (SIE)
400
200
120
4.5kg
Large Indust Enclosure (LIE)
300
380
155
7.0kg
Small Indust Cabinet (SIC)
600
380
210
15.0kg
Portable Enclosure
• Allows Datataker to be used in a portable mode, and protects the logger from water, dust and mechanical damage.
Rated to IP-67 or NEMA 6, and can be submersed for short periods.
• Clamshell design, constructed of black ABS plastic with stainless steel hinge. The lid has a neoprene seal, and can be
padlocked.
• Withstands 800kg stacking loads, and does not dent or warp.
• Houses one Datataker, and a 4Ah gel cell or 17Ah alkaline battery. The logger and battery are mounted into a
supporting frame which locates in the base of the enclosure. The frame can be lifted out for easy access to the screw
terminals and connectors of the logger.
• Optional subassembly to also install a CEM.
• A Panel-Mount Display module can be factory installed into the lid of the enclosure by special order.
• Normally used with the lid open, however cable for cable entry can be installed by the user.
• Size of portable enclosure is
Dimensions (mm)
Portable Enclosure (PE)
Length
Width
Depth
Weight
355
260
155
3.5kg
1.00 12/4/90
DT50 & DT500 released
1.10 26/7/90 Major Revision
Syntax changes to schedules & commands
Card operation changed
/A, /C, /S, /Y switch changes
New sensor support Ni RTD’s, Thermistors
1.11 to 1.20 4/6/91
Various minor bug fixes
PASSWORD added
Improved 3 wire resistance calibration
2.00 2/5/91 Major Revision
Card operation changed
BEGIN & END added and append dropped
Expression evaluation added
Difference, integrate & rate functions added
Minor syntax changes
Changes to /C, /G, /N, /Z switches
Channel ID text added
LCD display support added
2.01 to 2.03 24/5/91
Various bug fixes
DEL character processing change
2.10 23/8/91 Significant Revision
Time and date automatically stored
UNLOAD from date to date added
Histograms added
Counter operation changed
Variables as ALARM setpoints allowed
Floating point rounds rather than truncate
2.11 and 2.12 20/9/91
Minor bug fixes
2.90 to 2.99 24/12/91 Significant Rev
Memory card changes - incompatible
/L, /U, /Z switches changed
UNLOAD selectable from card or internal
STATUS10-13 added
Several ALARM bugs fixed
3.00 24/12/91 Consolidation Release
Old checksum UNLOAD /P removed
Network performance improved
3.01 to 3.05 15/5/92
DT505 support added
Vibrating wire sensor support added
Internal channel addressing change (2+%V)
ES extra samples channel option added
Baud rate switch function changed slightly
/J, /V, /X switches added
Serial port commands added
CEM support added
Repeating ALARMR added
3.10 4/6/92
Allow program to be placed in EPROM
New switch /A to control ALARMs display
ES9 default channel option for FW channels
P7 - network turnaround time for radio links
P22 - maximum number of significant digits
6WARN for backlight without flashing added
3.11 15/6/92
1#..5# addressing bug fixed
Modification to 3 wire calibration
3.12 to 3.24 21/10/92
Various bug fixes
✶
✶
✶
✶
✶
✶
✶
✶
✶
13
✶
✶
✶
8
3
7
5, 7
✶
✶
11
5
12
✶
✶
✶
3, 8
8
11
4, 16
✶
✶
13
✶
✶
✶
✶
✶
✶
8
8
5
4, 18
9
7
✶
✶
✶
✶
✶
✶
8
11
8
10
✶
✶
8
3.30 15/2/93
Reduced lower frequency limit to 0.1Hz
Modify scaling of bridge channel types
Baud rate selection change
TEST command extended
System timers synchronised if time reset
Grey code function F7 added
P21 data return address added
3.31 25/3/93
P33 field width added
3.32 to 3.36 1/7/93
Various bug fixes
Bug fix to analog readings following delay
4-20mA current loop restriction removed
Vibrating wire settling delay changed
3.40 8/12/93
PCMCIA card capability added
CTEST card check command added
3.42 26/04/94
Some bug fixes
XON / XOFF handling modified
Day of year added, accessed as 15SV
3.44 03/06/94
Some minor bug fixes
3.45 10/03/95
Fixed bug where logger can get several
commands behind
4.00 01/09/95
Added support for hardware clock
Added support for multiple insertions of
memory cards for same program
Changed some display messages for cards
Added ^b for quote characters in alarm text
Changed default function key settings
Various bug fixes
4.01 and 4.02
Minor bug fixes
5.00 01/08/96
Version ID change for Datataker Series 2
loggers. No changes to firmware.
Notes ....
Ca
r
N d
et
w
O ork
p
N era
ew ti
F on
Pa ea al
ge tu
re
D
es
cr
ip
tio
n
Ve
rs
an ion
d
D
at
e
Ca
r
N d
et
w
O ork
p
N era
ew ti
F on
Pa ea al
ge tu
re
D
es
cr
ip
tio
n
Ve
rs
an ion
d
D
at
e
Appendix — Firmware Change History
✶
✶
✶
4
17
13
10
6
7
11, 14
✶
10, 11
✶
✶
✶
✶
✶
✶
✶
✶
✶
✶
4
✶
✶
✶
✶
✶
8
8
11
6
✶
✶
✶
✶
✶
✶
✶
✶
✶
6
8, 29
8, 29
9, 23
12
✶
✶
✶
✶
✶
✶
✶
4, 5
4
5
13
11
13
27
9
✶
✶
✶
✶
✶
✶
18
11,12
4
11
10, 11
12
✶
✶
✶
✶
✶
✶ ✶
4
Explanation
The software built into the Datataker is referred to as firmware, and
is placed in Read Only Memory or ROM. This ROM is mounted inside
the Datataker, on the lower circuit board, and is socketed for easily
replacement. Please contact your dealer for more information about
ROM upgrades.
Note: When operating Datatakers in a network, it is advisable that
all loggers in the network be running the same firmware version.
Page 34
Page 35
Appendix — Accuracy of the Datataker Data Loggers
ABSOLUTE ACCURACY
Range
Full
Scale Units
Resolution Units
Tolerance at 25°C
% of
Plus
Full Scale
Offset Units
ABSOLUTE ACCURACY
Tolerance –20 to 70°C
% of
Plus
Full Scale
Offset Units
VOLTAGE
100V ▲
50V ◆
5V
2.5V
250mV
25mV
642
64.2
6.42
3000
300
30
V
V
V
mV
mV
mV
28.0
2.8
0.28
130
13
1.3
mV
mV
mV
µV
µV
µV
±0.26%
±0.26%
±0.26%
±0.06%
±0.06%
±0.06%
±150
±14
±1.2
±700
±63
±5.7
mV
mV
mV
µV
µV
µV
±0.31%
±0.31%
±0.31%
±0.16%
±0.17%
±0.16%
±150
±14
±1.2
±700
±63
±5.7
mV
mV
mV
µV
µV
µV
RESISTANCE
7KΩ (4W,I)
1KΩ (4W,I)
100Ω (4W,I)
500Ω (4W,II)
100Ω (4W,II)
10Ω (4W,II)
8
1.2
0.12
800
120
12
kΩ
kΩ
kΩ
Ω
Ω
Ω
0.52
0.052
0.0052
52
5.2
0.52
Ω
Ω
Ω
mΩ
mΩ
mΩ
±0.20%
±0.15%
±0.10%
±0.15%
±0.10%
±0.15%
±2.0
±0.26
±0.023
±280
±26
±2.3
Ω
Ω
Ω
mΩ
mΩ
mΩ
±0.31%
±0.24%
±0.17%
±0.24%
±0.17%
±0.24%
±2.0
±0.26
±0.023
±280
±26
±2.3
Ω
Ω
Ω
mΩ
mΩ
mΩ
10Ω)
±0.20%
±0.15%
±0.10%
±0.15%
±0.10%
±0.15%
±2.9
±0.32
±0.09
±320
±66.0
±43
Ω
Ω
Ω
mΩ
mΩ
mΩ
±0.31%
±0.24%
±0.17%
±0.24%
±0.17%
±0.24%
±2.9
±0.32
±0.09
±320
±66.0
±43
Ω
Ω
Ω
mΩ
mΩ
mΩ
±0.25%
±0.26%
±0.25%
±7 µA
±0.7 µA
±0.06 µA
RESISTANCE, 3-Wire Compensation (Lead Resistance
7KΩ (3W,I)
8 kΩ
0.52 Ω
1KΩ (3W,I)
1.2 kΩ
0.052 Ω
100Ω (3W,I)
0.12 kΩ
0.0052 Ω
500Ω (3W,II)
800 Ω
52 mΩ
100Ω (3W,II)
120 Ω
5.2 mΩ
10Ω (3W,II)
12 Ω
0.52 mΩ
CURRENT
25mA
2.5mA
0.25mA
30 mA
3 mA
0.3 mA
FREQUENCY
300kHz
30kHz
3kHz
300Hz
300
30
3
0.3
kHz
kHz
kHz
kHz
1.3 µA
0.13 µA
0.013 µA
0.0022
0.0022
0.0022
0.0022
%
%
%
%
±0.16%
±0.16%
±0.16%
±0.052%
±0.052%
±0.052%
±0.052%
±7 µA
±0.7 µA
±0.06 µA
±6.5
±0.65
±0.065
±0.007
Hz
Hz
Hz
Hz
±0.061%
±0.061%
±0.061%
±0.061%
±6.5
±0.65
±0.065
±0.007
Hz
Hz
Hz
Hz
Range
Full
Scale Units
Resolution Units
RTDs, 4-Wire
Pt100 (100Ω)
<51 °C
Pt100 (500Ω) 51-600 °C
Ni1000 (7K)
°C
Cu135 (500Ω)
°C
0.01
0.13
0.10
0.14
BRIDGES, FULL, Voltage
2.5V
600000 ppm
250mV
60000 ppm
25mV
6000 ppm
°C
°C
°C
°C
Tolerance at 25°C
% of
Plus
Full Scale
Offset Units
±0.10%
±0.15%
±0.20%
±0.15%
±0.07
±0.73
±0.56
±0.73
26 ppm
2.6 ppm
0.26 ppm
±0.00%
±0.05%
±0.10%
BRIDGES, FULL, Current
2.5V
3E+06 ppm
250mV
342857 ppm
25mV
34286 ppm
150 ppm
15 ppm
1.5 ppm
BRIDGES, HALF:,Current
2.5V
2E+06 ppm
250mV
171429 ppm
25mV
17143 ppm
74 ppm
7.4 ppm
0.74 ppm
°C
°C
°C
°C
Tolerance –20 to 70°C
% of
Plus
Full Scale
Offset Units
±0.17%
±0.24%
±0.31%
±0.24%
±0.07
±0.73
±0.56
±0.73
±140 ppm
±13 ppm
±1.2 ppm
±0.00%
±0.07%
±0.12%
±140 ppm
±13 ppm
±1.2 ppm
±0.16%
±0.16%
±0.16%
±800 ppm
±72 ppm
±6.5 ppm
±0.33%
±0.34%
±0.33%
±800 ppm
±72 ppm
±6.5 ppm
±0.36%
±0.36%
±0.36%
±400 ppm
±36 ppm
±3.3 ppm
±0.62%
±0.63%
±0.62%
±400 ppm
±36 ppm
±3.3 ppm
BRIDGES, FULL (4 Active Gauges, Gauge Factor = 2.0), Voltage
2.5V
150000 µS
6.50 µS
±0.00%
250mV
15000 µS
0.65 µS
±13.00%
25mV
1500 µS
0.07 µS
±15.50%
35 µS
3.2 µS
0.28 µS
±0.00%
±13.00%
±15.50%
35 µS
3.2 µS
0.28 µS
BRIDGES, FULL (4 Active Gauges, Gauge Factor = 2.0), Current
2.5V
857143 µS
37.14 µS
±0.20%
250mV
85714 µS
3.71 µS
±0.25%
25mV
8571 µS
0.37 µS
±0.10%
200 µS
18 µS
1.6 µS
±0.34%
±0.41%
±0.17%
200 µS
18 µS
1.6 µS
BRIDGES, HALF (2 Active Gauges, Gauge Factor = 2.0), Current
2.5V
857143 µS
37.14 µS
±0.40%
250mV
85714 µS
3.71 µS
±0.45%
25mV
8571 µS
0.37 µS
±0.30%
200 µS
18 µS
1.6 µS
±0.63%
±0.70%
±0.46%
200 µS
18 µS
1.6 µS
TIME
24 hrs
1 sec
0.03 sec per day
0.78 sec per month
6.3 sec per day
3.16 min per month
TEMPERATURE (LM35)
0.013 °C
±0.00%
±1.5 °C
±2.00%
±1.5 °C
THERMOCOUPLES, Reference Un-Trimmed
25mV range
°C
0.04 °C
250mV range
°C
0.43 °C
°C
±0.06%
±0.06%
±2.7 °C
±4.6 °C
±0.16%
±0.17%
±2.7 °C
±4.6 °C
THERMOCOUPLES, Reference Trimmed
25mV range
°C
0.04 °C
250mV range
°C
0.43 °C
±0.06%
±0.06%
±1.2 °C
±3.1 °C
±0.16%
±0.17%
±1.2 °C
±3.1 °C
RTDs, 3-Wire
Pt100 (100Ω)
<51 °C
Pt100 (500Ω) 51-600 °C
Ni1000 (7K)
°C
Cu135 (500Ω)
°C
±0.10%
±0.15%
±0.20%
±0.15%
0.01
0.13
0.10
0.14
°C
°C
°C
°C
±0.17
±0.82
±0.57
±0.84
°C
°C
°C
°C
±0.17%
±0.24%
±0.31%
±0.24%
±0.17
±0.82
±0.57
±0.84
°C
°C
°C
°C
▲ DT505, 605, 515 and 615 only.
◆ Thermocouple accuracy figure varies slightly with thermocouple type, and applies as percentage of Celsius scale.
USING THE ACCURACY TABLE (ABOVE)
Example 1 — Calculate the resolution when measuring a frequency of 25kHz.
From the “Frequency \ Range 30kHz” row above,
Resolution = 0.0022% of Full Scale
= 0.022% of 30kHz
= 0.66Hz (minimum ADC step)
Example 2 — Calculate the tolerance in measuring a frequency of 25kHz at 25°C.
From the “Frequency \ Range 30kHz” row above,
Tolerance in the reading at 25°C = (% of Full Scale) +
(Offset)
= (±0.052% of 30kHz) + (±0.65Hz)
=
(±15.6Hz)
+ (±0.65Hz)
= ±16.3Hz
That is, the reading is 25,000Hz ±16.3Hz at 25°C.
°C
°C
°C
°C
Index
Page 36
... where to find it!
characters 13, 23
A ASCII
action
comments (' ) 2, 13
commands
BEGIN 3
CALARMS 9
CALARMn 9
CARDID 8
CDATA 8
CLAST 8
CLEAR 8
COPY 8
CPROG 8
CSCANS 3
CTEST 8
END 3
G, GA, GB, GC, GD, GS, GX,
GZ, GZn 3, 9
H, HA, HB, HC, HD, HS, HX,
HZ, HZ n 3, 9
LOGON, LOGOFF 8
NOCOPY 8
PASSWORD 13
Q 8
RESET 10
RUNPROG 8
SIGNOFF 13
STATUS, STATUSn 10
TEST, TEST n 10
U, UA, UB, UC, UD and UX 8
computer format mode (/H) 10, 11
COMS port 1, 13
isolation 12, 22, 25, 26
conditional
scanning (:nW) 3
tests 9
expressions 7
convert lamp 24, 25, 26, 27
COPY command 8
counter 4, 18, 20
events 3
19200 Hz input 26
country setting 10, 24, 25, 26
CSCANS command 3
current input 4, 19
loop (4 – 20mA) 4, 19
commands 9
text 9
accuracy 17
address 1, 11, 14, 24, 25, 26
alarm 9
combining 9
number 9
output channels 9
schedule 3, 9
arithmetic operators 7
assignment
to parameters 11
to variables 7
to digital outputs 4
attenuated input 4, 17, 19, 26
graph display 10
B barchannel
option 5
battery 15
connection 1, 15, 22
current 6
life 15, 26
voltage 6
baud rate 1, 13, 24, 25, 26
BEGIN command 1, 13
bridges 4, 17, 19, 20
current excitation 17
voltage excitation 17
buzzer (4WARN ) 12
command 9
C CALARMS
calculations 7
by channel options 5, 7
calibration
auto, interval (P0, /K) 11
using spans 6
CARDID command 8
CDATA command 8
channel
expansion 27
factor 4, 10, 13, 17
identification 3, 5, 10, 12, 28
lists 3
numbering (/N) 3, 4, 28
options 5
sequences 4, 28
types 4
characters, special 13
CLAST command 8
CLEAR command 8
clearing
alarms 9
card data 8
card program 8
schedules 3
stored data 8
D
data bits 13
data retrieval 8
date (D) 6
delay period
digital output 4
alarm condition 9
differential input 4, 19, 23, 27
attenuated 26
digital
events 3
input 4
output 4, 19
DIP switch 13, 14, 15, 24, 25, 26
display 5, 14
alarms 12
backlight (WARN5, WARN6) 12
options (ND, /W, BG) 5, 12
E
F
END command 2, 3
error messages (E n ) 21
errors, response to 21
event
schedules 3
triggers ( nE, n..mE) 3
excite terminal ( ✶ ) 4, 19, 20
expression evaluation 7
external excitation 28
format of output 5, 10
frequency measurement 4, 27
function keys 12
functions 7
LOGON command 8
low power operation 15
N
networking 14
NOCOPY command 8
noise minimisation 17
extra samples (ES n ) 5
averaging 6
O
order of
scanning 3
Unloading 8
sampling 3
schedules 3
output
format 10
units 4, 6
P
schedules 3
H Hhigh- halting
voltage measurement 4, 20, 26
host computer 1, 13, 14
humidity measurement 18
HZ- halting alarms 3, 9
IBM PCs 13
IF - see alarms 9
immediate scans 3
input termination 5, 22, 19
interface wiring 13
internal channels 6, 24, 25, 26, 28, 27
intrinsic functions 7
isolation of COMS port 13, 24, 25, 26
isothermal block 16
line frequency (P11, 8SV) 1, 5, 6, 27
list key 12
listing
alarms (STATUS3) 9, 10
schedules (STATUS2) 3, 10
local logger 14
logging 8, 11
disabled 8
status 8
logical operators 7
LOGOFF command 8
T
temperature
sensors 4, 16, 19, 28
units (P36) 11
TEST command 10
text string ($ ) 6
thermistors (YS n ) 4, 16
thermocouples (TJ, TT etc.) 4, 16
time (T) 1, 6
triggers 3
U
units text 3, 4, 11
unloading data (U) 8
V
variables ( n CV) 4, 7
version number of ROM 10
vibrating wire gauges ( n FW) 4, 27
voltage input 4, 19
W
waking by
COMS port 13
network 14
schedule 3
WAKE terminal 15
WARN 4, 12
warning LEDs (n WARN) 12
memory card 8, 12, 29
messages to COMS ports 14
modem connection 13
multiple reports 3, 4, 12
multiplexer power 15, 24, 25
Grey code conversion (F7) 7
ground loops 17, 23
guard (G) 6, 23
K keypad 12
screen 12
L LCD
light key 12
sampling
order 3
time (P11, 8SV) 6, 11
scan
interval 3
order 3
trigger 3
schedules 3
scrolling display 12
self heating of sensors 17
sensor wiring 4, 19, 20
settling time (P10, 7SV) 6, 11
shunts, current 4, 17, 19
sign on message 12
SIGNOFF command 13
single ended
input 4, 19, 22
reference input 4, 19, 22
span scaling (Sn ) 6
speaker (/V) 28
statistical sub-schedule 3
STATUS command 10
status screens 12
stop bits 1, 13
storage capacity 8
strain gauges 17
switches ( / ) 11
synchronised scanning (/S) 3
system timers ( n ST) 4, 6
system variables ( n SV) 4, 6
connection 13
M Macintosh
mathematical functions 7
option (Gn ) 5, 22
G gain
Geologger 27
I
S
Q
R
parameters (P n ) 11
parity 13
PASSWORD protection 13
phase encoder 4, 20, 23
polled schedule (RX) 3
polling alarm data (?ALL, ?n ) 9
polynomials 7
power
external connection 1, 15, 24, 25, 26
consumption 15, 26
printer on COMS port 14
program "branching" 18
program in EPROM 18
programming from cards 8
protect program (/F) 11
pulse output (nDSO( f.f,R)=1) 4
pulse generator ( nHSCO(0)) 18
Q quit Unload 8
radians 7
RAM card 8, 12
rate of change 5
reference junction 5, 16, 28
relational operators 7
RESET command 10
resetting counters (R) 4, 5, 18
resistance measurement 4, 16, 19
resolution 4, 17, 23
retrieval of data 8
RS232, RS423 13
RTD's 4, 19, 28
X
XON - XOFF 10, 13
Internet Home Page
http://www.datataker.com /~ dtaker
Head Office
Data Electronics (Aust.) Pty. Ltd.
7 Seismic Court
Rowville
VIC 3178
Australia
Phone +61 3 9764 8600
Fax +61 3 9764 8997
E-mail datataker @ dataelec.com.au
U.S.A. Office
Data Electronics U.S.A., Inc.
22961 Triton Way, Suite E
Laguna Hills, CA 92653
U.S.A.
Phone +1 714 452 0750
1-800-9-LOGGER
Fax +1 714 452 1170
E-mail deusa @ datataker.com
U.K. Office
Data Electronics (U.K.) Ltd.
26 Business Centre West – Avenue One
Letchworth Garden City
Hertfordshire SG6 2HB
United Kingdom
Phone +44 1462 481291
Fax +44 1462 481375
Printed in Australia
ACN 006 134 863
CV-0002-A0.S04