1
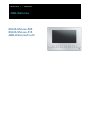
0073-1-7516 │
│ 22.02.2012
ABB-Welcome
Pos: 2 /DinA4 - Anleitungen Online/Inhalt/KNX/DoorEntry/83220-AP-xxx/Titelblatt - 83220-AP-xxx - ABB @ 19\mod_1323249806476_15.docx @ 111084 @ @ 1
83220-SM-xxx-500
83220-SM-xxx-515
ABB-WelcomeTouch
=== Ende der Liste für Textmarke Cover ===
ABB-Welcome
Pos: 4 /Busch-Jaeger (Neustruktur)/Modul-Struktur/Online-Dokumentation/Inhaltsverzeichnis (--> Für alle Dokumente <--)/Inhaltsverzeichnis @ 19\mod_1320649044386_15.docx @ 109653 @ @ 1
1
2
3
4
5
6
7
8
Safety....................................................................................................................................................................... 3
Intended use ............................................................................................................................................................ 3
Environment ............................................................................................................................................................. 3
3.1
ABB devices ............................................................................................................................................ 3
User Manual............................................................................................................................................................. 3
Operation ................................................................................................................................................................. 5
5.1
Standard operation ................................................................................................................................. 5
5.1.1
Control elements ..................................................................................................................................... 5
5.1.2
Welcome screen and status bar .............................................................................................................. 7
5.2
Control actions ........................................................................................................................................ 8
5.2.1
Setting up the voice and video connection .............................................................................................. 8
5.2.2
Opening the door .................................................................................................................................... 9
5.2.3
Muting
....................................................................................................................................... 10
5.2.4
Switching the light ................................................................................................................................. 11
5.2.5
Events and picture memory / history ..................................................................................................... 12
5.2.6
Inserting the SD card ............................................................................................................................ 15
5.2.7
Settings
....................................................................................................................................... 16
5.2.7.1
Overview
....................................................................................................................................... 16
5.2.7.2
Volume
....................................................................................................................................... 18
5.2.7.3
Display
....................................................................................................................................... 19
5.2.7.4
Date / time
....................................................................................................................................... 21
5.2.7.5
Language
....................................................................................................................................... 22
5.2.7.6
Door Entry System ................................................................................................................................ 24
5.2.7.7
Firmware update ................................................................................................................................... 25
5.3
Cleaning ................................................................................................................................................ 26
5.4
Adjusting the device .............................................................................................................................. 27
5.4.1
Terminal resistor ................................................................................................................................... 27
5.4.2
Setting the master/slave switch ............................................................................................................. 27
Technical data........................................................................................................................................................ 28
Mounting / Installation ............................................................................................................................................ 29
7.1
Requirements for the electrician ........................................................................................................... 29
7.2
General installation instructions ............................................................................................................ 29
7.3
Mounting ............................................................................................................................................... 30
7.4
Connection ............................................................................................................................................ 34
Addressing ............................................................................................................................................................. 35
8.1
Addressing the stations ......................................................................................................................... 35
8.1.1
Potentiometer ....................................................................................................................................... 35
8.1.2
Setting the address of the outdoor station:............................................................................................ 35
8.1.3
Assigning the doorbell push-button of an outdoor station to an apartment ........................................... 35
8.1.4
Setting the address of the indoor station ............................................................................................... 35
8.1.5
Setting of the "standard outdoor station" ............................................................................................... 36
8.2
Video for addressing the device ............................................................................................................ 38
=== Ende der Liste für Textmarke TOC ===
| 0073-1-7516
—2—
ABB-Welcome
Safety
Pos: 6 /Busch-Jaeger (Neustruktur)/Modul-Struktur/Online-Dokumentation/Überschriften (--> Für alle Dokumente <--)/1. Ebene/S - T/Sicherheit @ 18\mod_1302612791790_15.docx @ 103357 @ 1 @ 1
1
Safety
Pos: 7 /Busch-Jaeger (Neustruktur)/Modul-Struktur/Online-Dokumentation/Sicherheit (--> Für alle Dokumente <--)/Warnhinweise/Sicherheit - 230 V @ 18\mod_1302606816750_15.docx @ 103308 @ @ 1
Warning
E lec tric volta ge!
Risk of death and fire due to electrical voltage of 230 V.
– Work on the 230V supply system may only be performed by authorised electricians!
– Disconnect the mains power supply prior to installation and/or disassembly!
Pos: 8 /Busch-Jaeger (Neustruktur)/Modul-Struktur/Online-Dokumentation/Überschriften (--> Für alle Dokumente <--)/1. Ebene/A - F/Bestimmungsgemäßer Gebrauch @ 18\mod_1302763321316_15.docx @ 103483 @ 1 @ 1
2
Intended use
Pos: 9 /DinA4 - Anleitungen Online/Inhalt/KNX/DoorEntry/83220-AP-xxx/Bestimmungsgemaesser Gebrauch - 83220-AP-xxx-500 @ 20\mod_1324561168699_15.docx @ 112728 @ @ 1
The ABB-WelcomeTouch 83220-SM-xxx-500 is an integral part of the ABB Welcome door communication system
and operates exclusively with components from this system. The device must only be installed in dry indoor
rooms.
Pos: 10 /Busch-Jaeger (Neustruktur)/Modul-Struktur/Online-Dokumentation/Überschriften (--> Für alle Dokumente <--)/1. Ebene/U - Z/Umwelt @ 18\mod_1302614158967_15.docx @ 103383 @ 1 @ 1
3
Environment
Pos: 11 /Busch-Jaeger (Neustruktur)/Modul-Struktur/Online-Dokumentation/Umwelt (--> Für alle Dokumente <--)/Hinweise/Hinweis - Umwelt - Hinweis Elektrogeräte @ 18\mod_1302763973434_15.docx @ 103500 @ @ 1
C ons ider the protec tion of the environment!
Used electric and electronic devices must not be disposed of with domestic waste.
– The device contains valuable raw materials which can be recycled. Therefore, dispose of the
device at the appropriate collecting depot.
Pos: 12 /DinA4 - Anleitungen Online/Ueberschriften/2./ABB Geraete @ 19\mod_1323162843832_15.docx @ 110875 @ 2 @ 1
3.1
A B B devic es
Pos: 13 /Busch-Jaeger (Neustruktur)/Modul-Struktur/Online-Dokumentation/Umwelt (--> Für alle Dokumente <--)/Hinweise/Hinweis - Umwelt - ABB Elektrogeräte @ 19\mod_1323162745839_15.docx @ 110867 @ @ 1
All packaging materials and devices from ABB bear the markings and test seals for proper disposal. Always
dispose of the packaging material and electric devices and their components via the authorized collecting depots
and disposal companies.
ABB products meet the legal requirements, in particular the laws governing electronic and electrical devices and
the REACH ordinance.
(EU-Directive 2002/96/EG WEEE and 2002/95/EG RoHS)
(EU-REACH ordinance and law for the implementation of the ordinance (EG) No.1907/2006)
Pos: 14 /DinA4 - Anleitungen Online/Ueberschriften/1./Anwenderhandbuch @ 19\mod_1309347227593_15.docx @ 107473 @ 1 @ 1
4
User Manual
Pos: 15 /DinA4 - Anleitungen Online/Inhalt/KNX/DoorEntry/Systemhandbuch/Anwenderhandbuch - ABB @ 19\mod_1323163157997_15.docx @ 110883 @ @ 1
Detailed information for planning ABB-Welcome systems is contained in the user manual. Download at
www.Busch-Jaeger.com.
Pos: 16 /Busch-Jaeger (Neustruktur)/Modul-Struktur/Online-Dokumentation/Steuermodule - Online-Dokumentation (--> Für alle Dokumente <--)/++++++++++++ Seitenumbruch ++++++++++++ @ 9\mod_1268898668093_0.docx @ 52149 @ @ 1
| 0073-1-7516
—3—
ABB-Welcome
User Manual
Pos: 17 /Busch-Jaeger (Neustruktur)/Modul-Struktur/Online-Dokumentation/Steuermodule - Online-Dokumentation (--> Für alle Dokumente <--)/++++++++++++ Seitenumbruch ++++++++++++ @ 9\mod_1268898668093_0.docx @ 52149 @ @ 1
| 0073-1-7516
—4—
ABB-Welcome
Operation
Pos: 18 /DinA4 - Anleitungen Online/Ueberschriften/1./Bedienung @ 18\mod_1302613924165_15.docx @ 103365 @ 1 @ 1
5
Operation
Pos: 19 /DinA4 - Anleitungen Online/Ueberschriften/2./Normaler Betrieb @ 18\mod_1302768820965_15.docx @ 103540 @ 2 @ 1
5.1
S tanda rd operation
Pos: 20 /DinA4 - Anleitungen Online/Ueberschriften/3./Bedienelemente @ 20\mod_1323260220559_15.docx @ 111647 @ 3 @ 1
5.1.1
C ontrol elements
Pos: 21 /DinA4 - Anleitungen Online/Inhalt/KNX/DoorEntry/83220-AP-xxx/Bedienelemente - 83220-AP-xxx @ 18\mod_1303212853605_15.docx @ 103673 @ @ 1
Fig. 1:
Overview of control buttons
| 0073-1-7516
—5—
Operation
ABB-Welcome
No.
F unc tion
1
Press this button accept a call.
2
Press this button to open the door.
3-1
Press this button to deactivate the doorbell.
3-2
While a call is pending, this button has the "reject call" function.
3-3
During the conversation the button has the "mute" function.
- Press this button reject a call.
Press on this button to activate the mute function.
– The party at the other end cannot hear you.
- Press the button again to continue the conversation.
4
Press this button to switch on the lighting.
5
Press this button to display the events and picture memory / history.
6
Press this button to change to "Settings".
6-1
• The ring tone volume
– Setting nos. 6-1 to 6-6 are available on the touch screen.
6-2
• The brightness of the display
6-3
• The time and date
6-4
• The language
6-5
• Door Entry System
6-6
• Firmware update
Pos: 22 /Busch-Jaeger (Neustruktur)/Modul-Struktur/Online-Dokumentation/Steuermodule - Online-Dokumentation (--> Für alle Dokumente <--)/++++++++++++ Seitenumbruch ++++++++++++ @ 9\mod_1268898668093_0.docx @ 52149 @ @ 1
| 0073-1-7516
—6—
Operation
ABB-Welcome
Pos: 23 /DinA4 - Anleitungen Online/Ueberschriften/3./Startbildschirm und Statusleiste @ 20\mod_1323260336194_15.docx @ 111695 @ 3 @ 1
5.1.2
W elc ome s c reen and s tatus bar
Pos: 24 /DinA4 - Anleitungen Online/Inhalt/KNX/DoorEntry/83220-AP-xxx/Startbildschirm und Statusleiste - 83220-AP-xxx @ 20\mod_1323260371864_15.docx @ 111903 @ @ 1
Fig. 2:
No.
F unc tion
1
Current date
2
Time
3
System information
Status bar
- Set the date by touching the button.
- Set the correct time by touching the button.
- Call up the address (number of the indoor station) of this panel and the current hardware and software
information by touching the button.
4
History
- New information is available in History (events and picture memory) when this icon flashes. E.g., a
missed call.
- Display the events and picture memory by touching the button.
5
Mute function
- The icons "crossed-out handset" and "crossed-out bell" indicate the mute function of the microphone or
the loudspeaker of the panel.
6
Open entrance door
- The "Open door" icon is displayed when you press the door opener or activate the function "Automatic
door opener".
7
SD card
8
Light
- The icon shows whether you have inserted an SD card.
- The icon is shown when you have switched the light directly from the panel.
9
Cleaning blockage
- The icon is shown when the display is blocked to prevent functions being triggered during cleaning.
Pos: 25 /Busch-Jaeger (Neustruktur)/Modul-Struktur/Online-Dokumentation/Steuermodule - Online-Dokumentation (--> Für alle Dokumente <--)/++++++++++++ Seitenumbruch ++++++++++++ @ 9\mod_1268898668093_0.docx @ 52149 @ @ 1
| 0073-1-7516
—7—
Operation
ABB-Welcome
Pos: 26 /DinA4 - Anleitungen Online/Ueberschriften/2./Bedienaktionen @ 20\mod_1323262294281_15.docx @ 111911 @ 2 @ 1
5.2
C ontrol ac tions
Pos: 27 /DinA4 - Anleitungen Online/Ueberschriften/3./Sprech- und Videoverbindung @ 20\mod_1323262368700_15.docx @ 111927 @ 3 @ 1
5.2.1
S etting up the voic e and video c onnec tion
Pos: 28 /DinA4 - Anleitungen Online/Inhalt/KNX/DoorEntry/83220-AP-xxx/Sprech- und Videoverbindung - 83220-AP-xxx @ 20\mod_1323262341852_15.docx @ 111919 @ @ 1
Fig. 3:
Setting up the voice and video connection
The following functions are available for setting up the voice and video connections (pressing the handset button):
No.
F unc tion
1
Designation of camera
2
Set the volume by touching the respective buttons (plus and minus).
3
If several outdoor stations or external cameras are connected:
– Select the camera by touching the respective buttons (forward and back).
4
Set the display by touching the respective buttons.
• Saturation of the display (plus and minus)
• Contrast of the display (plus and minus)
Pos: 29 /Busch-Jaeger (Neustruktur)/Modul-Struktur/Online-Dokumentation/Steuermodule - Online-Dokumentation (--> Für alle Dokumente <--)/++++++++++++ Seitenumbruch ++++++++++++ @ 9\mod_1268898668093_0.docx @ 52149 @ @ 1
| 0073-1-7516
—8—
Operation
ABB-Welcome
Pos: 30 /DinA4 - Anleitungen Online/Ueberschriften/3./Tuer oeffnen @ 20\mod_1323263277453_15.docx @ 111935 @ 3 @ 1
5.2.2
O pening the door
Pos: 31 /DinA4 - Anleitungen Online/Inhalt/KNX/DoorEntry/83220-AP-xxx/Tuer oeffnen - 83220-AP-xxx @ 20\mod_1323267958479_15.docx @ 112109 @ @ 1
Fig. 4:
Opening the door
When activating the door opener (by pressing the key button), the following function is available:
No.
F unc tion
1
The "Open door" icon is displayed when you press the door opener or activate the function "Automatic door
opener".
Pos: 32 /Busch-Jaeger (Neustruktur)/Modul-Struktur/Online-Dokumentation/Steuermodule - Online-Dokumentation (--> Für alle Dokumente <--)/++++++++++++ Seitenumbruch ++++++++++++ @ 9\mod_1268898668093_0.docx @ 52149 @ @ 1
| 0073-1-7516
—9—
Operation
ABB-Welcome
Pos: 33 /DinA4 - Anleitungen Online/Ueberschriften/3./Stumm schalten @ 20\mod_1323263607142_15.docx @ 111951 @ 3 @ 1
5.2.3
Muting
Pos: 34 /DinA4 - Anleitungen Online/Inhalt/KNX/DoorEntry/83220-AP-xxx/Stumm schalten - 83220-AP-xxx @ 20\mod_1323263648687_15.docx @ 111959 @ @ 1
Fig. 5:
Mute function (mute timer)
The following functions are available for muting (mute timer):
No.
F unc tion
1
No call is pending:
If you press the "Mute function" while no call is pending the bell sound of the panel is deactivated for a
certain period.
- If calls come in during this time, only the video image is displayed.
- Missed calls are displayed in the events and picture storage.
2
A call is pending:
If you press the button "Mute function" during a call, the microphone of the panel is deactivated until the
button is pressed again.
Pos: 35 /Busch-Jaeger (Neustruktur)/Modul-Struktur/Online-Dokumentation/Steuermodule - Online-Dokumentation (--> Für alle Dokumente <--)/++++++++++++ Seitenumbruch ++++++++++++ @ 9\mod_1268898668093_0.docx @ 52149 @ @ 1
| 0073-1-7516
— 10 —
Operation
ABB-Welcome
Pos: 36 /DinA4 - Anleitungen Online/Ueberschriften/3./Licht schalten @ 20\mod_1323264614518_15.docx @ 111967 @ 3 @ 1
5.2.4
S witc hing the light
Pos: 37 /DinA4 - Anleitungen Online/Inhalt/KNX/DoorEntry/83220-AP-xxx/Licht schalten - 83220-AP-xxx @ 20\mod_1323264693171_15.docx @ 111995 @ @ 1
Fig. 6:
Switching lights
When activating the light switch, the following function is available:
No.
F unc tion
1
The "Light" icon is displayed when you press the button "Switching lights".
Pos: 38 /Busch-Jaeger (Neustruktur)/Modul-Struktur/Online-Dokumentation/Steuermodule - Online-Dokumentation (--> Für alle Dokumente <--)/++++++++++++ Seitenumbruch ++++++++++++ @ 9\mod_1268898668093_0.docx @ 52149 @ @ 1
| 0073-1-7516
— 11 —
Operation
ABB-Welcome
Pos: 39 /DinA4 - Anleitungen Online/Ueberschriften/3./Ereignis- und Bildspeicher - History @ 20\mod_1323264954284_15.docx @ 112093 @ 3 @ 1
5.2.5
E vents and pic ture memory / his tory
Pos: 40 /DinA4 - Anleitungen Online/Inhalt/KNX/DoorEntry/83220-AP-xxx/Ereignis- und Bildspeicher - History - 83220-AP-xxx @ 20\mod_1323265076529_15.docx @ 112101 @ @ 1
The panel records all events. Pressing the "History" button displays the last 100 events (prior events are
overwritten).
Fig. 7:
Events and picture storage / history
No.
F unc tion
1
If you have activated the function "Auto snapshots activated" in the system settings, the flashing icon in the
status bar signals a newly taken snapshot.
- The symbol stops flashing when you call up the events and picture storage.
| 0073-1-7516
— 12 —
Operation
ABB-Welcome
Fig. 8:
| 0073-1-7516
Events and picture storage / history
— 13 —
Operation
ABB-Welcome
During a call you can take a snapshot at any time by pressing the "History" button, even when the "Automatic
snapshots" function is not active.
The following functions are available for the "Events and picture storage /history" function.
No.
F unc tion
1
If you have activated the system setting "Automatic snapshots", a miniature view is displayed in the events
list when incoming calls are missed.
- Date, time and the type of the event are recorded together with the snapshot.
- If no automatic snapshots are active, a camera icon is displayed in the miniature view.
2
Individual entries or the entire list can be deleted at any time.
- Snapshots which you would like to archive can be copied on an inserted SD card (SD, SDHC).
3
Three pictures are are always made when a visitor rings the bell. This ensures an optimum snapshot.
- All recorded pictures are called up via the detail view.
4
Display of the detail view of a record
5
Select the event by touching the respective buttons (forward and back).
6
Select the single picture by touching the respective buttons (1 to 3).
Pos: 41 /Busch-Jaeger (Neustruktur)/Modul-Struktur/Online-Dokumentation/Steuermodule - Online-Dokumentation (--> Für alle Dokumente <--)/++++++++++++ Seitenumbruch ++++++++++++ @ 9\mod_1268898668093_0.docx @ 52149 @ @ 1
| 0073-1-7516
— 14 —
Operation
ABB-Welcome
Pos: 42 /DinA4 - Anleitungen Online/Ueberschriften/3./SD-Karte einfuegen @ 20\mod_1324291540680_15.docx @ 112363 @ 3 @ 1
5.2.6
Ins erting the S D c ard
Pos: 43 /DinA4 - Anleitungen Online/Inhalt/KNX/DoorEntry/83220-AP-xxx/SD-Karte einfügen - 83220-AP-xxx @ 20\mod_1324291581867_15.docx @ 112371 @ @ 1
Fig. 9:
Inserting the SD card
Pos: 44 /Busch-Jaeger (Neustruktur)/Modul-Struktur/Online-Dokumentation/Steuermodule - Online-Dokumentation (--> Für alle Dokumente <--)/++++++++++++ Seitenumbruch ++++++++++++ @ 9\mod_1268898668093_0.docx @ 52149 @ @ 1
| 0073-1-7516
— 15 —
Operation
ABB-Welcome
Pos: 45 /DinA4 - Anleitungen Online/Ueberschriften/3./Einstellungen @ 20\mod_1323267988133_15.docx @ 112227 @ 3 @ 1
5.2.7
S ettings
Pos: 46 /DinA4 - Anleitungen Online/Ueberschriften/4./Übersicht @ 20\mod_1323856515464_15.docx @ 112244 @ 4 @ 1
5.2.7. 1
O ver view
Pos: 47 /DinA4 - Anleitungen Online/Inhalt/KNX/DoorEntry/83220-AP-xxx/Einstellungen Uebersicht- 83220-AP-xxx @ 20\mod_1323263342029_15.docx @ 111943 @ @ 1
Fig. 10: Overview of settings
The following areas are available when touching the "Settings" button:
No.
F unc tion
1
Volume
– The volumes of the bell sounds
2
Display
– Different display settings
3
Date and time
4
Language
5
Door Entry System
6
Firmware update
– Different time settings
– The local language
– Different system settings, e.g bell sounds
| 0073-1-7516
— 16 —
Operation
ABB-Welcome
Fig. 11: Settings
To
1.
2.
3.
change into the settings areas of the list field (1), carry out the following steps:
To display the hidden functions, tip on the scroll buttons (2).
Touch one of the setting areas.
Touch the button "Set" (3).
– The device changes to the setting area selected.
– The individual functions are described in the following chapters.
– The device changes back to the start page via button "Back".
Pos: 48 /Busch-Jaeger (Neustruktur)/Modul-Struktur/Online-Dokumentation/Steuermodule - Online-Dokumentation (--> Für alle Dokumente <--)/++++++++++++ Seitenumbruch ++++++++++++ @ 9\mod_1268898668093_0.docx @ 52149 @ @ 1
| 0073-1-7516
— 17 —
Operation
ABB-Welcome
Pos: 49 /DinA4 - Anleitungen Online/Ueberschriften/4./Lautstaerke @ 20\mod_1323856705443_15.docx @ 112251 @ 4 @ 1
5.2.7. 2
V olume
Pos: 50 /DinA4 - Anleitungen Online/Inhalt/KNX/DoorEntry/83220-AP-xxx/Einstellungen Lautstaerke- 83220-AP-xxx @ 20\mod_1323856817689_15.docx @ 112259 @ @ 1
Fig. 12: Setting the volume
When changing to "Volume" the following functions become available:
No.
F unc tion
1
Bell-sound volume
2
Mute timer
– Set the volume of the bell sound via the "Plus / minus" buttons.
- Use the "Plus / minus" buttons to set the time of the mute function which you activate via the "mute"
button.
– Before the adjustment tip on ""Hours" or "Minutes". The active range is marked with a frame.
3
OK
– By tipping on this button you activate the settings.
4
Back
– By tipping on this button you return to the start page without saving the settings.
Pos: 51 /Busch-Jaeger (Neustruktur)/Modul-Struktur/Online-Dokumentation/Steuermodule - Online-Dokumentation (--> Für alle Dokumente <--)/++++++++++++ Seitenumbruch ++++++++++++ @ 9\mod_1268898668093_0.docx @ 52149 @ @ 1
| 0073-1-7516
— 18 —
Operation
ABB-Welcome
Pos: 52 /DinA4 - Anleitungen Online/Ueberschriften/4./Display @ 20\mod_1323859069487_15.docx @ 112267 @ 4 @ 1
5.2.7. 3
Dis pla y
Pos: 53 /DinA4 - Anleitungen Online/Inhalt/KNX/DoorEntry/83220-AP-xxx/Einstellungen Display- 83220-AP-xxx @ 20\mod_1323859176842_15.docx @ 112275 @ @ 1
Fig. 13: Display settings
When changing to "Display", the following functions become available:
No.
F unc tion
1
Brightness
- Set the brightness of the display via the "Plus / minus" buttons.
2
Screen saver
– The display is preset as digital clock
– If an SD card with suitable pictures is located in the device, you can select a screen saver via the folddown menu. If several pictures are stored on the SD card they are displayed as a slide show.
Slide show (electronic picture frame)
– Each picture appears for 20 seconds.
Picture requirements:
– The pictures must be stored on the SD card in directory "DCIM" (Digital Camera Images) on the first
level.
– The maximum admissible size of the picture is 2048 x 1960 pixel.
– The maximum admissible resolution of a picture is 800 x 480 pixel.
– The resolution of the display is 800 x 600. Larger pictures will be reduced to this resolution.
– The format supported is "jpg".
3
Touch feedback
– By tipping on the checkbox you activate or deactivate the feedback tone which sounds when the display
is touched.
4
The entire screen
– Activate or deactivate the full-page mode of the door camera by tipping on the checkbox. The full-page
mode remains active for the period the picture of the visitor is shown after the door bell has been rung.
5
OK
– By tipping on this button you activate the settings.
6
Back
– By tipping on this button you return to the start page without saving the settings.
7
Calibration
– If the buttons and the associated graphics of the display are no longer superimposed, the monitor must
be calibrated.
– Tip on the calibration button and then consecutively on the 5 displayed position crosses. Finally confirm
the dialogue box displayed.
The display has been calibrated.
| 0073-1-7516
— 19 —
Operation
ABB-Welcome
8
Screen saver Off
– Select the active period for the screen saver via the fold-down menu until it switches itself off
automatically.
– Available are 5 / 15 / 30 minutes.
– To protect the display the maximum period for the display is limited to 30 minutes.
9
Screen saver On
– Select the start time for the screen saver via the fold-down menu.
– Available are 30 / 60 / 120 seconds.
Pos: 54 /Busch-Jaeger (Neustruktur)/Modul-Struktur/Online-Dokumentation/Steuermodule - Online-Dokumentation (--> Für alle Dokumente <--)/++++++++++++ Seitenumbruch ++++++++++++ @ 9\mod_1268898668093_0.docx @ 52149 @ @ 1
| 0073-1-7516
— 20 —
Operation
ABB-Welcome
Pos: 55 /DinA4 - Anleitungen Online/Ueberschriften/4./Datum - Uhrzeit @ 20\mod_1323862082869_15.docx @ 112283 @ 4 @ 1
5.2.7. 4
Date / time
Pos: 56 /DinA4 - Anleitungen Online/Inhalt/KNX/DoorEntry/83220-AP-xxx/Einstellungen Datum-Uhrzeit - 83220-AP-xxx @ 20\mod_1323862147113_15.docx @ 112291 @ @ 1
Fig. 14: Settings of the date and time
With the change to "Date and time" the following functions become available:
No.
F unc tion
1
Time
– Set the time via the "Plus / minus" buttons.
– Before the adjustment tip on ""Hours", "Minutes" or "Seconds". The active area is marked with a frame.
2
Date
– Set the date via the "Plus / minus" buttons.
– Before the adjustment tip on "Day", "Month" or "Year". The active area is marked with a frame.
3
OK
– By tipping on this button you activate the settings.
4
Back
– By tipping on this button you return to the start page without saving the settings.
5
Summertime
– Activate or deactivate the summertime by tipping on the checkbox (automatic switchover).
6
Time
– Select the format of the displayed time via the fold-down menu.
– Available are 12 h am/pm / 12 h / 24 h.
7
Date
– Select the format of the displayed date via the fold-down menu.
Pos: 57 /Busch-Jaeger (Neustruktur)/Modul-Struktur/Online-Dokumentation/Steuermodule - Online-Dokumentation (--> Für alle Dokumente <--)/++++++++++++ Seitenumbruch ++++++++++++ @ 9\mod_1268898668093_0.docx @ 52149 @ @ 1
| 0073-1-7516
— 21 —
Operation
ABB-Welcome
Pos: 58 /DinA4 - Anleitungen Online/Ueberschriften/4./Sprache @ 20\mod_1323864236322_15.docx @ 112299 @ 4 @ 1
5.2.7. 5
L anguage
Pos: 59 /DinA4 - Anleitungen Online/Inhalt/KNX/DoorEntry/83220-AP-xxx/Einstellungen Sprache- 83220-AP-xxx @ 20\mod_1323865579258_15.docx @ 112307 @ @ 1
Fig. 15: Setting the language
When changing to "Language" the following functions become available:
No.
F unc tion
1
Language (list field)
2
Scroll
– Here the languages available for selection are listed
– To display the hidden languages tip on the scroll boxes.
3
OK
– By tipping on this button you activate the settings.
4
Back
– By tipping on this button you return to the start page without saving the settings.
| 0073-1-7516
— 22 —
Operation
ABB-Welcome
F oreign language is s et
If a foreign language has been set, take the following steps for a reset:
1. Tip on the "Settings" button below the display.
2. In the list field of the "Settings" display (on the left in the display) tip on the 4th entry from the
top (this entry is marked with a flag).
3. In the "Settings" display, tip on the button at the bottom right (adjust).
– The device changes to the "Language" display.
4. In the list field (1) of the "Language" display (on the left in the display) tip on your language.
5. In the "Language" display, tip on the button at the bottom right (3) (ok).
– The device changes the language.
– The device changes back to the start page.
The language has been changed.
Fig. 16: Foreign language is set
Pos: 60 /Busch-Jaeger (Neustruktur)/Modul-Struktur/Online-Dokumentation/Steuermodule - Online-Dokumentation (--> Für alle Dokumente <--)/++++++++++++ Seitenumbruch ++++++++++++ @ 9\mod_1268898668093_0.docx @ 52149 @ @ 1
| 0073-1-7516
— 23 —
Operation
ABB-Welcome
Pos: 61 /DinA4 - Anleitungen Online/Ueberschriften/4./Door Entry System @ 20\mod_1323867424221_15.docx @ 112315 @ 4 @ 1
5.2.7. 6
Door E ntry S y s tem
Pos: 62 /DinA4 - Anleitungen Online/Inhalt/KNX/DoorEntry/83220-AP-xxx/Einstellungen Door Entry System- 83220-AP-xxx @ 20\mod_1323867533515_15.docx @ 112323 @ @ 1
Fig. 17: Settings of the Door Entry Systems
Information a bout the s ettings
The settings always apply to all connected outdoor stations.
With the change to "Door Entry System" the following functions become available:
No.
F unc tion
1
Outdoor stations
– Select the number of available outdoor stations via the fold-down menu.
– A maximum of 4 outdoor stations connected to the device are available.
2
OK
– By tipping on this button you activate the settings.
3
Back
– By tipping on this button you return to the start page without saving the settings.
4
Door opened automatically
– Via the "Plus / Minus" buttons adjust the period the automatic door opener (5) is to be active.
– Before the adjustment tip on "Hours" or "Minutes". The active range is marked with a frame.
5
Automatic door opener
– The automatic door opener unlocks the door when the bell is activated.
– Activate or deactivate the automatic door opener by tipping on the checkbox.
6
Automatic snapshots
– When the bell is pressed, three snapshots are automatically stored in the History.
– This function can only be activated when the automatic door opener is deactivated. Otherwise too many
snapshots would be stored during busy periods.
7
Bell sound for apartment
– Select the bell sound for the apartment door by tipping on one of the buttons in the list field.
– While tipping on the button the melody of the bell sound is played.
8
Bell sound for the building
– Select the bell sound for the front door by tipping on one of the buttons in the list field.
– While tipping on the button the melody of the bell sound is played.
Pos: 63 /Busch-Jaeger (Neustruktur)/Modul-Struktur/Online-Dokumentation/Steuermodule - Online-Dokumentation (--> Für alle Dokumente <--)/++++++++++++ Seitenumbruch ++++++++++++ @ 9\mod_1268898668093_0.docx @ 52149 @ @ 1
| 0073-1-7516
— 24 —
Operation
ABB-Welcome
Pos: 64 /DinA4 - Anleitungen Online/Ueberschriften/4./Firmware Update @ 20\mod_1323869513808_15.docx @ 112331 @ 4 @ 1
5.2.7. 7
F irmware update
Pos: 65 /DinA4 - Anleitungen Online/Inhalt/KNX/DoorEntry/83220-AP-xxx/Einstellungen Firmware Update - 83220-AP-xxx @ 20\mod_1323869578244_15.docx @ 112339 @ @ 1
Fig. 18: Firmware update
The firmware updates are made available on the Internet at www.busch-jaeger.de.
If the firmware for your device is to be updated, carry out the following steps:
1. On page www.busch-jaeger.de enter the article number of the device in the "Search" section.
– The page changes to the area of the device.
– If an update for the firmware is available, it is ready for downloading in this area.
– The package for downloading includes the firmware and instructions on how to install the firmware.
2. Install the firmware according to the downloaded instructions.
Pos: 66 /Busch-Jaeger (Neustruktur)/Modul-Struktur/Online-Dokumentation/Steuermodule - Online-Dokumentation (--> Für alle Dokumente <--)/++++++++++++ Seitenumbruch ++++++++++++ @ 9\mod_1268898668093_0.docx @ 52149 @ @ 1
| 0073-1-7516
— 25 —
ABB-Welcome
Operation
Pos: 67 /DinA4 - Anleitungen Online/Ueberschriften/2./Reinigung @ 19\mod_1310733980533_15.docx @ 107853 @ 2 @ 1
5.3
C leaning
Pos: 68 /DinA4 - Anleitungen Online/Inhalt/KNX/DoorEntry/Reinigung/Reinigung Touchscreenmonitor @ 19\mod_1310734108978_15.docx @ 107862 @ @ 1
Caution
R is k of da ma ge to the s c reen s urfa c e.
The screen surface can be damaged by hard or sharp objects!
Never use such objects for entries on the touch screen monitor.
– Use your finger or a plastic stylus.
The screen surface can be damaged by cleaning fluids or abrasive agents!
– Clean the surfaces using a soft cloth and commercially available glass cleaner.
– Never use abrasive cleaning agents.
Pos: 69 /Busch-Jaeger (Neustruktur)/Modul-Struktur/Online-Dokumentation/Steuermodule - Online-Dokumentation (--> Für alle Dokumente <--)/++++++++++++ Seitenumbruch ++++++++++++ @ 9\mod_1268898668093_0.docx @ 52149 @ @ 1
| 0073-1-7516
— 26 —
ABB-Welcome
Operation
Pos: 70 /DinA4 - Anleitungen Online/Ueberschriften/2./Geraeteeinstellungen @ 18\mod_1302768847744_15.docx @ 103548 @ 2 @ 1
5.4
A djus ting the devic e
Pos: 71 /DinA4 - Anleitungen Online/Ueberschriften/3./Abschlusswiderstand @ 19\mod_1321958079906_15.docx @ 110083 @ 3 @ 1
5.4.1
T erminal res is tor
Pos: 72 /DinA4 - Anleitungen Online/Inhalt/KNX/DoorEntry/Bedienung/Abschlusswiderstand setzen 83220-AP-xxx @ 19\mod_1310723392369_15.docx @ 107841 @ @ 1
Fig. 19:
•
•
In pure audio installations always set the terminal resistor (2) on "OFF".
In video installations or mixed audio and video installations set the terminal resistor for the the last devices of
a branch on "ON".
Pos: 73 /DinA4 - Anleitungen Online/Ueberschriften/3./Master-Slave -- Schalter setzen @ 19\mod_1321958721399_15.docx @ 110106 @ 3 @ 1
5.4.2
S etting the mas ter/s la ve s witc h
Pos: 74 /DinA4 - Anleitungen Online/Inhalt/KNX/DoorEntry/Bedienung/Master/Slave Schalter setzen 83220-AP-xxx @ 19\mod_1310723320966_15.docx @ 107833 @ @ 1
Fig. 20:
One station in each apartment must be set as "Master". All additional indoor stations in the same apartment must
be set as "Slave".
Indoor s tation that is to be s et a s " Ma s ter"
Set the switch "M"(1-1) on "ON".
F or all other indoor s tations
Set the switch "S"(1-2) on "OFF".
Pos: 75 /Busch-Jaeger (Neustruktur)/Modul-Struktur/Online-Dokumentation/Steuermodule - Online-Dokumentation (--> Für alle Dokumente <--)/++++++++++++ Seitenumbruch ++++++++++++ @ 9\mod_1268898668093_0.docx @ 52149 @ @ 1
| 0073-1-7516
— 27 —
Technical data
ABB-Welcome
Pos: 76 /DinA4 - Anleitungen Online/Ueberschriften/1./Technische Daten @ 18\mod_1302615863001_15.docx @ 103416 @ 1 @ 1
6
Technical data
Pos: 77 /DinA4 - Anleitungen Online/Inhalt/KNX/DoorEntry/83220-AP-xxx/Technische Daten - 83220-AP-xxx @ 18\mod_1303212854559_15.docx @ 103705 @ @ 1
Des igna tion
V a lue
Display resolution:
800 x 480
Display size:
17.8 cm (7")
Operating temperature
-5° C to +40° C
Storage temperature
-20° C – +70° C
Protection
IP 30
Single-wire clamps
2 x 0.6 mm² – 2 x 1 mm²
Fine-wire clamps
2 x 0.6 mm² – 2 x 0.75 mm²
Bus voltage
28 V- ±2 V
Volume
Maximum 80 dB
Pos: 78 /Busch-Jaeger (Neustruktur)/Modul-Struktur/Online-Dokumentation/Steuermodule - Online-Dokumentation (--> Für alle Dokumente <--)/++++++++++++ Seitenumbruch ++++++++++++ @ 9\mod_1268898668093_0.docx @ 52149 @ @ 1
| 0073-1-7516
— 28 —
ABB-Welcome
Mounting / Installation
Pos: 79 /Busch-Jaeger (Neustruktur)/Modul-Struktur/Online-Dokumentation/Überschriften (--> Für alle Dokumente <--)/1. Ebene/M - O/Montage / Installation @ 18\mod_1302613966111_15.docx @ 103373 @ 1 @ 1
7
Mounting / Installation
Pos: 80 /Busch-Jaeger (Neustruktur)/Modul-Struktur/Online-Dokumentation/Sicherheit (--> Für alle Dokumente <--)/Warnhinweise/Sicherheit - Niederspannungs- und 230 V-Leitungen @ 18\mod_1302617821491_15.docx @ 103465 @ @ 1
Warning
E lec tric volta ge!
Risk of death and fire due to electrical voltage of 230 V.
– Low-voltage and 230 V cables must not be installed together in a flush-mounted socket!
In case of a short-circuit there is the danger of a 230 V load on the low-voltage line.
Pos: 81 /Busch-Jaeger (Neustruktur)/Modul-Struktur/Online-Dokumentation/Sicherheit (--> Für alle Dokumente <--)/Warnhinweise/Sicherheit - Fachkenntnisse @ 18\mod_1302774384017_15.docx @ 103564 @ 2 @ 1
7.1
R equirements for the elec tric ian
Warning
E lec tric volta ge!
Install the device only if you have the necessary electrical engineering knowledge and experience.
•
Incorrect installation endangers your life and that of the user of the electrical system.
•
Incorrect installation can cause serious damage to property, e.g. due to fire.
The minimum necessary expert knowledge and requirements for the installation are as follows:
•
Apply the "five safety rules" (DIN VDE 0105, EN 50110):
1.
Disconnect from power;
2.
Secure against being re-connected;
3.
Ensure there is no voltage;
4.
Connect to earth;
5.
Cover or barricade adjacent live parts.
•
Use suitable personal protective clothing.
•
Use only suitable tools and measuring devices.
•
Check the type supply network (TN system, IT system, TT system) to secure the following
power supply conditions (classic connection to ground, protective earthing, necessary
additional measures, etc.).
Pos: 82 /DinA4 - Anleitungen Online/Inhalt/KNX/DoorEntry/Montage/Montagehinweise - Allgemein @ 19\mod_1310563670478_15.docx @ 107743 @ 2 @ 1
7.2
G eneral ins ta llation ins truc tions
•
Terminate all branches of the wiring system via a connected bus device (e.g., indoor station, outdoor station,
system device).
•
Do not install the system controller directly next to the bell transformer and other power supplies (to avoid
interference).
•
Do not install the wires of the system bus together with 230 V wires.
•
Do not use common cables for the connecting wires of the door openers and wires of the system bus.
•
Avoid bridges between different cable types.
•
Use only two wires for the system bus in a four-core or multi-core cable.
•
When looping, never install the incoming and outgoing bus inside the same cable.
•
Never install the internal and external bus inside the same cable.
Pos: 83 /Busch-Jaeger (Neustruktur)/Modul-Struktur/Online-Dokumentation/Steuermodule - Online-Dokumentation (--> Für alle Dokumente <--)/++++++++++++ Seitenumbruch ++++++++++++ @ 9\mod_1268898668093_0.docx @ 52149 @ @ 1
| 0073-1-7516
— 29 —
ABB-Welcome
Mounting / Installation
Pos: 84 /Busch-Jaeger (Neustruktur)/Modul-Struktur/Online-Dokumentation/Überschriften (--> Für alle Dokumente <--)/2. Ebene/M - O/Montage @ 18\mod_1302615960458_15.docx @ 103424 @ 2 @ 1
7.3
Mounting
Pos: 85.1 /DinA4 - Anleitungen Online/Inhalt/KNX/DoorEntry/83220-AP-xxx/Montage - Module/Montage - Montagedose -- 83220-AP-xxx @ 19\mod_1323250406848_15.docx @ 111098 @ @ 1
Installation on an FM socket according to DIN 49073-1, or directly on a level wall surface.
Fig. 21:
1.
Open the housing of the panel by pulling the clamp on the bottom of the device.
Pos: 85.2.1 /DinA4 - Anleitungen Online/Inhalt/KNX/DoorEntry/Video-Module/Einleitungen/Einleitung - Montage und Anschluss des Geraetes @ 20\mod_1324553399047_15.docx @ 112597 @ @ 1
Video for mounting and connecting the device
Pos: 85.2.2 /DinA4 - Anleitungen Online/Inhalt/KNX/DoorEntry/Video-Module/Videos/Sprachneutral/Video Montage - Innenstation-Panel - Zerlegen - Vorbereitung @ 21\mod_1329750248359_0.docx @ 198730 @ @ 1
Pos: 85.3 /DinA4 - Anleitungen Online/Inhalt/KNX/DoorEntry/83220-AP-xxx/Montage - Module/Montage - montieren-anschließen-aufsetzen -- 83220-AP-xxx @ 19\mod_1323250705343_15.docx @ 111115 @ @ 1
| 0073-1-7516
— 30 —
ABB-Welcome
Mounting / Installation
Fig. 22:
2.
Fix the bottom of the device to the wall.
Fig. 23:
3.
Connect the bottom part of the device according to the graphics (see chapter "Connection" on page 34).
Fig. 24:
| 0073-1-7516
— 31 —
ABB-Welcome
4
Mounting / Installation
Set the address of the preferred outdoor stations and the address of the indoor station on the rotary switches
(see chapter "Addressing" on page 35).
Fig. 25:
5.
Set the master/slave function and the terminal resistor on the switches at the rear of the top part of the
housing (see chapter "Setting the master/slave switch" on page 27).
| 0073-1-7516
— 32 —
ABB-Welcome
Mounting / Installation
Fig. 26:
6.
Latch the upper part of the device onto its bottom part. To do this, place the upper side of the device on
the lock-in lugs and then press the bottom side onto the bottom part of the device until the clamp catches.
The installation of the indoor station is now complete.
Pos: 85.4.1 /DinA4 - Anleitungen Online/Inhalt/KNX/DoorEntry/Video-Module/Einleitungen/Einleitung - Montage des Geraetes @ 20\mod_1324552679883_15.docx @ 112541 @ @ 1
Video for mounting the device
Pos: 85.4.2 /DinA4 - Anleitungen Online/Inhalt/KNX/DoorEntry/Video-Module/Videos/Sprachneutral/Video Montage - Innenstation-Panel - Montage-Anschluss-Aufsetzen @ 21\mod_1329750163049_0.docx @ 198701 @ @ 1
Pos: 86 /Busch-Jaeger (Neustruktur)/Modul-Struktur/Online-Dokumentation/Steuermodule - Online-Dokumentation (--> Für alle Dokumente <--)/++++++++++++ Seitenumbruch ++++++++++++ @ 9\mod_1268898668093_0.docx @ 52149 @ @ 1
| 0073-1-7516
— 33 —
Mounting / Installation
ABB-Welcome
Pos: 87 /DinA4 - Anleitungen Online/Ueberschriften/2./Anschluss @ 18\mod_1302617573351_15.docx @ 103449 @ 2 @ 1
7.4
C onnec tion
Pos: 88 /DinA4 - Anleitungen Online/Inhalt/KNX/DoorEntry/83220-AP-xxx/Anschluss - 83220-AP-xxx @ 18\mod_1303212853012_15.docx @ 103665 @ @ 1
Fig. 27:
No.
F unc tion
1
Connection for the floor call push-button
2
• Connection for the system controller
• When using several indoor stations: connection for the internal bus
Pos: 89 /Busch-Jaeger (Neustruktur)/Modul-Struktur/Online-Dokumentation/Steuermodule - Online-Dokumentation (--> Für alle Dokumente <--)/++++++++++++ Seitenumbruch ++++++++++++ @ 9\mod_1268898668093_0.docx @ 52149 @ @ 1
| 0073-1-7516
— 34 —
ABB-Welcome
Addressing
Pos: 90 /DinA4 - Anleitungen Online/Ueberschriften/1./Adressierung @ 18\mod_1302616059553_15.docx @ 103432 @ 1 @ 1
8
Addressing
Pos: 91 /DinA4 - Anleitungen Online/Inhalt/KNX/DoorEntry/Adressierung/Adressierung-Projektierung @ 20\mod_1324287710173_15.docx @ 112353 @ 233333 @ 1
8.1
A ddres s ing the s ta tions
8.1.1
P otentiometer
Before installing as system, it must must be addressed.
For this "Addressing", three potentiometers have been fitted
to the rear of the device. The digits 0 to 9 can be set on each
potentiometer.
Fig. 28: Potentiometer for setting the stations
Outdoor station:
The left potentiometer (1) at an outdoor station indicates the
address of this station.
The next two potentiometers (2) indicate the address of the
topmost doorbell push-button of this station. The doorbell
push-switches below that are automatically numbered
(consecutive).
Indoor station:
The left potentiometer (3) of the indoor station indicates the
address of the preferred outdoor station. The next two
potentiometers (4) indicate the address of this indoor station.
Fig. 29: The function of the potentiometers
8.1.2
S etting the a ddres s of the outdoor s tation:
The allocation to one of the four inputs of the system is made on the outdoor stations and the associated switch
actuators for door and light via the setting of the address.
For this the potentiometer house/outdoors is set on an address between 1 and 4. The potentiometer is located on
the rear of the outdoor station or the front of the MDRC switch actuator.
8.1.3
A s s igning the doorbell pus h-button of an outdoor s tation to an a partment
The doorbell push-buttons of an outdoor station are assigned to the apartments consecutively from top to bottom
and left to right with the addresses 01, 02, etc.
This assignment applies equally to several outdoor stations in a system. This means that in Figure 31 on page37,
in each outdoor station push-button A is assigned to apartment 01, etc.
This factory setting is fixed via two potentiometers on the rear of the outdoor station. The middle potentiometer
must be on "0" and the right one on "1".
8.1.4
S etting the a ddres s of the indoor s tation
The apartment is assigned on the indoor station via the setting of the address. Up to 99 apartments can be
addressed within one system. In each of these up to four indoor stations with the same rights can be located with
the same address.
When pressing the assigned doorbell push-button, all four indoor stations are called. The address of an indoor
station (e.g. "15") is set with the aid of the potentiometers on the indoor station, the middle one indicating the tens
digit (here "1") and the right one the singles digit (here "5"). The potentiometer is located on the back or outside of
the indoor stations.
| 0073-1-7516
— 35 —
Addressing
ABB-Welcome
8.1.5
S etting of the " s tandard outdoor s tation"
For several outdoor stations in a system the "standard outdoor station" must be set on the indoor stations.
For this the potentiometer STATION is set on the address of the standard outdoor station - between 1 and 4.
The potentiometer is located on the rear of the indoor stations.
Fig. 30: Factory assignment of doorbell push-buttons
No.
Des igna tion
1
Apartment 01
2
Apartment 01
3
Outdoor station
4
Apartment 09
5
Apartment 10
| 0073-1-7516
— 36 —
Addressing
ABB-Welcome
Fig. 31: Several outdoor stations with identical assignment
No.
Des igna tion
1
Main entrance outdoor station
2
Side entrance outdoor station
3
Apartment 01
4
Apartment 02
5
Apartment 03
| 0073-1-7516
— 37 —
Addressing
ABB-Welcome
Fig. 32: Several outdoor stations with identical assignment
No.
Des igna tion
1
Apartment 01
2
Apartment 02
3
Outdoor station of the left building
4
Outdoor station of the entrance gate
5
Outdoor station of the right building
6
Apartment 03
7
Apartment 04
Pos: 92 /DinA4 - Anleitungen Online/Ueberschriften/2./Video zur Adressierung des Geraetes @ 19\mod_1322130240851_15.docx @ 110503 @ 2 @ 1
8.2
V ideo for addres s ing the devic e
Pos: 93.1 /DinA4 - Anleitungen Online/Inhalt/KNX/DoorEntry/Video-Module/Einleitungen/Einleitung - Adressierung des Geraetes @ 20\mod_1324552270462_15.docx @ 112509 @ @ 1
Video for addressing the device
Pos: 93.2 /DinA4 - Anleitungen Online/Inhalt/KNX/DoorEntry/Video-Module/Videos/Sprachneutral/Video Adressierung @ 21\mod_1329747104105_0.docx @ 198412 @ @ 1
Pos: 94 /Busch-Jaeger (Neustruktur)/Modul-Struktur/Online-Dokumentation/Steuermodule - Online-Dokumentation (--> Für alle Dokumente <--)/++++++++++++ Seitenumbruch ++++++++++++ @ 9\mod_1268898668093_0.docx @ 52149 @ @ 1
| 0073-1-7516
— 38 —
Addressing
ABB-Welcome
Pos: 95 /DinA4 - Anleitungen Online/Inhalt/KNX/DoorEntry/Projektierung-Merkblatt/Projektierung-Merkblatt - ABB @ 19\mod_1323176717034_15.docx @ 111044 @ @ 1
Project
name:
Mounting position for
the outdoor station:
Floor 02
01
=== Ende der Liste für Textmarke Content ===
| 0073-1-7516
— 39 —
ABB-Welcome
Busch-Jaeger Elektro GmbH
PO box
58505 Lüdenscheid
Notice
We reserve the right to at all times make
technical changes as well as changes to the
contents of this document without prior notice.
The detailed specifications agreed to at the time
of ordering apply to all orders. ABB accepts no
responsibility for possible errors or
incompleteness in this document.
Freisenbergstraße 2
58513 Lüdenscheid
Germany
We reserve all rights to this document and the
topics and illustrations contained therein. The
document and its contents, or extracts thereof,
must not be reproduced, transmitted or reused by
third parties without prior written consent by ABB.
www.BUSCH-JAEGER.com
[email protected]
Copyright© 2012 Busch-Jaeger Elektro GmbH
All rights reserved
Central sales service:
Phone:
+49 180 5 669900
Fax:
+49 180 5 669909
=== Ende der Liste für Textmarke Backcover ===
0073-1-7516 |
A member of the ABB Group
| 22.02.2012
Pos: 97 /Busch-Jaeger (Neustruktur)/Modul-Struktur/Online-Dokumentation/Rückseiten (--> Für alle Dokumente <--)/Rückseite - Busch-Jaeger - Allgemein @ 20\mod_1327320074886_15.docx @ 137103 @ @ 1