1
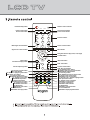
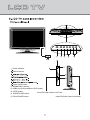
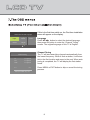
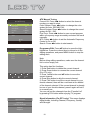
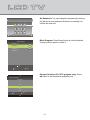
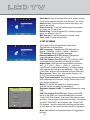
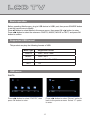
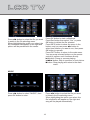
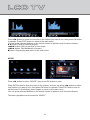
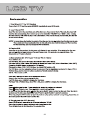
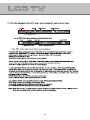
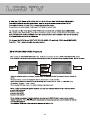
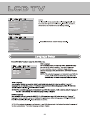
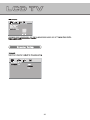
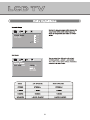
KALCD22DVDAB
USER MANUAL
USB.....................................................................
E
TITL
U
EN
D.M
/SD
USB
ST
C.LI
/ RE
Remote control/batteries
Power cord
Remote control indicator
Power/Standby button
P.MODE
Picture mode button
Sound mode button
FREEZE
S.MODE
SLEEP
1
1
2
33
4
4
5
6
7
8
9
Sleep function button
Picture frozen button
Numeric buttons
A/DTV
00
-/--
Multi-digits channel buttton
Return channel button
Signal source select button
Menu button
MENU
SOURCE
Navigation buttons (Up, Down, Left, Right)
OK
Confirm button
EXIT
Mute button
Information display button
Volume adjusting button
TV: Favorite program button
DVD: Angle button
TV: Electronic program guide button
DVD: Setup menu button
TV: Teletext index button
Media/DVD: Play/pause button
TV: Teletext cancel button
Media/DVD: Stop button
TV: Teletext hold button
Media/DVD: Previous button
TV: Teletext size button
Media/DVD: Next button
TV: RED button
Media/DVD: Goto button
TV: GREEN button
Media/DVD: Slow play button
INFO
Menu exit button
TITLE
+
DVD: Title button
VOL
CH
I/II
D.MENU
DVD SETUP
ANGLE
EPG
FAV
SUBTITLE
USB/SD
/REC.LIST
ZOOM
X
TXT/MIX
GOTO
SLOW
REPEAT
A-B
RC-TFG019
Channel select button
DVD: Disc menu button
ATV: NICAM function button
DTV/DVD: Audio channel select button
TV/Media/DVD: Subtitle button
TV: Recording buttton
DVD: USB/SD Card function select button
TV: Display mode select button
Media/DVD: Zoom in/out button
TV: Recording list / Teletext subpage button
DVD: Open/close button
TV: Teletext on/off / mix button
Media/DVD: Forward button
TV: Teletext reveal button
Media/DVD: Rewind button
TV: BLUE button
Media/DVD: A-B repeat button
TV: YELLOW button
Media/DVD: Repeat playback button
P.MODE: Picture mode button, setting the picture mode.
S.MODE: Sound mode button, setting the sound mode.
I/II: Press the I/II button to choose a different audio channel.
SLEEP: Sleep button, setting TV power off time.
0,1-9: TV channel selection button.
USB/SD: Press the USB/SD button to choose USB or SD card function.
Press the FAV button to start the “Favorite List” for selecting your favorite program.
SOURCE: Signal source selection button (ATV/DTV/Media/AV/PC/Component/DVD/HDMI).
OK: Confirm button, confirm all the changes and settings.
INFO: Press the INFO button for information.
MUTE
ASPECT: Press the ASPECT button to select the picture display ratio: Auto / 4:3 / 16:9 / Zoom 1 / Zoom 2 / Just Scan.
Press the EPG button for detailed information about the channel.
AUTO: Press the AUTO button to auto adjust items in PC mode.
POWER
POWER
1 2
SOURCE
SOURCE
MENU
MENU
VOL
CH
CH
VOL
11
12
Power indicator.
10
Remote sensor.
8
9
Power on/off button.
8. SD/MMC/MS card slot.
9. USB2 port (Only available in DVD mode).
10. STOP button.
11. OPEN/CLOSE button.
12. PLAY/PAUSE button.
Insert DVD with Label to the Front
Insert DVD with Label to the Back
USB1
DC IN
HDMI
Y
Pb/Cb Pr/Cr
COAXIAL
VIDEO
OUT
USB1 input (Available for performing Media or PVR function).
Component video input terminals (Y Pb/Cb Pr/Cr).
Composite video & audio input terminals (AV).
R
L
RF(75 )
YPbPr
AV
USB1
DC IN
HDMI
Y
Pb/Cb Pr/Cr
COAXIAL
VIDEO
OUT
R
L
RF(75 )
Please select an OSD Language
English
Español
Deutsch
Français
Italiano
OK
Channel Tuning
TV
:
0 Programme
DTV
:
0 Programme
Radio
:
0 Programme
0%
(TV)
If this is the first time switch on, the First time installation
menu will appear on the display.
Language
Press o/p/b/a button to select the desired language,
then press OK button to enter the “Channel Tuning”
screen. The original language of this TV is English.
Channel Tuning
The TV will start searching channels automatically from
the lowest frequency. When it finds a station, it will store
this in the first location and move to the next. When auto
tuning is completed, the TV will display the first station
found.
Press MENU or EXIT button to skip or cancel the tuning
process.
Please press MENU key to exit
8
1 CHANNEL MENU
Auto Tuning
ATV Manual Tuning
DTV Manual Tuning
Programme Edit
CHANNEL
Signal Information
Move
MENU
Return
OK
Select
EXIT
Channel Tuning
TV
:
0 Programme
DTV
:
0 Programme
Radio
:
0 Programme
0%
Exit
The image on the left depicts the channel menu.
The definition of each option:
Auto Tuning: Press
button to this position, then
press or OK button to enter auto tuning of both ATV
and DTV channels.
DTV Manual Tuning: Press
button to this position,
then press or OK button to enter DTV Manual Tuning.
It will scan current DTV (Digital TV) program within a
frequency range accurately and store the result manually.
ATV Manual Tuning: Press
button to this position,
then press or OK button to enter ATV Manual Tuning.
Programme Edit: Press
button to this position, then
press or OK button to enter Programme Edit screen.
You can do such editing operations as delete, rename,
move, skip (sign/cancel the skip mark) and fav (add/
delete to the favorite program list) for the selected
channel in the available channel list when the “Programme
Edit” is selected.
Signal Information (For DTV only): Press
button
to this position, then press or OK button to enter Signal
Information screen.
Auto Tuning: It will auto scan the channels automatically,
and stop at the end of the channel search. The auto
scan result stores in the internal memory automatically.
(TV)
Please press MENU key to exit
DTV Manual Tuning: Press b/a button to select channel,
then press OK button to search programs.
DTV Manual Tuning
VHF CH 9A
Press OK to search
Bad
Freq:
205.50 Mhz
Good
9
ATV Manual Tuning:
Current CH: Press b/a button to select the channel
number you want to store.
Color System: Press b/a button to change the color
system as Auto, SECAM, PAL.
Sound System: Press b/a button to change the sound
system as DK, I, BG.
Fine-Tune: Press b/a button to scan current program
within a frequency range accurately and store the result
manually.
AFC: Press b/a button to set the Automatic Frequency
Control to On or Off.
Search: Press b/a button to start search.
ATV Manual Tuning
Current CH
1
Color System
PAL
Sound System
BG
Fine-Tune
44.00 MHz
AFC
Off
Search
Menu
Programme Edit
1 S-43
ATV
2 S-09
ATV
3 S-11
ATV
4 S-14
ATV
Delete
OK
Rename
FAV
Move
Fav
Signal Information
Channel 154
Skip
Menu
Programme Edit: Press o/p button to move the highlighted bar. Press the colored short-cut keys to do the
editing operations, and press MENU button to stop the
editing work.
Note:
Before doing editing operations, make sure the channel
list is not an empty one.
This option has five functions:
1. Press Red button to delete the current channel.
2. Press Green button to rename the current channel
(For ATV only).
3. Press Yellow button and o/p button to move the
current channel.
4. Press Blue button to skip the current channel.
5. Press FAV button to set the current channel to your
favorite channel, there will be a red heart at the behind
of the channel selected. If the current channel is already
be one of your favorite channel, press it again will set it
to a normal one.
You can call out the channels from the “Favorite List”
by pressing FAV button while enjoying TV program.
Signal Information (For DTV only): This menu displays
signal details, including Channel, Frequency, Quality
and Strength.
Frequency 205.50 Mhz
Quality 99
Strength 22
10
2 PICTURE MENU
Personal
Picture Mode
PICTURE
Contrast
50
Brightness
50
Colour
50
50
Tint
30
Sharpness
Move
Return
MENU
Colour Temp
Normal
Noise Reduction
Middle
OK
Select
EXIT
Exit
The image on the left depicts the picture menu.
The definition of each option:
Picture Mode: Changes the picture mode in sequence:
Dynamic Standard Mild Personal. You may select
the picture mode by pressing P.MODE button repeatedly.
Contrast: Changes the value of contrast with the key
in the range of 0 to 100.
Brightness: Changes the value of brightness with the
key
in the range of 0 to 100.
Colour: Changes the value of colour with the key
in the range of 0 to 100.
Tint: Changes the value of tint with the key
in the
range of 0 to 100 (For NTSC signal only).
Sharpness: Changes the value of sharpness with the
key
in the range of 0 to 100.
Colour Temp: Changes the colour temperature
in sequence: Cold Normal Warm.
Noise Reduction: Changes the picture noise reduction
in sequence: Off Low Middle Default.
3 SOUND MENU
Standard
Sound Mode
50
Treble
50
Bass
0
Balance
SOUND
Auto Volume
Off
SPDIF Mode
Auto
Off
AD Switch
Move
Return
MENU
OK
AD Switch
Select
EXIT
On
AD Volume 30
Menu
Exit
The image on the left depicts the sound menu.
The definition of each option:
Sound Mode: Changes the sound mode in sequence:
Standard Music Movie Sports Personal. You may
select the sound mode by pressing S.MODE button repeatedly.
Treble: Changes the value of treble with the key
in the range of 0 to 100.
Bass: Changes the value of bass with the key
in
the range of 0 to 100.
Balance: Changes the value of balance with the key
in the range of -50 to +50.
Auto Volume: Changes the auto volume mode to “On”
or “Off”.
SPDIF Mode: Changes the SPDIF mode in sequence:
Auto Off PCM.
AD Switch (For DTV only): Press
button to this
position, then press or OK button to enter. Press b/a
button to select the audio descriptor to On or Off as well
as adjust the volume of the AD.
11
4 TIME MENU
01/Jan 11:11
Clock
NSW/ACT
Time Zone
Off
Sleep Timer
Move
Off
Auto Standby
TIME
15 S
OSD Timer
MENU
Return
OK
Select
EXIT
Exit
The image on the left depicts the time menu.
The definition of each option:
Clock (For DTV only): Display the current system time.
It’s not available.
Time Zone (For DTV only): Press p/o/b/a button to
set the proper time zone according to your region.
Sleep Timer: Set the sleep timer to put automatically
the TV in standby mode. Timer can be selected as 10,
20, 30, 60, 90, 120, 180, 240 and 0 Min(Off). You may
select the sleep timer by pressing SLEEP button
repeatedly.
Auto Standby: The options are Off, 3 H, 4 H, 5 H. You
can set the main unit to turn off automatically when there
is no signal in a preset time (1 minute while the input
source is "PC").
OSD Timer: Changes the OSD timer as 5 S, 10 S,
15 S, 20 S, 25 S, 30 S.
5 LOCK MENU
Off
Lock System
Set Password
Block Program
Parental Guidance
LOCK
Move
NO BLOCK
Key Lock
Hotel Mode
MENU
Return
OK
Select
Off
EXIT
Exit
The image on the left depicts the lock menu.
The definition of each option:
Lock System: Press o/p button to select Lock System,
then press a or OK button to select On or Off which
enables or disables below lock functions.
Password: Enter the default password “0000” to go to
the LOCK function menu if you have set Lock System
to On.
Set Password: Set a new password.
Block Program: Add or release a lock to some special
program. When watch a locked program, a dialogue box
appears. You should enter the correct password. The
initial password is “0000”.
Parental Guidance (For DTV program only):
Set the parental guidance level.
Key Lock: Set to On, the keypads on the main unit
cannot work.
Hotel Mode: Set the hotel mode function.
12
Set Password: You can change the password by entering
the old and a new password and then re-entering it to
confirm the new one.
Please enter old password
Please enter new password
Confirm new password
Clear
Cancel
Block Program: Press Green button to lock the desired
channel, press it again to unlock it.
Block Program
350 DVB-4-1
DTV
351 DVB-4-1
DTV
352 DVB-4-1
DTV
353 DVB-4-1
DTV
Lock
OK
Menu
Parental Guidance (For DTV program only): Press
o/p button to set the parental guidance level.
Parental Guidance
BLOCK ALL
G
PG
M
MA
AV
OK
Menu
13
Off
Hotel Mode
Source Lock
HOTEL
Default Source
Off
Default Prog
1
100
Max Volume
Clear Lock
Move
MENU
Return
OK
Select
EXIT
Exit
Hotel Mode: Have the priority than other options below.
To set below options, this item must be set to “On” firstly.
Source Lock: To set the input source item which you
want to be locked.
Default Source: To set the default input source when
you open the TV main unit.
Default Prog: To set the default ATV channel program
when you power on the TV.
Max Volume: To set the maximum volume value.
Clear Lock: To clear all the locks.
6 SETUP MENU
English
OSD Language
West
TT Language
Off
Hearing Impaired
PVR File System
SETUP
Aspect Ratio
16:9
Blue Screen
On
First Time Installation
Reset
Software Update (USB)
Move
MENU
Return
OK
Select
Select Disk
Check PVR File System
EXIT
C:
Start
USB Disk
Format
Time Shift Size
Speed
Free Record Limit
OK
Exit
The image on the left depicts the setup menu.
The definition of each option:
OSD Language: Changes the OSD language as
English Spanish French Italian German.
TT Language: Set the teletext language.
Hearing Impaired (For DTV only): Changes the
hearing impaired mode to “On” or “Off”.
PVR File System (For DTV only): To check the USB
connected and provide with the recording function.
Aspect Ratio: Changes the aspect ratio in sequence:
Auto 4:3 16:9 Zoom 1 Zoom 2 Just Scan.
(“Just Scan” is panoramic display, so black edging
may appear according to the data rate. “Auto” and
“Just Scan” may be not available in some sources.)
Blue Screen: Set to “On”, blue screen displays; set
to “Off”, blue screen disappears.
First Time Installation: Set relevant options including
OSD Language and Channel Tuning. Please refer to P8
for concrete operations.
Reset: To set all the options to factory setting
(Set this option only when it is necessary).
Software Update (USB): To update software by using
USB.
6 Hr.
Menu
PVR File System (For DTV only): Firstly insert USB
device to the USB1 port, and press o/p button to choose
“Check PVR File System”, then press OK button to start
checking. This process needs some seconds. If it finishes,
the word “SUCCESS” will be shown after “Check PVR
File System”, and the speed will be shown on the menu
as well. Now you can record and save the DTV programme.
Note: Hard disk with self-contained power is suggested to
be used.
14
[00:00:59]
(0000:23:40)
Play
FB
FF
Prev.
Next
Pause
Stop
9 Nine Digital
15:51
Recorded List
Press button on the remote control to start recording
the programme. “ ” mark appears at the top left corner
of the TV screen, and the title bar appears at the bottom
which includes the recording information. You can press
b/a button to select one function you want to run, then
press OK button to operate.
Press EXIT button to hide the title bar.
You can press relevant buttons on the remote control
to perform such functions directly.
Programme
Press REC.LIST button to display the recorded list.
Press o/p button to select the desired one, then press
OK button to play the recorded programme.
HI-1
HI-2
HI-3
Press Red button to delete the current list.
Press Green button to show the list’s information.
Press INDEX
button to sort all the programs according
to Programme, Channel or Time.
HI-4
HI-5
Delete
INFO
OK
Index
Input Source
ATV
DTV
Media
AV
1. Press SOURCE button to change from ATV to other
available inputs.
2. Press
button to select signal source.
3. Press OK or button to confirm.
4. Press EXIT button to exit signal souce menu.
PC
Component
DVD
HDMI
OK
15
Basic operation
Before operating Media menu, plug in USB device in USB1 port, then press SOURCE button
to set the input source to Media.
Press o/p button to select Media in the source menu. then press OK or a button to enter.
Press b/a button to select the submenu: PHOTO, MUSIC, MOVIE or TEXT, and press OK
button to confirm.
Supported USB format
This product can play the following formats of USB.
Mode Type
Supported Format
PHOTO
PNG / JPEG / BMP
MUSIC
WMA / MP3
MOVIE
AVI / DAT / MP4 / MPG
TEXT
TXT
USB menu
PHOTO
Press b/a button to select “Return” option to
back to the previous menu. Select “C” option
to enter.
Press b/a button to select “PHOTO”, then
press OK button to enter.
17
EXIT Exit
EXIT Exit
Press b/a button to select the file you want
to watch in the file selecting menu.
When highlighting the option you select, the
file information will appear on the right and
picture will be previewed in the center.
Press OK button to start a slideshow.
Press Red button then select “Yes” or press
OK button to delete the file selected.
Press INFO button to show the menu in the
bottom, and you can press b/a button to
select one function you want to run, then press
OK button to operate.
Press EXIT button to return to the main menu.
You can press relevant buttons on the remote
control to perform such functions directly.
l button: Pause or resume playing.
f/e button: Skip to previous or next picture.
n button: Stop playing and return to the main
menu.
MUSIC
EXIT Exit
Press b/a button to select “MUSIC”, then
press OK button to enter.
Press b/a button to select the file you want
to listen in the file selecting menu.
When highlighting the option you select, the
file information will appear on the right and
song will be played automatically.
18
Press b/a button to select one function in the bottom you want to run, then press OK button
to operate. Press EXIT button to return to the main menu.
You can press relevant buttons on the remote control to perform such functions directly.
l button: Pause or resume playing.
f/e button: Skip to previous or next music.
d/c button: Fast backward or forward.
n button: Stop playing and return to the main menu.
MOVIE
EXIT Exit
Press b/a button to select “MOVIE”, then press OK button to enter.
Press INFO button to show the menu in the bottom, and you can press b/a button to select
one function you want to run, then press OK button to operate. Press EXIT button once to
exit the menu in the bottom, press it again to return to the main menu.
You can press relevant buttons on the remote control to perform such functions directly.
The basic operations are the same as “MUSIC”.
19
TEXT
EXIT Exit
Press b/a button to select “TEXT”, then
press OK button to enter.
Press b/a button to select the file you want
to watch in the file selecting menu.
When highlighting the option you select, the
file information will appear on the right and
text will be previewed in the center.
Press OK button to start to view the text in
full screen.
Press INFO button to show the menu in the
bottom, and you can press b/a button to
select one function you want to run, then
press OK button to operate.
Press EXIT button to return to the main menu.
You can press relevant buttons on the remote
control to perform such functions directly.
20
22
23
24
25
26
DVD.SETUP
TV SYSTEM
SCREEN SAVER
TV TYPE
PASSWORD
RATING
POWER RESUME
DEFAULT
TV SYSTEM
SCREEN SAVER
TV TYPE
PASSWORD
DVD.SETUP
NTSC
PAL
AUTO
RATING
POWER RESUME
DEFAULT
27
Screen Saver
TV SYSTEM
SCREEN SAVER
TV TYPE
PASSWORD
ON
OFF
Power Resume
RATING
POWER RESUME
DEFAULT
TV Type
TV SYSTEM
SCREEN SAVER
TV TYPE
PASSWORD
RATING
POWER RESUME
DEFAULT
4:3PS
4:3LB
16:9
Password
Rating
28
TV SYSTEM
SCREEN SAVER
TV TYPE
PASSWORD
1 KID SAFE
2G
3 PG
4 PG13
RATING
POWER RESUME
5 PG-R
6R
7 NC-17
8 ADULT
DEFAULT
TV SYSTEM
SCREEN SAVER
TV TYPE
PASSWORD
RATING
POWER RESUME
DEFAULT
RESTORE
GERMAN
SPANISH
FRENCH
ITALIAN
5
5
29
5
30
FULL
6/8
4/8
2/8
OFF
31
32
33
21.5 inch
476.64mm (H) X 268.11mm (V)
16:9
1920 X 1080
250 cd/m
1000:1
170
160
0.24825mm (H) X 0.24825mm (V)
16.7M
5ms
2 (5W, 4 Ohm)
1
YPbPr Input
1
1
(For YPBPR, AV)
1
2
USB Input
1920x1080
DC 12V 5A
50W
34
pin