1
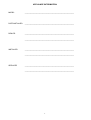
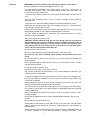
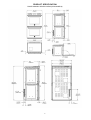
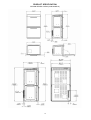
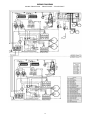
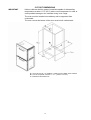
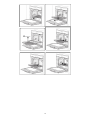
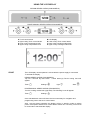
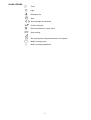
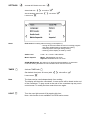
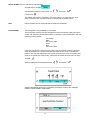
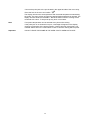
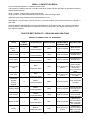
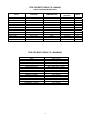
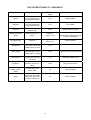
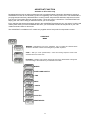
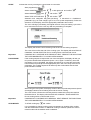
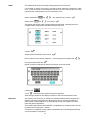
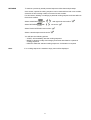
INSTALLATION, USE & CARE MANUAL 30” DOUBLE BUILT‐IN OVEN FD30CONXE (FD..PQC1XE.UA) FD30CONXT (FD..PKC1XE.UA) FD30PROX (FD..PAZ1XE.UA) FD30PROXE (FD..PAU1XE.UA) FD30PROXT (FD..PHU1XE.UA) PROFD30XT (FD..PHU1XE.UP) MASFD30XT (FD..PHC1XE.UP) 310494 FROM THE DESK OF THE PRESIDENT Dear new owner of a Bertazzoni product, I want to thank you for choosing one of our beautiful products. We know that you have many brands and products to choose from and we are thrilled that you have decided to take one of our products into your home. BERTAZZONI SpA Via Palazzina 8 42016 Guastalla RE ITALY WWW.BERTAZZONI.COM We take as much pride in making our products as we hope you will in owning them. My family started manufacturing cooking appliances in 1882. Each of our products is a blend of Italian design finesse and superior appliance technology. While we will never replace your unique talent at preparing delicious dishes, we try our best at making cooking easier, more effective and more fun. Our appliances are designed according to the strictest safety and performance standard for the European and the North American market. We follow the most advanced manufacturing techniques. Each appliance leaves the factory after thorough quality inspection and testing. Our distributors and our service partners are ready to answer any questions you may have regarding how to install, use and care for your Bertazzoni product. This manual will help you learn to use the product safely and most effectively and care for it so that it may give you the highest satisfaction for years to come. The manual also includes directions for the professional installer that will install the product in your home. We recommend using factory-trained professionals for the delicate task of installing and testing appliances in your home. Please call Customer Service if you need help locating a factory-trained professional installer in your area. Please keep this manual handy for future use. Grazie! TABLE OF CONTENTS APPLIANCE INFORMATION ______________________________________________ 4 WARRANTY AND SERVICE _______________________________________________ 5 IMPORTANT SAFETY INSTRUCTIONS ______________________________________ 6 PRODUCT SPECIFICATION _______________________________________________ 9 INSTALLATION INSTRUCTIONS __________________________________________ 12 CARING FOR THE ENVIRONMENT ________________________________________ 12 WIRING DIAGRAM _____________________________________________________ 13 CUT-OUT DIMENSIONS _________________________________________________ 15 INSTALLING THE OVEN ________________________________________________ 16 GETTING STARTED ____________________________________________________ 17 USING THE LCD DISPLAY _______________________________________________ 20 BEFORE USING THE OVEN______________________________________________ 23 BASIC OPERATION - DESIGN SERIES MODELS ____________________________ 24 BASIC OPERATION – PROFESSIONAL SERIES MODELS _____________________ 25 TIME MANAGEMENT MENU – TIMER, DELAY/END COOKING, FOOD PROBE ____ 26 COOKING MODES GUIDE _______________________________________________ 29 BROIL / CONVECTION BROIL ____________________________________________ 30 TIPS FOR BEST RESULTS – BROILING AND ROASTING _____________________ 30 TIPS FOR BEST RESULTS - BAKING ______________________________________ 31 TIPS FOR BEST RESULTS - WARMING ____________________________________ 31 TIPS FOR BEST RESULTS - DEHYDRATE __________________________________ 32 ASSISTANT FUNCTION _________________________________________________ 33 SABBATH MODE ______________________________________________________ 38 SELF-CLEANING CYCLE ________________________________________________ 39 CLEANING THE OVEN __________________________________________________ 40 REPLACING THE OVEN LIGHTS __________________________________________ 41 TROUBLESHOOTING GUIDE ____________________________________________ 42 3 APPLIANCE INFORMATION MODEL _____________________________________________________ DATE INSTALLED _____________________________________________________ DEALER _____________________________________________________ _____________________________________________________ INSTALLER _____________________________________________________ _____________________________________________________ SERVICER _____________________________________________________ _____________________________________________________ 4 Please kindly register on our web site www.bertazzoni.com to validate your new product warranty and help us to assist you better in case of any inconvenience. TWO YEAR LIMITED WARRANTY The warranties provided by Bertazzoni Spa in this statement apply exclusively to Bertazzoni appliances and accessories sold as new products to the original owner by a Bertazzoni authorized distributor, retailer, dealer or service center and installed in the United States and Canada. The warranties provided in this statement are not transferable and have validity from the date of installation. COVERAGE INFORMATION Bertazzoni SpA will repair or replace any component part which fails or proves defective due to materials and/or workmanship within 2 years from the date of installation and under conditions of normal residential use. Repair or replacement will be free of charge, including labor at standard rates and shipping expenses. Repair service must be performed by a Bertazzoni Authorized Service Center during normal working hours. COSMETIC WARRANTY Bertazzoni will cover parts showing cosmetic defects in material and workmanship for a period of thirty (30) days from date of installation of the unit. This coverage will include scratches, stains, surface imperfections on stainless steel, paint and porcelain, with the exclusion of slight differences in color due to materials and painting/enamelling technologies. Exclusions are labor costs, B stock items, out‐of‐box appliances and display units. HOW TO OBTAIN SERVICE To obtain warranty service please contact Bertazzoni Customer Service at the numbers below and provide model number, serial number and date of purchase. ENGLISH 866 905 0010 ‐ FRANCAIS 800 561 7265 Save proof of original purchase or of original installation to establish warranty period. Copy of the product serial tag is affixed to the back cover of the instruction manual. 1 WHAT IS NOT COVERED The product used in any commercial application 2 Repair service provided by other than a Bertazzoni authorized service agency. 3 Damage or repair service to correct service provided by an unauthorized agency or the use of unauthorized parts. 4 Installation not in accordance with local electrical codes or plumbing codes. 5 Defects or damage due to improper storage of the product. 6 Defects or damage or missing parts on products sold out of the original factory packaging or from displays. 7 Service calls or repairs to correct the installation of the product and/or related accessories. 8 Service calls to connect, convert or otherwise repair the electrical wiring and/or gas line to properly use the product. 9 Service calls to provide instructions on the use of a Bertazzoni product. 10 Repair service due to product usage in manner other than what is normal and customary for home use. 11 Replacement of wear and tear parts 12 Replacement of glasses and light bulbs if they are claimed to have failed later than 30 days after installation and in no case later than 4 months after date of purchase 13 Defects and damages arising from accident, alteration, misuse, abuse, improper installation. 14 Defects and damages arising from transportation of the product to the home of the owner. 15 Defects and damage arising from external forces beyond the control of Bertazzoni SpA such as fire, flood, earthquakes and other acts of God. In case the product will be installed in a remote area, where certified trained technicians are not reasonably available, the customer will be responsible for the transportation costs for the delivery of the product to the nearest authorized service center or for the displacement costs of a certified trained technician. Bertazzoni does not assume any responsibility for incidental or consequential damages. Some states do not allow the exclusion or limitation of incidental or consequential damages, so the above limitation or exclusion may not apply to you. This warranty gives you specific legal rights and you may also have other rights which may vary from state to state or province to province. IMPORTANT SAFETY INSTRUCTIONS Read these instructions before installing or using the oven for the first time. Save these instructions and review them periodically. Keep the instructions in a safe place and transfer them to any future user. General This appliance complies with current safety requirements. The appliance is intended for domestic use only: cooking, baking, roasting, broiling, defrosting and heating of food. It is not designed for industrial or laboratory use. Only use the appliance for its intended purpose. Improper use of the appliance can lead to personal injury and property damage. The manufacturer is not liable for personal injury, product or property damage caused by improper use of this oven. Those who lack physi cal, sensory or mental abili ties, or exp erience with the appliance should not use it without supervision or instructio n by a re sponsible person. Children Children should not be left unattended in an area where the appliance is in use. Never allow children to hang or lean on any part of the appliance. CAUTION! Do not store items of interest to children in cabinets above an o ven. Children climbing on the oven to reach these items could be injured. Children should not use the unit without supervision unless its operation has been sufficiently explained so they can use it safely. Children must be able to understand potential hazards or improper operation. Do not allow children to touch or play in, on or near the oven when it is in operation. The oven gets hot at the o ven door glass, the cooling exhaust, the handle and the operating controls. Use extra care to avoid burns. Installation Before installation, make sure that the voltage and frequency listed on the data plate correspond with the household’s electrical supply to prevent personal injury and/or damage to the appliance. Consult a qualified electrician if in doubt. Make sure your appliance is properly installed and grounded by a qual ified technician. CAUTION: The applia nce must be effectively grounded to guara ntee the electrical safety. If in d oubt, have the elect rical system of the hou se checked by a quali fied electrician. The manuf acturer is not li able for d amages caused by the la ck or inadequacy of an effective grounding system or the failure to adhere to national and local electrical codes. The oven should not to be operated until it has been properly installed. Installation, maintenance and rep air work should be perfo rmed by a factory authorized service technician. Work by unqualified persons could be dangerous and may void the warranty. Before installation or service, disconnect the po wer supply to th e work area by removing the fuse, tripping the circuit breaker or shutting off the power main. WARNING! ELECTRICAL SHOCK HAZARD! Disconnect electrical power at the circuit breaker box or fuse box before inst alling the appliance. Provide appropriate grounding for the appliance. Use copper conductors only. Failure to follow these instructions could result in serious injury or death CAUTION! Label all wi res prior to discon necting when servici ng controls. Wiring errors can cause improper and dangerous operation. Verify proper operation after servicing. 6 Oven use WARNING! Ovens can produce high temperatures that can cause burns. Prevent children from touching the appliance while in use. Use heat-resistant potholders when placing items in the oven, turning th em, or removing them from the oven. The upper heating element and oven racks can become very hot and cause burns. To prevent burns, always place oven racks at their desired height while the oven is cool. Open the door carefully to allow removing food. hot air or steam to escape before placing or To prevent burns, allow the heating element to cool before cleaning by hand. During the self cleaning f unction the ov en will become very hot. Prevent children from coming in contact with the oven. Remove all a ccessories from the oven before starting a self-clea n cycle. The high temperatures needed for this program will damage the accessories. The door gasket is essential for a good seal. Care should be taken not to wear, damage or remove the gasket. Only clean parts listed in this manual. CAUTION: Heating elements may be hot even though they are not glowing. During and after use, do not let clothing or other flammable materials come in contact with heating elements or interior surfaces of the oven until they have had sufficient time to cool. External parts of the oven such as the door glass, vents, and the control panel can become hot. Do not block the exhaust vents. Aluminum foil should not be used to line the bottom of the oven cavity. Do not place pots, pans or baking sheets directly on the bottom of the oven cavity. Do not slide pots or pans on the oven floor. Thi s could scratch and damage the surface enamel. Do not let metal objects (aluminium foil, pans) or th e meat probe come in contact with the heating element. Do not sit or step on the oven door. Do not place heavy items on the open oven door. Only use the food probe supplied with the oven. Contact Bertazzoni Service if you need to purchase a new probe. To prevent damage, remove the food probe from the oven when it is not being used. Do not h eat unopened containers of fo od in the oven, pressure may build up and cause them to explode. Never add water to food on a hot tray or pan, or directly onto food in a hot oven. The steam generated could cause serious burns or scalds. This oven must only be used for cooking. Do not use it as a dryer, kiln, dehumidifier, etc. Fumes or vapors given off by glues, plastics or flammable liquids and materials could be hazardous. Never store flammable liquids an d materials in, abo ve or unde r an oven, or near cooking surfaces. Do not use the appliance to store or dehydrate flammable materials. This is a fire hazard. Do not use the oven to heat the room. When baking frozen pizzas or pies, place them on the rack li ned with p archment paper. Frozen food like french fries, fish sticks, chicken fingers etc. can be baked on the baking tray. Always check that food is sufficiently heated. The time required varies depending on a number of factors, su ch as initial temperature, quantity of food, type and 7 consistency of the food, and recipe. Germs present in the food are killed off only at a sufficiently high temp erature (> 158F / 70C) and after a sufficiently long time (10 minutes or longer). Select a longer cooking time if you are unsure whether the food is thoroughly heated. To ensure temperature is distributed eve nly, stir food b efore serving. It is recommended to cover all cooked food that is left in the oven to be kept warm. This will prevent moisture from condensing on the interior of the oven. Be careful when cooking with alcoholic beverages like rhum, whiskey, wine etc. The alcohol evaporates at high temperatures but may in rare circumstances combust on the hot heating elements. Other Do not use a steam cleaner to clean the oven. Steam could penetrate electrical components and cause a short. Do not leave the oven un attended when cooking with oils o r fats, they are a fire hazard if overheated. Do not use water on grease fires! Smother the fire with a properly rated dry chemical or foam fire extinguisher. Be aware of loose or hanging garments while operating the cooktop, they present a fire hazard. Make certain that the po wer cords of small appliances do not come in contact with or get caught in the oven door. Use only dry, heat-resistant potholders. Moist or damp potholders used on hot surfaces may result in steam burns. Do not let potholders come in contact with oils. Do not substitute towels or other bulky items for potholders. SAVE THESE INSTRUCTIONS AND REVIEW THEM PERIODICALLY. 8 PRODUCT SPECIFICATION PROFESSIONAL SERIES OVENS (PRO MODELS) 9 PRODUCT SPECIFICATION DESIGN SERIES OVENS (CON MODELS) 10 Electrical requirements Electrical requirements 120/240V - 5500W (24 A max) or 120/208V – 4400W (21 A max). Upper heating element 3400W Lower heating element 2100W Convection heating elements 2 x 1650W 120/240V - 5500W (24 A max) or 120/208V – 4400W (21 A max). Upper heating element 3400W Lower heating element 2100W Convection heating elements 2 x 1650W 11 INSTALLATION INSTRUCTIONS INSTALLER: PLEASE LEAVE THESE INSTRUCTIONS WITH THE OWNER. Electrical connection CAUTION: Before installing the oven, disconnect the power supply by either removing the fuse, shutting off the power main or manually tripping the circuit breaker. Installation work and repairs should only be performe d by a qualified technician in accordance with all applicable codes and stand ards. Repairs and service by unqualified persons could be d angerous and may void the warranty. The manufa cturer is not lia ble for pe rsonal injury, product or property damage caused by serviced performed by unqualified persons. Before connecting the appliance to the power supply, make sure that the voltage and frequency listed on the data plate correspond with the household electrical supply. This data must correspond to prevent damage to the product. Consult an electrician if in doubt. Only operate the appliance after it has been installed in a cabinet. Power supply The oven is equipped with a 4 ft. (1.2 m.) flexible metal cable with 4 wires ready for connection to a dedicated 3 pole, 4 wire grounded power supply: 120/240Vac: 5500 Watt or 24 A max. or 120/208Vac: 4400 Watt or 21 A max. Black wire: connect to L1 (hot) Red wire: connect to L2 (hot) White wire: connect to N (neutral) Green wire: connect to GND (ground) A dedicated line and junction box should be used to connect the oven to a 30 A circuit. CARING FOR THE ENVIRONMENT Disposal of packing materials The cardboard box and packing materials protect the appliance during shipping. Ensure that any plastic wrappings, bags, etc. are disposed of safely and kept out of the reach of children. Danger of suffocation! Disposal of an old appliance Old appliances may contain materials that can be recycled. Please contact your local recycli ng authority about the possibility of recycling these materials. Make sure that the appli ance presents no danger to children while being stored for disposal. Before discarding an old appliance, unplug it from the outlet and cut off its power cord. Rem ove any doors t o prevent trapping hazards. 12 WIRING DIAGRAM Models: FD 30 PR OX - FD3 0 PRO XE - FD30 PRO XT 13 WIRING DIAGRAM Models: FD30CONXE - FD30CONXT 14 CUT-OUT DIMENSIONS IMPORTANT Kitchen cabinets shall be made of materials capable of withstanding temperatures at least 117°F (65°C) above room temperature in order to avoid possible damage to the cabinets during oven usage. The oven must be installed into cabinetry and be supported from underneath. The oven vent at the bottom of the door must be left unobstructed. A Vent cut-out 16” x 4” (406mm x 102mm) in the base of the cabinet B Cut-out for power cord min. 1" x 1” (2.54 x 2.54 cm.) C Electrical connection box 15 INSTALLING THE OVEN STEP 1 Fix the supplied skid plates to the cabinet floor. STEP 2 Prepare the door for removal. Flip up the locking clamps on each door hinge. Slowly shut the door until the protruding clamps stop the movement. Pull oven door upwards and remove. STEP 3 Connect the oven to the electrical supply. STEP 4 Slide the oven into the cabinet and align. STEP 5 Reinstall the oven door. STEP 7 Open the oven door and locate the two mounting screw holes in the oven frame. Mark and drill ¼” (6 mm) pilot holes. Secure the oven to the cabinetry by inserting screws through the frame and into the cabinetry. Assemble the supplied screw caps over the screw head to conceal them. 16 GETTING STARTED 1 2 3 4 5 6 7 8 9 Control Panel (KNOBS only presents on PRO models) Cooling exhaust Self-clean cycle door lock Lights Food probe port (XT (models only) Convection fans Seven level shelf supports Data plate Oven door 17 COOLING FANS Two cooling fans are concealed in the upper portion of the oven. They activate each time the internal temperature reaches 390F (200C) and continue to operate until the temperature drops to 320F (160C). Therefore the cooling fans may be on after the oven has been turned off. When the temperature inside the oven is over 280F (140C), the cooling fans activate each time the door is opened in order to avoid that the hot air escaping the cavity enters in contact with the control panel. Cooling fans are always operated when a cleaning cycle is selected. NOTE: COOLING FANS ARE DIFFERENT FROM THE CONVECTION SYSTEM FANS, WHICH ARE PLACED AT THE BACK OF THE OVEN CAVITY. OVEN LIGHTS Oven lights are activated each time the door is opened and when the oven is in operation. In ECO mode, the oven lights will not turn on during operation to save energy. During the following functions the oven lights are not activated: - Sabbath Mode - Cleaning cycle - Proofing - Defrost You can turn on the lights inside the oven by tapping STEEL RACKS on the display. Slide the racks onto the runners on both sides of the oven. The racks have non-tip safety notches, which prevent them from being pulled out completely while the oven is in use. When inserting a rack, always check that the safety notches are at the back. To remove racks, raise them upwards and pull out. TELESCOPIC RACKS The oven is also equipped with full-extension telescopic racks that extend on ball bearing glides. The telescopic racks must be securely fastened to the side runners. Additional racks can be purchased as accessory (part # 901267). To change shelf position: - extract the rack out of the oven - lift the rack to disengage the runners - pull the rack out of the oven cavity - close the rack - install the rack in another position while completely closed 18 19 USING THE LCD DISPLAY DESIGN SERIES OVENS (CON MODELS) PROFESSIONAL SERIES OVENS (PRO MODELS) A Touch control areas C Upper cavity Touch control areas E Lower cavity Temperature knob G Upper cavity Temperature knob START B LCD Display D Lower cavity Touch control areas F Lower cavity Cooking modes knob H Upper cavity Cooking modes knob The LCD display can be operated 1 minute after the power supply is connected. To activate the display: DESIGN SERIES OVENS (CON MODELS) Tap for 2 seconds any of the touch control areas (A). The fol lowing icons will appear: Timer Settings Light Start PROFESSIONAL SERIES OVENS (PRO MODELS) Turn the cooking modes knob (right side). The following icons will appear: Timer Settings Once activated each menu will show the icons necessary for navigation and programming next to the touch control areas. After 1 min ute without operation the display will go in stand-by mode to reduce power consumption and the touch control area s will turn off. Touch any control area for 2 seconds to reactivate the display. 20 ICONS LEGEND Timer Light Settings menu Start Scroll left/right and up/down Confirm selection Remove selection or leave menu Stop cooking Set cooking time, delay start/end time, food probe Modify cooking mode Modify cooking temperature 21 SETTINGS Activate SETTINGS menu with Select field with and confirm Set the desired values with and confirm Leave menu Notes ECO mode: this setting reduces energy consumption by: ‐ turning off the oven before the end of a cooking program and using residual heat to complete the cooking ‐ switching off the oven light during cooking ‐ switching off the display in stand-by mode. Audio Level Level 1 to 3. Level 1 is NO AUDIO Metric /Imperial Metric: Celsius/Kg/24 hour clock Imperial:Farenheit/Lbs/12 hour clock SHOW ROOM mode: this option is for showroom demonstration. In showroom mode the heating elements are not activated. Never use this at home. TIMER Activate TIMER with Set desired time (max 10 hours) with and confirm Leave menu Note The timer can be used independently from cooking. The display will show the countdown. A tone so und will be heard at the end of the countdown. To stop sound at the end of the countdown tap any touch control areas. To modify the timer enter this menu again. LIGHT Turn the oven light on and off by tapping this icon. Note : this function is not available in the PRO series ovens. 22 BEFORE USING THE OVEN Before using the oven for preparing food: Remove the protective film from the oven door and control panel Remove all accessories from the oven Remove all stickers from the baking tray, from the roasting pan or from the interior cavity of the oven Remove all spacers and packing material from the interior of the oven cavity Make sure the room is properly ventilated Run the oven for 2 hours at 500F / 260C in turbo mode. The two cavities all identical in the double oven and can be operated at the same time, except for pirolytyc cleaning function. The display will show the status of one of the two cavities at a time.The cavity shown on the display is indicated by the symbol XX or YY placed on the upper right corner. In most of the different operation menu the cavity displayed id shown on the screen by the symbol XX or YY To switch the display from one cavity to the other : PRO models : A – in stand –by condition operate the function control knobs B- during operation : touch the area indicated by the symbol XX or YY on the left side of the display CON models Always touch the dedicated areas indicated by the symbol XX or YY on the control panel. The switch of the display is confirmed by sound. The touch area will remain lit for 3 seconds after the touch. The oven will normally work even if its status is not displayed. In case an event happens in a cavity when the oven status is not displayed (e.g end of cooking function or request of introduction of a food probe) the interface display will automatically switch to this oven status. It is always possible to switch from one oven status to the other using the different switch buttons. The modification of the oven parameters affects both cavities at the same time and it is only possible when both cavities are switched off. In case of a malfunction on one of the cavity, depending on the type of malfunction it will be possible to continue to operate the other cavity. Specific warning messages will be displayed. This pre-operating procedure will ensure that all internal residues burn off prior to preparing food. 23 BASIC OPERATION - DESIGN SERIES MODELS START Activate the oven by touching any control area for 2 seconds. Start programming with Select COOKING MODES and confirm Set desired COOKING TEMPERATURE and confirm The oven will start PRE-HEATING in a few second showing the progress in the display. The end of pre-heating will be confirmed with a tone. Place the food in the oven when the desired temperature has been reached. Note The preheating bar is not shown.in broil, convection broil, dehydrate, defrost, warming and proofing modes. MODIFY/STOP Modify COOKING MODE during cooking with Modify COOKING TEMPERATURE during cooking with STOP cooking with and confirm 24 BASIC OPERATION – PROFESSIONAL SERIES MODELS START Activate the oven by turning the COOKING MODE knob (right) Select COOKING MODE by turning the right knob Select COOKING TEMPERATURE by turning the temperature left knob The oven will start PRE-HEATING in a few second showing the progress in the display. The end of pre-heating will be confirmed with a tone. Place the food in the oven when the desired temperature has been reached. Note The preheating bar is not shown-in broil, convection broil, dehydrate, defrost, warming and proofing modes. In order to shorten the heat-up time the preheating is always done with turbo mode Each cooking mode has a default optimum temperature that appears as soon the cooking mode is selected MODIFY/STOP Modify COOKING MODE during cooking by turning the cooking mode knob Modify COOKING TEMPERATURE during cooking by turning the temperature knob Stop cooking by turning the function knob in the OFF position 25 TIME MANAGEMENT MENU – TIMER, DELAY/END COOKING, FOOD PROBE START After programming the oven for cooking, touch management menu. or to enter the time SET TIMER This function is simply a minute minder: the timer can be used independently from cooking and it will not turn off the oven at the end of the set time. For the oven to shut off automatically, select END OF COOKING (see below). Activate the TIMER Set the desired duration (max 10 hours) and confirm Leave menu The display will show the countdown. The end of the countdown will be confirmed with a repeating tone. Tap any touch control area to stop tone. Important! COOKING WILL NOT STOP AT THE END OF THE COUNTDOWN. TURN THE OVEN OFF MANUALLY AND REMOVE FOOD FROM OVEN TO AVOID OVERCOOKING. END OF COOKING The oven will automatically turn off after the set cooking time has elapsed. Activate END OF COOKING Set the desired duration (max 10 hours) and confirm Leave menu The display will show the countdown. the oven will turn off at the end of the countdown and the display will show END OF COOKING – BUON APPETITO! The end of the countdown will be confirmed with a repeating tone. Touch any touch control area to stop tone. MODIFY/CANCEL Activate end of cooking menu and modify the time value. Set time to 0:00 to cancel Note Cooking time is calculated from the end of preheating. During preheating the end of cooking time is not shown in the display. It is not possible to set end of cooking when using the food probe. If a food probe temperature is set, the end of cooking will be deleted. 26 DELAY START The oven will start at a desired time. Activate DELAY START Set desired time before oven will turn on and confirm Leave menu The display will show the countdown. The oven will turn on at the end of a count down. The end of the countdown will be confirmed with a repeating tone. Note DELAY START can be combined with the END OF COOKING. FOOD PROBE The food probe is only available on XT models. The food probe monitors the core temperature of the food during cooking and turns off the oven when the desired temperature is reached. It can be used ONLY with the following cooking modes: Convection Bake Convection bake Turbo Broil Convection Broil Insert the food probe in the item to be cooked. For best results, insert the probe as close as possible to the center of the item and make sure it is not in contact with bones or fat. Improper placement of the probe could shut the oven off too early and result in uncooked food. With poultry, make sure the probe does not rest in a cavity. Activate Select the desired food temperature with and confirm After the preheating sequence is completed, the display will show the message INSERT FOOD PROBE. CONTINUE? 27 Connect the probe jack to the port located in the upper left side of the oven cavity. Place the food in the oven and confirm The display will show the set temperature and the actual temperature measured by the probe. The oven will turn off when the desired food temperature is reached. The display will show END OF COOKING – BUON APPETITO! End of cooking will be confirmed with a tone. To stop tone tap any touch control area. Note Food probe temperature can be selected at any time while cooking. If the probe jack is not inserted in its port, a message will appear on the display requiring confirmation of the probe insertion. Cooking will stop if the probe is not inserted. Select NO on the confirmation screen to continue cooking without probe. Important DO NOT LEAVE THE PROBE IN THE OVEN CAVITY WHEN NOT IN USE. 28 COOKING MODES GUIDE MODE BAKE DETAILS Bake and broil elements ON Convection OFF Temperature 100F - 500F Use lower 2 shelf levels. CONVECTION BAKE Bake element ON at full power Broil element ON at moderate power Convection fan ON Temperature 100F- 500F Use several levels at the same time. NOTE: As a general rule, the temperature of a recipe not designed for baking in a convection oven should be lowered by 20F (15C) CONVECTION Convection fan and convection element ON Use several levels at the same time. Temperature 100F - 500F NOTE: As a general rule, the temperature of a recipe not designed for baking in a convection oven should belowered by 20 °F (15 °C.) TURBO Bake element ON at full power Convection element and fan ON at full power USE FOR/TIPS Soufflés Meringues Angel food cakes Cream puffs Cookies Cakes Cheesecakes, Pies Quiches Baked potatoes Cookies Cakes Breads Rising dough Cheesecake Pies Quiches Baked potatoes Casseroles Gentle cooking of p astries, soufflés and cakes. At higher temperature use also for roasting meats and poultry. Uniform cooking with strong heat from the bottom of pizza, focaccia and bread. Temperature 100F – 500F Use shelf levels 2 and 3 BROIL Broil element ON 4 power settings – LOW (1) to HIGH (4) Brown food on the top side only. Turn food over if browning is required on both sides. The element is heated for the first 3 minutes at maximum power and then the power is reduced according to the selected power setting. CONVECTION BROIL Broil element ON Brown food on top and bottom side. This mode is preferred for browning food that is too delicate for turning such as fish. Convection fan ON 4 power settings – LOW (1) to HIGH (4) The element is heated for the first 3 minutes at maximum power and then the power is reduced according to the selected power setting. DEFROST/DEHYDRATE In DEFROST mode only the fan is active to circulate air in the cavity. All heating elements are turned off. NOTE: The degree of browning on each side might be different. Defrost food Dehydrate food, flowers, vegetables. In DEHYDRATE mode th e fan is on and the cavity is maintained at 100F. PROOFING Bake element ON at low constant heat power Fan on every 5 minutes to eliminate stagnant air. For best results, place dough in bowl and cover with a clean towel. Use any shelf level. WARMING Bake element at low to moderate power. Temperature 140/170/200F preset. 29 Use the warming program in Sabb ath mode (S.M.) during religious observance. BROIL / CONVECTION BROIL The broil element operates on 4 different power levels. The element is heated for the first 3 minutes at maximum power and then the power is reduced according to different desired effects. Level 1 produce a mild browning of the food surface Level 4 produce an intense irradiated heat that cause a fast browning of food. Select the power level according to the desired effect on food. Select BROIL to brown food on the top side only. This mode requires turning food if browning is required on both sides Select CONVECTION BROILER to brown food slightly also on the bottom side. This mode is preferred for browning food on both sides that is too delicate for turning such as fish. The degree of browning on each side might be different TIPS FOR BEST RESULTS – BROILING AND ROASTING ADJUST TO DESIRE LEVEL OF ‘DONENESS’ FOOD SHELF POSITION Ground beef patties, ½” thick 6 T-Bone steak 6 Flank steak 6 Eye of round roast 5 Loin roast 5 Boneless skinless chicken breasts 6 5 Half chicken 5 Turkey TEMPERATURE APPROXIMATE COOKING TIME LEV 4 15 to 20 minutes Broil until not pink in center LEV 4 12 to 20 minutes Broil until done to desired level LEV 4 12 to 20 minutes Broil until done to desired level 330° 20 to 25 min per pound Small roasts require longer time per pound; reduce time using Convection Bake 330° 20 to 25 min per pound Cook until juices are clear LEV 3 20 to 25 minutes Cook until juices are clear LEV 3 25 to 30 minutes Remove skin and ook until juices are clear LEV 4 30 to 45 minutes Turn with tongs and cook until juices are clear 350° 75 to 90 minutes Reduce time using Convection Bake. Time may vary if stuffed. 330° 20 to 25 min per pound Reduce time using Convection Bake. Time may vary if stuffed. Broiler Convection Broiler Broiler Convection Broiler Broiler Convection Broiler Bake Convection bake Chicken thighs Roast chicken COOKING MODE 4 4 Bake Convection bake Broiler Convection Broiler Broiler Convection Broiler Broiler Convection Broiler Bake Convection bake Bake or Convection bake 30 SUGGESTIONS TIPS FOR BEST RESULTS - BAKING CHECK PACKAGE DIRECTIONS FOOD PAN SIZE TEMPERATURE Cookies Layer Cakes Sheet Cakes Bunt Cakes Brownies, Bar Cookies Biscuits Quick Bread Muffins Fruit Pies Fruit Cobblers Yeast Bread Dinner Rolls Cinnamon Rolls Yeast Cake 12”x15” Cookie Sheet 8”or 9”Round 9”x13” Pan 12 Cup 9"x9" Pan 12"x15" Cookie Sheet 8"x4" Loaf Pan 12 cup Muffin Pan 9" Diameter 9"x9" Pan 8"x4" Loaf Pan 9"x13" Pan 9"x13" Pan 12"x15" Cookie Sheet 370° 350° 350° 320° 320° 420° 350° 420° 420° 400° 370° 400° 370 400° COOKING TIME (minutes) 8 to 12 25 to 35 30 to 40 60 to 75 20 to 25 10 to 15 55 to 70 14 to 19 35 to 45 25 to 30 25 to 30 12 to 18 25 to 30 20 to 30 TIPS FOR BEST RESULTS - WARMING FOOD Beef Bacon Biscuits and Muffins (covered) Casserole (covered) Fish and Seafood Deep Fried Foods Gravy or Cream Sauces (covered) Lamb and Veal Roasts Pancakes and Waffles (covered) Potatoes Baked Mashed (covered) Pies and Pastries Pizza (covered) Pork Poultry (covered) Vegetables (covered) TEMPERATURE 150°F (70°C) 200° -225°F (90 - 110°C) 175°-200°F (80 – 90°C) 175°-200°F (80 – 90°C) 175°-200°F (80 – 90°C) 200° -225°F (90 - 110°C) 175°F (80°C) 175°-200°F (80 – 90°C) 200° -225°F (90 - 110°C) 200°F (110°C) 175°F (80°C) 175°F (80°C) 225°F (110°C) 175°-200°F (80 – 90°C) 175°-200°F (80 – 90°C) 175°F (80°C) 31 LEVEL 2..5 2..5 2..5 2..5 2..5 2..5 2..5 2..5 2..5 2..5 2..5 2..5 2..5 2..5 TIPS FOR BEST RESULTS - DEHYDRATE FOOD PREPARATION APPROXIMATE TIME (hrs) DONE WHEN… Apples Cut in ¼” slices and dip in 1/4 cup lemon juice + 2 cups water solution 11-15 Slightly pliable Bananas Cut in ¼” slices and dip in 1/4 cup lemon juice + 2 cups water solution 10-15 Soft, pliable Cherries Wash and towel dry. Remove pits 10-15 Pliable, leathery, chewy Orange peels and slices Peel and cut in 1/4" slices Pineapple rings Towel dry Strawberries Wash and towel dry. Cut in 1/2" slices. Place skin (outside) down on rack 12-17 Red peppers Wash and towel dry. Remove stems, chop coarsely about 1" pieces 16-20 Leathery with no moisture inside Mushrooms Wash and towel dry. Cut off stem end. Cut into 1/8" slices 7-12 Tough and leathery, dry Tomatoes Wash, drain well.and towel dry. Cut in 1/8" slices. 16-23 Dry, brick red colour Oregano, sage, parsley, thyme, fennel Rinse and dry with paper towel 3-5 Crisp and brittle Basil Use basil leaves 3 to 4 inches from top. Spray with water, shake off moisture and pat dry 3-5 Crisp and brittle Peels:2-4 Slices: 12-16 Canned: 9-13 Fresh: 8-12 32 Orange peel: dry and brittle. Orange slices: skins are dry and brittle, fruit is slightly Soft and pliable Dry, brittle ASSISTANT FUNCTION Available on XT models only Developed with the help of Italian professional chef consultant Roberto Carcangiu, Bertazzoni’s exclusive ASSISTANT function is a revolutionary system for upgrading oven cooking in the home. The ASSISTANT is pre-programmed with finely calibrated sets of cooking modes, temperatures and times sequences for each type of food. The system does not provide recipes – those are yours to choose from. The ASSISTANT will simply ‘pilot’ the oven to help you make the best of your oven recipes. Enjoy selecting the sequences already stored in the ASSISTANT that best suit your own style of cooking and culinary taste. After you have familiarized with them, you will be able to build new sequences of your own creation and store them for future use. The ASSISTANT is available on XT models only together with a food probe for temperature control. ASSISTANT MENU MANAGE - Selected the fo od type, weigh/size, type of cooking and desired finish and let the Assistant oversee the cooking until your dish is perfect. SAVE – After you cook a perfect dish, n ame the cook ing sequence and l et the Assistant store it for future use. RETRIEVE – Retrieve a pr eviously stored set and let the ASSISTANT manage the oven according to the instructions you selected for that dish. BREAD CAKES AND PASTRY FISH MEAT PASTA PIZZA POULTRY VEGETABLES 33 START Activate the oven by touching any control area for 2 seconds. Start programming with Select ASSISTANT Select MANAGE with or with right knob and confirm with and confirm Select TYPE OF FOOD with and confirm Selected food categories will guide you throug h the selecti on of additional parameters (e.g. for meat: weight, type of cut, food probe temperature). Follow the directions on the display, select the appropriate parameters and confirm. The oven will begin pre-heating and signal the end of the pre-heating cycle with a tone. Insert the food in the oven only after the pre-heating is complete. The display will show the time remaining until the end of the cooking sequence. The oven will turn off at the end of the cooking cycle. The display will show END OF COOKING – BUON APPETITO! End of cooking will be confirmed with a tone. Important: COOKING WILL CONTINUE WITH RESIDUAL HEAT. REMOVE THE DISH FROM THE OVEN IMMEDIATELY TO AVOID OVERCOOKING. FOOD PROBE If the cooking sequence requires the use of the food probe, the display will ask you to input the desired food temperature (lower = rare, higher = well done). Once the pre-heating cycle is completed, the display will remind you to insert the food probe. Connect the food probe jack to the appropriate port in the oven cavity at the end of preheating. The cooking sequence will start only after confirmation that the food probe has been inserted. When using the food probe, the display will show the food probe temperature (actual and target) instead of the remaining time until the end of cooking. The oven will turn off when the food temperature measured by the probe reaches the desired level. The display will show END OF COOKING – BUON APPETITO! End of cooking will be confirmed with a tone. Important: COOKING WILL CONTINUE WITH RESIDUAL HEAT. REMOVE THE DISH FROM THE OVEN IMMEDIATELY TO AVOID OVERCOOKING. STOP/MODIFY To STOP cooking tap and confirm. It is not possible to change cooking mode, temperature or duration while cooking with the ASSISTANT function. If additional cooking is needed, operate the oven in manual mode until the desired result is obtained. 34 Important Pre-programmed sequences have been calibrated for cooking food starting from room temperature. If using frozen food for a dish, defrost it before starting a sequence. Note : In low temp roasting mode, food is baked at a very low temperature then requiring long cooking time. Baking time can last up to 5/6 hours, according to food dimensions. In assistant cooking mode, the time is calculated from the end of preheating. Make sure to introduce food in the oven as soon as the preheating time is finished, otherwise the cooking time can result too short. All cooking methods refer to fresh food, except where indicated. For frozen food, refer to your standard procedure ASSISTANT FUNCTION - OPTIONS CHART Food Preparation Food probe Traditional Roasting Low Temp. Roasting Meat Braising Slow cooking Oven Fried Traditional Roasting Poultry Slow cooking Traditional Roasting Oven Fried Fish Grilled - food temp. probe Grilled – manual Rising pastry dough Cakes Shortbread dough Manual Bread Food temp. probe Pizza Homemade pizza Frozen au gratin Pasta Fresh au gratin Stew / Sautè Vegetables Grilled Roasted potatoes * Time indicated excludes pre-heating SLOW COOKING yes yes yes yes yes yes yes yes Pre-programmed cooking time* 90 min. 6 min. 12 min. 7 min. 35 min. 25 min. 22 min. 14 min. yes 35 min. 20 min. 7 min. 50 min. Slow cooking allows cooking of very l arge pieces of meat and poultry (over 4Kg. or 8,8Lbs ) for several hou rs at a very lo w temperature. This co oking mode do es not end when the temperature set on the food probe is rea ched, but the food i s then continuously kept at this temperature. The temperature shown on the food probe will them continuously be adjusted (-15F +0)once the set valve has been reached. A manual switch off of th e oven is th en required. A cooking time of 1 2 hours is suggested. The program is automatically switched off after 24h. CUT TYPE Cut type Less tender Type of meat Beef chuck Beef brisket Corned beef Short ribs Pork shoulder Lamb shank Pork blade roast Beef tenderloin Prime rib Pork tenderloin Leg of lamb Chicken legs/thighs Tender 35 SAVE The ASSISTANT stores your latest cooking sequence for future use. It is possi ble to save in the memo ry the last co oking sequence performed in each oven. In this case enter in the assistant mode from the oven cavity where You have performed the cooking sequence You would like to save. Select ASSISTANT Select SAVE with with or with right knob and confirm and confirm The display will show the last cooking sequence performed, indicating the set of cooking modes, temperatures and times used for the cycle. Confirm Select FOOD CATEGORY and confirm Enter a name for this cooking sequence - scroll through the keyboard with and confirm each letter with NOTE: scrolling accelerates by keeping the finger on the touch area. Confirm with Touch to leave this menu without saving the sequence. After saving a sequence, the display will return to the main ASSISTANT menu. Important The memory can store up to a maximum of 32 personalized cooking sequences in addition to those pre-programmed. When the memory is full and you attempt to store another cooking sequence, a message will prompt you to delete one of the previously stored sequences. The interface will eliminate steps that are not significant for cooking results, such as functions used for less then 1 minute. A maximum of 4 different cooking steps (combination of function/temperature/time) can be recorded in a sequence. 36 RETRIEVE To retrieve a previously stored personal sequence follow these simple steps. Once saved, a personal cooking sequence can be retrieved from both oven cavities, as the file of save cooking modes is common for both cavities. For this reason, deleting or modifying a personal cooking sequence will also affect te file for both cavities. Select ASSISTANT Select RETRIEVE with with or with right knob and confirm and confirm Select FOOD CATEGORY and confirm Select a stored sequence and confirm You will have the following options: - START: will immediately start the cooking sequence. - MODIFY: allows to modify food category and name associated to a personal cooking sequence - DELETE: delete the selected cooking sequence. Confirmation is required. Note: if no cooking sequence is saved an empty menu will be displayed. 37 SABBATH MODE This special program is designed for religious observances. START Activate the oven by touching any control area for 2 seconds. Start programming with Select WARMING with Select S.M. with or with right knob and confirm and confirm The oven will turn on and pre-heat until the temperature of 200F is reached. Then, the temperature will be held constant until the oven is switched off. Opening of the door will not cause an immediate re-heating of the oven: the heating will continue according to a set procedure independent from use. The oven lights will not turn on in Sabbath Mode even if the door is open. MODIFY/STOP To modify cooking mode: ‐ ‐ DESIGN SERIES OVEN: Scroll COOKING MODES PROFESSIONAL SERIES OVENS: use the cooking mode knob (right) Turn off the oven with 38 SELF-CLEANING CYCLE DESCRIPTION In the self-cleaning cycle, the oven cavity is heated to very high temperatures to burn off any residue on the oven interior. After the cleaning cycle, any burnt off residue is transformed to ash and can be easily wiped out with a damp sponge. Spilled fruit juices may permanently discolour surfaces. This discoloration is permanent but will not affect the efficiency of the enamel. If the oven is not cleaned regularly, debris may become extremely difficult to remove even with the CLEAN function. DOOR LOCK Due to the extremely high temperature reached in the self-cleaning function, the door will automatically lock after 1 minute. The lock will release once the cycle has ended and the oven temperature has dropped below 500F (260C). PREPARE Before starting the CLEAN function: ‐ Remove large pieces of debris and grease deposits from the interior of the oven cavity. Debris and grease can ignite at high temperatures. ‐ Remove all accessories from the oven. The high temperature reached during the cycle will damage the accessories. SPECIAL CONDITIONS It is possible to activate the cleaning cycle on one of the cavity at a time. During the clean cycle the other cavity will be completely switched off, the door will not be locked but the oven lights will not work. It will not be possible to switch the interface display to the other oven. It will not be possible to activate a cleaning cycle if the other cavity is in operation. START CON models: Select Clean in the COOKING modes menu PRO models: set both knobs to CLEAN. NOTE: if either knob is moved from the clean position, the cycle is aborted. Select REGULAR or ECO cleaning mode. The regular cycle lasts longer than the ECO cycle and therefore uses more energy. Confirm that all accessories have been removed from oven cavity to start the cleaning cycle. The oven door will lock for the duration of the cycle and it will not be possible to operate the oven. During the clean cycle the cooling fans are constantly in operation. The end of the cleaning cycle will be confirmed with a tone. The oven door will remain locked until the oven temperature falls below 500F (260C). STOP CON models: touch OFF PRO models: move either knob from clean position. CAUTION The interior of the oven will still be at high temperature when the automatic lock is released – USE MAXIMUM CAUTION TO AVOID BURNS. If "SELF CL EAN" is accidentally selected, shut off the oven and wait for th e oven temperature to drop for the door lock to release. 39 CLEANING THE OVEN FRONT Clean spills from the front of the appliance immediately. Spills may cause discoloration of the glass and steel surfaces. Clean the front of the appl iance with a clean sponge or cloth, liquid dish soap and warm water. Alternatively, use a clean, damp microfiber cloth and then dry wit h a soft cloth. All surfaces are vulnerable to scratching. Scratches can lead to shattering of the glass surface. All surfaces can become discoloured or changed if they come into contact with unsuitable cleaning agents. In PRO model the display is protected with a transparent glass which is very delicate. Avoid contact with cleaning agents. Do not rub the surface. Swipe delicately with a mild cleaning agent and dry with a clean cloth. INTERIOR Caution: Danger of burns! Allows the oven to cool before cleaning. Clean the oven surface with a solution of hot water, liquid dish soap and a sponge or soft nylon brush. Do not use abrasive cleaning agents, hard brushes, metal scouring pads, steel wool, knives or other abrasive materials. Avoid cleaning the gasket around the interior (sealing the door glass pane). It is made from glass fiber and will get damaged if rubbed or scrubbed. Do not use oven spray on any part of this oven. Tips The porcelain enamel finish of the cavity is a cid resistant, but not acid proof. Acidic food, such as citrus juices, tomatoes, rhubarb, vinegar, alcohol or milk, sh ould be wiped off and not allowed to bake onto the porcelain during the next use. Remove the oven racks when cleaning the interior of the oven. The heating elements in the oven do not require cleaning; the elements burn themselves clean when the oven is in use. Elements are permanently connected. It is not necessary to clean the broiler shield above the broil element. To avoid surface damage from cleaning, do not use any of the following: ‐ ‐ ‐ ‐ ‐ ‐ ‐ ‐ ‐ ‐ cleaning products that contain washing soda, ammonia, acids, or chlorine lime removers scouring cleansers, e.g., scouring powder, scouring liquid, pumice stones solvent-based cleansers stainless steel cleaners dishwasher detergents oven sprays glass cleaners scouring sponges or brushes, such as pot scrubbers sharp metal scrapers FOOD PROBE Wash with soapy water and a sponge. Rinse under running water. Do not leave the probe submerged in water. Do not clean the food probe in the dishwasher. ACCESSORIES Wash with soapy water and a sponge. Rinse under running water. 40 REPLACING THE OVEN LIGHTS WARNING! Disconnect power before servicing unit. To replace the oven light bulb, remove the protection cap. It is not necessary to remove the rack supports. NOTE: Touching the bulb with fingers may cause the bulb to burn out. Always use protective gloves or use a cloth to remove the bulb. 41 TROUBLESHOOTING GUIDE OVEN PROBLEM POSSIBLE CAUSES AND/OR REMEDY Oven does not function Range is not connected to electrical power. Ask a professional to check power circuit breaker, wiring and fuses. Self-clean cycle does not activate Door is not shut tight and door latch cannot lock Door does not open Oven is still in self-clean mode. Door latch will release when safe temperature is reached. Oven light does not work Light bulb is burned out. Oven is not connected to power. Clean cycle is on. Oven door is locked and will not release after cooling Turn the oven off at the circuit breaker and wait 5 minutes. Turn breaker back on. The oven should reset itself and will be operable. Check the circuit breaker or fuse box to your house. Oven is not heating Make sure there is proper electrical power to the oven. Make sure the oven temperature has been selected. Oven light is not working properly Replace or reinsert the light bulb if loose or defective. Oven light stays on Check for obstruction in oven door. Check to see if hinge is bent. Cannot remove light cover There may be debris/spillage around the lens cover. Wipe lens cover area with a clean dry towel prior to attempting to remove the lens cover. One cavity is not working Other oven is in self cleaning mode this is normal, wait for termination of the cleaning cycle One cavity is not working but other cavity is working regularly a problem in the involved cavity has occurred. Contact after sale service with the indication of the error message shown on the display. Specific error messages may appear in case of malfunction. Call after sale service and provide the information that appear in the display for a quick and accurate diagnosis. 42 NUM. COMPONENT DESCRIPTION EXPLODED VIEW SPARE PARTS LIST FD30CONXE FD30CONXT FD30PROX FD30PROXE FD30PROXT 800584 800584 800584 800584 800584 800588 800588 800585 800585 800585 800587 800587 800587 800587 800587 800589 800589 800589 800589 800589 1 409063 OVEN TOUCHSCREEN SELECTOR BOARD 1 1 1 310494 USER MANUAL 1 1 1 1 1 1 310495 USER MANUAL 1 1 1 1 1 1 601444 WIRING 1 1 1 1 1 1 601665 WIRING 2 2 4 4 4 1 601673 WIRING 2 2 2 1 601674 WIRING 4 4 4 1 601676 MEAT PROBE WIRING 1 601677 POWER BOARD INTERFACE WIRING 2 2 1 601678 DOUBLE OVEN COMMUTATOR WIRING 1 1 1 601679 COOLING FANS WIRING 2 2 1 601691 MEAT PROBE WIRING 4 4 2 2 2 2 2 2 2 2 2 2 1 601692 WIRING 2 2 2 2 2 30 202797 OVEN RESISTANCE FASTENING CLAMP 6 6 6 6 6 38 306003 THERMOSTAT CLIP 4 4 4 4 4 104 202729 MOTORFAN FLAP 2 2 2 2 2 105 202724 UP SUPPORT FOR AXIAL COOLIN FAN 1 1 1 1 1 105 202724 UP SUPPORT FOR AXIAL COOLIN FAN 1 1 1 1 1 106 202723 DOWN SUPPORT FOR AXIAL COOLIN FAN 1 1 1 1 1 106 202723 DOWN SUPPORT FOR AXIAL COOLIN FAN 1 1 1 1 1 117 150009 PROTECTION FOR VENTILATED OVEN 2 2 2 2 2 119 941014 GRID FOR OVEN 2 2 2 2 2 120 101048 BLACK OVEN DRIP TRAY 1 1 1 1 1 120 101441 BLACK OVEN DRIP TRAY 138 202735 DISHWARMER BOTTOM 1 166 50008 INSIDE OVEN DOOR 2 2 2 2 2 311 301122 SCREW 4,2X30 2 2 2 2 2 313 301073 SCREW 5MAX10 TCT 313 301073 SCREW 5MAX10 TCT 329 309160 INSIDE DOOR SPACER 12 12 12 329 309161 INSIDE DOOR SPACER 4 4 4 330 309035 FIXING BUSH FOR RETAINER HEADPIECE 4 4 4 4 4 388 301133 SCREW 4,2X13 98 94 116 112 112 389 301109 SCREW M5X32 FOR HANDLE 440 402167 CATALYST 2 2 2 2 2 441 404507 SIDE GRID FOR OVEN 4 4 4 4 4 442 404508 GRID FOR OVEN 2 2 2 2 2 443 404497 GRID FOR TRAY 1 1 1 1 443 404512 GRID FOR TRAY 444 405095 OVEN DOOR HINGE FIX PART 4 4 4 4 446 405094 OVEN DOOR HINGE 4 4 4 4 470 404509 GRID FOR OVEN 2 2 2 2 2 568 508039 PROBE 2 2 2 2 2 573 609001 MEAT PROBE 1 1 1 1 2 2 12 12 4 1 4 2 4 2 584 609002 MEAT PROBE CONNECTION 608 309159 ANTI-SHORT BUSHING AS5 2 2 2 2 2 2 2 609 309151 CORE HITCH 4 4 4 4 4 610 603031 LOOK DOOR MOTOR 2 2 2 2 2 611 603030 OVEN CONVECTION FAN 4 4 4 4 4 612 603019 COOLING FAN 2 2 2 2 2 612 603019 COOLING FAN 2 2 2 2 2 613 606079 OVEN RESISTANCE 2100W 230V 2 2 2 2 2 614 606080 RESISTENCE 3400W 240V 2 2 2 2 2 615 606090 CIRCULAR HEATER 3300W 4 4 4 4 4 623 608057 OVEN BULB WITH HOLDER 4 4 4 4 4 624 309158 SQUEEZE CONNECTORS L423 1 1 1 1 1 641 602056 COMMUTATOR 11+0 2 2 2 642 602047 TEMPERATURE SELECTOR 648 607027 TERMINAL SEPARATOR 658 409061 DISPLAY + LOGIC CARD 658 409067 DISPLAY + LOGIC CARD 658 409062 DISPLAY + LOGIC CARD 658 409065 DISPLAY + LOGIC CARD 659 409058 LOGIC CARD 662 602049 THERMOSTAT 2 2 2 2 2 2 2 2 1 1 1 1 2 2 2 2 2 2 2 2 2 2 4 4 1 947 403343 HANDLE TERMINAL 4 1041 4010219 ELECTRIC KNOB 4 1406 403534 OVEN DOOR HANDLE 1406 403535 OVEN HANDLE 1406 403531 OVEN DOOR HANDLE 1406 403519 OVEN HANDLE 1407 406463 OVEN DOOR GLASS 1407 406469 OVEN DOOR GLASS 2 2 2 2 2 2 1 2 1 2 2 1407 406471 OVEN DOOR GLASS NO BRAND NAME 1 1 1409 411128 GLASS OVEN GASKET 2 2 2 2 1411 411127 GASKET FOR OVEN FRONT 2 2 2 2 1414 602050 THERMOSWITCH 2 2 2 2 2 1415 602051 THERMOREGULATOR 2 2 2 2 2 1415 602051 THERMOREGULATOR 2 2 2 2 2 1421 406462 INTERNAL OVEN GLASS 6 6 6 6 6 1427 406461 GLASS CONTROL PANEL 1 1 1428 406474 CONTROL PANEL GLASS 1 1 1508 410809 STAINLESS STEEL OVEN DOOR 2 2 1508 410765 STAINLESS STEEL OVEN DOOR 1601 410812 CONTROL PANEL FRAME 1602 211124 CONTROL PANEL 1 2 1 2 2 1 1 1 1 1605 402446 INSULATING FOR LAMP 4 4 4 4 4 1614 202765 UP BACK PANEL 1 1 1 1 1 1614 202766 DOWN BACK PANEL 1 1 1 1 1 1615 202761 CONTROL SUPPORT 1 1 1615 202722 CONTROL SUPPORT 1 1 1 1639 202733 VERTICAL VENT 4 4 4 4 4 1677 200469 FRONT PANEL INOX 2 2 2 2 2 1687 202728 UNDER OVEN CARTER 1 1 1 1 1 1690 202763 UNDER OVEN CARTER FOR OVEN UP 1 1 1 1 1 1712 200493 INNER GLASSES FRAME RIGHT 4 4 4 4 4 1861 6010014 TUBE 1 1 1 1 1 2019 202736 SIDE CHASSIS 4 4 4 4 4 2023 202734 REAR SIDE CHASSIS 2 2 2 2 2 2028 202738 UP SIDE CHASSIS 1 1 1 1 1 2098 202727 ELECTRIC RESISTANCE COMPARTMENT 2 2 2 2 2 2130 202726 GRILL PROTECTION 2 2 2 2 2 2147 150008 FRONTAL SCREEN GRILL 2 2 2 2 2 2184 202730 LAMPS WOOL FASTENING CLAMP 4 4 4 4 4 2185 1080053 FIXING DYSPLAY 1 1 2185 202743 FIXING DYSPLAY 1 1 1 2301 202803 SUPPORT LOGIC CARD 2 2 2 2 2 2306 202764 EQUERRE SUPPORT FERME CABLE 1 1 1 1 1 2375 1080011 SQUARE FOR HANDLE DOOR FIXING 4 4 4 2381 202725 FLAP FASTENER 8 8 8 8 8 2404 202741 CARTER CATALYST 2 2 2 2 2 2406 202572 DOOR FOR INSPECTION LOOK DOOR 2 2 2 2 2 2409 201187 TERMINAL SEPARATOR DOOR 5 5 5 5 5 2410 202742 LOOK DOOR CARTER 2 2 2 2 2 2501 1080010 SCREEN FIBER GLASS 2 2 2 2521 1080039 PROTECTION GLASS FIBER INSIDE O. DOOR 2 2 2 2 2 3201 402444 GLASS FIBER FOR MUFFLE 2 2 2 2 2 3215 402443 UP/DOWN GLASS FIBER FOR MUFFLE 4 4 4 4 4 3220 402445 BACK FIBER GLASS FOR MUFFLE 2 2 2 2 2 3240 402442 GLASS FIBER FOR OVEN DOOR 4 4 4 3265 402441 GLASS FIBER FOR OVEN DOOR 2 2 2 2 2 3500 604075 SWITCH 2 2 2 2 2 3500 604075 SWITCH 2 2 2 2 2 3551 604076 SWITCH BLADE 2 2 2 2 2 3551 604076 SWITCH BLADE 2 2 2 2 2 3552 604077 SWITCH SUPPORT 2 2 2 2 2 2 2 2 1 1 3552 604077 SWITCH SUPPORT 2 2 4301 200486 SIDE PROFILE 1 1 4301 200471 SIDE PROFILE 4302 200487 SIDE PROFILE 4302 200472 LEFT SIDE PROFILE 4303 200489 DOWN SIDE PROFILE 4303 200491 DOWN SIDE PROFILE 4304 200490 DOWN SIDE PROFILE 1 1 1 1 1 1 1 1 1 4304 200492 DOWN SIDE PROFILE 4303 200489 DOWN SIDE PROFILE 1 1 1 1 4304 200490 DOWN SIDE PROFILE 1 1 4403 200470 DRIP DRAIN PROFILE 1 1 1 1 4405 200507 DRIP DRAIN PROFILE 1 1 4405 200488 DRIP DRAIN PROFILE 1 1 1 4529 201213 PROFILE 2 2 2 2 2 4531 202768 PROFILE 1 1 1 1 1 2 2 2 4548 1080052 SQUARE FOR HANDLE DOOR FIXING 1 1 4548 1080052 SQUARE FOR HANDLE DOOR FIXING 1 1 4550 202767 OVEN OVERLAPPING RAIL 2 2 1 1