1
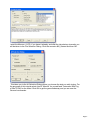
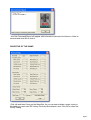
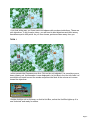
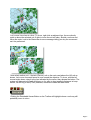
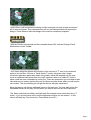
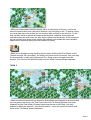
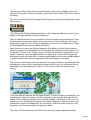
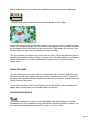
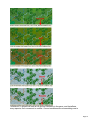
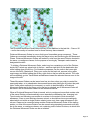
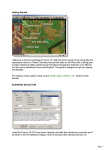
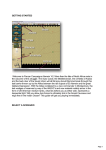
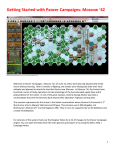
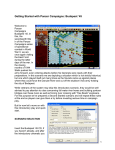
Getting Started with Panzer Campaigns: Moscow ‘41 Welcome to Panzer Campaigns Moscow ‘41. The orders for the capture of Moscow came in October 1941. As the Germans closed in on the capital, the fighting got fiercer and more desperate. The delay of the German forces after Smolensk left little time for the drive to Moscow before the onset of winter. Both German and Russian High Commands were well aware of this; nevertheless, "Operation Typhoon" went ahead as planned. The attack was a costly affair and by November was literally "frozen in its tracks" as the harsh Soviet winter set in. Yet despite all this, the Germans continued to claw their way steadily forward, in an effort to encircle the city. This introductory scenario takes place 50 km north of Moscow where, in a surprise move, elements of the 7th Panzer Division surged forward and captured intact a bridge over the Volga-Moskva Canal. For veterans of the system check out the WHAT'S NEW IN MOSCOW '41? Section of this manual. SCENARIO SELECTION Page 1 Insert the Moscow ‘41 CD, if you haven’t already, and after the introductory cinematic you will be taken to the File Selection Dialog. Click the scenario #00_Started and then OK. This takes you to the AI Selection Dialog where you choose the side you wish to play. For the purposes of this tutorial select Axis AI "Manual" for yourself and "Automatic With Fog of War"(FOW) for the Allied. Click OK to get the game underway and you are now the German commander. Page 2 Your first Command Report will appear with information relevant to the first turn. Note its contents and click OK to close it. OBJECTIVE OF THE GAME Click Info and then Victory on the Menu Bar. As you can see to obtain a major victory in this battle you must earn 500 Victory Points by the scenario’s end. Click OK to close the Victory Dialog. Page 3 If you look at the map, you’ll see some oval shapes with numbers inside them. These are your objectives. To win a major victory, you will need to hold objectives and inflict enemy casualties equal to 400 points. As you incur losses, points are taken away from you. TURN 1 In this scenario the Germans move first. Click on the unit indicated. It is a machine gun or heavy infantry unit. Its information is now displayed in its Unit Box in the Hex Info Area. Let’ s send this unit north to scout the woods and protect the flank of the column as it moves toward the objectives. Double click this unit on the map, or click its Unit Box, so that the Unit Box lights up. It is now "selected" and ready for orders. Page 4 Let’s move it one hex at a time. To do so, right click an adjacent hex, the one directly north or above the selected unit. If able to move the unit will obey. Should a unit ever not follow the order, look to the Status Bar to see a message telling you why the movement can’t be performed. Now select another unit – the tank (Panzer) unit on the main road above the HQ unit as shown. Let’s move it several hexes at once toward the objective. To do so, with the left mouse button down, drag it to the hex indicated by the arrow, then release the button. The system will determine the path it follows, so it’s wise to drag smallish distances to keep control, as with fog of war (FOW) selected, movement cannot be taken back. Clicking the Reachable Hexes Button on the Toolbar will highlight where a unit may still potentially move in a turn. Page 5 Notice there is still movement remaining, but the unit does not have enough movement left to enter the forest. This is because the unit is in its Deployed Mode as opposed to being in Travel Mode to take advantage of the road for movement purposes. With the Panzer unit selected and the reachable hexes ON, click the Change Travel Mode button on the Toolbar. You’ll see a white line appear at the bottom of the unit and a "T" next to its movement points in its Unit Box. It is now in Travel Mode (T mode), this gives units a larger movement allowance particularly when using roads, notice the selected unit can now move an additional two hexes down the road. However, there is a "trade off". Units in travel mode are more vulnerable to enemy fire. There are times when you will need to take risks and move in enemy territory this way, but there are other times when you will need to use caution. This is something you will get the feel for with play experience. Move the panzer unit the two additional hexes to the east now. You may want to turn the Reachable Hexes off and only use this when you want to see how far a unit can travel. (Tip: Some units such as Artillery and Anti-tank Guns cannot move unless they are in T mode – if you try and move such a unit the status bar will give you the reason – in this case it will likely say "Unit must be in Travel Mode to move") Page 6 Let’s now move a third unit, a recon unit already in T Mode – the German unit farthest to the east near the 50 point objective. Select it and right click adjacent hexes until it reaches the position as shown in this image. Doing so will reveal an enemy unit occupying the objective. Sometimes when this occurs the enemy unit may fire at you. The system handles enemy defensive fire during your turn and, likewise, may fire your own units during the opposing side’s turn too! Your unit is lightly armed recon unit but it is a hard target (armoured unit) and it will be unscathed in this contact with the enemy. Furthermore, your unit still has sufficient remaining movement points (MPs) left, enabling you to fire at the enemy. To do so select your unit exactly as you did for movement. Now with the Control Button pressed, place the mouse over the adjacent enemy unit. A crosshairs will appear. Right click to Fire. The results of your fire will be shown on screen – either there will be no effect, or you’ll cause a loss, or possibly disrupt the enemy (the results will be yellow), or cause it to be broken (the results will be red). Most direct fire occurs against adjacent hexes. (Tip: Enemy unit information with fog of war active will be hidden from you and summarized as X = less than 10 men, XX= 10 to 99 men and XXX = 100 to 999 men. With both direct and indirect fire, if more than one enemy unit exists in a hex, you are given the option to select a target should your weapons be appropriate). Page 7 Now that you’ve spotted an enemy unit, let’s fire some artillery. Artillery can fired at any unit within its range, as long as an eligible spotter can see it. Select the artillery unit shown. To check any unit’s range, right click its Unit Box, or select the "H" hot key with the unit selected. In this case you will see your artillery unit’s range is 12 hexes. To fire artillery do exactly as you did with direct fire – place your mouse over the enemy unit and with the Control Button pressed, right click the enemy’s hex. (Tip: Units normally have enough MPs to fire two or three times per turn. This artillery unit can fire twice at the Russians in the village hex with the objective.) You may be able to soften the enemy up further with airpower. The Command Report at the beginning of your turn advised that you have Airpower available. Click the enemy’s hex again, now click the Call Air Mission Button on the Toolbar. Page 8 A dialog will appear showing any air units available. You will see the II./StG 1 – an air unit made up of 28 Stuka dive bombers ready for orders. Click the air unit line in the dialog and then OK. An air mission will be conducted against the selected hex and, if successful, its combat results will be displayed on screen. First possible Anti-Aircraft fire against your air unit, with the result of that AA fire, and then you will be shown the result of the bombing. Results shown in yellow letters are disruptions of the enemy units. As you look around your remaining units, you will find most of them to be "Fixed". In this state of readiness, these units cannot move yet, normally they will be released for player use later in the scenario. However, Fixed units that come into contact with the enemy are automatically released. There are two more units you can move forward toward the village so that you can assault it, and maybe capture this first objective. You can continue to move your recon unit even though it has already moved and fired once. That is, it still has MPs remaining and while you do not have to use them all, you may find a better place to position this unit. Page 9 In order to move your units, as shown as "Before", to the positions shown as "After", you first need to move the recon unit out of the way so that it does not block the roads, preventing the other units to use road movement as you move forward. With experience you will learn to keep your roads clear, especially in tight ground such as forest. So move your recon unit as shown by the orange arrow first by right clicking on each hex. Once you have moved this unit, select only the panzer unit by clicking on the hex and then clicking on the image of the panzer in the unit window. (Tip: The game has a road movement stacking limit of one unit or 400 men, so in many situations only one unit at a time can take advantage of the road movement.) Move the panzer unit to the clear hex above the recon unit. Once there, press the Change Travel Mode button to take the unit out of T mode, this places the unit in deployed mode in preparation for an assault next turn. Now move the infantry unit forward to the village above the panzer and, like the panzer unit, also press the Change Travel Mode button to place the unit in deployed mode. Note, during the move into the hex, or when changing from T mode, you may be fired at by the enemy unit. (Tip: While it would have been possible to put the panzers in the town and the infantry in the open, it is a judgment call that the men of the infantry may be best deployed from T mode in the protection of the town, should they be fired upon. Also in the AI’s turn, your opponent will likely target your units forming up for the attack.) Page 10 While you cannot predict what the enemy will do in their phase of the turn, your forces have the initiative and must continue to advance if you are going to win. To pursue victory, you must place your units so that you can continue with your plan in the next turn. To this end, the plan will be to assault and capture the objective, hopefully driving back the defenders along the main road, (as seen by the orange line and arrow), at the same time as you send out your recon unit to explore the southern route toward the more valuable objectives at Yakhroma (along the route marked in yellow). When you’ve finished moving and firing all your units, click the Next Turn Button on the Toolbar and click OK if prompted. The enemy will move and fire its forces. Your units may fire automatically in reply using Opportunity Fire. Some enemy movement may be spotted. Your next turn will be announced once the Allied Command Report appears. TURN 2 Dawn has turned to dusk and you will notice that visibility has improved to two hexes and you may see a new enemy unit. The Fixed units of the 7th Panzer Division have been released, but the 23rd Infantry Division bringing up the rear is still Fixed. You are in position to attack the objective – this time by assault – recon the route to the south and move up the 7th Panzer toward Yakhroma. Page 11 The Command Report will contain more information, such as the availability of air units, HQs out of command, artillery unavailable, and a host of other details. Click OK to remove the dialog. (Tip: You can recall the Last Command Report during your turn by selecting the item under the Info menu.) (Tip: Clicking the Divisional Markings Button on the Toolbar will add color to your forces based on the organizations to which they belong.) First, let’s send that recon unit on its mission to scout the south route to Yakhroma. Press the Reachable Hexes button; double click on the recon unit, then holding the left mouse button down, drag the cursor to the hex indicated by the arrow in the image above. Press the Reachable Hexes button to disable this feature. Next, the enemy is still on the 50-point objective. If the artillery unit that fired on that hex last turn is marked as Unavailable in the Unit Window, you will have to attack without it. If it is Available, it is best to use it again this turn to soften up the target in preparation for the assault. As before, select an eligible artillery unit, place your mouse over the target hex and press Control, then right click. It is always a good idea to use up any available artillery in order to weaken the enemy in preparation for the next stage of your attack. (Tip: You have other artillery units, but they are out of range. Recall you can determine this by putting your cursor in the hex and right clicking on the unit box. You could also do it by selecting the unit and pressing the H Key. H is a Hot Key to show the selected units range.) Let’s now order an advance into the objective itself. To enter an enemy occupied hex, you must assault it. Select the infantry unit that is adjacent to the objective and right click the enemy’s hex. A dialog will appear announcing the initiating of an assault. In fact, you can add other units to the assault, as this type of an attack designed to capture the hex, is not restricted to a single unit. Additionally, you can add any units from other hexes too. Add the panzer unit next to the infantry to support the attack. (Tip: when vehicles assault into non-Clear hexes, they may suffer a penalty for lacking Page 12 infantry support, so for best results use a combined arms approach when assaulting.) To resolve your assault, click the Resolve Assault Button on the Toolbar. Results will appear showing both sides’ losses. If you’ve won, and any remaining enemy retreat, you will capture its hex. If you win and the enemy does not, or is unable, to retreat, you will capture some of its forces, but not enter its hex. (Remember, do not worry if your outcome does not match the one illustrated, as play will differ.) (Tip: If you capture an objective hex you will earn its Victory Points, but objectives can be recaptured an endless number of times in a game. Only the side owning it at a scenario’s end receives its points. To take an objective hex simply enter it. You do not need to remain there.) FINISH THE GAME You now know how to move your units, fire, and assault with your forces. With the victory conditions in mind, keep maneuvering your forces in the manner you see fit. The end of the game will be announced at the conclusion of the enemy’s final turn, at which time final Victory Points will be shown. To restart the scenario, click File and Selection in the Menu Bar. A list of scenarios will appear and you may select any by double clicking on its entry. FURTHER INFORMATION This Guide is designed to make you feel comfortable with what’s going on in Panzer Campaigns, but it is no substitute for the User Manual, which is the serie’s rulebook. You can see this while playing by pressing F2 or click User Manual here. Page 13 The Main Program Manual discusses the various elements of the interface in helpful detail. You can see this while playing by pressing F1 or click Main Program Help File here. If you wish to delve inside the game designer’s head, press F3 while running the game and Designer’s Notes will be yours, or click Notes Help File here. Pressing F4 invokes a feature called the Parameter Data Table. It provides a host of information including movement costs, terrain benefits, and stacking limits amongst other things. Lastly, documentation for the game’s editors may be found in the following help files: Scenario Editor Help File Order of Battle Editor Help File WHAT'S NEW IN MOSCOW '41? Page 14 WHAT'S NEW IN MOSCOW '41? Weather Page 15 In Moscow ‘41 players will see all five ground conditions in the game, and that affects many aspects, from movement to combat. Ground conditions are not something new to Page 16 Panzer Campaigns, but the amount of variation you may see, even within a non Campaign scenario might be. So I thought it might be important to illustrate those conditions here showing how the conditions are displayed on the status bar as well as visually what the map looks like for each. The images at the left show the exact same area in each ground conditions. (Tip: in Frozen conditions, streams completely disappear and both Rivers and Canals freeze over and function as gullies to impede but not prevent movement). Frozen Penalty With the existing weather rules, and including the Storm feature added with Panzer Campaigns 8: Rzhev ’42, we still felt it was imperative to some method to simulate the cold weather effects, and how these impacted the Germans, as they were so ill prepared for the severity of the Russian winter. Therefore we established a "Frozen Penalty" that is PDT, or Parameter based. so as to affect only the side designated – in this case the Germans. The value was set at 20% in the game, after testing various values and looking at there effects on the game, particularly over the longer campaigns. With this Frozen Penalty, the following effects apply to the specified side during Frozen turns only: - The Frozen Penalty reduces the defense value of units in Clear hexes, - The defense value of units in non-Clear hexes is reduced by half the Frozen Penalty, - The attack value and assault value of units is reduced by half the Frozen Penalty, and - The movement allowance of vehicle units is reduced by twice the Frozen Penalty. Note – Players are recommended to use the Optional Programmed weather rules as it provides for a more realistic variance of weather conditions. Also note that Storm effects, a feature released in Rzhev ’42 and not used since, are also in effect in this game . See the Game User.HLP, or User.Doc, file under Main Features | Environment for details. Anti-Tank Guns At the Tillercon, held in Richmond in June 2005, Panzer Campaigns fans expressed to John Tiller some concern about Anti-Tank Guns. There were a number of issues, but some players argued that their performance on tanks was not effective enough. As a result, some players had begun to use them as engineer troops, to dig IPs and Trenches for fall back positions, rather than risk them on the front where, if forced to retreat by assault, the entire unit was deleted. Other players deployed them on their own, to plug up open ground with Zone-of-Control (ZOC) hexes which effect all units, even large Infantry units. Of course, Anti-Tank guns are normally deployed in support of Infantry Page 17 positions. So, after consideration, it was decided that some rule revisions were required. There are already units in the game that don’t exert ZOC’s. These are HQ units, Supply Units, Broken Units, and so, Anti-Tank and Heavy Anti-Aircraft units were added to this list. To address the complete loss of an Anti-Gun unit in the event of a lost assault, a Special Retreat Rule was established, where instead of being eliminated, Towed Anti-Tank guns now suffer 50% losses and, after the assault is resolved, they are put in Travel Mode and retreated. To address the effectiveness without the adjusting all combat values for all the many components in all of the games, Moscow ’41, and all previous titles of the series, the Special Disruption Rules were created. This works by doubling the disruption effect when an indirect fire unit fires on a Hard Target, and, when towed anti-tank guns fire on a hard vehicle, the disruption effect is twice that of normal. Railroad Track Art Another piece of Tillercon input that was easy to address was the complaint that in the game the Railroad Tracks don’t look like. …well…. railroads in the traditional sense! As people are aware, there are many Art Mods for Panzer Campaigns – including Terrain Mods on The Unofficial Panzer Campaigns Homepage ( http://members.shaw.ca/gcsaunders/index.html ) So one of these mods was itself modified and, with the permission of the person who originally made it, was included with this title. Hope you guys like it. Divisional Movement Orders Page 18 The Divisional Movement Orders were actually a new addition to the last title – France ’40 – and is also worthy of mention here for those that may have missed it. Divisional Movement Orders is a one-click type of immediate group movement. These Orders are executed immediately during the player’s turn and not during the A/I Movement Phase. Divisional Movement Orders are issued to units from the same Division located in the same, or contiguous hexes, for the purpose of moving by Transport mode toward a designated location. To initiate a Divisional Movement Order, select any hex containing a unit of the Division, but do NOT select any actual units in the hex - and then right click on the destination hex while holding down the Alt key. For illustration purposes, use the units in the lower right corner of the #00_Started.scn. Place your cursor on the lead unit, as seen in the upper map image, and while holding the Alt key, right click on the hex with the red dot. The units will immediately go into Travel Mode and advance toward the selected hex as seen in the image at the left. These Movement Orders can be issued one hex at a time, when you wish to control the exact path taken, or to a destination hex several hexes away letting the A/I select the path. Note: Unlike other methods for movement, no unit is to be selected for a Divisional Movement Order and in fact if any unit in the hex is selected, an A/I Movement Order will be issued. See AI Movement Orders in the reference manual. When a Divisional Movement Order is issued, units in contiguous hexes that contain units of the same Division will automatically move towards the destination hex, changing into Travel mode, and following one another in a column to the extent of their movement allowance. If two or more divisions become mixed, or should there be some ambiguity about which unit within a single Division should move next, then a gap will appear in the column. Gaps can be corrected using another Divisional Movement Order on the trailing portion, or units of the same Division can be moved using standard movements until they are in the same, or contiguous hexes, not containing units of other Divisions, at which time the Divisional Movement Order can be re-initiated. Page 19 Optional Rules Just a word about Optional Rules as some have a far greater effect on the game than others. Of course these rules are Optional, but some of them, particularly the default fire rules are recommended to be left at the default setting. While you are free to experiment with them please note that changing these rules, or using the Optional Surrender rule, may indeed invalidate the Victory levels which were established using this set of rules. Page 20