1
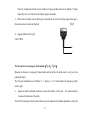
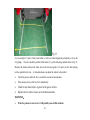
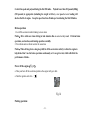
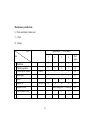
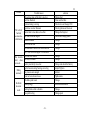
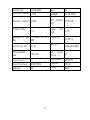
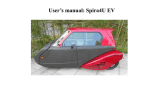
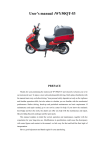
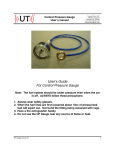
User’s manual: 150cc Spira4U PREFACE Thanks for purchasing the Spira4U vehicle. Your personal safety depends not only on your driving and operation skills, but also relates to whether you are familiar with the mechanical performance. Before driving, check-up and periodical maintenance are basic requirements. If maintenance and repair are needed, go to a skilled motorcycle mechanic for help. If you have the mechanic knowledge and the tools, the dealer can offer you advice and the spare parts. Have an enjoyable ride and thanks again for your purchasing. Important points to remember Be slow and cautious in cornering as 3 wheeled vehicles tip easier than 4 wheeled vehicles. This motorcycle is limited to one driver and one passenger. Never exceed the maximum load capacity of this motorcycle. For safety, avoid driving or slowdown in windy weather (over 20 mph winds) as Spira4U is light. Please read the user’s manual carefully. Modifications in specifications could cause discrepancies with some figures and content in the manual. WARNING Not following operation instructions in this manual may cause injury to you and damage the vehicle. California Proposition 65 warning: Gasoline engine exhaust from this vehicle contains chemicals known to the State of California to cause cancer, birth defects, or other reproductive harm. The engine exhaust contains carbon monoxide, which is tasteless, odorless, poisonous gas. Never operate this vehicle indoors or in an enclosed area with poor ventilation. INDEX Ⅰ. Notice for safe driving Notice for safe driving ……………………… 1 Payload ……………………………………… 1 Ⅱ. Controls and operating instructions Brakes and Accelerator……………………… 2 Meter and indicator…………………………… 3 Ignition switch……………………………… 3 Fuel meter…………………………………… 4 Emergency ON/OFF switch…………………… 4 Headlight switch………………………………5 Starting switch…………………………………5 Headlight dimmer switch………………………6 Turning signal light switch……………………6 Horn switch……………………………………6 Rear trunk lock……………………………… 6 Steering lock ……………………………… 6 Ⅲ、Operation instruction Check up before driving……………………..7 Gasoline……………………………………...7 Inspect the oil level…………………………..7 The free path of the emergency brake handle..8 Tires and alignment…………………….……9 -0- Start engine………………….…………… 11 Drive motorcycle………………….………12 Driving operation………………….………13 Brake operation………………….……….. 13 Power off the engine…………………….…13 Parking operation………………….………13 Ⅳ、Maintenance and service Maintenance periodic table…………………… 14 Solution for troubles…………………………17 Clean the air filter………………………… 19 Battery maintenance……………………… 19 Idle speed adjustment……………………… 19 Change oil and clean the filter net……………20 Change the gear oil…………………………21 Spark plug………………………………… 22 Fuse replacement……………………………23 Ⅴ、Vehicle storage Storage……………………………………23 Ⅵ、Vehicle identification …………………24 VII、Main technique Parameter……………25 VIII. Wiring Diagram ……………………27 IX. NHTSA Safety Notice ………………28 Ⅰ Notice for safe driving Rules for safe driving 1. Many traffic accidents are caused by the inability of car drivers to notice the smaller vehicles, so the drivers of smaller vehicles should be aware to be noticed by other drivers Please drive with the running or low beam headlights on according to the local law. Please drive with great caution when in a blind spot or when bright lights hinders visions Do not drive in water over 4 inches deep or you may loose traction and float. 2. A ½” drain hole is located in the trunk right side bottom and in the right front floor in case rain gets in. 3. Never drive over the speed limit, otherwise accidents may occur. 4. You must obtain the appropriate driving license and be familiar with the vehicle. Never lend the vehicle to the person without driving license or who is unfamiliar with the vehicle. 5. Avoid driving on rough roads. This can easily result in the operation failure and structural damage to the vehicle frame. 6. Check up before driving. (Look at page 9) 7. Hold on to the hand grips when driving. 8. Do not drive too close to the other vehicles. Never contend for lane, and strictly observe the local traffic. Payload The max payload of this motorcycle is 228kg(502 lb), including the weight of the driver, -1- passenger and goods. The loading and any load shifts will affect the stability and operation of the vehicle so tie down any heavy loads and wear the seat belts. Ⅱ. Controls and operating instructions Brakes and Accelerator location(Fig 1) F i g 1 Parking Brake Brake Accelerato r -2- Meter and indicators(Fig 2) (1)Left turn signal indicator (2)Right turn signal indicator (3)Low brake fluid indicator Fig 2 (4)Speedometer (5)Odometer (6)Fuel level indicator Ignition switch(Fig 3) ⑴Open( )—this is the run position for staring and running the engine. Do not pull out the key. Lights can be turned on and the engine start button used. ⑵Close( )—when the switch turns to this position, Fig 3 the engine stops and you can take out the key. ⑶Lock( )—when the switch turns to the handlebar lock position you can take out the key, but not -3- turn the handlebar, and not start the engine. Fuel meter(Fig 4) Fuel meter (6) indicate the fuel volume in the fuel tank. When the needle points to (F), it indicates that the Fig 4 full fuel level is 8L. When the needle points at red section, it indicates the remainder of fuel is 2L or less. Emergency On/Off Switch --RIGHT HAND-- (Fig 5) - The motor can quickly be turned off by pressing to the red switch on the far right of the handle to the “OFF” position as shown on the below picture Fig 5. - The vehicle will not start or run when in the “OFF” position. - The Vehicle must be in the “ON” for starting and for the engine to run. ***BEWARE PLEASE *** Many experienced drivers forget to turn this switch on when starting. This and not pressing the brake are common reasons that the engine will not start. -4- Fig 5 Headlight switch –RIGHT HAND--(Fig 5) Three position of light switch: “ ” ”and“” : Headlight, position lights, tail lights and instrument lights works : Position lights, tail lights and instrument lights works (required on in most states) : Headlight, position lights, tail lights and instrument lights off. Starting switch --RIGHT HAND--(Fig 5) Press the red button on the inside of the right hand grip along with depressing brake pedal to start the engine. -5- F i g 6 Headlight dimmer switch –RIGHT HAND—(Fig 5) Press“ ”button,for high beam;Press“ ”button,for low beam. Turning signal light switch 2 –LEFT HAND(Fig 5) Press the switch to “ Press the switch to ” to turn on the Left Turn Signal “ ” to turn on the Right Turn Signal Horn switch 3 –LEFT HAND—(Fig6) Depress this switch to make the horn work. Rear trunk lock—RIGHT HAND REAR— Turn the key clockwise to unlock the trunk. Steering lock –RIGHT HAND—(Fig 5、 Fig 7) Turn the tiller away from the door (Fig 5). Press IN on the ignition key while turning the key to the lock( ) position (3). The steering setting is now locked. Do the opposite to unlock the steering. Fig 7 -6- The key can now be removed. Ⅲ. Operation Instruction Check Up Before Driving For safety and preventing trouble or accident, a pre-checkup is necessary. Gasoline When the fuel meter pointer is close to red section add gasoline Gasoline tank container maximum volume is 8 Liters (2 Gallons) Turn the fuel tank cover, located on the left rear, counter-clockwise to open the fuel The gasoline octane number should be equal to or above 90. NOTICE: Gasoline is flammable, it causes fire and even explodes on certain conditions, replenish gasoline only in an open air place after stopping the engine. Do not smoke or light a fire when filling up gasoline or gasoline storage. Do not top off level of fuel level to above the inlet tube of fuel tank when adding gasoline. Gasoline is poisonous. Keep your skin, mouth, and eyes away from it. Please place it out of the reach of children. Inspect the engine oil level(Fig 8、Fig 9) 1. Keep the motor level with the ground, screw the oil dipstick counter Clockwise, then remove the oil dipstick. See Fig 8 for location. -7- Fig8 Clean the oil dipstick and then reinsert without screwing and then take out the dipstick. Visually inspect the oil to see if the oil on the dipstick appears abnormal. 2. If the oil level reaches to down limit sign 2, replenish the oil to the level below upper limit sign 3, Fig 9 then insert and screw down the dipstick. 3. Suggested Motor Oil weight: SAE-15W/40 3 2 The free path of rear emergency brake handle( Fig 10、 Fig 11) Measure the distance of emergency brake handle pulls up before the brake starts to stop you from pushing the Spira. The free path should between 25-50mm (1 – 2 inches) or 3 to 5 clicks before the emergency brake starts to grab. Adjust nut under the handle clockwise to reduce the distance of free path. Or counterclockwise to increase the distance of free path The bolt in the emergency brake on the wheel can also be adjusted if the handle adjustment is at the end. -8- A brake expert should do this adjustment to the brake shown on Fig 11 to and check to assure proper functioning after adjusting. Make sure the lock nut is tightened after adjusting. bolt is not in a position to interfere with the fender when the wheel hits a bump. Also make sure the A shorter bolt may be used to assure no interference. Fig 10 Fig 11 Notice: Once maintenance for brake system is needed, find a nearest professional repair department. Make sure the parts for replacement were made by our company. WARNING: When a steel disc gets worn to the limit (see the notice on the steel disc: MINIMUM THICKNESS 3mm), the old disc must be changed in order to not influence the brake performance. Tires and Alignment Check the tire pressure regularly and adjust if necessary. Front tire pressure: 32psi = 225kPa Rear tire pressure: 32psi = 225kPa -9- Fig 12 Use two straight 1.5 meter (5 feet) metal tubes to verify rear wheel alignment periodically or if you hit a big bump. The tires should be parallel within 6mm (¼”) per the following method shown in Fig 12. Measure the distance between the tubes close to the tires and again at 1.2 meters (4 feet) after placing to tubes parallel to the tires. A trained mechanic can adjust the wheels to be parallel. Check tire pressure when the tire is cooled for an accurate measurement. If the motorcycle has a flat tire, fix it immediately. Check for any metal, trash, or gravel in the groove of tires. Replace the tire when it wears out to the abrasion mark. WARNINGS: If the tire pressure is not correct, it will possibly cause traffic accidents. - 10 - It is dangerous to use a worn tire because the traction between tire and road will be affected and may cause trouble with driving or even an accident. Start engine (Fig 13) Put the key into the key hole and turn the engine kill switch to “ ” and push on the brake Fig 13 Press the red start button to start engine. Don’t keep the start button pressed more than 5 seconds each time. Do not accelerate the engine while starting or it may flood as the electronic fuel injection adjusts for the engine temperature. Only accelerate the engine slowly after it has run a few seconds. NOTICE: Electric starting is based on pushing on the foot brake. - 11 - If electric starting doesn’t work, there must be a break for 30 seconds before you start the engine again. When starting the engine in cold condition, please warm up engine for 20 seconds before running under load and then proceed slowly for the first minute. The engine can get over heated if it runs for a long time at idle or high speed on extremely hot days. Please power off the engine temporarily to allow the engine to cool down. Blow-by can increase oil consumption so check the oil level frequently during hot weather. Check the blow-by oil collected in the clear tube in back of the air filter. Driving operation: WARNING: The temperature of exhaust pipe is much higher during driving. Injuries can occur if it is touched while hot, even after the vehicle has been stopped for a short time. to park over dry grass or combustible material. NOTICE: - 12 - Be careful not Control the speed and payload during the first 500 miles. Payload lower than 220 pounds(100kg) (220 pounds) is appropriate (including the weight of driver), over speed or over loading will shorten the life of engine. Keep the speed less than 45 miles per hour during the first 100 miles. Brake operation 1. Let off the accelerator when braking to slow down. Notice:Drive with care when driving in bad situation like on a wet or icy road. Perform brake operation, acceleration, and turning operation carefully. 2. Front brake and rear brake work at the same time Notice:When driving down a long steep hill, let off the accelerator entirely to allow the engine to help brake. Don’t use the brake operation continuously or it can get too hot, which will affect the performance of brake. Power off the engine( Fig 14) Take your foot off the accelerator pedal so the engine will go to idle. Turn the ignition switch to ( ) Fig 14 Parking operation: - 13 - When parking, turn the key to( )position, put on the emergency brake and lock the handle.(See P3) For anti-theft Lock the steering and do not leave the key in the ignition before you leave. Ⅳ、Maintenance and service Maintenance Table This maintenance is based on the odometer, See the Maintenance periodic form as an important guide for your motor’s maintenance on schedule. You should increase the frequency of maintenance if you use the motor at a high speed for extended times. All the main parts of your vehicle should be inspected by a service man after a collision. Repair or replace broken parts so the vehicle will operate safely. Notice:For the safety and dependability use the genuine factory parts by the dealer for replacement. Otherwise, the performance and operation function can be affected. Warning: For the safety of personnel, first power off the engine and park on level ground whenever maintenance work is carried out. Notice: If the vehicle is not used for periods over one month, do a thorough inspection and check if the fuel, tires, or battery are still in good condition before driving. - 14 - Maintenance periodic form I:Check and adjust it when need. C:Clean R:Change Cycle speedometer(×1000 miles) Item 1 ﹡ ﹡ ﹡ ﹡ ﹡ ﹡ ﹡ ﹡ I I I I I R Fuel hose Throttle operation Core of the air cleaner Spark plug Valve Engine oil Engine oil filter The carburetor idling (Note1) (200 mi)R I - 15 - 2 4 6 I I I I I I I I I I I I I I I R R R When change oil: C If need R I I I Ref page 19 20 22 20 20 19 Cycle speedometer(×1000 miles) Item ** ﹡ ** * ﹡ ** ﹡ ** ** 1 Rotate the belt Gearbox oil (Note3) 4 6 I I I I I I I I I R (200 mi.)R Brake system Brake fluid Head light I Engine Hanging The system nuts\bolts 2 (Note2) I I I I I Tires & alignment I a紧 Steering bearing alialalignmen I I I I I Ref page 21 13 I I 9 * Unless you are an expert on maintenance, please let a mechanic maintain or repair your vehicle. ** For safety, we insist all items are to be completed by a mechanic. Note:1、It is recommended to shorten the period of maintenance if use the motor in a particularly moist or dusty area. When the fuel consumption becomes high, or acceleration is bad, you should change some parts. 2、If you usually drive the on rough roads, please check bolt tightness to insure the safety of the vehicle. 3、Use synthetic oil in a very cold area. - 16 - Solution for troubles Trouble phenomenon Reason Spark plug no spark Spark plug wear out Change Ignition wire wear out Change CDI wear out Change Ignition switch wear out Change Connect well or firm and tight Adjust Ignition wire is off or too flexible Spark plug gap too small or big The spark is weak Can’t start the engine No mixed air in cylinder The cylinder compresses strength low solution Spark plug pole burn The spark plug accumulates carbons seriously CDI is wearing out Change No fuel Fuel tank suction screen plugged Fuel pump sending no fuel Replenish Clean Change Fuel line or filter clogged Clean or Change Air cleaner clogged with dirt Clean or Change Vacuum line system leak Tighten or Change Spark plug seat leak Screw down spark plug Cylinder head gasket leak Valve seat washer worn out The piston-ring or the cylinder block worn Change Polish Change piston-ring The piston-ring is broken or filled up with seriously Change piston-ring or too much carbon clear carbon - 17 - Clear out Change B Trouble phenomenon The vehicle has bad accelerative performance The electric start does not work Trouble reason The octane value of the fuel is too low Fuel line blocked Ignition timing is wrong Spark too weak or flameout Gas/air mix is too dense or too thin Air leaks from the engine Muffler blocked Belt wear and tear The automatic clutch roller wear and tear See “ can’t start the engine” as reference The clutch is broken the relay is broken Battery electricity is too low solution Change fuel Clean out fuel line Check wire and change CDI Check ignition and clear out Change fuel injector Check and change gasket Change Change Change Change Change Charge and check the battery Riding unsteady gap between steering bearings is too big tire pressure not enough Front or rear axle are loose Adjust/Tighten Add air Tighten nuts the brake does not work The brake pads worn Brake spongy Parking brake cable is broken Free path too big Change Add Fluid and Bleed Change Change pads - 18 - Clean the air filter After removing the muffler take down the fixing bolt of the air cleaner cover. Take out the core from the air cleaner box and clean out the oil blow by area. Clean the filter element using compress air or dry brush Do the above the opposite way to reinstall the air filter. or put a new filter in the air clean box. NOTICE: Never use gasoline or low burning point solvent to clean air filter Battery maintenance(Fig 15) The battery is maintenance free (don’t add water) NOTICE:Never take off the upper cover of the electrolyte. If you don’t use the motor for a long time, take out the battery and keep it in a ventilated, dry, and above freezing area. Fig 15 If the battery post and/or terminal is corroded, please disconnect and clean. NOTICE: Turn off the ignition switch before disconnecting the battery. Remove negative terminal first and positive terminal next, when installing, just opposite to the above procedure. Idle speed adjustment The fuel injector and throttle has been adjusted to optimal performance at the factory. If adjustments need to be made, ask a professional mechanic to adjust the throttle cable as follows: - 19 - Instructions Warm up engine for several minutes The foot throttle has an adjusting/lock nuts which can be loosened and adjusted The idle speed is factory set but cable wear could change the cable length so set the free path of the throttle to 2-4mm by adjusting the position of threaded cover of the accelerator cable (#3) with the nut(#2) in Fig 16. After adjusting, the engine speed should increase steadily when suddenly applying the throttle. Change oil(Fig 17) Fig 17 - 20 - Fig 24 Fig 16 Change oil only when the engine is warm so the oil will pour out completely and quickly Clean the oil filter screen Remove the oil dipstick Remove oil drain plug (1) then remove the strainer (2) along with removing the spring (3) Clean the oil filter screen using thinner. Replace the oil filter screen, spring and the oil drain plug. Pour oil into the engine being careful to not exceed the upper mark, When measuring the oil level, do not screw down the cover of the oil dipstick. Replace the cover of oil hole / oil dip rod Start engine and let it idle for a few minutes then turn it off. Measure the oil volume of engine again to make sure it does not leak. Change gear oil(Fig 18) We suggest oil octane number: SAE 80W/90(you should use synthetic oil in very cold area) Oil capacity Fig 18 Resolving capacity Changing capacity: 0.10L - 21 - Place the vehicle by the main stand. Screw out the immersion bolt 1 and oil-drain bolt 2. NOTICE:When draining the oil, the engine needs a certain temperature, use the main stand to support the motor, make sure all the oil is drained. Clean the drain bolt and then re-install it. Inject oil into the hole of the immersion bolt slowly until the oil spills over. Fix the immersion bolt and screw it tight. 1 2 Spark plug(Fig19) (0.6 0.7)mm Spark plug specification Fig 19 Standard: C7HSA(NGK) or A7T、A7RT Disconnect the joint of the spark plug cover and take apart the spark plug with special spanner. Check if there is any burning ash or accumulated dirt on electrode or porcelain head, if it singed badly, replace the spark plug, Clean the ash or dirt with plug cleanser or a brush. ~ Normally the gap between side electrode (1) and Center - 22 - electrode (2) is 0.6-0.7 mm. Don’t use other kind of spark plug with different specification. Fuse replacement The rated electric current of the fuse is 15 A. If the fuse often burns down, it indicates the short circuit or overload in the electric system. Ask the serviceman to repair it, and never use the brass wires to replace the fuse. Ⅴ.Vehicle Storage STORAGE If the vehicle hasn’t been used for a long time, some steps should be taken to prevent malfunction and damage to the parts. Besides, before the long-time storage, proper repairs should also be done. Change the engine oil. Drain out the fuel in the fuel tank and fuel in the carburetor. Warning: Gasoline is flammable and may cause fire and even explosion on certain conditions. Therefore, no smoking or fire when draining. Take out the spark plug, inject about 15~20ml oil into the cylinder, use the starter motor and ignition switch to rotate the engine several times and then fix the spark back on. Remove the battery and store it in a dark place which will stay above freezing. every month. - 23 - Charge it once Clean the vehicle and wipe it dry, coat the wax on the surface of the paint, and anti-rust oil on other metal parts. Cover the vehicle and put it in a cool place. Use the vehicle after long-time storage Take off the cover and clean the vehicle. You should change the oil after 4 months above storage. Charge the battery if necessary, and fit it in place. Check all the parts before driving.(see p9), ride motorcycle in a low speed in non-busy area, make sure the safety. Ⅵ. Vehicle identification. Position of the model code, vehicle identification number and label Provide the VIN numbers above when registering to get the license and when getting service or inspection. The Engine Number is located on the bottom of gear box A VIN Plate is riveted onto the dash F i g 2 - 24 - Ⅷ. Main technique Parameter Table5 Item L×W×H (mm) Wheel Base (mm) Parameter 2720×1470×1300 1880 Ground Clearance (mm) 125mm Dry Weight lbs. kg 422# 192 kg Max Payload lbs. kg Turning Angle of Steering Handle º 502# 228 kg Max speed (km/h) Economic Pressure Of Rear Tire (kpa) Transmission Reduction Ratio Transmission m Fuel Gal. Item 32psi (225) 32psi (225) Automatic of 6.89~22.39 Speed-down average m/s22 ≥4.4(5.8) ≥85 Consumption G/100 m Climbing Performance Fuel capacity (kPa) ≤44 ≤37.3 Parameter 100/80-14 100/80-14 Pressure Of Front Tire 5 inches Brake Distance V=35m/h Item Front Tire Rear Tire Clutch Engine type Automatic 157QMJ Single cylinder 4-Stroke Air cooled ≤1.2 Bore/stroke(mm) ≥16 degrees Displacement ml 2.5 Battery 12V 20Ah Table5 continue Item Parameter Parameter - 25 - 57.4×57.8 149.6 Lubricating Way Rated Power kW/r/min Press and splash Fuse 5.9/7000 Headlight Max Torque N.m/r/min 8.3/6000 Tail light 9.2:1 License Light Compression Ratio Specification Plug Spark Plug Gap of Spark mm Idling Speed r/min r/min Engine Oil Capacity L Engine Oil Specification Ignition way C7HSA(NGK) A7RT or A7T or 15A 12V 35W/35W×2 Light/Brake Plate Turning light Fuel Type 0.6~0.7 Oil Capacity, Gearbox L (1700±300) Gear Oil Brand 1.0 SF SAE 15W/40 CDI Valve Play Starting - 26 - 12V 5W/21W 12V 5W 12V 10W×4 Unleaded Above RQ90 0.11 SAE 80W/90 0.03-0.05 electric IX Wiring Diagram - 27 - - 28 - NHTSA Safety Notice If you believe that your vehicle has a defect which could cause serious injury or death, you should immediately contact the National Highway Traffic Safety Administration (NHTSA) in addition to notifying Spira4u Co. Ltd. If NHTSA receives similar complaints, it may open an investigation and if it finds that a safety defect exists in a group of vehicles, it may order a recall and remedy campaign. However, NHTSA cannot become involved in any individual problems between you, your dealer or Spira4u Co. Ltd. To contact NHTSA you may call the Auto Safety Hot line toll-free within the United States on 1-800-424-9393 or write to: NHTSA, 400 Seventh Street SW, Washington, DC 20590. - 29 -