1
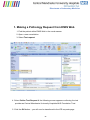
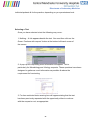
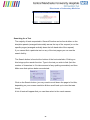
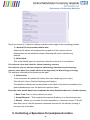
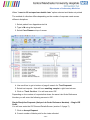
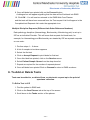
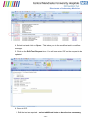
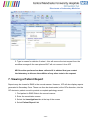
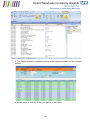
Directorate of Laboratory Medicine
EMIS WEB
Sunquest ICE System User Manual
-1-
Directorate of Laboratory Medicine
CONTENTS
CONTENTS
1. Making a Pathology Request from EMIS Web
3
2. Placing a Request in ICE
4
Navigating Around the Test Request Screen
4
Selecting a Test
5
Searching for a Test
6
3. Completing a Request
7
4. Collecting a Specimen at Phlebotomy
9
Single Discipline Requests–Single ICE Order
9
Multiple Discipline Requests - Multiple ICE Orders
10
6. To Add or Delete Tests
10
To Edit a Test in ICE
10
To Delete an Entire Request in ICE
12
Deleting a Request in EMIS Web
12
7. Viewing a Patient Report
13
Downloading Hospital Reports
16
Appendix A – Setting Up Passwords
17
Appendix B – Contact details
18
-2-
Directorate of Laboratory Medicine
1. Making a Pathology Request from EMIS Web
1. Find the patient within EMIS Web in the usual manner
2. Open a new consultation
3. Select Test request
4. Select Online Test Request & the following screen appears confirming the test
provider as Central Manchester University Hospitals NHS Foundation Trust
5. Click the OK button – you will now be transferred to the ICE requests page
-3-
Directorate of Laboratory Medicine
4. Test
panels
1. Patient
Details
2. Placing a Request in ICE
2. Tests
5. Test
pages
6. Search
button
3. Last 5
Requests
7. Continue
with request
button
Navigating Around the Test Request Screen
1. Patient Details -these are pulled from EMIS
2. Tests – click on the test name or tick box to select a test
3. Last 5 requests – details of the last 5 requests made for this patient on ICE.
4. Test panels – designed for each laboratory discipline. These
display the commonly requested tests from Primary Care
5. Test Pages – designed to display additional tests that can be
requested for each pathology discipline
6. Search button – for use if you cannot find a particular test
7. Continue with request button – click on this to move to next screen
There is also a Services menu bar which will allow you to navigate around the
ICE environment. This will allow you to view reports & previous requests for
-4-
Directorate of Laboratory Medicine
individual patients & for the practice, depending on your permissions level.
Selecting a Test
Once you have selected a test the following may occur:
1. Nothing – A tick appears beside the test. You must then click on the
Green ‘Continue with request’ button at the bottom left-hand corner of
the screen
2. A pop-up box requesting more information will appear. This is
particularly for Microbiology and Virology requests. These questions have been
designed to gather as much information as possible & reduce the
requirement for free-texting
3. For time restricted test a warning box will appear stating that the test
has been previously requested with the opportunity either to continue
with the request or not, as appropriate
-5-
Directorate of Laboratory Medicine
Searching for a Test
The majority of tests requested in General Practice can be found either on the
discipline panels (arranged horizontally across the top of the request) or on the
specific pages (arranged vertically down the left-hand side of the request)
If you cannot find a particular test on any of the test pages you can use the
search facility.
The Search button is found at the bottom of the horizontal tabs. Clicking on
this brings up the search function. Type in the test you wish to find (limit the
number of characters to 3 to take account of any spelling anomalies) and then
Make sure that options below are selected:
Click on the Search button (you may need to scroll down the page to find this,
depending on your screen resolution & then scroll back up to view the tests
found).
A list of tests will appear that you can then select in the usual manner.
-6-
Directorate of Laboratory Medicine
3. Completing a Request
1. Select all the tests you require for the patient
2. Click on the Green Continue with Request button
3. You are now presented with the Request Details Screen
-7-
Directorate of Laboratory Medicine
Left-hand Side of the Screen
Here you find the requestor details
• User – this will be pre-populated with the user making the request
• Bleep/Contact No – This can be entered if required. However it will be mandatory if
the ‘Please Telephone Results’ box is ticked or the priority is Urgent
• Requesting Consultant/GP – This will be automatically completed if you are ordering
in your own right. If you are placing an order on behalf of another user you will need to
select that user from the dropdown list
• Location – This will be automatically completed with the Practice name.
• Global Clinical Details – This is an area where you may type in any further information
that has not been previously captured. This is a non-mandatory field and will take up to
1000 haracters. However, please be aware that the Laboratory system can only accept
the first 35
characters!
• Category – Please select either NHS or Private (default is NHS)
Right-hand Side of the Screen
Here you will find the specific order details for each of the laboratory disciplines
-8-
Directorate of Laboratory Medicine
There is a choice of 3 collection options available at this stage of the requesting process.
1. I want to fill out specimen details later
Selecting this option will postpone the completion of the request until the
phlebotomist has collected the sample. Selecting this option overrides any
defaults
2. Collect Now
This is the default option for specimen collection at the time of consultation.
This will print a form and a label for Cellular Pathology requests
This will print only one label per sample for Haematology, Biochemistry &Immunology
requests, three labels (one sample label and two bag labels) for Microbiology & Virology
The date/time collected will be printed on the label
3. Collect Later
To be used when the patient will collect their own sample (eg urine, stool)
This will print a form (Cellular Pathology) and label(s)
The date/time collected will not be printed on the label & will need to be added by the
patient/phlebotomist once the specimen has been taken.
Once the order details have been completed for each discipline there are 3 further options:
1. More Tests Click on this to select more tests
2. Accept Request – This completes the request & takes you to the printing screen
3. Review – Allows you to review the tests requested on a summary screen. This will
also allow you to view the specimen containers required for the tests by showing a
print preview of the label
5. Collecting a Specimen for postponed orders
-9-
Directorate of Laboratory Medicine
When “I want to fill out specimen details later” option selected and labels not printed
The method of collection differs depending on the number of requests made across
different disciplines
1. Select patient from Appointments List
2. Type in M using the keyboard
3. Select Care Planner at top of screen
4. Use scroll bar to get to bottom of page & search for ‘Test Requests’
5. Select test request – this will have awaiting sample in right hand column
6. Click on ‘Track On-Line’. You will now enter ICE
Depending on the number of requests that share the same Lab Order Reference
Number you will enter the following screens in ICE:
Single Discipline Requests (Unique Lab Order Reference Number) – Single ICE
Order
You will now enter the ICE General Details Screen (section 3.3 page 7)
7. Click on Accept Request
8. Correct number of labels print for the tests collected
- 10 -
Directorate of Laboratory Medicine
9. Once all labels have printed click on the Proceed button.
A dialogue box will appear signalling that the data will be filed back into EMIS
10. Click OK – You will now be returned to the EMIS Web Care Planner
and the tests will have been removed from the Test request List & will appear in the
Completed test Requests List under the appropriate icon.
Multiple Discipline Requests (Different Lab Order Reference Numbers)
Each pathology discipline (Haematology, Biochemistry, Microbiology etc) is set up in
ICE as an individual Provider. This will mean that requests for blood tests, for
example, for Haematology and Biochemistry are treated by ICE as separate requests
on one order.
1. Perform steps 1 – 6 above
2. A list of samples to be taken appears
3. Select the first test
4. Click on Accept Request to print labels for first test
5. Once this label has printed, click on the Services menu
6. Select Patient Sample Queue from the drop down list
7. Repeat as required for the number of requests placed
8. Once all labels have printed Click on Proceed to return to EMIS as above
6. To Add or Delete Tests
Tests can be added to, or deleted from, an electronic request up to the point of
specimen collection.
To Edit a Test in ICE
1. Find the patient in EMIS web
2. Click on the Care Planner tab at the top of the screen
3. Scroll down to the Tasks section of the planner
- 11 -
Directorate of Laboratory Medicine
4. Select test and click on Open – This takes you to the workflow task in workflow
manager
5. Click on the Edit Test Request icon. You will now enter ICE on the request to be
updated
6. Once in ICE:
I. Edit the test as required – select additional tests or de-select as necessary
- 12 -
Directorate of Laboratory Medicine
II. Click on green ‘Continue with request…’ button
III. Accept the request. – This will write the amended test back into EMIS Web
To Delete an Entire Request in ICE
7. Follow steps 1 – 5 above
8. Select the Services menu
9. Select Patient Request List from drop-down menu
10. Select the request for deletion
11. Click on this request & select Delete Request from list
12. Enter reason for deletion
13. Close ICE using the Red Cross at the top right hand corner of the screen – This
will not delete the request in EMIS Web – please see next section to delete from
the patient record at the surgery
Deleting a Request in EMIS Web
1. Select Workflow Manager
2. Click on Awaiting Sample
3. Right click on patient name
4. Select Delete test request from drop down list
- 13 -
Directorate of Laboratory Medicine
5. Type in reason for deletion if asked – this will remove the test request from the
workflow manager & the care planner BUT will not remove it from ICE
NB Once the specimen has been collected it is advised that you contact
the laboratory to discuss the addition of any other tests to the request.
7. Viewing a Patient Report
Reports may be viewed in EMIS in the normal manner. However, ICE will also display reports
generated in Secondary Care. These can then be downloaded, at the GPs discretion, into the
GP electronic patient record to provide a complete pathology record.
1. Find patient in EMIS Web in the normal manner
2. Enter the consultation screen
3. Select the Investigations tab at the top of the screen
4. Select Patient Report List
- 14 -
Directorate of Laboratory Medicine
5. The Patient Report list appears showing all the reports available for the selected
patient
6. Select report to view by clicking on the line of the report
- 15 -
Directorate of Laboratory Medicine
The reports can be filtered using the search fields at the top of the screen.
The following options are now available:
• The < and > buttons allow you to move to earlier or later reports for the same test
• The cumulative button allows you to view the cumulative results for the selected
patient
This screen displays the patient’s results in chronological order.
Using the <and > buttons allows you to scroll from left to right across the page to view
more sample dates.
• Clicking on a selected test in the left-hand column will display a summary window of
the results for that test
- 16 -
Directorate of Laboratory Medicine
• Clicking on the graph box in the summary window will display a graph of the results for
that test. The reference ranges are shaded green
NB: The first graph will take a long time to download. After this, they should load more
rapidly.
Downloading Hospital Reports
As stated previously, Hospital generated pathology reports can be downloaded from ICE
into the GP system. The patient report screen will display a Download button on the
right-hand side of each report. Clicking on this will mark the report for download and it
will be queued for the next scheduled PMIP run.
- 17 -
Directorate of Laboratory Medicine
Appendix A - Setting Up Password
The ICE password is set using the EMAS Manager. This is only available to an
Administrator.
1. Click on the EMIS ball at the top left hand corner of the screen
2. Select System Tools
3. Select EMAS Manager
4. Select Test Requests
5. Highlight the Provider Trust
6. Select Users
7. Click on the user name
8. Type in the password as required (Password will be provided by the Trust)
9. Click OK
10. Save settings
- 18 -
Directorate of Laboratory Medicine
- 19 -