1
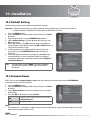
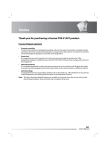
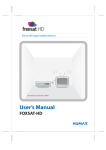
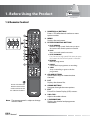
1. Before Using the Product
1.5 Remote Control
1. NUMERIC(0-9) BUTTONS
Enters a TV/radio channel number or menu
option number.
2. MENU
Displays the main menu.
3. PLAYBACK CONTROL BUTTONS
a. FAST REWIND
Rewinds at high speed. Each time you press
this button the rewind speed is increased.
b. PLAY
Plays at normal speed or resumes.
c. FAST FORWARD
Fasts forward at high speed. Each time you press
this button the fast forward speed is increased.
d. RECORD
Records programme.
e. PAUSE
Pauses the live programme or recording.
f. STOP
Stops a recording or goes to the live
programme.
4. COLOUR BUTTONS
Selects colour keys for interactive/text
channels.
5. LIST
Displays the channel list.
Please slide down the
bottom section of the
remote control to find
the additional buttons.
6. ARROW BUTTONS
Navigates through the menu options.
7. EXIT
Exits all On-Screen Display (OSD) screens.
8. VOL+/VOLAdjusts the audio volume.
Note: The remote control is subject to change
without notice.
GB12
User’s Manual
9. i (INFORMATION)
Displays the channel and programme
information.
10. Installation
This chapter describes how to search for channels and other series of procedures.
Note:
• Press the BACK or button to save the changes and return to the previous menu. Press the MENU or
EXIT button to exit from the menu screen.
• You can easily select all menu items using the assigned number for each menu.
10.1 Automatic Search
If your product is connected to the aerial and television, you can automatically search channels without
entering any other information.
1. Press the MENU button.
2. Select Installation using the / button and press the OK or button.
3. Enter the password using the NUMERIC(0-9) buttons.
4. Select Automatic Search from installation menu using the /
button and press the OK or button.
5. Automatic channel search begins.
Tip:
The default password is 0000. If you have forgotten
your password, please contact your local product
distributor.
1. Search
Wait while channel search continues. This may take a few minutes.
1. While operating search, the cursor is located at Stop. Therefore,
if you press the OK button during searching, the operation is
stopped and the channels found until then will be displayed.
2. If search operation is successfully completed and the channel
does not exist, press the OK button and try to reset the search
operation again if necessary.
3. You can delete unnecessary channels from the searched
channels. Select the channels to delete and press the OK
button. Then select Delete and press the OK button. To delete
all channels, select Select All to select all channels, select
Delete and press the OK button.
4. When completing channel search and deleting unnecessary channels, select Save and press the OK
button to save the changes.
GB54
User’s Manual
10. Installation
10.3 Default Setting
Default setting restores the product to the default settings.
Warning: Please note that once you perform default setting, all data such as channel list and user
configured data are deleted, no information on the HDD will be lost.
1. Press the MENU button.
2. Select Installation using the / button and press the OK or
button.
3. Enter the password using the NUMERIC(0-9) buttons.
4. Select Default Setting using the / button and press the
OK or button.
5. Select Yes and press the OK button to restore all setting to
factory default. Select No and press the OK or BACK button to
return to the previous menu.
6. Confirm again to start loading default setting. Enter the
password using the NUMERIC(0-9) buttons to perform
restoring.
7. When completing the default setting, press the OK button
to automatically run the installation wizard. For detailed
information about the installation wizard, refer to Chapter 3.
Installation Wizard.
Tip:
The default password is 0000. If you have forgotten
your password, please contact your local product
distributor.
10.4 Antenna Power
Make sure to set the Antenna Power to On when you connect an active antenna to the ANTENNA IN
connector on the rear of the product.
1. Press the MENU button.
2. Select Installation using the / button and press the OK or
button.
3. Select Antenna Power from the installation menu using the
/ button.
4. Press the OK or button to select On/Off.
On
Off
5V power supply from the active antenna cable.
+5V/50mA (max.)
No power supply.
Note:
• Active antenna is a portable or indoor antenna which needs power supply from the product because it
does not have power cord for itself.
GB56
User’s Manual