1
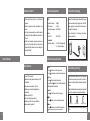
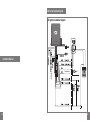
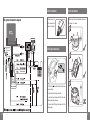
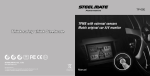
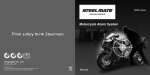
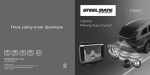
2-WAY
Motorcycle alarm system
All rights reserved
The trademark, patent and copyright are owned by Steelmate Co., Ltd.
The right to change the design and specifications reserved
Manual
Contents
User's Manual
Installation Manual
Important notice -------------------------------------- 01
886 series installation guide ---------------------- 06
Key features ------------------------------------------
01
986 series installation guide ---------------------- 08
Technical parameter -------------------------------- 02
ECU installation -------------------------------------- 10
Brief look at each device --------------------------
ECU light installation -------------------------------
02
10
Transmitter charging -------------------------------- 02
Siren installation ------------------------------------- 10
Low battery warning --------------------------------
02
Troubleshooting -------------------------------------- 11
Functions ----------------------------------------------
03
Important notice
Please install the system by an authorized
engineer
Keep the product and the transmitters from
water.
It is highly recommended you read this manual
carefully before the installation and operation of
this unit.
When the transmitter operating distance is
shorter or its indicator light turns dark, please
replace the battery with a new one or charge the
transmitter ASAP
Technical parameter
Transmitter charging
ECU
Operation voltage:
12V 3V
Static current:
<3.5 mA
Operation frequency: 433.92 MHz
Connect the charger's plug to transmitter's charging
socket, and then insert the charger into 100~240V
power supplier, the transmitter's battery can be
charged discontinuously.
Siren
Siren SPL:
When transmitter is full charged, the battery
indicator will be full.
Transmitter
Operation voltage:
108~125 dB
3.2~4.2V (Rechargeable)
1.1~1.5V (AAA battery)
Brief look at each device
User's Manual
Key features
2-way LCD transmitter
Motorcycle battery status indication on LCD
transmitter
Low power consumption (<3.5 mA)
Shock sensor sensitivity adjustable via
transmitter
Water resistant ECU
Out of operating range warning
Small siren & ECU for easy installation
Backup battery (optional)
Arm
Press button once to arm the system.
Press button twice to enter mute arming mode.
Low battery warning
Disarm
Press button to disarm the system
Press and hold button to turn on/off transmitter.
(Rechargeable transmitters)
When a transmitter's battery is low, the transmitter
will send out warning sound after the button is
pressed, the battery indicator will show the battery
status.
Start
button twice to start the engine.
Press
When the battery indicator is empty, the transmitter
needs to be charged or changed immediately.
Mute
Press button to arm in mute arming mode.
Panic
Press button once to locate the motorcycle.
Some buttons are only for some transmitters
01
Battery is full
Battery is low
Battery is empty
The transmitting range will be affected when the battery
is low.
02
Functions
1. Arming
When ignition is turned to off, press
arm the system.
2. Mute arming
Press button twice (or
muet arming mode.
button to
button once) to enter
3. Shock impact alarm
In arming mode, the first shock impact will trigger
the system warning, the siren will chirp with turn
signals flashing 3 times, and the engine will be
immobilized. The 2-way transmitter will beep 5
times with vibration, the
icon and
icon will
be flashing with backlight.
If the second shock impact triggered in 15 seconds,
the siren will chirp 15 seconds with turn signals
flashing and the engine will be immobilized. The
2-awy transmitter will beep and vibrate, the icon
icon will be flashing with backlight.
and
In mute arming mode, the siren will not chirp.
4. Emergency alarm
In arming mode, if the key is turned to ACC ON
position, the siren will chirp sharply, the turn signals
will flash and the engine will be immobilized. press
button to stop alarming.
5. Disarming and rearming
In arming mode, press button to disarm the
system. If the motorcycle is not touched or the
enging is not started in 30 seconds, the system
will automatically return to the former arming mode.
03
Press button twice, the turn signals will flash
twice and the system will be disarmed completely.
When the engine is running, press
the engine will be stopped.
6. Locating
Press button once or press and hold / + / +
buttons to locate motorcycle, the siren will chirp
for 10 seconds with turn signals flashing.
12. LED indicator
In arming mode, the LED indicator will flash once
every two seconds. When shock sensor is
triggered, the LED indicator will flash continuously.
7. Anti-hijack
Ignition on, press and hold
or
button, the
siren will chirp sharply with the turn signals flashing.
The engine will be immobilized after 10 seconds.
Press button to stop this function.
13. Special music reminding
Press any button on the transmitter, if it sends out
special music, the transmitter is communicating
with ECU, please operate it later.
8. Not-armed warning
When the ignition off and the system is not armed
within 10 seconds, the siren will chirp 3 times with
turn signals flashing to remind to arm the system.
9. Remote stop engine
During driving or starting engine, press
once to stop the engine.
button
10. Remote engine start (986 series only)
Press
button twice continuously, the engine
will be started and run for 8 minutes, then engine
will be shut down and the system sill return to the
previous status. During the 8 minutes, if you insert
the key and turn to ACC ON, the engine will keep
running.
11. keyless driving (986 series only)
If the engine is started, press
button again in
8 minutes the siren will beep once to confirm that
the motorcycle can be driven with keyless.
button once,
14. Time setting
Press + button together for 2 seconds, the
transmitter beeps once, the figure will flash, the
press button to choose hour or minute setting,
and set the time by button.
Parameter setting:
1 Time: setting hour, minute (time in 24 hour
notation)
2 Exit: press + button together to save the setting
and exit the setting mode, the transmitter beeps
once.
15. Antenna range indication
Antenna range shows by bar on the LCD screen,
the more the bar, the stronger the signal. When
the transmitter can not receive the signal fron the
system, the signal bar will disappear.
16. Sensitivity adjustment by transmitter
In disarming mode, press and hold +
buttons
button to enter the shock sensor sensitivity
or
setting function. Press
button or
button to
change the 1~8 sensitivity levels (level 8 is the
highest sensitivity levels (level 8 is the highest
sensitivity level and level 1 is the lowest sensitivity
level).
When selecting sensitivity levels, the siren beeps
once with turn signals flashing once to indicate
the sensitivity is at level "1", the LCD transmitter
will monitor "1", the siren beeps twice with turn
signals flashing twice to indicate the sensitivity is
at level 2, the LCD transmitter will monitor "2", and
so on. Once the suitable sensitivity is set, press
button to confirm and exit the setting mode. (If
there is no adjustment within 15 seconds after the
system enters the sensitivity setting mode, the
system will automatically exit setting & revert to
its former sensitivity status, Factory default: level
5)
17. Backup battery (optional)
A backup battery provides power to the system
when the primary source of power is unavailable.
18. Monitoring the battery status of the
motorcycle
Every time when press armed button on the LCD
transmitter, the battery voltage of the motorcycle
will be shown on the transmitter with V icon flashing.
You can know the motorcycle's battery status at
any time.
04
886 series installation guide
AC ignition installation diagram
Installation Manual
Flameout wire
05
06
986 series installation guide
DC ignition installation diagram
AC ignition installation diagram
Fuse
Flameout wire
07
Flameout wire
08
DC ignition installation diagram
ECU installation
Siren installation
Please mount the
ECU downside as
shown in the figure.
Please mount the siren downwards as shown in
the figures 1 or 2 below
1
ECU light installation
Fuse
2
Flameout wire
1. Drill a hole ( 8) around the block where it can
be seen clearly.
3
2. Insert the outer bushing to the hole.
3. insert the inner bushing with LED to the outer
bushing and tighten them up.
4. Connect the LED plug to the main unit of the
alarm system.
09
10
Troubleshooting
1). Transmitter is ineffective or the control distance
decreased significantly.
l Tall building, radio tower or high frequency
electromagnetic wave may affect the control range.
l Low power of the battery.
l The transmitter is broken or damaged.
l The installation location of the antenna is wrong.
You should straighten the antenna and keep it
away from other wire harness.
2). The siren does not chirp when the alarm system
is triggered.
l The wire connection between the siren and ECU
has problem.
l The siren is damaged.
3). The system gives false alarms when heavy
vehicles by passing.
l The sensitivity of the sensor is too high.
4) The continuous chirping of the siren cannot be
stopped by transmitter after the installation of ECU.
l The plug is improperly inserted.
l The wire is improperly connected.
l The siren is damaged.
5) If the problem persists, please follow these steps
l For consumer contact your dealer or nearby service
centre.
l For installer or dealer email your question to us
and we will reply ASAP.
11