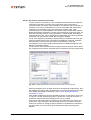
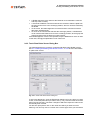
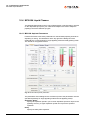
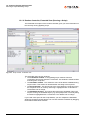
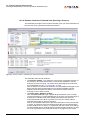
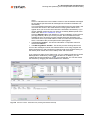
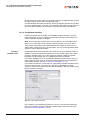
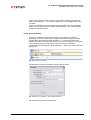
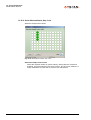
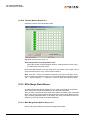
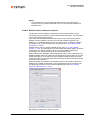
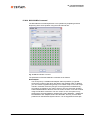
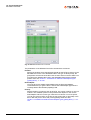
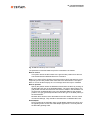
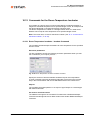
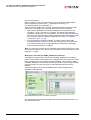
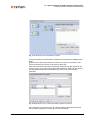
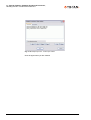
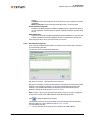
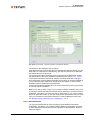
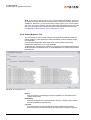
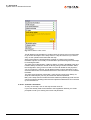
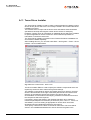
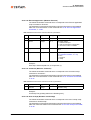
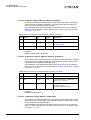
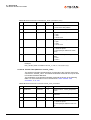
1
Software Manual
Freedom EVOware® Standard 2.3
Freedom EVOware® Plus 2.3
Extended Device Support (Research Use Only)
Freedom EVOware Software Manual, 393172, en, V2.3
Document Status Sheet
Title:
Freedom EVOware Software Manual
Part number:
10393172.09
ID:
393172, en, Version 2.3
Translated from:
-
Version
Revision
Issue
Document History
1
0
2004-04-30
New edition (released with Freedom EVOware V1.0)
1
1
2004-07-31
Only published as context-sensitive help file
1
2
2005-03-30
Updated for Freedom EVOware V1.1
1
3
2005-08-18
Updated for Freedom EVOware V1.19
1
4
2005-12-16
Updated for Freedom EVOware V1.20
1
5
2006-03-31
Updated for Freedom EVOware V1.21
1
6
2006-06-30
Updated for Freedom EVOware V1.3
1
7
2006-09-30
Updated for Freedom EVOware V1.4
2
0
2006-12-31
Updated for Freedom EVOware V2.0
2
1
2007-12-01
Updated for Freedom EVOware V2.1
2
2
2008-09-05
Updated for Freedom EVOware V2.2
2
3
2009-04-01
Updated for Freedom EVOware V2.3
© 2009, Tecan Schweiz AG, Switzerland, all rights reserved
Information contained in this document is subject to change without notice.
Table of Contents
Table of Contents
1
About This Manual
1.1
1.2
1.2.1
1.3
1.4
1.5
Conventions Used in This Manual . . . . . . . . . . . . . . . . . . . . . . . . . . . . . . .
Reference Documents . . . . . . . . . . . . . . . . . . . . . . . . . . . . . . . . . . . . . . . .
Related Documentation and Software . . . . . . . . . . . . . . . . . . . . . . . . .
Trademarks . . . . . . . . . . . . . . . . . . . . . . . . . . . . . . . . . . . . . . . . . . . . . . . .
Abbreviations . . . . . . . . . . . . . . . . . . . . . . . . . . . . . . . . . . . . . . . . . . . . . . .
Context-Sensitive Help System . . . . . . . . . . . . . . . . . . . . . . . . . . . . . . . . .
2
Safety
2.1
2.2
2.3
2.4
2.5
2.6
2.6.1
2.7
2.8
2.8.1
2.8.2
User Qualification. . . . . . . . . . . . . . . . . . . . . . . . . . . . . . . . . . . . . . . . . . . .
Warning Notices Used in the Manuals . . . . . . . . . . . . . . . . . . . . . . . . . . . .
Use of the Software . . . . . . . . . . . . . . . . . . . . . . . . . . . . . . . . . . . . . . . . . .
Specific Hazards . . . . . . . . . . . . . . . . . . . . . . . . . . . . . . . . . . . . . . . . . . . .
Safety of the Overall System . . . . . . . . . . . . . . . . . . . . . . . . . . . . . . . . . . .
Safety Features of the Pipetting Instrument. . . . . . . . . . . . . . . . . . . . . . . .
Safe Operation of the Pipetting Instrument and the Doorlocks . . . . . .
General Safety Rules . . . . . . . . . . . . . . . . . . . . . . . . . . . . . . . . . . . . . . . . .
Specific Safety Rules . . . . . . . . . . . . . . . . . . . . . . . . . . . . . . . . . . . . . . . . .
Unintended or Unexpected Movement of Robot Arms and Other Devices
General Rules When Using the Pipetting Instrument . . . . . . . . . . . . .
3
Product Description
3.1
3.1.1
3.1.2
3.1.3
3.1.4
3.2
3.3
3.4
3.4.1
3.4.2
3.5
Overview of Freedom EVOware . . . . . . . . . . . . . . . . . . . . . . . . . . . . . . . .
Freedom EVOware Standard and Freedom EVOware Plus . . . . . . . .
Hardlocks for Freedom EVOware Standard and Freedom EVOware Plus
Tecan Software Add-ons for Freedom EVOware . . . . . . . . . . . . . . . .
3D Simulation Tool for the Pipetting Instrument . . . . . . . . . . . . . . . . .
Intended Use of the Freedom EVOware Software. . . . . . . . . . . . . . . . . . .
What’s New in Freedom EVOware 2.3 . . . . . . . . . . . . . . . . . . . . . . . . . . .
Supported Pipetting Instruments and Tecan Options . . . . . . . . . . . . . . . .
Supported Combinations of Robot Arms . . . . . . . . . . . . . . . . . . . . . . .
Supported Firmware Versions for the Optional Devices . . . . . . . . . . .
Computer Requirements . . . . . . . . . . . . . . . . . . . . . . . . . . . . . . . . . . . . . .
4
Installation
4.1
4.2
4.3
4.3.1
4.3.2
4.4
4.5
4.5.1
4.5.2
Before You Start. . . . . . . . . . . . . . . . . . . . . . . . . . . . . . . . . . . . . . . . . . . . .
Installing Freedom EVOware . . . . . . . . . . . . . . . . . . . . . . . . . . . . . . . . . . .
Modifying, Removing or Repairing Your Installation . . . . . . . . . . . . . . . . .
Upgrading to the Latest Software Version . . . . . . . . . . . . . . . . . . . . . .
Installation of Service Packs and Hotfixes . . . . . . . . . . . . . . . . . . . . . .
The Freedom EVOware Hardlock . . . . . . . . . . . . . . . . . . . . . . . . . . . . . . .
Installing the USB driver for the Freedom EVO pipetting instrument . . . . .
USB Power Management Setting . . . . . . . . . . . . . . . . . . . . . . . . . . . .
USB Hubs . . . . . . . . . . . . . . . . . . . . . . . . . . . . . . . . . . . . . . . . . . . . . .
Freedom EVOware Software Manual, 393172, en, V2.3
1-2
1-3
1-3
1-4
1-4
1-5
2-1
2-2
2-2
2-3
2-4
2-4
2-5
2-6
2-6
2-6
2-6
3-1
3-2
3-2
3-3
3-3
3-3
3-4
3-4
3-6
3-6
3-7
4-1
4-2
4-8
4-10
4-11
4-12
4-12
4-14
4-15
i
Table of Contents
ii
5
Starting Freedom EVOware
5.1
5.1.1
5.1.2
5.1.3
5.1.4
5.2
5.2.1
5.3
5.3.1
5.4
5.4.1
5.4.2
5.4.3
5.4.4
5.4.5
5.5
Login Screen . . . . . . . . . . . . . . . . . . . . . . . . . . . . . . . . . . . . . . . . . . . . . . .
Loading the device drivers . . . . . . . . . . . . . . . . . . . . . . . . . . . . . . . . .
Driver pre-loading. . . . . . . . . . . . . . . . . . . . . . . . . . . . . . . . . . . . . . . . .
Driver loading errors. . . . . . . . . . . . . . . . . . . . . . . . . . . . . . . . . . . . . . .
Instrument and Hardlock Detection . . . . . . . . . . . . . . . . . . . . . . . . . . .
Startup Wizard, Freedom EVOware Standard . . . . . . . . . . . . . . . . . . . . .
Startup Wizard for Freedom EVOware Standard Operators . . . . . . . .
Startup Wizard, Freedom EVOware Plus . . . . . . . . . . . . . . . . . . . . . . . . .
Startup Wizard for Freedom EVOware Plus Operators . . . . . . . . . . . .
Overview of the Main Window in Freedom EVOware . . . . . . . . . . . . . . . .
Control Bar . . . . . . . . . . . . . . . . . . . . . . . . . . . . . . . . . . . . . . . . . . . . . .
Infopads . . . . . . . . . . . . . . . . . . . . . . . . . . . . . . . . . . . . . . . . . . . . . . . .
The Process Editor (Freedom EVOware Plus) . . . . . . . . . . . . . . . . . .
The Script Editor . . . . . . . . . . . . . . . . . . . . . . . . . . . . . . . . . . . . . . . . .
Worktable Editor. . . . . . . . . . . . . . . . . . . . . . . . . . . . . . . . . . . . . . . . . .
Exiting Freedom EVOware. . . . . . . . . . . . . . . . . . . . . . . . . . . . . . . . . . . . .
5-1
5-1
5-2
5-3
5-3
5-5
5-6
5-7
5-8
5-9
5-9
5-15
5-17
5-19
5-21
5-24
Freedom EVOware Software Manual, 393172, en, V2.3
Table of Contents
6
Menus
6.1
6.1.1
6.1.2
6.1.3
6.1.4
6.1.5
6.1.6
6.1.7
6.1.8
6.1.9
6.1.10
6.1.11
6.2
6.2.1
6.2.2
6.2.3
6.2.4
6.2.5
6.2.6
6.3
6.3.1
6.3.2
6.3.3
6.4
6.4.1
6.4.2
6.4.3
6.4.4
6.4.5
6.4.6
6.4.7
6.4.8
6.5
6.5.1
6.5.2
6.5.3
6.6
6.6.1
6.6.2
6.6.3
6.6.4
6.6.5
6.6.6
6.7
6.7.1
6.7.2
6.7.3
File Menu . . . . . . . . . . . . . . . . . . . . . . . . . . . . . . . . . . . . . . . . . . . . . . . . . .
New . . . . . . . . . . . . . . . . . . . . . . . . . . . . . . . . . . . . . . . . . . . . . . . . . . .
Open . . . . . . . . . . . . . . . . . . . . . . . . . . . . . . . . . . . . . . . . . . . . . . . . . .
Save . . . . . . . . . . . . . . . . . . . . . . . . . . . . . . . . . . . . . . . . . . . . . . . . . .
Save As ... . . . . . . . . . . . . . . . . . . . . . . . . . . . . . . . . . . . . . . . . . . . . . .
Delete . . . . . . . . . . . . . . . . . . . . . . . . . . . . . . . . . . . . . . . . . . . . . . . . .
Print . . . . . . . . . . . . . . . . . . . . . . . . . . . . . . . . . . . . . . . . . . . . . . . . . . .
Start Up Wizard . . . . . . . . . . . . . . . . . . . . . . . . . . . . . . . . . . . . . . . . . .
Recent Scripts . . . . . . . . . . . . . . . . . . . . . . . . . . . . . . . . . . . . . . . . . . .
Lock EVOware . . . . . . . . . . . . . . . . . . . . . . . . . . . . . . . . . . . . . . . . . .
Exit . . . . . . . . . . . . . . . . . . . . . . . . . . . . . . . . . . . . . . . . . . . . . . . . . . . .
Exit, Unload Drivers . . . . . . . . . . . . . . . . . . . . . . . . . . . . . . . . . . . . . . .
Edit Menu . . . . . . . . . . . . . . . . . . . . . . . . . . . . . . . . . . . . . . . . . . . . . . . . . .
Undo / Redo. . . . . . . . . . . . . . . . . . . . . . . . . . . . . . . . . . . . . . . . . . . . .
Undo / Redo Configuration . . . . . . . . . . . . . . . . . . . . . . . . . . . . . . . . .
Cut / Copy / Paste . . . . . . . . . . . . . . . . . . . . . . . . . . . . . . . . . . . . . . . .
Search & Replace . . . . . . . . . . . . . . . . . . . . . . . . . . . . . . . . . . . . . . . .
Auto-Validation. . . . . . . . . . . . . . . . . . . . . . . . . . . . . . . . . . . . . . . . . . .
Validate Script . . . . . . . . . . . . . . . . . . . . . . . . . . . . . . . . . . . . . . . . . . .
View Menu . . . . . . . . . . . . . . . . . . . . . . . . . . . . . . . . . . . . . . . . . . . . . . . . .
Worktable. . . . . . . . . . . . . . . . . . . . . . . . . . . . . . . . . . . . . . . . . . . . . . .
Infopads . . . . . . . . . . . . . . . . . . . . . . . . . . . . . . . . . . . . . . . . . . . . . . . .
Log Window . . . . . . . . . . . . . . . . . . . . . . . . . . . . . . . . . . . . . . . . . . . .
Execute Menu . . . . . . . . . . . . . . . . . . . . . . . . . . . . . . . . . . . . . . . . . . . . . .
Run . . . . . . . . . . . . . . . . . . . . . . . . . . . . . . . . . . . . . . . . . . . . . . . . . . .
Run Maintenance. . . . . . . . . . . . . . . . . . . . . . . . . . . . . . . . . . . . . . . . .
Clear Recovery Status . . . . . . . . . . . . . . . . . . . . . . . . . . . . . . . . . . . . .
Tools . . . . . . . . . . . . . . . . . . . . . . . . . . . . . . . . . . . . . . . . . . . . . . . . . .
VB Scripts . . . . . . . . . . . . . . . . . . . . . . . . . . . . . . . . . . . . . . . . . . . . . .
Declare Variables . . . . . . . . . . . . . . . . . . . . . . . . . . . . . . . . . . . . . . . .
Move Arms. . . . . . . . . . . . . . . . . . . . . . . . . . . . . . . . . . . . . . . . . . . . . .
Switch to real mode . . . . . . . . . . . . . . . . . . . . . . . . . . . . . . . . . . . . . . .
Administrator Menu . . . . . . . . . . . . . . . . . . . . . . . . . . . . . . . . . . . . . . . . . .
Change User . . . . . . . . . . . . . . . . . . . . . . . . . . . . . . . . . . . . . . . . . . . .
Change Password . . . . . . . . . . . . . . . . . . . . . . . . . . . . . . . . . . . . . . . .
Configure . . . . . . . . . . . . . . . . . . . . . . . . . . . . . . . . . . . . . . . . . . . . . . .
Help Menu . . . . . . . . . . . . . . . . . . . . . . . . . . . . . . . . . . . . . . . . . . . . . . . . .
Contents . . . . . . . . . . . . . . . . . . . . . . . . . . . . . . . . . . . . . . . . . . . . . . .
Index . . . . . . . . . . . . . . . . . . . . . . . . . . . . . . . . . . . . . . . . . . . . . . . . . .
Using Help . . . . . . . . . . . . . . . . . . . . . . . . . . . . . . . . . . . . . . . . . . . . . .
Error History. . . . . . . . . . . . . . . . . . . . . . . . . . . . . . . . . . . . . . . . . . . . .
Service Contact . . . . . . . . . . . . . . . . . . . . . . . . . . . . . . . . . . . . . . . . . .
About . . . . . . . . . . . . . . . . . . . . . . . . . . . . . . . . . . . . . . . . . . . . . . . . .
Freedom EVOware Toolbar . . . . . . . . . . . . . . . . . . . . . . . . . . . . . . . . . . .
Toolbar Buttons for the Script Editor (Freedom EVOware Plus) . . . . .
Toolbar Buttons for the Worktable Editor. . . . . . . . . . . . . . . . . . . . . . .
Status Bar . . . . . . . . . . . . . . . . . . . . . . . . . . . . . . . . . . . . . . . . . . . . . .
Freedom EVOware Software Manual, 393172, en, V2.3
6-1
6-1
6-3
6-5
6-6
6-6
6-6
6-7
6-7
6-7
6-8
6-8
6-8
6-8
6-8
6-9
6-9
6-9
6-9
6-9
6-9
6-10
6-10
6-10
6-10
6-10
6-11
6-11
6-12
6-12
6-15
6-15
6-15
6-15
6-16
6-16
6-17
6-17
6-17
6-17
6-17
6-17
6-17
6-18
6-19
6-20
6-20
iii
Table of Contents
7
Tecan User Management System
7.1
7.1.1
7.2
7.3
7.3.1
Main Features of the Tecan User Management System . . . . . . . . . . . . . .
7-2
User Management Audit Trail . . . . . . . . . . . . . . . . . . . . . . . . . . . . . . .
7-2
Freedom EVOware Access Rights (User Levels) . . . . . . . . . . . . . . . . . . .
7-3
Special configuration options for the User Management System. . . . . . . .
7-3
Freedom EVOware login using the Microsoft Windows login name instead of
the Tecan user database7-4
Sharing the Tecan user management database in a network environment 7-5
7.3.2
iv
Freedom EVOware Software Manual, 393172, en, V2.3
Table of Contents
8
Configuration Tool
8.1
8.1.1
8.1.2
8.1.3
8.1.4
8.1.5
8.2
8.2.1
8.2.2
8.3
8.3.1
8.3.2
8.3.3
8.4
8.4.1
8.4.2
8.4.3
8.4.4
8.5
8.5.1
8.5.2
8.5.3
8.5.4
8.5.5
8.5.6
8.5.7
8.5.8
8.5.9
8.5.10
8.5.11
8.5.12
8.5.13
8.5.14
8.5.15
8.5.16
8.5.17
8.5.18
8.5.19
8.5.20
8.5.21
8.5.22
8.5.23
8.5.24
8.5.25
8.5.26
8.5.27
8.5.28
8.5.29
8.5.30
8.5.31
8.5.32
8.5.33
Toolbar Buttons and Menus . . . . . . . . . . . . . . . . . . . . . . . . . . . . . . . . . . . .
Toolbar Buttons . . . . . . . . . . . . . . . . . . . . . . . . . . . . . . . . . . . . . . . . . .
File Menu . . . . . . . . . . . . . . . . . . . . . . . . . . . . . . . . . . . . . . . . . . . . . . .
Edit Menu. . . . . . . . . . . . . . . . . . . . . . . . . . . . . . . . . . . . . . . . . . . . . . .
View Menu . . . . . . . . . . . . . . . . . . . . . . . . . . . . . . . . . . . . . . . . . . . . . .
Help Menu . . . . . . . . . . . . . . . . . . . . . . . . . . . . . . . . . . . . . . . . . . . . . .
Backing Up and Restoring Your Configuration . . . . . . . . . . . . . . . . . . . . .
Making an External Backup . . . . . . . . . . . . . . . . . . . . . . . . . . . . . . . . .
Copying Scripts and Processes Between Different Pcs . . . . . . . . . . .
General Settings . . . . . . . . . . . . . . . . . . . . . . . . . . . . . . . . . . . . . . . . . . . .
General Section . . . . . . . . . . . . . . . . . . . . . . . . . . . . . . . . . . . . . . . . . .
Notifications Section
....................................
User Management Section . . . . . . . . . . . . . . . . . . . . . . . . . . . . . . . .
Device Settings . . . . . . . . . . . . . . . . . . . . . . . . . . . . . . . . . . . . . . . . . . . . .
General Section . . . . . . . . . . . . . . . . . . . . . . . . . . . . . . . . . . . . . . . . . .
Instrument Options Tab . . . . . . . . . . . . . . . . . . . . . . . . . . . . . . . . . . .
Communication Section . . . . . . . . . . . . . . . . . . . . . . . . . . . . . . . . . . . .
Scheduling Section . . . . . . . . . . . . . . . . . . . . . . . . . . . . . . . . . . . . . . .
Device Driver Configuration . . . . . . . . . . . . . . . . . . . . . . . . . . . . . . . . . . . .
Settings for the Barcode Scanner . . . . . . . . . . . . . . . . . . . . . . . . . . . .
Settings for the Carousel . . . . . . . . . . . . . . . . . . . . . . . . . . . . . . . . . .
Settings for the Carousel NT . . . . . . . . . . . . . . . . . . . . . . . . . . . . . . . .
Settings for the Hettich Centrifuge . . . . . . . . . . . . . . . . . . . . . . . . . . .
Settings for the CNS (Common Notification Server) . . . . . . . . . . . . . .
Settings for the Columbus Washer . . . . . . . . . . . . . . . . . . . . . . . . . . .
Settings for the FlaskFlipper . . . . . . . . . . . . . . . . . . . . . . . . . . . . . . . .
Settings for Heated Incubators 1 to 3 . . . . . . . . . . . . . . . . . . . . . . . . .
Settings for the Base Incubator . . . . . . . . . . . . . . . . . . . . . . . . . . . . . .
Settings for the Room Temperature Incubator . . . . . . . . . . . . . . . . . .
Settings for the Liquid Handling Arm (LiHa). . . . . . . . . . . . . . . . . . . . .
Settings for the MCA96 (Multi Channel Arm 96) . . . . . . . . . . . . . . . . .
Settings for the MCA384 (Multi Channel Arm 384) . . . . . . . . . . . . . . .
Settings for the Magellan Driver . . . . . . . . . . . . . . . . . . . . . . . . . . . . .
Settings for the PW384 Washer . . . . . . . . . . . . . . . . . . . . . . . . . . . . .
Settings for the PW384GP Washer . . . . . . . . . . . . . . . . . . . . . . . . . . .
Settings for the 96PW Washer . . . . . . . . . . . . . . . . . . . . . . . . . . . . . .
Settings for the Tube Robot (PnP) . . . . . . . . . . . . . . . . . . . . . . . . . . .
Settings for the PosID-3 . . . . . . . . . . . . . . . . . . . . . . . . . . . . . . . . . . .
Settings for the REMP PHS . . . . . . . . . . . . . . . . . . . . . . . . . . . . . . . .
Settings for the REMP Reatrix . . . . . . . . . . . . . . . . . . . . . . . . . . . . . .
Settings for the REMP ACD96 . . . . . . . . . . . . . . . . . . . . . . . . . . . . . .
Settings for the Plate Robot (RoMa) . . . . . . . . . . . . . . . . . . . . . . . . . .
Settings for the Te-Shake . . . . . . . . . . . . . . . . . . . . . . . . . . . . . . . . . .
Settings for the Symbol MS-954 Barcode Scanner . . . . . . . . . . . . . . .
Settings for the Te-Link . . . . . . . . . . . . . . . . . . . . . . . . . . . . . . . . . . .
Settings for the Te-MagS . . . . . . . . . . . . . . . . . . . . . . . . . . . . . . . . . .
Settings for the Te-Stack and Te-Stack Te-MO . . . . . . . . . . . . . . . . .
Settings for the Te-VacS . . . . . . . . . . . . . . . . . . . . . . . . . . . . . . . . . . .
Settings for the Te-MO . . . . . . . . . . . . . . . . . . . . . . . . . . . . . . . . . . . .
Settings for the Pooling Balance . . . . . . . . . . . . . . . . . . . . . . . . . . . . .
Settings for the Process Script. . . . . . . . . . . . . . . . . . . . . . . . . . . . . . .
Settings for the Transfer Station . . . . . . . . . . . . . . . . . . . . . . . . . . . . .
Freedom EVOware Software Manual, 393172, en, V2.3
8-1
8-1
8-2
8-2
8-2
8-3
8-3
8-3
8-3
8-4
8-4
8-12
8-16
8-21
8-21
8-22
8-35
8-38
8-39
8-39
8-42
8-45
8-49
8-50
8-50
8-54
8-55
8-58
8-59
8-60
8-63
8-66
8-71
8-73
8-75
8-76
8-77
8-80
8-82
8-82
8-84
8-85
8-89
8-90
8-92
8-95
8-96
8-105
8-109
8-110
8-111
8-113
v
Table of Contents
8.5.34
8.5.35
vi
Settings for Microplate Reader Devices . . . . . . . . . . . . . . . . . . . . . . .
Driver Tab of the Configure Device Driver Properties Dialog Box . . .
8-113
8-116
Freedom EVOware Software Manual, 393172, en, V2.3
Table of Contents
9
Specifying Your Instrument Setup
9.1
9.2
9.2.1
9.3
9.3.1
9.3.2
9.3.3
9.3.4
9.3.5
9.3.6
9.3.7
9.3.8
9.4
9.4.1
9.4.2
9.4.3
9.4.4
9.4.5
9.4.6
9.4.7
9.4.8
9.5
9.5.1
9.5.2
9.5.3
9.5.4
9.5.5
9.6
9.6.1
9.6.2
9.6.3
9.6.4
9.7
9.7.1
9.7.2
9.7.3
9.7.4
9.8
9.8.1
9.8.2
9.9
9.10
9.10.1
9.10.2
9.10.3
9.10.4
9.10.5
9.10.6
9.10.7
9.11
Instrument Configuration . . . . . . . . . . . . . . . . . . . . . . . . . . . . . . . . . . . . .
Basic Concepts . . . . . . . . . . . . . . . . . . . . . . . . . . . . . . . . . . . . . . . . . . . . .
Introduction to Carriers and Labware. . . . . . . . . . . . . . . . . . . . . . . . . .
Moving the Arms and Other Devices . . . . . . . . . . . . . . . . . . . . . . . . . . . . .
Moving the LiHa . . . . . . . . . . . . . . . . . . . . . . . . . . . . . . . . . . . . . . . . .
Moving the RoMa (Plate Robot) . . . . . . . . . . . . . . . . . . . . . . . . . . . . .
Moving the PnP (Tube Robot) . . . . . . . . . . . . . . . . . . . . . . . . . . . . . .
Moving the MCA96 . . . . . . . . . . . . . . . . . . . . . . . . . . . . . . . . . . . . . . .
Moving the MCA384 . . . . . . . . . . . . . . . . . . . . . . . . . . . . . . . . . . . . . .
Moving the CGM . . . . . . . . . . . . . . . . . . . . . . . . . . . . . . . . . . . . . . . . .
Moving the Te-MO . . . . . . . . . . . . . . . . . . . . . . . . . . . . . . . . . . . . . . .
Moving the PosID Barcode Scanner . . . . . . . . . . . . . . . . . . . . . . . . . .
Configuring Labware . . . . . . . . . . . . . . . . . . . . . . . . . . . . . . . . . . . . . . . . .
Editing Labware, Well Dimensions Tab . . . . . . . . . . . . . . . . . . . . . . .
Editing Labware, Advanced Tab . . . . . . . . . . . . . . . . . . . . . . . . . . . . .
Labware Coordinates. . . . . . . . . . . . . . . . . . . . . . . . . . . . . . . . . . . . . .
Teaching the Labware Coordinates . . . . . . . . . . . . . . . . . . . . . . . . . .
Labware Types and DITI Types. . . . . . . . . . . . . . . . . . . . . . . . . . . . . .
Well Alignment . . . . . . . . . . . . . . . . . . . . . . . . . . . . . . . . . . . . . . . . . . .
Y-distance of Wells . . . . . . . . . . . . . . . . . . . . . . . . . . . . . . . . . . . . . . .
Labware Attributes . . . . . . . . . . . . . . . . . . . . . . . . . . . . . . . . . . . . . . .
Configuring Carriers . . . . . . . . . . . . . . . . . . . . . . . . . . . . . . . . . . . . . . . . .
Carrier Dimensions and X/Y Offsets . . . . . . . . . . . . . . . . . . . . . . . . . .
Z Offsets for Carriers . . . . . . . . . . . . . . . . . . . . . . . . . . . . . . . . . . . . . .
Custom Objects . . . . . . . . . . . . . . . . . . . . . . . . . . . . . . . . . . . . . . . . . .
Teaching the MCA384 System Carrier with DITI Racks . . . . . . . . . . .
Carrier Attributes . . . . . . . . . . . . . . . . . . . . . . . . . . . . . . . . . . . . . . . . .
Creating and Editing Plate Robot Vectors . . . . . . . . . . . . . . . . . . . . . . . . .
Using RoMa Vectors . . . . . . . . . . . . . . . . . . . . . . . . . . . . . . . . . . . . . .
Teach Plate Robot Vector Dialog Box . . . . . . . . . . . . . . . . . . . . . . . .
Absolute Positions in RoMa Vectors . . . . . . . . . . . . . . . . . . . . . . . . . .
Defining the Home Position for a RoMa. . . . . . . . . . . . . . . . . . . . . . . .
Creating and Editing Tube Robot Vectors . . . . . . . . . . . . . . . . . . . . . . . . .
Using PnP Vectors. . . . . . . . . . . . . . . . . . . . . . . . . . . . . . . . . . . . . . . .
Teach Tube Robot Vector Dialog Box . . . . . . . . . . . . . . . . . . . . . . . .
Absolute Positions in PnP Vectors. . . . . . . . . . . . . . . . . . . . . . . . . . . .
Defining the Home Position for a PnP . . . . . . . . . . . . . . . . . . . . . . . . .
Creating and Editing MCA Vectors . . . . . . . . . . . . . . . . . . . . . . . . . . . . . .
MCA96 Vectors . . . . . . . . . . . . . . . . . . . . . . . . . . . . . . . . . . . . . . . . . .
MCA384 Vectors . . . . . . . . . . . . . . . . . . . . . . . . . . . . . . . . . . . . . . . . .
Configuring Device Drivers . . . . . . . . . . . . . . . . . . . . . . . . . . . . . . . . . . . .
Local Settings for Process Steps (Context Menu) . . . . . . . . . . . . . . . . . . .
Execution Parameters . . . . . . . . . . . . . . . . . . . . . . . . . . . . . . . . . . . . .
Adjust Time/Error handling . . . . . . . . . . . . . . . . . . . . . . . . . . . . . . . . .
Pre-actions / Post-actions (Custom) . . . . . . . . . . . . . . . . . . . . . . . . . .
Locations . . . . . . . . . . . . . . . . . . . . . . . . . . . . . . . . . . . . . . . . . . . . . . .
Comment . . . . . . . . . . . . . . . . . . . . . . . . . . . . . . . . . . . . . . . . . . . . . .
Copy. . . . . . . . . . . . . . . . . . . . . . . . . . . . . . . . . . . . . . . . . . . . . . . . . . .
Delete. . . . . . . . . . . . . . . . . . . . . . . . . . . . . . . . . . . . . . . . . . . . . . . . . .
Local Settings for Labware Source Icons (Context Menu). . . . . . . . . . . . .
Freedom EVOware Software Manual, 393172, en, V2.3
9-1
9-2
9-2
9-3
9-4
9-5
9-6
9-8
9-9
9-11
9-12
9-14
9-15
9-19
9-22
9-25
9-26
9-32
9-33
9-33
9-34
9-39
9-45
9-46
9-47
9-47
9-47
9-55
9-58
9-59
9-61
9-62
9-63
9-65
9-65
9-68
9-69
9-69
9-69
9-70
9-70
9-70
9-71
9-71
9-72
9-75
9-76
9-76
9-76
9-77
vii
Table of Contents
viii
10
Configuring Liquid Classes
10.1
10.1.1
10.1.2
10.2
10.2.1
10.2.2
10.2.3
10.3
10.3.1
10.3.2
10.3.3
10.3.4
10.4
10.4.1
10.4.2
10.4.3
10.4.4
10.5
10.5.1
10.5.2
10.5.3
10.6
10.6.1
10.6.2
10.6.3
10.6.4
10.7
10.7.1
10.7.2
10.7.3
10.7.4
Liquid Classes Editor . . . . . . . . . . . . . . . . . . . . . . . . . . . . . . . . . . . . . . . . .
Global Parameters for Liquid Classes . . . . . . . . . . . . . . . . . . . . . . . . .
Type Parameters for Liquid Classes . . . . . . . . . . . . . . . . . . . . . . . . . .
LiHa Liquid Classes for Fixed Tips and DiTis. . . . . . . . . . . . . . . . . . . . . . .
LiHa Aspirate Parameters (Fixed Tips and DiTis) . . . . . . . . . . . . . . . .
LiHa Dispense Parameters (Fixed Tips and DiTis) . . . . . . . . . . . . . . .
LiHa Calibration Parameters (Fixed Tips and DiTis) . . . . . . . . . . . . . .
MCA96 Liquid Classes . . . . . . . . . . . . . . . . . . . . . . . . . . . . . . . . . . . . . . . .
MCA96 Aspirate Parameters . . . . . . . . . . . . . . . . . . . . . . . . . . . . . . .
MCA96 Dispense Parameters . . . . . . . . . . . . . . . . . . . . . . . . . . . . . . .
MCA96 Calibration Parameters . . . . . . . . . . . . . . . . . . . . . . . . . . . . .
MCA96 Plunger Parameters . . . . . . . . . . . . . . . . . . . . . . . . . . . . . . . .
MCA384 Liquid Classes . . . . . . . . . . . . . . . . . . . . . . . . . . . . . . . . . . . . . . .
MCA384 Aspirate Parameters . . . . . . . . . . . . . . . . . . . . . . . . . . . . . . .
MCA384 Dispense Parameters . . . . . . . . . . . . . . . . . . . . . . . . . . . . . .
MCA384 Calibration Parameters . . . . . . . . . . . . . . . . . . . . . . . . . . . . .
MCA384 Plunger Parameters . . . . . . . . . . . . . . . . . . . . . . . . . . . . . . .
Te-MO 96 Liquid Classes. . . . . . . . . . . . . . . . . . . . . . . . . . . . . . . . . . . . . .
Te-MO 96 Aspirate Parameters . . . . . . . . . . . . . . . . . . . . . . . . . . . . .
Te-MO 96 Dispense Parameters . . . . . . . . . . . . . . . . . . . . . . . . . . . .
Te-MO 96 Calibration Parameters . . . . . . . . . . . . . . . . . . . . . . . . . . .
Te-MO 384 Liquid Classes. . . . . . . . . . . . . . . . . . . . . . . . . . . . . . . . . . . . .
Te-MO 384 Aspirate Parameters . . . . . . . . . . . . . . . . . . . . . . . . . . . .
Te-MO 384 Dispense Parameters . . . . . . . . . . . . . . . . . . . . . . . . . . .
Te-MO 384 Calibration Parameters . . . . . . . . . . . . . . . . . . . . . . . . . .
Te-MO 384 Plunger Parameters . . . . . . . . . . . . . . . . . . . . . . . . . . . . .
Overview of Liquid Classes Supplied With Freedom EVOware . . . . . . . . .
General . . . . . . . . . . . . . . . . . . . . . . . . . . . . . . . . . . . . . . . . . . . . . . . .
Dispense Modes . . . . . . . . . . . . . . . . . . . . . . . . . . . . . . . . . . . . . . . . .
Installed Liquid Classes . . . . . . . . . . . . . . . . . . . . . . . . . . . . . . . . . . . .
Liquid Classes on the Freedom EVOware CD. . . . . . . . . . . . . . . . . . .
10-1
10-4
10-7
10-7
10-7
10-12
10-15
10-17
10-17
10-20
10-22
10-22
10-24
10-24
10-27
10-29
10-30
10-32
10-32
10-35
10-37
10-38
10-38
10-39
10-39
10-41
10-42
10-42
10-43
10-44
10-49
Freedom EVOware Software Manual, 393172, en, V2.3
Table of Contents
11
Getting Started - Setting Up a New Script or Process
11.1
11.2
11.3
11.3.1
11.4
11.4.1
11.4.2
11.4.3
11.4.4
11.4.5
11.4.6
11.5
11.5.1
11.5.2
11.5.3
11.5.4
11.5.5
11.5.6
11.5.7
11.5.8
11.5.9
11.5.10
11.5.11
11.6
11.6.1
11.6.2
11.6.3
11.7
11.7.1
11.7.2
11.7.3
First Steps . . . . . . . . . . . . . . . . . . . . . . . . . . . . . . . . . . . . . . . . . . . . . . . . .
Setting Up a New Pipetting Instrument . . . . . . . . . . . . . . . . . . . . . . . . . . .
Pre-requirements . . . . . . . . . . . . . . . . . . . . . . . . . . . . . . . . . . . . . . . . . . . .
Setting Up Carriers on the Worktable . . . . . . . . . . . . . . . . . . . . . . . . .
Setting Up a Pipetting Script in Freedom EVOware Standard . . . . . . . . . .
Choosing Labware for a Pipetting Script . . . . . . . . . . . . . . . . . . . . . . .
Creating a Pipetting Script . . . . . . . . . . . . . . . . . . . . . . . . . . . . . . . . . .
Adding Robot Movement Commands to the Script . . . . . . . . . . . . . . .
Saving the Script . . . . . . . . . . . . . . . . . . . . . . . . . . . . . . . . . . . . . . . . .
Running the Script . . . . . . . . . . . . . . . . . . . . . . . . . . . . . . . . . . . . . . . .
Example Scripts and Example Process . . . . . . . . . . . . . . . . . . . . . . . .
Setting Up a Process in Freedom EVOware Plus . . . . . . . . . . . . . . . . . . .
Choosing Labware for a Process. . . . . . . . . . . . . . . . . . . . . . . . . . . . .
Adding Device Commands to the Process . . . . . . . . . . . . . . . . . . . . .
Adding Robot Movement Commands to the Process . . . . . . . . . . . . .
Choosing Labware for a Pipette Command . . . . . . . . . . . . . . . . . . . . .
Creating a Script for the Pipette Command . . . . . . . . . . . . . . . . . . . . .
Closing the Script Editor . . . . . . . . . . . . . . . . . . . . . . . . . . . . . . . . . . .
Adding Final Position Icons to your Process . . . . . . . . . . . . . . . . . . . .
Linking the Process Steps in the Order of Execution. . . . . . . . . . . . . .
Adding On-the-fly Actions . . . . . . . . . . . . . . . . . . . . . . . . . . . . . . . . . .
Saving the Process . . . . . . . . . . . . . . . . . . . . . . . . . . . . . . . . . . . . . . .
Running the Process . . . . . . . . . . . . . . . . . . . . . . . . . . . . . . . . . . . . . .
Labware Generator (Freedom EVOware Plus) . . . . . . . . . . . . . . . . . . . . .
Creating a labware repository in a feeder device. . . . . . . . . . . . . . . . .
Creating a labware repository on the worktable. . . . . . . . . . . . . . . . . .
Context Menu of the Labware Generator. . . . . . . . . . . . . . . . . . . . . . .
Additional Information on Labware and Carriers . . . . . . . . . . . . . . . . . . . .
Assigning a Label (Name) to the Labware . . . . . . . . . . . . . . . . . . . . .
Example of a Worktable With Several Carriers and Labware Items . .
System Liquid Icon. . . . . . . . . . . . . . . . . . . . . . . . . . . . . . . . . . . . . . . .
12
Running Scripts and Processes
12.1
Running a Liquid Handling Script . . . . . . . . . . . . . . . . . . . . . . . . . . . . . . .
12.1.1
Buttons in Standard View. . . . . . . . . . . . . . . . . . . . . . . . . . . . . . . . . . .
12.1.2
Runtime Controller, Extended View (Running a Script) . . . . . . . . . . .
12.1.3
Buttons in Extended View . . . . . . . . . . . . . . . . . . . . . . . . . . . . . . . . . .
12.2
Running and Optimizing a Process (Freedom EVOware Plus) . . . . . . . . .
12.2.1
Process Controller during process runtime . . . . . . . . . . . . . . . . . . . . .
12.2.2
Additional Runtime Settings for Processes . . . . . . . . . . . . . . . . . . . . .
12.2.3
Buttons in Standard View. . . . . . . . . . . . . . . . . . . . . . . . . . . . . . . . . . .
12.2.4
Runtime Controller, Extended View (Running a Process) . . . . . . . . .
12.2.5
Buttons in Extended View . . . . . . . . . . . . . . . . . . . . . . . . . . . . . . . . . .
Freedom EVOware Software Manual, 393172, en, V2.3
11-1
11-1
11-2
11-2
11-4
11-4
11-5
11-6
11-6
11-7
11-7
11-7
11-7
11-10
11-10
11-11
11-12
11-12
11-13
11-13
11-15
11-15
11-15
11-16
11-16
11-17
11-19
11-19
11-19
11-20
11-20
12-1
12-2
12-4
12-5
12-5
12-9
12-10
12-12
12-14
12-16
ix
Table of Contents
13
Overview of Freedom EVOware Commands
13.1
Overview of Script Commands. . . . . . . . . . . . . . . . . . . . . . . . . . . . . . . . . .
13.1.1
Liquid Handling Arm (LiHa) Commands, Overview . . . . . . . . . . . . . . .
13.1.2
Wizards, Overview . . . . . . . . . . . . . . . . . . . . . . . . . . . . . . . . . . . . . . . .
13.1.3
Programming Commands, Overview . . . . . . . . . . . . . . . . . . . . . . . . . .
13.1.4
Commands for the Te-MO, Overview . . . . . . . . . . . . . . . . . . . . . . . . .
13.1.5
Commands for the Plate Robot, Overview. . . . . . . . . . . . . . . . . . . . . .
13.1.6
Commands for the Tube Robot, Overview. . . . . . . . . . . . . . . . . . . . . .
13.1.7
Commands for Identification Devices, Overview . . . . . . . . . . . . . . . . .
13.1.8
Miscellaneous Commands, Overview . . . . . . . . . . . . . . . . . . . . . . . . .
13.1.9
Commands for the MCA96 (Multi Channel Arm 96), Overview . . . . . .
13.1.10
Commands for the MCA384 (Multi Channel Arm 384), Overview . . . .
13.1.11
Commands for the Common Notification Server, Overview. . . . . . . . .
13.2
Overview of Device Commands . . . . . . . . . . . . . . . . . . . . . . . . . . . . . . . . .
13.2.1
Commands for the Barcode Scanner, Overview . . . . . . . . . . . . . . . . .
13.2.2
Commands for the Carousel, Overview . . . . . . . . . . . . . . . . . . . . . . . .
13.2.3
Commands for the Carousel NT, Overview . . . . . . . . . . . . . . . . . . . . .
13.2.4
Commands for the Hettich Centrifuge, Overview. . . . . . . . . . . . . . . . .
13.2.5
Commands for the Columbus Washer, Overview . . . . . . . . . . . . . . . .
13.2.6
Commands for the FlaskFlipper, Overview . . . . . . . . . . . . . . . . . . . . .
13.2.7
Commands for the GENios Reader, Overview . . . . . . . . . . . . . . . . . .
13.2.8
Commands for the GENios Pro Reader, Overview . . . . . . . . . . . . . . .
13.2.9
Commands for the Heated Incubator, Overview . . . . . . . . . . . . . . . . .
13.2.10
Commands for the Base Incubator, Overview . . . . . . . . . . . . . . . . . . .
13.2.11
Commands for the Room Temperature Incubator, Overview . . . . . . .
13.2.12
Commands for the Liquid Handling Arm (LiHa), Overview . . . . . . . . .
13.2.13
Commands for the Multi Channel Arm (MCA) Overview . . . . . . . . . . .
13.2.14
Commands for the MCA384 (Multi Channel Arm) Overview . . . . . . . .
13.2.15
Commands for the Magellan option, Overview . . . . . . . . . . . . . . . . . .
13.2.16
Commands for the PW384 Washer, Overview . . . . . . . . . . . . . . . . . .
13.2.17
Commands for the PW384 GP Washer, Overview . . . . . . . . . . . . . . .
13.2.18
Commands for the 96PW Washer, Overview . . . . . . . . . . . . . . . . . . .
13.2.19
Commands for the PosID-3, Overview. . . . . . . . . . . . . . . . . . . . . . . . .
13.2.20
Commands for the REMP PHS, Overview . . . . . . . . . . . . . . . . . . . . . .
13.2.21
Commands for the REMP Reatrix, Overview. . . . . . . . . . . . . . . . . . . .
13.2.22
Commands for the REMP ACD96, Overview. . . . . . . . . . . . . . . . . . . .
13.2.23
Commands for the Tube Robot, Overview. . . . . . . . . . . . . . . . . . . . . .
13.2.24
Commands for the Process Starter, Overview. . . . . . . . . . . . . . . . . . .
13.2.25
Commands for the Plate Robot, Overview. . . . . . . . . . . . . . . . . . . . . .
13.2.26
Commands for the Safire Reader, Overview . . . . . . . . . . . . . . . . . . . .
13.2.27
Commands for the Te-Shake Shaker, Overview . . . . . . . . . . . . . . . . .
13.2.28
Commands for the Symbol MS-954 Barcode Scanner, Overview . . . .
13.2.29
Commands for the Spectra Fluor Reader, Overview . . . . . . . . . . . . . .
13.2.30
Commands for the Sunrise Reader, Overview. . . . . . . . . . . . . . . . . . .
13.2.31
Commands for the Magnetic Bead Separator (Te-MagS), Overview. .
13.2.32
Commands for the Te-Stack Te-MO, Overview . . . . . . . . . . . . . . . . . .
13.2.33
Commands for the Te-Stack, Overview . . . . . . . . . . . . . . . . . . . . . . . .
13.2.34
Commands for the Vacuum Separator (Te-VacS), Overview . . . . . . .
13.2.35
Commands for the Te-MO, Overview . . . . . . . . . . . . . . . . . . . . . . . . .
13.2.36
Commands for the Ultra Reader, Overview . . . . . . . . . . . . . . . . . . . . .
13.2.37
Commands for the Ultra Evolution Reader, Overview . . . . . . . . . . . . .
13.2.38
Commands for the Process Script, Overview . . . . . . . . . . . . . . . . . . .
13.2.39
Commands for the Transfer Station, Overview . . . . . . . . . . . . . . . . . .
x
13-1
13-1
13-4
13-4
13-6
13-7
13-8
13-8
13-9
13-9
13-10
13-11
13-12
13-12
13-13
13-14
13-15
13-16
13-17
13-17
13-18
13-19
13-20
13-20
13-20
13-21
13-21
13-21
13-22
13-22
13-23
13-24
13-25
13-25
13-25
13-25
13-26
13-26
13-27
13-28
13-29
13-29
13-30
13-30
13-31
13-31
13-32
13-33
13-34
13-34
13-35
13-35
Freedom EVOware Software Manual, 393172, en, V2.3
Table of Contents
13.2.40
14
Commands for the Te-Link, Overview . . . . . . . . . . . . . . . . . . . . . . . . .
13-35
Advanced Programming Features for Scripts
14.1
Variables and Expressions in Scripts. . . . . . . . . . . . . . . . . . . . . . . . . . . . .
14-1
14.1.1
Declaring Variables in Scripts . . . . . . . . . . . . . . . . . . . . . . . . . . . . . . .
14-1
14.1.2
Script Commands That Write to Variables. . . . . . . . . . . . . . . . . . . . . .
14-2
14.1.3
Querying the Value of a Variable During Script Runtime. . . . . . . . . . .
14-3
14.1.4
Pre-Defined Variables . . . . . . . . . . . . . . . . . . . . . . . . . . . . . . . . . . . . .
14-4
14.1.5
Script Commands That Accept String Variables . . . . . . . . . . . . . . . . . 14-10
14.1.6
Mathematical Expressions . . . . . . . . . . . . . . . . . . . . . . . . . . . . . . . . . . 14-11
14.1.7
Script Commands That Accept Numeric Variables and Expressions . 14-12
14.1.8
Converting Numeric Variables and Expressions to Strings . . . . . . . . . 14-13
14.1.9
Array Variables . . . . . . . . . . . . . . . . . . . . . . . . . . . . . . . . . . . . . . . . . . 14-15
14.1.10
Script Commands That Accept Variables and Expressions Converted to a
String14-16
14.1.11
Labware Attributes and String Variables . . . . . . . . . . . . . . . . . . . . . . . 14-16
14.1.12
Validating a Script Which Contains Variables . . . . . . . . . . . . . . . . . . . 14-18
14.2
Conditions . . . . . . . . . . . . . . . . . . . . . . . . . . . . . . . . . . . . . . . . . . . . . . . . . 14-19
14.3
Sub-routines. . . . . . . . . . . . . . . . . . . . . . . . . . . . . . . . . . . . . . . . . . . . . . . . 14-19
14.3.1
Creating a Sub-Routine . . . . . . . . . . . . . . . . . . . . . . . . . . . . . . . . . . . . 14-19
14.3.2
Sub-Routine Command . . . . . . . . . . . . . . . . . . . . . . . . . . . . . . . . . . . . 14-19
14.3.3
Exchanging Data With Sub-Routines. . . . . . . . . . . . . . . . . . . . . . . . . . 14-22
14.3.4
Validating a Script Which Contains Sub-Routines . . . . . . . . . . . . . . . . 14-22
14.3.5
Log file for a Script Which Contains Sub-Routines . . . . . . . . . . . . . . . 14-23
14.4
Loop Options . . . . . . . . . . . . . . . . . . . . . . . . . . . . . . . . . . . . . . . . . . . . . . . 14-23
Freedom EVOware Software Manual, 393172, en, V2.3
xi
Table of Contents
xii
15
Script Commands
15.1
15.2
15.3
15.4
15.5
15.6
15.7
15.8
15.9
15.10
15.11
15.12
15.13
15.14
15.15
15.16
15.17
15.18
15.19
15.20
15.21
15.22
15.23
15.24
15.24.1
15.24.2
15.24.3
15.24.4
15.24.5
15.24.6
15.24.7
15.25
15.26
15.26.1
15.26.2
15.26.3
15.26.4
15.27
15.27.1
15.28
15.28.1
15.28.2
15.28.3
15.28.4
15.29
15.29.1
15.29.2
15.29.3
15.29.4
15.29.5
15.30
15.30.1
Aspirate Command . . . . . . . . . . . . . . . . . . . . . . . . . . . . . . . . . . . . . . . . . .
Dispense Command . . . . . . . . . . . . . . . . . . . . . . . . . . . . . . . . . . . . . . . . .
Mix Command . . . . . . . . . . . . . . . . . . . . . . . . . . . . . . . . . . . . . . . . . . . . . .
Wash Tips Command . . . . . . . . . . . . . . . . . . . . . . . . . . . . . . . . . . . . . . . .
Periodic Wash Command . . . . . . . . . . . . . . . . . . . . . . . . . . . . . . . . . . . . .
Activate DITI Handling Command . . . . . . . . . . . . . . . . . . . . . . . . . . . . . . .
Get DITIs Command . . . . . . . . . . . . . . . . . . . . . . . . . . . . . . . . . . . . . . . . .
Drop DITIs Command . . . . . . . . . . . . . . . . . . . . . . . . . . . . . . . . . . . . . . . .
Set DITI Position Command . . . . . . . . . . . . . . . . . . . . . . . . . . . . . . . . . . .
Pick Up DITIs Command . . . . . . . . . . . . . . . . . . . . . . . . . . . . . . . . . . . . . .
Set DITIs Back Command . . . . . . . . . . . . . . . . . . . . . . . . . . . . . . . . . . . . .
Pickup ZipTip Command . . . . . . . . . . . . . . . . . . . . . . . . . . . . . . . . . . . . . .
Detect Liquid Command . . . . . . . . . . . . . . . . . . . . . . . . . . . . . . . . . . . . . .
Te-Fill Aspirate Command . . . . . . . . . . . . . . . . . . . . . . . . . . . . . . . . . . . . .
Te-Fill Dispense Command . . . . . . . . . . . . . . . . . . . . . . . . . . . . . . . . . . . .
Te-Fill Prime Command . . . . . . . . . . . . . . . . . . . . . . . . . . . . . . . . . . . . . .
Te-Fill Switch Valve Command . . . . . . . . . . . . . . . . . . . . . . . . . . . . . . . . .
Activate PMP Command . . . . . . . . . . . . . . . . . . . . . . . . . . . . . . . . . . . . . .
Deactivate PMP Command . . . . . . . . . . . . . . . . . . . . . . . . . . . . . . . . . . . .
Tip Alignment Check Command . . . . . . . . . . . . . . . . . . . . . . . . . . . . . . . .
Move LiHa Command . . . . . . . . . . . . . . . . . . . . . . . . . . . . . . . . . . . . . . . .
Waste Command . . . . . . . . . . . . . . . . . . . . . . . . . . . . . . . . . . . . . . . . . . . .
Active WashStation Command . . . . . . . . . . . . . . . . . . . . . . . . . . . . . . . . .
Worklist Command . . . . . . . . . . . . . . . . . . . . . . . . . . . . . . . . . . . . . . . . . .
Decontamination Wash Settings . . . . . . . . . . . . . . . . . . . . . . . . . . . . .
Worklist File Format . . . . . . . . . . . . . . . . . . . . . . . . . . . . . . . . . . . . . . .
Worklist Examples Using Labware Labels . . . . . . . . . . . . . . . . . . . . . .
Worklist Examples Using Labware Barcodes . . . . . . . . . . . . . . . . . . .
Worklist Examples Using Tube Barcodes . . . . . . . . . . . . . . . . . . . . . .
Worklist Examples for the Reagent Distribution Record . . . . . . . . . . .
Advanced Worklists . . . . . . . . . . . . . . . . . . . . . . . . . . . . . . . . . . . . . . .
Worklist Import Command . . . . . . . . . . . . . . . . . . . . . . . . . . . . . . . . . . . . .
Export Data Command . . . . . . . . . . . . . . . . . . . . . . . . . . . . . . . . . . . . . . .
File Names for Labware Report Files. . . . . . . . . . . . . . . . . . . . . . . . . .
Simulated Barcodes for the Export Data Command . . . . . . . . . . . . . .
Report File Format . . . . . . . . . . . . . . . . . . . . . . . . . . . . . . . . . . . . . . . .
Pooling balance data in report files . . . . . . . . . . . . . . . . . . . . . . . . . . .
Manual Tip Alignment Command . . . . . . . . . . . . . . . . . . . . . . . . . . . . . . .
Tip Alignment Results . . . . . . . . . . . . . . . . . . . . . . . . . . . . . . . . . . . . .
Copy Plate Wizard . . . . . . . . . . . . . . . . . . . . . . . . . . . . . . . . . . . . . . . . . . .
Copy Plate Wizard, Step 1 of 4 . . . . . . . . . . . . . . . . . . . . . . . . . . . . . .
Copy Plate Wizard, Step 2 of 4 . . . . . . . . . . . . . . . . . . . . . . . . . . . . . .
Copy Plate Wizard, Step 3 of 4 . . . . . . . . . . . . . . . . . . . . . . . . . . . . . .
Copy Plate Wizard, Step 4 of 4 . . . . . . . . . . . . . . . . . . . . . . . . . . . . . .
Replicates Wizard . . . . . . . . . . . . . . . . . . . . . . . . . . . . . . . . . . . . . . . . . . .
Replicates Wizard, Step 1 of 5. . . . . . . . . . . . . . . . . . . . . . . . . . . . . . .
Replicates Wizard, Step 2 of 5 . . . . . . . . . . . . . . . . . . . . . . . . . . . . . .
Replicates Wizard, Step 3 of 5 . . . . . . . . . . . . . . . . . . . . . . . . . . . . . .
Replicates Wizard, Step 4 of 5 . . . . . . . . . . . . . . . . . . . . . . . . . . . . . .
Replicates Wizard, Step 5 of 5 . . . . . . . . . . . . . . . . . . . . . . . . . . . . . .
Serial Dilution Wizard . . . . . . . . . . . . . . . . . . . . . . . . . . . . . . . . . . . . . . . .
Serial Dilution Wizard, Step 1 of 6 . . . . . . . . . . . . . . . . . . . . . . . . . . . .
15-1
15-3
15-5
15-8
15-10
15-12
15-13
15-14
15-15
15-16
15-18
15-19
15-20
15-22
15-24
15-26
15-28
15-29
15-30
15-30
15-33
15-35
15-36
15-36
15-39
15-39
15-43
15-44
15-45
15-45
15-46
15-46
15-48
15-50
15-50
15-50
15-56
15-57
15-58
15-59
15-59
15-60
15-62
15-62
15-63
15-64
15-65
15-66
15-68
15-69
15-69
15-70
Freedom EVOware Software Manual, 393172, en, V2.3
Table of Contents
15.30.2
15.30.3
15.30.4
15.30.5
15.30.6
15.31
15.31.1
15.31.2
15.31.3
15.31.4
15.31.5
15.31.6
15.31.7
15.32
15.32.1
15.32.2
15.32.3
15.32.4
15.33
15.33.1
15.33.2
15.33.3
15.33.4
15.34
15.35
15.35.1
15.36
15.37
15.38
15.38.1
15.39
15.40
15.41
15.41.1
15.41.2
15.42
15.42.1
15.42.2
Serial Dilution Wizard, Step 2 of 6 . . . . . . . . . . . . . . . . . . . . . . . . . . . 15-72
Serial Dilution Wizard, Step 3 of 6 . . . . . . . . . . . . . . . . . . . . . . . . . . . 15-73
Serial Dilution Wizard, Step 4 of 6 . . . . . . . . . . . . . . . . . . . . . . . . . . . 15-75
Serial Dilution Wizard, Step 5 of 6 . . . . . . . . . . . . . . . . . . . . . . . . . . . 15-76
Serial Dilution Wizard, Step 6 of 6 . . . . . . . . . . . . . . . . . . . . . . . . . . . 15-77
Merge Plates Wizard . . . . . . . . . . . . . . . . . . . . . . . . . . . . . . . . . . . . . . . . . 15-77
Merge Plates Wizard, Step 1 of 7 . . . . . . . . . . . . . . . . . . . . . . . . . . . . 15-78
Merge Plates Wizard, Step 2 of 7 . . . . . . . . . . . . . . . . . . . . . . . . . . . . 15-79
Merge Plates Wizard, Step 3 of 7 . . . . . . . . . . . . . . . . . . . . . . . . . . . . 15-80
Merge Plates Wizard, Step 4 of 7 . . . . . . . . . . . . . . . . . . . . . . . . . . . . 15-81
Merge Plates Wizard, Step 5 of 7 . . . . . . . . . . . . . . . . . . . . . . . . . . . . 15-83
Merge Plates Wizard, Step 6 of 7 . . . . . . . . . . . . . . . . . . . . . . . . . . . . 15-84
Merge Plates Wizard, Step 7 of 7 . . . . . . . . . . . . . . . . . . . . . . . . . . . . 15-85
Transfer Wizard . . . . . . . . . . . . . . . . . . . . . . . . . . . . . . . . . . . . . . . . . . . . . 15-85
Transfer Wizard, Step 1 of 4 . . . . . . . . . . . . . . . . . . . . . . . . . . . . . . . . 15-86
Transfer Wizard, Step 2 of 4 . . . . . . . . . . . . . . . . . . . . . . . . . . . . . . . . 15-87
Transfer Wizard, Step 3 of 4 . . . . . . . . . . . . . . . . . . . . . . . . . . . . . . . . 15-89
Transfer Wizard, Step 4 of 4 . . . . . . . . . . . . . . . . . . . . . . . . . . . . . . . . 15-90
MCA Merge Plate Wizard . . . . . . . . . . . . . . . . . . . . . . . . . . . . . . . . . . . . . 15-90
MCA Merge Plate Wizard, Step 1 of 4 . . . . . . . . . . . . . . . . . . . . . . . . . 15-90
MCA Merge Plate Wizard, Step 2 of 4 . . . . . . . . . . . . . . . . . . . . . . . . 15-92
MCA Merge Plate wizard, Step 3 of 4 . . . . . . . . . . . . . . . . . . . . . . . . . 15-93
MCA Merge Plate wizard, Step 4 of 4 . . . . . . . . . . . . . . . . . . . . . . . . . 15-94
Start Timer Command . . . . . . . . . . . . . . . . . . . . . . . . . . . . . . . . . . . . . . . . 15-95
Wait for Timer Command . . . . . . . . . . . . . . . . . . . . . . . . . . . . . . . . . . . . . 15-95
Wait for Timer Message Box . . . . . . . . . . . . . . . . . . . . . . . . . . . . . . . . 15-96
Execute Application Command . . . . . . . . . . . . . . . . . . . . . . . . . . . . . . . . . 15-96
Comment Command . . . . . . . . . . . . . . . . . . . . . . . . . . . . . . . . . . . . . . . . . 15-97
User Prompt Command . . . . . . . . . . . . . . . . . . . . . . . . . . . . . . . . . . . . . . 15-98
User Prompt Message Box . . . . . . . . . . . . . . . . . . . . . . . . . . . . . . . . . 15-99
Begin Loop Command . . . . . . . . . . . . . . . . . . . . . . . . . . . . . . . . . . . . . . . 15-100
End Loop Command . . . . . . . . . . . . . . . . . . . . . . . . . . . . . . . . . . . . . . . . . 15-100
Set Variable Command . . . . . . . . . . . . . . . . . . . . . . . . . . . . . . . . . . . . . . . 15-101
Set Variable, Operator Prompt. . . . . . . . . . . . . . . . . . . . . . . . . . . . . . . 15-102
Set Variable - User Query At Script Start. . . . . . . . . . . . . . . . . . . . . . . 15-103
Import Variable Command . . . . . . . . . . . . . . . . . . . . . . . . . . . . . . . . . . . . 15-103
Import Variable Default Values Dialog Box . . . . . . . . . . . . . . . . . . . . . 15-106
Field Separator for the Import Variable and Export Variable Commands 15-
Freedom EVOware Software Manual, 393172, en, V2.3
xiii
Table of Contents
107
15.43 Export Variable Command . . . . . . . . . . . . . . . . . . . . . . . . . . . . . . . . . . . .
15.44 Condition Command . . . . . . . . . . . . . . . . . . . . . . . . . . . . . . . . . . . . . . . . .
15.45 If - Then Command . . . . . . . . . . . . . . . . . . . . . . . . . . . . . . . . . . . . . . . . . .
15.46 Else Command. . . . . . . . . . . . . . . . . . . . . . . . . . . . . . . . . . . . . . . . . . . . . .
15.47 End If Command . . . . . . . . . . . . . . . . . . . . . . . . . . . . . . . . . . . . . . . . . . . .
15.48 Group Command . . . . . . . . . . . . . . . . . . . . . . . . . . . . . . . . . . . . . . . . . . . .
15.49 Sub-Routine Command . . . . . . . . . . . . . . . . . . . . . . . . . . . . . . . . . . . . . . .
15.50 Execute VB Script Command . . . . . . . . . . . . . . . . . . . . . . . . . . . . . . . . . .
15.50.1
Menu Items for VB Scripts . . . . . . . . . . . . . . . . . . . . . . . . . . . . . . . . . .
15.51 Notification Command . . . . . . . . . . . . . . . . . . . . . . . . . . . . . . . . . . . . . . . .
15.52 Start Script Command . . . . . . . . . . . . . . . . . . . . . . . . . . . . . . . . . . . . . . . .
15.53 On Error Goto Command . . . . . . . . . . . . . . . . . . . . . . . . . . . . . . . . . . . . .
15.54 Resume Command . . . . . . . . . . . . . . . . . . . . . . . . . . . . . . . . . . . . . . . . . .
15.55 End Script Command . . . . . . . . . . . . . . . . . . . . . . . . . . . . . . . . . . . . . . . .
15.56 Te-MO Commands. . . . . . . . . . . . . . . . . . . . . . . . . . . . . . . . . . . . . . . . . . .
15.56.1
Te-MO Aspirate Command . . . . . . . . . . . . . . . . . . . . . . . . . . . . . . . . .
15.56.2
Te-MO Dispense Command . . . . . . . . . . . . . . . . . . . . . . . . . . . . . . . .
15.56.3
Te-MO Mix Command . . . . . . . . . . . . . . . . . . . . . . . . . . . . . . . . . . . . .
15.56.4
Te-MO Wash Command . . . . . . . . . . . . . . . . . . . . . . . . . . . . . . . . . . .
15.56.5
Te-MO 384 Wash Tip Head Command . . . . . . . . . . . . . . . . . . . . . . . .
15.56.6
Te-MO Get DITIs Command . . . . . . . . . . . . . . . . . . . . . . . . . . . . . . . .
15.56.7
Te-MO Drop DITIs Command . . . . . . . . . . . . . . . . . . . . . . . . . . . . . . .
15.56.8
Te-MO Get Tip Block Command . . . . . . . . . . . . . . . . . . . . . . . . . . . . .
15.56.9
Te-MO Drop Tip Block Command . . . . . . . . . . . . . . . . . . . . . . . . . . . .
15.56.10 Te-MO Refill Trough Command . . . . . . . . . . . . . . . . . . . . . . . . . . . . .
15.56.11 Te-MO Relative Movements Command . . . . . . . . . . . . . . . . . . . . . . .
15.56.12 Load the Te-MO Command . . . . . . . . . . . . . . . . . . . . . . . . . . . . . . . .
15.56.13 Fill system (Te-MO 384) Command . . . . . . . . . . . . . . . . . . . . . . . . . .
15.57 Move RoMa Command . . . . . . . . . . . . . . . . . . . . . . . . . . . . . . . . . . . . . . .
15.58 RoMa Vector Command . . . . . . . . . . . . . . . . . . . . . . . . . . . . . . . . . . . . . .
15.58.1
Moving labware with the RoMa Vector command . . . . . . . . . . . . . . . .
15.59 Transfer Labware Command . . . . . . . . . . . . . . . . . . . . . . . . . . . . . . . . . . .
15.60 Move PnP Command . . . . . . . . . . . . . . . . . . . . . . . . . . . . . . . . . . . . . . . .
15.61 PnP Vector Command . . . . . . . . . . . . . . . . . . . . . . . . . . . . . . . . . . . . . . . .
15.61.1
Moving tubes with the PnP Vector command . . . . . . . . . . . . . . . . . . .
15.62 Transfer Tube Command . . . . . . . . . . . . . . . . . . . . . . . . . . . . . . . . . . . . .
15.63 PosID Command . . . . . . . . . . . . . . . . . . . . . . . . . . . . . . . . . . . . . . . . . . . .
15.63.1
PosID Command (Barcode Types Tab) . . . . . . . . . . . . . . . . . . . . . . .
15.64 Waterbath Control Command . . . . . . . . . . . . . . . . . . . . . . . . . . . . . . . . . .
15.65 Balance Command . . . . . . . . . . . . . . . . . . . . . . . . . . . . . . . . . . . . . . . . . .
15.66 Balance Send Command Command . . . . . . . . . . . . . . . . . . . . . . . . . . . . .
15.67 Send Command Command . . . . . . . . . . . . . . . . . . . . . . . . . . . . . . . . . . . .
15.68 MCA96 Commands . . . . . . . . . . . . . . . . . . . . . . . . . . . . . . . . . . . . . . . . . .
15.68.1
MCA96 Aspirate Command . . . . . . . . . . . . . . . . . . . . . . . . . . . . . . . .
15.68.2
MCA96 Dispense Command . . . . . . . . . . . . . . . . . . . . . . . . . . . . . . . .
15.68.3
MCA96 Mix Command . . . . . . . . . . . . . . . . . . . . . . . . . . . . . . . . . . . .
15.68.4
MCA96 Wash Command . . . . . . . . . . . . . . . . . . . . . . . . . . . . . . . . . .
15.68.5
MCA96 Get DITIs Command . . . . . . . . . . . . . . . . . . . . . . . . . . . . . . .
15.68.6
MCA96 Drop DITIs Command . . . . . . . . . . . . . . . . . . . . . . . . . . . . . .
15.68.7
MCA96 Get Tip Block Command . . . . . . . . . . . . . . . . . . . . . . . . . . . .
15.68.8
MCA96 Drop Tip Block Command . . . . . . . . . . . . . . . . . . . . . . . . . . .
15.68.9
MCA96 Relative Movements Command . . . . . . . . . . . . . . . . . . . . . . .
xiv
15-107
15-109
15-111
15-111
15-112
15-112
15-113
15-114
15-116
15-116
15-117
15-118
15-119
15-120
15-121
15-122
15-124
15-125
15-127
15-130
15-132
15-133
15-134
15-135
15-135
15-136
15-138
15-138
15-140
15-141
15-142
15-143
15-145
15-146
15-148
15-148
15-150
15-153
15-154
15-155
15-157
15-158
15-159
15-159
15-161
15-162
15-164
15-167
15-168
15-170
15-171
15-171
Freedom EVOware Software Manual, 393172, en, V2.3
Table of Contents
15.68.10
MCA96 Move Command . . . . . . . . . . . . . . . . . . . . . . . . . . . . . . . . . . .
15.68.11
MCA96 Vector Command . . . . . . . . . . . . . . . . . . . . . . . . . . . . . . . . . .
15.68.12
MCA96 Transfer Labware Command . . . . . . . . . . . . . . . . . . . . . . . . .
15.69 MCA384 Commands . . . . . . . . . . . . . . . . . . . . . . . . . . . . . . . . . . . . . . . . .
15.69.1
Overview of MCA384 head adapters . . . . . . . . . . . . . . . . . . . . . . . . . .
15.69.2
MCA384 Aspirate Command . . . . . . . . . . . . . . . . . . . . . . . . . . . . . . .
15.69.3
MCA384 Dispense Command . . . . . . . . . . . . . . . . . . . . . . . . . . . . . .
15.69.4
MCA384 Mix Command . . . . . . . . . . . . . . . . . . . . . . . . . . . . . . . . . . .
15.69.5
MCA384 Wash Command . . . . . . . . . . . . . . . . . . . . . . . . . . . . . . . . .
15.69.6
MCA384 Get Head Adapter Command . . . . . . . . . . . . . . . . . . . . . . .
15.69.7
MCA384 Drop Head Adapter Command . . . . . . . . . . . . . . . . . . . . . .
15.69.8
MCA384 Get DITIs Command . . . . . . . . . . . . . . . . . . . . . . . . . . . . . .
15.69.9
MCA384 Drop DITIs Command . . . . . . . . . . . . . . . . . . . . . . . . . . . . .
15.69.10
MCA384 Move Command . . . . . . . . . . . . . . . . . . . . . . . . . . . . . . . . . .
15.69.11
MCA384 Vector Command . . . . . . . . . . . . . . . . . . . . . . . . . . . . . . . . .
15.69.12
MCA384 Transfer Labware Command . . . . . . . . . . . . . . . . . . . . . . . .
15.69.13
MCA384 Dock CGM Command. . . . . . . . . . . . . . . . . . . . . . . . . . . . . .
15.69.14
MCA384 Undock CGM Command . . . . . . . . . . . . . . . . . . . . . . . . . . .
15.70 CNS SendNotification command . . . . . . . . . . . . . . . . . . . . . . . . . . . . . . . .
Freedom EVOware Software Manual, 393172, en, V2.3
15-174
15-175
15-177
15-179
15-180
15-181
15-183
15-185
15-187
15-189
15-190
15-191
15-194
15-198
15-199
15-201
15-204
15-204
15-205
xv
Table of Contents
xvi
16
Device Commands
16.1
16.2
16.2.1
16.3
16.3.1
16.3.2
16.3.3
16.3.4
16.3.5
16.3.6
16.3.7
16.3.8
16.3.9
16.3.10
16.3.11
16.3.12
16.3.13
16.4
16.4.1
16.4.2
16.4.3
16.4.4
16.4.5
16.4.6
16.4.7
16.4.8
16.4.9
16.4.10
16.4.11
16.4.12
16.4.13
16.4.14
16.4.15
16.4.16
16.5
16.5.1
16.5.2
16.5.3
16.5.4
16.5.5
16.6
16.6.1
16.6.2
16.6.3
16.6.4
16.6.5
16.6.6
16.6.7
16.6.8
16.6.9
16.6.10
16.6.11
Service Functions. . . . . . . . . . . . . . . . . . . . . . . . . . . . . . . . . . . . . . . . . . . .
Commands for the Symbol LS-1220 Barcode Scanner . . . . . . . . . . . . . . .
Barcode Scanner - Read Barcode Command . . . . . . . . . . . . . . . . . . .
Commands for the Carousel . . . . . . . . . . . . . . . . . . . . . . . . . . . . . . . . . . .
Carousel - PresentPlate Command . . . . . . . . . . . . . . . . . . . . . . . . . . .
Carousel - PreReturnPlateByBC Command . . . . . . . . . . . . . . . . . . . .
Carousel - ReturnPlate Command . . . . . . . . . . . . . . . . . . . . . . . . . . . .
Carousel - ReturnPlateByBarcode Command . . . . . . . . . . . . . . . . . . .
Carousel - ReadAllBarcodes command . . . . . . . . . . . . . . . . . . . . . . . .
Carousel - InitCarousel Command. . . . . . . . . . . . . . . . . . . . . . . . . . . .
Carousel - MoveToCartridge Command . . . . . . . . . . . . . . . . . . . . . . .
Carousel - EndAccess Command . . . . . . . . . . . . . . . . . . . . . . . . . . . .
Carousel - ReadPlatesInCartridge Command . . . . . . . . . . . . . . . . . . .
Carousel - PresentPlateByBarcode Command . . . . . . . . . . . . . . . . . .
Carousel - PrePresentPlate Command . . . . . . . . . . . . . . . . . . . . . . . .
Carousel - UndoPrePresent Command . . . . . . . . . . . . . . . . . . . . . . . .
Carousel - LoadBCFromFile Command . . . . . . . . . . . . . . . . . . . . . . .
Commands for the Carousel NT . . . . . . . . . . . . . . . . . . . . . . . . . . . . . . . .
Carousel NT - OpenDoorlock command . . . . . . . . . . . . . . . . . . . . . . .
Carousel NT - CloseDoorlock command . . . . . . . . . . . . . . . . . . . . . . .
Carousel NT - VerifyCartridges command . . . . . . . . . . . . . . . . . . . . . .
Carousel NT - ScanAllCartridges command . . . . . . . . . . . . . . . . . . . .
Carousel NT - ScanCartridge Command . . . . . . . . . . . . . . . . . . . . . . .
Carousel NT - ScanLocation Command . . . . . . . . . . . . . . . . . . . . . . .
Carousel NT - PresentPlate Command . . . . . . . . . . . . . . . . . . . . . . . .
Carousel NT - ReturnPlate Command . . . . . . . . . . . . . . . . . . . . . . . . .
Carousel NT - PresentPlateByBC Command . . . . . . . . . . . . . . . . . . .
Carousel NT - ReturnPlateByBC Command . . . . . . . . . . . . . . . . . . . .
Carousel NT - MoveToCartridge Command . . . . . . . . . . . . . . . . . . . .
Carousel NT - Initialize Command . . . . . . . . . . . . . . . . . . . . . . . . . . . .
Carousel NT - Shutdown Command . . . . . . . . . . . . . . . . . . . . . . . . . .
Carousel NT - PrePresentPlate Command . . . . . . . . . . . . . . . . . . . . .
Carousel NT - UndoPrePresent Command . . . . . . . . . . . . . . . . . . . . .
Carousel NT - LoadBCFromFile Command . . . . . . . . . . . . . . . . . . . .
Commands for the Hettich Centrifuge . . . . . . . . . . . . . . . . . . . . . . . . . . . .
Hettich Centrifuge - Init Command. . . . . . . . . . . . . . . . . . . . . . . . . . . .
Hettich Centrifuge - Open Command. . . . . . . . . . . . . . . . . . . . . . . . . .
Hettich Centrifuge - Close Command . . . . . . . . . . . . . . . . . . . . . . . . .
Hettich Centrifuge - ExecuteN Command . . . . . . . . . . . . . . . . . . . . . .
Hettich Centrifuge - MoveToPos Command . . . . . . . . . . . . . . . . . . . .
Commands for the Columbus Washer . . . . . . . . . . . . . . . . . . . . . . . . . . . .
Columbus Washer - WashPlate command . . . . . . . . . . . . . . . . . . . . .
Columbus Washer - Prime Command . . . . . . . . . . . . . . . . . . . . . . . . .
Columbus Washer- Rinse Command. . . . . . . . . . . . . . . . . . . . . . . . . .
Columbus Washer - Remote Command . . . . . . . . . . . . . . . . . . . . . . .
Columbus Washer - ExitRemote Command . . . . . . . . . . . . . . . . . . . .
Columbus Washer - Status Command. . . . . . . . . . . . . . . . . . . . . . . . .
Columbus Washer - Init Command . . . . . . . . . . . . . . . . . . . . . . . . . . .
Columbus Washer - StopRinse Command . . . . . . . . . . . . . . . . . . . . .
Columbus Washer - StartProg Command . . . . . . . . . . . . . . . . . . . . . .
Columbus Washer - WashPlateEx Command . . . . . . . . . . . . . . . . . .
Columbus Washer - DisableAutoPrime Command . . . . . . . . . . . . . . .
16-1
16-1
16-2
16-2
16-2
16-3
16-3
16-4
16-5
16-5
16-5
16-6
16-6
16-7
16-7
16-8
16-8
16-8
16-9
16-9
16-9
16-9
16-10
16-10
16-11
16-12
16-13
16-14
16-14
16-15
16-15
16-15
16-16
16-16
16-16
16-16
16-17
16-17
16-17
16-18
16-19
16-19
16-22
16-23
16-24
16-24
16-24
16-24
16-25
16-25
16-26
16-29
Freedom EVOware Software Manual, 393172, en, V2.3
Table of Contents
16.6.12
16.7
16.7.1
16.7.2
16.7.3
16.7.4
16.7.5
16.8
16.8.1
16.8.2
16.8.3
16.8.4
16.8.5
16.8.6
16.8.7
16.9
16.9.1
16.9.2
16.9.3
16.9.4
16.9.5
16.9.6
16.9.7
16.9.8
16.9.9
16.10
16.10.1
16.10.2
16.10.3
16.10.4
16.10.5
16.10.6
16.10.7
16.11
16.11.1
16.12
16.12.1
16.13
16.13.1
16.13.2
16.14
16.14.1
16.15
16.15.1
16.16
16.16.1
16.16.2
16.16.3
16.16.4
16.16.5
16.16.6
16.17
16.17.1
Columbus Washer - AllowAutoPrime Command . . . . . . . . . . . . . . . . .
Commands for the FlaskFlipper . . . . . . . . . . . . . . . . . . . . . . . . . . . . . . . .
FlaskFlipper - ExecuteScript Command . . . . . . . . . . . . . . . . . . . . . . .
FlaskFlipper - LoadUnloadFlask Command. . . . . . . . . . . . . . . . . . . . .
FlaskFlipper - PrepareForPipette Command . . . . . . . . . . . . . . . . . . . .
FlaskFlipper - Shake Command . . . . . . . . . . . . . . . . . . . . . . . . . . . . .
FlaskFlipper - Knock Command. . . . . . . . . . . . . . . . . . . . . . . . . . . . . .
Commands for the GENios Reader . . . . . . . . . . . . . . . . . . . . . . . . . . . . . .
GENios Reader - Status Command. . . . . . . . . . . . . . . . . . . . . . . . . . .
GENios Reader - Excitation Out Command. . . . . . . . . . . . . . . . . . . . .
GENios Reader - Emission Out Command . . . . . . . . . . . . . . . . . . . . .
GENios Reader - Open Command . . . . . . . . . . . . . . . . . . . . . . . . . . .
GENios Reader - Close Command . . . . . . . . . . . . . . . . . . . . . . . . . . .
GENios Reader - Measure Command . . . . . . . . . . . . . . . . . . . . . . . . .
GENios Reader - Multilabel Command . . . . . . . . . . . . . . . . . . . . . . . .
Commands for the GENios Pro Reader. . . . . . . . . . . . . . . . . . . . . . . . . . .
GENios Pro Reader - Status Command . . . . . . . . . . . . . . . . . . . . . . .
GENios Pro Reader - Excitation Out Command . . . . . . . . . . . . . . . . .
GENios Pro Reader - Emission Out Command . . . . . . . . . . . . . . . . . .
GENios Pro Reader - Open Command . . . . . . . . . . . . . . . . . . . . . . . .
GENios Pro Reader - Close Command . . . . . . . . . . . . . . . . . . . . . . . .
GENios Pro Reader - Measure Command . . . . . . . . . . . . . . . . . . . . .
GENios Pro Reader - Multilabel Command . . . . . . . . . . . . . . . . . . . . .
GENios Pro Reader - PrimeManual Command . . . . . . . . . . . . . . . . . .
GENios Pro Reader - DispenseManual Command . . . . . . . . . . . . . . .
Commands for the Heated Incubator . . . . . . . . . . . . . . . . . . . . . . . . . . . .
Heated Incubator - Incubate Command. . . . . . . . . . . . . . . . . . . . . . . .
Heated Incubator - CloseDoor Command . . . . . . . . . . . . . . . . . . . . . .
Heated Incubator - StartShaker Command . . . . . . . . . . . . . . . . . . . . .
Heated Incubator - StopShaker Command . . . . . . . . . . . . . . . . . . . . .
Heated Incubator - InsertPlate Command . . . . . . . . . . . . . . . . . . . . .
Heated Incubator - RemovePlate Command . . . . . . . . . . . . . . . . . . . .
Heated Incubator - SetTemperature Command . . . . . . . . . . . . . . . . .
Commands for the Base Incubator . . . . . . . . . . . . . . . . . . . . . . . . . . . . . .
Base Incubator - BaseIncubate Command . . . . . . . . . . . . . . . . . . . . .
Commands for the Room Temperature Incubator . . . . . . . . . . . . . . . . . .
Room Temperature Incubator - Incubate Command . . . . . . . . . . . . . .
Commands for the Liquid Handling Arm . . . . . . . . . . . . . . . . . . . . . . . . . .
Liquid Handling Arm - Flush RSP Command . . . . . . . . . . . . . . . . . . .
Liquid Handling Arm - Pipette Command. . . . . . . . . . . . . . . . . . . . . . .
Commands for the MCA96. . . . . . . . . . . . . . . . . . . . . . . . . . . . . . . . . . . . .
MCA96 - Pipette Command . . . . . . . . . . . . . . . . . . . . . . . . . . . . . . . . .
Commands for the MCA384. . . . . . . . . . . . . . . . . . . . . . . . . . . . . . . . . . . .
MCA384 - Pipette Command . . . . . . . . . . . . . . . . . . . . . . . . . . . . . . . .
Commands for the Magellan option . . . . . . . . . . . . . . . . . . . . . . . . . . . . . .
Magellan - Status Command . . . . . . . . . . . . . . . . . . . . . . . . . . . . . . . .
Magellan - Excitation Out Command . . . . . . . . . . . . . . . . . . . . . . . . . .
Magellan - Emission Out Command . . . . . . . . . . . . . . . . . . . . . . . . . .
Magellan - Open Command. . . . . . . . . . . . . . . . . . . . . . . . . . . . . . . . .
Magellan - Close Command . . . . . . . . . . . . . . . . . . . . . . . . . . . . . . . .
Magellan - Measure Command . . . . . . . . . . . . . . . . . . . . . . . . . . . . . .
Commands for the PW384 Washer . . . . . . . . . . . . . . . . . . . . . . . . . . . . . .
PW384 Washer - Status Command. . . . . . . . . . . . . . . . . . . . . . . . . . .
Freedom EVOware Software Manual, 393172, en, V2.3
16-29
16-29
16-30
16-30
16-31
16-31
16-32
16-32
16-33
16-33
16-33
16-33
16-33
16-34
16-34
16-36
16-36
16-36
16-36
16-37
16-37
16-37
16-38
16-39
16-39
16-39
16-40
16-40
16-41
16-41
16-41
16-42
16-43
16-44
16-44
16-45
16-45
16-46
16-46
16-47
16-47
16-48
16-48
16-48
16-48
16-48
16-49
16-49
16-49
16-49
16-49
16-51
16-52
xvii
Table of Contents
16.17.2
16.17.3
16.17.4
16.17.5
16.17.6
16.18
16.18.1
16.18.2
16.18.3
16.18.4
16.18.5
16.18.6
16.18.7
16.18.8
16.18.9
16.19
16.19.1
16.19.2
16.19.3
16.19.4
16.19.5
16.19.6
16.19.7
16.19.8
16.20
16.20.1
16.20.2
16.21
16.21.1
16.22
16.22.1
16.22.2
16.23
16.23.1
16.23.2
16.24
16.24.1
16.24.2
16.25
16.25.1
16.26
16.26.1
16.26.2
16.26.3
16.26.4
16.26.5
16.26.6
16.26.7
16.26.8
16.26.9
16.27
16.27.1
16.27.2
xviii
PW384 Washer - Prime Command . . . . . . . . . . . . . . . . . . . . . . . . . . .
PW384 Washer - Rinse Command . . . . . . . . . . . . . . . . . . . . . . . . . . .
PW384 Washer - Wash Command . . . . . . . . . . . . . . . . . . . . . . . . . . .
PW384 Washer - Stop Command . . . . . . . . . . . . . . . . . . . . . . . . . . . .
PW384 Washer - PrepareEmptyWaste Command . . . . . . . . . . . . . . .
Commands for the PW384GP Washer . . . . . . . . . . . . . . . . . . . . . . . . . . .
PW384GP Washer - Aspirate Command . . . . . . . . . . . . . . . . . . . . . .
PW384GP Washer - Dispense Command . . . . . . . . . . . . . . . . . . . . .
PW384GP Washer - Prime Command . . . . . . . . . . . . . . . . . . . . . . . .
PW384GP Washer - Rinse Command . . . . . . . . . . . . . . . . . . . . . . . .
PW384GP Washer - Stop Command. . . . . . . . . . . . . . . . . . . . . . . . . .
PW384GP Washer - PrepareEmptyWaste Command . . . . . . . . . . . . .
PW384GP Washer - DownloadWash Command . . . . . . . . . . . . . . . .
PW384GP Washer - StartWash Command . . . . . . . . . . . . . . . . . . . .
PW384GP Washer - Wash Command . . . . . . . . . . . . . . . . . . . . . . . .
Commands for the 96PW Washer . . . . . . . . . . . . . . . . . . . . . . . . . . . . . . .
96PW Washer - WashPlate Command . . . . . . . . . . . . . . . . . . . . . . . .
96PW Washer - Dispense Command . . . . . . . . . . . . . . . . . . . . . . . . .
96PW Washer - Aspirate Command . . . . . . . . . . . . . . . . . . . . . . . . . .
96PW Washer - Prime Command . . . . . . . . . . . . . . . . . . . . . . . . . . . .
96PW Washer - Rinse Command . . . . . . . . . . . . . . . . . . . . . . . . . . . .
96PW Washer - Remote Command. . . . . . . . . . . . . . . . . . . . . . . . . . .
96PW Washer - ExitRemote Command. . . . . . . . . . . . . . . . . . . . . . . .
96PW Washer - Status Command . . . . . . . . . . . . . . . . . . . . . . . . . . . .
Commands for the PosID-3 . . . . . . . . . . . . . . . . . . . . . . . . . . . . . . . . . . . .
PosID-3 - Initialize Command . . . . . . . . . . . . . . . . . . . . . . . . . . . . . . .
PosID-3 - Scan Command . . . . . . . . . . . . . . . . . . . . . . . . . . . . . . . . .
Commands for the REMP PHS . . . . . . . . . . . . . . . . . . . . . . . . . . . . . . . . .
REMP PHS - SealPlate Command . . . . . . . . . . . . . . . . . . . . . . . . . . .
Commands for the REMP Reatrix . . . . . . . . . . . . . . . . . . . . . . . . . . . . . . .
REMP Reatrix - Read Command . . . . . . . . . . . . . . . . . . . . . . . . . . . . .
REMP Reatrix - Initialize Command. . . . . . . . . . . . . . . . . . . . . . . . . . .
Commands for the REMP ACD96 . . . . . . . . . . . . . . . . . . . . . . . . . . . . . . .
REMP ACD96 - Cap Command. . . . . . . . . . . . . . . . . . . . . . . . . . . . . .
REMP ACD96 - Decap Command . . . . . . . . . . . . . . . . . . . . . . . . . . . .
Commands for the Process Starter . . . . . . . . . . . . . . . . . . . . . . . . . . . . . .
Process Starter - Start Command . . . . . . . . . . . . . . . . . . . . . . . . . . . .
Process Starter - WaitForProcess Command . . . . . . . . . . . . . . . . . . .
Commands for the Tube Robot . . . . . . . . . . . . . . . . . . . . . . . . . . . . . . . . .
Tube Robot - ExecuteScript Command . . . . . . . . . . . . . . . . . . . . . . . .
Commands for the Plate Robot . . . . . . . . . . . . . . . . . . . . . . . . . . . . . . . . .
Plate Robot - ExecuteSingleVector Command . . . . . . . . . . . . . . . . . .
Plate Robot - Initialize Command. . . . . . . . . . . . . . . . . . . . . . . . . . . . .
Plate Robot - MoveObject Command . . . . . . . . . . . . . . . . . . . . . . . . .
Plate Robot - ReplaceObject Command . . . . . . . . . . . . . . . . . . . . . . .
Plate Robot - MoveToBase Command . . . . . . . . . . . . . . . . . . . . . . . .
Plate Robot - ChangeObject Command. . . . . . . . . . . . . . . . . . . . . . . .
Plate Robot - MoveInsert Command . . . . . . . . . . . . . . . . . . . . . . . . . .
Plate Robot - SwapInsert Command . . . . . . . . . . . . . . . . . . . . . . . . . .
Plate Robot - ClearLocation Command . . . . . . . . . . . . . . . . . . . . . . . .
Commands for the Safire Reader. . . . . . . . . . . . . . . . . . . . . . . . . . . . . . . .
Safire Reader - Status Command . . . . . . . . . . . . . . . . . . . . . . . . . . . .
Safire Reader - Open Command . . . . . . . . . . . . . . . . . . . . . . . . . . . . .
16-52
16-52
16-52
16-53
16-53
16-54
16-54
16-55
16-57
16-57
16-58
16-59
16-59
16-62
16-62
16-65
16-66
16-67
16-68
16-68
16-69
16-69
16-70
16-70
16-70
16-70
16-70
16-74
16-74
16-74
16-76
16-77
16-77
16-78
16-78
16-78
16-78
16-82
16-83
16-83
16-83
16-84
16-85
16-85
16-85
16-85
16-86
16-86
16-86
16-86
16-86
16-87
16-87
Freedom EVOware Software Manual, 393172, en, V2.3
Table of Contents
16.27.3
Safire Reader - Close Command. . . . . . . . . . . . . . . . . . . . . . . . . . . . .
16.27.4
Safire Reader - Measure Command . . . . . . . . . . . . . . . . . . . . . . . . . .
16.27.5
Safire Reader - Multilabel Command. . . . . . . . . . . . . . . . . . . . . . . . . .
16.28 Commands for the Te-Shake Shaker. . . . . . . . . . . . . . . . . . . . . . . . . . . . .
16.28.1
Te-Shake shaker - Init Command . . . . . . . . . . . . . . . . . . . . . . . . . . . .
16.28.2
Te-Shake shaker - Shake Command . . . . . . . . . . . . . . . . . . . . . . . . .
16.28.3
Te-Shake shaker - Start Command . . . . . . . . . . . . . . . . . . . . . . . . . .
16.28.4
Te-Shake shaker - Stop Command . . . . . . . . . . . . . . . . . . . . . . . . . . .
16.28.5
Te-Shake shaker - SetTemperature Command . . . . . . . . . . . . . . . . .
16.28.6
Te-Shake shaker - SetFrequency Command . . . . . . . . . . . . . . . . . . .
16.29 Commands for the Symbol MS-954 Barcode Scanner . . . . . . . . . . . . . . .
16.29.1
Symbol MS-954 Barcode Scanner - Read Barcode Command . . . . . .
16.30 Commands for the Spectra Fluor Reader . . . . . . . . . . . . . . . . . . . . . . . . .
16.30.1
Spectra Fluor Reader - Status Command . . . . . . . . . . . . . . . . . . . . . .
16.30.2
Spectra Fluor Reader - Excitation Out Command . . . . . . . . . . . . . . . .
16.30.3
Spectra Fluor Reader - Emission Out Command . . . . . . . . . . . . . . . .
16.30.4
Spectra Fluor Reader - Open Command . . . . . . . . . . . . . . . . . . . . . . .
16.30.5
Spectra Fluor Reader - Close Command. . . . . . . . . . . . . . . . . . . . . . .
16.30.6
Spectra Fluor Reader - Measure Command . . . . . . . . . . . . . . . . . . . .
16.30.7
Spectra Fluor Reader - Multilabel Command. . . . . . . . . . . . . . . . . . . .
16.31 Commands for the Sunrise Reader . . . . . . . . . . . . . . . . . . . . . . . . . . . . . .
16.31.1
Sunrise Reader - Status Command . . . . . . . . . . . . . . . . . . . . . . . . . . .
16.31.2
Sunrise Reader - Open Command . . . . . . . . . . . . . . . . . . . . . . . . . . .
16.31.3
Sunrise Reader - Close Command . . . . . . . . . . . . . . . . . . . . . . . . . . .
16.31.4
Sunrise Reader - Measure Command . . . . . . . . . . . . . . . . . . . . . . . . .
16.31.5
Sunrise Reader - Multilabel Command . . . . . . . . . . . . . . . . . . . . . . . .
16.32 Commands for the Magnetic Bead Separator . . . . . . . . . . . . . . . . . . . . . .
16.32.1
Magnetic Bead Separator - MoveToPosition Command . . . . . . . . . . .
16.32.2
Magnetic Bead Separator - ActivateHeater Command . . . . . . . . . . . .
16.32.3
Magnetic Bead Separator - DeactivateHeater Command . . . . . . . . . .
16.32.4
Magnetic Bead Separator - Execution Command . . . . . . . . . . . . . . . .
16.33 Commands for the Te-Stack Te-MO . . . . . . . . . . . . . . . . . . . . . . . . . . . . .
16.33.1
Te-Stack Te-MO - InitStacker Command. . . . . . . . . . . . . . . . . . . . . . .
16.33.2
Te-Stack Te-MO - MoveObject Command . . . . . . . . . . . . . . . . . . . . .
16.33.3
Te-Stack Te-MO - DropPlate Command . . . . . . . . . . . . . . . . . . . . . . .
16.33.4
Te-Stack Te-MO - GetPlate Command . . . . . . . . . . . . . . . . . . . . . . . .
16.34 Commands for the Te-Stack . . . . . . . . . . . . . . . . . . . . . . . . . . . . . . . . . . .
16.34.1
Te-Stack - InitStacker Command. . . . . . . . . . . . . . . . . . . . . . . . . . . . .
16.34.2
Te-Stack - MoveObject Command. . . . . . . . . . . . . . . . . . . . . . . . . . . .
16.34.3
Te-Stack - ReturnPlate Command. . . . . . . . . . . . . . . . . . . . . . . . . . . .
16.34.4
Te-Stack - PrepareReturnPlate Command . . . . . . . . . . . . . . . . . . . . .
16.34.5
Te-Stack - PresentPlate Command . . . . . . . . . . . . . . . . . . . . . . . . . . .
16.35 Commands for the Te-VacS . . . . . . . . . . . . . . . . . . . . . . . . . . . . . . . . . . .
16.35.1
Te-VacS - SetPressureDiff Command . . . . . . . . . . . . . . . . . . . . . . . . .
16.35.2
Te-VacS - ApplyVacuumRear Command . . . . . . . . . . . . . . . . . . . . . .
16.35.3
Te-VacS - ApplyVacuumFront Command . . . . . . . . . . . . . . . . . . . . . .
16.35.4
Te-VacS - VentRear Command . . . . . . . . . . . . . . . . . . . . . . . . . . . . . .
16.35.5
Te-VacS - VentFront Command . . . . . . . . . . . . . . . . . . . . . . . . . . . . .
16.35.6
Te-VacS - DeactivateSystem Command . . . . . . . . . . . . . . . . . . . . . . .
16.35.7
Te-VacS - CheckWasteLevel Command . . . . . . . . . . . . . . . . . . . . . . .
16.35.8
Te-VacS - CheckPlateWithBlock Command . . . . . . . . . . . . . . . . . . . .
16.35.9
Te-VacS - Filtration Command . . . . . . . . . . . . . . . . . . . . . . . . . . . . . .
16.35.10
Te-VacS - PositionPlateRear Command . . . . . . . . . . . . . . . . . . . . . .
Freedom EVOware Software Manual, 393172, en, V2.3
16-87
16-87
16-88
16-90
16-90
16-90
16-92
16-92
16-92
16-93
16-93
16-94
16-94
16-94
16-95
16-95
16-95
16-95
16-95
16-96
16-97
16-98
16-98
16-98
16-98
16-99
16-100
16-100
16-101
16-102
16-102
16-105
16-105
16-105
16-106
16-106
16-107
16-108
16-108
16-108
16-109
16-109
16-110
16-110
16-111
16-111
16-112
16-112
16-112
16-112
16-112
16-113
16-118
xix
Table of Contents
16.35.11 Te-VacS - PositionPlateFront Command . . . . . . . . . . . . . . . . . . . . . .
16.35.12 Te-VacS - OpenDesaltingValve Command . . . . . . . . . . . . . . . . . . . . .
16.36 Commands for the Te-MO . . . . . . . . . . . . . . . . . . . . . . . . . . . . . . . . . . . . .
16.36.1
Te-MO - Init Command . . . . . . . . . . . . . . . . . . . . . . . . . . . . . . . . . . . .
16.36.2
Te-MO - Pipette Command . . . . . . . . . . . . . . . . . . . . . . . . . . . . . . . . .
16.37 Commands for the Ultra Reader . . . . . . . . . . . . . . . . . . . . . . . . . . . . . . . .
16.37.1
Ultra Reader - Status Command . . . . . . . . . . . . . . . . . . . . . . . . . . . . .
16.37.2
Ultra Reader - Excitation Out Command . . . . . . . . . . . . . . . . . . . . . . .
16.37.3
Ultra Reader - Emission Out Command. . . . . . . . . . . . . . . . . . . . . . . .
16.37.4
Ultra Reader - Open Command . . . . . . . . . . . . . . . . . . . . . . . . . . . . . .
16.37.5
Ultra Reader - Close Command. . . . . . . . . . . . . . . . . . . . . . . . . . . . . .
16.37.6
Ultra Reader - Measure Command . . . . . . . . . . . . . . . . . . . . . . . . . . .
16.37.7
Ultra Reader - Multilabel Command. . . . . . . . . . . . . . . . . . . . . . . . . . .
16.38 Commands for the Ultra Evolution Reader. . . . . . . . . . . . . . . . . . . . . . . . .
16.38.1
Ultra Evolution Reader - Status Command . . . . . . . . . . . . . . . . . . . . .
16.38.2
Ultra Evolution Reader - Excitation Out Command . . . . . . . . . . . . . . .
16.38.3
Ultra Evolution Reader - Emission Out Command. . . . . . . . . . . . . . . .
16.38.4
Ultra Evolution Reader - Open Command . . . . . . . . . . . . . . . . . . . . . .
16.38.5
Ultra Evolution Reader - Close Command . . . . . . . . . . . . . . . . . . . . . .
16.38.6
Ultra Evolution Reader - Measure Command . . . . . . . . . . . . . . . . . . .
16.38.7
Ultra Evolution Reader - Multilabel Command . . . . . . . . . . . . . . . . . . .
16.39 Commands for the Process Script Driver . . . . . . . . . . . . . . . . . . . . . . . . . .
16.39.1
Process Script - Script Command . . . . . . . . . . . . . . . . . . . . . . . . . . . .
16.40 Commands for the Transfer Station . . . . . . . . . . . . . . . . . . . . . . . . . . . . . .
16.40.1
Transfer Station - Transfer Command . . . . . . . . . . . . . . . . . . . . . . . . .
16.41 Commands for the Te-Link. . . . . . . . . . . . . . . . . . . . . . . . . . . . . . . . . . . . .
16.41.1
Te-Link - Move Command . . . . . . . . . . . . . . . . . . . . . . . . . . . . . . . . . .
16.42 Specifying Output Filenames for Reader Data. . . . . . . . . . . . . . . . . . . . . .
xx
16-118
16-119
16-119
16-120
16-120
16-120
16-120
16-120
16-121
16-121
16-121
16-121
16-122
16-123
16-123
16-124
16-124
16-124
16-124
16-124
16-125
16-126
16-127
16-127
16-127
16-127
16-128
16-128
Freedom EVOware Software Manual, 393172, en, V2.3
Table of Contents
17
Special Features, Example Scripts and Processes,
17.1
17.1.1
17.1.2
17.2
17.2.1
17.2.2
17.3
17.4
17.5
17.6
17.6.1
17.6.2
17.6.3
17.6.4
17.7
17.8
17.9
17.9.1
17.9.2
17.9.3
17.9.4
17.9.5
17.9.6
17.10
Using the Automatic DITI Handling feature . . . . . . . . . . . . . . . . . . . . . . . .
Automatic DITI handling in Freedom EVOware Standard . . . . . . . . . .
Automatic DITI handling in Freedom EVOware Plus . . . . . . . . . . . . . .
Script and process recovery function . . . . . . . . . . . . . . . . . . . . . . . . . . . .
Script Recovery Function . . . . . . . . . . . . . . . . . . . . . . . . . . . . . . . . . .
Process Recovery Function . . . . . . . . . . . . . . . . . . . . . . . . . . . . . . . .
Site-specific RoMa vectors. . . . . . . . . . . . . . . . . . . . . . . . . . . . . . . . . . . . .
Safe Pathways Feature . . . . . . . . . . . . . . . . . . . . . . . . . . . . . . . . . . . . . . .
Columbus Washer - Washing a Variable Number of Strips in the Plate . .
Configuring and Using PMP (Pressure Monitored Pipetting) . . . . . . . . . . .
Activating the PMP Option . . . . . . . . . . . . . . . . . . . . . . . . . . . . . . . . . .
Permissible sequence of script commands for the PMP option . . . . . .
PMP Pressure Viewer Tool . . . . . . . . . . . . . . . . . . . . . . . . . . . . . . . . .
PMP Error and Success Messages . . . . . . . . . . . . . . . . . . . . . . . . . . .
Configuring the Waste Option of the Te-Stack in Freedom EVOware Plus
Handling inserts in Freedom EVOware Plus . . . . . . . . . . . . . . . . . . . . . . .
Using Freedom EVOware with the Tecan Magellan Software . . . . . . . . . .
Compatibility . . . . . . . . . . . . . . . . . . . . . . . . . . . . . . . . . . . . . . . . . . . .
Preparing the Magellan Software. . . . . . . . . . . . . . . . . . . . . . . . . . . . .
Configuring Freedom EVOware for the Magellan software . . . . . . . . .
Freedom EVOware Standard Script for the Magellan software . . . . . .
Additional Settings for the Magellan Method . . . . . . . . . . . . . . . . . . . .
Freedom EVOware Plus Process for the Magellan software. . . . . . . .
Example Scripts and Processes . . . . . . . . . . . . . . . . . . . . . . . . . . . . . . . .
Freedom EVOware Software Manual, 393172, en, V2.3
17-1
17-1
17-3
17-5
17-5
17-9
17-13
17-14
17-15
17-16
17-17
17-18
17-18
17-22
17-24
17-25
17-29
17-29
17-29
17-30
17-32
17-37
17-38
17-40
xxi
Table of Contents
18
Error Handling
18.1
Error Dialogs . . . . . . . . . . . . . . . . . . . . . . . . . . . . . . . . . . . . . . . . . . . . . . .
18.1.1
Liquid Detection Error . . . . . . . . . . . . . . . . . . . . . . . . . . . . . . . . . . . . .
18.1.2
Clot Error . . . . . . . . . . . . . . . . . . . . . . . . . . . . . . . . . . . . . . . . . . . . . . .
18.1.3
Clot Error (PMP) . . . . . . . . . . . . . . . . . . . . . . . . . . . . . . . . . . . . . . . . .
18.1.4
PMP Instrument Error . . . . . . . . . . . . . . . . . . . . . . . . . . . . . . . . . . . . .
18.1.5
Liquid Arrival Check Error . . . . . . . . . . . . . . . . . . . . . . . . . . . . . . . . . .
18.1.6
Volume Monitoring Error (Diluter Overflow) . . . . . . . . . . . . . . . . . . . .
18.1.7
Diluter Error . . . . . . . . . . . . . . . . . . . . . . . . . . . . . . . . . . . . . . . . . . . . .
18.1.8
Error Fetching DITIs . . . . . . . . . . . . . . . . . . . . . . . . . . . . . . . . . . . . . .
18.1.9
Error Mounting DITIs . . . . . . . . . . . . . . . . . . . . . . . . . . . . . . . . . . . . . .
18.1.10
Lost DITI Error . . . . . . . . . . . . . . . . . . . . . . . . . . . . . . . . . . . . . . . . . . .
18.1.11
DITI Already Mounted Error . . . . . . . . . . . . . . . . . . . . . . . . . . . . . . . .
18.1.12
Error Reading Barcodes . . . . . . . . . . . . . . . . . . . . . . . . . . . . . . . . . . .
18.1.13
Carrier Barcode Error . . . . . . . . . . . . . . . . . . . . . . . . . . . . . . . . . . . . .
18.1.14
Barcode Error . . . . . . . . . . . . . . . . . . . . . . . . . . . . . . . . . . . . . . . . . . .
18.1.15
Labware or Tube Barcode Error . . . . . . . . . . . . . . . . . . . . . . . . . . . . .
18.1.16
Enter Barcode . . . . . . . . . . . . . . . . . . . . . . . . . . . . . . . . . . . . . . . . . .
18.1.17
Enter Barcode (Double Blind Entry) . . . . . . . . . . . . . . . . . . . . . . . . . .
18.1.18
Instrument Error . . . . . . . . . . . . . . . . . . . . . . . . . . . . . . . . . . . . . . . . .
18.1.19
Doorlock Error . . . . . . . . . . . . . . . . . . . . . . . . . . . . . . . . . . . . . . . . . . .
18.1.20
Grip Error . . . . . . . . . . . . . . . . . . . . . . . . . . . . . . . . . . . . . . . . . . . . . .
18.1.21
Te-Stack Errors . . . . . . . . . . . . . . . . . . . . . . . . . . . . . . . . . . . . . . . . . .
18.1.22
Te-MO DITI Error . . . . . . . . . . . . . . . . . . . . . . . . . . . . . . . . . . . . . . . .
18.1.23
WRC/Te-MO Error . . . . . . . . . . . . . . . . . . . . . . . . . . . . . . . . . . . . . . .
18.1.24
WRC Errors . . . . . . . . . . . . . . . . . . . . . . . . . . . . . . . . . . . . . . . . . . . . .
18.1.25
WinWash Liquid Error . . . . . . . . . . . . . . . . . . . . . . . . . . . . . . . . . . . . .
18.1.26
Vacuum Waste Container Error . . . . . . . . . . . . . . . . . . . . . . . . . . . . .
18.1.27
Liquid Error (PW384) . . . . . . . . . . . . . . . . . . . . . . . . . . . . . . . . . . . . .
18.1.28
Liquid Error (PW384GP) . . . . . . . . . . . . . . . . . . . . . . . . . . . . . . . . . . .
18.2
Editing Messages in Message Boxes. . . . . . . . . . . . . . . . . . . . . . . . . . . . .
18.3
List of Error Messages . . . . . . . . . . . . . . . . . . . . . . . . . . . . . . . . . . . . . . .
xxii
18-1
18-1
18-2
18-3
18-4
18-5
18-6
18-7
18-9
18-10
18-11
18-12
18-13
18-13
18-14
18-15
18-16
18-17
18-18
18-19
18-20
18-20
18-22
18-23
18-24
18-26
18-27
18-27
18-28
18-29
18-32
Freedom EVOware Software Manual, 393172, en, V2.3
Table of Contents
19
Customer Support
A
Appendix A
A.1
A.1.1
A.1.2
A.1.3
A.1.4
A.1.5
A.1.6
A.1.7
A.2
A.2.1
A.2.2
A.2.3
A.2.4
A.2.5
A.3
A.4
A.5
A.6
A.7
A.8
A.9
A.9.1
A.9.2
A.9.3
A.9.4
A.9.5
A.9.6
A.9.7
A.9.8
A.9.9
A.9.10
A.9.11
A.9.12
A.9.13
A.10
A.10.1
A.10.2
A.10.3
A.10.4
A.10.5
A.10.6
A.11
A.12
A.12.1
A.12.2
A.13
A.13.1
A.13.2
A.13.3
Overview of the Log Files. . . . . . . . . . . . . . . . . . . . . . . . . . . . . . . . . . . . . .
Structure of Log Files of Type EVO . . . . . . . . . . . . . . . . . . . . . . . . . . .
Structure of Log Files of Type USR . . . . . . . . . . . . . . . . . . . . . . . . . . .
Structure of Log Files of Type ERR . . . . . . . . . . . . . . . . . . . . . . . . . . .
Log Files of Type MACRO . . . . . . . . . . . . . . . . . . . . . . . . . . . . . . . . . .
Log Files of Type DB . . . . . . . . . . . . . . . . . . . . . . . . . . . . . . . . . . . . . .
Log Files of Type MCS . . . . . . . . . . . . . . . . . . . . . . . . . . . . . . . . . . . .
Structure of the Trace File (Audit Trail) . . . . . . . . . . . . . . . . . . . . . . . .
Structure of the Barcode Files . . . . . . . . . . . . . . . . . . . . . . . . . . . . . . . . . .
Barcode files written by the Carousel commands . . . . . . . . . . . . . . . .
Barcode file written by the PosID and PosID-3 commands . . . . . . . . .
Barcode File for the PosID-3 Driver . . . . . . . . . . . . . . . . . . . . . . . . . . .
Barcode File for the Labware Generator . . . . . . . . . . . . . . . . . . . . . . .
Barcode File for the Freedom EVOware Plus Runtime Controller . . . .
Parameters in the Evoware.opt file . . . . . . . . . . . . . . . . . . . . . . . . . . . . . .
Parameters in the Evoware.inf file . . . . . . . . . . . . . . . . . . . . . . . . . . . . . . .
Freedom EVOware Directory Structure and Files . . . . . . . . . . . . . . . . . . .
Command Line Parameters (Freedom EVOware) . . . . . . . . . . . . . . . . . . .
Freedom EVO 75 Pipetting Instrument - LiHa Configuration . . . . . . . . . . .
Frequently Asked Questions (FAQ) . . . . . . . . . . . . . . . . . . . . . . . . . . . . . .
System Tools for Freedom EVOware . . . . . . . . . . . . . . . . . . . . . . . . . . . .
Data Explorer Tool . . . . . . . . . . . . . . . . . . . . . . . . . . . . . . . . . . . . . . .
Validate Configuration Tool . . . . . . . . . . . . . . . . . . . . . . . . . . . . . . . . .
Duplicate Device Tool . . . . . . . . . . . . . . . . . . . . . . . . . . . . . . . . . . . . .
Export/Import Tool . . . . . . . . . . . . . . . . . . . . . . . . . . . . . . . . . . . . . . .
Zip & Send Tool . . . . . . . . . . . . . . . . . . . . . . . . . . . . . . . . . . . . . . . . .
Audit Trail Archiving tool . . . . . . . . . . . . . . . . . . . . . . . . . . . . . . . . . . .
EVOTransfer . . . . . . . . . . . . . . . . . . . . . . . . . . . . . . . . . . . . . . . . . . . .
Gemini Migration Tool . . . . . . . . . . . . . . . . . . . . . . . . . . . . . . . . . . . . .
Shutdown EVOware drivers. . . . . . . . . . . . . . . . . . . . . . . . . . . . . . . . .
IQ Wizard . . . . . . . . . . . . . . . . . . . . . . . . . . . . . . . . . . . . . . . . . . . . . .
Registration Wizard . . . . . . . . . . . . . . . . . . . . . . . . . . . . . . . . . . . . . . .
Import vCards Tool . . . . . . . . . . . . . . . . . . . . . . . . . . . . . . . . . . . . . . .
Version Checker Tool . . . . . . . . . . . . . . . . . . . . . . . . . . . . . . . . . . . . .
LogViewer Tool . . . . . . . . . . . . . . . . . . . . . . . . . . . . . . . . . . . . . . . . . . . . .
Using the Channels window. . . . . . . . . . . . . . . . . . . . . . . . . . . . . . . . .
Using the Message List window. . . . . . . . . . . . . . . . . . . . . . . . . . . . . .
Using the Message Detail window . . . . . . . . . . . . . . . . . . . . . . . . . . . .
Configuring the user interface . . . . . . . . . . . . . . . . . . . . . . . . . . . . . . .
LogViewer Menus . . . . . . . . . . . . . . . . . . . . . . . . . . . . . . . . . . . . . . . .
LogViewer Channel assignments for Freedom EVOware . . . . . . . . . .
Tecan Driver Installer . . . . . . . . . . . . . . . . . . . . . . . . . . . . . . . . . . . . . . . . .
Common Notification Server (CNS) . . . . . . . . . . . . . . . . . . . . . . . . . . . . . .
CNS Web Server . . . . . . . . . . . . . . . . . . . . . . . . . . . . . . . . . . . . . . . . .
CNS Configuration Tool . . . . . . . . . . . . . . . . . . . . . . . . . . . . . . . . . . .
ASTM Interface Module . . . . . . . . . . . . . . . . . . . . . . . . . . . . . . . . . . . . . . .
Access rights . . . . . . . . . . . . . . . . . . . . . . . . . . . . . . . . . . . . . . . . . . . .
ASTM File Parser . . . . . . . . . . . . . . . . . . . . . . . . . . . . . . . . . . . . . . . .
Configuration file . . . . . . . . . . . . . . . . . . . . . . . . . . . . . . . . . . . . . . . . .
Freedom EVOware Software Manual, 393172, en, V2.3
A-1
A-2
A-9
A-9
A-10
A-10
A-10
A-11
A-11
A-11
A-13
A-13
A-14
A-15
A-17
A-24
A-25
A-29
A-30
A-31
A-32
A-35
A-36
A-36
A-38
A-42
A-47
A-50
A-54
A-55
A-55
A-63
A-68
A-70
A-72
A-72
A-74
A-74
A-74
A-75
A-79
A-80
A-82
A-83
A-84
A-90
A-90
A-90
A-92
xxiii
Table of Contents
A.13.4
ASTM Configurator . . . . . . . . . . . . . . . . . . . . . . . . . . . . . . . . . . . . . . .
A.14
Configuring and Using the 3D Simulation Tool EVOSim . . . . . . . . . . . . . .
A.14.1
Communication Between EVOSim and Freedom EVOware . . . . . . . .
A.14.2
Data Splitter Tool EVOSim Splitter . . . . . . . . . . . . . . . . . . . . . . . . . . .
A.14.3
Using EVOSim Splitter . . . . . . . . . . . . . . . . . . . . . . . . . . . . . . . . . . . .
A.14.4
EVOSim Configuration Wizard. . . . . . . . . . . . . . . . . . . . . . . . . . . . . . .
A.14.5
Simulating the Loading Interface . . . . . . . . . . . . . . . . . . . . . . . . . . . . .
A.14.6
EVOSim Views . . . . . . . . . . . . . . . . . . . . . . . . . . . . . . . . . . . . . . . . . .
A.14.7
EVOSim Toolbar . . . . . . . . . . . . . . . . . . . . . . . . . . . . . . . . . . . . . . . . .
A.14.8
EVOSim Menus . . . . . . . . . . . . . . . . . . . . . . . . . . . . . . . . . . . . . . . . . .
A.14.9
Replay Package feature. . . . . . . . . . . . . . . . . . . . . . . . . . . . . . . . . . . .
A.14.10
Command Line Parameters (EVOSim) . . . . . . . . . . . . . . . . . . . . . . . .
A.14.11
Adding custom labware to EVOSim . . . . . . . . . . . . . . . . . . . . . . . . . . .
A.15
Advanced Worklist Commands . . . . . . . . . . . . . . . . . . . . . . . . . . . . . . . . .
A.15.1
Command Syntax and Parameter Types . . . . . . . . . . . . . . . . . . . . . . .
A.15.2
Example Worklist with Three Advanced Worklist Commands . . . . . . .
A.15.3
Well Selection . . . . . . . . . . . . . . . . . . . . . . . . . . . . . . . . . . . . . . . . . . .
A.15.4
Advanced Worklist Commands for Script Commands . . . . . . . . . . . . .
A.15.5
Advanced Worklist Commands for the Carousel . . . . . . . . . . . . . . . . .
A.15.6
Advanced Worklist Commands for the Hettich Centrifuge . . . . . . . . . .
A.15.7
Advanced Worklist Commands for the Magellan Option . . . . . . . . . . .
A.15.8
Advanced Worklist Commands for the PosID-3 Barcode Scanner . . .
A.15.9
Advanced Worklist Commands for the Te-Shake Shaker . . . . . . . . . .
A.15.10
Advanced Worklist Commands for the Te-MagS . . . . . . . . . . . . . . . . .
A.15.11
Advanced Worklist Commands for the Te-Stack Stacker . . . . . . . . . .
xxiv
A-96
A-103
A-104
A-105
A-106
A-106
A-109
A-110
A-110
A-110
A-112
A-115
A-115
A-118
A-119
A-119
A-120
A-123
A-157
A-162
A-164
A-167
A-170
A-173
A-176
Freedom EVOware Software Manual, 393172, en, V2.3
Table of Contents
B
Appendix B - FDA 21 CFR Part 11 Compliance
B.1
B.2
B.3
B.4
B.4.1
B.5
B.5.1
B.5.2
B.5.3
B.5.4
B.5.5
B.5.6
B.5.7
B.5.8
B.6
B.6.1
B.6.2
B.7
B.7.1
B.7.2
B.7.3
B.7.4
B.8
B.8.1
B.8.2
B.8.3
B.9
B.9.1
B.9.2
B.9.3
Related Documentation . . . . . . . . . . . . . . . . . . . . . . . . . . . . . . . . . . . . . . .
Purpose of this Appendix . . . . . . . . . . . . . . . . . . . . . . . . . . . . . . . . . . . . . .
Definitions and Acronyms . . . . . . . . . . . . . . . . . . . . . . . . . . . . . . . . . . . . .
Recommendations . . . . . . . . . . . . . . . . . . . . . . . . . . . . . . . . . . . . . . . . . . .
Assigning and Using Freedom EVOware User Names . . . . . . . . . . . .
Security Features in the Software Which Assist 21 CFR Part 11 Compliance
Closed Systems . . . . . . . . . . . . . . . . . . . . . . . . . . . . . . . . . . . . . . . . . .
Freedom EVOware User Levels . . . . . . . . . . . . . . . . . . . . . . . . . . . . .
Tecan User Management System . . . . . . . . . . . . . . . . . . . . . . . . . . . .
Checksums . . . . . . . . . . . . . . . . . . . . . . . . . . . . . . . . . . . . . . . . . . . . .
Electronic Signatures . . . . . . . . . . . . . . . . . . . . . . . . . . . . . . . . . . . . . .
Trace File (Audit Trail) . . . . . . . . . . . . . . . . . . . . . . . . . . . . . . . . . . . . .
Log Files . . . . . . . . . . . . . . . . . . . . . . . . . . . . . . . . . . . . . . . . . . . . . . .
Backing Up Files . . . . . . . . . . . . . . . . . . . . . . . . . . . . . . . . . . . . . . . . .
Part A - General Provisions . . . . . . . . . . . . . . . . . . . . . . . . . . . . . . . . . . . .
§ 11.1 Scope . . . . . . . . . . . . . . . . . . . . . . . . . . . . . . . . . . . . . . . . . . . .
§ 11.2 Implementation . . . . . . . . . . . . . . . . . . . . . . . . . . . . . . . . . . . . .
Part B - Electronic Records . . . . . . . . . . . . . . . . . . . . . . . . . . . . . . . . . . . .
§ 11.10 Control of Closed Systems . . . . . . . . . . . . . . . . . . . . . . . . . . .
§ 11.30 Controls for Open Systems. . . . . . . . . . . . . . . . . . . . . . . . . . .
§ 11.50 Signature Manifestations . . . . . . . . . . . . . . . . . . . . . . . . . . . .
§ 11.70 Signature/ Record Linking. . . . . . . . . . . . . . . . . . . . . . . . . . . .
Part C - Electronic Signatures . . . . . . . . . . . . . . . . . . . . . . . . . . . . . . . . . .
§ 11.100 General Requirements . . . . . . . . . . . . . . . . . . . . . . . . . . . . .
§ 11.200 Electronic Signature Components and Controls . . . . . . . . . .
§ 11.300 Controls for Identification Codes and Passwords . . . . . . . . .
Freedom EVOware Installation Checklist. . . . . . . . . . . . . . . . . . . . . . . . . .
Before Installing Freedom EVOware . . . . . . . . . . . . . . . . . . . . . . . . . .
Installing Freedom EVOware . . . . . . . . . . . . . . . . . . . . . . . . . . . . . . . .
After Installing Freedom EVOware . . . . . . . . . . . . . . . . . . . . . . . . . . .
C
Validation of Freedom EVOware Applications
C.1
C.2
C.3
Important Points to Check When Validating Freedom EVOware Applications C-1
Setting the Validation Status of Scripts and Processes . . . . . . . . . . . . . . .
C-4
Recommendations when using barcodes . . . . . . . . . . . . . . . . . . . . . . . . .
C-4
D
Glossary
D.1
D.2
Glossary of Terms and Instrument Options . . . . . . . . . . . . . . . . . . . . . . . .
Important GUI features in MS Windows Applications . . . . . . . . . . . . . . . .
IX
Index
Freedom EVOware Software Manual, 393172, en, V2.3
B-1
B-1
B-2
B-5
B-6
B-6
B-6
B-7
B-7
B-8
B-9
B-10
B-11
B-11
B-11
B-11
B-13
B-14
B-14
B-23
B-24
B-25
B-26
B-26
B-27
B-28
B-29
B-30
B-30
B-30
D-1
D-27
xxv
Table of Contents
xxvi
Freedom EVOware Software Manual, 393172, en, V2.3
1 - About This Manual
1 About This Manual
Purpose of This
Chapter
This chapter points out the purpose of the manual, specifies the product the
manual deals with and who the manual is intended for. Furthermore, it explains
the symbols, conventions and abbreviations used and offers other general
information.
Purpose of This
Manual
This manual describes the Freedom EVOware software, provides the information
required for proper installation, instructs how to run the software and how to make
use of all its features.
Target Group
This manual is intended for application specialists who need to develop programs
(laboratory processes and/or pipetting programs) for controlling the Freedom EVO
series of pipetting instruments. It is assumed that such specialists are already
acquainted with standard laboratory procedures for handling and pipetting liquids
as described in standard textbooks on this subject.
This manual is also helpful for operators of the Freedom EVO pipetting instrument
to give an overview of the wide range of potential applications and instrument
options which are available, and to help to understand the function of the
processes and/or pipetting scripts which they want to run.
For Your Safety
Please read this manual carefully before installing and running the Freedom
EVOware software, in particular Chapter 2, “Safety”.
Scope
This manual applies to Freedom EVOware Standard 2.3 and Freedom EVOware
Plus 2.3. For additional information on the Freedom EVOware software, see
3.4 “Supported Pipetting Instruments and Tecan Options”, 3-4.
Freedom EVOware Software Manual, 393172, en, V2.3
1-1
1 - About This Manual
Conventions Used in This Manual
1.1 Conventions Used in This Manual
The following list provides an overview of the conventions as used throughout this
manual:
Names
Freedom EVO: To facilitate reading, the term “pipetting instrument” stands for
the Freedom EVO series of pipetting instruments.
User Interface
Names of screens (menus, windows, dialog boxes, message boxes) are
printed in italic, e.g.: “The Select Components window appears.”
Menus and command sequences are printed in bold type and connected
with a > sign, e.g., “Start the function with Options > Te-MO > Wash Unit.”
Names of controls in dialog boxes, windows or message boxes
(command buttons, checkboxes, option buttons etc.) are printed in bold type,
e.g. “Select the Automatic checkbox.”
Directory and file names are printed as follows:
– Path and file names are quoted directly,
e.g.: C:\Program Files\Tecan\EVOware\database
– or a placeholder is given for the directory, e.g: <install_path>, which
stands for the “real” directory name (the default installation path for
Freedom EVOware is C:\Program Files\Tecan\EVOware. Also see the
next point.
Placeholders (for file names, numbers dates etc.) are set in angle brackets
< >, e.g.: TeSonic_<serial_number>_<date>_<time>.any.
Cross references appear as follows, e.g: “Refer to section 1.1.1, 1-1
– 1.1.1 refers to the corresponding section number.
– The symbol
denotes the page number.
– 1-1 stands for the chapter number followed by the page number.
1-2
Freedom EVOware Software Manual, 393172, en, V2.3
1 - About This Manual
Reference Documents
1.2 Reference Documents
This section provides a list of documents which are needed or may be useful in
connection with the Freedom EVOware software. They either concern the
pipetting instrument itself or the optional devices.
1.2.1 Related Documentation and Software
The following Tecan documentation provides additional information which can be
useful when using this manual:
What Does the
Doc. ID Tell
You?
The Doc. IDs listed below are root numbers. Therefore, they do not contain
information about the language, document version or the medium (data storage
medium, hardcopy, downloadable file, etc.) of the document.
Check the scope of the corresponding document to make sure that you are in
possession of the correct version.
Note: The Doc. ID does not represent ordering information. For orders refer to the
number on the binder, CD casing, etc.
Operating and
Software
Manuals
Freedom EVOware Sample Oriented Add-On (Doc ID 394284 and 394285)
Freedom EVOware Sample Tracking Add-On (Doc ID 393933)
Hit-Picking Wizard for Freedom EVOware (Doc ID 395128)
Normalization Software for Freedom EVOware (Doc ID 394288)
Freedom EVOware Runtime Controller Manual (Doc ID 394329) 1)
PMP Option Application Manual (Doc ID 395390)
Freedom EVO Operating Manual (Doc ID 392886)
Carousel Operating Manual (Doc ID 391209)
Microplate Auto Sealer Operating Manual (Doc ID 391749)
Te-Flow Operating Manual (Doc ID 391584)
Te-MagS Operating Manual Doc ID 391237)
Te-MO Operating Manual (Doc ID 391733)
Te-MO 384 Multichannel Pipetting Option Operating Manual (Doc ID 391352)
Te-MO 384 Pipetting Head Operating Manual (Doc ID 391358)
Te-MO 384 WRS Operating Manual (Doc ID 391768)
Te-MO 3/3 96 Operating Manual Multi-pipetting Option (Doc ID 392553)
Te-MO 3/3 384 Operating Manual Multi-pipetting Option (Doc ID 392679)
Te-MO Active Positioning Carrier Operating Instructions (Doc ID 391864)
Te-Shake Operating Manual (Doc ID 391496)
Te-Stack Operating Manual (Doc ID 391862)
Te-VacS Operating Manual (Doc ID 391236)
WRC Tower Operating Manual (Doc ID 391865)
Columbus Washer (Doc ID 30008658)
96PW Washer (Doc ID 30001495)
PW384 Washer (Doc ID 30003394)
Magellan Data Reduction Software (Doc ID 30001495)
Magellan Data Reduction Software, two manuals (Doc ID I 117519)
1) This manual is intended for operators of the pipetting instrument. The same information is also contained in
the Freedom EVOware Software Manual.
Freedom EVOware Software Manual, 393172, en, V2.3
1-3
1 - About This Manual
Trademarks
GENios, GENios FL, GENios plus (DocID 1 112904)
GENios Pro (DocID 1 112935)
Safire Microplate Reader (Doc ID I 112913)
SpectraFluor Microplate Reader (Doc ID I 112903)
SpectraFluor+ Microplate Reader (Doc ID I 112905)
Sunrise Microplate Reader (Doc ID I 137301 and 1 137302)
Ultra Evolution Microplate Reader (Doc ID I 112929)
Cellerity system Operating Manual (DocID 394070)
Firmware
Manuals
PosID-2 Command Set (Doc ID 391141)
Te-Flow Commands (Doc ID 391845)
Te-MagS Command Set (DocID 391294)
Te-VacS Command Set SPE (DocID 3912216)
Te-Shake ORBI Command Set (DocID 391543)
Te-Stack Command Set (DocID 392118)
The following Tecan documentation describes the Setup & Service software,
which is one of the components of the Tecan Instrument Software:
Instrument Software Manual (Doc ID 392888)
The Setup & Service software is used for calibration, adjustment and
commissioning of the pipetting instrument. Setup and service must only be carried
out by suitably qualified personnel or by the Tecan Field Service Engineer.
The above manuals can be ordered from your nearest Tecan representative (see
19 “Customer Support”, 19-1).
1.3 Trademarks
The following product names and any registered and unregistered trademarks
mentioned in this manual are used for identification purposes only and remain the
exclusive property of their respective owners (for simplicity reasons, the symbols
for trademarks, such as ® and ™ are not repeated later in the manual):
Freedom EVOware®, Freedom EVO® and Genesis Freedom® are registered
trademarks of Tecan Group Ltd. in major countries.
Windows® is a registered trademark of Microsoft Corporation.
Excel® is a registered trademark of Microsoft Corporation.
Roboflask® is a registered trademark of Corning Inc.
1.4 Abbreviations
See D.1 “Glossary of Terms and Instrument Options”, D-1 for information on
common abbreviations. You can also search for abbreviations in the index.
1-4
Freedom EVOware Software Manual, 393172, en, V2.3
1 - About This Manual
Context-Sensitive Help System
1.5 Context-Sensitive Help System
Freedom EVOware is provided with extensive context-sensitive help (more than
900 pages when printed out). When Freedom EVOware is running, press F1 or
click the Help button to get help on the current screen, dialog box or operation you
are performing. Some of the dialog boxes do not have a Help button. Press F1 in
this case. You can also open the help file with the shortcut in Start > All Programs
> Tecan > EVOware.
Note: The help system contains all of the information which is provided in the
Software Manual PDF file on the Freedom EVOware installation CD. It uses the
same numbering scheme for chapter headings, figures and tables as the software
manual. Help is not provided for standard Windows operations such as Cut and
Paste.
The Index tab has the same entries as the index of the printed manual or PDF file.
The Search tab (full text search function) lets you use the wild cards ? (one
additional character) and * (zero or more additional characters). For example,
scan* finds scan and scanner. The wild cards can also be used at the beginning of
the search string. For example, *allbarcodes will find the ReadAllBarcodes
command.
If you specify more than one search term, they are treated as alternatives (OR
function). The search terms are not case sensitive. Use quotes "" to search for
strings which contain space characters (e.g. “file names”).
Refer to the standard Microsoft documentation if you need more information on
using Microsoft HTML Help.
The Freedom EVOware Software Manual was written using Adobe FrameMaker.
The context-sensitive help was created from the FrameMaker files using a special
software tool.
Glossary
This manual has an extensive glossary with descriptions of general terms and
instrument options (e.g. Te-MagS). The glossary terms are included in the index of
the printed manual or PDF file and the Index tab of the online help. They are
marked with “overview”, for example “Te-MagS (overview)”.
Freedom EVOware commands
See 13 “Overview of Freedom EVOware Commands”, 13-1 for an overview of
the Freedom EVOware commands in the Control Bar. Also see 5.4 “Overview of
the Main Window in Freedom EVOware”, 5-9.
Freedom EVOware Software Manual, 393172, en, V2.3
1-5
1 - About This Manual
Context-Sensitive Help System
1-6
Freedom EVOware Software Manual, 393172, en, V2.3
2 - Safety
User Qualification
2 Safety
Purpose of This
Chapter
This chapter covers only the general introductory safety instructions applicable to
the Freedom EVOware. Specific safety instructions of the hardware devices are
laid down in the respective hardware manuals.
Significance of
These Safety
Instructions
The Freedom EVOware is a pure software product and as such it does not contain
any hazardous parts. However, the software is used to control hardware devices
and options, which may contain parts that can move with great force and at
considerable speed.
As a consequence, the safety of users and personnel can only be ensured if the
safety instructions in this Software Manual as well as the safety instructions of the
hardware devices controlled with the software described here are strictly
observed and followed.
Therefore, all relevant manuals must always be available to all users working with
the Freedom EVOware.
2.1 User Qualification
What Users
Must Know
Training
Courses
Users must be qualified and trained to run Freedom EVOware.
In particular, they must fulfill the following qualifications:
They must have a basic knowledge of the Windows operating system.
They must have read and understood the instructions in this Software Manual.
Only users that meet the qualifications prescribed here are authorized to run
the program described in this Software Manual.
Note: Tecan recommends that users attend a software training course. Please
ask your nearest Tecan representative about the available courses.
Freedom EVOware Software Manual, 393172, en, V2.3
2-1
2 - Safety
Warning Notices Used in the Manuals
2.2 Warning Notices Used in the Manuals
The symbols used for safety-related notices have the following significance:
WARNING
Symbols
WARNING notices appear as follows:
WARNING
Generally, the triangular warning symbol indicates the possibility of personal injury
or even loss of life if the instructions are not followed.
ATTENTION
Symbols
ATTENTION notes appear as follows:
ATTENTION
With the general “Read This!” symbol, ATTENTIONs indicate the possibility of
equipment damage, malfunctions or incorrect process results, if instructions are
not followed.
2.3 Use of the Software
Intended Use
2-2
The intended use of the Freedom EVOware software is defined in chapter
3.2 “Intended Use of the Freedom EVOware Software”, 3-3.
The software must not be used for applications other than listed there.
Freedom EVOware Software Manual, 393172, en, V2.3
2 - Safety
Specific Hazards
2.4 Specific Hazards
The following hazards are associated with the use of the Freedom EVOware
software:
Cellular Phones
If you have a cellular phone
PROHIBITION
Turn off all cellular phones. Do not use or keep them on standby within the
laboratory. The use of cellular phones may cause faulty liquid detection and
unreliable results.
Electrostatic
Discharge
Care must be taken when it is unavoidable to touch delicate electronic circuits.
ATTENTION
Discharge static electricity from your body. Wear a wrist wrap that is connected to
ground when handling delicate electronic circuits.
Risks Through
Contamination
Always make sure that the instrument is not contaminated chemically, biologically
or radioactively.
WARNING
Chemical, biological and radiative hazards can be associated with certain
substances used or processed with the instrument.
The same applies to waste disposal.
Always wear appropriate laboratory safety items such as gloves when working
on or operating the pipetting instrument.
Always be aware of possible hazards associated with such substances. Request
a filled out and signed Decontamination Declaration before performing any setup
and test procedures.
Movable Parts
Keep in mind that arm and pipetting devices can move at great speed and with
considerable force.
WARNING
Keep your hands off the zone in which pipetting devices move.
Never stick your head into the pipetting instrument when the power is
switched on.
Freedom EVOware Software Manual, 393172, en, V2.3
2-3
2 - Safety
Safety of the Overall System
Laser
Note that barcode readers such as the PosID or Symbol LS-1220 use laser
technology for scanning.
WARNING
Laser beam (Laser Class II).
Radiation may be harmful to your eyes.
Do not stare into beam.
Always switch instrument off before servicing devices containing a laser
source.
2.5 Safety of the Overall System
In addition to the safety instructions in this Software Manual, the safety
instructions in the manuals of the hardware devices must also be observed and
followed.
WARNING
Hazards originating from the hardware devices controlled with this software.
Mind the safety instructions of all instruments and options which are used in
connection with Freedom EVOware.
2.6 Safety Features of the Pipetting Instrument
The Access/Status feature for the Freedom EVO pipetting instruments consists of
up to four electrically-operated doorlocks for safety hoods or safety doors which
prevent access to the instrument when it is operating, a status lamp and acoustic
alarm device which is mounted above the instrument at a conspicuous position to
ensure that it is visible to the operator from some distance away and an
electrically-operated pause/resume button to stop and then continue the pipetting
script.
The Freedom EVO pipetting instrument is always fitted with two doorlocks. Two
additional doorlocks can be fitted to support special hardware arrangements.
Freedom EVOware controls the status lamp and acoustic alarm device as follows:
Green, red and acoustic alarm are off: Freedom EVOware is idle (not
executing a script).
Green is continuously lit: A script is running and everything is ok.
Green is flashing: The script has been paused by clicking the Pause button or
the script command “User prompt” or “Set Variable” with user query is
currently waiting for user input.
Red is flashing and the acoustic alarm is on: An error message is being
displayed.
2-4
Freedom EVOware Software Manual, 393172, en, V2.3
2 - Safety
Safety Features of the Pipetting Instrument
2.6.1 Safe Operation of the Pipetting Instrument and the Doorlocks
Freedom EVOware supports up to four electrically-operated doorlocks for the
pipetting instrument and the doorlocks are arranged in groups. The following
mechanisms are used to unlock and lock the doorlocks at the appropriate times.
All doorlocks are locked automatically when a pipetting script or process is
started. A mechanical interlock ensures that the script or process cannot be
started unless the safety hoods are closed and locked. The Doorlock Error is
displayed and the script or process will not run if the doorlocks cannot be locked.
The doorlocks are unlocked when the script or process is finished, aborted or
paused by clicking the Pause button.
The doorlocks are locked again when the script or process is continued after
being paused by clicking the Pause button.
For safety reasons, it is not possible to unlock the doorlocks when the script or
process is running.
For additional information on the operation of the doorlocks see 15.38 “User
Prompt Command”, 15-98.
For maximum safety, please observe the following points:
If you have fitted additional doorlocks, make sure that they are correctly
assigned in the Freedom EVOware configuration (see 8.4.2.7 “Doorlocks”,
8-31).
Above all when the instrument is put into service for the first time, run a test
script to check the correct mechanical and electrical function of the doorlocks.
Never unplug the electrical connections to the doorlocks.
If an error message causes the script or process to pause, the doorlocks are
unlocked to allow operator intervention.
WARNING
Risk of injury to operating personnel.
Take extra care when designing the script or process if you have programmed
operations which could cause parts of the instrument to move even when the
script or process is stopped. Asynchronous movements can be carried out
e.g. by stacker devices.
Freedom EVOware Software Manual, 393172, en, V2.3
2-5
2 - Safety
General Safety Rules
2.7 General Safety Rules
Legal
Regulations
Modifications
Legal regulations, such as local, state and federal laws which prescribe the use or
application as well as the handling of dangerous materials in connection with the
Freedom EVOware software must be strictly followed.
Modifications to the Freedom EVOware software are not permitted. The
manufacturer will decline any claim resulting from unauthorized modifications.
2.8 Specific Safety Rules
2.8.1 Unintended or Unexpected Movement of Robot Arms and Other
Devices
Safety-relevant situations which can cause unintended or unexpected movement
of robot arms and other devices include the following:
The operator enters an incorrect value in a user prompt.
The operator enters an incorrect value when teaching a robot movement
vector.
Faulty algorithm in the user application.
Accordingly:
WARNING
Risk of injury to operating personnel.
Keep your hands off the zone in which pipetting devices move.
Never stick your head into the pipetting instrument when the power is
switched on.
You must not enter the working area of the pipetting instrument when teaching
a robot movement vector.
2.8.2 General Rules When Using the Pipetting Instrument
The following rules must be observed to ensure operator safety, to ensure valid
results from the assays or methods and to avoid damage to the equipment:
All persons working with the pipetting instrument and/or the Freedom
EVOware software must be suitably trained. See 2.1 “User Qualification”, 21 for more information.
Users of the pipetting instrument and/or the Freedom EVOware software
should be aware of responsibility they carry to ensure that the results obtained
are correct and valid. When running Freedom EVOware scripts and
processes, users should remain alert and observant at all times to minimize
the risk of operator errors and to check for possible equipment malfunctions,
e.g. as a result of hardware failures or incorrect set up of the pipetting
instrument. See also C “Validation of Freedom EVOware Applications”, C-1.
If the pipetting instrument will be used with hazardous or contaminating
liquids, it is recommended to fit and activate the LICOS option. The LICOS
2-6
Freedom EVOware Software Manual, 393172, en, V2.3
2 - Safety
Specific Safety Rules
option is a device which monitors the liquid level in the waste liquid and
system liquid containers. It outputs a warning if the waste container is nearly
full or if the system liquid container is nearly empty.
If DITIs are dropped by mistake, the pipetting instrument must be checked for
contamination.
To avoid contamination when DITIs are dropped on purpose (e.g. to pick up
new ones), we recommend you to use the Lower DITI Eject option.
Always wear appropriate laboratory safety items such as gloves when working
on or operating the pipetting instrument.
After setting up the pipetting instrument and installing the Freedom EVOware
software, use the Configuration Tool to check that the configured dilutor
capacity matches the size of the syringe which is fitted to the pipetting
instrument. The syringe size is on a label which is attached to the syringe.
All scripts and processes must be validated for correct functioning and for
correct results before they are used for pipetting with real samples. See
11.4.2.1 “Checking the Pipetting Script for Errors”, 11-5.
Before running a script or process, you must set up the worktable with the
carriers, labware and devices which are needed by the application or assay.
The administrator or owner of the pipetting instrument must establish standard
operating procedures for setting up the worktable and make them available to
everyone who carries out pipetting.
After setting up the worktable with the carriers, labware and devices which are
needed by the application or assay, inspect the paths that the instrument arms
(LiHa, RoMa, PnP) will take during the hardware initialization sequence to
make sure that there are no obstacles which could obstruct the movements.
See also 8.4.2.8 “Arm Initialization”, 8-31.
Make sure that the RoMa will not interfere with the tubing and syringes at the
back of the pipetting instrument during the hardware initialization sequence
(the path that the RoMa will take depends to some extent on its initial position,
see 9.6.4 “Defining the Home Position for a RoMa”, 9-62).
When programming movement vectors for the RoMa and/or PnP, inspect the
paths to make sure that there are no obstacles which could obstruct the
movements when the vector is used; make sure that the RoMa will not
interfere with the tubing and syringes at the back of the pipetting instrument.
Manually initialize the arms of the pipetting instrument (e.g. using the Initialize
button in the Freedom EVOware toolbar), make a visual check that the
initialization sequence has been carried out correctly and check the log file for
initialization errors.
Only use barcodes with fixed length and check digits for general purpose
pipetting applications in a regulated environment. This ensures that incorrectly
scanned barcodes are always detected.
If you are using the PosID-3 for general purpose applications in a regulated
environment, you must always activate the Double Blind Entry feature if you
intend to enter barcodes manually when they cannot be read.
When setting up an assay for a liquid which can clot, make sure that clot
detection is enabled in the liquid classes which are used to handle the liquid.
Refer to the Good Usage information in the Operating Manual for the pipetting
instrument for additional recommendations.
When setting up an assay which uses a trough (container for a reagent liquid),
make sure that the liquid classes which are used for aspirating from the trough
are configured to immerse the tips in the liquid by at least 3 mm.
If the system pauses for any reason when running a script or process, the
duration of the pipetting script, process step or procedure may differ from the
intended time. For example, sample incubation time may be outside of the
Freedom EVOware Software Manual, 393172, en, V2.3
2-7
2 - Safety
Specific Safety Rules
specified limits. Depending on the application, this can make the assay
invalid.
– A system pause can be caused e.g. by clicking the Pause button in
Freedom EVOware’s Runtime Controller dialog box, by pressing the
Pause button on the pipetting instrument, by a pipetting error or by an
internal timeout if a process step has taken longer than expected or
specified.
– System pauses are not shown in the Gantt chart in the Extended View of
the Runtime Controller (the Gantt chart is only available in Freedom
EVOware Plus).
After running a script or process, you must check the log files to make sure
that the script or process has completed fully and without errors.
The results of an assay are only valid if the entire script or process completed
without errors. If this is not the case, the entire script or process must
repeated after rectifying the cause of the error(s).
2-8
Freedom EVOware Software Manual, 393172, en, V2.3
3 - Product Description
Overview of Freedom EVOware
3 Product Description
Purpose of This
Chapter
This chapter provides a brief overview of the Freedom EVOware software and
defines its scope of application. In addition, it describes the features and specifies
the PC-requirements for running the software.
3.1 Overview of Freedom EVOware
Freedom EVOware provides a graphical user interface for controlling Tecan’s
Freedom EVO series of pipetting instruments that facilitates the liquid handling
needs of a wide range of life science applications, including both routine and
research activities.
The Freedom EVOware software allows the user to develop pipetting programs
(which are called scripts) and to quickly visualize how a laboratory process or
experiment can be implemented. Commands are provided for a wide range of
Tecan hardware options and third-party devices and the scripting system is
designed for maximum flexibility when developing complex custom processes.
When the script or process is ready, Freedom EVOware controls the pipetting run
by sending control signals to the pipetting instrument and optional laboratory
devices through a data connection. If operator interaction is necessary, Freedom
EVOware can display a dialog box on the display of the workstation which
prompts for the information which is needed.
Freedom EVOware has an external programming interface (API) which allows you
to integrate Freedom EVOware into third party products or custom applications or
to use Freedom EVOware components within other Tecan products running on
the same computer or on a different computer in the network.
Freedom EVOware’s modular device driver concept allows a wide range of Tecan
and third-party devices and options to be supported; a plug-in concept allows new
or updated drivers to be easily added to existing Freedom EVOware installations.
The Freedom EVOware CD contains drivers for the most commonly used
devices. Contact Tecan for information on additional drivers which are available
for special applications and third-party hardware.
In addition, the device driver API allows external software specialists to develop
and integrate custom device drivers for third party hardware. Furthermore, the
modular help system lets you integrate your own HTML Help components within
the existing, extensive context-sensitive help system.
Please contact the Tecan software specialists for information on the device driver
API and on extending the modular context-sensitive help.
It is instructive for new users of Freedom EVOware to load the example scripts
and processes which are provided and to work through each of them by reviewing
the on-line help (see 11.4.6 “Example Scripts and Example Process”, 11-7).
In addition, Freedom EVOware’s “Infopads” give useful tips for new users (see
5.4.2 “Infopads”, 5-15). Click the hyperlinks in the How To section of the Infopad
area to run short animations (films) which demonstrate various commonly needed
tasks. The animations are stored in AVI format and will be shown e.g. in Windows
Media Player.
Also see D.1 “Glossary of Terms and Instrument Options”, D-1.
This manual instructs the user how to:
Install the Freedom EVOware software,
Set up instrument and configuration data,
Freedom EVOware Software Manual, 393172, en, V2.3
3-1
3 - Product Description
Overview of Freedom EVOware
Define the pipetting worktable,
Define the pipetting scheme,
Set up pipetting scripts and processes,
Run pipetting scripts and processes.
3.1.1 Freedom EVOware Standard and Freedom EVOware Plus
Freedom EVOware Plus groups pipetting scripts and device commands into
processes. This concept makes it possible to optimize the efficiency and thus
maximize the throughput of the pipetting instrument through the use of multitasking and scheduling. This feature is not available for Freedom EVOware
Standard.
In addition, Freedom EVOware Plus allows you to run several processes in
parallel. You can run several copies of the same process and/or several different
processes in parallel.
The Freedom EVOware installation copies files for both versions of Freedom
EVOware to your PC. Activation of the appropriate Freedom EVOware version is
done using a hardlock (dongle).
3.1.2 Hardlocks for Freedom EVOware Standard and Freedom EVOware
Plus
Freedom EVOware is available with two different feature levels - Freedom
EVOware Standard and Freedom EVOware Plus. In addition, a special version is
available for the Freedom EVO 75 pipetting instrument. Whereas the software on
the Freedom EVOware CD is the same in all cases, the additional features
provided by Freedom EVOware Plus are enabled by purchasing and fitting the
appropriate hardlock (an intelligent USB plug or “dongle”).
Four different hardlocks are available:
Freedom EVOware Standard
Freedom EVOware Standard for Freedom EVO 75
Freedom EVOware Plus
Freedom EVOware Plus for Freedom EVO 75
The hardlock version you are currently using is shown in the Freedom EVOware
status bar (see 6.7.3 “Status Bar”, 6-20, Dongle type). The Freedom EVOware
Plus hardlock also allows you to use Freedom EVOware Standard (but not vice
versa).
Note: Freedom EVOware will run in offline mode if it cannot detect a hardlock
when it starts (see 5.1.4 “Instrument and Hardlock Detection”, 5-3). Firmware
commands such as movement commands are not sent to the pipetting instrument
in offline mode (i.e. pipetting does not take place).
It is not necessary to fit a hardlock if you want to run Freedom EVOware in offline
mode or if you are using the 3D simulation program EVOSim.
Several software add-ons are available for Freedom EVOware which must be
puchased separately. They extend the functionality with special features (see
3.1.3 “Tecan Software Add-ons for Freedom EVOware”, 3-3). To allow the use
of the add-ons, the Freedom EVOware hardlock must be upgraded. This is
usually done using an activation tool (software). After purchasing the add-on
software, the activation tool is normally sent to you by eMail. The activation tool is
3-2
Freedom EVOware Software Manual, 393172, en, V2.3
3 - Product Description
Intended Use of the Freedom EVOware Software
specifically coded for the serial number of your hardlock and will not carry out the
upgrade if the serial number does not match.
3.1.3 Tecan Software Add-ons for Freedom EVOware
Several software add-ons are available for Freedom EVOware which extend the
functionality with special features. The following add-ons are currently available:
Freedom EVOware Sample Oriented Add-On
Freedom EVOware Sample Tracking Add-On
Hit-Picking Wizard for Freedom EVOware
Normalization Software for Freedom EVOware
See D “Glossary”, D-1 for an overview of these products. See the help files and/
or software manuals of these add-ons for full details (see 1.2.1 “Related
Documentation and Software”, 1-3).
3.1.4 3D Simulation Tool for the Pipetting Instrument
The Freedom EVOware setup program lets you install a 3D simulation tool
(EVOSim) which can be used to visualize the movements which are carried out by
the arms of the Freedom EVO pipetting instrument (LiHa, RoMa, PnP and MCA)
when running Freedom EVOware scripts and processes. It can also be used to
visualize several other devices such as the Te-MO and the PosID-3.
EVOSim interprets the firmware (hardware) commands which are sent to the
pipetting instrument and sends the appropriate responses to Freedom EVOware.
To do this, the RS232 connection to the pipetting instrument is configured to
communicate with EVOSim instead.
Using an additional tool, EVOSim can also be used to monitor the communication
between Freedom EVOware and the pipetting instrument.
For more information, see A.14 “Configuring and Using the 3D Simulation Tool
EVOSim”, A-103.
3.2 Intended Use of the Freedom EVOware Software
Freedom EVOware 2.3 in this configuration is only intended for scientific or
research applications and must not be used for human clinical or diagnostic
procedures.
Certain hardware options are only intended for research applications. If you install
device drivers which are not part of the general purpose configuration, you will
see a warning message during the installation that your Freedom EVOware
installation is now only suitable for research applications.
Choose About in the Help menu to get information on the current configuration of
your Freedom EVOware installation. Refer to 3.4 “Supported Pipetting
Instruments and Tecan Options”, 3-4 for a list of the options which are
supported by the current configuration. Refer to the Getting Started Guide for a list
of all of the options which are supported by the Freedom EVOware software.
Freedom EVOware Software Manual, 393172, en, V2.3
3-3
3 - Product Description
What’s New in Freedom EVOware 2.3
3.3 What’s New in Freedom EVOware 2.3
In addition to a large number of detail improvements, the key new Freedom
EVOware features in version 2.3 are as follows:
General & Usability
Support and new commands for the Common Gripper Module (CGM) of the
MCA384 pipetting arm (see 15.69, 15-179).
3.4 Supported Pipetting Instruments and Tecan Options
Freedom EVOware 2.3 is intended for the following Tecan pipetting instruments:
Freedom EVO 100, 150, 200
Freedom EVO 75
Freedom EVOware 2.3 in this configuration supports the following optional
devices, instrument options and systems:
Liquid Handling Arm (LiHa) with 2, 4 or 8 tips
8 Plus 1 Access option for the Freedom EVO 75 pipetting instrument
Multi Channel Arm (MCA) with 96 tips.
Multi Channel Arm 384 (MCA384) with 96 or 384 tips.
CGM option (Common Gripper Module) for the MCA384
Tecan Pressure Monitored Pipetting (PMP) option
XP dilutor
XLP dilutor
XMP dilutor (for the Freedom EVO 75 pipetting instrument)
Standard tips, low volume tips and disposable tips (DITIs)
Te-PS (Tecan Positioning System) for the Freedom EVO pipetting instrument
Low Volume Option
Te-Fill Option
Lower DITI Tip Eject option
Robot Manipulator (RoMa), standard and long version
Pick and Place arm (PnP)
PosID-2 Barcode Scanner
PosID-3 Barcode Scanner
Fast Wash Option (FWO)
Monitored Pump Option (MPO)
SPO (Sensored Pump Option)
Liquid Container Supervisor (LICOS)
Vacuum Assisted Waste option for viscous liquids
Te-MO 3/3 and Te-MO 5/3 (Tecan Multi-pipetting Option)
Te-MO 96-tip pipetting head
Te-MO 384-tip pipetting head
Wash & Refill Center for the Te-MO
6 or 10 x Te-MO Active Positioning Carriers, depending on Te-MO version (2
solenoids)
1 x Te-Stack Labware Stacker for the Te-MO (up to 3 stacks per stacker)
3-4
Freedom EVOware Software Manual, 393172, en, V2.3
3 - Product Description
Supported Pipetting Instruments and Tecan Options
4 x Te-Stack Labware Stacker, stand-alone (2 stacks per stacker)
Te-VacS (Tecan SPE Vacuum Separator)
Collector plate repositioner and de-salter valve options for the Te-VacS
Te-MagS (Tecan Magnetic Bead Separator)
Te-Shake (Orbital Shaker)
MIO (Monitored Incubator Option) with or without shaking option
Carousel/Carousel HS with or without barcode scanner
Carousel NT
Connection Box for the Te-Flow (In Situ Hybridization) option
Lauda Waterbath for the Te-Flow (In Situ Hybridization) option (GenePaint
chamber racks)
Symbol LS-1220 Barcode Scanner
Symbol MS-954 Barcode Scanner
Hettich Centrifuge
Te-Link (transfer rail / conveyor system)
Mettler Balance
Mettler WM pooling balance (for the Liquid Arrival Check feature)
96PW Washer
PW384 Washer (via WinWash Plus software)
PW384 Washer (via PW384GP driver)
Columbus Plate Washer
REMP Reatrix 2D barcode reader for REMP sample tubes
REMP PHS Portrait Heat Sealer for microplates
REMP ACD Automatic Capper Decapper
Tecan Safety features (4 x doorlocks and pause/resume button)
Tecan Access/Status feature (status lamp and acoustic alarm device)
Tecan Magellan data reduction and analysis software for Tecan microplate
readers.
Tecan microplate readers (raw data mode):
– Sunrise
– SpectraFluor
– SpectraFluor+
– Genios
– Genios Pro
– Safire
– Ultra
– Ultra Evolution
Freedom EVOware Software Manual, 393172, en, V2.3
3-5
3 - Product Description
Supported Pipetting Instruments and Tecan Options
3.4.1 Supported Combinations of Robot Arms
The Freedom EVO 100, 150 and 200 pipetting instruments can be configured with
a maximum of three robot arms on the X slide as follows:
Up to two liquid handling arms (LiHa)
One Multi Channel Arm (MCA)
One Multi Channel Arm 384 (MCA384), optionally fitted with one Common
Gripper Module (CGM)
Up to two plate robot (RoMa) arms
Up to two tube robot (PnP) arms
The total number of arms of all types is three (e.g. 1 x LiHa and 2 x RoMa or
1 x LiHa, 1 x RoMa and 1 x PnP).
The Freedom EVO 75 pipetting instrument can only be fitted with one liquid
handling arm.
3.4.2 Supported Firmware Versions for the Optional Devices
The Device Information tab in the Devices section of the Configuration Tool lists
the device firmware version for which each of the Freedom EVOware device
drivers was originally developed. In many cases, the device driver will control the
device correctly even if the stated firmware version and the actual firmware
version of the device are not identical. See 8.4.1.1 “Device Information Tab”, 821.
Some devices have a firmware command (e.g. Get_Version) which allows you to
interrogate their firmware version using the Freedom EVOware Configuration Tool
(see 8.4.3.4 “Test Tab”, 8-37). For descriptions of the pre-configured firmware
commands which are available for each device, see the section “Firmware
commands” for the device (see 8.5 “Device Driver Configuration”, 8-39).
3-6
Freedom EVOware Software Manual, 393172, en, V2.3
3 - Product Description
Computer Requirements
3.5 Computer Requirements
The PC on which Freedom EVOware will be installed must meet the following
minimum requirements:
Operating
System
Hardware
Freedom EVOware 2.3 is compatible with the following operating system:
Microsoft Windows XP Professional (Service Pack 3)
Microsoft Windows Vista
A CPU that is suitable for running Windows XP Professional (recommended
minimum specification Pentium 4 or Athlon cpu running at 3 GHz; optimum
dual core or multi processor system running at 2.33 GHz).
RAM size should be suitable for running Windows XP Professional
(recommended minimum size 1 GB, optimum 1 GB for Freedom EVOware
Standard, 2 GB for Freedom EVOware Plus).
Virtual memory as required by the operating system.
An SVGA monitor with 32,768 colors or more and a minimum resolution of
1024x768 pixels (optimum 1280x1024 or higher). To ensure correct display of
the dialog boxes, we recommend you to configure your display settings in the
Control Panel for Small Fonts;
Mouse.
CD-ROM drive.
Hard disk with about 5 GB of unused space for the Freedom EVOware
software, optional software components, scripts and log files;
One serial interface for the data interface to the pipetting instrument (if you
intend to connect the pipetting instrument via RS232);
Additional serial interfaces are required by some of the instrument options
(e.g. the Mettler balance);
A hardlock (dongle) for either Freedom EVOware Standard or Freedom
EVOware Plus (a hardlock is a copy protection device which is plugged into
the USB port of your PC). See 3.1.2 “Hardlocks for Freedom EVOware
Standard and Freedom EVOware Plus”, 3-2.
One USB port for the hardlock;
One USB port for the data interface to the pipetting instrument (if you intend to
connect the pipetting instrument via USB);
Printer (optional).
ATTENTION
Risk of the script or process aborting.
The PC must be configured to prevent it from going in to Sleep Mode even if
no user inputs take place for an extended period of time.
The USB power management in Windows must be switched off to avoid losing
the connection to the pipetting instrument, which may otherwise occur in rare
cases. See 4.5.1 “USB Power Management Setting”, 4-14 for more
information.
If you want to connect the pipetting instrument via USB, it should be connected
directly to the PC. This also applies to USB connections from hardware options, if
they have their own cable. The use of an external USB hub should be avoided. If
an external USB hub is absolutely necessary, use an active USB hub (i.e. with its
Freedom EVOware Software Manual, 393172, en, V2.3
3-7
3 - Product Description
Computer Requirements
own power supply). Data transfer problems may occur if you use a passive USB
hub, especially if you are also using the PMP option. Please note that some port
replicators for laptops contain a USB hub.
Security
The following table shows which permissions are needed for installing and
running the Freedom EVOware 2.3 software.
Tab. 3-1 Minimum Security Permissions
Activity
Windows XP
Professional
Program installation
MS Windows Local
Administrator
Running the program
MS Windows Power User
Freedom EVOware has four user levels – Administrator, Application Specialist,
Power User and Operator. The Freedom EVOware user levels are independent of
the MS Windows user levels.
All four Freedom EVOware user levels need read/write access to the Freedom
EVOware directory and its subdirectories during program runtime. The Freedom
EVOware user level Operator cannot create or modify scripts or processes, but
Freedom EVOware still needs read/write access to write log and export files and
audit trail data.
3-8
Freedom EVOware Software Manual, 393172, en, V2.3
4 - Installation
Before You Start
4 Installation
Purpose of This
Chapter
This chapter describes the installation of the Freedom EVOware software on a
target computer. Read it carefully before starting the installation.
4.1 Before You Start
Cross
References
Target
Computers
Other
Requirements
List of cross references to information provided in other sections:
Information
References
Supported pipetting instruments and
Tecan options
See section 3.4,
3-4
Computer requirements
See section 3.5,
3-7
Freedom EVOware must be installed on target computers that are or will be
connected to the pipetting instrument
The PW384 Plate Washer driver requires the Tecan WinWash Plus software,
which must be installed separately. It is normally provided with the washer.
WinWash Plus is not necessary for the PW384GP Plate Washer driver.
Drivers for microplate readers (e.g. photometers) require the RdrOLE and XFluor4
software, which must be installed separately. It is normally provided with the
reader. Freedom EVOware can also control microplate readers using the
Magellan software.
The Magellan driver requires the Tecan Magellan software, which must be
installed separately. The Magellan software has built-in drivers for Tecan
microplate readers. If you intend to use the Magellan software, it is not necessary
to install the driver for your reader when you install Freedom EVOware unless you
also want to use the reader in raw data mode.
Note: You cannot run the FACTS 5.x dynamic scheduling software and Freedom
EVOware on the same computer. Please un-install FACTS before you install
Freedom EVOware.
Who Should
Install?
The Freedom EVOware software must be installed by a properly trained
specialist.
Access Rights
To install Freedom EVOware on the target computer, you need local administrator
access rights for the Microsoft Windows XP operating system. Refer to the
Microsoft documentation for further information on access rights.
For information on the access rights which are required to use Freedom
EVOware, see 3.5 “Computer Requirements”, 3-7, Security.
Saving User
Data
If Freedom EVOware is already installed on your PC, before running the
installation program we recommend you to back up your Freedom EVOware data
files, scripts and processes to exchangeable media or to a network or temporary
directory (not within the Freedom EVOware <install_path>). See 8.2 “Backing Up
Freedom EVOware Software Manual, 393172, en, V2.3
4-1
4 - Installation
Installing Freedom EVOware
and Restoring Your Configuration”, 8-3. You can also use the Export Import tool
to save your scripts and processes and other configuration data (see
A.9.4 “Export/Import Tool”, A-38).
Saving these files is especially recommended in the following cases:
Before un-installing (removing) the Freedom EVOware software.
Before installing a newer version of Freedom EVOware.
Before modifying an existing Freedom EVOware installation.
Saving Audit
Trail Data
If you are required to comply with the FDA regulations, make sure you keep
archive copies of all audit trail, trace and log files. These files are located in the
<install_path>\AuditTrail directory. They are not backed up by the Backup function
- you should use the Audit Trail Archiving function instead. See A.9.6 “Audit Trail
Archiving tool”, A-47 and B “Appendix B - FDA 21 CFR Part 11 Compliance”,
B-1.
4.2 Installing Freedom EVOware
Installation
Directory
The First Steps
By default, Freedom EVOware will be installed into the <windrive>\Program
Files\Tecan\Freedom EVOware directory. <windrive> is the drive in which the
Windows operating system is installed.
We recommend you to accept this directory. However, you may install Freedom
EVOware into a different drive/directory if you want.
To install Freedom EVOware:
1
Finish all Windows programs that are currently running.
2
Make sure that anti-virus programs (if installed) are not running and that all
processes associated with anti-virus programs are stopped. Anti-virus
programs can cause the installation of Microsoft .NET Framework and .NET
Framework components to fail.
3
Make sure that you are logged in as the local administrator.
4
Insert the installation CD in the computer’s CD-ROM drive.
5
In the Windows Explorer, open your CD-ROM drive and change to the
Freedom EVOware\Disk1 directory.
Certain hardware options are only intended for research applications. Refer to
“Supported pipetting instruments and Tecan options” in the Getting Started Guide
for a list of all of the options which are supported by the Freedom EVOware
software.
4-2
6
To install Freedom EVOware with the device drivers which are intended for
general purpose applications, run Setup.exe in the Disk1 directory.
7
To install Freedom EVOware with all available device drivers (including drivers
for devices which are only intended for research applications), run
Setup_ro.exe in the Disk1 directory.
8
The Welcome window appears.
Freedom EVOware Software Manual, 393172, en, V2.3
4 - Installation
Installing Freedom EVOware
Fig. 4-1
9
Welcome window
Click Next to continue.
You are then shown a window displaying the license agreement.
Note: The real window may look slightly different from the one shown below.
License
Agreement
Fig. 4-2
License Agreement window
10 Read the license agreement and click I accept the terms ... if you are in
agreement. Continue with Next.
Destination
Path
A destination path for the application is suggested in the Destination Folder
window.
Freedom EVOware Software Manual, 393172, en, V2.3
4-3
4 - Installation
Installing Freedom EVOware
Fig. 4-3
Destination Folder window
11 Do one of the following:
–
–
Selecting
Components
In most cases, you can accept the suggested destination path. Continue
with Next in this case.
If necessary, choose a different destination folder with Change….
Continue with Next when you are ready.
The Custom Setup window appears.
Fig. 4-4
Custom Setup window
The choices you will see in the Custom Setup window depend on whether you are
installing the general purpose configuration or the research only configuration.
Certain Tecan options are only intended for research applications.
The Custom Setup window lets you choose the components you wish to install.
You can expand the Instrument Configurations, the Devices and Options and
the Software Options groups by clicking on the ’+’ box on the left side. This
4-4
Freedom EVOware Software Manual, 393172, en, V2.3
4 - Installation
Installing Freedom EVOware
shows the individual components in these groups. Click the ’-’ box if you want to
collapse the group again.
When you highlight a group, additional information about the installation of the
group is shown in the Feature Description panel on the right side of the window.
The EVOware group contains components which are always needed.
The Instrument Configurations group contains the drivers for the robot arms
(liquid handling arm, LiHa; plate robots, RoMa; tube robot, PnP; MCA, multichannel arm; PosID-3, barcode scanner).
The Options group contains drivers for optional hardware such as the TeShake orbital shaker and the Te-MagS magnetic bead separator.
The Storage Devices group contains drivers for optional hardware such as
the Te-Stack plate stacker and the Carousel.
The Incubators group contains drivers for optional hardware such as the MIO
heated incubator.
The Washers group contains drivers for optional hardware such as the
PW384 Power Washer.
The Readers group contains drivers for optional hardware such as the
Sunrise microplate absorbance reader and the interface driver for the
Magellan option.
The REMP group contains drivers for REMP hardware such as the Reatrix 2D
barcode scanner for REMP tubes.
The 3rd Party group contains drivers for optional hardware from other
manufacturers such as the Hettich centrifuge.
The Software Options group contains drivers for software options such as
Freedom EVOSim 3D Simulation Tool (see 3.1.4 “3D Simulation Tool for the
Pipetting Instrument”, 3-3).
The Legacy Drivers group contains drivers for optional legacy hardware
which is no longer sold by Tecan, such as the Columbus washer, which is now
superseded by other Tecan washers.
For more information on the optional hardware see 16 “Device Commands”,
16-1.
12 Click on each component you want to install and choose This feature will be
installed on local hard drive:
Fig. 4-5
Selecting components
Freedom EVOware Software Manual, 393172, en, V2.3
4-5
4 - Installation
Installing Freedom EVOware
You should select the devices and options that are currently available on your
pipetting instrument. In the above example, the first plate robot, the liquid handling
arm, the tube robot and the Te-Stack have already been selected for installation.
Each pipetting instrument can be configured with a maximum of three robot arms
as follows:
Up to two liquid handling arms (LiHa)
One Multi Channel Arm (MCA)
One Multi Channel Arm 384 (MCA384), optionally fitted with one Common
Gripper Module (CGM)
Up to two plate robot (RoMa) arms
Up to two tube robot (PnP) arms
The total number of arms of all types is three (e.g. 1 x LiHa plus 2 x RoMa or 1 x
LiHa plus 1 x RoMa plus 1 x PnP).
The PW384 Plate Washer driver requires the Tecan WinWash Plus software,
which must be installed separately. It is normally provided with the washer.
WinWash Plus is not necessary for the PW384GP Plate Washer driver.
Drivers for microplate readers (e.g. photometers) require the RdrOLE and XFluor4
software, which must be installed separately. It is normally provided with the
reader. Freedom EVOware can also control microplate readers using the
Magellan software.
The Magellan driver requires the Tecan Magellan software, which must be
installed separately. The Magellan software has built-in drivers for Tecan
microplate readers. If you intend to use the Magellan software, it is not necessary
to install the driver for your reader when you install Freedom EVOware unless you
also want to use the reader in raw data mode.
If necessary, you can run the Freedom EVOware installation program again at a
later time and add missing components or remove components you no longer
need.
When you highlight a component, additional information about that component is
shown in the Feature Description panel on the right side of the window.
13 Click Next after you have made your choices.
You will then be asked if you want to begin the installation:
Fig. 4-6
4-6
Ready to Install window
Freedom EVOware Software Manual, 393172, en, V2.3
4 - Installation
Installing Freedom EVOware
Click Install if you want to continue.
If you have previously installed Tecan software components on your PC which use
the Tecan User Management System (such as Freedom EVOware or the Tecan
Magellan software), the Tecan User Management System needs to be updated
too and you will be prompted for the name and password of the Administrator
acccount.
After entering the name and password, you will be shown the following window:
Fig. 4-7
Installation
Complete
Installing Freedom EVOware window
When the installation is finished, the InstallShield Wizard Completed window is
shown:
Fig. 4-8
InstallShield Wizard Completed window
14 Confirm with Finish. The installation of the Freedom EVOware software is
now complete.
15 Start Freedom EVOware as the Tecan administrator and carry out the
following checks:
Freedom EVOware Software Manual, 393172, en, V2.3
4-7
4 - Installation
Modifying, Removing or Repairing Your Installation
–
–
–
Choose About in the Help menu and check that you have installed the
intended software version (version for general purpose applications or
version for scientific research applications with extended device support).
Check that the correct hardlock (dongle) is fitted to your PC. The hardlock
ID number is shown in the About box. If there is no hardlock fitted, “Non
upgradable hardlock” is shown. See also 6.7.3 “Status Bar”, 6-20,
Dongle type.
Check that you are running the intended software feature level (Freedom
EVOware Standard or Freedom EVOware Plus). This is shown in the
status bar and is also dependent on your hardlock (see 6.7.3 “Status Bar”,
6-20, Feature level).
Note: If you have made a backup copy of configuration and user data from a
previous Freedom EVOware installation, you should now use the Restore function
to restore it.
4.3 Modifying, Removing or Repairing Your Installation
If you run the Freedom EVOware installation program when Freedom EVOware is
already installed, you are given the options of modifying, removing or repairing the
installation.
Note: You cannot modify, remove or repair Freedom EVOware by choosing Add
or Remove Programs in the Windows Control Panel.
Insert the Freedom EVOware CD and proceed as described in 4.2 “Installing
Freedom EVOware”, 4-2. The installation program automatically detects the
software components which you installed previously and will start the
Maintenance Program.
After confirming the Welcome window by clicking Next you are shown the
Program Maintenance window:
Fig. 4-9
Program Maintenance window
The three options which are provided are as follows:
4-8
Freedom EVOware Software Manual, 393172, en, V2.3
4 - Installation
Modifying, Removing or Repairing Your Installation
Modify: This function allows you to add further software components to the
existing Freedom EVOware installation or to remove software components
that are no longer needed.
Certain software components are only intended for research applications. If
you use the installation program Setup_ro.exe to install options which are not
included in the general purpose configuration, you will see a warning
message during the installation that your Freedom EVOware installation is
now configured for research applications and is no longer intended for general
purpose applications.
If you need to switch back to the general purpose configuration, you must
uninstall and then re-install Freedom EVOware.
Repair: This function reinstalls all components of the current software
configuration on the target computer. Note that this option does not allow you
to add new functions or remove existing functions. Repairing an existing
installation may be necessary if the current installation does not run properly
(e.g. due to a corrupt file or a file that was deleted unintentionally).
Remove: Completely uninstalls (removes) the Freedom EVOware software
from the target computer.
If you choose to un-install Freedom EVOware completely, you will be asked if you
also want to delete the user management data. Click No if you want to continue
using other Tecan software components such as Magellan (or if you plan to reinstall Freedom EVOware again). If you click Yes, you will have to set up your
Tecan users and groups again (see 7 “Tecan User Management System”, 7-1).
Note: Before modifying, repairing or removing Freedom EVOware, we
recommend you to back up your Freedom EVOware data files, scripts and
processes to exchangeable media or to a network or temporary directory (not
within the Freedom EVOware <install_path>). See 8.2 “Backing Up and Restoring
Your Configuration”, 8-3.
Decide What
to Do
16 Click the appropriate option button:
– Modify to add or remove components.
– Repair to reinstall the program.
– Remove to uninstall.
17 Click Next and continue with your section. You should then follow the
instructions which are displayed.
If you choose Modify, you can choose the Freedom EVOware components which
you want to add or remove (see Fig. 4-5 “Selecting components”, 4-5). The
installation program automatically detects the software components which you
installed previously.
Maintenance
Complete
When the selected operation is finished, the InstallShield Wizard Completed
window is shown:
Freedom EVOware Software Manual, 393172, en, V2.3
4-9
4 - Installation
Modifying, Removing or Repairing Your Installation
Fig. 4-10 InstallShield Wizard Completed window for an un-install operation
18 Click Finish to end the installation program.
4.3.1 Upgrading to the Latest Software Version
To upgrade Freedom EVOware to the latest software version, insert the Freedom
EVOware CD and proceed as described in 4.2 “Installing Freedom EVOware”,
4-2. The installation program automatically detects the existing installation and
will start the upgrade process.
Additional steps which may be required when upgrading are dependent in part on
the pipetting instrument and system options which you are already using. For this
reason upgrading is normally carried out by a Tecan representative.
Where applicable, please observe your local regulations for re-certification of your
pipetting system following a software upgrade.
We recommend you to back up your Freedom EVOware data files, scripts and
processes to exchangeable media or to a network or temporary directory before
upgrading (see 8.2 “Backing Up and Restoring Your Configuration”, 8-3).
4.3.1.1 Checking the software version which is currently installed
Choose About Freedom EVOware in the Help menu if you want to check which
version of Freedom EVOware you are currently using. The dialog box shows the
Freedom EVOware version, the service pack level and the software build code.
It also shows the intended use of your Freedom EVOware configuration - general
purpose applications or research use only. See 3.2 “Intended Use of the Freedom
EVOware Software”, 3-3 for more information.
Alternatively, click the Windows Start button and choose Control Panel. Then
double-click on Add or Remove Programs. Navigate in the list to the entry
EVOware and choose Click here for support information. You need local
administrator access rights for the Microsoft Windows XP operating system to use
the Control Panel.
4 - 10
Freedom EVOware Software Manual, 393172, en, V2.3
4 - Installation
Modifying, Removing or Repairing Your Installation
4.3.2 Installation of Service Packs and Hotfixes
Service packs are minor upgrades and/or are used to correct small faults in the
Freedom EVOware software. To install a service pack, follow the instructions
which are provided.
Note: Some types of service pack require Freedom EVOware to be re-installed.
Other types of service pack do not require Freedom EVOware to be re-installed.
You must backup up your system and data files before un-installing Freedom
EVOware (see 8.2 “Backing Up and Restoring Your Configuration”, 8-3). Then
use the Restore function after Freedom EVOware has been re-installed.
Hotfixes are used to correct small faults in the Freedom EVOware software.
Hotfixes do not required Freedom EVOware to be re-installed. To install a hotfix,
follow the instructions which are provided.
Choose About Freedom EVOware in the Help menu if you want to check which
version of Freedom EVOware you are currently using. The dialog box shows the
Freedom EVOware version, the service pack level and the software build code.
Freedom EVOware Software Manual, 393172, en, V2.3
4 - 11
4 - Installation
The Freedom EVOware Hardlock
4.4 The Freedom EVOware Hardlock
To use the full functionality of the Freedom EVOware software, you must attach a
hardlock (dongle) to a USB port on your PC. Freedom EVOware checks for the
presence of the hardlock when it starts and will switch to offline mode if the
hardlock cannot be found. See 3.1.2 “Hardlocks for Freedom EVOware Standard
and Freedom EVOware Plus”, 3-2.
4.5 Installing the USB driver for the Freedom EVO
pipetting instrument
If you want to connect the Freedom EVO pipetting instrument to the PC which is
running Freedom EVOware through USB instead of using the serial (RS232) port,
you must carry out the following steps to install the USB driver.
The following steps are only necessary when you connect the pipetting instrument
to the PC for the first time.
Please install Freedom EVOware before connecting the USB cable.
Switch on the PC, switch on the pipetting instrument and plug in the USB cable.
The following dialog box should appear:
Fig. 4-11 Installing the USB driver, step 1
Click No, not this time and click Next. The following dialog box is shown:
4 - 12
Freedom EVOware Software Manual, 393172, en, V2.3
4 - Installation
Installing the USB driver for the Freedom EVO pipetting instrument
Fig. 4-12 Installing the USB driver, step 2
Click Install the software automatically (Recommended) and click Next. The
following dialog box is shown while the driver is being installed:
Fig. 4-13 Installing the USB driver, step 3
The following dialog box is shown when installation is nearly finished.:
Freedom EVOware Software Manual, 393172, en, V2.3
4 - 13
4 - Installation
Installing the USB driver for the Freedom EVO pipetting instrument
Fig. 4-14 Installing the USB driver, step 4
Click Finish to complete the installation of the USB driver.
The following figure shows a view of the PC’s Device Manager with the USB
driver correctly installed (at the bottom of the list).
Fig. 4-15 Device Manager showing the correctly installed USB driver
4.5.1 USB Power Management Setting
The USB power management in Windows must be switched off to avoid losing the
connection to the pipetting instrument, which may otherwise occur in rare cases.
4 - 14
Freedom EVOware Software Manual, 393172, en, V2.3
4 - Installation
Installing the USB driver for the Freedom EVO pipetting instrument
To switch off the USB power management in Windows, choose Start -> Control
Panel -> System -> Hardware -> Device Manager -> Universal Serial Bus
Controllers -> Power Management tab:
Fig. 4-16 Device Manager, USB Power Management tab
4.5.2 USB Hubs
If you want to connect the pipetting instrument via USB, it should be connected
directly to the PC. This also applies to USB connections from hardware options, if
they have their own cable. The use of an external USB hub should be avoided. If
an external USB hub is absolutely necessary, use an active USB hub (i.e. with its
own power supply). Data transfer problems may occur if you use a passive USB
hub, especially if you are also using the PMP option. Please note that some port
replicators for laptops contain a USB hub.
Freedom EVOware Software Manual, 393172, en, V2.3
4 - 15
4 - Installation
Installing the USB driver for the Freedom EVO pipetting instrument
4 - 16
Freedom EVOware Software Manual, 393172, en, V2.3
5 - Starting Freedom EVOware
Login Screen
5 Starting Freedom EVOware
This chapter describes how to start Freedom EVOware and gives an overview of
the main window.
5.1 Login Screen
To start Freedom EVOware, click the Start button in the Windows Task Bar and
choose All Programs > Tecan > EVOware > EVOware Standard or EVOware
Plus, depending on which version you want to run.
You will be shown the Login dialog box:
Fig. 5-1
Login dialog box
Enter you user name and password for Freedom EVOware and click the large
green arrow on the right. Contact your Freedom EVOware Administrator if you do
not have a user name and password.
Note: When Freedom EVOware is started for the first time after installation, you
will be prompted to assign a user name and password for the Freedom EVOware
Administrator (see 7 “Tecan User Management System”, 7-1).
5.1.1 Loading the device drivers
After clicking the large green arrow you will be shown a progress bar as Freedom
EVOware loads all of the software components and device drivers:
Freedom EVOware Software Manual, 393172, en, V2.3
5-1
5 - Starting Freedom EVOware
Login Screen
Fig. 5-2
Loading the device drivers
5.1.2 Driver pre-loading
To ensure that Freedom EVOware starts quickly, above all if you have chosen to
install and use a large number of device drivers, the installation program installs a
shortcut which automatically loads all of the Tecan drivers each time the PC is
started. The drivers remain loaded while the PC is running and it is no longer
necessary to load them each time you start Freedom EVOware.
To unload the Tecan drivers when you quit Freedom EVOware, choose Exit,
unload drivers in the File menu. Alternatively, check the Unload drivers checkbox
in the Startup Wizard and click Exit. Driver pre-loading will be available again
when you restart your PC.
Remove the shortcut “EVOware Prelaunch“ from the MS Windows Autostart
folder if you do not want the drivers to be loaded each time the PC is started. If
you do this, Freedom EVOware will take somewhat longer to start in future.
The driver pre-loading feature can be disabled in the Configuration Tool (see
8.4.1.1 “Device Information Tab”, 8-21).
5-2
Freedom EVOware Software Manual, 393172, en, V2.3
5 - Starting Freedom EVOware
Login Screen
5.1.3 Driver loading errors
If errors are detected when loading the device drivers, the following dialog box will
show status messages:
Fig. 5-3
Loading the device drivers - status messages and warnings
Use the scroll bar to inspect last column (Info), which explains the reason for the
error.
If one of the error messages is shown truncated because it is too long, lengthen
the field in the dialog box and activate the horizontal scroll bar by double-clicking
on the divider (short vertical line in the header) at the end of the field.
Some of the device drivers will output errors or warnings during loading if
Freedom EVOware detects configuration errors.
5.1.4 Instrument and Hardlock Detection
Freedom EVOware will run in offline mode if it cannot detect a hardlock (dongle)
when it starts. See 3.1.2 “Hardlocks for Freedom EVOware Standard and
Freedom EVOware Plus”, 3-2.
It will also run in offline mode if it cannot detect a pipetting instrument on one of
the USB ports or on the configured COM port (it checks the USB ports first).
The following dialog box will be shown if Freedom EVOware cannot communicate
with the pipetting instrument:
Fig. 5-4
Starting Freedom EVOware - no pipetting instrument detected
Click No to continue with offline mode. See also 4.5.1 “USB Power Management
Setting”, 4-14 and 4.5.2 “USB Hubs”, 4-15.
In offline mode, firmware commands such as movement commands are not sent
to the pipetting instrument (i.e. pipetting does not take place).
Freedom EVOware Software Manual, 393172, en, V2.3
5-3
5 - Starting Freedom EVOware
Login Screen
Freedom EVOware’s current operating mode is shown in the Status Bar (see
6.7.3 “Status Bar”, 6-20).
See 8.4.3.3 “Com Ports Tab”, 8-36 for information on configuring the pipetting
instrument’s COM port. The USB ports do not need configuring.
5-4
Freedom EVOware Software Manual, 393172, en, V2.3
5 - Starting Freedom EVOware
Startup Wizard, Freedom EVOware Standard
5.2 Startup Wizard, Freedom EVOware Standard
After all of the modules and drivers have been loaded and you have logged in as
the Freedom EVOware Administrator or Application Specialist, you will be shown
the Freedom EVOware Standard startup wizard.
Fig. 5-5
Freedom EVOware Standard startup wizard
This dialog box is also shown if you choose Startup Wizard from the File menu.
The options in the Startup Wizard are as follows:
Run an existing script
This option opens the Selection dialog box to allow you to choose the script
you want to run. After choosing the script you are shown the Runtime
Controller dialog box (see 12.1 “Running a Liquid Handling Script”, 12-1).
Run maintenance
This option is used to run instrument maintenance tasks.
Create a new script
This option opens the Selection dialog box to allow you to choose a template
for the new script. The template contains information on e.g. the worktable
layout.
Edit an existing script
This option opens the Selection dialog box to allow you to choose the script
you want to edit or view. After loading the script, you can also choose to run it.
Configure system
This option is used to configure general settings for the Freedom EVOware
software (see 8 “Configuration Tool”, 8-1).
Do not show this dialog again
Check this checkbox if you do not want Freedom EVOware to show the
Startup Wizard when it starts next time. In this case, Freedom EVOware
Standard will start by opening the Script Editor with the pipetting script which
was last used. To deactivate this feature again, open the Startup Wizard by
choosing Startup Wizard in the File menu or click the Startup button in the
Toolbar and uncheck the checkbox.
Freedom EVOware Software Manual, 393172, en, V2.3
5-5
5 - Starting Freedom EVOware
Startup Wizard, Freedom EVOware Standard
Unload drivers
To ensure that Freedom EVOware starts quickly, all of the Tecan drivers you
have chosen to use are loaded each time the PC is started and remain loaded
while the PC is running (see 5.1.2 “Driver pre-loading”, 5-2). Check this
checkbox before you click Exit if you want to unload the drivers when you quit
Freedom EVOware. The drivers should be unloaded e.g. if Freedom
EVOware reports an internal error. The drivers will be loaded again when you
re-start Freedom EVOware.
Note: If you have made configuration changes using the Configuration Tool, the
drivers will be unloaded automatically when you quit Freedom EVOware.
Exit
Quit Freedom EVOware.
5.2.1 Startup Wizard for Freedom EVOware Standard Operators
Operators of Freedom EVOware Standard have less access rights than
Administrators or Application Specialists (see 7.2 “Freedom EVOware Access
Rights (User Levels)”, 7-3). Accordingly, they are presented with a startup
wizard which has less functions:
Fig. 5-6
Freedom EVOware Standard startup wizard for Operators
See 5.2 “Startup Wizard, Freedom EVOware Standard”,
the functions.
5-6
5-5 for a description of
Freedom EVOware Software Manual, 393172, en, V2.3
5 - Starting Freedom EVOware
Startup Wizard, Freedom EVOware Plus
5.3 Startup Wizard, Freedom EVOware Plus
After all of the modules and drivers have been loaded and you have logged in as
the Freedom EVOware Administrator or Application Specialist, you will be shown
the Freedom EVOware Plus startup wizard.
Fig. 5-7
Freedom EVOware Plus startup wizard
This dialog box is also shown if you choose Startup Wizard from the File menu.
The options in the Startup Wizard are as follows:
Run an existing process
This option is used run an existing process or method. Click the large green
arrow and choose the process or method you want to run in the Selection
dialog box which follows. After choosing the process or method, you are
shown the Runtime Controller dialog box (see 12.2 “Running and Optimizing a
Process (Freedom EVOware Plus)”, 12-5).
A method is a set of one or more processes to be run together (either
sequentially or in parallel). The method file also contains information on the
runtime settings. Methods are created and saved in the Runtime Controller.
Run maintenance
This option is used to run instrument maintenance tasks. See 6.4.2 “Run
Maintenance”, 6-10.
Create a new process
This option opens the Selection dialog box to allow you to choose a template
for the new process. The template contains information on e.g. the worktable
layout.
Edit an existing process
This option opens the Selection dialog box to allow you to choose the process
you want to edit or view. After loading the process, you can also choose to run
it.
Configure system
This option is used to configure general settings for the Freedom EVOware
software (see 8 “Configuration Tool”, 8-1).
Freedom EVOware Software Manual, 393172, en, V2.3
5-7
5 - Starting Freedom EVOware
Startup Wizard, Freedom EVOware Plus
Do not show this dialog again
Check this checkbox if you do not want Freedom EVOware to show the
Startup Wizard when it starts next time. In this case, Freedom EVOware Plus
will start by opening the Process Editor with the process which was last used.
To deactivate this feature again, open the Startup Wizard by choosing Startup
Wizard in the File menu or click the Startup button in the Toolbar and uncheck
the checkbox.
Unload drivers
To ensure that Freedom EVOware starts quickly, all of the Tecan drivers you
have chosen to use are loaded each time the PC is started and remain loaded
while the PC is running (see 5.1.2 “Driver pre-loading”, 5-2). Check this
checkbox before you click Exit if you want to unload the drivers when you quit
Freedom EVOware. The drivers should be unloaded e.g. if Freedom
EVOware reports an internal error. The drivers will be loaded again when you
re-start Freedom EVOware.
Note: If you have made configuration changes using the Configuration Tool, the
drivers will be unloaded automatically when you quit Freedom EVOware.
Exit
Quit Freedom EVOware.
5.3.1 Startup Wizard for Freedom EVOware Plus Operators
Operators of Freedom EVOware Plus have less access rights than Administrators
or Application Specialists (see 7.2 “Freedom EVOware Access Rights (User
Levels)”, 7-3). Accordingly, they are presented with a startup wizard which has
less functions:
Fig. 5-8
Freedom EVOware Plus startup wizard for Operators
See 5.3 “Startup Wizard, Freedom EVOware Plus”,
functions.
5-8
5-7 for a description of the
Freedom EVOware Software Manual, 393172, en, V2.3
5 - Starting Freedom EVOware
Overview of the Main Window in Freedom EVOware
5.4 Overview of the Main Window in Freedom EVOware
The following section describes the key features of the Freedom EVOware main
window. See also 6 “Menus”, 6-1 and 13 “Overview of Freedom EVOware
Commands”, 13-1.
5.4.1 Control Bar
The Control Bar is the vertical area at the left of the screen. It is used to select the
objects and commands which you need to set up your process or script. It is also
used to configure the liquid classes for the liquid you want to pipette and to set up
robot vectors.
The Control Bar is only visible for the user levels Administrator, Application
Specialist and Power User (not for operators).
Six colored tabs can be seen to the right of the Control Bar. Click on the tabs to
select the type of object you want to work with. Each of the tabs contains a list of
objects which are arranged in groups. For example, the Labware tab contains
groups for Microplates, Tips, Wash and Waste, Troughs, Tubes, Miscellaneous
and Allowed Labware. Click
in the group’s title bar to collapse the group.
Fig. 5-9
Control Bar showing the Commands tab
Freedom EVOware Software Manual, 393172, en, V2.3
5-9
5 - Starting Freedom EVOware
Overview of the Main Window in Freedom EVOware
If necessary, you can resize the Control Bar by dragging the divider to the left of
the colored tabs.
5.4.1.1 My Favorites
Click this tab to view your favorite direct commands, device commands, liquid
handling commands, robot vectors and labware. The list already contains a few
standard items when Freedom EVOware has just been installed. To add a copy of
an object from another Control Bar group to My Favorites, right-click the object
and choose Add to favorites from the context menu. To remove the object again
from My Favorites, right-click the object (in the My Favorites section or in the
section where the object belongs) and choose Remove from favorites.
If you click My Favorites and select a carrier, you will not see an Allowed Labware
section (below the Labware section) if none of your favorite labware items are
compatible with this carrier. Click the Labware tab instead to see all of the allowed
labware for this carrier.
5.4.1.2 Commands
Click this tab to view the available script commands and device commands. The
commands are divided into groups (e.g. Liquid Handling Arm commands).
In addition, the Commands tab also contains up to seven direct commands (see
5.4.1.3 “Direct commands”, 5-10).
In Freedom EVOware Plus, when the Script Editor is open the Commands tab of
the Control Bar only shows script commands (commands which are used for
writing pipetting scripts, see 13.1 “Overview of Script Commands”, 13-1). When
the Process Editor is open, the Commands tab of the Control Bar only shows
device commands (commands for the optional devices, see 13.2 “Overview of
Device Commands”, 13-12).
In Freedom EVOware Standard, the Control Bar always shows both command
types (it does not have a Process Editor).
If you cannot find the device that you want to use in the Control Bar, you must run
the installation program again and install the respective device driver (see
4.3 “Modifying, Removing or Repairing Your Installation”, 4-8). Also check
whether the driver has been installed but is currently deactivated (see
8.4.1.1 “Device Information Tab”, 8-21, Start checkbox).
5.4.1.3 Direct commands
Direct commands are used for service purposes, e.g. for picking up DITIs or
flushing the tips. They provide a convenient alternative to creating and running a
pipetting or maintenance script which carries out the same function.
The Control Bar only shows direct commands for devices whose device driver is
installed and loaded. For example, the direct command “Load the Te-MO” is only
shown in the Control Bar if you have installed and have chosen to load the Te-MO
driver. The DITI commands are only shown if the LiHa is configured with DITIs.
To run a direct command, right click on the command and choose Run in the
context menu.
Direct commands are only meaningful If you are running Freedom EVOware in
real mode and the PC is connected to a pipetting instrument. If Freedom
EVOware is running in offline mode, in most cases the dialog box of the direct
command will not open when you double-click on the command.
Many of the direct commands have an equivalent script command. In these
cases, click the cross-reference link and refer to the script command for a
description of the parameters which are required:
5 - 10
Freedom EVOware Software Manual, 393172, en, V2.3
5 - Starting Freedom EVOware
Overview of the Main Window in Freedom EVOware
Prime WRC: This direct command is used to prime the wash block of the TeMO 96, Te-MO 384 or MCA. Choose the required wash block from the pull
down list. The list shows all wash blocks which are currently positioned in the
Worktable Editor. Then specify the required priming duration and click Start.
Load the Te-MO: See 15.56.12 “Load the Te-MO Command”, 15-138.
Fill Te-MO 384: See 15.56.13 “Fill system (Te-MO 384) Command”, 15-138.
Flush: This is used to flush the LiHa. See 15.4 “Wash Tips Command”, 158.
Prime Te-Fill: See 15.16 “Te-Fill Prime Command”, 15-26.
Drop DITIs: See 15.8 “Drop DITIs Command”, 15-14. Note: Freedom
EVOware automatically opens the dialog box for this command if the Runtime
Controller encounters a Get DITIs command when tips are already mounted
from a previous pipetting operation.
Set DITI Position: See 15.9 “Set DITI Position Command”, 15-15.
Get DITIs: See 15.7 “Get DITIs Command”, 15-13.
LiHa Safe Flush: This direct command is used to discard the contents of the
LiHa tips to a specified location (typically into a microplate, tube rack, a trough
or the wash station waste). If hazardous liquid is left in the tips after
completing a script or process, you can use this command to empty the tips
for safety reasons. It can also be used to recover the contents of the tips if the
script or process was aborted for some reason before it completed.
If your pipetting instrument is fitted with more than one LiHa, choose the one
you want to use and select the labware you want to use by clicking on the
labware in the Worktable Editor. Then click on the well(s) you want to use. See
15.2 “Dispense Command”, 15-3 for information on the other parameters
you need to specify (e.g. tip selection).
Send Firmware Command:
– Command: Specify the firmware command you want to send to the
instrument. For example, “A1RPZ0” returns the current Z position of each
of the LiHa tips. See the respective instrument manual for a list of
firmware commands. Firmware commands are nearly always written
uppercase.
– Response: Some firmware commands terminate with one or more return
parameters (numeric values) separated by commas. See the respective
instrument manual for information on return parameters from firmware
commands.
– Error Code: All firmware commands terminate with an error code.The
error code is 0 if the command was executed with no errors.
WARNING
Risk of injury to operating personnel or damage to the equipment
Take care when sending firmware commands. Sending the wrong commands
can damage the instrument or objects in its workspace, hurt yourself or other
people.
5.4.1.4 Direct commands for the MCA96
Direct commands are used for service purposes, e.g. for picking up DITIs or
flushing the tips. They provide a convenient alternative to creating and running a
pipetting or maintenance script which carries out the same function. For general
information on direct commands see 5.4.1.3 “Direct commands”, 5-10.
Freedom EVOware Software Manual, 393172, en, V2.3
5 - 11
5 - Starting Freedom EVOware
Overview of the Main Window in Freedom EVOware
MCA96 Get Tips: This direct command is used to get MCA96 DITIs or tip
blocks. See 15.68.5 “MCA96 Get DITIs Command”, 15-167 and
15.68.7 “MCA96 Get Tip Block Command”, 15-170.
MCA96 Drop Tips: This direct command is used to put down MCA96 DITIs or
tip blocks. See 15.68.6 “MCA96 Drop DITIs Command”, 15-168 and
15.68.8 “MCA96 Drop Tip Block Command”, 15-171.
MCA96 Safe Flush: This direct command is used to discard the contents of
the MCA96 tips to a specified location (typically into a microplate or a trough).
If hazardous liquid is left in the tips after completing a script or process, you
can use this command to empty the tips for safety reasons. It can also be
used to recover the contents of the tips if the script or process was aborted for
some reason before it completed.
5.4.1.5 Direct commands for the MCA384 and the CGM
Direct commands are used for service purposes, e.g. for picking up DITIs or
flushing the tips. They provide a convenient alternative to creating and running a
pipetting or maintenance script which carries out the same function. For general
information on direct commands see 5.4.1.3 “Direct commands”, 5-10.
MCA384 Get DITIs: See 15.69.8 “MCA384 Get DITIs Command”, 15-191.
MCA384 Drop DITIs: See 15.69.9 “MCA384 Drop DITIs Command”, 15194.
MCA384 Get Head Adapter: See 15.69.6 “MCA384 Get Head Adapter
Command”, 15-189.
MCA384 Drop Head Adapter: See 15.69.7 “MCA384 Drop Head Adapter
Command”, 15-190.
MCA384 Safe Flush: This direct command is used to discard the contents of
the MCA96 tips to a specified location (typically into a microplate or a trough).
If hazardous liquid is left in the tips after completing a script or process, you
can use this command to empty the tips for safety reasons. It can also be
used to recover the contents of the tips if the script or process was aborted for
some reason before it completed.
Dock CGM. This direct command is used to dock the common gripper module
of the MCA384. See also 15.69.13 “MCA384 Dock CGM Command”, 15204.
Undock CGM. This direct command is used to undock the common gripper
module of the MCA384 and rotate the gripper to a specified angle (in 0.1
degrees steps). See also 15.69.14 “MCA384 Undock CGM Command”, 15204.
5.4.1.6 Robot Vectors
Click this tab to view the movement vectors which have been defined for the plate
robot, the multi channel arm and the tube robot.
This tab only shows home vectors and vectors which were not assigned to
carriers or labware items in the Edit Carrier or Edit Labware dialog boxes.
Plate robot vectors specify movements to be carried out by the RoMa (Robot
Manipulator). Current Tecan pipetting instruments can be fitted with up to two
RoMas. See 9.6 “Creating and Editing Plate Robot Vectors”, 9-55.
Multi channel arm vectors specify movements to be carried out by the MCA.
Current Tecan pipetting instruments can only be fitted with one MCA. MCA
vectors are very similar to RoMa vectors. See 9.8 “Creating and Editing MCA
Vectors”, 9-69.
5 - 12
Freedom EVOware Software Manual, 393172, en, V2.3
5 - Starting Freedom EVOware
Overview of the Main Window in Freedom EVOware
Tube robot vectors specify movements to be carried out by the PnP (Pick & Place
robot). Current Tecan pipetting instruments can be fitted with up to two PnP arms.
See 9.7 “Creating and Editing Tube Robot Vectors”, 9-63.
Home vectors specify the movements to be carried out by the RoMa and/or PnP
in order to move the robot back to its home (parking) position. See 9.6.4 “Defining
the Home Position for a RoMa”, 9-62 and 9.7.4 “Defining the Home Position for
a PnP”, 9-69. You cannot and do not need to define a home vector for the multi
channel arm.
To create a new plate robot vector, right-click the group heading Robot Vectors,
choose New, enter a descriptive name of your choice and click OK to open the
Teach Plate Robot Vector dialog box (see 9.6.2 “Teach Plate Robot Vector Dialog
Box”, 9-59).
If your pipetting instrument is fitted with more than one plate robot, it is
recommended to suffix the vector name with “1” or “2”, e.g. “MoveBlock2” to
indicate which RoMa was used for teaching (Note: the vector name does not
influence which RoMa is used, either in Freedom EVOware Plus or in Freedom
EVOware Standard). In Freedom EVOware Standard, user-defined plate robot
vectors can be used in Transfer Labware and RoMa Vector commands. See also
17.3 “Site-specific RoMa vectors”, 17-13.
To create a new tube robot vector, right-click the group heading Robot Vectors
(Tubes), choose New, enter a descriptive name of your choice and click OK to
open the Teach Tube Robot Vector dialog box (see 9.7.2 “Teach Tube Robot
Vector Dialog Box”, 9-65). Use the name “Home1” to create a home vector for
tube robot 1.
To create a new multi channel arm vector, right-click the group heading Multi
Channel Arm Vectors, choose New, enter a descriptive name of your choice and
click OK to open the Teach Multi Channel Arm Vector dialog box (see 9.6.2 “Teach
Plate Robot Vector Dialog Box”, 9-59).
To view and/or edit plate robot and multi channel arm vectors which are
associated with carriers, double click on the carrier in the Labware section of the
Control Bar and click Edit. To view and/or edit tube robot vectors which are
associated with labware items, double click on the labware item in the Labware
section of the Control Bar and click Edit.
5.4.1.7 Liquid Classes
Click this tab to view the available liquid classes. A liquid class is a set of liquid
handling parameters. It specifies aspirating and dispensing speeds, airgaps, liquid
detection modes, etc. The values of the parameters are dependent on the
physical characteristics of the liquid. See 10 “Configuring Liquid Classes”, 10-1
for information on creating and editing liquid classes.
5.4.1.8 Carriers
Click this tab to view the available carriers. A carrier is a removable support on the
instrument's worktable (i.e. deck) which holds one or more pieces of labware (e.g.
a microplate) in place. The carrier name indicates the type of labware for which it
is designed. Optional devices which can be placed on the worktable (e.g. the TeShake shaker) are also treated as carriers.
Carriers are normally fitted to the instrument’s worktable at pre-defined grid
positions (see Fig. 11-8, 11-20).
The Carriers tab is subdivided into groups for Devices, Hotels, Microplate
Carriers, DITI Carriers, Wash Stations, Trough Carriers, Tube Carriers (tube
racks) and Miscellaneous Carriers.
See 9.5 “Configuring Carriers”, 9-39 for information on creating and editing
carrier templates.
Freedom EVOware Software Manual, 393172, en, V2.3
5 - 13
5 - Starting Freedom EVOware
Overview of the Main Window in Freedom EVOware
The Freedom EVOware database already contains a large selection of predefined carrier types. You only need to create or edit carriers if you cannot find a
standard item which is suitable for your needs.
5.4.1.9 Labware
Click this tab to view the available labware. Labware refers to consumable items
such as microplates or sample tubes. Microplates have a regular arrangement of
containers or cavities (wells) for holding liquids or samples. To allow pipetting,
microplates are normally placed on microplate carriers and tubes are inserted in
tube racks.
The Labware tab is subdivided into groups for Microplates, Tips, Wash and
Waste, Troughs, Tubes, Miscellaneous and Allowed Labware.
Allowed Labware shows the labware types which are compatible with the
currently selected carrier. If you have already put a carrier onto the Worktable
Editor, click on it to see which labware types are allowed.
See 9.4 “Configuring Labware”, 9-15 for information on creating and editing
labware templates.
The Freedom EVOware database already contains a large selection of predefined labware types. You only need to create or edit labware if you cannot find a
standard item which is suitable for your needs.
5.4.1.10 Search
Click this tab to view the Control Bar objects which were found using the search
function.
5.4.1.11 Searching for objects in the Control Bar
To search for any object or command in the Control Bar, enter the name or part of
the name in the text field at the bottom and click . The search results are shown
in the Search tab of the Control Bar.
5.4.1.12 Context Menu for Objects in the Control Bar
Right-click on an object in the Control Bar to open the context menu. The context
menu is context sensitive and the options it contains depend on the currently
active Control Bar tab and on the object you have selected. The available options
in the context menu are as follows:
Edit
Edit the selected object.
Delete
Delete the selected object.
New
Create a new object of the same type.
Duplicate
Duplicate the selected object. You will be prompted for a new name.
Rename
Rename the selected object. You will be prompted for a new name.
Add to favorites
Add the selected object to the My Favorites tab of the Control Bar.
Remove from favorites
Remove the selected object from the My Favorites tab of the Control Bar.
5 - 14
Freedom EVOware Software Manual, 393172, en, V2.3
5 - Starting Freedom EVOware
Overview of the Main Window in Freedom EVOware
Hide
Hides the selected object. Use this feature if you want to hide items which you
do not normally use. Depending on the Show/Hide status of the Control Bar,
the object will either disappear immediately or it will be shown in gray. See
5.4.1.13 “Context Menu for Group Titles in the Control Bar”, 5-15.
Show
Shows the selected object (cancels the hidden status). Before you can do this
you must make the hidden objects visible (see 5.4.1.13 “Context Menu for
Group Titles in the Control Bar”, 5-15).
Run Command
This option is only available for device commands and is used for service
purposes, e.g. to initialize the device manually or to test correct functioning
(see 16.1 “Service Functions”, 16-1). See 6.4.2 “Run Maintenance”, 6-10
for information on instrument maintenance functions. Maintenance functions
are scripts which are created using the Script Editor.
5.4.1.13 Context Menu for Group Titles in the Control Bar
Right click on a group title in the in the Control Bar to open the context menu. The
context menu is context sensitive and the options it contains depend on the
currently active Control Bar tab and on the group title you have selected (e.g.
“Carriers”). The available options in the context menu are as follows:
Edit
Edit the selected object.
New
Create a new object.
Show hidden items
Shows all objects you have marked as hidden in gray. This allows you to
cancel the hidden status of an object. To cancel the hidden status, right-click
on the object and choose Show.
Hide hidden items
Completely hides all objects you have marked as hidden.
5.4.2 Infopads
Infopads are small windows which contain prompts, hints or context-related
information on the task which is currently being carried out or the object which is
currently selected. The Infopads are positioned to the right of the Control Bar.
Freedom EVOware Software Manual, 393172, en, V2.3
5 - 15
5 - Starting Freedom EVOware
Overview of the Main Window in Freedom EVOware
Fig. 5-10 Lower infopad with a labware item selected
If your pipetting script contains Comment commands, the comment texts and the
corresponding script line numbers are listed as hyperlinks in the upper Infopad.
Click on one of the entries to jump to the script line which contains the Comment
command (script navigation feature). See 15.37 “Comment Command”, 1597 for more information.
If you need more space for the Process Editor or the Worktable Editor, you can
collapse the upper and/or lower Infopad by clicking
in the title bars. You can
also resize the windows by dragging the dividers between the windows.
The hyperlinks in the How To section of the infopads take you to short animations
(films) which demonstrate the currently selected task. The animations are stored
in AVI format and will be shown e.g. in Windows Media Player.
5.4.2.1 Hyperlinks in the Infopads
The infopads are provided with hyperlinks (blue underlined text) which are
shortcuts to commonly needed actions. The hyperlinks are context sensitive and
the available options depend on what you have selected (e.g. a carrier or labware
item in the Worktable Editor):
Edit carrier type
This option is shown when you select a carrier or a carrier which is a device. It
opens the Edit Carrier dialog box and is equivalent to double-clicking the
selected carrier in the Control Bar.
Edit labware type
This option is shown when you select a labware item. It opens the Edit
Labware dialog box and is equivalent to double-clicking the selected labware
item in the Control Bar.
Edit liquid class
This opens the Liquid Class Editor and is equivalent to double-clicking the
selected liquid class in the Control Bar.
5 - 16
Freedom EVOware Software Manual, 393172, en, V2.3
5 - Starting Freedom EVOware
Overview of the Main Window in Freedom EVOware
Show labware
This option is shown when you select a carrier or a carrier which is a device. It
opens the Labware tab of the Control Panel. Allowed Labware then shows the
labware types which are compatible with the selected carrier.
Show me
This runs a short animation (film) to demonstrate the currently selected task.
The animations are stored in AVI format and will be shown e.g. in Windows
Media Player.
5.4.3 The Process Editor (Freedom EVOware Plus)
In Freedom EVOware Plus, the sequence of steps which are required to carry out
a particular application or experiment, for example to extract the substance you
are looking for, is called a process. The process specifies the operations you want
the pipetting instrument to execute. Processes are set up in the Process Editor,
which is shown at the top right of the screen.
In the Process Editor, each process step (such as centrifuging a plate or pipetting
to a plate) is shown as an icon, whereby each icon is associated with a single
device such as a centrifuge, a storage device or the liquid handling arm.
See 13.2 “Overview of Device Commands”, 13-12 for a list of device commands
which are provided with the standard Freedom EVOware installation. When
installing Freedom EVOware, you normally only install the device drivers which
you want to use.
There are four basic types of icon - process steps, labware source icons, final
position icons and on-the-fly icons:
Fig. 5-11 Process Editor showing an example process
If you need more space for the Process Editor, you can collapse the Worktable
Editor by clicking
in the title bar. In addition, you can collapse the Infopad
windows by clicking
in the title bars. You can also resize the windows by
dragging the dividers between the windows.
Process steps are created by dragging commands from the Control Bar onto the
Process Editor. A process is then created by interlinking the process steps to
create the workflow which is required by your application or experiment.
The bottom part of each process step icon shows the name or names of the
labware items which are involved in the operation (so-called object parameters).
Freedom EVOware Software Manual, 393172, en, V2.3
5 - 17
5 - Starting Freedom EVOware
Overview of the Main Window in Freedom EVOware
Each process step is associated with a single device, and devices can typically
carry out several different functions. For example, a plate washer may have a
washing function, a priming function and an initialization function. This is handled
by associating the process step with a command. Each device driver contains a
pre-configured command for each of the device functions (the available
commands are shown in the Commands section of the Control Bar, below the
symbol for the device). Many of the commands have one or more execution
parameters (such as the duration of the washing operation). When you create a
process step by dragging the command onto the Process Editor, you will be
prompted to specify the execution parameters.
Each command can be associated with pre-actions and/or post-actions –
additional commands which are carried out before and after the main command.
For example, if you want to scan a plate in a Tecan Ultra reader with the Measure
command, it is necessary to move the plate to the reader using the plate robot
(with the RoMa_MoveObject command) and to open the reader door before the
plate gets there (with an Ultra_Open command). Another RoMa_MoveObject
command and an Ultra_Close command are needed when the scanning operation
is finished. The process diagram is simplified by implementing these standard
actions using pre-actions and post-actions which are linked to the Measure
command. It avoids having to specify additional process steps. In most cases,
Freedom EVOware configures suitable pre-actions and post-actions for you
automatically. This applies above all to the plate robot (RoMa_MoveObject
command).
Freedom EVOware keeps track of the location of the labware on your instrument,
and - to take the above example - automatically configures a suitable
RoMa_MoveObject command to move the plate from its current location to the
reader.
The pipette command for the liquid handling arm has a large number of subcommands which are used for writing so-called scripts. In Freedom EVOware
Plus, if you drag the pipette command onto the Process Editor, this opens
scripting mode and the Process Editor is replaced by the Script Editor (see
below).
Labware source icons are used at the start of a process to represent the source of
the labware items (e.g. microplates or tubes) which are needed by the process.
See 11.6 “Labware Generator (Freedom EVOware Plus)”, 11-16 for information
on creating labware source icons.
Final position icons are used to specify the final position of the labware after the
process has finished. They are often associated with a storage device such as a
hotel or with a waste position for discarding used labware. Final position icons are
not necessary if you want to return the labware to its original position after the
process has finished, for example back to a storage device such as a carousel
(the “base” location). Final position icons are created by right-clicking on the
background of the Process Editor and choosing Choose Final Position from the
context menu.
On-the-fly icons represent on-the-fly devices. Such devices always require the
use of a plate robot (RoMa) to carry out their function. A typical example of this
type of icon is the Symbol barcode scanner which is rigidly fixed to the
instrument's deck and cannot move towards the labware to scan it. Instead, a
plate robot is used to move the labware past the barcode scanner “on-the-fly”
while carrying out something else, for example when moving the labware from
one carrier (or process step) to another. The barcode scanner is then instructed to
perform a read operation when the plate robot presents the labware. An on-the-fly
icon for the barcode scanner is created by dragging the Barcode scanner
command from the Control Bar onto a line which links two process steps.
See 11 “Getting Started - Setting Up a New Script or Process”, 11-1 for more
information.
5 - 18
Freedom EVOware Software Manual, 393172, en, V2.3
5 - Starting Freedom EVOware
Overview of the Main Window in Freedom EVOware
5.4.3.1 Context Menu for the Process Editor
Right-click on the Process Editor to open the context menu. The context menu is
context sensitive and the options it contains depend on what you have selected (a
process step icon or the background). The available options in the context menu
are as follows if you select the background of the Process Editor:
Choose Final Position
This option adds a final position icon for labware. Final position icons are used
to specify the final position of the labware after the process has finished. Final
position icons are not necessary if you want to return the labware to its original
position after the process has finished. See the above description of the
Process Editor.
Paste
This option is available if you have selected a process step and choose Copy.
Arrows
This option allows you to choose between Rectangular and Straight arrows for
the lines which connect the process steps. The choice you make solely
depends on your personal taste.
See 9.10 “Local Settings for Process Steps (Context Menu)”, 9-70 and
9.11 “Local Settings for Labware Source Icons (Context Menu)”, 9-77 for
information on the options in the context menu if you select a process step.
5.4.4 The Script Editor
The Script Editor, which is shown at the top right of the screen, is used to set up a
pipetting (liquid handling) script.
Freedom
EVOware Plus
Freedom
EVOware
Standard
To open the Script Editor in Freedom EVOware Plus, select the Pipette command
in the Control Bar (Liquid Handling Arm section) and drag it to the Process Editor
window.
After creating the script, click the Accept to accept your changes and return to the
Process Editor. If you want to edit or view the script later, you can open the Script
Editor again by double-clicking on the icon for the Pipette command in the
Process Editor.
Freedom EVOware Standard does not have a Process Editor, and displays the
Script Editor as soon as it has started.
Freedom EVOware Software Manual, 393172, en, V2.3
5 - 19
5 - Starting Freedom EVOware
Overview of the Main Window in Freedom EVOware
Fig. 5-12 Script Editor with three scripts open
If you have opened more than one pipetting script, click the tabs below the Script
Editor window if you want to view, edit, save or close one of the other scripts.
If you need more space for the Script Editor, you can collapse the Worktable
Editor by clicking
in the title bar. In addition, you can collapse the Infopad
windows by clicking
in the title bars. You can also resize the windows by
dragging the dividers between the windows.
5.4.4.1 Context Menu for the Script Editor
Right-click on the Script Editor to open the context menu. The available options in
the context menu are as follows:
Edit
Edit the selected script line.
Delete
Delete the selected script line(s).
Cut
Cut the selected script line(s).
Copy
Copy the selected script line(s).
Paste
Paste the script line(s) in the clipboard at the current cursor position.
Seach & Replace
Opens the Search and Replace dialog box which allows you to replace strings
in the pipetting script (e.g. the string you have specified in the User Prompt
command). If you do not specify a string in the Replace with field, matching
strings are deleted (you cannot carry out a search without replacing).
Context Menu for the Tabs of the Script Editor
Save
Save the selected script.
Close
Close the selected script.
5 - 20
Freedom EVOware Software Manual, 393172, en, V2.3
5 - Starting Freedom EVOware
Overview of the Main Window in Freedom EVOware
Open
Open an additional script.
5.4.5 Worktable Editor
The Worktable Editor at the bottom right of the screen is a graphical
representation of the pipetting instrument's worktable (deck). It shows the carriers
and labware that are physically placed on the worktable. It also shows icons for
the devices which are installed.
Fig. 5-13 Example worktable showing carriers, labware and labware labels
The gray area in the Worktable Editor represents that part of the worktable which
can be accessed by the Liquid Handling Arm. This is called the pipetting area. The
real worktable is normally larger than this. For example, hotels (storage shelves
for plates) are normally put at the rear of the worktable, behind the pipetting area.
The displayed size of the worktable is scaled automatically depending on the size
of the Worktable Editor window. The displayed size of the worktable will be very
small if the Worktable Editor window is small and/or a large number of device
icons are visible (i.e. you have installed a large number of devices).
In the above figure, 84 microplates have been put in the carousel.
If you need more space for the Worktable Editor, you can collapse the Infopad
windows by clicking
in the title bars. You can also resize the windows by
dragging the dividers between the windows. In addition, you can rearrange the
device icons by dragging them to the required position.
Before programming your pipetting operations, you need to place the carriers and
labware which you want to use on to the worktable.
The worktable layout is stored in the script or process file together with the
information on the script or process.
5.4.5.1 Shared worktable layouts
Freedom EVOware detects automatically if scripts, processes, maintenance
scripts and templates use an identical worktable layout. If you save one of these
file types after changing the worktable layout, you will be asked whether you also
want to update the worktable information in the other files which share the same
worktable.
Freedom EVOware Software Manual, 393172, en, V2.3
5 - 21
5 - Starting Freedom EVOware
Overview of the Main Window in Freedom EVOware
If you are saving a pipetting script, you will only be prompted about other pipetting
scripts, maintenance scripts or script templates which share the same worktable
layout. If you are saving a process, you will only be prompted about other
processes or process templates which share the same worktable layout.
Fig. 5-14 Prompt when saving worktable layouts which are shared
Select the files whose worktable you also want to update or choose Cancel
saving. The list shows all files of the selected file types (Scripts / Processes),
Maintenance and Templates) which share the same worktable layout.
The following options are available:
Cancel saving
Cancel the saving operation.
Only save the active file
Update the file you are saving but do not update the other files which share
this worktable.
Save the file and update the worktable for the selected items too
Update the worktable information for the active file and for the files you have
selected.
If one of the other scripts which shares the same worktable layout is also
currently open in the Script Editor, you will be prompted to save it first before
updating.
Do not show this dialog again
Check this checkbox to hide this dialog box in future. In this case, Freedom
EVOware will only save worktable layout changes for the current file in future.
To make this dialog box appear again (i.e. to uncheck the checkbox), press
the Shift key when you choose Save.
5.4.5.2 Context Menu for the Worktable Editor
Right-click on the Worktable Editor to open the context menu. The context menu
is context sensitive and the options it contains depend on what you have selected
(a carrier, a labware item or the background). The available options in the context
menu are as follows:
5 - 22
Freedom EVOware Software Manual, 393172, en, V2.3
5 - Starting Freedom EVOware
Overview of the Main Window in Freedom EVOware
Set Grid
This option is used to move a robot-only device (a device which is not
accessible to the liquid handling arm) to a new position on the worktable.
Choose the required grid position and click OK. Tip: If you click on a device
icon in the Worktable Editor, an orange line shows the grid position which is
occupied by the device.
To move a carrier to a new position, click the edge of the carrier to select it
and drag to the required position.
Modify labware
This option is only available for generated labware (labware in feeder devices
or a labware repository on the worktable) and is only for Freedom EVOware
Plus. It opens the labware generator to allow you to edit the settings you have
made (see 11.6 “Labware Generator (Freedom EVOware Plus)”, 11-16).
Edit labware type
This option is used to edit labware definitions.
Set label
This option is used to assign a label (i.e. a user-defined name) to the selected
labware item.
Edit carrier
This option is used to edit carrier definitions.
Delete
This deletes the selected object. You cannot delete carriers if labware is
already positioned on the carrier (you must delete the labware first).
Automatic replace
This activates the automatic DITI handling feature for the selected site. This
option is only available for Freedom EVOware Plus and is only available for
DITI racks. See 17.1 “Using the Automatic DITI Handling feature”, 17-1.
Waste for DiTi racks
This activates the automatic DITI rack waste feature for the selected site. This
option is only available for Freedom EVOware Plus and is only available for
the DITI waste site of a DITI carrier with waste. It is intended for discarding
empty stackable DITI racks and spacers. See 17.1 “Using the Automatic DITI
Handling feature”, 17-1.
Save worktable as template
This option is used to save the current worktable layout as a template. The
template file which is saved contains configuration settings for Freedom
EVOware, for example the positions of the devices and the labware in the
Worktable Editor. To choose this option, right click on the worktable (but not on
labware items).
Freedom EVOware Software Manual, 393172, en, V2.3
5 - 23
5 - Starting Freedom EVOware
Exiting Freedom EVOware
5.5 Exiting Freedom EVOware
To exit Freedom EVOware, choose Exit or Exit, unload drivers in the File menu.
In the latter case, you will be shown a progress bar as Freedom EVOware
unloads all of the software components and device drivers. If errors are detected
when unloading the device drivers, a dialog box will appear with status messages.
Use the scroll bar to inspect last column (Info), which explains the reason for the
error.
In Freedom EVOware Plus, you must first close the Script Editor before you can
exit.
5 - 24
Freedom EVOware Software Manual, 393172, en, V2.3
6 - Menus
File Menu
6 Menus
This chapter describes the menus in the Freedom EVOware software. It also
describes the toolbar.
The menus are only available if you have been given Freedom EVOware
Administrator or Application Specialist rights in the Tecan User Management
system. Freedom EVOware Operators are only allowed to run existing scripts or
processes and/or instrument maintenance scripts (see 7.2 “Freedom EVOware
Access Rights (User Levels)”, 7-3).
Most of the features and dialog boxes in Freedom EVOware are provided with
context-sensitive help. See 1.5 “Context-Sensitive Help System”, 1-5 for more
information.
6.1 File Menu
Freedom
EVOware
Standard,
Freedom
EVOware Plus
This menu lets you create a new Freedom EVOware script or process, to open an
existing script or process, to save the current script or process, to print the
contents of a script or process, to run the Start Up Wizard, to Lock Freedom
EVOware if you want to leave the PC unattended and to quit Freedom EVOware.
6.1.1 New
Freedom
EVOware
Standard,
Freedom
EVOware Plus
This option lets you create a new script or process. A dialog box is opened to
allow you to choose an existing script or process template:
Fig. 6-1
Choosing a template file
Choose the required template and click the green arrow.
Click Default Dir to choose a template from the default template directory for
scripts or processes. Click User defined and navigate to another directory to
choose a template from a different location. The currently chosen directory is
shown in the dialog box.
Freedom EVOware Software Manual, 393172, en, V2.3
6-1
6 - Menus
File Menu
If required, click the column headers Name or Date to sort the list by name or
date. Type the first letter of the template name to jump to templates starting with
that letter.
Template files with a green icon (“worktable templates”) only contain worktable
settings for Freedom EVOware, for example the positions of the devices and the
labware in the Worktable Editor.
Template files which contain pipetting scripts (“script templates”) have a brown
icon.
Template files which contain processes (“process templates”) have a blue icon.
Non-validated files are shown with a gray icon if you have enabled the file
validation feature (see C.2 “Setting the Validation Status of Scripts and
Processes”, C-4).
Click All if you want to see all of the templates which are available. Click History to
see the most recently used templates. Click Favorites to see your favorite
templates.
Context menus for this dialog box
Add to favorites
Right click a template in the All or History view and choose Add to favorites
from the context menu to add the template to the Favorites view.
Remove from favorites
Right click a template in the Favorites view and choose Remove from
favorites from the context menu to remove the template from the Favorites
view.
Views
Right click the Favorites, History or All button to open a context menu. You
can then choose the view which you prefer to use (Favorites, History or All)
the next time you open this dialog box.
Validate, Remove validation
These two options are only shown if you have enabled the file validation
feature. See C.2 “Setting the Validation Status of Scripts and Processes”,
4.
6-2
C-
Freedom EVOware Software Manual, 393172, en, V2.3
6 - Menus
File Menu
6.1.2 Open
Freedom
EVOware
Standard
This option opens an existing script. A dialog box is opened to allow you to
choose the script you want:
Fig. 6-2
Choosing an existing script
Choose the required script file and click the green arrow.
Click Default Dir to choose a script from the default script directory. Click User
defined and navigate to another directory to choose a script from a different
location. The currently chosen directory is shown in the dialog box.
If required, click the column headers Name or Date to sort the list by name or
date. Type the first letter of the script name to jump to scripts starting with that
letter.
Click All if you want to see all of the scripts which are available. Click History to
see the most recently used scripts. Click Favorites to see your favorite scripts.
Script files have a green icon. Maintenance scripts have a light orange icon and
are are listed after the normal scripts.
Non-validated files are shown with a gray icon if you have enabled the file
validation feature (see C.2 “Setting the Validation Status of Scripts and
Processes”, C-4). They are not shown at all if your Freedom EVOware access
level is Operator.
Context menus for this dialog box
Add to favorites
Right click a script in the All or History view and choose Add to favorites from
the context menu to add the script to the Favorites view.
Remove from favorites
Right click a script in the Favorites view and choose Remove from favorites
from the context menu to remove the script from the Favorites view.
Views
Right click the Favorites, History or All button to open a context menu. You
can then choose the view which you prefer to use (Favorites, History or All)
the next time you open this dialog box.
Freedom EVOware Software Manual, 393172, en, V2.3
6-3
6 - Menus
File Menu
Validate, Remove validation
These two options are only shown if you have enabled the file validation
feature. See C.2 “Setting the Validation Status of Scripts and Processes”,
4.
Freedom
EVOware Plus
C-
This option opens an existing process. A dialog box is opened to allow you to
choose the process you want:
Fig. 6-3
Choosing an existing process
Choose the required process file and click the green arrow.
Click Default Dir to choose a process from the default process directory. Click
User defined and navigate to another directory to choose a process from a
different location. The currently chosen directory is shown in the dialog box.
Note: You must use the Export/Import Tool if you want to transfer processes
between different Freedom EVOware installations. Do not open and run a process
which has been saved on a network drive or USB stick by a different Freedom
EVOware installation. The process file may not contain all of the information
required to run the process correctly.
If required, click the column headers Name or Date to sort the list by name or
date. Type the first letter of the process name to jump to processes starting with
that letter.
Click All if you want to see all of the processes which are available. Click History
to see the most recently used processes. Click Favorites to see your favorite
processes.
Non-validated files are shown with a gray icon if you have enabled the file
validation feature (see C.2 “Setting the Validation Status of Scripts and
Processes”, C-4). They are not shown at all if your Freedom EVOware access
level is Operator.
Context menus for this dialog box
Add to favorites
Right click a process in the All or History view and choose Add to favorites
from the context menu to add the process to the Favorites view.
Remove from favorites
Right click a process in the Favorites view and choose Remove from favorites
from the context menu to remove the process from the Favorites view.
6-4
Freedom EVOware Software Manual, 393172, en, V2.3
6 - Menus
File Menu
Views
Right click the Favorites, History or All button to open a context menu. You
can then choose the view which you prefer to use (Favorites, History or All)
the next time you open this dialog box.
Validate, Remove validation
These two options are only shown if you have enabled the file validation
feature. See C.2 “Setting the Validation Status of Scripts and Processes”,
4.
C-
6.1.3 Save
Freedom
EVOware
Standard
This option lets you save the current script. The file which is saved also contains
information on the worktable layout which is used:
Fig. 6-4
Saving a script
Enter the required name of the script and click the green arrow.
Click Default Dir to save the script in the default script directory. Click User defined
and navigate to another directory to save the script in a different location. The
currently chosen directory is shown in the dialog box.
Click Script to save a normal script. Click Template to save a script template. Click
Maintenance to save a maintenance script (see 6.4.2 “Run Maintenance”, 610). Maintenance scripts are normal scripts which are saved in a special directory.
You cannot choose a user defined directory for maintenance scripts.
Freedom
EVOware Plus
This option lets you save the current process. You will be prompted for a file name
if you have not already assigned one. The file which is saved also contains
information on the worktable layout which is used:
Freedom EVOware Software Manual, 393172, en, V2.3
6-5
6 - Menus
File Menu
Fig. 6-5
Saving a process
Enter the required name of the process and click the green arrow.
Click Default Dir to save the process in the default process directory. Click User
defined and navigate to another directory to save the process in a different
location. The currently chosen directory is shown in the dialog box.
Click Process to save a normal process. Click Template to save a process
template.
Note: If you save a process on a network drive or USB stick, do not open it using
a different Freedom EVOware installation. The process file may not contain all of
the information required to run the process correctly on the other PC. You must
use the Export/Import to to transfer processes between different Freedom
EVOware installations.
6.1.4 Save As ...
Freedom
EVOware
Standard,
Freedom
EVOware Plus
This option lets you save the current script or process using a different file name
to before. You will be prompted for the file name. See 6.1.3 “Save”, 6-5 for
additional information.
6.1.5 Delete
This option lets you delete a script, process or method.
6.1.6 Print
If you have a printer connected to your computer, this option lets you print
Freedom EVOware scripts and processes. The following items are printed:
6-6
Freedom EVOware Software Manual, 393172, en, V2.3
6 - Menus
File Menu
Freedom
EVOware
Standard
The script
The worktable layout
The name of the script
The name of the currently logged in user
The page number, time and date
Freedom
EVOware Plus
If the Process Editor is open:
The process diagram
Information on each of the process steps
The worktable layout
The name of the currently logged in user
The page number, time and date
If the Script Editor is open:
The script
The worktable layout
The name of the script and the name of the process which uses it
The name of the currently logged in user
The page number, time and date
6.1.7 Start Up Wizard
This option runs the Start Up Wizard. See 5.2 “Startup Wizard, Freedom
EVOware Standard”, 5-5 and/or 5.3 “Startup Wizard, Freedom EVOware Plus”,
5-7.
6.1.8 Recent Scripts
This menu item is only shown in Freedom EVOware Standard. Freedom
EVOware keeps a list of up to eight of the most recently used scripts. You can
open one of the recent scripts by choosing it from the list.
6.1.9 Lock EVOware
This option is used to log out the current Freedom EVOware user. To prevent
unauthorized use of the software, you should do this if you plan to leave the PC
and the pipetting instrument unattended.
You must log in to Freedom EVOware again to regain control of the program.
Another use of the Lock function is to switch Freedom EVOware users when you
are handing over to another employee due to a change of laboratory staff
(evening shift etc.). In this case, you should log out and immediately log in again
with the new user name.
If you log out while a script or process is running, the script or process continues
to run. All other Freedom EVOware functions are disabled until you log in again.
Note: In an emergency, you can stop the script or process (i.e. the pipetting) by
pressing the Pause button on the pipetting instrument.
Freedom EVOware Software Manual, 393172, en, V2.3
6-7
6 - Menus
Edit Menu
Note: Irrespective of the Lock Freedom EVOware feature, users are automatically
logged out after a specified time during which no keyboard or mouse-click
activities have been detected (see 7 “Tecan User Management System”, 7-1).
6.1.10 Exit
This option closes all currently open scripts and/or processes, de-initializes the
instrument, saves configuration settings and quits Freedom EVOware.
6.1.11 Exit, Unload Drivers
To ensure that Freedom EVOware starts quickly, all of the Tecan drivers you have
chosen to use are loaded each time the PC is started and remain loaded while the
PC is running (see 5.1.2 “Driver pre-loading”, 5-2). Choose this option if you
want to unload the Tecan drivers when you quit Freedom EVOware. The drivers
should be unloaded e.g. if Freedom EVOware reports an internal error. The
drivers will be loaded again when you re-start Freedom EVOware.
If you run Freedom EVOware for an extended period without unloading the
drivers, this can result in a slight degradation of the performance (throughput of
your scripts and processes). Accordingly, we recommend you to unload the
drivers using the menu option Exit, Unload Drivers and then to restart Freedom
EVOware every six or seven days. Microsoft Windows, too, can suffer from a
slight degradation of the performance - independently of Freedom EVOware - if
you do not shut down and then restart your PC from time to time.
The driver pre-loading feature can be disabled in the Configuration Tool (see
8.4.1.1 “Device Information Tab”, 8-21).
Note: If you have made configuration changes using the Configuration Tool, the
drivers will be unloaded automatically when you quit Freedom EVOware.
6.2 Edit Menu
This menu lets you cut, copy and paste Freedom EVOware script commands and
process steps (see 11.4 “Setting Up a Pipetting Script in Freedom EVOware
Standard”, 11-4) and 11.5 “Setting Up a Process in Freedom EVOware Plus”,
11-7.
6.2.1 Undo / Redo
The two options in this sub-menu are used to undo and redo changes you have
made to a pipetting script in the Script Editor.
6.2.2 Undo / Redo Configuration
The two options in this sub-menu are used to undo and redo changes you have
made to the Freedom EVOware configuration settings for carriers, labware, liquid
classes and robot vectors.
6-8
Freedom EVOware Software Manual, 393172, en, V2.3
6 - Menus
View Menu
6.2.3 Cut / Copy / Paste
Freedom EVOware lets you duplicate and move script commands and process
steps using Cut, Copy & Paste. The same options are available if you right-click in
the Script Editor or Process Editor.
6.2.4 Search & Replace
This menu opens the Search and Replace dialog box which allows you to replace
strings in the pipetting script (e.g. the string you have specified in the User Prompt
command). If you do not specify a string in the Replace with field, matching strings
are deleted (you cannot carry out a search without replacing).
6.2.5 Auto-Validation
Pipetting scripts are normally checked for errors automatically when you add each
new command to the script (11.4.2.1 “Checking the Pipetting Script for Errors”,
11-5). Choose this menu item to toggle auto-validation on and off (a check mark
alongside this menu item shows that auto-validation is switched on).
If the script contains errors and auto-validation is switched on, the faulty
command(s) are marked in red and you cannot click Run in the Toolbar to start the
Runtime Controller and run the script.
If the script contains errors and auto-validation is switched off, the faulty
command(s) are not marked in red and you can click Run in the Toolbar to start
the Runtime Controller. Uncheck the Run full script checkbox in the Runtime
Controller if you want to run part of the script only, e.g. for testing purposes. If you
run the full script, you will get errors. The errors are shown in the Log window.
6.2.6 Validate Script
This menu item is used to validate a pipetting script manually (i.e. check for
errors). You can only choose this menu item if you have switched off autovalidation. If auto-validation is switched on, the script is validated automatically
when you add each new command to the script. See also 11.4.2.1 “Checking the
Pipetting Script for Errors”, 11-5.
6.3 View Menu
This menu lets you view or hide the Worktable Editor, Infopads and Log Window.
6.3.1 Worktable
This option is used to view or hide the Worktable Editor.
Freedom EVOware Software Manual, 393172, en, V2.3
6-9
6 - Menus
Execute Menu
6.3.2 Infopads
This option is used to view or hide the Infopads for the Process Editor or the Script
Editor (upper infopad) or the Worktable Editor (lower infopad).
6.3.3 Log Window
This option is used to view or hide the Log window, a troubleshooting tool that
tracks every command sent by the computer to the instrument, every response
returned from the instrument to the computer and any user input. The content and
format of the log corresponds to a Full log file of type LOG (see A.1 “Overview of
the Log Files”, A-1).
6.4 Execute Menu
This menu lets you run scripts and processes, run instrument maintenance
functions, run tools and VB scripts and declare variables for use in scripts.
6.4.1 Run
This option is used to run scripts and processes. See 12 “Running Scripts and
Processes”, 12-1.
6.4.2 Run Maintenance
This option is used to run maintenance scripts for the pipetting instrument and/or
optional devices. Maintenance scripts are normal scripts which are saved in a
special directory. They are created using the Script Editor. Maintenance scripts
can only be created by the Freedom EVOware Administrator or Application
Specialist.
The following script commands are mainly intended for use in maintenance
scripts:
Fill System (384 tip head) (see 15.56.13, 15-138),
Load the Te-MO (see 15.56.12, 15-138),
Manual Tip Alignment (see 15.27, 15-57).
The following script commands are also useful in maintenance scripts:
Wash Tips (see 15.4, 15-8),
Drop DiTis (see 15.8, 15-14),
Set DiTi Position (see 15.9, 15-15),
Send Command (see 15.67, 15-158).
The following device command is also useful in maintenance scripts:
Carousel - ReadAllBarcodes.
A selection of commonly-needed maintenance scripts are provided with the
Freedom EVOware installation. The purpose of each of the scripts is explained in
a Comment command at the start of the script. The scripts are intended for both
6 - 10
Freedom EVOware Software Manual, 393172, en, V2.3
6 - Menus
Execute Menu
Freedom EVOware Plus and Freedom EVOware Standard, but they can only be
viewed and modified by loading Freedom EVOware Standard.
Freedom
EVOware
Standard
To create a maintenance script, specify the script in the Script Editor, click Save
and click the Maintenance button in the Save File dialog box. The script will then
appear automatically in the Run Maintenance menu. Choose the script from the
maintenance menu when you want to execute the maintenance function. If you
want to make changes to the maintenance script, edit it using the Script Editor and
save it again.
Freedom
EVOware Plus
To create a maintenance script, specify the script in the Script Editor, click Save as
Template and click the Maintenance button in the Save File dialog box. The script
will then appear automatically in the Run Maintenance menu. Choose the script
from the maintenance menu when you want to execute the maintenance function.
Freedom EVOware Plus cannot load a maintenance script to make changes.
Instead, Freedom EVOware Plus users should load Freedom EVOware Standard
instead, which allows you to edit the script using the the Script Editor.
Note: In Freedom EVOware Plus, you cannot use device commands in scripts. To
create maintenance scripts which contain device commands, Freedom EVOware
Plus users should load Freedom EVOware Standard to create the script. The
maintenance scripts you create with Freedom EVOware Standard are also
available in Freedom EVOware Plus.
It is recommended to choose descriptive file names for the maintenance scripts to
ensure that their purpose is clear to instrument operators.
6.4.3 Clear Recovery Status
Freedom EVOware provides functions for script and process error recovery. This
allows aborted pipetting scripts and processes to be restarted where they were
stopped (see 17.2 “ Script and process recovery function”, 17-5).
Use this menu option to clear the Recovery status if you want the script or process
to start again at the beginning, even if it was not fully executed the last time it was
run.
6.4.4 Tools
This option is used to run tools (external programs) manually, without running an
Freedom EVOware script or process.
6.4.4.1 Creating Custom Menu Items for Tools (External Programs)
When it starts, Freedom EVOware scans the <install_path>\database\Tools
directory for executable files with the extensions EXE, COM or BAT. The
filenames then appear as custom entries in the Execute > Tools menu and allow
the tools to be executed manually, without running a script or process.
See 15.36 “Execute Application Command”, 15-96 if you want to execute a tool
from within an Freedom EVOware script.
Freedom EVOware Software Manual, 393172, en, V2.3
6 - 11
6 - Menus
Execute Menu
6.4.5 VB Scripts
This option is used to run Visual Basic scripts manually, without running an
Freedom EVOware script or process.
6.4.5.1 Creating Custom Menu Items for VB Scripts
When it starts, Freedom EVOware scans the <install_path>\Database\VBscripts
directory for VB scripts. The filenames then appear as custom entries in the
Execute > Tools menu and allow the VB scripts to be executed manually, without
running a script or process.
See 15.50 “Execute VB Script Command”, 15-114 if you want to execute a VB
script from within an Freedom EVOware script.
6.4.6 Declare Variables
This option, which is only available in Freedom EVOware Plus, is used to declare
variables which can be shared between different pipetting scripts.
Freedom EVOware Plus processes can contain one or more pipetting scripts. in
addition, Freedom EVOware Plus allows you to run several copies of the same
process in parallel. Each copy of the process is called an instance. Freedom
EVOware Plus also allows you to run different processes in parallel.
All variables (including pre-defined variables) must be declared before use (see
also 14.1.1 “Declaring Variables in Scripts”, 14-1).
Variables in Freedom EVOware Plus can have one of three scopes (run, instance
and script).
Run: Variables with this scope are shared globally by all of the pipetting
scripts in all instances of all processes.
Instance: Variables with this scope are shared by all of the pipetting scripts in
the same process or process copy.
Script: Variables with this scope are declared in pipetting scripts with the Set
Variable command (see 15.41 “Set Variable Command”, 15-101). They are
not shared with other scripts.
If you declare a variable with scope Run or Instance, do not declare it again
within a script. This will cause an error.
Note: In Freedom EVOware Standard, all variables have the scope Script and
are declared with the Set Variable command.
6.4.6.1 Set Process Variables Dialog Box
This dialog box is used to declare variables of scope Run and/or Instance and is
only available in Freedom EVOware Plus:
6 - 12
Freedom EVOware Software Manual, 393172, en, V2.3
6 - Menus
Execute Menu
Fig. 6-6
Set Process Variables dialog box
Name
Specify the required variable name. Variable names can be 1 to 64 characters
in length and must not begin with a digit. Variable names are not casesensitive. See also 14.1 “Variables and Expressions in Scripts”, 14-1.
Note: You are not allowed to declare pre-defined variables with this dialog box.
See 14.1.4 “Pre-Defined Variables”, 14-4 for information on the reserved names
for pre-defined variables. Pre-defined variables must be declared before use with
the Set Variable command.
Type
Choose either number (numeric variable) or string.
Scope
Choose either “run” or “instance” (see 6.4.6.4 “Scope of a Variable”,
6-15).
Initial value
Specify the required initial value.
Mode
Fixed value: The variable will be assigned the specified initial value.
User Query: The operator will be prompted for the value of the variable when
the process is run (see below).
File import: The value of the variable will be imported from a file (see
6.4.6.3 “Import File for the Declare Variables Feature”, 6-14).
6.4.6.2 Set Process Variable Values Dialog Box
If you have declared variables with the Declare Variables feature in Freedom
EVOware Plus and you chose User Query in the Set Process Variables dialog
box, the following dialog box is shown when the process is run:
Freedom EVOware Software Manual, 393172, en, V2.3
6 - 13
6 - Menus
Execute Menu
Fig. 6-7
Set Process Variable Values dialog box
Entered the required initial value for the variables in the Initial value column.
In the above example, the variables were declared as shown in Fig. 6-6, 6-13
and the number of process instances (process copies) was set to three in the
Runtime Controller when the process was run.
The scope of the Barcode variable is instance and a different value can be
entered for each of the three process instances. The scope of the Microplates
variable is run; the value you specify will be used for all three process instances.
This is indicated by the value 0 in the Instance column.
6.4.6.3 Import File for the Declare Variables Feature
If you choose File Import in the Mode column of the Set Process Variables dialog
box, you must create a comma-separated text file which contains the required
values of the variables. The file name must be <process name>_var.csv, for
example myproc1_var.csv.
The file must be stored in the sub-directory which contains the process (the .epd
file), for example:
C:\Program Files\Tecan\EVOware\database\processes\myproc1
Each line of the file should have the following syntax:
variable name,process instance,value
In the following example, the variables were declared as shown in Fig. 6-6, 6-13
and the number of process instances (process copies) will be set to three in the
Runtime Controller when the process is run:
Tubes,1,5
Tubes,2,7
Tubes,3,4
Counter2,0,25
The scope of the Tubes variable is instance and a different value can be specified
for each of the process instances. The scope of the Counter variable is run; the
value you specify will be used for all three process instances. This is indicated by
the value 0 in the Instance field.
For variables of scope instance, make sure that you specify enough lines for all of
the process instances that you will run. If there are not enough entries in the file,
Freedom EVOware will use the initial value that you specified in the Set Process
Variables dialog box for the missing entries.
6 - 14
Freedom EVOware Software Manual, 393172, en, V2.3
6 - Menus
Administrator Menu
6.4.6.4 Scope of a Variable
The scope of a variable describes the extent of validity of the variable. For
example, variables with the scope script only have meaningful values within the
script within which they are declared. They are “unknown” to other scripts in the
same process. If you re-use a script from another application and the scope of the
variables it uses is “script”, you don’t need to check whether other scripts in your
process use the same variable names, which could otherwise lead to unexpected
results. On the other hand, if you want to exchange parameters with other scripts
in the process, the scope of the respective variables must be instance or run. See
also 14.1 “Variables and Expressions in Scripts”, 14-1.
Variable scope is only relevant in Freedom EVOware Plus.
6.4.7 Move Arms
This option is used to move the LiHa, the RoMa, the PnP, the MCA, the MCA384,
the Te-MO or the PosID to the required position by pressing keys on the numeric
keypad. See 9.3 “Moving the Arms and Other Devices”, 9-3.
6.4.8 Switch to real mode
This option is used to switch Freedom EVOware from offline mode to real mode
(see 6.7.3 “Status Bar”, 6-20). In addition, the pipetting instrument will be
initialized again if necessary.
For example, Freedom EVOware will switch to offline mode if an instrument error
is detected and you click Abort in the Instrument Error dialog box. After resolving
the cause of the error, you can use this option to switch back to real mode without
needing to restart Freedom EVOware.
6.5 Administrator Menu
This menu is used to start the Configuration Tool, to change the password of the
currently logged in user and to log in to Freedom EVOware as a different user
without quitting Freedom EVOware.
6.5.1 Change User
This option is used to log in to Freedom EVOware as a different user without
quitting Freedom EVOware first:
Freedom EVOware Software Manual, 393172, en, V2.3
6 - 15
6 - Menus
Administrator Menu
Fig. 6-8
Change User dialog box
6.5.2 Change Password
This option is used to change the password of the currently logged in user. You
will be prompted to enter your old password and the new password:
Fig. 6-9
Change Password dialog box
Passwords cannot be reused and must follow certain rules. Password rules are
configured in Freedom EVOware’s Configuration Tool (see 8.3.3 “User
Management Section”, 8-16.
6.5.3 Configure
This option is used to start the Configuration Tool (see 8 “Configuration Tool”, 81). The Configuration Tool is used to configure general settings for Freedom
EVOware. It also allows you to configure settings for the liquid handling arm,
instrument options and optional devices and to set up Freedom EVOware users
and groups.
6 - 16
Freedom EVOware Software Manual, 393172, en, V2.3
6 - Menus
Help Menu
6.6 Help Menu
This menu is used to access the context-sensitive online help and identify the
Freedom EVOware version that you are using.
6.6.1 Contents
This option opens the first page of the context-sensitive help and selects the
contents tab. Press F1 instead if you want information on the currently selected
item or dialog box.
6.6.2 Index
This option opens the first page of the context-sensitive help and selects the index
tab. Press F1 instead if you want information on the currently selected item or
dialog box.
6.6.3 Using Help
This option opens a help page with brief instructions on using the contextsensitive help.
6.6.4 Error History
This option opens a dialog box with a list of the last 20 information or error
messages which were displayed while using Freedom EVOware. In the case of
error messages, the ID column shows the Error ID string (see 18.3 “List of Error
Messages”, 18-32).
Double-click on an entry in the list to see more details of the message.
If required, users with the user level Administrator or Application Specialist can
add more information to each message such as a reason and a possible solution.
The user-defined texts are saved in Freedom EVOware and appear in future each
time the message is displayed. See 18.2 “Editing Messages in Message Boxes”,
18-29 for more information.
6.6.5 Service Contact
This option opens a window with information on the service engineer who is
responsible for supporting your Tecan hardware and software components. The
contact information which shown on this page can be entered and/or edited using
the IQ Wizard (see A.9.10 “IQ Wizard”, A-55, Customer information).
6.6.6 About
This option shows information on the Freedom EVOware version which is
installed, the available real memory and hard disk memory, Tecan copyright
Freedom EVOware Software Manual, 393172, en, V2.3
6 - 17
6 - Menus
Freedom EVOware Toolbar
information and the hardlock (dongle) ID. If there is no hardlock fitted, “Non
upgradable hardlock” is shown.
Version information for the currently installed device drivers can be viewed using
the Configuration Tool (see 8.4.1.1 “Device Information Tab”, 8-21).
It also shows the intended use of your Freedom EVOware configuration - general
purpose applications or research use only. See 3.2 “Intended Use of the Freedom
EVOware Software”, 3-3 for more information.
See 3.1 “Overview of Freedom EVOware”, 3-1 for an introduction to the
Freedom EVOware software.
6.7 Freedom EVOware Toolbar
The toolbar gives you quick access to commonly used functions:
Fig. 6-10 Toolbar
New
See 6.1.1 “New”,
6-1.
Open
See 6.1.2 “Open”,
6-3
Save
See 6.1.3 “Save”,
6-5.
Initialize
This function is used to manually initialize the arms of the pipetting instrument.
It also initializes all of the optional devices.
Each time Freedom EVOware or an Freedom EVOware script or process is
started, the status of the instrument arms (LiHa, RoMa and PnP) and optional
devices (e.g. Te-MO or Te-VacS) is checked and they are initialized if
necessary. In addition, a full initialization sequence is carried out when
Freedom EVOware is started for the first time after powering up the pipetting
instrument.
Manual initialization is not normally necessary, but can be used as a quick
check that the instrument is responding properly. When you use the Initialize
function, Freedom EVOware determines automatically whether it is necessary
to carry out a full or a partial initialization sequence.
See 8.4.2.8 “Arm Initialization”,
Print
See 6.1.6 “Print”,
8-31 for more information.
6-6.
Configure
See 6.5.3 “Configure”,
6-16.
Startup
See 6.1.7 “Start Up Wizard”,
6-7.
Maintenance
To run a maintenance script, click this button and choose the script from the
pull-down list. See 6.4.2 “Run Maintenance”, 6-10.
6 - 18
Freedom EVOware Software Manual, 393172, en, V2.3
6 - Menus
Freedom EVOware Toolbar
Run
This button is used to run scripts and processes (see 12 “Running Scripts and
Processes”, 12-1). Click the small black arrow to choose one of the three
Run options from the pull-down list:
–
–
–
Run: This option opens the Runtime Controller, where you can choose the
required runtime settings before you run the script or process.
Run direct: This option runs the currently loaded script or process
immediately using the default settings of the Runtime Controller. In
Freedom EVOware Plus, you can also choose from the pull-down list how
many process instances (copies of the process) you want to run in
parallel. For more information on process instances, see 12.2 “Running
and Optimizing a Process (Freedom EVOware Plus)”, 12-5.
Recover: This option is only available if the script or process was
interrupted while it was running - for example due to a runtime error or
because Pause was clicked - and did not execute completely. See
17.2 “ Script and process recovery function”, 17-5.
Lock
See 6.1.9 “Lock EVOware”,
Change User
See 6.5.1 “Change User”,
6-7.
6-15.
6.7.1 Toolbar Buttons for the Script Editor (Freedom EVOware Plus)
The following buttons are shown on the right side of the toolbar if you click on the
Script Editor window:
Fig. 6-11 Toolbar buttons for the Script Editor
Accept
Accept any changes you have made to the script, close the Script Editor and
return to the Process Editor. To permanently save any changes you have
made for future Freedom EVOware sessions, you must also choose Save in
the File menu.
Reject
Reject any changes you have made to the script, close the Script Editor and
return to the Process Editor.
Load a Template
Load an existing script template. Please note that the labware definitions are
taken from the currently loaded process, and not from the script template. If
you get script validation errors, open each line of the script and select the
appropriate labware on the worktable.
Save as Template
Save the current script as a template. The file which is saved also contains
configuration settings for Freedom EVOware, for example the positions of the
devices and the labware in the Worktable Editor.
Freedom EVOware Software Manual, 393172, en, V2.3
6 - 19
6 - Menus
Freedom EVOware Toolbar
6.7.2 Toolbar Buttons for the Worktable Editor
The following button is shown on the right side of the toolbar if you click on the
Worktable Editor window.
Fig. 6-12 Toolbar button for the Worktable Editor
Save Worktable as Template
Save the current worktable layout (the positions of the devices and the
labware) as a template.
6.7.3 Status Bar
The status bar displays the following information:
A
B
C
D
E
Fig. 6-13 Status bar
A
B
C
User level
Operation mode
Feature level
D
E
Dongle type
Clock
The fields in the status bar are as follows:
User Level
This shows the level of the currently logged in user:
Administrator = Administrator
Specialist = Application Specialist
Operator = Power User
The Status Bar is not shown at all if you are logged in as Operator.
Operation Mode
This shows the operation mode as follows:
REAL MODE = Real mode (normal operation)
OFFLINE = Offline mode (previously called simulation mode).
3D SIMULATION = Freedom EVOware is connected to EVOSim (see
A.14 “Configuring and Using the 3D Simulation Tool EVOSim”, A-103).
Freedom EVOware will run in offline mode if (a) you choose to start in offline
mode - see A.6 “Command Line Parameters (Freedom EVOware)”, A-29 or (b) Freedom EVOware cannot detect a hardlock and/or a pipetting
instrument when it starts (see 5.1.4 “Instrument and Hardlock Detection”, 53). In offline mode, firmware commands such as movement commands are
not sent to the pipetting instrument (i.e. pipetting does not take place).
Feature Level
This field shows the Freedom EVOware feature level:
STD = Freedom EVOware Standard
PLUS = Freedom EVOware Plus
6 - 20
Freedom EVOware Software Manual, 393172, en, V2.3
6 - Menus
Freedom EVOware Toolbar
Dongle Type
This field shows which type of hardlock (dongle) is fitted to your PC:
DEMO= No hardlock detected
EVO = Hardlock for Freedom EVOware Standard.
EVO+ = Hardlock for Freedom EVOware Plus.
EVO75 = Hardlock for Freedom EVOware Standard and Freedom EVO 75.
EVO75+ = Hardlock for Freedom EVOware Plus and Freedom EVO 75.
3D SIM = Freedom EVOware is being used with the 3D simulator EVOSim; a
dongle is not required in this case.
The hardlocks EVO and EVO+ can be used for all supported pipetting
instruments. The hardlocks EVO75 and EVO75+ can only be used for the
Freedom EVO 75 pipetting instrument.
See also 3.1.2 “Hardlocks for Freedom EVOware Standard and Freedom
EVOware Plus”, 3-2.
Clock
This shows the current time as reported by the PC’s clock.
Note: If a blinking message “Your software is not registered yet” is shown in the
middle of the status bar, see A.9.11 “Registration Wizard”, A-63 for more
information.
Freedom EVOware Software Manual, 393172, en, V2.3
6 - 21
6 - Menus
Freedom EVOware Toolbar
6 - 22
Freedom EVOware Software Manual, 393172, en, V2.3
7 - Tecan User Management System
7 Tecan User Management System
Freedom EVOware is a closed system and access to Freedom EVOware requires
you to enter a user name and password. Please note that user names and
passwords are case-sensitive. Contact your Freedom EVOware Administrator if
you are authorized to use Freedom EVOware but do not have a user name and
password. Some of the features in Freedom EVOware are only available if you
have been given Freedom EVOware Administrator or Application Specialist
access rights.
Note: You can only change the settings for users and groups if you have been
given Freedom EVOware Administrator access rights.
The Tecan User Management system is a central software component which
handles user log in and user authorization for all Tecan software components. It
also provides facilities to log out users after a specified period of inactivity and to
send warnings by eMail to a specified person (usually the Freedom EVOware
Administrator) if an attempt is made to log in to the Tecan software using an
invalid user name and password combination. Furthermore, users are disabled
automatically after entering the password incorrectly a specified number of times
consecutively.
To access the Tecan User Management system, click Configure in the toolbar to
start the Configuration Tool. Then click the General tab and choose either Users
or Groups in the User Management section (see 8.3.3 “User Management
Section”, 8-16). You need to have Freedom EVOware Administrator rights to do
this.
The Tecan User Management system does not rely on the MS Windows access
rights and log in mechanisms which have been configured for your PC and/or for
your local network. The Tecan User Management system thus provides an
additional security barrier against unauthorized use of the Tecan software.
Freedom EVOware writes log files and audit trails and can create data files. It is
important to correctly configure the MS Windows access rights to the respective
directories on your PC and/or local network to prevent unauthorized access to and
tampering with this data.
There are four different levels of access rights for the Freedom EVOware
software: Administrator, Application Specialist, Power User and Operator. See
7.2 “Freedom EVOware Access Rights (User Levels)”, 7-3 for information on
the user levels. After logging in, the user level is shown in the status bar at the
bottom of the screen (see 6.7.3 “Status Bar”, 6-20).
When the Freedom EVOware software is started for the first time after being
installed, you will be prompted to create a new user with Freedom EVOware
Administrator rights. Try to develop a secure and effective way of remembering
your password. To prevent access to the system by unauthorized persons, make
sure that the Administrator log in is only known to the Freedom EVOware
Administrator and to no-one else.
Users, groups and password rules are configured in Freedom EVOware’s
Configuration Tool (see 8.3.3 “User Management Section”, 8-16). In addition, a
tool is provided to import user information into the Tecan User Management
System (user database) from vCard files (see A.9.12 “Import vCards Tool”, A68).
Freedom EVOware Software Manual, 393172, en, V2.3
7-1
7 - Tecan User Management System
Main Features of the Tecan User Management System
7.1 Main Features of the Tecan User Management System
The Tecan User Management system has the following main features:
All changes relating to user management require Freedom EVOware
Administrator access rights.
All changes relating to user management are recorded in the user
management audit trail.
User accounts are automatically disabled following a configurable number of
consecutive failed attempts to enter the correct user name and password
combination. The disabled account can only be reactivated again by the
Freedom EVOware Administrator.
Freedom EVOware does not allow more than one person to use the software
simultaneously.
Users can log out without leaving Freedom EVOware or interrupting a running
pipetting script or process. The same or a different user can then log in to
Freedom EVOware again while the script or process is still running. See
6.1.9 “Lock EVOware”, 6-7.
Users are automatically logged out after a specified time during which no
keyboard or mouse-click activities have been detected.
User passwords expire after a configurable number of days. The user must
then choose another password. The new password must be different from the
old password.
Passwords must contain a specified minimum number of characters.
Passwords can be forced to contain numeric digits.
Passwords cannot be reused.
User names and user name and password combinations are unique within the
system and cannot be assigned more than once.
The Freedom EVOware Administrator provides a temporary password when
setting up a user. When the new user first logs on to the system, he or she is
forced to change to change the password immediately. This ensures that no
one other than the individual user knows the particular user name and
password combination.
If a user forgets his/her password, the Freedom EVOware Administrator does
not have access to the user’s password. The Freedom EVOware
Administrator is only able to reset the password and provide a new temporary
password.
If the Freedom EVOware Administrator forgets his or her password, no one
has access to the password.
A specified person (typically the Freedom EVOware Administrator) can be
automatically notified by eMail in case of potential security threats (e.g. a user
account has been disabled after a configurable number of consecutive failed
login attempts).
7.1.1 User Management Audit Trail
All changes relating to user management are recorded in the user management
audit trail. A new file is written to the <install_path>\AuditTrail\Configuration
directory each time you start and then exit the Freedom EVOware Configuration
Tool. The file name is UserTrailYYYYMMDD_HHMMSS, where YYYYMMDD is
the file creation date and HHMMSS is the file creation time.
7-2
Freedom EVOware Software Manual, 393172, en, V2.3
7 - Tecan User Management System
Freedom EVOware Access Rights (User Levels)
7.2 Freedom EVOware Access Rights (User Levels)
Freedom EVOware provides four user levels with the following rights:
Tab. 7-1 Access rights for operators, application specialists and administrators
Operator
Power user a)
has rights to:
• Run a pipetting script (Freedom EVOware Standard)
or process (Freedom EVOware Plus)
• Run maintenance scripts (see 6.4.2 “Run Maintenance”, 610)
• View a pipetting script (but not change it)
• Handle errors during pipetting
Since operators are not allowed to create or modify scripts and
processes, most of the program interface features are hidden or
disabled.
same as Operator but with additional rights to:
• Start running pipetting scripts at a specified line number.
• Run direct commands (see 5.4.1.3 “Direct commands”, 510).
Application
Specialist
same as Operator but with additional rights to:
• Create, modify and save pipetting scripts (Freedom EVOware
Standard and Freedom EVOware Plus) and processes (Freedom EVOware Plus)
• Edit the configuration of the pipetting instrument
• Edit the configurations of carriers and labware
• Edit the liquid classes for pipetting
• Change settings in the Freedom EVOware Configuration Tool
• Skip pre-programmed timers during pipetting
Administrator
same as Application Specialist but with additional rights to:
• Create and disable/re-enable users
• Configure the options in the Tecan User Management system
• Enable or disable the Electronic Signatures feature
a) Using the Configuration Tool, you can assign additional rights to the Power User for special
applications. In addition, you can create additional user levels (user groups). See
8.3.3.3 “Groups Tab”, 8-20.
All four Freedom EVOware user levels need read/write access to the
<install_path> directory and its subdirectories. The user level Operator cannot
create or modify scripts or processes, but Freedom EVOware still needs read/
write access to write log and export files and audit trail data.
Other Tecan software components such as Magellan have a different hierarchy of
user levels. Please refer to the respective user manual for more information. The
Tecan User Management system handles user authorization for all of the Tecan
software components.
Freedom EVOware Software Manual, 393172, en, V2.3
7-3
7 - Tecan User Management System
Special configuration options for the User Management System
7.3 Special configuration options for the User
Management System
The following features are intended for experienced systems administrators.
7.3.1 Freedom EVOware login using the Microsoft Windows login name
instead of the Tecan user database
The Tecan User Management System can be configured to use the Microsoft
Windows user database (with Windows login names) instead of the Tecan user
database. This avoids the need to remember two different user names and
passwords - one for Microsoft Windows and a different one for Freedom
EVOware.
Since Freedom EVOware 2.1 SP2, the User Management System is implemented
as a server which runs as a Windows service. The Tecan user management
server normally manages users and groups using an encrypted XML database,
but can be configured to use the Microsoft Active Directory user and groups
database or the Windows local machine user database instead (in read-only
mode).
If your company uses Microsoft Active Directory for managing users and groups
and you have more than one Freedom EVOware system, this allows you to
manage Tecan users and groups centrally for all of your systems.
Use the SwitchProvider tool to switch between using the Tecan user management
database (encrypted XML file) and using the Windows user management
database:
Fig. 7-1
SwitchProvider tool
To start the SwitchProvider tool, navigate to the directory C:\Program
Files\Tecan\Tecan User Management\v1.1 using Windows Explorer and doubleclick on Tecan.UserManagement.SwitchProvider.exe.
Please exit Freedom EVOware before using this tool.
Windows Vista users: Windows administrator rights are needed to run this
application.
The status of the radio buttons shows which of the two user management systems
is currently being used by the Tecan software.
After switching to the Windows user database, user accounts for Freedom
EVOware must be created, edited and deleted using Microsoft Active Directory or
the User Accounts feature in the Windows Control Panel and no longer in the
Configuration Tool of Freedom EVOware.
Run the tool again if you want to switch back to using the Tecan user database.
7-4
Freedom EVOware Software Manual, 393172, en, V2.3
7 - Tecan User Management System
Special configuration options for the User Management System
Tecan user groups and user roles
Windows users are assigned to roles (user groups) in Freedom EVOware by
assigning them to specially created Windows groups using the following naming
conventions:
Tecan_<evoware_group_name>
i.e. the string “Tecan_” is prefixed to the Freedom EVOware group name.
Tu run Freedom EVOware using a Windows login, you must be a member of at
least one of these Windows groups (depending on the Freedom EVOware rights
you require):
Tecan_Administrators
Tecan_Evoware_Application_Specialist
Tecan_Evoware_Power User
Tecan_Evoware_Operator
For information on user group names and rights in Freedom EVOware see
8.3.3.3 “Groups Tab”, 8-20.
7.3.1.1 How the SwitchProvider tool works
SwitchProvider works by modifying the XML configuration file
Tecan.UserManagement.Server.exe.config as follows.
The line <membership defaultProvider="XmlMembershipProvider">
is changed to
<membership defaultProvider="WindowsMembershipProvider">
The line <roles defaultProvider="XmlRoleProvider">
is changed to
<roles defaultProvider="WindowsRoleProvider">
The tool then re-starts the service Tecan.UserManagement.Server.exe.
The default location of Tecan.UserManagement.Server.exe.config is:
Windows XP and Windows Vista: C:\Program Files\Tecan\Tecan User
Management\v1.1\
7.3.1.2 Compatibility
This feature is not available for the Tecan User Management System concept
which was used prior to Freedom EVOware 2.1 SP2 (former ERES system).
The ERES system is also used by Tecan Magellan software prior to version 6.5. If
you want to use Freedom EVOware 2.1 or later and Magellan 6.4 or earlier,
Magellan must be installed before you install Freedom EVOware. Magellan will
then proceed to use the new user management server instead of ERES. If you
install Freedom EVOware before Magellan, Freedom EVOware will revert to using
the former ERES system.
This feature cannot be used together with the feature “Sharing the Tecan user
management database in a network environment” (see 7.3.2, 7-5).
7.3.2 Sharing the Tecan user management database in a network
environment
If you are running multiple Freedom EVOware installations which are connected
together within the same LAN, you can configure the system to use a central user
management database which can be shared by several pipetting instruments.
This avoids having to set up Tecan users and groups separately on each of the
PCs.
Freedom EVOware Software Manual, 393172, en, V2.3
7-5
7 - Tecan User Management System
Special configuration options for the User Management System
Since Freedom EVOware 2.1 SP2, the User Management System is implemented
as a server which runs as a Windows service. The Tecan user management
server manages users and groups using an encrypted XML database.
The XML database is normally located in a local directory of each Freedom
EVOware installation as follows:
Windows XP: C:\Documents and Settings\All Users\Application
Data\Tecan\Tecan User Management\v1.1
Windows Vista: C:\ProgramData\Tecan\Tecan User Management\v1.1\
Proceed as follows to share the user management database:
Choose the Freedom EVOware installation whose XML database you want to
share
Right-click the directory containing the XML database, click Properties and
click the Sharing tab. Then share the directory which contains the XML
database with other network users and assign a share name. See the MS
Windows documentation for more information on network sharing.
Still in Properties, click the Security tab and assign read/write permissions to
this directory for the system account of all of the remote Freedom EVOware
installations.
– Note: On the local system, the system account of each remote system is
normally the host name of the remote system.
– Note: On the local system, Tecan.UserManagement.Server.exe runs as a
Windows service under the local account SYSTEM.
On all of the Freedom EVOware installations except for the installation whose
XML database you want to share - reconfigure the Tecan user management
server to use the shared directory:
Click Start, choose Run, enter cmd and click OK.
In the console window, navigate to the directory of the Tecan user
management server:
– Windows XP and Windows Vista: C:\Program Files\Tecan\Tecan User
Management\v1.1\
Type in "Tecan.UserManagement.Server.exe
/xmlPath:"\\servername\sharename\UserManagement.xml"
Where server name is the host name of the PC with the shared XML database
and sharename is the name you chose for the network share.
The Tecan user management server is then permanently configured to use
the shared XML file instead of the local XML file
To revert back to using the local file, use the following console string instead:
"Tecan.UserManagement.Server.exe /xmlPath:localpath"
Where localpath is:
Windows XP: C:\Documents and Settings\All Users\Application
Data\Tecan\Tecan User Management\v1.1
Windows Vista: C:\ProgramData\Tecan\Tecan User Management\v1.1\
Contact Tecan if you need further information on implementing this feature.
7.3.2.1 Compatibility
Users and groups cannot be edited by more than one of the Freedom EVOware
installations simultaneously.
This feature cannot be used together with the feature “Freedom EVOware login
using the Microsoft Windows login name” (see 7.3.1, 7-4).
See also 7.3.1.2 “Compatibility”, 7-5.
7-6
Freedom EVOware Software Manual, 393172, en, V2.3
8 - Configuration Tool
Toolbar Buttons and Menus
8 Configuration Tool
This chapter describes how to use Freedom EVOware’s Configuration Tool to
configure general settings for Freedom EVOware. The Configuration Tool also
allows you to configure settings for the liquid handling arm, instrument options and
optional devices and to set up Freedom EVOware users and groups.
The Configuration Tool is started by clicking Configure in the Freedom EVOware
toolbar. The Configuration Tool has two main tabs, Instrument and Devices.
You can also start the Configuration Tool by clicking the Start button in the
Windows task bar and choosing All Programs > Tecan > EVOware > Configure.
You will be prompted to enter your Freedom EVOware user name and password.
Note: You can only use the Configuration Tool if you have been given Freedom
EVOware Administrator or Application Specialist access rights. You can only
change the settings for users and groups if you have been given Freedom
EVOware Administrator access rights.
Note: Liquid classes are configured with the Liquid Classes Editor, not with the
Configuration Tool (see 10 “Configuring Liquid Classes”, 10-1).
8.1 Toolbar Buttons and Menus
8.1.1 Toolbar Buttons
The toolbar gives you quick access to commonly used functions:
Fig. 8-1
Toolbar and menus, Configuration Tool
Exit
This function is used to exit the Configuration Tool.
Save
This function saves the configuration changes you have made.
Undo
This function undoes the configuration changes you have made (it resets your
changes to the settings which were last saved). It only resets the changes for
the currently selected page.
Backup
This function is used to back up the Freedom EVOware configuration and
data files (including scripts and processes). See 8.2 “Backing Up and
Restoring Your Configuration”, 8-3.
The Backup function is not available when Freedom EVOware is running
(start the Configuration Tool on its own with Start > All Programs > Tecan >
EVOware > Configure).
Freedom EVOware Software Manual, 393172, en, V2.3
8-1
8 - Configuration Tool
Toolbar Buttons and Menus
Restore
This function is used to restore a previously made backup of the Freedom
EVOware configuration and data files. A dialog box is shown to allow you to
choose which backup version you want to restore. All existing configuration
and data files will be overwritten.
The Restore function is not available when Freedom EVOware is running
(start the Configuration Tool on its own with Start > All Programs > Tecan >
EVOware > Configure).
Help
This function opens the help page for the currently selected tab. You can also
get help for the currently selected tab by pressing F1.
8.1.2 File Menu
Backup
This function is used to back up the Freedom EVOware configuration and
data files (including scripts and processes). See 8.2 “Backing Up and
Restoring Your Configuration”, 8-3.
The Backup function is not available when Freedom EVOware is running
(start the Configuration Tool on its own with Start > All Programs > Tecan >
EVOware > Configure).
Restore
This function is used to restore a previously made backup of the Freedom
EVOware configuration and data files. A dialog box is shown to allow you to
choose which backup version you want to restore. Existing configuration and
data files will be overwritten.
The Restore function is not available when Freedom EVOware is running
(start the Configuration Tool on its own with Start > All Programs > Tecan >
EVOware > Configure).
Save changes
This function saves the configuration changes you have made.
Exit Configuration Tool
This function is used to exit the Configuration Tool.
8.1.3 Edit Menu
Undo changes on this page
This function undoes the configuration changes you have made (it resets your
changes to the settings which were last saved). It only resets the changes for
the currently selected page.
8.1.4 View Menu
Status bar
This function is used to show or hide the status bar.
8-2
Freedom EVOware Software Manual, 393172, en, V2.3
8 - Configuration Tool
Backing Up and Restoring Your Configuration
8.1.5 Help Menu
Show help for this page
This function opens the help page for the currently selected tab. You can also
get help for the currently selected tab by pressing F1.
About
This function shows information on the Configuration Tool version which is
installed, the available real memory and hard disk memory and Tecan
copyright information.
8.2 Backing Up and Restoring Your Configuration
The Backup function is used to back up the Freedom EVOware configuration and
data files (including scripts and processes) to a specified directory.
Freedom EVOware creates a new sub-directory in the specified directory for each
backup. The name of the new sub-directory is BACKUP_YYYYMMDD_HHMMSS,
where YYYYMMDD is the date and HHMMSS is the time of the backup. The
default backup directory is <install_path>\Backup. See 8.3.1.4 “Protocol Options
Tab”, 8-8 for information on specifying a different backup directory. You can also
choose a network directory.
The Restore function is used to restore a previously made backup of the Freedom
EVOware configuration and data files. A dialog box is shown to allow you to
choose which backup version you want to restore. Existing configuration and data
files will be overwritten.
The backup and restore operations are reported in the Freedom EVOware trace
file.
Saving Audit
Trail Data
If you are required to comply with the FDA regulations, make sure you keep
archive copies of all audit trail, trace and log files. These files are located in the
<install_path>\AuditTrail directory. They are not backed up by the Backup function
- you should use the Audit Trail Archiving function instead. See A.9.6 “Audit Trail
Archiving tool”, A-47 and B “Appendix B - FDA 21 CFR Part 11 Compliance”,
B-1.
8.2.1 Making an External Backup
To make an external backup of your configuration and data files, configure
Freedom EVOware to use a network directory for backing up. Alternatively, make
a local backup and copy the sub-directory containing the backup files to another
PC, to your backup device or to a network directory.
8.2.2 Copying Scripts and Processes Between Different Pcs
Instead of using the backup and restore functions, you can copy scripts and
processes between Freedom EVOware installations on different PCs using the
Export Import tool (see A.9.4 “Export/Import Tool”, A-38).
Freedom EVOware Software Manual, 393172, en, V2.3
8-3
8 - Configuration Tool
General Settings
8.3 General Settings
Click the General tab to view or edit the instrument settings. This group of settings
allows you to configure general settings for Freedom EVOware, eMail notifications
and the Tecan User Management system.
8.3.1 General Section
This section is used to configure general settings for Freedom EVOware.
8.3.1.1 Timeouts Tab
Timeouts panel
The Initialization and Shutdown fields let you specify the maximum duration of
the initialization and shutdown procedures. An error message will be output if
initialization and/or shutdown is not completed within the specified times.
Specify the times in seconds.
Delay panel
When running in offline mode, Freedom EVOware Standard highlights the
currently active pipetting command and pauses for a specified time before
executing the next command. The pause serves to optimize the visualization
effect. Specify the required duration of the pause.
8.3.1.2 Pause Tab
Specify whether you want to globally enable or disable the system pause. You can
also specify an interval during which the system is not allowed to pause due to an
error. For example, you may want to prevent a system pause during the night
when the system cannot be manually restarted.
8-4
Freedom EVOware Software Manual, 393172, en, V2.3
8 - Configuration Tool
General Settings
8.3.1.3 Scheduler Tab
The settings in the Scheduler tab are only relevant for Freedom EVOware Plus.
Fig. 8-2
Configuring the Scheduler
Common panel
Timeslice
The Timeslice field specifies the smallest unit of time (scheduling tick) which
the scheduler should use to calculate and optimize processes. With the
default setting of 5 seconds, the scheduler checks every 5 seconds whether
rescheduling is possible or necessary. Increasing this value will speed up the
scheduling process whereas lower values may increase the throughput of the
process (e.g. microplates per hour).
Note: The scheduler can handle a maximum of 65,000 timeslices. The maximum
runtime is then roughly 90 hours with a timeslice setting of 5 seconds. If
necessary, the system specialist can increase the maximum number of timeslices
for advanced applications.
Freedom EVOware Software Manual, 393172, en, V2.3
8-5
8 - Configuration Tool
General Settings
Timeout Buffer
This field lets you specify how many seconds the system should wait before
triggering a timeout. A larger value gives the system more time to potentially
solve the problem that caused the timeout before stopping the system.
Example: If timeout buffer = 60 seconds and the expected duration of the
command is exceeded, a system pause is requested and the timeout buffer of
60s is started. If the command completes within the 60s, the system resumes
and the timeout buffer is reset to 60 s. If the command does not complete
within 60s, a timeout is triggered and an error message is output. The other
actions which are then taken depend on the situation.
Keep in mind that RoMa move times can vary significantly because of
interaction with pipetting operations (the arm collision avoidance algorithms
give a higher priority to LiHa movements than RoMa movements once
pipetting has started and until a wash or drop DiTi command is reached).
Especially if you use close-fitting or optimized move times, the timeout buffer
setting should be large enough to allow for possible RoMa movement delays.
Re-schedule on macro feedback
With the default setting of the Timeslice parameter, the scheduler checks
every 5 seconds for completion messages from internal Freedom EVOware
commands (macros) and will reschedule the macros and the associated
process if they have completed faster than expected. Check this checkbox if
you want the scheduler to re-schedule as soon as possible without waiting for
the timeslice to complete. This can improve the performance (throughput) of
the process.
Optimize Robot Move Times panel
Enable learning mode
If you enable this feature, information is stored on the actual times required by
robot moves (RoMa moves, MCA96 gripper and MCA384 CGM moves, move
times of external robots, pre/post actions but not PnP moves) each time you
run a process. If you also check the Use time fit information checkbox, the
scheduler interprets the stored information when you run the process again.
This allows the scheduler to plan the process more accurately in future and to
optimize the throughput.
This is similar to making a calibration run, but you only need to run a single
process instance to get meaningful data. The stored information becomes
increasingly accurate and thus more beneficial the more times the process is
run.
Click Edit Data if you want to edit the stored time information manually. In the
editing window, each section (e.g. [Hotel_9Pos_Microplate]) refers to the
starting point of a robot move. The entries within the sections list the
destinations of the robot move (e.g. MP_3Pos). The eight numeric parameters
are as follows:
–
–
–
–
–
–
–
8-6
Move type 1: Time required for normal move (the labware has no lid or the
labware is moved together with the lid)
Move type 2: Time required to remove the lid from the labware
Move type 3: Time required to put back the lid on the labware
Move type 4: Time required to move the labware and the lid separately
(the labware and the lid are put down at different locations)
Number of moves recorded for move type 1 (do not edit)
Number of moves recorded for move type 2 (do not edit)
Number of moves recorded for move type 3 (do not edit)
Freedom EVOware Software Manual, 393172, en, V2.3
8 - Configuration Tool
General Settings
– Number of moves recorded for move type 4 (do not edit)
All times are in seconds. Both “time required” and “number of moves” are zero
if this move type has not taken place during the learning phase. The accuracy
of the time measurement increases with an increasing number of moves
during the learning phase.
Use optimized move times
Check this checkbox if you want the scheduler to interpret and use information
which has been stored on the actual times required by robot moves. If you
activate this option, make sure that the setting for timeout buffer is long
enough (see Timeout Buffer, above, for more information).
Click Clear Data to delete the stored information. You should do this e.g. if you
have edited or optimized a RoMa vector, for example by re-designing it to use
less waypoints. You then need to re-enable learning mode again.
Tool Optimization panel
Enable pre-emptive tool operations
Check this checkbox if you want Freedom EVOware to check the process for
device commands which are soon due for execution (look ahead). Depending
on the device type and the command, this allows Freedom EVOware to send
preparatory instructions to the device to speed up the execution of the
command.
For example, the carousel can be instructed to bring the next labware item to
be processed from the carousel tower to the transfer position, where it can
wait for a subsequent fetch command (RoMa movement). The RoMa then
does not have to wait for the labware to be brought from the tower. This
optimizes the movement times for the carousel.
Pre-emptive tool operations are only available for the carousel and some
third-party incubators.
Look ahead time
Specify how far ahead the scheduler should check the process for device
commands which can be optimized in this way. The time you specify should
be about the same time which is required for the preparatory instructions (e.g.
about the same time which is required to bring the labware from the carousel
tower to the transfer position).
Very long times can increase the risk of unnecessary unloading of labware
from the carousel due to changes in the schedule. This will result in time
wastage since the unloaded labware has to be put back in the carousel tower
before another labware item can be brought.
If the location is an incubator, keep in mind that pre-emptive tool operations
can affect the incubation time specified in the process if the look ahead time is
longer than necessary, since the labware could be removed from the
controlled environment earlier than necessary.
The look ahead time you specify here is a global setting. See 8.4.4.4 “Preemptive Tool tab”, 8-38 for information on specifying the look ahead time
individually for each optimizable device command.
Show advanced topics
Check this checkbox if you want to make more detailed settings for the scheduler
and the simulator. The first three topics below are always available:
Freedom EVOware Software Manual, 393172, en, V2.3
8-7
8 - Configuration Tool
General Settings
Optimize
If you enable optimization for the scheduler, the resource reservations for the
process will be optimized dynamically if a command finishes earlier than
planned. The default setting for the Scheduler is “enabled”. The default setting
for the Simulator is “disabled” and should not be changed.
Use pre-planning
Check the respective checkboxes to enable or disable pre-planning for the
scheduler and/or the simulator. If pre-planning is enabled, the system will use
more time and schedule more processes during the first scheduling tick
before the pipetting instrument starts to operate. This allows more exact
forecasting of the process timing but reduces flexibility for dynamic planning.
The default setting is “disabled” for both scheduler and simulator.
Timeout for pre-planning
Specify the maximum amount of time in s which the system will wait before
starting process execution, regardless of how many processes have been
scheduled so far. This setting is only relevant if you are using pre-planning.
Latest start for pre-planning / Latest start for execution
These fields specify the maximum amount of time in scheduling ticks between
making resource reservations for a process and starting it. The settings affect
how much advanced planning will be carried out and are important for
rescheduling a process. The scheduling is more dynamic if you choose a
lower value. Latest Start for pre-planning is used during the pre-planning
phase (before scheduling starts) whereas Latest Start for execution is used as
soon as the execution phase begins.
Time per Process
Maximum time in ms which is given to the scheduler to make reservations for
one process during the current planning tick (timeslice). You should choose a
value which is much shorter than one timeslice.
Maximum Time
Maximum time in ms which is given to the scheduler to make reservations for
all processes during the current planning tick (timeslice). You should choose a
value which is shorter than one timeslice.
8.3.1.4 Protocol Options Tab
This is used to configure the paths which Freedom EVOware uses to store output,
backup and log files.
System path
This non-editable field shows the Freedom EVOware installation path. See
A.5 “Freedom EVOware Directory Structure and Files”, A-25 for more
information on the Freedom EVOware directory structure and file names.
Output panel
Specify the directory which should be used for output files from the Export
Data and PosID commands. Enter the path directly or click Browse and
choose the required directory. You can also choose a network directory.
Backup panel
Specify the directory which should be used to store backup copies of the
Freedom EVOware configuration and data files. Enter the path directly or click
Browse and choose the required directory. You can also choose a network
directory.
Freedom EVOware creates a new sub-directory in the specified backup
directory for each backup. See 8.2 “Backing Up and Restoring Your
Configuration”, 8-3 for more information.
8-8
Freedom EVOware Software Manual, 393172, en, V2.3
8 - Configuration Tool
General Settings
Log Options panel
Freedom EVOware writes log files to document the pipetting, to record user
actions, to help you to check scripts in offline mode and to find errors. In
addition, it writes audit trail data and a trace file. The log files and the trace file
are written to the c:\program files\Tecan\EVOware\AuditTrail\Log directory.
Freedom EVOware always writes log files of type EVO. The information which
is logged can also be viewed in the Tecan/EVOware/Log channel of the
LogViewer tool (see A.10 “LogViewer Tool”, A-72).
Freedom EVOware users with Administrator or Application Specialist rights
can activate two additional log file types (User and/or Error) with different
levels of logging detail, either individually or in combination:
–
Check the Input checkbox to write log files of type USR. The information
which is logged can also be viewed in the Tecan/EVOware/Usr channel of
the LogViewer tool.
– Check the Error checkbox to write log files of type ERR. The information
which is logged can also be viewed in the Tecan/EVOware/Error channel
of the LogViewer tool.
See A.1 “Overview of the Log Files”, A-1 for more information on these log
file types.
You can also view recent log entries by choosing Log Window in the View
menu. The Log Window has the same contents as the log file of type EVO and
initially shows the last 1000 log entries.
Note: Freedom EVOware can output a large amount of logging information. It is
recommended to back up and then delete the old log files on a regular basis. They
are not backed up by the Backup function - you should use the Audit Trail
Archiving function instead. See A.9.6 “Audit Trail Archiving tool”, A-47.
Evaluate Checksums
Freedom EVOware uses a checksum system which is based on a CRC
algorithm to protect configuration, script, trace and log files. The checksum is
a computed value which is used to detect corrupted or otherwise altered data.
It is also able to detect whether files have been modified outside of Freedom
EVOware by another program or process.
A warning is shown if an attempt is made to load a file with an incorrect or
missing checksum. The user can then choose to load the file or cancel. In the
latter case, Freedom EVOware aborts with the exception of script files. In this
case, the file is not loaded but Freedom EVOware remains running. An entry
is written to the log file each time an incorrect or missing checksum is found.
Uncheck the Evaluate file checksums checkbox if you want to disable the
warning (you need Freedom EVOware Administrator rights to change this
setting). You should not disable this feature if you need to comply with the
FDA regulations (see B “Appendix B - FDA 21 CFR Part 11 Compliance”, B1).
The Data Explorer can be used to check whether Freedom EVOware
configuration and data files have valid checksums (see A.9.1 “Data Explorer
Tool”, A-35).
Freedom EVOware Software Manual, 393172, en, V2.3
8-9
8 - Configuration Tool
General Settings
Log Serial Data
Check the Log serial data checkbox to include serial data (instrument
firmware commands) in the EVOware/Log channel of the LogViewer tool. This
will significantly increase the amount of data which is logged. The firmware
commands are marked with an “F” in the log files. See A.1 “Overview of the
Log Files”, A-1 for more information.
The serial data can be useful when investigating communication errors. The
log file also includes firmware commands for devices which are connected to
the instrument’s CAN bus (e.g. LiHa, RoMa, PnP, incubator(s), Te-Shake, TeMagS, Te-VacS and Te-Stack). It does not include firmware commands for
devices which have their own RS232 interface.
To avoid logging an excessive amount of data, this logging feature should be
disabled when it is not needed.
See 8.4.3.2 “Logging Option”, 8-36 for information on log files for devices
which have their own RS232 interface.
Electronic signatures
If you check the Electronic Signatures checkbox, users will be forced to enter
a comment to explain the reason when carrying out one of the following
actions:
– Creating, deleting or editing script files and script templates
– Creating, deleting or editing process files and process templates
– Creating, deleting or editing worktable templates
– Creating, deleting or editing carrier definitions
– Creating, deleting or editing labware definitions
– Creating, deleting or editing liquid classes
– Making changes to configuration settings
– Creating, deleting or editing users, groups and password rules
This feature helps to identify why the user performed a specific action. This
feature can only be activated or disabled by a user with Freedom EVOware
Administrator rights.
The Electronic Signatures feature also requires the currently logged in user to
enter his or her Freedom EVOware password each time one of the above
actions are carried out:
8 - 10
Freedom EVOware Software Manual, 393172, en, V2.3
8 - Configuration Tool
General Settings
Fig. 8-3
Password prompt when the Electronic Signatures feature is active
The user comment for each of the above files can be viewed in the Data
Explorer (see A.9.1 “Data Explorer Tool”, A-35). Only the most recent
comment is saved. Earlier comments are stored with earlier versions of these
files, which are automatically backed up to the
<install_path>\AuditTrail\Configuration directory (see A.5 “Freedom EVOware
Directory Structure and Files”, A-25).
If one of the above files has been modified automatically by Freedom
EVOware, a comment is inserted which starts with “EVOware:”.
The Electronic Signatures feature also requires the currently logged in user to
enter his or her password if errors occur when running a script or process. The
user name and the errors will be recorded in the Freedom EVOware log files.
Audit Trail Archiving panel
The Audit Trail Archiving tool (AuditArch) allows you to archive Freedom
EVOware log files and audit trail data either manually or automatically.
Start AuditArch at EVOware startup
Check this checkbox if you want AuditArch to archive the log files and the
audit trail data automatically. AuditArch will then start in the background each
time you start Freedom EVOware and archive the log files if this is required by
the currently configured archiving actions.
Archiving Settings
Click this button to specify the required archiving actions. This opens the
AuditArch dialog box:
See A.9.6 “Audit Trail Archiving tool”,
A-47 for more information.
PMP Data panel
Pressure Monitored Pipetting is a hardware option for the liquid handling arm
that monitors the pressure in the airgap between the sample and the system
liquid during aspiration and dispensing. PMP is only available for 200 µl and
1000 µl LiHa DITI tips. Specify the directory to use for storing PMP evaluation
configuration data and pressure curves.
The default setting is as follows:
C:\Program Files\Tecan\EVOware\PMP\ (Windows XP) or
C:\ProgramData\Tecan\EVOware\PMP\ (Windows Vista).
Freedom EVOware Software Manual, 393172, en, V2.3
8 - 11
8 - Configuration Tool
General Settings
8.3.1.5 Collision Avoidance Tab
This is used to configure the settings for collision avoidance.
Enable parallel movement
Before moving a robot arm (LiHa, RoMa, MCA etc.) to a new position,
Freedom EVOware checks whether it could collide with another arm during
the movement and moves the other arm aside to make space. Check this
checkbox if you want to allow the first arm to start its movement before the
other arm has moved fully aside.
Movement delay
Specify how long the first arm should wait before starting its movement
(default: 200 ms). You should allow enough time for the other arm to move
aside before the first arm reaches its destination position.
8.3.2 Notifications Section
Freedom EVOware can be configured to send notification messages about
system events and error situations to specific groups of users and/or write them to
log files. When you configure this feature for the first time, we recommend you to
configure the users and log files first, then the groups and finally the notifications.
The users and groups for the notification feature are independent of the users and
groups that you configure in the User Management section.
The Notifications feature requires either the MAPI service or access to an SMTP
server (mail server). MAPI is included with many eMail programs, e.g. Microsoft
Outlook.
The groups which you configure here are also used by the script commands
“Notification” (see 15.51 “Notification Command”, 15-116) and “Tip Alignment
Check” (see 15.20 “Tip Alignment Check Command”, 15-30).
8.3.2.1 Settings Tab
This tab is used to configure the eMail settings for the notifications feature.
Note: If you expect to receive replies to the notification eMails, make sure that
you configure an eMail program on another PC to receive the replies. Freedom
EVOware does not provide facilities to receive eMails.
Send User Notifications
Check this checkbox to enable the eMail notifications feature. If you disable
this feature, this does not delete the eMail settings and you can re-enable
them later if required.
MAPI, SMTP
Click the radio buttons to choose whether to send the notifications via MAPI or
SMTP.
MAPI panel
The settings in this panel are only needed if you want to send the notification
eMails using MAPI.
8 - 12
Freedom EVOware Software Manual, 393172, en, V2.3
8 - Configuration Tool
General Settings
MAPI Profile
Specify the MAPI profile you want to use for sending the notification eMails.
You can get a list of available profiles by double-clicking the Mail button in the
Windows Control Panel. The Mail button will only be present in the Control
Panel if you have installed the MAPI service. MAPI is included with many
eMail programs such as Microsoft Outlook.
MAPI Password
Specify the password for the MAPI profile.
SMTP panel
The settings in this panel are only needed if you want to send the notification
eMails using SMTP.
Server
Specify the address of the SMTP server you want to use for sending the
eMails. You should normally specify the SMTP server address which is
recommended by your eMail provider or eMail administrator.
Port
Specify the SMTP port number (default 25).
Sender Mail
Specify the required eMail address of the sender. It is recommended to
choose an address which allows the Freedom EVOware PC to be easily
identified in the eMail which is sent (e.g. “[email protected]”).
Alternatively, you can specify the Windows host name of the PC (e.g.
“[email protected]”).
Sender Host
Specify the name of the eMail domain which you want to use for sending the
notification eMails. This is normally the host name part of the eMail address in
the Sender Mail field (the part after the “@” character, e.g.
“mycompany.com”).
Timeout
Specify the maximum duration of the SMTP send mail command in ms. An
error message will be output if the notification eMail could not be sent within
this time.
Log File
Specify the file name and path of a optional log file which records the sending
of eMail notifications via SMTP. The log file feature is mainly intended for
debugging, e.g. to check that the eMails have been sent correctly.
Authentication
Check this checkbox if the SMTP server (mail server) requires authentication
to allow eMails to be sent. This is normally the case.
User
Specify the user name for SMTP authentication.
Password
Specify the password for SMTP authentication.
The user name and password for SMTP authentication depends on the SMTP
server. In most cases, it is the same user name and password which is used to
collect eMails using the POP3 protocol. With some eMail providers, the user
name is the same as the eMail address.
Freedom EVOware Software Manual, 393172, en, V2.3
8 - 13
8 - Configuration Tool
General Settings
8.3.2.2 Notifications Tab
The following window is used to configure the notifications:
Fig. 8-4
Notifications
Click
in the Notifications panel to add a new notification. Then enter a
descriptive name for the notification. You can change the name later if required.
The Events panel shows all of the system events which are available for the
notification feature. Check the events which you want to include in this notification.
The Receiving groups panel shows the notification groups which you have defined
(see 8.3.2.3 “Groups Tab”, 8-15). Check the groups which should receive this
notification.
Click
to delete the currently selected entry. Click
or
to change the sort
order of the entries in the list.
The E-mail panel is used to configure the e-mail message that you want to send
for this notification:
Fig. 8-5
Notification e-mail
Enter a subject for the e-mail that will be created in the Subject field. Then enter
the message text for the for the e-mail. Click the buttons if you want to include
placeholders for system variables in the message text. They will be dynamically
replaced with their current values when the message is created.
8 - 14
Freedom EVOware Software Manual, 393172, en, V2.3
8 - Configuration Tool
General Settings
The available placeholders are as follows:
<NAME>
The name of the current action.
<OBJECT>
The current object (normally a labware item)
<MODULE>
The device driver which producing the error.
<MACRO>
The EVOware command currently being executed.
<STARTTIME>
The starting time of the current command.
<ENDTIME>
The finishing time of the current command.
<STATUS>
The status of the current command (i.e. the error message).
<NOTE>
Any notes the command writes to trace files.
Note: The placeholders referring to commands will only produce meaningful
information if the system event is related to the execution of a command.
If your recipients list for this notification includes a log file, when the notification email is created during system runtime the same message will be written to the log
file.
8.3.2.3 Groups Tab
Freedom EVOware can be configured to send notification messages about
system events and error situations to specific groups of users and/or write them to
log files. The following window is used to configure recipient groups for the
notification feature:
Fig. 8-6
Groups for notifications
Click
in the Groups panel to add a new group for the notification feature. Then
enter a descriptive name for the group. You can change the name later if required.
Click
to delete the currently selected entry. Click
or
to change the sort
order of the entries in the list.
Freedom EVOware Software Manual, 393172, en, V2.3
8 - 15
8 - Configuration Tool
General Settings
The Users and Files panels show all users and files that you have configured
under Recipients. Check the checkboxes alongside the users and files which
should receive notifications for the currently selected group. Repeat this for all of
the groups you have defined.
The users and groups for the notification feature are independent of the users and
groups that you configure under User Management.
8.3.2.4 Recipients Tab
Freedom EVOware can be configured to send notification messages about
system events and error situations to specific groups of users and/or to write the
notification messages to log files. The following window is used to configure
recipients for the notification feature:
Fig. 8-7
Recipients for notifications
Click
in the User panel to add a new e-mail recipient for the notification feature.
Then enter the recipient’s full name and e-mail address. You can change the
entries later if required.
Click
to delete the currently selected entry. Click
or
to change the sort
order of the entries in the list.
Click
in the LogFile panel to add a new log file for the notification feature. Then
enter a descriptive name for the file and the filename (including the full path).
Click
to delete the currently selected entry. Click
or
to change the sort
order of the entries in the list.
The users and groups for the notification feature are independent of the users and
groups that you configure under User Management.
8.3.3 User Management Section
Freedom EVOware is a closed system and access to Freedom EVOware requires
you to enter a user name and password. The Tecan User Management system is
a central software component which handles user log in and user authorization for
all Tecan software components.
The User Management section in the Configuration Tool is used to set up the
users who are authorized to use the Tecan software and to configure user groups.
The security features of the User Management system are described in 7 “Tecan
User Management System”, 7-1.
8 - 16
Freedom EVOware Software Manual, 393172, en, V2.3
8 - Configuration Tool
General Settings
All changes relating to user management are recorded in the user management
audit trail (see 7.1.1 “User Management Audit Trail”, 7-2).
Note: You can only change the settings for users and groups if you have been
given Freedom EVOware Administrator access rights.
When the Freedom EVOware software is started for the first time after being
installed, you will be prompted to create a new user with Freedom EVOware
Administrator rights. We recommend you to create one additional user with
Freedom EVOware Administrator rights in case you need to access the user
management and the normal system administrator is not available.
To prevent access to the system by unauthorized persons, make sure that the
Freedom EVOware Administrator password is only known to the system
administrator of the Tecan software and to no-one else. Try to develop a secure
and effective way of remembering your password. Please note that user names
and passwords are case-sensitive.
8.3.3.1 Settings Tab
This tab is used to configure settings for the user management.
Security panel
Lock application after x minutes idle time
Users are automatically logged out of Freedom EVOware after a specified
time during which no keyboard or mouse-click activities have been detected.
Specify the required time interval (range: 1 minute to 24 hours). Logged out
users must log in to Freedom EVOware again to regain control of the
program.
Exit after x unsuccessful logins
User accounts are automatically disabled after a configurable number of
consecutive failed attempts to enter the correct user name and password
combination. In addition, an optional security alert eMail can be sent to the
Freedom EVOware Administrator (see below). Specify the required maximum
number of unsuccessful logins (range: 1 to 10).
Enable file validation
All Freedom EVOware scripts and processes must be validated for correct
functioning and for correct results and approved by the application specialist
before they are used for pipetting with real samples (see C “Validation of
Freedom EVOware Applications”, C-1). Check this checkbox if you want to
hide non-validated scripts and processes from users with the access level
Operator to ensure that they cannot use them.
If you check this checkbox, non-validated scripts, processes and templates
are shown to Freedom EVOware Administrators and Application Specialists in
the Selection dialog box with a gray icon instead of a green icon (they are not
visible at all to Operators).
Deactivate user management
Check this checkbox if you want to deactivate user management. You can
only change this setting if you have been given Freedom EVOware
Administrator access rights.
With user management disabled, it is not necessary to enter a user name or
password when Freedom EVOware is started, and all users will be given
Freedom EVOware Administrator access rights automatically. Be aware of the
security risk if you deactivate user management and make sure this is
permitted by the security procedures of your laboratory or company.
Freedom EVOware Software Manual, 393172, en, V2.3
8 - 17
8 - Configuration Tool
General Settings
Validate files on saving
Check this checkbox if you want the file status of the script or process to be
automatically set to Approved when the file is saved.
Password panel
Minimum size of password x characters
Passwords can be forced to contain a specified minimum number of
characters. Specify the required number of characters.
Passwords must contain numeric characters
Check this checkbox if passwords should contain one or more numeric
characters.
Passwords expire after x days
User passwords expire after a configurable number of days. The user must
then choose another password. Specify the required number of days (range: 1
to 365 days).
E-mail panel
A specified person (typically the Freedom EVOware Administrator) can be
automatically warned by eMail in case of potential security threats (i.e. a user
account has been disabled after a configurable number of consecutive failed login
attempts). This panel is used to configure the settings for the eMail warnings.
Note: If you expect to receive replies to the warning eMails, make sure that you
configure an eMail program on another PC to receive the replies. Freedom
EVOware does not provide facilities to receive eMails.
Notification via e-mail
Check this checkbox if you want Freedom EVOware to send security
warnings by eMail. If you disable this feature, this does not delete the eMail
settings and you can re-enable them later if required.
Address
Specify the eMail address of the recipient (e.g. the system administrator).
The eMail warnings can be sent using either SMTP or MAPI:
Send with SMTP
Server: Specify the address of the SMTP server you want to use for sending
the eMails. You should normally specify the SMTP server address which is
recommended by your eMail provider or eMail administrator.
Send with MAPI
Profile: Specify the MAPI profile you want to use for sending the warning
eMails. You can get a list of available profiles by double-clicking the Mail
button in the Windows Control Panel. The Mail button will only be present in
the Control Panel if you have installed the MAPI service. MAPI is included with
many eMail programs, e.g. Microsoft Outlook.
Password: Specify the password for the MAPI profile.
Language panel
Choose the required user interface language for the runtime controller and other
software components which are accessible to the operator of the pipetting
instrument. The user interface of the Configuration Tool and parts of the Freedom
EVOware software which are only accessible to the application specialist and/or
system administrator are always shown in English.
8 - 18
Freedom EVOware Software Manual, 393172, en, V2.3
8 - Configuration Tool
General Settings
8.3.3.2 Users Tab
The top panel on the right lists all users who are currently known to the Tecan
software. The bottom panel lists all available user groups and shows the groups to
which the currently selected user belongs. Check or uncheck the Select
checkboxes to change the group assignments as required. Users inherit the rights
of the groups to which they belong.
You do not need to assign users with Administrator rights to any groups since they
automatically have all rights for the Tecan software. Accordingly, the bottom panel
with the list of groups is hidden if you select a user with Administrator rights.
Check the Admin checkbox if you want to assign Administrator rights for Freedom
EVOware to the currently selected user. The user is then authorized to use the
Tecan User Management system to modify the settings for users and groups (see
7.2 “Freedom EVOware Access Rights (User Levels)”, 7-3).
Uncheck the Enable checkbox if you want to temporarily disable the log in for the
selected user, for example during a holiday period. Never uncheck all of the
Enable checkboxes because you will not be able to log in to Freedom EVOware
again. We do not recommend you to disable the Freedom EVOware Administrator
login.
Click in the Password field and then click
if you want to change the password
of the currently selected user. This opens the Enter New Password dialog box.
The new password is saved as soon as you click OK. You do not need to click the
Save button. Passwords cannot be reused and must follow certain rules (see
7.1 “Main Features of the Tecan User Management System”, 7-2).
Click
in the top panel to create a new user. You will be prompted to specify the
user name, the user’s full name and the user’s password:
Fig. 8-8
Edit User dialog box
Password panel
The password which you assign to the new user is a temporary password. The
user will be forced to enter a new password of his or her choice when logging in to
the Tecan software for the first time. The temporary password is only valid for
three days. You must assign a new temporary password if the user does not
choose a new password within three days.
After creating a new user, you must log out from Freedom EVOware and log in
again if you want to test the new user account (see 6.1.9 “Lock EVOware”, 6-7).
Click
to delete the currently selected user. You cannot delete the user
“Administrator”.
Freedom EVOware Software Manual, 393172, en, V2.3
8 - 19
8 - Configuration Tool
General Settings
8.3.3.3 Groups Tab
The Group Name panel lists all of the user groups which are currently available. If
you have installed more than one Tecan software component (e.g. Freedom
EVOware and Magellan), the list will include default groups for all of the installed
components. The default groups are created automatically when you install and
configure the software components.
The panel to the right lists all available access rights for the currently installed
Tecan software components and shows the access rights which are assigned to
the currently selected user group. Users inherit the rights of the groups to which
they belong.
When Freedom EVOware is first installed, the user group (user level)
Evoware_Application Specialist is given the access rights “Application
Specialist”. It is not recommended to change this setting since application
specialists normally need all rights.
When Freedom EVOware is first installed, the user group (user level)
Evoware_Operator is given the access rights “Operator”. For security reasons it
is not recommended to change this setting and/or to assign additional rights.
When Freedom EVOware is first installed, the user group (user level)
Evoware_Power User is given the access rights “Power User”. If necessary, you
can give this user group additional rights for special applications. You can also
create a new user group and give it a special set of rights to meet your needs.
The available rights are as follows:
Tab. 8-1 Available rights which can be granted
Rights
Explanation
Application Specialist
Application Specialist has all rights listed in this table.
Operator
Operator has rights to:
• Run an existing pipetting script or process
• Run maintenance scripts (see 6.4.2 “Run Maintenance”,
6-10)
• View a pipetting script (but not change it)
• Handle errors during pipetting
Power User
Same as Operator plus
• Start running pipetting scripts at a specified line number
• Run direct commands
Change Liquid Classes
Edit and create liquid classes
Edit Scripts
Edit and create pipetting scripts
Partial script running
Start running pipetting scripts at a specified line number
Bypass Timer
Skip pre-programmed timers during pipetting
Edit Carriers
Edit and create carriers
Edit Labware
Edit and create labware
Run direct commands
See 5.4.1.3 “Direct commands”,
Configure System
Use the Freedom EVOware Configuration Tool
5-10.
You do not need to (and cannot) assign users with Administrator rights to any
groups since they automatically have all rights for the Tecan software.
8 - 20
Freedom EVOware Software Manual, 393172, en, V2.3
8 - Configuration Tool
Device Settings
See 7.2 “Freedom EVOware Access Rights (User Levels)”, 7-3 for more
information on Freedom EVOware access rights and information on the rights of
the System Administrator. Refer to the respective software manual for information
on access rights for other Tecan software components (see 1.2 “Reference
Documents”, 1-3).
Check or uncheck the Select checkboxes to change the access rights
assignments as required.
To create a new group, click
and enter the name of the group in the new, blank
line which appears.
To assign to a user to more than one Tecan software component (e.g. Freedom
EVOware and Magellan), it is recommended to create a new, suitably named
group instead of modifying the rights of an existing, group such as
EVOware_Operator.
Click
to delete the currently selected group. You cannot delete the default
groups for the currently installed Tecan software components.
All changes relating to user management are recorded in the user management
audit trail (see 7.1.1 “User Management Audit Trail”, 7-2).
8.4 Device Settings
Click the Devices tab to view or edit the device settings. This group of settings
allows you to configure global settings for optional devices which can be attached
to your pipetting instrument. It also allows you to configure the liquid handling arm
and the instrument options.
Note: Devices are invisible in the Freedom EVOware Control Bar and in the
Configuration Tool if the respective device drivers are not installed.
The global device settings apply to all process steps which use the device.
The usage of the dialog boxes is similar for all devices. Device-specific settings
are described in the section on the respective device.
8.4.1 General Section
This section is used to configure general settings for the optional devices, the
liquid handling arm and the instrument options. In addition, you can choose the
colors which are used to display each of the devices in the Gantt chart of the
runtime controller:
8.4.1.1 Device Information Tab
Select a device in the list to get general information on the device driver. The list
only shows devices which have been installed. The following only describes the
fields which are not self-explanatory:
Call name
The device name which used by Freedom EVOware internally.
File name, Version, Build
The file name, version and build version of the device driver.
Freedom EVOware Software Manual, 393172, en, V2.3
8 - 21
8 - Configuration Tool
Device Settings
Firmware
The device firmware version for which the driver was originally developed.
Some devices do not have firmware. In many cases, the device driver will
control the device correctly even if the stated firmware version and the actual
firmware version of the device are not identical. However, this field may be
useful to support engineers for the purpose of troubleshooting.
Start checkbox
Select a device in the list and check the Start checkbox if you want Freedom
EVOware to load the device driver when it starts. The checkbox is shown in
gray if the device does not have a loadable driver.
When you install Freedom EVOware, you normally only install the device
drivers you want to use. If you later choose to disconnect a device from the
pipetting instrument because it is no longer needed for your application or
experiment, you can uncheck the Start checkbox to prevent the driver from
being loaded and thus speed up the startup process.
Settings button
Select a device in the list and click Settings to make global configuration
settings for the device (see 8.5 “Device Driver Configuration”, 8-39).
Unload drivers
To ensure that Freedom EVOware starts quickly, all of the Tecan drivers you
have chosen to use are loaded each time the PC is started and remain loaded
while the PC is running (see 5.1.2 “Driver pre-loading”, 5-2). Check this
checkbox to disable driver pre-loading. In this case, Freedom EVOware will
take somewhat longer to start in future.
8.4.1.2 Colors Tab
Select a device in the list, click in the Color column and click
to choose the
required color for the device when it is displayed in the Gantt chart of the runtime
controller (see 12.2.4 “Runtime Controller, Extended View (Running a Process)”,
12-14).
8.4.2 Instrument Options Tab
This tab is used to configure settings for the liquid handling arm (LiHa), the PosID
(movable barcode scanner), the MPO/LICOS system (Monitored Pump Option),
system liquids (Chemical System) and the doorlocks. You can also configure
settings for initializing the instrument arms.
8.4.2.1 LiHa (Liquid Handling Arm)
The LiHa (Liquid Handling Arm) is a robot arm on the pipetting instrument which is
mounted on the X-slide and typically holds four or eight pipetting tips.
Initialization panel
Freedom EVOware detects automatically whether the instrument needs to be
initialized, and carries out initialization if necessary. If your instrument is
equipped with a LiHa, during initialization it is moved above the left-most
waste and all dilutors are initialized. This can cause some liquid to drip from
the tips.
Deep in Waste: If you check this checkbox, Freedom EVOware lowers the
tips into the waste to minimize the risk of contamination due to stray drops of
liquid during instrument initialization. See also 8.4.2.8 “Arm Initialization”, 831.
8 - 22
Freedom EVOware Software Manual, 393172, en, V2.3
8 - Configuration Tool
Device Settings
ATTENTION
Risk of the tips colliding with the waste and/or the washer.
Please check the coordinates of the waste and/or the washer before
activating these options. Otherwise the tips might collide with the labware.
DITI Handling panel
Optimize positions when fetching DITIs
If you check this checkbox, the following method is used to reduce the number
of LiHa movements which are needed when getting DITIs (i.e. to speed up the
Get DITI commands):
If you choose all of the tips in the Get DITI command, they are picked up
starting at the beginning of the DITI rack (for the 8-tip LiHa: positions 1 to 8).
The next eight tips are then picked up at positions 9 to 16.
If you do not choose all of the tips in the Get DITI command, they are picked
up at the end of the DITI rack (starting at position 96).
This feature ensures that the beginning of the DITI rack always has full rows
of fresh DITIs which can be picked up in a single movement.
This optimization feature is permanently activated for the Freedom EVO 75
pipetting instrument with the 2-tip LiHa or 8 PLus 1 Access option (see
A.7 “Freedom EVO 75 Pipetting Instrument - LiHa Configuration”, A-30).
DITI fetch mode
Specify the required DITI fetch mode as follows:
Sequential: The DITIs are mounted one after the other sequentially..
Even/Odd: All of the even-numbered DITIs are mounted simultaneously (2, 4,
6, 8) followed by all of the odd-numbered DITIs simultaneously (1, 3, 5, 7).
This option requires a reinforced DITI support bracket (hardware option).
All parallel: All of the DITIs are mounted simultaneously. This option is only
allowed for mounting up to four DITIs (maximum). In addition, this option
requires a reinforced DITI support bracket (hardware option).
The options Even/Odd and All Parallel reduce the time required to mount the
DITIs (increased performance).
Speed up Movements panel
Use fast positioning in XZ
When the LiHa moves across a single labware item in the X direction, for
example for reagent distribution, the tips are normally moved upwards (Z
direction), then across to the next column of wells and then down again.
Check this checkbox to enable smart moves. In this case, the X and Z
movements take place simultaneously and the tips follow a curved or
parabolic path instead of a rectangular path. This reduces the time required
for the movement.
Freedom EVOware Software Manual, 393172, en, V2.3
8 - 23
8 - Configuration Tool
Device Settings
Optimize Z-travel
To avoid a collision, when the LiHa moves across different types of labware or
across the entire worktable, the tips are normally moved upwards to the height
you specify with the global parameter Travel Height (see below). The
Optimize Z-Travel settings allows Freedom EVOware to make smart moves
by analyzing the height of all obstacles along the path of travel and moving the
tips up just enough to clear the highest obstacle. This reduces the time
required for the movement.
No Z-travel optimization: Do not optimize the z movements. The tips will be
raised to the specified global Travel Height when moving between different
types of labware and across different carriers.
Optimize Z-travel within carriers: Raise the tips to clear all obstacles within
the same carrier. The tips will be raised to the specified Travel Height when
moving between different carriers or across the entire worktable.
Optimize Z-travel for worktable: Raise the tips to clear all obstacles when
moving across the entire worktable.
Instrument tab
If Freedom EVOware is running in normal mode and connected to a pipetting
instrument, the liquid handling arm configuration (number of tips) and some of the
other parameters are determined automatically by interrogating the instrument.
Such parameters can only be configured manually on the Offline tab.
Note: The settings on the Offline tab only apply to offline mode.
8 - 24
Freedom EVOware Software Manual, 393172, en, V2.3
8 - Configuration Tool
Device Settings
Click the Instrument tab to see the current settings (you will only see four columns
if you only have four tips):
Fig. 8-9
Configuring the LiHa
Number of tips
Specify the number of pipetting tips on the liquid handling arm.
Instrument type
Choose the width of the instrument’s worktable (measured in grid positions).
Travel height
To avoid a collision, Freedom EVOware retracts the tips to a certain height
when moving the LiHa across the worktable in the X and Y directions.
When the LiHa moves over a single labware item or between adjacent
identical labware items, it retracts the tips to the Z-Travel value which is
specified in the labware definition (see 9.4.3 “Labware Coordinates”, 9-25).
However, if consecutive commands cause it to move over different types of
labware or across the entire worktable, the tips are retracted to the height you
specify here. This is done to speed up and optimize LiHa movements (to avoid
the need for repeated height changes during the movement). Travel Height
(also called Global Z-Travel) is specified in instrument steps (0.1 mm).
Choose the global parameter Travel Height to be higher than all obstacles on
the woktable. See also Optimize z-travel, above.
A travel height of 0 is the highest position (tips fully retracted). Specify 200 in
this field to lower the tips by 2 cm during global travel.
Freedom EVOware Software Manual, 393172, en, V2.3
8 - 25
8 - Configuration Tool
Device Settings
ATTENTION
Risk of the tips colliding with the PosID.
Set Travel Height to the highest position (0) if your pipetting instrument is
equipped with a PosID or PosID-3. Otherwise the tips may collide with the
device.
The settings for the LiHa tips are as follows:
Tip Type
Choose the tip type (Fixed tips or DITIs, disposable tips). Freedom EVOware
automatically sets the correct value for the tip offset. If you want to use a
combination of fixed tips and DITIs, the fixed tips must have lower tip numbers
(e.g. fixed tips at positions 1 to 4 and DITI tips at positions 5 to 8).
Tip is Broken
Check this checkbox to deactivate individual tips (including the corresponding
dilutors and valves) if they are broken. Freedom EVOware will deactivate the
affected tips/dilutors and check this checkbox automatically if it detects a tip or
diluter problem. This is done to to prevent them being used for any further
pipetting.
Note: Freedom EVOware will output an error message if you use a broken tip in a
pipetting script. Accordingly, it is also necessary to deselect broken tips in the
pipetting commands.
Low Volume
Check this checkbox if the tip position is equipped with the Low Volume
option. If Freedom EVOware is running in normal mode and connected to a
pipetting instrument, the Low Volume option is detected automatically.
Accordingly, it can only be configured manually on the Offline tab.
Te-Fill Option
Check this checkbox if the tip position is equipped with the Te-Fill option. TeFill uses a bi-directional pump instead of the diluter to aspirate and dispense
large volumes of liquid, for example buffer solutions.
PMP Option
Check this checkbox if the tip position is equipped with a special tip adapter
for the PMP (Pressure Monitored Pipetting) option. PMP is only available for
200 µl and 1000 µl LiHa DITI tips. If Freedom EVOware is running in normal
mode and connected to a pipetting instrument, the PMP option is detected
automatically. Accordingly, the PMP option can only be activated manually on
the Offline tab.
Tip Offset
Specify the length of the tip in instrument steps (0.1 mm). Freedom EVOware
uses these values to calculate the correct Z-coordinates when using different
tips in a pipetting run. The offsets are measured relative to the Reference Tip
in increments of 0.1 mm. A positive value indicates that this tip type is longer
than the Reference Tip. For example, 390 means that the tip is 3.9 cm longer
than the Reference Tip. Tip offsets should be changed with great care and
there is normally no need to modify them. Specify -270 for Te-PS tips.
8 - 26
Freedom EVOware Software Manual, 393172, en, V2.3
8 - Configuration Tool
Device Settings
Pump type
Specify which dilutor pump your pipetting instrument is fitted with (XP or XLP
or XMP). The XP dilutor supports syringe sizes from 25 µl to 5 ml. The XLP
dilutor supports syringe sizes from 50 µl to 50 ml. In addition it has a high
resolution mode which allows more accurate pipetting. The XMP dilutor is
used by the Freedom EVO 75 pipetting instrument.
Resolution
Specify the resolution of your dilutor pump (Normal or High). This parameter is
only relevant for XLP dilutors.
Pipetting is more accurate in high resolution mode. However, the maximum
pipetting speed is much less in this mode. This may be a disadvantage for
viscous liquids and/or very low pipetted volumes, since droplets may remain
attached to the tip due to surface tension.
Diluter Capacity
Choose the maximum volume in µl that the dilutor is able to dispense or
aspirate with the current syringe size. The syringe size is on a label which is
attached to the syringe.
System Capacity
Specify the system capacity in µl. For standard tips, this is the volume of the
tubing from the tip to the dilutor valve (typically 3500 µl). If you are using the
Low Volume option, this is the volume of the tubing from the tip to the pinch
valve.
Freedom EVOware limits the maximum pipetting volume to the System
Capacity or the Diluter Capacity, whichever is smaller.
Tubing Length
Specify the length of the tubing between the diluter and the liquid handling
arm in mm. The PMP option (if fitted) uses this information to calculate the
volume of the liquid system of the pipetting instrument. Specify 3200 mm if the
pipetting instrument only has one LiHa; Specify 3900 mm if the pipetting
instrument has two LiHas and the PMP option is fitted to the left LiHa.
Tubing Diameter
Specify the internal diameter of the tubing between the diluter and the liquid
handling arm in 0.01 mm. The PMP option (if fitted) uses this information to
calculate the volume of the liquid system of the pipetting instrument. The
default value of 100 (= 1 mm) should not be changed. The PMP option does
not currently support other tubing diameters.
Max. Pipetting Speed
Specify the maximum flow rate of liquid through the LiHa dilutor when
pipetting. Freedom EVOware calculates an appropriate value automatically.
You will get a validation error if the liquid class you are using in your pipetting
script specifies a higher speed than this. You may need to reduce the max.
pipetting speed for viscous liquids.
Max. Wash Speed
Specify the maximum flow rate of liquid through the LiHa dilutor when washing
the tips. Freedom EVOware calculates an appropriate value automatically.
You can reduce the max. wash speed for viscous liquids.
For standard tips or DITIs, the maximum dilutor speed (pipetting or washing)
depends on the dilutor capacity (syringe size) as follows:
Freedom EVOware Software Manual, 393172, en, V2.3
8 - 27
8 - Configuration Tool
Device Settings
Tab. 8-2 Max. dilutor speeds for the LiHa (pipetting or washing)
Dilutor capacity
Max. dilutor speed
Max. breakoff speed
25 µl
21 µl/s
11 µl/s
50 µl
42 µl/s
23 µl/s
100 µl
83 µl/s
45 µl/s
250 µl
208 µl/s
113 µl/s
500 µl
417 µl/s
225 µl/s
1000 µl
833 µl/s
450 µl/s
2500 µl
2083 µl/s
1125 µl/s
5000 µl
4167 µl/s
2250 µl/s
The breakoff speed is the recommended final dilutor speed when dispensing. See
10.2.2 “LiHa Dispense Parameters (Fixed Tips and DiTis)”, 10-12.
If you are using the XLP dilutor pump in high resolution mode, the maximum
dilutor speeds are 12.5% of the values given in the above table (Freedom
EVOware calculates an appropriate value for the XLP dilutor pump automatically).
Offline tab
Click the Offline tab to specify the required configuration of the liquid handling arm
and the tip parameters if Freedom EVOware is running in offline mode. See
Instrument tab, above, for a description of the parameters.
Copy machine parameters
Click this button to copy the current parameters from the Instrument tab to the
Offline tab. This allows you to create processes and scripts in offline mode
without having to specify all of the liquid handling settings manually.
8.4.2.2 PosID (Moveable Barcode Scanner)
This tab is used to specify custom command strings for the PosID (Positive
Identification System). The PosID is a movable barcode scanner which can be
used to read the barcode labels on carriers, labware and tubes. Note: The allowed
barcode types are configured with the PosID command (see 15.63 “PosID
Command”, 15-150). This tab is not shown if you have installed the driver for
the PosID-3 barcode scanner, which supercedes the PosID barcode scanner.
8 - 28
Freedom EVOware Software Manual, 393172, en, V2.3
8 - Configuration Tool
Device Settings
Commands for Custom Labware panel
Specify the firmware commands which should be sent to the PosID before
each pipetting script is started. This is normally only necessary for custom
labware; standard Tecan labware is handled by the PosID automatically.
Click
to add a new entry to the list. Click
to delete the currently selected
entry. Click
or
to change the sort order of the entries.
The following example shows the three commands which are required to
define a strip rack with carrier code 500, which is similar to a standard strip
rack with code 016:
SPS1,16,3,0,200,188,7,1
SPC1,1,0,0,1
SPA500,1,1
See the manual “Command Set, PosID firmware (Doc ID 391141)” for a list of
firmware commands. Firmware commands are nearly always written
uppercase.
The above commands only define the custom labware for the PosID. You
must also define it as labware in Freedom EVOware to allow it to be used in a
script. Only use barcode numbers in the range 500 to 999 for custom labware.
The settings on this tab do not apply to the PosID-3.
8.4.2.3 MPO/SPO and LICOS
The MPO (Monitored Pump Option) consists of FWO (Fast Wash Option) and
LICOS (Liquid Container Supervisor). The Fast Wash Option is used to pump a
large amount of liquid at high speed through the system, normally to rinse the tips.
The LICOS option is a device which monitors the liquid level in the waste and
system liquid containers. The SPO supersedes the MPO and has improved liquid
level sensors for the waste and system liquid containers.
This tab is used to set parameters for the MPO/SPO and for LICOS:
MPO flow rate
MPO is normally used for washing standard tips. This option allows you to
reduce the default flow rate and thus the pressure in the tubing. This can be
useful when special (smaller) tips are used. Do not use a flow rate in excess of
80% if you are using the Pressure Monitored Pipetting (PMP) hardware
option. PMP is only available for DITI tips.
LICOS
Check this checkbox to activate the LICOS option. You can then specify the
liquid levels at which an error message will be output and the system will be
paused. This option is only relevant if your pipetting instrument is fitted with
the LICOS option.
Freedom EVOware checks the liquid levels in the waste and system liquid
containers each time the tips are washed. It also checks the liquid level in the
system liquid container when the Aspirate script command is executed if you
choose to aspirate the system liquid.
You must use the Tecan Setup & Service software to calibrate the LICOS. See
1.2 “Reference Documents”, 1-3 for information on this software.
Freedom EVOware Software Manual, 393172, en, V2.3
8 - 29
8 - Configuration Tool
Device Settings
SPO
Check the checkbox to activate the SPO liquid level sensors for the waste and
system liquid containers. An error message will then be output and the system
will be paused if the waste container is full or the system liquid container is
empty. This option is only relevant if your pipetting instrument is fitted with the
SPO option.
Freedom EVOware checks the liquid levels in the waste and system liquid
containers each time the tips are washed. It also checks the liquid level in the
system liquid container when the Aspirate script command is executed if you
choose to aspirate the system liquid.
8.4.2.4 Te-Fill option
The Te-Fill option uses a bi-directional pump instead of the diluter to aspirate and
dispense large volumes of liquid, for example buffer solutions. The Te-Fill option
can be optionally provided with a 6-way valve, which allows you to switch between
six different liquid containers.
The pipetting commands for the Te-Fill option cause the pipetting instrument to
switch from using the diluter to using the bi-directional pump and to switch back
again when the command is finished.
Te-Fill Pump
6-way valve connected
Check this checkbox if the Te-Fill option is fitted with a 6-way valve. If
required, you can assign the names of the liquids you want to use to the
channels of the 6-way valve (see 8.4.2.6 “6-way valve for Te-Fill”, 8-31).
8.4.2.5 System Liquids
The system liquids option allows you to use up to six different system liquids in the
pipetting instrument. It uses a 6-way valve to choose the required liquid.
The system liquids option is not currently available for the Freedom EVO series of
pipetting instruments.
System Liquids panel
Specify the names of the system liquids you want to use in the System Liquids
panel. Click
to add a new entry to the list. Click
to delete the currently
selected entry. Click
or
to change the sort order of the entries.
The available system liquids are then shown as green bars in the System icon
at the bottom right of the Worktable Editor, one bar for each liquid. See
Fig. 11-8 “Example worktable showing carriers, labware and labware labels”,
11-20 for an example of the System icon. In the example, only one green
bar is shown (only one system liquid is available).
When you specify an Aspirate script command and want to aspirate the
system liquid, click directly on the green bar in the System icon at the bottom
right of the Worktable Editor. If you need to aspirate large volumes of the
system liquid, this avoids having to place a trough on the worktable.
After clicking on the green bar, the gray (protected) field in the dialog box of
the pipetting command then shows the reserved labware label Systemliquid.
At present, the Freedom EVO series of pipetting instruments only allows you
to use one system liquid.
8 - 30
Freedom EVOware Software Manual, 393172, en, V2.3
8 - Configuration Tool
Device Settings
8.4.2.6 6-way valve for Te-Fill
The Te-Fill option uses a bi-directional pump instead of the diluter to aspirate and
dispense large volumes of liquid, for example buffer solutions. The Te-Fill option
can be optionally provided with a 6-way valve, which allows you to switch between
six different liquid containers.
Specify the names of the liquids you want to use to the channels of the 6-way
valve. Click
to add a new entry to the list. Click
to delete the currently
selected entry. Click
or
to change the sort order of the entries.
The assigned names will then be shown in the Te-Fill pipetting commands in the
Channel / Liquid pull-down list.
See also see 8.4.2.4 “Te-Fill option”, 8-30.
8.4.2.7 Doorlocks
Freedom EVOware supports up to four electrically-operated doorlocks which are
fitted to the pipetting instrument and the doorlocks are arranged in groups. This
function is used to assigned each of the doorlocks to one of the four available
groups.
The doorlocks of all groups are locked automatically when starting or continuing a
script. The doorlocks of all groups are unlocked automatically when finishing,
pausing or aborting a script. See 2.6 “Safety Features of the Pipetting Instrument”,
2-4.
Doorlock panel
The Freedom EVO pipetting instrument is always fitted with two doorlocks
(Doorlock 1 and Doorlock 2) and they are permanently assigned to Doorlock
Group 1 (their assignment cannot be changed). A mechanical interlock
ensures that scripts and processes cannot be started unless the safety hoods
are closed and locked. Two additional doorlocks can be fitted to the pipetting
instrument to support special hardware arrangements.
Specify the required doorlock group assignment for doorlocks 3 and 4 by
choosing the required group from the list. Choose none if the additional
doorlocks are not fitted to your instrument.
8.4.2.8 Arm Initialization
Each time Freedom EVOware or an Freedom EVOware script or process is
started, the status of the instrument arms (LiHa, RoMa and PnP) and optional
devices (e.g. Te-MO and Te-VacS) is checked and they are initialized if necessary.
In addition, a full initialization sequence is carried out when Freedom EVOware is
started for the first time after powering up the instrument.
When the instrument arms are initialized, a sequence of movements is carried out
to determine the reference (zero) positions along the X, Y and Z axes. During the
full initialization sequence, the arms need to move fully to the rear of the
instrument to determine the zero position in the Y direction.
You can also initialize the instrument manually by clicking the Initialize button in
the toolbar (see 6.7 “Freedom EVOware Toolbar”, 6-18).
A progress bar shows the progress of the initialization:
Freedom EVOware Software Manual, 393172, en, V2.3
8 - 31
8 - Configuration Tool
Device Settings
Fig. 8-10 Initializing the pipetting instrument
Click Pause if you want to pause the initialization procedure. This unlocks the
doorlocks and switches off the electrical power to the motors which move the
instrument arms (LiHa, RoMa, PnP). The arms can then be moved along the
slides manually. To speed up initialization If the arms are far away from their home
(parking) positions, click Pause, move them closer to their home positions and
then click Resume. The doorlocks will lock again and initialization will continue.
If initialization fails, for example because Freedom EVOware is unable to
communicate with one of the devices, a dialog box is shown with information on
the error(s). If one of the error messages is shown truncated because it is too
long, lengthen the field in the dialog box and activate the horizontal scroll bar by
double-clicking on the divider (short vertical line in the header) at the end of the
field.
The configuration options for the initialization procedure are as follows:
Initialization mode: Standard
With the Freedom EVO series of pipetting instruments, during initialization all
arms move from their current position to the rear of the worktable to initialize
all of the axes. After reaching the rear of the instrument, they then move to the
rear left.
The arms then move to their home (i.e. safe or parking) positions if they have
been defined (see 9.6.4 “Defining the Home Position for a RoMa”, 9-62 and
9.7.4 “Defining the Home Position for a PnP”, 9-69).
Initialization mode: To the front
If the rear of the worktable is occupied by large (i.e. high) objects such as the
Te-MO, choose To the front to avoid a collision during full initialization. You
must then specify a grid position range in the From grid and To grid fields.
Empty space on worktable for Y initialization
Specify a grid position range in the From grid and To grid fields to indicate
where it is safe to move the arms to the rear of the instrument (i.e. where there
are no other objects which could obstruct the arm movements). Since, with
this option, the arms move one at a time to the rear, the grid position range
only needs to be wide enough to accommodate one arm.
8.4.2.9 Te-MO
The Te-MO is a robot pipetting device which can be attached to the worktable of
the pipetting instrument. It is equipped with a specially designed multi-pipetting
head which can pipette to up to 384 wells simultaneously, resulting in an
extremely high throughput and efficiency.
8 - 32
Freedom EVOware Software Manual, 393172, en, V2.3
8 - Configuration Tool
Device Settings
Settings panel
The following parameters can be configured for the Te-MO.
Number of tips
Specify the number of pipetting head tips you want to use if you are running
Freedom EVOware in offline mode (96 or 384). If Freedom EVOware is
running in normal mode and connected to a pipetting instrument which is fitted
with a Te-MO, the number of tips is determined automatically by interrogating
the Te-MO.
Global Z-Travel
To avoid a collision, Freedom EVOware retracts the Te-MO pipetting head to a
certain height when moving it across the Te-MO deck in the X and Y directions
(see 9.4.3 “Labware Coordinates”, 9-25).
When the Te-MO moves over a single labware item or between adjacent
identical labware items, it retracts the pipetting head to the Z-Travel value
which is specified in the labware definition. However, if two consecutive
commands cause it to move over different pieces of labware, the pipetting
head is retracted to the height you specify here. This is done to speed up and
optimize Te-MO movements (to avoid the need for repeated height changes
during the movement).
Global Z-Travel is specified in instrument steps (0.1 mm). A travel height of 0
is the highest position (pipetting head fully retracted). Specify 200 in this field
to lower the pipetting head by 2 cm during global travel (range: 0 to 200).
Turn PWM checking off
The servo motors of the Te-MO monitor the downwards force which is applied
when mounting DITIs. Check this checkbox to disable force feedback. This is
only necessary for special applications. This setting is only intended for
specialists such as Tecan Field Service Engineers.
8.4.2.10 MCA96
The Multi Channel Arm (MCA) is a special liquid handling arm which is fitted with
a 96-tip pipetting head. The pipetting head can be fitted with a tipblock (a
replaceable block with 96 tips) or with DITIs. The spacing between the tips is fixed
(9 mm).
Initialization panel
Park over washer: Check this checkbox if you want the MCA96 to move
above the MCA96 Wash & Refill Center (WRC) and wait there after the
pipetting script or process has finished.
Instrument tab
Travel height
To avoid a collision, Freedom EVOware retracts the tips to a certain height
when moving the MCA96 across the worktable in the X and Y directions (see
9.4.3 “Labware Coordinates”, 9-25).
When the MCA96 moves over a single labware item or between adjacent
identical labware items, it retracts the tips to the Z-Travel value which is
specified in the labware definition. However, if two consecutive commands
cause it to move over different pieces of labware, the tips are retracted to the
height you specify here. This is done to speed up and optimize MCA96
Freedom EVOware Software Manual, 393172, en, V2.3
8 - 33
8 - Configuration Tool
Device Settings
movements (to avoid the need for repeated height changes during the
movement). Travel Height (also called Global Z-Travel) is specified in
instrument steps (0.1 mm). Choose Travel Height to be higher than all
obstacles on the worktable.
A travel height of 0 is the highest position (tips fully retracted). Specify 200 in
this field to lower the tips by 2 cm during global travel.
ATTENTION
Risk of the tips colliding with the PosID.
Set Travel Height to the highest position (0) if your pipetting instrument is
equipped with a PosID or PosID-3. Otherwise the tips may collide with the
device.
Max. Pipetting Speed
Specify the maximum flow rate of liquid through the dilutor when pipetting.
Freedom EVOware calculates an appropriate value automatically. You can
reduce the max. pipetting speed for viscous liquids. If you specify higher
speeds in your pipetting script, Freedom EVOware will limit them to this value.
Washer address
Specify the hardware address of the MCA96 Wash & Refill Center (WRC).
Specify the address as “address on the switch plus 1” (default: O7). Each
physical device (regardless of device type) must have a unique hardware
address.
The MCA96 allows you to use two WRCs. To do this, specify both hardware
addresses separated by a semicolon, e.g. O7;O8. Freedom EVOware will
then search the worktable for MCA96 WRCs and assign the address O7 to the
first one on the worktable and O8 to the second one. The search order on the
worktable is from rear to front and then from left to right.
Gripper type
Choose the gripper type which is fitted to the MCA96 from the pull-down list.
Offline tab
Click the Offline tab to specify the required configuration of the MCA96 if Freedom
EVOware is running in offline mode. See above, for a description of the
parameters.
Copy machine parameters
Click this button to copy the current parameters from the Instrument tab to the
Offline tab. This allows you to create processes and scripts in offline mode
without having to specify all of the settings manually.
Has gripper
Check this checkbox if you want to simulate an MCA96 with the gripper
hardware option.
Gripper type
Choose the MCA96 gripper type which you want to use for offline mode.
8.4.2.11 MCA384
The MCA384 (Multi Channel Arm 384) is a special liquid handling arm which can
be fitted with 96 or 384 fixed tips or with 96 or 384 disposable tips (DITIs). The
8 - 34
Freedom EVOware Software Manual, 393172, en, V2.3
8 - Configuration Tool
Device Settings
spacing between the tips is fixed (9 mm and/or 4.5 mm). So-called head adapters
are used to adapt the pipetting head to the different tip types.
Settings panel
Washer address
Specify the hardware address of the MCA384 Wash & Refill Center (WRC).
Specify the address as “address on the switch plus 1” (default: O7). Each
physical device (regardless of device type) must have a unique hardware
address.
The MCA384 allows you to use two WRCs. To do this, specify both hardware
addresses separated by a semicolon, e.g. O7;O8. Freedom EVOware will
then search the worktable for MCA384 WRCs and assign the address O7 to
the first one on the worktable and O8 to the second one. The search order on
the worktable is from rear to front and then from left to right.
Advanced Z-Travel
Check this checkbox if you want the MCA384 to make smart moves by
analyzing the height of all obstacles along the path of travel across the entire
worktable and moving the tips up just enough to clear the highest obstacle.
This reduces the time required for the movement. See also 9.5.5.1 “Labware
Carrier Attributes”, 9-49, ZTravel parameter.
8.4.2.12 RoMa
The RoMa is a robot arm equipped with special grippers that can pick up,
transport and place objects within the working area of the pipetting instrument.
Optimize vectors
Depending on how the RoMa vectors have been have created, Freedom
EVOware may send consecutive movement commands to the pipetting
instrument which command the RoMa to move to identical position
coordinates. This can occur e.g. if the waypoints in the RoMa vector uses a
mixture of absolute and relative positions to move to different sites in a hotel.
Check this checkbox to suppress the additional (and unnecessary since
identical) movement commands. This reduces the time required by the RoMa
vector by reducing the number of firmware commands which are sent.
Enable round moves
When carrying out a RoMa vector, the RoMa normally moves to each
waypoint which is specified in the vector before starting to move to the
following waypoint. If you check this checkbox, the RoMa will start to move to
the following waypoint before it has fully reached the current waypoint.
Depending on the RoMa vector, the RoMa can be seen to cut corners (round
off the corners) as it moves, instead of moving in a straight line. This reduces
the time required by the RoMa vector. Note: The collision avoidance
algorithms have a higher priority and will ensure that no collisions will occur,
even when cutting corners.
8.4.3 Communication Section
This section is used to configure the data communication between Freedom
EVOware, the pipetting instrument and the optional devices.
Freedom EVOware Software Manual, 393172, en, V2.3
8 - 35
8 - Configuration Tool
Device Settings
8.4.3.1 I/O State Tab
Select a device in the list and check or uncheck the Active checkbox to enable or
disable data communication with the device.
Set the I/O State to ON for all devices which are installed and physically
connected to the PC.
For devices with an RS232 interface, if you set the I/O state to ON you must also
choose a unique COM port address with the COM Ports tab. This is also
necessary if you are running Freedom EVOware in offline mode.
Note: After installing Freedom EVOware, data communication is initially set to
OFF for all devices with a COM interface. The PC cannot communicate with the
device if the I/O status is OFF.
Note: Freedom EVOware automatically disables data communication with the
LiHa and the RoMa if it cannot detect a hardlock (dongle) when it starts. Pipetting
is not possible in this case.
8.4.3.2 Logging Option
Select a device in the list and check the checkbox if you want to log the exchange
of firmware commands between the device driver and the device, including
commands which are exchanged through an RS232 connection to the device.
This can be useful for testing purposes. The information which is logged can be
viewed in Tecan/Drivers/<call_name> channel of the LogViewer tool, where
<call_name> is the device call name in Freedom EVOware (see A.10 “LogViewer
Tool”, A-72).
For devices which are connected to the CAN bus of the pipetting instrument, you
can also log the exchange of firmware commands by checking Log serial data in
the Protocol files tab (Instrument settings, General section). See 8.3.1.4 “Protocol
Options Tab”, 8-8.
To avoid logging an excessive amount of data, this logging feature should be
disabled when it is not needed.
8.4.3.3 Com Ports Tab
This tab is used to choose the COM port that you want to use for devices which
are connected to the PC via a dedicated RS 232 interface (serial interface). You
can also choose the COM port for the pipetting instrument.
Note: Some of the devices such as the RoMa, the LiHa and the incubators are
connected to the data bus (CAN bus) of the pipetting instrument. You cannot (and
do not need to) make COM port settings for such devices.
Select a device in the list, click in the Port column and choose the COM port which
you want to use for data communication from the pull-down list. The pull-down list
shows all of the COM ports which are currently installed in the PC.
The Port information panel shows the currently configured interface settings:
Baud rate, Data bits, Stop bits, Parity
This shows the speed of data transmission, the number of data bits, the
number of stop bits and the parity for the data transfer.
Receive Retries, Transmit Timeout
This shows the number of retries and the transmit timeout for the data
connection.
8 - 36
Freedom EVOware Software Manual, 393172, en, V2.3
8 - Configuration Tool
Device Settings
Flow Control
This shows the flow control method which is used for the data connection
(’none’, ’X-On/X-Off’ ’Hardware’ or ’undefined’).
With the exception of the COM port, Freedom EVOware automatically sets the
parameters to the appropriate values for each of the devices. If the data
communication settings of the device’s serial interface are configurable, make
sure that you set them to the values shown in the Port information panel. See the
hardware manual for the device for further information (see 1.2 “Reference
Documents”, 1-3).
If Freedom EVOware is not able to communicate successfully with the device,
make sure that the device’s serial interface has been configured correctly. Also
make sure that you are using the correct serial interface cable. Some devices
have firmware commands (such as Get_Version) which can be used as a simple
test of the data communications (see 8.4.3.4 “Test Tab”, 8-37).
For some devices, you must first switch the device to Remote or Slave mode to
allow Freedom EVOware to control it remotely through its data interface. Typically,
this is done using the buttons on the front panel of the device. See the hardware
manual for the device for further information (see 1.2 “Reference Documents”,
1-3).
Note: The PC cannot communicate with the device if the I/O Status is OFF (see
8.4.3.1 “I/O State Tab”, 8-36).
8.4.3.4 Test Tab
The Test tab allows you to send firmware commands (command strings) to the
selected device and is only intended for specialists. It can be used e.g. to initialize
the device, test communications with the device and to move the arms etc. to a
specified position.
In many cases, the Command name panel is pre-configured with useful command
strings (but some of the devices have no command strings). Select the device,
select one of the pre-configured strings and click Send. The response string from
the device will be displayed in the Response panel.
To send a custom command string, click , specify the command in the
Command column and click Send. You do not need to specify a command name.
Custom command strings cannot be saved permanently. See the hardware
manual for the device for a full list of command strings (see 1.2 “Reference
Documents”, 1-3). Alphabetic characters in command strings are nearly always
written uppercase.
For descriptions of the pre-configured command strings which are available for
each device, see the section “Firmware commands” for the device (see
8.5 “Device Driver Configuration”, 8-39). The section “Firmware commands” is
only available if the device has pre-configured command strings.
WARNING
Risk of injury to operating personnel or damage to the equipment
Take care when sending firmware commands. Sending the wrong commands
can damage the instrument or objects in its workspace, hurt yourself or other
people.
Freedom EVOware Software Manual, 393172, en, V2.3
8 - 37
8 - Configuration Tool
Device Settings
8.4.4 Scheduling Section
The Scheduling section lets you specify how the driver will react if errors occur
during execution of one of its commands. You can also set general scheduling
options for the driver.
8.4.4.1 Resource Locking Tab
Check the Lock checkbox if you want the device to be unavailable for other
actions during execution of its pre-actions and post-actions. You can uncheck this
checkbox to improve scheduling efficiency if you are using standard Tecan
RoMa’s which support automatic collision avoidance. In the case of the LiHa, this
allows the RoMa to fetch new labware while the LiHa is still busy.
The Te-MO is normally treated as two separate resources (the two outer slides
are controlled independently). For example, the RoMa can exchange the
microplates on one of the slides while the other slide is being used for pipetting.
Check the Lock checkbox if you want to treat the Te-MO as one resource, for
example if you only want to use one of the slides.
Do not uncheck this option if you are using third party robots which do not support
automatic collision avoidance.
8.4.4.2 Error Reaction Tab
Check the Pre-action and/or Post action checkboxes if you want a “Loss of
peripheral” error to be triggered for the selected device if an error occurs during
execution of its pre-actions and/or post-actions.
If for example the RoMa_MoveObject command fails when transporting labware
to a device, preventing further access to the device, the “Loss of peripheral error”
stops Freedom EVOware from trying to use the device in future. For example, if a
labware item is physically obstructing the entrance to an incubator, to prevent
further errors the incubator will no longer be used, even if the incubator is still fully
functional.
8.4.4.3 Pause On Error Tab
The Pause on error panel specifies which kinds of device errors will result in a
system pause. Check the corresponding boxes if you want the system to halt on
all errors, on loss of peripheral errors, on pre-action errors and/or on post-action
errors.
The Pause on error settings can also be made individually for each process step
(see 9.10.2.2 “Pause On Error Tab”, 9-72). Check Enforce these settings if you
want the settings in this tab to override the settings for the process steps.
8.4.4.4 Pre-emptive Tool tab
Freedom EVOware can be instructed to check the process for device commands
which are soon due for execution (look ahead). Depending on the device type and
the command, this allows Freedom EVOware to send preparatory instructions to
the device to speed up the execution of the command.
To activate this feature, you must check the Enable pre-emptive tool operations
checkbox on the Scheduler tab (see 8.3.1.3 “Scheduler Tab”, 8-5, Tool
Optimization panel).
For example, the carousel can be instructed to bring the next labware item to be
processed from the carousel tower to the transfer position, where it can wait for a
subsequent fetch command (RoMa movement). The RoMa then does not have to
8 - 38
Freedom EVOware Software Manual, 393172, en, V2.3
8 - Configuration Tool
Device Driver Configuration
wait for the labware to be brought from the tower. This optimizes the movement
times for the carousel.
Pre-emptive tool operations are only available for the carousel and some thirdparty incubators.
The parameters in this panel are as follows:
Device
Name of the device which can be optimized by pre-emptive instructions.
Macro name
Choose the internal command (macro) to use for the preparatory instructions.
The pull-down list shows all of the commands which are available for the
selected device. For the carousel and the carousel NT, you should normally
choose the internal command PrePresentPlate (see 16.3.11 “Carousel PrePresentPlate Command”, 16-7 and 16.4.14 “Carousel NT PrePresentPlate Command”, 16-15).
Time frame
Specify in seconds how far ahead the scheduler should check the process for
the specified internal command (look ahead time). The time you specify
should be about the same time which is required for the preparatory
instructions (e.g. about the same time which is required to bring the labware
from the carousel tower to the transfer position).
Very long times can increase the risk of unnecessary unloading of labware
from the carousel due to changes in the schedule. This will result in time
wastage since the unloaded labware has to be put back in the carousel tower
before another labware item can be brought.
If the location is an incubator, keep in mind that pre-emptive tool operations
can affect the incubation time specified in the process if the look ahead time is
longer than necessary, since the labware could be removed from the
controlled environment earlier than necessary.
8.5 Device Driver Configuration
The optional devices which connected to your pipetting instrument each have
individual settings that can be adjusted to your needs. To access these settings,
start the Configuration Tool, click the Devices tab, click Device Information, select
the required device in the Devices panel, click the Settings button and click the
Settings tab of the Configure Device Driver Properties dialog box.
The Information panel shows general information on the device and the device
driver (see 8.4.1.1 “Device Information Tab”, 8-21).
The usage of the Driver tab is the same for all devices and is described in
8.5.35 “Driver Tab of the Configure Device Driver Properties Dialog Box”, 8-116.
The usage of the Conversion tab is the same for all microplate readers and is
described in 8.5.34.3 “Microplate Reader Configuration - Conversion Tab”, 8115. The Settings tab for microplate readers is described in 8.5.34.2 “Microplate
Reader Configuration - Settings Tab”, 8-114.
8.5.1 Settings for the Barcode Scanner
This is used to configure settings for the Symbol LS-1220 barcode scanner. For
general information on this device, see 16.2 “Commands for the Symbol LS-1220
Barcode Scanner”, 16-1.
Freedom EVOware Software Manual, 393172, en, V2.3
8 - 39
8 - Configuration Tool
Device Driver Configuration
8.5.1.1 Barcode Scanner Configuration - Settings Tab
The Settings tab is used to make general settings for the Barcode Scanner.
Fig. 8-11 Settings tab of the Barcode Scanner driver
Settings panel
Barcode variable name
Specify the name of an internal variable which should be used to store the
barcode which is scanned. The default variable name for barcodes is “ID”.
Enter Barcode Manually on Timeout, Manual Entry Timeout
If you check Enter Barcode Manually on Timeout, the operator will be
prompted to enter the barcode manually during process runtime if the scanner
was unable to read it, despite retries. A default barcode will be used if the
operator does not enter the barcode within the specified time (Manual Entry
Timeout field).
If you do not check Enter Barcode Manually on Timeout, a default barcode will
always be used if the scanner was unable to read it.
Default Barcode
The following placeholders can be used in the Default Barcode field:
Tab. 8-3 Placeholders for use in default barcodes
Placeholder
Example
Description
<IDX> or <GIDX>
123
Counter
<IDXn> or
<GIDXn>
004
Counter which is adjusted to a length of n
digits using leading zeros
The placeholders are replaced dynamically with their current values during script
or process runtime. You can combine the placeholders with plain text.
8 - 40
Freedom EVOware Software Manual, 393172, en, V2.3
8 - Configuration Tool
Device Driver Configuration
Example: Use the following string to generate default barcodes containing the
string “Generated” and a 4-digit counter:
Generated<IDX4>
(e.g. Generated0003).
Example: Use the following string to generate default barcodes containing the
string “Unreadable” and a counter:
Unreadable<IDX>
(e.g. Unreadable2)
Auto Read Retries
Specify how many times the device should try to read the barcode before
considering it unreadable.
Move Timeout
Specify the timeout for the robot move which is associated with the
ReadBarcode command. An error message will be output if the robot takes
longer than this to move.
Move Robot in Beam
Specify the distances in the x, y and z directions that the robot should move
the labware in the scanner beam when scanning.
Multiplication Factors for Retries
Specify multiplication factors for the distances in the Move Robot in beam
field.
If the labware cannot be scanned on the first try, the distances in Move Robot
in Beam are multiplied by the specified multiplication factors for each
successive attempt, resulting in larger distances each time. This allows
Freedom EVOware to search for the barcode label with the help of the robot in
case it is not accurately positioned on the labware.
The barcode scanner can be configured to only accept the barcode types which
are expected on your barcode labels. This makes it easier for the scanner to
identify incorrect barcodes. This can be done by the Tecan Field Service Engineer
using special configuration barcodes. The valid barcode types list is stored in the
barcode scanner firmware.
8.5.1.2 Barcode Scanner Configuration - Firmware Commands
The following firmware commands (command strings) are pre-configured for the
Barcode Scanner in the Test tab of the Configuration Tool:
Read Barcode <STIE>
Performs a single read operation of the barcode scanner.
Refer to the firmware documentation for the device for a complete list of firmware
commands (see also 1.2.1 “Related Documentation and Software”, 1-3).
WARNING
Risk of injury to operating personnel or damage to the equipment
Take care when sending firmware commands. Sending the wrong commands
can damage the instrument or objects in its workspace, hurt yourself or other
people.
Freedom EVOware Software Manual, 393172, en, V2.3
8 - 41
8 - Configuration Tool
Device Driver Configuration
8.5.2 Settings for the Carousel
This is used to configure settings for the Carousel. For general information on this
device, see 16.3 “Commands for the Carousel”, 16-2.
8.5.2.1 Carousel Configuration - Driver Tab
See 8.5.35 “Driver Tab of the Configure Device Driver Properties Dialog Box”,
8-116.
8.5.2.2 Carousel Configuration - Scanner Settings Tab
This tab is used to make settings for the optional barcode scanner of the carousel.
Fig. 8-12 Scanner Settings tab of the Carousel driver
Settings panel
Barcode variable name
Specify the name of an internal variable which should be used to store the
barcode which is scanned. The default variable name for barcodes is “ID”.
Default Barcode
A default barcode will be used if the carousel barcode scanner was unable to
read the barcode. The following placeholders can be used in the Default
Barcode field:
Tab. 8-4 Placeholders for use in default barcodes
8 - 42
Placeholder
Example
Description
<IDX> or <GIDX>
123
Counter
<IDXn> or
<GIDXn>
004
Counter which is adjusted to a length of n
digits using leading zeros
Freedom EVOware Software Manual, 393172, en, V2.3
8 - Configuration Tool
Device Driver Configuration
The placeholders are replaced dynamically with their current values during script
or process runtime. You can combine the placeholders with plain text.
Example: Use the following string to generate default barcodes containing the
string “Generated” and a 4-digit counter:
Generated<IDX4>
(e.g. Generated0003).
Example: Use the following string to generate default barcodes containing the
string “Unreadable” and a counter:
Unreadable<IDX>
(e.g. Unreadable2)
8.5.2.3 Carousel Configuration - Barcode File Settings Tab
The Carousel commands ReadAllBarcodes and ReadPlatesInCartridge read the
barcodes of the labware in the carousel and create a barcode list in a text file. This
tab is used to specify the filename and path of the barcode file.
Fig. 8-13 Barcode File Settings tab of the Carousel driver
Barcode File panel
File name
Specify the filename and path of the barcode file. Specify the filename and
path directly or click Browse and choose an existing file. See A.2.1 “Barcode
files written by the Carousel commands”, A-11 for information on the
barcode file which will be created.
Note: When the barcodes are scanned, the barcode file will be overwritten if it
already exists.
8.5.2.4 Carousel Configuration - Barcode Settings Tab
The Barcode Settings tab is used to configure the barcode types which the
carousel barcode scanner option will accept:
Freedom EVOware Software Manual, 393172, en, V2.3
8 - 43
8 - Configuration Tool
Device Driver Configuration
Fig. 8-14 Barcode Settings tab of the Carousel driver
Barcodes panel
Number of codes
Specify how many different barcode types you want to read (maximum 6).
Depending on your setting, additional tabs will appear (Code1, Code2, etc.)
where you can configure each of the barcode types you expect. You should
only configure the barcode types which are expected on your barcode labels.
This makes it easier for the scanner to identify incorrect barcodes.
If you set this field to 0, Freedom EVOware will use the settings stored in the
barcode scanner firmware and you do not have to enter any further settings.
The following parameters must be set for each barcode type you want to read:
CodeX
Code Type
Select the barcode type from the list. The supported types are:
Disabled, Code 2/5 interleaved, Code 39 standard, Code 39 full ASCII, Code
32. C.I.P., Codabar, Code 128, EAN 128, Code 93 standard, Code 93 full
ASCII, EAN 13, EAN 8, UPCA, UPCE, EAN 13 add on 2, EAN 8 add on 2,
UPCA add on 2, UPCE add on 2, EAN 13 add on 5, EAN 8 add on 5, UPCA
add on 5 and UPCE add on 5.
Number of Digits
Specify the length of the barcode.
Check Digit
Check this checkbox if the barcode includes a check digit.
Transmit Check Digit
Check this checkbox if you want to transmit the check digit to Freedom
EVOware as part of the barcode.
Transmit Start/Stop
Check this checkbox if you want to transmit a start/stop code to Freedom
EVOware as part of the barcode.
8 - 44
Freedom EVOware Software Manual, 393172, en, V2.3
8 - Configuration Tool
Device Driver Configuration
8.5.3 Settings for the Carousel NT
This is used to configure settings for the Carousel NT. For general information on
this device, see 16.4 “Commands for the Carousel NT”, 16-8.
8.5.3.1 Carousel NT Configuration - Monitoring Tab
This tab is used to make settings for temperature and moisture monitoring of the
carousel.
Fig. 8-15 StoreX tab of the Carousel NT driver
Monitoring panel
Enable monitoring
The Carousel NT is fitted with sensors which monitor the temperature and
moisture level inside the carousel. Check this checkbox if you want the
carousel to transfer this information to Freedom EVOware. The measured
values are logged to the driver report file. See 8.4.3.2 “Logging Option”, 836 for information on how to activate the driver report file for the carousel.
In Freedom EVOware Plus, you can view the measured values by clicking on
Carousel NT in the Devices panel of the runtime controller (extended view)
after you have run the process (see 12.2.4 “Runtime Controller, Extended
View (Running a Process)”, 12-14). The measured values will be shown in
the Event Log panel. The values shown are not refreshed automatically. Click
Carousel NT again to show the new values.
Time interval
Specify the frequency with which the carousel should report the the
temperature and moisture level to Freedom EVOware.
Freedom EVOware Software Manual, 393172, en, V2.3
8 - 45
8 - Configuration Tool
Device Driver Configuration
8.5.3.2 Carousel NT Configuration - Hotel - Cartridge Configuration Tab
This tab is used to specify the labware type which can be stored in each of the
carousel cartridges (towers). You must also specify the number of slots in the
cartridge. The configuration of the exchangeable cartridges in the carousel
depends on the requirements of your application, and the settings in this dialog
box may need to be changed if you want to run another script or process.
Fig. 8-16 Hotel - Cartridge Configuration tab of the Carousel NT driver
Cartridge Configuration panel
Cartridge type
Choose the labware type which can be stored in the selected cartridge
(tower). The carousel uses this information to calculate the slot pitch height
(the vertical distance in device steps between the bottoms of adjacent labware
items). This information is required by the carousel feeder mechanism.
Use Custom pitch #1 to #10 heights for labware with non-standard pitch
height (see 8.5.3.3 “Carousel NT Configuration - Hotel - Custom Pitch Height
tab”, 8-46).
Number of slots
Specify the number of slots in the cartridge (the maximum number of labware
items of this type which the selected cartridge can store).
The standard cartridge for microplates has a pitch height of 788 device steps
per slot and has 22 slots. The special microplate cartridge with a pitch height
of 719 device steps per slot has 24 slots.
8.5.3.3 Carousel NT Configuration - Hotel - Custom Pitch Height tab
This tab is used to specify the carousel slot pitch height for labware with nonstandard pitch height. For standard labware types, the carousel has an internal
table of slot pitch heights.
8 - 46
Freedom EVOware Software Manual, 393172, en, V2.3
8 - Configuration Tool
Device Driver Configuration
Fig. 8-17 Hotel - Custom Pitch Height tab of the Carousel NT driver
Custom Pitch Height Definition panel
Custom Pitch Height #1 to #10
Specify the slot pitch height (the vertical distance in device steps between the
bottoms of adjacent labware items) for up to 10 custom labware items which
you want to use in the carousel. This information is required by the carousel
feeder mechanism.
See also Cartridge type in 8.5.3.2 “Carousel NT Configuration - Hotel Cartridge Configuration Tab”, 8-46.
8.5.3.4 Carousel NT Configuration - Barcode Settings Tab
The Barcode Settings tab is used to configure the barcode types which the
carousel barcode scanner option will accept:
Freedom EVOware Software Manual, 393172, en, V2.3
8 - 47
8 - Configuration Tool
Device Driver Configuration
Fig. 8-18 Barcode Settings tab of the Carousel NT driver
Barcode Generation Options panel
Default Barcode
The following placeholders can be used in the Default Barcode field:
Tab. 8-5 Placeholders for use in default barcodes
Placeholder
Example
Description
<IDX> or <GIDX>
123
Counter
<IDXn> or
<GIDXn>
004
Counter which is adjusted to a length of n
digits using leading zeros
The placeholders are replaced dynamically with their current values during script
or process runtime. You can combine the placeholders with plain text.
Example: Use the following string to generate default barcodes containing the
string “Generated” and a 4-digit counter:
Generated<IDX4>
(e.g. Generated0003).
Example: Use the following string to generate default barcodes containing the
string “Unreadable” and a counter:
Unreadable<IDX>
(e.g. Unreadable2)
8 - 48
Freedom EVOware Software Manual, 393172, en, V2.3
8 - Configuration Tool
Device Driver Configuration
Enter Barcode Manually on Timeout, Manual Entry Timeout
If you check Enter Barcode Manually on Timeout, the operator will be
prompted to enter the barcode manually during process runtime if the scanner
was unable to read it, despite retries. A default barcode will be used if the
operator does not enter the barcode within the specified time (Manual Entry
Timeout field).
If you do not check Enter Barcode Manually on Timeout, a default barcode will
always be used if the scanner was unable to read it.
Scan while loading plate
Check this checkbox to scan the barcode when the labware is being loaded
into the carousel.
... at transfer station
Check this checkbox to scan the barcode at the transfer position when the
labware is being loaded into the carousel. In this case, it won’t be scanned
again when it reaches the cartridge (tower).
Scan while unloading plate
Check this checkbox to scan the barcode when the labware is being unloaded
from the carousel.
8.5.4 Settings for the Hettich Centrifuge
This is used to configure settings for the Hettich Centrifuge. For general
information on this device, see 16.5 “Commands for the Hettich Centrifuge”,
16.
16-
8.5.4.1 Hettich Centrifuge Configuration - Driver Tab
See 8.5.35 “Driver Tab of the Configure Device Driver Properties Dialog Box”,
8-116.
8.5.4.2 Hettich Centrifuge Configuration - Settings Tab
The Settings tab is used to make general settings for the Hettich Centrifuge.
Fig. 8-19 Settings tab of the Hettich Centrifuge driver
Freedom EVOware Software Manual, 393172, en, V2.3
8 - 49
8 - Configuration Tool
Device Driver Configuration
Centrifuge panel
Device Address
Specify the hardware (device) address of the centrifuge. This setting is only
relevant when daisy chaining several devices and should not normally be
changed.
8.5.4.3 Hettich Centrifuge Configuration - Firmware Commands
The following firmware commands (command strings) are pre-configured for the
Hettich Centrifuge in the Test tab of the Configuration Tool:
ClearError <E00685>
Clears the error condition of the device. In case of an error the device will
block until this command has been executed.
Close <S00640=0070>
Closes the door of the device.
Open <S00640=0060>
Opens the door of the device.
PosN <S00640=000N>
Moves the rotor into position N (1-4).
Status <E00640>
Requests the device status.
Refer to the firmware documentation for the device for a complete list of firmware
commands (see also 1.2.1 “Related Documentation and Software”, 1-3).
WARNING
Risk of injury to operating personnel or damage to the equipment
Take care when sending firmware commands. Sending the wrong commands
can damage the instrument or objects in its workspace, hurt yourself or other
people.
8.5.5 Settings for the CNS (Common Notification Server)
This is used to make settings for the Common Notification Server. For general
information on this device see A.12 “Common Notification Server (CNS)”, A-82.
8.5.5.1 CNS configuration - Driver tab
See 8.5.35 “Driver Tab of the Configure Device Driver Properties Dialog Box”,
8-116.
8.5.6 Settings for the Columbus Washer
This is used to configure settings for the Columbus Washer. For general
information on this device, see 16.6 “Commands for the Columbus Washer”,
16-19.
8 - 50
Freedom EVOware Software Manual, 393172, en, V2.3
8 - Configuration Tool
Device Driver Configuration
8.5.6.1 Columbus Washer Configuration - Driver Tab
See 8.5.35 “Driver Tab of the Configure Device Driver Properties Dialog Box”,
8-116.
8.5.6.2 Columbus Washer Configuration - Settings Tab
The Settings tab is used to make general settings for the Columbus washer.
Fig. 8-20 Settings tab of the Columbus Washer driver
Device panel
Manifold type
Choose whether the washer is equipped with an 8, 12 or 16 way manifold.
Strip selection
Enable or disable the strip selection feature of the washer. If enabled, the strip
of the microplate to be washed can be selected before the wash program is
executed. A strip is a row or column of the microplate.
Aerosol protection
Specify whether the washer is equipped with the aerosol protection option.
The aerosol protection option is a special manifold and pump to aspirate any
aerosol vapors away from the microplate when it is washed.
Fill verification
Specify whether the washer is equipped with the fill verification option. The fill
verification option checks whether the wash buffer was dispensed into each
well during an overflow wash step (special manifold required).
Waste full detector
Specify whether the washer is equipped with the optional waste full sensor.
The waste full sensor detects when the waste bottle becomes full and alerts
the user.
Freedom EVOware Software Manual, 393172, en, V2.3
8 - 51
8 - Configuration Tool
Device Driver Configuration
Rinse when shutdown
Enable: Check this checkbox if you want the washer to carry out an automatic
rinsing procedure when you shut down Freedom EVOware.
Channel: Choose the channel (liquid container) which contains the required
rinsing liquid.
WashPlateEx folder
Path: Specify the required path for the WashPlateEx configuration file. The
WashPlateEx configuration file is used by the WashPlateEx script command.
External Valve Support panel
Enable
Check this checkbox if you want to use an external two-way valve for liquid
channel 4. This allows you to use five channels (liquid containers) with the
washer instead of four. The external valve is intended for special applications.
Device Address
Specify the hardware address of the external valve. Specify the address as
“address on the switch plus 1”. Each physical device (regardless of device
type) must have a unique hardware address.
Device Sub Address
Specify the hardware sub-address of the external valve.
Set left, Set right
These settings control which input of the external valve is connected to which
liquid container (4 or 5). Refer to the third-party supplier of the external valve
for more information.
Miscellaneous panel
Time for autoprime
Specify the amount of time in seconds which is required by the automatic
priming procedure. The washer is primed automatically each time you change
the channel (liquid container).
Wash procedure time
Specify the amount of time in seconds which is required by one wash cycle.
Overhead for cycle
Specify the overhead time in seconds for each wash cycle.
Overhead for move
Specify the time in seconds which is required to move the washer manifold.
Note: The execution time which Freedom EVOware uses for scheduling the wash
procedure is calculated from the wash procedure time, overhead for cycle,
overhead for move, soak time, final aspiration time and repetitions (the number of
wash cycles). The latter three parameters are specified when you add the
WashPlate command to your process.
Init Timeout
Specify the maximum duration of the device initialization procedure. An error
message will be output if initialization is not completed within this time.
8.5.6.3 Columbus Washer Configuration - Autopriming Tab
The Autopriming tab is used to configure settings for the auto-priming and autorinsing functions.
8 - 52
Freedom EVOware Software Manual, 393172, en, V2.3
8 - Configuration Tool
Device Driver Configuration
Fig. 8-21 Auto Priming tab of the Columbus Washer driver
Auto Priming Channel panels
Auto-priming is used to prime the washer the automatically if it has been left idle
for a specified time. This can be done to prevent blockage of the needles, e.g. due
to crystallization of the washing liquid.
Enable
Check this checkbox if you want to activate the auto-priming procedure using
the selected channel (liquid container).
Idle Time
Specify how long to wait when the washer is idle before starting the autopriming procedure.
Prime Time
Specify how long to carry out the priming procedure.
Clean after prime
Check this checkbox if you want to clean the washer after priming.
Channel
Choose the channel (liquid container) which contains the required cleaning
liquid.
Cleaning time
Specify how long to carry out the cleaning procedure.
Auto Rinsing Channel panel
Auto-rinsing is used to rinse the washer the automatically if it has been left idle for
a specified time. Rinsing takes place using soak mode (see 16.6.3 “Columbus
Washer- Rinse Command”, 16-23).
Enable
Check this checkbox if you want to activate the auto-rinsing procedure. You
can only activate auto-rinsing if you have not activated auto-priming.
Freedom EVOware Software Manual, 393172, en, V2.3
8 - 53
8 - Configuration Tool
Device Driver Configuration
Idle Time
Specify how long to wait when the washer is idle before starting the autorinsing procedure.
Channel
Choose the channel (liquid container) which contains the required rinsing
liquid.
8.5.6.4 Columbus Washer Configuration - Firmware Commands
The following firmware commands (command strings) are pre-configured for the
Columbus washer in the Test tab of the Configuration Tool:
Remote <Y0>
This firmware command switches the device from local mode to remote mode.
The device can only be controlled remotely by Freedom EVOware (through
the interface cable) in remote mode.
Exit Remote <E>
This firmware command switches the device from remote mode to local mode.
The device can not be controlled remotely by Freedom EVOware (through the
interface cable) in local mode.
Refer to the firmware documentation for the device for a complete list of firmware
commands (see also 1.2.1 “Related Documentation and Software”, 1-3).
WARNING
Risk of injury to operating personnel or damage to the equipment
Take care when sending firmware commands. Sending the wrong commands
can damage the instrument or objects in its workspace, hurt yourself or other
people.
8.5.7 Settings for the FlaskFlipper
This is used to make settings for the Flask Flipper. For general information on this
device, see 16.7 “Commands for the FlaskFlipper”, 16-29.
8.5.7.1 FlaskFlipper Configuration - Driver Tab
See 8.5.35 “Driver Tab of the Configure Device Driver Properties Dialog Box”,
8-116.
8.5.7.2 FlaskFlipper Configuration - Settings Tab
The Settings tab is used to make general settings for the Flask Flipper.
8 - 54
Freedom EVOware Software Manual, 393172, en, V2.3
8 - Configuration Tool
Device Driver Configuration
Fig. 8-22 Settings tab of the Flask Flipper driver
Device Address panel
Device Address
Specify the hardware address of the Flask Flipper. Specify the address as
“address on the switch plus 1” (default: Q3). Each physical device (regardless
of device type) must have a unique hardware address.
Module Variables panel
Name
Parameter name. This field cannot be edited.
Value
FlipperHorizontal: Required rotary position of the flipper hardware when the
flasks are loaded or unloaded, in 0.1° (default: 0, horizontal).
FlipperPipette: Required rotary position of the flipper hardware when
pipetting into the flasks, in 0.1° (default: -900, vertical).
Description
Parameter description. This field cannot be edited.
8.5.8 Settings for Heated Incubators 1 to 3
An incubator is a device which is used to keep labware containing samples or
reagents at a defined temperature for a specified length of time, for example until
the desired biological or biochemical reaction has taken place. The heated
incubator can be fitted with a shaker option.
Freedom EVOware distinguishes between physical and logical incubators. A
physical incubator is the device you place on the worktable of your instrument. A
logical incubator is a group of incubator slots which are configured for the same
Freedom EVOware Software Manual, 393172, en, V2.3
8 - 55
8 - Configuration Tool
Device Driver Configuration
incubating temperature. The group of slots can all lie within the same physical
incubator or can extend over more than one physical incubator. In the latter case,
all of the physical incubators must have the same number of slots (4 or 6).
The Settings tab is used to configure the currently selected logical incubator. For
each of the logical incubators you want to use (Incubator1, Incubator2 and
Incubator3), you must specify the physical incubators (“towers”) which it uses and
the first slot of the first tower which is used.
For additional information on this device, see 16.10 “Commands for the Heated
Incubator”, 16-39.
8.5.8.1 Heated Incubator Configuration - Driver Tab
See 8.5.35 “Driver Tab of the Configure Device Driver Properties Dialog Box”,
8-116.
8.5.8.2 Heated Incubator Configuration - Settings Tab
The Settings tab is used to make general settings for the currently selected logical
incubator (Incubator1, Incubator2 or Incubator3).
Fig. 8-23 Settings tab of the Incubator driver
Common panel
First used slot
Choose the first slot that this logical incubator uses. Slots are counted from
top to bottom. The first used slot is one of the slots in the first physical
incubator which is used by this logical incubator (tower 1 in the Towers panel).
Note: Slots are counted from top to bottom. When teaching robot vectors for the
incubator, teach slot 1 (the top slot) and then teach the vertical offset of the slots.
To ensure the correct assignment of slot numbers to slot temperatures, always
teach from slot 1 downwards and not from the bottom slot upwards.
8 - 56
Freedom EVOware Software Manual, 393172, en, V2.3
8 - Configuration Tool
Device Driver Configuration
Number of slots per tower
Choose the number of slots which are available per physical incubator (4 or
6). If the logical incubator extends over more than one physical incubator, all
of them must have the same number of slots.
Temperature
Specify the temperature of the logical incubator (range, model MIO1: 25° to
47°C; range, model MIO2: 25° to 65°C). The same temperature is used for all
of the slots of the logical incubator. Specify 0 to disable the heater. To ensure
that the incubator reaches and maintains a stable temperature, make sure
that the incubator doors are not left open.
Note: For special applications, you can use the SetTemperature command to
assign a different temperature to individual slots during script or process runtime.
Shaker speed
Specify the speed at which the labware should be shaken during incubation
(range, model MIO1: 1 to 10.5 Hz; range, model MIO2: 1 to 8.5 Hz). Specify 0
to disable shaking. Shaking requires the incubator shaker option.
Towers panel
Number of Towers
Choose how many physical incubators are used by this logical incubator
(maximum 8). Depending on your choice, additional tabs will appear (1, 2, 3
etc.).
Device address
For each of the Towers tabs (physical incubators), choose the device address
which is associated with this logical incubator. Choose the address as
“hardware address plus 1”. On heated incubators, the hardware address is set
with the blue address switch at the back. Each physical device (regardless of
device type) must have a unique hardware address.
Examples
Example 1: Two logical incubators (Incubator1, Incubator2) each have three slots
and share the same physical incubator (tower 1). Incubator1 starts at slot 1 (the
topmost slot) and has a temperature of 35 °C; Incubator2 starts at slot 4 and has a
temperature of 40 °C.
Example 2: One logical incubator has 7 slots and starts at slot 4 of tower 1. The
last used slot is then slot 3 of tower 2.
Additional settings in the configuration file for the incubator driver
Two of the parameters in the [Settings] section of the configuration file for the
incubator driver allow you to adjust the warning level if the incubator temperature
differs from the configured value.
The configuration file is located in the Freedom EVOware installation directory
and has the name Te-Incubator1.ini (for the first heated incubator) to TeIncubator3.ini (for the third heated incubator).
The parameter TempRange specifies the threshold for the warning. The
incubator driver interrogates the actual incubator temperature once per
minute and a warning is output if the temperature differs from the configured
temperature by more than the specified range (either hotter or colder).
TempRange is specified as an unsigned integer in °C.
The parameter TempWarnDelay specifies a time delay after inserting the
labware in the incubator and before the first warning is output. This allows
Freedom EVOware Software Manual, 393172, en, V2.3
8 - 57
8 - Configuration Tool
Device Driver Configuration
time for the incubator temperature to stabilize. TempWarnDelay is specified as
an unsigned integer in seconds.
Note: Freedom EVOware must be re-started (and the drivers unloaded) for the
changes to take effect.
Configuration files are protected with checksums. When you re-start Freedom
EVOware after editing this file, you will be warned that the checksum is invalid.
Proceed as follows to repair the checksum:
Quit Freedom EVOware and start the Configuration Tool with Start > All
Programs > Tecan > EVOware > Configure. You will be warned again that the
checksum is invalid and you will be asked if you want to repair the checksum.
Click Yes. Then Click Exit and re-start Freedom EVOware. Alternatively, repair
the checksum using the Validate Configuration tool (see A.9.2 “Validate
Configuration Tool”, A-36).
8.5.9 Settings for the Base Incubator
This is used to make settings for the Base Incubator. For general information on
this device, see 16.11 “Commands for the Base Incubator”, 16-44.
8.5.9.1 Base Incubator Configuration - Driver Tab
See 8.5.35 “Driver Tab of the Configure Device Driver Properties Dialog Box”,
8-116.
8.5.9.2 Base Incubator Configuration - Settings Tab
The Settings tab is used to make general settings for the base incubator:
Fig. 8-24 Settings tab of the Base Incubator driver
8 - 58
Freedom EVOware Software Manual, 393172, en, V2.3
8 - Configuration Tool
Device Driver Configuration
General panel
Positions
Specify the number of positions available for keeping labware at room
temperature.
Resources
This parameter is not configurable.
Variables panel
There are no configurable parameters in this panel.
8.5.10 Settings for the Room Temperature Incubator
This is used to make settings for the Room Temperature Incubator. For general
information on this device, see 16.12 “Commands for the Room Temperature
Incubator”, 16-45.
Note: The same dialog box is used for the Base Incubator settings (see
8.5.9 “Settings for the Base Incubator”, 8-58).
Note: See 8.5.33 “Settings for the Transfer Station”,
configuring the Transfer Station.
8-113 for information on
8.5.10.1 Room Temperature Incubator Configuration - Driver Tab
See 8.5.35 “Driver Tab of the Configure Device Driver Properties Dialog Box”,
8-116.
8.5.10.2 Room Temperature Incubator Configuration - Settings Tab
The Settings tab is used to make general settings for the room temperature
incubator:
Fig. 8-25 Settings tab of the Room Temperature Incubator driver
Freedom EVOware Software Manual, 393172, en, V2.3
8 - 59
8 - Configuration Tool
Device Driver Configuration
General panel
Positions
Specify the number of positions available for keeping labware at room
temperature.
Resources
This parameter is not configurable.
Variables panel
There are no configurable parameters in this panel.
8.5.11 Settings for the Liquid Handling Arm (LiHa)
This is used to make settings for the Liquid Handling Arm. For general information
on this device, see 16.13 “Commands for the Liquid Handling Arm”, 16-46.
8.5.11.1 Liquid Handling Arm Configuration - Driver Tab
See 8.5.35 “Driver Tab of the Configure Device Driver Properties Dialog Box”,
8-116.
8.5.11.2 Liquid Handling Arm Configuration - Settings Tab
The Settings tab is used to make general settings for the Liquid Handling Arm.
Note: See 8.5.32 “Settings for the Process Script”,
configuring the Process Script driver.
8-111 for information on
Fig. 8-26 Settings tab of the Liquid Handling Arm driver
8 - 60
Freedom EVOware Software Manual, 393172, en, V2.3
8 - Configuration Tool
Device Driver Configuration
Miscellaneous panel
Initialization timeout
Specify the maximum duration of the device initialization procedure. An error
message will be output if initialization is not completed within this time.
Advanced DITI handling
Check this checkbox if you want to use to use a special driver for exchanging
DITIs. The special driver is not provided with the standard Freedom EVOware
installation.
In case of script error panel
Request system pause
Check this checkbox if you want the driver to request a system pause if a
script error is detected during command execution.
Note: Do not confuse the settings made here with those made in the scheduling/
error handling configuration. The settings in this tab define the reaction of the
system if the Liquid Handling Arm outputs an error message during execution of a
pipetting command. The settings for error handling take effect if the pipetting
command has already been stopped due to an error.
8.5.11.3 Liquid Handling Arm Configuration - Command Generation Tab
The Command Generation tab is used to make settings for the default pre-actions
and post-actions to be used when generating commands for the Liquid Handling
Arm. The settings are only relevant to Freedom EVOware Plus.
Note: See 8.5.32 “Settings for the Process Script”,
configuring the Process Script driver.
8-111 for information on
Fig. 8-27 Command Generation tab of the Liquid Handling Arm driver
Freedom EVOware Software Manual, 393172, en, V2.3
8 - 61
8 - Configuration Tool
Device Driver Configuration
Command Generation panel
Default pre-action
Choose the default pre-action to be used by Liquid Handling Arm commands
and specify the execution time to be used when scheduling this operation.
Default post-action
Choose the default post-action to be used by Liquid Handling Arm commands
and specify the execution time to be used when scheduling this operation.
Note: Freedom EVOware compares the initial worktable layout with the worktable
layout which is required by the script. For each labware item which needs to be
moved, it then uses the specified pre-action and post-action to create and
configure the RoMa movements which will be needed.
Default replace action
Choose the default action to be used by Liquid Handling Arm commands
when replacing DITIs and specify the execution time to be used when
scheduling this operation.
Note: Freedom EVOware compares the initial worktable layout with the worktable
layout which is required by the script. For each DITI rack, it then uses the
specified replace action to create and configure the RoMa movements which will
be needed when the DITI rack needs to be replaced.
Default start process action for advanced DITI handling
If you are using a special driver for exchanging DITIs, specify the execution
time to be used when scheduling this operation. The special driver is not
provided with the standard Freedom EVOware installation.
8.5.11.4 Liquid Handling Arm Configuration - Firmware Commands
The following firmware commands (command strings) are pre-configured for the
Liquid Handling Arm in the Test tab of the Configuration Tool:
Get RSP <GET_RSP>
Requests the pipetting instrument type the device is connected to.
Get VERSION <GET_VERSION>
Requests the firmware version of the pipetting instrument. Only the first two
positions are shown.
Initialize System <INIT_RSP>
Initializes the pipetting instrument.
Refer to the firmware documentation for the device for a complete list of firmware
commands (see also 1.2.1 “Related Documentation and Software”, 1-3).
WARNING
Risk of injury to operating personnel or damage to the equipment
Take care when sending firmware commands. Sending the wrong commands
can damage the instrument or objects in its workspace, hurt yourself or other
people.
8 - 62
Freedom EVOware Software Manual, 393172, en, V2.3
8 - Configuration Tool
Device Driver Configuration
8.5.12 Settings for the MCA96 (Multi Channel Arm 96)
This is used to make settings for the MCA96. For general information on this
device, see 15.68 “MCA96 Commands”, 15-159.
8.5.12.1 MCA96 Configuration - Driver Tab
See 8.5.35 “Driver Tab of the Configure Device Driver Properties Dialog Box”,
8-116.
8.5.12.2 MCA96 Configuration - Settings Tab
The Settings tab is used to make general settings for the MCA96:
Fig. 8-28 Settings tab of the MCA96 driver
Miscellaneous panel
Initialization timeout
Specify the maximum duration of the device initialization procedure. An error
message will be output if initialization is not completed within this time.
Advanced DITI handling
This checkbox is not relevant for the MCA96 and should be ignored.
Allow stacker commands in script
This setting is only relevant for Freedom EVOware Plus. When you create a
pipetting script for the MCA96 in an MCA96 Pipette process step, the
Commands section of the Control Bar only shows relevant and/or permissible
script commands. Te-Stack commands are not shown because stacker
actions are normally part of a robot move or programmed using a separate TeStack process step. Check this checkbox to show Te-Stack commands in the
Control Bar when you create a pipetting script for the MCA96. This is intended
for special applications, above all for getting nested DITIs for the MCA96 from
the stacker. The Te-Stack commands are only shown if you have installed the
Te-Stack driver.
Freedom EVOware Software Manual, 393172, en, V2.3
8 - 63
8 - Configuration Tool
Device Driver Configuration
In case of script error panel
Request system pause
Check this checkbox if you want the driver to request a system pause if a
script error is detected during command execution.
Move panel
Grip Detection
Specify whether grip detection should be used.
Home after move
Specify whether the MCA96 should be moved to its home position after each
move. This may be necessary for some worktable layouts, but will reduce
system performance.
Regrip location
This setting is analogous to the regrip location for the RoMa. See
8.5.23.2 “Plate Robot Configuration - Settings Tab”, 8-86, Regrip location.
8.5.12.3 MCA96 Configuration - Command Generation Tab
The Command Generation tab is used to make settings for the default pre-actions
and post-actions to be used when generating commands for the Multi Channel
Arm. The settings are only relevant to Freedom EVOware Plus.
Fig. 8-29 Command Generation tab of the MCA96 driver
Command Generation panel
Default pre-action
Choose the default pre-action to be used by Liquid Handling Arm commands
and specify the execution time to be used when scheduling this operation.
Default post-action
Choose the default post-action to be used by Liquid Handling Arm commands
and specify the execution time to be used when scheduling this operation.
8 - 64
Freedom EVOware Software Manual, 393172, en, V2.3
8 - Configuration Tool
Device Driver Configuration
Note: Freedom EVOware compares the initial worktable layout with the worktable
layout which is required by the script. For each labware item which needs to be
moved, it then uses the specified pre-action and post-action to create and
configure the RoMa movements which will be needed.
Default replace action
Choose the default action to be used by Liquid Handling Arm commands
when replacing DITIs and specify the execution time to be used when
scheduling this operation.
Note: Freedom EVOware compares the initial worktable layout with the worktable
layout which is required by the script. For each DITI rack, it then uses the
specified replace action to create and configure the RoMa movements which will
be needed when the DITI rack needs to be replaced.
Default start process action for advanced DITI handling
This field is not relevant for the MCA96 and should be ignored.
8.5.12.4 MCA96 Configuration - Plugins Tab
Plugins are software tools from third-party suppliers which are used to control
special devices. The Plugins tab is used to assign the MCA96 commands which
are needed by the device.
Fig. 8-30 Plugins tab of the MCA96 driver
Associate Plugin Tools panel
Choose the plugin in the Tools panel, choose the MCA96 command which the
device should use and click Add.
8.5.12.5 MCA96 Configuration - Firmware Commands
The following firmware commands (command strings) are pre-configured for the
MCA96 in the Test tab of the Configuration Tool:
Get RSP <GET_RSP>
Requests the pipetting instrument type the device is connected to.
Freedom EVOware Software Manual, 393172, en, V2.3
8 - 65
8 - Configuration Tool
Device Driver Configuration
Get VERSION <GET_VERSION>
Requests the firmware version of the pipetting instrument. Only the first two
positions are shown.
Initialize System <INIT_RSP>
Initializes the pipetting instrument.
Refer to the firmware documentation for the device for a complete list of firmware
commands (see also 1.2.1 “Related Documentation and Software”, 1-3).
WARNING
Risk of injury to operating personnel or damage to the equipment
Take care when sending firmware commands. Sending the wrong commands
can damage the instrument or objects in its workspace, hurt yourself or other
people.
8.5.13 Settings for the MCA384 (Multi Channel Arm 384)
This is used to make settings for the MCA384. For general information on this
device, see 15.69 “MCA384 Commands”, 15-179.
8.5.13.1 MCA384 Configuration - Driver Tab
See 8.5.35 “Driver Tab of the Configure Device Driver Properties Dialog Box”,
8-116.
8.5.13.2 MCA384 Configuration - Settings Tab
The Settings tab is used to make general settings for the MCA384:
Fig. 8-31 Settings tab of the MCA384 driver
8 - 66
Freedom EVOware Software Manual, 393172, en, V2.3
8 - Configuration Tool
Device Driver Configuration
Miscellaneous panel
Initialization timeout
Specify the maximum duration of the device initialization procedure. An error
message will be output if initialization is not completed within this time.
Advanced DITI handling
This checkbox is not relevant for the MCA384 and should be ignored.
Allow stacker commands in script
This setting is only relevant for Freedom EVOware Plus. When you create a
pipetting script for the MCA384 in an MCA384 Pipette process step, the
Commands section of the Control Bar only shows relevant and/or permissible
script commands. Te-Stack commands are not shown because stacker
actions are normally part of a robot move or programmed using a separate TeStack process step. Check this checkbox to show Te-Stack commands in the
Control Bar when you create a pipetting script for the MCA384. This is
intended for special applications, above all for getting nested DITIs for the
MCA384 from the stacker. The Te-Stack commands are only shown if you
have installed the Te-Stack driver.
In case of script error panel
Request system pause
Check this checkbox if you want the driver to request a system pause if a
script error is detected during command execution.
Move panel
Grip Detection
Specify whether grip detection should be used.
Home after move
Specify whether the MCA384 should be moved to its home position after each
move. This may be necessary for some worktable layouts, but will reduce
system performance.
Regrip location
This setting is analogous to the regrip location for the RoMa. See
8.5.23.2 “Plate Robot Configuration - Settings Tab”, 8-86, Regrip location.
Freedom EVOware Software Manual, 393172, en, V2.3
8 - 67
8 - Configuration Tool
Device Driver Configuration
Dock CGM after move
This setting is only relevant for Freedom EVOware Plus. In Freedom
EVOware Standard, the CGM can be docked and undocked using script
commands.
The CGM (common gripper module) is a hardware option for the MCA384
which can be used to pick up and move labware. The CGM can only be used
for gripping and moving labware when it is undocked.
If sufficient space is available on the worktable, the CGM can be kept
permanently undocked to avoid the time needed for undocking when the CGM
is used. This speeds up commands which use the CGM.
Check this checkbox if you want to automatically dock the CGM again after
using it. In this case, it will be undocked automatically before it is used and
docked again when the operation is finished. Docking reduces the amount of
space required by the MCA384/CGM hardware in the X direction.
If you do not check this checkbox, the CGM is normally kept permanently
undocked. If it has been docked by a previous operation for some reason, it
will be undocked before it is used.
To optimize the speed of more complex operations, you can leave the
checkbox unchecked and specify a MCA384_DockCGM command as a preaction or post action to the last MCA384 movement command before carrying
out the pipetting sequence.
To dock the CGM, the gripper fingers are lowered below the MCA384 pipetting
head, opened completely and rotated until they point to the left. The grippers
are then raised again until the pipetting head is positioned centrally between
the fingers. When docked, the CGM always moves together with the pipetting
head, and the pipetting head can be moved as if the CGM is not mounted. Tip:
You can test and view docking and undocking using the 3D simulator
EVOSim.
8.5.13.3 MCA384 Configuration - Command Generation Tab
The Command Generation tab is used to make settings for the default pre-actions
and post-actions to be used when generating commands for the MCA384. The
settings are only relevant to Freedom EVOware Plus.
8 - 68
Freedom EVOware Software Manual, 393172, en, V2.3
8 - Configuration Tool
Device Driver Configuration
Fig. 8-32 Command Generation tab of the MCA384 driver
Command Generation panel
Default pre-action
Choose the default pre-action to be used by Liquid Handling Arm commands
and specify the execution time to be used when scheduling this operation.
Default post-action
Choose the default post-action to be used by Liquid Handling Arm commands
and specify the execution time to be used when scheduling this operation.
Note: Freedom EVOware compares the initial worktable layout with the worktable
layout which is required by the script. For each labware item which needs to be
moved, it then uses the specified pre-action and post-action to create and
configure the RoMa movements which will be needed.
Default replace action
Choose the default action to be used by Liquid Handling Arm commands
when replacing DITIs and specify the execution time to be used when
scheduling this operation.
Note: Freedom EVOware compares the initial worktable layout with the worktable
layout which is required by the script. For each DITI rack, it then uses the
specified replace action to create and configure the RoMa movements which will
be needed when the DITI rack needs to be replaced.
Default start process action for advanced DITI handling
This field is not relevant for the MCA384 and should be ignored.
8.5.13.4 MCA384 Configuration - Plugins Tab
Plugins are software tools from third-party suppliers which are used to control
special devices. The Plugins tab is used to assign the MCA384 commands which
are needed by the device.
Freedom EVOware Software Manual, 393172, en, V2.3
8 - 69
8 - Configuration Tool
Device Driver Configuration
Fig. 8-33 Plugins tab of the MCA384 driver
Associate Plugin Tools panel
Choose the plugin in the Tools panel, choose the MCA384 command which
the device should use and click Add.
8.5.13.5 MCA384 Configuration - Firmware Commands
The following firmware commands (command strings) are pre-configured for the
MCA384 in the Test tab of the Configuration Tool:
Get RSP <GET_RSP>
Requests the pipetting instrument type the device is connected to.
Get VERSION <GET_VERSION>
Requests the firmware version of the pipetting instrument. Only the first two
positions are shown.
Initialize System <INIT_RSP>
Initializes the pipetting instrument.
Refer to the firmware documentation for the device for a complete list of firmware
commands (see also 1.2.1 “Related Documentation and Software”, 1-3).
WARNING
Risk of injury to operating personnel or damage to the equipment
Take care when sending firmware commands. Sending the wrong commands
can damage the instrument or objects in its workspace, hurt yourself or other
people.
8 - 70
Freedom EVOware Software Manual, 393172, en, V2.3
8 - Configuration Tool
Device Driver Configuration
8.5.14 Settings for the Magellan Driver
This is used to make settings for the Tecan Magellan software option. The
Magellan software is used to control microplate readers (e.g. photometers) and to
carry out data analysis using stored procedures. The Magellan software, which
has its own installation procedure, has built-in drivers for Tecan microplate
readers. If you intend to use the Magellan software, it is not necessary to install
the reader driver when you install Freedom EVOware.
For additional information on this device, see 16.16 “Commands for the Magellan
option”, 16-48.
8.5.14.1 Magellan Configuration - Driver Tab
See 8.5.35 “Driver Tab of the Configure Device Driver Properties Dialog Box”,
8-116.
8.5.14.2 Magellan Configuration - Settings Tab
The Settings tab is used to make general settings for the Magellan driver.
Fig. 8-34 Settings tab of the Magellan driver
Output File Default
Specify the required default filename and path for the calculated results
(workspace file) from the Magellan software. The default filename and path which
you specify here will then be shown in the dialog box of the Magellan Measure
command (see 16.16.6 “Magellan - Measure Command”, 16-49).
Freedom EVOware Software Manual, 393172, en, V2.3
8 - 71
8 - Configuration Tool
Device Driver Configuration
Magellan
Standard
Path: Specify the path which is configured in Magellan for workspace files. This
makes it easier to load the generated workspace files if you run Magellan on its
own later on.
Filename: If you are using a barcode scanner, you should specify the placeholder
<ID>, which will instruct Freedom EVOware and thus Magellan to generate the
filename from the labware barcode. It is not necessary to specify the file extension
(which is .wsp). Note: The labware must be scanned in advance of the Magellan
Measure command.
Examples:
c:\Documents and Settings\All Users\Documents\Tecan\Magellan\<ID>
or
c:\Documents and Settings\All Users\Documents\Tecan\Magellan\wsp\<ID>
Note: To check the paths which are configured in Magellan, start the Magellan
Wizard, click More and click Options. Then choose the Paths tab.
Magellan
Tracker
Path: Magellan Tracker stores the workspace files in the path which is configured
in Magellan and ignores the path that you specify here. Accordingly, it is
recommended to leave the Output File Default field blank for Magellan Tracker.
The filename and path of the workspace file will then be taken from the settings
which were made in the Magellan method.
Filename: If you are using a barcode scanner, you should specify the placeholder
<ID>, which will instruct Freedom EVOware and thus Magellan to generate the
filename from the labware barcode. It is not necessary to specify the file extension
(which is .wsp). Note: The labware must be scanned in advance of the Magellan
Measure command.
Example:
c:\Documents and Settings\All Users\Documents\Tecan\Magellan\wsp\<ID>
Note: In both Magellan Standard and Magellan Tracker, if you leave the Output
File Default field blank in Freedom EVOware, the filename and path of the
workspace file will be taken from the settings which were made in the Magellan
method.
Note: In Windows Explorer, the directory c:\Documents and Settings\All
Users\Documents is shown as “Shared Documents” and not “Documents”.
Miscellaneous panel
Temperature, Temperature Control
Check the Temperature Control checkbox if you want to carry out
measurements at a specified temperature. Then specify the required
temperature in the Temperature field.
Initialization Timeout
Specify the maximum duration of the reader initialization procedure. An error
message will be output if initialization is not completed within this time.
Power Down Timeout
Specify the delay after which the reader should go into standby (energy
saving) mode. Specify 0 if you do not want the reader to go into standby
mode. The reader can take several minutes to wake up from standby mode
before it is ready for use.
8 - 72
Freedom EVOware Software Manual, 393172, en, V2.3
8 - Configuration Tool
Device Driver Configuration
Move plate out during initialization
Check this checkbox if you want to move out the labware during the
initialization procedure.
Sample Tracking panel
Sample Tracking
Check the Sample Tracking checkbox if you are also using the Tecan software
option Freedom EVOware Sample Tracking. This allows Freedom EVOware
to exchange labware and sample barcodes and Magellan result data with the
Sample Tracking software package. Do not check this checkbox if you are not
using Freedom EVOware Sample Tracking.
Communication panel
USB reader
Check the USB reader checkbox and choose the reader type if the reader is
connected to the PC via USB.
8.5.15 Settings for the PW384 Washer
This is used to make settings for the PW384 microplate washer. For general
information on this device, see 16.17 “Commands for the PW384 Washer”, 1651.
8.5.15.1 PW384 Washer Configuration - Driver Tab
See 8.5.35 “Driver Tab of the Configure Device Driver Properties Dialog Box”,
8-116.
8.5.15.2 PW384 Washer Configuration - Settings Tab
The Settings tab is used to make general settings for the PW384 Plate Washer.
Freedom EVOware Software Manual, 393172, en, V2.3
8 - 73
8 - Configuration Tool
Device Driver Configuration
Fig. 8-35 Settings tab of the PW384 Washer driver
Miscellaneous panel
Initialization Timeout
Specify the maximum duration of the device initialization procedure. An error
message will be output if initialization is not completed within this time.
Liquid detection panel
Bottle1/2/3
Check the checkboxes if you want to activate liquid detection for the wash
liquid bottles.
Plates after bottle empty warning
If the liquid detection signals an empty wash liquid bottle, specify how many
plates can still be washed before trigerring an error.
Plates after waste full warning
If the liquid detection signals a full waste bottle, specify how many plates can
still be washed before trigerring an error.
In case of liquid error panel
Request system pause
Check this box if you want the driver to request a system pause if the washer
detects a liquid error during command execution.
Note: Do not confuse the settings made here with those made in the scheduling/
error handling configuration. The settings in this tab define the reaction of the
system if the washer outputs an error message during execution of a washer
command. The settings for error handling take effect if the washer command has
already been stopped due to an error.
8 - 74
Freedom EVOware Software Manual, 393172, en, V2.3
8 - Configuration Tool
Device Driver Configuration
8.5.16 Settings for the PW384GP Washer
This is used to make settings for the PW384GP microplate washer. For general
information on this device, see 16.18 “Commands for the PW384GP Washer”,
16-54.
8.5.16.1 PW384GP Washer Configuration - Driver Tab
See 8.5.35 “Driver Tab of the Configure Device Driver Properties Dialog Box”,
8-116.
8.5.16.2 PW384GP Washer Configuration - Settings Tab
The Settings tab is used to make general settings for the PW384 Plate Washer.
Fig. 8-36 Settings tab of the PW384GP Washer driver
Miscellaneous panel
Initialization Timeout
Specify the maximum duration of the device initialization procedure. An error
message will be output if initialization is not completed within this time.
Head type
Choose the wash head type which is fitted to the washer (96 needle or 384
needle).
Liquid detection panel
Bottle1/2/3
Check the checkboxes if you want to activate liquid detection for the wash
liquid bottles.
Freedom EVOware Software Manual, 393172, en, V2.3
8 - 75
8 - Configuration Tool
Device Driver Configuration
Plates after bottle empty warning
If the liquid detection signals an empty wash liquid bottle, specify how many
plates can still be washed before trigerring an error.
Plates after waste full warning
If the liquid detection signals a full waste bottle, specify how many plates can
still be washed before trigerring an error.
Request system pause if botle is empty
Check this box if you want the driver to request a system pause if the washer
detects a liquid error during command execution.
Note: Do not confuse the settings made here with those made in the scheduling/
error handling configuration. The settings in this tab define the reaction of the
system if the washer outputs an error message during execution of a washer
command. The settings for error handling take effect if the washer command has
already been stopped due to an error.
8.5.17 Settings for the 96PW Washer
This is used to make settings for the 96PW microplate washer. For general
information on this device, see 16.19 “Commands for the 96PW Washer”, 1665.
8.5.17.1 96PW Washer Configuration - Driver Tab
See 8.5.35 “Driver Tab of the Configure Device Driver Properties Dialog Box”,
8-116.
8.5.17.2 96PW Washer Configuration - Settings Tab
The Settings tab is used to make general settings for the 96PW Plate Washer.
Fig. 8-37 Settings tab of the 96PW Washer driver
Miscellaneous panel
Overhead / Wash
Specify the global overhead time to be used when calculating command
execution times.
8 - 76
Freedom EVOware Software Manual, 393172, en, V2.3
8 - Configuration Tool
Device Driver Configuration
Overhead / Cycle
Specify the overhead time per cycle to be used when calculating command
execution times.
Initialization Timeout
Specify the maximum duration of the device initialization procedure. An error
message will be output if initialization is not completed within this time.
8.5.17.3 96PW Washer Configuration - Firmware Commands
The following firmware commands (command strings) are pre-configured for the
96PW Washer in the Test tab of the Configuration Tool:
Remote <Y0>
This firmware command switches the device from local mode to remote mode.
The device can only be controlled remotely by Freedom EVOware (through
the interface cable) in remote mode.
Exit Remote <E>
This firmware command switches the device from remote mode to local mode.
The device can not be controlled remotely by Freedom EVOware (through the
interface cable) in local mode.
Prime <M>
Prime the washer.
Exit Command Mode <E>
Exit command mode.
Query Status <Q>
Query the status.
These commands correspond to the driver commands described in
16.19 “Commands for the 96PW Washer”, 16-65 and perform the actions
described there. Refer to the firmware documentation for the device for a
complete list of firmware commands (see also 1.2.1 “Related Documentation and
Software”, 1-3).
WARNING
Risk of injury to operating personnel or damage to the equipment
Take care when sending firmware commands. Sending the wrong commands
can damage the instrument or objects in its workspace, hurt yourself or other
people.
8.5.18 Settings for the Tube Robot (PnP)
This is used to make settings for the Tube Robot driver. For general information
on this device, see 16.25 “Commands for the Tube Robot”, 16-83.
8.5.18.1 Tube Robot Configuration - Driver Tab
See 8.5.35 “Driver Tab of the Configure Device Driver Properties Dialog Box”,
8-116.
8.5.18.2 Tube Robot Configuration - Settings Tab
The Settings tab is used to make general settings for the Tube Robot:
Freedom EVOware Software Manual, 393172, en, V2.3
8 - 77
8 - Configuration Tool
Device Driver Configuration
Fig. 8-38 Settings tab of the Tube Robot driver
Miscellaneous panel
Initialization Timeout
Specify the maximum duration of the device initialization procedure. An error
message will be output if initialization is not completed within this time.
Advanced DITI handling
This checkbox is not relevant for the tube robot and should be ignored.
In case of script error panel
Request system pause
Check this checkbox if you want the driver to request a system pause if a
script error is detected during command execution.
8.5.18.3 Tube Robot Configuration - Command Generation Tab
The Command Generation tab is used to make settings for the default pre-actions
and post-actions to be used when generating commands for the tube robot (PnP).
The settings are only relevant to Freedom EVOware Plus.
8 - 78
Freedom EVOware Software Manual, 393172, en, V2.3
8 - Configuration Tool
Device Driver Configuration
Fig. 8-39 Command Generation tab of the Tube Robot driver
Command Generation panel
Default pre-action
Choose the default pre-action to be used by tube robot commands and
specify the execution time to be used when scheduling this operation.
Default post-action
Choose the default post-action to be used by tube robot commands and
specify the execution time to be used when scheduling this operation.
Note: Freedom EVOware compares the initial worktable layout with the worktable
layout which is required by the script. For each labware item which needs to be
moved, it then uses the specified pre-action and post-action to create and
configure the RoMa movements which will be needed. This feature only creates
movement commands for the RoMa; it does not create movement commands for
the PnP.
Default replace action
Choose the default action to be used by tube robot commands when replacing
DITIs and specify the execution time to be used when scheduling this
operation.
Note: Freedom EVOware compares the initial worktable layout with the worktable
layout which is required by the script. For each DITI rack, it then uses the
specified replace action to create and configure the RoMa movements which will
be needed when the DITI rack needs to be replaced. This feature only creates
movement commands for the RoMa; it does not create movement commands for
the PnP.
Default start process action for advanced DITI handling
This field is not relevant for the the tube robot and should be ignored.
Freedom EVOware Software Manual, 393172, en, V2.3
8 - 79
8 - Configuration Tool
Device Driver Configuration
8.5.18.4 Tube Robot Configuration - Firmware Commands
The following firmware commands (command strings) are pre-configured for the
PnP in the Test tab of the Configuration Tool:
Get RSP <GET_RSP>
Requests the pipetting instrument type the device is connected to.
Get VERSION <GET_VERSION>
Requests the firmware version of the pipetting instrument. Only the first two
positions are shown.
Initialize System <INIT_RSP>
Initializes the pipetting instrument.
Refer to the firmware documentation for the device for a complete list of firmware
commands (see also 1.2.1 “Related Documentation and Software”, 1-3).
WARNING
Risk of injury to operating personnel or damage to the equipment
Take care when sending firmware commands. Sending the wrong commands
can damage the instrument or objects in its workspace, hurt yourself or other
people.
8.5.19 Settings for the PosID-3
This is used to make settings for the PosID-3 driver. For general information on
this device, see 16.20 “Commands for the PosID-3”, 16-70.
8.5.19.1 PosID-3 Configuration - Driver Tab
See 8.5.35 “Driver Tab of the Configure Device Driver Properties Dialog Box”,
8-116.
8.5.19.2 PosID-3 Configuration - Settings Tab
The Settings tab is used to make general settings for the PosID-3:
8 - 80
Freedom EVOware Software Manual, 393172, en, V2.3
8 - Configuration Tool
Device Driver Configuration
Fig. 8-40 Settings tab of the PosID-3 driver
Manual Barcode Entry panel
Double Blind Entry
Check this checkbox if you want to activate double blind entry. In this case,
you will be prompted to enter the barcode twice manually during script or
process runtime if the scanner was unable to read it, despite retries. The
barcode characters that you enter are hidden using bullet characters.
Freedom EVOware will then try to scan the labware again. If the retry is
successful, the scanned barcode will be used. If the retry fails again, the
barcode which was entered manually will be used.
If you are using the PosID-3 for general purpose applications in a regulated
environment, you must always activate the Double Blind Entry feature if you
intend to enter barcodes manually when they cannot be read.
Barcode File panel
For the purpose of testing or training, the PosID-3 driver can be configured to read
simulated barcodes from a text file and return them to Freedom EVOware through
the PosID-3 - Scan command as if the PosID-3 has actually scanned some
labware.
Proceed as follows to use this feature:
Create a text file with barcodes using the syntax described in A.2.3 “Barcode
File for the PosID-3 Driver”, A-13.
Set the I/O State of the PosID-3 driver to OFF.
In the configuration of the PosID-3 driver (see above figure), check the Enable
barcode file usage checkbox and specify the path and name of the barcode
file. The suggested file name is PosID3_ManualBarcodes.txt.
Enable barcode file usage
Check this checkbox if you want to use the simulated barcodes feature.
Freedom EVOware Software Manual, 393172, en, V2.3
8 - 81
8 - Configuration Tool
Device Driver Configuration
Barcode file
Specify the filename and path of a text file with the simulated barcodes.
Specify the filename and path directly or click Browse and choose an existing
file.
8.5.20 Settings for the REMP PHS
This is used to make settings for the REMP Reatrix 2D Barcode Scanner. For
general information on this device see 16.21 “Commands for the REMP PHS”,
16-74.
8.5.20.1 REMP PHS configuration - Driver tab
See 8.5.35 “Driver Tab of the Configure Device Driver Properties Dialog Box”,
8-116.
8.5.21 Settings for the REMP Reatrix
This is used to make settings for the REMP Reatrix 2D Barcode Scanner. For
general information on this device see 16.22 “Commands for the REMP Reatrix”,
16-74.
8.5.21.1 REMP Reatrix configuration - Driver tab
See 8.5.35 “Driver Tab of the Configure Device Driver Properties Dialog Box”,
8-116.
8.5.21.2 REMP Reatrix configuration - Settings tab
The Settings tab is used to make general settings for the REMP Reatrix:
Fig. 8-41 Settings tab of the REMP Reatrix driver
8 - 82
Freedom EVOware Software Manual, 393172, en, V2.3
8 - Configuration Tool
Device Driver Configuration
The parameters are as follows:
Post result as message
Check this checkbox if you want to send the scanned barcodes to the
Freedom EVOware Message Control Server (MCS). See also LogViewer Tool
on page A.10 “LogViewer Tool”, A-72. This checkbox must always be
checked if you are using Freedom EVOware with the Tecan Sample Tracking
software option.
Write result to file
Barcode information which is received from the Reatrix scanner is stored by
Freedom EVOware internally. Check this checkbox if you want to write the
scanned data to an XML file as well, e.g. for testing or documentation
purposes. You must then specify the directory to use for the result file and
placeholders for generating the file name. The screen shot above shows
recommended values for these parameters.
Plate Barcode Handling panel
If barcode cannot be read, enter it manually
If you check this checkbox, the operator will be prompted to enter the plate
barcode manually during process runtime if the scanner was unable to read it.
A default barcode will be used if the operator does not enter the barcode
within the time specified with Dialog for manual entry closes after.
If you do not check this checkbox, a default plate barcode will always be used
if the scanner was unable to read it.
Format of default barcode
The following placeholders can be used in this field:
Tab. 8-6 Placeholders for use in default barcodes
Placeholder
Example
Description
<IDX> or <GIDX>
123
Counter
<IDXn> or
<GIDXn>
004
Counter which is adjusted to a length of n
digits using leading zeros
The placeholders are replaced dynamically with their current values during script
or process runtime. You can combine the placeholders with plain text.
Example: Use the following string to generate default barcodes containing the
string “Generated” and a 4-digit counter:
Generated<IDX4>
(e.g. Generated0003).
Example: Use the following string to generate default barcodes containing the
string “Unreadable” and a counter:
Unreadable<IDX>
(e.g. Unreadable2)
8.5.21.3 REMP Reatrix configuration - Communication tab
The Communication tab is used to make communication settings for the REMP
Reatrix:
Freedom EVOware Software Manual, 393172, en, V2.3
8 - 83
8 - Configuration Tool
Device Driver Configuration
Fig. 8-42 Communication tab of the REMP Reatrix driver
The parameters are as follows:
TCP/IP address
Specify the remote TCP/IP address or remote host name if the Reatrix
software is running on a different PC to Freedom EVOware. Specify
LOCALHOST if the Reatrix software is running on the same PC as Freedom
EVOware.
TCP/IP port
Specify the TCP/IP port which is configured in the Reatrix.ini file of the Reatrix
software (default port: 6054).
8.5.22 Settings for the REMP ACD96
This is used to make settings for the REMP Reatrix 2D Barcode Scanner. For
general information on this device see 16.23 “Commands for the REMP ACD96”,
16-77.
8.5.22.1 REMP ACD96 configuration - Driver tab
See 8.5.35 “Driver Tab of the Configure Device Driver Properties Dialog Box”,
8-116.
8.5.22.2 REMP ACD96 configuration - Settings tab
The Settings tab is used to make general settings for the REMP ACD96
Automated Capper Decapper.
8 - 84
Freedom EVOware Software Manual, 393172, en, V2.3
8 - Configuration Tool
Device Driver Configuration
Fig. 8-43 Settings tab of the REMP ACD96 driver
The parameters are as follows:
Server
Specify VBRempCapperDriver.
Computer
Leave this field blank.
Report file
Specify the path and name of a text file if you want to log the output of the
ACD96 driver, e.g. for testing purposes. Create an empty text file, click
Browse and choose the file you created.
Server
Leave this field blank.
Connect
This checkbox must always be checked.
Configure
This button has no effect because the ACD96 driver does not have any other
configurable parameters.
8.5.22.3 REMP ACD96 configuration - Macro Variables tab
There are no user-configurable parameters on this tab.
8.5.23 Settings for the Plate Robot (RoMa)
This is used to make settings for the Plate Robot driver. For general information
on this device, see 16.26 “Commands for the Plate Robot”, 16-83.
Freedom EVOware Software Manual, 393172, en, V2.3
8 - 85
8 - Configuration Tool
Device Driver Configuration
8.5.23.1 Plate Robot Configuration - Driver Tab
See 8.5.35 “Driver Tab of the Configure Device Driver Properties Dialog Box”,
8-116.
8.5.23.2 Plate Robot Configuration - Settings Tab
The Settings tab is used to make general settings for the Plate Robot:
Fig. 8-44 Settings tab of the Plate Robot driver
Move panel
Grip Detection
Specify whether grip detection should be used.
Home after move
Specify whether the robot arm should be moved to its home position after
each move. This may be necessary for some worktable layouts, but will
reduce system performance.
Regrip Location
Choose a location where the plate robot can put down the labware temporarily
for the purpose of changing the grip mode from wide to narrow and vice versa
and/or for changing the grip position (grip height).
Proceed as follows to specify the regrip location (an unused carrier site):
–
–
–
8 - 86
Right-click the microplate carrier where you want to regrip and choose
Edit Carrier from the context menu.
Assign a group label (e.g. “Regrip”) to the site you want to use (see
9.5 “Configuring Carriers”, 9-39, “Groups”).
Save the process.
Freedom EVOware Software Manual, 393172, en, V2.3
8 - Configuration Tool
Device Driver Configuration
–
Return to this dialog box and choose the carrier site you have labeled from
the pull-down list. The group name you have chosen is shown appended
to the end of the carrier name, e.g. MP_3Pos_Regrip.
Regrip location is only relevant for Freedom EVOware Plus. The regrip
location will be used automatically, e.g. if labware is picked by the RoMa by
gripping the narrow side but must be put down on the destination while
gripping the wide side. In this case, the labware will be picked up from the
source carrier using the Move Narrow RoMa vector, put down on the regrip
location, picked up on the wide side using the Move Wide RoMa vector and
put down on the destination carrier.
For the regrip location, you must always specify at least two RoMa vector
types (Move Narrow and Move Wide). This is usually not necessary for normal
carriers. See 9.6.1 “Using RoMa Vectors”, 9-58 for information on RoMa
vector types.
The regrip feature is necessary e.g. for some reader and washer types which
only allow the RoMa to insert the labware in portrait or landscape orientation
for mechanical reasons.
If the Transfer Station driver was installed when you installed Freedom
EVOware, regrip location is automatically set to Transfer (i.e. use the transfer
station for re-gripping). You do not need to create a group label in this case.
See 8.5.33 “Settings for the Transfer Station”, 8-113. The Transfer Station
driver is only installed if you have installed Freedom EVOware with two
RoMas.
This field and the above instructions are only relevant for Freedom EVOware
Plus.
Custom grip position
Some special carrier types and device carriers (e.g. readers) may require you to
grip the labware at a non-standard grip height or grip position, for example to
avoid a collision with adjacent mechanical components. The non-standard grip
position is specified with the special carrier attributes Maximum grip offset and
Minimum grip offset. See 9.5.5 “Carrier Attributes”, 9-47, Custom grip position.
In Freedom EVOware Plus, the labware will be regripped automatically using the
regrip location if the current grip position is not within the range Minimum grip
offset <> Maximum grip offset for the destination carrier.
In Freedom EVOware Standard, you will get a script validation error if the current
grip position is not within the range Minimum grip offset <> Maximum grip offset
for the destination carrier. In this case, you must use two Transfer Labware
commands. The first one moves the labware to an unused carrier and the second
one moves the labware from the unused carrier to the destination carrier. This
allows the labware to be re-gripped.
Note: The labware attributes Plate Grip Offset Narrow and Plate Grip Offset Wide
adjust the grip position globally for this labware type (not just for a specific carrier).
Miscellaneous panel
Initialization Timeout
Specify the maximum duration of the device initialization procedure. An error
message will be output if initialization is not completed within this time.
Freedom EVOware Software Manual, 393172, en, V2.3
8 - 87
8 - Configuration Tool
Device Driver Configuration
8.5.23.3 Plate Robot Configuration - Plugins Tab
Plugins are software tools from third-party suppliers which are used to control
special devices. The Plugins tab is used to assign the RoMa commands which are
needed by the device.
Fig. 8-45 Plugins tab of the Plate Robot driver
Associate Plugin Tools panel
Choose the plugin in the Tools panel, choose the RoMa command which the
device should use and click Add.
8.5.23.4 Plate Robot Configuration - Firmware Commands
The following firmware commands (command strings) are pre-configured for the
RoMa in the Test tab of the Configuration Tool:
Get RSP <GET_RSP>
Requests the pipetting instrument type the device is connected to.
Get VERSION <GET_VERSION>
Requests the firmware version of the pipetting instrument. Only the first two
positions are shown.
Initialize System <INIT_RSP>
Initializes the pipetting instrument.
Refer to the firmware documentation for the device for a complete list of firmware
commands (see also 1.2.1 “Related Documentation and Software”, 1-3).
WARNING
Risk of injury to operating personnel or damage to the equipment
Take care when sending firmware commands. Sending the wrong commands
can damage the instrument or objects in its workspace, hurt yourself or other
people.
8 - 88
Freedom EVOware Software Manual, 393172, en, V2.3
8 - Configuration Tool
Device Driver Configuration
8.5.24 Settings for the Te-Shake
This is used to make settings for the Te-Shake. For general information on this
device, see 16.28 “Commands for the Te-Shake Shaker”, 16-90.
Freedom EVOware is provided with several different types of Te-Shake shaker. If
you want to use more than one shaker in your script or process, you must use the
Duplicate Device tool top create a separate device driver for each of them. For
more information see 16.28 “Commands for the Te-Shake Shaker”, 16-90.
8.5.24.1 Te-Shake Configuration - Driver Tab
See 8.5.35 “Driver Tab of the Configure Device Driver Properties Dialog Box”,
8-116.
8.5.24.2 Te-Shake Configuration - Settings Tab
The Settings tab is used to make general settings for the Te-Shake shaker:
Fig. 8-46 Settings tab of the Te-Shake driver
Device ID
Specify the hardware address of the Te-Shake. Specify the address as
“address on the switch plus 1”. The address switch of the Te-Shake is on the
CC board (inside the device). Each physical device (regardless of device
type) must have a unique hardware address.
Heater
Check this checkbox if you want to activate the optional heating plate.
Initial temperature
Specify the required initial temperature of the heating plate (range: 15 to
90 °C). The heating plate cannot cool, so the minimum temperature of the
labware is room temperature. The working temperature can be set with the
execution parameters when you add the Te-Shake Shake command to your
process.
Freedom EVOware Software Manual, 393172, en, V2.3
8 - 89
8 - Configuration Tool
Device Driver Configuration
8.5.25 Settings for the Symbol MS-954 Barcode Scanner
This is used to configure settings for the Symbol MS-954 Barcode Scanner. For
general information on this device, see 16.2 “Commands for the Symbol LS-1220
Barcode Scanner”, 16-1.
8.5.25.1 Symbol MS-954 Barcode Scanner Configuration - Settings Tab
The Settings tab is used to make general settings for the Barcode Scanner.
Fig. 8-47 Settings tab of the Symbol MS-954 Barcode Scanner driver
Settings panel
Default Barcode
The following placeholders can be used in the Default Barcode field:
Tab. 8-7 Placeholders for use in default barcodes
Placeholder
Example
Description
<IDX> or <GIDX>
123
Counter
<IDXn> or
<GIDXn>
004
Counter which is adjusted to a length of n
digits using leading zeros
The placeholders are replaced dynamically with their current values during script
or process runtime. You can combine the placeholders with plain text.
Example: Use the following string to generate default barcodes containing the
string “Generated” and a 4-digit counter:
Generated<IDX4>
(e.g. Generated0003).
Example: Use the following string to generate default barcodes containing the
string “Unreadable” and a counter:
8 - 90
Freedom EVOware Software Manual, 393172, en, V2.3
8 - Configuration Tool
Device Driver Configuration
Unreadable<IDX>
(e.g. Unreadable2)
Enter Barcode Manually on Timeout, Manual Entry Timeout
If you check Enter Barcode Manually on Timeout, the operator will be
prompted to enter the barcode manually during process runtime if the scanner
was unable to read it, despite retries. A default barcode will be used if the
operator does not enter the barcode within the specified time (Manual Entry
Timeout field).
If you do not check Enter Barcode Manually on Timeout, a default barcode will
always be used if the scanner was unable to read it.
Auto Read Retries
Specify how many times the device should try to read the barcode before
considering it unreadable.
Move Timeout
Specify the timeout for the robot move which is associated with the
ReadBarcode command. An error message will be output if the robot takes
longer than this to move.
Move Robot in Beam
Specify the distances in the x, y and z directions that the robot should move
the labware in the scanner beam when scanning.
Multiplication Factors for Retries
Specify multiplication factors for the distances in the Move Robot in beam
field.
If the labware cannot be scanned on the first try, the distances in Move Robot
in Beam are multiplied by the specified multiplication factors for each
successive attempt, resulting in larger distances each time. This allows
Freedom EVOware to search for the barcode label with the help of the robot in
case it is not accurately positioned on the labware.
The barcode scanner can be configured to only accept the barcode types which
are expected on your barcode labels. This makes it easier for the scanner to
identify incorrect barcodes. This can be done by the Tecan Field Service Engineer
using special configuration barcodes. The valid barcode types list is stored in the
barcode scanner firmware.
8.5.25.2 Symbol MS-954 Barcode Scanner Configuration - Barcodes Tab
The Barcodes tab is used to configure the barcode types which the Symbol MS954 barcode scanner will accept:
Freedom EVOware Software Manual, 393172, en, V2.3
8 - 91
8 - Configuration Tool
Device Driver Configuration
Fig. 8-48 Barcodes tab of the Symbol MS-954 Barcode Scanner driver
Barcodes panel
Use the checkboxes to choose how many different barcode types you want to
read. You should only configure the barcode types which are expected on your
barcode labels. This makes it easier for the scanner to identify incorrect barcodes.
8.5.25.3 Symbol MS-954 Barcode Scanner Configuration - Firmware Commands
The following firmware commands (command strings) are pre-configured for the
Barcode Scanner in the Test tab of the Configuration Tool:
Read Barcode <STIE>
Performs a single read operation of the barcode scanner.
Refer to the firmware documentation for the device for a complete list of firmware
commands (see also 1.2.1 “Related Documentation and Software”, 1-3).
WARNING
Risk of injury to operating personnel or damage to the equipment
Take care when sending firmware commands. Sending the wrong commands
can damage the instrument or objects in its workspace, hurt yourself or other
people.
8.5.26 Settings for the Te-Link
This is used to make settings for the Te-Link. For general information on this
device, see 16.41 “Commands for the Te-Link”, 16-127.
8 - 92
Freedom EVOware Software Manual, 393172, en, V2.3
8 - Configuration Tool
Device Driver Configuration
8.5.26.1 Te-Link Configuration - Driver Tab
See 8.5.35 “Driver Tab of the Configure Device Driver Properties Dialog Box”,
8-116.
8.5.26.2 Te-Link Configuration - Settings Tab
The Settings tab is used to make general settings for the Te-Link:
Fig. 8-49 Settings tab of the Te-Link driver
Device ID
Specify the hardware address of the Te-Link. Specify the address as “address
on the switch plus 1”. The address switch of the Te-Link is on the CC board
(inside the device). Each physical device (regardless of device type) must
have a unique hardware address.
Initialization timeout
Specify the maximum duration of the device initialization procedure. An error
message will be output if initialization is not completed within this time.
Locations panel
Location1, Location2
Specify which RoMa should be used to access which position of the Te-Link
shuttle.
Location1 and Location2 are assigned to two absolute positions of the Te-Link
shuttle (normally the two ends of the Te-Link rail) when setting up the
hardware with the Setup & Service software. The absolute positions are
stored in the device EEPROM. Freedom EVOware uses the stored positions
instead of addressing the absolute positions directly.
Proceed as follows to teach two absolute positions for Freedom EVOware with the
Setup & Service software:
Freedom EVOware Software Manual, 393172, en, V2.3
8 - 93
8 - Configuration Tool
Device Driver Configuration
Move the carrier to the first required position using the Move page of the TeLink panel and note the current position in instrument steps.
Send the following firmware command to the Te-Link to store the first position:
<DeviceID>SCP0,<position>
– where <DeviceID> is the the hardware address of the Te-Link and
<position> is the absolute position of the carrier in instrument steps, for
example: Q1SCP0,374.
Move the carrier to the second required position and note the new position.
Send the following firmware command to the Te-Link to store the second
position: <DeviceID>SCP1,<position>
The Setup & Service software is described in the Instrument Software Manual
(Doc ID 392888). Please refer to the Instrument Software Manual for additional
information.
WARNING
Risk of injury to operating personnel or damage to the equipment
Take care when sending firmware commands. Sending the wrong commands
can damage the instrument or objects in its workspace, hurt yourself or other
people.
8.5.26.3 Te-Link Configuration - Communications Tab
The Communications tab is used to make communications settings for the device
driver:
Fig. 8-50 Communications tab of the Te-Link driver
Local server
Check this checkbox if the Te-Link is attached to the local Freedom EVOware
installation.
8 - 94
Freedom EVOware Software Manual, 393172, en, V2.3
8 - Configuration Tool
Device Driver Configuration
Remote server name
Specify the remote TCP/IP address or remote host name if the Te-Link is
connected to another Freedom EVOware installation running on a different
PC. The local Freedom EVOware installation will then control the Te-Link
device through the network connection.
8.5.27 Settings for the Te-MagS
This is used to make settings for the Te-MagS (Magnetic Bead Separator). For
general information on this device, see 16.32 “Commands for the Magnetic Bead
Separator”, 16-100.
8.5.27.1 Te-MagS Configuration - Driver Tab
See 8.5.35 “Driver Tab of the Configure Device Driver Properties Dialog Box”,
8-116.
8.5.27.2 Te-MagS Configuration - Settings Tab
The Settings tab is used to make general settings for the Te-MagS:
Fig. 8-51 Settings tab of the Te-MagS driver
Miscellaneous panel
Initialization Timeout
Specify the maximum duration of the device initialization procedure. An error
message will be output if initialization is not completed within this time.
Device Address
Specify the hardware address of the Te-MagS. Specify the address as
“address on the switch plus 1”. The address switch of the Te-MagS is on the
CC board (inside the device). Each physical device (regardless of device
type) must have a unique hardware address.
Freedom EVOware Software Manual, 393172, en, V2.3
8 - 95
8 - Configuration Tool
Device Driver Configuration
Support Z-Positioning
If you check this checkbox, you can adjust the height (Z position) of the
magnet block in the MoveToPosition and Execute commands to simplify
aspiration of the supernatant or wash liquid if there is only a small volume of
liquid in the labware. This checkbox should only be checked if your Te-MagS
hardware supports this feature.
Heater
Check this checkbox if you want to activate the optional heating function.
Initial Temperature
Specify the required initial temperature of the heating block (range: 15 to
80 °C). The heating block cannot cool, so the minimum temperature of the
labware is room temperature. The working temperature can be set with the
execution parameters when you add the Te-MagS ActivateHeater command
to your process.
8.5.27.3 Te-MagS Configuration - Firmware Commands
The following firmware commands (command strings) are pre-configured for the
Te-MagS in the Test tab of the Configuration Tool:
Get RSP <GET_RSP>
Requests the pipetting instrument type the device is connected to.
Get VERSION <GET_VERSION>
Requests the firmware version of the pipetting instrument. Only the first two
positions are shown.
Initialize System <INIT_RSP>
Initializes the pipetting instrument.
Refer to the firmware documentation for the device for a complete list of firmware
commands (see also 1.2.1 “Related Documentation and Software”, 1-3).
WARNING
Risk of injury to operating personnel or damage to the equipment
Take care when sending firmware commands. Sending the wrong commands
can damage the instrument or objects in its workspace, hurt yourself or other
people.
8.5.28 Settings for the Te-Stack and Te-Stack Te-MO
This is used to make settings for the Te-Stack and the Te-Stack Te-MO. For
general information on these devices, see 16.34 “Commands for the Te-Stack”,
16-107.
8.5.28.1 Te-Stack and Te-Stack Te-MO Configuration - Driver Tab
See 8.5.35 “Driver Tab of the Configure Device Driver Properties Dialog Box”,
8-116.
8.5.28.2 Te-Stack and Te-Stack Te-MO Configuration - Settings Tab
The following dialog box is used to make general settings:
8 - 96
Freedom EVOware Software Manual, 393172, en, V2.3
8 - Configuration Tool
Device Driver Configuration
Fig. 8-52 Settings tab of the Te-Stack driver
Barcode panel
Specify the barcode scanner settings for the Te-Stack.
Note: The Te-Stack Te-MO cannot be fitted with a barcode scanner and you
cannot make any entries in the Barcode panel in this case.
Read barcode on store plate
Read the labware barcode when returning labware to the stacker.
Read barcode on get plate
Read the labware barcode when getting labware from the stacker.
Barcode variable name
Specify the name of an internal variable which should be used to store the
barcode which is scanned. The default variable name for barcodes is “ID”.
Enter Barcode Manually on Timeout, Manual Entry Timeout
If you check Enter Barcode Manually on Timeout, the operator will be
prompted to enter the barcode manually during process runtime if the scanner
was unable to read it. A default barcode will be used if the operator does not
enter the barcode within the specified time (Manual Entry Timeout field).
If you do not check Enter Barcode Manually on Timeout, a default barcode will
always be used if the scanner was unable to read it.
Default Barcode
The following placeholders can be used in the Default Barcode field:
Freedom EVOware Software Manual, 393172, en, V2.3
8 - 97
8 - Configuration Tool
Device Driver Configuration
Tab. 8-8 Placeholders for use in default barcodes
Placeholder
Example
Description
<IDX> or <GIDX>
123
Counter
<IDXn> or
<GIDXn>
004
Counter which is adjusted to a length of n
digits using leading zeros
The placeholders are replaced dynamically with their current values during script
or process runtime. You can combine the placeholders with plain text.
Example: Use the following string to generate default barcodes containing the
string “Generated” and a 4-digit counter:
Generated<IDX4>
(e.g. Generated0003).
Example: Use the following string to generate default barcodes containing the
string “Unreadable” and a counter:
Unreadable<IDX>
(e.g. Unreadable2)
Miscellaneous panel
Initialization Timeout
Specify the maximum duration of the device initialization procedure. An error
message will be output if initialization is not completed within this time.
8.5.28.3 Te-Stack and Te-Stack Te-MO Configuration - Towers Tab
The standard Te-Stack normally has two towers, each of which can hold up to 50
microplates (depending on microplate height). When you fetch labware, the TeStack brings it from the specified tower to the Te-Stack transfer position, where it
can be picked up by the RoMa. To return the labware, the RoMa puts it on the TeStack transfer position and the Te-Stack moves it back into the specified tower.
Both towers share the same transfer position. A moveable carriage (the “shuttle”
or “transfer carrier”) is used to move the labware between the transfer position
and the two towers.
The Te-Stack Te-MO does not have or need a shuttle. It is able to put plates
directly onto the Te-MO slides.
To increase the total storage capacity, Freedom EVOware can group several
physical Te-Stack devices into one logical Te-Stack device. Each pair of towers
has its own shuttle and each shuttle has its own transfer position.
The number of transfer positions (RoMa sites) in the logical Te-Stack device, the
total number of towers and the number of plates per tower are configured with
Position Layout and Use to offset RoMa vector in the Carrier Definition (see
9.5 “Configuring Carriers”, 9-39).
This dialog box is used to assign the towers to the physical Te-Stack devices:
8 - 98
Freedom EVOware Software Manual, 393172, en, V2.3
8 - Configuration Tool
Device Driver Configuration
Fig. 8-53 Towers tab of the Te-Stack driver
Towers panel
Number of Towers
Specify the number of towers in the logical Te-Stack device. Depending on
your setting, additional tabs will appear (Tower 1, Tower 2, etc.) where you can
configure each of the towers.
The following parameters must be set for each tower:
Device panel
Device ID
Each tower has a unique device ID (hardware address). Specify the ID for this
tower. On the Te-Stack, the device ID is set with the address switch on the
printed circuit board (inside the device). Each physical device (regardless of
device type) must have a unique hardware address.
Master Device ID
Each shuttle can serve two towers. The master tower is the tower which
controls the shuttle and the optional barcode scanner. Specify the device ID
(hardware address) of the master tower.
Note: If the Te-Stack is mounted above the Te-MO (“Te-MO Stacker”), the Master
ID must be set here to <TeMo>.
Freedom EVOware Software Manual, 393172, en, V2.3
8 - 99
8 - Configuration Tool
Device Driver Configuration
Transfer Position
The position of the shuttle (sliding carrier) when it is below the selected tower.
The Te-Stack tower can pick up and put down labware on the slide at this
position.
With the default tower configuration for a double Te-Stack:
Tower 1: Shuttle position 1
Tower 2: Shuttle position 1
Tower 3: Shuttle position 2
Tower 4: Shuttle position 2
See Fig. 8-54, 8-100, below.
Note:
RoMa transfer position: Shuttle position 0
Waste position (hardware option): Shuttle Position 3
Location panel
Location
Specify the Freedom EVOware location associated with this device. TeStack_left is on the left of the worktable. Te-Stack_right is on the right of the
worktable. Te-Stack Te-MO is the Te-MO Stacker option.
X Position
Specify the site index along the X axis for the location for this tower:
Fig. 8-54 Site index, Double Te-Stack Right (with the default tower configuration)
Y Position
Specify the site index along the Y axis for the location for this tower.
Warnings/Pause panel
You can configure the Te-Stack driver to issue a warning or to pause the system
according to a signal from its labware sensor. The labware sensor is mounted
about half way up one of the stacker towers. The number of labware items in the
tower when it is half full depends on the height of each item.
Click Sensor detects no plate if you want the Te-Stack driver to issue a nearly
empty warning or to pause the system when the Te-Stack is being unloaded. Set
Pause system x plates after to 45% - 50% of the number of plates which fit in the
8 - 100
Freedom EVOware Software Manual, 393172, en, V2.3
8 - Configuration Tool
Device Driver Configuration
tower. Set Send warning x plates after to a slightly higher number of plates. This
ensures that the warning will be issued before the system pauses.
Click Sensor detects plate if you want the Te-Stack driver to issue a nearly full
warning or to pause the system when the Te-Stack is being loaded with plates. Set
Pause system x plates after to 45% - 50% of the number of plates which fit in the
tower. Set Send warning x plates after to a slightly lower number of plates. This
ensures that the warning will be issued before the system pauses.
The above suggestions for how many plates to set for the warning and/or system
pause are guidelines only. Test your stacker system with the plates you plan to
use to get more accurate figures. Specify a large number of plates if you want to
disable the warning and/or the system pause.
Freedom EVOware Software Manual, 393172, en, V2.3
8 - 101
8 - Configuration Tool
Device Driver Configuration
8.5.28.4 Te-Stack and Te-Stack Te-MO Configuration - Locations Tab
Te-Stack
The Te-Stack is able to move labware to the Te-Stack transfer position without
using the RoMa. Labware on the Te-Stack transfer position can be accessed by
the LiHa for pipetting.
If you want to pipette with the LiHa onto the Te-Stack transfer position(s), they
must be associated with locations in Freedom EVOware. This is done using this
tab:
Fig. 8-55 Locations tab of the Te-Stack driver
Te-Stack Te-MO
8 - 102
The Te-Stack Te-MO is able to move labware to a site on one of the Te-MO slides
without using the RoMa. Labware on the Te-MO carrier can be accessed by the
Te-MO pipetting head by moving the slides to position the site below the pipetting
head.
The middle slide of the Te-MO is normally only used for DITI racks, troughs, wash
stations and tip blocks. You can only put microplates on the outer two slides.
Specify six locations for the Te-Stack Te-MO if you are using DITIs:
Freedom EVOware Software Manual, 393172, en, V2.3
8 - Configuration Tool
Device Driver Configuration
Fig. 8-56 Locations tab of the Te-Stack Te-MO driver
If you are not using DiTis you only need to specify four locations for the Te-Stack
Te-MO. See also EVOware location, below.
General panel
Number of Locations
Choose the required number of Freedom EVOware locations (i.e. Te-Stack
transfer positions) for this logical Te-Stack device. For example, a Te-Stack
with two towers and one transfer position has one location.
You only need to specify locations if you want to pipette onto labware which is
on the transfer position. In most cases, you should set the number of locations
to the number of transfer positions which are available. You will then be able
to pipette to all of the transfer positions on the Te-Stack.
Locations Associations panel
To change the assignment of an Freedom EVOware location to a transfer position,
select it in the list and adjust the settings using the pull-down lists:
Freedom EVOware location
Choose the Freedom EVOware location as follows:
Te-Stack
Te-Stack Te-MO
For the Te-Stack, choose Te-Stack_left or Te-Stack_right. Te-Stack_left is on
the left of the worktable. Te-Stack_right is on the right of the worktable.
The three towers of the Te-Stack Te-MO can only put labware on the front two
sites of the respective Te-MO slide (a total of six locations). For mechanical
reasons, the sites at the rear of the Te-MO are not accessible to the stacker.
Use the Groups column in the carrier definition for the Te-MO to group
equivalent sites into a single Freedom EVOware location. For example,
Freedom EVOware Software Manual, 393172, en, V2.3
8 - 103
8 - Configuration Tool
Device Driver Configuration
assign Te-MO sites 4 and 5 to “Stack1”, sites 9 and 10 to “StackM” and sites
14 and 15 to “Stack2”. The location groups are then shown in the Freedom
EVOware location pull-down list. See “Groups” in 9.5 “Configuring Carriers”,
9-39.
Te-MO sites are counted from rear to front and then from left to right:
Tab. 8-9 Te-MO 3x5 site numbers
Te-MO 3 x 5
1
6
11
2
7
12
3
8
13
4
9
14
5
10
15
Tab. 8-10 Te-MO 3x3 site numbers
Te-MO 3 x 3
1
4
7
2
5
8
3
6
9
Use the following group labels in the Te-MO 3 x 5 carrier definition if you want
to use the Te-Stack Te-MO to put labware on both outer slides and DITI racks
on the middle slide:
Tab. 8-11 Te-MO 3x5 group labels
Te-MO 3 x 5
Slide1
SlideM
Slide2
Slide1
SlideM
Slide2
Slide1
SlideM
Slide2
Stack1
StackM
Stack2
Stack1
StackM
Stack2
Then configure the locations as shown in Fig. 8-56, 8-103. For mechanical
reasons, the Te-Stack Te-MO cannot be fitted to the Te-MO 3 x 3. You can use
different group names if you want to, but you should use the same scheme.
8 - 104
Freedom EVOware Software Manual, 393172, en, V2.3
8 - Configuration Tool
Device Driver Configuration
Position
Choose the position coordinates. For the above example of the Te-Stack TeMO, the front two sites on each slide only differ in the Y coordinate. For slide
1, create two locations Te-MO_3x5_Stack1 and assign them to 1,1,1 and 1,2,1
respectively. Follow the same system for both other slides.
Note: The Freedom EVOware locations and location groups for the Te-MO are
only visible in the pull-down list if you have put a Te-MO on the worktable.
Master Device ID
Choose the device ID (hardware address) of the master tower for the current
location. The master tower is the tower which controls the shuttle and the
optional barcode scanner. On the Te-Stack tower, the device ID is set with the
address switch on the printed circuit board (inside the device).
Note: Make sure that you have correctly set the Allowed Robots field for all
locations which are involved. To do this, click Attributes in the Edit Carrier dialog
box for the Te-Stack.
8.5.28.5 Te-Stack and Te-Stack Te-MO Configuration - Firmware Commands
The following firmware commands (command strings) are pre-configured for the
Te-Stack and the Te-Stack Te-MO in the Test tab of the Configuration Tool:
Get RSP <GET_RSP>
Requests the pipetting instrument type the device is connected to.
Get VERSION <GET_VERSION>
Requests the firmware version of the pipetting instrument. Only the first two
positions are shown.
Initialize System <INIT_RSP>
Initializes the pipetting instrument.
Refer to the firmware documentation for the device for a complete list of firmware
commands (see also 1.2.1 “Related Documentation and Software”, 1-3).
WARNING
Risk of injury to operating personnel or damage to the equipment
Take care when sending firmware commands. Sending the wrong commands
can damage the instrument or objects in its workspace, hurt yourself or other
people.
8.5.29 Settings for the Te-VacS
This is used to make settings for the Te-VacS (vacuum separator option). For
general information on this device, see 16.35 “Commands for the Te-VacS”, 16110.
The Te-VacS carrier has six sites: filtration plate (front and rear), vacuum block
(front and rear) and collection plate (front and rear). The vacuum block supports
the filtration plate. The collection plate is inside the vacuum block and is
underneath the filtration plate. It is supported by a so-called adaptor plate. Seven
different adaptor plates with different heights are available from Tecan. When
setting up the Te-VacS, you must adjust the Te-VacS carrier configuration for the
height of the adaptor plate you are using, which affects the height of the collection
Freedom EVOware Software Manual, 393172, en, V2.3
8 - 105
8 - Configuration Tool
Device Driver Configuration
plate. The parameter to change is Z-offset for the collection positions, carrier sites
3 and 6 (see 9.5 “Configuring Carriers”, 9-39).
8.5.29.1 Te-VacS Configuration - Driver Tab
See 8.5.35 “Driver Tab of the Configure Device Driver Properties Dialog Box”,
8-116.
8.5.29.2 Te-VacS Configuration - Settings Tab
The Settings tab is used to make general settings for the Te-VacS.
Fig. 8-57 Settings tab of the Te-VacS driver
Miscellaneous panel
Initialization timeout
Specify the maximum duration of the device initialization procedure. An error
message will be output if initialization is not completed within this time.
Device address
Specify the hardware address of the Te-VacS. Specify the address as
“address on the switch plus 1”. The address switch of the Te-VacS is on the
CC board (inside the device). Each physical device (regardless of device
type) must have a unique hardware address.
In case of script error panel
Request system pause
Check this checkbox if you want the driver to request a system pause if a
script error is detected during command execution.
8 - 106
Freedom EVOware Software Manual, 393172, en, V2.3
8 - Configuration Tool
Device Driver Configuration
Note: Do not confuse the settings made here with those made in the scheduling/
error handling configuration. The settings in this tab define the reaction of the
system if the vacuum separator outputs an error message during execution of a
Te-VacS command. The settings for error handling take effect if the Te-VacS
command has already been stopped due to an error.
8.5.29.3 Te-VacS Configuration - Command Generation Tab
The Command Generation tab is used to make settings for the default pre-actions
and post-actions to be used when generating commands for the Te-VacS. The
settings are only relevant to Freedom EVOware Plus.
Fig. 8-58 Command Generation tab of the Te-VacS driver
Pre-actions / Post actions panel
LiHa configuration file
Specify the file which contains the LiHa configuration. Specify the path and file
name of the file directly or click Browse and choose an existing file. It is
normally located in the Freedom EVOware <install_path> directory.
Move command
Choose the command to use for moving the plates and specify the execution
time to be used when scheduling this command.
Note: Freedom EVOware compares the initial worktable layout with the worktable
layout which is required by the script. For each object which needs to be moved, it
then uses the specified move command to create and configure the RoMa
movements which will be needed.
Freedom EVOware Software Manual, 393172, en, V2.3
8 - 107
8 - Configuration Tool
Device Driver Configuration
Replace absorbent command
Choose the command to use for replacing the absorbent station and specify
the execution time to be used when scheduling this command. The absorbent
station uses a blotting pad to remove drops of liquid from the bottom of the
filtration and collection plates (the labware is put on to the pad using the
RoMa). The replacement intervals for the absorbent station are configured in
the Filtration command and depend on your application or experiment.
Note: Freedom EVOware compares the initial worktable layout with the worktable
layout which is required by the script. It then uses the specified replace action to
create and configure the RoMa movements which will be needed when the
absorbent station needs to be replaced because the blotting pad is used up.
Locations panel
This panel is used to specify the location (carrier site) of the absorbent station.
Absorbent station
The absorbent station uses a blotting pad to remove drops of liquid from the
bottom of the filtration and/or collection plate after each filtration step. It
usually consists of a stand or carrier that contains a piece of fabric or
absorbent material. It can also be programmed to be a replaceable item. The
filtration or collection plate is put on to the absorbent station using the RoMa.
Proceed as follows to configure the absorbent station:
–
Create a suitable one-site carrier for the absorbent station and put it on
the worktable. Use the name Absorbent_Station.
– Create labware for the absorbent station. Use the name AbsorbentPlate.
– Create a suitable RoMa vector for the labware.
– Put the labware on the carrier:
• If the absorbent station labware is fixed and not replaceable, you must
create it on the carrier using the labware generator. Select the labware
in the Control Bar, press Ctrl and drag the labware onto the carrier in
the Worktable Editor. This opens the the labware generator. In the
labware generator, assign the name AbsorbentPlate in the Labware
Groupname field. After closing the labware generator, this name will
be shown in the yellow label of the generated labware.
• If the absorbent station labware will be replaced after each use, the
labware must be stored in a hotel or other storage device and be
brought to the worktable using the RoMa with each iteration of the
filtration commmand. Create sufficient absorbent plate labware items
in the hotel using the labware generator.
– Return to the Command Generation dialog box and choose the location
Absorbent_Station in the pull-down list.
– Choose the appropriate options for the absorbent station in the General
tab of the Te-VacS - Filtration command.
The Command Generation dialog box and the above instructions are only
relevant for Freedom EVOware Plus.
8 - 108
Freedom EVOware Software Manual, 393172, en, V2.3
8 - Configuration Tool
Device Driver Configuration
8.5.30 Settings for the Te-MO
This is used to make settings for the Te-MO. For general information on this
device, see 15.56 “Te-MO Commands”, 15-121.
8.5.30.1 Te-MO Configuration - Driver Tab
See 8.5.35 “Driver Tab of the Configure Device Driver Properties Dialog Box”,
8-116.
8.5.30.2 Te-MO Configuration - Settings Tab
The Settings tab is used to make general settings for the Te-MO:
Fig. 8-59 Settings tab of the Te-MO driver
Miscellaneous panel
Initialization timeout
Specify the maximum duration of the device initialization procedure. An error
message will be output if initialization is not completed within this time.
In case of script error panel
Request system pause
Check this checkbox if you want the driver to request a system pause if a
script error is detected during command execution.
Freedom EVOware Software Manual, 393172, en, V2.3
8 - 109
8 - Configuration Tool
Device Driver Configuration
Write pre and post actions panel
This setting is only relevant for Freedom EVOware Plus. Pipette process steps for
the LiHa, MCA96 and MCA384 allow you to configure custom pre-actions and
post-actions in the Process Editor. They apply to the currently selected process
step. This is not possible for the Te-MO. As an alternative, you can edit the
standard (global) pre-actions and post-actions for the Te-MO in the Configuration
Tool. However, the changes you make are normally overwritten by the default
settings each time the Te-MO pipetting script (the Te-MO Pipette process step) is
modified. Click the radio buttons to change the behaviour, as follows:
Always
Changes to the standard pre-actions and post-actions are always overwritten
when the the Te-MO Pipette process step is modified (default action).
Ask user
Prompt the user before overwriting changes to standard pre-actions and postactions.
Never
Never overwrite changes to standard pre-actions and post-actions.
8.5.30.3 Te-MO Configuration - Firmware Commands
The following firmware commands (command strings) are pre-configured for the
Te-MO in the Test tab of the Configuration Tool:
Get RSP <GET_RSP>
Requests the pipetting instrument type the device is connected to.
Get VERSION <GET_VERSION>
Requests the firmware version of the pipetting instrument. Only the first two
positions are shown.
Initialize System <INIT_RSP>
Initializes the pipetting instrument.
Refer to the firmware documentation for the device for a complete list of firmware
commands (see also 1.2.1 “Related Documentation and Software”, 1-3).
WARNING
Risk of injury to operating personnel or damage to the equipment
Take care when sending firmware commands. Sending the wrong commands
can damage the instrument or objects in its workspace, hurt yourself or other
people.
8.5.31 Settings for the Pooling Balance
The Liquid Arrival Check (LAC) feature verifies that the correct liquid volumes
have been dispensed by weighing the labware before and after pipetting. The
labware must be put onto a special balance (pooling balance) for the dispense
operation. The LAC feature is only supported by special balance types such as
the Mettler WM pooling balance. See 10.1.1 “Global Parameters for Liquid
Classes”, 10-4, Liquid Arrival Check panel, for more information.
8 - 110
Freedom EVOware Software Manual, 393172, en, V2.3
8 - Configuration Tool
Device Driver Configuration
Maximum initial weight
Specify the maximum allowed weight of the objects on the pooling balance
before the script or process is started. If the specified maximum is exceeded,
an error will be output when the balance is initialized. In addition, you cannot
run the script or process until the weight on the balance has been reduced.
To ensure maximum accuracy of the balance, it must not be overloaded. Make
sure that the sum of maximum initial weight + weight of the liquids you want to
dispense does not exceed the rated maximum weight for the balance.
8.5.32 Settings for the Process Script
This is used to make settings for the Process Script driver. For general information
on this device, see 16.39 “Commands for the Process Script Driver”, 16-126.
8.5.32.1 Process Script Configuration - Driver Tab
See 8.5.35 “Driver Tab of the Configure Device Driver Properties Dialog Box”,
8-116.
8.5.32.2 Process Script Configuration - Settings Tab
The Settings tab is used to make general settings for the Process Script driver.
Fig. 8-60 Settings tab of the Process Script driver
Miscellaneous panel
Initialization timeout
Specify the maximum duration of the device initialization procedure. An error
message will be output if initialization is not completed within this time.
Freedom EVOware Software Manual, 393172, en, V2.3
8 - 111
8 - Configuration Tool
Device Driver Configuration
Advanced DITI handling
Check this checkbox if you want to use to use a special driver for exchanging
DITIs. The special driver is not provided with the standard Freedom EVOware
installation.
In case of script error panel
Request system pause
Check this checkbox if you want the driver to request a system pause if a
script error is detected during command execution.
Note: Do not confuse the settings made here with those made in the scheduling/
error handling configuration. The settings in this tab define the reaction of the
system if the Process Script driver outputs an error message during execution of a
pipetting command. The settings for error handling take effect if the pipetting
command has already been stopped due to an error.
8.5.32.3 Process Script Configuration - Command Generation Tab
The Command Generation tab is used to make settings for the default pre-actions
and post-actions to be used when generating commands for the Process Script.
The settings are only relevant to Freedom EVOware Plus.
Fig. 8-61 Command Generation tab of the Process Script driver
Command Generation panel
Default pre-action
This field is not relevant for the Process Script and can be ignored.
Default post-action
This field is not relevant for the Process Script and can be ignored.
Default replace action
This field is not relevant for the Process Script and can be ignored.
8 - 112
Freedom EVOware Software Manual, 393172, en, V2.3
8 - Configuration Tool
Device Driver Configuration
Default start process action for advanced DITI handling
This field is not relevant for the Process Script and can be ignored.
8.5.33 Settings for the Transfer Station
The Transfer Station is an unused location on the worktable of the pipetting
instrument. If your pipetting instrument is fitted with two RoMa arms, it is used to
transfer labware from one RoMa to another. The Transfer Station driver is only
installed if you have installed Freedom EVOware with two RoMas.
8.5.33.1 Transfer Station Configuration - Driver Tab
See 8.5.35 “Driver Tab of the Configure Device Driver Properties Dialog Box”,
8-116.
8.5.33.2 Transfer Station Configuration - Settings Tab
The Settings tab is used to make general settings for the Transfer Station driver:
.
Fig. 8-62 Settings tab of the Transfer Station driver
Capacity panel
Positions
This specifies the number of Transfer Station sites. This field should normally
be left at the default value of 1 (one site).
8.5.34 Settings for Microplate Reader Devices
The GENios, GENios Pro, Safire, Spectra, SpectraFluor, Sunrise, Ultra and Ultra
Evolution microplate reader devices are controlled by the same driver and have a
Freedom EVOware Software Manual, 393172, en, V2.3
8 - 113
8 - Configuration Tool
Device Driver Configuration
common configuration dialog. For general information on these devices, see the
respective section in 16 “Device Commands”, 16-1.
8.5.34.1 Microplate Reader Configuration - Driver Tab
See 8.5.35 “Driver Tab of the Configure Device Driver Properties Dialog Box”,
8-116.
8.5.34.2 Microplate Reader Configuration - Settings Tab
The Settings tab is used to make general settings for the microplate reader driver:
.
Fig. 8-63 Settings tab of the microplate reader driver
Output panel
Output File Default
Specify the default file name and path to be used for the output data. If
necessary, you can overwrite the file name and path when you add the
measurement command to your process. See 16.42 “Specifying Output
Filenames for Reader Data”, 16-128 for a description of the placeholders
which can be used to generate reader data file names.
Format
This setting is used to swap rows and columns in the records of the output file.
E.g. for a 96-well microplate, the data is output as 8 rows x 12 columns or 12
rows x 8 columns.
8 - 114
Freedom EVOware Software Manual, 393172, en, V2.3
8 - Configuration Tool
Device Driver Configuration
Orientation
This setting is used to reverse the row order in the records of the output file.
E.g. for a 96-well microplate, the first 12 records contain data for row 1 or for
row 8. This can be useful if you want to insert the labware in the reader back
to front.
Start Delimiter
Choose the delimiter to use at the beginning of each data record in the output
file. You can choose none or blank (space character).
End Delimiter
Choose the delimiter to use at the end of each data record in the output file.
You can choose none or blank (space character).
Result Selection for Fluorescence Polarization panel
Select the types of results you want to be written to the output file when carrying
out fluorescence polarization. Each checkbox is only relevant for readers which
support the respective measurement mode. The checkbox will be ignored if the
reader does not support the respective mode.
Result Selection for Fluorescence Lifetime panel
Specify whether you want raw data to be written to the output file or not.
Use old output file format where possible
Check this box if you want the reader to write its output in the file format used
before version 4.8.1 of FACTS and not in the XML format used by later
versions of FACTS and by Freedom EVOware.
Miscellaneous panel
Temperature, Temperature Control
Check the Temperature Control checkbox if you want to carry out reader
measurements at a specified temperature. The required temperature is
specified in the Temperature field. Refer to your reader manual for the allowed
temperature range.
Move plate out during initialization
Check this checkbox if you want to move out the labware during the
initialization procedure.
Initialization Timeout
Specify the maximum duration of the reader initialization procedure. An error
message will be output if initialization is not completed within this time.
Power Down Timeout
Specify the delay after which the reader should go into standby (energy
saving) mode. Specify 0 if you do not want the reader to go into standby
mode. The reader can take several minutes to wake up from standby mode
before it is ready for use.
8.5.34.3 Microplate Reader Configuration - Conversion Tab
The Conversion tab is used to make settings for measurement result handling.
Freedom EVOware Software Manual, 393172, en, V2.3
8 - 115
8 - Configuration Tool
Device Driver Configuration
Fig. 8-64 Conversion tab of the microplate reader driver
Measure panel
In some cases it may be necessary to convert the reader output data to a different
data format. Select Message to send a system message to any program
configured to listen to the message that the measurement command has been
completed and that the output data is ready for conversion. Please refer to the
documentation on the Freedom EVOware Programming Interface (API) for
information on developing external software which listens to Freedom EVOware
system messages.
Alternatively, you can specify an external program to be executed on completion
of the measurement command. Specify the path and file name of the external
program directly or click Browse and choose the required program. The name of
the file to be converted is passed to the external program as a command line
parameter.
8.5.35 Driver Tab of the Configure Device Driver Properties Dialog Box
The Driver tab is used to configure, add and delete device commands. You can
also specify the command execution times which should be used by the prescheduler during simulation.
The Commands panel lists the device commands which are available for the
device you have selected (the example below is for the Ultra Reader):
8 - 116
Freedom EVOware Software Manual, 393172, en, V2.3
8 - Configuration Tool
Device Driver Configuration
Fig. 8-65 Configuring commands, pre-actions and post-actions
Device commands are used to implement device-specific functions such as
washing a microplate in a washer or reading a microplate in a reader. Each device
has its own set of commands, whereby each device function has its own
command. Please refer to the section on the respective device driver for a
description of the device commands which are provided with the Freedom
EVOware installation (see 16 “Device Commands”, 16-1).
8.5.35.1 Commands Panel
If you select a command, the currently configured execution time is shown in the
Expected Duration field. If necessary, correct this value by specifying a better
approximation of the command execution time. This is the value which is shown in
the Execution Time field of the Edit Parameters dialog box when you add the
command to your process. The execution time does not include the execution
times of the pre-actions and post-actions of the command, if any (see below).
If necessary, you can fine tune the execution time for each process step
individually when you add the process step to the Process Editor (see
9.10.2.1 “General Tab”, 9-71).
Click Add to add a new command. Then enter a name for the command and
specify the default execution time in the Edit Command dialog box which is then
shown.
Freedom EVOware Software Manual, 393172, en, V2.3
8 - 117
8 - Configuration Tool
Device Driver Configuration
Fig. 8-66 Edit Command dialog box
By convention, command names start with the underline character “_”.
Commands are already provided for all standard device functions, so it is normally
not necessary or meaningful to create new commands.
Click EdIt to change the name and or default execution time of the currently
selected command. We only recommend you to rename new commands which
you have created (and not the standard commands).
Click Delete to delete the currently selected command.
Note: You can only delete commands which are not currently used in any process
which is stored in the Freedom EVOware database
8.5.35.2 Parameters Tab
Some commands perform actions on objects such as microplates. The objects are
then defined as parameters of the command (“command parameters”). Click the
Parameters tab to see the parameters of the command which is selected in the
Commands panel (see Fig. 8-65, 8-117).
Click Add to add a new parameter to the command. This opens the Edit
Parameter dialog box:
Fig. 8-67 Edit Parameter dialog box
The list shows all available parameter types. Choose the required parameter type
from the pull-down list, specify the required value of the parameter in the Name
field and click OK when you have made your entries.
To edit an existing parameter, select it in the Parameters tab and click Edit to open
the Edit Parameter dialog box. Choose a new parameter type from the pull-down
list and enter the required value of the parameter in the Name field.
To delete an existing parameter, select it in the Parameters tab and click Delete.
8 - 118
Freedom EVOware Software Manual, 393172, en, V2.3
8 - Configuration Tool
Device Driver Configuration
8.5.35.3 Pre-actions and Post-actions Tabs
In some cases it is necessary to carry out additional actions before and after the
command is executed. This done using pre-actions and/or post-actions –
commands which are always carried out before and after the main command. For
example, if you want to scan labware in a Tecan Ultra reader with the Measure
command, it is necessary to open the reader door (with the Ultra_Open
command) and to move the labware to the reader using the plate robot (with the
RoMa_MoveObject command). To make sure that the door is opened in time, the
door must be opened before moving the labware. Another RoMa_MoveObject
command and an Ultra_Close command are needed when the scanning operation
is finished. The door must be closed after moving the labware.
The process diagram is simplified by implementing the additional actions as preactions and post-actions which are linked to the Measure command. EVOware
then adds the pre-actions and post-actions to the Measure command
automatically. This avoids having to specify these four additional steps for each
Measure command manually.
The pre-actions and post-actions tabs list the pre-actions and post-actions which
are configured for the device command which is selected in the Commands panel:
Fig. 8-68 Configuring pre-actions and post-actions for the device command
With few exceptions (such as Open and Close commands for reader doors), all of
the standard pre-actions and post-actions are movement commands for the plate
robot (RoMa_MoveObject commands). See 8.5.35.5 “RoMa_MoveObject
Command”, 8-121.
Click Delete to delete the currently selected pre-action or post-action. Click Copy
to copy the currently selected pre-action or post-action. The new pre-action or
post-action will have the same settings as the one you copied.
Click the Up and Down buttons to change the sort order of the pre-actions and
post-actions. This changes the sequence with which the pre-actions and postactions are carried out. Taking the above example of the Measure command for
the Ultra reader, the door must be opened before the plate robot brings the
labware.
Freedom EVOware Software Manual, 393172, en, V2.3
8 - 119
8 - Configuration Tool
Device Driver Configuration
8.5.35.4 Editing Pre-actions and Post-actions
To edit a pre-action or post-action, click the Pre-actions or the Post-actions tab,
select the required entry and click Edit to display the Pre-actions / Post-actions
dialog box.
Click the Execution Parameters button to edit the execution parameters for the
command (the settings you make only apply to the selected pre-action or post
action; execution parameters for process steps are configured in the Process
Editor). The Execution Parameters button has no effect if the command does not
have any execution parameters.
To add a pre-action or post-action, click the Pre Actions or the Post Actions tab
and click Add to display the Pre-actions / Post-actions dialog box:
Fig. 8-69 Editing pre-actions and post-actions
Then choose the command to be executed as a pre-action or post-action from the
pull-down list and specify its default execution time in the Expected Duration field.
Click the Execution Parameters button to specify the execution parameters. If the
command has any, a dialog box will appear so you can specify them.
The Object Parameters panel lists the parameters which are needed by the
selected command. Select an object parameter and choose the required value
from the list in the Value panel. Click the Parameters radio button to show predefined constants. Click the Variables radio button to show defined instances of
objects.
The Value panel shows the parameters and variables which can be chosen for the
selected object parameter, as follows:
8 - 120
Freedom EVOware Software Manual, 393172, en, V2.3
8 - Configuration Tool
Device Driver Configuration
Tab. 8-12 Parameters and variables versus object parameter types
Object parameter
type
Placeholder
Variables
Object
<none> or MP
Labware site on the
worktable
Location
<base> or <none>
Device or labware
site
Tool
<base> or <none>
On-the-fly tool (e.g.
barcode scanner) a)
a) This field is normally set to <NONE>. On-the-fly tools are normally
specified in the Process Editor using drag and drop.
<base> is a placeholder which represents the original location of the object (the
labware source). <none> is a placeholder to indicate that the parameter is
unused.
If necessary you can specify custom pre-action and/or post-actions for each
process step individually when you add the process step to the Process Editor
(see 9.10.3 “Pre-actions / Post-actions (Custom)”, 9-72).
8.5.35.5 RoMa_MoveObject Command
With the exception of Open and Close commands (e.g. for reader doors), most of
the pre-actions and post-actions for device commands are RoMa_MoveObject
commands. They are used to move an object - typically a microplate - to and from
the device. The RoMa_MoveObject command has three command parameters
but does not have any pre-actions or post-actions. The three command
parameters (Object, Location and Tool) are shown as three fields when you insert
the command in the Process Editor:
Fig. 8-70 Specifying locations
The above figure is shown as an example only. The RoMa_MoveObject command
is normally only used for pre-actions and post-actions and is not normally used
directly in the Process Editor.
See also 9.10.4 “Locations”, 9-75.
Freedom EVOware Software Manual, 393172, en, V2.3
8 - 121
8 - Configuration Tool
Device Driver Configuration
8 - 122
Freedom EVOware Software Manual, 393172, en, V2.3
9 - Specifying Your Instrument Setup
Instrument Configuration
9 Specifying Your Instrument Setup
This chapter describes how to specify the setup of your pipetting instrument in
Freedom EVOware. Freedom EVOware automatically detects the presence of
certain instrument options by interrogating the pipetting instrument. However, it is
necessary to provide Freedom EVOware with additional information which cannot
be determined by interrogation – such as the dimensions and properties of the
carriers and the labware (e.g. microplates) you want to use – and with other
details such as the barcode types which should be accepted by the barcode
scanner. The latter depend on the design of your barcode labels.
9.1 Instrument Configuration
Freedom EVOware stores information on fixed and variable parts of the pipetting
instrument in an internal database and a set of configuration files. It also stores
information on the dimensions of carriers and labware items and the configuration
settings for the optional devices.
Note: If you are setting up a new pipetting instrument, use the Setup & Service
software to check and calibrate the reference coordinates of the hardware. This is
normally done for you by the Tecan Field Service Engineer when installing the
pipetting instrument and the optional devices. See 1.2 “Reference Documents”,
1-3 for information on this software.
The following lists the items you need to configure when setting up the pipetting
instrument in Freedom EVOware (some of the items refer to options which may
not be fitted to your instrument):
Carriers
To edit a carrier, double click on the carrier name in the Labware section of the
Control Bar (see 9.5 “Configuring Carriers”, 9-39).
Labware
To edit a labware item, double click on the labware name in the Labware
section of the Control Bar (see 9.4 “Configuring Labware”, 9-15).
Note: The Freedom EVOware database already contains a large selection of predefined carrier and labware types. You only need to create or edit carriers or
labware if you cannot find a standard item which is suitable for your needs.
Vectors for the plate robot(s) and the tube robot(s)
To edit a robot vector double click on the vector name in the Robot Vectors
section of the Control Bar (see 9.6 “Creating and Editing Plate Robot Vectors”,
9-55 and 9.7 “Creating and Editing Tube Robot Vectors”, 9-63).
Appropriate robot vectors may already be provided with your Freedom
EVOware installation.
Liquid Handling Arm (LiHa)
The Liquid Handling Arm is configured using the Configuration Tool (see
8.4.2.1, 8-22).
PosID
The PosID barcode scanner is configured using the Configuration Tool (see
8.4.2.2, 8-28).
Freedom EVOware Software Manual, 393172, en, V2.3
9-1
9 - Specifying Your Instrument Setup
Basic Concepts
MPO/SPO LICOS
The MPO/SPO LICOS system is configured using the Configuration Tool (see
8.4.2.3, 8-29).
Chemical System
The Chemical System is configured using the Configuration Tool (see
8.4.2.5, 8-30).
Doorlocks
The Doorlocks are configured using the Configuration Tool (see 8.4.2.7,
31).
8-
Liquid Classes
To edit a liquid class, double click on the liquid class name in the Liquid
Classes section of the Control Bar (see 10.1 “Liquid Classes Editor”, 10-1).
Device drivers
Global settings for device drivers are configured using the Configuration Tool
(see 8.4 “Device Settings”, 8-21).
9.2 Basic Concepts
9.2.1 Introduction to Carriers and Labware
Freedom EVOware allows you to define an object (e.g. a microplate) once only,
and then to use it at any required position on the worktable. This is because
Freedom EVOware uses a hierarchical system for the coordinates:
The labware coordinates are relative to the site on which the labware is
placed.
The site coordinates are relative to the carrier.
The carrier offsets are relative to the grid position on the worktable (see also
Fig. 9-17 “Carrier dimensions and X/Y offsets”, 9-46).
The grid positions on the worktable have a periodic spacing of 25 mm.
This hierarchy allows you to place the labware at any suitable site, carrier and
worktable position without having to redefine its coordinates.
The following figure shows the relationship between labware, carriers and the
worktable:
9-2
Freedom EVOware Software Manual, 393172, en, V2.3
9 - Specifying Your Instrument Setup
Moving the Arms and Other Devices
Fig. 9-1
Labware, carrier and worktable
When you set up the worktable for your Freedom EVOware script, you first
choose a carrier with the required number of sites (see 9.5 “Configuring Carriers”,
9-39). Each of the sites can hold labware. If you cannot find the carrier you
need in the Freedom EVOware database, you can define a new carrier (see
9.5 “Configuring Carriers”, 9-39).
You then choose the labware you want to use. If you cannot find the labware you
need in the Freedom EVOware database, you can define a new labware item (see
9.4 “Configuring Labware”, 9-15).
In the third step you position the carriers on the worktable and place the labware
onto the carriers (see 11.3.1 “Setting Up Carriers on the Worktable”, 11-2) and
e.g. 11.4.1 “Choosing Labware for a Pipetting Script”, 11-4.
The procedure to follow to set up a script or process is described in detail in
11.4 “Setting Up a Pipetting Script in Freedom EVOware Standard”, 11-4 and
11.5 “Setting Up a Process in Freedom EVOware Plus”, 11-7.
9.3 Moving the Arms and Other Devices
Positions in Freedom EVOware are measured and checked by moving the LiHa,
the RoMa, the PnP, the MCA, the Te-MO or the PosID to the required position by
pressing keys on the numeric keypad. You can then store the current coordinates
in the appropriate dialog box for the object. Positions are defined in instrument
steps, i.e. the smallest unit of movement of the servo motors (0.1 mm). The
pipetting instrument’s coordinate system uses three axes for the LiHa (X, Y, and
Z), five axes for the RoMa (X, Y, Z, R, and G), five axes for the PnP (X, Y, Z, R,
and G), four axes for the MCA96 (X, Y, Z, G), three axes for the MCA384 (X, Y, Z),
five axes for the Te-MO (X, Y1, Y2, Y3 and Z) and three axes for the PosID (X, Y
and B).
Freedom EVOware Software Manual, 393172, en, V2.3
9-3
9 - Specifying Your Instrument Setup
Moving the Arms and Other Devices
9.3.1 Moving the LiHa
The LiHa (Liquid Handling Arm) is mounted on the X-slide and holds the pipetting
tips. On the pipetting instrument, the origin of the LiHa coordinate system (X=0,
Y=0, Z=0) is the rear left of the worktable with the pipetting tips raised. The three
axes of the LiHa are defined as follows:
Tab. 9-1 Movement axes for the LiHa
X
From left to right
Y
From rear to front
Z
From from top to bottom
When editing an object for which a position has to be specified, an additional
dialog box appears which helps you to specify certain movements:
Fig. 9-2
Move LiHa dialog box
The LIHA tab shows the current position of the LiHa in instrument steps (0.1 mm).
If your instrument is not fitted with a LiHa, the LIHA tab is not displayed unless you
are running in offline mode.
The Z-movements panel lets you select which tips should be moved in the Zdirection. You can specify the first tip to move and the total number of tips to
move.
Get Tips, Drop Tips
If you are teaching with DITIs, click these buttons if you want to pick up or
drop the DITIs. They open the direct commands Get DITIs and Drop DITIs
respectively (see 15.7 “Get DITIs Command”, 15-13 and 15.8 “Drop DITIs
Command”, 15-14). The DITIs must be fetched using these buttons (or
using the direct commands) and not by using any other method such as
mounting by hand.
If necessary, e.g. when teaching a position, you can move the LiHa manually
using the numeric keypad (make sure that the NUM Lock key is pressed):
9-4
Freedom EVOware Software Manual, 393172, en, V2.3
9 - Specifying Your Instrument Setup
Moving the Arms and Other Devices
Tab. 9-2 Moving the LiHa using the keys on the numeric keypad
8 : rear (-Y)
4 : left (-X)
9 : up (-Z)
6 : right (+X)
2 : front (+Y)
3 : down (+Z)
Each time you press one of these keys, the arm is moved by a single step. Keep
the key pressed to move the arm by two steps per second. If you also press the
CONTROL key, the arm is accelerated until it reaches a certain maximum speed.
Note: You cannot use the cursor keys to move the arm since they have default
functions in Windows applications.
9.3.2 Moving the RoMa (Plate Robot)
The RoMa (Robot Manipulator Arm) is a robot arm with gripper fingers that can
grip and move objects such as microplates. On the pipetting instrument, the origin
of the RoMa coordinate system (X=0, Y=0, Z=0) is the rear left of the worktable
with the gripper raised and pointing towards the front of the instrument. The five
axes of the RoMa are defined as follows:
Tab. 9-3 Movement axes for the RoMa
X
From left to right
Y
From rear to front
Z
From top to bottom
R
Clockwise rotation of the gripper when
viewed from above
G
From narrow to wide gripper distance
When editing an object for which a position has to be specified, an additional
dialog box appears which helps you to specify certain movements:
Freedom EVOware Software Manual, 393172, en, V2.3
9-5
9 - Specifying Your Instrument Setup
Moving the Arms and Other Devices
Fig. 9-3
Move RoMa dialog box
The Plate Robot tab shows the current position of the RoMa in instrument steps
(0.1 mm). The R parameter (gripper rotation) is measured in 0.1° steps. If your
instrument is not fitted with a RoMa, the Plate Robot tab is not displayed unless
you are running in offline mode.
If necessary, e.g. when teaching a position, you can move the RoMa manually
using the numeric keypad (make sure that the NUM Lock key is pressed):
Tab. 9-4 Moving the RoMa using the keys on the numeric keypad
7 : clockwise (+R)
8 : rear (-Y)
9 : up (-Z)
4 : left (-X)
1 : counterclockwise (-R)
6 : right (+X)
2 : front (+Y)
0 : narrow (-G)
3 : down (+Z)
, : wide (+G)
Each time you press one of these keys, the arm is moved by a single step. Keep
the key pressed to move the arm by two steps per second. If you also press the
CONTROL key, the arm is accelerated until it reaches a certain maximum speed.
Note: You cannot use the cursor keys to move the arm since they have default
functions in Windows applications.
9.3.3 Moving the PnP (Tube Robot)
The PnP (Pick and Place) is a robot arm with gripper fingers that can grip and
move small objects such as tubes. On the pipetting instrument, the origin of the
PnP coordinate system (X=0, Y=0, Z=0) is the rear left of the worktable with the
gripper raised. The five axes of the PnP are defined as follows:
9-6
Freedom EVOware Software Manual, 393172, en, V2.3
9 - Specifying Your Instrument Setup
Moving the Arms and Other Devices
Tab. 9-5 Movement axes for the PnP
X
From left to right
Y
From rear to front
Z
From top to bottom
R
Clockwise rotation of the gripper when
viewed from above
G
From narrow to wide gripper distance
When editing an object for which a position has to be specified, an additional
dialog box appears which helps you to specify certain movements:
Fig. 9-4
Move PnP dialog box
The Tube Robot tab shows the current position of the PnP in instrument steps
(0.1 mm). If your instrument is not fitted with a PnP, the Tube Robot tab is not
displayed unless you are running in offline mode.
If necessary, e.g. when teaching a position, you can move the PnP manually
using the numeric keypad (make sure that the NUM Lock key is pressed):
Tab. 9-6 Moving the PnP using the keys on the numeric keypad
7 : clockwise (+R)
8 : rear (-Y)
4 : left (-X)
1 : counterclockwise (-R)
0 : narrow (-G)
9 : up (-Z)
6 : right (+X)
2 : front (+Y)
3 : down (+Z)
, : wide (+G)
Each time you press one of these keys, the arm is moved by a single step. Keep
the key pressed to move the arm by two steps per second. If you also press the
CONTROL key, the arm is accelerated until it reaches a certain maximum speed.
Freedom EVOware Software Manual, 393172, en, V2.3
9-7
9 - Specifying Your Instrument Setup
Moving the Arms and Other Devices
Note: You cannot use the cursor keys to move the arm since they have default
functions in Windows applications.
9.3.4 Moving the MCA96
The MCA96 (Multi Channel Arm 96) is a special liquid handling arm which is fitted
with a 96-tip pipetting head. It is mounted on the X-slide and can be optionally
fitted with gripper fingers to allow it to pick up and move labware. In contrast to the
RoMa, the gripper fingers cannot be rotated (they are always parallel to the X axis
of the pipetting instrument).
On the pipetting instrument, the origin of the MCA96 coordinate system (X=0,
Y=0, Z=0) is the rear left of the worktable with the pipetting tips raised. The four
axes of the MCA96 are defined as follows:
Tab. 9-7 Movement axes for the MCA96
X
From left to right
Y
From rear to front
Z
From from top to bottom
G
From narrow to wide gripper distance
When editing an object for which a position has to be specified, an additional
dialog box appears which helps you to specify certain movements:
Fig. 9-5
Move MCA96 dialog box
The MCA96 tab shows the current position of the MCA96 in instrument steps
(0.1 mm). If your instrument is not fitted with a MCA, the MCA96 tab is not
displayed unless you are running in offline mode.
Get Tips, Drop Tips
If you are teaching labware with wells (such as microplates), click these
buttons if you want to pick up or drop a tipblock or some DITIs. These buttons
are inactive (grey) if you teach an MCA96 tipblock or MCA96 DITI labware.
9-8
Freedom EVOware Software Manual, 393172, en, V2.3
9 - Specifying Your Instrument Setup
Moving the Arms and Other Devices
If necessary, e.g. when teaching a position, you can move the MCA96 manually
using the numeric keypad (make sure that the NUM Lock key is pressed):
Tab. 9-8 Moving the MCA96 using the keys on the numeric keypad
7:
8 : rear (-Y)
4 : left (-X)
1:
9 : up (-Z)
6 : right (+X)
2 : front (+Y)
0 : narrow (-G)
3 : down (+Z)
, : wide (+G)
Each time you press one of these keys, the arm is moved by a single step. Keep
the key pressed to move the arm by two steps per second. If you also press the
CONTROL key, the arm is accelerated until it reaches a certain maximum speed.
Note: You cannot use the cursor keys to move the arm since they have default
functions in Windows applications.
9.3.5 Moving the MCA384
The MCA384 (Multi Channel Arm MCA384) is a special liquid handling arm which
can be fitted with a 96-tip or 384-tip pipetting head. It is mounted on the X-slide
and can be optionally fitted with a gripper module (CGM, common gripper module)
which can be used to pick up and move labware. The gripper module can be
rotated.
On the pipetting instrument, the origin of the MCA384 coordinate system (X=0,
Y=0, Z=0) is the rear left of the worktable with the pipetting tips raised. The three
axes of the MCA384 are defined as follows:
Tab. 9-9 Movement axes for the MCA384
X
From left to right
Y
From rear to front
Z
From from top to bottom
When editing an object for which a position has to be specified, an additional
dialog box appears which helps you to specify certain movements:
Freedom EVOware Software Manual, 393172, en, V2.3
9-9
9 - Specifying Your Instrument Setup
Moving the Arms and Other Devices
Fig. 9-6
Move MCA384 dialog box
The MCA384 tab shows the current position of the MCA384 in instrument steps
(0.1 mm). If your instrument is not fitted with an MCA384, the MCA384 tab is not
displayed unless you are running in offline mode.
Get Tips, Drop Tips
If you are teaching labware with wells (such as microplates), click these
buttons if you want to to pick up some DITIs. The pipetting head must already
be fitted with a suitable head adapter for DITIs. These buttons cannot be used
to pick up a head adapter with fixed tips. These buttons are inactive (grey) if
you teach an MCA384 head adapter or MCA384 DITI labware.
Lock DITI carrier
Check this checkbox to lock the DITI carrier in place before picking up the
DITIs. The DITI carrier should normally be locked before picking up the DITIs
except for special applications.
If necessary, e.g. when teaching a position, you can move the MCA384 manually
using the numeric keypad (make sure that the NUM Lock key is pressed):
Tab. 9-10 Moving the MCA384 using the keys on the numeric keypad
7:
8 : rear (-Y)
9 : up (-Z)
4 : left (-X)
1:
6 : right (+X)
2 : front (+Y)
3 : down (+Z)
Each time you press one of these keys, the arm is moved by a single step. Keep
the key pressed to move the arm by two steps per second. If you also press the
CONTROL key, the arm is accelerated until it reaches a certain maximum speed.
Note: You cannot use the cursor keys to move the arm since they have default
functions in Windows applications.
9 - 10
Freedom EVOware Software Manual, 393172, en, V2.3
9 - Specifying Your Instrument Setup
Moving the Arms and Other Devices
9.3.6 Moving the CGM
The CGM (Common Gripper Module) is a robot arm with gripper fingers that can
grip and move objects such as microplates. It is a hardware option for the
MCA384 (Multi Channel Arm 384). The gripper module can be rotated.
On the pipetting instrument, the origin of the CGM coordinate system (X=0, Y=0,
Z=0) is the rear left of the worktable with the gripper raised and pointing towards
the front of the instrument. The five axes of the CGM are defined as follows:
Tab. 9-11 Movement axes for the CGM
X
From left to right
Y
From rear to front
Z
From top to bottom
R
Clockwise rotation of the gripper when
viewed from above
G
From narrow to wide gripper distance
MCH_Y
Y position of the MCA384 pipetting head
When editing an object for which a position has to be specified, an additional
dialog box appears which helps you to specify certain movements:
Fig. 9-7
Move CGM dialog box
The CGM tab shows the current position of the CGM in instrument steps
(0.1 mm). The R parameter (gripper rotation) is measured in 0.1° steps. When you
teach a CGM vector, Freedom EVOware also needs to know the Y position of the
MCA384 pipetting head (MCH Y) to ensure that the CGM will not collide with the
MCA384 as it moves.
If your instrument is not fitted with a CGM, the CGM tab is not displayed unless
you are running in offline mode.
If necessary, e.g. when teaching a position, you can move the CGM manually
using the numeric keypad (make sure that the NUM Lock key is pressed):
Freedom EVOware Software Manual, 393172, en, V2.3
9 - 11
9 - Specifying Your Instrument Setup
Moving the Arms and Other Devices
Tab. 9-12 Moving the CGM using the keys on the numeric keypad
7 : clockwise (+R)
8 : rear (-Y)
9 : up (-Z)
4 : left (-X)
1 : counterclockwise (-R)
6 : right (+X)
2 : front (+Y)
0 : narrow (-G)
3 : down (+Z)
, : wide (+G)
Tab. 9-13 Moving the MCA384 pipetting head using the keys on the numeric keypad
- : rear (-Y)
+ : front (+Y)
Each time you press one of these keys, the arm is moved by a single step. Keep
the key pressed to move the arm by two steps per second. If you also press the
CONTROL key, the arm is accelerated until it reaches a certain maximum speed.
Note: You cannot use the cursor keys to move the arm since they have default
functions in Windows applications.
9.3.7 Moving the Te-MO
Moving the Te-MO (Tecan Multi-pipetting Option) is similar to moving the LiHa or
RoMa. The five axes of the Te-MO are defined as follows:
Tab. 9-14 Movement axes for the Te-MO
X
Te-MO head, from left to right
Y1
Left slide, from rear to front
Y2
Middle slide, from rear to front
Y3
Right slide, from rear to front
Z
Te-MO head, from top to bottom
When editing an object for which a position has to be specified, an additional
dialog box appears which helps you to specify certain movements:
9 - 12
Freedom EVOware Software Manual, 393172, en, V2.3
9 - Specifying Your Instrument Setup
Moving the Arms and Other Devices
Fig. 9-8
Move Te-MO dialog box
The Te-MO tab shows the current position of the Te-MO in instrument steps
(0.1 mm). If your instrument is not fitted with a Te-MO, the Te-MO tab is not
displayed unless you are running in offline mode.
To move a specified Te-MO site to the RoMa transfer position (also called the
exchange position), for example to test a RoMa (plate robot) vector or to
exchange labware manually, select the slide and site from the pop-up list and click
Move to Transfer Position. In this position, the LiHa or RoMa can access the
specified site without colliding with the Te-MO pipetting head. When the Te-MO
reaches the transfer position and you are using an APC (Active Positioning
Carrier), click Open APC to release the labware. Click Close APC to lock the
labware in position again. You can only release or lock the labware at the transfer
position.
If necessary, e.g. when teaching a position, you can move the Te-MO pipetting
head and slides manually using the numeric keypad (make sure that the NUM
Lock key is pressed):
Tab. 9-15 Moving the Te-MO using the keys on the numeric keypad
7 : Y1 rear (-Y)
8 : Y2 rear (-Y)
4 : left (-X)
1 : Y1 front (+Y)
2 : Y2 front (+Y)
9 : Y3 rear (-Y)
- : up (-Z)
6 : right (+X)
+ : down (+Z)
3 : Y3 front (+Y)
Each time you press one of these keys, the arm is moved by a single step. Keep
the key pressed to move the arm by two steps per second. If you also press the
CONTROL key, the arm is accelerated until it reaches a certain maximum speed.
Note: You cannot use the cursor keys to move the arm since they have default
functions in Windows applications.
Freedom EVOware Software Manual, 393172, en, V2.3
9 - 13
9 - Specifying Your Instrument Setup
Moving the Arms and Other Devices
9.3.8 Moving the PosID Barcode Scanner
The PosID (Positive Identification System) is a movable barcode scanner which
can be used to read the barcode labels on carriers, labware and tubes. The PosID
is installed at the rear of the pipetting instrument and is provided with a gripper
which pulls the carrier towards the rear for barcode identification and then slides
the carrier back into the pipetting position. The scanning head hinges to read
barcodes which are attached to horizontal or vertical surfaces.
Moving the PosID is similar to moving the LiHa or RoMa. On the pipetting
instrument, the origin of the PosID coordinate system (X=0, Y=0, B=0) is the rear
left of the worktable with the carrier gripper towards the front.
Note: The description in this section also applies to the PosID-3.
The three axes of the PosID are defined as follows:
Tab. 9-16 Movement axes for the PosID
X
PosID, from left to right
Y
PosID carrier gripper, from front to rear
B
PosID scanner head, tilt head from vertical to horizontal
When editing an object for which a position has to be specified, an additional
dialog box appears which helps you to specify certain movements:
Fig. 9-9
Move Barcode Scanner dialog box
The Barcode Scanner tab shows the current position of the PosID in instrument
steps (0.1 mm). If your instrument is not fitted with a PosID, the Barcode Scanner
tab is not displayed. The Barcode Scanner tab is not displayed either if you are
running Freedom EVOware in offline mode. The Move Barcode Scanner dialog
box is not intended for the Symbol barcode scanner, which cannot be moved.
If necessary, e.g. when teaching a position, you can move the PosID manually
using the numeric keypad (make sure that the NUM Lock key is pressed):
9 - 14
Freedom EVOware Software Manual, 393172, en, V2.3
9 - Specifying Your Instrument Setup
Configuring Labware
Tab. 9-17 Moving the PosID using the keys on the numeric keypad
7:
8 : front (-Y)
4 : left (-X)
9 : tilt to vertical (-B)
6 : right (+X)
2 : rear (+Y)
3 : tilt to horizontal (+B)
Each time you press one of these keys, the arm is moved by a single step. Keep
the key pressed to move the arm by two steps per second. If you also press the
CONTROL key, the arm is accelerated until it reaches a certain maximum speed.
Note: You cannot use the cursor keys to move the arm since they have default
functions in Windows applications.
9.4 Configuring Labware
Labware refers to consumable items such as microplates or sample tubes.
Microplates have a regular arrangement of containers or cavities (wells) for
holding liquids or samples. During pipetting, microplates are normally placed on
carriers and tubes are inserted in tube racks which are placed on carriers.
Carriers are fitted to the instrument’s worktable at pre-defined grid positions (see
Fig. 9-1, 9-3).
Note: The Freedom EVOware database already contains a large selection of predefined carrier and labware types. You only need to create or edit carriers or
labware if you cannot find a standard item which is suitable for your needs.
Freedom EVOware Software Manual, 393172, en, V2.3
9 - 15
9 - Specifying Your Instrument Setup
Configuring Labware
The three tabs of the following dialog box are used to configure labware (to get to
this dialog box, double-click on the labware item in the Labware section of the
Control Bar):
Fig. 9-10 Edit Labware dialog box, Teaching tab
It is recommended not to change the properties of the predefined carrier and
labware types. Make a copy of the object with a new name if you want to alter any
of the properties (see 5.4.1.12 “Context Menu for Objects in the Control Bar”, 514).
9 - 16
Freedom EVOware Software Manual, 393172, en, V2.3
9 - Specifying Your Instrument Setup
Configuring Labware
The parameters in the Teaching tab are as follows:
Wells (X), (Y)
These two fields specify the well geometry:
(X): Specify the total number of wells in the X-direction (max. 128).
(Y): Specify the total number of wells in the Y-direction (max. 128).
Number of compartments per well
Some special labware types (e.g. for protein crystallography) have wells with
several compartments (cavities). Freedom EVOware can pipette a different
liquid into each of the compartments. Each well typically has one main
compartment and one or more satellite compartments which are directly
adjacent and are often smaller in size. Specify the number of compartments
per well in this field. Specify 1 for normal labware. See also Compartment,
below.
Device to be used for teaching
Choose the pipetting arm you want to use for teaching the dimensions of this
labware item (Left LiHa, Right LiHa, MCA, MCA384 or Te-MO). The Te-MO
option is only available if you have chosen labware on the Te-MO and
Freedom EVOware is running in real mode (and attached to a Te-MO) or you
are using the 3D simulation tool EVOSim.
If your pipetting instrument is only fitted with DITIs (disposable tips), this pulldown list also shows DiTi types in brackets, for example LiHa (DiTi 200 µl).
You must then choose the pipetting arm and DITI type which you want to use
for teaching. Freedom EVOware uses the DITI type to determine the tip
length. The tip length is specified with Tip Offset in the definition of the DITI
rack for this DITI type (see 9.4.1 “Editing Labware, Well Dimensions Tab”,
9-19).
If the LiHa is fitted with a mixture of fixed tips and DITIs, teaching must be
carried out with the fixed tips and DITI types are not shown in the pull-down
list Device to be used for teaching.
Position during definition
Specify the carrier, grid and site that you want to use to configure the labware:
Choose the carrier from the list and then choose the grid position and the site.
An easy way to choose the correct carrier, grid, site and labware is to click on
the labware in the Worktable Editor. Since you will need to closely observe the
movements of the liquid handling arm, you should choose a site which has
good accessibility.
Position
Compartment
For special labware types which have wells with several compartments,
choose the compartment you want to edit from the pull-down list. Then specify
the position coordinates and the area for the selected compartment. Repeat
this process for all of the compartments in the well. See Number of
compartments per well, above, for more information. This pull-down list is
inactive (gray) if the well only has one compartment.
Freedom EVOware Software Manual, 393172, en, V2.3
9 - 17
9 - Specifying Your Instrument Setup
Configuring Labware
Well positions
Eight fields are provided for you to specify the X, Y and Z positions of the wells
in instrument steps (0.1 mm). See Tab. 9-18, 9-25 for more information. The
positions are normally specified by manually moving the LiHa or the Te-MO
pipetting head above the first and last wells of the labware and clicking the
corresponding transfer... buttons (see 9.4.4 “Teaching the Labware
Coordinates”, 9-26).
If you have chosen labware with well offsets on the Well Dimensions tab (Well
alignment radio buttons), an additional field is shown for the Y position of the
first well in column 2. See 9.4.6 “Well Alignment”, 9-33 for more information.
The green, blue and red lines illustrate the four Z positions which you have to
specify. After specifying the coordinates, it is recommended to test them on
another site (choose another site in the Site field and click move to to move
the LiHa to the new site).
The “chain” buttons next to the X, Y and Z fields lock the values together:
–
Chain locked : If a value is changed in one of the fields, the same
change is also applied to the other fields in the same column. Example: If
the labware is raised or lowered by exchanging a spacer plate, you can
adjust all four Z parameters by the same offset in one step.
–
Chain unlocked : The values in each of the fields can be changed
independently of the other fields in the same column.
ATTENTION
Risk of the tips moving to the wrong position on the worktable.
Choose the correct site before specifying any coordinates. Otherwise the tips
might move to the wrong position on the worktable.
Y-distance of wells
Check that the Y-distance (the spacing between adjacent wells) which is
shown graphically by the vertical bar lies within the green area (see 9.4.7 “Ydistance of Wells”, 9-33). If the vertical bar lies within the red area, you may
have specified the coordinates incorrectly or inaccurately.
Adjust Site button
The Adjust Site button is used to adjust the carrier definition for a specified,
single site to compensate for small manufacturing inaccuracies in a multi-site
carrier without needing to switch to the Edit Carrier dialog box. To use this
feature, choose the site you want to adjust and click the Move to buttons for
Well #1 and for Z-Max to move the LiHa to the teaching position. Then fine
tune the LiHa position using the numeric keypad and click Adjust Site to
modify the carrier definition to match the current X, Y and Z coordinates. After
saving your changes, they will also be visible in the Edit Carrier dialog box
(the units in the Move dialog box are in 0.1 mm; the units in the Edit Carrier
dialog box are in mm).
9 - 18
Freedom EVOware Software Manual, 393172, en, V2.3
9 - Specifying Your Instrument Setup
Configuring Labware
9.4.1 Editing Labware, Well Dimensions Tab
The Well dimensions tab is used to configure additional well parameters for
labware:
Fig. 9-11 Edit Labware dialog box, Well Dimension tab
The parameters in the Well dimensions tab are as follows:
Color
Choose a unique color to make it easier for you to identify this labware type in
the Worktable Editor. The default labware colors are as follows:
Labware (e.g. microplates): blue
Racks for tubes: blue-green
DiTi racks: violet
Labware for the wash station: orange
Default for all other labware types: blue
Type
Choose the labware type from the pull-down list. If necessary, choose the subtype from the second pull-down list. See 9.4.5 “Labware Types and DITI
Types”, 9-32 for more information.
Freedom EVOware Software Manual, 393172, en, V2.3
9 - 19
9 - Specifying Your Instrument Setup
Configuring Labware
Tip Capacity
This field is only shown if you are configuring a LiHa DITI rack, a Te-MO DITI
rack or a Te-MO Tipblock. Specify the DITI Capacity (range: 1 to 1000 µl). To
prevent contamination, Freedom EVOware limits the total aspirated volume to
the specified tip capacity.
Tip Offset
This field is only shown if you are configuring a LiHa DITI rack, a Te-MO DITI
rack or a Te-MO Tipblock. Specify the DITI Offset in 0.1 mm (range: 0 to
1000). The offset is used to compensate for the length differences of different
tip and tipblock versions.
Tip with filter
This field is only shown if you are configuring a LiHa DITI rack, a Te-MO DITI
rack or a Te-MO Tipblock. Check this checkbox if the tips are fitted with a filter.
The filter serves to minimize the risk of aerosol contamination in the tip
adapter or pipetting head.
Tip Index
Freedom EVOware automatically assigns a unique numeric index to each
DITI type. You cannot edit the index manually. The DITI index is used e.g. by
the Set DITI Type command in worklists and in advanced worklists.
Vendor Name
Specify the vendor name of the labware. In the case of DITI labware, Vendor
Name refers to the vendor or manufacturer of the DITI tips, not the DITI rack.
The vendor name is optional and is currently intended for documentation
purposes only.
If you are using the pressure-monitored pipetting (PMP) hardware option, the
vendor name is stored in the pressure curve files which are created.
Additional information
This field is for information purposes only and allows you to enter some notes
about this labware type.
Link to
This field is for information purposes only and is intended for the internet
address (website URL) of the labware manufacturer.
Labware shape
Choose the shape of the well bottom.
Well alignment
Choose between “rectangular labware” or “rectangular labware with offset”.
See 9.4.6 “Well Alignment”, 9-33 for more information.
Tip-Touching Distance (mm), X or Y offset while pipetting
This parameter is used when you activate tip touching in the liquid class. Tip
touching is a special movement when dispensing a liquid. When tip touching
is activated, Freedom EVOware dispenses to the destination container in the
normal way, but then moves the tips to the side of the well and back before
retracting them. This helps to remove any droplets which may be adhering to
the tip.
Freedom EVOware also uses this parameter if you select an offset (noncenter) X and/or Y position for aspiration or dispensing. This is done on the
Aspirate or Dispense tab of the liquid class and is mainly used for the
Te-MagS.
9 - 20
Freedom EVOware Software Manual, 393172, en, V2.3
9 - Specifying Your Instrument Setup
Configuring Labware
Tips per well
This parameter specifies the number of tips which can access the well at the
same time. Specify “1” for normal wells. Specify the appropriate number for
troughs (e.g. “8” for a Trough 100ml; specify “96” or “384” for Te-MO troughs).
Before Freedom EVOware inserts tips into LiHa troughs, it slides the tips
together to the minimum tip-to-tip spacing of 9 mm. Use this value to calculate
the number of tips which can access the well at the same time.
Depth of bottom
For a well with a v-shaped bottom, specify the vertical distance in mm from the
lowest point of the v (Z-max) to the beginning of the cylindrical part of the well.
This is used for volume calculations and is important for tracking (keeping the
tips immersed when aspirating or dispensing). For wells with a round
(hemispherical) bottom, Freedom EVOware calculates the volume of the
bottom automatically.
Area
Specify the area of the well in mm². Click Area to display a dialog box which
helps you to calculate the area from the diameter or from the length and the
width.
Note: Troughs are normally specified with length and width. In this case, click
“Area”, click “Length” and enter the length and the width.
Robot vector, Create
Click this button if you want to create or edit a tube robot vector for this
labware (the button changes from Create to Edit if the robot vector has
already been created). If your pipetting instrument is fitted with two tube
robots, first choose the one you want to use (1 or 2). In this case you should
create a vector for both tube robots. Tip: the home position for tube robot 1 is
at the rear left of the pipetting instrument. Only one tube robot is shown in
offline mode.
Freedom EVOware Software Manual, 393172, en, V2.3
9 - 21
9 - Specifying Your Instrument Setup
Configuring Labware
9.4.2 Editing Labware, Advanced Tab
The Advanced tab is used to configure advanced properties for labware:
Fig. 9-12 Edit Labware dialog box, Advanced tab
The parameters in the Advanced tab are as follows:
Piercing panel
If you activate Pierce through septum, Freedom EVOware executes special
movements for septum piercing when accessing the labware. It will pierce from ZTravel to Z-Start and then retract from Z-Start to Z-Travel. Liquid level detection is
not available with this option activated.
The Te-MO does not support septum piercing. If you make any entries in this
panel, they will be ignored if the labware is used on the Te-MO.
Pierce with
Specify the piercing speed in mm/s.
Retract with
Specify the retract speed after piercing in mm/s.
Piercing force
Specify the required force to use for piercing the septum (range: 0 to 249).
9 - 22
Freedom EVOware Software Manual, 393172, en, V2.3
9 - Specifying Your Instrument Setup
Configuring Labware
Precise Positioning panel
If you activate this option, Freedom EVOware executes a special movement to
increase positioning accuracy, e.g. for 1536 well plates. When accessing labware
for the first time in a sequence of pipetting commands, it makes a normal move to
X-Start/Y-Start. It then makes a high resolution move to the actual pipetting
position. This sequence of movements eliminates mechanical backlash and
ensures the highest possible accuracy. X-Start should be set to ca. 0.4 cm to the
left of the first well of the labware. Y-Start should be set to ca. 0.4 cm behind the
first well of the labware. Note: The first well is at the rear left of the labware.
Precise positioning requires LiHa firmware version 1.2 or later. You cannot use
precise positioning with earlier firmware versions.
X-Start
Specify the required X-Start position for the precise X movement. Besides
typing the position manually, you can teach the position by moving the LiHa to
the X-Start/Y-Start position and clicking the transfer button. This copies the
current LiHa coordinates to the X-Start and Y-Start fields. See also
9.3.1 “Moving the LiHa”, 9-4.
Y-Start
Specify the required Y-Start position for the precise Y movement. Besides
typing the position manually, you can teach the position by moving the LiHa to
the X-Start/Y-Start position and clicking the transfer button. This copies the
current LiHa coordinates to the X-Start and Y-Start fields. See also
9.3.1 “Moving the LiHa”, 9-4.
Move with
Specify the speed for the precise positioning movement in mm/s.
Note: The Te-MO does not support precise positioning. If you make any entries in
this panel, they will be ignored if the labware is used on the Te-MO.
Grip Narrow, Wide
Specify the spacing in mm between the RoMa grippers which should be used
to grip the labware on the narrow side and on the wide side, respectively. To
ensure a firm grip, the grippers will close by an additional 1 cm (this is limited
by the specified grip force). To release the labware, the grippers will open by
an additional 0.5 cm (default setting). Example: If Grip Narrow = 85 mm, the
grippers will move to 90 mm to release the labware or to 75 mm to grip the
labware.
Stacker plate type
Specify the plate type (from 1 to 10). This tells the stacker the plate
dimensions and how to handle the plate correctly. Labels (names) can be
assigned to plate types to make it easier to choose the correct plate type in
the pull-down list. The labels are assigned using the Setup & Service software
and are stored in the stacker firmware (see 1.2.1 “Related Documentation and
Software”, 1-3 for information on this software.
Washer plate type
Specify the plate type (from 1 to 10). This tells the washer the plate
dimensions and how to handle the plate correctly.
Labware can have lid
Check this checkbox if the labware can be fitted with a lid. Note: The lid must
be removed before pipetting, for example by using the RoMa.
Lid offset
Specify the vertical distance between the bottom of the labware and the lower
edge of the lid.
Freedom EVOware Software Manual, 393172, en, V2.3
9 - 23
9 - Specifying Your Instrument Setup
Configuring Labware
Lid grip narrow, wide
Specify the spacing in mm between the RoMa grippers which should be used
to grip the lid on the narrow side and on the wide side, respectively. To ensure
a firm grip, the grippers will close by an additional 1 cm (this is limited by the
specified grip force). To release the lid, the grippers will open by an additional
0.5 cm (default setting). Example: If Grip Narrow = 85 mm, the grippers will
move to 90 mm to release the lid or to 75 mm to grip the lid.
Labware can have insert
Check this checkbox if the labware can contain an insert. For more
information on insert plates see 17.8 “Handling inserts in Freedom EVOware
Plus”, 17-25.
Insert offset
Specify the vertical distance between the bottom of the labware and the lower
edge of the insert.
Insert lid offset
Specify the vertical distance between the bottom of the insert and the lower
edge of the lid.
Insert grip narrow, wide
Specify the spacing in mm between the RoMa grippers which should be used
to grip and pick up the insert on the narrow side and on the wide side,
respectively.
Sort in Labware group
The Labware tab in the Control Bar is subdivided into groups for Microplates,
Tips, Wash and Waste, Troughs, Tubes and Miscellaneous. Choose the group
where you want this labware item to be shown in the Control Bar. Choose
Default to use the default Control Bar group for this labware item.
Attributes button
See 9.4.8 “Labware Attributes”,
9 - 24
9-34 for information on labware attributes.
Freedom EVOware Software Manual, 393172, en, V2.3
9 - Specifying Your Instrument Setup
Configuring Labware
9.4.3 Labware Coordinates
The following table describes the X, Y and Z coordinates in the Teaching tab of the
Edit Labware dialog box:
Tab. 9-18 X, Y and Z coordinates for labware
Coordinate
Position / Function
X,Y
At this position, the tip is situated above the well/tube of the first/last position
on the labware. See Tab. 9-19, 9-33 for additional information on labware
with offsets.
Z-Travel
Tip height at which the tips move from one X/Y position to another. Choose
Z-Travel to be higher than all obstacles on the carrier. Movements that pass
over different pieces of labware use a tip height of Z-Travel (global) instead.
Z-Travel (global)
This parameter is also called Travel Height. When the LiHa moves over a
single labware item or between adjacent identical labware items, it retracts
all tips to the Z-Travel value which is specified in the labware definition.
However, if two consecutive commands cause it to move over different
pieces of labware, the tips are retracted to the height you specify with Travel
Height in the Configuration Tool (see 8.4.2.1 “LiHa (Liquid Handling Arm)”,
8-22). This is done to speed up and optimize LiHa movements. Choose
this parameter to be higher than all obstacles on the woktable.
Z-Start
Tip height at which the liquid level detection (ILID) is switched on during
pipetting. For tubes and containers (troughs), choose Z-Start to be at least 1
mm below the rim but above the liquid surface. For microplates, choose ZStart to be at least 1 mm above the edge of the well.
Z-Start should be chosen as low as possible to ensure fast liquid level detection. At the same time, Z-Start must be above the highest possible liquid
level in the well/tube to ensure that the liquid surface is found.
Z-Dispense
Tip height at which liquid is dispensed. It should be low enough to ensure
that no liquid drops can get into adjacent wells or tubes.
Z-Max
Tip height which is very slightly above the lowest point of the well, tube or
container. It is the lowest position which the tip is allowed to reach without
touching the bottom. When searching for the liquid surface, the pipetting
instrument will search from Z-Start down to Z-Max. If the tip reaches Z-max
without finding liquid, the pipetting instrument reacts according to the configured liquid level detection error mode.
Freedom EVOware Software Manual, 393172, en, V2.3
9 - 25
9 - Specifying Your Instrument Setup
Configuring Labware
The figure below illustrates the different Z positions:
Fig. 9-13 Z positions for a tube (example)
9.4.4 Teaching the Labware Coordinates
Teaching is the process of showing Freedom EVOware the positions on the
worktable or the Te-MO by physically moving the LiHa, MCA or the Te-MO
pipetting head to the correct position above the labware and then clicking the
appropriate buttons in the dialog boxes (see 9.3.1 “Moving the LiHa”, 9-4,
9.3.7 “Moving the Te-MO”, 9-12 and 9.3.4 “Moving the MCA96”, 9-8).
If the labware is intended for use on the worktable, put it on a carrier the worktable
and teach it on the worktable. If the labware is intended for use on the Te-MO, put
it on the Te-MO and teach it on the Te-MO.
A group of eight Position fields for the labware coordinates are shown in the Edit
Labware dialog box. Next to the coordinates you can see buttons labeled with
transfer and move to.
Click the transfer buttons to copy the current LiHa, MCA or Te-MO coordinates
(as shown in the respective tab of the Move dialog box) to the position fields in the
Edit Labware dialog box. Do this when you want to teach the current position.
Note: If you click the move to buttons instead, this moves the LiHa, MCA or TeMO to the coordinates shown in the Position fields of the Edit Labware dialog box.
The tips first lift as far as possible, then the LiHa, MCA or Te-MO moves to the
new position and the tips move back to the previous height. The corresponding
tab of the Move dialog box will be updated accordingly.
Collision avoidance is not available when teaching. Accordingly, take care when
using the “Move To” button, which moves the selected arm directly to the
9 - 26
Freedom EVOware Software Manual, 393172, en, V2.3
9 - Specifying Your Instrument Setup
Configuring Labware
destination using the shortest (diagonal) path. Move other arms out of the way to
avoid the risk of collisions or use the cursor keys, which are slower but safer.
9.4.4.1 Teaching with the LiHa
Specify the carrier, grid and site that you want to use to teach the labware:
Choose the carrier from the list and then choose the grid position and the site.
Alternatively, with the Labware Editor closed, put the labware on the worktable at
the required position, right click the labware and choose Edit Labware Type from
the context menu. This opens the Labware Editor with the correct settings.
In the Edit labware dialog box, choose LiHa from the pull-down list Device to be
used for teaching.
Note: If your pipetting instrument is only fitted with DITIs (disposable tips), the
pull-down list also shows DiTi types in brackets, for example LiHa (DiTi 200 µl).
⌦ Teaching the X and Y coordinates of labware on the worktable:
Move one of the LiHa tips above the center of the first well of the labware (at
the rear left of the labware) and click the corresponding transfer button. This
copies the current LiHa X and Y coordinates to the position fields in the Edit
Labware dialog box. We recommend you to use one of the middle tips for
teaching (e.g. tip 3).
Move the same LiHa tip above the center of the last well of the labware (at the
front right of the labware) and click the corresponding transfer button. This
copies the current LiHa X and Y coordinates to the position fields in the Edit
Labware dialog box.
For labware with offsets, you also need to move the LiHa above the first well
of the second column and click the transfer button next to the field “Y2
(column 2)”. See Tab. 9-19, 9-33.
Note: if the LiHa is fitted with DITIs, you must use the direct command “Get DITIs”
(or the Get Tips button in the Move dialog box) to fetch the tips you want to teach
with and not by using any other method such as mounting by hand. See
9.3.1 “Moving the LiHa”, 9-4.
In addition, you must choose the correct pipetting arm and DiTi type in the pulldown list “Device to be used for teaching”. Freedom EVOware uses the DiTi type
to determine the tip length. The tip length is specified with Tip Offset in the
labware definition of the DITI rack which is used for this DITI type (see
9.4.1 “Editing Labware, Well Dimensions Tab”, 9-19).
Note: if the LiHa is fitted with a mixture of fixed tips and DITIs, teaching must be
carried out with the fixed tips and DITI types are not shown in the drop down list
“Device to be used for teaching”.
⌦ Teaching the X and Y coordinates of a LiHa Trough:
A LiHa Trough is treated as labware with only one well, whereby several tips can
access the well at the same time. LiHa troughs are taught just like labware:
Move one of the LiHa tips above the center of the trough and click the
corresponding transfer button. This copies the current LiHa X and Y
coordinates to the position fields in the Edit Labware dialog box. We
recommend you to use one of the middle tips for teaching (e.g. tip 3). Do not
use select than one tip when teaching the X and Y coordinates of a LiHa
trough, because this can cause a collision with other objects when the trough
is used in a script. Before Freedom EVOware inserts tips into LiHa troughs, it
Freedom EVOware Software Manual, 393172, en, V2.3
9 - 27
9 - Specifying Your Instrument Setup
Configuring Labware
slides the tips together to the minimum tip-to-tip spacing of 9 mm. In addition,
it automatically centers the group of tips above the center of the trough.
⌦ Teaching the Z coordinates of labware on the worktable:
Move one of the LiHa tips to the Z-Travel position above the first well of the
labware (at the rear left of the labware) and click the corresponding transfer
button. This copies the current LiHa Z coordinate to the Z-Travel field in the
Edit Labware dialog box. We recommend you to use one of the middle tips for
teaching (e.g. tip 3).
Repeat this process for the Z-Dispense, Z-Start and Z-Max positions.
⌦ Teaching labware on the Te-MO with the LiHa
The basic procedure to follow is similar to teaching labware on the worktable with
the LiHa. However, teaching can only be done on sites 3 or 13 for a Te-MO 3x5
and sites 2 or 8 for a Te-MO 3x3. In addition, to ensure that the LiHa can access
the site, you must move the site you want to teach with to the RoMa transfer
position.
Collision avoidance is not available when teaching. Accordingly, take care when
using the “Move To” button, which moves the selected arm directly to the
destination using the shortest (diagonal) path. Move other arms out of the way to
avoid the risk of collisions or use the cursor keys, which are slower but safer.
Proceed as follows (the example is for site 3 of the Te-MO 3x5):
Make sure that the fixed tips or DITIs you want to use for teaching are already
mounted on the LiHa.
Put the labware on site 3 of the Te-MO and on the Freedom EVOware
worktable.
Right-click site 3, choose Edit Labware Type and choose “LiHa”.
In the Te-MO tab of the Move dialog box, move the Te-MO pipetting head to
the right-hand side using the cursor keys. See 9.3.7 “Moving the Te-MO”, 912.
In the Te-MO tab of the Move dialog box, choose “Left / 3” from the pull-down
list and click Move to transfer position. If necessary, move other arms out of
the way to avoid the risk of collisions.
In the LiHa tab of the Move dialog box, move the LiHa to site 3 of the Te-MO
using the cursor keys. See 9.3.1 “Moving the LiHa”, 9-4.
Teach the X, Y and Z coordinates of the MCA as described in “Teaching the X
and Y coordinates of labware on the worktable, above.
See Tab. 8-9 “Te-MO 3x5 site numbers”, 8-104 and Tab. 8-10 “Te-MO 3x3 site
numbers”, 8-104 for information on Te-MO site numbers.
9.4.4.2 Teaching with the Te-MO pipetting head
Specify the carrier, grid and site that you want to use to teach the labware:
Choose the carrier from the list and then choose the grid position and the site.
Alternatively, with the Labware Editor closed, put the labware on the worktable at
the required position, right click the labware and choose Edit Labware Type from
the context menu. This opens the Labware Editor with the correct settings.
In the Edit labware dialog box, choose Te-MO from the pull-down list Device to be
used for teaching.
9 - 28
Freedom EVOware Software Manual, 393172, en, V2.3
9 - Specifying Your Instrument Setup
Configuring Labware
⌦ Teaching the X and Y coordinates of labware on the Te-MO:
Move the Te-MO pipetting head to position the rear left tip above the center of
the first well of the labware (at the rear left of the labware) and click the
corresponding transfer button. This copies the current Te-MO X and Y
coordinates to the position fields in the dialog box.
Move the Te-MO pipetting head to position the front right tip above the center
of the last well of the labware (at the front right of the labware) and click the
corresponding transfer button. This copies the current Te-MO X and Y
coordinates to the position fields in the dialog box.
For labware with offsets, you also need to move the Te-MO pipetting head to
position the rear left tip above the center of the first well of the second column
and click the transfer button next to the field “Y2 (column 2)”. See Tab. 919, 9-33.
⌦ Teaching the Z coordinates of labware on the Te-MO:
Move the Te-MO pipetting head to position the rear left tip above the first well
of the labware (at the rear left of the labware) and click the corresponding
transfer button. This copies the current Te-MO Z coordinate to the Z-Travel
field in the Edit Labware dialog box.
Repeat this process for the Z-Dispense, Z-Start and Z-Max positions.
⌦ Teaching the X and Y coordinates of labware on the Te-MO 96 Wash
Block:
A teaching block is available which simplifies teaching the coordinates of the TeMO 96 Wash Block using the Te-MO pipetting head. Formerly, teaching was
difficult due to the restricted visibility and the view perspective. Using the teaching
block, teaching is done at an offset to the actual positions of the wash block.
Proceed as follows when teaching the coordinates of the Te-MO 96 Wash Block:
Teaching with the Te-MO 96 Wash Block (teaching without offset)
Make sure the wash block is fitted.
In the Edit labware dialog box, choose Te-MO from the pull-down list Device to
be used for teaching.
Teach the X, Y and Z coordinates as described in Teaching the X and Y
coordinates of labware on the Te-MO and Teaching the Z coordinates of
labware on the Te-MO, above. The tips should be lowered into the channels of
the wash block when teaching.
Teaching with the teaching block (teaching with offset).
Fit the teaching block before you start teaching.
In the Edit labware dialog box, choose Te-MO with offset from the pull-down
list Device to be used for teaching.
Teach the X and Y coordinates as described in Teaching the X and Y
coordinates of labware on the Te-MO. The tips should be aligned with the
offset points of the teaching block.
Teach the Z coordinates as described in Teaching the Z coordinates of
labware on the Te-MO, above. The tips should be lowered into the channels of
the teaching block when teaching.
See Tab. 8-9 “Te-MO 3x5 site numbers”, 8-104 and Tab. 8-10 “Te-MO 3x3 site
numbers”, 8-104 for information on Te-MO site numbers.
Freedom EVOware Software Manual, 393172, en, V2.3
9 - 29
9 - Specifying Your Instrument Setup
Configuring Labware
9.4.4.3 Teaching with the MCA96 and the MCA384
Specify the carrier, grid and site that you want to use to teach the labware:
Choose the carrier from the list and then choose the grid position and the site.
Alternatively, with the Labware Editor closed, put the labware on the worktable at
the required position, right click the labware and choose Edit Labware Type from
the context menu. This opens the Labware Editor with the correct settings.
In the Edit labware dialog box, choose MCA96 or MCA384 from the pull-down list
Device to be used for teaching.
⌦ Teaching the X and Y coordinates of labware on the worktable:
Move the MCA pipetting head to position the rear left tip above the center of
the first well of the labware (at the rear left of the labware) and click the
corresponding transfer button. This copies the current MCA X and Y
coordinates to the position fields in the dialog box.
Move the MCA pipetting head to position the front right tip above the center of
the last well of the labware (at the front right of the labware) and click the
corresponding transfer button. This copies the current MCA X and Y
coordinates to the position fields in the dialog box.
For labware with offsets, you also need to move the MCA pipetting head to
position the rear left tip above the center of the first well of the second column
and click the transfer button next to the field “Y2 (column 2)”. See Tab. 919, 9-33.
⌦ Teaching the Z coordinates of labware on the worktable:
Move the MCA pipetting head to position the rear left tip above the first well of
the labware (at the rear left of the labware) and click the corresponding
transfer button. This copies the current MCA Z coordinate to the Z-Travel field
in the Edit Labware dialog box.
Repeat this process for the Z-Dispense, Z-Start and Z-Max positions.
⌦ Teaching labware on the Te-MO with the MCA96 and the MCA384
The basic procedure to follow is similar to teaching labware on the worktable with
the MCA. However, teaching can only be done on sites 3 or 13 for a Te-MO 3x5
and sites 2 or 8 for a Te-MO 3x3. In addition, to ensure that the MCA can access
the site, you must move the site you want to teach with to the RoMa transfer
position.
Collision avoidance is not available when teaching. Accordingly, take care when
using the “Move To” button, which moves the selected arm directly to the
destination using the shortest (diagonal) path. Move other arms out of the way to
avoid the risk of collisions or use the cursor keys, which are slower but safer.
Proceed as follows (the example is for site 3 of the Te-MO 3x5):
Put the labware on site 3 of the Te-MO and on the Freedom EVOware
worktable.
Right-click site 3, choose Edit Labware Type and choose “MCA”.
In the Te-MO tab of the Move dialog box, move the Te-MO pipetting head to
the right-hand side using the cursor keys. See 9.3.7 “Moving the Te-MO”, 912.
In the Te-MO tab of the Move dialog box, choose “Left / 3” from the pull-down
list and click Move to transfer position. If necessary, move other arms out of
the way to avoid the risk of collisions.
9 - 30
Freedom EVOware Software Manual, 393172, en, V2.3
9 - Specifying Your Instrument Setup
Configuring Labware
In the MCA tab of the Move dialog box, click Get Tips and choose the tipblock
to use or the DITI rack containing the DITIs. See 9.3.4 “Moving the MCA96”,
9-8.
In the MCA tab of the Move dialog box, move the MCA to site 3 of the Te-MO
using the cursor keys.
Teach the X, Y and Z coordinates of the MCA as described in “Teaching the X
and Y coordinates of labware on the worktable, above.
In the Multi Channel Arm tab of the Move dialog box, click Drop Tips to drop
the tipblock or the DITIs.
See Tab. 8-9 “Te-MO 3x5 site numbers”, 8-104 and Tab. 8-10 “Te-MO 3x3 site
numbers”, 8-104 for information on Te-MO site numbers.
9.4.4.4 Additional information on teaching with the MCA384
This section describes how to teach DITI racks using a teaching pin and how to
teach head adapters. See also 9.5.4 “Teaching the MCA384 System Carrier with
DITI Racks”, 9-47.
⌦ Teaching MCA384 DITI racks using the teaching pin
A teaching pin is available from Tecan which simplifies teaching the coordinates of
MCA384 DITI racks.
Before you start teaching, mount the head adapter “Adapter DiTi Combo
MCA384” or the “Adapter Combo MCA384” with the direct command MCA384
Get Head Adapter. Then proceed as follows:
Insert the teaching pin into a DITI mounting hole at one of the four corners of
the head adapter.
Open the Edit Labware dialog box and check the Use teaching pin checkbox.
This checkbox is only available if you are teaching an MCA384 DITI rack, and
causes the plunger in the pipetting head to be retracted. This produces a
vacuum which holds the teaching pin in place. In addition, the fields for ZDispense and Z-Max can no longer be edited.
Remove the four adjacent DITIs from the same corner of the DITI rack to
make room for the teaching pin.
During teaching, lower the pipetting head until the teaching pin is inserted into
the DITI rack as far as it will go.
In the Edit Labware dialog box, click the Transfer button for well #1.
In the Edit Labware dialog box, click the Transfer button for Z-Start. The
values for Z-Dispense and Z-Max will be adjusted automatically.
Click OK when you are finished.
⌦ Teaching a head adapter with the head adapter mounted
You can also teach the pipetting head with the head adapter already mounted on
the pipetting head. Before you start teaching, check that the head adapter is
mounted. Then proceed as follows:
Select the head adapter in the Worktable Editor and open the Edit Labware
dialog box.
A checkbox “Use fetched head adapter” is shown to indicate that the head
adapter is mounted. This checkbox cannot be unchecked. In addition, the
fields for Z-Dispense and Z-Max cannot be edited.
Move the pipetting head with the head adapter to position it on top of the
support shoe on the system carrier.
In the Edit Labware dialog box, click the Transfer button for Z-Start. The
values for Z-Dispense and Z-Max will be adjusted automatically.
Freedom EVOware Software Manual, 393172, en, V2.3
9 - 31
9 - Specifying Your Instrument Setup
Configuring Labware
Click OK when you are finished.
⌦ Teaching a head adapter without mounting it first
Put the head adapter onto the support shoe on the system carrier and move the
pipetting head over the head adapter until the clamps are just touching the front
edge of the head adapter. The front edge of the clamps on the pipetting head
must be aligned with the front edge of the head adapter. In the X direction, the
center line of the pipetting head should be above the center line of the head
adapter. This Z position of the pipetting head now corresponds to Z-Start (which is
the same as Z-Dispense).
In the Edit Labware dialog box, click the Transfer buttons for Z-Start and ZDispense.
Specify a value for Z-Max which is 45 higher than the value for Z-Start. This
corresponds to a head position which is 4.5 mm lower.
Click OK when you are finished.
9.4.5 Labware Types and DITI Types
When you choose the labware type on the Well Dimensions tab of the Edit
Labware dialog box, in some cases you also have to select the intended usage of
the labware in a second pull-down list. Current Tecan pipetting instruments
support the following labware types:
Regular
DITI:
– DITI Type or DITI Waste.
Muiti-pipetting head:
– Te-MO DITI, Te-MO Tipblock, Te-MO DITI Waste, Te-MO Wash station or
Te-MO Trough.
– These labware types should also be used for MCA96 DITIs, MCA96
Tipblocks, the MCA96 Wash Block and MCA96 Troughs.
MCA384 (Multi Channel Arm 384):
– MCA384 DITI, MCA384 Fixed Tips, MCA384 Wash Station or MCA384
Head Adapter.
Washer (wash station):
– Cleaner Short, Cleaner Long or Waste (all of these items are part of a
wash station).
– Cleaner LowVol (part of a LowVol wash station).
System (this labware type is used internally and should not be selected).
Te-PS Sensor Plate.
DITI Types
When you choose a DITI type in a script command, the pull-down list all of the
LiHa DITI types which are currently configured in the labware database. When
you want to pick up a DiTi, Freedom EVOware searches the worktable for a DITI
rack which contains the DITI type you have specified in the script command.
To configure Freedom EVOware for a new DITI type, create a new DITI rack or
duplicate an existing DITI rack and give the new labware a suitable name (e.g.
“ZipTip”).
Note: DITI racks are also used to store ZipTips.
9 - 32
Freedom EVOware Software Manual, 393172, en, V2.3
9 - Specifying Your Instrument Setup
Configuring Labware
Note: Te-MO DITI racks should be configured with the labware type “Te-MO
DITI”, not “DITI”.
DiTi Index
Freedom EVOware automatically assigns a unique numeric index to each
DITI type. You cannot edit the index manually. The DITI index is used e.g. by
the Set DITI Type command in worklists and in advanced worklists. The DITI
index is shown in the Edit Labware dialog box for the DITI labware (Well
Dimensions tab).
Te-PS
This labware type Te-PS must only be used for the Te-PS Sensor Plate. The TePS Sensor Plate is used by the Manual Tip Alignment function (see
15.27 “Manual Tip Alignment Command”, 15-57) and the Tip Alignment Check
command (see 15.20 “Tip Alignment Check Command”, 15-30).
9.4.6 Well Alignment
The following table describes the two styles of well alignment supported by
Freedom EVOware:
Tab. 9-19 Well alignment
Type
Name
Comment
Rectangular labware
This is labware where the wells are arranged in regular rows
and columns, e.g. a standard microplate. The first well is rear
left; the last well is right front.
Rectangular labware
with offset
This labware is similar to the rectangular type, but every second column is displaced in the +Y direction. The spacing of
the wells in the Y direction is the same for all columns. In
addition to specifying the X and Y positions of the first and
the last well, you must also specify the Y position of the first
well in the second row in the field “Y2 (column 2)”.
9.4.7 Y-distance of Wells
If the pipetting operation specifies the use of more than one tip, Freedom
EVOware adjusts the spacing between the tips in the Y direction to allow pipetting
to take place on several wells simultaneously if possible. The tips are spread by a
servo motor on the LiHa and the spacing is subject to physical limitations. The
minimum spacing between adjacent tips is 9 mm and the maximum spacing is 38
mm, as shown by the light green area in the middle of the indicator. Freedom
EVOware calculates the Y-distance (the spacing between adjacent wells) from the
labware coordinates and the number of wells you have specified. This is shown by
a vertical line which is colored either dark green or dark red. To optimize pipetting
speed, the vertical line should lie within the green area. If the vertical line lies
within the red area, you may have specified the coordinates incorrectly or
inaccurately. Alternatively, you are using labware with a non-standard design.
The yellow line shows half of the minimum Y-distance (i.e. 4.5 mm). If you are
using microplates with 384 wells and choose this Y-distance, pipetting can take
place simultaneously to every other well.
Freedom EVOware Software Manual, 393172, en, V2.3
9 - 33
9 - Specifying Your Instrument Setup
Configuring Labware
9.4.8 Labware Attributes
The following table describes the standard attributes (parameters) in the Freedom
EVOware database which are available for labware. All attributes are
automatically configured with appropriate values when Freedom EVOware is
installed. You only need to change the settings for special applications. Labware
attributes should only be changed by specialists.
Tab. 9-20 Labware attributes
Field name
Default value
Description
Lid is allowed
0 (not allowed)
1 = a lid is allowed on this labware type.
0 = a lid is not allowed on this labware type.
Read-only field - please set this attribute with
the Labware can have lid checkbox in the
advanced labware settings.
Location to store lid
<OBJECT>
Read-only field - Freedom EVOware writes
the current location of the lid to this field when
the script or process is running.
Lid grip offset narrow
0,0,0
Offset (in cm) from the taught position for gripping the lid of this labware type on the narrow
side. a) b)
Lid grip offset wide
0,0,0
Offset (in cm) from the taught position for gripping the lid of this labware type on the wide
side. a) b)
Plate grip offset narrow
0,0,0
Offset (in cm) from the taught position for gripping this labware type on the narrow side. a) b)
Plate grip offset wide
0,0,0
Offset (in cm) from the taught position for gripping this labware type on the wide side. a) b)
Force to grip plate
75
Specify the force to use when gripping plates
(range: 0 to 249). A Grip Error message will
be output if no resistance is detected when
gripping.
Force to grip lid
60
Specify the force to use when gripping lids
(range: 0 to 249). A Grip Error message will
be output if no resistance is detected when
gripping.
a) This allows the RoMa positions which have been taught to be shared by different labware types.
b) RoMa offset in the X, Y and Z direction (see 9.4.8.2 “RoMa Coordinate System”, 9-39).
Other lid attributes can be set in the carrier definition. Broadly speaking, the lid
attributes in the labware definition specify how to grip the lid; the lid attributes in
the carrier definition specify where to store the lid if it is removed.
Labware attributes can also be used as variables in pipetting scripts (see
14.1.11 “Labware Attributes and String Variables”, 14-16).
The Attributes dialog box for the Edit Labware dialog box normally shows
descriptive names for the attributes. Check the Show internal names checkbox to
see the internal names which are used.
9 - 34
Freedom EVOware Software Manual, 393172, en, V2.3
9 - Specifying Your Instrument Setup
Configuring Labware
Click Add to activate a special attribute for the labware and add it to the
Attributes list. Special attributes are used to control advanced features in Freedom
EVOware which normally dormant (inactive).
Check the Show hidden attributes checkbox to see additional, hidden attributes
which should not normally be changed. They only need to be edited for special
applications:
Tab. 9-21 Labware attributes, hidden
Field name
Default value
Description
Monitoring (obsolete)
1 (shown)
This field is no longer used.
Locking (obsolete)
1
This field is no longer used.
Lid arrival (Plus only)
0,0,1
Movement of the RoMa arm (in cm) to remove
the lid. The default moves the arm up by
1 cm. a)
Lid grip narrow
8.5
The spacing (in cm) between the RoMa grippers which should be used to grip the lid on
the narrow side. To ensure a firm grip, the
grippers will try to close by an additional 1 cm
(this is limited by the specified grip force).
Lid grip wide
12.5
The spacing (in cm) between the RoMa grippers which should be used to grip the lid on
the wide side. To ensure a firm grip, the grippers will try to close by an additional 1 cm (this
is limited by the specified grip force).
Lid offset
0,0,0.8
Distance (in cm) from the bottom of the labware to the bottom edge of the lid. a)
Lid position
0,0,0
Read-only field - Freedom EVOware writes
the current position of the lid within the lid
location to this field when the script or process
is running.
Barcode (Plus only)
Scanned barcode data is written to this field. It
contains <none> if the barcode was not yet
scanned; it contains a default barcode if the
scanner was unable to read the barcode See
Default Barcode in 8.5.1.1, 8-40.
Labware type (obsolete)
0
Labware type (for automatic positioning of the
labware on the worktable):
1 = Source
2 = Pre-dilution
4 = Destination
32 = DiTi
This field is no longer used.
Well count
96
Number of wells in the labware
Freedom EVOware Software Manual, 393172, en, V2.3
9 - 35
9 - Specifying Your Instrument Setup
Configuring Labware
Tab. 9-21 Labware attributes, hidden (cont.)
Field name
Default value
Description
Plate type
1
Read-only field - please set this attribute with
the Washer plate type field in the advanced
labware settings. This variable is used by the
Columbus Washer. It overwrites the plate type
specified with the Columbus WashPlate
device command.
File (obsolete)
<NONE>
This field is no longer used.
Source barcode (Plus
only)
Barcode ID of the mother plate
Base location
Read-only field - Freedom EVOware writes
the home location of the labware to this field
when the labware is created.
Base position
9 - 36
1,1,1
Read-only field - Freedom EVOware writes
the labware position within the base location
to this field when the labware is created.
Finger type (obsolete)
This field is no longer used.
Location
Read-only field - Freedom EVOware writes
the current location of the labware to this field
when the script or process is running.
Position
1,1,1
Read-only field - Freedom EVOware writes
the current position of the labware within the
current location to this field when the script or
process is running.
Grip narrow
8.5
The spacing (in cm) between the RoMa grippers which should be used to grip the labware
on the narrow side. To ensure a firm grip, the
grippers will try to close by an additional 1 cm
(this is limited by the specified grip force).
Grip wide
12.5
The spacing (in cm) between the RoMa grippers which should be used to grip the labware
on the wide side. To ensure a firm grip, the
grippers will try to close by an additional 1 cm
(this is limited by the specified grip force).
Offset between
stacked plates (obsolete)
0,0,1
For stacked plates, distance from the bottom
of the plate to the bottom of the next plate
above a). This field is no longer used.
Stacker type
1
Read-only field - please set this attribute with
the Stacker plate type field in the advanced
labware settings.
Freedom EVOware Software Manual, 393172, en, V2.3
9 - Specifying Your Instrument Setup
Configuring Labware
Tab. 9-21 Labware attributes, hidden (cont.)
Field name
Default value
Description
Grip delta
0.5
Distance which is added to the grip distance
when releasing the labware or lid. Example: If
Grip_Narrow is 8.5 cm and Grip_delta is 0.5
cm, the grippers will open to 9 cm to release
the labware.
StripCount, StripMask
See 17.5 “Columbus Washer - Washing a
Variable Number of Strips in the Plate”, 1715.
BCZoffset
450
Offset in device steps to adjust the vertical
position of the barcode scanner. This setting
is related to the distance between the barcode
label and the bottom edge of the labware.
Run_Parallel (Plus
only)
1
Specifies the locking mode of the labware:
0 = If several process iterations want to use
the same instance of this labware type, only
one of them can run at the same time. The
other processes (if any) must wait until the
first process has finished. For example, this
avoids a second process trying to pipette
while the first process is still incubating the
same labware.
1 = Labware is never locked; several process
iterations can use the same instance of this
labware type simultaneously. This is the
default setting if the attribute Run_Parallel has
not been defined. See also 9.11, 9-77.
a) RoMa offset in the X, Y and Z direction (see 9.4.8.2 “RoMa Coordinate System”,
9-39).
Table legend: “Plus only” - only relevant for Freedom EVOware Plus.
Freedom EVOware Software Manual, 393172, en, V2.3
9 - 37
9 - Specifying Your Instrument Setup
Configuring Labware
9.4.8.1 Attributes for MCA384 labware
The following attributes are only relevant for labware which is used by the
MCA384 (Multi Channel Arm with 96 or 384 tips):
Tab. 9-22 Attributes for MCA384 labware
9 - 38
Field name
Default value
Description
RelMovesAllowed
-
Only for MCA384 head adapters:
0 = The head adapter can pick up all of the
DITIs but not one row or one column.
1 = The head adapter can pick up one row or
one column of DITIs in addition to picking up
all of the DITIs. This requires a special head
adapter (e.g. “Combo”) and a relative movement of the pipetting head.
DropOffset
-
This attribute is no longer used and should be
set to “0”.
TipOffset
0,0,0
Only for MCA384 head adapters for DITIs:
Offset of the tips (in 0.1 mm) compared to the
head adapter for fixed tips. For example, with
the “MCA Adapter 384 DITIs” the tips are displaced by 0.8 mm in the Y direction (0,8,0).
With the “MCA Adapter 96 DITIs” the tips are
displaced by -3.7 mm in the Y direction
(0,-37,0).
YShift
-145
Only for MCA384 head adapters:
The pipetting head movement which is
required in the Y direction to pick up or put
down the head adapter. It is dependent on the
gear ratio of the bayonet locking mechanism
and is normally -145.
PlateHardwareID
-
Only for MCA384 head adapters:
Head adapter ID. All head adapter types have
an ID (magnetic bit pattern from 1 to 15) to
allow automatic identification by the pipetting
head. It is used to check that the correct head
adapter has been mounted.
MCA384Absolute
PlungerPosition
-
Only for MCA384 DITI racks:
The height of the MCA384 DITI racks
depends on the type. This parameter specifies
the plunger height which is required to mount
the DITIs. Specify 27000 for 50 µl and 125 µl
DITIs. Specify 8500 for 15 µl DITIs.
Freedom EVOware Software Manual, 393172, en, V2.3
9 - Specifying Your Instrument Setup
Configuring Carriers
9.4.8.2 RoMa Coordinate System
The plate robot (RoMa) has it’s own coordinate system which rotates with the
RoMa:
Fig. 9-14 RoMa coordinate system
The Y axis is aligned with the current direction of the gripper fingers. The X axis is
perpendicular to the current direction of the gripper fingers.
In the dialog box for the Move RoMa command, RoMa coordinate “x” is labelled
“A” and “y” is labelled “B” to avoid confusion with the worktable coordinates X, Y
and Z.
9.5 Configuring Carriers
A carrier is a removable support on the instrument's worktable (i.e. deck) which
holds one or more pieces of labware in place. Carriers can be fitted to the
instrument’s worktable at pre-defined grid positions (see Fig. 9-1, 9-3).
In Freedom EVOware, carriers are also used to represent positions on devices
which can be accessed by the plate or tube robot. For example, the plate robot
can put a microplate onto the shuttle of the Te-Stack stacker when the shuttle is at
the transfer position.
The carrier name indicates the labware type for which it is desiged (for device
carriers, it indicates the device type).
Note: The Freedom EVOware database already contains a large selection of predefined carrier and labware types. You only need to create or edit carriers or
labware if you cannot find a standard item which is suitable for your needs.
The following dialog box is used to configure carriers (to get to this dialog box,
double-click on the carrier in the Labware section of the Control Bar):
Freedom EVOware Software Manual, 393172, en, V2.3
9 - 39
9 - Specifying Your Instrument Setup
Configuring Carriers
Fig. 9-15 Edit Carrier dialog box
It is recommended not to change the properties of the predefined carrier and
labware types. Make a copy of the object with a new name if you want to alter any
of the properties (see 5.4.1.12 “Context Menu for Objects in the Control Bar”, 514).
The parameters in the Edit Carrier dialog box are as follows:
9 - 40
Freedom EVOware Software Manual, 393172, en, V2.3
9 - Specifying Your Instrument Setup
Configuring Carriers
Carrier is device
Check this checkbox and choose the device type (e.g. “Carousel”) from the
Device pull-down list if the carrier you are configuring represents a device.
The device will then appear as an icon in the Worktable Editor, around the
edge of the pipetting area (the gray area). Do not check Carrier is device if the
carrier is not a device.
For devices which are available in several versions (e.g. Te-Shake Shaker),
Carrier is device must only be checked for the device version which you are
actually using. By default, Carrier is device is only checked for Te-Shake
2Pos. If instead you are using e.g. Te-Shake 1Pos Front, uncheck this
checkbox for Te-Shake 2Pos, check it for Te-Shake 1Pos Front and then
choose Shaker from the Device pull-down list. Tip: The assigned device type
is shown in the device icon in the Worktable Editor.
Use the Duplicate Device tool to create copies of the device driver if you want
to use more than one Te-Shake Shaker (either the same or different versions).
See A.9.3 “Duplicate Device Tool”, A-36.
Note: If you click on a device icon in the Worktable Editor, an orange line shows
the worktable grid position which is occupied by the device. By default, devices
are configured for grid position 1, at the left edge of the worktable. Right-click the
device icon, choose Set Grid and choose the actual grid position. This is not
strictly necessary for devices which are rigidly attached to the pipetting instrument
(you must check and/or teach the RoMa movement vectors in this case). For
devices which are clipped to the locating pins of the worktable, the supplied RoMa
vectors will only work correctly if the actual grid position is set correctly.
Attributes
See 9.5.5 “Carrier Attributes”,
9-47 for information on carrier attributes.
Accessible for liquid handling arm
Check this checkbox if the carrier can be accessed by the LiHa for pipetting.
This allows you to put the carrier on the pipetting area of the worktable (by
dragging it from the Control Bar to the gray area in the Worktable Editor).
Uncheck this checkbox if the carrier can only be accessed by a plate or tube
robot. This is the case with most devices. Devices are normally positioned on
the worktable to the rear of the pipetting area or at the left or right side (some
devices such as the centrifuge are mounted below a cutout in the worktable).
Three exceptions are the Te-Shake shaker (the LiHa can pipette onto labware
on the shaker), the Te-MO (the LiHa can pipette onto labware on Te-MO
slides) and the Te-Stack stacker (the LiHa can pipette onto labware which is
placed on the shuttle at the Te-Stack transfer position).
Color
Choose a unique color to make it easier for you to identify this carrier type in
the Worktable Editor. The default color for carriers is gray.
Dimensions
Specify the X and Y dimensions of the carrier outline in millimeters. See
9.5.1 “Carrier Dimensions and X/Y Offsets”, 9-45.
Reference offset
The X reference offset is the distance in millimeters between the left edge of
the carrier and the closest positioning pin on the worktable below the carrier.
The Y reference offset is the distance in millimeters between the rear edge of
the carrier and the closest positioning pin on the worktable below the carrier.
Freedom EVOware Software Manual, 393172, en, V2.3
9 - 41
9 - Specifying Your Instrument Setup
Configuring Carriers
The Z reference offset is the vertical distance in millimeters between the top
surface of the worktable and the bottom edge of the labware on the carrier.
See 9.5.1 “Carrier Dimensions and X/Y Offsets”, 9-45 and 9.5.2 “Z Offsets
for Carriers”, 9-46.
Barcode
Specify the carrier code for the carrier. This is the first three digits of the
barcode at the end of the carrier. All standard Tecan carriers have a unique
carrier code. Only use barcode numbers in the range 500 to 999 for custom
carriers.
If the PosID cannot scan the carrier or labware on the carrier due to a special
carrier design, please set the Barcode field to “000”.
You cannot specify a barcode for a Robot only carrier (see the Accessible for
liquid handling arm checkbox, above). The Barcode field is inactive (gray) in
this case. Carriers which are devices do not have barcodes. Specify “000” if
the Barcode field is active (not gray).
Carrier barcodes are not applicable to the Te-MO. The Barcode field should
be left blank or specified as “000” in this case.
Edit and Create buttons: If your pipetting instrument is fitted with a PosID-3
barcode scanner, for some carrier types you will see Edit and Create buttons
next to the Barcode field. These buttons are used to edit and create advanced
barcode properties and barcode position information for the carrier. The
Freedom EVOware database already contains advanced barcode properties
for most common carrier types.
This configuration feature is only intended for specialists. Please contact
Tecan for further information.
Te-PS Sensor Plate Offset (Z)
Standard carriers for microplates normally have a raised plateau which fits into
a recess in the bottom of the plate (Te-PS carriers do not have a raised
plateau and the Te-PS Sensor plate has a flat bottom without a recess).
Accordingly, the Te-PS Sensor plate sits higher on a standard carrier than a
microplate. If the carrier has a raised plateau, specify its height with this
parameter (range: 0 to 10 mm). This parameter is only used if you place a TePS Sensor plate on a standard carrier for the purpose of arm alignment.
Position layout
Specify the number of positions (sites) which are available for labware in the
X, Y and Z directions. The product X * Y * Z is the total number of sites (the
maximum number of labware items that the carrier can accommodate). The
total number of sites must not exceed 396.
The position layout for the 3-position microplate carrier is X=1, Y=3, Z=1 (total
of 3 sites). The RoMa can access all 3 sites by moving in the Y direction.
The position layout for a common type of incubator is X=1, Y=1, Z=6 (total of 6
sites). The RoMa can access all 6 sites by moving in the Z direction.
The Te-MO 3x5 has 5 sites on each of 3 slides (X=3, Y=5, Z=1). To allow the
RoMa to access all 15 sites, the slides move automatically to position the
required site at the RoMa transfer position.
If you are configuring the carousel carrier, see also 9.5.5.3 “Carousel Carrier
Attributes”, 9-50 and 9.5.5.4 “Carousel NT Carrier Attributes”, 9-52.
9 - 42
Freedom EVOware Software Manual, 393172, en, V2.3
9 - Specifying Your Instrument Setup
Configuring Carriers
Use to offset RoMa vector
Check the checkboxes to indicate how many unique sites the device or carrier
has for the RoMa to access. The total number of RoMa sites is shown in the
Sites field. The checkboxes determine the directions in which the RoMa
needs to move to access the sites (X, Y and/or Z).
For most carrier types, you should check all three checkboxes (X, Y and Z).
Special cases:
A common type of carousel has 9 towers and 21 microplates per tower (X=1,
Y=9, Z=21, 189 labware items) but only one site for the RoMa to access (the
carousel transfer position). In this case, you should only check the X column.
A single Te-Stack has 1 or 2 towers and 50 microplates per tower (X=1 or 2,
Y=1, Z=50) but only one site for the RoMa to access (the Te-Stack transfer
position). In this case, you should only check the Y column.
A double Te-Stack has 4 towers, 50 microplates per tower and two sites
(transfer positions) for the RoMa to access (X=2, Y=2, Z=50). The RoMa can
access both transfer positions by moving in the Y direction, so you should only
check the Y column (total of 2 RoMa sites).
Use the Te-Stack Right carrier if the Te-Stack is mounted on the right side of
the worktable; use the Te-Stack Left carrier if the Te-Stack is mounted on the
left side of the worktable:
Fig. 9-16 Double Te-Stack Right (with the default tower configuration)
The Te-Stack X and Y coordinates are not the same as the worktable grid
coordinates. See also 8.5.28.3 “Te-Stack and Te-Stack Te-MO Configuration Towers Tab”, 8-98.
Robot
The pipetting instrument uses robots to pick up and put down labware on
carriers. Movement commands for robots are called “robot vectors”. If you
want to create or edit a robot vector for this carrier, you must first choose the
robot you want to use (RoMa, MCA96 or CGM for the MCA384).
If your pipetting instrument is fitted with two plate robots (RoMa 1 and
RoMa 2), you should create a vector for both plate robots for all carriers which
can be accessed by both robots. Tip: the home position for plate robot 1 is at
the rear left of the instrument.
Freedom EVOware Software Manual, 393172, en, V2.3
9 - 43
9 - Specifying Your Instrument Setup
Configuring Carriers
Robot vectors
Choose the required robot vector type from the list and click Create (the
button changes to Edit if the robot vector has already been created). .
See 9.6.1 “Using RoMa Vectors”,
9-58 for information on robot vector types.
Additional information
This field is for information purposes only and allows you to enter some notes
about this carrier type. When you first install Freedom EVOware, this field
shows the Tecan part number of the carrier.
Link to
This field is for information purposes only and is intended for the internet
address (website URL) of the carrier manufacturer.
Sort in Carrier group
The Carriers tab in the Control Bar is subdivided into groups for Devices,
Hotels, Microplate Carriers, DITI Carriers, Wash Stations, Trough Carriers,
Tube Carriers (tube racks) and Miscellaneous Carriers. Choose the group
where you want this carrier to be shown in the Control Bar. Choose Default to
use the default Control Bar group for this carrier.
Table of sites and offsets
The table is used to configure dimensions for the sites and offsets. All dimensions
are in millimeters.
X-Offset, Y-Offset
The X offset for sites is the distance between the left edge of the carrier and
the left edge of the labware at the respective site. The Y offset for sites is the
distance between the rear edge of the carrier and the rear edge of the labware
at the respective site. See Fig. 9-17, 9-46.
Z-Offset
The Z offset for sites is normally “0” and is only specified non-zero if the sites
on the carrier are not at the same height. You can specify either negative or
positive values in this case. See Fig. 9-18, 9-46.
X-Size, Y-Size
X-Size and Y-Size are the outline dimensions of the site. See Fig. 9-17,
46.
9-
Shape
Shape must always be Rectangle.
Groups
For carriers or devices with more than one site, if the sites have different
mechanical characteristics you can specify labels (names) in the groups
column to group equivalent sites into a single Freedom EVOware location.
Freedom EVOware Plus automatically chooses which site it will use from the
group when optimizing the schedule.
For example, the three towers of the Te-Stack Te-MO can only put plates on
the front two sites of the respective Te-MO slide. For mechanical reasons, the
sites at the rear of the Te-MO are not accessible to the stacker. In this case,
assign the front two sites of each Te-MO slide to a separate group. For
example, assign the group labels “Stack1” to sites 4 and 5, “StackM” to sites 9
9 - 44
Freedom EVOware Software Manual, 393172, en, V2.3
9 - Specifying Your Instrument Setup
Configuring Carriers
and 10 and “Stack2” to sites 14 and 15 (see Tab. 8-9 “Te-MO 3x5 site
numbers”, 8-104). Choose descriptive labels with no space characters. See
also EVOware location in 8.5.28.4 “Te-Stack and Te-Stack Te-MO
Configuration - Locations Tab”, 8-102.
A group is also needed for the Te-MO if you are using Active Positioning
Carriers (APCs) but you have not fitted them to all sites. Assign the group
label “APC” to the APC sites and put the labware onto one of the APC sites. if
Freedom EVOware decides to use another Te-MO site or slide for pipetting, it
will only use the APC sites.
The location groups you have created will be shown in dialog boxes which
allow you to choose locations. The group name you have chosen is shown
appended to the end of the carrier name, e.g. Te-MO_3x5_Stack1.
You can also use a label in the Groups column to identify a single site.
For example, you can assign a group label (e.g. “DITI-Waste”) to the waste
site of a DITI carrier if you want Freedom EVOware Plus to use it for
discarding racks with used DITIs. You must then specify this site for
MoveLocation2 in the respective RoMa_ReplaceObject command (see
9.10.3.1 “Editing Custom Pre-actions and Post-actions”, 9-74, “Usage
Example”). If you don’t specify a specific waste site, Freedom EVOware Plus
will return DITI racks with used DITIs to their base (labware source) location,
e.g. the carousel.
If you want to use group labels, you must assign labels to all sites of the
carrier, not just one site. See e.g. Tab. 8-11 “Te-MO 3x5 group labels”, 8104. For more examples, refer to Group labels for carrier sites in the index.
The Groups function is not relevant for Freedom EVOware Standard.
Allowed Labware on this carrier
For each of the labware types which can be used with this labware carrier or
device carrier, check the checkboxes alongside the allowed sites.
9.5.1 Carrier Dimensions and X/Y Offsets
The figure below shows how to define the various dimensions for a carrier. The
example is for the standard Tecan carrier Microplate, 3 Pos., landscape. The
carrier type which is shown has a nose which extends beyond the rear edge. The
positioning pins (shown in grey) are clipped to the worktable and are partially
hidden from view by the carrier.
Freedom EVOware Software Manual, 393172, en, V2.3
9 - 45
9 - Specifying Your Instrument Setup
Configuring Carriers
Fig. 9-17 Carrier dimensions and X/Y offsets
9.5.2 Z Offsets for Carriers
The figure below shows how to specify the reference offset Z (the vertical distance
in millimeters between the top surface of the worktable and the bottom edge of the
labware on the carrier). It does not refer to the top edge of the labware:
Fig. 9-18 Specifying the Z offset for carriers
9 - 46
Freedom EVOware Software Manual, 393172, en, V2.3
9 - Specifying Your Instrument Setup
Configuring Carriers
9.5.3 Custom Objects
Proceed as follows if you want to define a custom object which is neither a carrier
nor labware (i.e. it cannot be disassembled into a carrier and one or more pieces
of labware). Define it as a new carrier and only specify X and Y dimensions for the
carrier and X-Size and Y-Size for the site. Then define a new labware item, assign
it to the site, specify the grid position and measure its coordinates as described in
9.4.4 “Teaching the Labware Coordinates”, 9-26. After saving the configuration
you can use the custom object on the worktable anywhere where it is required.
9.5.4 Teaching the MCA384 System Carrier with DITI Racks
The DITI rack for 15 µl MCA384 DITIs is not as high as the DITI racks for 50 and
125 µl DITIs. The height difference is normally compensated by putting a 19 mm
spacer block onto one or more sites of the MCA384 system carrier. Accordingly,
when you specify dimensions for the MCA384 system carrier, you must increase
the Z-offset of the site or sites to be used for the 15ul DITI rack by 19 mm. To do
this, add 19 to the Z-offset value shown in the table of sites and offsets in the Edit
Carrier dialog box.
If required, you can make a duplicate of the standard MCA384 system carrier
using a new name and configure the copy with a modified Z-offset on one or more
sites. This allows you to set up the worktable with several system carriers for a
different combination of DITI sizes.
9.5.5 Carrier Attributes
The following tables describe the standard attributes (parameters) in the Freedom
EVOware database which are available for carriers (including carriers which are
devices). All attributes are automatically configured with appropriate values when
Freedom EVOware is installed. You only need to change the settings for special
applications. Carrier attributes should only be changed by specialists.
Carriers which are devices normally require you to specify the server name, as
follows (the example is for the centrifuge):
Tab. 9-23 Carrier attributes, centrifuge
Field name
Default value
Description
Server
Centrifuge
Specify the call name for the device (the internal name of the device driver).
Most of the carriers require you to specify Grip orientation, Lid is allowed, Location
to store lid and Allowed robots. These attributes are described in 9.5.5.1 “Labware
Carrier Attributes”, 9-49. To save space, these descriptions are not repeated for
each of the available carrier types.
The Attributes dialog box for the Edit Carrier dialog box normally shows
descriptive names for the attributes. Check the Show internal names checkbox to
see the internal names which are used.
Click Add to activate a special attribute for the carrier and add it to the Attributes
list. Special attributes are used to control advanced features in Freedom
EVOware which normally dormant (inactive).
Freedom EVOware Software Manual, 393172, en, V2.3
9 - 47
9 - Specifying Your Instrument Setup
Configuring Carriers
Check the Show hidden attributes checkbox to see additional attributes which
should not normally be changed. They only need to be edited for special
applications.
Custom grip position
Some special carrier types and device carriers (e.g. readers) may require you to
grip the labware at a non-standard grip height or grip position, for example to
avoid a collision with adjacent mechanical components. The non-standard grip
position is specified with the special carrier attributes Maximum grip offset and
Minimum grip offset:
Tab. 9-24 Carrier attributes, custom grip position for labware
Field name
Default value
Description
Maximum grip offset
0,0,0
Maximum position (in cm) for gripping labware
for use on this carrier. a)
Minimum grip offset
0,0,0
Minimum position (in cm) for gripping labware
for use on this carrier. a)
a) RoMa offset in the X, Y and Z direction (see 9.4.8.2 “RoMa Coordinate System”,
9-39).
See 8.5.23.2 “Plate Robot Configuration - Settings Tab”, 8-86, Custom grip
position, for more information.
If the above two attributes are not visible in the Attributes list, click Add to activate
them (the internal names are Grasp_Location_max and Grasp_Location_min).
Note: The labware attributes Plate Grip Offset Narrow and Plate Grip Offset Wide
adjust the grip position globally globally for this labware type (not just for a specific
carrier).
9 - 48
Freedom EVOware Software Manual, 393172, en, V2.3
9 - Specifying Your Instrument Setup
Configuring Carriers
9.5.5.1 Labware Carrier Attributes
The attributes which you can configure for labware carriers are as follows:
Tab. 9-25 Labware carrier attributes
Field name
Default value
Description
Grip orientation
narrow (narrow side)
This field specifies whether the RoMa should
grip labware on this carrier on the narrow side
or wide side. If you specify “narrow”, make
sure that you have created a “Move Narrow”
RoMa vector for this carrier (vice versa for
“wide”) a).
Lid is allowed
no (not allowed)
Specify “yes” if a lid is allowed on labware
which is on this carrier.
Location to store lid
<base> (original position of labware)
If lids are not allowed on labware which is on
this carrier, the lid will be removed from the
labware and moved to the location specified in
this field. b)
Allowed robots
SafeMoveOffset
Comma separated list of all plate robots that
can safely access this location (e.g. “RoMa,
RoMa2”). The robot names are case sensitive. If this field is left empty, Freedom
EVOware assumes that all plate robots can
safely access this location. The list may be
necessary if e.g. the carrier is positioned at
the extreme left or extreme right of the worktable.
0
SafeMoveSpeed
X-offset in mm for safe LiHa movement to and
from the pipetting position (see 17.4 “Safe
Pathways Feature”, 17-14).
Speed to use for movements along safe paths
in mm/s (see 17.4 “Safe Pathways Feature”,
17-14).
Safety
1
Only for the MCA384 DITI Carrier:
1 = Close the locking mechanism when
mounting DITIs from the MCA384 DITI Carrier.
0 = Do not close the locking mechanism.
ZTravel
-
Only if you choose Positioning with advanced
Z-travel in the Configuration Tool (see
8.4.2.11, 8-34). If the ZTravel parameter is
non-zero, it is used for Z-travel height instead
of the taught Z-travel height.
a) If you specify “narrow” and the physical orientation of the carrier site is landscape (e.g. the “MP 3 Pos”
carrier), the RoMa will grip the labware from the side of the worktable (with the grippers pointing in the
direction X or -X), not from the front (vice versa for “wide”).
b) Broadly speaking, the lid attributes in the labware definition specify how to grip the lid; the lid attributes in
the carrier definition specify where to store the lid if it is removed.
Freedom EVOware Software Manual, 393172, en, V2.3
9 - 49
9 - Specifying Your Instrument Setup
Configuring Carriers
Other lid attributes can be set in the labware definition. Broadly speaking, the lid
attributes in the labware definition specify how to grip the lid; the lid attributes in
the carrier definition specify where to store the lid if it is removed.
Check the Show hidden attributes checkbox to see additional, hidden attributes
which should not normally be changed. They only need to be edited for special
applications:
Tab. 9-26 Labware carrier attributes, hidden
Field name
Default value
Description
Lid_position
0,0,0
Specify the required position of the lid within
the lid location. a)
Dimension
-
Read-only field - please set this attribute with
the Position Layout pull-down lists in the Edit
Carrier dialog box.
Occupation
0
For internal use only.
Speed
-
Allowed maximum speed of RoMa movement
in % of full RoMa speed when moving to this
location.
Dimension_mask
1,1,1
Read-only field - please set this attribute with
the Use to offset RoMa vector checkboxes in
the Edit Carrier dialog box. a)
a) X, Y and Z RoMa movements in cm (see 9.4.8.2 “RoMa Coordinate System”,
9-39).
9.5.5.2 Barcode Scanner Carrier Attributes
The additional attributes which you can configure for the barcode scanner carrier
are as follows:
Tab. 9-27 Carrier attributes, barcode scanner
Field name
Default value
Description
Server
BarcodeScanner
Specify the call name for the device (the internal name of the device driver).
Device requires
release of labware
no
With most devices such as the Te-Shake
shaker, the RoMa puts the labware onto the
device. The barcode scanner is an on-the-fly
device - the RoMa presents the labware to the
scanner but does not release it. Specify “no” in
this field for on-the-fly devices.
See 9.5.5.1 “Labware Carrier Attributes”,
attributes.
9-49 for descriptions of the other
9.5.5.3 Carousel Carrier Attributes
The additional attributes which you can configure for the Carousel carrier are as
follows:
9 - 50
Freedom EVOware Software Manual, 393172, en, V2.3
9 - Specifying Your Instrument Setup
Configuring Carriers
Tab. 9-28 Carrier attributes, Carousel
Field name
Default value
Description
Slot pitch height
1925
Specify the vertical distance in device steps
between the bottoms of adjacent labware
items in the same tower. This information is
required by the carousel feeder mechanism.
The slot pitch height also determines how
many labware items will fit in the carousel
tower. If you change this setting, you may
need to correct the YS setting in the position
layout for the carousel carrier (see
9.5 “Configuring Carriers”, 9-39).
Starting cartridge in
carousel
1
The carousel must be subdivided into several
logical carousels (separate sets of towers) if
you want to use it to store a mixture of labware types with different dimensions. To create logical carousels, make copies of the
carousel carrier (right-click the carrier in the
Control Bar and choose Duplicate) and specify the starting tower, the slot pitch height, the
Y dimensions (number of towers) and a new
name for each copy. a)
The settings for starting tower and number of
towers must not overlap the settings of other
logical carousels for this device. You should
not put labware with different dimensions in
the same tower.
Server
Carousel
Specify the call name for the device (the internal name of the device driver).
Transfer height
5000
Specify the height of the handler (shuttle) in
device steps when it is positioned at the carousel transfer position.
a) You must restart Freedom EVOware after creating the logical carousel(s).
See 9.5.5.1 “Labware Carrier Attributes”,
attributes.
Freedom EVOware Software Manual, 393172, en, V2.3
9-49 for descriptions of the other
9 - 51
9 - Specifying Your Instrument Setup
Configuring Carriers
9.5.5.4 Carousel NT Carrier Attributes
The additional attributes which you can configure for the Carousel NT carrier are
as follows:
Tab. 9-29 Carrier attributes, Carousel NT
Field name
Default value
Description
Starting cartridge in
carousel
1
The carousel must be subdivided into several
logical carousels (separate sets of towers) if
you want to use it to store a mixture of labware types with different dimensions. To create logical carousels, make copies of the
carousel carrier (right-click the carrier in the
Control Bar and choose Duplicate) and specify the starting tower, the slot pitch height, the
Y dimensions (number of towers) and a new
name for each copy. a)
The settings for starting tower and number of
towers must not overlap the settings of other
logical carousels for this device. You should
not put labware with different dimensions in
the same tower. For the Carousel NT, slot
pitch height is configured in the driver (see
8.5.3.2 “Carousel NT Configuration - Hotel Cartridge Configuration Tab”, 8-46).
BCZOffset
450
Offset in device steps to adjust the vertical
position of the barcode scanner. This setting
is related to the distance between the barcode
label and the bottom edge of the labware.
Server
CarouselNT
Specify the call name for the device (the internal name of the device driver).
a) You must restart Freedom EVOware after creating the logical carousel(s).
See 9.5.5.1 “Labware Carrier Attributes”,
attributes.
9-49 for descriptions of the other
9.5.5.5 Centrifuge Carrier Attributes
The additional attributes which you can configure for the centrifuge carrier are as
follows:
Tab. 9-30 Carrier attributes, centrifuge
Field name
Default value
Description
Server
Centrifuge
Specify the call name for the device (the internal name of the device driver).
See 9.5.5.1 “Labware Carrier Attributes”,
attributes.
9 - 52
9-49 for descriptions of the other
Freedom EVOware Software Manual, 393172, en, V2.3
9 - Specifying Your Instrument Setup
Configuring Carriers
9.5.5.6 Incubator Carrier Attributes
See 8.5.8 “Settings for Heated Incubators 1 to 3”,
incubators.
8-55 for information on logical
9.5.5.7 Pooling Balance Carrier Attributes
The additional attributes which you can configure for the Mettler pooling balance
are as follows:
Tab. 9-31 Carrier attributes, Mettler pooling balance
Field name
Default value
Description
Carrier is a pooling
balance
No
Choose Yes if the balance is a pooling balance. See 10.1.1 “Global Parameters for Liquid Classes”, 10-4, Liquid Arrival Check for
more information.
Enforce tip-wise dispensing
No
The Liquid Arrival Check feature normally verifies that the correct liquid volumes have been
dispensed by weighing the labware after
pipetting from all of the tips which are selected
in the pipetting command. If a volume discrepancy is detected, it is not possible to identify
which tip has pipetted inaccurately. Choose
Yes if you want to verify the pipetted volume
for each tip separately. The pipetting operation
will take significantly longer in this case.
See 9.5.5.1 “Labware Carrier Attributes”, 9-49 for descriptions of the other
attributes.
For more information on the pooling balance, see Liquid Arrival Check in
10.1.1 “Global Parameters for Liquid Classes”, 10-4.
9.5.5.8 Te-Shake Carrier Attributes
The additional attributes which you can configure for the Te-Shake carrier are as
follows:
Tab. 9-32 Carrier attributes, Te-Shake
Field name
Default value
Description
Server
Shaker
Specify the call name for the device (the internal name of the device driver).
DeviceIDs a)
7
Hardware address of the shaker plus 1. Readonly field - please set this attribute with the
Settings tab of the Te-Shake driver in the Configuration Tool.
Has heater a)
0
Specify 1 if the shaker is fitted with the heater
option.
Init temperature a)
0
If the shaker is fitted with the heater option,
specify the initial temperature.
a) Hidden attribute. Click the Show hidden attributes checkbox to make it visible.
Freedom EVOware Software Manual, 393172, en, V2.3
9 - 53
9 - Specifying Your Instrument Setup
Configuring Carriers
See 9.5.5.1 “Labware Carrier Attributes”, 9-49 for descriptions of the other
attributes.
See also 16.28 “Commands for the Te-Shake Shaker”, 16-90 for more
information on the Te-Shake carrier.
9.5.5.9 Te-Stack Carrier Attributes
The additional attributes which you can configure for the Te-Stack carrier are as
follows:
Tab. 9-33 Carrier attributes, Te-Stack
Field name
Default value
Allowed robots
Description
Comma separated list of all plate robots that
can safely access this location (e.g. “RoMa,
RoMa2”). The robot names are case sensitive. If this field is left empty, Freedom
EVOware assumes that all plate robots can
safely access this location.
PlateStacker
1
Always specify 1 to indicate that this is a lastin first-out stacking device (if a microplate is
removed from the stacker, all of the other
ones will slide down one position).
Server
Te-Stacker
Specify the call name for the device (the internal name of the device driver).
WasteLocation
0 = Do not use the Te-Stack Waste option.
1 = Use the Te-Stack Waste option. Labware
returned to the Te-Stack will then be discarded
to the Te-Stack Waste. The Te-Stack Waste
hardware option is mainly intended for discarding empty DITI racks. WasteLocation is a
hidden attribute.
See 9.5.5.1 “Labware Carrier Attributes”, 9-49 for descriptions of the other
attributes.
See also 16.34 “Commands for the Te-Stack”, 16-107 for information on logical
Te-Stack devices.
9 - 54
Freedom EVOware Software Manual, 393172, en, V2.3
9 - Specifying Your Instrument Setup
Creating and Editing Plate Robot Vectors
9.5.5.10 Te-Stack Te-MO Carrier Attributes
The additional attributes which you can configure for the Te-Stack Te-MO carrier
are as follows:
Tab. 9-34 Carrier attributes, Te-Stack Te-MO
Field name
Default value
Description
Allowed robots
Te-StackTeMO
Always specify Te-StackTeMO.
PlateStacker
1
Always specify 1 to indicate that this is a lastin first-out stacking device (if a microplate is
removed from the stacker, all of the other
ones will slide down one position).
Server
Te-StackTeMO
Specify the call name for the device (the internal name of the device driver).
See 9.5.5.1 “Labware Carrier Attributes”,
attributes.
9-49 for descriptions of the other
9.6 Creating and Editing Plate Robot Vectors
The plate robot (RoMa, robot manipulator) is a robot arm with gripper fingers that
can grip and move objects within the working area of the pipetting instrument. It
can be used to transport microplates, reagent blocks, deep well plates, etc.
between carriers, incubators and storage positions (e.g. a RoMa shelf or
carousel). Current Tecan pipetting instruments can be fitted with up to two RoMas.
RoMa actions such as getting a microplate from a RoMa hotel or putting it onto a
carrier are stored in the Freedom EVOware configuration. Each RoMa action is
called a RoMa vector, which is a predefined sequence of RoMa positions (called
waypoints). RoMa vectors are associated with carriers.
Movement vectors for the MCA96 gripper and the CGM of the MCA384 are very
similar in principle to RoMa vectors, so they will not be described explicitly in this
chapter. See 9.8 “Creating and Editing MCA Vectors”, 9-69 for additional
information on these vector types.
In Freedom EVOware Standard, RoMa actions are specified by adding RoMa
commands to your pipetting script. The RoMa Vector and Transfer Labware
commands specify the RoMa vector you want to execute (see 15.58 “RoMa
Vector Command”, 15-141, 15.59 “Transfer Labware Command”, 15-143 and
15.57 “Move RoMa Command”, 15-140).
In Freedom EVOware Plus, RoMa movements are carried out automatically when
the process is run. Freedom EVOware Plus automatically chooses the carriers
and sites which will be used for pipetting to maximize the throughout (efficiency)
of the process. It then chooses the RoMa vectors which are needed to move the
labware to and from these sites. You only need to make sure that the appropriate
RoMa vectors are available for the carrier types you want to use.
RoMa vectors can have up to 7 waypoints, but must have at least two. The first
waypoint is called the safe position and the last waypoint is called the end
position.
The safe position is where the RoMa starts its movement towards the site to
pick up or to release the object (e.g. the microplate). It should be chosen such
Freedom EVOware Software Manual, 393172, en, V2.3
9 - 55
9 - Specifying Your Instrument Setup
Creating and Editing Plate Robot Vectors
that the RoMa can move to the safe position of another RoMa vector or to the
RoMa home position without colliding with other objects on the worktable.
The end position is where the RoMa grips or releases the object.
Each RoMa vector is associated with a carrier. If the carrier is moved on the
worktable, the RoMa vector moves along with it and does not need to be
redefined. Accordingly, you only have to define a RoMa vector once for each
carrier type, and you can then use it for any worktable position of this carrier type.
In addition, Freedom EVOware automatically recalculates the RoMa vector for
each site of the carrier (it gets information on the spacing between the sites from
the carrier definition). So you only need to define a RoMa vector for one of the
sites (typically the first site).
2
end position
(site 1)
end position
(site 2)
2
3
3
1
safe position
(site 1)
site 1
1
safe position
(site 2)
site 2
y
Fig. 9-19 Two site carrier showing two RoMa movements with three waypoints each
The above figure shows two RoMa vectors for a two site carrier. In the example,
each Roma vector has three waypoints (1, 2 and 3). Freedom EVOware
automatically calculates the RoMa vector for site 2 from the RoMa vector for site
1.
Up to four RoMa vectors can be created for each carrier type:
Approach Narrow
Move Narrow
Approach Wide
Move Wide
See 9.6.1 “Using RoMa Vectors”, 9-58 for more information on these vectors.
They are associated with carriers and are stored in the carrier definition (see
9.6.2 “Teach Plate Robot Vector Dialog Box”, 9-59).
You also need to create a RoMa vector which moves the RoMa back to the home
(parking) position, out of the way of other objects on the worktable (you need to
define two home vectors if your instrument is fitted with two RoMas). See
9.6.4 “Defining the Home Position for a RoMa”, 9-62.
When Freedom EVOware moves an object from one position to another, it
typically needs to carry out two RoMa vectors. The first one moves the RoMa from
its current position to the safe position of site 1 and then to the end position of site
1, grips the plate and moves back to the safe position again using the same vector
in reverse. It then moves directly to the safe position of site 2. Using the second
9 - 56
Freedom EVOware Software Manual, 393172, en, V2.3
9 - Specifying Your Instrument Setup
Creating and Editing Plate Robot Vectors
RoMa vector it moves to the end position of site 2, releases the plate and moves
back to the safe position again. Depending on the configuration, in Freedom
EVOware Plus the RoMa then either waits at this position or moves back to its
home (parking) position out of the way of other objects on the worktable. In
Freedom EVOware Standard, you should use the Move RoMa command to move
the RoMa back to its home position after carrying out a sequence of RoMa
movements.
end position A1
RoMa home position
end position A2
safe position A
end position A3
safe position B
end position B
Fig. 9-20 Moving labware from carrier A to carrier B
The above figure shows how the RoMa moves labware between three sites of
carrier A and one site of carrier B.
When the RoMa transfers a plate from carrier A to carrier B, it first moves from its
current position (not shown in the figure) to the safe position of carrier A, then it
moves to the end position of the required site, grips the plate and moves back to
the safe position of carrier A again. From this position it moves directly to the safe
position of carrier B, moves to its end position, releases the plate and moves back
to the safe position of carrier B. Depending on the configuration of the RoMa, the
RoMa either waits at this position or moves back to its home (parking) position.
See 9.6.4 “Defining the Home Position for a RoMa”, 9-62.
Note: The safe positions of the RoMa vectors and the RoMa home position
should all be chosen such that the RoMa can move between them without
colliding with other objects on the worktable. Also keep in mind that the RoMa
needs to rotate if the two sites have a different orientation (landscape or portrait)
and that it needs to move without obstruction both with and without a microplate.
A so-called “teach plate” is available from Tecan as an aid when teaching the
positions of the labware. The teach plate can be can be mounted on the RoMa
grippers and ensures that the labware is always gripped in the same way.
RoMa vectors can be assigned to regular carriers such as microplate carriers
which are used by the liquid handling arm for pipetting operations. They can also
be assigned to so-called Robot only carriers, which are typically storage devices
such as carousels and hotels or other devices such as shakers and incubators.
Robot only carriers can be accessed by plate or tube robots but are not used for
pipetting operations. See the Accessible for liquid handling arm checkbox in
9.5 “Configuring Carriers”, 9-39.
Freedom EVOware Software Manual, 393172, en, V2.3
9 - 57
9 - Specifying Your Instrument Setup
Creating and Editing Plate Robot Vectors
9.6.1 Using RoMa Vectors
Movement commands for the robot arms (RoMa, MCA96 gripper and the CGM of
the MCA384) are called vectors. You can create them in the Edit Carrier dialog
box, in which case they are associated with a specific carrier and are stored in the
carrier definition. You can also create “user-defined” vectors. This is done on the
Robot Vectors tab of the Control Bar. User-defined vectors are intended e.g. for
the Vector command of the respective robot arm.
Movement vectors for the MCA96 gripper and the CGM are very similar in
principle to RoMa vectors, so they will not be described explicitly in this chapter.
See 9.8 “Creating and Editing MCA Vectors”, 9-69 for additional information on
these vector types.
Freedom
EVOware
Standard
Freedom
EVOware Plus
In Freedom EVOware Standard, RoMa vectors are executed using the script
commands RoMa Vector and Transfer Labware. Simple RoMa movements are
executed with the Move RoMa command, which does not need a vector.
In Freedom EVOware Plus, RoMa vectors are mainly used as pre-actions and
post-actions of device commands. The pre-actions and post-actions are executed
automatically when the process step is executed. If your process involves
pipetting to a plate which is initially stored in a carousel, Freedom EVOware first
uses the robot vector associated with the carousel to take the plate from the
carousel and then uses the robot vector associated with the carrier to put the plate
on the carrier. You do not need to specify the RoMa vectors - Freedom EVOware
gets them from the carrier and device definitions. You only need to make sure that
the RoMa vectors which you want to use are already set up in the Freedom
EVOware configuration.
Note: An example of a special application which requires you to specify RoMa
vectors explicitly is working with insert plates. The sequence of movements which
is required to access a certain part of the plate depends on the laboratory process
which you want to implement.
Up to four RoMa vectors can be created for each carrier type:
Approach Narrow: Vector for picking up plates on the narrow side. The end
position of this vector is chosen to be a short distance away from the final
position (a few cm).
Move Narrow: Vector for picking up plates on the narrow side. It moves from
the current position of the robot to the final position where the object is
gripped.
Approach Wide: Vector for picking up plates on the wide side. The end
position of this vector is chosen to be a short distance away from the final
position (a few cm).
Move Wide: Vector for picking up plates on the wide side. It moves from the
current position of the robot to the final position where the object is gripped.
It is normally only necessary to specify the Move vectors and not the Approach
vectors. For example, the microplate carrier “MP 3Pos” normally only needs a
Move Narrow vector. Although the labware is put on this carrier in landscape
orientation, the RoMa is instructed to grip the labware on the narrow side and not
from the front (see 9.5.5.1 “Labware Carrier Attributes”, 9-49).
The two Approach vectors can be optionally defined for intelligent devices such as
the carousel, and are used together with the Move vectors to optimize the
throughput. The carousel may take 20 seconds or so to get a plate out of the
specified tower. To save time, the Approach vector can be started while the
carousel is still getting the plate.
If you request a plate from a carousel, Freedom EVOware proceeds as follows:
9 - 58
Freedom EVOware Software Manual, 393172, en, V2.3
9 - Specifying Your Instrument Setup
Creating and Editing Plate Robot Vectors
A RoMa Approach vector instructs the RoMa to move towards the carousel
and stop a few cm away.
A Carousel LoadPlate command instructs the carousel to take the plate from
the tower and move it to the exchange position, where it can be accessed by
the RoMa.
To save time, the RoMa Approach movement and the carousel movement
take place simultaneously.
As soon as the carousel has reached the exchange position, a RoMa Move
vector instructs the RoMa to move to the exchange position, where it grips the
plate and returns with the plate to it’s safe position.
If the RoMa Approach vector is not specified, only the RoMa Move vector is used.
In this case, throughput optimization is not carried out.
9.6.2 Teach Plate Robot Vector Dialog Box
The following dialog box is used to create and edit plate robot (RoMa) vectors.
See 9.6 “Creating and Editing Plate Robot Vectors”, 9-55 for more information
on plate robot vectors.
Fig. 9-21 Teach Plate Robot Vector dialog box
To get to this dialog box, open the Edit Carrier dialog box for the carrier you want
to use, choose the plate robot you want to use (1 or 2), choose a robot vector from
the list and click Create. The button changes to Edit if the respective robot vector
has already been created.
You are then prompted to click on the carrier site which you want to use for
teaching. You can only click on a carrier of the correct type. Since you will need to
Freedom EVOware Software Manual, 393172, en, V2.3
9 - 59
9 - Specifying Your Instrument Setup
Creating and Editing Plate Robot Vectors
carefully observe the plate robot movements, you should choose a site which has
good visibility.
The parameters in the Teach Plate Robot Vector dialog box are as follows:
Carrier name
Name of the carrier for which the RoMa vector is being defined.
Grid, Site
These fields show the grid position and the site which you chose for teaching.
The adjustment buttons of the Site field are protected (gray) if the carrier only
has one site.
ATTENTION
Risk of the RoMa moving to the wrong position on the worktable.
Please choose the correct grid position and site before specifying any
coordinates or using any of the movement buttons. Otherwise the RoMa might
move to the wrong position on the worktable.
Define Coordinates panel
This shows the RoMa positions (waypoints) which will be used for the RoMa
vector. Each waypoint is specified by its X, Y and Z coordinates in instrument
steps (0.1 mm) and a value for the rotation of the gripper arms (R, measured in
0.1° steps).
Absolute
Check this checkbox to use absolute positions for the selected waypoint. In
this case, when Freedom EVOware automatically recalculates the RoMa
vector for each site of the carrier it only changes the X coordinates. This may
be necessary if the RoMa could otherwise collide with other objects on the
worktable. See 9.6.3 “Absolute Positions in RoMa Vectors”, 9-61. The
Absolute checkbox should not be checked for the End position.
The following buttons can be used to edit, insert and delete waypoints and to
move the RoMa along the specified waypoints:
add pos.
This button inserts a new entry in the waypoint list above the currently
selected entry.
delete
This button deletes the currently selected entry in the waypoint list.
transfer
This button copies the current RoMa position (as shown in the Plate Robot tab
of the Move dialog box) to the selected entry in the waypoint list. Do this when
you want to teach the current position of the RoMa.
Note: You can move the RoMa using the keys on the numeric keypad (see the
Move dialog box and 9.3.2 “Moving the RoMa (Plate Robot)”, 9-5).
move to...
This button moves the RoMa to the coordinates of the selected entry in the
waypoint list. The Plate Robot tab of the Move dialog box will be updated
accordingly.
9 - 60
Freedom EVOware Software Manual, 393172, en, V2.3
9 - Specifying Your Instrument Setup
Creating and Editing Plate Robot Vectors
move to Safe Position
This button moves the RoMa along the defined waypoints from the selected
waypoint to the safe position of the RoMa vector (the first waypoint).
move to End Position
This button moves the RoMa along the defined waypoints from the selected
waypoint to the end position of the RoMa vector (the last waypoint).
Adjust button
The Adjust button is only available if the carrier is not accessible to the liquid
handling arm (example: microplate hotel). It is used to adjust the carrier
definition for a specified, single site to compensate for small manufacturing
inaccuracies in a multi-site carrier without needing to switch to the Edit Carrier
dialog box. To use this feature, choose the site you want to adjust and click
Move to End Position to move the RoMa to the final position of the RoMa
vector. Then fine tune the RoMa position using the numeric keypad and click
the Adjust button to modify the carrier definition to match the current X, Y and
Z coordinates. After saving your changes, they will also be visible in the Edit
Carrier dialog box (the units in the Move dialog box are in 0.1 mm; the units in
the Edit Carrier dialog box are in mm).
Movements panel
XYZ Speed
Specify the required speed for x, y and z movements.
Grip Parameters panel
Grip Distance
This is the distance in mm that the RoMa gripper closes to when gripping an
object with this vector (range: 55 to 140 mm). It should be about 1 to 2 mm
less than the width of the object.
Release Distance
This is the distance in mm that the RoMa gripper opens to when releasing an
object with this vector (range: 55 to 140 mm). It should be about 3 to 4 mm
more than the width of the object.
Force
This is the force that the gripper uses when gripping an object. The force is
specified by a number between 0 and 249. Higher numbers mean higher
force.
Speed
This is the speed in mm/s with which the gripper tries to grip an object.
grip
Click this button to close the gripper to the specified gripping distance for
testing purposes. The gripper remains at the specified gripping distance until
the Release button is clicked.
release
Click this button to open the gripper to the specified release distance for
testing purposes.
9.6.3 Absolute Positions in RoMa Vectors
One or more waypoints in a RoMa vector can be configured as absolute positions.
For such waypoints, when Freedom EVOware automatically calculates the RoMa
Freedom EVOware Software Manual, 393172, en, V2.3
9 - 61
9 - Specifying Your Instrument Setup
Creating and Editing Plate Robot Vectors
vector for each site of the carrier it only changes the X coordinates. You can test
this by checking the Absolute checkbox in the Edit Plate Robot Vector dialog box
and changing the specified site.
You may need to specify one or more absolute waypoints in your RoMa vector if
the RoMa could otherwise collide with other objects on the worktable. The Abs.
checkbox should not be checked for the End position.
In the following figure, waypoint 1 is an absolute waypoint (compare this figure
with Fig. 9-19, 9-56).
end position
(site 2)
1
2
end position
(site 1)
2
3
3
safe position
(site 1 and 2)
site 1
site 2
y
Fig. 9-22 Two RoMa vectors with three waypoints each. Waypoint 1 is an absolute
waypoint - it is used by both RoMa vectors
The above figure shows two RoMa Vectors for a two site a carrier; the Absolute
checkbox has been checked for waypoint 1 (the safe position in this case).
Accordingly, EVOware uses the same safe position for both sites. This may be
necessary if the RoMa could otherwise collide with other objects on the worktable
(not shown in the figure). When Freedom EVOware automatically calculates the
RoMa vector for site 2 from the RoMa vector for site 1, it does not change the
coordinates for waypoint 1.
9.6.4 Defining the Home Position for a RoMa
After completing a sequence of movements with the RoMa, it should be moved
back to its home (i.e. parking) position, out of the way of other objects on the
worktable. Otherwise it might obstruct the movement of other arms such as the
LiHa.
The RoMa moves to the home position when you exit Freedom EVOware. In
Freedom EVOware Standard, the RoMa moves to the home position if you specify
Move to home position with the Move RoMa command. Freedom EVOware Plus
moves the RoMa back to the home position automatically (see 8.5.23.2 “Plate
Robot Configuration - Settings Tab”, 8-86).
The home position for a RoMa is normally at the extreme left or right of the
worktable, and should be chosen to be out of the way of other objects on the
worktable. The home position is specified by creating a special RoMa vector with
the name “Home 1”, which moves the RoMa to the chosen safe position.
If your instrument is fitted with two RoMas, the home position for RoMa 1 is
normally at the extreme left of the worktable and the home position for RoMa 2 is
9 - 62
Freedom EVOware Software Manual, 393172, en, V2.3
9 - Specifying Your Instrument Setup
Creating and Editing Tube Robot Vectors
normally at the extreme right of the worktable. The home position for RoMa 2 is
specified by creating a special RoMa vector with the name “Home 2”.
Proceed as follows to define a home vector for the RoMa:
Identify a route across the worktable from right to left (for RoMa 1) or left to right
(for RoMa 2) along which the RoMa can safely move without colliding with other
objects. Then create a RoMa vector for this route with at least five waypoints,
whereby the first waypoint of this vector (the safe position) is the required home
position.
To edit an existing home vector, click Robot Vectors in the Control Bar, right-click
on the vector and choose Edit. See 9.6.2 “Teach Plate Robot Vector Dialog Box”,
9-59 for further information.
To create a new home vector, click Robot Vectors in the Control Bar, right-click on
the Robot Vectors group title and chose New. Name the vector “Home 1” (for
RoMa 1) or “Home 2” (for RoMa 2). The new home vector will be shown in the
Home Vectors group in the Control Bar (Robot Vectors section).
Freedom
EVOware
Standard
If you specify Move to home position with the Move RoMa command, during script
runtime Freedom EVOware automatically determines the closest waypoint of the
home vector to the current RoMa position. The RoMa then moves to this waypoint
and along the home vector until the home position (the first waypoint) has been
reached.
9.7 Creating and Editing Tube Robot Vectors
The tube robot (PnP; Pick & Place arm) is a robot arm with gripper fingers that can
grip and move tubes within the working area of the pipetting instrument, for
example to transport tubes between tube racks. Current Tecan pipetting
instruments can be fitted with up to two PnP arms.
PnP actions such as getting a tube from a tube rack are stored in the Freedom
EVOware configuration. Each PnP action is called a PnP vector, which is a
predefined sequence of PnP positions (called waypoints). PnP vectors are
associated with labware such as tube racks.
In both Freedom EVOware Standard and Freedom EVOware Plus, PnP
movements are initiated by script commands (see 15.61 “PnP Vector Command”,
15-146, and 15.62 “Transfer Tube Command”, 15-148). Simple PnP
movements are carried out with the Move PnP command, which does not need a
PnP vector (see 15.60, 15-145).
In Freedom EVOware Plus, you first must use a special process step to open the
script editor (see 16.25.1 “Tube Robot - ExecuteScript Command”, 16-83).
PnP vectors can have up to 7 waypoints, but must have at least two. The first
waypoint is called the safe position and the last waypoint is called the end
position.
The safe position is where the PnP starts its movement towards the site to
pick up or to release the tube. It should be chosen such that the PnP can
move to the safe position of another PnP vector or to the PnP home position
without colliding with other objects on the worktable.
The end position is where the PnP grips or releases the tube.
Each PnP vector is associated with a labware item such as a tube rack. If the
labware is moved on the worktable, the PnP vector moves along with it and does
not need to be redefined. Accordingly, you only have to define a PnP vector once
Freedom EVOware Software Manual, 393172, en, V2.3
9 - 63
9 - Specifying Your Instrument Setup
Creating and Editing Tube Robot Vectors
for each labware type, and you can then use it for any worktable position of this
labware type.
In addition, Freedom EVOware automatically recalculates the PnP vector for each
well of the labware (it gets information on the spacing between the wells from the
labware definition). So you only need to define a PnP vector for one of the wells
(typically the first well). In your pipetting script, the position of a tube in the tube
rack can be specified as a variable. This allows you to access all of the tubes in
the tube rack using the same script command.
2
end position
(site 1)
end position
(site 2)
2
3
3
1
safe position
(site 1)
site 1
1
safe position
(site 2)
site 2
y
Fig. 9-23 Two site carrier showing two PnP movements with three waypoints each
The above figure shows two PnP vectors for a two site carrier. In the example,
each PnP vector has three waypoints (1, 2 and 3). Freedom EVOware
automatically calculates the PnP vector for site 2 from the PnP vector for site 1.
PnP vectors are associated with labware (typically tube racks) and are stored in
the labware definition (see 9.7.2 “Teach Tube Robot Vector Dialog Box”, 9-65).
You also need to create a PnP vector which moves the PnP back to the home
(parking) position, out of the way of other objects on the worktable (you need to
create two home vectors if your instrument is fitted with two PnPs). See
9.7.4 “Defining the Home Position for a PnP”, 9-69.
When Freedom EVOware moves a tube from one tube rack to another, it typically
needs to carry out two PnP vectors. The first one moves the PnP from its current
position to the safe position of site 1 and then to the end position of site 1, grips
the tube and moves back to the safe position again using the same vector in
reverse. It then moves directly to the safe position of site 2. Using the second PnP
vector it moves to the end position of site 2, releases the tube and moves back to
the safe position again. Depending on the configuration, in Freedom EVOware
Plus the PnP then either waits at this position or moves back to its home (parking)
position out of the way of other objects on the worktable. In Freedom EVOware
Standard, you should use the Move PnP command to move the PnP back to its
home position after carrying out a sequence of PnP movements.
9 - 64
Freedom EVOware Software Manual, 393172, en, V2.3
9 - Specifying Your Instrument Setup
Creating and Editing Tube Robot Vectors
end position A1
PnP home position
end position A2
safe position A
end position A3
safe position B
end position B
Fig. 9-24 Moving labware from carrier A to carrier B
The above figure shows how the PnP moves tubes between three sites of carrier
A and one site of carrier B.
When the PnP transfers a tube from carrier A to carrier B, it first moves from its
current position (not shown in the figure) to the safe position of carrier A, then it
moves to the end position of the required site, grips the tube and moves back to
the safe position of carrier A again. From this position it moves directly to the safe
position of carrier B, moves to its end position, releases the tube and moves back
to the safe position of carrier B. Depending on the configuration of the PnP, the
PnP either waits at this position or moves back to its home (parking) position. See
9.7.4 “Defining the Home Position for a PnP”, 9-69.
Note: The safe positions of the PnP vectors and the PnP home position should all
be chosen such that the PnP can move between them without colliding with other
objects on the worktable. Also keep in mind that the PnP needs to rotate if the two
sites have a different orientation (landscape or portrait) and that it needs to move
without obstruction both with and without a microplate.
9.7.1 Using PnP Vectors
Movement commands for the tube robot (PnP vectors) are associated with
labware such as tube racks. They are specified in the labware definition.
In both Freedom EVOware Standard and Freedom EVOware Plus, PnP vectors
are executed using the script commands PnP Vector and Transfer Tube. Simple
PnP movements are executed with the Move PnP command, which does not
need a vector.
9.7.2 Teach Tube Robot Vector Dialog Box
The following dialog box is used to create and edit tube robot (PnP) vectors. See
9.7 “Creating and Editing Tube Robot Vectors”, 9-63 for more information on
tube robot vectors.
Freedom EVOware Software Manual, 393172, en, V2.3
9 - 65
9 - Specifying Your Instrument Setup
Creating and Editing Tube Robot Vectors
Fig. 9-25 Teach Tube Robot Vector dialog box
To get to this dialog box, open the Edit Labware dialog box for the tube rack you
want to use and click the Create button (it is just above the Cancel button). The
button changes to Edit if the robot vector has already been created.
You are then prompted to click on the carrier site which you want to use for
teaching. Since you will need to carefully observe the tube robot movements, you
should choose a site which has good visibility.
The parameters in the Teach Tube Robot Vector dialog box are as follows:
Carrier name
Name of the labware item for which the PnP vector is being defined.
Grid, Site
These fields show the grid position and the site which you chose for teaching
the vector.
The adjustment buttons of the Site field are protected (gray) if the labware’s
carrier only has one site.
Position
Choose the position in the tube rack which you want to use for teaching (tube
positions are counted from rear to front).
ATTENTION
Risk of the PnP moving to the wrong position on the worktable.
Please choose the correct grid position and site before specifying any
coordinates or using any of the movement buttons. Otherwise the PnP might
move to the wrong position on the worktable.
9 - 66
Freedom EVOware Software Manual, 393172, en, V2.3
9 - Specifying Your Instrument Setup
Creating and Editing Tube Robot Vectors
Define Coordinates panel
This shows the PnP positions (waypoints) which will be used for the PnP vector.
Each waypoint is specified by its X, Y and Z coordinates in instrument steps (0.1
mm) and a value for the rotation of the gripper fingers (R, measured in 0.1° steps).
Absolute
Check this checkbox to use absolute positions for the selected waypoint. In
this case, when Freedom EVOware automatically recalculates the PnP vector
for each site of the carrier it only changes the X coordinates. This may be
necessary if the PnP could otherwise collide with other objects on the
worktable. See 9.7.3 “Absolute Positions in PnP Vectors”, 9-68. The
Absolute checkbox should not be checked for the End position.
The following buttons can be used to edit, insert and delete waypoints and to
move the PnP along the specified waypoints:
add pos.
This button inserts a new entry in the waypoint list above the currently
selected entry.
delete
This button deletes the currently selected entry in the waypoint list.
transfer
This button copies the current PnP position (as shown in the Tube Robot tab
of the Move dialog box) to the selected entry in the waypoint list. Do this when
you want to teach the current position of the PnP.
Note: You can move the PnP using the keys on the numeric keypad (see the
Move dialog box and 9.3.3 “Moving the PnP (Tube Robot)”, 9-6).
move to...
This button moves the PnP to the coordinates of the selected entry in the
waypoint list. The Tube Robot tab of the Move dialog box will be updated
accordingly.
move to Safe Position
This button moves the PnP along the defined waypoints from the selected
waypoint to the safe position of the PnP vector (the first waypoint).
move to End Position
This button moves the PnP along the defined waypoints from the selected
waypoint to the end position of the PnP vector (the last waypoint).
Movements panel
XYZ Speed
Specify the required speed for x, y and z movements.
Grip Parameters panel
Grip Distance
This is the distance in mm that the PnP gripper closes to when gripping an
object with this vector (range: 7 to 28 mm). It should be about 1 to 2 mm less
than the width of the object.
Release Distance
This is the distance in mm that the PnP gripper opens to when releasing an
object with this vector (range: 7 to 28 mm). It should be about 3 to 4 mm more
than the width of the object.
Freedom EVOware Software Manual, 393172, en, V2.3
9 - 67
9 - Specifying Your Instrument Setup
Creating and Editing Tube Robot Vectors
grip
Click this button to close the gripper to the specified gripping distance for
testing purposes. The gripper remains at the specified gripping distance until
the Release button is clicked.
release
Click this button to open the gripper to the specified release distance for
testing purposes.
9.7.3 Absolute Positions in PnP Vectors
One or more waypoints in a PnP vector can be configured as absolute positions.
For such waypoints, when Freedom EVOware automatically calculates the PnP
vector for each site of the carrier it only changes the X coordinates. You can test
this by checking the Absolute checkbox in the Edit Tube Robot Vector dialog box
and changing the specified site.
You may need to specify one or more absolute waypoints in your PnP vector if the
PnP could otherwise collide with other objects on the worktable. The Abs.
checkbox should not be checked for the End position.
In the following figure, waypoint 1 is an absolute waypoint (compare this figure
with Fig. 9-23, 9-64).
end position
(site 2)
1
2
end position
(site 1)
2
3
3
safe position
(site 1 and 2)
site 1
site 2
y
Fig. 9-26 Two PnP vectors with three waypoints each. Waypoint 1 is an absolute waypoint
- it is used by both PnP vectors
The above figure shows two PnP Vectors for a two site a carrier; the Absolute
checkbox has been checked for waypoint 1 (the safe position in this case).
Accordingly, EVOware uses the same safe position for both sites. This may be
necessary if the PnP could otherwise collide with other objects on the worktable
(not shown in the figure). When Freedom EVOware automatically calculates the
PnP vector for site 2 from the PnP vector for site 1, it does not change the
coordinates for waypoint 1.
9 - 68
Freedom EVOware Software Manual, 393172, en, V2.3
9 - Specifying Your Instrument Setup
Creating and Editing MCA Vectors
9.7.4 Defining the Home Position for a PnP
After completing a sequence of movements with the PnP, it should be moved back
to its home (i.e. parking) position, out of the way of other objects on the worktable.
Otherwise it might obstruct the movement of other arms such as the LiHa.
The PnP moves to the home position when you exit Freedom EVOware. In
Freedom EVOware Standard, the PnP moves to the home position if you specify
Move to home position with the Move PnP command. Freedom EVOware Plus
moves the PnP back to the home position automatically.
The home position for a PnP is normally at the extreme left or right of the
worktable, and should be chosen to be out of the way of other objects on the
worktable. The home position is specified by creating a special PnP vector with
the name “Home 1”, which moves the PnP to the chosen safe position.
If your instrument is fitted with two PnPs, the home position for PnP 1 is normally
at the extreme left of the worktable and the home position for PnP 2 is normally at
the extreme right of the worktable. The home position for PnP 2 is specified by
creating a special PnP vector with the name “Home 2”.
Proceed as follows to define a home vector for the PnP:
Identify a route across the worktable from right to left (for PnP 1) or left to right (for
PnP 2) along which the PnP can safely move without colliding with other objects.
Then create a PnP vector for this route with at least five waypoints, whereby the
first waypoint of this vector (the safe position) is the required home position.
To edit an existing home vector, click Robot Vectors in the Control Bar, right-click
on the vector and choose Edit. See 9.7.2 “Teach Tube Robot Vector Dialog Box”,
9-65 for further information.
To create a new home vector, click Robot Vectors in the Control Bar, right-click on
the Robot Vectors (Tubes) group title and chose New. Name the vector “Home 1”
(for PnP 1) or “Home 2” (for PnP 2). The new home vector will be shown in the
Home Vectors group in the Control Bar (Robot Vectors section).
Freedom
EVOware
Standard
If you specify Move to home position with the Move PnP command, during script
runtime Freedom EVOware automatically determines the closest waypoint of the
home vector to the current PnP position. The PnP then moves to this waypoint
and along the home vector until the home position (the first waypoint) has been
reached.
9.8 Creating and Editing MCA Vectors
Movement ectors for the MCA (Multi Channel Arm) are very similar in principle to
RoMa vectors. The special features of MCA96 and MCA384 vectors are
described below.
9.8.1 MCA96 Vectors
The MCA96 can be optionally fitted with gripper fingers to allow it to pick up and
move labware. In contrast to the RoMa, the gripper fingers cannot be rotated (they
are always parallel to the X axis of the pipetting instrument). Accordingly, you
cannot specify the R axis for MCA vectors.
When setting up the hardware, the MCA96 gripper option can be attached to the
MCA96 pipetting head on the left side with the gripper fingers pointing to the right
(under the head) or on the right side with the gripper fingers pointing to the left
Freedom EVOware Software Manual, 393172, en, V2.3
9 - 69
9 - Specifying Your Instrument Setup
Configuring Device Drivers
(under the head) or to the right (away from the head). On the left side and pointing
to the left is not supported.
You cannot and do not need to define a home position for the MCA96.
Please see 9.6 “Creating and Editing Plate Robot Vectors”, 9-55 for more
information on creating vectors.
9.8.2 MCA384 Vectors
The MCA384 can be optionally fitted with a gripper module (CGM, common
gripper module) which can be used to pick up and move labware. The CGM can
be rotated. The CGM can only be used for gripping and moving labware when it is
undocked. Commands which use the CGM initiate the undocking operation
automatically, if necessary. See also 15.69.13 “MCA384 Dock CGM Command”,
15-204 and 15.69.14 “MCA384 Undock CGM Command”, 15-204.
When you teach a CGM vector, Freedom EVOware also needs to know the Y
position of the MCA384 pipetting head to ensure that the CGM will not collide with
the MCA384 as it moves.
You cannot and do not need to define a home position for the MCA384.
Please see 9.6 “Creating and Editing Plate Robot Vectors”, 9-55 for general
information on creating vectors.
9.9 Configuring Device Drivers
Device drivers are configured with Freedom EVOware’s Configuration Tool (see
8.5 “Device Driver Configuration”, 8-39). See 13.2 “Overview of Device
Commands”, 13-12 for information on the device drivers which are provided
with EVOware together with the icon which is shown in the Worktable Editor.
9.10 Local Settings for Process Steps (Context Menu)
In Freedom EVOware Plus, the following settings can be made in the Process
Editor for each of the process steps. You can access the settings by right-clicking
on the process step icon and choosing the required item from the context menu.
Fig. 9-27 Context menu for a process step
9 - 70
Freedom EVOware Software Manual, 393172, en, V2.3
9 - Specifying Your Instrument Setup
Local Settings for Process Steps (Context Menu)
See 9.11 “Local Settings for Labware Source Icons (Context Menu)”,
the settings you can make for labware source icons.
9-77 for
9.10.1 Execution Parameters
This option is used to edit the execution parameters for the current process step
(i.e. device command). The settings only apply to the selected process step. You
can also open the Edit Parameters dialog box by double-clicking on the process
step. The available settings are described under “Execution Parameters” in the
respective section for the device (see 16 “Device Commands”, 16-1).
In addition, the Edit Parameters dialog box is opened automatically when you add
the command to the Process Editor.
Note: The dialog box will not open if the respective device command does not
have any execution parameters.
9.10.2 Adjust Time/Error handling
This option is used to edit the command execution time and the reaction to errors.
The settings only apply to the selected process step.
9.10.2.1 General Tab
This tab lets you specify the execution time and waiting time which should be
used by the scheduler for this process step.
Fig. 9-28 Configuring the execution time and max. waiting time for a command
The parameters in this dialog box are as follows:
Execution Time
Specify the execution time in seconds that should be assigned to this process
step. An error will be output during process runtime if the command is not
completed within this time. When you insert the command into your process,
this field initially shows the default execution time specified for the command
with the Configuration Tool (see 8.5.35 “Driver Tab of the Configure Device
Driver Properties Dialog Box”, 8-116).
Freedom EVOware Software Manual, 393172, en, V2.3
9 - 71
9 - Specifying Your Instrument Setup
Local Settings for Process Steps (Context Menu)
Note: With some device commands, the default execution time is automatically
re-calculated when the command is inserted and a more accurate value is put into
this field.
Max. Waiting Time
Specify the maximum additional time in seconds the labware can wait before
the next action has to be performed. This may be important e.g. if you have
heated the samples to a specified temperature and they should not be allowed
to cool down too much before the next process step.
Example - A pipetting command with an execution time of 500 s must be
completed within 500 s or an error message will be generated. If you set Max.
Waiting Time to 300 s, Freedom EVOware may leave the plate for an
additional 300 s at the pipetting position or on the following device if this is
advantageous for the scheduling.
Note: Max. Waiting Time includes the time required to move the labware to the
next device. Accordingly, it should always be larger than the time required for the
associated RoMa_MoveObject command.
9.10.2.2 Pause On Error Tab
This tab lets you specify which types of errors will trigger a system pause if they
occur during execution of this process step.
Fig. 9-29 Configuring the reaction of the command to errors
Check the corresponding boxes if you want the system to halt on all errors, on
loss of peripheral errors, on errors in pre-actions and/or on errors in post-actions.
Note: The settings made in the Error Handling tab section of the Freedom
EVOware Configuration Tool can be configured to overwrite the local settings you
make here. See 8.4.4.3 “Pause On Error Tab”, 8-38 for details.
9.10.3 Pre-actions / Post-actions (Custom)
In some cases it is necessary to carry out additional actions before and after the
command is executed. This done using pre-actions and/or post-actions –
commands which are always carried out before and after the main command. For
example, if you want to scan labware in a Tecan Ultra reader with the Measure
command, it is necessary to open the reader door (with the Ultra_Open
command) and to move the labware to the reader using the plate robot (with the
9 - 72
Freedom EVOware Software Manual, 393172, en, V2.3
9 - Specifying Your Instrument Setup
Local Settings for Process Steps (Context Menu)
RoMa_MoveObject command). To make sure that the door is opened in time, the
door must be opened before moving the labware. Another RoMa_MoveObject
command and an Ultra_Close command are needed when the scanning operation
is finished. The door must be closed after moving the labware.
The process diagram is simplified by implementing the additional actions as preactions and post-actions which are linked to the Measure command. EVOware
then adds the pre-actions and post-actions to the Measure command
automatically. This avoids having to specify these four additional steps for each
Measure command manually.
The standard pre-actions and post-actions are specified in the command
definition using the Configure Tool (see 8.5.35 “Driver Tab of the Configure Device
Driver Properties Dialog Box”, 8-116).
Choose Pre-actions & Post-actions in the context menu to specify custom preactions and post-actions, which are used for special applications. The settings
only apply to the currently selected process step.
In the Custom Pre-actions / Post-actions dialog box, the Pre-actions and Postactions tabs Initially show the standard pre-actions and post-actions (if any):
Fig. 9-30 Configuring custom pre-actions and post-actions for the process step
Uncheck Use default pre-actions and/or Use default post-actions if you want to
specify additional pre-actions and/or post-actions or to modify existing ones.
Note: If you create any custom pre-actions and post-actions, they will be deleted
again if you check Use default pre-actions and/or Use default post-actions.
Click Delete to delete the currently selected pre-action or post-action. Click Copy
to copy the currently selected pre-action or post-action. The new pre-action or
post-action will have the same settings as the one you copied.
Click the Up and Down buttons to change the sort order of the pre-actions and
post-actions. This changes the sequence with which the pre-actions and postactions are carried out. Taking the above example of the Measure command for
the Ultra reader, the door must be opened before the plate robot brings the
labware.
Freedom EVOware Software Manual, 393172, en, V2.3
9 - 73
9 - Specifying Your Instrument Setup
Local Settings for Process Steps (Context Menu)
9.10.3.1 Editing Custom Pre-actions and Post-actions
To edit a pre-action or post-action, click the Pre-actions or the Post-actions tab,
select the required entry and click Edit to display the Edit Custom Pre-actions /
Post-actions dialog box.
To add a pre-action or post-action, click the Pre Actions or the Post Actions tab
and click Add to display the Edit Custom Pre-actions / Post-actions dialog box.
Fig. 9-31 Editing custom pre-actions and post-actions
In the Edit Custom Pre-actions / Post-actions dialog box, choose the command to
be executed as a pre-action or post-action from the pull-down list and specify its
default execution time in the Expected Duration field.
The Object Parameters panel lists the parameters which are needed by the
selected command. Select an object parameter and choose the required value
from the list in the Value panel. Click the Parameters radio button to show predefined constants. Click the Variables radio button to show defined instances of
objects.
The Value panel shows the parameters and variables which can be chosen for the
selected object parameter type, as follows:
Tab. 9-35 Parameters and variables versus object parameter types
Object parameter
type
Placeholder
Variables
Object
<none> or MP
Labware site on the
worktable
Location
<base> or <none>
Device or labware
site
Tool
<base> or <none>
On-the-fly tool (e.g.
barcode scanner) a)
a) This field is normally set to <NONE>. On-the-fly tools are normally
specified in the Process Editor using drag and drop.
9 - 74
Freedom EVOware Software Manual, 393172, en, V2.3
9 - Specifying Your Instrument Setup
Local Settings for Process Steps (Context Menu)
<base> is a placeholder which represents the original location of the object (the
labware source). <none> is a placeholder to indicate that the parameter is
unused.
Usage example
You can use a custom pre-action if you want Freedom EVOware Plus to use a
specific location for discarding racks with used DITIs. If you don’t specify a
specific waste site, Freedom EVOware Plus will return racks with used DITIs to
their base (labware source) location, e.g. the carousel. Proceed as follows:
– Configure the pipetting instrument to use DITIs and put a DITI carrier (e.g.
DITI 2Pos + Waste) on the worktable. Then right-click on the carrier and
choose Edit Carrier from the context menu.
– Assign a group label (e.g. “DITI-Waste”) to the DITI waste site (site 3). See
9.5 “Configuring Carriers”, 9-39, “Groups”.
– Put DITI racks in the carousel using the labware generator. Add a LiHa
Pipette process step to your process, put a DITI rack on the DITI carrier
and add DITI commands to the pipetting script. Exit the Script Editor.
– Save the process.
– Right-click the LiHa Pipette process step, choose Pre-actions / Postactions from the context menu and select the RoMa_ReplaceObject
command. Click Edit, choose MoveLocation2, click Variables and choose
the carrier site you have labeled from the pull-down list. The group name
you have chosen is shown appended to the end of the carrier name, e.g.
DiTi_2Pos_+_Waste_DITI-Waste. Confirm the dialog boxes with OK.
Pre-actions and post-actions are not relevant for Freedom EVOware
Standard.
9.10.4 Locations
Process steps can have one or more object parameters, which are shown as
“fields” in the bottom half of the icon. The object parameters show the names of
the labware and/or devices which are involved in the operation.
The first object parameter is the name of the labware which is involved in the
process step.
If the labware needs to be moved in the process step, the second object
parameter specifies the required location of the labware when the process step
has been completed. For example, the RoMa_MoveObject command requires
you to specify where you want to move the labware item to. Right-click on the
second object parameter, choose Locations and choose the required location,
typically another device. Choose the placeholder <base> if you want the labware
to be returned to the position it had at the beginning of the process (the labware
source).
After choosing a location you will see a tick alongside the object parameter field
and the object parameter field shows the specified location.
The third object parameter is used to specify an optional on-the-fly device,
normally a barcode scanner. Right-click on the second object parameter, choose
Locations and choose the required on-the-fly device. Choose the placeholder
<none> if you do not want to use an on-the-fly device in this process step.
The following example shows the RoMa_MoveObject command before you have
specified the labware, the location and the on-the-fly-device:
Freedom EVOware Software Manual, 393172, en, V2.3
9 - 75
9 - Specifying Your Instrument Setup
Local Settings for Process Steps (Context Menu)
Fig. 9-32 Specifying locations 1
In the following example, the RoMa_MoveObject command has been configured
to move the microplate MyLabware1 to the centrifuge but does not scan the
barcode on the way:
Fig. 9-33 Specifying locations 2
The above figure is shown as an example only. The RoMa_MoveObject command
is normally only used for pre-actions and post-actions and is not normally used
directly in the Process Editor.
9.10.5 Comment
Specify an optional comment (or label) for the process step:
Fig. 9-34 Comment for the process step
When you run the process, the comments are shown in the Gantt chart of the
Runtime Controller as tool tips (yellow labels which appear when you move the
cursor above the horizontal colored bars). If you choose suitable comments, this
can help you to identify different parts of the Gantt chart. See 12.2.4 “Runtime
Controller, Extended View (Running a Process)”, 12-14.
9.10.6 Copy
This option is used to copy the selected process step.
9.10.7 Delete
This option is used to delete the selected process step.
9 - 76
Freedom EVOware Software Manual, 393172, en, V2.3
9 - Specifying Your Instrument Setup
Local Settings for Labware Source Icons (Context Menu)
9.11 Local Settings for Labware Source Icons (Context
Menu)
In Freedom EVOware Plus, the following settings can be made in the Process
Editor for each of the labware source icons. You can access these dialog boxes
by right-clicking on the labware source icon and choosing the required item from
the context menu.
Fig. 9-35 Context menu for labware source icons
Rename
This option is used to enter a new name for the labware source. You can also
rename the labware source by double-clicking on the labware source icon.
Use n times
Specify the required number of times if you want to reuse the labware in
another process instance. A typical use of this feature is a serial dilution where
you want to use different process instances to handle different columns of the
same microplate. Another use is a trough or deep well microplate which
contains a sufficient volume of liquid to be used several times. Take care with
this feature if the settings in the Runtime Controller allow the process
instances to run in parallel. You need to make sure that the labware will still be
available for all of the instances when it is needed. See also Tab. 921 “Labware attributes, hidden”, 9-35, Run Parallel attribute.
Copy
Make a copy of the labware source. A typical use of this feature is a carousel
which contains different plate types in different towers. For the first copy of the
labware source, use the labware generator to take a set of plates from a
specific tower. Then use the copy feature if you need the same plate type
somewhere else in your process. This is faster to do than using the labware
generator a second time.
Delete
Press Del or choose Delete to delete the labware source.
See 9.10 “Local Settings for Process Steps (Context Menu)”,
settings you can make for process steps for devices.
Freedom EVOware Software Manual, 393172, en, V2.3
9-70 for the
9 - 77
9 - Specifying Your Instrument Setup
Local Settings for Labware Source Icons (Context Menu)
9 - 78
Freedom EVOware Software Manual, 393172, en, V2.3
10 - Configuring Liquid Classes
Liquid Classes Editor
10 Configuring Liquid Classes
This chapter describes how to create and edit liquid classes for the liquids that
you want to aspirate or dispense.
A liquid class is a collection of parameters necessary for pipetting liquids. Each
liquid class is divided into subclasses for a certain hardware configuration and
volume range. The subclasses are automatically selected at runtime depending
on the used hardware and required volume.
The Freedom EVOware database already contains a large selection of predefined liquid classes.You only need to create or edit a liquid class if you cannot
find a standard liquid class which is suitable for your needs. See 10.7 “Overview
of Liquid Classes Supplied With Freedom EVOware”, 10-42.
10.1 Liquid Classes Editor
A liquid class is a set of liquid handling parameters. It specifies aspirating and
dispensing speeds, airgaps, liquid detection modes, etc. The values of the
parameters are dependent on the physical characteristics of the liquid. Freedom
EVOware contains a large number of pre-defined liquid classes which are based
on the extensive experience of the Tecan liquid handling specialists. Freedom
EVOware stores the liquid classes in the <install_path>\Database directory) and
has a built-in editor for displaying, creating and deleting liquid classes.
To open the liquid classes editor, click Liquid Classes in the Control Bar and
double-click on any of the liquid classes:
Freedom EVOware Software Manual, 393172, en, V2.3
10 - 1
10 - Configuring Liquid Classes
Liquid Classes Editor
Fig. 10-1 Aspirate tab of the Liquid Classes editor
The left side of the window shows pre-defined liquid classes (
) and custom
liquid classes (
). Custom liquid classes are user-defined liquid classes.
Note: You cannot change the properties of the pre-defined (standard) liquid
classes. However, you can create a new custom class with the same properties
and then change them.
Check the Show all liquid classes checkbox to see all available liquid classes.If
this checkbox is unchecked, you will only see liquid classes which are compatible
with the current tip and device configuration of your pipetting instrument.
If you check the Show all liquid classes checkbox and click OK to close the Liquid
Classes Editor, the Liquid Classes tab of the Control Bar will also show all liquid
classes. If you uncheck the Show all liquid classes checkbox and click OK to close
the Liquid Classes Editor, the Liquid Classes tab of the Control Bar will only show
liquid classes which are compatible with the current tip and device configuration.
For information on the current tip configuration, start the Configuration Tool, click
the Devices tab and click Instrument Options in the General group (see Fig. 89 “Configuring the LiHa”, 8-25).
Each liquid class is divided into one or more sub-classes. Click the + symbol in
front of a liquid class or double-click the liquid class name to show its sub-classes.
The + symbol then changes to a - symbol. Click the - symbol to hide the subclasses again.
A sub-class is characterized by the tip type and volume range for which its
parameters are specified. During script runtime, Freedom EVOware selects the
liquid class and sub-class that best matches the liquid class name, the currently
used tip type and the pipetting volume.
10 - 2
Freedom EVOware Software Manual, 393172, en, V2.3
10 - Configuring Liquid Classes
Liquid Classes Editor
If you choose an item in the liquid classes list, Freedom EVOware displays one or
more parameter pages in the right side of the window. The parameter pages are
described in more detail in the following chapters.
New Class
Click this button to create a new liquid class. A dialog box is shown to allow
you to choose an existing liquid class as a template for the new liquid class.
Choose the entry you want to use as a template and click OK. The template
makes it easier to create a new liquid class since you only need to edit the
parameters which are different.
Liquid classes must have unique names.
New Entry
Click this button to create a new sub-class. A dialog box is shown to allow you
to choose an existing sub-class as a template for the new sub-class. Choose
the entry you want to use as a template and click OK. The template makes it
easier to create a new sub-class since you only need to edit the parameters
which are different.
If you want to create more than one sub-class with the same name, the
pipetting volume ranges must not overlap.
Delete
Click this button to delete the currently selected liquid class or sub-class.
Print
Click this button to print information on the currently selected liquid class
(including every sub-class) or sub-class (single page) as a report. You are first
shown a print preview window. Click the Printer button in the menu bar of the
print preview window to print the report.
Freedom EVOware Software Manual, 393172, en, V2.3
10 - 3
10 - Configuring Liquid Classes
Liquid Classes Editor
10.1.1 Global Parameters for Liquid Classes
Freedom EVOware uses these parameters for all sub-classes of the selected
liquid class.
Fig. 10-2 Global parameters for liquid classes
Class Name
Specify a unique name for the liquid class.
Description
Enter additional information about this liquid class. The description is optional
and is currently intended for documentation purposes only.
If you are using the pressure-monitored pipetting (PMP) hardware option, the
description is stored in the pressure curve files which are created.
Liquid Density
Specify the density of the liquid (range: 0.1 to 10 mg/µl). The liquid arrival
check function of the pooling balance option uses this parameter to calculate
the pipetted liquid volume from the measured weight difference. The PMP
option uses this parameter to estimate the volume of liquid which was
dispensed.
Liquid Detection panel
Liquid Level detection can be used e.g. to ensure minimal tip contamination
by limiting the tip immersion depth. Specify the liquid level detection
parameters as follows:
10 - 4
Freedom EVOware Software Manual, 393172, en, V2.3
10 - Configuring Liquid Classes
Liquid Classes Editor
–
Choose the required liquid level detection mode from the pull down list.
Pressure-based liquid level detection requires the PMP hardware option.
Capacitive liquid level detection is always available.
– Choose the liquid conductivity from the pull down list. This setting is not
available if you choose the liquid detection mode pressure only (pLLD).
– Choose the required detection speed (range: 0.1 to 500 mm/s).
– Choose the required double distance (range: 0.1 to 50 mm). The double
distance is the distance by which the tips retract (move upwards) before
carrying out liquid level detection for the second time. It is only used when
a detection mode with double detection is chosen.
To enable liquid level detection, you also need to activate it on the Aspirate
and/or Dispense tabs of the respective sub-class.
If you choose a combination of capacitive and pressure-based liquid level
detection, both methods must indicate the same liquid level within a specified
tolerance. Error messages will be generated if this is not the case.
If you are using LiHa tips (fixed tips or DITIs) and you choose Detect with first
tip, move others to same position, 1 mm will be added to the aspiration offset
you specify on the Aspirate Parameters page. See 10.2.1 “LiHa Aspirate
Parameters (Fixed Tips and DiTis)”, 10-7, Aspiration Position for more
information.
The Te-MO, the MCA96 and the MCA384 do not support liquid level detection.
If you want to use a liquid class which specifies liquid level detection, the liquid
level must be emulated using a special variable (see
14.1.4.14 “RACK_VOLUME_x”, 14-7). The values you specify here are
ignored in this case. The Te-MO and the MCA96 only use the emulated liquid
level detection for aspirating. The MCA384 uses the emulated liquid level
detection for aspirating and dispensing.
Pressure Liquid Detection panel
The settings in this panel are only available if you choose the liquid detection
mode pressure only or pressure and capacity.
Sensitivity
Choose the required sensitivity for pressure-based liquid level detection
(pLLD) from the pull down list.
Liquid Characteristics
Choose the liquid characteristics from the pull down list. You can choose
between hydrophilic (water-based, conductive) and hydrophobic (non-waterbased, non-conductive).
Pressure Monitored Pipetting panel
The PMP option monitors the pressure in the airgap between the sample and
the system liquid during aspiration and dispensing. The PMP hardware option
is only available for LiHa DiTi tips. The settings you make here will be ignored
if PMP is not activated. See also 17.6 “Configuring and Using PMP (Pressure
Monitored Pipetting)”, 17-16.
Viscosity
Specify the viscosity of the liquid in mPa s.
Freedom EVOware Software Manual, 393172, en, V2.3
10 - 5
10 - Configuring Liquid Classes
Liquid Classes Editor
Clot Detection panel
Specify the global settings for capacitive clot detection (cLLD). You can
specify the detection speed and the clot limit. The clot limit is a tolerance
factor to compensate for cohesion effects. To enable clot detection, you need
to check the Use exit signal detection checkbox on the Aspirate tab of the
respective sub-class. See the description of this checkbox for more
information.
The Te-MO, the MCA96 and the MCA384 do not support clot detection. The
values you specify here are ignored in this case.
Liquid Arrival Check panel
The Liquid Arrival Check (LAC) feature verifies that the correct liquid volumes
have been dispensed by weighing the labware before and after pipetting. The
labware must be put onto a special balance (pooling balance) for the dispense
operation. Freedom EVOware automatically calculates the liquid volume from the
weight difference and compares the results with the volume specified in the
pipetting command. An LAC error is output if the two values differ by more than
the maximum volume deviation which is specified in the liquid class.
The LAC feature is only supported by special balance types such as the Mettler
WM pooling balance. This balance has a built-in tube rack for 16 x 13 mm tubes
and is commonly used for liquid pooling operations.
See also 9.5.5.7 “Pooling Balance Carrier Attributes”, 9-53, 15.26.4 “Pooling
balance data in report files”, 15-56, 8.5.31 “Settings for the Pooling Balance”,
8-110 and A.3 “Parameters in the Evoware.opt file”, A-17, [OPTIONS]
section, Poolsafe_Balances.
Use Check
Check the checkbox to activate the LAC feature for this liquid class. The
Liquid Arrival Check will then be carried out automatically during dispensing if
you dispense this liquid type into containers (e.g. tubes) which have been put
onto a pooling balance. You do not need to add a Balance command to your
pipetting script to use the Liquid Arrival Check feature.
Lower deviation
Specify the required accuracy for the liquid arrival check - how close the
calculated volume must be to the volume specified in the pipetting command
(range: 0 to 100 µl or 0 to 10%). If the pipetted volume is too small, Freedom
EVOware will write a warning message to the log file if the specified deviation
is exceeded. In addition, an LAC error code will be contained in the report file
output by the Export Data command.
Upper deviation
Specify the required accuracy for the liquid arrival check - how close the
calculated volume must be to the volume specified in the pipetting command
(range: 0 to 100 µl or 0 to 10%). If the pipetted volume is too large, Freedom
EVOware will write a warning message to the log file if the specified deviation
is exceeded. In addition, an LAC error code will be contained in the report file
output by the Export Data command.
On LAC error
Select the required error handling if an LAC error occurs.
The error handling option User prompt shows the Liquid Arrival Check Error
dialog (see 18.1.5 “Liquid Arrival Check Error”, 18-5) and pauses the script
or process. Alternatively you can choose to ignore the error and continue
without pausing. The logging of the LAC error is not affected by your choice.
10 - 6
Freedom EVOware Software Manual, 393172, en, V2.3
10 - Configuring Liquid Classes
LiHa Liquid Classes for Fixed Tips and DiTis
10.1.2 Type Parameters for Liquid Classes
Freedom EVOware uses these parameters to select the best suited sub-class for
a specified tip type and pipetting volume.
Fig. 10-3 Type parameters for liquid classes
Tip Type
Select the tip type. The following tip types are available:
– Standard tips
– DITI (disposable tips)
– Std. & Low Vol. (standard tips with the low volume option)
– DITI & Low Vol. (disposable tips with the low volume option)
– Te-MO Fixed tips (96 tips)
– Te-MO DITI tips (96 tips)
– Te-MO 384 (384-tip pipetting head)
– MCA96 Fixed (Multi-Channel Arm with fixed tips)
– MCA96 DITI (Multi-Channel Arm with disposable tips)
– MCA384 Fixed (Multi-Channel Arm with fixed tips)
– MCA384 DITI (Multi-Channel Arm with disposable tips)
The following options are only intended for research applications: Low
Volume, Te-MO tips (all types).
Volume Range
If you check the Use for All Volumes checkbox, the aspirate, dispense and
calibration parameters for this sub-class are valid for all pipetting volumes.
If this box is not checked, you must specify the minimum volume and the
maximum volume. Freedom EVOware will then use this sub-class during
pipetting if the following expression is true:
Minimum Volume ≤ pipetting volume < Maximum Volume
10.2 LiHa Liquid Classes for Fixed Tips and DiTis
The LiHa (Liquid Handling Arm) is a robot arm on the pipetting instrument which is
mounted on the X-slide and typically holds four or eight pipetting tips.
10.2.1 LiHa Aspirate Parameters (Fixed Tips and DiTis)
Freedom EVOware uses these parameters when aspirating or mixing with LiHa
fixed tips or DITIs. The illustrations at the top right of the dialog box show
Freedom EVOware Software Manual, 393172, en, V2.3
10 - 7
10 - Configuring Liquid Classes
LiHa Liquid Classes for Fixed Tips and DiTis
graphically the current settings for single pipetting mode and multi pipetting mode.
Vol. stands for the pipetted volume.
Fig. 10-4 Aspirate parameters for fixed tips and DITIs
The parameters of this dialog box are as follows (some of the parameters must be
specified separately for single pipetting mode and multi pipetting mode):
Aspiration Speed
Specify the aspiration speed in µl/s. A lower aspiration speed can improve the
pipetting accuracy, a higher aspiration speed can improve the speed of
operation. See Tab. 8-2 “Max. dilutor speeds for the LiHa (pipetting or
washing)”, 8-28 for related information.
Delay
Specify the delay after aspiration.
System Trailing Airgap (STAG)
Specify the volume of the system trailing airgap. Freedom EVOware uses the
aspiration speed specified for the leading airgap for the system trailing airgap,
too. The system trailing airgap is used to prevent contamination by ensuring
that the system liquid cannot come into contact with the liquid being aspirated.
Leading Airgap (LAG)
Specify the volume of the leading airgap. Click the
button to specify
aspiration speed and delay after aspiration. The air of the leading airgap is
dispensed together with the net volume which you specify in the Dispense
command. The resulting tip blowout leads to more accurate pipetting.
10 - 8
Freedom EVOware Software Manual, 393172, en, V2.3
10 - Configuring Liquid Classes
LiHa Liquid Classes for Fixed Tips and DiTis
Trailing Airgap (TAG)
Specify the volume of the trailing airgap. Click the
button to specify
aspiration speed and delay after aspiration. The trailing airgap is used to
prevent liquid dripping from the tips when the arm moves. In addition, it
ensures that the liquid meniscus is not dragged away from the end of the tip
during fast arm movements.
The trailing airgap is aspirated at the Z-position specified with Retract tips to.
A Z-position relative to the liquid level requires liquid level detection and must
not be used if you are carrying out septum piercing (the septum interferes with
the capacitance-based detection system). Otherwise the trailing airgap may
be aspirated with the tips still in the liquid.
Excess Volume
Specify the excess volume (in µl or %). Click the
button to choose the
position to use for discarding the excess volume (Discard to waste or Back to
vessel). The excess volume is used to reduce contamination of the liquid in
the tips with the system liquid to an absolute minimum. The excess volume is
discarded after the pipetting cycle (aspiration and dispensing) has been
completed.
Specify a digit in the Replace after field to discard the excess volume after reusing it several times (e.g. to save costs). This only applies if excess volume >
0 and if you are using multi-pipetting.
Conditioning Volume
Specify the conditioning volume. Click the
button to choose the position to
use for discarding the conditioning volume (Discard to waste or Back to
vessel). A conditioning volume can be used to maximize pipetting accuracy by
ensuring that the liquid meniscus at the end of the tips is the same shape after
aspirating as it will be after dispensing.The conditioning volume is discarded
directly after aspirating.
Use Pinch Valve
This is used to activate the Low Volume option if it is fitted to your pipetting
instrument.
Use Liquid Detection
Check this box if you want to use capacitative liquid level detection (cLLD)
when aspirating. cLLD detects the liquid surface through a change of the
electrical capacitance of the pipetting tip when the tip enters the liquid. It is
carried out just before aspirating and can be used e.g. to minimize tip
contamination by limiting the tip immersion depth.
cLLD is carried out with the detection mode, liquid conductivity, detection
speed and double distance settings which you specified on the Global dialog
box for the liquid class.
cLLD must not be used if you are carrying out septum piercing (the septum
interferes with the capacitive detection system).
Freedom EVOware Software Manual, 393172, en, V2.3
10 - 9
10 - Configuring Liquid Classes
LiHa Liquid Classes for Fixed Tips and DiTis
Aspiration Position
Specify the Z-position and the Z-offset of the tips when aspirating. A positive
value for the offset lowers the tips. You can only choose a Z-position relative
to the liquid level if you have activated liquid level detection.
If you choose an aspirate position with tracking, the tips will move downwards
as the liquid level drops in the wells during aspiration. This option can be used
e.g. to ensure minimal tip contamination by limiting the tip immersion depth.
If you choose Detect with first tip, move others to same position, on the Global
Parameters page (10.1.1, 10-4) and you choose the aspiration position zmax ± offset (with or without tracking), 1 mm will be added to the aspiration
offset you specify. Example: If you specify an offset of 2 mm, the tips will be
submerged by 3 mm. This is done to make sure that all of the tips are
submerged in the liquid in case of small differences in the liquid level between
the wells.
You can also choose the X-position when aspirating as follows:
–
–
Center: as specified for the labware which is used
Left: left of center; the offset is specified with X or Y offset while pipetting
for the labware which is used
– Right: right of center; the offset is specified with X or Y offset while
pipetting for the labware which is used
– Left / Right: left of center for odd columns, right of center for even
columns; the offset is specified with X or Y offset while pipetting for the
labware which is used
– Right / Left: right of center for odd columns, left of center for even
columns; the offset is specified with X or Y offset while pipetting for the
labware which is used
You can also choose the Y-position when aspirating as follows:
–
–
Center: as specified for the labware which is used
Rear: rear of center; the offset is specified with X or Y offset while pipetting
for the labware which is used
– Front: front of center; the offset is specified with X or Y offset while
pipetting for the labware which is used
– Rear / Front: rear of center for odd columns, front of center for even
columns; the offset is specified with X or Y offset while pipetting for the
labware which is used
– Front / Rear: front of center for odd columns, rear of center for even
columns; the offset is specified with X or Y offset while pipetting for the
labware which is used
By combining an X offset and a Y offset, there are nine possible pipetting
positions (including the center position with no offsets).
On Detection Error
Select the required error handling if Freedom EVOware detects no liquid or
not enough liquid.
If a liquid detection error occurs, the error handling option User prompt shows
the Liquid Detection Error dialog (see 18.1.1 “Liquid Detection Error”, 18-1);
the other three options carry out the chosen action directly and do not show
the Liquid Detection Error dialog.
10 - 10
Freedom EVOware Software Manual, 393172, en, V2.3
10 - Configuring Liquid Classes
LiHa Liquid Classes for Fixed Tips and DiTis
Use Exit Signal Detection
Check this box to activate capacitive exit signal detection (dip out signal
detection). This detects the liquid surface through a change of the electrical
capacitance of the pipetting tip when the tip is retracted and exits the liquid. It
is carried out just after aspirating. The measured liquid level is then compared
with the liquid level which should have resulted from the aspiration.
You can only activate exit signal detection if you have also enabled liquid level
detection.
On Exit Signal Error
Select the required error handling if the exit signal error does not take place as
expected when retracting the tips.
If an exit signal error occurs, the error handling option User prompt shows the
Clot Error dialog (see 18.1.2 “Clot Error”, 18-2); the other two options carry
out the chosen action directly and do not show the Clot Error dialog.
Two error situations are possible:
–
–
The exit signal was detected within the specified “retract tips to” distance
but not within the clot limit which which you specified in the Global dialog
box for the liquid class. This is probably because a clot is attached to one
of the tips and has maintained the electrical contact between the tip and
the liquid. A “clot error” is reported in the log file in this case.
The exit signal was not detected at all within the specified “retract tips to”
distance. In this case, there is another reason for the tips failing to loose
contact with the liquid. A “no exit signal error” is reported in the log file in
this case.
Note: Both clot error and exit signal error are currently reported in the report file
from the Export Data command as “clot was detected”.
On PMP Clot Error
Select the required error handling if a clot is detected using pressure-based
clot detection. Pressure-based clot detection requires the PMP hardware
option. The PMP hardware option is only available for LiHa DiTi tips.
If a clot error is detected by PMP, the error handling option User prompt shows
the Clot Error (PMP) dialog; the other three options carry out the chosen
action directly and do not show the Clot Error (PMP) dialog.
If you choose User Prompt, the Clot Error (PMP) dialog then allows the
instrument operator to choose between the following options:
– Dispense back into vessel and then pipette nothing
– Ignore clot error and continue
– Discard the DITI and pipette nothing
See 18.1.3 “Clot Error (PMP)”, 18-3 for more information.
See also 17.6.4 “PMP Error and Success Messages”,
information on PMP.
17-22 for more
Mix before Aspiration
Check this box if you want Freedom EVOware to mix the liquid before
aspirating it. You can specify the number of mix cycles (range: 1 to 99), the
mix volume (range: 1 to 2500 µl), the Z-position and the Z-offset. A positive
value for the offset lowers the tips.
Retract Tips to
Specify the Z-position and the Z-offset to which the tips should retract (move
upwards) after aspirating. A positive value for the offset lowers the tips. You
can only choose a Z-position relative to the liquid level if you have activated
liquid level detection.
Freedom EVOware Software Manual, 393172, en, V2.3
10 - 11
10 - Configuring Liquid Classes
LiHa Liquid Classes for Fixed Tips and DiTis
Retract Speed
Specify the required retract speed.
10.2.2 LiHa Dispense Parameters (Fixed Tips and DiTis)
Freedom EVOware uses these parameters when dispensing or mixing with LiHa
fixed tips or DITIs.
Fig. 10-5 Dispense parameters for fixed tips and DITIs
The parameters of this dialog box are as follows (some of the parameters must be
specified separately for single pipetting mode and multi pipetting mode):
Dispense Speed
Specify the dispense speed in µl/s. The maximum dispense speed is about
80% of the dilutor capacity (syringe size) per second. See Tab. 8-2 “Max.
dilutor speeds for the LiHa (pipetting or washing)”, 8-28.
A high dispense speed is needed to achieve a proper free dispense. Contact
dispense requires a lower speed (in the same range as the aspirate speed).
Breakoff Speed
Specify the breakoff speed (final dispense speed) in µl/s. The breakoff speed
should normally be about 70% of the actual dispense speed but should not
exceed 45% of the the dilutor capacity (syringe size) per second. A high
breakoff speed is needed to achieve a proper free dispense.
Delay
Specify the delay after dispensing.
10 - 12
Freedom EVOware Software Manual, 393172, en, V2.3
10 - Configuring Liquid Classes
LiHa Liquid Classes for Fixed Tips and DiTis
Trailing Airgap after each Dispense
You can automatically aspirate a trailing airgap after each dispense operation
to avoid droplets forming on the tips. The trailing airgap parameters for
dispensing are specified in the Aspirate dialog box.
Use Pinch Valve
This is used to activate the Low Volume option if it is fitted to your pipetting
instrument.
Use Liquid Detection
Check this box if you want to use capacitative liquid level detection (cLLD)
when dispensing. cLLD detects the liquid surface through a change of the
electrical capacitance of the pipetting tip when the tip enters the liquid. Liquid
level detection when dispensing can be used e.g. to ensure that the tips
remain immersed in the liquid during dispensing.
cLLD is carried out with the detection mode, liquid conductivity, detection
speed and double distance settings which you specified on the Global dialog
box for the liquid class.
cLLD must not be used if you are carrying out septum piercing (the septum
interferes with the capacitive detection system).
Dispense Position
Specify the Z-position and the Z-offset of the tips when dispensing. A positive
value for the offset lowers the tips. You can only choose a Z-position relative
to the liquid level if you have activated liquid level detection.
If you choose a dispense position with tracking, the tips will move upwards as
the liquid level rises in the wells during dispensing. This option can be used
e.g. to ensure minimal tip contamination by limiting the tip immersion depth.
You can also choose the X-position when dispensing as follows:
–
–
Center: as specified for the labware which is used
Left: left of center; the offset is specified with X or Y offset while pipetting
for the labware which is used
– Right: right of center; the offset is specified with X or Y offset while
pipetting for the labware which is used
– Left / Right: left of center for odd columns, right of center for even
columns; the offset is specified with X or Y offset while pipetting for the
labware which is used
– Right / Left: right of center for odd columns, left of center for even
columns; the offset is specified with X or Y offset while pipetting for the
labware which is used
You can also choose the Y-position when dispensing as follows:
–
–
Center: as specified for the labware which is used
Rear: rear of center; the offset is specified with X or Y offset while pipetting
for the labware which is used
– Front: front of center; the offset is specified with X or Y offset while
pipetting for the labware which is used
– Rear / Front: rear of center for odd columns, front of center for even
columns; the offset is specified with X or Y offset while pipetting for the
labware which is used
– Front / Rear: front of center for odd columns, rear of center for even
columns; the offset is specified with X or Y offset while pipetting for the
labware which is used
By combining an X offset and a Y offset, there are nine possible pipetting
positions (including the center position with no offsets).
Freedom EVOware Software Manual, 393172, en, V2.3
10 - 13
10 - Configuring Liquid Classes
LiHa Liquid Classes for Fixed Tips and DiTis
Tip Touching
Activate the tip touching function if required and specify the direction of the
movement. The amount of movement is specified with Tip-touching distance
for the labware which is used.
Tip touching is a special movement when dispensing a liquid. When tip
touching is activated, Freedom EVOware dispenses to the destination
container in the normal way, but then moves the tips to the side of the well and
back before retracting them. This helps to remove any droplets which may be
adhering to the tips.
Speed: Specify the tip touching speed.
Delay after touching: Specify the delay between the tip touching the well and
moving back to the middle of the well.
Mix after Dispense
Check this box if you want to mix the liquid after dispensing it. You can specify
the number of mix cycles (range: 1 to 99), the mix volume (range: 1 to 2500
µl), the Z-position and the Z-offset. A positive value for the offset lowers the
tips.
Retract Tips to
Specify the Z-position and the Z-offset to which the tips should retract (move
upwards) after dispensing. A positive value for the offset lowers the tips. You
can only choose a Z-position relative to the liquid level if you have activated
liquid level detection.
Retract Speed
Specify the required retract speed.
10 - 14
Freedom EVOware Software Manual, 393172, en, V2.3
10 - Configuring Liquid Classes
LiHa Liquid Classes for Fixed Tips and DiTis
10.2.3 LiHa Calibration Parameters (Fixed Tips and DiTis)
Freedom EVOware uses these parameters to ensure that the specified net
volumes are dispensed accurately by the LiHa. The two curves in the dialog box
show graphically the current settings for single pipetting mode and multi pipetting
mode.
Fig. 10-6 Calibration parameters for fixed tips and DITIs
The parameters of this dialog box are as follows:
Offset / Factor
Specify an offset and/or calibration factor to be applied for single pipetting
mode and multi pipetting mode.
Freedom EVOware uses the following expression to calculate the dilutor
movement from the net volume specified in the pipetting script:
Calibrated dilutor movement = (net volume * factor) + offset
Individual calibration tables
If necessary you can specify a separate offset and calibration factor for each of
the dilutors which overrides the global setting. This can be used to compensate
for very small differences in the characteristics of the dilutors due to
manufacturing tolerances. It is only needed for special applications which require
extreme accuracy and is only available for the LiHa (the Te-MO, the MCA96 and
the MCA384 do not use dilutors). The individual calibration settings can be made
separately for single pipetting and multi pipetting.
Freedom EVOware Software Manual, 393172, en, V2.3
10 - 15
10 - Configuring Liquid Classes
LiHa Liquid Classes for Fixed Tips and DiTis
Please note the following if you specify an individual dilutor calibration factor or
offset:
– The individual calibration settings are only intended for specialists such as
Tecan Field Service Engineers.
– Before changing the calibration settings, make sure that the pipetting
inaccuracy has been caused by the dilutor and that all other possibilities
such as tubing problems or air bubbles have been ruled out.
– The calibration settings must be determined and verified gravimetrically
for the liquids and volume ranges in question.
– The calibration settings are only valid for the type of liquid used during
testing.
– The calibration settings only apply to Freedom EVOware and do not affect
the gravimetric tests using the Setup & Service software.
– The values must be reset if you change the dilutor.
10 - 16
Freedom EVOware Software Manual, 393172, en, V2.3
10 - Configuring Liquid Classes
MCA96 Liquid Classes
10.3 MCA96 Liquid Classes
The MCA96 (Multi Channel Arm 96) has a 96-tip pipetting head. The 96-tip
pipetting head can be fitted with a tipblock (fixed tips) or with disposable tips
(DITIs).
10.3.1 MCA96 Aspirate Parameters
Freedom EVOware uses these parameters for the MCA96 pipetting head when
aspirating or mixing. The illustrations at the top right of the dialog box show
graphically the current settings for single pipetting mode and multi pipetting mode.
Vol. stands for the pipetted volume.
Fig. 10-7 MCA96 Aspirate parameters
The parameters of this dialog box are as follows (some of the parameters must be
specified separately for single pipetting mode and multi pipetting mode):
Aspiration Speed
Specify the aspiration speed in µl/s. A lower aspiration speed can improve the
pipetting accuracy, a higher aspiration speed can improve the speed of
operation.
Delay
Specify the delay after aspiration.
Freedom EVOware Software Manual, 393172, en, V2.3
10 - 17
10 - Configuring Liquid Classes
MCA96 Liquid Classes
System Trailing Airgap (STAG)
Specify the volume of air to aspirate directly after getting the tip block or DITIs
(recommended range: 0 to 50 µl). Freedom EVOware uses the aspiration
speed specified for the leading airgap for the system trailing airgap, too.
When washing the tips, the air is dispensed during the empty step of the Wash
command together with the remaining liquid. The STAG ensures that all of the
liquid in the tips is discarded at the start of the wash procedure. This helps to
reduce the carryover. In contrast to the leading airgap, the STAG is only
relevant for washing the tips and is not dispensed by the Dispense command.
Leading Airgap (LAG)
Specify the volume of the leading airgap. Click the
button to specify
aspiration speed and delay after aspiration. The air of the leading airgap is
dispensed together with the net volume which you specify in the Dispense
command. The resulting tip blowout leads to more accurate pipetting.
Trailing Airgap (TAG)
Specify the volume of the trailing airgap. Click the
button to specify
aspiration speed and delay after aspiration. The trailing airgap is used to
prevent liquid dripping from the tips when the arm moves. In addition, it
ensures that the liquid meniscus is not dragged away from the end of the tip
during fast arm movements.
Excess Volume
Specify the excess volume (in µl or %). Click the
button to choose the
position to use for discarding the excess volume (Discard to waste or Back to
vessel). The excess volume is used to reduce contamination of the liquid in
the tips with previously used liquids to an absolute minimum.
Specify a digit in the Replace after field to discard the excess volume after reusing it several times (e.g. to save costs). This only applies if excess volume >
0 and if you are using multi-pipetting. The excess volume is discarded after
the pipetting cycle (aspiration and dispensing) has been completed.
Conditioning Volume
Specify the conditioning volume. Click the
button to choose the position to
use for discarding the conditioning volume (Discard to waste or Back to
vessel). A conditioning volume can be used to maximize pipetting accuracy by
ensuring that the liquid meniscus at the end of the tips is the is the same
shape after aspirating as it will be after dispensing. The conditioning volume is
discarded directly after aspirating.
Use Pinch Valve
The MCA96 does not have a pinch valve.
Use Liquid Detection
The MCA96 does not support liquid level detection for aspiration directly. If
you want to use a liquid class for the MCA96 which specifies liquid level
detection, the liquid level must be emulated using a special variable (see
14.1.4.14 “RACK_VOLUME_x”, 14-7). Check this checkbox if you want to
activate the emulated liquid level detection. Liquid level detection can be used
e.g. to ensure minimal tip contamination by limiting the tip immersion depth.
For Freedom EVOware Plus, see 14.1.4 “Pre-Defined Variables”, 14-4 for
information on accessing the current value of this pre-defined variable in
another script.
10 - 18
Freedom EVOware Software Manual, 393172, en, V2.3
10 - Configuring Liquid Classes
MCA96 Liquid Classes
Aspiration Position
Specify the Z-position and the Z-offset of the tips when aspirating. A positive
value for the offset lowers the tips. You can only choose a Z-position relative
to the liquid level if you have activated liquid level detection emulation.
If you choose an aspirate position with tracking, the tips move downwards as
the liquid level drops in the wells during aspiration. This option can be used
e.g. to ensure minimal tip contamination by limiting the tip immersion depth.
You can also choose the X-position when aspirating as follows:
–
–
Center: as specified for the labware which is used
Left: left of center; the offset is specified with X or Y offset while pipetting
for the labware which is used
– Right: right of center; the offset is specified with X or Y offset while
pipetting for the labware which is used
– Left / Right: left of center for odd columns, right of center for even
columns; the offset is specified with X or Y offset while pipetting for the
labware which is used
– Right / Left: right of center for odd columns, left of center for even
columns; the offset is specified with X or Y offset while pipetting for the
labware which is used
You can also choose the Y-position when aspirating as follows:
–
–
Center: as specified for the labware which is used
Rear: rear of center; the offset is specified with X or Y offset while pipetting
for the labware which is used
– Front: front of center; the offset is specified with X or Y offset while
pipetting for the labware which is used
– Rear / Front: rear of center for odd columns, front of center for even
columns; the offset is specified with X or Y offset while pipetting for the
labware which is used
– Front / Rear: front of center for odd columns, rear of center for even
columns; the offset is specified with X or Y offset while pipetting for the
labware which is used
By combining an X offset and a Y offset, there are nine possible pipetting
positions (including the center position with no offsets).
On Detection Error
Select the required error handling if Freedom EVOware detects no liquid or
not enough liquid.
Use Exit Signal Detection
The MCA96 does not support exit signal detection. The PMP option is not
available for the MCA96.
Mix before Aspiration
Check this box if you want Freedom EVOware to mix the liquid before
aspirating it. You can specify the number of mix cycles (range: 1 to 99), the
mix volume (max. 2500 µl), the Z-position and the Z-offset. A positive value for
the offset lowers the tips.
Retract Tips to
Specify the Z-position and the Z-offset to which the tips should retract (move
upwards) after aspirating. A positive value for the offset lowers the tips.
Retract Speed
Specify the required retract speed.
Freedom EVOware Software Manual, 393172, en, V2.3
10 - 19
10 - Configuring Liquid Classes
MCA96 Liquid Classes
10.3.2 MCA96 Dispense Parameters
Freedom EVOware uses these parameters for the MCA96 pipetting head when
dispensing or mixing.
Fig. 10-8 MCA96 Dispense parameters
The parameters of this dialog box are as follows (some of the parameters must be
specified separately for single pipetting mode and multi pipetting mode):
Dispense Speed
Specify the dispense speed in µl/s. A high speed (400-600 µl/s) is needed to
achieve a proper free dispense. Contact dispense requires a lower speed (in
the same range as the aspirate speed).
Breakoff Speed
You cannot specify a breakoff speed for the MCA96.
Delay
Specify the delay after dispensing.
Trailing Airgap after each Dispense
You can automatically aspirate a trailing airgap after each dispense operation
in order to avoid droplets forming on the tip. The trailing airgap parameters are
specified in the Aspirate dialog box.
Use Pinch Valve
The MCA96 does not have a pinch valve.
Use Liquid Detection
The MCA96 does not support liquid level detection (or emulated liquid level
detection) for dispensing.
10 - 20
Freedom EVOware Software Manual, 393172, en, V2.3
10 - Configuring Liquid Classes
MCA96 Liquid Classes
Dispense Position
Specify the Z-position and the Z-offset of the tips when dispensing. A positive
value for the offset lowers the tips.
If you choose a dispense position with tracking, the tips move upwards as the
liquid level rises in the wells during dispensing. This option can be used e.g. to
ensure minimal tip contamination by limiting the tip immersion depth.
You can also choose the X-position when dispensing as follows:
–
–
Center: as specified for the labware which is used
Left: left of center; the offset is specified with X or Y offset while pipetting
for the labware which is used
– Right: right of center; the offset is specified with X or Y offset while
pipetting for the labware which is used
– Left / Right: left of center for odd columns, right of center for even
columns; the offset is specified with X or Y offset while pipetting for the
labware which is used
– Right / Left: right of center for odd columns, left of center for even
columns; the offset is specified with X or Y offset while pipetting for the
labware which is used
You can also choose the Y-position when dispensing as follows:
–
–
Center: as specified for the labware which is used
Rear: rear of center; the offset is specified with X or Y offset while pipetting
for the labware which is used
– Front: front of center; the offset is specified with X or Y offset while
pipetting for the labware which is used
– Rear / Front: rear of center for odd columns, front of center for even
columns; the offset is specified with X or Y offset while pipetting for the
labware which is used
– Front / Rear: front of center for odd columns, rear of center for even
columns; the offset is specified with X or Y offset while pipetting for the
labware which is used
By combining an X offset and a Y offset, there are nine possible pipetting
positions (including the center position with no offsets).
Tip Touching
Activate the tip touching function if required and specify the direction of the
movement. The amount of movement is specified with Tip-touching distance
for the labware which is used.
Tip touching is a special movement when dispensing a liquid. When tip
touching is activated, Freedom EVOware dispenses to the destination
container in the normal way, but then moves the tips to the side of the well and
back before retracting them. This helps to remove any droplets which may be
adhering to the tips.
Speed: Specify the tip touching speed.
Delay after touching: Specify the delay between the tip touching the well and
moving back to the middle of the well.
Mix after Dispense
Check this box if you want to mix the liquid after dispensing it. You can specify
the number of mix cycles (range: 1 to 99), the mix volume (max. 2500 µl), the
Z-position and the Z-offset. A positive value for the offset lowers the tips.
Retract Tips to
Specify the Z-position and the Z-offset to which the tips should retract (move
upwards) after dispensing. A positive value for the offset lowers the tips.
Freedom EVOware Software Manual, 393172, en, V2.3
10 - 21
10 - Configuring Liquid Classes
MCA96 Liquid Classes
Retract Speed
Specify the required retract speed.
10.3.3 MCA96 Calibration Parameters
Freedom EVOware uses these parameters for the MCA96 pipetting head to
ensure that the specified net volumes are dispensed accurately. The two curves in
the dialog box show graphically the current settings for single pipetting mode and
multi pipetting mode.
Fig. 10-9 MCA96 Calibration parameters
The parameters of this dialog box are as follows (some of the parameters must be
specified separately for single pipetting mode and multi pipetting mode):
Offset / Factor
Specify an offset and/or calibration factor to be applied for single pipetting
mode and multi pipetting mode.
Freedom EVOware uses the following expression to calculate the MCA96
plunger movement from the net volume specified in the pipetting script:
Calibrated MCA96 plunger movement = (net volume * factor) + offset
10.3.4 MCA96 Plunger Parameters
Freedom EVOware uses these parameters for the MCA96 pipetting head to
control the plunger during dispensing. The graph illustrates the plunger speed
versus the time for the specified dispense volume.
10 - 22
Freedom EVOware Software Manual, 393172, en, V2.3
10 - Configuring Liquid Classes
MCA96 Liquid Classes
Fig. 10-10 MCA96 Plunger parameters
The parameters of this dialog box are as follows (some of the parameters must be
specified separately for single pipetting mode and multi pipetting mode):
Accelerate with / Decelerate with
Specify the required acceleration and deceleration of the MCA96 plunger for
single pipetting mode and multi pipetting mode. For mechanical reasons the
MCA96 plunger cannot accelerate or decelerate instantly. The graph then
illustrates the plunger speed versus the time for the specified dispense
volume.
Dispense volume
Specify the dispense volume for which you want to see a graph (the volume
you specify should include the leading and trailing airgaps) and choose the
graph you want to see (single pipetting mode or multi pipetting mode). The
volume you specify is only used to calculate the graph and is not a dispense
command for the MCA96 (the volume which will be dispensed is specified with
the MCA96 Dispense command).
The graph helps you to identify whether you have chosen suitable settings in
this dialog box.
If the graph has a flat top (plateau), the plunger acceleration/deceleration will
allow the plunger to reach the dispense speed specified on the Dispense tab
of the liquid class for the dispense volume you have chosen.
Freedom EVOware Software Manual, 393172, en, V2.3
10 - 23
10 - Configuring Liquid Classes
MCA384 Liquid Classes
10.4 MCA384 Liquid Classes
The MCA384 (Multi Channel Arm) can be fitted with 96 or 384 fixed tips or with 96
or 384 disposable tips (DITIs). So-called head adapters are used to adapt the
pipetting head to the different tip types.
10.4.1 MCA384 Aspirate Parameters
Freedom EVOware uses these parameters for the MCA384 pipetting head when
aspirating or mixing. The illustrations at the top right of the dialog box show
graphically the current settings for single pipetting mode and multi pipetting mode.
Vol. stands for the pipetted volume.
Fig. 10-11 MCA384 Aspirate parameters
The parameters of this dialog box are as follows (some of the parameters must be
specified separately for single pipetting mode and multi pipetting mode):
Aspiration Speed
Specify the aspiration speed in µl/s. A lower aspiration speed can improve the
pipetting accuracy, a higher aspiration speed can improve the speed of
operation.
Delay
Specify the delay after aspiration.
10 - 24
Freedom EVOware Software Manual, 393172, en, V2.3
10 - Configuring Liquid Classes
MCA384 Liquid Classes
System Trailing Airgap (STAG)
Specify the volume of air to aspirate directly after getting the tip block or DITIs
(recommended range: 0 to 50 µl). Freedom EVOware uses the aspiration
speed specified for the leading airgap for the system trailing airgap, too.
When washing the tips, the air is dispensed during the empty step of the Wash
command together with the remaining liquid. The STAG ensures that all of the
liquid in the tips is discarded at the start of the wash procedure. This helps to
reduce the carryover. In contrast to the leading airgap, the STAG is only
relevant for washing the tips and is not dispensed by the Dispense command.
Leading Airgap (LAG)
Specify the volume of the leading airgap. Click the
button to specify
aspiration speed and delay after aspiration. The air of the leading airgap is
dispensed together with the net volume which you specify in the Dispense
command. The resulting tip blowout leads to more accurate pipetting.
Trailing Airgap (TAG)
Specify the volume of the trailing airgap. Click the
button to specify
aspiration speed and delay after aspiration. The trailing airgap is used to
prevent liquid dripping from the tips when the arm moves. In addition, it
ensures that the liquid meniscus is not dragged away from the end of the tip
during fast arm movements.
Excess Volume
Specify the excess volume (in µl or %). Click the
button to choose the
position to use for discarding the excess volume (Discard to waste or Back to
vessel). The excess volume is used to reduce contamination of the liquid in
the tips with previously used liquids to an absolute minimum.
Specify a digit in the Replace after field to discard the excess volume after reusing it several times (e.g. to save costs). This only applies if excess volume >
0 and if you are using multi-pipetting. The excess volume is discarded after
the pipetting cycle (aspiration and dispensing) has been completed.
Conditioning Volume
Specify the conditioning volume. Click the
button to choose the position to
use for discarding the conditioning volume (Discard to waste or Back to
vessel). A conditioning volume can be used to maximize pipetting accuracy by
ensuring that the liquid meniscus at the end of the tips is the is the same
shape after aspirating as it will be after dispensing. The conditioning volume is
discarded directly after aspirating.
Use Pinch Valve
The MCA384 does not have a pinch valve.
Use Liquid Detection
The MCA384 does not support liquid level detection for aspiration directly. If
you want to use a liquid class for the MCA384 which specifies liquid level
detection, the liquid level must be emulated using a special variable (see
14.1.4.14 “RACK_VOLUME_x”, 14-7). Check this checkbox if you want to
activate the emulated liquid level detection. Liquid level detection can be used
e.g. to ensure minimal tip contamination by limiting the tip immersion depth.
For Freedom EVOware Plus, see 14.1.4 “Pre-Defined Variables”, 14-4 for
information on accessing the current value of this pre-defined variable in
another script.
Freedom EVOware Software Manual, 393172, en, V2.3
10 - 25
10 - Configuring Liquid Classes
MCA384 Liquid Classes
Aspiration Position
Specify the Z-position and the Z-offset of the tips when aspirating. A positive
value for the offset lowers the tips. You can only choose a Z-position relative
to the liquid level if you have activated liquid level detection emulation.
If you choose an aspirate position with tracking, the tips move downwards as
the liquid level drops in the wells during aspiration. This option can be used
e.g. to ensure minimal tip contamination by limiting the tip immersion depth.
You can also choose the X-position when aspirating as follows:
–
–
Center: as specified for the labware which is used
Left: left of center; the offset is specified with X or Y offset while pipetting
for the labware which is used
– Right: right of center; the offset is specified with X or Y offset while
pipetting for the labware which is used
– Left / Right: left of center for odd columns, right of center for even
columns; the offset is specified with X or Y offset while pipetting for the
labware which is used
– Right / Left: right of center for odd columns, left of center for even
columns; the offset is specified with X or Y offset while pipetting for the
labware which is used
You can also choose the Y-position when aspirating as follows:
–
–
Center: as specified for the labware which is used
Rear: rear of center; the offset is specified with X or Y offset while pipetting
for the labware which is used
– Front: front of center; the offset is specified with X or Y offset while
pipetting for the labware which is used
– Rear / Front: rear of center for odd columns, front of center for even
columns; the offset is specified with X or Y offset while pipetting for the
labware which is used
– Front / Rear: front of center for odd columns, rear of center for even
columns; the offset is specified with X or Y offset while pipetting for the
labware which is used
By combining an X offset and a Y offset, there are nine possible pipetting
positions (including the center position with no offsets).
On Detection Error
Select the required error handling if Freedom EVOware detects no liquid or
not enough liquid.
Use Exit Signal Detection
The MCA384 does not support exit signal detection. The PMP option is not
available for the MCA384.
Mix before Aspiration
Check this box if you want Freedom EVOware to mix the liquid before
aspirating it. You can specify the number of mix cycles (range: 1 to 99), the
mix volume (max. 2500 µl), the Z-position and the Z-offset. A positive value for
the offset lowers the tips.
Retract Tips to
Specify the Z-position and the Z-offset to which the tips should retract (move
upwards) after aspirating. A positive value for the offset lowers the tips.
Retract Speed
Specify the required retract speed.
10 - 26
Freedom EVOware Software Manual, 393172, en, V2.3
10 - Configuring Liquid Classes
MCA384 Liquid Classes
10.4.2 MCA384 Dispense Parameters
Freedom EVOware uses these parameters for the MCA384 pipetting head when
dispensing or mixing.
Fig. 10-12 MCA384 Dispense parameters
The parameters of this dialog box are as follows (some of the parameters must be
specified separately for single pipetting mode and multi pipetting mode):
Dispense Speed
Specify the dispense speed in µl/s. A high speed (400-600 µl/s) is needed to
achieve a proper free dispense. Contact dispense requires a lower speed (in
the same range as the aspirate speed).
Breakoff Speed
You cannot specify a breakoff speed for the MCA384.
Delay
Specify the delay after dispensing.
Trailing Airgap after each Dispense
You can automatically aspirate a trailing airgap after each dispense operation
in order to avoid droplets forming on the tip. The trailing airgap parameters are
specified in the Aspirate dialog box.
Use Pinch Valve
The MCA384 does not have a pinch valve.
Freedom EVOware Software Manual, 393172, en, V2.3
10 - 27
10 - Configuring Liquid Classes
MCA384 Liquid Classes
Use Liquid Detection
The MCA384 does not support liquid level detection for dispensing directly. If
you want to use a liquid class for the MCA384 which specifies liquid level
detection, the liquid level must be emulated using a special variable (see
14.1.4.14 “RACK_VOLUME_x”, 14-7). Check this checkbox if you want to
activate the emulated liquid level detection. Liquid level detection can be used
e.g. to ensure minimal tip contamination by limiting the tip immersion depth.
For Freedom EVOware Plus, see 14.1.4 “Pre-Defined Variables”, 14-4 for
information on accessing the current value of this pre-defined variable in
another script.
Dispense Position
Specify the Z-position and the Z-offset of the tips when dispensing. A positive
value for the offset lowers the tips.
If you choose a dispense position with tracking, the tips move upwards as the
liquid level rises in the wells during dispensing. This option can be used e.g. to
ensure minimal tip contamination by limiting the tip immersion depth.
You can also choose the X-position when dispensing as follows:
–
–
Center: as specified for the labware which is used
Left: left of center; the offset is specified with X or Y offset while pipetting
for the labware which is used
– Right: right of center; the offset is specified with X or Y offset while
pipetting for the labware which is used
– Left / Right: left of center for odd columns, right of center for even
columns; the offset is specified with X or Y offset while pipetting for the
labware which is used
– Right / Left: right of center for odd columns, left of center for even
columns; the offset is specified with X or Y offset while pipetting for the
labware which is used
You can also choose the Y-position when dispensing as follows:
–
–
Center: as specified for the labware which is used
Rear: rear of center; the offset is specified with X or Y offset while pipetting
for the labware which is used
– Front: front of center; the offset is specified with X or Y offset while
pipetting for the labware which is used
– Rear / Front: rear of center for odd columns, front of center for even
columns; the offset is specified with X or Y offset while pipetting for the
labware which is used
– Front / Rear: front of center for odd columns, rear of center for even
columns; the offset is specified with X or Y offset while pipetting for the
labware which is used
By combining an X offset and a Y offset, there are nine possible pipetting
positions (including the center position with no offsets).
10 - 28
Freedom EVOware Software Manual, 393172, en, V2.3
10 - Configuring Liquid Classes
MCA384 Liquid Classes
Tip Touching
Activate the tip touching function if required and specify the direction of the
movement. The amount of movement is specified with Tip-touching distance
for the labware which is used.
Tip touching is a special movement when dispensing a liquid. When tip
touching is activated, Freedom EVOware dispenses to the destination
container in the normal way, but then moves the tips to the side of the well and
back before retracting them. This helps to remove any droplets which may be
adhering to the tips.
Speed: Specify the tip touching speed.
Delay after touching: Specify the delay between the tip touching the well and
moving back to the middle of the well.
Mix after Dispense
Check this box if you want to mix the liquid after dispensing it. You can specify
the number of mix cycles (range: 1 to 99), the mix volume (max. 2500 µl), the
Z-position and the Z-offset. A positive value for the offset lowers the tips.
Retract Tips to
Specify the Z-position and the Z-offset to which the tips should retract (move
upwards) after dispensing. A positive value for the offset lowers the tips.
Retract Speed
Specify the required retract speed.
10.4.3 MCA384 Calibration Parameters
Freedom EVOware uses these parameters for the MCA384 pipetting head to
ensure that the specified net volumes are dispensed accurately. The two curves in
the dialog box show graphically the current settings for single pipetting mode and
multi pipetting mode.
Fig. 10-13 MCA384 Calibration parameters
Freedom EVOware Software Manual, 393172, en, V2.3
10 - 29
10 - Configuring Liquid Classes
MCA384 Liquid Classes
The parameters of this dialog box are as follows (some of the parameters must be
specified separately for single pipetting mode and multi pipetting mode):
Offset / Factor
Specify an offset and/or calibration factor to be applied for single pipetting
mode and multi pipetting mode.
Freedom EVOware uses the following expression to calculate the MCA384
plunger movement from the net volume specified in the pipetting script:
Calibrated MCA384 plunger movement = (net volume * factor) + offset
10.4.4 MCA384 Plunger Parameters
Freedom EVOware uses these parameters for the MCA384 pipetting head to
control the plunger during dispensing. The graph illustrates the plunger speed
versus the time for the specified dispense volume.
Fig. 10-14 MCA384 Plunger parameters
The parameters of this dialog box are as follows (some of the parameters must be
specified separately for single pipetting mode and multi pipetting mode):
Accelerate with / Decelerate with
Specify the required acceleration and deceleration of the MCA384 plunger for
single pipetting mode and multi pipetting mode. For mechanical reasons the
MCA384 plunger cannot accelerate or decelerate instantly. The graph then
illustrates the plunger speed versus the time for the specified dispense
volume.
10 - 30
Freedom EVOware Software Manual, 393172, en, V2.3
10 - Configuring Liquid Classes
MCA384 Liquid Classes
Vol. dependent speed
Check these checkboxes to use a pipetting speed which is dependent on the
volume you want to pipette. The aspiration and/or dispense speed which you
choose on the aspirate and/or dispense tabs will be ignored and the following
pipetting speeds will be used instead:
–
½ Vol. µl/s: The volume you choose in the Aspirate command will be
aspirated in 2 seconds.
– Vol. µl/s: The volume you choose in the Dispense command will be
dispensed in 1 second.
Dispense volume
Specify the dispense volume for which you want to see a graph (the volume
you specify should include the leading and trailing airgaps) and choose the
graph you want to see (single pipetting mode or multi pipetting mode). The
volume you specify is only used to calculate the graph and is not a dispense
command for the MCA384 (the volume which will be dispensed is specified
with the MCA384 Dispense command).
The graph helps you to identify whether you have chosen suitable settings in
this dialog box.
If the graph has a flat top (plateau), the plunger acceleration/deceleration will
allow the plunger to reach the dispense speed specified on the Dispense tab
of the liquid class for the dispense volume you have chosen.
Freedom EVOware Software Manual, 393172, en, V2.3
10 - 31
10 - Configuring Liquid Classes
Te-MO 96 Liquid Classes
10.5 Te-MO 96 Liquid Classes
The Te-MO is available with a 96-tip or 384-tip pipetting head. The following
settings apply to the 96-tip version. The 96-tip pipetting head can be fitted with a
tipblock (fixed tips) or with disposable tips (DITIs).
10.5.1 Te-MO 96 Aspirate Parameters
Freedom EVOware uses these parameters when aspirating or mixing with the 96tip Te-MO tip block or DITI pipetting head. The illustrations at the top right of the
dialog box show graphically the current settings for single pipetting mode and
multi pipetting mode. Vol. stands for the pipetted volume.
Fig. 10-15 Te-MO 96 Aspirate parameters for the tip block and DITIs
The parameters of this dialog box are as follows (some of the parameters must be
specified separately for single pipetting mode and multi pipetting mode):
Aspiration Speed
Specify the aspiration speed in µl/s. A lower aspiration speed can improve the
pipetting accuracy, a higher aspiration speed can improve the speed of
operation.
Delay
Specify the delay after aspiration.
10 - 32
Freedom EVOware Software Manual, 393172, en, V2.3
10 - Configuring Liquid Classes
Te-MO 96 Liquid Classes
System Trailing Airgap (STAG)
Specify the volume of air to aspirate directly after getting the tip block or DITIs
(recommended range: 0 to 50 µl). Freedom EVOware uses the aspiration
speed specified for the leading airgap for the system trailing airgap, too.
When washing the tips, the air is dispensed during the empty step of the Wash
command together with the remaining liquid. The STAG ensures that all of the
liquid in the tips is discarded at the start of the wash procedure. This helps to
reduce the carryover. In contrast to the leading airgap, the STAG is only
relevant for washing the tips and is not dispensed by the Dispense command.
Leading Airgap (LAG)
Specify the volume of the leading airgap. Click the
button to specify
aspiration speed and delay after aspiration. The air of the leading airgap is
dispensed together with the net volume which you specify in the Dispense
command. The resulting tip blowout leads to more accurate pipetting.
Trailing Airgap (TAG)
Specify the volume of the trailing airgap. Click the
button to specify
aspiration speed and delay after aspiration. The trailing airgap is used to
prevent liquid dripping from the tips when the arm moves. In addition, it
ensures that the liquid meniscus is not dragged away from the end of the tip
during fast arm movements.
Excess Volume
Specify the excess volume (in µl or %). Click the
button to choose the
position to use for discarding the excess volume (Discard to waste or Back to
vessel). The excess volume is used to reduce contamination of the liquid in
the tips with previously used liquids to an absolute minimum.
Specify a digit in the Replace after field to discard the excess volume after reusing it several times (e.g. to save costs). This only applies if excess volume >
0 and if you are using multi-pipetting. The excess volume is discarded after
the pipetting cycle (aspiration and dispensing) has been completed.
Conditioning Volume
Specify the conditioning volume. Click the
button to choose the position to
use for discarding the conditioning volume (Discard to waste or Back to
vessel). A conditioning volume can be used to maximize pipetting accuracy by
ensuring that the liquid meniscus at the end of the tips is the is the same
shape after aspirating as it will be after dispensing. The conditioning volume is
discarded directly after aspirating.
Use Pinch Valve
The Te-MO does not have a pinch valve.
Use Liquid Detection
The Te-MO does not support liquid level detection for aspiration directly. If you
want to use a liquid class for the Te-MO which specifies liquid level detection,
the liquid level must be emulated using a special variable (see
14.1.4.14 “RACK_VOLUME_x”, 14-7). Check this checkbox if you want to
activate the emulated liquid level detection. Liquid level detection can be used
e.g. to ensure minimal tip contamination by limiting the tip immersion depth.
For Freedom EVOware Plus, see 14.1.4 “Pre-Defined Variables”, 14-4 for
information on accessing the current value of this pre-defined variable in
another script.
Freedom EVOware Software Manual, 393172, en, V2.3
10 - 33
10 - Configuring Liquid Classes
Te-MO 96 Liquid Classes
Aspiration Position
Specify the Z-position and the Z-offset of the tips when aspirating. A positive
value for the offset lowers the tips. You can only choose a Z-position relative
to the liquid level if you have activated liquid level detection emulation.
If you choose an aspirate position with tracking, the tips move downwards as
the liquid level drops in the wells during aspiration. This option can be used
e.g. to ensure minimal tip contamination by limiting the tip immersion depth.
You can also choose the X-position when aspirating as follows:
–
–
Center: as specified for the labware which is used
Left: left of center; the offset is specified with X or Y offset while pipetting
for the labware which is used
– Right: right of center; the offset is specified with X or Y offset while
pipetting for the labware which is used
– Left / Right: left of center for odd columns, right of center for even
columns; the offset is specified with X or Y offset while pipetting for the
labware which is used
– Right / Left: right of center for odd columns, left of center for even
columns; the offset is specified with X or Y offset while pipetting for the
labware which is used
You can also choose the Y-position when aspirating as follows:
–
–
Center: as specified for the labware which is used
Rear: rear of center; the offset is specified with X or Y offset while pipetting
for the labware which is used
– Front: front of center; the offset is specified with X or Y offset while
pipetting for the labware which is used
– Rear / Front: rear of center for odd columns, front of center for even
columns; the offset is specified with X or Y offset while pipetting for the
labware which is used
– Front / Rear: front of center for odd columns, rear of center for even
columns; the offset is specified with X or Y offset while pipetting for the
labware which is used
By combining an X offset and a Y offset, there are nine possible pipetting
positions (including the center position with no offsets).
On Detection Error
Select the required error handling if Freedom EVOware detects no liquid or
not enough liquid.
Use Exit Signal Detection
The Te-MO does not support exit signal detection. The PMP option is not
available for the Te-MO.
Mix before Aspiration
Check this box if you want Freedom EVOware to mix the liquid before
aspirating it. You can specify the number of mix cycles (range: 1 to 99), the
mix volume (max. 2500 µl), the Z-position and the Z-offset. A positive value for
the offset lowers the tips.
Retract Tips to
Specify the Z-position and the Z-offset to which the tips should retract (move
upwards) after aspirating. A positive value for the offset lowers the tips.
Retract Speed
Specify the required retract speed.
10 - 34
Freedom EVOware Software Manual, 393172, en, V2.3
10 - Configuring Liquid Classes
Te-MO 96 Liquid Classes
10.5.2 Te-MO 96 Dispense Parameters
Freedom EVOware uses these parameters when dispensing or mixing with the
96-tip Te-MO tip block or DITI pipetting head.
Fig. 10-16 Te-MO 96 Dispense parameters for the tip block and DITIs
The parameters of this dialog box are as follows (some of the parameters must be
specified separately for single pipetting mode and multi pipetting mode):
Dispense Speed
Specify the dispense speed in µl/s. A high speed (400-600 µl/s) is needed to
achieve a proper free dispense. Contact dispense requires a lower speed (in
the same range as the aspirate speed).
Breakoff Speed
You cannot specify a breakoff speed for the Te-MO.
Delay
Specify the delay after dispensing.
Trailing Airgap after each Dispense
You can automatically aspirate a trailing airgap after each dispense operation
in order to avoid droplets forming on the tip. The trailing airgap parameters are
specified in the Aspirate dialog box.
Use Pinch Valve
The Te-MO does not have a pinch valve.
Use Liquid Detection
The Te-MO does not support liquid level detection (or emulated liquid level
detection) for dispensing.
Freedom EVOware Software Manual, 393172, en, V2.3
10 - 35
10 - Configuring Liquid Classes
Te-MO 96 Liquid Classes
Dispense Position
Specify the Z-position and the Z-offset of the tips when dispensing. A positive
value for the offset lowers the tips.
If you choose a dispense position with tracking, the tips move upwards as the
liquid level rises in the wells during dispensing. This option can be used e.g. to
ensure minimal tip contamination by limiting the tip immersion depth.
You can also choose the X-position when dispensing as follows:
–
–
Center: as specified for the labware which is used
Left: left of center; the offset is specified with X or Y offset while pipetting
for the labware which is used
– Right: right of center; the offset is specified with X or Y offset while
pipetting for the labware which is used
– Left / Right: left of center for odd columns, right of center for even
columns; the offset is specified with X or Y offset while pipetting for the
labware which is used
– Right / Left: right of center for odd columns, left of center for even
columns; the offset is specified with X or Y offset while pipetting for the
labware which is used
You can also choose the Y-position when dispensing as follows:
–
–
Center: as specified for the labware which is used
Rear: rear of center; the offset is specified with X or Y offset while pipetting
for the labware which is used
– Front: front of center; the offset is specified with X or Y offset while
pipetting for the labware which is used
– Rear / Front: rear of center for odd columns, front of center for even
columns; the offset is specified with X or Y offset while pipetting for the
labware which is used
– Front / Rear: front of center for odd columns, rear of center for even
columns; the offset is specified with X or Y offset while pipetting for the
labware which is used
By combining an X offset and a Y offset, there are nine possible pipetting
positions (including the center position with no offsets).
Tip Touching
Activate the tip touching function if required and specify the direction of the
movement. The amount of movement is specified with Tip-touching distance
for the labware which is used.
Tip touching is a special movement when dispensing a liquid. When tip
touching is activated, Freedom EVOware dispenses to the destination
container in the normal way, but then moves the tips to the side of the well and
back before retracting them. This helps to remove any droplets which may be
adhering to the tips.
Speed: Specify the tip touching speed.
Delay after touching: Specify the delay between the tip touching the well and
moving back to the middle of the well.
Mix after Dispense
Check this box if you want to mix the liquid after dispensing it. You can specify
the number of mix cycles (range: 1 to 99), the mix volume (max. 2500 µl), the
Z-position and the Z-offset. A positive value for the offset lowers the tips.
Retract Tips to
Specify the Z-position and the Z-offset to which the tips should retract (move
upwards) after dispensing. A positive value for the offset lowers the tips.
10 - 36
Freedom EVOware Software Manual, 393172, en, V2.3
10 - Configuring Liquid Classes
Te-MO 96 Liquid Classes
Retract Speed
Specify the required retract speed.
10.5.3 Te-MO 96 Calibration Parameters
Freedom EVOware uses these parameters for the 96-tip Te-MO tip block or DITI
pipetting head to ensure that the specified net volumes are dispensed accurately.
The two curves in the dialog box show graphically the current settings for single
pipetting mode and multi pipetting mode.
Fig. 10-17 Te-MO 96 Calibrate parameters for the tip block and DITIs
The parameters of this dialog box are as follows (some of the parameters must be
specified separately for single pipetting mode and multi pipetting mode):
Offset / Factor
Specify an offset and/or calibration factor to be applied for single pipetting
mode and multi pipetting mode.
Freedom EVOware uses the following expression to calculate the Te-MO
plunger movement from the net volume specified in the pipetting script:
Calibrated Te-MO plunger movement = (net volume * factor) + offset
Freedom EVOware Software Manual, 393172, en, V2.3
10 - 37
10 - Configuring Liquid Classes
Te-MO 384 Liquid Classes
10.6 Te-MO 384 Liquid Classes
The Te-MO is available with a 96-tip or 384-tip pipetting head. The following
settings apply to the 384-tip version. The 384-tip pipetting head can be fitted with
a tipblock (fixed tips) but not with disposable tips (DITIs).
10.6.1 Te-MO 384 Aspirate Parameters
Freedom EVOware uses these parameters for the 384-tip Te-MO pipetting head
when aspirating or mixing. The illustrations at the top right of the dialog box show
graphically the current settings for single pipetting mode and multi pipetting mode.
Vol. stands for the pipetted volume.
Fig. 10-18 Te-MO 384 Aspirate parameters
See 10.5.1 “Te-MO 96 Aspirate Parameters”, 10-32 for details of the
parameters.
The Te-MO 384 does not have a pinch valve and does not support exit signal
detection. The PMP option is not available for the Te-MO.
10 - 38
Freedom EVOware Software Manual, 393172, en, V2.3
10 - Configuring Liquid Classes
Te-MO 384 Liquid Classes
10.6.2 Te-MO 384 Dispense Parameters
Freedom EVOware uses these parameters for the 384-tip Te-MO pipetting head
when dispensing or mixing.
Fig. 10-19 Te-MO 384 Dispense parameters
The parameters of this dialog box are as follows (some of the parameters must be
specified separately for single pipetting mode and multi pipetting mode):
Delay before
Specify the required settling time for the Te-MO after completing the previous
Te-MO command and before starting to dispense (range: 0 to 5000 ms).
The Te-MO 384 does not support liquid level detection or tip touching for
dispensing.
See 10.5.2 “Te-MO 96 Dispense Parameters”, 10-35 for details of the other
parameters.
10.6.3 Te-MO 384 Calibration Parameters
Freedom EVOware uses these parameters for the 384-tip Te-MO pipetting head
to ensure that the specified net volumes are dispensed accurately. The two curves
in the dialog box show graphically the current settings for single pipetting mode
and multi pipetting mode.
Freedom EVOware Software Manual, 393172, en, V2.3
10 - 39
10 - Configuring Liquid Classes
Te-MO 384 Liquid Classes
Fig. 10-20 Te-MO 384 Calibration parameters
The parameters of this dialog box are as follows (some of the parameters must be
specified separately for single pipetting mode and multi pipetting mode):
Offset / Factor
Specify an offset and/or calibration factor to be applied for single pipetting
mode and multi pipetting mode.
Freedom EVOware uses the following expression to calculate the Te-MO
plunger movement from the net volume specified in the pipetting script:
Calibrated Te-MO plunger movement = (net volume * factor) + offset
10 - 40
Freedom EVOware Software Manual, 393172, en, V2.3
10 - Configuring Liquid Classes
Te-MO 384 Liquid Classes
10.6.4 Te-MO 384 Plunger Parameters
Freedom EVOware uses these parameters for the 384-tip Te-MO pipetting head
to control the plunger during dispensing. The graph illustrates the plunger speed
versus the time for the specified dispense volume.
Fig. 10-21 Te-MO 384 Plunger parameters
The parameters of this dialog box are as follows (some of the parameters must be
specified separately for single pipetting mode and multi pipetting mode):
Accelerate with / Decelerate with
Specify the required acceleration and deceleration of the Te-MO plunger for
single pipetting mode and multi pipetting mode. For mechanical reasons the
Te-MO plunger cannot accelerate or decelerate instantly. The graph then
illustrates the plunger speed versus the time for the specified dispense
volume.
Dispense volume
Specify the dispense volume for which you want to see a graph (the volume
you specify should include the leading and trailing airgaps) and choose the
graph you want to see (single pipetting mode or multi pipetting mode). The
volume you specify is only used to calculate the graph and is not a dispense
command for the Te-MO (the volume which will be dispensed is specified with
the Te-MO Dispense command).
The graph helps you to identify whether you have chosen suitable settings in
this dialog box.
If the graph has a flat top (plateau), the plunger acceleration/deceleration will
allow the plunger to reach the dispense speed specified on the Dispense tab
of the liquid class for the dispense volume you have chosen.
Freedom EVOware Software Manual, 393172, en, V2.3
10 - 41
10 - Configuring Liquid Classes
Overview of Liquid Classes Supplied With Freedom EVOware
10.7 Overview of Liquid Classes Supplied With Freedom
EVOware
A liquid class is a collection of parameters necessary for pipetting liquids. Each
liquid class is divided into subclasses for a certain hardware configuration and
volume range. The subclasses are automatically selected at runtime depending
on the used hardware and required volume.
10.7.1 General
Tecan provides a default liquid class database for water, DMSO, serum and
ethanol, installed with EVOware. Additional liquid classes for special pipetting
options can be imported from the EVOware CD.
Note: If not specified, all liquid classes are for use with 1000 µl syringes.
Using a standard liquid class assumes that the most suitable tip size is used; for
example, when pipetting 150 µl with the Liquid Handling Arm, it is assumed that
the 200 µl tip is used. In this case, the standard liquid class "Water free dispense"
should be used. However, if it is preferred to use the 1000 µl tip for pipetting 150
µl, a specific liquid class should be used, in this case "Water free dispense DiTi
1000" .
The diagram Fig. 10-23, 10-43 and Fig. 10-22, 10-42 show the usage for the
most common liquid classes in combination of the required volume and tip
capacity.
Eg.: Pipetting a volume of 10 µl with a 50 µl tip using the MCA384 would require
the liquid class Water wet contact MCA 384 DiTi 50.
Pipetted volume
Liquid class usage for DiTi operated with the LiHa:
A
B
A
Tip capacity
Fig. 10-22 Liquid class usage for Disposable Tips on the LiHa
A
10 - 42
Water free dispense
B
Water free dispense DiTi 1000
Freedom EVOware Software Manual, 393172, en, V2.3
10 - Configuring Liquid Classes
Overview of Liquid Classes Supplied With Freedom EVOware
Liquid class usage for DiTi operated with the MCA384:
Pipetted volume
A
B
A
C
A
Tip capacity
Fig. 10-23 Liquid class usage for Disposable Tips on the MCA 384
A
B
Water wet contact
Water wet contact MCA 384 DiTi 125
C
Water wet contact MCA 384 DiTi 50
Approach
The liquid class names have been chosen to be self-explanatory containing the
liquid type, dispense mode and if necessary the hardware configuration.
Many liquid classes may have similar parameter settings when being compared to
each other. The differences are usually found in adaptations of parameter values
for certain volumes.
Refer to the respective section for further information:
10.7.3 “Installed Liquid Classes”, 10-44
10.7.4 “Liquid Classes on the Freedom EVOware CD”,
10-49
10.7.2 Dispense Modes
The figures below show how liquids are dispensed into a well.
The dispense modes differ from each other to provide certain features to match
the liquid’s attributes and application requirements.
Freedom EVOware Software Manual, 393172, en, V2.3
10 - 43
10 - Configuring Liquid Classes
Overview of Liquid Classes Supplied With Freedom EVOware
A
B
C
Fig. 10-24 Dispense modes
A
B
Free Dispense (non contact)
Wet Contact (contact with liquid)
C
Dry Contact (contact with
labware)
Free Dispense (non contact)
The free dispense mode dispenses the liquid from a defined dispense
position, generally at the container top. If liquid is present the dispense
position is above the liquid level.
–
Medium precision; maximum throughput
Wet Contact (contact with liquid)
The wet contact dispense mode dispenses the liquid at Z-Max or below the
liquid level of a pre-dispensed liquid (e.g. diluent). Mixing can be added
without additional tip movement.
–
High precision; low throughput
Dry Contact (contact with labware)
The dry contact dispense mode dispenses at or close to Z-Max.
High precision; medium throughput
10.7.3 Installed Liquid Classes
The default liquid classes listed below are intended for water, DMSO, serum and
ethanol.
DMSO
10 - 44
Name
DMSO free dispense
Usage
General liquid class
Devices
LiHa, MCA96 with DiTi
Comment
Can be used for most pipetting devices and tip types
Name
DMSO wet contact
Usage
General liquid class
Devices
MCA96, MCA384, Te-MO96
Comment
For multi channel pipetting heads
Freedom EVOware Software Manual, 393172, en, V2.3
10 - Configuring Liquid Classes
Overview of Liquid Classes Supplied With Freedom EVOware
Name
DMSO wet contact MC96 HP block
Usage
High Precision fixed tip block on 96-channel pipetting heads
Devices
MCA96, Te-MO96
Comment
Name
DMSO wet contact MCA 384 DiTi 125
Usage
Devices
MCA384 with 125 µl DiTi
Comment
Improved accuracy below 50 µl
Name
DMSO wet contact MCA 384 DiTi 50
Usage
Devices
MCA384 with 50 µl DiTi
Comment
Improved accuracy below 15 µl
Name
DMSO wet contact MCA 384 large capacity tip block
Usage
For large capacity fixed tip blocks
Devices
MCA384 with 96 or 384 fixed tip block
Comment
Name
DMSO wet contact MCA 384 small capacity tip block
Usage
For small capacity fixed tip blocks
Devices
MCA384 with 96 or 384 fixed tip block
Comment
Ethanol
Name
Ethanol free dispense
Usage
General liquid class
Devices
LiHa
Comment
Freedom EVOware Software Manual, 393172, en, V2.3
10 - 45
10 - Configuring Liquid Classes
Overview of Liquid Classes Supplied With Freedom EVOware
Serum
Name
Serum free dispense
Usage
General liquid class
Devices
LiHa
Comment
Name
Serum free dispense DiTi 1000
Usage
Devices
LiHa with 1000 µl DiTi
Comment
Improved accuracy below 200 µl with 1000 µl DiTi
Name
System Liquid free dispense
Usage
Aspirate and dispense system liquid with the LiHa
Devices
LiHa
System Liquid
Comment
Water
Name
Water dry contact High density plate
Usage
For Te-PS tips and 10 µl Disposable Tips in dry 1536 well plate
Devices
LiHa with Te-PS tips or 10 µl DiTi
Comment
Name
Water free dispense
Usage
General liquid class
Devices
LiHa, MCA96
Comment
For most pipetting devices and tip types
Name
Water free dispense DiTi 1000
Usage
10 - 46
Devices
LiHa with 1000 µl DiTi
Comment
Improved accuracy below 200 µl for 1000 µl Disposable Tips
Freedom EVOware Software Manual, 393172, en, V2.3
10 - Configuring Liquid Classes
Overview of Liquid Classes Supplied With Freedom EVOware
Name
Water wet contact
Usage
General liquid class
Devices
LiHa, MCA384, MCA96, Te-MO 96
Comment
For most pipetting devices and tip types
Name
Water wet contact MC96 HP block
Usage
High Precision fixed tip block on 96-channel pipetting heads
Devices
MCA96, Te-MO 96
Comment
Name
Water wet contact MCA 384 DiTi 125
Usage
Devices
MCA384 with 125 µl DiTi
Comment
Improved accuracy below 50 µl
Name
Water wet contact MCA 384 DiTi 50
Usage
Devices
MCA384 with 50 µl DiTi
Comment
Improved accuracy below 15 µl
Name
Water wet contact MCA 384 large capacity tip block
Usage
For large capacity fixed tip blocks
Devices
MCA384 with 96 or 384 fixed tip block
Comment
Name
Water wet contact MCA 384 small capacity tip block
Usage
For small capacity fixed tip blocks
Devices
MCA384 with 96 or 384 fixed tip blocks
Comment
Freedom EVOware Software Manual, 393172, en, V2.3
10 - 47
10 - Configuring Liquid Classes
Overview of Liquid Classes Supplied With Freedom EVOware
Wash Refill Center
The WRC wash and refill center has default liquid classes, required for washing
tips. The WRC wash and refill center is used for washing the MCA96, MCA384 as
well as the Te-MO 96.
WRC
10 - 48
Name
WRC step 1 Empty tips
Usage
Step 1 of wash command
Devices
MCA384, MCA96, Te-MO 96
Comment
For emptying tips
Name
WRC step 2 Dip in
Usage
Step 2 of wash command
Devices
MCA384, MCA96, Te-MO 96
Comment
For dipping into the wash liquid
Name
WRC step 3 Blow out underwater
Usage
Step 3 of wash command
Devices
MCA384, MCA96, Te-MO 96
Comment
For blowing out air inside the wash liquid
Freedom EVOware Software Manual, 393172, en, V2.3
10 - Configuring Liquid Classes
Overview of Liquid Classes Supplied With Freedom EVOware
10.7.4 Liquid Classes on the Freedom EVOware CD
The liquid classes listed below can be imported from the Freedom EVOware CD.
LiHa 50 µl DiTi
Name
Water free dispense DiTi 50
Usage
For 50 µl DiTi without filter
Devices
LiHa with 50 µl DiTi
Comment
Used with 500 µl syringe
Name
Water free dispense DiTi 50 Filter
Usage
For 50 µl DiTi with filter
Devices
LiHa with 50 µl DiTi
Comment
Used with 500 µl syringe
Name
384 DMSO contact wet
Te-MO 384
Usage
Devices
Te-MO 384
Comment
Name
384 DMSO free dispense
Usage
Devices
Te-MO 384
Comment
Name
384 Dummy
Usage
Devices
Te-MO 384
Comment
Only used for maintenance scripts
Name
384 Water contact wet
Usage
Devices
Te-MO 384
Freedom EVOware Software Manual, 393172, en, V2.3
10 - 49
10 - Configuring Liquid Classes
Overview of Liquid Classes Supplied With Freedom EVOware
Comment
Name
384 Water free dispense
Usage
Devices
Te-MO 384
Comment
PMP
Name
Water free dispense PMP DiTi 200 filter
Usage
Pressure Monitored Pipetting using Tecan part no. 10 612 553
Devices
PMP LiHa with 200 µl DiTi with filter
Comment
Name
Water free dispense PMP DiTi 1000 filter
Usage
Pressure Monitored Pipetting using Tecan part no. 10 612 555
Devices
PMP LiHa with 1000 µl DiTi with filter
Comment
Name
Serum free dispense PMP DiTi 200 filter
Usage
Pressure Monitored Pipetting using Tecan part no. 10 612 553
Devices
PMP LiHa with 200 µl DiTi with filter
Comment
Name
Serum free dispense PMP DiTi 1000 filter
Usage
Pressure Monitored Pipetting using Tecan part no. 10 612 555
Devices
PMP LiHa with 1000 µl DiTi with filter
Comment
Name
DMSO free dispense PMP DiTi 200
Usage
Pressure Monitored Pipetting using Tecan part no. 10 612 552
Devices
PMP LiHa with 200 µl DiTi without filter
Comment
10 - 50
Freedom EVOware Software Manual, 393172, en, V2.3
10 - Configuring Liquid Classes
Overview of Liquid Classes Supplied With Freedom EVOware
Name
DMSO free dispense PMP DiTi 200 filter
Usage
Pressure Monitored Pipetting using Tecan part no. 10 612 553
Devices
PMP LiHa with 200 µl DiTi with filter
Comment
Name
DMSO free dispense PMP DiTi 1000 filter
Usage
Pressure Monitored Pipetting using Tecan part no. 10 612 555
Devices
PMP LiHa with 1000 µl DiTi with filter
Comment
Name
Template free dispense PMP DiTi 200
Usage
Template for creating a customized PMP liquid class
Devices
PMP LiHa with 200 µl DiTi without filter
Comment
Name
Template free dispense PMP DiTi 200 filter
Usage
Template for creating a customized PMP liquid class
Devices
PMP LiHa with 200 µl DiTi with filter
Comment
Name
Template free dispense PMP DiTi 1000 filter
Usage
Template for creating a customized PMP liquid class
Devices
PMP LiHa with 1000 µl DiTi with filter
Comment
Freedom EVOware Software Manual, 393172, en, V2.3
10 - 51
10 - Configuring Liquid Classes
Overview of Liquid Classes Supplied With Freedom EVOware
10 - 52
Freedom EVOware Software Manual, 393172, en, V2.3
11 - Getting Started - Setting Up a New Script or Process
First Steps
11 Getting Started - Setting Up a New Script or
Process
This chapter describes the steps which are required to set up a new pipetting
script (Freedom EVOware Standard) or process (Freedom EVOware Plus).
Processes and scripts can only be created and/or modified by users with Freedom
EVOware Administrator or Application Specialist rights.
11.1 First Steps
Freedom
EVOware
Standard
Start Freedom EVOware and choose Create a new script in the Startup Wizard
(see 5.2 “Startup Wizard, Freedom EVOware Standard”, 5-5). This opens the
main window of Freedom EVOware. Initially, the Worktable Editor at the bottom
right of the screen will be empty (i.e. it does not contain any carriers or labware
etc.). The Script Editor at the top right of the screen will also empty be until you
add some pipetting commands. Until you save the script for the first time and
assign a name of your choice, the title bar of the Script Editor will show a generic
name.
Freedom
EVOware Plus
Start Freedom EVOware and choose Create a new process in the Startup Wizard
(see 5.3 “Startup Wizard, Freedom EVOware Plus”, 5-7). This opens the main
window of Freedom EVOware. Initially, the Worktable Editor at the bottom right of
the screen will be empty (i.e. it does not contain any carriers or labware etc.). The
Process Editor at the top right of the screen will also empty be empty until you add
some process steps. Until you save the script for the first time and assign a name
of your choice, the title bar of the Process Editor will show a generic name.
The various elements of the Freedom EVOware main window are described in
5.4 “Overview of the Main Window in Freedom EVOware”, 5-9.
11.2 Setting Up a New Pipetting Instrument
Please proceed as follows when setting up a new pipetting instrument:
Use the Setup & Service software to check and calibrate the reference
coordinates of the hardware. This is normally done for you by the Tecan Field
Service Engineer when installing the pipetting instrument and the optional
devices. See 1.2 “Reference Documents”, 1-3 for information on this
software.
Edit the settings for the LiHa (see 8.4.2.1 “LiHa (Liquid Handling Arm)”, 822).
If necessary, edit the settings for the PosID barcode scanner (see
8.4.2.2, 8-28), the MPO/LICOS system (see 8.4.2.3, 8-29), the Chemical
System (see 8.4.2.5, 8-30) and the doorlocks (see 8.4.2.7, 8-31).
Freedom EVOware Software Manual, 393172, en, V2.3
11 - 1
11 - Getting Started - Setting Up a New Script or Process
Pre-requirements
11.3 Pre-requirements
Before you can set up a process or script, you have to configure the infrastructure
of your system as follows:
Check that the optional devices you want to use (such as barcode scanners)
are installed on your pipetting instrument and that the devices are present in
the Control Bar (Commands section) and/or visible in the Worktable Editor. If
the icons are missing, then you need to run the installation program again and
install the device drivers which are missing (see 13.2 “Overview of Device
Commands”, 13-12 and 4.3 “Modifying, Removing or Repairing Your
Installation”, 4-8). In general, the device drivers are pre-configured during
installation with appropriate global settings. For information on configuring the
global settings see 8.4 “Device Settings”, 8-21.
Check that the general settings for the Freedom EVOware software are
configured appropriately (see 8 “Configuration Tool”, 8-1). Among other
things, check that the COM ports have been configured for the optional
devices and that the I/O state is switched ON for the devices that you want to
use (this enables the COM interface for the respective device). See 8.4.3.1 “I/
O State Tab”, 8-36.
Check that the carriers and labware you want to use for your process are
visible in Freedom EVOware in the Control Bar (Labware section). If you are
using custom carriers and/or labware items which are not in the list, you need
to create them in Freedom EVOware before you can set up your process. See
9.5 “Configuring Carriers”, 9-39 and 9.4 “Configuring Labware”, 9-15. In
the case of carriers, this involves e.g. specifying the carrier dimensions and
how many labware items can be put on the carrier. In the case of labware, this
involves e.g. specifying the labware dimensions.
Check that liquid classes are available for the liquids you want to pipette (see
10.1 “Liquid Classes Editor”, 10-1). A liquid class is a set of liquid handling
parameters. It specifies aspirating and dispensing speeds, airgaps, liquid
detection modes, etc.
Rectangular labware such as microplates is moved to and from carriers and
other devices such as carousels using a plate robot (RoMa; robot
manipulator). Tubes are moved to and from tube racks using a tube robot
(PnP; Pick & Place arm). Movement commands for the RoMa and PnP are
called robot vectors. The robot vectors for the RoMa are associated with the
carrier definitions. The robot vectors for the PnP are associated with the
labware definitions. Appropriate robot vectors may already be provided with
your Freedom EVOware installation. Check in the respective carrier and
labware definitions to see whether the robot vectors you want to use are
already present. Otherwise you will need to configure a new vector. See
9.6 “Creating and Editing Plate Robot Vectors”, 9-55 and 9.7 “Creating and
Editing Tube Robot Vectors”, 9-63.
Additional RoMa and PnP vectors are needed to move the RoMa or PnP back
to a home (or parking) position when not in use. Such vectors can be seen in
the Robot Vectors section of the Control Bar. See 9.6.4 “Defining the Home
Position for a RoMa”, 9-62 and 9.7.4 “Defining the Home Position for a
PnP”, 9-69 for more information.
11.3.1 Setting Up Carriers on the Worktable
The Worktable Editor at the bottom right of the screen is a graphical
representation of the pipetting instrument's worktable (deck). It shows icons for
11 - 2
Freedom EVOware Software Manual, 393172, en, V2.3
11 - Getting Started - Setting Up a New Script or Process
Pre-requirements
the devices which are installed and the arrangement of the carriers and labware.
See 13.2 “Overview of Device Commands”, 13-12.
Before programming your process or pipetting script, you need to move the
carriers and labware etc. which you want to use on to the Worktable Editor to
match the real arrangement of these objects on the pipetting instrument.
This section describes how to add carriers; putting labware on the carriers is
described in 11.4.1 “Choosing Labware for a Pipetting Script”, 11-4,
11.5.1 “Choosing Labware for a Process”, 11-7 and 11.5.4 “Choosing Labware
for a Pipette Command”, 11-11.
Note: Each script or process has its own worktable layout, and the worktable
layout is automatically saved with the script or process. Click on the worktable and
click Save worktable as template if you want to save the worktable layout as a
template for use in another script or process. The worktable template contains
information on the carriers you have chosen. If you have already put labware onto
the carriers, the template also contains information on the labware you have
chosen.
Carriers can only be placed on the Worktable Editor at specified grid positions
which correspond to the positioning pins on the instrument’s worktable. One grid
unit is 25.0 mm. The choice and the positions of carriers and labware are chosen
according to the requirements of your application or experiment.
You can change the carrier positions later by dragging with the mouse without
needing to change your script or process, for example if it turns out that the
carriers are too close together to position additional objects in between.
You can change the size of the Worktable Editor by moving the mouse over the
one of the edges until the double arrow cursor appears. Then click and drag until
the required size has been reached.
When required by the script or process, Freedom EVOware uses the RoMa
(Robot Manipulator) to move labware during runtime to new positions (carrier
sites). However, carriers and devices always stay at the same position.
Accordingly, you must set up the initial worktable with all of the carriers you need
in the correct positions.
There are two basic types of carrier - normal carriers on which you can place
labware for pipetting and carriers which are devices. The latter type are used as
placeholders on the worktable for devices such as the orbital shaker or the
incubator. Depending on the type of device, such carriers are often not available
for pipetting, even though you can place labware on (or into) them. When the
carrier is configured, this is specified by unchecking the Accessible for liquid
handling arm checkbox.
To create the worktable layout, select the required carrier type from the Control
Bar (Labware section) and drag it onto the worktable at the required position.
Make sure that there is enough space on the worktable for the carrier. If
necessary, drag already positioned objects to the left or right to make space.
Remember that the final positions you choose must correspond to the actual
position of the objects on the pipetting instrument. Large objects such as the TeMO need a lot of space to allow them to be positioned.
Repeat this process to add all of the carriers to the worktable that you need. The
choice and the positions of the carriers is based on the requirements of your
application or experiment.
To move a carrier to a new position, click the edge of the carrier to select it and
drag it to the required position. When dragging the carrier, the current grid position
is shown in the small yellow tab at the bottom left. To delete a carrier, click on it
and drag it off of the worktable.
To make a copy of a carrier which is already on the worktable, press the Ctrl
button, click on the carrier and drag the cursor to the required grid position.
Freedom EVOware Software Manual, 393172, en, V2.3
11 - 3
11 - Getting Started - Setting Up a New Script or Process
Setting Up a Pipetting Script in Freedom EVOware Standard
When adding, deleting or moving carriers, a special cursor is shown to indicate
the action you are performing (“+”, “del” or “move”).
If you click on a carrier (click on the edge, not on the labware on the carrier),
information on the carrier is shown in the lower infopad.
Carrier types can be assigned unique colors in the Freedom EVOware
configuration make it easier for you to identify them in the Worktable Editor
(see “Color”, 9-41).
Carriers which are designed for one type of labware only (such as tube racks and
the wash station) are put on the worktable with a full complement of labware. For
other carrier types, you need to add the labware by hand (see later).
See also 11.7.2 “Example of a Worktable With Several Carriers and Labware
Items”, 11-20.
11.4 Setting Up a Pipetting Script in Freedom EVOware
Standard
After setting up the worktable with the carriers and devices you want to use,
before you write the pipetting script you must to choose the labware you need.
11.4.1 Choosing Labware for a Pipetting Script
Select the required labware type from the Labware section of the Control Bar and
drag it onto the required carrier site on the worktable. To help you, Freedom
EVOware highlights all carrier sites which are suitable for the chosen labware
item.
Note: If you click on the carrier and scroll down to Allowed Labware, Freedom
EVOware will show you the labware types which are compatible with the selected
carrier.
Repeat this process to add all of the labware to the worktable that you need. The
choice and the positions of the labware is based on the requirements of your
application or experiment.
To move labware to a new position, click on the labware to select it and drag to the
required carrier site.To delete labware, click on it and drag it off of the worktable.
To make a copy of a labware item which is already on the worktable, press the Ctrl
button, click on the labware and drag the cursor to the required carrier site.
When adding, deleting or moving labware, a special cursor is shown to indicate
the action you are performing (“+”, “del” or “move”).
Labware types can be assigned unique colors in the Freedom EVOware
configuration make it easier for you to identify them in the Worktable Editor
(see “Color”, 9-19).
In addition, labware items can be assigned labels (names) to make it easier to
identify them in the Worktable Editor (see 11.7.1 “Assigning a Label (Name) to the
Labware”, 11-19). Labware labels are shown in yellow.
If you click on a labware item, information on the item is shown in the lower
infopad. See Fig. 11-8, 11-20 for an example of a worktable.
11 - 4
Freedom EVOware Software Manual, 393172, en, V2.3
11 - Getting Started - Setting Up a New Script or Process
Setting Up a Pipetting Script in Freedom EVOware Standard
11.4.2 Creating a Pipetting Script
The pipetting program (or script) is created by choosing script commands in the
Control Bar and dragging them to the Script Editor window (see 5.4.4 “The Script
Editor”, 5-19). See 13.1 “Overview of Script Commands”, 13-1.
Because Freedom EVOware normally executes a script in a linear sequence, you
should add the commands in the order that you want the script to be executed.
Each script is associated with its own worktable layout (carriers, devices and
labware), which must be specified before you write the script.
When you drag a script command to the Script Editor, a blue line helps you to
choose where the new command should be inserted.
When you drop the command onto the Script Editor, a dialog box is opened where
you can specify the command parameters. After making your entries, click OK to
add the command to the script. To change the command parameters later, doubleclick the script line to open the dialog box again (or click on the script line and
press Enter).
If your script uses device commands, it is also necessary to put labware of the
correct type onto the device icon(s). This is shown by a grey rectangle inside the
icon. This is not necessary in Freedom EVOware Plus. Tip: If you click on the grey
rectangle, the chosen labware type is shown in the lower Infopad.
The currently selected script line is highlighted in orange. The associated object in
the Worktable Editor is highlighted using the same color. The cursor keys can be
used to move through the script one line at a time.
The Cut, Copy, and Paste functions in the Edit menu (and in the Script Editor’s
context menu) can also be used when creating a script. Select one or more script
lines, choose Cut or Copy, select where you want to insert the command(s) and
then choose Paste.
To select several script lines, click on the first line you want to select and shift-click
on the last line (click while pressing the Shift key). To clear the selection, click on a
line outside of the selected range. To move a line, click on it and drag it to the
required position.
See also 17 “Special Features, Example Scripts and Processes,”, 17-1.
11.4.2.1 Checking the Pipetting Script for Errors
Each time you insert a new command in your script or edit an existing command,
Freedom EVOware validates the entire script to check for errors and shows all
commands which have errors in red. If you select a faulty command, the infopad
will show information on the error. Double-click on the command in the Script
Editor to open a dialog box where you can change the command parameters.
Choose Auto-Validation in the Edit menu if you want to switch off automatic
validation of pipetting scripts (see 6.2.5 “Auto-Validation”, 6-9). You then need
to validate the script manually (by choosing Validate Script in the Edit menu).
If your script contains conditional jumps or branches, validation only checks those
parts of the script which are executed with the default values of the IF variables in
Condition commands. For this reason, it is not recommended to declare variables
(e.g. with the Set Variable command) within conditional parts of the script (see
14.1.12 “Validating a Script Which Contains Variables”, 14-18).
If your script contains conditional jumps or branches, you should separately
validate those parts of the script which are not executed with the default values of
the IF variables. To do this, temporarily modify the values of the IF variables to
ensure that all of the script branches have been tested.
Freedom EVOware chooses multi-dispensing mode automatically if the pipetting
script specifies an aspirate command followed by several consecutive dispense
commands. In turn, this influences the liquid class parameters which are used.
Freedom EVOware Software Manual, 393172, en, V2.3
11 - 5
11 - Getting Started - Setting Up a New Script or Process
Setting Up a Pipetting Script in Freedom EVOware Standard
The decision between single dispensing mode and multi-dispensing mode is
made when the script is validated and not when the script is run. Scripts are
validated when they are modified and also when they are opened for running
without being modified. Validation is done using default values for the variables.
If the number of consecutive dispense commands is controlled by a variable
whose value can change during runtime, it is recommended to design the script
with branches or separate groups of commands for single-pipetting mode (one
dispense operation) and multi-pipetting mode (more than one dispense
operation). This ensures that the correct pipetting mode and liquid class
parameters will be chosen at runtime.
See also 14.3.4 “Validating a Script Which Contains Sub-Routines”, 14-22.
See also C “Validation of Freedom EVOware Applications”, C-1.
11.4.3 Adding Robot Movement Commands to the Script
Plate Robot
Movement commands for the plate robot (RoMa vectors) are associated with
carriers. They are specified in the carrier definition (see 9.6 “Creating and Editing
Plate Robot Vectors”, 9-55).
In Freedom EVOware Standard, RoMa movements are initiated by script
commands (see 15.58 “RoMa Vector Command”, 15-141 and 15.59 “Transfer
Labware Command”, 15-143). Simple RoMa movements are carried out with
the Move RoMa command, which does not need a RoMa vector (see 15.57, 15140).
For Freedom EVOware Plus see 11.5.3 “Adding Robot Movement Commands to
the Process”, 11-10.
Tube Robot
Movement commands for the tube robot (PnP vectors) are associated with
labware such as tube racks. They are specified in the labware definition (see
9.7 “Creating and Editing Tube Robot Vectors”, 9-63).
In both Freedom EVOware Standard and Freedom EVOware Plus, PnP
movements are initiated by script commands (see 15.61 “PnP Vector Command”,
15-146, and 15.62 “Transfer Tube Command”, 15-148). Simple PnP
movements are carried out with the Move PnP command, which does not need a
PnP vector (see 15.60, 15-145).
In Freedom EVOware Plus, you first must use a special process step to open the
script editor (see 16.25.1 “Tube Robot - ExecuteScript Command”, 16-83).
Multi channel
arm (MCA)
Movement commands for the MCA96 or the MCA384 (MCA vectors) are
associated with carriers. They are specified in the carrier definition (see
9.8 “Creating and Editing MCA Vectors”, 9-69). MCA vectors are very similar to
RoMa vectors.
In Freedom EVOware Standard, MCA movements are initiated by script
commands (see 15.68.11 “MCA96 Vector Command”, 15-175,
15.68.12 “MCA96 Transfer Labware Command”, 15-177, 15.69.11 “MCA384
Vector Command”, 15-199 and 15.69.12 “MCA384 Transfer Labware
Command”, 15-201). Also see 9.8 “Creating and Editing MCA Vectors”, 9-69.
For Freedom EVOware Plus see 11.5.3 “Adding Robot Movement Commands to
the Process”, 11-10.
11.4.4 Saving the Script
Save the script you have created by clicking Save in the toolbar or by choosing
Save from the File menu. Then enter a name for the script in the Save File dialog
11 - 6
Freedom EVOware Software Manual, 393172, en, V2.3
11 - Getting Started - Setting Up a New Script or Process
Setting Up a Process in Freedom EVOware Plus
box or select an existing script which you want to overwrite and click the green
arrow. You can also save the script as a script template by choosing Save As from
the File menu and clicking the Template button in the Save File dialog box.
11.4.5 Running the Script
See 12.1 “Running a Liquid Handling Script”,
12-1.
11.4.6 Example Scripts and Example Process
Freedom EVOware is provided with a number of example scripts which illustrate
various aspects of script programming. It is instructive for new users of Freedom
EVOware to load the scripts which are provided and to study each command
while looking at the on-line help. For learning purposes, some of the scripts can
also be run in offline mode. The scripts are stored as script templates. To load
them, click New and select the required template. Script templates have a yellow
icon.
Note that scripts will indicate errors (marked in red in the Script Editor) if the
configuration of the pipetting instrument is unsuitable. For example, if the script
uses DITIs, errors which be shown if the liquid handling arm is not configured with
DITIs. Conversely, if the liquid handling arm is configured with DITIs, Aspirate
commands must be preceeded by Get DITI commands. Errors will also be shown
if the script uses liquid classes or volume ranges which are not currently available.
In many cases, the purpose of each of the scripts is explained in a Comment
command at the start of the script.
The Freedom EVOware installation contains a number of maintenance scripts
(see 6.4.2 “Run Maintenance”, 6-10). Maintenance scripts can be run by both
Freedom EVOware versions but can only be created and edited with Freedom
EVOware Standard. Script files and maintenance scripts have a green icon.
Freedom EVOware Plus is also provided with an example process template,
which is for the ELISA test (Enzyme immunoassay). Process templates have a
blue icon.
11.5 Setting Up a Process in Freedom EVOware Plus
In Freedom EVOware Plus, the sequence of steps which are required to carry out
a particular application or experiment, for example to extract the substance you
are looking for, is called a process. The process specifies the operations you want
the pipetting instrument to execute. Processes are set up in the Process Editor,
which is shown at the top right of the screen (see 5.4.3 “The Process Editor
(Freedom EVOware Plus)”, 5-17).
11.5.1 Choosing Labware for a Process
After setting up the worktable with the carriers and devices you want to use, you
then need to choose the labware you need. There are several ways to do this
depending on the situation:
Freedom EVOware Software Manual, 393172, en, V2.3
11 - 7
11 - Getting Started - Setting Up a New Script or Process
Setting Up a Process in Freedom EVOware Plus
⌦ The labware will always stay at the same position and does not need to
be moved when you run the process
This option is typically used for reagent troughs.
Select the required labware type in the Control Bar (Labware section) and drag it
onto the required carrier site on the worktable. To help you, Freedom EVOware
highlights all carrier sites which are suitable for the chosen labware item.
Note: If you click on the carrier and scroll down to Allowed Labware, Freedom
EVOware will show you the labware types which are compatible with the selected
carrier.
Repeat this process to add all of the labware to the worktable that you need. The
choice and the positions of the labware is based on the requirements of your
application or experiment.
To move labware to a new position, click on the labware to select it and drag to the
required carrier site.To delete labware, click on it and drag it off of the worktable.
To make a copy of a labware item which is already on the worktable, press the Ctrl
button, click on the labware and drag the cursor to the required carrier site.
When adding, deleting or moving labware, a special cursor is shown to indicate
the action you are performing (“+”, “del” or “move”).
Labware types can be assigned unique colors in the Freedom EVOware
configuration make it easier for you to identify them in the Worktable Editor
(see “Color”, 9-19).
In addition, labware can be assigned labels (names) to make them easier to
identify in the Worktable Editor (see 11.7.1 “Assigning a Label (Name) to the
Labware”, 11-19). The label is shown in yellow.
If you click on a labware item, information on the item is shown in the lower
infopad.
⌦ You want to create a repository of labware in a feeder device such as a
carousel
Before you run a process which contains a pipetting script, you must put all of the
labware on the worktable that the pipetting script will need. You also need to tell
Freedom EVOware how many labware items you will be using. When you run the
process, Freedom EVOware will take labware items from the feeder device as
and when needed by the pipetting script and move them using the RoMa to the
empty carriers which you have put aside for the pipetting operations.
Proceed as follows to create a labware repository in a feeder device: Select the
required labware type in the Control Bar (Labware section) and drag it onto the
icon for the carousel (or another feeder device or a hotel) in the Worktable Editor.
This opens the Labware Generator dialog box, which allows you specify how
many labware items you need. See 11.6 “Labware Generator (Freedom EVOware
Plus)”, 11-16.
The Labware Generator will insert a labware source icon in the Process Editor.
Notes:
The chosen number of labware items is shown in the carousel device icon
(see Fig. 11-8 “Example worktable showing carriers, labware and labware
labels”, 11-20).
Repeat the above procedure to create additional labware source icons if the
carousel will be filled with different labware types in different towers.
The number of towers and the storage capacity of the feeder device are
configured in the Edit Carrier dialog box for the feeder (see 9.5, 9-39). See
also 9.5.5.3 “Carousel Carrier Attributes”, 9-50 and 16.33 “Commands for
the Te-Stack Te-MO”, 16-105.
11 - 8
Freedom EVOware Software Manual, 393172, en, V2.3
11 - Getting Started - Setting Up a New Script or Process
Setting Up a Process in Freedom EVOware Plus
⌦ You want to create a repository of labware on the worktable
This option is only used for special applications; labware repositories (storage
areas) are normally created in feeder devices.
Before you run a process which contains a pipetting script, you must put all of the
labware on the worktable that the pipetting script will need. You may decide to
use, say, the left side of the worktable as a storage area for all of the labware
which you will need and the right side of the worktable for pipetting. You also need
to tell Freedom EVOware how many labware items you will be using. When you
run the process, Freedom EVOware will take the required labware items from the
storage area when needed by the pipetting script and move them using the RoMa
to the carrier sites which you have chosen to use for the pipetting operations.
Proceed as follows to create a labware repository on the worktable: Make sure
that you have already put enough carriers in the Worktable Editor, select the
required labware type in the Control Bar (Labware section), press Ctrl and drag
the labware icon onto one of the carriers in the Worktable Editor.
This opens the Labware Generator dialog box, which allows you specify how
many labware items you need and which carriers to place them on. See
11.6 “Labware Generator (Freedom EVOware Plus)”, 11-16.
The Labware Generator will insert a labware source icon in the Process Editor.
⌦ The labware will be used dynamically by a pipetting script
When you run a process with a pipetting script, Freedom EVOware Plus will take
the required labware items from the storage device or storage area when needed
by the pipetting script and move them using the RoMa to the carrier sites which
you have chosen to use for the pipetting operations. Labware which is used
dynamically by the pipetting script should be positioned in the Worktable Editor
when you create the script. See 11.5.4 “Choosing Labware for a Pipette
Command”, 11-11.
Note: Labware which you position when the Script Editor is open is shown in grey
when you return to the Process Editor. This is because it is only moved to the
pipetting position during process runtime and is initially kept elsewhere (typically
in a carousel).
11.5.1.1 Labware in the Worktable Editor of Freedom EVOware Plus
In the figure below, the labware on sites 1 and 2 of the first carrier (at grid position
2) will always stay at the same position. The labware was dragged from the
Control Bar to the carrier directly.
Sites 1 and 2 of the second carrier (at grid position 10) are used as a labware
repository. The labware was dragged from the Control Bar to the carrier while
pressing the Ctrl button to open the Labware Generator.
Sites 1 and 2 of the third carrier (at grid position 18) show (in grey) labware which
will be used dynamically by a pipetting script and will be moved to this position
during process runtime. The labware was dragged from the Control Bar to the
carrier when the Script Editor was open.
Freedom EVOware Software Manual, 393172, en, V2.3
11 - 9
11 - Getting Started - Setting Up a New Script or Process
Setting Up a Process in Freedom EVOware Plus
Fig. 11-1 Labware in the Worktable Editor of Freedom EVOware Plus
See Fig. 11-8,
carousel.
11-20 for a worktable example where the labware is taken from a
11.5.2 Adding Device Commands to the Process
To add a device command to your process, click the Commands tab in the Control
Bar, look for the device you want to use and drag the command from the Control
Bar onto the Process Editor window. If you need to specify any execution
parameters for the command, the Parameters dialog box will open automatically
when you do this. For example, the MoveToCartridge command for the Carousel
requires you to specify the number of the required tower. The Pipette command of
the Liquid Handling Arm requires you to specify a pipetting script.
The device command is then shown as a process step icon in the Process Editor.
You can change the position of a process step icon by dragging it to the required
location.
To edit the execution parameters of the command (or the pipetting script) later,
double-click on the icon (or right click on the icon and choose Edit Parameters).
The Parameters dialog box will only be shown if the command has parameters.
To edit the runtime parameters for the command, right click on the icon and
choose Adjust Time/Error handling. See 9.10.2 “Adjust Time/Error handling”, 971. These parameters are set automatically to appropriate values and do not
normally need to be changed.
To edit the pre-actions and post-actions for the command, right click on the icon
and choose Pre-actions / Post-actions. See 9.10.3 “Pre-actions / Post-actions
(Custom)”, 9-72. The pre-actions and post-actions are normally configured
through the global settings of the device driver and only need to be changed for
special applications.
To delete a process step, select the icon and press Del (or right click on the icon
and choose Delete in the context menu).
11.5.3 Adding Robot Movement Commands to the Process
Plate Robot
11 - 10
Movement commands for the plate robot (RoMa vectors) are associated with
carriers. They are specified in the carrier definition (see 9.6 “Creating and Editing
Plate Robot Vectors”, 9-55).
Freedom EVOware Software Manual, 393172, en, V2.3
11 - Getting Started - Setting Up a New Script or Process
Setting Up a Process in Freedom EVOware Plus
In Freedom EVOware Plus, RoMa vectors are mainly used by pre-actions and
post-actions of device commands. The pre-actions and post-actions and thus the
RoMa movements are executed automatically when the process step is executed.
If your process involves pipetting to a plate which is initially stored in a carousel,
Freedom EVOware first uses the robot vector associated with the carousel to take
the plate from the carousel and then uses the robot vector associated with the
carrier to put the plate on the carrier. You do not need to specify the RoMa vectors
- Freedom EVOware gets them from the carrier and device definitions. You only
need to make sure that the RoMa vectors which you want to use are already set
up in the Freedom EVOware configuration.
Tube Robot
Multi channel
arm (MCA)
Movement commands for the tube robot (PnP vectors) are associated with
labware such as tube racks. They are specified in the labware definition (see
9.7 “Creating and Editing Tube Robot Vectors”, 9-63).
In both Freedom EVOware Standard and Freedom EVOware Plus, PnP vectors
are executed using script commands (see 15.61 “PnP Vector Command”, 15146, and 15.62 “Transfer Tube Command”, 15-148). Simple PnP movements
are executed with the Move PnP command, which does not need a PnP vector
(see 15.60, 15-145).
In Freedom EVOware Plus, you first must use a special process step to open the
script editor (see 16.25.1 “Tube Robot - ExecuteScript Command”, 16-83).
Movement commands for the MCA96 or the MCA384 (MCA vectors) are
associated with carriers. They are specified in the carrier definition (see
9.8 “Creating and Editing MCA Vectors”, 9-69).
11.5.4 Choosing Labware for a Pipette Command
Script (e.g. pipetting) commands are carried out by the liquid handling arm and
are defined in the Script Editor. To open the Script Editor, select the Pipette
command in the Control Bar (Liquid Handling Arm group) and drag it to the
Process Editor window.
Before you can specify script commands such as Aspirate or Dispense, you must
put the labware you want to use onto the carriers. When you run the process,
Freedom EVOware Plus will take the specified labware items from the storage
device or storage area as and when needed and move them using the RoMa to
the carrier sites which you allocated for the pipetting operations.
Select the required labware type from the Labware section of the Control Bar and
drag it onto the required carrier site on the worktable (you cannot choose sites
which are already occupied by labware). To help you, Freedom EVOware
highlights all carrier sites which are suitable for the chosen labware item.
Note: If you click on the carrier and scroll down to Allowed Labware, Freedom
EVOware will show you the labware types which are compatible with the selected
carrier.
Repeat this process to add all of the labware to the worktable that you need. The
choice and the positions of the labware is based on the requirements of your
application or experiment.
To move labware to a new position, click on the labware to select it and drag to the
required carrier site.To delete labware, click on it and drag it off of the worktable.
To make a copy of a labware item which is already on the worktable, press the Ctrl
button, click on the labware and drag the cursor to the required carrier site.
When adding, deleting or moving labware, a special cursor is shown to indicate
the action you are performing (“+”, “del” or “move”).
Freedom EVOware Software Manual, 393172, en, V2.3
11 - 11
11 - Getting Started - Setting Up a New Script or Process
Setting Up a Process in Freedom EVOware Plus
Labware can be assigned unique colors in the Freedom EVOware configuration
make it easier for you to identify them in the Worktable Editor (see “Color”, 919).
In addition, labware can be assigned labels (names) to make them easier to
identify in the Worktable Editor (see 11.7.1 “Assigning a Label (Name) to the
Labware”, 11-19). The label is shown in yellow.
If you click on a labware item, information on the item is shown in the lower
infopad.
Note: Labware which you position when the Script Editor is open is shown in grey
when you return to the Process Editor. This is because it is only moved to the
pipetting position during process runtime and is initially kept elsewhere (typically
in a carousel).
Since the labware is only moved to the pipetting position during process runtime,
if your process has more than one pipetting script you can specify the same
carrier sites for pipetting operations in different scripts. The carrier sites you
choose are used as placeholders. When you run the process, Freedom EVOware
Plus may decide to use different sites to maximize the throughout (efficiency) of
the process.
See Fig. 11-8, 11-20 for an example of a worktable.
11.5.5 Creating a Script for the Pipette Command
Script (e.g. pipetting) commands are carried out by the liquid handling arm and
are defined in the Script Editor (see 5.4.4 “The Script Editor”, 5-19). To open the
Script Editor, select the Pipette command in the Control Bar (Liquid Handling Arm
group) and drag it to the Process Editor window.
The pipetting script is then created by choosing script commands in the Control
Bar and dragging them to the Script Editor window.
Note: In Freedom EVOware Plus, when the Script Editor is open the Commands
tab of the Control Bar only shows script commands (commands which are used
for writing pipetting scripts). When the Process Editor is open, the Commands tab
of the Control Bar only shows device commands (commands for the optional
devices).
The procedure to follow to create a script is the same for Freedom EVOware Plus
and Freedom EVOware Standard See 11.4.2 “Creating a Pipetting Script”, 11-5
for more information.
See also 13.1 “Overview of Script Commands”, 13-1.
11.5.6 Closing the Script Editor
When you have finished adding all of the script commands you need, click Accept
at the top right of the Script Editor window to return to the Process Editor. This
stores the script in memory and creates a Pipette process step icon. To
permanently save the script you must save the process as described in
11.5.10 “Saving the Process”, 11-15.
Click Reject if you do not want to keep the changes you have made to the script.
Click Save as template if you want to save the script as a template for use in
another process or process step.
11 - 12
Freedom EVOware Software Manual, 393172, en, V2.3
11 - Getting Started - Setting Up a New Script or Process
Setting Up a Process in Freedom EVOware Plus
Labware which you positioned when the Script Editor was open is shown in grey
when you return to the Process Editor. When you run the process, Freedom
EVOware Plus will move the labware to these carrier sites automatically.
If your process uses more than one pipetting script, insert another Pipette
command in your process using the procedure described above.
To edit an existing pipetting script, double-click the Pipette process step to open
the Script Editor again. Alternatively, select the Pipette process step and click Edit
Parameters in the Infopad.
11.5.7 Adding Final Position Icons to your Process
Final position icons are used to specify the final position of the labware after the
process has finished. They are often associated with a storage device such as a
hotel. Final position icons are not necessary if you want Freedom EVOware to
return the labware to its original position after the process has finished, for
example back to a storage device such as a carousel (the “base” location). Final
position icons are created by right-clicking on the background of the Process
Editor and choosing Choose Final Position from the context menu.
11.5.8 Linking the Process Steps in the Order of Execution
After adding all of the process steps you need in the Process Editor, you must
specify the order in which you want to execute them by linking the icons together.
Start by clicking the pointed end of a labware source icon. Then drag and drop the
arrow cursor which appears onto the labware field (“object parameter”) of the first
process step that will handle this labware. A connecting line will be drawn from the
labware source icon to the process step to visualize the connection and the
default labware name “MP” in the labware field changes to the labware name of
the source labware (e.g. “sample_1”).
If the process step can handle more than one labware item at a time (for example
if the LiHa command needs two microplates), repeat this process to connect more
labware source icons to the labware fields.
Then drag the next process step to be adjacent or close to the first process step
and link them together in the same way. Click the black arrow on the labware field
of the first process step and drag and drop the arrow cursor onto the labware field
of the second process step.
Freedom EVOware Software Manual, 393172, en, V2.3
11 - 13
11 - Getting Started - Setting Up a New Script or Process
Setting Up a Process in Freedom EVOware Plus
Fig. 11-2 Process Editor showing process icons
Proceed until you have connected all of your process steps in the order you want.
Note: You cannot save the process until you have connected all of the process
steps (Freedom EVOware will display an error message).
Note: If you make a mistake when connecting the process steps or change your
mind, right-click on the connecting line and choose Delete.
Note: Make sure that the labware source icons and labware fields which you
connect together use the same physical labware type. For example, do not
connect a labware source icon for a microplate to a labware field for a deep well
plate. Freedom EVOware does not check the labware types when you make the
connections. However, you are allowed to connect landscape and portrait
versions of the same physical labware together (e.g. 96 Well Microplate and 96
Well Microplate portrait). In this case, Freedom EVOware will automatically use
the RoMa to rotate the labware by 90° if necessary.
11.5.8.1 Reserving and Linking Devices
Some process steps, typically initialize or prime commands for devices, do not
need labware and do not have labware fields. In such cases, click the right edge
of the process step and drag and drop the arrow cursor onto the icon of the
following process step:
Fig. 11-3 Linking a process step which does not have a labware field
In the above example, the connecting line makes sure that priming takes place
before the plate washer is used to wash the plate.
This type of connection can also be used to reserve a device. In the following
example, a magnetic separation is carried out using the Te-MagS and a pipetting
operation is then carried out. The plate is then returned to the Te-MagS for
another separation step. The line linking the two Te-MagS process steps makes
11 - 14
Freedom EVOware Software Manual, 393172, en, V2.3
11 - Getting Started - Setting Up a New Script or Process
Setting Up a Process in Freedom EVOware Plus
sure that the Te-MagS is reserved and thus immediately available for use when
the pipetting operation has finished:
Fig. 11-4 Reserving a device
Freedom EVOware Plus lets you run several processes in parallel. If you don’t
reserve the Te-MagS, it may be occupied by another process when the first
process wants to use it. The first process will then have to wait until it becomes
free again. Depending on your application or experiment, the waiting may be
inacceptable.
11.5.9 Adding On-the-fly Actions
Some devices require the use of the RoMa (plate robot) to carry out their function.
A typical example of this is the Symbol LS-1220 barcode scanner which is rigidly
fixed to the instrument's deck and cannot move towards the labware to scan it.
Instead, the RoMa is used to move the labware past the barcode scanner “on-thefly” while carrying out something else, for example when moving the labware from
one carrier to another. The barcode scanner is then instructed to perform a read
operation when the RoMa presents the labware. Such devices are called on-thefly devices.
Add an on-the-fly device to your process by dragging it from the Control Bar onto
the line which links two process steps. The corresponding actions will then be
executed when the labware moves between the two process steps.
For example, If you want to read the barcodes of your labware items as they move
from the washer to the pipetting station, drag the Barcode Scanner device onto
the line which links these two process steps.
See Fig. 5-11 “Process Editor showing an example process”, 5-17.
11.5.10 Saving the Process
Save the process you have created by clicking Save in the toolbar or by choosing
Save from the File menu. Then enter a name for the process in the Save File
dialog box or select an existing process which you want to overwrite and click the
green arrow. You can also save the process as a process template by choosing
Save As from the File menu and clicking the Template button in the Save File
dialog box.
11.5.11 Running the Process
See 12.2 “Running and Optimizing a Process (Freedom EVOware Plus)”,
Freedom EVOware Software Manual, 393172, en, V2.3
12-5.
11 - 15
11 - Getting Started - Setting Up a New Script or Process
Labware Generator (Freedom EVOware Plus)
11.6 Labware Generator (Freedom EVOware Plus)
The labware generator is used to specify the type and quantity of labware items
which you will need for the pipetting script commands in your process (LiHa
Pipette process steps).
11.6.1 Creating a labware repository in a feeder device
Select the required labware type in the Control Bar (Labware section) and drag it
onto the icon for the feeder device (e.g. carousel) in the Worktable Editor. If the
chosen labware type is allowed for the feeder device, this opens the labware
generator dialog box:
Fig. 11-5 Labware generator when generating labware for the carousel
The rectangles at the top of the dialog box show all of the labware storage
positions (sites) in the feeder device. For the carousel or Te-Stack stacker, each
column is one tower (cartridge).
The number of towers and the storage capacity of the feeder device are
configured in the Edit Carrier dialog box for the feeder (see 9.5, 9-39). See also
9.5.5.3 “Carousel Carrier Attributes”, 9-50 and 16.33 “Commands for the TeStack Te-MO”, 16-105.
Storage positions which are yellow (occupied) or red (unavailable) cannot be used
for generating labware since they are already in use.
Enter the number of labware items you want to create in the Create field and click
on the first site you want to use. The message area at the bottom of the labware
generator will tell you if sufficient sites are available for the chosen number of
items. Adjust your entries until the labware generator indicates that your selection
is valid and click Create to create the specified labware. The newly created
11 - 16
Freedom EVOware Software Manual, 393172, en, V2.3
11 - Getting Started - Setting Up a New Script or Process
Labware Generator (Freedom EVOware Plus)
labware changes colour from green (selected position) to yellow (occupied
position). This creates a labware group (a set of labware associated with a
labware source icon in the Process Editor).
If you move the cursor over the coloured rectangles, the Labware ID field shows
the ID (internal labware name) of the selected labware item. If you click on a
labware item (yellow rectangle), the starting position and the name of the
associated labware group are shown. Click Delete if you want to delete all of the
labware in the group.
Right click a labware item to open the context menu (see 11.6.3 “Context Menu of
the Labware Generator”, 11-19).
Repeat this process if you want to create further labware of a different type or
using a different group name (i.e. an additional labware source icon).
Click Close when you have created all of the labware you need. This closes the
labware generator. The labware you have created is shown as one or more
labware source icons in the Process Editor and the total number of storage
positions containing labware is shown in the icon for the feeder device.
Note: When the Process Editor is open, right-click on the icon for the feeder
device and choose Modify Labware in the context menu if you want to
subsequently edit the settings you have made.
11.6.2 Creating a labware repository on the worktable
This option is only used for special applications; labware repositories are normally
created in feeder devices such as the carousel.
Make sure that you have already put enough carriers in the Worktable Editor,
select the required labware type from the Control Bar (Labware section), press
Ctrl and drag the labware icon onto a suitable carrier type in the Worktable Editor.
This opens the labware generator dialog box:
Freedom EVOware Software Manual, 393172, en, V2.3
11 - 17
11 - Getting Started - Setting Up a New Script or Process
Labware Generator (Freedom EVOware Plus)
Fig. 11-6 Labware generator when generating labware for three microplate carriers on the
worktable
The rectangles at the top of the dialog box show the sites of all of the suitable
carriers on the worktable. Sites marked occupied or not available cannot be used
for generating labware since they are already in use. If you have already created a
pipetting script, sites which are used by the pipetting script must not be used
either. Freedom EVOware will put the labware onto these sites during process
runtime, and they must not be occupied by a labware repository.
Note: Labware which you position when the Script Editor is open is shown in grey
when you return to the Process Editor.
Note: Carrier sites which are used for a labware repository cannot be used in your
script for pipetting. Make sure you have kept enough unused sites for your
pipetting script. Put another carrier on the worktable if necessary.
Enter the number of labware items you want to create in the Create field and click
on the first site you want to use. The message area at the bottom of the labware
generator will tell you if sufficient sites are available for the chosen number of
items. Adjust your entries until the labware generator indicates that your selection
is valid and click Create to create the specified labware. The newly created
labware changes colour from green (selected position) to yellow (occupied
position). This creates a labware group (a set of labware associated with a
labware source icon in the Process Editor).
If you move the cursor over the coloured rectangles, the Labware ID field shows
the ID (internal labware name) of the selected labware item. If you click on a
labware item (yellow rectangle), the starting position and the name of the
associated labware group are shown. Click Delete if you want to delete all of the
labware in the group.
Right click a labware item to open the context menu (see 11.6.3 “Context Menu of
the Labware Generator”, 11-19).
11 - 18
Freedom EVOware Software Manual, 393172, en, V2.3
11 - Getting Started - Setting Up a New Script or Process
Additional Information on Labware and Carriers
Click Close when you have created all of the labware you need. This closes the
labware generator. The labware you have created is shown as a labware source
icon in the Process Editor and is also visible on the worktable.
Note: When the Process Editor is open, right-click on the generated labware and
choose Modify Labware in the context menu if you want to subsequently edit the
settings you have made.
If you use labware barcodes to specify source and/or destination positions in the
worklist, do not use a labware repository on the worktable if the labware will be
moved during runtime to another worktable position for pipetting. This can lead to
pipetting at the wrong worktable position. Use a labware repository in a feeder
device (e.g. hotel or carousel) instead.
11.6.3 Context Menu of the Labware Generator
Right click a labware item (yellow rectangle) in the labware generator to open the
context menu. The menu item are as follows:
Enter barcode
Choose this option to enter a barcode manually for the selected labware item.
This option is mainly used for testing since it is inflexible in a production
environment to store barcodes within the process. You should normally use a
barcode scanner instead.
Read barcodes from file
Choose this option to import a list of barcodes for the selected labware group.
This feature is mainly intended for testing or training. For information on the
syntax see A.2.4 “Barcode File for the Labware Generator”, A-14.
Rename labware
Choose this option to change the name of the labware group.
Delete labware
Choose this option to delete all of the labware in the group.
11.7 Additional Information on Labware and Carriers
11.7.1 Assigning a Label (Name) to the Labware
You can assign a label (i.e. a user-defined name) to each labware item by double
clicking on the labware in the Worktable Editor and typing the required name in
the Name field of the Edit Labware Name dialog box:
Fig. 11-7 Specifying labels for objects on the worktable
Freedom EVOware Software Manual, 393172, en, V2.3
11 - 19
11 - Getting Started - Setting Up a New Script or Process
Additional Information on Labware and Carriers
The label is shown in yellow. The label for the currently selected labware item is
also shown in the Infopad together with the other properties.
Labware labels can be used in scripts and worklist files to make them easier to
understand for other persons (see 15.24 “Worklist Command”, 15-36). They are
also used by Freedom EVOware in log files. If you don’t specify labware labels,
the scripts, worklists and log files contain the generic labware name instead, e.g.
Microplate, landscape.
11.7.2 Example of a Worktable With Several Carriers and Labware Items
The following figure shows an example worktable with carriers, labware and
labware labels:
Fig. 11-8 Example worktable showing carriers, labware and labware labels
In this example, the labware generator was used to assign 84 microplates to the
carousel.
11.7.3 System Liquid Icon
When you specify a script command which involves aspiration, click on the
System icon at the bottom right of the Worktable Editor if you want to aspirate the
system liquid. If you need to aspirate large volumes of the system liquid, this
avoids having to place a trough on the worktable. See 8.4.2.5 “System Liquids”,
8-30 for further information.
11 - 20
Freedom EVOware Software Manual, 393172, en, V2.3
12 - Running Scripts and Processes
Running a Liquid Handling Script
12 Running Scripts and Processes
This chapter describes how to run, preview and calibrate a process (Freedom
EVOware Plus) and how to run a script (Freedom EVOware Standard).
12.1 Running a Liquid Handling Script
This section describes how to run a liquid handling script.
Freedom
EVOware
Standard
To run the currently loaded script, click the Run button in the toolbar or choose
Run in the Execute menu. To run another, previously saved script click the Wizard
button in the toolbar or choose Startup Wizard in the File menu. Then choose the
script you want to run.
Freedom
EVOware Plus
To run a script which belongs to a process, open the Script Editor by doubleclicking the Pipette command which is associated with the script and click the Run
button in the toolbar or choose Run in the Execute menu.
After a short delay you are shown the Runtime Controller dialog box:
Fig. 12-1 Script runtime settings
Click the Run button to run the script. Unless you are running Freedom EVOware
in offline mode, commands will be sent to the pipetting instrument and pipetting
will take place according to the instructions in your script.
The Run button will change to Recover if the script did not execute completely
the last time it was run (see 17.2 “ Script and process recovery function”, 17-5).
Run full script?
To start running the script at a specified line, e.g. for testing purposes,
uncheck this checkbox and specify the script lines which you want to run by
entering the first and last script line. Then click the Run button.
This option is not available when running a script in in Freedom EVOware
Plus.
If you start running the script at a specified line and if the part of the script
which you have chosen to run uses variables which have not been defined,
you will be prompted to enter the values manually.
Freedom EVOware Software Manual, 393172, en, V2.3
12 - 1
12 - Running Scripts and Processes
Running a Liquid Handling Script
Start time
Specify when you want to start the script. Initially, this field shows the current
time (i.e. start the script immediately).
A progress bar shows the progress of the script as it runs:
Fig. 12-2 Script runtime showing progress bar
To pause a running script, click the Pause button (orange parallel bars). The
script is paused and the System paused message is shown.
To resume running a script which has been paused, click the Run button again.
To stop the script from running, click the Stop button (red square).
If the pipetting script contains Comment commands, the comments are shown in
the Comments panel in the center of the dialog box (example: see figure above). If
suitable comments have been chosen, this can help the instrument operator to
monitor the progress of the script as it runs.
The other options in this dialog box are as follows:
Start time
This shows the time when the script was started.
Elapsed
The amount of time which has elapsed since the script was started.
12.1.1 Buttons in Standard View
Cancel
Return to the Script Editor.
Extended view
Switch to the extended view of the Runtime Controller where you can get
more information on the currently running script.
12 - 2
Freedom EVOware Software Manual, 393172, en, V2.3
12 - Running Scripts and Processes
Running a Liquid Handling Script
Lock Freedom EVOware
This button logs out the current Freedom EVOware user (see 6.1.9 “Lock
EVOware”, 6-7). Another use of the Lock button is to switch Freedom
EVOware users when you are handing over to another employee, e.g. due to
a change of shift.
Show Log File
This button displays the Freedom EVOware log file in a new window. The log
file tracks every command sent by the computer to the instrument, every
response returned from the instrument to the computer and any user input.
The content and format of the log corresponds to a log file of type LOG (see
A.1 “Overview of the Log Files”, A-1).
If the script finished with warnings or errors, click this button to get more
information from the log file.
Stop
This button stops the script.
Run
This button runs the script; it is also used to continue the script if it has been
paused.
Pause
This button pauses the script.
Freedom EVOware Software Manual, 393172, en, V2.3
12 - 3
12 - Running Scripts and Processes
Running a Liquid Handling Script
12.1.2 Runtime Controller, Extended View (Running a Script)
The Extended View option of the runtime controller gives you more information on
the currently running pipetting script:
Fig. 12-3 Script runtime - Extended view
The extended view has four windows:
The Comments window - If the pipetting script contains Comment
commands, this window shows the comments. This window is refreshed after
executing each script line.
The Variables window - This shows the value of all defined variables during
script runtime. This window is refreshed after executing each script line.
The Script window - This shows part of the script. When the script is running,
the script line which is currently executing is highlighted with a colored line.
The default color is orange.
The Worktable window - This shows the instrument’s worktable. When the
script is running, the worktable object (e.g. microplate) which is currently being
accessed is highlighted with a colored box. The default color is orange.
If you need more space for the Script window, you can collapse the Worktable
window by clicking
in the title bar. You can also resize the windows by dragging
the dividers between the windows.
12 - 4
Freedom EVOware Software Manual, 393172, en, V2.3
12 - Running Scripts and Processes
Running and Optimizing a Process (Freedom EVOware Plus)
12.1.3 Buttons in Extended View
Cancel
Return to the Script Editor.
Standard view
Return to the standard view of the Runtime Controller.
Lock Freedom EVOware
This button logs out the current Freedom EVOware user (see 6.1.9 “Lock
EVOware”, 6-7). Another use of the Lock button is to switch Freedom
EVOware users when you are handing over to another employee, e.g. due to
a change of shift.
Show Log File
This button displays the Freedom EVOware log file in a new window. The log
file tracks every command sent by the computer to the instrument, every
response returned from the instrument to the computer and any user input.
The content and format of the log corresponds to a log file of type LOG (see
A.1 “Overview of the Log Files”, A-1).
If the script finished with warnings or errors, click this button to get more
information from the log file.
Stop
This button stops the script.
Run
This button runs the script; it is also used to continue the script if it has been
paused.
Pause
This button pauses the script.
12.2 Running and Optimizing a Process (Freedom
EVOware Plus)
This section describes how to run, preview and calibrate a process.
To run the currently loaded process, click the Run button in the toolbar or choose
Run in the Execute menu. To run another, previously-saved process click the
Wizard button in the toolbar or choose Startup Wizard in the File menu. Then click
Run an existing process and choose the process you want to run.
Freedom EVOware allows you to run several processes in parallel or sequentially.
You can save all of the runtime settings for one or more processes as a “method”.
For information on creating and running methods see the description of the Save
as method button, below.
After a short delay you are shown the Runtime Controller dialog box:
Freedom EVOware Software Manual, 393172, en, V2.3
12 - 5
12 - Running Scripts and Processes
Running and Optimizing a Process (Freedom EVOware Plus)
Fig. 12-4 Process runtime settings
To run the process, click the Run button at the bottom right of the dialog box.
Unless you are running Freedom EVOware in offline mode, commands will be
sent to the pipetting instrument and pipetting will take place according to the
instructions in your process.
The Run button will change to Recover if the script did not execute completely
the last time it was run (see 17.2 “ Script and process recovery function”, 17-5).
Click the Preview button to run the process for testing without carrying out
pipetting. Firmware commands such as movement commands are not sent to the
pipetting instrument.
Process List
Freedom EVOware Plus allows you to run several processes in parallel or
sequentially. You can run several copies of the same process and/or several
different processes. You can also add new processes to processes which are
already running. The process list shows the processes you have set up to run.
Batch
Read-only field. If you want to run more than one process type, you can
assign batch numbers if you want them to group the processes into batches
which run sequentially rather than in parallel. See 12.2.2 “Additional Runtime
Settings for Processes”, 12-10 for information on using batches.
Process
The name of the process.
12 - 6
Freedom EVOware Software Manual, 393172, en, V2.3
12 - Running Scripts and Processes
Running and Optimizing a Process (Freedom EVOware Plus)
Instances
Specify how many times you want to run the process in parallel. To optimize
the throughput (efficiency) of your pipetting instrument (i.e. to maximize the
number of samples which are processed per hour), Freedom EVOware Plus
allows you to run several copies of the same process in parallel. This allows
Freedom EVOware to e.g. to fetch a microplate from the carousel while
pipetting is taking place on another microplate. Each copy of the process is
called an instance.
The maximum value you should set for this parameter depends e.g. on how
much space you have assigned on the worktable for Freedom EVOware to set
up multiple sites for pipetting. There is no speed advantage to be gained in
fetching a microplate from the carousel if there are currently no unoccupied
carrier sites where it can be put down.
More
Click
to specify additional runtime settings. See 12.2.2 “Additional
Runtime Settings for Processes”, 12-10.
Run
Freedom EVOware allows you to start one or more additional processes when
other processes are already running. For example, if you have forgotten to
start a process which you need. To use this feature, add the process as
described in Add process, below. If other processes are already running, the
Run column in the runtime list will now contain a small Run button for the new
process. Click this button when you are ready to start the new process.
Val.
A green tick (“validated”) shows that enough labware has been assigned to
the process. A red cross shows that process validation was not successful, for
example because not enough labware is available for the specified number of
instances or the same labware has been assigned to two different processes
(invalid assignment).
Buttons
Save method
Save all of the settings you have made in the Runtime Controller as a
“method”. If you have configured to run several processes, the saved method
will contain the runtime settings you have made for all of the processes.
To run a previously-saved method, click the Wizard button in the toolbar or
choose Startup Wizard in the File menu. Then click Run an existing process
and choose the method you want to run (the lists shows both processes and
methods).
Load method
Load a previously saved method file. You can then run the method and/or edit
the method and save it again.
Add process
To add another process to the runtime list, click Add process and select the
process from the dialog box. The dialog box only lists processes which use
the same worktable layout. You cannot add processes which use a different
worktable layout. If the original process was saved in a user defined directory
(see 6.1.3 “Save”, 6-5, User Defined), the dialog box only lists processes
which use the same worktable layout AND have been saved in the same base
directory.
Freedom EVOware Software Manual, 393172, en, V2.3
12 - 7
12 - Running Scripts and Processes
Running and Optimizing a Process (Freedom EVOware Plus)
Delete process
Click this button to delete the currently selected process from the runtime list.
You can only delete a process with this button if it is not yet running.
Options
Click Options to show additional options:
Calibration run
Check this checkbox if you want to run the process and carry out pipetting for
the purpose of calibration. You only need to run one process instance for the
calibration run. The following options (buttons) are available in the Runtime
Controller when the calibration run has finished:
Click Update Proc to store information in the process file on the actual times
required by device commands. The next time you run the process, the stored
information allows the scheduler to plan more accurately and thus optimize
the throughput of the process.
Click Optimize to optimize the schedule using the real execution times which
were recorded during the calibration run. You must then click Save to save the
optimized schedule.
Click Save Schedule to save a schedule for this process. Schedules can be
used to ensure that processes always run the same way and use the same
timing.
The calibration run allows Freedom EVOware to get realistic execution times
for each of the process steps which are more accurate than the estimated
values in the database. This generally results in better optimization
(throughput) of the process. The Calibration run option is not available if you
run several different processes in parallel.
Use pre-scheduled process
Check this checkbox if you want to run the process using a schedule which
you saved previously, for example after carrying out a calibration run. A
separate schedule can be saved for each of the processes you have run.
If you run the process using a saved schedule, it will always run the same way
and use the same timing. If you don’t use a saved schedule and you have
chosen to run more than one instance of the process, the order of the process
steps may change each time you run the process if the time required for
certain operations such as robot movements varies slightly from run to run.
Automated DiTi Handling panel
The options in this panel are only relevant for the automatic DITI handling feature.
See 17.1.2.1 “Process runtime settings for automatic DITI handling”, 17-4.
12 - 8
Freedom EVOware Software Manual, 393172, en, V2.3
12 - Running Scripts and Processes
Running and Optimizing a Process (Freedom EVOware Plus)
Start Initial DiTi Load process
If you check this checkbox, there should not be any DITI racks on the
worktable when you start the process.
Reset Counters
If you do not check Start Initial DiTi Load process, click this button if you want
to re-load the worktable with full DITI racks before you start the process, for
example to re-run the process from the beginning for testing. The Reset
Counters button resets all of the DITI-related internal variables to their initial
values. The Reset Counters button is not relevant if you have checked the
Start Initial DiTi Load process checkbox (the counters are reset automatically
in this case each time the process is run).
Information box
For each DITI type which is used in the process, this text box shows the
source position of the full DITI racks which will be used next. In addition, it
shows the position in the DITI Rack source (e.g. carousel or hotel) which will
be used for the empty DITI racks during the next replacement operation. This
position must be empty. Note: The empty DITI racks are returned to the
carousel or hotel before getting the full DITI racks.
12.2.1 Process Controller during process runtime
Additional information is shown during process runtime as follows:
Fig. 12-5 Process runtime showing progress bar
Start
The time when the process was started.
Elapsed
The amount of time which has elapsed since the process was started.
End
The time when the process is expected to finish.
Freedom EVOware Software Manual, 393172, en, V2.3
12 - 9
12 - Running Scripts and Processes
Running and Optimizing a Process (Freedom EVOware Plus)
12.2.2 Additional Runtime Settings for Processes
Click
in the More field to make the following additional runtime settings for
special applications:
Fig. 12-6 Additional runtime settings
Batch
If you want to run more than one process type, you can assign batch numbers
if you want them to group the processes into batches which run sequentially
rather than in parallel. For example, if the processes “preparation” and “assay”
are assigned the batch number 1 and the process “cleanup” is assigned the
batch number 2, “preparation” and “assay” will run in parallel but “cleanup” will
not be scheduled to start until both “preparation” and “assay” have finished.
Usage example: The creation of a mother plate for subsequent use in assays.
The batch number has a higher priority than the emergency checkbox. See
also Start offset, below.
If you have assigned
Emergency
The Emergency checkbox is used to assign a higher priority to special
processes. You can use emergency processes for samples which you want to
process first or operations (such as barcode scanning) which you need to
carry out first.
The standard (non-emergency) processes will only be started after all of the
emergency processes have been started, even if they have a higher value in
the Priority column. Freedom EVOware always starts emergency processes in
the order of their priorities.
Priority
Specify the required process priority. Freedom EVOware tries to start
processes which have a higher priority first. Note: Smaller numbers
correspond to a lower priority (the lowest priority is “1”).
12 - 10
Freedom EVOware Software Manual, 393172, en, V2.3
12 - Running Scripts and Processes
Running and Optimizing a Process (Freedom EVOware Plus)
Start offset
Specify a starting offset in days to delay the starting of the process (range: 0 to
99 days).
Start offset and Time are additive. In the above figure, the process will be
started after a delay of 1 day plus 2.5 hours (26.5 hours).
If you have chosen to run more than one instance (copy) of this process, the
offset applies to all instances of the process.
Time
Specify a time in hours, minutes and seconds to delay the starting of the
process. If you have configured more than one instance of this process, it
applies to all instances of the process.
Start offset and Time are additive. In the above figure, the process will be
started after a delay of 1 day plus 2.5 hours (26.5 hours).
If you have chosen to run more than one instance (copy) of this process, the
time delay applies to all instances of the process.
Instance offset
If you have chosen to run more than one instance (copy) of this process,
specify an instance offset if you do not want to start all of the instances
simultaneously. The starting of the instances will then be staggered by the
specified delay. This may be necessary e.g. if the pipetting instrument
transfers processed samples to another piece of equipment which cannot
handle a large number of samples simultaneously.
Specify plates by barcode
Check this checkbox if you want to run the process using specific labware
items which are identified by their barcodes. A dialog box opens to allow you
to choose a .txt or .csv file which contains a list of barcodes. See
A.2.5 “Barcode File for the Freedom EVOware Plus Runtime Controller”, A15 for information on the required syntax of this file.
This feature is only intended for random access storage devices such as the
carousel (the stacker is a first-in last-out storage device, not random access).
For labware in the carousel, you can use the ReadAllBarcodes or
ReadPlatesInCartridge commands to read the barcodes and store them in a
file (see 16.3 “Commands for the Carousel”, 16-2).
Labware source, Group, Labware, Val.
Click the Group field and choose the required labware if you want to run this
process using a specific item of labware. You can choose labware from any of
the labware sources which you have configured on your worktable.
Leave the labware fields empty if you do not want to use a specific labware
item. In this case, the process will use the next labware item which is available
for the configured labware source.
Val.: A green tick (“validated”) shows that enough labware has been assigned
to the process. A red cross shows that process validation was not successful,
for example because not enough labware is available for the specified number
of instances or the same labware has been assigned to two different
processes (invalid assignment).
Freedom EVOware Software Manual, 393172, en, V2.3
12 - 11
12 - Running Scripts and Processes
Running and Optimizing a Process (Freedom EVOware Plus)
12.2.3 Buttons in Standard View
Cancel
Return to the Process Editor.
Extended view
Switch to the extended view of the Runtime Controller where you can get
more information on the currently running process.
Lock Freedom EVOware
This button logs out the current Freedom EVOware user (see 6.1.9 “Lock
EVOware”, 6-7). Another use of the Lock button is to switch Freedom
EVOware users when you are handing over to another employee, e.g. due to
a change of shift.
Show Log File
This button displays the Freedom EVOware log file in a new window. The log
file tracks every command sent by the computer to the instrument, every
response returned from the instrument to the computer and any user input.
The content and format of the log corresponds to a log file of type LOG (see
A.1 “Overview of the Log Files”, A-1).
Stop
This button runs the process; it is also used to continue the process if it has
been paused.
Preview
This button previews the process; it is also used to continue the process if it
has been paused.
Run
This button runs the process; it is also used to continue the process if it has
been paused.
Pause
This button pauses the process.
If you have already run the process
Click Save Schedule to save a schedule for this process. Schedules can be
use to ensure that processes always run the same way and use the same
timing.
Click New Run to return to the standard view of the Runtime Controller, e.g. to
run the process again from the beginning. If you want to save a schedule for
this process, do this before you click New Run.
12 - 12
Freedom EVOware Software Manual, 393172, en, V2.3
12 - Running Scripts and Processes
Running and Optimizing a Process (Freedom EVOware Plus)
If the process has stopped before being completed
Click Recover to start the Process Recovery Wizard (see 17.2.2.2 “Process
Recovery Wizard, Recovery Settings”, 17-10).
Click New Run to return to the standard view of the Runtime Controller, e.g. to
run the process again from the beginning.
If you have just made a calibration run
Click Optimize first if you want to optimize the schedule before saving it.
Click New Run to return to the standard view of the Runtime Controller, e.g. to
run the process again. If you want to save a schedule for this process, do this
before you click New.
Click Update Proc to store information in the process file on the actual times
required by device commands. The next time you run the process, the stored
information allows the scheduler to plan more accurately and thus optimize
the throughput of the process.
Click Optimize to optimize the schedule using the real execution times which
were recorded during the calibration run. You must then click Save to save the
optimized schedule.
Click Save Schedule to save a schedule for this process. Schedules can be
used to ensure that processes always run the same way and use the same
timing.
Freedom EVOware Software Manual, 393172, en, V2.3
12 - 13
12 - Running Scripts and Processes
Running and Optimizing a Process (Freedom EVOware Plus)
12.2.4 Runtime Controller, Extended View (Running a Process)
The Extended View option of the runtime controller gives you more information on
the currently running Freedom EVOware processes:
Fig. 12-7 Process runtime - Extended view (showing the Gantt Chart window)
The extended view has four windows:
The Devices window - This shows the colors which are assigned to each of
the devices in the Gantt chart and the current device utilization in percent
when the process is running. The colors which are assigned to the devices
are configurable (see 8.4.1.2 “Colors Tab”, 8-22).
Click on a device in the Devices window to see all available messages for the
device (the list shows all messages since Freedom EVOware was last
started). Coloured buttons are shown in the Devices window if device
warnings or errors have occured.
The Gantt chart / Statistics window
Click the Gantt chart tab to get a graphical representation of the currently
running process(es). For each labware item or resource, the process steps or
actions which will take place (have already taken place) are shown as
horizontal colored bars. When a process is running, the vertical red line
indicates the progess of process execution.
Click on a horizontal colored bar to get more information on the process step
or action. The first line of the Info window shows the process name and the
process instance ID. To zoom in to a particular part of the chart, click with the
mouse and drag open a rectangle which encloses the part of interest. To reset
the zoom, right-click on the chart and choose Fit to page from the context
12 - 14
Freedom EVOware Software Manual, 393172, en, V2.3
12 - Running Scripts and Processes
Running and Optimizing a Process (Freedom EVOware Plus)
menu.
Click on a labware item in the Labware column to see all available messages
for the labware (the list shows all messages since Freedom EVOware was
last started).
If you have added comments to the process steps (in the Process Editor), the
comments are shown in the Gantt chart as tool tips (yellow labels which
appear when you move the cursor above the horizontal colored bars). If you
choose suitable comments, this can help you to identify different parts of the
Gantt chart. See 9.10.5 “Comment”, 9-76.
Click the Statistics tab to get statistics on resource utilization for the process
(see figure below). When you run the process, the information becomes
available as soon as the the process schedule has been calculated. The
information which is provided makes it easier to locate resource bottlenecks
which could reduce the process performance (throughput).
The Event log window - This shows information on important events for
devices and labware.
The Warnings/Errors window - This shows process warnings and errors.
If one of the messages is shown truncated because it is too long, lengthen the
field in the dialog box and activate the horizontal scroll bar by double-clicking on
the divider (short vertical line in the header) at the end of the field.
If you need more space for the Gantt chart, you can collapse the Event log and/or
Messages/Error windows by clicking
in the title bar. In addition, you can
collapse the Devices windows by clicking
in the title bar. You can also resize
the windows by dragging the dividers between the windows.
Fig. 12-8 Process runtime - Extended view (showing the Statistics window)
Freedom EVOware Software Manual, 393172, en, V2.3
12 - 15
12 - Running Scripts and Processes
Running and Optimizing a Process (Freedom EVOware Plus)
12.2.5 Buttons in Extended View
Cancel
Return to the Process Editor.
Standard view
Return to the standard view of the Runtime Controller.
Lock Freedom EVOware
This button logs out the current Freedom EVOware user (see 6.1.9 “Lock
EVOware”, 6-7). Another use of the Lock button is to switch Freedom
EVOware users when you are handing over to another employee, e.g. due to
a change of shift.
Show Log File
This button displays the Freedom EVOware log file in a new window.
Stop
This button runs the process; it is also used to continue the process if it has
been paused.
Preview
This button previews the process; it is also used to continue the process if it
has been paused.
Run
This button runs the process; it is also used to continue the process if it has
been paused.
Pause
This button pauses the process.
If you have already run the process
Save schedule
Click Save schedule to save a schedule for this process. Schedules can be
use to ensure that processes always run the same way and use the same
timing.
Click New Run to return to the standard view of the Runtime Controller, e.g. to
run the process again. If you want to save a schedule for this process, do this
before you click New Run.
If the process has stopped before being completed
Click Recover to start the Process Recovery Wizard (see 17.2.2.2 “Process
Recovery Wizard, Recovery Settings”, 17-10).
Click New Run to return to the standard view of the Runtime Controller, e.g. to
run the process again from the beginning.
12 - 16
Freedom EVOware Software Manual, 393172, en, V2.3
12 - Running Scripts and Processes
Running and Optimizing a Process (Freedom EVOware Plus)
If you have just made a calibration run
Click Optimize first if you want to optimize the schedule before saving it.
Click New Run to return to the standard view of the Runtime Controller, e.g. to
run the process again. If you want to save a schedule for this process, do this
before you click New.
Click Update Proc to store information in the process file on the actual times
required by device commands. The next time you run the process, the stored
information allows the scheduler to plan more accurately and thus optimize
the throughput of the process.
Click Optimize to optimize the schedule using the real execution times which
were recorded during the calibration run. You must then click Save to save the
optimized schedule.
Click Save Schedule to save a schedule for this process. Schedules can be
used to ensure that processes always run the same way and use the same
timing.
Freedom EVOware Software Manual, 393172, en, V2.3
12 - 17
12 - Running Scripts and Processes
Running and Optimizing a Process (Freedom EVOware Plus)
12 - 18
Freedom EVOware Software Manual, 393172, en, V2.3
13 - Overview of Freedom EVOware Commands
Overview of Script Commands
13 Overview of Freedom EVOware Commands
This chapter gives an overview of the commands which are available in Freedom
EVOware Standard and Freedom EVOware Plus.
After creating a worktable and choosing/defining the carriers and labware that you
want to use, the process or pipetting script is created by selecting commands from
the Control Bar (see 11 “Getting Started - Setting Up a New Script or Process”,
11-1).
In this chapter, the commands are divided into two sections - script commands
and device commands - and each section is divided into groups (e.g. Liquid
Handling Arm commands). The same groups are used in the Control Bar. See
Commands in the index for an alphabetic list of the commands.
Some of the commands will only be shown in the Control Bar if your pipetting
instrument is fitted with the appropriate hardware option.
In addition, you can hide commands which you do not normally use (see
5.4.1.13 “Context Menu for Group Titles in the Control Bar”, 5-15).
Tecan and third party software add-ons for Freedom EVOware may add additional
script and/or device commands to the Control Bar which are not described in this
manual. In this case, refer to the instruction manual for the respective software
add-on for more information.
13.1 Overview of Script Commands
In Freedom EVOware Plus, when the Script Editor is open the Commands tab of
the Control Bar only shows script commands (commands which are used for
writing pipetting scripts). When the Process Editor is open, the Commands tab of
the Control Bar only shows device commands (commands for the optional
devices, see 13.2 “Overview of Device Commands”, 13-12).
In Freedom EVOware Standard, the Control Bar always shows both command
types (it does not have a Process Editor).
Tecan and third party software add-ons for Freedom EVOware may add additional
script and/or device commands to the Control Bar which are not described in this
manual. In this case, refer to the instruction manual for the respective software
add-on for more information.
13.1.1 Liquid Handling Arm (LiHa) Commands, Overview
The following table lists the commands for the liquid handling arm. To use these
commands in Freedom EVOware Plus, add the device command “Liquid Handling
Arm - Pipette” to your process; this opens the Script Editor (see 16.13.2, 16-47).
If your pipetting instrument is fitted with two liquid handling arms (and you have
installed drivers for both of them), there will be two liquid handling arm groups in
the Control Bar (Liquid Handling Arm and Liquid Handling Arm 2). Use the
commands in the group “Liquid Handling Arm” if you want to pipette with the first
LiHa. Use the commands in the group “Liquid Handling Arm 2” if you want to
pipette with the second LiHa. The commands themselves are identical in both
groups. The Script Editor window appends a “2” to the commands which are
destined for the second LiHa (e.g. “Aspirate 2”).
Freedom EVOware Software Manual, 393172, en, V2.3
13 - 1
13 - Overview of Freedom EVOware Commands
Overview of Script Commands
Tab. 13-1 Liquid Handling Arm (LiHa) commands
Aspirate - The Aspirate command is used to pick up liquid from specified positions on
the worktable. See 15.1 “Aspirate Command”, 15-1.
Dispense - The Dispense command is used to dispense liquid to specified positions
on the worktable. See 15.2 “Dispense Command”, 15-3.
Mix - The Mix command performs a mix operation by aspirating and then dispensing
at the same position. See 15.3 “Mix Command”, 15-5.
Wash Tips - The Wash Tips command is used to flush and wash fixed tips or to flush
DITI adapters using a wash station. It is not intended for flushing DITI tips. See
15.4 “Wash Tips Command”, 15-8.
Periodic Wash - The Periodic Wash command is used to flush DITI adapters in a
wash station at specified, regular intervals. It is not intended for flushing DITI tips. See
15.5 “Periodic Wash Command”, 15-10.
Activate DITI Handling - The Activate DITI Handling command activates the automatic DITI handling feature in your pipetting script and specifies the DITI replacement
script to use. See 15.6 “Activate DITI Handling Command”, 15-12.
Get DITIs - The Get DITIs command is used to pick up DiTis (disposable tips) of the
specified capacity from a DITI rack. Freedom EVOware keeps track of their position
on the worktable and automatically chooses the next available unused DiTi. This command is only shown in the Control Bar if you are using DiTis on the LiHa. See
15.7 “Get DITIs Command”, 15-13.
Drop DITIs - The Drop DITIs command is used to discard the specified DITIs into the
specified DITI waste. This command is only shown in the Control Bar if you are using
DiTis on the LiHa. See 15.8 “Drop DITIs Command”, 15-14.
Set DiTi Position - The Set DiTi Position command is used to specify the location of
the next DiTi which should be used by the Get DiTis command. This command is only
shown in the Control Bar if you are using DiTis on the LiHa. See 15.9 “Set DITI Position Command”, 15-15.
Pick Up DITIs - The Pick Up DITIs command is used to pick up DITIs which have
already been used and put back into the DiTi rack with the Set DITIs Back command.
You must specify the DiTis you want to pick up. This command is only shown in the
Control Bar if you are using DiTis on the LiHa. See 15.10 “Pick Up DITIs Command”,
15-16.
Set DITIs Back - The Set DITIs Back command is used to return used DITIs to specified positions on a DiTi rack for later use. This command requires the Lower DiTi Eject
option. This command is only shown in the Control Bar if you are using DiTis on the
LiHa. See 15.11 “Set DITIs Back Command”, 15-18.
Pickup ZipTip - The Pickup ZipTip command is used to pick up ZipTips. See
15.12 “Pickup ZipTip Command”, 15-19.
Detect Liquid - The Detect Liquid command is used to carry out liquid level detection
without pipetting and reports the liquid volume for each of the chosen wells in the
rack. See 15.13 “Detect Liquid Command”, 15-20.
Te-Fill Aspirate - The Te-Fill Aspirate command is used to pick up liquid from specified positions on the worktable using the Te-Fill option. See 15.14 “Te-Fill Aspirate
Command”, 15-22
13 - 2
Freedom EVOware Software Manual, 393172, en, V2.3
13 - Overview of Freedom EVOware Commands
Overview of Script Commands
Tab. 13-1 Liquid Handling Arm (LiHa) commands (cont.)
Te-Fill Dispense - The Te-Fill Dispense command is used to dispense liquid to specified positions on the worktable using the Te-Fill option. See 15.15 “Te-Fill Dispense
Command”, 15-24
Te-Fill Prime - The Te-Fill Prime command is used to prime the liquid channel of the
Te-Fill option. See 15.16 “Te-Fill Prime Command”, 15-26
Te-Fill Switch Valve - The Te-Fill Switch Valve command is used for special applications which require the Te-Fill liquid path to be selected but without aspirating or dispensing. See 15.17 “Te-Fill Switch Valve Command”, 15-28
Activate PMP - The Activate PMP command is used to activate the PMP (Pressure
Monitored Pipetting) function at the appropriate point in your pipetting script. You must
do this before getting (mounting) the PMP-controlled DiTis. See 15.18 “Activate PMP
Command”, 15-29.
Deactivate PMP - The Deactivate PMP command is used to deactivate the PMP
(Pressure Monitored Pipetting) function at the appropriate point in your pipetting
script. You must do this after finishing the pipetting sequence and dropping the DITIs.
See 15.19 “Deactivate PMP Command”, 15-30.
Tip Alignment Check - The Tip Alignment Check command is used to check and readjust the alignment of the Liquid Handling Arm (LiHa) during script runtime. This
function is normally only necessary if you are using microplates with 1536 wells or
other high precision labware. See 15.20 “Tip Alignment Check Command”, 15-30.
Move LIHA - The Move LIHA command is used to move the liquid handling arm from
one position to another without performing an Aspirate or Dispense operation. See
15.21 “Move LiHa Command”, 15-33.
Waste - The Waste command is used to control the vacuum-assisted waste (instrument option for viscous liquids which creates a partial vacuum in the waste bottles).
See 15.22 “Waste Command”, 15-35.
Active WashStation – The Active WashStation command is used to control the pressure pump of the Active WashStation. It is mainly intended for ZipTips. See
15.23 “Active WashStation Command”, 15-36.
Worklist - The Worklist command is used to load a worklist file or run previously
loaded worklist files. A worklist file is a text file containing instructions for the pipetting
instrument. It contains information on source and destination positions and the volumes to pipette. See 15.24 “Worklist Command”, 15-36.
Worklist Import - The Worklist Import command is used to create an Freedom
EVOware worklist from an Excel file which is stored in CSV format. See
15.25 “Worklist Import Command”, 15-46.
Export Data - The Export Data command is used to create report files for selected
labware or for all labware on the worktable or the Te-MO deck. The report files contain
information about the pipetting which has been carried out. See 15.26 “Export Data
Command”, 15-48.
Manual Tip Alignment - The Manual Tip Alignment command is used to check the
alignment of the Liquid Handling Arm (LiHa) before or after running a script. It is also
able to detect bent tips. This function is normally only necessary if you are using
microplates with 1536 wells or other high precision labware. See 15.27 “Manual Tip
Alignment Command”, 15-57. This command is mainly intended for use in maintenance scripts (see 6.4.2 “Run Maintenance”, 6-10).
Freedom EVOware Software Manual, 393172, en, V2.3
13 - 3
13 - Overview of Freedom EVOware Commands
Overview of Script Commands
13.1.2 Wizards, Overview
The following table lists advanced commands which are configured using wizards.
To use these commands in Freedom EVOware Plus, add the device command
“Liquid Handling Arm - Pipette” to your process; this opens the Script Editor (see
16.13.2, 16-47).
Tab. 13-2 Wizards
Copy Plate - The Copy Plate wizard creates a set of script commands which make
identical copies of the source plate on one or more destination plates. You can copy
the whole plate or a rectangular selection of wells. See 15.28 “Copy Plate Wizard”,
15-59.
Replicates - The Replicates wizard creates a set of script commands which make
one or more repetitions (copies) of selected wells on the source plate on one or more
destination plates. All of the destination plates will be identical. You can only create
horizontal replicates. See 15.29 “Replicates Wizard”, 15-63.
Serial Dilution - The Serial Dilution wizard creates a set of script commands which
perform a serial dilution in two or more steps. Each dilution step has the same dilution
factor. See 15.30 “Serial Dilution Wizard”, 15-69.
Merge Plates - The Merge Plates wizard creates a set of script commands which
make a destination plate (e.g. a 384 well plate) by merging together wells from one or
more source plates (e.g. four 96 well plates). See 15.31 “Merge Plates Wizard”, 1577.
Transfer - The Transfer wizard creates a set of script commands which aspirate liquid
from specified wells on the source plate and transfer it to destination positions See
15.32 “Transfer Wizard”, 15-85.
MCA Merge Plate - The MCA Merge Plate wizard creates a set of script commands
for the MCA96 which merge four 96-well microplates into one 384-well microplate.
See 15.33 “MCA Merge Plate Wizard”, 15-90.
13.1.3 Programming Commands, Overview
The following table lists the script programming commands. To use these
commands in Freedom EVOware Plus, add the device command “Liquid Handling
Arm - Pipette” to your process; this opens the Script Editor (see 16.13.2, 16-47).
13 - 4
Freedom EVOware Software Manual, 393172, en, V2.3
13 - Overview of Freedom EVOware Commands
Overview of Script Commands
Tab. 13-3 Script programming commands
Start Timer - The Start Timer command re-starts one of the 100 internal timers in
Freedom EVOware. See 15.34 “Start Timer Command”, 15-95.
Wait for Timer - The Wait for Timer command pauses the execution of the script until
a specified number of seconds have expired since a specified timer was started. See
15.35 “Wait for Timer Command”, 15-95.
Execute Application - The Execute Application command instructs Freedom
EVOware to run an external program from within a pipetting script. You can run DOS
and Windows applications. See 15.36 “Execute Application Command”, 15-96.
Comment - The Comment command is used to insert a comment for a script command or for some other reason. It is used to annotate the script and is not executable.
See 15.37 “Comment Command”, 15-97. Use the User Prompt command instead if
you want to prompt the instrument operator. Comment commands are also used as
labels by the Condition command.
User Prompt - The User Prompt command is an informational command that displays a prompt on the screen as a reminder to the operator to execute a function or to
perform a special action. See 15.38 “User Prompt Command”, 15-98.
Begin Loop - The Begin Loop command instructs Freedom EVOware to repeat a
command or a set of commands (i.e. a loop) a specified number of times until the
matching End Loop command is encountered in the script. See 15.39 “Begin Loop
Command”, 15-100.
End Loop - The End Loop command terminates the loop which is initiated by the
matching Begin Loop command. The End Loop command is inserted in the script
automatically when you add the Begin Loop command. Freedom EVOware uses the
same loop name for the Begin Loop command and the End Loop command. See
15.40 “End Loop Command”, 15-100.
Set Variable - The Set Variable command is used to declare a numeric or string variable in a pipetting script and to assign an initial value. You can also prompt the operator for the value. See 15.41 “Set Variable Command”, 15-101.
Import Variable - The Import Variable command is used to import values for script
variables from a file during script runtime. You can import values for variables which
are already declared (defined) in the script. You can also use this command to declare
new variables for use in the script and assign an initial value which is read from the
import file. See 15.42 “Import Variable Command”, 15-103.
Export Variable - The Export Variable command is used to export the values of script
variables to a file during script runtime. See 15.43 “Export Variable Command”, 15107.
Condition - The Condition command is used to jump to a specified line in the script if
a specified condition is met. See 15.44 “Condition Command”, 15-109.
If - Then - The If -Then command is used to execute a set of script commands if a
specified condition is met and execute a different set of commands if the condition is
not met (Else condition. See 15.45 “If - Then Command”, 15-111.
Group - The Group command is used to group together script commands to make
long scripts easier to understand. When you insert a Group command, a Group End
command is also inserted. Click the “-” button in the Group command icon in the
Script Editor if you want to collapse and hide all of the script lines in the group. See
15.48 “Group Command”, 15-112.
Freedom EVOware Software Manual, 393172, en, V2.3
13 - 5
13 - Overview of Freedom EVOware Commands
Overview of Script Commands
Tab. 13-3 Script programming commands (cont.)
Sub-Routine - The Sub-Routine command executes another script as part of the current script. The Sub-Routine command is not available in Freedom EVOware Plus.
See 15.49 “Sub-Routine Command”, 15-113.
Execute VB Script – The Execute VB Script command is used to execute a Visual
Basic (VB) script from within an Freedom EVOware script. See 15.50 “Execute VB
Script Command”, 15-114.
Notification - The Notification command is used to send an email from within a script
(e.g. to inform an operator in another room that a certain process has finished). It can
also be used to send an automatic email if an error occurs during script execution.
See 15.51 “Notification Command”, 15-116.
Start Script - The Start Script command starts another script from the currently running script, which is terminated. In contrast to sub-routines, the new script can use a
different worktable layout to the original script. The Start Script command is not available in Freedom EVOware Plus. See 15.52 “Start Script Command”, 15-117.
On Error Goto - The On Error Goto command is used to jump to a specified line in
the script if an error occurs during script runtime. Error recovery commands then allow
the pipetting script to react automatically to the error. See 15.53 “On Error Goto Command”, 15-118.
Resume - The Resume command is used together with the On Error Goto command
and specifies where to resume running the script after executing the error recovery
commands. See 15.54 “Resume Command”, 15-119.
End Script - The End Script command is used to stop the pipetting script prematurely
and to specify a return code (error code) for the script. It is typically used together with
error recovery commands. See 15.55 “End Script Command”, 15-120.
13.1.4 Commands for the Te-MO, Overview
The following table lists the commands for the Te-MO.
To use these commands in Freedom EVOware Plus, add the device command
“Te-MO - Pipette” to your process; this opens the Script Editor (see 16.36.2, 16120).
Tab. 13-4 Te-MO commands
Te-MO Aspirate – The Te-MO Aspirate command is used to pick up liquid from specified positions on the Te-MO. It is analogous to the Aspirate command for the LiHa.
See 15.56.1 “Te-MO Aspirate Command”, 15-122.
Te-MO Dispense – The Te-MO Dispense command is used to dispense liquid to
specified positions on the Te-MO. It is analogous to the Dispense command for the
LiHa. See 15.56.2 “Te-MO Dispense Command”, 15-124.
Te-MO Mix – The Te-MO Mix command performs a mix operation by aspirating and
then dispensing at the same Te-MO position. It is equivalent to the Mix command for
the LiHa. See 15.56.3 “Te-MO Mix Command”, 15-125.
Te-MO Wash – The Te-MO Wash command is used to wash the Te-MO tips or DITIs
using the specified Te-MO 96 wash block. It is designed for standard Te-MO tip blocks
and DITi pipetting heads with 96 tips. See 15.56.4 “Te-MO Wash Command”, 15127.
13 - 6
Freedom EVOware Software Manual, 393172, en, V2.3
13 - Overview of Freedom EVOware Commands
Overview of Script Commands
Tab. 13-4 Te-MO commands (cont.)
Te-MO Wash 384 Tip Head - The Te-MO Wash 384 Tip Head command is used to
wash the Te-MO tips using the specified Te-MO 384 wash block. It is designed for
384-tip pipetting heads. See 15.56.5 “Te-MO 384 Wash Tip Head Command”, 15130.
Te-MO Get DITIs – The Te-MO Get DITIs command is used to pick up disposable tips
of the specified capacity from a specified position on the Te-MO. See 15.56.6 “Te-MO
Get DITIs Command”, 15-132.
Te-MO Drop DITIs – The Te-MO Drop DITIs command is used to return the disposable tips to a specified position on the Te-MO. See 15.56.7 “Te-MO Drop DITIs Command”, 15-133.
Te-MO Get Tip Block – The Te-MO Get Tip Block command is used to pick up a tip
block from a specified position on the Te-MO. It is analogous to the Te-MO Get DITIs
command. See 15.56.8 “Te-MO Get Tip Block Command”, 15-134.
Te-MO Drop Tip Block – The Te-MO Drop Tip Block command is used to put down
the tipblock at a specified position on the Te-MO. It is analogous to the Te-MO Drop
DITIs command. See 15.56.9 “Te-MO Drop Tip Block Command”, 15-135.
Te-MO Refill Trough - The trough is a special carrier on the Te-MO which is used as
a container for a reagent liquid. The Te-MO Refill Trough command is used to refill the
trough with reagents. See 15.56.10 “Te-MO Refill Trough Command”, 15-135.
Te-MO Relative Movements - The Te-MO Relative Movements command is used to
perform Te-MO movements with an offset. It can be used e.g. to program a serial dilution. It is only available for the Te-MO 96. See 15.56.11 “Te-MO Relative Movements
Command”, 15-136.
Export Data - The Export Data command is used to create report files for selected
labware or for all labware on the worktable or the Te-MO deck. The report files contain
information about the pipetting which has been carried out. See 15.26 “Export Data
Command”, 15-48.
Load the Te-MO - The Load the Te-MO command is used to move a specified Te-MO
site to the RoMa exchange position (transfer position) to make it easier to exchange
the labware manually. See 15.56.12 “Load the Te-MO Command”, 15-138. This
command is mainly intended for use in maintenance scripts (see 6.4.2 “Run Maintenance”, 6-10).
Fill System (384 tip head) - The Fill system (Te-MO 384) command is used to fill and
flush the 384-tip Te-MO pipetting system and to prime the wash block of the Te-MO
384 Wash & Refill Center. See 15.56.13 “Fill system (Te-MO 384) Command”, 15138. This command is mainly intended for use in maintenance scripts (see 6.4.2 “Run
Maintenance”, 6-10).
13.1.5 Commands for the Plate Robot, Overview
The following table lists the commands for the Robot manipulator (RoMa). These
commands are only available in Freedom EVOware Standard. In Freedom
EVOware Plus, plate robot actions are normally specified as pre-actions and postactions of device commands (see 8.5.35.3 “Pre-actions and Post-actions Tabs”,
8-119).
Freedom EVOware Software Manual, 393172, en, V2.3
13 - 7
13 - Overview of Freedom EVOware Commands
Overview of Script Commands
Tab. 13-5 Commands for the plate robot
Move RoMa - The Move RoMa command is used to carry out simple RoMa movements. See 15.57 “Move RoMa Command”, 15-140.
RoMa Vector - The RoMa Vector command executes a RoMa vector, which is a predefined sequence of RoMa movements. You can also specify gripper actions at the
Safe and End positions. See 15.58 “RoMa Vector Command”, 15-141.
Transfer Labware - The Transfer Labware command is used to to transfer labware
(e.g. a microplate) from one position to another with the plate robot (RoMa) . The
same action can be carried out by defining two RoMa Vector commands and using
two RoMa vectors. See 15.59 “Transfer Labware Command”, 15-143.
13.1.6 Commands for the Tube Robot, Overview
The following table lists the commands for the Pick & Place arm (PnP).
To use these commands in Freedom EVOware Plus, add the device command
“Tube Robot - Execute Script” to your process; this opens the Script Editor (see
16.25.1, 16-83).
Tab. 13-6 Commands for the tube robot
Move PnP - The Move PnP command is used to carry out simple PnP movements.
See 15.60 “Move PnP Command”, 15-145.
PnP Vector - The PnP Vector command executes a PnP vector, which is a predefined sequence of PnP movements. You can also specify gripper actions at the
Safe and End positions. See 15.61 “PnP Vector Command”, 15-146.
Transfer Tube - The Transfer Tube command is used to transfer a tube from one
position to another with the tube robot (PnP) . The same action can be carried out by
defining two PnP Vector commands and using two PnP vectors. See 15.62 “Transfer
Tube Command”, 15-148.
13.1.7 Commands for Identification Devices, Overview
The following table lists the command for the PosID movable barcode scanner.
The PosID-3 (a new, improved version of the PosID hardware) uses device
commands instead of script commands. If your pipetting instrument is fitted with
the PosID-3 instead of the PosID, the Identification Devices group of the Control
Bar will not contain any commands. The PosID-3 device commands can be found
in the PosID-3 group of the Control Bar.
Tab. 13-7 Commands for identification devices
PosID - The PosID command is used to read the barcode labels on one or more
pieces of labware using the PosID option. The PosID (Positive Identification System)
is a movable barcode scanner which can be used to read the barcode labels on carriers, labware and tubes. See 15.63 “PosID Command”, 15-150.
13 - 8
Freedom EVOware Software Manual, 393172, en, V2.3
13 - Overview of Freedom EVOware Commands
Overview of Script Commands
13.1.8 Miscellaneous Commands, Overview
The following table lists the script commands for miscellaneous devices. To use
these commands in Freedom EVOware Plus, add the device command “Liquid
Handling Arm - Pipette” to your process; this opens the Script Editor (see
16.13.2, 16-47).
Tab. 13-8 Commands for miscellaneous devices
Waterbath Control – The Waterbath Control command is used to control the waterbaths for the Te-Flow option. The Te-Flow option provides support for the In Situ
Hybridization method. See 15.64 “Waterbath Control Command”, 15-154.
Balance - The Balance command is used to read a weight from the Mettler balance
and store it in a variable. See 15.65 “Balance Command”, 15-155.
Balance Send Command - The Balance Send Command command allows you to
send a firmware command directly to the Mettler balance. This command is only
intended for specialists. See 15.66 “Balance Send Command Command”, 15-157.
Send Command - The Send Command command allows you to send a firmware
command directly to the pipetting instrument. This command is only intended for specialists. See 15.67 “Send Command Command”, 15-158.
13.1.9 Commands for the MCA96 (Multi Channel Arm 96), Overview
The following table lists the script commands for the MCA96.
Tab. 13-9 Commands for the MCA96
Aspirate - The MCA96 Aspirate command is used to pick up liquid from specified
positions on the worktable of the pipetting instrument using the multi channel arm.
See 15.68.1 “MCA96 Aspirate Command”, 15-159.
Dispense - The MCA96 Dispense command is used to dispense liquid to specified
positions on the worktable of the pipetting instrument using the multi channel arm.
See 15.68.2 “MCA96 Dispense Command”, 15-161.
Mix - The MCA96 Mix command performs a mix operation by aspirating and then dispensing at the same position using the multi channel arm. See 15.68.3 “MCA96 Mix
Command”, 15-162.
Wash - The MCA96 Wash command is used to wash MCA96 tips or MCA96 DITIs
using the specified MCA96 wash block. See 15.68.4 “MCA96 Wash Command”,
15-164.
Get DITIs - The MCA96 Get DITIs command is used to pick up disposable tips for the
multi channel arm from a specified position on the worktable of the pipetting instrument. See 15.68.5 “MCA96 Get DITIs Command”, 15-167.
Drop DITIs - The MCA96 Drop DITIs command is used to return the disposable tips
of the multi channel arm to a specified position on the worktable of the pipetting instrument. See 15.68.6 “MCA96 Drop DITIs Command”, 15-168.
Get Tipblock - The MCA96 Get Tip Block command is used to pick up a tip block for
the MCA96 from a specified position on the worktable of the pipetting instrument. See
15.68.7 “MCA96 Get Tip Block Command”, 15-170.
Freedom EVOware Software Manual, 393172, en, V2.3
13 - 9
13 - Overview of Freedom EVOware Commands
Overview of Script Commands
Tab. 13-9 Commands for the MCA96 (cont.)
Drop Tipblock - The MCA96 Drop Tip Block command is used to put down the tipblock of the MCA96 at a specified position on the worktable of the pipetting instrument. See 15.68.8 “MCA96 Drop Tip Block Command”, 15-171.
Relative Movements - The MCA96 Relative Movements command is used to perform movements of the MCA96 with an offset. It can be used e.g. to program a serial
dilution. See 15.68.9 “MCA96 Relative Movements Command”, 15-171.
Move - The MCA96 Move command is used to move the MCA96 from one position to
another without performing an Aspirate or Dispense operation. See 15.68.10 “MCA96
Move Command”, 15-174.
Vector - The MCA96 Vector command executes an MCA96 vector, which is a predefined sequence of MCA96 movements. You can also specify gripper actions at the
Safe and End positions. Gripper actions require the MCA96 gripper option. See
15.68.11 “MCA96 Vector Command”, 15-175.
Transfer Labware - The MCA96 Transfer Labware command is used to transfer labware (e.g. a microplate) from one position to another with the MCA96 gripper. The
same action can be carried out using two MCA96 Vector commands. This command
requires the MCA96 gripper option. See 15.68.12 “MCA96 Transfer Labware Command”, 15-177.
13.1.10 Commands for the MCA384 (Multi Channel Arm 384), Overview
The following table lists the script commands for the MCA384.
Tab. 13-10 Commands for the MCA384
Aspirate - The MCA384 Aspirate command is used to pick up liquid from specified
positions on the worktable of the pipetting instrument using the multi channel arm.
See 15.69.2 “MCA384 Aspirate Command”, 15-181.
Dispense - The MCA384 Dispense command is used to dispense liquid to specified
positions on the worktable of the pipetting instrument using the multi channel arm.
See 15.69.3 “MCA384 Dispense Command”, 15-183.
Mix - The MCA384 Dispense command performs a mix operation by aspirating and
then dispensing at the same position using the multi channel arm. See
15.69.4 “MCA384 Mix Command”, 15-185.
Wash - The MCA384 Wash command is used to wash the MCA384 tips or MCA384
DITIs using the specified MCA384 wash block. See 15.69.5 “MCA384 Wash Command”, 15-187.
Get Head Adapter - The MCA384 Get Head Adapter command is used to pick up an
adapter plate for the multi channel arm from a specified position on the worktable of
the pipetting instrument. See 15.69.6 “MCA384 Get Head Adapter Command”, 15189.
Drop Head Adapter - The MCA384 Drop Head Adapter command is used to put
down the adapter plate of the multi channel arm at a specified position on the worktable of the pipetting instrument. See 15.69.7 “MCA384 Drop Head Adapter Command”, 15-190.
13 - 10
Freedom EVOware Software Manual, 393172, en, V2.3
13 - Overview of Freedom EVOware Commands
Overview of Script Commands
Tab. 13-10 Commands for the MCA384 (cont.)
Get DITIs - The MCA384 Get DITIs command is used to pick up disposable tips for
the multi channel arm from a specified position on the worktable of the pipetting
instrument. See 15.69.8 “MCA384 Get DITIs Command”, 15-191.
Drop DITIs - The MCA384 Drop DITIs command is used to return the disposable tips
of the multi channel arm to a specified position on the worktable of the pipetting instrument. See 15.69.9 “MCA384 Drop DITIs Command”, 15-194.
Move - The MCA384 Move command is used to move the MCA384 from one position
to another without performing an Aspirate or Dispense operation. See
15.69.10 “MCA384 Move Command”, 15-198.
Vector - The MCA384 Vector command executes a CGM vector, which is a predefined sequence of CGM movements. You can also specify gripper actions at the
Safe and End positions. This command requires the CGM (common gripper module),
which is a hardware option for the MCA384. See 15.69.11 “MCA384 Vector Command”, 15-199.
Transfer Labware - The MCA384 Transfer Labware command is used to transfer
labware (e.g. a microplate) from one position to another with the CGM. The same
action can be carried out using two MCA384 Vector commands. This command
requires the CGM (common gripper module), which is a hardware option for the
MCA384. See 15.69.12 “MCA384 Transfer Labware Command”, 15-201.
Dock CGM - The MCA384 Dock CGM command is used to dock the CGM around the
MCA384 pipetting head. This reduces the amount of space required by the MCA384/
CGM hardware. The CGM (common gripper module) is a hardware option for the
MCA384. See 15.69.13 “MCA384 Dock CGM Command”, 15-204.
Undock CGM - The MCA384 Undock CGM command is used to undock the CGM
from the MCA384 pipetting head. The CGM can only be used for gripping and transferring labware when it is undocked. The CGM (common gripper module) is a hardware option for the MCA384. See 15.69.14 “MCA384 Undock CGM Command”, 15204.
13.1.11 Commands for the Common Notification Server, Overview
The following table lists the command for the Common Notification Server. The
Common Notification Server (CNS) is a central Tecan software component which
is responsible for sending notification messages to administrators, users or
operators of the pipetting instrument. The CNS complements the features of the
Notification script command.
Tab. 13-11 Commands for the Common Notification Server
SendNotification - The Common Notification Server (CNS) is a central Tecan software component which is responsible for sending notification messages. The SendNotification command is used to send a message to one or more recipients. See
15.70 “CNS SendNotification command”, 15-205.
Freedom EVOware Software Manual, 393172, en, V2.3
13 - 11
13 - Overview of Freedom EVOware Commands
Overview of Device Commands
13.2 Overview of Device Commands
In Freedom EVOware Plus, when the Process Editor is open the Control Bar only
shows device commands (commands which are used for controlling optional
devices).
Conversely, when the Script Editor is open the Control Bar only shows script
commands (commands which are used for writing pipetting scripts). See
11.5.5 “Creating a Script for the Pipette Command”, 11-12).
In Freedom EVOware Standard, both command types are shown in the Control
Bar (it does not have a Process Editor).
Tecan and third party software add-ons for Freedom EVOware may add additional
script and/or device commands to the Control Bar which are not described in this
manual. In this case, refer to the instruction manual for the respective software
add-on for more information.
Note: Device commands are handled by device drivers.The currently installed
devices are shown in the Control Bar. If you cannot find the device command you
need even though it is listed in this chapter, you must run the Freedom EVOware
installation program again to install it. Also check whether the driver has been
installed but is currently deactivated (see 8.4.1.1 “Device Information Tab”, 821, Start checkbox).
13.2.1 Commands for the Barcode Scanner, Overview
The following table lists the command for the Symbol LS-1220 barcode scanner.
In Freedom EVOware Plus, the Barcode Scanner command is an on-the-flycommand – drag the command to the line which connects two process steps (see
5.4.3 “The Process Editor (Freedom EVOware Plus)”, 5-17).
In Freedom EVOware Standard, proceed as follows to use the Symbol LS-1220
barcode scanner:
Make sure that the labware type has been “allowed” for scanning with the
barcode scanner (see 9.5 “Configuring Carriers”, 9-39, “Allowed Labware
on this carrier”).
Drag labware of the type you want to scan from the Control Bar (Labware
section) onto the device icon of the barcode scanner.
Use the Transfer Labware command to move the labware to the barcode
scanner (the barcode scanner carrier attribute “on-the-fly” instructs Freedom
EVOware not to release the labware at this position); see 15.59 “Transfer
Labware Command”, 15-143;
Add the Barcode Scanner - ReadBarcode command to your script;
Use the Transfer Labware command to move the labware from the barcode
scanner to the required destination position.
Tab. 13-12 Commands for the Barcode Scanner
Read Barcode - The Read Barcode command is used to read barcodes from the labware or tube which is presented to the barcode scanner by the RoMa. See
16.2.1 “Barcode Scanner - Read Barcode Command”, 16-2.
13 - 12
Freedom EVOware Software Manual, 393172, en, V2.3
13 - Overview of Freedom EVOware Commands
Overview of Device Commands
13.2.2 Commands for the Carousel, Overview
The following table lists the commands for the Carousel. The commands
PresentPlate, ReturnPlate, MoveToCartridge and EndAccess are only relevant for
Freedom EVOware Standard. These actions are handled automatically in
Freedom EVOware Plus.
PresentPlateByBarcode, ReturnPlateByBarcode and PreReturnPlateByBC are
also only available in Freedom EVOware Standard. In Freedom EVOware Plus,
you should use the Use barcode file option in the Runtime Controller instead (see
12.2 “Running and Optimizing a Process (Freedom EVOware Plus)”, 12-5).
Tab. 13-13 Commands for the Carousel
PresentPlate - The PresentPlate command gets labware from the carousel. The labware is brought to the carousel transfer position where the plate robot can pick it up
and move it away. See 16.3.1 “Carousel - PresentPlate Command”, 16-2.
PreReturnPlateByBC - The PreReturnPlateByBC command moves the carousel’s
plate handler to the carousel transfer position where it waits for the RoMa to bring the
labware which you want to return to the carousel. It is used together with the ReturnPlateByBarcode command. See 16.3.2 “Carousel - PreReturnPlateByBC Command”,
16-3.
ReturnPlate - The ReturnPlate command returns labware from the carousel transfer
position to the specified tower and position in the carousel. See 16.3.3 “Carousel ReturnPlate Command”, 16-3.
ReturnPlateByBarcode - The ReturnPlateByBarcode command returns labware
from the carousel transfer position to its original position in the carousel. See
16.3.4 “Carousel - ReturnPlateByBarcode Command”, 16-4.
ReadAllBarcodes - The ReadAllBarcodes command reads the barcodes of all of labware in the carousel. See 16.3.5 “Carousel - ReadAllBarcodes command”, 16-5.
InitCarousel - The InitCarousel command initializes the carousel. This needs to be
executed before the carousel is first used in a process or script. See 16.3.6 “Carousel
- InitCarousel Command”, 16-5.
MoveToCartridge - The MoveToCartridge command rotates the carousel to a specified tower. See 16.3.7 “Carousel - MoveToCartridge Command”, 16-5.
EndAccess - The EndAccess command completes the current carousel movement.
This command is necessary after each PresentPlate, PresentPlateByBarcode and
ReturnPlate command. See 16.3.8 “Carousel - EndAccess Command”, 16-6.
ReadPlatesInCartridge - The ReadPlatesInCartridge command reads the barcodes
of all of the labware in the specified cartridge (tower) of the carousel. See
16.3.9 “Carousel - ReadPlatesInCartridge Command”, 16-6.
PresentPlateByBarcode - The PresentPlateByBarcode command gets the labware
with the specified barcode from the carousel. The labware is brought to the carousel
transfer position where the plate robot can pick it up and move it away. See
16.3.10 “Carousel - PresentPlateByBarcode Command”, 16-7.
LoadBCFromFile - The LoadBCFromFile command reads a list of barcodes from a
text file and assigns them to labware in the carousel. See 16.3.13 “Carousel - LoadBCFromFile Command”, 16-8.
Freedom EVOware Software Manual, 393172, en, V2.3
13 - 13
13 - Overview of Freedom EVOware Commands
Overview of Device Commands
13.2.3 Commands for the Carousel NT, Overview
The following table lists the commands for the Carousel NT. The commands
PresentPlate, ReturnPlate and MoveToCartridge are only available in Freedom
EVOware Standard. These actions are handled automatically in Freedom
EVOware Plus.
PresentPlateByBC and ReturnPlateByBC are also only available in Freedom
EVOware Standard. In Freedom EVOware Plus, you should use the Use barcode
file option in the Runtime Controller instead (see 12.2 “Running and Optimizing a
Process (Freedom EVOware Plus)”, 12-5).
PrePesentPlate and UndoPrePesentPlate are not relevant for (and not available
in) Freedom EVOware Standard.
Tab. 13-14 Commands for the Carousel NT
OpenDoorlock - The OpenDoorlock command unlocks the doorlocks of the carousel
safety door. See 16.4.1 “Carousel NT - OpenDoorlock command”, 16-9.
CloseDoorlock- The CloseDoorlock command locks the doorlocks of the carousel
safety door. See 16.4.2 “Carousel NT - CloseDoorlock command”, 16-9.
VerifyCartridges - The VerifyCartridges command is used to check that the correct
cartridge types have been loaded in the carousel. See 16.4.3 “Carousel NT - VerifyCartridges command”, 16-9.
ScanAllCartridges - The ScanAllCartridges command reads the barcodes of all of
labware in the carousel. See 16.3.5 “Carousel - ReadAllBarcodes command”, 16-5.
ScanCartridge - The ScanCartridge command reads the barcodes of all labware in
the specified cartridge (tower) of the carousel. See 16.4.5 “Carousel NT - ScanCartridge Command”, 16-10.
ScanLocation - The ScanLocation command reads the barcodes of all of the labware
in the specified logical carousel. See 16.4.6 “Carousel NT - ScanLocation Command”,
16-10.
PresentPlate - The PresentPlate command gets labware from the carousel. The labware is brought to the carousel transfer position where the plate robot can pick it up
and move it away. See 16.4.7 “Carousel NT - PresentPlate Command”, 16-11.
ReturnPlate - The ReturnPlate command returns labware from the carousel transfer
position to the specified tower and position in the carousel. See 16.4.8 “Carousel NT ReturnPlate Command”, 16-12.
PresentPlateByBC - The PresentPlateByBC command gets the labware with the
specified barcode from the carousel. The labware is brought to the carousel transfer
position where the plate robot can pick it up and move it away. See 16.4.9 “Carousel
NT - PresentPlateByBC Command”, 16-13.
ReturnPlateByBC - The ReturnPlateByBC command returns labware from the carousel transfer position to its original position in the carousel. See 16.4.10 “Carousel
NT - ReturnPlateByBC Command”, 16-14.
13 - 14
Freedom EVOware Software Manual, 393172, en, V2.3
13 - Overview of Freedom EVOware Commands
Overview of Device Commands
Tab. 13-14 Commands for the Carousel NT (cont.)
MoveToCartridge - The MoveToCartridge command rotates the carousel to a specified tower. See 16.4.11 “Carousel NT - MoveToCartridge Command”, 16-14.
PrePresentPlate - The PrePresentPlate command moves the next labware item to
be processed to the carousel transfer position where it can be picked up by the robot
during idle time. The robot then does not have to wait for the labware to be presented.
This optimizes the movement times for the carousel. See 16.4.14 “Carousel NT PrePresentPlate Command”, 16-15.
UndoPrePresent - The UndoPrePresent command cancels the pre-unloading of
plates. See 16.4.15 “Carousel NT - UndoPrePresent Command”, 16-16.
LoadBCFromFile - The LoadBCFromFile command reads a list of barcodes from a
text file and assigns them to labware in the carousel. See 16.4.16 “Carousel NT LoadBCFromFile Command”, 16-16.
13.2.4 Commands for the Hettich Centrifuge, Overview
The following table lists the commands for the Hettich Centrifuge. The commands
Execute2, Execute3 and Execute4 are only available in Freedom EVOware Plus.
In Freedom EVOware Standard, plates are loaded into the carousel using RoMa
movement commands. For example, use two RoMa movement commands to load
two plates.
In Freedom EVOware Plus, plate loading/unloading is handled automatically by
the Execute command.
Tab. 13-15 Commands for the Hettich Centrifuge
Init - The Init command initializes the centrifuge. This needs to be done before the
device is first used in a script or process. See 16.5.1 “Hettich Centrifuge - Init Command”, 16-16.
Open - The Open command opens the door of the centrifuge. See 16.5.2 “Hettich
Centrifuge - Open Command”, 16-17.
Close - The Close command closes the door of the centrifuge. See 16.5.3 “Hettich
Centrifuge - Close Command”, 16-17.
Execute1 - The Execute1 command performs the rotation procedure with one rotor
position of the device occupied by labware. After the plates have been placed into the
device and the door closed, the centrifuge will start rotating with the specified parameters. See 16.5.4 “Hettich Centrifuge - ExecuteN Command”, 16-17.
Freedom EVOware Software Manual, 393172, en, V2.3
13 - 15
13 - Overview of Freedom EVOware Commands
Overview of Device Commands
Tab. 13-15 Commands for the Hettich Centrifuge (cont.)
Execute2 - The Execute2 command performs the rotation procedure with two rotor
positions of the device occupied by labware. After the plates have been placed into
the device and the door closed, the centrifuge will start rotating with the specified
parameters. See 16.5.4 “Hettich Centrifuge - ExecuteN Command”, 16-17.
Execute3 - The Execute3 command performs the rotation procedure with three rotor
positions of the device occupied by labware. After the plates have been placed into
the device and the door closed, the centrifuge will start rotating with the specified
parameters. See 16.5.4 “Hettich Centrifuge - ExecuteN Command”, 16-17.
Execute4 - The Execute4 command performs the rotation procedure with four rotor
positions of the device occupied by labware. After the plates have been placed into
the device and the door closed, the centrifuge will start rotating with the specified
parameters. See 16.5.4 “Hettich Centrifuge - ExecuteN Command”, 16-17.
MoveToPos - The MoveToPos command slowly turns the centrifuge rotor to align the
specified bucket (rotor position) with the transfer position. After opening the door, the
labware can then be removed or inserted using the RoMa. See 16.5.5 “Hettich Centrifuge - MoveToPos Command”, 16-18.
13.2.5 Commands for the Columbus Washer, Overview
The following table lists the commands for the Columbus Washer. The Status
command is only available in Freedom EVOware Plus.
Tab. 13-16 Commands for the Columbus Washer
WashPlate - The WashPlate command performs the washing of a microplate. See
16.6.1 “Columbus Washer - WashPlate command”, 16-19.
Prime - Before the washer is used, all dispensing channels needed for the wash step
must be primed to fill the liquid system with the required liquid. The Prime command
starts the priming procedure. See 16.6.2 “Columbus Washer - Prime Command”,
16-22.
Rinse - The Rinse command starts the rinsing procedure of the washer to flush the
liquid system and prevent needle blockages. Rinsing should be performed when the
device is left in standby or is switched off at the end of use. See 16.6.3 “Columbus
Washer- Rinse Command”, 16-23.
Remote - The Remote command switches the device from local mode to remote
mode. The device can only be controlled remotely by Freedom EVOware (through the
interface cable) in remote mode. See 16.6.4 “Columbus Washer - Remote Command”, 16-24.
ExitRemote - The ExitRemote command switches the device from remote mode to
local mode. The device can not be controlled remotely by Freedom EVOware
(through the interface cable) in local mode. See 16.6.5 “Columbus Washer - ExitRemote Command”, 16-24.
Status - The Status command interrogates the status of the Columbus washer. See
16.6.6 “Columbus Washer - Status Command”, 16-24.
Init - The Init command initializes the washer. This must be done before the washer is
first used in a script or process. See 16.6.7 “Columbus Washer - Init Command”,
16-24.
13 - 16
Freedom EVOware Software Manual, 393172, en, V2.3
13 - Overview of Freedom EVOware Commands
Overview of Device Commands
Tab. 13-16 Commands for the Columbus Washer (cont.)
StopRinse - The StopRinse command stops the currently running rinsing procedure.
See 16.6.8 “Columbus Washer - StopRinse Command”, 16-25.
StartProg - The StartProg command starts a washing program which is stored in the
Columbus washer. The washer is capable of storing up to 30 user-definable washing
programs. See 16.6.9 “Columbus Washer - StartProg Command”, 16-25.
WashPlateEx - The WashPlateEx command performs the washing of a microplate.
Information on the channels (liquid containers) to use with this command is read from
an external text file. The washer is capable of storing up to 30 user-definable washing
programs. See 16.6.10 “Columbus Washer - WashPlateEx Command”, 16-26.
DisableAutoPrime - The DisableAutoPrime command disables the auto-priming
function for the Columbus washer. Auto-priming is configured in the Columbus driver
settings. See 16.6.11 “Columbus Washer - DisableAutoPrime Command”, 16-29.
AllowAutoPrime - The AllowAutoPrime command activates the auto-priming function
for the Columbus washer. Auto-priming is configured in the Columbus driver settings.
See 16.6.12 “Columbus Washer - AllowAutoPrime Command”, 16-29.
13.2.6 Commands for the FlaskFlipper, Overview
The following table lists the commands for the FlaskFlipper.
Tab. 13-17 Commands for the FlaskFlipper
ExecuteScript - The ExecuteScript command is used to execute commands for the
FlaskFlipper. Most of the functions can also be executed using the other FlaskFlipper
commands. See 16.7.1 “FlaskFlipper - ExecuteScript Command”, 16-30.
LoadUnloadFlask - The LoadUnloadFlask command turns the flask flipper to the
horizontal position and opens the flask holding mechanism. In this position, you can
load (insert) or unload (remove) flasks using the plate robot (RoMa) or AutoLoader.
See 16.7.2 “FlaskFlipper - LoadUnloadFlask Command”, 16-30.
PrepareForPipette - The PrepareForPipette command closes the flask holding
mechanism and turns the flask flipper to the vertical position. In this position, you can
pipette into the flasks through the septum in the screw cap using the liquid handling
arm (LiHa). See 16.7.3 “FlaskFlipper - PrepareForPipette Command”, 16-31.
Shake - The Shake command is used to shake the flasks in the flask flipper for the
purpose of distributing and mixing liquids. This is done by alternately rocking the flask
flipper clockwise and counterclockwise with the specified shaking amplitude and
acceleration. See 16.7.4 “FlaskFlipper - Shake Command”, 16-31.
Knock - The Knock command moves the flask flipper to the horizontal position and
knocks the flasks using a spring-loaded mechanism. This is done to detach the cell
culture from the inner wall of a flask when the culture is fully grown. See
16.7.5 “FlaskFlipper - Knock Command”, 16-32.
13.2.7 Commands for the GENios Reader, Overview
The following table lists the commands for the GENios Reader. The Status
command is only available in Freedom EVOware Plus.
Freedom EVOware Software Manual, 393172, en, V2.3
13 - 17
13 - Overview of Freedom EVOware Commands
Overview of Device Commands
Tab. 13-18 Commands for the GENios Reader
Status - The Status command interrogates the status of the reader. See
16.8.1 “GENios Reader - Status Command”, 16-33.
Excitation Out - The Excitation Out command moves the excitation filter slide out of
the reader to allow the filters to be removed or exchanged. See 16.8.2 “GENios
Reader - Excitation Out Command”, 16-33.
Emission Out - The Emission Out command moves the emission filter slide out of the
reader to allow the filters to be removed or exchanged. See 16.8.3 “GENios Reader Emission Out Command”, 16-33.
Open - The Open command opens the door of the reader. See 16.8.4 “GENios
Reader - Open Command”, 16-33.
Close - The Close command closes the door of the reader. See 16.8.5 “GENios
Reader - Close Command”, 16-33.
Measure - The Measure command performs a measurement procedure using external software which is controlled by external software. See 16.8.6 “GENios Reader Measure Command”, 16-34.
Multilabel - The Multilabel command performs up to four consecutive measurement
steps on the same plate using external software. The plate does not have to leave the
reader in between measurements. See 16.8.7 “GENios Reader - Multilabel Command”, 16-34.
13.2.8 Commands for the GENios Pro Reader, Overview
The following table lists the commands for the GENios Pro Reader. The Status
command is only available in Freedom EVOware Plus.
Tab. 13-19 Commands for the GENios Pro Reader
Status - The Status command interrogates the status of the reader. See
16.9.1 “GENios Pro Reader - Status Command”, 16-36.
Excitation Out - The Excitation Out command moves the excitation filter slide out of
the reader to allow the filters to be removed or exchanged. See 16.9.2 “GENios Pro
Reader - Excitation Out Command”, 16-36.
Emission Out - The Emission Out command moves the emission filter slide out of the
reader to allow the filters to be removed or exchanged. See 16.9.3 “GENios Pro
Reader - Emission Out Command”, 16-36.
Open - The Open command opens the door of the reader. See 16.9.4 “GENios Pro
Reader - Open Command”, 16-37.
Close - The Close command closes the door of the reader. See 16.9.5 “GENios Pro
Reader - Close Command”, 16-37.
13 - 18
Freedom EVOware Software Manual, 393172, en, V2.3
13 - Overview of Freedom EVOware Commands
Overview of Device Commands
Tab. 13-19 Commands for the GENios Pro Reader (cont.)
Measure - The Measure command performs a measurement procedure using external software. See 16.9.6 “GENios Pro Reader - Measure Command”, 16-37.
Multilabel - The Multilabel command performs up to four consecutive measurement
steps on the same plate using external software. The plate does not have to leave the
reader in between measurements. See 16.9.7 “GENios Pro Reader - Multilabel Command”, 16-38.
PrimeManual - The PrimeManual command executes the priming procedure, which
fills the injectors with fluid, if the reader is equipped with the injector option. See
16.9.8 “GENios Pro Reader - PrimeManual Command”, 16-39.
DispenseManual - The DispenseManual command dispenses fluid from the injectors, if the reader is equipped with the injector option. See 16.9.9 “GENios Pro
Reader - DispenseManual Command”, 16-39.
13.2.9 Commands for the Heated Incubator, Overview
The following table lists the commands for the Heated Incubator. Freedom
EVOware in the standard configuration lets you configure up to three logical
incubators, each of them with a different temperature (see 8.5.8 “Settings for
Heated Incubators 1 to 3”, 8-55).
Use the Duplicate Device tool if you need more than three (see A.9.3 “Duplicate
Device Tool”, A-36).
The commands CloseDoor, StartShaker, StopShaker, InsertPlate and
RemovePlate are only available in Freedom EVOware Standard. Plates are
loaded into the incubator using RoMa movement commands. Use the Wait For
Timer command to control the incubating time.
Use the Incubate command instead in Freedom EVOware Plus (the Incubate
command handles all of these actions, including incubating time and plate
loading/unloading, automatically).
Tab. 13-20 Commands for the Heated Incubator
Incubate - The Incubate command incubates the labware inside the incubator for the
specified amount of time. See 16.10.1 “Heated Incubator - Incubate Command”,
16-40.
SetTemperature - The SetTemperature command sets the specified slot of the incubator to the chosen temperature. See 16.10.7 “Heated Incubator - SetTemperature
Command”, 16-43.
CloseDoor- The CloseDoor command closes all of the doors of the incubator. To
maintain a constant temperature within the incubator, it is best to close the doors
again directly after inserting or removing labware. See 16.10.2 “Heated Incubator CloseDoor Command”, 16-40.
Freedom EVOware Software Manual, 393172, en, V2.3
13 - 19
13 - Overview of Freedom EVOware Commands
Overview of Device Commands
Tab. 13-20 Commands for the Heated Incubator (cont.)
StartShaker - The StartShaker command starts the optional shaker of the incubator.
See 16.10.3 “Heated Incubator - StartShaker Command”, 16-41.
StopShaker - The StopShaker command stops the optional shaker of the incubator.
See 16.10.4 “Heated Incubator - StopShaker Command”, 16-41.
InsertPlate - The InsertPlate command must be used each time the RoMa inserts
labware into the incubator slot. The InsertPlate command itself does not move the
labware. It’s purpose is to regulate the power of the slot’s heater. See 16.10.5 “Heated
Incubator - InsertPlate Command”, 16-41.
RemovePlate - The RemovePlate command must be used each time the RoMa
removes labware from the incubator slot. The RemovePlate command itself does not
move the labware. It’s purpose is to tell Freedom EVOware to stop recording information on the slot temperature to the log file. See 16.10.6 “Heated Incubator - RemovePlate Command”, 16-42.
13.2.10 Commands for the Base Incubator, Overview
The following table lists the command for the Base Incubator. The Base Incubator
is a software concept and it is not a device which you can fit to your pipetting
instrument. This command is not necessary in Freedom EVOware Standard.
Tab. 13-21 Commands for the Base Incubator
BaseIncubate - The BaseIncubate command moves the labware back to its base
(labware source) position (e.g. the carousel) and leaves it there at room temperature
for the specified amount of time. The base incubator is a software concept and it is not
a device which you can fit to your pipetting instrument. See 16.11.1 “Base Incubator BaseIncubate Command”, 16-44.
13.2.11 Commands for the Room Temperature Incubator, Overview
The following table lists the command for the Room Temperature Incubator, which
is only available in Freedom EVOware Plus. The Incubate command handles
incubating time and plate loading/unloading automatically.
This command is not available in Freedom EVOware Standard. The labware is
loaded into the room temperature incubator using RoMa movement commands.
The incubating time can then be controlled by the Wait For Timer command.
Tab. 13-22 Commands for the Room Temperature Incubator
Incubate - The Incubate command keeps the labware at room temperature for the
specified amount of time. See 16.12.1 “Room Temperature Incubator - Incubate Command”, 16-45.
13.2.12 Commands for the Liquid Handling Arm (LiHa), Overview
The following table lists the device commands for the Liquid Handling Arm (LiHa).
These commands are only available in Freedom EVOware Plus. They are not
13 - 20
Freedom EVOware Software Manual, 393172, en, V2.3
13 - Overview of Freedom EVOware Commands
Overview of Device Commands
necessary in Freedom EVOware Standard - all of the required functions are
provided by the Liquid Handling Arm script commands.
Tab. 13-23 Commands for the Liquid Handling Arm (LiHa)
Flush RSP - The Flush RSP command uses a wash station to flush the dilutors and
the tubing of the pipetting instrument (fill them with system liquid) and to flush and
wash the tips on the LiHa. It is mainly intended as a service function. See
16.13.1 “Liquid Handling Arm - Flush RSP Command”, 16-46.
Pipette - The Pipette command is used to create a pipetting script. When you drag it
to the Process Editor, it opens the Script Editor automatically. See 16.13.2 “Liquid
Handling Arm - Pipette Command”, 16-47. See also 11.4.2 “Creating a Pipetting
Script”, 11-5.
13.2.13 Commands for the Multi Channel Arm (MCA) Overview
The following table lists the device commands for the Multi Channel Arm (MCA).
These commands are only available in Freedom EVOware Plus. They are not
necessary in Freedom EVOware Standard - all of the required functions are
provided by the Multi Channel Arm script commands.
Tab. 13-24 Commands for the Multi Channel Arm (MCA)
Pipette - The Pipette command is used to create a pipetting script. When you drag it
to the Process Editor, it opens the Script Editor automatically. See 16.14.1 “MCA96 Pipette Command”, 16-48. See also 11.4.2 “Creating a Pipetting Script”, 11-5.
13.2.14 Commands for the MCA384 (Multi Channel Arm) Overview
The following table lists the device commands for the Multi Channel Arm (MCA).
These commands are only available in Freedom EVOware Plus. They are not
necessary in Freedom EVOware Standard - all of the required functions are
provided by the Multi Channel Arm script commands.
Tab. 13-25 Commands for the MCA384 (Multi Channel Arm)
Pipette - The Pipette command is used to create a pipetting script. When you drag it
to the Process Editor, it opens the Script Editor automatically. See 16.14.1 “MCA96 Pipette Command”, 16-48. See also 11.4.2 “Creating a Pipetting Script”, 11-5.
13.2.15 Commands for the Magellan option, Overview
The following table lists the Freedom EVOware commands for the Tecan
Magellan option, which must be installed separately. The Magellan software is
used to control microplate readers (e.g. photometers) and to carry out data
analysis using stored procedures. The Status command is only available in
Freedom EVOware Plus.
Freedom EVOware Software Manual, 393172, en, V2.3
13 - 21
13 - Overview of Freedom EVOware Commands
Overview of Device Commands
Tab. 13-26 Commands for the Magellan option
Status - The Status command interrogates the status of the reader. See
16.16.1 “Magellan - Status Command”, 16-48.
Excitation Out - The Excitation Out command moves the excitation filter slide out of
the reader to allow the filters to be removed or exchanged. See 16.16.2 “Magellan Excitation Out Command”, 16-49.
Emission Out - The Emission Out command moves the emission filter slide out of the
reader to allow the filters to be removed or exchanged. See 16.16.3 “Magellan - Emission Out Command”, 16-49.
Open - The Open command opens the door of the currently active reader. See
16.16.4 “Magellan - Open Command”, 16-49.
Close - The Close command closes the door of the currently active reader. See
16.16.5 “Magellan - Close Command”, 16-49.
Measure - The Measure command performs a measurement procedure using the
Magellan software. See 16.16.6 “Magellan - Measure Command”, 16-49.
13.2.16 Commands for the PW384 Washer, Overview
The following table lists the commands for the PW384 Washer. The Status
command is only available in Freedom EVOware Plus.
Tab. 13-27 Commands for the PW384 Washer
Status - The Status command interrogates the status of the washer. See
16.17.1 “PW384 Washer - Status Command”, 16-52.
Prime - Before the washer is used, all dispensing channels needed for the wash step
must be primed to fill the liquid system with the required liquid. The Prime command
starts the priming procedure. See 16.17.2 “PW384 Washer - Prime Command”, 1652.
Rinse - The Rinse command starts the rinsing procedure of the washer to flush the
liquid system. See 16.17.3 “PW384 Washer - Rinse Command”, 16-52.
Wash - The Wash command performs the washing of a microplate by executing a
wash program which is stored in the washer. See 16.17.4 “PW384 Washer - Wash
Command”, 16-52.
Stop - The Stop command stops the washing procedure. See 16.17.5 “PW384
Washer - Stop Command”, 16-53.
PrepareEmptyWaste - The PrepareEmptyWaste command collapses the vacuum in
the waste bottle to allow it to be emptied. This needs to be done whenever the
washer’s liquid detection indicates that the waste bottle is full. See 16.17.6 “PW384
Washer - PrepareEmptyWaste Command”, 16-53.
13.2.17 Commands for the PW384 GP Washer, Overview
The following table lists the commands for the PW384 GP Washer.
13 - 22
Freedom EVOware Software Manual, 393172, en, V2.3
13 - Overview of Freedom EVOware Commands
Overview of Device Commands
Tab. 13-28 Commands for the PW384 GP Washer
Aspirate - The Aspirate command starts the aspiration procedure of the washer. It is
mainly intended for special applications, e.g. to remove sample or reagent liquids
from the wells. See 16.18.1 “PW384GP Washer - Aspirate Command”, 16-54.
Dispense - The Dispense command starts the liquid dispensing procedure of the
washer. It is mainly intended for special applications, e.g. to fill the wells with liquid.
See 16.18.2 “PW384GP Washer - Dispense Command”, 16-55.
Prime - Before the washer is used, all dispensing channels needed for the wash step
must be primed to fill the liquid system with the required liquid. The Prime command
starts the priming procedure. See 16.18.3 “PW384GP Washer - Prime Command”,
16-57.
Rinse - The Rinse command starts the rinsing procedure of the washer to flush the
liquid system. See 16.18.4 “PW384GP Washer - Rinse Command”, 16-57.
Stop - The Stop command stops the washing procedure. See 16.18.5 “PW384GP
Washer - Stop Command”, 16-58.
PrepareEmptyWaste - The PrepareEmptyWaste command collapses the vacuum in
the waste bottle to allow it to be emptied. This needs to be done whenever the
washer’s liquid detection indicates that the waste bottle is full. See
16.18.6 “PW384GP Washer - PrepareEmptyWaste Command”, 16-59.
DownloadWash - The PW384GP washer can store parameter sets for up to 49 different wash programs. The DownloadWash command is used to configure a wash program and download it to non-volatile memory in the washer. The stored wash
program can then be executed with the StartWash command. See
16.18.7 “PW384GP Washer - DownloadWash Command”, 16-59.
StartWash - The PW384GP washer can store parameter sets for up to 49 different
wash programs. The StartWash command is used to execute one of the stored wash
programs. See 16.18.8 “PW384GP Washer - StartWash Command”, 16-62.
Wash - The Wash command performs the washing of a microplate with specified
parameters such as wash volume and aspiration time. See 16.18.9 “PW384GP
Washer - Wash Command”, 16-62.
13.2.18 Commands for the 96PW Washer, Overview
The following table lists the commands for the 96PW washer. The Status
command is only available in Freedom EVOware Plus.
Freedom EVOware Software Manual, 393172, en, V2.3
13 - 23
13 - Overview of Freedom EVOware Commands
Overview of Device Commands
Tab. 13-29 Commands for the 96PW washer
WashPlate - The WashPlate command performs the washing of a microplate with
specified parameters such as wash volume and aspiration time. See 16.19.1 “96PW
Washer - WashPlate Command”, 16-66.
Dispense - The Dispense command starts the liquid dispensing procedure of the
washer. It is mainly intended for special applications, e.g. to fill the wells with liquid.
See 16.19.2 “96PW Washer - Dispense Command”, 16-67.
Aspirate - The Aspirate command starts the aspiration procedure of the washer. It is
mainly intended for special applications, e.g. to remove sample or reagent liquids
from the wells. See 16.19.3 “96PW Washer - Aspirate Command”, 16-68.
Prime - Before the washer is used, all dispensing channels needed for the wash step
must be primed to fill the liquid system with the required liquid. The Prime command
starts the priming procedure. See 16.19.4 “96PW Washer - Prime Command”, 1668.
Rinse - The Rinse command starts the rinsing procedure of the washer to flush the
liquid system. See 16.19.5 “96PW Washer - Rinse Command”, 16-69.
Remote - The Remote command switches the device from local mode to remote
mode. The device can only be controlled remotely by Freedom EVOware (through the
interface cable) in remote mode. See 16.19.6 “96PW Washer - Remote Command”,
16-69.
ExitRemote - The ExitRemote command switches the device from remote mode to
local mode. The device can not be controlled remotely by Freedom EVOware
(through the interface cable) in local mode. See 16.19.7 “96PW Washer - ExitRemote
Command”, 16-70.
Status - The Status command interrogates the status of the washer. See
16.19.8 “96PW Washer - Status Command”, 16-70.
13.2.19 Commands for the PosID-3, Overview
The following table lists the command for the PosID-3 movable barcode scanner.
The PosID (the previous version of the PosID-3 hardware) uses script commands
instead of device commands. If your pipetting instrument is fitted with the PosID
instead of the PosID-3, the PosID group of the Control Bar will not contain any
commands. The PosID script commands can be found in the Identification
Devices group.
Tab. 13-30 Commands for the PosID-3
Initialize - The Initialize command initializes the PosID-3. This needs to be done
before the PosID-3 is first used in a script or process. See 16.20.1 “PosID-3 - Initialize
Command”, 16-70.
Scan - The Scan command is used to read the barcode labels on one or more pieces
of labware using the PosID-3 option. The PosID-3 (Positive Identification System) is a
movable barcode scanner which can be used to read the barcode labels on carriers,
labware and tubes. See 16.20.2 “PosID-3 - Scan Command”, 16-70.
13 - 24
Freedom EVOware Software Manual, 393172, en, V2.3
13 - Overview of Freedom EVOware Commands
Overview of Device Commands
13.2.20 Commands for the REMP PHS, Overview
The following table lists the command for the REMP PHS (Portrait Heat Sealer).
The REMP PHS is used to heat seal microplates using a special REMP sealing
foil.
Tab. 13-31 Commands for the REMP PHS
SealPlate - The SealPlate command applies the sealing foil to the microplate using
heat and pressure. The plate feeder mechanism removes the microplate from the
device again after sealing. See 16.21.1 “REMP PHS - SealPlate Command”, 16-74.
13.2.21 Commands for the REMP Reatrix, Overview
The following table lists the commands for the REMP Reatrix. The REMP Reatrix
is used to scan the 2D tube barcodes and the tube rack barcode of REMP
STBR96 tube racks.
Tab. 13-32 Commands for the REMP Reatrix
Read - The Read command reads the 2D tube barcodes and the tube rack barcode of
the REMP STBR96 tube rack which has been placed on the Reatrix barcode scanner.
See 16.22.1 “REMP Reatrix - Read Command”, 16-76.
Initialize - The Initialize command initializes the REMP Reatrix. This needs to be
done before the REMP Reatrix is first used in a script or process. See 16.22.2 “REMP
Reatrix - Initialize Command”, 16-77.
13.2.22 Commands for the REMP ACD96, Overview
The following table lists the commands for the REMP ACD96 (Automated Capper
Decapper). The REMP ACD96 is used to fit or remove sealing caps from REMP
tubes in REMP STBR96 tube racks.
Tab. 13-33 Commands for the REMP ACD96
Cap - The Cap command fits caps to 96 REMP tubes in the REMP STBR96 tube
rack. Before fitting the caps, they are held by a mechanism inside the ACD96. See
16.23.1 “REMP ACD96 - Cap Command”, 16-78.
Decap - The Decap command removes the caps from 96 REMP tubes in the REMP
STBR96 tube rack. After removing the caps, they are held by a mechanism inside the
ACD96. See 16.23.2 “REMP ACD96 - Decap Command”, 16-78.
13.2.23 Commands for the Tube Robot, Overview
The following table lists the command for the Tube Robot. This device command
is only available in Freedom EVOware Plus. It is not necessary in Freedom
EVOware Standard - all of the required functions are provided by the Tube Robot
script commands.
Freedom EVOware Software Manual, 393172, en, V2.3
13 - 25
13 - Overview of Freedom EVOware Commands
Overview of Device Commands
Tab. 13-34 Commands for the Tube Robot
ExecuteScript - The ExecuteScript command is used to write a script for tube handling. When you drag it to the Process Editor, it opens the Script Editor automatically.
See 16.25.1 “Tube Robot - ExecuteScript Command”, 16-83. See also
11.4.2 “Creating a Pipetting Script”, 11-5.
13.2.24 Commands for the Process Starter, Overview
The following table lists the commands for the Process Starter device driver.
These commands are only available in Freedom EVOware Plus.
The Start command is available in five versions (Start and StartP1 to StartP4)
depending on the number of labware items required by the processes you want to
start (0 to 4 labware items).
You can only use StartP1 to StartP4 as process steps. The Start command can be
used as a process step or in scripts for the Process Script - Script command. The
WaitForProcess commands can only be used in scripts for the Process Script Script command (see 16.39.1 “Process Script - Script Command”, 16-127).
Tab. 13-35 Commands for the Process Starter
Start - The Start command starts a single instance of a specified process when a set
of user-defined conditions are met. You can specify conditions which are based on
database locations and/or on the values of variables. See 16.24.1 “Process Starter Start Command”, 16-78.
WaitForProcess - The WaitForProcess script command waits for a specified process
to finish before allowing the pipetting script to continue. See 16.24.2 “Process Starter
- WaitForProcess Command”, 16-82.
13.2.25 Commands for the Plate Robot, Overview
The following table lists the commands for the Plate Robot. These commands are
only available in Freedom EVOware Plus and are mainly intended for special
applications. Plate Robot (RoMa movement) commands are normally used as
pre-actions and/or post-actions of other commands and are not normally used as
process steps.
in Freedom EVOware Standard, RoMa movements are specified with the script
commands Move RoMa, RoMa Vector and Transfer Labware.
13 - 26
Freedom EVOware Software Manual, 393172, en, V2.3
13 - Overview of Freedom EVOware Commands
Overview of Device Commands
Tab. 13-36 Commands for the Plate Robot
ExecuteSingleVector - The ExecuteSingleVector command executes a predefined
movement from one position on the worktable to another (a RoMa vector). See
16.26.1 “Plate Robot - ExecuteSingleVector Command”, 16-84.
Initialize - The Initialize command initializes the plate robot. This needs to be executed before the robot is first used in a script or process. See 16.26.2 “Plate Robot Initialize Command”, 16-85.
MoveObject- The MoveObject command moves an object (plate) to a specified location. See 16.26.3 “Plate Robot - MoveObject Command”, 16-85.
ReplaceObject - The ReplaceObject command moves an object to a specified location. If the destination is occupied, the blocking object will be removed. It is mainly
used for moving reagent carriers. See 16.26.4 “Plate Robot - ReplaceObject Command”, 16-85.
MoveToBase - The MoveToBase command moves an object (plate) to its base (labware source) position. See 16.26.5 “Plate Robot - MoveToBase Command”, 16-85.
ChangeObject - The ChangeObject command moves an object to a specified location. If the destination is occupied, the blocking object will be removed. It is only used
for changing DiTi’s. See 16.26.6 “Plate Robot - ChangeObject Command”, 16-86.
MoveInsert - The MoveInsert command moves the insert of an Insert Plate to the
specified location. See 16.26.7 “Plate Robot - MoveInsert Command”, 16-86.
SwapInsert - The SwapInsert command moves the insert of an Insert plate to an
Insert plate which doesn’t have an insert. See 16.26.8 “Plate Robot - SwapInsert
Command”, 16-86.
ClearLocation - The ClearLocation command moves all objects which are currently
at the specified location to a new location. See 16.26.9 “Plate Robot - ClearLocation
Command”, 16-86.
13.2.26 Commands for the Safire Reader, Overview
The following table lists the commands for the Safire Reader. The Status
command is only available in Freedom EVOware Plus.
Tab. 13-37 Commands for the Safire Reader
Status - The Status command interrogates the status of the reader. See
16.27.1 “Safire Reader - Status Command”, 16-87.
Freedom EVOware Software Manual, 393172, en, V2.3
13 - 27
13 - Overview of Freedom EVOware Commands
Overview of Device Commands
Tab. 13-37 Commands for the Safire Reader (cont.)
Open - The Open command opens the door of the reader. See 16.27.2 “Safire
Reader - Open Command”, 16-87.
Close - The Close command closes the door of the reader. See 16.27.3 “Safire
Reader - Close Command”, 16-87.
Measure - The Measure command performs a measurement procedure using external software. See 16.27.4 “Safire Reader - Measure Command”, 16-87.
Multilabel - The Multilabel command performs up to four consecutive measurement
steps on the same plate using external software. The plate does not have to leave the
reader in between measurements. See 16.27.5 “Safire Reader - Multilabel Command”, 16-88.
13.2.27 Commands for the Te-Shake Shaker, Overview
The following table lists the commands for the Te-Shake Shaker.
The commands Init, Start, Stop, SetTemperature and SetFrequency are only
available in Freedom EVOware Standard. Plates are loaded into the Te-Shake
using RoMa movement commands. The shaking time can be controlled by the
Wait For Timer command.
Use the Shake command instead in Freedom EVOware Plus (the Shake
command handles all of these actions, including shaking time and plate loading/
unloading, automatically). The Shake command is not available in Freedom
EVOware Standard.
Freedom EVOware is provided with several different types of Te-Shake shaker. If
you want to use more than one shaker in your script or process, you must use the
Duplicate Device tool top create a separate device driver for each of them. For
more information see 16.28 “Commands for the Te-Shake Shaker”, 16-90.
Tab. 13-38 Commands for the Te-Shake Shaker
Init - The Init command initializes the shaker. This needs to be done before the
shaker is first used in a script or process. See 16.28.1 “Te-Shake shaker - Init Command”, 16-90.
Shake - The Shake command performs the shaking procedure with the specified
direction, frequency and temperature. See 16.28.2 “Te-Shake shaker - Shake Command”, 16-90.
Start - The Start command starts the shaking procedure. See 16.28.3 “Te-Shake
shaker - Start Command”, 16-92.
Stop - The Stop command stops the shaking procedure. See 16.28.4 “Te-Shake
shaker - Stop Command”, 16-92.
SetTemperature - The SetTemperature command sets the shaker to the specified
temperature. See 16.28.5 “Te-Shake shaker - SetTemperature Command”, 16-92.
SetFrequency - The SetFrequency command set the shaking frequency of the
shaker. See 16.28.6 “Te-Shake shaker - SetFrequency Command”, 16-93.
13 - 28
Freedom EVOware Software Manual, 393172, en, V2.3
13 - Overview of Freedom EVOware Commands
Overview of Device Commands
13.2.28 Commands for the Symbol MS-954 Barcode Scanner, Overview
The following table lists the command for the Symbol MS-954 barcode scanner. In
Freedom EVOware Plus, the Barcode Scanner command is an on-the-flycommand – drag the command to the line which connects two process steps (see
5.4.3 “The Process Editor (Freedom EVOware Plus)”, 5-17).
In Freedom EVOware Standard, proceed as follows to use the Symbol MS-954
barcode scanner:
Make sure that the labware type has been “allowed” for scanning with the
barcode scanner (see 9.5 “Configuring Carriers”, 9-39, “Allowed Labware
on this carrier”).
Drag labware of the type you want to scan from the Control Bar (Labware
section) onto the device icon of the Symbol MS-954 barcode scanner.
Use the Transfer Labware command to move the labware to the barcode
scanner (the barcode scanner carrier attribute “on-the-fly” instructs Freedom
EVOware not to release the labware at this position); see 15.59 “Transfer
Labware Command”, 15-143;
Add the Barcode Scanner - ReadBarcode command to your script;
Use the Transfer Labware command to move the labware from the barcode
scanner to the required destination position.
Tab. 13-39 Commands for the Symbol MS-954 Barcode Scanner
Read Barcode - The Read Barcode command is used to read barcodes from the labware or tube which is presented to the barcode scanner by the RoMa. See
16.29.1 “Symbol MS-954 Barcode Scanner - Read Barcode Command”, 16-94.
13.2.29 Commands for the Spectra Fluor Reader, Overview
The following table lists the commands for the Spectra Fluor Reader. The Status
command is only available in Freedom EVOware Plus.
Tab. 13-40 Commands for the Spectra Fluor Reader
Status - The Status command interrogates the status of the reader. See
16.30.1 “Spectra Fluor Reader - Status Command”, 16-94.
Excitation Out - The Excitation Out command moves the excitation filter slide out of
the reader to allow the filters to be removed or exchanged. See 16.30.2 “Spectra
Fluor Reader - Excitation Out Command”, 16-95.
Emission Out - The Emission Out command moves the emission filter slide out of the
reader to allow the filters to be removed or exchanged. See 16.30.3 “Spectra Fluor
Reader - Emission Out Command”, 16-95.
Freedom EVOware Software Manual, 393172, en, V2.3
13 - 29
13 - Overview of Freedom EVOware Commands
Overview of Device Commands
Tab. 13-40 Commands for the Spectra Fluor Reader (cont.)
Open - The Open command opens the door of the reader. See 16.30.4 “Spectra Fluor
Reader - Open Command”, 16-95.
Close - The Close command closes the door of the reader. See 16.30.5 “Spectra
Fluor Reader - Close Command”, 16-95.
Measure - The Measure command performs a measurement procedure using external software. See 16.30.6 “Spectra Fluor Reader - Measure Command”, 16-95.
Multilabel - The Multilabel command performs up to four consecutive measurement
steps on the same plate using external software. The plate does not have to leave the
reader in between measurements. See 16.30.7 “Spectra Fluor Reader - Multilabel
Command”, 16-96.
13.2.30 Commands for the Sunrise Reader, Overview
The following table lists the commands for the Sunrise Reader. The Status
command is only available in Freedom EVOware Plus.
Tab. 13-41 Commands for the Sunrise Reader
Status - The Status command interrogates the status of the reader. See
16.31.1 “Sunrise Reader - Status Command”, 16-98.
Open - The Open command opens the door of the reader. See 16.31.2 “Sunrise
Reader - Open Command”, 16-98.
Close - The Close command closes the door of the reader. See 16.31.3 “Sunrise
Reader - Close Command”, 16-98.
Measure - The Measure command performs a measurement procedure using external software. See 16.31.4 “Sunrise Reader - Measure Command”, 16-98.
Multilabel - The Multilabel command performs up to four consecutive measurement
steps on the same plate using external software. The plate does not have to leave the
reader in between measurements. See 16.31.5 “Sunrise Reader - Multilabel Command”, 16-99.
13.2.31 Commands for the Magnetic Bead Separator (Te-MagS), Overview
The following table lists the commands for the Magnetic Bead Separator.
13 - 30
Freedom EVOware Software Manual, 393172, en, V2.3
13 - Overview of Freedom EVOware Commands
Overview of Device Commands
Tab. 13-42 Commands for the Magnetic Bead Separator
MoveToPosition - The MoveToPosition command moves the carrier to one of four
positions. You must specify the required position. See 16.32.1 “Magnetic Bead Separator - MoveToPosition Command”, 16-100.
ActivateHeater - The ActivateHeater command is used to switch on the heater. You
must specify the required temperature. See 16.32.2 “Magnetic Bead Separator - ActivateHeater Command”, 16-101.
DeactivateHeater - The DeactivateHeater command is used to switch off the heater
when you no longer want to use it. See 16.32.3 “Magnetic Bead Separator - DeactivateHeater Command”, 16-102.
Execution - The Execution command lets you specify the sequence of operations to
be carried out by the Magnetic Bead Separator (Te-MagS) during the separation process. See 16.32.4 “Magnetic Bead Separator - Execution Command”, 16-102.
13.2.32 Commands for the Te-Stack Te-MO, Overview
The following table lists the commands for the Te-Stack Te-MO stacker. The
commands DropPlate and GetPlate are only available in Freedom EVOware
Standard. These actions are handled automatically in Freedom EVOware Plus.
The MoveObject command in Freedom EVOware Plus is only intended for special
applications.
Tab. 13-43 Commands for the Te-Stack Te-MO stacker
InitStacker - The InitStacker command initializes the Te-Stack Te-MO. This needs to
be done before the stacker is first used in a process or script. See 16.33.1 “Te-Stack
Te-MO - InitStacker Command”, 16-105.
MoveObject - The MoveObject command moves a plate to a site on one of the TeMO slides. This command is provided for special applications; it is not normally used
as a process step. See 16.33.2 “Te-Stack Te-MO - MoveObject Command”, 16-105.
DropPlate - The DropPlate command gets a plate from the specified Te-Stack tower
and puts in on the specified Te-MO site. See 16.33.3 “Te-Stack Te-MO - DropPlate
Command”, 16-106.
GetPlate - The GetPlate command gets a plate from the specified Te-MO site and
returns it to the specified Te-Stack tower. See 16.33.4 “Te-Stack Te-MO - GetPlate
Command”, 16-106.
13.2.33 Commands for the Te-Stack, Overview
The following table lists the commands for the Te-Stack stacker. The commands
ReturnPlate, PrepareReturnPlate and PresentPlate are only available in Freedom
EVOware Standard. These actions and plate loading/unloading are handled
automatically in Freedom EVOware Plus.
The MoveObject command in Freedom EVOware Plus is only intended for special
applications.
Freedom EVOware Software Manual, 393172, en, V2.3
13 - 31
13 - Overview of Freedom EVOware Commands
Overview of Device Commands
Tab. 13-44 Commands for the Te-Stack stacker
InitStacker - The InitStacker command initializes the Te-Stack. This needs to be done
before the stacker is first used in a process or script. See 16.34.1 “Te-Stack - InitStacker Command”, 16-108.
MoveObject - The MoveObject command moves a plate to the Te-Stack transfer
position. This command is provided for special applications; it is not normally used as
a process step. See 16.34.2 “Te-Stack - MoveObject Command”, 16-108.
ReturnPlate - The ReturnPlate command returns a plate from the Te-Stack transfer
position to the specified tower. See 16.34.3 “Te-Stack - ReturnPlate Command”, 16108.
PrepareReturnPlate - The PrepareReturnPlate command moves the Te-Stack shuttle to the Te-Stack transfer position, e.g. to wait for the RoMa to bring a plate. After the
RoMa has brought the plate, the ReturnPlate command can then be used to return
the plate to the specified stacker tower. See 16.34.4 “Te-Stack - PrepareReturnPlate
Command”, 16-109.
PresentPlate - The PresentPlate command gets a plate from the specified tower and
brings it to the Te-Stack transfer position, where the robot can pick it up and move it
away. See 16.34.5 “Te-Stack - PresentPlate Command”, 16-109.
13.2.34 Commands for the Vacuum Separator (Te-VacS), Overview
The following table lists the commands for the vacuum separator.
The commands Filtration, CheckWasteLevel and CheckPlateWithBlock are only
available in Freedom EVOware Plus.
To carry out vacuum separation in Freedom EVOware Standard you must use a
combination of the commands SetPressureDiff, ApplyVacuumRear,
ApplyVacuumFront, VentRear, VentFront, PositionPlateRear, PositionPlateFront
and OpenDesaltingValve. The Filtration command in Freedom EVOware Plus is a
high-level command which combines all of these functions.
Tab. 13-45 Commands for the Te-VacS
SetPressureDiff- The SetPressureDiff command This option starts the vacuum
pump. You must specify the required vacuum. The vacuum is not applied to either of
the SPE blocks and the script or process does not wait for the vacuum to build up.
See 16.35.1 “Te-VacS - SetPressureDiff Command”, 16-110.
ApplyVacuumRear - The ApplyVacuumRear command applies the vacuum to the
rear SPE block (i.e. the SPE block which is connected to vacuum pipe 2). You must
specify the required vacuum. See 16.35.2 “Te-VacS - ApplyVacuumRear Command”,
16-111.
ApplyVacuumFront - The ApplyVacuumFront command applies the vacuum to the
front SPE block (i.e. the SPE block which is connected to vacuum pipe 1). You must
specify the required vacuum. See 16.35.3 “Te-VacS - ApplyVacuumFront Command”,
16-111.
VentRear - The VentRear command vents the vacuum from the rear SPE block. It is
used to stop the solid phase extraction process. See 16.35.4 “Te-VacS - VentRear
Command”, 16-112.
13 - 32
Freedom EVOware Software Manual, 393172, en, V2.3
13 - Overview of Freedom EVOware Commands
Overview of Device Commands
Tab. 13-45 Commands for the Te-VacS (cont.)
VentFront - The VentFront command vents the vacuum from the front SPE block. It is
used to stop the solid phase extraction process. See 16.35.5 “Te-VacS - VentFront
Command”, 16-112.
DeactivateSystem - The DeactivateSystem command is used to shut down the TeVacS when you no longer want to use it in your script or process. It switches off the
vacuum pump and vents all blocks and the vacuum tank. See 16.35.6 “Te-VacS DeactivateSystem Command”, 16-112.
CheckWasteLevel - The CheckWasteLevel command is used to check the liquid
level in the waste bottle. The waste level is reported during process runtime in the
Messages/Error window of the runtime controller. See 16.35.7 “Te-VacS - CheckWasteLevel Command”, 16-112.
CheckPlateWithBlock - If a plate has been put on the vacuum block and a RoMa
movement command has moved the vacuum block, the CheckPlateWithBlock command is used to inform Freedom EVOware that the plate has moved too. See
16.35.8 “Te-VacS - CheckPlateWithBlock Command”, 16-112.
Filtration - The Filtration command is used to specify the sequence of operations to
be carried out by the Te-VacS during the vacuum separation process. See
16.35.9 “Te-VacS - Filtration Command”, 16-113.
PositionPlateRear - The PositionPlateRear command is only relevant if the Te-VacS
is fitted with the Repositioner option. It moves the collection plate for the rear vacuum
block into one of four positions before you apply the vacuum. See 16.35.9 “Te-VacS Filtration Command”, 16-113.
PositionPlateFront - The PositionPlateFront command is only relevant if the TeVacS is fitted with the Repositioner option. It moves the collection plate for the front
vacuum block into one of four positions before you apply the vacuum. See
16.35.9 “Te-VacS - Filtration Command”, 16-113.
OpenDesaltingValve - The OpenDesaltingValve command opens the desalter valve
to drain the residues. It is only relevant for Te-VacS versions which are equipped with
a desalter valve. See 16.35.9 “Te-VacS - Filtration Command”, 16-113.
13.2.35 Commands for the Te-MO, Overview
The following table lists the commands for the Multi Pipetting Head. These device
commands are only available in Freedom EVOware Plus. They are not necessary
in Freedom EVOware Standard - all of the required functions are provided by the
Multi Pipetting Head script commands.
Tab. 13-46 Commands for the Te-MO
Init - The Init command initializes the Te-MO. This needs to be done before the TeMO is first used in a process or script. See 16.36.1 “Te-MO - Init Command”, 16120.
Pipette - The Pipette command is used to create a pipetting script for the Te-MO.
When you drag it to the Process Editor, it opens the Script Editor automatically. See
16.36.2 “Te-MO - Pipette Command”, 16-120. See also 11.4.2 “Creating a Pipetting
Script”, 11-5.
Freedom EVOware Software Manual, 393172, en, V2.3
13 - 33
13 - Overview of Freedom EVOware Commands
Overview of Device Commands
13.2.36 Commands for the Ultra Reader, Overview
The following table lists the commands for the Ultra Reader. The Status command
is only available in Freedom EVOware Plus.
Tab. 13-47 Commands for the Ultra Reader
Status - The Status command interrogates the status of the reader. See
16.37.1 “Ultra Reader - Status Command”, 16-120.
Excitation Out - The Excitation Out command moves the excitation filter slide out of
the reader to allow the filters to be removed or exchanged. See 16.37.2 “Ultra Reader
- Excitation Out Command”, 16-120.
Emission Out - The Emission Out command moves the emission filter slide out of the
reader to allow the filters to be removed or exchanged. See 16.37.3 “Ultra Reader Emission Out Command”, 16-121.
Open - The Open command opens the door of the reader. See 16.37.4 “Ultra Reader
- Open Command”, 16-121.
Close - The Close command closes the door of the reader. See 16.37.5 “Ultra Reader
- Close Command”, 16-121.
Measure - The Measure command performs a measurement procedure using external software. See 16.37.6 “Ultra Reader - Measure Command”, 16-121.
Multilabel - The Multilabel command performs up to four consecutive measurement
steps on the same plate using external software. The plate does not have to leave the
reader in between measurements. See 16.37.7 “Ultra Reader - Multilabel Command”,
16-122.
13.2.37 Commands for the Ultra Evolution Reader, Overview
The following table lists the commands for the Ultra Evolution Reader. The Status
command is only available in Freedom EVOware Plus.
Tab. 13-48 Commands for the Ultra Evolution Reader
Status - The Status command interrogates the status of the reader. See
16.38.1 “Ultra Evolution Reader - Status Command”, 16-123.
Excitation Out - The Excitation Out command moves the excitation filter slide out of
the reader to allow the filters to be removed or exchanged. See 16.38.2 “Ultra Evolution Reader - Excitation Out Command”, 16-124.
Emission Out - The Emission Out command moves the emission filter slide out of the
reader to allow the filters to be removed or exchanged. See 16.38.3 “Ultra Evolution
Reader - Emission Out Command”, 16-124.
13 - 34
Freedom EVOware Software Manual, 393172, en, V2.3
13 - Overview of Freedom EVOware Commands
Overview of Device Commands
Tab. 13-48 Commands for the Ultra Evolution Reader (cont.)
Open - The Open command opens the door of the reader. See 16.38.4 “Ultra Evolution Reader - Open Command”, 16-124.
Close - The Close command closes the door of the reader. See 16.38.5 “Ultra Evolution Reader - Close Command”, 16-124.
Measure - The Measure command performs a measurement procedure using external software. See 16.38.6 “Ultra Evolution Reader - Measure Command”, 16-124.
Multilabel - The Multilabel command performs up to four consecutive measurement
steps on the same plate using external software. The plate does not have to leave the
reader in between measurements. See 16.38.7 “Ultra Evolution Reader - Multilabel
Command”, 16-125.
13.2.38 Commands for the Process Script, Overview
The following table lists the command for the Process Script device driver. This
command is only available in Freedom EVOware Plus.
Tab. 13-49 Commands for the Process Starter
Script - The Script command is used to create a script for the Process Starter script
commands. When you drag it to the Process Editor, it opens the Script Editor automatically. See 16.39.1 “Process Script - Script Command”, 16-127.
13.2.39 Commands for the Transfer Station, Overview
The following table lists the command for the Transfer Station. The Transfer
Station is an unused location on the worktable of the pipetting instrument. If your
pipetting instrument is fitted with two RoMa arms, this location is used to transfer
labware from one RoMa to another. The Transfer command is only installed if you
have installed Freedom EVOware with two RoMas.
Tab. 13-50 Commands for the Transfer Station
Transfer - The Transfer Station is an unused location on the worktable of the pipetting
instrument. If your pipetting instrument is fitted with two RoMa arms, the Transfer
command uses the Transfer Station to pass labware from one RoMa to the other if
this becomes necessary. See 16.40.1 “Transfer Station - Transfer Command”, 16127.
13.2.40 Commands for the Te-Link, Overview
The following table lists the command for the Te-Link transfer rail.
This command is only available in Freedom EVOware Standard. In Freedom
EVOware Plus, when the labware is put down at either end of the transfer rail the
shuttle carrier starts to move automatically to the other end.
Freedom EVOware Software Manual, 393172, en, V2.3
13 - 35
13 - Overview of Freedom EVOware Commands
Overview of Device Commands
Tab. 13-51 Commands for the Te-Link
Move - The Move command moves the shuttle carrier of the Te-Link from one end of
the transfer rail to the other. See 16.41.1 “Te-Link - Move Command”, 16-128.
13 - 36
Freedom EVOware Software Manual, 393172, en, V2.3
14 - Advanced Programming Features for Scripts
Variables and Expressions in Scripts
14 Advanced Programming Features for Scripts
This chapter describes advanced programming features for liquid handling
scripts.
14.1 Variables and Expressions in Scripts
Freedom EVOware allows you to use variables in scripts instead of constants.
Variables let you modify the execution of the script during runtime. You can use
variables for pipetting volumes, timers and time durations, strings, names of
external applications and loop counters etc. Freedom EVOware also supports
expressions, which are a combination of variables and basic mathematical
operators such as add or multiply. The following paragraphs discuss the definition
and the use of variables.
When you run a script, the Extended View of the runtime controller shows the
value of all defined variables during script runtime (see 12.1.2 “Runtime
Controller, Extended View (Running a Script)”, 12-4).
Note: To run an individual script in Freedom EVOware Plus, open the Script
Editor by double-clicking the Pipette command which is associated with the script
and click the Run button in the toolbar or choose Run in the Execute menu.
14.1.1 Declaring Variables in Scripts
All variables (including pre-defined variables) must be declared (defined) before
use.
Note: The purpose of declaring a pre-defined variable is to assign an initial value
(see 14.1.4 “Pre-Defined Variables”, 14-4). In offline mode, scripts may not run
as expected if you do not set appropriate initial values for the pre-defined
variables.
In Freedom EVOware Plus, you can also declare variables by choosing Declare
Variables in the Execute menu (see 6.4.6 “Declare Variables”, 6-12).
Variables are declared in pipetting scripts with the following command:
Tab. 14-1 Declaring variables in a pipetting script
Icon
Command
Description
Set Variable
The Set Variable command is used to declare a numeric or
string variable and assign an initial value to it. You can also
prompt the instrument operator for the value. See 15.41 “Set
Variable Command”, 15-101.
If you declare a variable within a script, the variable only has a meaningful value
within the same script. It is “unknown” to other scripts (i.e. the “scope” of the
variable is “script”). In Freedom EVOware Plus, you can also declare variables
which are accessible to other scripts and thus allow parameters to be passed from
one script to another (see 6.4.6.4 “Scope of a Variable”, 6-15).
Freedom EVOware Software Manual, 393172, en, V2.3
14 - 1
14 - Advanced Programming Features for Scripts
Variables and Expressions in Scripts
Variable names can be 1 to 64 characters in length and must not begin with a
digit. Variable names are not case-sensitive and numeric variables are treated as
floating point numbers, except when used in a Send Command command (see
also 14.1.7 “Script Commands That Accept Numeric Variables and Expressions”,
14-12).
The following commands can also declare variables:
Tab. 14-2 Commands that can declare variables
Icon
Command
Variable and value used during validation
Balance
This command lets you write the measured weight to a variable.
Execute Application
Return value = 0
Send Command
Answer = ““ (empty string), error code = 0
The variable name which you want to use is specified in the dialog box for the
command. See also 14.1.12 “Validating a Script Which Contains Variables”, 1418.
14.1.2 Script Commands That Write to Variables
The following table lists all commands that write to variables (see also
14.1.4 “Pre-Defined Variables”, 14-4):
Tab. 14-3 Commands that write to variables
Icon
Command
Description
Aspirate
If liquid level detection is used, the LiHa pipetting commands
automatically write the detected volumes to a set of predefined variables. One variable is provided for each tip. The
variable names are as follows:
DETECTED_VOLUME_1
...
DETECTED_VOLUME_8.
The detected volume is reported in µl for each tip. The value
is updated by each subsequent LiHa pipetting command
which uses liquid level detection. The value -1 is reported if
the tip was used with liquid level detection disabled or was not
part of the pipetting command.
Dispense
Mix
14 - 2
Balance
This command lets you write the measured weight to a variable. The variable name to use is specified in the command.
Begin Loop
The Begin Loop command automatically writes to the predefined variable LOOP_x, where x is the name of the loop.
Freedom EVOware sets this variable to the current cycle
number for the loop, e.g. to 1 to 12 for a loop with 12 cycles.
Freedom EVOware Software Manual, 393172, en, V2.3
14 - Advanced Programming Features for Scripts
Variables and Expressions in Scripts
Tab. 14-3 Commands that write to variables (cont.)
Icon
Command
Description
Detect Liquid
The Detect Liquid command writes the detected volumes to a
set of pre-defined variables DETECTED_VOLUME_x, where
x is the tip number. The detected volume is reported in µl for
each tip.
Execute Application
This command lets you write the return value of the specified
application to a variable. The variable name to use is specified in the command.
Execute VB Script
The Execute VB Script command can assign values to variables for subsequent use in the Freedom EVOware script.
However, you must declare the variables in advance in the
Freedom EVOware script before calling the Execute VB Script
command. See 15.50 “Execute VB Script Command”, 15114.
PosID
The PosID command automatically writes to the pre-defined
counter variable TUBE_CNT, which is incremented each time
a tube is successfully scanned.
Send Command
This command lets you write the response of the specified
firmware command to a variable. The returned error code can
also be written to a variable. The variable name to use is
specified in the command.
14.1.3 Querying the Value of a Variable During Script Runtime
The Set Variable command can be used to prompt the operator for the value of a
numeric variable during script runtime (see 15.41 “Set Variable Command”, 15101). To do this, check the User Query checkbox when you specify the command
and specify the user prompt which should appear on the screen. You can also
specify a default value and check that the value which is entered by the operator
lies within a specified range.
The following example prompts the operator for a volume and sets the admissible
range to 10 to 100 µl. In addition, a default value of 50 µl is suggested:
Fig. 14-1 Querying the operator for a value during script runtime
Freedom EVOware Software Manual, 393172, en, V2.3
14 - 3
14 - Advanced Programming Features for Scripts
Variables and Expressions in Scripts
During runtime, the value which is input by the operator is validated and a warning
is output if it does not lie within the specified range.
The Set Variable command can also be used to prompt the operator for the value
of a string variable (text). To do this, choose String in the Define variable type pulldown list. String variables can be used to generate file names, barcodes etc.
14.1.4 Pre-Defined Variables
Freedom EVOware has a number of pre-defined variables which e.g. provide
useful information for use in pipetting scripts and/or allow the same script to be
used for different numbers of samples.
Note: Even though the variable names are pre-defined, you must still declare
them in your script with the Set Variable command before you can use them.
The purpose of declaring a pre-defined variable is to assign an initial value. In
offline mode, scripts may not run as expected if you do not set appropriate initial
values for the pre-defined variables.
Freedom
EVOware Plus
Freedom EVOware Plus processes can contain one or more pipetting scripts. in
addition, Freedom EVOware Plus allows you to run several copies of the same
process in parallel. Each copy of the process is called an instance. Freedom
EVOware Plus also allows you to run different processes in parallel.
In Freedom EVOware Plus, the pre-defined variables have the scope “script”. In
other words, the current values of the pre-defined variables are not available in
other pipetting scripts. See 6.4.6.4 “Scope of a Variable”, 6-15.
If you want to access the current value of a pre-defined variable in another script
from the same process or process copy, declare a new variable of scope
“instance” and save the value of the pre-defined variable in the new variable using
the Set Variable command:
Fig. 14-2 Set Variable command
In the example, the variable My_Detected_Volume_1 was previously declared
with scope “instance” using the Declare Variables option in the Execute menu
(see 6.4.6 “Declare Variables”, 6-12).
14 - 4
Freedom EVOware Software Manual, 393172, en, V2.3
14 - Advanced Programming Features for Scripts
Variables and Expressions in Scripts
If you want to access the current value of a pre-defined variable in a script from
another process or process copy, declare a new variable of scope “run” and save
the value of the pre-defined variable in the new variable using the Set Variable
command.
14.1.4.1 CURRENT_USER
This read-only variable contains the name of the currently logged in user.
14.1.4.2 DETECTED_VOLUME_x
If liquid level detection is used, the LiHa pipetting commands automatically write
the detected volumes to a set of variables. One variable is provided for each tip.
The variable names are as follows:
DETECTED_VOLUME_1
...
DETECTED_VOLUME_8.
The detected volume is reported in µl for each tip. The value is updated by each
subsequent LiHa pipetting command which uses liquid level detection. The value 1 is reported if the tip was used with liquid level detection disabled or was not part
of the pipetting command.
The Detect Liquid command also writes the detected volumes to these variables.
14.1.4.3 LAST_BARCODE
This read-only variable contains the barcode which was last read by the Symbol
barcode scanner.
14.1.4.4 LAST_ERROR_LINE
This read-only variable contains the line number in the pipetting script of the last
command which reported an error during script runtime.
14.1.4.5 LAST_ERROR_MESSAGE
This read-only variable contains the error message of the last command which
reported an error during script runtime (see 18.3 “List of Error Messages”, 1832).
14.1.4.6 LAST_ERROR_MESSAGE_ID
This read-only variable contains the error message ID of the last command which
reported an error during script runtime. The error message ID which is returned by
this variable is a numeric value which is calculated as follows from the error
message ID string (see 18.3 “List of Error Messages”, 18-32):
– Ignore all characters except the last seven
– Ignore underscore character
– Ignore the leading zero (if any)
Example:
– Error message ID string: EVO_EVO_016_024
– Error message ID: 16024
14.1.4.7 LIHA_MOVE_HEIGHT
This variable lets you specify the Z-Travel height for the Move LiHa command (the
tip height which is used during the arm movement). The Z-Travel height you
Freedom EVOware Software Manual, 393172, en, V2.3
14 - 5
14 - Advanced Programming Features for Scripts
Variables and Expressions in Scripts
specify with this variable only applies to the tips you select in the Move LiHa
command. The Z-Position of the unselected tips remains unchanged.
This variable only takes effect if you choose Positioning with variable Z-Travel in
the Move LiHa command.
A positive value for LIHA_MOVE_HEIGHT means that the tips will be lower during
the arm movement. A value of 0 is the highest position (tips fully retracted during
the arm movement).
An example application of this feature is for pipetting instruments which have
vacuum lines to the tips for the removal of liquids.
14.1.4.8 LOOP_x
The Begin Loop command automatically writes to the variable LOOP_x, where x
is the name of the loop. Freedom EVOware sets this variable to the current cycle
number for the loop, e.g. to 1 to 12 for a loop with 12 cycles.
14.1.4.9 MCA_MOVE_HEIGHT
This variable lets you specify the Z-Travel height for the MCA96 Move command
(the tip height which is used during the arm movement). The Z-Travel height you
specify with this variable only applies to the tips you select in the MCA96 Move
command. The Z-Position of the unselected tips remains unchanged.
This variable only takes effect if you choose Positioning with variable Z-Travel in
the MCA96 Move command.
A positive value for MCA_MOVE_HEIGHT means that the tips will be lower during
the arm movement. A value of 0 is the highest position (tips fully retracted during
the arm movement).
An example application of this feature is for pipetting instruments which have
vacuum lines to the tips for the removal of liquids.
14.1.4.10 PROCESS_ITERATION
To achieve the maximum throughput (efficiency) of the pipetting instrument, for
example the maximum number of processed microplates per hour, Freedom
EVOware Plus allows you to run several copies (instances) of the same process
in parallel. The number of process copies you want to run is chosen in the
Runtime Controller when you run the process.
This read-only variable contains the number of the process which is running the
current pipetting script. You can use it e.g. to pipette to a different well column
depending on the process copy. Process copies are counted starting with 1. The
process number is also shown in the log files. This variable is not relevant for
Freedom EVOware Standard.
14.1.4.11 PROCESS_NAME
This read-only variable contains the name of the process which is running the
current pipetting script (as shown in the title bar of the Process Editor). You can
use it e.g. in the User Prompt command. This variable is not relevant for Freedom
EVOware Standard.
14.1.4.12 PROCESS_NODE
This read-only variable contains the name of the process step which is running
the current pipetting script (as shown in the process icon in the Process Editor).
You can use it e.g. in the User Prompt command. This variable is not relevant for
Freedom EVOware Standard.
14 - 6
Freedom EVOware Software Manual, 393172, en, V2.3
14 - Advanced Programming Features for Scripts
Variables and Expressions in Scripts
14.1.4.13 RACK_OFFSET
This variable lets you modify the labware selection for the basic commands
Aspirate, Dispense, Mix and Move LIHA. If e.g. RACK_OFFSET equals 1,
Freedom EVOware searches for the next labware of the same type on the
worktable. The search direction is from rear to front of the worktable and then from
left to right. Negative values in RACK_OFFSET cause Freedom EVOware to
search in the opposite direction.
Set RACK_OFFSET to 0 to deactivate the offset.
14.1.4.14 RACK_VOLUME_x
The Te-MO, the MCA96 and the MCA384 do not support liquid level detection. If
you want to use a liquid class for these pipetting arms which specifies liquid level
detection, the liquid level must be emulated. To do this, specify the well volume
(well capacity) of the labware you are using by assigning a value to this variable.
Replace the X in the variable name with the labware label (labware name), e.g.
use RACK_VOLUME_SOURCE if you named the labware SOURCE. For
mechanical reasons, the same volume is pipetted by all of the tips.
Instead of setting this parameter to the well volume (well capacity), you can use
the LiHa command Detect Liquid before you aspirate with the Te-MO, MCA96 or
MCA384 to detect the actual liquid level in one of the wells. Then copy the value
reported in the DETECTED_VOLUME_x variable to the RACK_VOLUME_x
variable (see 14.1.4.2 “DETECTED_VOLUME_x”, 14-5).
Liquid level detection can be used e.g. to ensure minimal tip contamination by
limiting the tip immersion depth. The Te-MO and MCA96 only use the emulated
liquid level detection for aspiration. The MCA384 uses it for dispensing, too. The
value of the RACK_VOLUME_x varable is not updated by subsequent pipetting
commands, even if they affect the volume of liquid in the wells.
14.1.4.15 REPLACE_DITI_GRID
If you are using DITIs, Freedom EVOware provides special facilities to ensure that
sufficient DITIs are present on the worktable for your script or process and to
automatically fetch new DITI racks as and when needed.
For each Get DITI command in your pipetting script, Freedom EVOware
automatically sets the two variables REPLACE_DITI_GRID and
REPLACE_DITI_SITE to the correct grid and site for the selected DITI type before
executing the command.
If your script includes an Activate DITI Handling command and all of the DITIs in
the rack have been used, Freedom EVOware calls the DITI replacement script
which is specified in the command. The replacement script is normally
implemented using one or more Transfer Labware commands
The worktable location of the DITI rack which needs replacing is specified in the
replacement script with the variables REPLACE_DITI_GRID and
REPLACE_DITI_SITE.
These two variables are only used by the automatic DITI handling feature in
Freedom EVOware Standard. Freedom EVOware Plus uses a different concept
for automatic DITI handling.
See 17.1 “Using the Automatic DITI Handling feature”, 17-1) for more
information.
Freedom EVOware Software Manual, 393172, en, V2.3
14 - 7
14 - Advanced Programming Features for Scripts
Variables and Expressions in Scripts
14.1.4.16 REPLACE_DITI_SITE
If you are using DITIs, Freedom EVOware provides special facilities to ensure that
sufficient DITIs are present on the worktable for your script or process and to
automatically fetch new DITI racks as and when needed.
For each Get DITI command in your pipetting script, Freedom EVOware
automatically sets the two variables REPLACE_DITI_GRID and
REPLACE_DITI_SITE to the correct grid and site for the selected DITI type before
executing the command.
If your script includes an Activate DITI Handling command and all of the DITIs in
the rack have been used, Freedom EVOware calls the DITI replacement script
which is specified in the command. The replacement script is normally
implemented using one or more Transfer Labware commands
The worktable location of the DITI rack which needs replacing is specified in the
replacement script with the variables REPLACE_DITI_GRID and
REPLACE_DITI_SITE.
These two variables are only used by the automatic DITI handling feature in
Freedom EVOware Standard. Freedom EVOware Plus uses a different concept
for automatic DITI handling.
See 17.1 “Using the Automatic DITI Handling feature”, 17-1) for more
information.
14.1.4.17 SAMPLE_CNT
If you want to write a script which allows a different number of samples in each
run, you would normally need to modify the script each time you use it. The
SAMPLE_CNT counter variable allows you to write a script for the maximum
number of samples which you expect and to limit the script during runtime
according to the actual number of samples. SAMPLE_CNT is intended for use in
loops in combination with basic pipetting commands such as Aspirate, Dispense,
Mix, Get DITIs and Drop DITIs.
This feature is activated by assigning a positive value to SAMPLE_CNT.
If SAMPLE_CNT is set to a value which is greater than or equal to 0, Freedom
EVOware keeps a count of how many different tips are used in each cycle of the
following loop(s). The loop is then terminated the next time End Loop is executed
when the number of tips used reaches SAMPLE_CNT. If SAMPLE_CNT is not a
multiple of the number of tips used in one cycle of the loop(s), Freedom EVOware
modifies the tip selection in the final cycle of the loop.
The following figure shows an example of using the SAMPLE_CNT variable:
Fig. 14-3 Using the SAMPLE_CNT variable
14 - 8
Freedom EVOware Software Manual, 393172, en, V2.3
14 - Advanced Programming Features for Scripts
Variables and Expressions in Scripts
The above example script copies 10 µl from the source labware to the destination
labware. The loop is programmed for a maximum of 96 samples or wells. If
SAMPLE_CNT is set to 13, the script is executed as follows:
Wash tips 1-8,
Aspirate with tips 1-8 from column 1 of the source labware,
Dispense with tips 1-8 into column 1 of the destination labware,
Wash tips 1-8,
Aspirate with tips 1-5 from column 1 of the source labware,
Dispense with tips 1-5 into column 1 of the destination labware,
Wash tips 1-8.
Set SAMPLE_CNT to -1 to deactivate this feature again.
You can prompt the operator for the value of SAMPLE_CNT during script runtime
with the Set Variable command (see 15.41 “Set Variable Command”, 15-101).
14.1.4.18 TIP_MASK
This variable lets you modify the tip selection for the pipetting commands
Aspirate, Dispense, Mix, Wash Tips, Periodic Wash, Get DiTis, Drop DiTis, Pick
Up DiTis, Set DiTis Back, Detect Liquid, Activate/Deactivate PMP, and Move LiHa.
The tip selection is specified as a numeric, bit-coded value (tip1 = 1, tip2 = 2, tip3
= 4, tip4 = 8, tip5 = 16, tip6 = 32, tip7 = 64, tip8 = 128). The tip selection assigned
with this variable masks the tip selection specified in the pipetting command (bitwise AND of the tip selection in the pipetting command and the current
TIP_MASK value). Thus, only tips selected in both masks will be used for
pipetting.
Set TIP_MASK to -1 to deactivate the mask. Freedom EVOware then uses the tip
mask which is specified in the pipetting command.
14.1.4.19 TIP_OFFSET
This variable lets you modify the tip selection for the pipetting commands
Aspirate, Dispense, Mix and Move LIHA. A positive value increments the tip
number(s) which are specified in the pipetting command. For example, if the
pipetting command specifies tips 2 and 3 and you set this variable to 1, tips 3 and
4 will be used instead. Negative values of TIP_OFFSET shift the tip selection in
the opposite direction.
Set TIP_OFFSET to 0 to deactivate the offset. Freedom EVOware then uses the
tip selection which is specified in the pipetting command.
14.1.4.20 TIP_VOLUME_x
Liquid level detection can be used e.g. to ensure minimal tip contamination by
limiting the tip immersion depth. Liquid level detection is activated with the
Aspirate and/or Dispense parameters of the liquid class you are using.
This variable, which only applies to pipetting with the LiHa, can be used to bypass
or override the automatic liquid level detection for special applications. For
example, you can write a script for pipetting with a variable tip immersion depth.
To bypass automatic liquid level detection, specify the volume of liquid in one of
the wells by assigning a non-zero value to this variable. Replace the X in the
variable name with the tip number, e.g. use TIP_VOLUME_2 for tip 2. The setting
you make only applies to the next pipetting operation (aspirate, dispense or mix)
and is reset to zero again after this. If necessary, you can specify a value for this
variable several times in your script. Tip: You can use the Detect Liquid command
before you pipette to detect the actual liquid level in the wells (see
14.1.4.2 “DETECTED_VOLUME_x”, 14-5).
Freedom EVOware Software Manual, 393172, en, V2.3
14 - 9
14 - Advanced Programming Features for Scripts
Variables and Expressions in Scripts
14.1.4.21 TUBE_CNT
After executing a PosID command, Freedom EVOware writes the number of
tubes scanned in the script so far to TUBE_CNT.
14.1.4.22 WELL_OFFSET
This variable lets you modify the well selection for the pipetting commands
Aspirate, Dispense, Mix and Move LIHA. Freedom EVOware shifts the well
selection in the labware by the number of wells defined in WELL_OFFSET. If e.g.
A1 to H1 of a microplate have been selected in the script and WELL_OFFSET is
set to 8, Freedom EVOware will pipette in A2 to H2. When applying the offset,
Freedom EVOware shifts from rear to front and then from left to right. Negative
values of WELL_OFFSET shift the well selection in the opposite direction.
Set WELL_OFFSET to 0 to deactivate the offset. Freedom EVOware then uses
the well selection which is specified in the pipetting command.
14.1.5 Script Commands That Accept String Variables
The following table lists all commands that accept string variables:
Tab. 14-4 Commands that accept string variables
Icon
14 - 10
Command
Parameter name(s)
Balance
Store weight in variable
Condition
If variable
Execute Application
Path & Name & Command line
Execute VB Script
Path & Name
Notification
Receiver Group, Subject and Message
Send Command
Command
Set Variable
Value
Start Script
Script.gem
Freedom EVOware Software Manual, 393172, en, V2.3
14 - Advanced Programming Features for Scripts
Variables and Expressions in Scripts
Tab. 14-4 Commands that accept string variables (cont.)
Icon
Command
Parameter name(s)
Sub-Routine
Path & Name
User Prompt
Text
Worklist
Worklist (Path and Name)
Worklist Import
Import Worklist and Generated Freedom EVOware
Worklist
14.1.6 Mathematical Expressions
In addition to using variables and constants, certain script commands also allow
you to specify a mathematical expression (see 14.1.7 “Script Commands That
Accept Numeric Variables and Expressions”, 14-12).
An expression is constructed from floating point numbers, variables and
operators. The following operators are available:
Tab. 14-5 Expressions that can be used with variables
Operator
Function
+
addition
-
subtraction
*
multiplication
/
division
%
modulo division (division remainder)
()
parenthesis, used to specify the evaluation order
Examples of valid expressions:
volume
volume + 10.5
volume * 2
volume + (samples * 2)
3+4*5
Spaces in expressions are ignored. Multiplication and division have precedence
over addition and subtraction.
Modulo division returns the remainder of a division as an integer.
Examples: 13 % 8 = 5, 49 % 8 = 1
If e.g. the number of samples in a pipetting operation is not an exact multiple of
the number of tips you are using, modulo division can be used to calculate how
many samples you need to pipette in the last cycle of a pipetting loop. Take care
when using modulo division if one or both of the arguments are negative values.
Freedom EVOware Software Manual, 393172, en, V2.3
14 - 11
14 - Advanced Programming Features for Scripts
Variables and Expressions in Scripts
We recommend you to write a small test script to learn how modulo division works
in this case.
Numeric variables and expressions can also be converted to strings (see
14.1.8 “Converting Numeric Variables and Expressions to Strings”, 14-13).
14.1.7 Script Commands That Accept Numeric Variables and Expressions
Some commands accept numeric variables and expressions instead of integers or
floating point values, for example:
Fig. 14-4 Using an expression in a command
The following table lists all commands that accept numeric variables and
expressions.
Tab. 14-6 Commands that accept numeric variables and expressions
Icon
14 - 12
Command
Parameter name(s)
Aspirate
Volume or Individual Volumes
Begin Loop
Number of loops
Condition
Both sides of the comparison operator
Dispense
Volume or Individual Volumes
Import Variable
Line number in Read specified line
Column number in Start in specified column
Mix
Volume or Individual Volumes
Periodic Wash
Period
PnP Vector
Grid, Site and Position in labware
RoMa Vector
Grid and Site
Set DITI Position
Grid, Site and Position in labware
Freedom EVOware Software Manual, 393172, en, V2.3
14 - Advanced Programming Features for Scripts
Variables and Expressions in Scripts
Tab. 14-6 Commands that accept numeric variables and expressions (cont.)
Icon
Command
Parameter name(s)
Set Variable
Value
Start Timer
Timer
Te-MO Relative
Movements
Offset
Te-MO Aspirate
Volume
Te-MO Dispense
Volume
Te-MO Mix
Volume
Tip Alignment Check
Sensorplate position, Script aborts if... and Correct
pipetting position if...
Wait for Timer
Timer and Time span
Wash Tips
Volume in Waste and Volume in Cleaner
Some of the above parameters (e.g. Timer, Grid and Site) expect integer values.
Floating point values are also accepted and do not cause an error, but they will be
rounded before being used. In such cases, it is recommended to use integer
calculations to avoid unexpected results.
14.1.8 Converting Numeric Variables and Expressions to Strings
Some script commands (e.g. User Prompt) allow you to specify a numeric or
string variable or a mathematical expression instead of a string, e.g. for displaying
the value of the variable during runtime (see 14.1.10 “Script Commands That
Accept Variables and Expressions Converted to a String”, 14-16).
The expression or variable is enclosed within tilde characters “~”. Freedom
EVOware then replaces the expression with the value of the expression during
runtime.
The following shows an example script and the user prompt during script runtime:
Fig. 14-5 Freedom EVOware script with user prompt
Freedom EVOware Software Manual, 393172, en, V2.3
14 - 13
14 - Advanced Programming Features for Scripts
Variables and Expressions in Scripts
Fig. 14-6 User Prompt during script runtime
See 15.41 “Set Variable Command”, 15-101.
This example has a mathematical expression in the User Prompt command:
Fig. 14-7 Freedom EVOware script with user prompt
Fig. 14-8 User prompt during script runtime
The next example passes a variable to an external application as a command line
parameter:
Fig. 14-9 Passing a variable to an external application
The following example shows how to use string variables and numerical variables
to generate a worklist file name:
Fig. 14-10 Using string variables to generate worklist file names
14 - 14
Freedom EVOware Software Manual, 393172, en, V2.3
14 - Advanced Programming Features for Scripts
Variables and Expressions in Scripts
In line 3, the numeric variable counter is converted to a string by enclosing it
within tilde characters “~”. The string variable name is then assigned the value
“worklist1”.
In line 4, the Worklist command expects a string variable. The string variables
path and name must be enclosed within tilde characters, since otherwise they
would be interpreted literally.
14.1.9 Array Variables
An array of variables can be declared with the Set Variable command by
appending a counter variable to the variable name and enclosing the counter
variable within brackets [] and tilde characters “~”. Freedom EVOware then
replaces the counter variable name with the value of the counter during runtime.
In the following example script, which creates an array of 8 variables
TipVolume[1], TipVolume[2] etc., tilde characters “~” have been used in the user
prompt, too:
Fig. 14-11 Array of variables
The parameters of the Set Variable command are as follows:
Fig. 14-12 Array of variables - Set Variable command
The user prompt at runtime is as follows:
Freedom EVOware Software Manual, 393172, en, V2.3
14 - 15
14 - Advanced Programming Features for Scripts
Variables and Expressions in Scripts
Fig. 14-13 Array of variables - User prompt during script runtime
14.1.10 Script Commands That Accept Variables and Expressions Converted
to a String
The following table lists the commands that accept variables and expressions
converted to a string (i.e. plain text):
Tab. 14-7 Commands that accept variables and expressions converted to a string
Icon
Command
Parameter name(s)
Execute Application
Path & Name & Command line
Send Command
Command (the expression is converted to an integer value
before converting it to a string)
Set Variable
Query (Value and Default are also accepted if you declare a
string variable)
User Prompt
Text
14.1.11 Labware Attributes and String Variables
The Set Variable command allows you to read from and write to the labware
attribute “ID” from within pipetting scripts during script runtime. Freedom
EVOware uses the attribute “ID” to store the labware barcode. You can use this
feature to access scanned barcodes from within pipetting scripts.
You cannot read from or write to carrier attributes or other labware attributes in
this way.
This feature is available for both Freedom EVOware Standard and Freedom
EVOware Plus and is mainly intended for advanced applications. Take care when
modifying labware attributes.
In Freedom EVOware Plus, labware attributes are automatically assigned to string
variables, so it is not necessary to use the Set Variable command in this case (see
14.1.11.1 “Labware Attributes and String Variables in Freedom EVOware Plus”,
14-18).
Each of the attributes is associated with a script variable using the following
syntax:
$<labware_label>[index].<internal name of attribute>$
[index] is the well number (for microplates) or tube number (for tube racks).
14 - 16
Freedom EVOware Software Manual, 393172, en, V2.3
14 - Advanced Programming Features for Scripts
Variables and Expressions in Scripts
If you omit [index], then the string returns the labware or tube rack barcode
instead of the well or tube barcode.
For example:
$MyTubeRack2[5].ID$ - barcode of tube 5 in tube rack “MyTubeRack2”
$MyTubeRack1.ID$ - barcode for the tube rack “MyTubeRack1”
See 11.7.1 “Assigning a Label (Name) to the Labware”, 11-19.
An alternative syntax is as follows:
$<carrier_type>[site_global][index].<internal name of attribute>$
[site_global] is the site number counted for all sites for this labware type on the
worktable, counted from rear to front and then from left to right. It is not the same
as the site number on the carrier. For example, if there are two 3-position MP
carriers on the worktable at grid position 10 and 20, [site_global] = 4 for this carrier
type refers to site 1 of the carrier at grid position 20.
[index] is the well number (for microplates) or tube number (for tube racks).
If you omit [index], then the string returns the labware or tube rack barcode
instead of the well or tube barcode. You must not omit [site_global].
For example:
$Tube 16 mm 16 Pos[2][3].ID$ - barcode of tube 3, second tube rack on the
worktable (tube racks only have one site)
$MP 3Pos[4].ID$ - barcode of the labware at site 1 of the second MP carrier on
the worktable
$MP 3Pos[3][18].ID$ - barcode of well 18 on the labware at site 3 of the first MP
carrier on the worktable
Microplate wells do not normally have barcode labels. Nonetheless, the internal
database of Freedom EVOware provides a barcode attribute field for microplate
wells, too. This can be used for special applications, e.g. sample tracking.
Script example
The following example assumes that there is only one MP carrier on the
worktable.
The label of the labware on site 1 is Labware4.
The label of the labware on site 2 is Labware5.
Fig. 14-14 Example script
Line 1 sets the labware barcode of site 1 to “567”.
Line 2 sets the well barcode of site 2, well 3 to “d123”.
Line 3 copies the labware barcode of site 1 to string variable BC1.
Line 4 displays the string BC1 (= “567”) on the screen.
Freedom EVOware Software Manual, 393172, en, V2.3
14 - 17
14 - Advanced Programming Features for Scripts
Variables and Expressions in Scripts
Line 5 copies the well barcode of site 2, well 3 to string variable BC2.
Line 6 displays the string BC2 (= “d123”) on the screen.
Note: Normally, the barcode attribute is set by a barcode scanning operation such
as the PosID command, and not by assigning a value as in script line 1. The
above script solely serves to demonstrate the features which are available.
14.1.11.1 Labware Attributes and String Variables in Freedom EVOware Plus
Freedom EVOware Plus allows you to read from and write to labware attributes
from within pipetting scripts during script runtime. You cannot read from or write to
carrier attributes in this way.
Each of the attributes is automatically associated with a script variable using the
following syntax:
<labware_label>.<internal name of attribute>
For example:
MyPlate1.Grip_Narrow
MyPlate2.ID
You can use this feature e.g. to access scanned barcodes from within pipetting
scripts. This feature is mainly intended for advanced applications. Take care when
modfying labware attributes. See also 11.7.1 “Assigning a Label (Name) to the
Labware”, 11-19.
The Attributes dialog box for the Edit Labware dialog box normally shows
descriptive names for the attributes. Check the Show internal names checkbox to
see the internal names which are used.
14.1.12 Validating a Script Which Contains Variables
Each time you insert a new command in your script or edit an existing command,
Freedom EVOware validates the entire script to check for errors and shows all
commands which have errors in red. When validating the script, Freedom
EVOware uses default values for variables which are set during run-time, e.g.
from operator prompts or return codes.
The following table lists the default values which are used during validation for
commands which can declare variables:
Tab. 14-8 Commands with default values for variables for use during script validation
Icon
14 - 18
Command
Variable and value used during validation
Balance
Store weight in variable = 0
Execute Application
Return value = 0
Send Command
Response = ““ (empty string), Error code = 0
Set Variable
Variable = specified default value or default string
Freedom EVOware Software Manual, 393172, en, V2.3
14 - Advanced Programming Features for Scripts
Conditions
Choose Auto-Validation in the Edit menu if you want to switch off automatic
validation of pipetting scripts (see 6.2.5 “Auto-Validation”, 6-9). You then need
to validate the script manually (by choosing Validate Script in the Edit menu).
If your script contains conditional jumps or branches, validation only checks those
parts of the script which are executed with the default values of the IF variables in
Condition commands. For this reason, it is not recommended to declare variables
(e.g. with the Set Variable command) within conditional parts of the script.
14.2 Conditions
See 15.44 “Condition Command”,
15-109.
14.3 Sub-routines
Sub-routines are Freedom EVOware scripts (*.esc files) which can be used as
parts of another script. They allow you to structure and shorten complex scripts
and to build libraries of pipetting procedures (e.g. serial dilutions) which you want
to use repeatedly.
The differences between separate scripts and sub-routines are:
sub-routines use the same worktable as the main script.
sub-routines can share variables and timers with the main script.
sub-routines can execute a worklist which is loaded by the main script.
Loop names and line markers for conditions are not shared between sub-routines
and the main script.
14.3.1 Creating a Sub-Routine
To create a sub-routine, simply write a Freedom EVOware script and then store it.
You must use the same worktable layout as in the main script.
14.3.2 Sub-Routine Command
The Sub-Routine command executes another script as part of the current script.
Freedom EVOware Software Manual, 393172, en, V2.3
14 - 19
14 - Advanced Programming Features for Scripts
Sub-routines
Fig. 14-15 Sub-Routine command
The parameters of the Sub-Routine command are as follows:
Path & Name
This edit field shows the filename and location of the Freedom EVOware
script you want to use as a sub-routine.
Edit: Click this button if you want to open the specified sub-routine in a new
window for editing and/or checking.
Browse: Click this button to look for existing Freedom EVOware scripts and to
choose the one you want to use as a sub-routine.
Execute sub-routine and wait for it to finish
This option causes the main Freedom EVOware script to wait for the subroutine to finish before continuing.
Start sub-routine and continue
With this option, the main pipetting script continues without waiting for the
sub-routine to finish (“asynchronous” sub-routine, i.e. asynchronous
processing of the main script and the sub-routine). To allow asynchronous
processing, the sub-routine must only contain the following commands:
LiHa Commands
– Aspirate
– Dispense
– Mix
– Wash Tips
– Periodic Wash
– Activate DITI Handling
– Get DITIs
– Drop DITIs
– Set DITI Position
– Pick Up DITIs
– Set DITIs Back
– Pickup ZipTip
– Detect Liquid
– Tip Alignment Check
– Move LiHa
– Waste
– Active WashStation
14 - 20
Freedom EVOware Software Manual, 393172, en, V2.3
14 - Advanced Programming Features for Scripts
Sub-routines
– Worklist
– Export Data
– Manual Tip Alignment
Programming Commands
– Start Timer
– Wait for Timer
– Execute Application
– Comment
– User Prompt
– BeginLoop
– EndLoop
– Set Variable
– ImportVariable
– ExportVariable
– Condition
– If-Then
– Else
– End-If
– Group or Wizard
– GroupEnd or WizardEnd
– Sub-routine
– Execute VB Script
– On Error Go To
– Resume
– End Script
– Send Command
Commands for the Plate and Tube Robot
– Move ROMA
– ROMA Vector
– Transfer Labware
– Move PnP
– PnP Vector
– Transfer Tube
MCA96 Commands
– Aspirate
– Dispense
– Mix
– Wash
– Get DITIs
– Drop DITIs
– Get Tip Block
– Drop Tip Block
– Move
– Vector
– Relative Movements
– Transfer Labware
MCA384 Commands
– Aspirate
– Dispense
Freedom EVOware Software Manual, 393172, en, V2.3
14 - 21
14 - Advanced Programming Features for Scripts
Sub-routines
– Mix
– Wash
– Get Head Adapter
– Drop Head Adapter
– Get DITIs
– Drop DITIs
– Get Tip Block
– Drop Tip Block
– Move
– Transfer Labware
– Vector
– Dock CGM
– Undock CGM
Te-MO Commands
– Aspirate
– Dispense
– Mix
– Wash
– Wash 384 Tip Head
– Get DITIs
– Drop DITIs
– Get Tip Block
– Drop Tip Block
– Refill Trough
– Relative Movements
– Load the Te-MO
– Fill System (384 tip head)
All device commands (see 13.2 “Overview of Device Commands”, 13-12)
Wait for previously started sub-routine to finish
This option causes the main Freedom EVOware script to wait for the
specified, previously started sub-routine to finish before continuing.
Note: You can also start a sub-routine from within another sub-routine by
including a Sub-Routine command within the sub-routine.
14.3.3 Exchanging Data With Sub-Routines
Variables are shared between the main script and the sub-routine and can be
used to exchange data. To feed in data into the sub-routine, set a variable in the
main script and use the same variable in the sub-routine (e.g. for volumes or
loops). To get data back from a sub-routine (e.g. error codes), write the data to a
variable in the sub-routine and use the same variable in the main script.
14.3.4 Validating a Script Which Contains Sub-Routines
Each time you insert a new command in your script or edit an existing command,
Freedom EVOware validates the entire script to check for errors and shows all
commands which have errors in red. If a problem is detected in a sub-routine,
14 - 22
Freedom EVOware Software Manual, 393172, en, V2.3
14 - Advanced Programming Features for Scripts
Loop Options
Freedom EVOware shows the Sub-Routine command in the main script in red. To
correct the error, you have to open and correct the sub-routine script manually.
14.3.5 Log file for a Script Which Contains Sub-Routines
Freedom EVOware reports the currently executed script line in the log window
and in the log file. A typical line in the log file is as follows:
E 11:55:42 Line 1 : Aspirate
When Freedom EVOware executes a sub-routine, it displays the line number in
the main script and the line number in the sub-routine, separated by a slash /. A
typical line then looks like this (line 2 of the main script, line 1 of the sub-routine,
Aspirate command):
E 11:55:42 Line 2/1 : Aspirate
If you are using sub-routines nested inside of other sub-routines, the log file
shows the line numbers of all levels, separated by slashes.
14.4 Loop Options
Many of the standard pipetting commands allow you to specify loop options, which
let you use a different column, row, well and/or labware for each loop cycle if you
are using the command in a script loop.
In the dialog box for the command, click Loop Options to view, define or modify
the loop options:
Fig. 14-16 Loop Options dialog box
The fields of the Loop Options dialog box are as follows:
In every cycle of loop ...
Choose the name of the loop to which the loop options refer. The popup list
only shows the loops which are relevant for the script line where you have
inserted the pipetting command. Note: Loop names are defined in your script
with the Begin Loop command.
Freedom EVOware Software Manual, 393172, en, V2.3
14 - 23
14 - Advanced Programming Features for Scripts
Loop Options
Vary, for
Specify how to modify the current well selection in each cycle of the loop.
Choose column, row, well or labware from the vary popup list and specify the
increment in the for field. A positive value in the for field increases the chosen
parameter (e.g. use the next column) and a negative value decreases it.
Freedom EVOware interprets a positive value in the for field as follows:
Column
Left to right
Row
Rear to front
Well
Rear to front, then left to right
Labware
Rear to front on same carrier,
then the next carrier to the right
For standard 96-well microplates with 8 wells per column, “In every cycle of
loop ’loop1’, vary the well for +8” has the same effect as “In every cycle of loop
’loop1’, vary the column for +1”.
Add option
Click this button to add the current loop settings to the list of defined loop
options.
Defined loop options
This shows you all of the currently defined loop options for the pipetting
command.
Delete option
Click this button to delete the currently selected loop option from the list.
14 - 24
Freedom EVOware Software Manual, 393172, en, V2.3
15 - Script Commands
Aspirate Command
15 Script Commands
This chapter contains detailed descriptions of the Freedom EVOware script
commands.
In Freedom EVOware Plus, when the Script Editor is open the Commands tab of
the Control Bar only shows script commands (commands which are used for
writing pipetting scripts, see 13.1 “Overview of Script Commands”, 13-1). When
the Process Editor is open, the Commands tab of the Control Bar only shows
device commands (commands for the optional devices, see 13.2 “Overview of
Device Commands”, 13-12).
In Freedom EVOware Standard, the Control Bar always shows both command
types (it does not have a Process Editor).
15.1 Aspirate Command
The Aspirate command is used to pick up liquid from specified positions on the
worktable.
Fig. 15-1 Aspirate command
The parameters of the Aspirate command are as follows:
Freedom EVOware Software Manual, 393172, en, V2.3
15 - 1
15 - Script Commands
Aspirate Command
Tip Selection
Select the tips you want to use.
Loop options
If you are using the command in a script loop, click this button if you want to
specify loop options. This allows you to use a different column, row, well and/
or labware item for each cycle of the loop. You can choose different loop
options for the source and the destination. The gray (protected) field shows
the number of loop options you have chosen. See 14.4 “Loop Options”, 1423.
Liquid Classes
Choose the required liquid class from the pull down list. The list only shows
liquid classes which are suitable for the current configuration of the pipetting
instrument. For example, you will not see liquid classes for DiTis if the LiHa is
not currently configured with DiTis.
Click the Editor button to start the liquid classes editor if you want to create a
new class or modify an existing class (see 10 “Configuring Liquid Classes”,
10-1). Furthermore you can customize an existing liquid class for use by
this command only (click the Customize button). If you customize an existing
liquid class, the liquid class name is shown in the script command and in the
script editor within double angled brackets “>> name <<“.
Note: Instead of customizing a liquid class which is only used by a single instance
of this command, it is better practice to create a custom liquid class with the liquid
class editor which can then be used by any command and any script.
Volume
Specify the volume that you want to aspirate. Click Individual Volumes if you
want to select a different volume for each tip. The maximum allowed volume is
the dilutor or DITI capacity (Freedom EVOware does not automatically handle
volumes that exceed the dilutor or DITI capacity).
Tip Spacing
The Tip Spacing parameter controls the distance between adjacent pipetting
tips for this command. Tip spacing is only relevant if you want to use more
than one tip. A tip spacing of 1 means that the tips will be spread to match the
distance between adjacent wells of the labware. A tip spacing of 2 will select
every other well of the labware. You can only choose values for tip spacing
which are meaningful for the labware geometry.
The liquid handling arm achieves the highest mechanical accuracy when the
tips are not spread. For high-density labware such as 1536-well microplates,
you should choose tip spacing such that the tips are adjacent to one another
(physical tip spacing 9 mm). Accordingly, for 1536-well microplates you should
set tip spacing to 4 (every fourth well).
Compartment in well
Some special labware types (e.g. for protein crystallography) have wells with
several compartments (cavities). Freedom EVOware can pipette a different
liquid into each of the compartments. Each well typically has one main
compartment and one or more satellite compartments which are directly
adjacent and are often smaller in size. Choose the compartment which you
want to use for pipetting (the main compartment is normally compartment 1).
Well compartments are specified in the labware configuration. This field is
inactive (gray) if the well only has one compartment.
15 - 2
Freedom EVOware Software Manual, 393172, en, V2.3
15 - Script Commands
Dispense Command
Location
Select the labware for the source by clicking on the labware in the Worktable
Editor. Then click on the required source well(s). The gray (protected) field
then shows the label (name) of the labware that you have selected (it shows a
generic name if you have not assigned a label).
Cursor (x,y)
You can also select wells by entering the x coordinate (from left to right) and
the y coordinate (from top to bottom) of the top left well you want to select. Tip:
The x and y coordinates of each well are shown in a tool tip if you move the
cursor over the well area in the Location panel.
Select: Click this button to select the wells you have specified in the Cursor
(x,y) field. This button has no effect if your well selection does not fit within the
well area of the labware. For example, if you have chosen to use 8 tips and
you are pipetting to a 96-well microplate in landcape orientation, you can only
choose the required x coordinate (the y coordinate must be 1).
15.2 Dispense Command
The Dispense command is used to dispense liquid to specified positions on the
worktable.
Fig. 15-2 Dispense command
Freedom EVOware Software Manual, 393172, en, V2.3
15 - 3
15 - Script Commands
Dispense Command
The parameters of the Dispense command are as follows:
Tip Selection
Select the tips you want to use.
Loop options
If you are using the command in a script loop, click this button if you want to
specify loop options. This allows you to use a different column, row, well and/
or labware item for each cycle of the loop. You can choose different loop
options for the source and the destination. The gray (protected) field shows
the number of loop options you have chosen. See 14.4 “Loop Options”, 1423.
Liquid Classes
Choose the required liquid class from the pull down list. The list only shows
liquid classes which are suitable for the current configuration of the pipetting
instrument. For example, you will not see liquid classes for DiTis if the LiHa is
not currently configured with DiTis.
Click the Editor button to start the liquid classes editor if you want to create a
new class or modify an existing class (see 10 “Configuring Liquid Classes”,
10-1). Furthermore you can customize an existing liquid class for use by
this command only (click the Customize button and click the Dispense tab). If
you customize an existing liquid class, the liquid class name is shown in the
script command and in the script editor within double angled brackets “>>
name <<“.
Note: Instead of customizing a liquid class which is only used by a single instance
of this command, it is better practice to create a custom liquid class with the liquid
class editor which can then be used by any command and any script.
Volume
Specify the volume that you want to dispense. Click Individual Volumes if you
want to select a different volume for each tip. The maximum allowed volume is
the dilutor or DITI capacity (Freedom EVOware does not automatically handle
volumes that exceed the dilutor or DITI capacity).
Tip Spacing
The Tip Spacing parameter controls the distance between adjacent pipetting
tips for this command. Tip spacing is only relevant if you want to use more
than one tip. A tip spacing of 1 means that the tips will be spread to match the
distance between adjacent wells of the labware. A tip spacing of 2 will select
every other well of the labware. You can only choose values for tip spacing
which are meaningful for the labware geometry.
The liquid handling arm achieves the highest mechanical accuracy when the
tips are not spread. For high-density labware such as 1536-well microplates,
you should choose tip spacing such that the tips are adjacent to one another
(physical tip spacing 9 mm). Accordingly, for 1536-well microplates you should
set tip spacing to 4 (every fourth well).
Compartment in well
Some special labware types (e.g. for protein crystallography) have wells with
several compartments (cavities). Freedom EVOware can pipette a different
liquid into each of the compartments. Each well typically has one main
compartment and one or more satellite compartments which are directly
adjacent and are often smaller in size. Choose the compartment which you
want to use for pipetting (the main compartment is normally compartment 1).
Well compartments are specified in the labware configuration. This field is
inactive (gray) if the well only has one compartment.
15 - 4
Freedom EVOware Software Manual, 393172, en, V2.3
15 - Script Commands
Mix Command
Location
Select the labware for the destination by clicking on the labware in the
Worktable Editor. Then click on the required destination well(s). The gray
(protected) field then shows the label (name) of the labware that you have
selected (it shows a generic name if you have not assigned a label).
Cursor (x,y)
You can also select wells by entering the x coordinate (from left to right) and
the y coordinate (from top to bottom) of the top left well you want to select. Tip:
The x and y coordinates of each well are shown in a tool tip if you move the
cursor over the well area in the Location panel.
Select: Click this button to select the wells you have specified in the Cursor
(x,y) field. This button has no effect if your well selection does not fit within the
well area of the labware. For example, if you have chosen to use 8 tips and
you are pipetting to a 96-well microplate in landcape orientation, you can only
choose the required x coordinate (the y coordinate must be 1).
15.3 Mix Command
The Mix command performs a mix operation by aspirating and then dispensing at
the same position.
Fig. 15-3 Mix command
Freedom EVOware Software Manual, 393172, en, V2.3
15 - 5
15 - Script Commands
Mix Command
The parameters of the Mix command are as follows:
Tip Selection
Select the tips you want to use.
Loop options
If you are using the command in a script loop, click this button if you want to
specify loop options. This allows you to use a different column, row, well and/
or labware item for each cycle of the loop. You can choose different loop
options for the source and the destination. The gray (protected) field shows
the number of loop options you have chosen. See 14.4 “Loop Options”, 1423.
Liquid Classes
Choose the required liquid class from the pull down list. The list only shows
liquid classes which are suitable for the current configuration of the pipetting
instrument. For example, you will not see liquid classes for DiTis if the LiHa is
not currently configured with DiTis.
Click the Editor button to start the liquid classes editor if you want to create a
new class or modify an existing class (see 10 “Configuring Liquid Classes”,
10-1). Furthermore you can customize an existing liquid class for use by
this command only (click the Customize button and click the Aspirate or
Dispense tab). If you customize an existing liquid class, the liquid class name
is shown in the script command and in the script editor within double angled
brackets “>> name <<“.
Note: Instead of customizing a liquid class which is only used by a single instance
of this command, it is better practice to create a custom liquid class with the liquid
class editor which can then be used by any command and any script.
Volume
Specify the volume that you want to aspirate for the mixing process. Click
Individual Volumes if you want to select a different volume for each tip. The
maximum allowed volume is the dilutor or DITI capacity (Freedom EVOware
does not automatically handle volumes that exceed the dilutor or DITI
capacity).
Cycles
Specify how often you want to repeat the mixing process.
Tip Spacing
The Tip Spacing parameter controls the distance between adjacent pipetting
tips for this command. Tip spacing is only relevant if you want to use more
than one tip. A tip spacing of 1 means that the tips will be spread to match the
distance between adjacent wells of the labware. A tip spacing of 2 will select
every other well of the labware. You can only choose values for tip spacing
which are meaningful for the labware geometry.
The liquid handling arm achieves the highest mechanical accuracy when the
tips are not spread. For high-density labware such as 1536-well microplates,
you should choose tip spacing such that the tips are adjacent to one another
(physical tip spacing 9 mm). Accordingly, for 1536-well microplates you should
set tip spacing to 4 (every fourth well).
Compartment in well
Some special labware types (e.g. for protein crystallography) have wells with
several compartments (cavities). Freedom EVOware can pipette a different
liquid into each of the compartments. Each well typically has one main
compartment and one or more satellite compartments which are directly
15 - 6
Freedom EVOware Software Manual, 393172, en, V2.3
15 - Script Commands
Mix Command
adjacent and are often smaller in size. Choose the compartment which you
want to use for pipetting (the main compartment is normally compartment 1).
Well compartments are specified in the labware configuration. This field is
inactive (gray) if the well only has one compartment.
Location
Select the labware for the source and destination by clicking on the labware in
the Worktable Editor. Then click on the required well(s). The gray (protected)
field then shows the label (name) of the labware that you have selected (it
shows a generic name if you have not assigned a label).
Cursor (x,y)
You can also select wells by entering the x coordinate (from left to right) and
the y coordinate (from top to bottom) of the top left well you want to select. Tip:
The x and y coordinates of each well are shown in a tool tip if you move the
cursor over the well area in the Location panel.
Select: Click this button to select the wells you have specified in the Cursor
(x,y) field. This button has no effect if your well selection does not fit within the
well area of the labware. For example, if you have chosen to use 8 tips and
you are pipetting to a 96-well microplate in landcape orientation, you can only
choose the required x coordinate (the y coordinate must be 1).
Freedom EVOware Software Manual, 393172, en, V2.3
15 - 7
15 - Script Commands
Wash Tips Command
15.4 Wash Tips Command
The Wash Tips command is used to flush and wash fixed tips or to flush DITI
adapters using a wash station. It is not intended for flushing DITI tips (DITI tips
should not normally be flushed). If you are using DITIs, make sure in your script
that there are none attached when this command is executed.
Fig. 15-4 Wash Tips command
Tips should be washed as often as necessary, e.g. after a pipetting sequence and
before taking a new sample. DITI adapters should be flushed after replacing the
DITIs several times to renew the system liquid column in the DITI adapters. This
ensures maximum pipetting accuracy.
The parameters of the Wash Tips command are as follows:
Tip Selection
Select the tips you want to wash.
Volume in Waste
Specify the volume of system liquid which should be used to flush the inside of
the tips. Flushing takes place with the tips positioned above the waste of the
specified wash station (tip height for fixed tips = Z-dispense; tip height for DITI
adapters = Z-travel).
Volume in Cleaner
Specify the volume of system liquid which should be used to wash the outside
of the tips. Washing takes place with the tips lowered into the cleaner of the
specified wash station (tip height = Z-max). The wash cycle is skipped if you
are flushing DITI adapters and Volume in Cleaner is ignored in this case.
15 - 8
Freedom EVOware Software Manual, 393172, en, V2.3
15 - Script Commands
Wash Tips Command
Use Waste
Specify the worktable position for the waste you want to use by clicking on it in
the Worktable Editor. You must first put a wash station with waste unit in the
Worktable Editor at the required position. Alternatively, choose the required
waste position from the pull down list. The list shows all waste units which are
currently positioned in the Worktable Editor.
The gray (protected) fields show the worktable coordinates of the selected
waste.
Use Cleaner
Specify the worktable position for the cleaner you want to use by clicking on it
in the Worktable Editor. You must first put a wash station with cleaner unit in
the Worktable Editor at the required position. Alternatively, choose the
required cleaner position from the pull down list. The list shows all cleaner
units which are currently positioned in the Worktable Editor.
The gray (protected) fields show the worktable coordinates of the selected
cleaner.
Choose a shallow cleaner if you only need to clean the ends of the tips.
Choose a deep cleaner if there is a possibility of contamination along the shaft
of the tip. The deep cleaner requires a larger volume of system liquid and
cleaning takes somewhat longer.
The wash cycle is skipped if you are flushing DITI adapters and Use Cleaner
is ignored in this case.
Use Fast-Wash Module
If your instrument is fitted with FWO (Fast Wash Option) or MPO (Monitored
Pump Option), check this checkbox to use the Fast Wash module instead of
the dilutors to wash the tips. If you use the Fast Wash module, the volumes of
liquid which are dispensed in the flushing and washing steps may differ
significantly from the volumes you specify. This is due to accuracy limitations
of the pump.
Use Pinch Valve
If your instrument is fitted with the Low Volume Option, check this checkbox to
activate the Low Volume Option after washing the tips.
Delay in Waste
To reduce the pressure inside the tubing, you can instruct the instrument to
keep the valves open somewhat longer after flushing before moving the LiHa
away from the waste (range: 0 - 1000 ms).
Delay in Cleaner
To reduce the pressure inside the tubing, you can instruct the instrument to
keep the valves open somewhat longer after washing before moving the LiHa
away from the cleaner (range: 0 - 1000 ms). The wash cycle is skipped if you
are flushing DITI adapters and Delay in Cleaner is ignored in this case.
Retract with
Specify the speed with which you want to retract the tips from the cleaner
(range: 0 - 100 mm/s). If the speed is too high, droplets may be dragged out of
the cleaner and stick to the outside of the tips.
Airgap volume, Airgap speed
These settings are used to specify a system trailing airgap (STAG) which will
be aspirated after washing the tips. Specify the required size of the airgap in µl
and the aspiration speed for the airgap in µl/s. The system trailing airgap is
used to prevent contamination by ensuring that the system liquid cannot come
into contact with the liquid which will be aspirated in a subsequent pipetting
command.
Freedom EVOware Software Manual, 393172, en, V2.3
15 - 9
15 - Script Commands
Periodic Wash Command
15.5 Periodic Wash Command
The Periodic Wash command is used to flush DITI adapters in a wash station at
specified, regular intervals. It is not intended for flushing DITI tips.
Fig. 15-5 Periodic Wash command
This command is used to flush the DITI adapters at specified, regular intervals
when DITIs are replaced. The flushing takes place after the DITIs are dropped
and before getting new ones. This should be done after replacing the DITIs
several times to renew the system liquid column in the DITI adapters. This
ensures maximum pipetting accuracy.
The Periodic Wash command is not executed at its line in the script, but affects
subsequent Drop DITI and Get DITI commands. It also affects DITI replacement
actions in worklists.
You can deactivate a previous Periodic Wash command by specifying another
Periodic Wash command with the period set to 0 (zero).
The parameters of the Periodic Wash command are as follows:
Tip Selection
Select the DITI adapters you want to flush.
Volume in Waste
Specify the volume of system liquid which should be used to flush the DITI
adapters (range: 0 - 100 ml). Flushing takes place with the tips positioned
above the waste of the specified wash station (tip height for fixed tips = Zdispense; tip height for DITI adapters = Z-travel).
15 - 10
Freedom EVOware Software Manual, 393172, en, V2.3
15 - Script Commands
Periodic Wash Command
Volume in Cleaner
Specify the volume of system liquid which should be used to wash the outside
of the tips (range: 0.1 - 100 ml). Washing takes place with the tips lowered into
the cleaner of the specified wash station (tip height = Z-max). The wash cycle
is skipped if you are flushing DITI adapters and Volume in Cleaner is ignored
in this case.
Use Waste
Specify the worktable position for the waste you want to use by clicking on it in
the Worktable Editor. You must first put a wash station with waste unit in the
Worktable Editor at the required position. Alternatively, choose the required
waste position from the pull down list. The list shows all waste units which are
currently positioned in the Worktable Editor.
The gray (protected) fields show the worktable coordinates of the selected
waste.
Use Cleaner
Specify the worktable position for the cleaner you want to use by clicking on it
in the Worktable Editor. You must first put a wash station with cleaner unit in
the Worktable Editor at the required position. Alternatively, choose the
required cleaner position from the pull down list. The list shows all cleaner
units which are currently positioned in the Worktable Editor.
The gray (protected) fields show the worktable coordinates of the selected
cleaner.
Choose a shallow cleaner if you only need to clean the ends of the tips.
Choose a deep cleaner if there is a possibility of contamination along the shaft
of the tip. The deep cleaner requires a larger volume of system liquid and
cleaning takes somewhat longer.
The wash cycle is skipped if you are flushing DITI adapters and Use Cleaner
is ignored in this case.
Use Fast-Wash Module
If your instrument is fitted with FWO (Fast Wash Option) or MPO (Monitored
Pump Option), check this checkbox to use the Fast Wash module instead of
the dilutors to wash the tips.
Use Pinch Valve
If your instrument is fitted with the Low Volume Option, check this checkbox to
activate the Low Volume Option after washing the tips.
Period
Specify the number of DITI replacement actions after which Freedom
EVOware should flush the DITI adapters.
Delay in Waste
To reduce the pressure inside the tubing, you can instruct the instrument to
keep the valves open somewhat longer after flushing before moving the LiHa
away from the waste (range: 0 - 1000 ms).
Delay in Cleaner
To reduce the pressure inside the tubing, you can instruct the instrument to
keep the valves open somewhat longer after washing before moving the LiHa
away from the cleaner (range: 0 - 1000 ms). The wash cycle is skipped if you
are flushing DITI adapters and Delay in Cleaner is ignored in this case.
Retract with
Specify the speed with which you want to retract the tips from the cleaner. If
the speed is too high, droplets may be dragged out of the cleaner and stick to
the outside of the tips. Retract with is ignored if you are flushing DITI adapters.
Freedom EVOware Software Manual, 393172, en, V2.3
15 - 11
15 - Script Commands
Activate DITI Handling Command
Airgap volume, Airgap speed
These settings are used to specify a system trailing airgap (STAG) which will
be aspirated after washing the tips. Specify the required size of the airgap in µl
and the aspiration speed for the airgap in µl/s. The system trailing airgap is
used to prevent contamination by ensuring that the system liquid cannot come
into contact with the liquid which will be aspirated in a subsequent pipetting
command.
15.6 Activate DITI Handling Command
Freedom EVOware provides special facilities to ensure that sufficient DITIs are
present on the worktable for your script or process and to fetch new DITI racks as
and when needed. In Freedom EVOware Standard, automatic DITI replacement is
done using a DITI replacement script (sub-routine).
The Activate DITI Handling command, which is only available in Freedom
EVOware Standard, activates the automatic DITI Handling feature in your
pipetting script and specifies the DITI replacement script to use. Freedom
EVOware Plus uses a different concept for automatic DITI handling.
Your script must include an Activate DITI Handling command for each DITI type
you want to replace automatically.
Fig. 15-6 Activate DITI Handling command
The parameters of the Activate DITI Handling command are as follows:
Script Path and Name
Specify the filename and location of the script (sub-routine) you want to use to
replace DITI racks when all of the DITIs have been used. This is normally
done using one or more Transfer Labware commands. The worktable location
(grid, site) of the DITI racks which will need replacing during runtime is
specified in the DITI replacement script using the pre-defined variables
Replace_Diti_Grid and Replace_DiTi_Site. For each Get DITI command in
your pipetting script, Freedom EVOware automatically sets these variables to
the correct grid and site for the selected DITI type before executing the
command.
Edit: Click this button if you want to open the specified script in a new window
for editing and/or checking.
Browse: Click this button to look for existing scripts and to choose the one
you want to use.
15 - 12
Freedom EVOware Software Manual, 393172, en, V2.3
15 - Script Commands
Get DITIs Command
For DITI type
Choose the DITI type to which this command should apply. The list shows all
of the LiHa DITI types which are defined in the labware database.
To de-activate the automatic DITI Handling feature again, use the Activate DITI
Handling command and leave the Script Path and Name field blank.
See 17.1 “Using the Automatic DITI Handling feature”, 17-1 for more
information.
15.7 Get DITIs Command
The Get DITIs command is used to pick up DITIs (disposable tips) of the specified
type from a DITI rack. Freedom EVOware keeps track of their position on the
worktable and automatically picks up the next available unused DITIs of the
chosen type.
Note: DiTi handling is automatic in Freedom EVOware Plus.
This command is only shown in the Control Bar if you are using DiTis on the LiHa.
Freedom EVOware does not detect the LiHa tip type automatically. If you are
using DITIs you must configure them manually (see 8.4.2.1 “LiHa (Liquid Handling
Arm)”, 8-22).
Fig. 15-7 Get DITIs command
The parameters of the Get DITIs command are as follows:
Tip Selection
Select the tips you want to pick up. You can only choose tips which are
configured with DITIs.
DITI Type
Choose the required DITI type from the pull-down list. The list shows all of the
LiHa DITI types which are defined in the labware database.
Freedom EVOware Software Manual, 393172, en, V2.3
15 - 13
15 - Script Commands
Drop DITIs Command
If DITI is not fetched, try 3 times and then proceed to next DITI position
If you do not check this checkbox and the DITIs could not be picked up,
Freedom EVOware displays an error message and waits for user input.
If you check this checkbox and the DITIs could not be picked up, Freedom
EVOware makes two more attempts before proceeding to the next DITI
position and trying again.
Airgap volume, Airgap speed
These settings are used to specify a system trailing airgap (STAG) which will
be aspirated after mounting the DITIs. Specify the required size of the airgap
in µl and the aspiration speed for the airgap in µl/s. The system trailing airgap
is used to prevent contamination by ensuring that the system liquid cannot
come into contact with the liquid which will be aspirated in a subsequent
pipetting command.
Also see 15.9 “Set DITI Position Command”,
15-15.
15.8 Drop DITIs Command
The Drop DITIs command is used to discard the specified DITIs into the specified
DITI waste.
Note: DiTi handling is automatic in Freedom EVOware Plus.
This command is only shown in the Control Bar if you are using DiTis on the LiHa.
Freedom EVOware does not detect the LiHa tip type automatically. If you are
using DITIs you must configure them manually (see 8.4.2.1 “LiHa (Liquid Handling
Arm)”, 8-22).
Fig. 15-8 Drop DITIs command
The parameters of the Drop DITIs command are as follows:
Tip Selection
Select the tips you want to discard. You can only choose tips which are
configured with DITIs.
15 - 14
Freedom EVOware Software Manual, 393172, en, V2.3
15 - Script Commands
Set DITI Position Command
Use DITI Waste
Specify the worktable position for the DITI waste you want to use by clicking
on the waste in the Worktable Editor. You must first put a DITI waste in the
Worktable Editor at the required position. Alternatively, choose the required
DITI waste from the pull down list. The list shows all of the DITI wastes which
are currently positioned in the Worktable Editor.
The gray (protected) fields show the worktable coordinates of the selected
DITI waste.
15.9 Set DITI Position Command
If you are using DITIs, Freedom EVOware remembers the position in the DITI
rack of the last DITI which was fetched. When starting a new run, the Get DITIs
command starts picking up DITIs at the next available position. After loading a
new DITI rack onto the worktable during script runtime (e.g. using the RoMa), you
should use the Set DITI Position command in your script to set the DITI Position
counter to 1. This ensures that the next DITI is fetched from position 1 rather than
from the middle of the new rack.
You can specify the next position separately for each of the available DITI types
(i.e. DITI racks on the worktable).
Note: If you want to specify the next DITI position manually before the script or
process is started, use the direct command Set DITI Position (see 5.4.1.3 “Direct
commands”, 5-10) or create a maintenance script which contains the Set DITI
Position command (see 6.4.2 “Run Maintenance”, 6-10).
Note: DiTi handling is automatic in Freedom EVOware Plus.
This command is only shown in the Control Bar if you are using DiTis on the LiHa.
Freedom EVOware does not detect the LiHa tip type automatically. If you are
using DITIs you must configure them manually (see 8.4.2.1 “LiHa (Liquid Handling
Arm)”, 8-22).
If your pipetting instrument is fitted with two liquid handling arms, the Set DITI
Position command will be provided in the Control Bar for both arms. However,
please note that the same DITI position counter (and the same pool of unused
DITIs) is used by both arms.
Fig. 15-9 Set DITI Position command
The parameters of the Set DITI Position command are as follows:
Freedom EVOware Software Manual, 393172, en, V2.3
15 - 15
15 - Script Commands
Pick Up DITIs Command
DITI type
Choose the DITI type whose position you want to set. The list shows all of the
LiHa DITI types which are defined in the labware database. DITI types are
assigned to DITI racks in the labware definition for the rack (see 9.4.1 “Editing
Labware, Well Dimensions Tab”, 9-19).
Next DITI position
Grid, Site: Specify the worktable position of a DITI rack containing unused
DITIs of this type by clicking on the rack in the Worktable Editor. You can also
specify numeric constants or variables. The specified grid and site must
contain a DITI rack.
Position in labware: Specify the labware position in the DITI rack for the next
available unused DITI of this type. You can also specify a numeric constant or
a variable. Freedom EVOware counts labware positions from rear to front and
then from left to right.
Set last position
If you have activated the feature Optimize positions when fetching DITIs,
Freedom EVOware fetches new DITIs either starting from the beginning of the
DITI rack or starting from the end of the DITI rack, depending on the situation
(see 8.4.2.1 “LiHa (Liquid Handling Arm)”, 8-22, Optimize positions when
fetching DITIs). In this case, Freedom EVOware maintains two counters for
the last used DITI position (for DITIs which are taken from the beginning of the
rack and for DITIs which are taken from the end of the rack). Check this
checkbox if you want to set the last used DITI position for the end counter
instead of for the beginning counter.
If you have activated the feature Optimize positions when fetching DITIs, after
loading a new DITI rack onto the worktable during script runtime you should
use the Set DITI Position command twice in your script, to set the beginning
counter to 1 and the end counter to 96.
The Set last position checkbox is inactive (grey) if you have not activated
Optimize positions when fetching DITIs. If you have previously specified the
last used DITI position, it will be ignored during script execution.
15.10 Pick Up DITIs Command
The Pick Up DITIs command is used to pick up DITIs which have already been
used and put back into a DITI rack with the Set DITIs Back command. You must
specify the DITIs you want to pick up.
Note: DiTi handling is automatic in Freedom EVOware Plus.
This command is only shown in the Control Bar if you are using DiTis on the LiHa.
Freedom EVOware does not detect the LiHa tip type automatically. If you are
using DITIs you must configure them manually (see 8.4.2.1 “LiHa (Liquid Handling
Arm)”, 8-22).
15 - 16
Freedom EVOware Software Manual, 393172, en, V2.3
15 - Script Commands
Pick Up DITIs Command
Fig. 15-10 Pick Up DITIs command
The parameters of the Pick Up DITIs command are as follows:
Tip Selection
Select the tips you want to pick up. You can only choose tips which are
configured with DITIs.
Loop options
If you are using the command in a script loop, click this button if you want to
specify loop options. This allows you to use a different column, row, well and/
or labware item for each cycle of the loop. The gray (protected) field shows
the number of loop options you have chosen. See 14.4 “Loop Options”, 1423.
DITI Type
Choose the required DITI type from the pull-down list. The list shows all of the
LiHa DITI types which are defined in the labware database.
Location
Select the DITI rack where you want to pick up the DITIs by clicking on the
rack in the Worktable Editor. The gray (protected) field at the top of the
Location panel shows the label (name) of the labware that you have selected
(it shows a generic name if you have not assigned a label). Now click on the
required well(s).
Freedom EVOware Software Manual, 393172, en, V2.3
15 - 17
15 - Script Commands
Set DITIs Back Command
15.11 Set DITIs Back Command
The Set DITIs Back command is used to return used DITIs to specified positions
on a DITI rack for later use. This command requires the Lower DITI Eject option.
Note: DiTi handling is automatic in Freedom EVOware Plus.
This command is only shown in the Control Bar if you are using DiTis on the LiHa.
Freedom EVOware does not detect the LiHa tip type automatically. If you are
using DITIs you must configure them manually (see 8.4.2.1 “LiHa (Liquid Handling
Arm)”, 8-22).
Fig. 15-11 Set DITIs Back command
The parameters of the Set DITIs Back command are as follows:
Tip Selection
Select the tips you want to put down. You can only choose tips which are
configured with DITIs.
Loop options
If you are using the command in a script loop, click this button if you want to
specify loop options. This allows you to use a different column, row, well and/
or labware item for each cycle of the loop. The gray (protected) field shows
the number of loop options you have chosen. See 14.4 “Loop Options”, 1423.
Location
Select the DITI rack where you want to put down the DITIs by clicking on the
rack in the Worktable Editor. Then click on the required well(s). The gray
(protected) field at the top of the panel shows the label (name) of the labware
that you have selected (it shows a generic name if you have not assigned a
label).
15 - 18
Freedom EVOware Software Manual, 393172, en, V2.3
15 - Script Commands
Pickup ZipTip Command
15.12 Pickup ZipTip Command
The Pickup ZipTip command is used to pick up ZipTips. ZipTips are disposable
tips which are pre-filled with liquid and thus do not need an aspirate command.
Freedom EVOware keeps track of their position on the worktable and
automatically picks up the next available unused ZipTips of the chosen type.
The Pick Up ZipTip command automatically aspirates a specified volume of air
before picking up the tips. The same volume should be chosen in the subsequent
Dispense command, which then ejects the pre-filled liquid into the well.
Fig. 15-12 Pickup ZipTip command
The parameters of the Pickup ZipTip command are as follows:
Tip Selection
Select the tips you want to pick up. You can only choose tips which are
configured with DITIs or ZipTips.
Loop options
If you are using the command in a script loop, click this button if you want to
specify loop options. This allows you to use a different column, row, well and/
or labware item for each cycle of the loop. The gray (protected) field shows
the number of loop options you have chosen. See 14.4 “Loop Options”, 1423.
ZipTip Type
Choose the required ZipTip type from the pull-down list. ZipTips are stored in
DITI racks. The list shows all of the LiHa DITI and ZipTip types which are
defined in the labware database.
Freedom EVOware Software Manual, 393172, en, V2.3
15 - 19
15 - Script Commands
Detect Liquid Command
Airgap
Choose the required size of the airgap in µl and the aspiration speed for the
airgap in µl/s.
Location
Select the DITI rack where you want to pick up the ZipTips by clicking on the
rack in the Worktable Editor. The gray (protected) field at the top of the
Location panel shows the label (name) of the labware that you have selected
(it shows a generic name if you have not assigned a label). Now click on the
required well(s).
ZipTips can be washed after use in the Active WashStation (see 15.23 “Active
WashStation Command”, 15-36).
Also see 15.9 “Set DITI Position Command”, 15-15.
15.13 Detect Liquid Command
Liquid level detection is one of the options available for aspirating and dispensing
and can be individually defined for each liquid class. The Detect Liquid command
is used to carry out liquid level detection without pipetting and reports the liquid
volume for each of the chosen wells in the labware.
The volumes are returned in a set of variables DETECTED_VOLUME_x, where x
is the tip number.
Fig. 15-13 Detect Liquid command
The parameters of the Detect Liquid command are as follows:
15 - 20
Freedom EVOware Software Manual, 393172, en, V2.3
15 - Script Commands
Detect Liquid Command
Tip Selection
Select the tips you want to use.
Loop options
If you are using the command in a script loop, click this button if you want to
specify loop options. This allows you to use a different column, row, well and/
or labware item for each cycle of the loop. The gray (protected) field shows
the number of loop options you have chosen. See 14.4 “Loop Options”, 1423.
Liquid Class
Choose the required liquid class from the pull down list. The list only shows
liquid classes which are suitable for the current configuration of the pipetting
instrument. For example, you will not see liquid classes for DiTis if the LiHa is
not currently configured with DiTis.
Click the Editor button to start the liquid classes editor if you want to create a
new class or modify an existing class (see 10 “Configuring Liquid Classes”,
10-1).
Location
Select the labware which you want to check by clicking on the labware in the
Worktable Editor. The gray (protected) field at the top right of the Location
panel shows the label (name) of the labware that you have selected (it shows
a generic name if you have not assigned a label). Now click on the required
well(s).
Tip Spacing
The Tip Spacing parameter controls the distance between adjacent pipetting
tips for this command. You can choose a different tip spacing for the source
labware and the destination labware. Tip spacing is only relevant if you want
to use more than one tip. A tip spacing of 1 means that the tips will be spread
to match the distance between adjacent wells of the labware. A tip spacing of
2 will select every other well of the labware. You can only choose values for tip
spacing which are meaningful for the labware geometry.
The liquid handling arm achieves the highest mechanical accuracy when the
tips are not spread. For high-density labware such as 1536-well microplates,
you should choose tip spacing such that the tips are adjacent to one another
(physical tip spacing 9 mm). Accordingly, for 1536-well microplates you should
set tip spacing to 4 (every fourth well).
Compartment in well
Some special labware types (e.g. for protein crystallography) have wells with
several compartments (cavities). Freedom EVOware can pipette a different
liquid into each of the compartments. Each well typically has one main
compartment and one or more satellite compartments which are directly
adjacent and are often smaller in size. Choose the compartment which you
want to use for pipetting (the main compartment is normally compartment 1).
Well compartments are specified in the labware configuration. This field is
inactive (gray) if the well only has one compartment.
Freedom EVOware Software Manual, 393172, en, V2.3
15 - 21
15 - Script Commands
Te-Fill Aspirate Command
Cursor (x,y)
You can also select wells by entering the x coordinate (from left to right) and
the y coordinate (from top to bottom) of the top left well you want to select. Tip:
The x and y coordinates of each well are shown in a tool tip if you move the
cursor over the well area in the Location panel.
Select: Click this button to select the wells you have specified in the Cursor
(x,y) field. This button has no effect if your well selection does not fit within the
well area of the labware. For example, if you have chosen to use 8 tips and
you are pipetting to a 96-well microplate in landcape orientation, you can only
choose the required x coordinate (the y coordinate must be 1).
15.14 Te-Fill Aspirate Command
The Te-Fill option uses a bi-directional pump instead of the diluter to aspirate and
dispense large volumes of liquid, for example buffer solutions.
The Te-Fill can be optionally equipped with a 6-way valve, which allows you to
switch between six different liquid containers. If fitted, the 6-way valve must be
activated in the Configuration Tool (see 8.4.2.4 “Te-Fill option”, 8-30). Also use
the Configuration Tool to assign the names of the liquids you want to use to the
channels of the 6-way valve (see 8.4.2.6 “6-way valve for Te-Fill”, 8-31). The
assigned names will then be shown in this command in the Channel / Liquid pulldown list.
The Te-Fill Aspirate command is used to pick up liquid from specified positions on
the worktable using the Te-Fill option.
During runtime, the pipetting instrument will switch from using the diluter to using
the bi-directional pump and switch back again after pipetting - you do not need to
use the Te-Fill Switch Valve command for this purpose.
15 - 22
Freedom EVOware Software Manual, 393172, en, V2.3
15 - Script Commands
Te-Fill Aspirate Command
Fig. 15-14 Te-Fill Aspirate command
The parameters of the Te-Fill Aspirate command are as follows:
Tip Selection
Select the tips you want to use. You can only select tips which are configured
with the Te-Fill option (see 8.4.2.1 “LiHa (Liquid Handling Arm)”, 8-22, TeFill option).
Loop options
If you are using the command in a script loop, click this button if you want to
specify loop options. This allows you to use a different column, row, well and/
or labware item for each cycle of the loop. You can choose different loop
options for the source and the destination. The gray (protected) field shows
the number of loop options you have chosen. See 14.4 “Loop Options”, 1423.
Z-Position
Choose the Z-Position to which the selected tips should be lowered for
pipetting. All other tips remain at the currently applicable Z-Travel height.
Specify a Z offset if required. A positive value for the offset lowers the tips.
Freedom EVOware Software Manual, 393172, en, V2.3
15 - 23
15 - Script Commands
Te-Fill Dispense Command
Channel / Liquid
If the Te-Fill is fitted with the 6-way valve option, choose the channel (liquid
container) you want to use. The pull-down list is not available if the 6-way
valve is not present and/or not activated.
During runtime, the pipetting instrument will select the correct liquid channel
automatically - you do not need to use the Te-Fill Switch Valve command for
this purpose.
Volume
Specify the volume that you want to aspirate.
Speed
Specify the required pipetting speed for each tip. The available range depends
on how many tips you have selected. The Te-Fill pump has a range of 8 to 80
ml/min. If you have selected e.g. four tips, the range for this field is 2 to 20 ml/
min.
Tip Spacing
The Tip Spacing parameter controls the distance between adjacent pipetting
tips for this command. Tip spacing is only relevant if you want to use more
than one tip. A tip spacing of 1 means that the tips will be spread to match the
distance between adjacent wells of the labware. A tip spacing of 2 will select
every other well of the labware. You can only choose values for tip spacing
which are meaningful for the labware geometry.
The liquid handling arm achieves the highest mechanical accuracy when the
tips are not spread. For high-density labware such as 1536-well microplates,
you should choose tip spacing such that the tips are adjacent to one another
(physical tip spacing 9 mm). Accordingly, for 1536-well microplates you should
set tip spacing to 4 (every fourth well).
Location
Select the labware for the source by clicking on the labware in the Worktable
Editor. Then click on the required source well(s). The gray (protected) field
then shows the label (name) of the labware that you have selected (it shows a
generic name if you have not assigned a label).
Cursor (x,y)
You can also select wells by entering the x coordinate (from left to right) and
the y coordinate (from top to bottom) of the top left well you want to select. Tip:
The x and y coordinates of each well are shown in a tool tip if you move the
cursor over the well area in the Location panel.
Select: Click this button to select the wells you have specified in the Cursor
(x,y) field. This button has no effect if your well selection does not fit within the
well area of the labware. For example, if you have chosen to use 8 tips and
you are pipetting to a 96-well microplate in landcape orientation, you can only
choose the required x coordinate (the y coordinate must be 1).
15.15 Te-Fill Dispense Command
The Te-Fill option uses a bi-directional pump instead of the diluter to aspirate and
dispense large volumes of liquid, for example buffer solutions.
The Te-Fill can be optionally equipped with a 6-way valve, which allows you to
switch between six different liquid containers. If fitted, the 6-way valve must be
activated in the Configuration Tool (see 8.4.2.4 “Te-Fill option”, 8-30). Also use
the Configuration Tool to assign the names of the liquids you want to use to the
15 - 24
Freedom EVOware Software Manual, 393172, en, V2.3
15 - Script Commands
Te-Fill Dispense Command
channels of the 6-way valve (see 8.4.2.6 “6-way valve for Te-Fill”, 8-31). The
assigned names will then be shown in this command in the Channel / Liquid pulldown list.
The Te-Fill Dispense command is used to dispense liquid to specified positions on
the worktable using the Te-Fill option.
During runtime, the pipetting instrument will switch from using the diluter to using
the bi-directional pump and switch back again after pipetting - you do not need to
use the Te-Fill Switch Valve command for this purpose.
Fig. 15-15 Te-Fill Dispense command
The parameters of the Te-Fill Dispense command are as follows:
Tip Selection
Select the tips you want to use. You can only select tips which are configured
with the Te-Fill option (see 8.4.2.1 “LiHa (Liquid Handling Arm)”, 8-22, TeFill option).
Loop options
If you are using the command in a script loop, click this button if you want to
specify loop options. This allows you to use a different column, row, well and/
or labware item for each cycle of the loop. You can choose different loop
options for the source and the destination. The gray (protected) field shows
the number of loop options you have chosen. See 14.4 “Loop Options”, 1423.
Freedom EVOware Software Manual, 393172, en, V2.3
15 - 25
15 - Script Commands
Te-Fill Prime Command
Z-Position
Choose the Z-Position to which the selected tips should be lowered for
pipetting. All other tips remain at the currently applicable Z-Travel height.
Specify a Z offset if required. A positive value for the offset lowers the tips.
Channel / Liquid
If the Te-Fill is fitted with the 6-way valve option, choose the channel (liquid
container) you want to use. The pull-down list is not available if the 6-way
valve is not present and/or not activated.
During runtime, the pipetting instrument will select the correct liquid channel
automatically - you do not need to use the Te-Fill Switch Valve command for
this purpose.
Volume
Specify the volume that you want to aspirate.
Speed
Specify the required pipetting speed for each tip. The available range depends
on how many tips you have selected. The Te-Fill pump has a range of 8 to 80
ml/min. If you have selected e.g. four tips, the range for this field is 2 to 20 ml/
min.
Tip Spacing
The Tip Spacing parameter controls the distance between adjacent pipetting
tips for this command. Tip spacing is only relevant if you want to use more
than one tip. A tip spacing of 1 means that the tips will be spread to match the
distance between adjacent wells of the labware. A tip spacing of 2 will select
every other well of the labware. You can only choose values for tip spacing
which are meaningful for the labware geometry.
The liquid handling arm achieves the highest mechanical accuracy when the
tips are not spread. For high-density labware such as 1536-well microplates,
you should choose tip spacing such that the tips are adjacent to one another
(physical tip spacing 9 mm). Accordingly, for 1536-well microplates you should
set tip spacing to 4 (every fourth well).
Location
Select the labware for the source by clicking on the labware in the Worktable
Editor. Then click on the required source well(s). The gray (protected) field
then shows the label (name) of the labware that you have selected (it shows a
generic name if you have not assigned a label).
Cursor (x,y)
You can also select wells by entering the x coordinate (from left to right) and
the y coordinate (from top to bottom) of the top left well you want to select. Tip:
The x and y coordinates of each well are shown in a tool tip if you move the
cursor over the well area in the Location panel.
Select: Click this button to select the wells you have specified in the Cursor
(x,y) field. This button has no effect if your well selection does not fit within the
well area of the labware. For example, if you have chosen to use 8 tips and
you are pipetting to a 96-well microplate in landcape orientation, you can only
choose the required x coordinate (the y coordinate must be 1).
15.16 Te-Fill Prime Command
The Te-Fill option uses a bi-directional pump instead of the diluter to aspirate and
dispense large volumes of liquid, for example buffer solutions.
15 - 26
Freedom EVOware Software Manual, 393172, en, V2.3
15 - Script Commands
Te-Fill Prime Command
The Te-Fill can be optionally equipped with a 6-way valve, which allows you to
switch between six different liquid containers. If fitted, the 6-way valve must be
activated in the Configuration Tool (see 8.4.2.4 “Te-Fill option”, 8-30). Also use
the Configuration Tool to assign the names of the liquids you want to use to the
channels of the 6-way valve (see 8.4.2.6 “6-way valve for Te-Fill”, 8-31). The
assigned names will then be shown in this command in the Channel / Liquid pulldown list.
The Te-Fill Prime command is used to prime the liquid channel of the Te-Fill
option.
Fig. 15-16 Te-Fill Prime command
The liquid channel should be primed as often as necessary, e.g. after a pipetting
sequence, before taking a new sample, if you want to use a different liquid
channel in subsequent pipetting steps and if the liquid needs to be replaced due to
aging.
DITI adapters should be flushed after replacing the DITIs several times to renew
the liquid column in the DITI adapters. This ensures maximum pipetting accuracy.
DITIs should not normally be flushed. If you are using DITIs, make sure in your
script that there are none attached when this command is executed.
The parameters of the Te-Fill Prime command are as follows:
Tip Selection
Select the tips you want to prime. You can only select tips which are
configured with the Te-Fill option (see 8.4.2.1 “LiHa (Liquid Handling Arm)”,
8-22, Te-Fill option).
Volume in Waste
Specify the volume of liquid which should be used to prime the liquid channel
and the tips. Priming takes place with the tips positioned above the waste of
the specified wash station (tip height for fixed tips = Z-dispense; tip height for
DITI adapters = Z-travel).
Use Waste
Specify the worktable position for the waste you want to use by clicking on it in
the Worktable Editor. You must first put a wash station with waste unit in the
Worktable Editor at the required position. Alternatively, choose the required
waste position from the pull down list. The list shows all waste units which are
currently positioned in the Worktable Editor.
The gray (protected) fields show the worktable coordinates of the selected
waste.
Freedom EVOware Software Manual, 393172, en, V2.3
15 - 27
15 - Script Commands
Te-Fill Switch Valve Command
Channel / Liquid
If the Te-Fill is fitted with the 6-way valve option, choose the channel (liquid
container) you want to use. The pull-down list is not available if the 6-way
valve is not present and/or not activated.
During runtime, the pipetting instrument will select the correct liquid channel
automatically - you do not need to use the Te-Fill Switch Valve command for
this purpose.
Speed
Specify the required priming speed for each tip. The available range depends
on how many tips you have selected. The Te-Fill pump has a range of 8 to 80
ml/min. If you have selected e.g. four tips, the range for this field is 2 to 20 ml/
min.
15.17 Te-Fill Switch Valve Command
The Te-Fill option uses a bi-directional pump instead of the diluter to aspirate and
dispense large volumes of liquid, for example buffer solutions.
The Te-Fill can be optionally equipped with a 6-way valve, which allows you to
switch between six different liquid containers. If fitted, the 6-way valve must be
activated in the Configuration Tool (see 8.4.2.4 “Te-Fill option”, 8-30). Also use
the Configuration Tool to assign the names of the liquids you want to use to the
channels of the 6-way valve (see 8.4.2.6 “6-way valve for Te-Fill”, 8-31). The
assigned names will then be shown in this command in the Channel / Liquid pulldown list.
With the Te-Fill Aspirate, Dispense and Prime commands, the pipetting instrument
will switch during runtime from using the diluter to using the bi-directional pump
and switch back again after pipetting - you do not need to use the Te-Fill Switch
Valve command for this purpose.
The Te-Fill Switch Valve command is used for special applications which require
the Te-Fill liquid path to be selected but without aspirating or dispensing.
Fig. 15-17 Te-Fill Switch Valve command
The parameters of the Te-Fill Switch Valve command are as follows:
15 - 28
Freedom EVOware Software Manual, 393172, en, V2.3
15 - Script Commands
Activate PMP Command
Tip Selection
Select the tips you want to use. You can only select tips which are configured
with the Te-Fill option (see 8.4.2.1 “LiHa (Liquid Handling Arm)”, 8-22, TeFill option).
Open channel to Large Volume Pump
Position the valves in the pipetting instrument to select the liquid path through
the bi-directional pump instead of through the diluter.
Switch 6-way valve
If the Te-Fill is fitted with the 6-way valve option, choose the channel (liquid
container) you want to use. This option is not available if the 6-way valve is not
present and/or not activated.
Open standard liquid channel
Position the valves in the pipetting instrument to select the liquid path through
the diluter instead of through the bi-directional pump.
Channel / Liquid
If the Te-Fill is fitted with the 6-way valve option, choose the channel (liquid
container) you want to use. The pull-down list is not available if the 6-way
valve is not present and/or not activated.
15.18 Activate PMP Command
The Activate PMP command is used to activate the PMP (Pressure Monitored
Pipetting) function at the appropriate point in your pipetting script. You must do
this before getting (mounting) the PMP-controlled DiTis.
This command is only shown in the Control Bar if you are using DiTis and you
have enabled the PMP option (see 17.6.1 “Activating the PMP Option”, 17-17).
Certain restrictions apply to the pipetting commands which are allowed between
the Activate PMP command and a subsequent Deactivate PMP command (see
17.6.2 “Permissible sequence of script commands for the PMP option”, 17-18).
Fig. 15-18 Activate PMP command
The parameters of the Activate PMP command are as follows:
Tip Selection
Select the tip or tips whose PMP function you want to activate. You can only
choose tips which are configured with DITIs and with the PMP option.
Freedom EVOware Software Manual, 393172, en, V2.3
15 - 29
15 - Script Commands
Deactivate PMP Command
15.19 Deactivate PMP Command
The Deactivate PMP command is used to deactivate the PMP (Pressure
Monitored Pipetting) function at the appropriate point in your pipetting script. You
must do this after finishing the pipetting sequence and dropping the DITIs. All
PMP-controlled DITIs must be dropped before deactivating PMP.
This command is only shown in the Control Bar if you are using DiTis and you
have enabled the PMP option (see 17.6.1 “Activating the PMP Option”, 17-17).
Certain restrictions apply to the pipetting commands which are allowed between
the Activate PMP command and a subsequent Deactivate PMP command (see
17.6.2 “Permissible sequence of script commands for the PMP option”, 17-18).
Fig. 15-19 Deactivate PMP command
The parameters of the Deactivate PMP command are as follows:
Tip Selection
Select the tip or tips whose PMP function you want to deactivate. You can only
choose tips which are configured with DITIs and with the PMP option. You will
get a script error if you select a tip position whose PMP function was not
previously activated with the Activate PMP command.
15.20 Tip Alignment Check Command
This command is used to check and re-adjust the alignment of the Liquid Handling
Arm (LiHa) during script runtime. It is also able to detect bent tips. It is only
intended for the LiHa of the Freedom EVO pipetting instrument and is normally
only necessary if you are using microplates with 1536 wells or other high precision
labware. The Tip Alignment Check command should only be necessary for long
scripts which involve a large number of arm movements. Please note that this
command performs a quick test and delivers less precise results than the Setup &
Service software.
Labware with 1536 wells has a very high packing density and the wells have a
diameter of only 1.7 mm. The high precision requires a special LiHa design. In
addition, 1536-well labware needs to be placed on a specially designed carrier.
The special carrier and the high-precision LiHa are key components of the Tecan
Positioning System (Te-PS).
Arm alignment is done using the Te-PS Sensor plate, which is placed on the TePS Carrier. The tip alignment process moves each of the pipetting tips past the
sensor plate, and lasers are used to accurately measure the position.
The tip alignment can also be tested manually before or after running the script
(see 15.27 “Manual Tip Alignment Command”, 15-57).
15 - 30
Freedom EVOware Software Manual, 393172, en, V2.3
15 - Script Commands
Tip Alignment Check Command
Before starting a script which contains the Tip Alignment Check command, you
must place the Te-PS Sensor plate on one of the sites of the Te-PS Carrier. Check
that the sensor plate is properly connected to the pipetting instrument using the
supplied cable.
In addition, you must put the Te-PS Sensor plate at the same grid and site position
in Freedom EVOware’s Worktable Editor.
If necessary, the Tip Alignment Check command can also be used to check the tip
alignment with other carrier and labware types. The test should then be carried
out with the Te-PS Sensor plate placed on the same carrier which will be used for
pipetting. However, due to the mechanical design and other factors, the Te-PS
Carrier can achieve a higher alignment accuracy than conventional carrier types.
Fig. 15-20 Tip Alignment Check command
The parameters of the Tip Alignment command are as follows:
Alignment options panel
Te-PS Sensor plate position
Specify the location of the Te-PS Sensor plate by clicking on the sensor plate
in the Worktable Editor.
Script aborts if misalignment is more than ...
Specify a maximum value in mm for tip misalignment above which the script
should be aborted. The maximum allowed misalignment depends on the
radius and shape of the wells in the labware that you are using. It should be
less than well radius - tip radius. For 1536-well labware, an appropriate value
for this parameter is 0.5 mm.
If tip misalignment exceeds the specified value, the instrument must be recalibrated by authorized personnel using the Setup & Service software. See
1.2 “Reference Documents”, 1-3 for information on this software.
Freedom EVOware Software Manual, 393172, en, V2.3
15 - 31
15 - Script Commands
Tip Alignment Check Command
If script aborts panel
Send email notification
Check this checkbox if you want to inform an operator or maintenance
personnel by eMail if the script has aborted due to a tip alignment problem.
Freedom EVOware can be configured to send messages about system
events and error situations to specific groups of users. The groups are
configured with the Configuration Tool. The notification feature requires the
MAPI service to be installed (see 8.3.2 “Notifications Section”, 8-12).
Choose the user group which should be notified from the pull-down list. You
must configure the groups first.
Subject: Specify the required subject of the email.
Message: Specify the message you want to send.
If script continues panel
Correct pipetting position if misalignment is larger than/equal to ...
If the tip misalignment is not too serious and the script can continue, specify
the level of misalignment above which automatic re-adjustment of the LiHa
axes should be undertaken (range: 0.1 - 1.0 mm). For 1536-well labware, an
appropriate value for this parameter is 0.2 mm. The value you choose must be
less than the value in Script aborts if misalignment is more than ....
The misalignment correction is only made for the current script and is not
stored. If subsequent scripts use labware with 1536 wells, they should also
include the Tip Alignment Check command.
and well area of used labware is equal to or less than
You can limit the correction to small wells only by specifying the area of the
wells.
15 - 32
Freedom EVOware Software Manual, 393172, en, V2.3
15 - Script Commands
Move LiHa Command
15.21 Move LiHa Command
The Move LiHa command is used to move the liquid handling arm (LiHa) from one
position to another without performing an Aspirate or Dispense operation.
Fig. 15-21 Move LiHa command
The parameters of the Move LiHa command are as follows:
Tip Selection
Select the tips you want to use.
Loop options
If you are using the command in a script loop, click this button if you want to
specify loop options. This allows you to use a different column, row, well and/
or labware item for each cycle of the loop. The gray (protected) field shows
the number of loop options you have chosen. See 14.4 “Loop Options”, 1423.
Freedom EVOware Software Manual, 393172, en, V2.3
15 - 33
15 - Script Commands
Move LiHa Command
Type of movement
Choose X-Move, Y-Move or Z-Move to move only one axis of the LiHa. You
can then specify the speed of the movement. Z-Move only moves the selected
tips.
The options Positioning with global Z-travel, Positioning with local Z-travel and
Positioning with variable Z-travel move the LiHa to the labware at maximum
speed. The chosen height for Z-Travel (the tip height which is used during the
arm movement) only applies to the selected tips. The Z position of the
unselected tips remains unchanged.
If you choose Positioning with variable Z-travel, the required Z-Travel height is
specified using the pre-defined variable LIHA_MOVE_HEIGHT (see
14.1.4.7 “LIHA_MOVE_HEIGHT”, 14-5).
Z-Position
Unless you have chosen X-Move or Y-Move in the Type of Movement field,
you can specify the Z-Position to which the selected tips should be lowered at
the end of the LiHa movement. The Z position of the unselected tips remains
unchanged. Choose the required Z-position and then specify a Z offset in mm
if required. A positive value for the offset lowers the tips.
Tip Spacing
The Tip Spacing parameter controls the distance between adjacent pipetting
tips for this command. You can choose a different tip spacing for the source
labware and the destination labware. Tip spacing is only relevant if you want
to use more than one tip. A tip spacing of 1 means that the tips will be spread
to match the distance between adjacent wells in the labware. A tip spacing of
2 will select every other well in the labware. You can only choose values for tip
spacing which are meaningful for the labware geometry.
The liquid handling arm achieves the highest mechanical accuracy when the
tips are not spread. For high-density labware such as 1536-well microplates,
you should choose tip spacing such that the tips are adjacent to one another
(physical tip spacing 9 mm). Accordingly, for 1536-well microplates you should
set tip spacing to 4 (every fourth well).
Compartment in well
Some special labware types (e.g. for protein crystallography) have wells with
several compartments (cavities). Freedom EVOware can pipette a different
liquid into each of the compartments. Each well typically has one main
compartment and one or more satellite compartments which are directly
adjacent and are often smaller in size. Choose the compartment which you
want to use for pipetting (the main compartment is normally compartment 1).
Well compartments are specified in the labware configuration. This field is
inactive (gray) if the well only has one compartment.
Location
Select the labware which you want to use by clicking on the labware in the
Worktable Editor. Then click on the required well(s). The gray (protected) field
at the top right of the Location panel shows the label (name) of the labware
that you have selected (it shows a generic name if you have not assigned a
label). If you have chosen a movement which changes the Z position of the
tips, this only applies to the selected tips. The Z position of the unselected tips
remains unchanged (see Type of movement and Z-Position, above).
15 - 34
Freedom EVOware Software Manual, 393172, en, V2.3
15 - Script Commands
Waste Command
Cursor (x,y)
You can also select wells by entering the x coordinate (from left to right) and
the y coordinate (from top to bottom) of the top left well you want to select. Tip:
The x and y coordinates of each well are shown in a tool tip if you move the
cursor over the well area in the Location panel.
Select: Click this button to select the wells you have specified in the Cursor
(x,y) field. This button has no effect if your well selection does not fit within the
well area of the labware. For example, if you have chosen to use 8 tips and
you are pipetting to a 96-well microplate in landcape orientation, you can only
choose the required x coordinate (the y coordinate must be 1).
15.22 Waste Command
The Waste command is used to control the vacuum-assisted waste (instrument
option for viscous liquids which creates a partial vacuum in the waste bottles).
Fig. 15-22 Waste command
In contrast to the standard instrument waste, the vacuum-assisted waste lets you
use up to three waste bottles which are operated with a partial vacuum (suction).
This allows you to discard different waste liquids into different containers if they
should not be allowed to mix. The waste command is typically used before a
Wash tips command.
The parameters of the Waste command are as follows:
Init system
This command starts the vacuum pump. Due to the time needed to build up
the vacuum, you can specify this command at an earlier stage in your script to
ensure that the vacuum is present when you want to apply it with the Activate
waste command.
Activate waste #1
This command applies the vacuum to waste # 1. If no previous Init system
command was specified, Activate waste #1 also starts the vacuum pump.
Activate waste #2
This command applies the vacuum to waste # 2. If no previous Init system
command was specified, Activate waste #2 also starts the vacuum pump.
Activate waste #3
This command applies the vacuum to waste # 3. If no previous Init system
command was specified, Activate waste #3 also starts the vacuum pump.
Freedom EVOware Software Manual, 393172, en, V2.3
15 - 35
15 - Script Commands
Active WashStation Command
Deactivate all wastes
This command disconnects all wastes from the vacuum supply.
Deactivate system
This command switches off the vacuum pump. If you do not specify a
Deactivate system command in your script, the vacuum pump will be switched
off automatically when you quit Freedom EVOware.
15.23 Active WashStation Command
The Active WashStation command is used to control the pressure pump of the
Active WashStation. The Active WashStation command is mainly intended for
ZipTips.
Standard tips are washed in a wash station using the Wash Tips command, which
moves the LiHa over the wash station and flushes the system liquid through the
tips and into the waste. ZipTips cannot be flushed and are washed after use in the
Active WashStation. The LiHa must be positioned above the Active WashStation
with a Move Liha command before executing the Active WashStation command.
Fig. 15-23 Active WashStation command
The parameters of the Active WashStation command are as follows:
Time of activation in seconds
Specify the time of pump activation in seconds (range: 1 to 999 seconds).
Wait until termination of command
Freedom EVOware normally continues with subsequent commands in the
pipetting script even if the pressure pump is still busy. This option causes the
script to wait for the pressure pump to finish before continuing.
Continue with script without waiting for termination
This option causes the pipetting script to continue without waiting for the
pressure pump to finish.
15.24 Worklist Command
The Worklist command is used to load a worklist file or run previously loaded
worklist files. A worklist file is a text file containing pipetting instructions. It contains
information on source and destination positions and the volumes to pipette.
Worklists can be created using a plain text editor (see 15.24.2 “Worklist File
Format”, 15-39). They can also be created automatically by the Worklist Import
command (see 15.25 “Worklist Import Command”, 15-46).
15 - 36
Freedom EVOware Software Manual, 393172, en, V2.3
15 - Script Commands
Worklist Command
If your pipetting instrument is fitted with two liquid handling arms (and you have
installed drivers for both of them), there will be two Worklist commands in the
Control Bar. Use the “Worklist” command if you want the worklist to use the first
LiHa. Use the “Worklist 2” command if you want the worklist to use the second
LiHa. The commands are otherwise identical.
Fig. 15-24 Worklist command
The parameters of the Worklist command are as follows:
Worklist Mode
If you want to execute a worklist in an Freedom EVOware script, you must first
load it in the script. Insert a Worklist command and click Load Worklist to load
the worklist file and specify additional parameters for the pipetting operations.
Then insert another Worklist command in a later line of your script and click
Execute loaded worklist(s) to run the worklist file. In this mode, all other
parameters in the command are disabled and cannot be modified.
You can load several worklists by inserting several Load Worklist commands
in your script. In this case, a single Execute loaded worklist(s) command runs
all of the worklists which you have loaded. They will be executed in
chronological order of loading. Freedom EVOware keeps a track of the
worklists which have been run, and a second Execute loaded worklist(s)
command will not run them again unless you have reloaded them.
Worklist (Path and Name)
Specify the file name and location of the worklist file (*.gwl). Enter the path
and file name directly or click Browse and choose an existing file.
Tip Selection
Select the tips you want to use. If the worklist file specifies the tip selection
(with the TipMask parameter) it overrides the settings you make here.
Freedom EVOware Software Manual, 393172, en, V2.3
15 - 37
15 - Script Commands
Worklist Command
Note: You cannot use a mixture of tip types (fixed tips and DITIs) in the same
worklist. As soon as you choose a fixed tip, you can no longer choose any DITIs
and vice versa. If the LiHa is fitted with a mixture of tip types, uncheck all of the
checkboxes to switch from using fixed tips to DITIs, or vice versa.
Liquid Class
You can choose a different liquid class for each source labware and for the
destination labware. Click the Editor button to start the liquid classes editor if
you want to create a new class or modify an existing class (see
10 “Configuring Liquid Classes”, 10-1). Furthermore you can customize an
existing liquid class for use by this command only (click the Customize button
and click the Aspirate or Dispense tab). If you customize an existing liquid
class, the liquid class name is shown in the script command and in the script
editor within double angled brackets “>> name <<“.
Note: Instead of customizing a liquid class which is only used by a single instance
of this command, it is better practice to create a custom liquid class with the liquid
class editor which can then be used by any command and any script.
If the worklist file specifies the liquid class (with the LiquidClass parameter) it
overrides the settings you make here.
Additional Commands
If you want to use standard tips in the worklist, the Worklist command lets you
specify up to four wash schemes which are executed sequentially.
Check the first checkbox in the New Scheme column and click the Wash
button to configure the settings to use for washing the tips. The tips should be
washed between aspirations from different source wells. Tip washing is
specified in the worklist file with the W record.
If required, click additional checkboxes in the New Scheme column to
configure additional wash schemes. The wash schemes are selected in the
worklist using the worklist records W1, W2, W3 or W4. To ensure compatibility
with existing worklists, W also selects the first wash scheme.
If you want to use DITIs in the worklist, click the Get DITI and Drop DITI
buttons to configure the settings to use for replacing the DiTis. The DITIs
should be replaced between aspirations from different source wells. DITI
replacement is specified in the worklist file with the W record. Insert a Periodic
Wash command in your script before the Worklist command if you want to
flush the DITI adapters when the DITIs are replaced (see 15.5 “Periodic Wash
Command”, 15-10).
You cannot use a mixture of tip types (fixed tips and DITIs) in the same
worklist. The Get DITI and Drop DITI buttons will be inactive (grey) as soon as
you choose a fixed tip with the Tip Selection checkboxes. Conversely, the
Wash button will be inactive (grey) as soon as you choose a DITI with the Tip
Selection checkboxes.
Use decontamination wash: Check this checkbox if you want to carry out a
decontamination wash before the main wash procedure. Then click the
Decontamination button to specify the settings (see
15.24.1 “Decontamination Wash Settings”, 15-39).
Skip Wash / DITI replacement before worklist: When you execute a
worklist, Freedom EVOware normally washes the tips (if you are using fixed
tips) or replaces the DITIs (if you are using DITIs) before starting to execute
the worklist commands (this initial wash is done using the first wash scheme
which you configured in the Worklist command). Check this checkbox if you
do not want to wash the tips or replace the DITIs before executing the worklist
commands (for example because you have already washed the tips in a
previous script command).
15 - 38
Freedom EVOware Software Manual, 393172, en, V2.3
15 - Script Commands
Worklist Command
15.24.1 Decontamination Wash Settings
The decontamination wash operation soaks the tips in the specified liquid for a
specified time. It can be used e.g. to remove traces of sticky liquids from the tips
and is carried out before the main wash procedure:
Fig. 15-25 Worklist command - Decontamination Wash parameters
Decontamination Wash is specified in the worklist file with the WD record.
The parameters of the decontamination wash operation are as follows:
Tip Selection
The tip selection is shown for information only and cannot be changed. The
decontamination wash uses the same tip selection as the main wash
procedure.
Volume to aspirate
Specify the volume of wash liquid you want to aspirate (range: 1 to 1000 µl).
Use source
The wash liquid for the decontamination wash is aspirated from a trough
(liquid container). Choose the required trough from the pull down list. The list
shows all troughs which are currently positioned in the Worktable Editor.
Liquid Class
Choose the required liquid class from the pull down list. The list only shows
liquid classes which are suitable for the current configuration of the pipetting
instrument. For example, you will not see liquid classes for DiTis if the LiHa is
not currently configured with DiTis.
Delay after aspirate
Specify how long you want to soak the tips (range: 1 to 1800 s).
15.24.2 Worklist File Format
A worklist file is a text file containing pipetting instructions. The worklist
commands consist of individual lines (or records). Seven different record types
are available: Aspirate, Dispense, Wash Tips / Replace DITIs, Flush, Break, Set
DITI Type and Comment. Each record starts with a single character indicating the
type and is followed by one or more parameters. The parameters are separated
Freedom EVOware Software Manual, 393172, en, V2.3
15 - 39
15 - Script Commands
Worklist Command
by semicolons. Some of the parameters are optional (see later) and some record
types have no parameters.
The Aspirate record has the following structure:
A;RackLabel;RackID;RackType;Position;TubeID;Volume;LiquidClass;TipType
;TipMask;ForcedRackType
Each Aspirate record specifies the aspiration parameters for a single tip (the next
unused tip from the tip selection you have specified).
The Dispense record has the following structure:
D;RackLabel;RackID;RackType;Position;TubeID;Volume;LiquidClass;TipType
;TipMask;ForcedRackType
Each Dispense record specifies the dispensing parameters for a single tip. It uses
the same tip which was used by the preceeding Aspirate record.
See 15.24.2.1 “Parameters for Aspirate and Dispense records”, 15-41 for
details of the parameters.
The Wash Tip / Replace DITI record has the following structure:
W; (to use the first wash scheme in the worklist command), or
W1; (to use the first wash scheme in the worklist command), or
W2; (to use the second wash scheme in the worklist command), or
W3; (to use the third wash scheme in the worklist command), or
W4; (to use the fourth wash scheme in the worklist command).
The Wash Tip / Replace DITI record washes the tip (or replaces the DITI) which
was used by the preceeding Aspirate record. There are no parameters (the wash
position, wash parameters and/or drop DITIs position are specified in the Worklist
command).
The Decontamination Wash record has the following structure:
WD;
Decontamination wash consists of a decontamination wash operation followed by
the normal wash procedure. There are no parameters (the parameters are
specified in the Worklist command).
The Flush record has the following structure:
F;
It discards the contents of the tips without washing them or dropping DITIs.
The Break record forces the execution of previously specified aspirate, dispense
or wash actions which have not yet been executed. It has the following structure:
B;
If you don’t specify a Break record, Freedom EVOware normally executes
pipetting commands in groups to optimize the efficiency. For example, if you have
specified four tips in the Worlist command, Freedom EVOware will queue Aspirate
records until four of them are ready for execution. This allows pipetting to take
place using all four tips at the same time. Specify the Break record if you want to
execute all of the currently queued commands without waiting. You can use the
Break record e.g. to create a worklist which pipettes using only one tip at a time
(even if you chose more than one tip in the tip selection).
The Set DITI Type record has the following structure:
S;DITI_Index
When using DITIs, it is used to switch DITI types from within a worklist. Choose
the required DITI type by specifying the DiTi index. Freedom EVOware
automatically assigns a unique index to each DITI type. The DiTi index is shown in
the Edit Labware dialog box for the DITI labware (Well dimensions tab). See
9.4.1 “Editing Labware, Well Dimensions Tab”, 9-19.
The worklist normally uses the DITI type which you select with the Get DITI button
in the Worklist command.
15 - 40
Freedom EVOware Software Manual, 393172, en, V2.3
15 - Script Commands
Worklist Command
The Set DITI Type record can only be used at the very beginning of the worklist or
directly after a Break record. A Break record always resets the DITI type to the
type selected in the Worklist command. Accordingy, if your worklist contains a
Break record, you may need to specify the Set DITI Type record again.
The Comment record (ignored by Freedom EVOware) has the following
structure:
C;Comment
The Reagent Distribution record has the following structure:
R;AspirateParameters;DispenseParameters;Volume;LiquidClass;NoOfDitiRe
uses;NoOfMultiDisp;Direction[;ExcludeDestWell]*
where:
AspirateParameters =
SrcRackLabel;SrcRackID;SrcRackType;SrcPosStart;SrcPosEnd;
and
DispenseParameters =
DestRackLabel;DestRackID;DestRackType;DestPosStart;DestPosEnd;
See 15.24.2.2 “Parameters for Reagent D