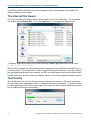
1
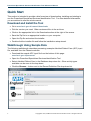
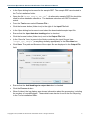
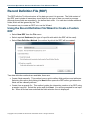
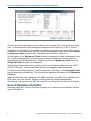
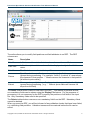
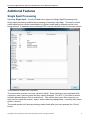
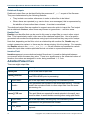
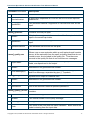
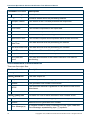
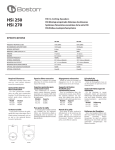
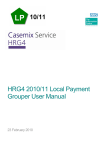
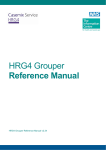
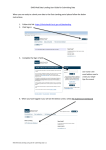
Prescribed Specialised Services Identification Tool 2013/14 A guide to using the Bespoke Software Solution Prescribed Specialised Services Identification Tool Reference Manual We are the trusted source of authoritative data and information relating to health and care. www.hscic.gov.uk [email protected] 2 Author: National Casemix Office, Health and Social Care Information Centre Version: 1.0 Date of publication: 02 April 2013 Copyright © 2013, Health and Social Care Information Centre. All rights reserved. Prescribed Specialised Services Identification Tool Reference Manual Contents Quick Start 4 Download and Install the Tool 4 Walkthrough Using Sample Data 4 Processing Your Data 6 Record Definition File (RDF) 7 Using the Record Definition File Wizard to Create a Custom RDF 7 Record Definition File Editor 8 Command Line Initiation 10 Additional Features 11 Single Spell Processing 11 The Internal File Viewer 12 Tool Priority 12 Input File Preparation 13 Admitted Patient Care (APC) 13 Non-Admitted Consultations (NAC) 14 Output Files 15 Admitted Patient Care 16 Non-Admitted Consultations 18 Errors and Validation 19 Casemix Methodology 20 Procedures and Diagnoses 20 Dominant Procedure 20 Subsidiary Codes 21 Dominant Service Lines Copyright © 2013, Health and Social Care Information Centre. All rights reserved. 21 3 Prescribed Specialised Services Identification Tool Reference Manual Quick Start This section is intended to provide a brief overview of downloading, installing and starting to use the Prescribed Specialised Services Identification Tool. For more detailed information, you are advised to read the whole manual. Download and Install the Tool Go to www.hscic.gov.uk/casemix/downloads. Pick the version you need. Older versions will be in the archives. Click on the appropriate link in the Download section at the right of the screen. Save the Zip file to an appropriate location on your computer. Open the Zip file and extract the installer. Double-click the installer file and follow the installation setup wizard. Walkthrough Using Sample Data The following walkthrough describes processing a sample Admitted Patient Care (APC) input file, available from the Casemix website. Download the sample APC input file from the bottom of this page: www.hscic.gov.uk/psmanual Open the Prescribed Specialised Services Identification Tool. Select Admitted Patient Care in the Database drop-down list. Other activity types available can be seen in the drop down. Click the Browse… button next to the Record Definition File drop-down list. 4 Copyright © 2013, Health and Social Care Information Centre. All rights reserved. Prescribed Specialised Services Identification Tool Reference Manual In the Open dialog box browse for the sample RDF. The sample RDFs are located in the Tool‟s installation folder. Open the file “NCBPS_Sample_APC.rdf”. An alternative sample RDF file should be used for other database selections. The database selection and RDF file should match. From the Tools menu select Process File… Click the browse button (folder icon) to the right of the Input File field. In the Open dialog box browse to and select the downloaded sample input file. Ensure that the Input data has headings box is checked. Click the browse button (folder icon) next to the Output File field. In the „Save As‟ form, browse to the folder containing the input file and type “output_apc_sample” (or anything similarly appropriate) in the File name box. Click Save. The path and filename of the output file are displayed in the Output File field. Ensure that the Add headings to output data box is checked. Click the Process button. When finished, the log display area shows information about the processing, including the number of records flagged. These details can also be found in the file ncbps.log in the Tool‟s installation folder. Copyright © 2013, Health and Social Care Information Centre. All rights reserved. 5 Prescribed Specialised Services Identification Tool Reference Manual Open Windows Explorer and browse to the folder specified for the output file. Open the file „output_apc_sample_FCE.csv’ in Microsoft Excel. The file is a copy of the input file with service lines and other related columns appended. Other output files are explained in the Output Files section of this document. The results from the processing can be compared to the expected results available from the sample data download page www.hscic.gov.uk/psmanual Processing Your Data In order to process your own data you need to either: Ensure that the structure of your data is identical to that as specified in an existing record definition file (RDF), or Create an RDF file that matches the structure of your data. Processing can be initiated from the graphical user interface (GUI) or from the command line. Whichever approach is used the same input rules, processing, and output file structures and content will result. Another approach for single records and for single admitted patient care (APC) multi-episode spells is to use the Single Spell Tool (available from the Tools menu). To get an initial appreciation of the processing you are recommended to experiment with the Single Spell Tool functionality. 6 Copyright © 2013, Health and Social Care Information Centre. All rights reserved. Prescribed Specialised Services Identification Tool Reference Manual Record Definition File (RDF) The RDF tells the Tool the structure of the data you want it to process. The field content of the RDF must include all mandatory input fields for the type of data you want to process. Although these fields are mandatory, you define their order. You can also include additional fields, which will be ignored by the Tool. The easiest way to create an RDF is to use the Wizard. Using the Record Definition File Wizard to Create a Custom RDF Select New RDF from the File menu. Select required Database (the type of input file with which the RDF will be used). Select Data Definition Method (the method by which the RDF will be created). Two data definition methods are available, these are: Create fields manually. This method uses a grid to define field positions and attributes. Selecting this option and clicking the Next button opens the RDF editor grid where the fields can be manually defined. Create from a sample file. This method guides the interactive creation of an RDF using a sample input file. Select the option and click Next. You will be prompted for an input file. When a file has been selected the field selection form is displayed. Copyright © 2013, Health and Social Care Information Centre. All rights reserved. 7 Prescribed Specialised Services Identification Tool Reference Manual The first row of the selected input file is shown in the preview area in the lower part of the form. At this stage each field is assigned a temporary field name (e.g. Field 1, Field 2). Depending on the data type, the number of repeating occurrences of certain fields can be increased. For example, if the input file contains 20 diagnosis codes, the value in Number of diagnosis codes should be set to 20 rather than the default value of 14. All field names in the Mandatory Fields list must be assigned to fields in the sample input file. Fields are assigned by using the mouse to drag the field name from the list to the appropriate field in the preview area. Fields move from the Mandatory Fields list to the Assigned Fields list as they are assigned. Multiple fields can be selected by clicking with the mouse while holding down the SHIFT and/or CTRL keys. The selected fields can then be dragged to the preview area. If a field is erroneously assigned, it can be removed by selecting it in the Assigned Fields list and pressing the Delete key. The field will then appear at the bottom of the Mandatory Fields list. When all fields have been assigned, click OK to proceed. The RDF will be opened in the RDF editor (see next section), allowing checking and any required amendments. Alternatively, just save the new RDF file ready for use (using Save As from the File menu). Record Definition File Editor Selecting Open RDF from the File menu prompts you to select a record definition file and opens it for editing. 8 Copyright © 2013, Health and Social Care Information Centre. All rights reserved. Prescribed Specialised Services Identification Tool Reference Manual The editor allows you to modify field positions and field attributes in an RDF. The RDF columns are: Name Description Field Name A field name abbreviation for internal use; it cannot be modified. Field Title A field description which can be edited to display a locally-defined field name. Field No The field column number in the input file. Picture Specifies whether specific character positions in the field are used or ignored during processing. For example: “AAA.A” (in which “A” means keep the character in that position. “.” Means remove the character in that position [all without quote marks].) Extract Allows you to specify that specific characters (in any position) in the field are ignored during processing. (e.g. “.” Without quote marks will remove full stops from the field) The Insert toolbar button inserts a new field in the RDF. This feature is provided so that non-mandatory fields can be shown using the Display File feature. For the purposes of processing, it is not necessary for the RDF to specify the positions of all fields in the input file. Only mandatory fields need to be specified. The Delete toolbar button removes a non-mandatory field from the RDF. Mandatory fields cannot be deleted. When you save the RDF, you will be informed of any validation checks that have been failed, e.g. conflicting field positions. Validation issues must be resolved before the file can be saved. Copyright © 2013, Health and Social Care Information Centre. All rights reserved. 9 Prescribed Specialised Services Identification Tool Reference Manual Command Line Initiation “Command line” refers to the character-based command shell user interface within Microsoft Windows, commonly known as the DOS Window. The Tool can process a file using the command line with parameters shown below. Mandatory parameters are enclosed within <angle brackets>; optional parameters are enclosed within [square brackets]. All parameters consist of a hyphen followed by a lower-case letter. The command line takes the following form: NCBPS –i <Input File> -o <Output File> -d <Record Definition File> -l <Processing Logic> [-h] [-t] [-p] Command line parameters -i The path and filename of the input file. -o The path and filename of the output file. -d The path and filename of the record definition file. -l The processing logic – a filename from the Tool directory that has the extension “.tre”. This is the equivalent of picking the database in the GUI. -h Optional. Where present, indicates that the input file has a header row (field names). Omit this parameter where the first row in the file is a data row. -t Optional. Where present, stops generation of field names in the top row of output file. If this parameter is omitted then each of the output files will contain a header row. -p Optional. Where present, sets the priority of the processing. The available values are 1, 2 and 3. 1 = Normal (Tool priority equal to that of other applications), 2 = Lower (Tool yields to other applications), 3 = Idle (Tool only processes data when other applications don‟t require processor time). If this parameter is omitted, the priority is set to 1 (Normal). -? Optional. Where present, directs the Tool to list the available command line parameters to the ncbps.log file in the Tool program folder. This parameter cannot be combined with other parameters. Where there are spaces in paths or filenames for parameter values, the parameter value must be enclosed within double-quote characters. An example batch script using the command line is: @echo off C: cd "\Program Files\HSCIC\Prescribed Services 2013_14" NCBPS -i "C:\Data\apc.csv" -o "C:\Data\output.csv" -d "PS_APC.rdf" -l apc_v46ps.tre -h -p 3 IF %ERRORLEVEL% NEQ 0 echo Error in command, please check ncbps.log Pause 10 Copyright © 2013, Health and Social Care Information Centre. All rights reserved. Prescribed Specialised Services Identification Tool Reference Manual Additional Features Single Spell Processing Selecting Single Spell… from the Tools menu opens the Single Spell Processing form. Single spell processing enables the processing of manually input data. This can be useful when exploring how certain combinations of clinical codes lead to different service lines being derived. A database and a matching RDF must be selected in the Tool‟s main screen. The window is divided into 3 sections: The top section is where you enter values for fields. Some have been pre-populated with commonly used / generic values but they can be changed. For APC, if you want to record multiple episodes press “Click to add record”. This can be done more than once but you may need to resize the window. Again, some fields are prepopulated – normally with values given in record 1. The middle section will show processing results fields after you have pressed the “Group” button. Copyright © 2013, Health and Social Care Information Centre. All rights reserved. 11 Prescribed Specialised Services Identification Tool Reference Manual The bottom section will show any error messages, which would appear in the quality file when processing a file of data. The Internal File Viewer The Tool provides a file viewer which can be used to view Tool output files. To access the file viewer, select Display File... from the Tools menu. This opens an open file box. To display output files in the file list ensure that the Files of type drop-down list is set to “*.inp,*.out,*.csv,*.txt”. When a file is opened, the fields displayed are restricted to those defined in the RDF that is currently active. This means that in order to use the Display File feature to view the columns that get appended during file processing, an RDF must be created that includes those fields. Double-clicking on a record within the display opens it in the Single Spell Processing screen. Tool Priority The identification tool can use a large amount of processor resource. On some computers this can make other applications slow or unresponsive during processing. To reduce impact on other applications the Tool‟s priority can be set using the radio buttons while the progress bar is displayed during file processing. 12 Copyright © 2013, Health and Social Care Information Centre. All rights reserved. Prescribed Specialised Services Identification Tool Reference Manual Setting Effect Normal Gives the Tool the same priority as other applications, other applications may be slowed down while the Tool is running. Lower Reduces processor utilisation and gives priority to other applications. Idle Minimises the Tool‟s use of processing resources. The Tool will only process data when no other applications require processing resources. Priority can be changed for the current processing run only, each time a file is processed Priority will automatically be set to Normal. The Priority options on the progress bar provide a shortcut to the thread priority settings in the Windows Task Manager. In Windows Task Manager, the same effect can be achieved by setting the Tool‟s process (NCBPS.exe) priority to “Normal”, “Below Normal” or “Low”. Where the Tool is run from the command line, the progress bar is not displayed thus there is no access to the Priority radio buttons. To set the priority for a processing run from the command line, use –p command line parameter or the Windows Task Manager as described above. Warning The process priority should not be set higher than “Normal” in Windows Task Manager. Setting the process priority above “Normal” might prevent Windows system services from running and could destabilise the system. Input File Preparation This section provides guidance about preparing input files for processing with the Tool. Note Unless otherwise stated, the values in each field are validated against enumerated sets of values – generally based on NHS Data Dictionary definitions. File Format Input data must be in comma-separated value (CSV) format using the standard American Standard Code for Information Interchange (ASCII) character set, excluding the non-printing ASCII characters. The input file must not include qualifiers, such as quotes, surrounding the fields. Using Excel for File Preparation If some of the records end with empty fields then a file structure issue can arise when saving a text file using Microsoft Excel (for more information please refer to Microsoft Article ID 77295 “Column delimiters are missing in an Excel spreadsheet that is saved as text” [http://support.microsoft.com/default.aspx?scid=77295]). To prevent this issue arising, ensure that the final (rightmost) column of data is populated for every record in the file with “dummy data” such as “x”. Admitted Patient Care (APC) The Tool sorts APC data prior to processing so that records with the same Provider Code and Provider Spell Number are placed together. Note that the sorting process only Copyright © 2013, Health and Social Care Information Centre. All rights reserved. 13 Prescribed Specialised Services Identification Tool Reference Manual considers the first 24 characters of the spell number, and longer values may lead to unexpected spell level results. The field list below shows the fields required by the Tool. The field order of the input file is defined by the Record Definition File used for the session; there is no significance to the order in which the fields are listed below. Tool Field Name CDS/DD Field Name Notes PROCODET ORGANISATION CODE (CODE OF PROVIDER) A value must be supplied but is not validated. For NHS organisations use the first 3 characters for non-NHS organisations use all 5 characters. PROVSPNO HOSPITAL PROVIDER SPELL NUMBER A value must be supplied but is not validated. STARTAGE Derived Whole years rounded down: START DATE (EPISODE) - PERSON BIRTH DATE SEX PERSON GENDER CODE CURRENT CLASSPAT PATIENT CLASSIFICATION CODE ADMIMETH ADMISSION METHOD CODE (HOSPITAL PROVIDER SPELL) MAINSPEF CARE PROFESSIONAL MAIN SPECIALTY CODE TRETSPEF ACTIVITY TREATMENT FUNCTION CODE DIAG_01 PRIMARY DIAGNOSIS (ICD) Valid ICD-10 code (excluding decimal point character and any dagger/asterisk suffix). If this field is blank an error will be generated. DIAG_02 DIAG_99 SECONDARY DIAGNOSIS (ICD) As above, but blank allowed. OPER_01 OPER_99 PRIMARY PROCEDURE (OPCS) and PROCEDURE (OPCS) Valid OPCS-4 codes (excluding decimal point character) or blank. PURCODE ORGANISATION CODE (CODE OF COMMISSIONER) A value must be supplied but is not validated. CSNUM COMMISSIONING SERIAL NUMBER Not validated, and blank allowed. Non-Admitted Consultations (NAC) Non-admitted Consultations are outpatient attendances or attendances by patients for nursing care on a ward (ward attenders). Since 1 April 2005 the Outpatient Attendance CDS has contained both of these types of data. 14 Copyright © 2013, Health and Social Care Information Centre. All rights reserved. Prescribed Specialised Services Identification Tool Reference Manual The field list below shows the fields required by the Tool. The field order of the input file is defined by the Record Definition File used for the session; there is no significance to the order in which the fields are listed below. Tool Field Name PROCODET STARTAGE CDS/DD Field Name Notes ORGANISATION CODE (CODE OF PROVIDER) A value must be supplied but is not validated. For NHS organisations use the first 3 characters for non-NHS organisations use all 5 characters. Derived Whole years rounded down: APPOINTMENT DATE - PERSON BIRTH DATE SEX PERSON GENDER CODE CURRENT ATTENDED ATTENDED OR DID NOT ATTEND CODE REFSOURC SOURCE OF REFERRAL FOR OUTPATIENTS MAINSPEF CARE PROFESSIONAL MAIN SPECIALTY CODE TRETSPEF ACTIVITY TREATMENT FUNCTION CODE OPER_01 OPER_99 PRIMARY PROCEDURE (OPCS) and PROCEDURE (OPCS) Valid OPCS-4 codes (excluding decimal point character) or blank. PURCODE ORGANISATION CODE (CODE OF COMMISSIONER) A value must be supplied but is not validated. Output Files In the text below and the tables in the following pages, the output file name supplied by the user during processing is referred to as [name]; the remainder of the file name is a standard suffix that is appended by the Tool. A single input file produces a number of output files. User requirements determine which files are used; some users may not require certain output files. In most cases an output field appears in more than one file thus enabling users to select the files that best suit their needs. Output files are produced as comma-separated text. These files may be opened with Microsoft Excel but very large files may exceed the maximum number of rows for Excel. In these cases an error message such as “File not loaded completely” will be displayed when attempting to open the file. The output files may be opened with a variety of applications, including Windows Notepad. Copyright © 2013, Health and Social Care Information Centre. All rights reserved. 15 Prescribed Specialised Services Identification Tool Reference Manual Relational Outputs Relational output files can be identified by the presence of “_rel” as part of the filename. They are characterised by the following features: • They include row number references in order to allow files to be linked. • Where items are repeated (e.g. service lines, error messages) this is represented by the addition of rows rather than columns – the data is normalised. The relational output files are supplied to support users who wish to import the Tool output into a relational database; other users may choose to ignore them – and vice versa. RowNo Field RowNo is an identifier that can be used to link rows in output files to rows in other output files. This is particularly useful in the case of the relational output files. Use of a system generated row number avoids problems using input values where they may not be unique. Note that, depending on the file‟s role in a relationship with another file, RowNo may not contain consecutive values i.e. there may be values missing; this is by design. For example, the RowNo values in the [name]_FCE_rel.csv file will contain non-consecutive values where the input data contains episodes that do not relate to a prescribed service. Iteration Field Iteration appears in some relational output files where it is used to distinguish between occurrences within the same key value. There is no significance to the numerical values of Iteration; the values are assigned in order, being numbered 1, 2, 3 etc. Admitted Patient Care There are eight output files. File Name/Field Name Description [name].csv A list of the other output files [name]_sort.csv A copy of the input data after it has been sorted by PROCODET and PROVSPNO prior to processing. <input data> All of the input data, including any non-mandatory fields. RowNo The generated row number of the record after sorting. This will match the equivalent fields in other output files from the same processing run. Contains both episode and spell output fields. [name]_FCE.csv 16 The spell fields are repeated for each episode in the spell; care must be taken to avoid double-counting when using spell fields. <input data> All of the input data, including any non-mandatory fields. RowNo Matches the run generated row number. FCE_NPOC The dominant National Programme of Care service code for the episode. Copyright © 2013, Health and Social Care Information Centre. All rights reserved. Prescribed Specialised Services Identification Tool Reference Manual File Name/Field Name Description ServiceLine The dominant Service Line for the episode. ServiceLineList A semi-colon separated list of all the Service Lines the episode qualifies for. SpellNPOC The dominant National Programme of Care service code for the spell. SpellServiceLine The dominant Service Line for the spell. [name]_spell.csv Contains one row per spell. RowNo Matches the run generated row number of the first episode in the spell in the sorted input data. SpellNPOC The dominant National Programme of Care service code for the spell. SpellServiceLine The dominant Service Line for the spell. Contains a row for each episode that contains an error. [name]_quality.csv Where one or more episodes within a multi-episode spell contain errors, all the episodes from the spell, including those that do not contain errors, are included in the quality file. Thus there are records in the quality file that do not include error messages. <input data> All of the input data for the episode, including any non-mandatory fields, are reproduced in the output. RowNo Matches the run generated row number. Error Message(s) A variable number of fields, each consisting of Code Type, Code and Error Message, separated by pipe (“|”) symbols. [name]_FCE_rel.csv Episode-level output in relational form. RowNo Matches the run generated row number. Iteration The ordinal number of the Service Line for the episode. ServiceLine One of the Service Lines the episode qualifies for. [name]_quality_rel.csv The relational format includes a row for each error that an episode contains. RowNo Matches the run generated row number. Iteration The ordinal number of the quality message. Code Type The type of code that has failed validation. Code The value of the code that has failed validation. Blank where the code is missing from the input data. Copyright © 2013, Health and Social Care Information Centre. All rights reserved. 17 Prescribed Specialised Services Identification Tool Reference Manual File Name/Field Name Error Message [name]_summary.csv Description Description of the error. Contains details about the processing session. Grouper Version The version of the Tool that produced the output files. Database Version The Tool‟s internal database version. FCE Count The number of episodes in the input data. Spell Count The number of spells in the input data. FCE Error Count The number of episodes having errors. Spell Error Count The number of spells whose episodes have at least one error. Run Start Date/Time The date and time that the processing run started. Run End Date/Time The date and time that the processing run finished. Input Filename The path and filename of the input file. Output Filename The path and filename of the output, as selected by the user. RDF path and name The path and filename of the Record Definition File used for processing. Non-Admitted Consultations There are five output files. File Name/Field Name Description [name].csv A list of the other output files. [name]_attend.csv The main output file. <input data> All of the input data, including any non-mandatory fields. RowNo The generated row number of the record. NPOC The dominant National Programme of Care service code for the attendance. ServiceLine The dominant Service Line for the attendance. [name]_quality.csv 18 Contains one row for each attendance that contains errors. <input data> All of the input data, including any non-mandatory fields. RowNo Matches the run generated row number. Error Message(s) A variable number of fields, consisting of Code Type, Code and Error Message, separated by pipe (“|”) symbols. Copyright © 2013, Health and Social Care Information Centre. All rights reserved. Prescribed Specialised Services Identification Tool Reference Manual File Name/Field Name Description [name]_quality_rel.csv All error messages in relational form. RowNo Matches the run generated row number. Iteration The ordinal number of the quality message. Code Type The type of code that has failed validation. Code The value of the code that has failed validation. Blank where the code is missing from the input data. Error Message Description of the error. [name]_summary.csv Contains details about the processing session. Grouper Version The version of the Tool that produced the output files. Database Version The Tool‟s internal database version. Attendance Count The number of records in the input data. Attendance Error Count The number of records having errors. Run Start Date/Time The date and time that the processing run started. Run End Date/Time The date and time that the processing run finished. Input Filename The path and filename of the input file. Output Filename The path and filename of the output, as selected by the user. RDF path and name The path and filename of the Record Definition File used for processing. Errors and Validation As part of processing the Tool carries out validation checks on many of the mandatory input fields. Where one or more fields fail validation the Tool will not derive any service lines for the record. Caution must be exercised when considering multi-episode spells that contain a mixture of episodes that pass validation and episodes that fail validation. The Tool will derive a spell service line from the episode service lines. Once the episode level errors have been fixed the spell service line could change. The Spell Errors field in the summary file indicates how many spells may be affected. Copyright © 2013, Health and Social Care Information Centre. All rights reserved. 19 Prescribed Specialised Services Identification Tool Reference Manual Details of all errors encountered are reported in the output quality file. The listings in the Output Files section of this document include a description of the quality files. The Input File Preparation section provides further information regarding the input field validation. Error Message Format Error messages in the quality file are displayed in three sections, the sections being separated by a pipe character. The format is a follows: Code Type|Code|Error Description “Code Type” identifies the field or field type. “Code” is the unrecognised value. Where an error is due to the absence of a code, this section is left blank. “Error Description” explains the nature of the error. An example error message is: ICD|H547|Code not recognised in DIAG_01 Most of the mandatory input fields are validated against lists of acceptable values within the Tool and will generate errors similar to this if an invalid value is used. Most mandatory fields will also report if a value has not been supplied, for example: MAINSPEF||Field is blank Note When one error is found in a record the Tool does not stop the validation process. The software aims to identify all errors and output them together. Casemix Methodology This section explains how the Tool is aligned with existing Casemix methodology, as used in the HRG Groupers for example. The intention is to highlight variations in implementation to users of previous alternate versions of the identification rules. Procedures and Diagnoses By default the Tool is configured to consider 12 procedures and 14 diagnosis codes. This can be altered in the software via the Record Definition File to allow for up to 99 of each. Dominant Procedure In keeping with Casemix practices the Tool uses a hierarchy to determine the dominant procedure in a record. The hierarchy reflects the relative resource use of the procedures. In the majority of records the dominant procedure is that recorded in the first procedure position, but this is not always the case. A few of the service line definitions rely on identifying the dominant procedure rather than looking for the procedure in any position in the record. 20 Copyright © 2013, Health and Social Care Information Centre. All rights reserved. Prescribed Specialised Services Identification Tool Reference Manual Subsidiary Codes Some of the service line definitions look for a subsidiary code as well as a main code. The Tool will take into account the fact that a number of subsidiary codes may be associated with a main code, and as such the required subsidiary code may not be in the next position. Dominant Service Lines The procedure for selecting a dominant service line for an episode from all the service lines it qualifies for has many elements and conditional logic. The Tool reproduces the logic implemented in previous alternate versions of the prescribed specialised services identification rules, with the exception of one element concerning a hierarchy of procedures. At this point the Tool again makes use of the dominant procedure as defined above, rather than considering the positions of the procedures in the record. Similarly, the Tool uses a number of logic steps to determine which of the episode level dominant service lines should apply at the spell level. Further information can be found in the NHS England publication “Identification rules for prescribed specialised services: guide for trust information managers”, section 3.1 Dealing with overlaps. Copyright © 2013, Health and Social Care Information Centre. All rights reserved. 21 Prescribed Specialised Services Identification Tool Reference Manual Published by the Health and Social Care Information Centre Part of the Government Statistical Service This publication may be requested in large print or other formats. For further information: www.hscic.gov.uk 0845 300 6016 [email protected] Copyright © 2013 Health and Social Care Information Centre. All rights reserved. This work remains the sole and exclusive property of the Health and Social Care Information Centre and may only be reproduced where there is explicit reference to the ownership of the Health and Social Care Information Centre. 22 This work may be re-used by NHS and government organisations without Copyright © 2013, Health and Social Care Information Centre.permission. All rights reserved.