1
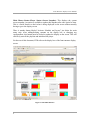
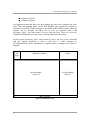
Informatics Forum
Front Entrance Display Screen Manual
Table of Contents
1. Introduction......................................................................................................................3
2. NTB Graphical User Interface (NTB GUI).....................................................................3
3. Supported Formats for Contents......................................................................................5
4. Informatics Layout...........................................................................................................5
4.1. Adding Images/Posters.............................................................................................7
4.1.1. Duration of Display for Posters/Movies...........................................................8
4.2. Adding Movies..........................................................................................................8
5. Other Layouts...................................................................................................................9
5.1. FullScreenLiveVideoInformatics Layout.................................................................9
5.2. FullScreenMovieInformatics Layout........................................................................9
5.3. FullScreenURLInformatics Layout........................................................................10
5.4. InformaticsForEventsMovie Layout.......................................................................10
5.5. InformaticsForEventsURL Layout.........................................................................10
6. Scheduling of Layout Display.......................................................................................10
7. Overriding the Default Schedule...................................................................................11
8. Settings for Playlist Contents.........................................................................................11
8.1. Default/Global Settings for the Playlist Elements..................................................11
8.2. Content-specific Settings for the Playlist Elements................................................11
9. Removing Content from Default Layouts......................................................................11
10. Backup.........................................................................................................................12
11. Restoring the Layout from Layout Packages...............................................................12
12. Plasma Screen Burn Mitigation...................................................................................13
13. Troubleshooting ..........................................................................................................13
14. Developer Notes...........................................................................................................13
Front Entrance Display Screen Manual
1. Introduction
This manual guides the user to maintain the OneLan Net-Top-Box (NTB) that drives the
display screen near the front door:
•
•
•
•
Add content to the NTB display box
Synchronize the display of different zones in the display
Set different options for the content display settings
Remove content from the NTB display box
2. NTB Graphical User Interface (NTB GUI)
Figure 1 shows the main user interface of NTB display box. This interface can be
accessed using following URL on DICE:
URL: http://ntbg07.inf.ed.ac.uk
In order to access this URL, a username and a password is required which will be
provided separately. To use the advanced features (required for addition/deletion of the
contents), the user must be marked as “Experts”. This can be done via Main Menu->UI
Options and selecting the “Expert” from the user interface policy. After doing this, user
can access the advanced GUI features. The main menu also provides access to all the
options available for uploading the content and managing the display of the contents. The
key elements of the main menu are discussed below:
Main Menu->Media->File & Folders: This menu item provides access to the filesystem of NTB display box. Each directory corresponds to the layouts available on the
display box. After clicking this menu item, an interface with two tabs is shown. First tab,
“Files & Folder”, shows the files available on the NTB hard drive. Second tab allows the
user to upload the files to the NTB hard drive from the local file-system.
Main Menu->Media->File & Folders->Upload File: Using this menu, user can upload
the file to NTB harddisk from local file system. The folder where the file will be
uploaded on NTB harddisk is shown just under the tab. Select the appropriate folder
before uploading files.
Main Menu->Playlist: This menu shows all the layouts and the playlist in each of the
layouts.
Layouts: This menu shows a list of the layouts available/configured on the NTB display
box.
3
Front Entrance Display Screen Manual
Main Menu->Status->Player Status->Screen Snapshot: This displays the current
screen snapshot. An option is available to update this snapshot after some period of time.
This is a useful feature to check what is being displayed on the screen without actually
having to go to the display screen.
There is another button labeled “Activate Schedule and Layout” just below the main
menu strip. After adding/deleting contents on the display box or changing any
configurations, this button must be clicked to update the display on the screen. This will
effectively start all the playlists and initialized the player.
For the rest of this document, NTB refers to the display box of the front entrance display
screen.
Figure 1: NTB Main Interface
4
Front Entrance Display Screen Manual
3. Supported Formats for Contents
Before uploading the contents to the display box hard drive make sure the content is
supported by the hardware/software of display box. Support is available for the
following:
Images:
• JPEG
• TIFF
• GIF
• PNG
• BMP
Movies:
• MPEG1-4 V.3
• QT
• WMV(9)
• Real 1-4
Presentation:
• PPT
• PPS
• ODP
4. Informatics Layout
In the current configuration of the display box, the following types of content will be
used:
•
•
•
Images
Movies
Text
For the current display layout of the display box, each image/movie is accompanied by a
text description. This text description resides in the corresponding text file. The name of
this text file starts with the string “txt” followed by the poster number e.g. 1, 2 and ends
with extension “.txt”. The contents of the zone A and zone C are synchronized based on
the alphanumerical order of the image/poster file name and related text file name. For
movies, text description in added directly using NTB graphical user interface (GUI).
The main layout of the display box is available in two styles. One is shown in figure 2.
The other style is simply the horizontally flipped version of this style where Zone C is on
the right side instead of the left and Zone A is on the right side. Ed logo and Informatics
Header in style 2 are also on the right side instead of left. These two styles corresponds to
the following NTB layouts:
5
Front Entrance Display Screen Manual
•
•
Informatics_Style1
Informatics_Style2
It is important to note that these two styles display the same set of content in the same
order. The corresponding folder on the NTB harddisk that contains the contents is
InformaticsLayoutData. Each layout has its own folder on the NTB file system where the
contents can be arranged in folders but in case of Informatics_Style1 and
Informatics_Style2 the same folder is used to store the files. These two styles are
scheduled on different days of the week as explained later in this document.
For the layouts Informatics_Style1 and Informatics_Style2, the user is only concerned
with the contents displayed in Zone A and Zone C. Other contents are
preconfigured/fixed and no maintenance is required unless a change in the layout is
required.
Ed
Logo
Informatics Header
Movies/Images
(Zone A)
BBC Newfeed
Figure 2: Informatics Layout
6
Clock
Text Description
(Zone C)
Front Entrance Display Screen Manual
The Informatics layout have a corresponding folder on the file-system. The folder holds
the contents for this layout is InformaticsLayoutData. This folder further contains the
following subfolders:
•
•
•
imagesFolder
moviesFolder
textFolder
For the rest of this document, information is specific to the Informatics_Style1 and
Informatics_Style2. All the images/posters to be displayed (e.g. image10.png) should be
uploaded to imagesFolder and corresponding text file (e.g. txt10.txt) containing the
description of the image/poster to the textFolder. For movies, the moviesFolder should be
used to store the movie files. The contents in zone A and C are played based on the
playlist. Each zone has its own playlist and contents to be displayed must be added to the
playlist after being uploaded in order to display them on the display box. Pre-configured
playlists are available for zone A and C. No effort is required for maintaining playlists
while adding images/posters to the display box as all the images available in the
imageFolder are displayed automatically in alphanumerical order. The related text file
containing the text description of the image is shown in zone C.
4.1. Adding Images/Posters
For images/posters, naming convention is very simple. Just append a number to end of
the text “image” as the file name e.g. image21.png means that it is the 21 st image in the
directory imageFolder. Also, related text file should be uploaded to the textFolder with
the same name. For instance, adding a new poster/image to the display can be done using
the following set of steps:
1. Assign a number to the poster. Of course, this should not be in conflict with the
existing images/posters in the imagesFolder. No change is required in extension.
2. Change the name of the image/poster file as explained above.
3. Create a text file with the same name as that of the image/poster file. Put the title,
explanation (max 100 words), credits and contacts in the text file separated by a
new line. Extension to be used is default i.e. .txt.
4. Upload the images to imagesFolder and text file to textFolder respectively. This
can be done via Main Menu->Media->Files & Folders. Then select the main
folder for layout (i.e. InformaticsLayoutData) and then select imagesFolder.
Select the tab “Upload Files” and browse to select the file on the local file system.
Select upload to upload the file to the specified folder.
5. Activate the layout with the changes. This can done by clicking the button on the
top left of the menu.
7
Front Entrance Display Screen Manual
Display of content in zones A and C is synchronized. Each image is displayed for 30
seconds in zone A and text description is also shown for 30 seconds in zone C. No effort
is required by the user while adding images/posters and related descriptions for
synchronization. Just upload the new image/poster and related text file to the appropriate
folders and the process of adding a poster is complete.
4.1.1. Duration of Display for Posters/Movies
To change the display duration for images/posters and related text, follow these steps.
1. Goto Main Menu->Playlists->Informatics Style1->Zone A
2. Click the “Edit” button in SECOND row of the playlist.
3. At the bottom of the page in the “Image Properties” section, set the duration to
desired value.
4. Click “Save Changes”.
5. Goto Main Menu->Playlists->Informatics Style1->Zone C
6. Click the “Edit” button in THIRD row of the playlist.
7. At the bottom of the page in the “Text Properties” section, set the duration to
desired value.
8. Click “Save Changes”.
9. Repeat step 1 to 8 for layout Informatics_Style2.
10. Activate the layout with the changes. This can done by clicking the button on the
top left of the menu.
4.2. Adding Movies
Adding movies to the display also requires configuration in the playlist of zone A and C.
As opposed to images/posters display, movies are not played from the folder in a
sequence. Each movie must be added to the playlist and must be synchronized with
related text description in the Zone C. Any name can be used for the movie. Adding a
movie requires the following set of steps:
1. Go to Main Menu->Playlists->Informatics_Style1->Zone C. Click the “Specials” tab.
Create a “Rendezvous Point” or synchronization point by entering a name and
clicking the add button. This will create a synchronization point at the end of the zone
C playlist that will be used to synchronize the related text display when the movie
start in the zone A.
2. Go to Main Menu->Playlists->Informatics_Style1->Zone C. Click the “Specials” tab.
Enter the movie title, description, contacts and credits in the text box labeled “Text”
separated by new lines. Select the radio button labeled “Show the text indefinitely”.
Click the add button.
3. Go to Main Menu->Playlists->Informatics_Style1->Zone A. Click the “Specials” tab.
Create an “Advance To” point by selecting the Rendezvous point created in the
8
Front Entrance Display Screen Manual
4.
5.
6.
7.
previous step from the dropdown list. This will create an “Advance To” point at the
end of the zone A playlist.
Upload the movie to the moviesFolder. This can be done via Main Menu->Media->
Files & Folders. Then select the main folder for layout (i.e. InformaticsLayoutData)
and then select moviesFolder. Select the tab “Upload Files” and browse to select the
file on the local file system. Select upload to upload the file to the selected folder.
Go to Main Menu->Media->InformaticsLayoutData->moviesFolder. Add the movie
to the playlist by clicking the “Add” button displayed on the left side of the movie
name in the NTB GUI. This will add the movie at the end the zone C playlist after the
“Advance To” point created in the previous step.
Repeat step 1 to 5 for layout Informatics_Style2.
Activate the layout with the changes. This can done by clicking the “Activate” button
on the top left of the menu.
5. Other Layouts
Other layouts already configured on NTB are:
1.
2.
3.
4.
5.
FullScreenLiveVideoInformatics Layout
FullScreenMovieInformatics Layout
FullScreenURLInformatics Layout
InformaticsForEventsMovie Layout
InformaticsForEventsURL Layout
Please see the section “Overriding the Default Schedule” for information about activating
these layouts.
5.1. FullScreenLiveVideoInformatics Layout
This layout display the live video on the NTB display from G03.
5.2. FullScreenMovieInformatics Layout
This layout shows a movie in full screen mode. The movie played is added to its playlist
before activating this layout.
To add/change the movie to the playlist of this layout, following steps are required.
1. Upload the movie file to otherMovies folder on NTB by navigating to Main Menu
->Media->File & Folders->InformaticsLayoutData->otherMovies and then selecting
the “Upload File” tab.
2. Remove any older files in this folder.
3. Goto Playlists->FullScreenMovieInformatics->Zone A.
9
Front Entrance Display Screen Manual
4.
5.
6.
7.
Delete any old entries in this playlist.
Select the “Files and Folder” tab.
Select otherMovies folder.
Click the add button next to the movie that is required to be played.
5.3. FullScreenURLInformatics Layout
This layout shows a webpage from a URL that is in the playlist of its Zone A.
To edit the URL in the playlist of this layout, following steps are required:
1.
2.
3.
4.
Goto Playlists->FullScreenURLInformatics->Zone A.
Click the “Edit” button next to the URL in the playlist.
Enter the URL in the “Web Page” text box. Click “Open in browser” to verify it.
Click “Save Changes”.
5.4. InformaticsForEventsMovie Layout
This layout is same as FullScreenMovieInformatics except that it does not show the
movie in full screen mode. Top header and bottom newsfeed are shown in this. Please
refer to section 5.2 if changes are required in its playlist.
5.5. InformaticsForEventsURL Layout
This layout is same as FullScreenURLInformatics except that it does not show the
webpage in full screen mode. Top header and bottom newsfeed is shown in this. Please
refer to section 5.3 if changes are required in its playlist.
6. Scheduling of Layout Display
The NTB provides the functionality to schedule different layouts on different days of the
week. These options can be accessed via Main Menu->Schedules->Manage Schedules.
The default schedule is already configured to display Infomatics_Style1(Mon, Wed, Fri,
8am-8pm) and Infomatics_Style2(Tue, Thu 8am-8pm). On all other times, NTB screen is
scheduled to be off. This corresponds to three entries in the default schedule:
1. Screen is off at all times unless otherwise scheduled.
2. Display Informatics_Style1 on Mon, Wed and Fri from 8am to 8pm.
3. Display Informatics_Style2 on Tue and Thu from 8am to 8pm.
To edit the default schedule, please refer to section 11.
10
Front Entrance Display Screen Manual
7. Overriding the Default Schedule
The default schedule of the NTB can be overridden if required. There are five layouts
available that can be used to override the default schedule as described in the section 5.
To override the default schedules, go to Main Menu->Schedules->Manage Overrides. A
list of five layouts corresponding to the five layout discussed in section 5 is shown. Select
the layout that is most suitable. Consider the following points when overriding the default
schedule:
•
•
Have you already updated the playlist of the layout that is to selected to override
the default schedule?
Restore the default layout when the overridden layout is no longer required.
8. Settings for Playlist Contents
Two types of settings can be specified for different type of content. These settings
determine the default behavior of images/movies display. These settings are default
settings and need not to be set.
8.1. Default/Global Settings for the Playlist Elements
These setting are defined in the “Default” tab of the playlist and are same all the content.
One such example is the stretching the movie to cover the whole zone area. This is the
default behavior of movies unless explicitly changed for each movie file. There are
option to set defaults for images, presentation, movies and text in the “Default” tab.
8.2. Content-specific Settings for the Playlist Elements
In some cases, it may be required to have different settings for some content of the
playlist than the default settings. In that case, content specific settings can be specified to
override the default settings. These setting can be accessed by clicking the “Edit” button
next to the items in playlist.
9. Removing Content from Default Layouts
To remove an image/poster from the display box, follow these step:
1. Remove the image/poster file from the imagesFolder and related text file from the
textFolder by clicking the red cross button next to the file under the “Actions”
column.
2. Activate the layout with the changes. This can done by clicking the button on the top
left of the menu.
11
Front Entrance Display Screen Manual
To remove a movie file from the display box playlist and hard drive, follow these steps:
1. From the playlist of zone A, delete the movie file and the synchronization point
“Advance To” before the movie file by clicking the red cross button next to the file
under the “Actions” column.
2. From the playlist of zone C, delete the entry that contains the text description of the
movie and rendezvous point before the text entry by clicking the red cross button
next to the file under the “Actions” column.
3. Delete the movie file from the moviesFolder by clicking the red cross button next to
the file under the “Actions” column.
10. Backup
To take a backup for a layout, do the following steps:
1. Goto Main Menu->Layouts->Layout Packages.
2. Select “Create” tab.
3. Enter the name in the “Name” text box and description in “Description” text box.
4. Tick the check box next to layout that you want to backup.
5. Click the button “Create Layout Package”.
This will create an install-able layout package that contains the settings for all the zones
in the layout including playlists and related files/folders. This package can be downloaded
from the link shown after the layout is created or using FTP with a valid username and
password. FTP address is
ftp://ntbg07.inf.ed.ac.uk/package/
This method is the recommended method to take backup for all different layouts on the
NTB harddisk. Note that using FTP all the files and folders are accessible and this feature
can also be used to create a backup disk. The backup taken using FTP can be used to
restore the data on the NTB harddisk as all the settings may not get properly restored.
11. Restoring the Layout from Layout Packages
To restore a layout from a layout package, the following steps are required:
1. Goto Main Menu->Layouts->Layout Packages.
2. Using the "Browse" button to select the layout package and click the "Upload"
button.
3. The layout package will be shown on the page after the upload.
4. Click the "Install" button. This will install the layout on NTB.
12
Front Entrance Display Screen Manual
12. Plasma Screen Burn Mitigation
Two layout packages are used to avoid screen burns. Burn mitigation functionality is also
available in the NTB display box. All the layouts on the NTB can have burn mitigation
enabled. To do this, follow these steps:
1. Goto Main Menu->Layouts. Select the layout for which burn mitigation is to be
activated. This will show the selected layout.
2. Select the second tab titled “Layout Properties”.
3. Check the “Enable Mitigation” checkbox.
4. In the “Scheme” dropdown box, select “Mirror Layout Zones left to right”.
5. Select the duration after which mirroring should take place.
6. Click the button “Save All Changes” just below the Main Menu.
7. Activate the layout with the changes. This can done by clicking the “Activate”
button on the top left of the menu.
13. Troubleshooting
In case of network outage, sometimes the newsfeed is not properly updated or it appears
to be broken. Rebooting the NTB from the web interface should fix this problem. To
reboot the NTB, follow these steps:
1. Goto Main Menu->Home->Setup.
2. On the bottom right corner, click “Reboot System”.
3. Confirm the reboot.
This will reboot the NTB and should fix the problem.
14. Developer Notes
Following are useful sources of information if some configuration are required:
•
•
•
13
Login to NTB and then select Main Menu->Help->User Guides. It contains an
extensive documentation regarding all the features supported.
Some more user guides: http://www.onelanftp.co.uk/support/
OneLan Technical Support: http://onelan.h2desk.com/