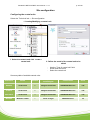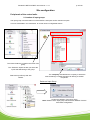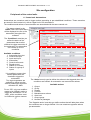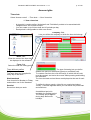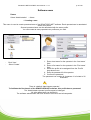
1
Access control
/
User manual
SenatorFX.NET/LOG.NET user manual – V.1.1
p. 2/140
Copyright © EDEN France LTD, 2010. All rights reserved. The SENATORFX.NET® integrated
access control system software package is protected under copyright law and international
treaties.
Any reproduction or distribution of this software or any part thereof may give rise to severe civil
or criminal sanctions as well as a suit for damages to the maximum extent permitted by law.
All other trade names and product names are registered trade names or trade names
belonging to their respective companies.
The information contained in this reference manual is subject to change without notice.
SenatorFX.NET/LOG.NET user manual – V.1.1
p. 3/140
Thank you
Dear customer,
You have just bought SENATORFX.NET® access management software, created by EDEN, a
French company.
The entire EDEN team would like to thank you for your interest as well as your confidence in
our total security solution.
We hope that you will be completely satisfied with the level of security it provides for your
company’s premises.
Should you have any comments, please contact us via our website at
www.eden-innovations.com
The EDEN INNOVATIONS team.
SenatorFX.NET/LOG.NET user manual – V.1.1
p. 4/140
Contents
Installing and using SENATORFX.NET® .............................................................................. 8
Editions of SENATORFX.NET® ............................................................................................ 9
SENATORFX.NET® software requirements ....................................................................... 10
Installing SENATORFX.NET® software .............................................................................. 11
Installing SENATORFX.NET® software (continued) ........................................................... 12
Starting up the SENATORFX.NET® software ..................................................................... 13
Client-server multi-machine applications ............................................................................. 14
Additional modules ............................................................................................................. 15
SENATORFX.NET user interface ......................................................................................... 16
Overview of the main screen............................................................................................... 17
‘Operating’ tab and sub-menus ........................................................................................... 18
‘Access Control’ tab and sub-menus ................................................................................... 19
‘Technical’ tab and sub-menus ........................................................................................... 20
‘Administration’ tab and sub-menus .................................................................................... 20
‘Extensions’ tab and sub-menus ......................................................................................... 21
‘Documentation’ tab and sub-menus ................................................................................... 22
Creating an installation ....................................................................................................... 25
Database management....................................................................................................... 26
The Controller Service ........................................................................................................ 27
Networks of central units ..................................................................................................... 28
1.
Adding a network ..................................................................................................... 28
2.
Creating a network via a ‘Com Port’ connection ....................................................... 29
3.
Creating a network via a ‘USB Port’ connection ....................................................... 29
4.
Creating a network via an ‘Ethernet Port’ connection ............................................... 30
5.
Modifying/deleting a network .................................................................................... 31
6.
Using biometrics....................................................................................................... 32
Configuring the central units ............................................................................................... 34
1. Creating/Modifying a central unit ................................................................................. 34
2. Duplicating a central unit ............................................................................................. 38
3. Deleting a central unit .................................................................................................. 39
Configuring the readers ...................................................................................................... 40
1. Configure the reader type ............................................................................................ 40
2. Automatic format detection for existing badges ........................................................... 43
3. Biometrics ................................................................................................................... 44
4. Configuring a reader .................................................................................................... 45
SenatorFX.NET/LOG.NET user manual – V.1.1
p. 5/140
5. 'Standard functions’ tab ............................................................................................... 46
6. 'Special functions’ tab .................................................................................................. 47
7.
‘Profiles’ tab.............................................................................................................. 48
8.
‘Connections’ tab ...................................................................................................... 49
9.
‘Characteristics’ tab .................................................................................................. 50
10.
Delete/add a reader .............................................................................................. 51
Peripherals of the central units ............................................................................................ 52
1. Input extension modules .............................................................................................. 52
Peripherals of the central units ............................................................................................ 53
2. Creation of input groups .............................................................................................. 53
3. Output extension modules ........................................................................................... 54
4. Creating output groups ................................................................................................ 55
5. Counters...................................................................................................................... 56
6. ‘Central unit’ Automations ............................................................................................ 57
Status of central units ......................................................................................................... 60
Updating the central unit ..................................................................................................... 62
Ethernet module detection .................................................................................................. 63
Centralised automations ..................................................................................................... 64
1. Global counters, e-mails, exports and instructions ....................................................... 64
2. Editing the ‘Centralised’ automations........................................................................... 65
Controlled zones ................................................................................................................. 68
Access groups .................................................................................................................... 70
Time slots ........................................................................................................................... 71
1. ‘User’ time slots ........................................................................................................... 71
2. ‘Automation’ time slots................................................................................................. 72
3. Holidays ...................................................................................................................... 73
Users and badges ................................................................................................................ 74
Creating a new series of badges ......................................................................................... 75
List of badges/users ............................................................................................................ 76
Learning the badges ........................................................................................................... 77
Badge personalisation ........................................................................................................ 78
Badge printing templates .................................................................................................... 79
Badge/user file .................................................................................................................... 80
1. ‘Standard’ profile ......................................................................................................... 80
2. ‘Additional’ profiles ...................................................................................................... 81
3. ‘Options’ tab ................................................................................................................ 82
4. ‘Additional information’ tab........................................................................................... 83
5. The ‘Enrolment’ tab ..................................................................................................... 84
6. The ‘Encoding’ tab ....................................................................................................... 85
SenatorFX.NET/LOG.NET user manual – V.1.1
p. 6/140
7. The ‘Print’ tab .............................................................................................................. 86
8. Fast data download ..................................................................................................... 87
The software operators ........................................................................................................ 88
User profiles ....................................................................................................................... 89
1.
Creating a profile ...................................................................................................... 89
User profiles ....................................................................................................................... 90
2. Modify a profile ............................................................................................................ 90
3. Deleting a profile ......................................................................................................... 90
Users .................................................................................................................................. 91
1. Creating a user ............................................................................................................ 91
Users .................................................................................................................................. 92
1.
Modifying a user ....................................................................................................... 92
3. Deleting a user ............................................................................................................ 92
The Log .............................................................................................................................. 93
Multi-company/multi-tenant management ........................................................................... 94
Software extensions............................................................................................................. 95
Site codes and distributor codes ......................................................................................... 96
Display preferences ............................................................................................................ 97
Plugin management ............................................................................................................ 98
Management of XML files ................................................................................................... 99
Enabling IP camera management ..................................................................................... 101
Enabling the management of GALAXY alarm units ........................................................... 102
Configuration report .......................................................................................................... 103
Software applications ........................................................................................................ 104
Configure autosave ........................................................................................................... 106
Presence time ................................................................................................................... 107
Zone occupancy ............................................................................................................... 108
Locate a badge ................................................................................................................. 109
Forgiving the badges ........................................................................................................ 110
Control of readers ............................................................................................................. 111
Intrusion alarm .................................................................................................................. 112
1. Configuring the central units ...................................................................................... 112
2. Add GALAXY alarm units .......................................................................................... 113
3. Modifying a GALAXY alarm unit ................................................................................ 114
4. Start communication .................................................................................................. 115
5. Track the dialogue ..................................................................................................... 115
6. Delete a central unit................................................................................................... 115
7. Simulator ................................................................................................................... 116
8. Displaying a GALAXY alarm unit ............................................................................... 117
SenatorFX.NET/LOG.NET user manual – V.1.1
p. 7/140
9. Alarm history ............................................................................................................. 118
IP video verification ........................................................................................................... 119
1. Add a camera ............................................................................................................ 119
2. Modify a camera ........................................................................................................ 119
3. Delete a camera ........................................................................................................ 119
4. Management of preset dome positions ...................................................................... 120
5. View management ..................................................................................................... 121
6. Cycle management ................................................................................................... 122
7. Recording photos/video sequences ........................................................................... 123
8. Photo search ............................................................................................................. 124
9. Search video sequences ........................................................................................... 125
‘Video via VDR’ verification ............................................................................................... 126
1. Add a DVR ................................................................................................................ 126
2. Add a camera ............................................................................................................ 126
3. Display cameras ........................................................................................................ 127
Graphical management of the site .................................................................................... 128
1. Add a plan ................................................................................................................. 128
2. Components .............................................................................................................. 129
3. Adding components ................................................................................................... 130
4. Personalising components......................................................................................... 131
5. Supervision ............................................................................................................... 132
List of events..................................................................................................................... 133
1. Event configuration .................................................................................................... 133
2. Event-based log ........................................................................................................ 134
3. Lists........................................................................................................................... 135
Advanced history .............................................................................................................. 136
Technical Support .............................................................................................................. 139
SenatorFX.NET/LOG.NET user manual – V.1.1
p. 8/140
Chapter 1
Installing and using SENATORFX.NET®
What does this chapter include?
Installing and using SENATORFX.NET® .............................................................................. 8
Editions of SENATORFX.NET® ............................................................................................ 9
SENATORFX.NET® software requirements ....................................................................... 10
Installing SENATORFX.NET® software .............................................................................. 11
Installing SENATORFX.NET® software (continued) ........................................................... 12
Starting up the SENATORFX.NET® software ..................................................................... 13
Client-server multi-machine applications ............................................................................. 14
Additional modules ............................................................................................................. 15
SENATORFX.NET® is an advanced and powerful integrated access control management
software package.
The following chapter contains important information about the installation and use of the
software.
SenatorFX.NET/LOG.NET user manual – V.1.1
p. 9/140
Installing and using SENATORFX.NET®
Editions of SENATORFX.NET®
There are six editions of SENATORFX.NET® software.
Reference
Description
Number of
machines
DONGLEFXCD2
Licence for 2 readers + SENATORFX.net® CD ROM + C1P2FXBT
(UTL 2 readers)
10 machines
DONGLEFXCD16
Licence for 16 readers + SENATORFX.net® software CD ROM
10 machines
DONGLEFXCD64
Licence for 64 readers + SENATORFX.net® software CD ROM
10 machines
DONGLEFXCD512
Licence for 512 readers + SENATORFX.net® software CD ROM
10 machines
SENATORFX.NET64
SENATORFX.NET512
kit including SENATORFX.net® + licence for 64 readers + C485FX
interface + webcam
kit including SENATORFX.net® + licence for 512 readers +
C485FX interface + webcam
10 machines
10 machines
The SENATORFX.NET® software licence comes in the form of a ‘dongle’, an electronic card
that plugs into the motherboard of one of the central units in the installation.
The DONGLEFXCD2 version manages two readers via a C1P2FXBT central unit, with no
licence required.
All of the functionality is integrated, irrespective of the software edition.
The only difference between the editions of the SENATORFX.NET® software package is the
number of access readers they can handle.
Each edition allows multi-machine ‘client/server’ management without any additional licence or
modules.
Reference
Description
Number of
machines
LIGALAXY
Licence for supervision of alarm units from Honeywell’s Galaxy Dimension
range
10 machines
LIAXISIP4
Licence for video verification and management of 4 IP cameras (Axis range)
10 machines
LIDEV
Development of special software to specific customer technical specifications
10 machines
SenatorFX.NET/LOG.NET user manual – V.1.1
p. 10/140
Installing and using SENATORFX.NET®
SENATORFX.NET® software requirements
Server
The SENATORFX.NET® server manages the local central units and maintains the database
of the integrated access control system.
The CD of the SENATORFX.NET® 1.0 software includes the client-server applications and
the drivers for the necessary and compatible biometric modules.
The manuals required for the installation and use of SENATORFX.NET® software are also
available on the CD:
•
•
•
Quick start guide
Online help
Reference manual
Computer (server) requirements
The server is designed to operate with PCs running a suitable Windows operating system as
described in ‘Operating system requirements’.
•
•
•
•
•
•
•
•
32-bit processor, speed 1 GHz
1 GB RAM (2 GB for optimum performance)
3 GB available hard disk space recommended, and more for very large installations
One RS-232 serial port according to the installation (and more than one port might be
necessary)
At least two available USB ports (and more for very large installations)
One Ethernet port for network connection and software update via Internet connection
One DirectX 9 graphics card with 128 MB of memory
VGA standard monitor
Operating system requirements
The SENATORFX.NET® server has been tested on the following operating systems:
•
•
•
•
Windows® XP SP3 Home and Business editions
Windows® 2003 SP2 Server edition
Windows® Vista Home Basic, Home Premium, Enterprise and Ultimate editions
Windows® 7
Other third-party software package requirements
•
•
Microsoft SQL Server 2005 Express (included on CD) or later
Microsoft.NET Framework 3.5 (included on CD)
SenatorFX.NET/LOG.NET user manual – V.1.1
p. 11/140
Installing and using SENATORFX.NET®
Installing SENATORFX.NET® software
Insert the SENATORFX.NET® CD ROM in the drive, and wait for the automatic execution of
the installation. Follow the instructions displayed on the screen.
Install the webcam drivers and the biometric module driver if necessary.
To install the SENATORFX.NET® software, you must be logged in as Administrator.
1. Read the license agreement and then accept it.
2. Choose the type of installation:
Full: Choose this option to install the communication
service to enable dialogue with the central units, the
database, and the software’s graphical user
interface.
Client (UI): Choose this option to connect to a
remote machine on which the communication service
is installed.
Installs the software’s graphical user interface only.
SenatorFX.NET/LOG.NET user manual – V.1.1
p. 12/140
Installing and using SENATORFX.NET®
Installing SENATORFX.NET® software (continued)
3. Click ‘Install’ to begin the installation.
4. Restart the system
If you have chosen the full installation, you
must restart the system.
SenatorFX.NET/LOG.NET user manual – V.1.1
p. 13/140
Installing and using SENATORFX.NET®
Starting up the SENATORFX.NET® software
First launch of the server after restarting the system
1. Enter the name of your installation
The new installation creation window appears.
Enter the name of your installation and then click OK.
2. Start the communication service
After creating the installation, select it from the list of
installations and then click Connect to start the
communication service.
The active installation is shown in green. You can then
close the window.
3. Launch the graphical user interface.
Click the SENATORFX.NET® shortcut on your desktop.
The connection screen appears.
Click ‘OK’.
To facilitate the opening of the software, there is no
default password for the ‘Administrator’ profile. It is
recommended that you subsequently create a password
for access to the software.
4. Opening the SENATORFX.NET® home page
The software will exit Demo Mode when it recognises
the presence of the Dongle licence plugged into one of
the installation’s central units (see the section on
configuring central units, page 34).
SenatorFX.NET/LOG.NET user manual – V.1.1
p. 14/140
Installing and using SENATORFX.NET®
Client-server multi-machine applications
SenatorFX.NET® allows several PCs (up to 10 client workstations) on one network to manage
an installation without the need for an additional licence.
On remote workstations, set the installation type to ‘Client’: refer to the ‘Software installation’
section for further details.
The first time the client workstation is booted, proceed as follows:
By default, the graphical user interface tries to connect
to the server on the current machine.
1. Specify the name of the machine on which the
communication service is installed
In the Server address field, specify the name of the
machine (or its IP address if fixed) on which the
communication service is installed. Click
Connection.
3. Opening the SENATORFX.NET® home page
The software will exit Demo Mode when it
recognises the presence of the Dongle licence
plugged into one of the installation’s central units
(see the section Editions of SenatorFX, page 9).
2. Click OK.
If you are unable to progress further than the Server
Connection screen:
• Ensure that the communication service is up
and running on the server workstation
• Check the input value for the server address
field
• Ensure that port 8731 is used by default
• Ensure that it has not been modified on the
server workstation
• If a firewall is active on the server
workstation, a TCP exception must be added
for port 8731.
SenatorFX.NET/LOG.NET user manual – V.1.1
p. 15/140
Installing and using SENATORFX.NET®
Additional modules
SENATORFX.NET® lets you integrate other security solutions in addition to access control
management:
•
•
The supervision of intrusion alarms using Galaxy Dimension central units by Honeywell
Video verification using IP domes and cameras manufactured by Axis.
For further information, refer to the installation procedure for plug-in modules.
To use additional modules, please ensure that the installation has a Dongle licence plugged
into one of the local management central units.
SenatorFX.NET/LOG.NET user manual – V.1.1
p. 16/140
Chapter 2
SENATORFX.NET user interface
What does this chapter include?
SENATORFX.NET user interface ......................................................................................... 16
Overview of the main screen............................................................................................... 17
‘Operating’ tab and sub-menus ........................................................................................... 18
‘Access Control’ tab and sub-menus ................................................................................... 19
‘Technical’ tab and sub-menus ........................................................................................... 20
‘Administration’ tab and sub-menus .................................................................................... 20
‘Extensions’ tab and sub-menus ......................................................................................... 21
‘Documentation’ tab and sub-menus ................................................................................... 22
This chapter describes the structure of the main window and the various menus, tabs, and
sub-menus of the application.
SenatorFX.NET/LOG.NET user manual – V.1.1
p. 17/140
SENATORFX.NET® user interface
Overview of the main screen
The main menu of the software is presented in a vertical column of six tabs.
6 tabs
Sub-menus
Main menu
User-modifiable screen
background
Level of the current crisis status
Status of licence check
Certain sub-menus might not appear, according to the access rights of the operator and/or the
absence of additional modules for the SENATORFX.NET® software package.
The six tabs of the main menu
SenatorFX.NET/LOG.NET user manual – V.1.1
p. 18/140
SENATORFX.NET® user interface
‘Operating’ tab and sub-menus
Icon
‘Operating’ tab
Description
Badge search
Printing, search, and management of badges and users of the
site
List of events
Real-time monitoring of access control event and intrusion
alarms
System setup overview
Graphical diagram editor (BMP/JPG) with icons for supervision
Supervision
Real-time graphical management of the site via dynamic
diagrams
Advanced history
Event history query tool.
Absence list
Real-time management of personnel present and absent at the
site
IP Cameras
Video verification module for IP cameras and domes
GALAXY intrusion alarm
Module for the management and supervision of Galaxy intrusion
alarm units by Honeywell
Control of readers
Monitoring and control of access to the site
Closes the session
Close the session to log out the operator (the software
continues to run)
Certain sub-menus might not appear, according to the access rights of the operator and/or the
absence of additional modules for the SENATORFX.NET® software package.
SenatorFX.NET/LOG.NET user manual – V.1.1
p. 19/140
SENATORFX.NET® user interface
‘Access Control’ tab and sub-menus
Icon
‘Access Control’ tab
Description
Access groups
Editing user groups
Time slots
Editing the weekly programmes and programmes for holiday
or special periods
Badges
Editing and management of badge/user sheets
Learning
Enrolment of badges via learning with choice of reader
Badge personalising
Editing of additional badge/user sheet fields
Event configuration
Configuring the display of events in the list of events
Lists
Real-time event list editing with choice of filters
Controlled zones
Editing of zones with Entry/Exit readers for presence and
counting
Centralised automations
Editing of automation scenarios managed by the software online
Configuration report
Printing the complete configuration of the site
Certain sub-menus might not appear, according to the access rights of the operator and/or the
absence of additional modules for the SENATORFX.NET® software package.
SenatorFX.NET/LOG.NET user manual – V.1.1
p. 20/140
SENATORFX.NET® user interface
‘Technical’ tab and sub-menus
Icon
‘Technical’ tab
Description
Site configuration
Editing and creating the site’s central units, readers and
peripherals
Status of central units
Real-time management of the status of the installation’s central
units
Update the central unit
Update local central units’ firmware
Ethernet module detection
Automatic detection and modification of EDEN Ethernet
connection modules
‘Administration’ tab and sub-menus
Icon
‘Administration’ tab
Description
User profiles
Management of software operator access rights
Users
Software operator management via password and profile
Log
History of actions performed by software operators
Companies
Editing the companies or site tenants
Fast data download
Module to import databases in text or spreadsheet format
Certain sub-menus might not appear, according to the access rights of the operator and/or the
absence of additional modules for the SENATORFX.NET® software package.
SenatorFX.NET/LOG.NET user manual – V.1.1
p. 21/140
SENATORFX.NET® user interface
‘Extensions’ tab and sub-menus
Icon
‘Extension’ tab
Description
Presence time
Module for ‘Cumulative presence time’ in the site’s zones
Video recorder
Management of Dedicated Micros and Bosch third-party video recorders
Zone occupancy
Display and printing of occupancy of the site’s zones
Locate a badge
Search for a badge/user and display its last checkpoint
Site code
Management of badge ‘site’ codes to provide a higher level of security
Distributor code
Management of badge ‘distributor’ codes to provide an additional level of
security
Configure autosave
Editing the site database ‘save’ reminder
Preferences
Management of the display and additional modules for the
SENATORFX.NET software package
Forgiving the badges
Forgiving the Anti-Passback of the site’s badges
Certain sub-menus might not appear, according to the access rights of the operator and/or the
absence of additional modules for the SENATORFX.NET® software package.
SenatorFX.NET/LOG.NET user manual – V.1.1
p. 22/140
SENATORFX.NET® user interface
‘Documentation’ tab and sub-menus
Icon
‘Documentation’ tab
Description
Operation and installation
manual
Online software user manual
Notepad
Free text editor
About
Version of the software installed
Updates
Software update module via Internet connection through the EDEN
server
Certain sub-menus might not appear, according to the access rights of the operator and/or the
absence of additional modules for the SENATORFX.NET® software package.
SenatorFX.NET/LOG.NET user manual – V.1.1
p. 23/140
Chapter 3
Site configuration
What does this chapter include?
Site configuration
Creating an installation ....................................................................................................... 25
Database management....................................................................................................... 26
The Controller Service ........................................................................................................ 27
Networks of central units ..................................................................................................... 28
1.
Adding a network ..................................................................................................... 28
2.
Creating a network via a ‘Com Port’ connection ....................................................... 29
3.
Creating a network via a ‘USB Port’ connection ....................................................... 29
4.
Creating a network via an ‘Ethernet Port’ connection ............................................... 30
5.
Modifying/deleting a network .................................................................................... 31
6.
Using biometrics....................................................................................................... 32
Configuring the central units ............................................................................................... 34
1. Creating/Modifying a central unit ................................................................................. 34
2. Duplicating a central unit ............................................................................................. 38
3. Deleting a central unit .................................................................................................. 39
Configuring the readers ...................................................................................................... 40
1. Configure the reader type ............................................................................................ 40
2. Automatic format detection for existing badges ........................................................... 43
3. Biometrics ................................................................................................................... 44
4. Configuring a reader .................................................................................................... 45
5. 'Standard functions’ tab ............................................................................................... 46
6. 'Special functions’ tab .................................................................................................. 47
7.
‘Profiles’ tab.............................................................................................................. 48
8.
‘Connections’ tab ...................................................................................................... 49
9.
‘Characteristics’ tab .................................................................................................. 50
10.
Delete/add a reader .............................................................................................. 51
Peripherals of the central units ............................................................................................ 52
1. Input extension modules .............................................................................................. 52
Peripherals of the central units ............................................................................................ 53
2. Creation of input groups .............................................................................................. 53
3. Output extension modules ........................................................................................... 54
4. Creating output groups ................................................................................................ 55
5. Counters...................................................................................................................... 56
SenatorFX.NET/LOG.NET user manual – V.1.1
p. 24/140
6. ‘Central unit’ Automations ............................................................................................ 57
Status of central units ......................................................................................................... 60
Updating the central unit ..................................................................................................... 62
Ethernet module detection .................................................................................................. 63
Centralised automations ..................................................................................................... 64
1. Global counters, e-mails, exports and instructions ....................................................... 64
2. Editing the ‘Centralised’ automations........................................................................... 65
Controlled zones ................................................................................................................. 68
SenatorFX.NET/LOG.NET user manual – V.1.1
p. 25/140
Site configuration
Creating an installation
To create a site, start by creating an installation. The creation of an installation generates a new
database, which will be stored on the main server.
This database is in SQL SERVER Express 2005 format.
Installations are managed using the Service Controller application, which is accessible from the task zone.
1. Click ‘Management of installations’
2. Enter the name of your installation
The new installation creation window appears. Enter the name of your
installation and then click OK.
3. Select the new installation
After creating the installation, select it
from the list of installations and then click
Connect to start the communication
service.
The active installation is shown in green.
You can then close the window.
Information concerning installations:
• Installations can be managed from the server machine only
• Only one installation can be active on a machine
• An installation represents all the configurations for a site (Administration, technical, access control and
operation)
• The installations are completely independent from each other
Find the Controller Service icon in the task zone
Indicates that the SenatorFX.NET service is running
Indicates that the SenatorFX.NET service is starting up
Indicates that the SenatorFX.NET service is shutting down
Indicates that the SenatorFX.NET service has shut down.
SenatorFX.NET/LOG.NET user manual – V.1.1
p. 26/140
Site configuration
Database management
Click ‘Management of
installations’. The following
window appears:
In the above example, one installation is enabled: ‘Installation’. Two
other installations have been created: ‘Installation 2’ and ‘Installation 3’.
All client workstations that connect to this service will dialogue with
‘Installation’.
To modify the active installation, click it, and then click the ‘Disconnect’
button
Likewise, to activate an installation,
click it and then the ‘Connect’ button.
You can also create, modify or
delete an installation using the
‘Installations’ menu.
SenatorFX.NET/LOG.NET user manual – V.1.1
p. 27/140
Site configuration
The Controller Service
Controller Service Menu
Options:
Start: Starts the service by activating the last active installation. If no installation was
activated, this choice has no effect.
Stop: Shuts down the service. This has the dual effect of interrupting communication
with the central units and disconnecting all the client workstations connected to the
service.
Communication of central units: Displays the exchanges of frames between the
service and the central units.
Network consumption of station: Displays an indicative value of the network
consumption of the workstation. Note that this refers to the overall consumption of the
workstation, not the consumption due to SenatorFX.NET alone.
Log file: Displays a file of messages returned by the SenatorFX.NET service.
Port configuration: Lets you change the port on which the service will dialogue with
client workstations.
Management of installations: Lets you manage the various installations. See above.
Restore an installation: Restores a previously saved installation.
Back up an installation: Backs up an installation along with the database and
external files: photos, overview plans, audio files, etc.
Quit: Shuts down the SenatorFX.NET Service and the Controller Service. To restart
the Controller Service, select ‘Programmes/Eden/Service Controller’.
SenatorFX.NET/LOG.NET user manual – V.1.1
p. 28/140
Site configuration
Networks of central units
Select the ‘Technical’ menu and then go to the ‘Site configuration’ tab, ‘Network’, and ‘Create
a network’.
1. Adding a network
To create a site, start by creating a network. A network can include one or more central units.
Each network can be connected to the central computer or server via several different types of
connection:
-
USB connection via the C485FX interface
RS232 COM Port connection via the C485FX interface
Ethernet connection of one central unit with a MODTCP/IP module
Ethernet connection of several central units with the C485FX interface + MODTCP/IP
plug-in module
Create a network via the Technical menu → Site configuration
2. Click ‘Create a network’
1. Click ‘Site configuration’
SenatorFX.NET/LOG.NET user manual – V.1.1
p. 29/140
Site configuration
Networks of central units
Select the Technical menu → Site configuration → Network → Create a network
2. Creating a network via a ‘Com Port’ connection
When the network with ‘Serial port’ connection is selected, the following window appears.
1. Enter the network name in the ‘Name’
field
2. Enter the port number in the ‘Serial
port’ field
3. Creating a network via a ‘USB Port’ connection
1. Enter the network name in the ‘Name’
field
2. Enter the port number in the ‘USB port’
field
SenatorFX.NET/LOG.NET user manual – V.1.1
p. 30/140
Site configuration
Networks of central units
Select the Technical menu → Site configuration
4. Creating a network via an ‘Ethernet Port’ connection
When the network with ‘Ethernet port’ connection is selected, the following window appears.
1. Enter the network name in the ‘Name’ field
2. Enter the IP address and port in the ‘Address’
field
You can choose between an IP
address and a DNS address. The ‘IP
Address’ field is split into two parts by
a hyphen (‘-‘). The IP address is
entered in the first part, and the port
is entered in the second part.
The same applies in the case of a
DNS server. The default ports are
10001 for TCP/IP modules, and
04000 for Comète-FX modules.
The ‘Search’ button launches the ‘IP
config’ application for automatic detection of the
hardware present in the Ethernet network.
Note:
You can drag and drop the IP address from the ‘IP
Config’ window to the ‘IP Address’ field in the ‘Network’
window.
The field is then completed automatically.
SenatorFX.NET/LOG.NET user manual – V.1.1
p. 31/140
Site configuration
Networks of central units
Select the Technical menu → Site configuration → Modify/Delete a network
5. Modifying/deleting a network
To modify the technology of the network, its address, or its name, use ‘Modify’.
2. Modify the desired information
1. Select the network of central units to be
modified
Confirm deletion of the network of central units
Note: Deleting the network will delete all the central
units and other associated peripherals.
To delete a network of central units, use
‘Delete’.
SenatorFX.NET/LOG.NET user manual – V.1.1
p. 32/140
Site configuration
Networks of central units
Select the Technical menu → ‘Site configuration’
6. Using biometrics
Read this section carefully if using biometric readers. There are two technologies:
•
•
Fingerprint recognition by SOLO readers
Finger vein pattern recognition by BIOVEIN readers
You must create one enrolment reader per technology used.
When used in badge + fingerprint mode, the SOLO reader meets the requirements defined by
the French Data Protection Authority (CNIL), in recommendation N° 2006-102 of 17th April
2006.
A Mifare ENCODUSB badge encoder must be used.
Creating a fingerprint enrolment reader
Select the enrolment reader with PC/USB link or one of the
SOLO readers of the site
Creating a fingerprint enrolment reader
SenatorFX.NET/LOG.NET user manual – V.1.1
p. 33/140
Site configuration
Networks of central units (continued)
6) Using biometrics (continued)
Use of fingerprints in ‘Prints only’ mode (1 to N)
Creating a vein pattern enrolment reader
1. Select the enrolment reader with PC/USB link or one
of the BIOVEIN readers of the site
2. The badge encoder then appears in the installation
overview.
SenatorFX.NET/LOG.NET user manual – V.1.1
p. 34/140
Site configuration
Configuring the central units
Select the ‘Technical’ tab → Site configuration
1. Creating/Modifying a central unit
1. Select the network and click ‘create a
central unit’
2. Define the model of the central unit to be
edited
-
Use the ‘Type of central unit’ field
Scroll down the menu
Select the central unit
Summary table of available central units:
Reference
Model
Readers
Compatible
technologies
Connections
Users
GENIUS
Central unit
2
Wiegand Clock/data
USB/RS485 Ethernet
10K
C1P2FX
Central unit
2
Wiegand Clock/data
USB/RS485 Ethernet
10K
C4PLUSFX
Central unit
4
Wiegand Clock/data
USB/RS485 Ethernet
10K
BIOVEIN
Biometric reader
1
Veins in finger
RS485 Ethernet
1K
SenatorFX.NET/LOG.NET user manual – V.1.1
p. 35/140
Configuring the central units (continued)
1. Creating a central unit (continued)
To name the central unit as it will appear in the software, use the ‘Name’ field.
The ‘Address’ drop-down menu is used to configure the address of the central unit in the
network. Addresses already used in the network do not appear in the drop-down menu.
Up to 32 central units can be put together in a network. The available addresses are therefore
numbered from 1 to 32. When the ‘Not connected’ box is selected, it tells the software not to
communicate with the central unit.
Descriptions of the ‘Central unit resources’ tab for GENIUS, C1P2FX and C4PLUSFX
•
•
•
•
•
•
Enable or disable ‘radio input’
Enable the summer/winter time change
Enable or disable 'intrusion check’
Select the mode of the ON/OFF input
Enable or disable ‘power supply check’
Select the central unit input
When all settings have been selected, click ‘OK’
to confirm
GENIUS, C1P2FX and C4PLUSFX central units
have a radio input.
This input is compatible with certain TECHNOEMand JCM-type radio receivers.
To activate this input, select the ‘Enable radio input’
box.
‘Observation of time change’ (summer/winter) allows
the automatic local management of the reader
without connecting to the software and the computer.
Description of the ‘Central unit resources’ tab for BIOVEIN
•
•
•
•
Enable or disable box intrusion management
Enable or disable the tear-off contact
Enable the summer/winter time change
Enable or disable the reader buzzer
When all settings have been selected, click ‘OK’ to
confirm
The BIOVEIN reader is used to manage the self-protection
of the box against opening and tear-off. This can generate
a local or remote alarm and lock the reader to prevent its
use.
The buzzer function provides an audible signal when the
reader is used.
‘Observation of time change’ (summer/winter) allows the
local management of the reader without connecting to the
software and the computer.
SenatorFX.NET/LOG.NET user manual – V.1.1
p. 36/140
Site configuration
Configuring the central units (continued)
1. Creating a central unit (continued)
Description of the ‘Access control’ tab for GENIUS, C1P2FX and C4PLUSFX
•
•
•
•
•
•
Enable or disable the ‘transit time’
Select the duration of the delay
Enable or disable ‘anti-passback’
Select ‘local mode’ or ‘global mode’.
Enable or disable ‘anti-timeback’
Select the duration of the ‘anti-timeback’
When all settings have been selected,
click ‘OK’ to confirm
When ‘anti-passback’ is enabled, the ‘Local APB’ , ‘Global APB’, and ‘Anti-timeback’ options appear.
For the anti-passback function to operate, at least one reader must be defined on the central unit as the
entrance and another reader defined as the exit.
The central unit then prohibits one badge from passing an entrance twice without passing an exit
between the two entrances, or from passing an exit twice without passing an entrance between the two
exits.
Local APB (anti-passback) is used to enable the anti-passback function between access points
belonging to the same central unit.
Global APB (anti-passback) is used to enable the anti-passback function between all access points
defined as entrances or exits. In this case, all of the installation’s central units switch to Global APB.
If the function is disabled on just one of the central units, it will automatically be disabled on all the units
of the installation. For global anti-passback to operate, it is essential for the SenatorFX.NET service to
be launched and for it to communicate with the central units.
The Anti-Timeback function lets you enable anti-passback according to a set time span. The same
badge cannot pass twice consecutively through one access point until a certain amount of time, defined
by the Anti-Timeback cursor, has passed. The time span can be set from 0 to 99 minutes. When the
time is set to 0, anti-timeback is disabled and anti-passback is in operation.
The ‘Transit time’ function is used to limit the time allotted for persons to go from one access point to
another. Beyond this time, users are refused at the second access point and are obliged to return to the
first.
SenatorFX.NET/LOG.NET user manual – V.1.1
p. 37/140
Site configuration
Configuring the central units
1. Creating a central unit (continued)
Description of the ‘Access Control’ tab for BIOVEIN
•
•
•
•
Enable or disable ‘antipassback’
Select ‘local mode’ or ‘global
mode’.
Enable or disable ‘antitimeback’
Select the duration of the antitimeback
When all settings have been
selected, click ‘OK’ to confirm
When ‘anti-passback’ is enabled, the ‘Local APB’, ‘Global APB’, and ‘Anti-timeback’
options appear.
For the Anti-passback function to operate on the BIOVEIN reader in central mode, only ‘Antitimeback’ or ‘Global Anti-passback’ can be used.
Global anti-passback is used to activate the anti-passback function between all access points of
the site defined as entrances or exits. In this case, all of the installation’s central units switch to
Global APB. If the function is disabled on just one of the central units, it will automatically be
disabled on all the units of the installation. For global anti-passback to operate, it is essential for
the SenatorFX.NET service to be launched and for it to communicate with the central units.
The Anti-timeback function lets you enable anti-passback according to a set time span.
The same identifier cannot pass twice consecutively through one access point until a certain
amount of time, defined by the Anti-timeback cursor, has passed. The time span can be set from
0 to 99 minutes. When the time is set to 0, anti-timeback is disabled and anti-passback is in
operation.
The BIOVEIN reader can also be used in reader mode (see page 44).
SenatorFX.NET/LOG.NET user manual – V.1.1
p. 38/140
Site configuration
Configuring the central units
1. Creating a central unit (continued)
When a password is defined on the central unit, password protection can prevent reading,
writing, or deletion of the data on the unit.
If anyone tries to connect to the central unit without the password, the central unit goes to
'Incorrect password' status in SenatorFX.NET.
•
•
•
Edit the new password for the central unit
Confirm the new password for the central
unit
If necessary, delete the central unit
password
2. Duplicating a central unit
1. Select the central unit to be duplicated, and
click ‘Duplicate’
The software completely duplicates the
central unit including:
•
•
•
The associated peripherals
Configuration
Incrementation of the available
address
SenatorFX.NET/LOG.NET user manual – V.1.1
p. 39/140
Site configuration
Configuring the central units
3. Deleting a central unit
2. Confirm deletion of the central unit
Note: Deleting the network will delete all the
associated peripherals
1. Select the central unit to be deleted, and click
‘Delete’
SenatorFX.NET/LOG.NET user manual – V.1.1
p. 40/140
Site configuration
Configuring the readers
Select the Technical menu → Site configuration
1. Configure the reader type
Select the reader to be configured, and then click ‘Configure’
Technology/Protocol
Description
HID
Reads a badge up to 32 bits
HID Decimal
Reads a badge up to 32 bits decimal
Personalised Wiegand
Config. with site code, distributor, even/odd parity, etc.
Personalised decimal Wiegand
Config. with site code, distributor, even/odd parity for the encoding of badges in
decimal
26-bit Wiegand
Reads a badge up to 26 bits standard Wiegand
27-bit Wiegand
Reads a badge up to 27 bits standard Wiegand
30-bit Wiegand
Reads a badge up to 30 bits standard Wiegand
BIOVEIN
EDEN finger vein pattern analysis reader
INT-NPP
Number plate recognition reader
ARGINA
EDEN password-protected proximity badge reader
SOLO3000
EDEN fingerprint reader with SAGEM sensor (3000 users)
SenatorFX.NET/LOG.NET user manual – V.1.1
p. 41/140
Site configuration
Configuring the readers
1. Configure the reader type (continued)
Technology/Protocol
Description
RK40
ICLASS HID reader with built-in keypad
ABA
Reads a badge in Clock/data format, 8 characters
Personalised ABA
Config. with site code, distributor, even/odd parity, etc.
This menu lets you configure the technology of the reader connected to the central unit.
The ‘reader type’ field lists and lets you choose the type of reader connected to the central
unit.
The table presents the possible choices.
•
•
In Wiegand Mode, EDEN central units can read a badge number on 32 bits.
In Clock/data Mode, EDEN central units can read a badge number of 8
characters.
Repeat this action for each reader of the installation’s local management central units.
SenatorFX.NET/LOG.NET user manual – V.1.1
p. 42/140
Site configuration
Configuring the readers
Select the Technical menu → Site configuration
1. Configure the reader type (continued)
Description of personalised formats:
Personalised Wiegand, personalised Wiegand Decimal, personalised ABA
Parity management with
start/end index
Configuration of channels 1,
2, 3 and 4
Position of badge code
Position of site code
Position of distributor code
Note
In all Wiegand modes, EDEN central units can read the encoding of a badge number up to 32
bits.
In all ABA modes, EDEN central units can read the encoding of a badge number up to 8
characters.
EDEN local management central units accept a different reader format for each ‘reader’ input,
i.e.
-
GENIUS / C1P2FX = 2 readers = 2 different reader formats
C4PLUSFX = 4 readers = 4 different reader formats
SenatorFX.NET/LOG.NET user manual – V.1.1
p. 43/140
Site configuration
Configuring the readers
2. Automatic format detection for existing badges
When downloading the existing badges for a site, the SENATORFX.NET software
automatically detects the badge encoding format via one of the readers in the installation.
Procedure:
- Choose a reader from a central unit that is
already connected and operational
- Enter the number of the badge to be
recognised
- Click ‘Search…’
- Swipe the badge in front of the reader
Result:
SenatorFX.NET displays the type of reader,
badge number, number of bits and code.
Simply click
‘Apply’ for the configuration
to be automatically applied to the reader.
SenatorFX.NET/LOG.NET user manual – V.1.1
p. 44/140
Site configuration
Configuring the readers
3. Biometrics
SenatorFX.NET provides the capability to use biometrics in your system of readers, with
SOLO/SOLO3000 (optical sensors) or BIOVEIN (vein patterns).
SOLO/SOLO3000 fingerprint readers
Enter the reader’s identifier printed on the
label affixed inside the reader
BIOVEIN finger vein pattern recognition reader
Enter the reader’s identifier printed in the information menu of the BIOVEIN reader
If EDEN biometric readers are connected to the central units via an RS485 bus rather
than on the ‘reader’ terminals, they take the place of a reader for the central unit also.
GENIUS/C1P2FX = 2 readers
C4PLUSFX = 4 readers
SenatorFX.NET/LOG.NET user manual – V.1.1
p. 45/140
Site configuration
Configuring the readers
4. Configuring a reader
This menu lets you set all the parameters associated with the readers
1. Select the reader to be
configured, and click ‘Modify’
The ‘Company’ field defines the company to which the
element belongs. Certain elements can belong to
several companies, e.g. a shared entrance reader.
The ‘Name’ field lets you edit the name of the
reader to be displayed in the software.
The ‘Position’ menu indicates
the input on which the reader
is located on the central unit.
The ‘Behaviour’ menu indicates how
the door is used. The available
behaviours are ‘Neutral’, ‘Entrance’, and
‘Exit’. The behaviour information is
dedicated to the anti-passback function
and the definition of zones.
When the ‘Do not update APB cycle'
option is selected, it authorises users
passing the reader not to change their
anti-passback status.
Certain tabs differ according to the type of reader that is declared and connected
SenatorFX.NET/LOG.NET user manual – V.1.1
p. 46/140
Site configuration
Configuring the readers
5. 'Standard functions’ tab
Description of basic access control parameters related to readers
The ‘Output' field defines the output
that will be activated when an
authorised badge passes the reader.
This field indicates the relay switching
mode. The choices are ‘Pulse’ and
‘Alternate’.
Pulse mode is adjustable from 1 to
127 seconds, using the cursor.
When the ‘End of command on open
door’ option is selected, it disables the
opening relay as soon as the door is
opened.
If you use an exit button, select this
box.
Select the desired central unit input
and its mode of operation: NO or NC.
Select the desired central unit input
and its mode of operation: NO or NC.
The ‘Door wedge alarm’ function lets
you manage and configure the alarm
that is triggered when the door
remains open longer than the
programmed authorised time.
This lets you manage the ‘Forced door’
alarm.
The counter can be set from 0 to 10
minutes.
Select this box if you wish to manage
the status of the door being controlled.
When the counter is set to 0, the
alarm is disabled.
SenatorFX.NET/LOG.NET user manual – V.1.1
p. 47/140
Site configuration
Configuring the readers
6. 'Special functions’ tab
Description of the auxiliary parameters related to the readers
Select the ‘conditional entry’
option box if you wish to trigger
authorised access only for
vehicles detected by a third-party
system, such as a loop detector.
Select the input (and its mode: NO
or NC) to which the vehicle
detection system will be
connected.
If a badge is presented to the
reader but no vehicle is detected,
access will be refused, with the
message ‘No vehicle present’.
Enabling of ‘Alarm Badge’ function
Choice of central unit relay output,
and its mode.
Detection of an Alarm Badge triggers a relay output in addition to
that of the door for a third-party action.
Conditions
Program the number of passages
required for Alarm Badges and the
time delay of this action.
-
The badge must have ‘Alarm Badge’ status
The ‘Alarm Badge’ function must be enabled on the
reader
The badge must be authorised on the reader
Number of passages of the badge accepted in the
specified time (at least two passages)
Action
-
Activate a relay output on the central unit in time delay mode
from 1 to 255 seconds or alternate.
Difference with Biovein
-
The Alarm finger is the second finger registered
-
A single passage of the finger triggers the relay output
SenatorFX.NET/LOG.NET user manual – V.1.1
p. 48/140
Site configuration
Configuring the readers
7. ‘Profiles’ tab
Description of the auxiliary parameters related to the readers
The ‘Profiles’ zone contains three tabs:
Alert levels 0, 1, and 2.
Each tab includes the same parameters,
which will be enabled via crisis status
management by the software operators,
or via pre-established automatic controls.
The different crisis status management
profiles cannot be enabled at the same
time.
The current alert level indicator is always
visible in the software, in the information
bar at the bottom of the SenatorFX.NET
window.
Free access slot to assign time slots
during which the access point is unlocked
(page 55).
Remote control to define the current
mode of the access point.
If the boxes are selected
Host management: Indicates how
the hosted persons are managed.
The choices are:
Visitor + host, Visitor always refused,
Visitor always accepted.
Test the validity of the group = If the access group is valid, then access is authorised
Test the APB cycle of badges = If the APB status of the badge is valid, then access is
authorised
Test the transit time = If the transit time status of the badge is ‘HS’ (out of service), then
access is refused
Test the validity date of badges = If the validity date has passed, then access is refused
Test group prohibition= If the group is prohibited, then access is refused
Test the time slots = Checking the status of the badge time slot
Test the number of passages = Check that the badge still has a passage credit
Count of number of passages = If the badge has passage credit, then at each passage
on this reader, deduct one passage unit from the credit.
Authorise management of Alarm Badges = Activates the function described on page 37
Authorise badges without the print code = Authorises access for badges configured as
‘badge only’ without code or print, for ‘badge + print’ and ‘badge + code’ systems.
Memorise unknown number plates = Memorises number plates not recorded in the
system, via the reader dedicated to this INTNPP application.
SenatorFX.NET/LOG.NET user manual – V.1.1
p. 49/140
Site configuration
Configuring the readers
8. ‘Connections’ tab
Description of the auxiliary parameters related to the readers
Model of outputs during free
access
In addition to simple access
control, it is possible to define
output groups that will be activated
during free access time slots. To
activate a model, you must first
create an ‘Output group’. Then,
simply select it from the ‘Model of
outputs during free access’ dropdown menu.
Integrated keyboard
management
Lets you use a reader with
integrated keyboard and trigger
dual identification.
The ‘Input time limit’ lets you
configure how much time the user
has available to enter the code
after presenting the badge. The
‘Number of attempts’ indicates
how many times an incorrect code
can be entered before the
keyboard is locked. The ‘Lock
time’ defines how long the
keyboard is locked following the
input of incorrect codes.
The ‘Code slot’ lets you define the
time slots during which the code is
not requested.
To define a time slot, an
automation slot is required
(Access control menu).
Hosting lets you define the parameters related to the host/visitor
function.
The ‘Host slot’ field lets you define the time slots during which the host
must be with the visitor.
During these periods, the visitor presents his/her badge and, to unlock
access, the host has a configurable amount of time in which to present
his/her badge.
For this function, an automation slot must be created (Access control
menu).
Outside these slots, the visitor may move freely through the access
points.
The ‘Hosting time delay’ is used to define the time available to the host
to present a badge after the presentation of the visitor’s badge.
SenatorFX.NET/LOG.NET user manual – V.1.1
p. 50/140
Site configuration
Configuring the readers
9. ‘Characteristics’ tab
Description of the auxiliary parameters related to the SOLO/SOLO3000 and BIOVEIN
biometric readers
Adjustment of the
reader sensor
Number of enrolments
Defines the number of
passages of the user’s
finger required for
enrolment.
Can be set from 3 to 5
passages
Security level
Adjustable from 0 to 5
(default = 2)
Sensitivity
From 8 to 900 (50 by
default)
Sensitivity 1
From 8 to 900 (30 by
default)
Sensitivity 2
From 0 to 900 (20 by
default)
Buzzer
If the box is selected,
then the reader’s buzzer
is enabled
Box intrusion
If the box is selected,
then management of box
intrusion is enabled.
Tear-off
If the box is selected,
then management of box
tear-off is enabled.
SenatorFX.NET/LOG.NET user manual – V.1.1
p. 51/140
Site configuration
Configuring the readers
10. Delete/add a reader
Deletion of the file reader will lead to
the deletion of all the associated
configuration
To add a reader to replace those previously deleted
Procedure:
1. Select the central unit
2. Click ‘Add reader’
3. Follow the instructions to configure the
reader file (page 45 )
SenatorFX.NET/LOG.NET user manual – V.1.1
p. 52/140
Site configuration
Peripherals of the central units
Select the Technical menu → Site configuration → Add input card
1. Input extension modules
Add an input card
1. Select the central unit
Click and then select: ‘Add input card’
The ‘Name’ field defines the name that will
identify the card in the software.
The ‘Address’ drop-down menu indicates the
address that was defined on the card (1 to 10).
The ‘Company’ field defines the
company to which the element belongs. Certain
elements can belong to several companies or
tenants.
You can enter one name
for each input in the
‘Name’ list
Delete an input card
Confirm the deletion of the input group
Note: The deletion of an input card will lead to deletion of all the
associated configuration
SenatorFX.NET/LOG.NET user manual – V.1.1
p. 53/140
Site configuration
Peripherals of the central units
2. Creation of input groups
The input group is an association of several INFX2 card inputs and/or central unit inputs.
It can be associated in an ‘Automation’ to control various configurable actions.
Select the central unit
Cliquez sur «Ajouter Groupe d’entrées »
The ‘Name’ field lets you define the name of the
group.
The ‘Select the inputs’ list lets you select the
inputs that will belong to the group.
Select the Input Group and click
‘Delete’.
The ‘Company’ field defines the company to which the
element belongs. Certain elements can belong to several
companies.
Delete an Input Group
Confirm the deletion of the input group
Note: Deletion of the input group will lead to the deletion of all the
associated configuration
SenatorFX.NET/LOG.NET user manual – V.1.1
p. 54/140
Site configuration
Peripherals of the central units
3. Output extension modules
Adding an OUTFX2 output card
-
Select the central unit
Click ‘Add output card’
The ‘Name’ field is used
to define the name that will identify
the card in the software
The ‘Address’ drop-down menu is used
to indicate the address that was defined
on the card (1 to 10)
The ‘Company’ field defines the
company to which the element belongs.
Certain elements can belong to several
companies or tenants.
You can enter a name
for each input in the
‘Name’ list.
Select an output card and click ‘Delete’
Delete an Output card
Confirm the deletion of the input group
Deletion of the input group will lead to the deletion of all the associated
configuration
SenatorFX.NET/LOG.NET user manual – V.1.1
p. 55/140
Site configuration
Peripherals of the central units
4. Creating output groups
The Output Group is an association of several outputs of an OUTFX2 card. It can be
associated within an ‘Automation’ as a configurable action, or for elevator management.
-
Select the central unit
Click ‘Add output group’
The ‘Name’ field defines the name of the group
The ‘Select outputs’ list is used to select the
outputs that will belong to the group
Select the output group and click
‘Delete’
The ‘Company’ field defines the company to
which the element belongs. Certain elements can
belong to several companies or tenants.
Deleting an Output group
Confirm the deletion of the input group
Deletion of the input group will lead to the deletion of all the
associated configuration
SenatorFX.NET/LOG.NET user manual – V.1.1
p. 56/140
Site configuration
Peripherals of the central units
5. Counters
These are used to ascertain the exact number of persons in a zone, to prohibit access when the maximum
authorised number of persons has been reached for a Parking management application, or for security reasons,
to control a third-party system when a zone contains absolutely no users.
Counters can be used as a condition, can be modified in automations, and can be displayed on a dynamic
supervision diagram.
The ‘Name’ is the name
by which the counter will
be called in the software.
Select the central unit and click ‘Add output
group’
Deleting a Counter
The ‘Company’ field defines
the company to which the element
belongs. Certain elements can belong
to several companies.
The ‘Value’ field defines the start
value of the counter
Confirm deletion of the counter
Note: Deletion of the counter will lead to the deletion of
all the associated configuration
Select the counter and click ‘Delete’
SenatorFX.NET/LOG.NET user manual – V.1.1
p. 57/140
Site configuration
Peripherals of the central units
6. ‘Central unit’ Automations
Automations are scenarios used to trigger actions according to pre-established conditions. These scenarios
are stored in their central unit, with an upper limit of 32 automations.
The conditions and actions of an automation are associated with the same central unit.
The name entered in the
‘Name’ field is the name that
will be displayed to refer to the
automation throughout the
software.
The ‘Conditions’ area lets you
define the status of the
parameters that must be
checked to trigger execution of
the automation. An automation
can contain up to four
conditions.
Available conditions
1. Automation time slot
2. Central unit input
3. Input card input,
4. Automation,
5. Central unit events
6. Reader event
7. Status of a counter,
8. Status of a group of
inputs
It is possible to ensure that
several parameters are
checked to trigger the
automation.
Two logical operators are
available to define how the
various parameters should be
checked: OR, AND.
For an ‘OR’, only one condition
needs to be fulfilled in order to
trigger the automation. For an
‘AND’, all the conditions must
be fulfilled at a given moment
‘T’.
The ‘Action’ area is used to define the actions to be triggered when the
conditions are fulfilled. An automation can execute two actions.
1.
2.
3.
4.
5.
6.
7.
8.
Available actions
Output
Group
Reader
Counter
Miscellaneous actions
Alert level
Output group
Number of passages
The ‘Opposite action’ area lets you define actions that will take place when
the conditions are no longer fulfilled. You can create two opposite actions
per automation.
SenatorFX.NET/LOG.NET user manual – V.1.1
p. 58/140
Site configuration
Peripherals of the central units (continued)
6. ‘Central unit’ Automations (continued)
Automation conditions
Description
Time slot
Checking the status of the time slot: activated or not
Central unit input
Checking the status of a central unit input: NO or NC
Input card input
Checking the status of a central unit input card input: NO or NC
Automation
Checking the status of the central unit automation
Central unit events
Checking an event associated with the central unit
Reader event
Checking an event associated with a central unit reader
Status of a counter
Checking the status of a central unit counter
Status of a group of inputs
Checking the status of a central unit input group
Automation actions
Description
Output
Activation of an output of the central unit or an output card (pulse/alternate)
Group
Change of status of an access group (Authorise or Prohibit)
Reader
Change of status of a central unit reader (Controlled Mode, Access Locked, Access
maintained unlocked, or Access unlocked by pulse)
Counter
Modification of the status of the counter (incremented/decremented by 1, or reset)
Miscellaneous actions
Forgiving badges, displaying a camera controlled by a video recorder, or displaying a
pre-configured instruction
Alert level
Modification of the alert level (increment/decrement, reset or change)
Output group
Activation of a central unit output group (Pulse or Alternate)
Number of passages
Modification of the number of passages of a selected access group
SenatorFX.NET/LOG.NET user manual – V.1.1
Events linked to a user
•
•
•
•
•
•
•
•
•
•
•
•
•
•
•
•
•
•
•
•
•
•
•
•
•
•
•
•
User accepted
User suspended
User prohibited
User unknown
User already entered
User already exited
User not valid on this door
User outside time slot
User off site
User outside distributor
User without print
User format error
Group prohibited
Stolen badge
Badge without code
Badge no longer valid
Badge error
Code accepted
Incorrect PIN
Successful print encoding
Alarm print used
Print refused
Host refused
Host accepted
Max. number of passages reached
User accepted + awaiting code
User accepted + awaiting print
User accepted + awaiting host
Events linked to a door
•
•
•
•
•
•
•
•
•
•
•
•
•
•
•
•
Door intrusion
End of intrusion
Door locked
Door wedged
End of open door
Pushbutton opening
Code input time has expired
Badge write error
Vehicle not detected
Number plate not recognised
Transit time has expired
Pulsed opening by CTM
Opening maintained by CTM
Closure maintained by CTM
Auto CTM control mode
Door open on start of free access
time slot
• Door closed on end of free access
time slot
• Number plate recognised, awaiting
badge
• Host timeout
p. 59/140
Events linked to the system
•
•
•
•
•
•
•
•
•
•
•
•
•
•
•
•
•
•
•
•
Out of condition
Soiled sensor
Keyboard locked
End of keyboard lock
Box intrusion
End of box intrusion
Power fault
End of power fault
BIO box intrusion
End of BIO box intrusion
Automation execution
End of automation
execution
Change of alert level
Connection of extension
bus
Disconnection of extension
bus
Tear-off of BIOVEIN box
End of BIOVEIN tear-off
Alarm activation (bistable
mode)
Alarm deactivation (bistable
mode)
Alarm ON/OFF pulse
Confirm deletion of the counter
Deletion of the counter will lead to the deletion of all the
associated configuration
‘Central unit automations’ cannot generate an action between the central units. To do this, use ‘Centralised
automations’ managed by the software (see page 64 )
SenatorFX.NET/LOG.NET user manual – V.1.1
p. 60/140
Site configuration
Status of central units
Select the Technical menu → Status of central units
The central unit status window gives an overview of the status of each central unit in the
installation
The first column displays an icon whose colour depends on the status of the central unit.
The second column displays the name of the central unit.
The status column indicates the status of the central unit.
The ‘Version’ column displays the type of central unit declared and the version of the central
unit detected by the software. Until communication has been established between the software
and the central unit, the central unit version will remain 'v 0.0'.
The ‘Network’ column indicates the name of the network the central unit is connected to.
The 'Address’ column displays the type of network the central unit is connected to and its
address.
Select the ‘Technical’ tab
and click ‘Status of
central units’
Nominal: This is the status of the central units when communication has been established between the computer
and the central units. ‘Nominal’ is the status that central units should normally be in.
Initialisation in progress: A central unit displays this status when it first connects to a computer, when a
reprogramming occurs, or when the user request a manual initialisation. The icon is red.
Configuration in progress: This status is displayed when the computer sends data to a central unit.
In this status, no event is uploaded to the computer. The icon is green.
Occupied: This status is displayed when data are being sent from the central unit to the computer.
Network unavailable The central unit has this status when the computer is unable to establish communication with
the interface (type C485FX, MODTCP/IP, etc.) The icon of the central unit is red.
Disconnected: ‘Disconnected' status is displayed when communication between the computer and the interface has
been established but the interface is unable to communicate with the central units.
Incompatible version: The computer displays this status when the software version and the firmware version of the
central unit are incompatible. In this case, the central unit needs to be updated.
Incompatible type: This status indicates an incorrect declaration of the type of central unit present at this address.
The icon of the central unit is shown in yellow.
The ‘Address Bus’ column indicates the address that the central unit occupies on the bus. A bus can have up to 32 central
units.
SenatorFX.NET/LOG.NET user manual – V.1.1
p. 61/140
Site configuration
Status of central units
Using the ‘Action’ menu, communication with all central units can be interrupted or activated at
the same time.
The ‘Disconnect’ action will switch the central units to ‘Disconnected’ mode and disable
communication, whilst ‘Connect’ will enable communication with this central unit.
You can also initialise a central unit, display its parameters page or disconnect/connect it by
right-clicking on the line displaying the information concerning this central unit:
SenatorFX.NET/LOG.NET user manual – V.1.1
p. 62/140
Site configuration
Updating the central unit
Updating the central unit’s firmware allows the installation of new firmware on the installation’s
central units.
It may be necessary to update the firmware when the software displays
‘incompatible version’ in the ‘status of central units’ menu.
The following central unit versions are compatible with the software:
• C1P2FX v3.0 and higher
C4PlusFX v5.0 and higher
• Genius v2.0 and higher
• BioVein v2.0 and higher
The software does not propose automatic updates of the central units, but
all the central units with lower versions have ‘Incompatible version’ status,
and the user must apply the central unit update procedure.
Procedure
1. Enter the password
‘edenfx’
2. Confirm with ‘OK’
3. Select the proposed
central unit model to be
updated from the dropdown menu
4. Enter the password
‘eden’
5. Confirm by pressing
‘enter’ on the PC keyboard.
6. Select the central units
to be updated
7. To launch the update,
click OK
8. Allow the software to update the selected central
units.
9. Repeat the procedure for the other central unit
models in the installation if necessary.
For additional information concerning the need to update
the central units in your
installation,
contact our hotline:
Site
configuration
[email protected]
SenatorFX.NET/LOG.NET user manual – V.1.1
p. 63/140
Ethernet module detection
Select the Technical tab → Ethernet module detection
The detection of EDEN Ethernet modules is always launched.
The ‘Search’ button launches the automatic detection of the hardware present on the Ethernet
network.
192.168.2.14
The field is then completed automatically.
You can drag and drop the ‘IP address’ from the ‘IP Config’
window to the ‘IP Address’ field in the ‘Network’ window.
To modify the configuration of one of the units, right-click the
line concerned. A contextual menu appears.
Choose ‘configure’ to open a new window.
Leave the mode set at RS 232.
SenatorFX.NET/LOG.NET user manual – V.1.1
p. 64/140
Site configuration
Centralised automations
Select the ‘Access control’ tab → ‘Centralised’ automations
Automations are scenarios used to trigger actions according to pre-established conditions.
This application is stored in the software server and can generate actions between the site’s
central units.
This application remains operational if the software is closed but the ‘Controller service’ is
open.
1. Global counters, e-mails, exports and instructions
- Select the ‘Access control’ tab
- Click ‘centralised automations’
- Select ‘Global counters’
- Click ‘Create a global counter’
-Enter the name of the e-mail to be displayed in the
software.
-Select the company or companies that will be able to
manage this e-mail.
- Enter the e-mail address of the recipient
- Enter the subject of the e-mail message
- Enter the name of the recipient’s e-mail account
- Enter the password
- Enter the name of the SMTP server
- From the drop-down menu, select the data to
be sent in the body of the message or as an
attachment.
-Enter the name of the instruction to be
displayed in the software.
- Enter the instruction.
-Select the company or companies that will be
able to manage this instruction.
- Enter the name of the global counter to be displayed in the
software. The ‘value’ field lets you enter a start value for the
counter.
- Select the company or companies that will be able to manage
this counter.
SenatorFX.NET/LOG.NET user manual – V.1.1
p. 65/140
Site configuration
‘Centralised’ automations
Select the ‘Access control’ tab → ‘Centralised’ automations
2. Editing the ‘Centralised’ automations
Note on the creation of centralised automations:
-
Conditions with the parameters ‘or’ and ‘and’, + unlimited actions and opposite actions
- Select the ‘Access control’ tab
- Click ‘centralised automations’
Create a centralised automation
Procedure
Enter a name for the automation
2. Using the drop-down menus, select the
conditions that will trigger the desired actions.
When fulfilled, these conditions will trigger the
Configuration du site
automation.
Lesmay
automatismes
«
The conditions
be combined using
the
logical operators AND, OR, and XOR.
3. Select the desired actions using the dropdown menus.
The actions define what will happen when the
conditions are fulfilled.
4. Select the opposite actions. Opposite actions
define an action to be executed when the
conditions are no longer fulfilled.
The execution of a centralised automation can be forced
directly from the ‘Supervision’ menu.
SenatorFX.NET/LOG.NET user manual – V.1.1
p. 66/140
Site configuration
‘Centralised’ automations
Select the ‘Access control’ tab → ‘Centralised’ automations
Automation conditions
Description
No condition
Checks that there is no condition to trigger the actions
Badge
Verifies the status of a badge (In service, Suspended, or Stolen)
Badge-related event
Verifies the event following the passage of a badge on a reader
Group
Verifies the status of an access group (Authorised or Prohibited)
Group-related event
Verifies an event following the passage of a badge from an identified access
group on a reader
Reader
Verifies the status of a reader (Auto Mode, Opening/Closure Maintained)
Reader-related event
Verifies the status of a central unit counter
Date
Verifies the value of a date
Time
Verifies the value of a time
Time slot
Verifies the status of a time slot
Zone
Checks the status of a presence counter of users from an access group in a
zone
Minutes of group presence in
a zone
Checks the status of a time counter of an access group in a zone
‘Central unit’ automation
Verifies the status of a ‘local’ automation
Counter
Verifies the status of a local counter (stored in a central unit)
Global counters
Verifies the status of a global counter (stored in the software server)
GALAXY alarm input
Verifies the status of a GALAXY central unit alarm input
GALAXY input group
Verifies the status of a GALAXY central unit alarm input group
GALAXY relay output
Verifies the status of a GALAXY central unit relay output
SenatorFX.NET/LOG.NET user manual – V.1.1
p. 67/140
Site configuration
‘Centralised’ automations
Select the ‘Access control’ tab → ‘Centralised’ automations
Automation actions
Description
Output
Activates an output of a central unit or an output card (pulse/alternate)
Reader
Changes the status of a reader (Controlled Mode, Access Locked, Access maintained
unlocked or Access unlocked by Pulse)
Group
Changes the status of an access group (Authorise or Prohibit)
Badge
Changes the status of a badge (In service, Suspended, Profile 0, 1, or 2)
Clear Zone
Empties the list of users present in a selected zone
Analogue video camera
Displays a camera or the preset position of a dome connected to a DVR
IP camera
Displays a camera or the preset position of an IP dome
Counter
Modifies the status of a local counter (incremented/decremented by 1, or reset)
Global counter
Modifies the status of a global counter (incremented/decremented by 1, or reset)
Instruction
Displays a safety instruction
Execute centralised automation
Executes a centralised automation
History
Executes a history query
Send an e-mail
Sends an e-mail message
Export to a file
Exports a data file
GALAXY input
Changes the status of a GALAXY central unit intrusion alarm input
GALAXY group
Changes the status of a GALAXY central unit intrusion alarm input group
GALAXY relay output
Changes the status of a GALAXY central unit relay output
Miscellaneous actions
Backs up the server database
SenatorFX.NET/LOG.NET user manual – V.1.1
p. 68/140
Site configuration
Controlled zones
Select ‘Access control’ → Controlled zones
-
A zone is an area delineated by one or more entry readers and one or more exit
readers.
A zone has an associated counting system and presence time management, allowing
the occupation of the zone at any moment to be determined.
Procedure
1. Enter the name of the zone
2. Select the entry reader(s) for the
zone
3. Select the exit reader(s) for the
zone
4. Select the company/companies or
tenant/tenants who may manage
the zone
A zone can have an unequal number of ‘Entry’ and
‘Exit’ readers.
When this zone has been created, the users present in
it can be monitored in real time via the ‘Zone
occupancy’ menu (page 108 ).
This zone can also be used to ascertain the cumulative
presence time of a group of users according to
calendar queries via the ‘presence time’ menu (page
107).
Deletion of this element will lead to the
deletion of all the associated configuration
SenatorFX.NET/LOG.NET user manual – V.1.1
p. 69/140
Chapter 4
Access rights
What does this chapter include?
Access rights
Access groups .................................................................................................................... 70
Time slots ........................................................................................................................... 71
1. ‘User’ time slots ........................................................................................................... 71
2. ‘Automation’ time slots................................................................................................. 72
3. Holidays ...................................................................................................................... 73
SenatorFX.NET/LOG.NET user manual – V.1.1
p. 70/140
Access rights
Access groups
Select ‘Access control’ → Access groups
-
Access groups are used to define the user access authorisations for the site.
A group consists of one or more readers, and can be modified at any time.
You can create up to 1024 access groups in the software.
‘Name’ fields
Enter the name of the access group, for display throughout the
software
The ‘Company’ field is used to
define the company to which the
group belongs.
You can associate a group with
only one tenant.
‘Reader’ field
Select the boxes for the desired
readers.
The ‘Apply the following slot to all selected readers’ field
assigns one time slot to all readers authorised for the group.
When the ‘Prohibit the group’ box is selected, it prevents the use
of all badges belonging to the group.
‘Time slot’ field
After validating the readers, you can
select a time slot for each one.
When the transit time function is in use on the installation, selecting
the ‘Do not test transit time’ box authorises the group not to be
subjected to this check.
‘Permanent
access’
gives
unrestricted access on a reader.
The ‘Maximum entries per group’ option lets you define a
maximum number of persons in the group to pass a reader defined
as an entry reader.
‘Edit slot’ lets you modify the
selected slot or create another one if
‘Permanent access’ is selected.
For further information about time
slots, see page 71.
‘Enable exit groups’ is used to activate exit groups for a given
time when a badge associated with this group passes the
corresponding reader.
This function is used for floor management in an elevator.
SenatorFX.NET/LOG.NET user manual – V.1.1
p. 71/140
Access rights
Time slots
Select ‘Access control’ → Time slots → ‘User’ time slots
1. ‘User’ time slots
-
A time slot is used to define ‘Authorised’ and ‘Prohibited’ periods to be associated with
‘Badges/Users’ and ‘Access Groups’.
You can create up to 64 time slots and 10 periods per day.
Each period is configurable to within one minute.
‘Company’ field:
Lets you define the company to which the time slot belongs.
‘Name’ field
Enter the name of the time slot to
be displayed in the software.
‘Type’ field
Select the time slot editing profile.
Three different profiles
Daily
The same time slot is applied for
every day of the week.
Week/weekend
One time slot for Monday to Friday,
and another one for the weekend.
Detailed
Seven time slots per week.
The type of drawing lets you define
whether the period is authorised (green) or prohibited (red).
To create a new time slot, click the bar(s) on which the time slot
must be created, and move the mouse whilst pressing and holding
the left button.
The time slot start and end times are displayed at the end of each
bar.
To define the times exactly, right-click on a period and select
‘modify’. A window appears where you can define the period start
and end times.
An additional period is
available: the holiday period.
The holiday period applies
during days defined as
holidays.
SenatorFX.NET/LOG.NET user manual – V.1.1
p. 72/140
Access rights
Time slots
Select ‘Access control’ → Time slots → ‘User’ time slots
2. ‘Automation’ time slots
-
A time slot allows you to define ‘Authorised’ and ‘Prohibited’ periods to be associated
with ‘Automation’ scenarios and with readers, for the ‘Free access’ function.
You can create up to 64 time slots and 10 periods per day.
Each period is configurable to within one minute.
‘Name’ field
Enter the name of the time slot to
be displayed in the software.
‘Company’ field:
Lets you define the company to which the time slot belongs.
‘Type’ field
Select the time slot editing profile.
Three different profiles
Daily
The same time slot is applied for
every day of the week.
Week/weekend
One time slot for Monday to
Friday, and another one for the
weekend.
Detailed
Seven time slots per week.
The type of drawing lets you define
whether the period is authorised (green)
or prohibited (red).
To create a new time slot, click the bar(s)
on which the time slot must be created,
and move the mouse whilst pressing and holding the left button.
The time slot start and end times are displayed at the end of each bar.
To define the times exactly, right-click on a period and select ‘modify’. A
window appears where you can define the period start and end times.
An additional period is available: the holiday period. The holiday
period applies during days defined as holidays.
SenatorFX.NET/LOG.NET user manual – V.1.1
p. 73/140
Access rights
Time slots
3. Holidays
Select ‘Access control’ → Time slots → Holidays
-
The annual schedule is used to define ‘holiday periods’ to be managed by access
control.
These days take priority irrespective of the day of the week. The times defined for
holidays apply to badges that do not have permanent access.
32 holiday periods can be created, without any limit on the number of days per period.
Click ‘Holidays’ and then ‘Modify’.
Click the ‘Add’ button to define a holiday
period.
Select the start and end date on the new
line.
There is no limit to the number of days
for the same period.
A holiday can be renewed every year by
selecting the box for the corresponding
line.
To remove a holiday, go to the relevant
line and click ‘Delete’.
Holidays are automatically updated in the
central units every day if the units are
connected to the computer.
SenatorFX.NET/LOG.NET user manual – V.1.1
p. 74/140
Chapter 5
Users and badges
What does this chapter include?
Users and badges ................................................................................................................ 74
Creating a new series of badges ......................................................................................... 75
List of badges/users ............................................................................................................ 76
Learning the badges ........................................................................................................... 77
Badge personalisation ........................................................................................................ 78
Badge printing templates .................................................................................................... 79
Badge/user file .................................................................................................................... 80
1. ‘Standard’ profile ......................................................................................................... 80
2. ‘Additional’ profiles ...................................................................................................... 81
3. ‘Options’ tab ................................................................................................................ 82
4. ‘Additional information’ tab........................................................................................... 83
5. The ‘Enrolment’ tab ..................................................................................................... 84
6. The ‘Encoding’ tab ....................................................................................................... 85
7. The ‘Print’ tab .............................................................................................................. 86
8. Fast data download ..................................................................................................... 87
SenatorFX.NET/LOG.NET user manual – V.1.1
p. 75/140
Users and badges
Creating a new series of badges
Select ‘Access control’ → Badges → List of badges
-
This menu is used to create, modify, and delete badges and users for the site.
The list of badges displays the complete or filtered list of badges and users configured on the
site.
Right-click a badge to modify (open the badge file) or delete the badge concerned.
Double-clicking a badge has the same effect as using the ‘Modify’ option.
-
Select the ‘Access control’ tab
Click ‘Badges’
Click ‘Add a series of badges’
Description of fields
First badge: number of the first badge in the series
Quantity: quantity of badges to be created
Status: status of badges to be created
In service, Suspended or Stolen
Group: access group to which the badges created will be
assigned
Display group: displays the selected access group
Users to enrol: indicates whether the badges created will
allow biometric enrolment of the user the first time they use a
reader.
Type of series: defines whether or not the badges created will
have a maximum number of passages
Number of passages: indicates the authorised number of
passages for the series of badges
Company: if several companies or tenants are defined,
specify the company of the badges to be created.
To ‘modify’ the badge/user file, select the relevant
line and right-click, then select ‘Modify badge’.
To ‘delete’ the badge/user file, select the relevant line
and right-click, then select ‘Delete the badge’. You will
be asked for confirmation.
SenatorFX.NET/LOG.NET user manual – V.1.1
p. 76/140
Users and badges
List of badges/users
Select ‘Access control’ → Badges → List of badges
This menu is used to process a list of badges and users saved in the system in various ways.
‘Tools’ menu
Grouped processing
Assigns or modifies the properties of several badges at
the same time
Copy to clipboard
Copies the displayed list of badges to the Windows
clipboard
Delete a series of badges
Deletes a specified series of badges.
Group filter
Selects an
access group to modify its parameters.
Status
Modifies the status of all badges/users associated
with the selected group.
Available statuses = In service, Suspended and
Stolen
Access slot
Displays the list of all available user time slots
Number of passages
Modifies/adds a passage credit to all users
associated with this group
Validity date
Modifies/assigns a validity start/end date for all users
associated with the selected group
The ‘Filter’ menu is
used to filter the list
of badges according
to the badge search
form. To display all
badges again, click
‘Delete filters’.
Delete a series of badges
This menu lets you delete a series of badges
between two configurable numbers.
Search for a badge
This menu is used to filter the badge list display
according to different criteria and fields of the badge/user
file database.
The criteria are: Badge number, name of bearer + all
the personalised fields of the badge/user file.
SenatorFX.NET/LOG.NET user manual – V.1.1
p. 77/140
Users and badges
Learning the badges
Select ‘Access control’ → Learn
This function is used to enrol badges by presenting them to one of the site’s readers in order to save them in the
database of the software. This can also prevent errors in reading printed badge numbers.
Learning reader selection
Reader
This drop-down menu is used to
select the reader that will enrol the
new badges, out of all the readers
on the site.
After being presented to the
selected reader, the new badges will
be displayed in the window.
Badge information
Group
This drop-down menu lets you
select and assign one of the existing
access groups to the badge and to
the newly-enrolled user.
Status
Assign a status for the badge and
the user associated with the
selected group.
Available statuses = In service,
Suspended and Stolen
Access slot
The drop-down menu displays the list of all available user time slots (page
71).
Company
This drop-down menu specifies the company or tenant to which the badge
and the user belong.
You can associate an identifier with only one tenant.
All badges enrolled via the ‘Learning’ menu join the main database
and the list of badges (page 76).
SenatorFX.NET/LOG.NET user manual – V.1.1
p. 78/140
Users and badges
Badge personalisation
Select ‘Access control’ → Badge personalisation
This function is used to create and add additional fields that will be displayed in the badge/user files of the site.
These fields can be completed in each badge/user file and can be used as ‘history’ search filters by the software
(page 137).
Add
Click this button to create a new
additional field.
A new line appears in the main window
of the menu.
Double-click this line to modify the
default name ‘New field’.
Delete
Select the additional field, and then
click the ‘Delete’ button.
Deletion of this field will lead to the
deletion
of
all
the
associated
configuration
SenatorFX.NET/LOG.NET user manual – V.1.1
p. 79/140
Users and badges
Badge printing templates
Select ‘Access control’ → Badge printing templates
This function lets you personalise badges using a commercially available special thermal printer.
You can create an unlimited selection of graphical print templates according to the requirements of the site.
Commercially available printers incorporating Windows drivers are compatible with this module.
Company
This drop-down menu specifies the company to which the badge and the user
belong.
1. Enter a name in the ‘Template
name’ field
2. Select the boxes concerning
the information desired for this
badge printing template
3. The selected information will
appear in the right-hand window.
4. You can then simply drag and
drop
5. You can change the font size
and colour
6. You can add a logo and a
screen background
7. Select the printer
8. Choose the badge orientation
(portrait or landscape).
SenatorFX.NET/LOG.NET user manual – V.1.1
p. 80/140
Users and badges
Badge/user file
Select ‘Access control’ → Badges → List of badges
1. ‘Standard’ profile
This menu is used to configure and modify a user’s badge file. The SenatorFX.NET software can handle 10,000
individual files.
Double-click the line for the desired badge or right-click and select
‘Modify badge’.
Configuring the ‘User’ file
1. Enter the user’s last name in the ‘Last
name’ field.
2. Enter the user’s first name in the ‘First
name’ field.
3. Select the company to which the user
belongs from the ‘Company’ drop-down
menu (‘Creation’, page 94).
4. Select the ‘Validity date’ box if
necessary, and enter the desired start/end
dates and times in the corresponding
fields.
5. You can record a sound and a photo
using the webcam supplied with the
software.
6. Standard profile: Assign or modify the
user’s access group via the drop-down
menu, or view it using the ‘…’ button.
7. Change the badge status in the ‘Status’
field.
8. ’Access slot’ displays the group time
slot by default. It is possible to choose a
time slot other than the group access time
slot by selecting it from the drop-down
menu.
9. Select the ‘Code’ box to assign a PIN
10. Select the ‘Registration number’ box
to enter the registration number of the
user’s vehicle.
11. Select the ‘Number of passages’ box
to enter a passage credit for the user.
13. Use the drop-down menu to
select a time slot to be assigned to
the additional readers.
12. Select additional readers if you wish
to extend access rights without changing 14. Select the ‘Hosted by’ box and
the access group of this user.
select the host badge to enable the
Host/Visitor function.
SenatorFX.NET/LOG.NET user manual – V.1.1
p. 81/140
Users and badges
Badge/user file
Select ‘Access control’ → Badges → List of badges
2. ‘Additional’ profiles
This menu is used to configure and modify the parameters of the ‘Additional profiles 1 and 2’ tab.
These profiles can be enabled via the management of ‘crisis status’ or other parameters.
Description of ‘Additional Profiles
1/2’
These profiles will be enabled
according
to
the
conditions
described below.
Two profiles cannot be enabled at
the same time.
Select the desired condition via the
drop-down menu
Available conditions
- Never = Profile never
enabled
- Alert level = Select the alert
level via the drop-down
menu. Alert levels can be
enabled via the software
operators or via preestablished scenarios
- Minimum alert level =
Select the minimum required
alert level via the drop-down
menu.
Alert levels can be enabled
via the software operators or via preestablished scenarios
- User time slot = Use the
drop-down menu to select
the time slot that will enable
this profile when active
- Period = Define the start/end
dates/times that will enable
the profile
- Permanent profile = Profile
always enabled
-
Double-click the line for the desired badge or right-click and select
‘modify badge’.
Possible parameters
1. Assign the access group via the drop-down menu
2. Change the status of the badge
3. ‘Access slot’ displays the list of all available time slots
4. Select additional readers if necessary
5. Select a time slot that will be assigned to the additional readers
6. Select the ‘Visitor identifier’ box if necessary
All of these parameters are identical to those of the ‘Standard’ profile and
are explained on page 80.
SenatorFX.NET/LOG.NET user manual – V.1.1
p. 82/140
Users and badges
Badge/user file
Select ‘Access control’ → Badges → List of badges
3. ‘Options’ tab
This menu is used to configure and modify the parameters of the ‘Additional profiles 1 and 2’ tab.
These profiles can be enabled via the management of ‘crisis status’ or other parameters.
Description of ‘Special badges’
If the box for the option is
selected, then:
Double-click the line for the desired badge or right-click and select ‘Modify
badge’.
Pass badge
This function allows the bearer
not to be subject to anti-passback
Alarm badge
This parameter authorises the
bearer to activate an additional
relay output when passing an
authorised reader.
The function must be enabled on
the desired readers (see page 47)
Forgive badge
This is a badge that resets all the
badges of the site
With administrator print
The administrator is a user who
can enrol the biometric prints of
other users
User to enrol
This allows the enrolment of
biometric prints to be triggered
when the badge/user with
‘Administrator’ status passes.
‘Display’ description
If the box for the option is selected, then:
Display in events list
Every event generated by the badge/user is displayed in the ‘events list’
event-based monitoring tool
Display in supervision
Every event generated by the badge/user is displayed in the dynamic plans
‘Supervision’ menu.
Display in overview
Every event generated by the badge/user is displayed in the dynamic plans
‘Overview’ menu.
Display in advanced history
Every event generated by the badge/user is displayed in the ‘Advanced
history’ menu.
SenatorFX.NET/LOG.NET user manual – V.1.1
p. 83/140
Users and badges
Badge/user file
Select ‘Access control’ → Badges → List of badges
4. ‘Additional information’ tab
This menu is used to edit the additional information fields assigned to badges and users.
These additional fields are created in the ‘Badge personalisation’ menu.
The number of these additional fields is unlimited. They can be used as a filter for queries in the ‘Advanced
history’ menu.
Double-click the line for the desired badge or right-click and select ‘Modify badge’.
Procedure
1. Select the additional
field to be modified in the
‘Value’ column
2. Double-click the field
3. Enter the desired
name
SenatorFX.NET/LOG.NET user manual – V.1.1
p. 84/140
Users and badges
Badge/user file
Select ‘Access control’ → Badges → List of badges
5. The ‘Enrolment’ tab
This tab appears in the badge/user file only if declared in the software for the ‘SOLO digital fingerprint’
and ‘BIOVEIN finger vein pattern’ biometric readers (pages 32-33).
The main purpose is to launch the user biometric print enrolment phase directly via the user’s file.
Whatever the biometric technology used, two prints per user can be enrolled.
-
Double-click the line for the desired badge or right-click and select ‘Modify badge’.
Procedure
1. Select the desired
technology for the
enrolment of the user’s
biometric identifier
from the ‘Type of
technology’ drop-down
menu.
2. Choose the reader
for enrolment of the
biometric identifiers
from the drop-down
menu on the right.
3. Select the first finger
to launch the
enrolment phase.
4. When this new
window appears,
present your finger to
the chosen reader and
perform the enrolment.
5. Repeat this
procedure for the
second finger if
necessary.
Second finger registered
First finger registered
In France, the use of fingerprints is governed by the CNIL data protection act, which
stipulates that fingerprints must be stored in a Mifare badge for 'print + badge' use.
SenatorFX.NET/LOG.NET user manual – V.1.1
p. 85/140
Users and badges
Badge/user file
Select ‘Access control’ → Badges → List of badges
6. The ‘Encoding’ tab
This tab appears in the badge/user file only if a Mifare ENCODUSB badge encoding module is declared in the software (page 32).
This tab is used to encode the digital prints already enrolled (page 84) in a Mifare badge.
This allows compliance with the recommendations of the French data protection authority (CNIL) concerning the use of digital
prints.
Following this encoding, you can use the ‘Print + badge’ or ‘Badge without print’ function.
Possible actions
Delete a badge
Deletion of the
information contained
in the first 16 sectors
of the Mifare badge
present in the
ENCODUSB
encoder.
Badge without print
This function triggers
encoding of the
badge when selected.
This can be useful for
persons who do not
have a print. Badges
without prints must
nonetheless be
authorised in the
configuration of
readers.
Badge with print
When selected, this
triggers the enrolment
of the finger and
encoding of the
badge if an encoder
and a USB enroller
have been declared.
If only an encoder
was declared, the
‘Badge with print’
button will operate in
the same way as the
‘Badge to enrol’
button.
Double-click the line for the desired badge or right-click and select ‘Modify badge’.
Badge to enrol
When selected, this triggers the encoding of the badge. When the badge has been encoded, simply
presenting the badge to one of the biometric readers of the installation will trigger enrolment. When
the reader beeps, present a finger three times. When enrolment is complete, the badge must be
presented to the reader again for the reader to receive the print.
If you use two prints per user, ENCODUSB uses the first 16 sectors of a Mifare badge.
You can only use 1 K Mifare badges with ENCOD-USB.
SenatorFX.NET/LOG.NET user manual – V.1.1
p. 86/140
Users and badges
Badge/user file
Select ‘Access control’ → Badges → List of badges
7. The ‘Print’ tab
This tab appears in the badge/user file only if declared as a ‘badge printing template’,
as explained on page 72.
This tab is used to print a badge according to a pre-established template with the parameters of this user.
Double-click the line for the desired badge or right-click and select ‘Modify badge’.
Procedure
1. From the ‘Select your
model’ drop-down menu,
select the pre-established
print template.
2. If you wish to see the
printing template, click
‘View’
3. If you wish to print the
badge according to the
chosen printing template,
click ‘Print’
Print preview using the chosen printing
template with the user information.
SenatorFX.NET/LOG.NET user manual – V.1.1
p. 87/140
Users and badges
Badge/user file
8. Fast data download
Select the ‘Administration’ tab → Fast data download
'Fast data download’ is used to import an external database in the form of a spreadsheet.
The fields available in the badge/user file can be imported and an access right and badge number assigned.
Procedure
1. Click ‘Fast data download’.
2. Open the spreadsheet-type
document containing the data to
be imported in the
SENATORFX.NET software.
3. Select and copy the data to be
imported in the Windows
clipboard.
4. Click the ‘Next’ button in the
Data download wizard.
5. The wizard has a drop-down
menu that gives you a list of the
fields available in the badge/user
files for each type of data.
6. Select a field for each type of
data to be imported.
7. To optimise the import, create a
series of badges to be assigned to
the data imported.
8. Enter the number of the first
badge in this new series to be
assigned.
9. Edit the proposed parameters
as on page 75, and then ‘OK’ to
confirm.
10. This new series of
badges/users will then be
displayed in the list of badges, as
on page 76.
SenatorFX.NET/LOG.NET user manual – V.1.1
p. 88/140
Chapter 6
The software operators
What does this chapter include?
The software operators ........................................................................................................ 88
User profiles ....................................................................................................................... 89
1.
Creating a profile ...................................................................................................... 89
User profiles ....................................................................................................................... 90
2. Modify a profile ............................................................................................................ 90
3. Deleting a profile ......................................................................................................... 90
Users .................................................................................................................................. 91
1. Creating a user ............................................................................................................ 91
Users .................................................................................................................................. 92
2. Modifying a user .......................................................................................................... 92
3. Deleting a user ............................................................................................................ 92
The Log .............................................................................................................................. 93
Multi-company/multi-tenant management ........................................................................... 94
SenatorFX.NET/LOG.NET user manual – V.1.1
p. 89/140
Software users
User profiles
Select ‘Administration’ → User profiles → Create a profile
1. Creating a profile
This menu is used to create operator access rights for the SENATORFX.NET software using filters
that are fully configurable by the site manager.
A profile can be associated with one or more software users according to the site management requirements.
You can create as many user profiles as you wish.
-
Select ‘User profiles’
‘Create a profile’
Procedure
1. Enter a name for the current profile in the
‘Profile name’ field. This name will be
displayed throughout the software.
Select the relevant boxes in the menus and
sub-menus you wish to display when using the
software with this 'User profile'.
3. Select the box(es) for the companies or
tenants assigned to this ‘User profile’.
This profile may belong to several companies
or tenants of the site.
When you create a new profile, a user with the profile name is created, and this profile is always assigned to
him/her.
To create a new user, refer to page 91.
SenatorFX.NET/LOG.NET user manual – V.1.1
p. 90/140
Software users
User profiles
Select ‘Administration’ → User profiles
2. Modify a profile
-
Select the desired profile
Click 'Modify’
You can modify all the available parameters in the profile, as explained on page 89.
The new parameters will be applied to all users assigned to this profile.
3. Deleting a profile
Deletion of the file will lead to the deletion of all the
associated configuration
SenatorFX.NET/LOG.NET user manual – V.1.1
p. 91/140
Software users
Users
Select ‘Administration’ → Users
1. Creating a user
This menu is used to create operators/users of the SENATORFX.NET software. Each operator/user is associated
with a user profile.
Several operators/users can be associated with the same profile.
You can create as many operator/user profiles as you wish.
Procedure
-
Click ‘User’
Select ‘Create’
1. Enter a last name for the operator in the ‘Last name’
field.
2. Enter a first name for the operator in the ‘First name’
field.
3. Select the profile to be assigned from the ‘Profile’
drop-down menu.
4. Enter the password for this operator.
5. Confirm the password.
The password can contain all characters. It is limited to 32
characters.
There is a default ‘Administrator operator’.
To facilitate the first launch of the SENATORFX.NET software, this profile has no password.
The ‘Administrator operator’ profile cannot be changed.
All other parameters can be filled in.
The software administrator will have access to all menus and all companies.
SenatorFX.NET/LOG.NET user manual – V.1.1
p. 92/140
Software users
Users
Select ‘Administration’ → Users
2. Modifying a user
-
Click the desired user
Select ‘Modify’.
You can modify all the available parameters for the user, as
explained on page 91.
The new parameters will be applied to this user.
3. Deleting a user
Deletion of this element will lead to the deletion of all the
associated configuration
SenatorFX.NET/LOG.NET user manual – V.1.1
p. 93/140
Software users
The Log
Select ‘Administration’ → Log
The log is a history of the actions applied to the software by operators/users.
The log is displayed as a table with three columns.
- The first column gives the date and time of the modification.
- The second column gives the name of the user who performed the modification.
- The third column specifies the action performed in the software by the operator/user.
Click ‘Log’
Column giving the date and
time of the modification
Column giving the name of the
operator/user who made the
modification
Column indicating the action
performed in the software by the
operator/user
SenatorFX.NET/LOG.NET user manual – V.1.1
p. 94/140
Software users
Multi-company/multi-tenant management
Select ‘Administration’ → Company
The presence on the site of several companies or tenants is managed by the operator/user assignments made
by the SENATORFX.NET software.
Each user can be assigned to one or more companies, and will not be able to view, modify or manage the others.
This means that, with just one database, each company or tenant can manage its own environment,
independently from the other companies, via the user profiles and using client workstations.
Certain access points can be defined as ‘common’ and managed by an operator with an Administrator profile.
The default setting is a single company called ‘Default’.
It can be renamed, and an unlimited number of other companies can be created.
Procedure
1. Enter a name for the company or tenant. This name
will be displayed in all software menus that feature
multi-company management.
2. Click ‘OK’ to confirm.
3. Repeat this procedure for the other companies.
Click ‘Company’
Select ‘Create a company’
Certain elements can belong to several companies; for example, a common entrance reader.
Filtering by company can be applied to the following elements:
Automation: can be assigned to one or more companies.
Badges: can be assigned to one company only.
Input cards/Output cards: can be assigned to one or more companies.
Global counters: can be assigned to one or more companies.
Instruction: can be assigned to one or more companies.
E-mail: can be assigned to one or more companies.
Group: can be assigned to one company only.
Input group/Output group: can be assigned to one or more companies.
Reader: can be assigned to one or more companies.
List: can be assigned to one or more companies.
Event configuration: can be assigned to one or more companies.
Time slots: can be assigned to one or more companies.
User profiles: can be assigned to one or more companies.
Controlled zones: can be assigned to one or more companies.
-
SenatorFX.NET/LOG.NET user manual – V.1.1
p. 95/140
Chapter 7
Software extensions
What does this chapter include?
Software extensions............................................................................................................. 95
Site codes and distributor codes ......................................................................................... 96
Display preferences ............................................................................................................ 97
Plugin management ............................................................................................................ 98
Management of XML files ................................................................................................... 99
Enabling IP camera management ..................................................................................... 101
Enabling the management of GALAXY alarm units ........................................................... 102
Configuration report .......................................................................................................... 103
SenatorFX.NET/LOG.NET user manual – V.1.1
p. 96/140
Software extensions
Site codes and distributor codes
Select ‘Extensions’ → Site code/Distributor code
The allocation of site codes provides an additional level of security compared to a site using only badge numbers
to identify users.
When an installation uses site codes, the system checks the site code of the badges first, to determine whether a
badge comes from that site, and then it checks the badge number to identify the person.
Management of site
codes
-
Click ‘Site code’
The site code can be configured for each central unit, which means that a different site code can be defined for
each company when multi-company management is used. Several site codes can be configured on each central
unit. In the case of multi-company management, the common access points will have the site codes of all
companies created. The ‘Select a central unit’ list is used to select the unit on which the user wishes to perform a
site code action. The ‘Edit site codes’ list is used to add, modify and delete the site codes on the central unit,
using the ‘Add’, ‘Modify’ and ‘Delete’ buttons.
Management of
Distributor codes
-
Click ‘Distributor code’
The distributor code provides an additional level of security for badge identification.
When a distributor code is used, the system checks the distributor code, followed by the site code (if enabled)
and then the badge number.
SenatorFX.NET/LOG.NET user manual – V.1.1
p. 97/140
Software extensions
Display preferences
Select ‘Extensions’ → Preferences
This menu is used to adjust several display parameters in SENATORFX.NET.
Select the ‘Display’ tab.
Name of application
Enter the software name,
displayed in the title bar.
Determine the screen
background
Modifies the software’s
screen background.
Indicates the path to the
new background image.
Determine the icon of
the application
Indicates the location
(directory) of the
new icon for the
software, displayed
in the title bar.
Display time of badge files in supervision
Sets the display duration for badge files when a badge is presented to a reader, in the ‘Supervision’ menu.
Window size
For video displays: gives the default size of the window that will contain the video.
Video configuration
Sets the time of a video recording triggered by an automation.
Disable sounds
Enables or disables the software sounds (the software must be rebooted).
SenatorFX.NET/LOG.NET user manual – V.1.1
Software extensions
Plugin management
Select ‘Extensions’ → Preferences
This menu is used to enable the optional plugin modules in the SENATORFX.NET software.
Plugins add special new functionality to the software.
Select the ‘Plugins’ tab.
Procedure
1. To install a new plugin, click
‘Install a plugin’.
2. Look for your plugin in the
Windows directory, select it,
and click ‘Open’.
3. After adding your plugin,
select it from the ‘Plugins
installed’ list. By default, the
plugin is disabled. To enable it,
contact our Customer Service
department to obtain an
activation key according to
your activation code.
4. After enabling your plugin,
you must reboot the system for
the plugin to appear in the
SenatorFX.NET menu.
p. 98/140
SenatorFX.NET/LOG.NET user manual – V.1.1
p. 99/140
Software extensions
Management of XML files
Select ‘Extensions’ → Preferences
This application is used for the automatic importing of a third-party database in XML format.
Select the ‘Management of
XML files’ tab.
This form will help you to create the mapping between your XML file and SenatorFX.NET.
‘Folder of XML files on the server’
Local folder containing the XML files. The XML files in this folder will be processed one by one, from the oldest to
the most recent.
Processing frequency
Time (minutes) from the processing of one XML file to the next.
CRC check
Indicates whether a <crc></crc> field is present in your XML file and whether it should be checked. This CRC field
is used to verify the validity of an XML file, and is calculated according to a special algorithm applied to the content
of the XML file. For further information concerning the method of computation, please contact Customer Service.
Date check
Indicates whether a <file_date></file_date> field is present in your XML file and whether it should be checked. If
this option is selected, the XML file being processed must have a more recent ‘file_date’ than the last file
processed.
SenatorFX.NET/LOG.NET user manual – V.1.1
p. 100/140
Software extensions
Management of XML files
Detailed description of the importing of a database in XML format.
Main node:
This is not the main node of your XML file, but the node encompassing all the data in the badge.
This field must be completed and must contain the name of the node.
Badge code *
Name of the field containing the badge code.
Valid from *
Name of the field containing the validity start date.
Valid until *
Name of the field containing the validity end date.
Last name *
Name of the field containing the user’s last name.
First name *
Name of the field containing the user’s first name.
Group *
Name of the field containing the user’s group
(name and spelling as defined in Senator FX).
* If you do not wish to enter any information, these fields must still be created, and may contain a null
value.
Action
Name of the field containing the action to be carried out for a given badge. Mandatory field if ‘Presence of a
confirmation field’ is deselected. Otherwise, ‘action’ will not be taken into account.
Action:
- Value of action field for modification: value that the ‘Action’ field will take on to apply a modification to a badge.
- Value of action field for addition: value that the ‘Action’ field will take on to add a badge.
Value of action field for deletion: value that the ‘Action’ field will take on to delete a badge.
Presence of a confirmation field
Indicates whether your file will contain one <Confirmed /> or <Cancelled /> field per badge, to add or delete a
badge respectively.
Overwrite existing badges
Indicates whether adding an existing badge number to SenatorFX will overwrite the previous one. If this box is
not selected, the addition will be cancelled if the badge code already exists.
Insert undefined fields in ‘Additional information’
Indicates whether fields contained in your XML file and not previously defined should be inserted in the additional
information of the badge file. As discussed later, it is preferable not to select this box, and to add an
<additional_information> node to your XML file.
Note that the values input for the ‘Main node’, ‘Badge code’, ‘Valid from’, ‘Valid until’, ‘Last name’, ‘First name’,
‘Group’, and ‘Action’ fields must comply with XML standards and must therefore contain no accents, spaces or
other special characters.
Tracking of badge additions, modifications and deletions by XML file processing
is available in the ‘Administration’ tab, ‘Log’ option.
SenatorFX.NET/LOG.NET user manual – V.1.1
p. 101/140
Software extensions
Enabling IP camera management
Select ‘Extensions’ → Preferences
The ‘IP cameras’ function is used to control Axis IP cameras using SenatorFX.NET
(application described on page 119).
Select the ‘IP cameras’ tab.
This function is disabled by default. To enable it, contact our
Customer Service department to obtain an activation key according to your activation
code.
After enabling the IP cameras function, you must reboot the system for it to appear in
the SenatorFX.NET menu.
SenatorFX.NET/LOG.NET user manual – V.1.1
p. 102/140
Software extensions
Enabling the management of GALAXY alarm units
Select ‘Extensions’ → Preferences
The ‘Intrusion’ function lets you control GALAXY Dimension intrusion alarm units using SenatorFX.NET (see
description on page 112).
Select the Intrusion tab
This function is disabled by default. To enable it, contact our Customer Service
department to obtain an activation key according to your activation code.
Intrusion
configuration
To ask for
authentication in order
to clear an intrusion
alarm.
After enabling the Intrusion function, you must reboot the system for it to appear in the
SenatorFX.NET menu.
SenatorFX.NET/LOG.NET user manual – V.1.1
p. 103/140
Software extensions
Configuration report
Select ‘Access control’ → Configuration report
This option lets you print out the complete site configuration.
Click ‘Configuration report’
Tab
Configuration of central units
Configuration of readers
Groups
Description
Name of central unit, type, bus address, APB profile, anti-timeback delay, transit
time, radio input, time change, off-line, version and serial number of central units
Name of reader, type, associated central unit, position with respect to the central
unit, APB profile, free access time slot
Name of group, associated readers, access time slots, associated relay output group
(elevator management), authorised maximum per group.
Slots
Name of slot, access rights per day, start/end times of access rights
Badges
Badge number, last name/first name of associated user, assigned access group,
status, associated tenant, PIN, passage credit, number plate
‘Export’ Button
‘Print’ Button
Exports the data from the active tab to
an external file in spreadsheet format.
Prints the data from the active tab.
SenatorFX.NET/LOG.NET user manual – V.1.1
p. 104/140
Chapter 8
Software applications
What does this chapter include?
Software applications ........................................................................................................ 104
Configure autosave ........................................................................................................... 106
Presence time ................................................................................................................... 107
Zone occupancy ............................................................................................................... 108
Locate a badge ................................................................................................................. 109
Forgiving the badges ........................................................................................................ 110
Control of readers ............................................................................................................. 111
Intrusion alarm .................................................................................................................. 112
1. Configuring the central units ...................................................................................... 112
2. Add GALAXY alarm units .......................................................................................... 113
3. Modifying a GALAXY alarm unit ................................................................................ 114
4. Start communication .................................................................................................. 115
5. Track the dialogue ..................................................................................................... 115
6. Delete a central unit................................................................................................... 115
7. Simulator ................................................................................................................... 116
8. Displaying a GALAXY alarm unit ............................................................................... 117
9. Alarm history ............................................................................................................. 118
IP video verification ........................................................................................................... 119
1. Add a camera ............................................................................................................ 119
2. Modify a camera ........................................................................................................ 119
3. Delete a camera ........................................................................................................ 119
4. Management of preset dome positions ...................................................................... 120
5. View management ..................................................................................................... 121
6. Cycle management ................................................................................................... 122
7. Recording photos/video sequences ........................................................................... 123
8. Photo search ............................................................................................................. 124
9. Search video sequences ........................................................................................... 125
‘Video via VDR’ verification ............................................................................................... 126
1. Add a DVR ................................................................................................................ 126
2. Add a camera ............................................................................................................ 126
3. Display cameras ........................................................................................................ 127
Graphical management of the site .................................................................................... 128
1. Add a plan ................................................................................................................. 128
SenatorFX.NET/LOG.NET user manual – V.1.1
p. 105/140
2. Components .............................................................................................................. 129
3. Adding components ................................................................................................... 130
4. Personalising components......................................................................................... 131
5. Supervision ............................................................................................................... 132
List of events..................................................................................................................... 133
1. Event configuration .................................................................................................... 133
2. Event-based log ........................................................................................................ 134
3. Lists........................................................................................................................... 135
Advanced history .............................................................................................................. 136
SenatorFX.NET/LOG.NET user manual – V.1.1
p. 106/140
Software applications
Configure autosave
Select the ‘Extensions’ tab → Configure autosave
This menu lets you configure the frequency of reminders to back up the site database.
You can also create a centralised automation to set up an autosave function for this database.
Click ‘Configure autosave’.
Select the ‘Enable autosave’ box.
The ‘Select reminder frequency’ drop-down menu allows you to choose the autosave
frequency.
You can have daily, weekly, or monthly back-ups.
Back-ups are created and stored on the SenatorFX.NET server machine.
Note: when you restore a back-up, all events and modifications since the last back-up will
be lost.
SenatorFX.NET/LOG.NET user manual – V.1.1
p. 107/140
Software applications
Presence time
Select ‘Extensions’ → Presence time
The SenatorFX.NET software can calculate the presence time of persons in a zone based on site entry and exit
events.
In France, this application must not under any circumstances be used for the purpose of calculating employee wages.
Click 'Presence time’
Operating procedure
1. Select the desired zone in the ‘Zone’ field.
2. In the ‘Selection by’ field, select the badge/user display condition for the chosen query.
• Possible choices are: bearer name, badge number, access group or company.
• You can filter for certain badges if 'Badge Number' is selected.
3. Enter a date and time for the start of the presence time calculation
4. Enter a date and time for the end of the presence time calculation
5. If you select the ‘Give details of passages’ box, details of passages and times will be displayed for each badge in
the specified period and zone.
Details of buttons
The Clipboard button (first button in the toolbar) copies all the elements displayed to the clipboard. They can then be
pasted into any spreadsheet or word processing application.
The Search button calculates the presence time.
The Preview button (second button in the toolbar) displays a print preview of the elements displayed.
You can launch printing from the preview.
SenatorFX.NET/LOG.NET user manual – V.1.1
p. 108/140
Software applications
Zone occupancy
Select ‘Extensions’ → Zone occupancy
The zone occupancy feature provides a real-time display of the number of persons present on the site in each zone,
as a total number, and by access group.
Click ‘Zone
occupancy’
Right-click the
chart to:
-Copy the image,
-Save the image
as…,
-Print the displayed
image of users
present
-View the values
-Reset the scale
SenatorFX.NET/LOG.NET user manual – V.1.1
p. 109/140
Software applications
Locate a badge
Select ‘Extensions’ → Locate a badge
The ‘Locate a badge’ application lets you search for the last passage of a badge at a site reader at a given time
‘T’.
Procedure
1. Search by
Used to select the search criterion from the fields in the badge file:
Click ‘Locate a badge’
Badge Number
Name of bearer
All existing additional fields
2. Enter search text
Lets you specify the value you are searching for
Last checkpoint
Display badge
Displays the last passage location for that
badge/user known to the system.
Displays the file of the
badge/user concerned and lets
you view or modify the details of
the badge information.
SenatorFX.NET/LOG.NET user manual – V.1.1
p. 110/140
Software applications
Forgiving the badges
Select ‘Extensions’ → Forgiving the badges
The ‘Forgiving the badges’ application resets the anti-passback position to ‘Neutral’ status for one or more
badges, according to the option chosen from the drop-down menu.
Click ‘Forgiving the badges’
All badges
Forgive all badges registered on the site
Central unit badge
Forgives all authorised
badges on the selected
central unit
Group badge
Forgives all badges
associated with the selected
access group
Badge
Forgives the selected badge.
Forgiving badges returns them to neutral status as part of the site’s
anti-passback management, and clears the zones of the badges concerned.
SenatorFX.NET/LOG.NET user manual – V.1.1
p. 111/140
Software applications
Control of readers
Select ‘Extensions’ → Control of readers
The ‘Control of readers’ application lets you control all the readers and access points of the site using the software.
Points to remember:
• Actions will operate in real time only if the central unit connected to the reader dialogues with the software,
i.e. if it is in ‘Nominal’ status.
• The change of reader status will apply according to the current alert level.
Click ‘Control
readers’
of
Definitions of the columns in the window
Central unit = All of the local access management central units declared on the site.
Central unit status = Indicates the status of the current central unit connection. For
actions to be applied, the status must be ‘Nominal’.
Reader = List of readers on the site that you will be able to control.
Remote control = Indicates the status of the reader.
CTM opening = Used to send an opening command to the door controlled by the reader.
SenatorFX.NET/LOG.NET user manual – V.1.1
p. 112/140
Software applications
Intrusion alarm
Select the ‘Operation’ tab → GALAXY intrusion
1. Configuring the central units
The ‘Intrusion alarm’ application is an optional SENATORFX.NET software module. For this application’s installation and
display procedure, refer to page 102. This provides integrated supervision and control of GALAXY Dimension intrusion alarm
units.
Advantages
•
•
•
•
•
•
A single software package for the management of access control and intrusion alarms
Viewing the status of an entry, exit, or group in real time
Control the alarm input of a central unit:
o Include,
o Exclude.
Control a group of alarm inputs on an alarm unit
o Activation
o Partial activation
o Deactivation.
Control a relay output
o Enabled mode
o Disabled mode
All signals will be supervised via the management of dynamic diagrams in the ‘Supervision’ application and real-time
monitoring.
GALAXY alarm units use an Ethernet connection.
Configuring the central unit
Use the central unit keypad to configure the unit.
1. Give rights to the installer
• Enter Manager Code ‘12345’ + ENT
• Go into Menu 48.1 and enable installer rights.
2. Go into Installer Mode to perform the following actions
• Enter Manager Code ‘112233’ + ENT
3. Configure the Ethernet module
• Go into Menu 56.4.1.1: give the IP address of the central unit
• Go into Menu 56.4.1.4: give the subnet mask
4. Alarm transfer
• Go into Menu 56.4.2.1: select ‘SIA’ Level 4
• Set all the events to be managed to ON
• Go into Menu 56.4.2.2.1: give the IP address of the PC that communicates with the central unit
• Go into Menu 56.4.2.2.2: specify communication port ‘10002’
• Go into Menu 56.4.2.4: specify client code ‘1234’
• Go into Menu 56.4.2.8: specify TCP protocol: ‘1’.
5. Remote access
• Go into Menu 56.4.3.1: For the access period, select ‘Always’
• Go into Menu 56.4.3.2: For the mode, select ‘Direct access’.
6. SIA control
•
Go into Menu 56.4.8: give the IP address of the PC that communicates with the central unit.
SenatorFX.NET/LOG.NET user manual – V.1.1
p. 113/140
Software applications
Intrusion alarm
Select ‘Exploitation’ → GALAXY intrusion
2. Add GALAXY alarm units
Select ‘Configuration’ and then
‘Add a central unit’
Procedure
1. ‘Name’ field
Enter a name for the central unit, to be used in the application and the
software
2. ‘Remote code’ field
Enter the remote code defined in Galaxy units (543210 by default)
3. ‘Client code’ field: Enter the client code defined in the Galaxy unit
4. ‘Model’ drop-down menu
Enter the type of Galaxy to be added
5. ‘Switch 8’ drop-down menu
Indicate whether Switch 8 on the central unit is set to On or Off. The
switch is set to Off by default.
6. ‘Pooling time delay’ drop-down menu: Configure the status reading
time delay.
7. 'IP address' field
Enter the address of the central unit on the IP networks
8. ‘Communication’ drop-down menu
Indicate whether or not the central unit should dialogue with the
application.
SenatorFX.NET/LOG.NET user manual – V.1.1
p. 114/140
Software applications
Intrusion alarm
Select the ‘Operation’ tab → GALAXY intrusion
3. Modifying a GALAXY alarm unit
Select ‘Configuration’
and then ‘Modify a central unit’
‘General information’ tab
See page 113.
Select the desired central unit.
‘Group, Outputs, Inputs’
tabs
‘Name’ field
Enter a name for each alarm
input, group or relay output to
be displayed in the software.
‘Supervised’ box
Indicates whether or not the
alarm input, group or relay
output should be supervised
by the application.
‘Acknowledgement’ box
Lets you define an
acknowledgement request if
the input is in alarm or autoprotection mode.
‘Instruction’ box
Lets you define whether an
instruction should be displayed
if the input is in alarm or autoprotection mode.
‘Report’ box
Lets you define whether a report should be entered to acknowledge the alarm or autoprotection.
SenatorFX.NET/LOG.NET user manual – V.1.1
p. 115/140
Software applications
Intrusion alarm
Select the ‘Operation’ tab → GALAXY intrusion
4. Start communication
Select ‘Start
communication’
‘Start communication’ menu
Launches communication with the central units in the installation.
‘Stop communication’ menu
Halts communication with the central units in the installation.
A ‘real-time’ message in the lower right-hand part of the main window of the software
indicates the communication status.
5. Track the dialogue
Click ‘Tool’
and then ‘Track the
dialogue’
This menu is used to display complete information concerning communications between the
software and the GALAXY alarm units.
6. Delete a central unit
Select ‘Configuration’ and then
‘Delete a central unit’
Deletion of the alarm unit will lead to the deletion of all the associated
configuration
SenatorFX.NET/LOG.NET user manual – V.1.1
p. 116/140
Software applications
Intrusion alarm
Select the ‘Operation’ tab → GALAXY intrusion
7. Simulator
This function is used to perform demonstrations and/or test the parameters associated with a GALAXY Intrusion alarm unit.
• The simulator can operate only if the GALAXY Intrusion alarm units are disconnected from the software.
• The simulator option will not be displayed if one of the GALAXY units is connected to the software. This means that
all actions triggered manually via the simulator are displayed in the events log, the supervision log, etc.
Click ‘Tool’ and then
‘Simulator’
‘Simulator for zones’
tab
- Select the desired
alarm input from the
drop-down menu.
- Select the status and
confirm with ‘OK’.
‘Simulator for
outputs’ tab
- Select the desired
relay output from the
drop-down menu.
- Select the status and
confirm with ‘OK’.
‘Simulator for groups’
tab
- Select the desired
group of inputs from the
drop-down menu.
- Select the status and
confirm with ‘OK’.
SenatorFX.NET/LOG.NET user manual – V.1.1
Software applications
Intrusion alarm
Select the ‘Operation’ tab → GALAXY intrusion
8. Displaying a GALAXY alarm unit
Click
‘Tool’
Select
‘Display a central unit’
This menu provides a realtime display of the status
of all components of
GALAXY alarm units
declared in the software.
Select tab BUS 1 or BUS
2 of the unit to display the
status of associated inputs
and outputs.
The components are:
Alarm inputs
Relay outputs
Input groups
The symbols to the left of
the menu display the
possible statuses of the
alarm unit components.
p. 117/140
SenatorFX.NET/LOG.NET user manual – V.1.1
p. 118/140
Software applications
Intrusion alarm
Select the ‘Operation’ tab → GALAXY intrusion
9. Alarm history
This menu lets you create queries via search filters of all events generated by the GALAXY Intrusion alarm unit(s)
managed by the software.
Click ‘Galaxy history’
Select one or all of the desired central units to view all events associated with your
selection in the ‘List of events’ tab.
The ‘Acknowledgement pending’ tab lists events that have not been acknowledged.
The ‘Filter’ tab lets you print out a list of events according to certain search criteria.
SenatorFX.NET/LOG.NET user manual – V.1.1
p. 119/140
Software applications
IP video verification
Select ‘Operation’ → IP camera video
1. Add a camera
The ‘IP video verification’ application is an optional plugin software module. For the installation and display procedure
concerning this application, refer to page 102.
This application is used to control IP cameras and domes via the software or pre-established scenarios.
Click ‘Camera(s)’
Click ‘Add a camera’
Procedure
1. Enter the name of this camera, to be displayed in
the software
2. Enter the IP address of the camera
3. Enter the User ID to connect to the camera
4. Enter the password to connect to the camera
5. For a dome, select the ‘Mobile camera’ box.
2. Modify a camera
Click ‘Edit’
Make the desired changes
Confirm with ‘OK’
3. Delete a camera
Click ‘Delete’
SenatorFX.NET/LOG.NET user manual – V.1.1
p. 120/140
Software applications
IP video verification
Select ‘Operation’ → IP camera video
4. Management of preset dome positions
Click ‘Camera(s)’
Click ‘Management of preset
positions’
Procedure
1. Move the PC mouse to place the dome in the
desired position.
2. Use the mouse wheel to set the zoom.
3. Click ‘+’ to save the name of the new preset
position.
To change a preset position, repeat the procedure.
To delete a preset position, select it from the list,
and click the ‘Wastebasket’ button.
SenatorFX.NET/LOG.NET user manual – V.1.1
Software applications
IP video verification
Select ‘Operation’ → IP camera video
5. View management
Click ‘View(s)’
Click ‘Add a view’
Procedure
1. Enter the name of the
desired view.
2. From the drop-down menu,
select the number of cameras to
be displayed in the view.
3. Click ‘OK’ to confirm.
4. Drag and drop the cameras.
5. After arranging the cameras,
click the desired view and select
‘Save’ from the menu.
Display a view
Select the desired view and
click ‘View’.
Delete a view
Select the desired view and
click ‘Delete’. Confirm with ‘OK’.
p. 121/140
SenatorFX.NET/LOG.NET user manual – V.1.1
Software applications
IP video verification
Select ‘Operation’ → IP camera video
6. Cycle management
A ‘Cycle’ is a cyclical display from several IP video cameras according to preset criteria.
Click ‘Add a cycle’
Procedure
1. Enter the name of the cycle
2. Select the time delay between
views in the ‘Cycle time delay
(seconds)’ field
3. From the ‘Views’ drop-down
menu, select the desired view.
4. Click the ‘+’ button
5. Repeat Step 4 to add as many
views as required
6. To delete a view from the cycle,
select the view to be deleted and
then click the ‘Wastebasket’ button
7. Click ‘OK’ to confirm.
Start a cycle
- Select the desired cycle
- Click ‘Start the cycle’
Stop a cycle
- Select the desired cycle
- Click ‘Stop the cycle’
Delete a cycle
- Select the desired cycle
- Click ‘Delete’
p. 122/140
SenatorFX.NET/LOG.NET user manual – V.1.1
p. 123/140
Software applications
IP video verification
Select ‘Operation’ → IP camera video
7. Recording photos/video sequences
You can trigger the acquisition of photographs or video sequences via the software.
Click ‘IP camera video’
Photography procedure
1. Select the desired camera
2. Click the ‘camera’ icon
3. Enter a name for the
photograph
4. Click ‘Save’ to confirm
Photos are saved to the
software server machine
Video procedure
1. Select the desired camera
2. Click the ‘Record’ button to
start the video recording
3. Click the ‘Stop’ button to
stop the video recording.
The video sequences are
saved to the software server
machine.
A manual recording cannot
last longer than 10
minutes.
Recording cuts out
automatically at 10
minutes.
To pause during
the video
sequence
To start manual
recording of video
sequences
To stop manual
recording of video
sequences
SenatorFX.NET/LOG.NET user manual – V.1.1
Software applications
IP video verification
Select ‘Operation’ → IP camera video
8. Photo search
This menu lets you search and display photos taken using the IP cameras and video domes.
- Select ‘File’
- Select ‘Search for a photo’
-Select the desired photo via
the ‘List of photos’ drop-down
menu
-The selected photo is
displayed on screen
p. 124/140
SenatorFX.NET/LOG.NET user manual – V.1.1
p. 125/140
Software applications
IP video verification
Select ‘Operation’ → IP camera video
9. Search video sequences
This menu lets you search and display video sequences taken using the IP cameras and video domes.
-Select 'File’
-Select ‘Search for a video’
1.Select the desired camera via
the ‘Cameras’ drop-down menu
2.Select the ‘Filter…’ box to select
a date/time as search filter
3.Click the ‘Search’ button
4.Select the desired video
sequence from the ‘Select a video’
drop-down menu
5.Click the ‘View’ button to launch
the video sequence.
If you wish to extract certain video sequences or photos from the
software, please consult EDEN.
SenatorFX.NET/LOG.NET user manual – V.1.1
p. 126/140
Software applications
‘Video via VDR’ verification
Select ‘Operation’ → Video recorder
1. Add a DVR
This application allows video verification via third-party video recorders from manufacturers such as Dedicated Micros.
This makes it possible to save the video stream from the cameras connected to the DVR associated with the activity of the
readers on the site.
Using pre-established scenarios or ‘Centralised automations’, and following events generated by access control or intrusion
alarms, the cameras can be displayed in real time in the software and video recording sequences can be generated and
stored in the DVR(s).
Select ‘Add a new recorder’.
Procedure
1. Enter a name for the video recorder
2. Select the recorder model from the drop-down
menu
3. Enter the IP address of the DVR
4. Enter the User ID and password of the DVR
5. Specify the number of cameras connected to
this DVR
2. Add a camera
- Click ‘Video recorder’
- Click ‘Add camera’
Procedure
1. Enter a name for the camera.
2. Select the address of the camera on
the DVR.
3. Select the reader associated with this camera.
4. Select the company/companies associated with this
camera.
With this application, the DVR continuously records the video
stream of the cameras associated with it.
SenatorFX.NET/LOG.NET user manual – V.1.1
Software applications
‘Video via VDR’ verification
Select ‘Extensions’ → Video recorder
3. Display cameras
Select a video recorder
‘Display camera’ procedure
1. Select the recorder and then the camera
2. Click ‘Display camera’
3. A real-time video image from the selected
camera is displayed by the software
4. If the dome is motorised, you can control it
using the PTZ functions.
‘View all cameras’ procedure
1. Select a video recorder
2. Click ‘View all cameras’.
You can launch a display of each camera via
the site supervision application (see page
132).
Refer to the DVR technical manual to find out
which motorised domes are compatible with it.
p. 127/140
SenatorFX.NET/LOG.NET user manual – V.1.1
p. 128/140
Software applications
Graphical management of the site
Select the ‘Operation’ tab → System setup overview
1. Add a plan
This application is used to edit the system setup diagram showing the site’s various components.
The system setup overview lets you position and configure the components of the site.
Graphical management of the site’s access point and alarm activity is carried out via the ‘Supervision’
application.
Select the ‘Operation’ tab
‘Add a plan’ procedure
Click ‘System setup overview’
1. Click the ‘Add a plan’ field
2. In the new window, search for the
directory containing BMP or JPG image files
3. Select the desired image
4. Confirm by clicking ‘Open’
5. The image of the desired plan appears
and will be available in the ‘System setup
overview’ and ‘Supervision’ menus
Repeat this procedure to incorporate other
graphical plans into the software. There is
no limit to the number of plans in the
software.
All plans can be viewed by all software
operators, except components linked to
the profile of the tenant or company.
SenatorFX.NET/LOG.NET user manual – V.1.1
p. 129/140
Software applications
Graphical management of the site
Select the ‘Operation’ tab → System setup overview
2. Components
The ‘Supervision’ application indicates the real-time status of the main components of a site. A
‘component’ can be a reader, a central unit or even an alarm point.
Component
Reader
Automation
Counter
Global counter
Centralised automation
Camera
Plan
Analogue camera
Alert level
GALAXY group
GALAXY input
GALAXY output
Description and use of the component in ‘Supervision’
Displays the status of the door controlled by a reader
Displays the photo of the user when passing the reader
Remote control and modification of door status by the operator
Displays the status of an automation associated with a central unit
This type of automation is managed by the central unit and does not depend on the software
status
Displays the status of a counter associated with a central unit
Manually changing the level of the counter
This type of counter is managed by the central unit and does not depend on the software
status
Displays the status of a counter associated with several central units
Manually changing the level of the counter
The global counter is managed by the software and depends on its status
Displays the status of an automation associated with one or more central units
Manually forces the execution of the automation
The centralised automation is managed by the software and depends on its status
Automatically displays the video stream from an IP camera via an automation
Controls the PTZ functions and zoom of a dome
Displays the video stream manually, with photography and video recording
Link/shortcut to navigate between plans
Automatically displays the video stream from a camera associated with a DVR via an
automation
Controls the PTZ functions and zoom of a dome
Displays the video stream manually
Displays the alert level for crisis management
Manually modifies the current alert level
Displays the status of a GALAXY central unit intrusion alarm input group
Modifies the status of a group manually
Displays the status of a GALAXY central unit intrusion alarm input
Modifies the status of an alarm input manually
Displays the status of a GALAXY central unit relay output
Modifies the status of a relay output manually
SenatorFX.NET/LOG.NET user manual – V.1.1
p. 130/140
Software applications
Graphical management of the site
Select the ‘Operation’ tab → System setup overview
3. Adding components
Select a plan
Right-click the plan
Which components should be added
to the site?
A reader to control a door
An automation associated with a central
unit
A counter associated with a central unit
A global counter managed by the
software
A centralised automation managed by
the software
An IP camera managed by the optional
module
A link to another graphical plan
A camera connected to a DVR
An alert level for crisis management
Intrusion alarm input group
Intrusion alarm input
Intrusion alarm central unit relay output
All components are represented by icons that can be
customised.
Other icons can be imported into the software in ICO
format.
‘Add component’ procedure
1. To add an element to a plan, select the plan from the list
of plans
2. Right-click the PC mouse at the location where you wish
to add a component to the site
3. Select the desired component (e.g., a reader)
4. Select the desired reader, and confirm with ‘OK’
5. A new icon appears in the desired plan.
Moving a component
To move an element in the plan, left-click it, hold
down the left mouse button, move the mouse, and
release the button when the element is in the
desired location.
Deleting a component
Right-click the element and
select the option ‘Delete’.
Confirm with ‘Yes’.
SenatorFX.NET/LOG.NET user manual – V.1.1
p. 131/140
Software applications
Graphical management of the site
Select the ‘Operation’ tab → System setup overview
4. Personalising components
Select a plan
Personalising a component icon
- Select the icon of the component
- Right-click
- Select ‘Personalise’
‘Name tab’ procedure
• Select one of the component statuses displayed.
• Select the ‘Name’ tab.
• Modify the name of the component status if necessary
(the name is the status of the component state which is
displayed in the real-time supervision).
• Enter the colour of the name if necessary.
• Enter an instruction if necessary.
• Carry out the same procedure for all available statuses
of the component.
‘Icon tab’ procedure
• Select one of the component statuses
displayed.
• Select the ‘Icon’ tab.
• Select an available icon from the dropdown menu.
• To make the icon flash throughout the
duration of the selected status, select the
‘Cause to flash’ box.
• If the icons on offer are not suitable,
you can import an icon in ICO format
by clicking the 'Folder' button.
• Carry out the same procedure for all
available statuses of the component.
SenatorFX.NET/LOG.NET user manual – V.1.1
p. 132/140
Software applications
Graphical management of the site
Select the ‘Operation’ tab → Supervision
5. Supervision
This application is used for the immediate graphical pinpointing of access point and alarm activity on the site,
and for the remote control of certain components that allow it.
-
Select the ‘Operation' tab
Click ‘Supervision’
Control/display of an IP
camera
Control/display of a
controlled access point
Control/display of an alarm
central unit output
Control/display of a
counter
Control/display of an
alarm zone
Control/display of an
automation
SenatorFX.NET/LOG.NET user manual – V.1.1
p. 133/140
Software applications
List of events
Select ‘Access control’ → Event configuration
1. Event configuration
This menu lets you configure the events generated by site access point and intrusion alarm management. Each
event can be filtered, can generate a sound and can be displayed in a pre-selected colour.
Once configured, these events will be displayed in the list of events (see page 134).
2. Enter its name
1. Select an event
Multi-tenant/Multi-company
management
Repeat this procedure for each
tenant or company
3. Select its display
colour
4. Record a
personalised audio
message
Configure the display options
•
Display (or not) the event in the list of events
•
Display (or not) in the Supervision
•
Display (or not) an instruction (enter the instruction if
necessary)
•
Purge the event (or not) after a set period of time
SenatorFX.NET/LOG.NET user manual – V.1.1
p. 134/140
Software applications
List of events
2. Event-based log
This application displays the list of events generated by access management and intrusion alarms if the
corresponding optional module is enabled.
1. Select the
desired filters
Each event can generate a sound
and be displayed in a different colour
from the others
List of events
generated by
access control
Click this button to
display a user file
List of events
generated by intrusion
alarms
Display of user photo
and details after
selecting an
associated event from
the list
Display of operator report
concerning the selected event
SenatorFX.NET/LOG.NET user manual – V.1.1
p. 135/140
Applications
List of events
Select the ‘Access control’ tab → Lists…
3. Lists
This application lets you create several configurable event-based lists of events generated by the access control.
Click ‘Lists’
Procedure
1. Enter the name of the list
2. Select the ‘Display on start-up’ box if
necessary
3. Select the type of list
• Presence list
• Event-based list
4. For an event-based list, select the
desired events from the ‘Types of event’
menu
5. Specify a colour for each event
6. Select the readers where the selected
events will be generated
7. If certain selected events are associated
with badges or access groups, an
additional filter by badge or access group is
available
8. Select the tenants/companies
associated with the list if necessary
There is no limit to the number of lists in the software.
To modify or delete a list, select it and then right-click or left-click.
The ‘Display on start-up’ box is used to display the lists automatically when the software starts up, without the need to do this
manually.
The list window appears at the bottom. You can close a list or the entire application at any time. All the events displayed in
these lists are saved in the software server database and can generate history reports.
SenatorFX.NET/LOG.NET user manual – V.1.1
p. 136/140
Software applications
Advanced history
Select the ‘Operation’ tab
The advanced history is a querying tool used to obtain information on badges and/or events related to these
badges.
The advanced history has a query creation wizard. This application can also export query results in CSV
format for spreadsheets, copy the resulting table to the clipboard, or print it.
Click ‘Advanced history’
List of available options
Queries
List of pre-established queries.
Add
Adds a query by launching the wizard.
Delete
Deletes the selected query.
Modify
Modifies the selected query using the wizard.
Execute
Executes the selected query and displays the result in the ‘Result’ table.
Export
Exports the results table currently displayed to a CSV file.
Copy
Copies the results table currently displayed to the clipboard.
Print
Prints the results table currently displayed.
SenatorFX.NET/LOG.NET user manual – V.1.1
p. 137/140
Software applications
Advanced history
Select the ‘Operation’ tab
Click ‘Advanced history’
Then click the ‘Add’ button
Create your query in four
steps
Step 1 of 4
Ent
er
the
na
me
of
the
que
ry,
to
be
dis
pla
yed
Step 2 of 4
in the application
- Click ‘Next…’
Step 3 of 4
- Enter the filter criteria for your query
- The filters already defined are listed beneath ‘Filters to
apply’
- You can remove filters by clicking ‘Delete’.
- Select the information you wish to display in the query
- Click ‘Next…’
SenatorFX.NET/LOG.NET user manual – V.1.1
p. 138/140
Applications
Create your query in four steps (continued)
Step 4 of 4
- Determine the sorting procedures to be applied to
the final result
- Click ‘Finish’.
The new query appears in the list
You can execute the query and then print it or export it.
List of preestablished
queries
‘Add query’ button
‘Delete query’ button
Display of selected
query
‘Modify query’
button
‘Execute query’
button
‘Export query’
button
‘Copy query’
button
‘Print query’ button
SenatorFX.NET/LOG.NET user manual – V.1.1
p. 139/140
Technical Support
Our technical support service is intended for safety professionals only.
Our technical support is available Monday to Friday from 9:00 am to 12:00 pm and from 2:00
pm to 6:00 pm (5:00 pm on Fridays)
[email protected]
We conduct technical training sessions on the use of products designed by EDEN.
All courses take place on our premises.
If you are a user requiring
-
Information on the use of our systems
-
A security professional to perform maintenance on your site
-
Advice in drawing up a detailed specification
Call our main switchboard on
+33 442 24 70 40
SenatorFX.NET/LOG.NET user manual – V.1.1
Zone Commerciale et Artisanale
670, route de Berre
13510 EGUILLES
France
www.eden-innovations.com
p. 140/140