1
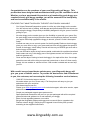
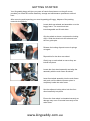
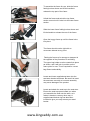
Kingcaddy Golf Buggies
Owners Instruction Manual
www.kingcaddy.com.au
Congratulations on the purchase of your new Kingcaddy golf buggy. This
product has been designed and manufactured with you, the customer in mind.
Whether you have purchased this product as a freewheeling push buggy or a
complete electric golf buggy package, you will be assured of the best quality
and service available today in the market.
FEATURES THAT MAKE THIS BUGGY THE BEST GOLF BUGGY AVAILABLE
-
-
-
-
-
Our Unique Patented Suspension system is unlike any other buggy on the market.
You will notice a lack of rattling, club damage and jarred hands from the minute you
start using the buggy. Simple and yet brilliantly designed it will give years of smooth
golfing for you.
No other buggy on the market gives you the flexibility to grow with your game. Buy
the push buggy now and enjoy all same frame and suspension features, and when
you require extra help upgrade the buggy to electric yourself. Couldn’t be simpler
really!
A brand new easy to use control system for the Kingcaddy Platinum electric buggy
gives you more time to enjoy your game and less time worrying about the speed or
control of the buggy. Inbuilt safety override will ensure you NEVER get stuck with a
broken buggy control again.
Our new innovative super strong frame material combined with a polished anodised
finish means not only is this buggy one of the lightest around, but will last for years
and look great as well.
Gone are the days of having to book the buggy in for repair all the time. Our simple
parts kits come with all the bits you need and instructions on how to fit them easily.
Simply visit our website or call the toll free 1300 number included and we can help
you out.
With careful use and considerate maintenance, your Kingcaddy buggy will
give you years of faithful service. To provide the best service and commitment
to you, the customer, we have setup the following innovative service features,
-
-
-
-
1300 667 224 technical support service
No matter where you live, we are only a Toll free phone call away to give you
assistance with your enquiries.
Web based support service
Please go to www.kingcaddy.com.au for technical support, after sales service, spare
parts and accessory sales
Simple pre-packaged support spare parts service
Spare parts and accessories will come to you pre-packaged with all the required
parts and technical guidance to fit and maintain your buggy.
Ease of mind upgrades between our models
Bought the Kingcaddy Glide push buggy and now would like to upgrade to the
Platinum electric buggy? Simply buy the upgrade kit and fit the parts yourself
according to the supplied instructions.
www.kingcaddy.com.au
GETTING STARTED
Your Kingcaddy buggy will give you years of hassle free pleasure on the golf course
provided you follow the correct assembly, storage and maintenance procedures outlined
here.
After removing and inspecting your new kingcaddy golf buggy, dispose of the packing
materials thoughtfully.
Locate both rear wheels and assemble on to the
buggy frame. The rear wheels are
interchangeable and fit both sides.
Grip the wheel as shown, and press the locking
clip in. Slide the wheel onto the axle and onto
the four guide pins.
Release the locking clip and ensure it springs
out again.
Repeat this for the other rear wheel.
Gently tug on each wheel to ensure they are
locked into place.
Locate the front wheel assembly and align the
assembly with the main frame as shown.
Insert front wheel assembly into the main frame
and push until the black connector piece is
completely inside the main frame.
Use the adjacent locking tab to lock the front
wheel assembly into place.
Ensure the front wheel is orientated correctly as
damage may occur if inserted incorrectly to the
main frame.
www.kingcaddy.com.au
To assemble the frame for use, slide the frame
folding lock as shown and lift the handle to
release the top part of the frame.
Unfold the frame and swivel the top frame
section around until it locks into the lower frame
section.
Slide the lower frame folding lock as shown and
lift the handle to release the rest of the frame.
Open the buggy frame up until the frame locks
into place.
The frame should now be rigid with no
movement allowed at any point.
Folding the frame up for storage or transport is
the opposite of the procedure for unfolding.
The upper bag holder must be rotated into place
as shown, and it will lock in position on the
frame piece for use. This is required for correct
bag fitment and stability.
Locate and insert supplied seat stem into the
seat stem bracket as shown. Be careful to insert
the seat stem correctly as incorrect assembly
may cause damage to the product.
Locate and attach the seat top to the seat stem.
Ensure the seat top opens toward you when
you assemble the seat onto the stem, as it
makes it harder to use any other way. A
supplied sand bucket ring has also been
included to give you easy access your sand
bucket.
www.kingcaddy.com.au
FOR THE KINGCADDY PLATINUM
Place the supplied battery into the battery
carrier so that the attached lead is close to the
connector coming from the buggy. The battery
tray is designed so that no strap is needed to
support the battery.
Connect the battery to the buggy so carefully
rotate the connector pieces together until they
slide together. You will notice a red light comes
on in the handle. This tells you the battery is
connected properly and the buggy controller s
ready to go.
ON THE COURSE
FOR THE KINGCADDY GLIDE
Assemble the buggy according to the instructions supplied and ensure wheels and frame
locks are locked into place before use. Incorrect or alternate assembly can cause damage to
the buggy or the operator.
Fit your golf bag to the buggy and attach the straps so that the golf bag is secure.
Play golf!
FOR KINGCADDY PLATINUM
Assemble as per Kingcaddy glide instructions.
Ensure battery to be used in fully charged and maintained (see instructions for battery
charging and maintenance).
Place battery into battery carrier and connect to the trolley battery lead as per instructions.
Ensure handle LED light is showing red. If the LED light is not glowing, check the battery
connection for correct assembly.
CONTROLLING THE SPEED
The rotating black knob adjacent to the switches will control the speed of the buggy. Rotating
away from you will be faster speeds. The control system has a cruise control feature so the
speed you select with the speed control will maintain on the course.
There are three modes the controller uses, and each mode is displayed by the LED light on
the handle. They are as follows,
www.kingcaddy.com.au
RED LIGHT – STOP MODE
In this mode the controller is on, but no power can be applied to the wheels. Pressing either
of the buttons instantaneously, takes the controller back to RED mode. And the buggy will
stop.
GREEN LIGHT – DRIVE MODE
This is the normal operating mode for driving the buggy. Pressing the GREEN button for
longer than half a second will make the GREEN light come on and give power to the wheels
according to the speed set by the speed control.
Any of the buttons pressed instantaneously will make the GREEN light change back to the
RED light and the buggy will stop. Pressing the GREEN button again for half a second will
change back to GREEN mode and the buggy will drive.
ORANGE LIGHT – DISTANCE CONTROL
Set distances can be selected for the buggy to travel away then stop. Pressing the RED
button for longer than half a second will make the GREEN light change to a flashing
ORANGE light. Pressing the RED button instantaneously after the ORANGE light is on will
select extra distance travelled. The distance travelled before stopping is as follows,
Constant ORANGE flash
15m travel
Double ORANGE flash
30m travel
Triple ORANGE flash
60m travel
After the buggy has travelled the set distance and stopped, the ORANGE light will change
back to a RED light. Pressing the RED button again for longer than half a second will change
back to the ORANGE mode and distance control again.
If you are experiencing difficulty controlling the buggy or the function outlined above are not
working, please find the troubleshooting guide at the back of the instruction manual for tips
to help you out.
FAILSAFE MODE
This mode is designed to be a last step to fix a problem out on the course. If for any reason
the buggy is not working correctly, this mode can be switched on, and the buggy operation
will be very simple and safe.
To switch on FAILSAFE MODE, simply hold down both RED and GREEN buttons at the
same time for at least 20 seconds. The handle light will go out while holding the buttons and
come on after FAILSAFE MODE has been activated.
The controls for FAILSAFE MODE are as follows,
RED MODE
same as normal operation
GREEN MODE
allows simple speed control with the speed control pot
ORANGE MODE
preset distance control as per normal operation
www.kingcaddy.com.au
TROUBLESHOOTING
The following troubleshooting guide is given to you to try to rectify simple problems
encountered during operation of this electric buggy. Please note that the simplest way to try
to rectify any problems encountered is to simply disconnect the battery from the controller
and reconnect after a few seconds. This will reset all the controller functions and should fix
most issues in operation.
NO HANDLE LIGHT AT ALL WHEN I PLUG THE BATTERY IN
-
-
Check the battery is charged. You can use the battery charger to check the battery
charge, or get some help checking the voltage of the battery. You can try another
compatible battery that you know is good. If this fixes the problem, take the battery
and charger to the nearest Kingcaddy service outlet and they will help you get going
again.
Check the wiring from the battery tray up to the handle. If the wire is broken or
damaged then the light might not come on and the control modes not work properly.
If you can wriggle the exposed wiring and the handle light comes on intermittently,
then there is a problem with the handle wiring. Take the buggy to the nearest
Kingcaddy service outlet and they will help you get going again.
THE HANDLE LIGHT WORKS PROPERLY BUT THE BUGGY ONLY
TRAVELS 2-3 METRES AND STOPS
-
The controller uses a sensor to determine wheel travel. If you are experiencing the
above complaint, the wheel sensor may not be picking up the wheel movement.
Check the sensor located near the axle on the right side under the buggy adjacent
the axle bearing. Sticks or dirt may interfere with the operation and affect the
controller. Check the connector plug on the sensor wire and make sure it is not
damaged. Check the operation again to make sure it works properly. You can switch
the controller to FAILSAFE mode if required to overcome this problem on the golf
course so you can still use the buggy. Please see FAILSAFE OPERATION below.
THE RED LIGHT FLASHES CONSTANTLY
-
This condition means that the battery voltage has dropped below the recommended
level for safe operation. It will not affect the control of the buggy, but the buggy may
travel a little slower. Check and charge the battery and determine the battery is good
before using it again.
THE OPERATION OF THE CONTROLLER MODES IS DIFFERENT TO
NORMAL
-
If you have any problem with the operation of the buggy and find the control is
different to outlined in the CONTROL section, you can change the mode to
FAILSAFE MODE. Please see FAILSAFE MODE below.
www.kingcaddy.com.au
THE BUGGY DRIVES AROUND IN CIRCLES
-
-
Each rear wheel has a clutch. If one of these clutches is broken or has failed, then
the buggy will not drive in a straight line. Each wheel should freewheel when rolled
forwards and lock when rolled backwards. If there is a problem, simply replace the
problem clutch with a spare parts kit available from us and you are away again.
If the buggy drifts left or right and both clutches are ok, there is an adjustment
available on the front wheel to correct this. A spanner is supplied for this with the
buggy instruction manual. Take care not to over tighten and damage the adjustment
system.
THE BUGGY SPEED IS ERRATIC AND THE SPEED CONTROL JUST
KEEPS TURNING
-
The speed control adjuster may have been damaged by force and is causing the
speed to be erratic. Our speed control spare parts kit can be bought to replace the
old part and fix the problem
MAINTENANCE
Your Kingcaddy buggy will give you years of faithful service provided it is maintained in
accordance with the following guidelines
After each use
Clean off excess dirt and moisture with a clean dry cloth
Do not spray water or liquids onto or near the trolley
Wipe over golf buggy with a suitable cleaner/lubricant (CRC, WD40, and RP7) and a cloth
Clean the wheels thoroughly with a damp cloth. Do not use spray cleaner into the clutches
Every few months
Use a suitable cleaner/lubricant (CRC, WD40, and RP7) and spray into front wheel bearing
area
Remove rear wheels and spray with a suitable cleaner/lubricant (CRC, WD40, and RP7) into
the wheel. Refit and check operation.
Once a year
Get the buggy serviced at an authorised service centre. This will extend the life of the buggy
and keep it in good working order. A list of service agents can be found at
www.kingcaddy.com.au or simply ring or toll free number 1300 667 224
www.kingcaddy.com.au
SERVICING AND REPAIRS TO THE BUGGY
Your Kingcaddy buggy has been designed to allow the owner to carry out most of the
servicing and repairs to the buggy themselves. Simply
-
Visit www.kingcaddy.com.au and look in the servicing section for guidance to help
you repair and service your own buggy
Ring us on the 1300 number and our helpful staff will guide you through any queries
you have.
All spare parts and upgrade kits include comprehensive instructions and all the parts
required to maintain the buggy yourself.
If you can’t fit the parts or don’t have the tools, please lookup our list of service agents listed
at www.kingcaddy.com.au under the service section.
BATTERY AND CHARGER MAINTENANCE
Battery and charger maintenance will depend on the battery and charger you select to use
with this buggy. If you are using your own battery and charger, refer to the usage information
originally supplied with the battery and charger.
If you are purchasing a new battery and charger from kingcaddy, you will be supplied with
the correct maintenance and usage information at purchase.
As a general rule with batteries
-
Always keep the battery charged when not in use
Charge the battery as soon as you can after use
Use the correct battery charger for the battery you are using.
Don’t charge or leave batteries on cold damp surfaces
Never turn battery chargers off at the wall and leave connected t batteries.
Consult Kingcaddy directly if you need further information
YOUR KINGCADDY WARRANTY
Your Kingcaddy golf buggy is guaranteed to be free from defects due to faulty materials,
design or workmanship for a period of 12 months from the date of purchase by the original
end user.
Faults due to accidental damage, wear and tear, misuse or modification of the standard
product, signs of commercial use, will not be covered by this warranty. All faults must be
reported to the manufacturer as soon as they are noticed.
You should call and discuss the problem with a representative of the manufacturer using the
Toll free 1300 667 224 and we can guide you to how corrective steps can be taken.
To claim warranty, it may be necessary to either the defective part or product must be
returned to the manufacturer at your cost.
Kingcaddy will at their discretion replace defective products or parts and cover the freight
cost to get the parts to you.
www.kingcaddy.com.au
SPECIFICATIONS
MODEL NO.
KINGCADDY GLIDE
KINGCADDY PLATINUM
MATERIAL.
6061 Aluminium
6061 Aluminium
BOXED DIMENSIONS
735x585x355
735x585x355
FOLDED DIMENSIONS
720x600x340
720x600x340
TYRES
PU foam airless
PU foam airless
MOTOR
-
180W four brush
CONTROLLER
-
30Amp high currrent
MAXIMUM SPEED
-
10Kmph
WEIGHT no battery
6.6Kg
7.9Kg
MAXIMUM LOAD
30Kg
30Kg
Australian Agent
Phantom Power Products
55 West Thebarton Rd
Thebarton 5031
Adelaide
SOUTH AUSTRALIA
your local agent
www.kingcaddy.com.au