1
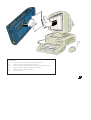
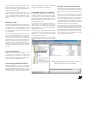
User Documentation
Data Transfer Software
NorXfer 4.0
The NorXfer (Transfer) program
provides modules for the transfer
of measurements made with the
Nor110, -116, -118, and the Nor121. In addition conversion of files
imported from Nor840 (e.g. via
floppy disk) may take place. The
data transferred can be converted
to fit spreadsheets and thus easily
become subject to postprocessing,
reportmaking and presentation.
The program is tightly integrated
with the NorProfile and NorReview postprocessing software.
The program requires Pentium
type PCs with Microsoft Windows
NT4, 2000 or XP.
To be able to convert data to MSExcel format, MS-Excel must be
installed in the PC.
á
Im1020_1Ed4R1En
Nor-Xfer version 4.0 – September 2004 Edition
Im1020_1Ed4R1En
Norsonic is a registered trademark of Norsonic AS. Windows is a
registered trade-mark of Microsoft in the US and other countries.
All other brand or product names are trademarks or registered
trademarks of their respective companies.
Every effort has been made to supply complete and accurate
information. However, Norsonic AS assumes no responsibility
for the use of – nor for the consequential damages of the use
of – this information and/or the instrumentation described herein.
Further-more Norsonic AS assumes no responsibility for any
infringement of the intellectual property rights of third parties,
wherever applicable, which would result from such use.
Norsonic AS reserves the right to amend any of the information
given in this manual in order to take ac count of new
developments.
If you wish to communicate with us, please feel welcome.
Our address is:
Norsonic AS, P.O. Box 24, N-3421 Lierskogen, Norway.
Tel: +47 3285 8900, Fax: +47 3285 2208
e-mail: [email protected]
www.norsonic.com
Copyright © Norsonic AS 1998–2004
All rights reserved
2
A few definitions:
.nbf
Norsonic binary file format (used by the Nor110/116/118)
.npf
Norsonic project file format (used by the Nor121)
.par
ASCII measurement setup information file (used by the Nor110 /116/118)
.prn
ASCII measurement data file (used by the Nor110/116)
.sdf
binary file format used by the Nor840
.xls
MS-Excel format
3
Installing NorXfer
T
he NorXfer (Transfer) software utility has been designed to provide easy
transfer of measured data from Norsonic
instruments to a PC running Windows
95/98, NT 4.0, 2000 or XP.
Observe that files stored in My measurements are left unaffected by this. Once the
old version has been removed completely,
select "NorXfer 4.0" again and the installation process will install the new version
on your hard disk. Just follow the instructions appearing.
Installing NorXfer
NorXfer is a program designed to take care
of the transfer of measurement data from
your Norsonic sound measuring instrument to your PC.
Installing from a
downloaded zip-file
Version requirements:
General Considerations
If you have downloaded NorXfer from our
web site, you must unpack the files before
installation.
Nor110 version 3.20 and higher
Nor116 version 2.20 and higher
Nor118 version 1.1 and higher
Nor121 software version 2.3 and higher.
You will need a zip program – such as
PKUNZIP or WINZIP to do this.
Nor121: If the instrument software is older,
the communication software in the instrument may be upgraded by the user.
We recommend that you exit all programs
before you start the installation. This frees
up memory for installation and prevents
possible conflicts between the NorXfer
installer and other programs.
Installing the Program
Insert the CD-ROM. The Autoplay feature
will start the installation program. Just follow the instructions appearing. If it does
not, do as follows: In Windows 2000/XP
right-click on the drive-letter (e.g. D:\). A
context-sensitive menu will appear containing Autoplay and a ReadMe file which
you may want to read. In Windows NT go
to the CD-ROM drive and double-click
norsonic.exe on the root.
A web-page like interface will now appear. Select "NorXfer 4.0" by clicking on
it. If this installation is an update of an
existing version of NorXfer, the old version must be removed before you proceed
with the installation itself. Select "Remove
all installed components" and click Next.
4
Do as follows:
• Copy the zip-file to a temporary folder.
• Unpack the files using pkunzip or winzip
• Use the Windows Explorer to locate the
file Setup.exe in the temporary folder.
Double-click this file and follow the
instructions.
NorXfer version 4.0 requires:
Running NorXfer
W
hen the program is started a PC
file/folder view similar to the
well-known Windows Explorer appears.
However some features from Explorer
are missing.
In order to browse through the contents of
the Nor121, the instrument must be connected to a parallel port LPT1 or LPT2 or
a serial port. Due to speed considerations
we recommend parallel connection.
The user can select which PC drives to
show in the directory tree.
With Windows NT NorXfer will need to
install a device driver (FastLynx.sys) in order to connect to LPT1 or LPT2.You must
have administrator privileges to do this
– see separate box below for details.
Press View > Options and key in a list of
drives letters without separators.
Several Instruments of Type Nor110/Nor116/Nor118 and one Nor121 can be connected simultaneously.
Connection to Nor110, Nor116 or Nor118
is possible at serial ports COM1 .. COM4.
Open existing text file
Display directory tree
(similar to File>New)
Connect instrument
(see also text for
details)
Blue colour indicates
that these folders are
inside the instrument
Submenu appearing
when Connect
instrument has been
activated
With Nor121 you may also save measurements on an external drive (ATA Card or
Jaz Drive).
may connect the external drive to your
Laptop PC.
Select“local”connection to access data on
this medium.
Refresh Screen
Select a folder and click the refresh icon
to update the display of the current folder
in the tree when the contents have been
altered by other programs than NorXfer.
When the measurements have been saved
and the instrument is switched off, you
Refresh display icon
Delete files permanently
(they are not sent to the
recycle bin!)
Nor121 only!
The instrument must
be in “Transfer Mode”
before starting a parallel
connection. Press MEMORY
and then select NOR-XFER
in the instrument. Wait
until the text “Transfer”
is shown in the Nor121
display before selecting
“Connect Instrument” in
the NorXfer program. This
won’t be needed for serial
connection.
Caution!
Never disconnect an
instrument physically from
the PC without informing
NorXfer (by pressing the
disconnect button or by
closing NorXfer).
5
Connect Instrument
Be sure to connect the instrument to the
PC through an appropriate cable. Click
on the Connect button ( ) to select an
instrument and to start the connection.
The instrument appears as if it were a
detachable drive. The instrument folders
are blue to indicate that the contents are
still inside the instrument.
When quitting the program your latest
selections will be preserved for use the
next time you start the program.
Running the program
Files and complete folders can be transferred us ing the clip-board (copy and
paste) or by drag and drop in the same
way as with Windows Explorer.
Transferring from 110/116/
118
1. Connect the cable and switch on the
instrument.
2. Click the Connect button (
by clicking on its name. Select more than
one file by pressing Ctrl while clicking
on the file name.
To select several consecutive files select
the first file and move the mouse to the
last file in question, press Shift and click
on this last file.
The two methods may be combined to
the extent you want.
Alternatively, you may use SHFT Arrow
up or CTRL Arrow down.
Single files can be deselected by pressing
Ctrl while clicking on the file using the
left mouse button.
6. Press Ctrl C to copy the selected files.
Select a destination folder and press
Ctrl V to paste the files or select Edit >
Copy, go to the destination folder and
select Edit > Paste.
Alternatively, you may use the mouse
and simply drag the selected files over
to the destination directory.
Allow some time for the file transfer to
take place.
).
3. In the dialogue box appearing, select
instrument type and corresponding
connection port.
4. Select the Serial port setup tab and
set the baud rate. Use 9 600 baud for
Nor110 and Nor116; 115 200 baud for
Nor118 and Nor121. Remember to set
the instrument to the same baud rate!
5. Expand the folder-tree of the instrument
if needed. Select the file to be transferred
Naming Conventions
Files from the Nor110/116/118 will be given
a file name composed from the instrument
directory name followed by an underscore
(ie the _ character) and the four-digit measurement number.
The extension NBF stands for Norsonic
Binary Format.
Example: Assume that we transfer the
file 999 of the directory 021104 in the
Nor116. This file will appear in the PC as:
021104_0999.NBF.
Using NorXfer with Windows NT/2000/XP
You’ll need Administrator privileges to install NorXfer on a system running Windows
NT/2000/XP.
6
Transferring from Nor121
Transferring files from the Nor121 is
very similar to the transfer of files from
the Nor110/116/118. However, the file
structure is somewhat different, since a
Nor121 measurement in fact consists of
several (sub)measurements like profile,
reports 1~5, event etc.
Therefore each measurement in the
Nor121 consists of a folder containing
several files. In the NorXfer Tree view, the
measurements are organised in three levels
of folders.
The first level is the storage medium in the
instrument, the second level is the measurement group,while the third level is the
measurement title.
Each complete measurement is stored in
the third level and is given the name Group_
Title_Index_date-and-time-of-day-of-storage
once they have been transferred to the PC.
Since each measurement consist of several
reports etc. these are kept together in a
measurement folder which appears yellow
(like folders do in Windows explorer), but
with the text 121 written on it.
By giving the measurement folder a name
containing the group, title, index and
date/time, ambiguity is avoided (you won't
meet two completely unrelated versions of
measurement No. 3).
If you connect the Nor121 to a serial port
(Com 1…4) of your PC, you can also select
and transfer parts of a measurement, such
as a single report to save transfer time. The
other reports, events or recordings can be
selected and transferred individually at a
later time, if needed.
Just click on the yellow foilder marked 121
and the individual files are revealed.
Example: Assume we have a Group
named Anton, a Title Dvorak and an Index 2.
Upon transfer to the PC, NorXfer will create a folder named Anton_Dvorak_2_[start
time], in which [start time] is the date and
time when the measurement was started.
In this folder you will find all the measurements (event, profile, report No. n etc.)
made and stored as Index 2 titled Dvorak
under the group Anton.
appearing. The files can then be studied
and processed in Microsoft Excel.
To transfer files, use the methods of selecting, copying and pasting or drag and
drop as described under Transferring Files
from Nor-110/116/118 above. Use 19200
baud.
Nor116/118 Overview Function
Memory card
Data measured with Nor121 may be stored
on an external memory card. If your PC has
a suitable slot or card reader, the stored
information may be transferred to your
PC directly from the memory card by the
use of NorXfer.
To access these files, plug the card to your
PC. Start NorXfer the usual way, and initiate a connection. Then select <121> for
instrument and <local> for connection,
and hit <enter>. A Nor121 icon followed
by the text Nor121.local will appear. The
internal memory structure of the device is
shown as usual, and operations like file
download and file conversion are exactly
as usual.
A convenient feature of NorXfer is the
overview function. This function creates
a single file out of several measurements
already transferred to the PC. The overview
file will contain the global data of the selected measurements.
To utilise this feature make sure the measurement files, for which you're going to
create overviews reside in the same folder
on your PC, i.e. on the same level in the
file/folder hierarchy.
Select a group of *.nbf files and click the
right mouse but ton. Se lect the option
Overview text or Overview Excel from the
context sensitive menu.
Nor121 Overview Function
You may convert the global data of several
Nor121 measurements already transferred
to your PC, into a single text file or Excel
file.
Make sure the measurements, for which
you're going to create overviews reside in
the same folder on your PC, i.e. on the
same level in the file/folder hierarchy. This
will typically be the case when you transfer
a set of measurements stored in the Nor121
under the same Group and/or Title.
Navigate down to the measurement folder
level (you're there when you see the yellow folders with 121 written on them) and
select the number of 121 folders required.
Right-click the mouse and select the option Overview text or Overview Excel from
the context sensitive menu.
Converted overview files are stored in
the same folder as the files it was created
from.
Converting Files
Files from Nor110/116/118/121 may be
convert ed to text format or MS Excel
work books: A conversion to MS Excel
format requires the presence of MS Excel
in your PC. (Excel 2000 or newer).
Converting 110/116/118Files
Example showing folders with 121 written on them
and the contents of one of these folders
Select the files you want to convert to
Excel workbook format using the familiar
Windows methods described above. Once
selected click the right mouse button and
select from the context sensitive menu
7
Converted overview files are stored in
the same folder as the files it was created
from.
If you save the workbooks under a new set
of names you will be able to avoid that the
workbooks are overwritten each time you
convert the measurement files.
the in stru ments to be up to date. The
minimal requirements for Nor-Xfer Version4.0 are:
Nor110: Version 3.20
Nor116: Version 2.20
Converting Nor121 Files
This utility can also be used to convert
multispectrum measurements from the
Nor840.
When using the Nor121:
1. In Nor-Xfer locate the measurement
directory named Group_Title_Index in
the directory tree.
In the file list in the right pane a file
named Nor-121.NPF appears. Never
delete this file! This is the header file
for all the hidden data files in the measurement directory. Below Nor-121.NPF
several reports are listed.
2. Select one or more reports. Right-click
to get a context menu and choose the
format to convert to.
Open Existing Text
Documents
Nor118: Version 1.1
You may open files of the types *.txt, *.prn,
*.par and *.xls by double clicking on the
file icon.
Nor121: Version 3.0 (serial connection)
More on this in NorXfer\Compatib.txt on
the CD.
Deleting Files
The program allows you to delete files
transferred to PC only. To delete files in
the instrument itself, use the instrument
keyboard. See the documentation accompanying your instrument.
Selected files of the types *.txt, *.prn, *.par,
*.xls, *.sdf and *.nbf or entire directory trees
are deleted permanently by clicking on the
Delete icon or by pressing the DEL key.
The files will be sent to the recycle bin.
Then wait! This may take some time.
When using files from Nor840:
1. Locate the measurement directory in
the tree. In the file list in the right pane
Nor840 files have extension .sdf
Optional extensions
There are optional extensions available for
this program: These are:
2. Select a file or a group of files and right- • Instrument Nor110
click to produce the context menu and • Instrument Nor116
choose the output format
• Instrument Nor118
3. Sit back and wait. This is likely to take • Instrument Nor121
some time.
Contact your local representative or
The conversion process may take con- www.norsonic.com for details on the
siderable time. Your PC may seem to be
availability.
hanged up whilst converting.
When the conversion is completed you will
see one or several text files or spreadsheet
workbooks. They are already saved in the
measurement directory in Microsoft Excel
format.
8
Nor121: Version 2.3 (parallel connection)
Instrument Version
Compatibility
Because Nor-Xfer is using advanced
features of the instruments, it requires
If your instruments do not fit these requirements, please ask your distributor
to up grade the instrument to a newer
version.
The Nor121 has the possibility of a partial
upgrade, which replaces only the commu ni ca tion portion of the software in
the instrument. Run the installation CD
and follow the instructions in the sections
NorXfer and Nor-121 Slave Upgrade.
Building Acoustics using Nor121 and NorXfer
The program NorXfer allows data measured in the building acoustic mode to be
transferred to a PC. The results may be
converted to a text file, or to MS Excel
work-book. Please refer to the NorXfer
manual for requirements to the PC, for
the appropriate version of MS Windows
programs, and to the procedure for installation. This description only describes
items that are specific for the building
acoustic mode of Nor121.
A building acoustic measurement consists
typically of averaged values for each of
the measurement positions as source and
receiving room. By manual operation of
the Nor121, only the averaged value is
displayed. However, when a measurement is stored, the measurement result
for each individual measurement is stored
and the averaged value and the standard
deviation are computed. NorXfer is an effective mean for transferring these data
to a PC for further calculation in order to
make the final report.
Note that Norsonic also supply PC programs for controlling the measurement
and for making the final report based on
a number of international and national
standards. Please contact your local Norsonic supplier for further information on
the programs NorSic and CtrlSic.
After a building acoustic measurement is
finished and the result is stored, the result
may be transferred to the PC in the following way:
1. Select serial port or parallel port for the
communication. Make the cable connection to the appropriate PC-port.
Switch on the instrument Nor121. If
serial port is used, the baud-rate has to
be set. If the parallel port is used, the
instrument has to be set in transfer
mode. The transfer mode may be selected by pressing Memory , move the
cursor to the NorXfer field and press
Enter. Wait until “Transfer mode...” is
displayed,
2. Start the NorXfer program in the PC.
3. Click on the communication symbol.
A symbol for the instrument Nor121
will be shown in the folder “My Instrument”. Click on the + symbol to
expand the diagram. The main blocks
of the memory system in the instrument will be shown. Click on the hdd
–symbol if the values are stored on the
hard disk drive. Expand the file structure until the wanted measurement
file is displayed. Drag and drop the
measurement file in the instrument
to the folder “My measurements” (or
other displayed folder)
4. Open the recently stored measurement folder in “My Measurement”
marked with the 121 –symbol and the
measurement file number. In addition
to three apparently empty folders,
three files marked with the instrument
symbol are displayed:
converted files will be placed in the
same folder as the “nor-121.npf” file.
6. If the “nor-121.npf” file is converted
to text, up to seven different text files
will be generated:
- BA_Setup.txt
- BA_Sending room.txt
- BA_Receiving room.txt
- BA_BGN.txt
- BA_Reverbation.txt
- BA_Correction.txt
- BA_Rating.txt
The delimiter may be selected in
“View – Options” setup.
7. If the “nor-121.npf” file is converted to
Excel, a workbook with up to seven
different worksheets will be generated:
- Setup
- Sending room
- Receiving room
- BGN
- Reverbation
- Correction
- Rating
8. The measurement values are accompanied with text to identify the different
values.
- Nor-121.npf
- Sending room
- Receiving room
The latter two contain information for
the sending and receiving room, respectively. The “nor-121.nfp” contains
all the information.
5. Point on “nor-121.npf” and right-click
the mouse. Select“Convert to Excel”or
“Convert to text” as appropriate. The
9
Transfer troubleshooting when using parallel port on Nor121
Introduction
The transfer of data from Nor121 when
using the parallel port is implemented
by the use of a program module named
FastLynx. Here follows some tips from
the manufacturer of the module.
Access denied message on
LPT or COM port
When listening as server or connecting as
client on a COM or LPT port, if you see
an “Access denied” message, this usually
means that another program or device
driver has the indicated port open, which
prevents FastLynx from opening and using it. The first thing to try is to close any
running programs that might be using the
port. If you had previously run a program
in a DOS session that accessed the port,
the DOS session may still have the port
open even though the DOS program that
originally used the port has exited. Close
the DOS session to free up the port. If
you have Windows Direct Cable Connection (DCC) configured to use the port, you
will probably need to disable DCC before
FastLynx can use the port. After doing the
above, you need to click the appropriate
LPT or COM port check box“off”and then
“on” again to get FastLynx to try to open
the port again.
For LPT ports, this problem can occur if you
have a printer driver installed. Some printer drivers have an option to continuously
poll the printer port to check on printer
status. If your driver has such an option,
you may be able to free up the LPT port by
selecting the printer driver option to NOT
poll for status. Other printer drivers have
an option to allow or disable printing from
DOS programs. If you don’t need to print
10
from DOS, disabling DOS mode printing
will sometimes free up the LPT port. The
Lexmark 2050 series is an example of a
driver that has this option. When using
this driver, run the “Lexmark 2050 Series
Ctrl Prog”and then select the Options tab.
Then check the option at the bottom that
says“Disable CJ2050 Series DOS Printing”.
Other printer drivers may not have options
such as these that will allow FastLynx to
use the LPT port while the driver is loaded.
In that case, the only recourse is to disable
or uninstall the printer driver before using
FastLynx on the LPT port.
”FastLynx NT device driver
is not installed” message
If you are trying parallel transfer on
Windows XP, 2000, or NT 4, and see the
message that the NT device driver is not
installed, perform the following steps to
load it:·
• Log on as a user with Administrative
privilege ·
• Start FastLynx ·
• Select the Setup/ReadMe option from the
FastLynx File menu
• Check the box related to the NT driver in
the dialog box ·
• Press the OK button or hit the Enter key
Parallel connection succeeds
but then drops later
If you succeed in getting a parallel connection, but the connection drops later, try
the following:
• Insure the parallel cable is screwed in
snugly
• Plug any laptops into a wall socket instead
of running on battery power
• Close any other active programs before
making the connection
• If you have previously used Windows Direct
Cable Connection (DCC), please insure that
it is not listening on the LPT port! Breaking
the connection does NOT stop DCC from
listening on the port.
• Change the BIOS LPT port setting from ECP
or EPP to SPP or Standard
If the connection is consistently reliable for
a period of time when you first start using
FastLynx, you may be having a problem
with power management features or a
screen saver. Try disabling power management for the CPU, hard disk, and monitor, and disabling the screen saver.Some
printer drivers regularly “poll” the printer
port looking for status information. If your
printer driver is trying to use the same LPT
port as FastLynx, this polling can disrupt
the ability of FastLynx to maintain a reliable
connection. Disable printer status polling
if your driver has this option. Some drivers
don’t have a way of turning this off. In that
case, try disabling or uninstalling the printer driver if practical.The last thing to try is
lowering the parallel port Maximum Speed
value. To do this, press the“Specify Remote
Connection Parameters” button and then
select lower Maximum Speed values, one
step at a time (the list is sorted with higher
speeds at the top). This only needs to be
done on one of the two computers. If none
of the above helps, you may have a cable
problem or a hardware problem in one of
the parallel ports. We suggest using serial
transfer as an alternate method.
Serial connection succeeds
but then drops later
If the connection is consistently reliable for
a period of time when you first start using
FastLynx, you may be having a problem
with power management features or a
screen saver. Try disabling power management for the CPU, hard disk, and monitor,
and disabling the screen saver.
Another thing to try is to disable accelerated mode. To do this, press the “Specify
Remote Connection Parameters”button in
FastLynx and then uncheck the serial accelerated mode box. If this doesn’t help, try
lowering the Maximum Baud Rate parameter one step at time. The last thing to try
is lowering the Maximum Block Size value.
These steps only need to be performed on
one of the two computers.
My application doesn’t work
after I transfer it to another
computer
In the old days, you could often successfully transfer a DOS application and
associated data files to another computer
using FastLynx. With newer Windows applications, this often does not work. Many
applications rely on installation and setup
programs to write settings to the Windows registry. Registry settings are not
transferred by FastLynx, which can cause
problems if you are trying to transfer an
application. Another problem is that many
applications now install shared DLLs in
directories other than the main application
directory. Due to these and other problems,
it is often not possible to transfer a Windows application and associated data files
solely by using FastLynx. The recommended procedure when you want to transfer an
application is to re-install the application
on the target computer from the original
media. Then transfer the application’s data
files using FastLynx.
File names with certain
extended characters won’t
transfer
On Windows 95 and 98, you may have
trouble transferring rare file names created
by old DOS applications that have certain
extended characters in them. Windows 95/
98 does file I/O using the ANSI character
set, but DOS uses the OEM character set.
There are some extended characters in the
OEM set that do not exist in the ANSI set.
Such files cannot be created by typical Windows programs, but they can be created by
certain DOS applications. The symptom of
this problem is that you highlight a file to
transfer it, and then FastLynx says it can’t
find the file. The Windows 95/98 Explorer
has the same problem. You can usually
transfer such files by running the DOS
slave on the system with the problem file.
Since the slave is a DOS program, it can
read the file name with the OEM characters. FastLynx will change the name of the
file to a Windows compatible name during
the transfer, but at least you can transfer
the file. This problem does not occur using the NT version of FastLynx because the
NT version processes file names using the
Unicode character set - which includes all
characters in the OEM and ANSI characters sets (and many others).
11