1
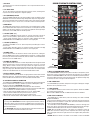
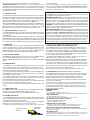
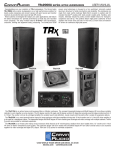
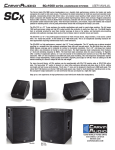
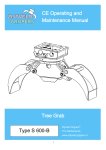
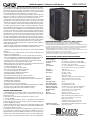
S600B StageMate™ PA System, S648 Speaker
The S600B StageMate™ portable PA system offers powerful state-of-theart performance in a compact lightweight package with multiple options for
connectivity and system expansion. The ability to run from internal battery
power allows high-power operation where other systems simply cannot go
and is rechargeable from either AC power or a 12V car socket.
Derived from large line array technology, the CDD™ (Constant Delivery
Dispersion™) speaker array delivers clear, intelligible sound over extended
distances. The coverage is up to twice that of conventional cabinets.
Designed for professional touring, the compact enclosure is made from
multi-ply Baltic birch, CNC machined for precise construction and weight
reduction, then covered in impact and weather resistant Duratec™ UV finish.
The system expands to stereo with the matching S648 extension speaker,
and allows connecting up to three S648’s resulting in a 400 watt system with
increased CDD™ array coverage. For bass-heavy applications, a powered subwoofer can be linked to the MAIN volume control through the XLR Line Out.
The built-in 6 channel mixer is capable of receiving up to 11 different sources
at the same time. A variety of inputs include Bluetooth® wireless technology
for audio playback, 4 XLR mic inputs, 2 instrument inputs with Hi-Z switch,
stereo dual 1/4” input, 1/8” stereo input for portable devices and an accessory bay which accepts an optional UHF wireless mic/instrument receiver.
The active 3-band EQ controls are designed for natural sounding yet powerful
tone shaping for vocals and instruments. DSP effects with variable settings
for Echo, Reverb and Chorus add extra dimension to live performances.
Other features include Phantom mic power, a USB charge port, Headphone
output and XLR Line Out.
Advanced speaker technology and flexible connectivity options in a light
weight yet rugged package make the S600B an indispensable system.
- Lightweight, compact PA system with pristine sound and outstanding
projection
- Can run for hours in battery mode on a single charge, rechargeable from
wall AC or car 12V DC socket
- 400w Stereo amplification drives up to three S648 extension speakers
- Four 3.5” Mid-Hi drivers in CDD™ (Constant Delivery Dispersion™) array
- 8-inch, 250 watt Neodymium woofer with computer tuned porting
- Six channel mixer, stereo or mono operation, 11 simultaneous inputs
- Bluetooth® wireless technology for streaming audio
- Optional UHF wireless mic/instrument receiver plugs in without connectors
- 4 balanced XLR mic inputs with Lo, Mid and Hi EQ
- 2 mono Line/Instrument inputs
- Hi-Z switch for Magnetic or Piezo pickups
- Dual 1/4” Stereo L-R Input with Lo and Hi EQ
- 1/8” jack Stereo Input with Lo and Hi EQ
- USB charge port for smartphone/media player
- 48V Phantom Power switch for mics
- DSP effects with adjustable Delays, Reverb & Chorus
- Direct Out XLR with Level, DC isolated and ground lifted
- Link to MAIN switch for Direct Out XLR to house system or powered sub
- Headphone/Tuner output jack
- Cool running Class D operation
- Amp limiter built-in to increase headroom
- Dual pole mounts for speaker stands and stacking S648 extension speaker
- Exclusive “lock-in” AC cord prevents accidental disconnect
- Designed and manufactured by Carvin Audio in the USA
GETTING STARTED QUICKLY
1. With POWER off, set the channel LEVELS and the MAIN volume at “0”.
Set the channel EQ controls to their center “0” position. This is the normal
setting for the amp.
2. Connect a mic or instrument to the Channel 1 XLR or 1/4” jack.
3. Turn the amp ON.
4. Turn up the channel LEVEL to about “5”. Gradually increase the MAIN
control to the desired level. If no sound is heard, turn down the MAIN and
check the POWER (green) LED.
5. Adjust the EQ controls to your liking. Keep in mind that turning up a tone
control isn’t always the answer. Sometimes turning down the MID control
will get you the sound you want.
6. Need more volume? Try the channel GAIN switch to compensate for low
levels from mics or instruments. Even though the S600B is driven by a
powerful amplifier, connecting additional speakers is the best way to get substantially more output. Doubling speakers increases acoustic output by four.
Using the “R/Stereo” speaker jack will also make use of the second amplifier.
USER MANUAL
RECEIVING INSPECTION - read before getting started
INSPECT YOUR SYSTEM FOR DAMAGE which may have occurred during shipping.
If damage is found, please notify the shipping company and Carvin Audio immediately.
SAVE THE CARTON & ALL PACKING MATERIALS. In the event you have to re-ship your unit, always use
the original carton and packing material. This will provide the best possible protection during shipment.
Carvin Audio and the shipping company are not liable for any damage caused by improper packing.
SAVE YOUR INVOICE. It will be required for warranty service if needed in the future.
SHIPMENT SHORTAGE. If you find items missing, they may have been shipped separately. Please allow
several days for the rest of your order to arrive before inquiring.
RECORD THE SERIAL NUMBER on the enclosed warranty card and on this manual for your records. Keep
your portion of the card and return the portion with your name and comments to us.
SPECIFICATIONS: S600B, S648 EXTENSION SPEAKER
Output Power, S600B:
Frequency Response:
Speaker Configuration:
Sensitivity:
Coverage:
Input Impedance:
Gain switch:
Phantom Power:
Tone Controls:
Direct Out:
DSP Effects:
Protection:
Power Amp topology:
Power Supply topology:
AC Power Requirements:
DC Battery Charge Input:
Dimensions: S600B, S648
Mounting/Transport:
Weight :
Warranty:
Optional Accessories:
S648 Extension Speaker:
(same size and configuration)
2x 200W @ 4 Ohms total, Int. speaker power 150W @ 8 Ohms
60Hz-18kHz
four 3.5”MF/HF, 8” Neodymium LF, 8 Ohms/200W
93dB 1W/1M, 90dB 1W/2M, max SPL 118dB @ 300W pk. (int.)
Horizontal: 110 deg. Vertical: 40 deg.
1/4” (Ch.1&2): 100K Ohms or Hi-Z switch: 500K Ohms
XLR: 2.2K Ohms, Stereo Inputs (Ch.5&6): 22K Ohms
+20dB (Ch. 1-4)
+48V, switchable for Mics 3&4
HI: 8.5kHz, +/-12dB
MID: 800Hz, +/-12dB
LOW: 70Hz, +/-12dB
Variable OFF to +4dBu, DC isolated, 100 Ohm gnd lift
Variable settings for Delay, Reverb, Chorus
speaker, thermal, over current, under voltage
Class D
High frequency switch mode
90 to 250VAC 50/60 Hz, 100VA
12-15VDC, 2A (car battery voltage with C12VDC cord)
9.7”W x 11.5”D x17.25”H (246 x 292 x 438mm)
top and bottom pole cups, integrated handle
(with battery): 25.5 lbs. (11.6 kgs)
One year parts and labor
UX600: Wireless Mic/Instrument Receiver
CB601: padded bag w/wheels, CV600: vinyl cover
SS20, SS15: pole stands, SS3: stacking pole
B600: replacement battery
C12VDC: charging cable for 12V vehicle outlet
S610B battery powered 400W 10” subwoofer
8 Ohms/200Wrms, 93dB 1W/1M, 90dB 1W/2M, max SPL 122dB
weight: 18lbs (8.2 kgs)
16262 WEST BERNARDO DR. SAN DIEGO, CA 92127
800-854-2235 CARVINAUDIO.COM
1. XLR INPUTS
The XLR input can be used for microphones or as an input from direct boxes or
active intruments.
2. 1/4” INPUT JACKS
The 1/4” input jacks are designed to work with nearly any source, including active
or passive instruments with piezo or magnetic pickups.
3. HI-Z (IMPEDANCE) SWITCH
Pressing the Hi-Z switch IN raises the input impedance of the 1/4” INPUT to above
500K Ohms. This allows the full tonal range and dynamics of piezo or magnetic pickups to be heard and can also benefit active pickup systems. If the sound is to bright
for your liking or if there is excess noise, set the Hi-Z switch to the OUT position.
4. GAIN SWITCH
The GAIN switch will increase the sensitivity of the 1/4” and XLR inputs by +20dB.
Set the GAIN switch IN to compensate for instruments or microphones with low
outputs. For low volume situations, or to get the best dynamics from high output
instruments, set the GAIN switch to the OUT position.
5. L-R INPUT (DUAL 1/4”)
The Channel 5 L-R INPUT consists of two 1/4” jacks for input from a variety of
sources such as keyboards, rhythm machines, amp modelers or other mixers.
Stereo speaker operation requires an extension speaker plugged into the (R)
SPEAKER OUTPUT. The PHONES jack retains the stereo signal path.
6. L-R INPUT (STEREO 1/8’)
The Channel 6 L-R INPUT is an 1/8” jack for input from your MP3 player or other
music source.
Stereo speaker operation requires an extension speaker connected to the (R)
SPEAKER OUTPUT. The PHONES jack retains the stereo signal path.
7. CHANNEL LEVEL
Use the channel LEVELs to control the volume of each input source, sending the
mix to the MAIN volume control. The GAIN switches on channels 1-4 will also affect
the level. If your sound becomes distorted, reduce the LEVEL or set the GAIN switch
OUT and increase the MAIN volume.
8. CHANNEL EQ CONTROLS
The HI, MID and LOW controls are custom shaped EQ controls designed to allow
adjustment of tone for a variety of instruments and sources. Center “0” is the flat
setting. When a control is turned to the right it boosts the signal content in the
LOW, MID or HI frequency range and when turned to the left reduces the frequency
range. If turning up an EQ control distorts the sound, reduce the channel LEVEL
and increase the MAIN volume or set the channel GAIN switch to OUT.
9. EFFECTS CONTROL (CHANNEL)
The EFFECTS control adjusts the effects level going from the channel to the internal
DSP effects processor. If unwanted distortion is heard from the effects, lower the
channel EFFECTS control and increase the master DSP EFFECTS LEVEL.
10. BLUETOOTH® WIRELESS CONNECTION
The S600B features Bluetooth® wireless technology which allows audio playback
from an enabled device. Pairing is available any time the S600B power is ON.
To hear the audio from a Bluetooth® enabled device:
1. Reduce the LEVEL for Channel 6 to avoid loud music after connection.
2. Press the Bluetooth® switch IN to enable the audio circuit and view LED status.
The blue LED blinks on and off to indicate it is open to pairing.
3. Pair your device with the S600B, which will be seen as “Carvin S600B -_ _ _ _”
The blue LED will be ON continuously when the device is paired.
4. On your device, play the music and turn up the volume to full.
5. Raise the Ch. 6 LEVEL control and the MAIN volume to the desired level.
Helpful hints about using Bluetooth®
1. The range of the Bluetooth® connection is typically about 20-30 feet, and can
be affected by people or objects between the S600B and the connected device.
2. Keep the connected device close to the S600B to avoid unexpected dropouts
from increased distance.
3. The Bluetooth® switch does not enable/disable the paired connection to your
device, it only affects the audio connection to the mixer.
S600B STAGEMATE CONTROL PANEL
20
14
13
7
7
9
10
8
8
11
4
12
1
5
2
6
15
17
3
18
19
16
22
21
20
23
shown with
optional UX600R
11. MICS 3-4 PHANTOM POWER SWITCH
The PHANTOM POWER switch provides power to condenser microphones, active
direct boxes or active instruments connected to the XLR input. The red LED will
indicate the PHANTOM POWER is ON. Leave this switch OUT if phantom power is
not required. Note that when running on battery power the phantom voltage may
be reduced, but will be enough for most microphones.
12. USB CHARGE PORT
The USB CHARGE port provides USB power to keep your media player charged.
One device can be powered at a time.
13. MAIN (VOLUME)
Use the MAIN to control the overall volume of the speakers. Reduce the MAIN if
your sound becomes distorted.
With the LINK to MAIN switch IN, the MAIN will also affect the XLR OUT.
14. DSP EFFECTS CONTROLS
The S600B features a DSP effects processor featuring lush effects of ECHO,
REVERB and CHORUS.
Raise the channel EFFECTS control to send the signal from the chosen channel to
the DSP processor. If distortion is heard, lower the channel EFFECTS control and
increase the main DSP EFFECTS LEVEL.
The left EFFECTS control (ECHO-REVERB-CHORUS) selects the effect type and
adjusts time, decay, regeneration and speed settings depending on the effect type.
The DSP EFFECTS LEVEL adjusts the effects level heard at the outputs.
ECHO: When the EFFECTS control is in the lower 1/3 of rotation it selects the
ECHO effect. The lowest setting is a short “Slapback” with a short, single repeat
delay. Turning the control to the right will increase the length of delay and number
of repeats.
REVERB: When the control is the middle 1/3 of rotation it selects the REVERB
effect. Turning the control to the right increases the reverb decay time.
CHORUS (with Reverb): When the control is in the last 1/3 of rotation it selects
the CHORUS effect, with optional Reverb. The first setting will be a slow chorus
swell without Reverb. Turning the control to the right will increase the Chorus
speed. REVERB is added at the half-way mark and the Chorus speed settings are
repeated from slow to fast.
15. LINE OUT XLR JACK
The LINE OUT XLR provides a balanced output for going direct to a house system,
recording input or to other powered systems like a powered subwoofer. The LINE
OUT signal is affected by the channel LEVEL, EQ controls and internal DSP effects.
With the LINK TO MAIN switch OUT, the XLR output is adjusted from the LINE
OUT LEVEL control, and the signal is not affected by the MAIN level.
With the LINK TO MAIN switch IN the XLR output is adjusted by the MAIN control.
The XLR is protected against Phantom power (DC voltage) on cables coming
from phantom powered mixer inputs. Ground pin 1 of the XLR is lifted to 100
Ohms above the chassis ground to prevent hum from grounding issues.
16. LINK TO MAIN SWITCH (LINE OUT XLR)
If the LINK TO MAIN switch is set to the OUT position, the LINE OUT XLR output
level is adjusted from the LINE OUT LEVEL control and the signal is not affected
by the MAIN level.
With the LINK TO MAIN switch IN, the LINE OUT XLR level is adjusted from
the MAIN volume control along with the S600B speaker outputs. This provides
better control when connecting a powered subwoofer to the S600B; once a good
bass balance is acheived, the MAIN volume will also control the subwoofer level.
17. PHONES JACK
The PHONES jack is a stereo 1/4” jack designed for connecting headphones, tuner
or stereo recording device. The volume is adjusted by the DIRECT OUT LEVEL
control, containing the audio mix from the channel LEVEL settings. To listen to
headphones without hearing the other speakers, turn down the MAIN control and
adjust the headphone volume with the DIRECT OUT LEVEL control.
18. LINE OUT LEVEL (PHONES)
The DIRECT OUT LEVEL controls the output level to the 1/4” PHONES jack and
with the LINK TO MAIN switch OUT, also controls the XLR output.
With the LINK TO MAIN switch IN, the XLR output is only adjusted by the MAIN
control.
19. SPEAKER OUTPUTS
The S600B has two 1/4” SPEAKER OUTPUTS connectors, each connected to
a different amplifier allowing stereo operation when the R (Right) jack is used.
For the best perfomance use the matching S648 extension speaker featuring
identical drivers and cabinet design as the S600B.
The L (Left) speaker jack is connected in parallel with the internal S600B speaker
system amplifier. You may connect one S648 extension speaker or a speaker with
an impedance of 8 Ohms or higher.
The R (Right) speaker jack is connected to a second amplifier and activates
stereo mode when plugged into. Stereo sources from CH.5 or CH.6, including
the Bluetooth® audio connection, will then be heard in stereo.
You can connect up to two S648 extension speakers to the R (right) speaker jack,
or speakers with a total impedance of 4 Ohms or higher.
If you go below the minimum speaker load rating, the S600B will protect and
shut off.
20. POWER SWITCH / LED
The POWER switch turns the amp ON or OFF. The green POWER LED will light
approximately 3 seconds after the POWER switch is turned on.
To charge the S600B from AC power, the POWER switch must be ON.
21. AC POWER JACK & FUSE
The AC POWER JACK will accept 90VAC to 250VAC, 50Hz or 60Hz. Plug the
cord into a grounded 3 prong power source. No attempt should ever be made to
use the AC cord without the ground connected.
A locking AC cord (Carvin part# 120V18L7) is supplied. However, a standard AC
cord can be used. (for European 230V use a CEE-7 plug cord set).
To detach the cord from the amp, press the release lever on the underside of
LOCKING AC CORD
120V16L7
PRESS TO
RELEASE
the cord near the amp.
The FUSE for AC power is located internally near the AC input. To check or
replace, first turn the POWER switch OFF and remove the power cord. Remove
the 12 screws from the edge of the control panel. Carefully remove the control
panel from the speaker enclosure.
BATTERY OPERATION AND CHARGING
The S600B features a rechargeable 12 volt battery system which is able to power
the unit without connecting to a wall AC socket.
MAXIMIZING BATTERY LIFE: Run time will vary depending on speaker volume and
the number of speakers connected. The S600B alone can run for over 2 hours at
100W peak power. At lesser volumes the S600B can run with all extension speakers
for 4 hours or more. If the CHARGE LED near the power switch blinks RED or if
the sound becomes distorted, lower the volume for better sound and longer play.
CHARGING: The battery will charge when the unit is powered ON from AC power,
or it can be charged through the CHARGE 12VDC connector. Charge time for a nearly
dead battery to full charge is approximately 6 hours.
BATTERY REPLACEMENT: If battery run time is greatly reduced after many charge
cycles it may need replacement (Carvin part #B600). To replace the battery first turn
the POWER switch OFF, and remove the power cord. Remove the 12 screws from the
edge of the control panel. Remove the panel from the speaker enclosure. Disconnect
the wires from the battery posts (leave these wires connected to the circuit board
to prevent shorting the battery) and disconnect the 4-pin speaker connector from
the circuit board. Remove the nut and wood block holding the battery. Secure the
new battery with block and nut. Connect the wires with the correct +/- polarity.
Replace the control panel screws by hand to avoid stripping (after repeated use).
The AC fuse type is a 5mm x 20mm 250V Slow Blow rated at 5A.
22. CHARGE 12VDC CONNECTOR, LED INDICATOR & FUSE
The CHARGE connector is for charging the S600B internal battery from a car
or other vehicle using an adapter such as our C12VDC power cord to plug into
a 12V car accessory socket (cigarette lighter). The S600B will charge through
the CHARGE connector whether the POWER switch is OFF or ON. The S600B
can be used while connected to the CHARGE 12VDC connector for continuous
use. It is recommended to start with a full charge.
The LED will indicate GREEN when the battery is at full charge, OFF when it is
slightly drained (OK), and RED when the battery is LOW.
NOTE: Charging a completely dead battery, running at high volume and multiple
speakers each require more power and can drain your vehicle’s battery faster.
The FUSE for the 12VDC power system is located internally near the 12VDC
connector. To check or replace, first turn the POWER switch OFF, and remove the
power cord. Remove the 12 screws from the edge of the control panel. Carefully
remove the control panel from the speaker enclosure.
The battery fuse type is a 6.35mm x 32mm 250V Slow Blow rated at 15A.
23. ACCESSORY BAY (FOR OPTIONAL UHF WIRELESS RECEIVER)
The S600B is designed with an accessory bay which allows direct mounting of
our UX600R UHF Wireless Mic/Instrument receiver, for use with the UX600M
wireless handheld microphone or the UX600B beltpack transmitter. The
UX600R plugs directly into the bay without any connectors to connect.
Audio from the UHF receiver will be heard through Channel 4 while allowing
full use of the CH.4 XLR input.
To mount the receiver in the accessory bay, first remove the adhesive cavity
cover. Remove the bag containing 4 mounting screws. Slide the unit into the
bay until you feel some resistance, then press more firmly as the receiver is
seated and the face panel meets the S600B. Screw in the 4 screws, being careful not to strip the plastic housing.
HELPFUL HINTS:
NO SOUND:
- The channel LEVEL or MAIN volume are set to “0”.
- Speaker Output jack has been shorted or not fully plugged in, triggering protection circuits.
POOR HIGH FREQUENCIES:
- The HI frequency EQ control is set too low.
- Set the Hi-Z impedance switch IN for instruments on Ch.1 or Ch.2.
AMP SEEMS VERY SENSITIVE TO INPUT SIGNALS:
- Adjust the channel LEVEL or MAIN volume.
- Turn OFF the GAIN switch for Ch.1-4.
FEEDEBACK FROM MIC OR INSTRUMENT:
- Keep the mic or the face of the instrument pointed away from the speakers.
- Use the EQ controls to reduce feedback or reduce the channel LEVEL.
DEVICE DOES NOT CHARGE WHEN CONNECTED TO USB CHARGE PORT:
- The phone or device battery is too low and is pulling too much power from the charge port,
which will stop the charging.
FOR MAXIMUM OUTPUT:
- Connecting an extension speaker to the “R” Speaker Out will make use of the second
internal amplifier. The S600B will drive a total of 3 extension speakers. Every time you
double your speakers your acoustic output goes up by a factor of four.
S600B EXAMPLE SETUP:
DRIVING
THREE S648
EXTENSION
CABINETS
Contains Transmitter Module FCC
ID: T9J-RN52:
This equipment has been tested
and found to comply with the
limits for a Class B digital device,
pursuant to part 15 of the FCC
Rules. These limits are designed
to provide reasonable protection
against harmful interference in a
residential installation. This equipment generates, uses and can
radiate radio frequency energy,
and if not installed and used in
accordance with the instructions,
may cause harmful interference to
radio communications. However,
there is no guarantee that interference will not occur in a particular installation. If this equipment
does cause harmful interference
to radio or television reception,
which can be determined by turning the equipment off and on, the
user is encouraged to try to
correct the interference by one or
more of the following measures:
• Reorient or relocate the receiving
antenna.
• Increase the separation between
the equipment and receiver.
• Connect the equipment into an
outlet on a circuit different from
that to which the receiver is connected.
• Consult the dealer or an experienced radio/TV technician for help.
UX600R Wireless Receiver
Wireless
UX600M Mic
or
UX600B
Beltpack with
UX-HM3 headset mic,
UX-LP1 lapel mic
or
UXGT 1/4”
instrument
cable
Powered
Subwoofer
This symbol is intended to
This symbol is
alert the user to the presintended to alert the
ence RISK
of uninsulated
“danuser to the presence
OF ELECTRIC
SHOCK
RISK OF ELECTRIC
SHOCK
OF ELECTRIC
SHOCK
DORISK
NOT OPEN
gerous voltage” DO
within NOT
the
of important operating
OPEN
product’s enclosure that
and OPEN
maintenance (serDO NOT
may be of sufficient magnitude to convicing) instructions in the literature
stitute a risk of electric shock to persons.
accompanying the appliance.
CAUTION
IMPORTANT! FOR YOUR PROTECTION, PLEASE READ THE FOLLOWING:
WATER AND MOISTURE: Appliance should not be used near water (near a bathtub, washbowl,
kitchen sink, laundry tub, in a wet basement, or near a swimming pool, etc). Care should be taken
so that objects do not fall and liquids are not spilled into the enclosure through openings.
POWER SOURCES: The product should be connected to a power supply only of the type
described in the operating instructions or as marked on the appliance.
GROUNDING OR POLARIZATION: Precautions should be taken so that the grounding or
polarization is not defeated.
POWER CORD PROTECTION: Power supply cords should be routed so that they are not likely
to be walked on or pinched by items placed upon or against them. Prevent sharp bends of the
cord, paying paticular attention to the plug at each end of the cord.
SERVICING: The user should not attempt to service the appliance beyond that described in the
operating instructions. All other servicing should be referred to qualified service personnel.
FUSING: If your unit is equipped with a fuse receptacle, replace only with the same type fuse.
Refer to replacement text on the unit for correct fuse type.
SAFETY INSTRUCTIONS (EUROPEAN)
The conductors in the AC power cord are colored in accordance with the following code.
GREEN & YELLOW—Earth
BLUE—Neutral
BROWN—Live
U.K. MAIN PLUG WARNING: A molded main plug that has been cut off from the cord is
unsafe. NEVER UNDER ANY CIRCUMSTANCES SHOULD YOU INSERT A DAMAGED
OR CUT MAIN PLUG INTO A POWER SOCKET.
76-60101G 122716
LIMITED WARRANTY
Your Carvin Audio product is guaranteed against failure for 1 YEAR unless otherwise
stated. Carvin will service and supply all parts at no charge to the customer providing the unit is under warranty. Shipping costs are the responsibility of the customer.
CARVIN DOES NOT PAY FOR PARTS OR SERVICING OTHER THAN OUR OWN. A
COPY OF THE ORIGINAL INVOICE IS REQUIRED TO VERIFY YOUR WARRANTY. Carvin
Corp. assumes no responsibility for horn drivers or speakers damaged by this unit.
This warranty does not cover, and no liability is assumed, for damage due to: natural
disasters, accidents, abuse, loss of parts, lack of reasonable care, incorrect use, or
failure to follow instructions. This warranty is in lieu of all other warranties, expressed
or implied. No representative or person is authorized to represent or assume for Carvin
Corp. any liability in connection with the sale or servicing of Carvin products. CARVIN
CORP. SHALL NOT BE LIABLE FOR INCIDENTAL OR CONSEQUENTIAL DAMAGES.
MAINTAINING YOUR EQUIPMENT
Avoid spilling liquids or allowing any other foreign matter inside the unit. The panel of
your unit can be wiped with a dry or slightly damp cloth in order to remove dust and bring
back the new look. As with all pro gear, avoid prolonged use in caustic environments (salt
air). When used in such an environment, be sure the amplifier is adequately protected.
SERVICE
In the USA go to www.carvinaudio.com.
Outside the USA, contact your dealer or go to www.carvinaudio.com and click on
“Dealers” for your nearest service center. Include a written description of the problem
with serial number and date of purchase.
CAUTION
REFER SERVICING TO QUALIFIED SERVICE
PERSONNEL! THIS UNIT CONTAINS HIGH
RISK OF ELECTRIC SHOCK VOLTAGE INSIDE!