1
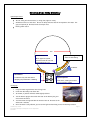
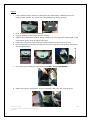
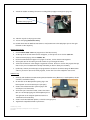
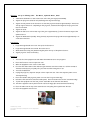
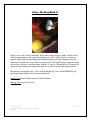
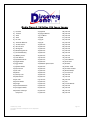
Discovery Dome
Teacher’s User Manual
Columbus City Schools
Science Department
For more information and CCS video Tutorials go to the
CCS Science Department Website
Columbus City Schools
Curriculum Leadership & Development Science Department
June 2012
Page 1
Discovery Dome
Teacher’s User Manual
Table of Contents
Discovery Dome Introduction……………………………….......................................
3
Discovery Dome Introductory Letter to Parents………………………………………
4
Discovery Dome Set-Up Directions with Photos……………………………………..
5
Discovery Dome Inventory Check List………………………………………………..
9
Discovery Dome Accommodations for Physically Challenged………………..........
10
Discovery Dome Rules and Safety Regulations……………………………………..
11
Discovery Dome Expectations…………………………………………………………
12
Discovery Dome To-Do Check List……………………………………………………
13
Discovery Dome Inspection Sheet…………………………………………………….
14
Discovery Dome Video Information & Reviews.......................................................
15
Discovery Dome Picture Information….……………………………………………….
31
Discovery Dome Media Player 3.96 Button #86 Space Images…………………….
33
Discovery Dome Media Player 3.96 Button #91 Space Images………………........
34
Discovery Dome Sample Lesson Example Dialogue……………………………….
35
Discovery Dome Professional Learning Community Sample Dialogue….…………
38
Collaborative Conversations (Common Core ELA State Standards)……………….
41
Movie Information
Earth’s Wild Ride
Two Small Pieces of Glass: The Amazing Telescope
IBEX: Search for the Edge of the Solar System
Saturn: The Ring World
Columbus City Schools
Curriculum Leadership & Development Science Department
June 2012
Page 2
Discovery Dome Introduction
Greetings and welcome to the exciting world of Discovery Dome! The Discovery
Dome was purchased by the Columbus City Schools in the fall of 2011, to help bring science
concepts to life and to give teachers and students a new way of exploring our Earth and
the Universe that surrounds us. The Discovery Dome is a portable, inflatable planetarium
that allows teachers to show star constellations, space phenomena, as well as science
videos in a 360 degree format. The Discovery Dome is different from the two Star Labs
that the school district currently possesses.
This isn't your old crawl-in star dome! It offers a fully portable digital theater
with true HD, with full dome movies and zoom-in digital star fields. With support from
NASA REASoN and a strong partnership with museums and universities, the Discovery
Dome brings the excitement of museum-quality shows, presenting a wide range of
educational topics.
Before being able to use the Discovery Dome, teachers will need to complete two
different training sessions. The training sessions will instruct teachers the proper usage
of the dome, set-up and take down procedures, as well as the use of the software involved
in running the different programs.
This user manual contains many different sections in the general usage of the
Discovery Dome. Also included, are lessons that can be used before, during and after
students experience the Discovery Dome. Be sure to read through this manual in detail, as
the usage of the Discovery Dome is much more technical than the Star Lab. If there are
any questions, or would like to receive training, please contact the Columbus City Schools
Science office at 365-5297.
"Astronomy compels the soul to look upwards and leads us from this world to another."
(Plato)
Columbus City Schools
Curriculum Leadership & Development Science Department
June 2012
Page 3
INTRODUCTORY LETTER TO PARENTS
Dear Parents,
Our class will be engaged in learning science through the Discovery Dome interactive
planetarium. The Discovery Dome is a portable, inflatable planetarium that students will
be going into to learn about our Earth and the Universe that surrounds us. Inside of the
dome, students will experience a 360 degree presentation on a variety of Science topics
and concepts that they are studying in science class. This will be an exciting experience
for your child!
We are confident the following benefits will result from your child’s participation in the
Discovery Dome:
Reinforcement of grade level science content and practices
Fostering curiosity, awareness, and creativity
Increased scientific knowledge
Growth in ability to understand phenomena and science in the world
around us.
Having fun with science!
In addition to the opportunity to visit and participate in the Discovery Dome, your student
will be working on several grade level specific lessons that coincide with what they will be
observing in the Discovery Dome. These lessons will provide the students with an
increased awareness of science and an opportunity to apply their newly obtained knowledge
through hands-on activities. The science activities allow children to use critical thinking
and problem solving skills. If you have any further questions, feel free to contact your
student’s science teacher.
“Science is not merely a collection of facts printed in an encyclopedia.
It is a living adventure of the human spirit.” (Source Unknown).
Columbus City Schools
Curriculum Leadership & Development Science Department
June 2012
Page 4
Discovery Dome Set-Up Directions
Space Requirement:
12 foot ceiling w/o obstructions (i.e. ceiling fans, lights or vents)
20x20 foot area on a clean floor. Be sure to sweep the area that will be exposed to the dome. The
gray area (inside) of the dome needs to be kept clean.
Nearby power source
16.5'
Optional Seating folding
chairs for adult seating
Newtonian -2
Mirror projection system
positioned near the rear wall;
small footprint 23" x 15"
b
Air Blower
Airlock Door
Continuous entry and exist without
disrupting the presentation or deflating
the dome; wheelchair accessible
4'
System Operator
Chair, stool, or sitting on the floor
next to projection system.
Setting Up:
1.
Unzip the dome bag with dome door facing front.
2.
Unroll the dome away from dome door.
3.
If needed, re-position the dome when slightly inflated.
4.
Tilt the blower upright then attach the hose to the blower (fan), and
secure with the Velcro.
5.
Turn the blower on high and hold the entrance door at the seam of the
dome until it inflates.
6.
Once the dome is fully inflated, you can use the light stick and hang it near the doorway entrance.
Columbus City Schools
Curriculum Leadership & Development Science Department
June 2012
Page 5
Supplies:
1.
Put the following items in the dome by sliding under the inflated dome: Newtonian-minus cover,
laptop, storage container, at least one chair, and flashlight from storage container.
2.
Enter the dome with the flashlight sideways.
3.
Hang the flashlight on the fixture above the doorway.
4.
Assemble the portable stand from the storage container; all of the legs must be same length, fit the
notch into the groove and screw tightly with fingers.
5.
Position the stand twelve inches from the back wall and twelve inches left of the air vent.
6.
Place the Newtonian on the stand, and open the lid by unscrewing the knob and pull out; then extend
the side panels outward.
7.
Place the projector sideways into the Newtonian, DO NOT TOUCH THE MIRROR!!
8.
Connect the projector cables (power to source, and laptop cable), then turn on the projector.
Columbus City Schools
Curriculum Leadership & Development Science Department
June 2012
Page 6
9.
Attach the smaller secondary flat mirror to sliding shelf (roughly 8 inches) from projector.
Small Mirror
8 inches from projector
10. Take the cap off of the projector’s lens.
11. Turn on the laptop (Password=science).
12. Double check that the WIFI access button is red (located next to the DVD player port on the right
hand side of the computer).
Opening the Program:
1.
Click the Media Show 3.96 Icon (top portion of the home screen).
2.
At the top of the screen a Red Tool bar will appear, at the top left corner click on Load Set.
3.
A new screen will pop up, click on Columbus Set.
4.
Different media shows will appear in top right of tool bar, click on chosen video segment.
5.
You may also use the left and right arrow buttons to cycle through the videos.
6.
Several of the links are either images or segments of videos. Be sure to click on the program that you
want to use. (It is recommended to already know what you want to show your students).
7.
(Stellarium, Celestia, and Telescope) are programs that can also be run without using the Media Show
3.96. If you want to use one of these programs, click on the icon on the computer’s main screen.
Audio Set Up:
1.
Carefully take out Bose surround sound system and labeled wires. (Black box, 2 small speakers, volume
controller, and labeled cables.)
2.
On the back of the Bose speaker system, plug in the
labeled power cord to the bottom port (AC input).
3.
Connect the Volume Controller (control pod) to the
second port from the bottom.
4.
In the third port from the bottom, connect the Sound
Box cord to the laptop-plug into the headphone port on
the right side of the computer (make sure switch is
turned ON on the sound box).
5.
Connect each individual Bose speaker, to the left and right ports.
6.
Adjust base compensation knob to preference.
Columbus City Schools
Curriculum Leadership & Development Science Department
June 2012
Page 7
Alignment: Set up in following order: Flat Mirror, Spherical Mirror, Dome
1.
Start Media Show-Mirror; load a button set; select the grid image (button #100).
2.
Adjust the projectors zoom full out (small image not large and close up).
3.
Adjust vertical position of the flat mirror so that the projected frame is approximately 1” down from
the top edge of the mirror. Depending on the projector, sometimes the height of the projector feet
must be increased.
4.
Adjust the focus.
5.
Adjust the flat mirror tilt-bottom ring of the grid is approximately ½” above the bottom edge of the
spherical mirror.
6.
Adjust the Newtonian lid (usually tilting forward) to position the projected horizon approximately 3 to
4 feet above the floor.
Final Checks:
1.
Projected image should not be over the top of the flat mirror.
2.
Projected image should not be below the convex mirror.
3.
Media Show menu strip (red) should be slightly above the top of the spherical mirror.
4.
Adjust projector focus as necessary.
Packing-Up
1.
Turn off all of the equipment and take down the Newtonian mirror and projector.
2.
Place the Flat mirror into its respective case.
3.
Move the equipment to the center of the dome.
4.
Face the door while inside of the dome and grab the dome near the bottom rim. Pull the bottom of
the dome carefully but yet quickly over your head to settle letting the air out.
5.
Turn off the Dome Fan.
6.
Unplug the projector, computer and put in their respective case. Place the computer power cord in
the Computer Bag.
7.
Place the USB wire and projector power cord into the “Projector Wire Bag”.
8.
Disconnect the audio wires from the sound system. Place the audio wires into the “Sound Wire Bag”.
9.
To pack the equipment into the case, put the Sound Box on the side with the wheels.
10. The other equipment can be placed into the case accordingly. (Be careful with the Flat Mirror)
11. Place the table onto the top of the materials once everything else is packed into the case.
12. Place the equipment onto the cart.
Columbus City Schools
Curriculum Leadership & Development Science Department
June 2012
Page 8
Discovery Dome Inventory Check List
Audio Equipment
Black box speaker
2 small speakers
Volume control knob
Sound box to laptop wire
Power Cord for sound system
Dome
Small Newtonian mirror with case
Big mirror in hard case
Table with collapsible legs
Dome Tent
Fan
Optima projector and case with power cord and USB cable
Accessories
Large flashlight (light stick)
2 small flashlights
Extension cord
Black surge protector
2 adaptors for large flashlight (light stick)
Orange bag containing Dome patch kit
Laptop
Dell laptop and case
Power Cord
Columbus City Schools
Curriculum Leadership & Development Science Department
June 2012
Page 9
Discovery Dome Accommodations for Special Needs Students
Because of its unique design, the Discovery Dome can accommodate visitors who are
restricted to wheelchairs, have walkers or have special needs. Instead of having these
individuals use the entrance door, they can enter and exit the planetarium by going in and
out under the edge of the dome. Individuals who have special needs should be brought into
the dome before the rest of the visitors. Begin by turning up the fan to the highest
setting so that the Discovery Dome becomes overinflated and starts lifting off of the
floor. Remove anything from the inside of the dome that maybe in contact with the edge.
Maneuver the individual to the side of the planetarium opposite the point where the
entrance and inflation tubes attach to the dome. With the help of a second person, lift
the side of the Discovery Dome, and roll the person in the wheelchair under the material
toward the center of the dome. Drop the side of the dome back down behind the person
and allow the dome to re-inflate. Once the dome has fully inflated, have the rest of the
students enter the dome through the entrance door. Have the last person entering turn
the fan to the lowest setting. Have the person in the wheelchair then sit near the
entrance door.
Once the lesson is over, allow the rest of the group to leave and then remove the
person in the wheelchair the same way that they were brought in.
Columbus City Schools
Curriculum Leadership & Development Science Department
June 2012
Page 10
Discovery Dome Safety Rules & Regulations
1.) No Shoes are allowed inside of the Discovery Dome.
2.) Participants should be wearing socks.
3.) No Food, Drinks, or Gum are allowed inside of the Discovery Dome.
4.) No pencils, pens, or sharp objects.
5.) No touching of the walls with feet or hands.
6.) No touching of the Discovery Dome equipment other than by a trained individual.
7.) Do not set the Discovery Dome near a heat source such as an incandescent light
bulb or heater. This will damage the Dome.
8.) Have at least two working flashlights / L.E.D. Utility Lights (Make sure the L.E.D.
Utility Lights are fully charged before use.)
9.) Do not leave the equipment in the Discover Dome unattended or protected when not
in use. (The Dome may still be setup while projection equipment is removed.)
10.) During the non-use of the Discovery Dome, turn the LCS projector off.
11.) Do not set up the Discovery Dome outside, the Discovery Dome is for inside use
only.
12.) During non-use of Discovery Dome, turn the LCD projector off.
13.) Do not set up the Discover Dome outside! The Discovery Dome is for inside use
only.
14.) Dome Trained Teacher should always be the first person in and out of the Dome.
(No students should be alone in the Dome)
15.) Always make sure there is a clear path out of the Dome in the event in of an
emergency.
16.) Never set up the Dome at the edge of the stage where individuals could possibly
fall off.
17.) In case of Dome deflation, check the fan and electric cord. If the fan cannot be
restarted, please evacuate students.
18.) In case of an emergency, have the trained teacher lift up the side of the Dome for
immediate exit. Do not use the entry/exit tunnel in an emergency.
Columbus City Schools
Curriculum Leadership & Development Science Department
June 2012
Page 11
Discovery Dome Expectations
1.) Due to the shape of the Discovery Dome, voices are amplified similar to a
microphone effect. There should be no talking while inside of the Discovery Dome.
2.) Presentations in the Dome may cause motion sickness, precautions should be
taken. (i.e. Imax Theaters)
3.) Students should be seated as far away as possible from the Dome equipment.
(Students should sit a minimum of one foot from the Dome all and equipment.)
4.) When students are entering/exiting, it is very important that the teacher
MUST be in charge AT ALL TIMES and protect the equipment. (Do not assign a
student to be in charge of Discovery Dome setup/take down and protection of
equipment.
5.) Suggested seating for students for the following activities:
a. Movies-all students should be seated with their backs to the
“equipment” wall (Near the door).
b. Star-field activities-all students should sit around the perimeter
of the Discovery Dome with their backs to the wall of the Dome.
6.) CCS approved programs already exist on the Discovery Dome computer. Please
do not download or use personal flash drives to load program to the Discovery
Dome laptop. Feel free to contact the Science Department if you find a great
program to include on the Discovery Dome computer. The Science Department will
be happy to review it.
**Review all expectations with students.
Columbus City Schools
Curriculum Leadership & Development Science Department
June 2012
Page 12
Discovery Dome To-Do Checklist
For use PRIOR to the Discovery Dome Session:
o
Determine where the Discovery Dome will be located:
____ Gym: (check for schedule conflicts)
____ Lunchroom: Arrange for breakfast and lunch to be eaten in classrooms
if need be.
____ Auditorium: Arrange for changes in classes and activities if need be.
o
Notify the office and custodians of the position of the Discovery Dome.
o
Send the Discovery Dome Parent Letter home with your students.
o
Arrangements have been made for pick up/return of Discovery Dome
___
Pick up person
_________________
___
Date of Pick up
_________________
___
Return person
_________________
___
Date of return
_________________
Suggestions:
o
Determine set up time
__________________
o
Determine take down time
__________________
o
Create a Schedule of classes involved
o
Invite parents to participate as volunteers
o
Become familiar with suggested lessons and included programs.
Columbus City Schools
Curriculum Leadership & Development Science Department
June 2012
Page 13
Discovery Dome Inspection Sheet
Upon receiving the Discovery Dome, it is important to inspect all of the equipment to be
certain that it is in working order and in place. Please place a check or mark in the box to indicate
that each piece of equipment is in satisfactory condition. If there are any problems with an item,
please list in the appropriate box and notify the Science Department.
Teacher Name_________________________________School________________________
Pick Up Date _______________
Equipment Title
Pack Up Date _______________
Pick-Up
Packed-Up
Bose Black Box Speaker
2 Small Bose Speakers
Volume Control Knob
Sound Box to Laptop Wire
Power Cord for Sound System
Small Newtonian mirror w/case
Large Newtonian mirror in hard
case
Table w/ 4 collapsible legs
Fan w/extension cord
LCD Projector w/ power cord &
USB cable
Large Flashlight (Light Stick)
2 Small Flashlights
Extension Cord
Black Surge Protector
2 adaptors for Large Flashlight
Dell Computer & Case
Dell Computer Power Cord
Discovery Dome
Columbus City Schools
Curriculum Leadership & Development Science Department
June 2012
Page 14
Discovery Dome Video/Picture Information & Reviews
Earth’s Wild Ride
Produced in collaboration with Rice University, through NASA's Immersive Earth Project.
Imagine Earth were a distant place you once called home but could never visit again. What would you
remember most about the planet, and how would you describe it to your grandchildren?
Set on the surface of the Moon in the year 2081, a grandfather and granddaughter watch a solar
eclipse from scenic cliffs overlooking their moon colony. Conversation leads to contrasts between
the moon, the only home the granddaughter knows, and the Earth, where the grandfather has spent
most of his life.
As they watch the Moon's shadow move across Earth, the grandfather tells stories of crashing
asteroids, erupting volcanoes, roaring dinosaurs, electrifying lightning and booming thunder. Each
experience begins with a telescope view of the dynamic Earth in stark contrast with the unchanging
lunar landscape.
“Earth's Wild Ride” is like many tales shared by grandparents over the centuries, except "the old
country" is really another planet, always visible from the moon base, but totally unlike the
granddaughter's world. While learning about eclipses, the ice age, Earth's water cycle and
differences between the Earth and Moon, the audience is taken on a roller-coaster-like ride
through canyons of raging rivers and hot flowing lava. Adventure and appreciation for home fill this
20-minute journey back to the Earth.
Grade Level: 2nd through 8th
Running Time: 20 minutes
Columbus City Schools
Curriculum Leadership & Development Science Department
June 2012
Page 15
Movie Reviews:
Feel free to write down your opinion of the movie, and what grade level it is
appropriate for.
Name: Eric S.
School: Ridgeview MS
Grade Taught: 7th
My students overall enjoyed Earth’s Wild Ride. The video is geared towards
elementary students, (grades 3-5) but my seventh graders were very entertained.
The movie correlates to the seventh grade curriculum when it has several parts
about volcanoes, eclipses, and water. Earth’s Wild Ride is recommended if you want
to show the “coolness” of the Discovery Dome, however it is not the greatest way
to teach content.
Recommendations: To support the development of Science concepts with Earth’s
Wild Ride, I would teach several of the lessons that are included in this User’s
Manual or are on the Science Department website.
Name:______________________School:___________________
Grade Level Taught: ________
Recommendations:
Columbus City Schools
Curriculum Leadership & Development Science Department
June 2012
Page 16
Feel free to write down your opinion of the movie, and what grade level it is
appropriate for.
Name:___________
School: ______________________
Grade Taught:
Recommendations:
Name:______________________School:___________________
Grade Level Taught: ________
Recommendations:
Columbus City Schools
Curriculum Leadership & Development Science Department
June 2012
Page 17
Feel free to write down your opinion of the movie, and what grade level it is
appropriate for.
Name:___________
School: ______________________
Grade Taught:
Recommendations:
Name:______________________School:___________________
Grade Level Taught: ________
Recommendations:
Columbus City Schools
Curriculum Leadership & Development Science Department
June 2012
Page 18
Two Small Pieces of Glass-The Amazing Telescope
While attending a local star party, two students learn how the telescope has helped us
understand our place in space and how telescopes continue to expand our understanding of
the Universe. Their conversation with a local astronomer enlightens them on the history of
the telescope and the discoveries these wonderful tools have made. The students see how
telescopes work and how the largest observatories in the world use these instruments to
explore the mysteries of the universe.
While looking through the astronomer's telescope, the students, along with the
planetarium audience, explore the Galilean Moons, Saturn's rings, and spiral structure of
galaxies. During their conversation with the astronomer, they also learn about the
discoveries of Galileo, Huygens, Newton, Hubble and many others. Engaging and appealing
to audiences of all ages, Two Small Pieces of Glass traces the history of the telescope
from Galileo's modifications to a child's spyglass-using two small pieces of glass-to the
launch of NASA's Hubble Space Telescope and the future of astronomy. It explores the
wonder and discovery made by astronomers throughout the last 400 years.
Grade Level: All Ages
Running Time: Appx. 23 minutes
Columbus City Schools
Curriculum Leadership & Development Science Department
June 2012
Page 19
Movie Reviews:
Feel free to write down your opinion of the movie, and what grade level it is
appropriate for.
Name: Eric S.
School: Ridgeview MS
Grade Taught: 7th
Two Pieces of Glass is a great way to introduce the creation of telescopes to
students. Its presentation is awe inspiring as the 360 degree format is
mesmerizing to anyone observing. The movie is geared to all ages and focuses much
of its time on space and star exploration. My students really enjoyed it!!!!!
Recommendations:
To support science concepts in this movie, I recommend using the program
Stellarium to help students extend knowledge of stars and constellations.
Name:______________________School:___________________
Grade Level Taught: ________
Recommendations:
Columbus City Schools
Curriculum Leadership & Development Science Department
June 2012
Page 20
Feel free to write down your opinion of the movie, and what grade level it is
appropriate for.
Name:___________
School: ______________________
Grade Taught:
Recommendations:
Name:______________________School:___________________
Grade Level Taught: ________
Recommendations:
Columbus City Schools
Curriculum Leadership & Development Science Department
June 2012
Page 21
Feel free to write down your opinion of the movie, and what grade level it is
appropriate for.
Name:___________
School: ______________________
Grade Taught:
Recommendations:
Name:______________________School:___________________
Grade Level Taught: ________
Recommendations:
Columbus City Schools
Curriculum Leadership & Development Science Department
June 2012
Page 22
IBEX- Search for the Edge of the Solar System
This movie is for observers with an appreciation for the challenges of space science and a
desire to learn more about science research, IBEX: Search for the Edge of the Solar
System follows the creation of NASA's Interstellar Boundary Explorer (IBEX). Audiences
will get an in-depth look at the mission and how IBEX is collecting high-speed atoms to
create a map of our Solar system and beyond.
IBEX is narrated by two curious teenagers; audiences will hear from the scientists and
engineers that developed the IBEX mission and created the spacecraft, and get the latest
updates on the mission's discoveries. It also introduces the basics to our solar system and
the Universe around us.
Grade Level: Upper Middle School & High School Students
Running Time: Approximately 28 minutes
Columbus City Schools
Curriculum Leadership & Development Science Department
June 2012
Page 23
Movie Reviews:
Feel free to write down your opinion of the movie, and what grade level it is
appropriate for.
Name: Eric S.
School: Ridgeview MS
Grade Taught: 7th
IBEX is a very technical and detailed oriented video. At times the content can be a little
dry and would be very difficult for younger viewers.
It does have some interesting
information about the IBEX space probe, however, I found it to be boring.
I would
recommend watching Two Pieces of Glass if your class is going to be learning about
exploring the Solar System.
Recommendations: To help support science concepts using this movie consider going to the
website, http://ibex.swri.edu/ for a great deal of information the IBEX space probe.
Name:______________________School:___________________
Grade Level Taught: ________
Recommendations:
Feel free to write down your opinion of the movie, and what grade level it is
appropriate for.
Columbus City Schools
Curriculum Leadership & Development Science Department
June 2012
Page 24
Name:___________
School: ______________________
Grade Taught:
Recommendations:
Name:______________________School:___________________
Grade Level Taught: ________
Recommendations:
Columbus City Schools
Curriculum Leadership & Development Science Department
June 2012
Page 25
Feel free to write down your opinion of the movie, and what grade level it is
appropriate for.
Name:___________
School: ______________________
Grade Taught:
Recommendations:
Name:______________________School:___________________
Grade Level Taught: ________
Recommendations:
Columbus City Schools
Curriculum Leadership & Development Science Department
June 2012
Page 26
Saturn- The Ring World II
Saturn is the true "Lord of the Rings". After nearly seven years in transit, the two-story
Cassini-Huygens spacecraft began orbiting Saturn on July 1, 2004. Cassini continues to
explore Saturn and its moons during its extended mission, while the Huygens probe had
landed on the surface of Titan, Saturn's largest moon. The Cassini Saturn encounter began
with a flyby of Saturn's farthest moon, Phoebe. In Saturn-The Ring World II viewers will
get an up-close and personal experience with one of the universes most popular planets.
Ring World is narrated by Star Trek's John Billingsley (Dr. Phlox on ENTERPRISE) and
was produced by NASA's Jet Propulsion Laboratory.
Grade Level: Middle School and High School Students
Running Time: Appx. 23 minutes
Columbus City Schools
Curriculum Leadership & Development Science Department
June 2012
Page 27
Movie Reviews:
Feel free to write down your opinion of the movie, and what grade level it is
appropriate for.
Name: Eric S.
School: Ridgeview MS
Grade Taught: 7th
Saturn-The Ring World II chronicles the Cassini-Huygens Spacecraft as it travels through
our Solar System and around Saturn and its different moons. The movie discusses the
composition of Saturn’s different moons and the conditions on Saturn itself. The video is
primarily computer generated which leads to some amazing renderings of the ringed
planet. I did find the video to be higher level and very detailed. Many students would find
it interesting, but teacher would need to have supplemental information to help water the
content down.
Recommendations: When using this movie, a good source for supplemental info is
http://nineplanets.org/saturn.html
http://solarsystem.nasa.gov/planets/profile.cfm?Object=Saturn
Name:______________________School:___________________
Grade Level Taught: ________
Recommendations:
Feel free to write down your opinion of the movie, and what grade level it is
appropriate for.
Columbus City Schools
Curriculum Leadership & Development Science Department
June 2012
Page 28
Name:___________
School: ______________________
Grade Taught:
Recommendations:
Name:______________________School:___________________
Grade Level Taught: ________
Recommendations:
Columbus City Schools
Curriculum Leadership & Development Science Department
June 2012
Page 29
Feel free to write down your opinion of the movie, and what grade level it is
appropriate for.
Name:___________
School: ______________________
Grade Taught:
Recommendations:
Name:______________________School:___________________
Grade Level Taught: ________
Recommendations:
Columbus City Schools
Curriculum Leadership & Development Science Department
June 2012
Page 30
Discovery Dome Media Player Picture & Feature Information
Inside of the Media Player 3.96, there are several pictures and trailers that can be viewed when in
the Discovery Dome. Below is a review of the way to observe the movies and pictures. Also
included is a short synopsis for each of the pictures.
1.
Click the Media Show 3.96 Icon (top portion of the home screen).
2. At the top of the screen a Red Tool bar will appear, at the top left corner click on Load
Set.
3. A new screen will pop up, click on Columbus Set.
4. Different media shows will appear in top right of tool bar, click on chosen video segment.
5. You may also use the left and right arrow buttons to cycle through the videos.
6. Several of the links are either images or segments of videos. Be sure to click on the
program that you want to use. (It is recommended to already know what you want to show
your students).
7. (Stellarium, Celestia, and Telescope) are programs that can also be run without using the
Media Show 3.96. If you want to use one of these programs, click on the icon on the
computer’s main screen.
Picture Information:
Focus Image (100) is used for adjusting your Newtonian mirrors and LCD Projector. To adjust the
focus, manipulate the LCD Projector and re-position the different mirrors. (Follow the steps in the
Set-Up Section)
Planets (99) is a button that can be used as an image that can be displayed on the interior of the
dome. This image can be up on the dome as students walk in and get seated for the presentation.
The image portrays the eight planets in our Solar System.
Apollo (98) is a button that can be used as an image that can be displayed on the interior of the
dome. This image can be up on the dome as students walk in and get seated for the presentation.
The image portrays the moonscape of our Moon during one of the Apollo missions.
St. Peters (97) is a button that can be used as an image that can be displayed on the interior of the
dome. This image can be up on the dome as students walk in and get seated for the presentation.
The image portrays the interior of St. Peter's Basilica in Vatican City.
Columbus City Schools
Curriculum Leadership & Development Science Department
June 2012
Page 31
Petra (96) is a button that can be used as an image that can be displayed on the interior of the
dome. This image can be up on the dome as students walk in and get seated for the presentation.
Petra is a historical and archaeological city in the Jordanian governorate of Ma'an that is famous
for its rock cut architecture and water conduit system.
Life of a Star Sequence (91) is a button that has twenty-three images of stars in different phases
of their life sequence. See the following pages for title names.
ISS (90) is a button that can be used as an image that can be displayed on the interior of the dome.
This image can be up on the dome as students walk in and get seated for the presentation. The
image shows to astronauts working on the International Space Station. I would not recommend
using this button because one of the astronauts does not have his shirt on in the picture.
Trailers & Enchanted Reef Trailers (89 & 88) are buttons that are showing products which are
available for purchase for the Discovery Dome.
Time Telescope (87) is a button that shows several unidentified star images.
Target Image Sequence (86) is a button that has eighty-six images of stars in different phases of
their life sequence. Many of the buttons have a title, however some are not titled.
Columbus City Schools
Curriculum Leadership & Development Science Department
June 2012
Page 32
Media Player 3.96 Button #86 Space Images
1.) Doradus
29.) Hyades
58.) No title
2.) Tucanae
30.) Lagoon Nebula
59.) No title
3.) Abell
31.) Leo Minor
60.) No title
4.) Abell
32.) LMC
61.) No title
5.) No title
33.) Lynx
62.) No title
6.) Antennae Galaxies
34.) Lynx
63.) No title
7.) Arches Cluster
35.) No title
64.) No title
8.) Beta Pictoris
36.) No title
65.) No title
9.) Betelgeuse
37.) No title
66.) No title
10.) Boomerang Nebula
38.) No title
67.) No title
11.) Cartwheel Galaxy
39.) No title
68.) No title
12.) Milkway Center
40.) No title
69.) No title
13.) Crab Nebula
41.) No title
70.) No title
14.) Dumbbell Nebula
42.) No title
71.) Orion Nebula
15.) Eagle Nebula
43.) No title
72.) Pistol Star
16.) Egg Nebula
44.) Massive Open Cluster
73.) Pleiades
17.) Eskimo Nebula
45.) No title
74.) Polaris A & B
18.) Eta Carinae
46.) No title
75.) Proxima Centauri
19.) No title
47.) No title
76.) Retina Nebula
20.) Gliese
48.) No title
77.) Sirius A & B
21.) Gravity Lens
49.) No title
78.) No title
22.) Gum Nebula
50.) No title
79.) No title
23.) No title
51.) No title
80.) No title
24.) Helix Nebula
52.) No title
81.) Sun
25.) Hodge
53.) No title
82.) Triffid Nebula
26.) Horsehead Nebula
54.) No title
83.) No title
27.) Hourglass Nebula
55.) No title
84.) No title
28.) Hubble Telescope
56.) No title
85.) No title
57.) No title
86.) No title
Deep Field
Columbus City Schools
Curriculum Leadership & Development Science Department
June 2012
Page 33
Media Player 3.96 Button #91 Space Images
1.) Sun
13.) Triffid Nebula
2.) Milky Way Center
14.) Lagoon Nebula
3.) No title
15.) Eagle Nebula
4.) No title
16.) Pistol Star
5.) No title
17.) Little Ghost
6.) No title
18.) Egg Nebula
7.) Abell
19.) No title
8.) Hubble Deep Field
20.) No title
9.) No title
21.) Eta Carinae
10.) Hyades
22.) Crab Nebula
11.) Pleiades
23.) Doradus
12.) Orion Nebula
Columbus City Schools
Curriculum Leadership & Development Science Department
June 2012
Page 34
Discovery Dome Sample Lesson Example Dialogue
This is a sample dialogue that would take place before, during and after the
Discovery Dome experience. The dialogue could be modified for students at different
grade levels and or using different content. The following focuses on students in grades
4th through 7th.
Before starting the lesson it is advisable to preview the movie. This dialogue would
be used for the movie Earth’s Wild Ride.
Teacher: Pre-Viewing (Discussions would take place in the classroom before entering
the Discovery Dome.
Ladies and gentleman, today we are going to be using the Discovery Dome in Science class.
Earlier in the week, I sent home with you a letter to give to your parents that explained a
little about the Discovery Dome, and the purpose for our class using it. Before I start our
lesson, I would first like to go over some of the different safety rules that you will need
to follow while visiting the Discovery Dome.
There are several things to remember while in the Discovery Dome:
1.) No shoes are allowed inside of the dome, please be sure to be wearing socks.
2.) Do not take any sharp objects into Discovery Dome, i.e. pencils, pens, etc.
3.) When walking into the Discovery Dome, be careful to not trip on the different
doorways.
4.) When you get inside of the Discovery Dome, do not use a loud voice, your voices will
carry inside of the dome because of the acoustics.
5.) Upon entering, please sit to far side of the doorway. There is not much light inside
of the dome, so be very careful.
Columbus City Schools
Curriculum Leadership & Development Science Department
June 2012
Page 35
Teacher: (While inside of the Discovery Dome)
As you can tell, voices carry inside of here. It is very important that you are quiet, and
not talking to your neighbors because it will be difficult for others to hear. (Display the
Apollo Moon Button #98) As you can tell, the image that is being displayed was taken on
the moon during the Apollo missions.
Possible Questions to Ask:
1.) Do you see Earth in the background?
2.) Why does the Earth have different colors?
3.) What do the different colors represent?
(Wait for feedback from the students and create more discussion. Answers can be found
in the Earth’s Wild Ride Movie Script).
Teacher: Now, we are going to be watching a movie called Earth’s Wild Ride. The movie is
set into the future and has three characters, a grandfather and his two grandchildren.
The three of them are on the surface of the moon at a moon base looking back at Earth.
Like many curious, kids, the grandchildren are asking all kinds of questions about Earth.
Sit, back, relax and enjoy the show. I will be stopping the movie every few minutes ask
some questions. Be ready to answer and discuss them.
(If the dome blower has not already been turned down from the highest setting, have a
student leave the dome, turn down the blower and then reenter. Once the presentation is
ready, remember to Velcro the front airlock door closed.)
(On the Media Player 3.96, click the button to activate Earth’s Wild Ride.)
(At the 6:20 mark during the movie, press pause the Media Player Red Tab and ask
the students some of the following questions).
Questions to Ask:
1.) Why does the moon’s surface appear blue?
2.) What is causing it?
3.) What is a lunar eclipse?
4.) How may a lunar eclipse look differently on the moon than on Earth?
5.) What are some things that people living on the Moon would need to do in order to
survive?
Columbus City Schools
Curriculum Leadership & Development Science Department
June 2012
Page 36
Teacher: What do you think so far? Pretty amazing!!!!
(Press play on the Media Player Red Tab.)
(On the Media Player, click pause at the 12:00 mark).
Questions to Ask:
1.) On Earth we had an Ice Age, it snowed a great deal. Why does the moon not have
any snow?
2.) How were the Wooly Mammoths able to survive the harsh conditions of the Ice
Age?
3.) What is a volcano?
4.) How do volcanoes erupt?
5.) Why does the moon have more craters than Earth?
6.) If an asteroid hit the Earth, would humans be able to adapt and survive?
(Wait for feedback and create more discussion).
(Press play on the Media Player Red Tab. Allow Earth’s Wild Ride to finish
completely. While discussing, you can leave the end of the movie on, or end the movie
and press one of the other buttons for an image to act as a back drop, You may use
Button #99, Planets)
Questions to Ask:
1.) A large asteroid impact can kill animals and plant around the world? Explain one
possible reason why so many forms of life would die.
2.) How are clouds formed?
3.) A river flowed through the canyon during the movie, how do you think this canyon
was possibly formed?
4.) Grandpa and his two grandchildren lived on the moon during Earth’s Wild Ride, do
you think human beings will be able to live on the moon? How would that be
accomplished?
(Before having the students exit the Discovery Dome, have a student exit first and
turn the Discovery Dome blower to highest setting.)
Teacher: I hope that you have enjoyed the presentation, as you leave the Discovery Dome,
please exit through the door one at a time. Please still remain quiet, as our voices carry.
Columbus City Schools
Curriculum Leadership & Development Science Department
June 2012
Page 37
Discovery Dome Professional Learning Community
Example Dialogue
Narrator: After the logistical details of the Discovery Dome are complete, it is important
to think about how the Discovery Dome will be used with your students. Please join us for
a science PLC and hear how the Discovery Dome can support your science goals.
(Grade Level or Content area teachers are seated around a table going over general
information)
Teacher 1: Good Morning, I have some amazing information to share with you all.
Teacher 2: What is it, what is it?
Teacher 1: I was at Northgate last evening for our Science Lead Meeting and found out
that the district has purchased a new piece of equipment called the Discovery Dome; they
actually bought it in the fall of 2012. Some teachers were trained last year, but not many
used it. I have already signed up for the training and reserved it for later this school
year. I thought it would be wise to use have it at school while we are studying about Space
in our Science class.
Teacher 3: What is the Discovery Dome, it sounds really cool? I have been trained for
the Star Lab, is it similar?
Teacher 1: Well, it is a portable planetarium that has many more capabilities than the
Star Lab. You can not only show the different stars and their constellations, but students
can watch different 360 degree HD movies that completely surround them. It has BOSE
surround sound and is pretty awesome.
Columbus City Schools
Curriculum Leadership & Development Science Department
June 2012
Page 38
Teacher 2: That sounds so cool. I want to use it with my students too. I can show a
movie to the students and I can just sit back and relax.
Teacher 1: Well, (Name) is not designed for that. Yes, it is important that the students
are mesmerized by the amazing technology and are getting excited for Science. However
the Science Department has spent a great deal of time and money in creating a User’s
Manual. The User’s Manual has a ton of activities/lessons that coincide with the programs
that can be shown inside of the dome.
Teacher3: Yeah, that sounds very similar to the Star Lab. I used the Star Lab with my
students and not only showed the students presentations inside of the dome, but also used
several activities as pre and post extension activities.
Teacher 1: What we need to figure out is how we want to use the Discovery Dome. I am
thinking about using the dome in teaching my fifth grade students about our Solar System
and the other celestial bodies in space. That aligns with our Fifth Grade State Science
Standards. It is so important that we make the time inside the dome useful and
meaningful to our students. It can’t just be a “Movie Time” for the kids.
Teacher 2: Yeah, I get it, but if you sign it out, can I use with it my students.
Teacher 3: Well, yes and no!! In order to use the Discovery Dome, all teachers need to be
trained by the Science Department. If you are not trained, you can not use it with your
students. What we can do is adjust our schedules that way the person who is trained can
teach all of the students. It is important that as many students can experience the dome.
You are welcome to come in and watch it with other classes.
Teacher 2: I guess that sounds good. What about planning? What activities should we
use with the kids?
Teacher 1: Currently, the Science Department has several movies that are all related to
Earth and Space. On the Science Department Website and in the Discovery Dome
Teacher’s Users Manual, there are descriptions about each of the movies, as well as
lessons for elementary, middle and high school grade levels. The movies can be used as a
gap lesson or as an extension to lessons that can be used in class.
Teacher 2: Are the movies aligned with our state standards?
Columbus City Schools
Curriculum Leadership & Development Science Department
June 2012
Page 39
Teacher 3: The movies in particular are not aligned, but the lessons that are in the Users
Manual are aligned to the State Standards. The movies are a part of the lesson unit.
These lessons and activities are very detailed and can be used either before or after using
the dome.
Teacher 1: The question now becomes what lessons and activities do we want to use in
addition to showing some of the different programs and presentations inside of the
Discovery Dome. We will need to review our State Standards and make sure the lessons
that we use after using the Discovery Dome align with each other.
Teacher 2: Okay, I can help with that.
Teacher 3: Tomorrow, let’s meet again and go over some of the information on the
Science Website. This should be beneficial for our students.
Teacher 2: I am excited to work together on this
Columbus City Schools
Curriculum Leadership & Development Science Department
June 2012
Page 40
Collaborative Conversations (Common Core ELA State
Standards)
Participate in collaborative conversations with diverse partners about grade-level topics
and texts with peers and adults in small and larger groups.
a. Follow agreed-upon rules for discussions (e.g., gaining the floor in respectful ways,
listening to others with care, speaking one at a time about the topics and texts under
discussion)
b. Build on other’s talk in conversations by linking their comments to the remarks of
others.
c. Pose and respond to questions by making comments that contribute to the discussion and
elaborate on the remarks of others. (Primary levels: Ask for clarification and further
explanation as needed about the topics and texts under discussion.)
d. Review the key ideas expressed and draw conclusions in light of information and
knowledge gained from the discussions.
The role of the teacher is:
•
•
•
•
•
•
To create an environment that
promotes engagement in
collaborative conversations about
text.
To guide students to elaborate on,
provide evidence for, and extend
their thinking about topics of inquiry.
To be an effective listener who is
respectful of the opinions of others.
To facilitate the students’
collaborative conversation around
topics of inquiry.
To balance peer interaction and
teacher guidance, providing multiple
and varied opportunities for students
to discuss before, during, and after
reading.
To explicitly instruct, model, and
Columbus City Schools
Curriculum Leadership & Development Science Department
June 2012
The role of the student is:
•
•
•
•
•
To read assigned text and
participate in collaborative
discussion in pairs, small groups, or in
a whole group setting.
To be an effective listener
respecting the opinions of others.
To clarify ideas, reflect feelings,
resolve different points of view, and
pose questions to peers.
To connect text to personal
experiences, other text, and the
world.
To return to text to clarify, verify,
and extend meaning.
Page 41
coach students to develop effective
collaborative discussion techniques
through think aloud and role play.
• To clarify ideas, reflect feelings,
resolve different points of view, and
pose questions to students.
• To encourage students to return to
text to clarify, verify, and extend
meaning.
The observer will see:
• The teacher facilitating student-centered collaborative discussions.
• The teacher modeling and coaching appropriate collaborative discussion
interactions.
• The teacher and students making connections, inferring, summarizing, synthesizing,
analyzing text, elaborating, and responding before, during, and after reading.
• The students engaging in collaborative discussion related to text before, during,
and after reading (in pairs or small groups).
Strategies
1. Carousel - Using poster paper, write one guiding question on each poster paper
(Number of posters will vary). Hang the posters around the room. Group students
into small groups and give each group a different color marker. Students rotate to
each poster, and answer the question or comment on other answers. Students share
main ideas from the poster they started at.
2. Jigsaw - Students are grouped into small groups with 5 students in each group. Each
group is responsible for discussing one question while everyone in the group records
information. Next, form new groups – each with one a student “expert” from the
original groups. Each “expert” should share information with the other people in
the group until all questions have been discussed.
3. Gallery Walk – Teachers or students post various graphic or textual displays around
the room. Clusters of students quietly circulate the room and interact around them
in a purposeful way, often leaving behind written comments as they go.
4. Formal/Informal Debate – Split students into two groups. Pose a question and
assign each a group a different side of the issue to debate. Allow time for students
to confer and prepare their side. Give each group a specific amount of
uninterrupted time to explain their position. Give both sides a few minutes to
prepare for rebuttals, and allow each side to give a rebuttal.
Columbus City Schools
Curriculum Leadership & Development Science Department
June 2012
Page 42