1
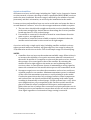
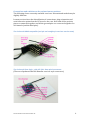
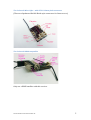
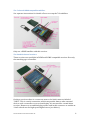
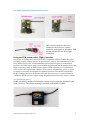
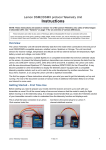
Instructions for Lemon Receivers DSMX and DSM2 Compatibility Lemon makes receivers in both DSM2 and DSMX versions. DSMX is a development of the earlier DSM2 specification that includes frequency hopping for more reliable operation in areas of high potential interference from other 2.4GHz transmitters. DSM2 receivers are generally lower cost. Lemon DSMX compatible receivers work with any DSMX transmitter and are backward compatible with DSM2 transmitters. Lemon DSM2 compatible receivers will work with either a DSM2 transmitter or a DSMX transmitter operating on DSM2. Most Spektrum DSMX transmitters work in both modes and will automatically detect a DSM2 receiver at bind time. If you experience difficulty getting a DSM2 compatible receiver to bind with a DSMX transmitter, try the option to force the transmitter into DSM2 mode if available. Binding Binding is the process of “locking” the receiver to its own transmitter so that it ignores any others in the area. Binding is the first step in setting up any receiver. Ensure the transmitter and receiver are separated by at least 6 ft/2m or the transmitter may “swamp” the receiver. In some cases it may be necessary to have 10ft/3m or more separation to achieve binding. Generally you should only need to bind once and, after binding, normal link-‐up should not require more than a couple of feet of separation. Step 1. Power up the receiver in bind mode For most receivers: put the bind plug on to the bind pins. For 6channel Ultra Light and Micro Light receivers, press and hold in the bind button. Connect a suitable power source to the receiver throttle servo pins. This can be: • a receiver pack battery; or • a stand-‐alone BEC; or • the throttle connection from your speed controller (ESC) with inbuilt BEC (if the ESC is in a model, disconnect the motor or remove the propeller). The red LED on the receiver will flash rapidly to indicate bind mode. If it doesn’t, you have a problem (such as reversed power connector). Make sure it is flashing before going any further. Step 2. Turn on transmitter in bind mode On some transmitters bind mode is activated by holding the Trainer button/switch while powering up. Others require going into a menu to enable bind mode. Lemon Receiver Instructions 13-‐Dec-‐14 1 Continue to hold the switch/button until the receiver LED stops flashing. Release it at that point and the bind process will complete. A solid light on the LED indicates successful bind. Some transmitters will display on screen the type of bind (DSM2 or DSMX) and the frame rate (normally 22mS). Step 3. Power down Remove power from the receiver, remove the bind plug, switch the transmitter off and back on, then apply power to the receiver. Check that the receiver is operating properly and that servos respond to the transmitter controls. NOTES: 1. If your receiver uses a satellite then binding must be done with the satellite connected. Both receiver and satellite LEDs should flash rapidly, then become solid. 2. Binding can be done with or without servos. Servos plugged in the wrong way round may prevent binding, so check this if you have difficulty. 3. Always perform a range check after binding, using the range check function on your transmitter. This attenuates transmitter power so that range is reduced by a factor of about 30. With Spektrum and similar transmitters, full control in range check mode at 30 yds/25m (roughly 30 paces for many adults) indicates ample range for normal visual flying. It is good practice to perform a range check at the beginning of every day’s flying to ensure everything is working properly. What the LEDs mean All Lemon receivers and satellites have a red LED. Some, including the 7channel stabilizer, also have a green LED. 1. A rapidly flashing red LED indicates the receiver is in Bind mode 2. A solid red LED indicates normal radio link between receiver and transmitter. 3. No red LED means there is no radio link. 4. A slowly flashing red LED on a receiver in DSM2 mode indicates that there has at some stage been a power loss (however brief), sometimes called a “brown out”. The flashing may indicate an inadequate receiver power supply or it may mean simply that the operator failed to turn off the transmitter when powering down the receiver. It does not indicate a range issue. Receivers in DSMX mode do not provide “brownout warning”. 5. On the 8/10 channel DSM2 and10 channel DSMX receivers a rapidly flashing Green LED at power up indicates 11mS frame rate mode. 6. On receivers equipped with a failsafe button, a solid green LED indicates that user-‐defined preset failsafe is enabled. No green LED indicates that failsafe is in the default throttle-‐only mode. This is explained below. 7. The 7ch stabilizer has both red and green LEDs that are used to indicate binding, version and stabilization status. See the separate stabilizer instructions for information on setting up the stabilizer. Lemon Receiver Instructions 13-‐Dec-‐14 2 Aerials and satellites All Lemon receivers are full range, including the “Light” series. In practice Lemon receivers match, or better, the range of other comparable DSM2/DSMX receivers under the same conditions. However range is affected by the number of aerials (antennas) and their orientation, as well as by the installation in the model. Lemon receivers and satellites have one active aerial wire and some also have a second identical “reflector” wire. For the strongest and most reliable reception: 1. The two wires should stick straight out from the receiver/satellite and be in the same straight line. Aerials that are bent along the receiver/satellite board may have 10-‐15% reduced range. 2. If a satellite is connected, it should be located at some distance from the main receiver, not right next to it. 3. If a satellite is connected, most reliable reception is obtained when the satellite aerial and main receiver aerial are at right angles. A receiver with only a single aerial wire (including satellite-‐enabled receivers when operated without a satellite) will generally have less range by about 10-‐ 15% than twin aerial wire receivers. This is still ample range for normal flying. NOTES: 1. A satellite does not increase the maximum available range. What it does is to increase the reliability of reception no matter what the orientation of the model. A satellite is a complete receiver and the main receiver chooses the stronger of its own signal or that of the satellite. By orienting the satellite aerial at right angles to the main one and separating the two receivers, there is a much better chance of maintaining a strong signal no matter the orientation of the model with respect to the transmitter aerial. 2. Strongest reception occurs when the transmitter and receiver aerials are oriented parallel to one another. Minimum transmitter power is radiated off the end of the transmitter antenna, so avoid pointing it at the model. Conductive materials such as foil coverings, batteries, metal components and carbon fiber can absorb and shield the incoming weak radio signal, resulting in dramatically reduced range. 2.4GHz systems have a very short wave length and are very susceptible to this. Receiver aerials need to be placed so that this effect is minimized. Helicopters, multicopters and gliders that use lots of carbon fiber construction require particular care in locating receivers and satellites to ensure that at least one aerial receives a clear signal regardless of orientation. Range testing is essential. Lemon Receiver Instructions 13-‐Dec-‐14 3 Connections and switches on the various Lemon receivers The following shows currently available receivers. Discontinued models may be slightly different. Lemon receivers have the identification of connections, plug orientation and switch function printed on the PC board or the case. Note that all the positive pins are connected together and all the ground pins are connected together for all channels (and the bind pins). The 6 channel DSM2 compatible (end pin and straight pin versions are the same) The 6 channel Ultra Light – with JST-‐ZH 1.5mm pitch connectors. (These are Spektrum AR6300 Nanolite receiver style connectors) Lemon Receiver Instructions 13-‐Dec-‐14 4 The 6 channel Micro Light – with JST-‐SH 1.0mm pitch connectors. (These are Spektrum AR6400 Brick style connectors for linear servos) The 6 channel DSMX compatible Only use a DSMX satellite with this receiver. Lemon Receiver Instructions 13-‐Dec-‐14 5 The 7 channel DSMX compatible stabilizer See separate instructions for details of how to set up the 7ch stabilizer. Only use a DSMX satellite with this receiver. The 8 and 10 channel receivers These receivers are available in DSM2 and DSMX compatible versions. Use only the matching type of satellite. On these receivers there is a connector next to the bind connector labeled “UART”. This is a serial connection, which can provide data to other external devices such a controller or on-‐screen display. It is not used for a stand-‐alone receiver. However a second bind plug can be used in this connector to enable an 11mS refresh rate for high-‐speed digital servos (see below). Lemon Receiver Instructions 13-‐Dec-‐14 6 The DSMX Compatible PPM 8 channel receiver This receiver does not allow for connection of servos or a speed control. It is designed to provide a PPM stream suitable for use by a flight controller. Using the PPM stream with a Flight Controller Receivers, including the Lemon Rx DSMX Compatible PPM 8-‐Channel Receiver, normally output channel pulses in the sequence sent by the transmitter. Hence, they cannot correct for incompatibilities such as that between a transmitter (such as the DX8) which uses a fixed standard Spektrum TAER channel order and flight controllers such as NAZA that require AETR sequence. For transmitters such as the DX9 in which the channel order can be changed this is not an issue. Lemon are currently developing an updated version of the DSMX compatible PPM 8-‐Channel Receiver firmware that will allow the user to switch between TAER and AETR receiver output using the push button when the input is TAER. The Satellite Receivers DSMX and DSM2 satellites look similar and the correct satellite should be used with a receiver. The plastic housing is marked with DSMX or DSM2. Lemon Receiver Instructions 13-‐Dec-‐14 7 Using 11mS frame rate Both DSM2 and DSMX versions of the 8 channel and 10 channel receivers can be set to function in 11mS mode. Only do this when all servos are digital and capable of an 11mS refresh rate. 1. Insert bind plugs into both the Bind and UART connectors on the receiver. 2. Provide power to the unit. The red LED should flash rapidly. 3. Enable bind mode in transmitter (ensuring a distance separation of at least 6 feet/2 meters from receiver). 4. When the receiver binds and the LED is solid, power down and remove both bind plugs. 5. Every time from now on when the receiver is powered, a quickly flashing green LED indicates 11ms frame rate is enabled. 6. To cancel 11mS mode, rebind normally without the UART bind plug. Failsafe The primary purpose of failsafe is to minimize the risk of injury and damage should the receiver lose signal while the model is powered up. The key safety requirement is therefore that the motor be shut down on loss of signal. Three types of failsafe are used by the various Lemon receivers: 1. Throttle-‐only preset On loss of signal, the throttle goes to a preset position (full low) determined by the position of the throttle stick during binding. Other channels hold their current position. This is equivalent to the Spektrum “Smart Failsafe” approach. This is the type of failsafe used by the “Light” series of receivers and is the default for other receivers except the 7-‐channel stabilizer. 2. User-‐defined Preset This type requires the operator to set the desired failsafe positions of all controls while binding. This allows for such special failsafe requirements as having a glider go into a spiral with spoilers deployed in order to prevent a flyaway. Likewise, multicopters may have specific failsafe requirements, such as a command to return home using GPS. This is an option on the 6 channel DSMX and the 8 and10 channel receivers. 3. No Pulse Modern speed controls (ESCs) go automatically to OFF if no control pulses are available. This important safety feature can be used to achieve appropriate failsafe behavior if the receiver on loss of signal sends no pulses to the ESC. The Lemon 7 channel stabilizer receiver takes advantage of this feature and simply sends no pulses to the ESC (or other channels) in case of signal loss. This results in the motor shutting down and the control surfaces not moving. An advantage of this approach is that it does not rely on the operator to ensure that the throttle stick is at low position when binding. Lemon Receiver Instructions 13-‐Dec-‐14 8 However you should be aware of this behavior if using a non-‐electric model, or using an ESC which does not have auto off. Changing failsafe mode The default failsafe method for all receivers except the 7-‐channel stabilizer is throttle-‐only preset, with the setting determined by throttle stick position at time of binding. User-‐defined preset failsafe is currently available only on the 6 channel DSMX receiver and the 8 and 10 channel DSM2 and DSMX receivers. That mode can be entered as follows: 1. With receiver and transmitter OFF, plug the bind plug into the receiver. 2. Power up the receiver. Note rapid flashing of the red LED. 3. Turn on the transmitter in bind mode and allow the bind to complete. 4. Leave the transmitter ON and the bind plug in place. The receiver should be showing a solid red LED. 5. Set the transmitter controls to the desired failsafe positions. 6. Press in the failsafe switch on the receiver. 7. The green LED will turn on to indicate positions have been stored. 8. Power off both transmitter and receiver and remove the bind-‐plug.1 Henceforth, whenever the receiver is powered up, the green LED will indicate “user-‐defined failsafe ready”. If signal is lost, the receiver will output the preset positions after approximately 3 seconds and maintain them until a signal is received again. Be sure to test failsafe operation by turning off the transmitter (be very careful if you do this with a live power system – preferably remove the propeller!). To return to throttle-‐only preset, simply rebind the receiver normally. Written by RCGroups user jj604 With assistance from Daedalus66 1 This is most important. If you forget and the receiver is restarted in the middle of the flight due to a brown-‐out, it will enter into the binding state. That means no control! Lemon Receiver Instructions 13-‐Dec-‐14 9