1
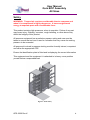
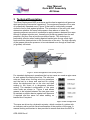
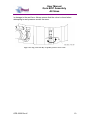
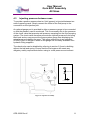
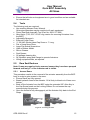
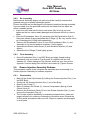
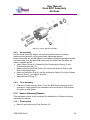
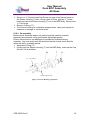
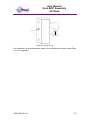
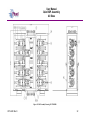
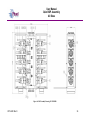
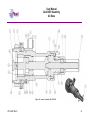
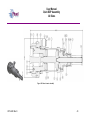
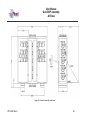
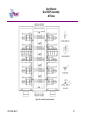
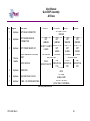
Unit 17 Denmore Industrial Estate, Denmore Road, Bridge of Don, AB23 8JW User Manual Quin BOP Assembly All Sizes This Manual Covers the Following Part Numbers: 195-2220 195-1878 OPS-2220 Rev K User Manual Quin BOP Assembly All Sizes Revision History Issue, Date Rev A, 08/10/08 Rev B, 16/02/09 Rev C, 08/05/09 Rev D, 21/6/10 Rev E, 16/08/10 Rev F, 15/09/10 Rev G, 18/10/10 Rev H, 22/10/10 Rev I, 02/02/11 Rev J, 05 Jul 11 Rev K, 03 Oct 11 OPS-2220 Rev K Remarks Initial Issue Addition of Fast Lock Operation Inclusion of 5 1/8 BOP Correction of spares list numbers Correction of parts list Figures 18 &19 Updated Parts List Updated Grease Injection Assembly Part No Changed Added replaceable valve seats on Equalising Blocks Pt No Correction for Eq Valve from 190-1871 to 190-1781 New Tag Info, Addition of Appendix A i User Manual Quin BOP Assembly All Sizes Revision History............................................................................................... i Safety .............................................................................................................iv 1 Introduction .............................................................................................. 1 1.1 General ............................................................................................ 1 1.2 Product Identification ........................................................................ 2 2 Technical Specification ............................................................................ 3 3 Technical Description .............................................................................. 5 4 Operation ................................................................................................. 7 4.1 Operating the Rams ......................................................................... 7 4.2 Equalising across the rams ............................................................... 9 4.3 Injecting pressure between rams .................................................... 11 4.4 Fitting the Magnet Detector ............................................................ 12 4.5 Job Planning................................................................................... 13 5 Maintenance .......................................................................................... 14 5.1 Introduction .................................................................................... 14 5.2 Schedule ........................................................................................ 14 5.3 Safety ............................................................................................. 14 5.4 Tools .................................................. 15 5.5 Ram Seal Redress ......................................................................... 15 5.6 Actuator Redress ............................................................................ 17 5.7 Shear Actuator Redress ................................................................. 19 5.8 Equalisation Block Redress ............................................................ 21 5.9 Grease Injection Assembly Redress ............................................... 23 5.10 Sensor Housing Redress ................................................................ 24 5.11 Maintenance Record Sheet ............................................................ 26 6 Testing .................................................................................................. 27 6.1 BOP .................................................. 27 6.2 Actuator .......................................................................................... 28 6.3 Equalisation Block .......................................................................... 28 6.4 Grease Injection Assembly ............................................................. 29 7 Parts List and Drawings ......................................................................... 31 8 Spares ................................................................................................... 49 8.1 Available Spare Kits ....................................................................... 49 8.2 Test Fixtures................................................................................... 51 8.3 Part Number Deviations ................................................................. 51 Appendix A Increasing the Shearing Capacity of the BOP ...........................A-1 Table 1: Technical Specification ..................................................................... 3 Table 2: Maintenance Record ....................................................................... 26 Table 3: BOP Parts List Part No 195-2220-HH0 ........................................... 31 Table 4: BOP Parts List Part No 195-1878-HH0 ........................................... 33 Table 5: Wireline Ram Assembly Parts List Part No 190-1764-HH0 ............. 35 Table 6: WireLine Ram Assembly Parts List Part No 190-1879-HH0 ............ 35 Table 7: Pipe Ram Assembly Parts List Part No 190-1765-HH0 ................... 35 Table 8: Pipe ram Assembly Parts List Part No 190-1880-HH0 .................... 35 OPS-2220 Rev K ii User Manual Quin BOP Assembly All Sizes Table 9: Shear Ram Assembly Parts List Part No 190-1766-HH0................. 36 Table 10: Shear Ram Assembly Parts List Part No 190-1881-HH0............... 36 Table 11: Actuator Parts List Part No 190-2247-HH0 ................................... 38 Table 12: Actuator 190-1932-HV0 Parts List ................................................. 40 Table 13: Shear Actuator Parts List Part No 190-2190-HH0 ......................... 42 Table 14: Equalising Block Assembly Parts List Part No 190-1863-HH0....... 44 Table 15: Grease Injection Assembly Parts List Part No 190-2787-HV0 ....... 45 Table 16: Hydraulics Parts List ..................................................................... 48 Table 17: BOP Redress Kit Part No. RDK-2220-HV0 ................................... 49 Table 18: BOP Redress Kit Part No. RDK-1878-HV0 ................................... 49 Table 19: Actuator Redress Kit Part No. RDK-2247-HV0.............................. 49 Table 20: RDK-1932-HV0 ............................................................................. 50 Table 21: Shear Actuator Redress Kit No RDK-2190-HH0 ........................... 50 Table 22: Equalisation Block Assembly Redress Kit Part No. RDK-1863-HH0 .............................................................................................................. 50 Table 23: Grease Injection Assembly Redress Kit Part No. RDK-2787 HV0 . 50 Table 24: Ram Seals (order individual parts as required) ............................. 50 Table 25: Shear Blades (order by pair as required) ...................................... 51 Table 26: Test Fixtures ................................................................................. 51 Figure 1: BOP Safety ......................................................................................iv Figure 2: BOP General Layout ........................................................................ 4 Figure 3: Section through BOP rams (closed position).................................... 5 Figure 4: Ram Configuration ........................................................................... 5 Figure 5: Using a 5/16 A/F Key to equalise pressure across rams ................ 10 Figure 6: Injection Assembly ......................................................................... 11 Figure 7: Fitting the Detector ........................................................................ 12 Figure 8: Accessing the rams ....................................................................... 15 Figure 9: BOP Rams..................................................................................... 16 Figure 10: Exploded View of Equalisation Assembly .................................... 22 Figure 11: Grease Injection Assembly .......................................................... 24 Figure 12: Sensor Housing components ....................................................... 25 Figure 13: Test Fixture Layout ...................................................................... 29 Figure 14: Testing Set Up ............................................................................. 30 Figure 15: BOP Assembly Drawing 195-2220-HH0 ...................................... 32 Figure 16: BOP Assembly Drawing 195-1878-HH0 ...................................... 34 Figure 17: Ram Assembly Drawings ............................................................. 37 Figure 18: Actuator Assembly Drawing (190-2247-HH0) .............................. 39 Figure 19: Actuator Assembly 190-1932-HV0 ............................................... 41 Figure 20: Shear Actuator Assembly ............................................................ 43 Figure 21: Equalisation Block Assembly ....................................................... 44 Figure 22: Grease Injection Assembly Drawing ............................................ 45 Figure 23: General Layout with crash frame ................................................. 46 Figure 24: General Layout of hydraulics ....................................................... 47 Figure 25: Clamping of the Minibooster to the BOP frame ...........................A-3 Figure 26: Clamping of the Minibooster to the BOP frame ...........................A-3 OPS-2220 Rev K iii User Manual Quin BOP Assembly All Sizes Safety WARNING: Trapped air requires considerable time to compress and when it is compressed is highly dangerous. It has enough stored energy to separate parts with considerable force. This product contains high pressures, when in operation. Failure of any part may cause injury. Welding, corrosion, rough handling, or other abuse may affect the Integrity of this product. All pressure equipment has a particular pressure rating and care must be taken to ensure that no item is used in a situation that may cause its working pressure to be exceeded. All personnel involved in pressure testing must be formally trained, competent and utilise the appropriate PPE. Ensure the identification plate is fitted and is displaying the correct information This equipment and the equipment it is attached to is heavy never position yourself below a suspended load Figure 1: BOP Safety OPS-2220 Rev K iv User Manual Quin BOP Assembly All Sizes 1 Introduction 1.1 General The Deployment Blow out Preventer (BOP) provides essential safety barriers against well pressure during the deployment operation. It is located directly above the wellhead flange and immediately below the Deployment Window. The BOP has five sets of rams: two pipe rams that seal against the deployment bar; two wire-line rams for sealing against braided line and one shear and seal ram that is capable of cutting through the deployment bar and then sealing against the well pressure. Each ram consists of a standard and interchangeable actuator assembly. A hydraulic piston can be extended or retracted to energise or retract the rams. Each ram has a set of inner and horse shoe seals that when compressed against the opposite ram forms a continuous seal that is further energised by the application of pressure in one direction. The rams consequently can be arranged so that they hold pressure from below the BOP or from above. The actuators are connected with hard hydraulic piping to provide sealing integrity during a fire. The hydraulic circuit includes a ram valve on each of the four upper ram pairs to allow one half of the rams to be extended without the other half. This is used during the deployment operation when setting the pipe rams against the deployment bar and ensures that the bar is not damaged by the slight misalignment of the two sets of pipe rams. The shear rams do not have a ram valve for safety reasons. Between each of the ram pairs it is possible to inject pressure or grease through the injection port. For the deployment operation this can be used to create an area of pressure that is greater than wellhead pressure and thus provide a safety barrier. For braided line operations or in cases where an effective seal cannot be achieved with fluid, the injection port can be used to inject grease at pressures greater than the well head pressure. The injection port has a check valve to prevent well pressure entering the injection lines and also has a gauge port that allows the pressure between the rams to be monitored during the deployment operation. Across each pair of rams there is an equalisation valve assembly. This is used to equalise pressure across the rams so that the rams can be withdrawn to open up the well bore. The equalisation valve assembly consists of a cone seal set on a screw. Unwinding the screw opens the valve and allows equalisation across the rams. Tightening the screw closes the seal and prevents pressure from passing through the valve assembly. OPS-2220 Rev K 1 User Manual Quin BOP Assembly All Sizes As part of the detection system the BOP has six possible locations to mount the magnet sensor. The normal Wireline operation uses the upper and lower most locations but other configurations may be used when shorter bar assemblies are being used for perforating guns. The deployment bars used must match the locations used in the BOP, as the spacing of the magnets is critical to successful operation. The sensor housing is a separate part from the BOP body and is manufactured from non-magnetic steel in order to maximise the sensitivity of the detection system. The BOP is mounted to a crash frame assembly that provides forklift pockets protection during transport. The crash frame has foldable platforms for the operators to stand on when operating the BOP and stabbing in the lubricator (not shown in diagrams below). This user manual serves as an introduction to the equipment and contains the relevant specifications, operation, planning and maintenance instructions, parts list and drawings. 1.2 Product Identification Phuel products are identified by a unique serial number that facilitates full product traceability. Each product is supplied with a documentation pack that contains product certification and material/inspection reports. The serial number is always etched on the surface of the product but can sometimes be difficult to find or read after painting. A customer identification number is also included to allow the customer to track the asset in their system. A stainless steel band secures the nameplate tag that is stamped with the information shown below. This tag should be located in the first instance to ensure that this manual refers to the correct equipment. OPS-2220 Rev K 2 User Manual Quin BOP Assembly All Sizes 2 Technical Specification Part No Top Connection Bottom Connection Height Make-up Height Width Working Pressure Test Pressure Service Hydraulic Pressure 195-2220-HH0 195-1878-HH0 7-1/16 BX 10K Flange 7-1/16 BX 10K Flange 5 1/8 BX 10K Flange 5 1/8 BX 10K Flange 75.8”/1.93 m 65”/1.65 m 23.78”/0.6 m 10,000 PSI (690 Bar) 15,000 PSI (1035 Bar) H2S 3,000 psi (210 Bar) Max (Standard Actuators) 5,000 psi (345 Bar) Max (Shear Actuators) Stroke Volume (Standard Act) 52 cu-in to close – 48 cu-in to open – Total =107 cu-in (1.64 litres) Stroke Volume (Shear Act) 105 cu-in to close – 100 cu-in to open – Total=205 cu-in (3.36 litres) Weight 7930 lbs. (3,600 Kg) Hydraulic Connections Pipe Rams – 3/8” Phoenix Beattie HP Quick Release Coupling (QR74 Range) Wireline Rams - 3/8” Phoenix Beattie HP Quick Release Coupling (QR74 Range) Shear Rams – 1/2” Phoenix Beattie HP Quick Release Coupling (QR74 Range) Actuators – ¼” NPT x 3/8” Tube Grease Injection – ½” NPT (10,000 psi max WP) Gauge Port – Autoclave SF250CX Table 1: Technical Specification OPS-2220 Rev K 3 User Manual Quin BOP Assembly All Sizes Figure 2: BOP General Layout OPS-2220 Rev K 4 User Manual Quin BOP Assembly All Sizes 3 Technical Description The Phuel Deployment BOP provides a positive barrier against well pressure while performing intervention operations. The equipment consists of five sets of hydraulically operated rams (Figure 3) that can be individually pumped closed to form a seal against pressure. The orientation of the ram outer seal determines whether the rams hold pressure from above or below. By opposing adjacent ram sets it is possible to apply pressure between the rams through a grease injection port, normally at a pressure greater than the well pressure, and thus form a positive protection barrier. This technique is particularly effective when sealing against braided wire-line as a leak tight seal cannot be obtained due to the construction of the wire. The high viscosity of the grease allows the pressure to be maintained even though a small leak (of grease) still exists. Inner Seal Outer Seal Indicator Rod Piston Ram Pressure Figure 3: Section through BOP rams (closed position) For standard deployment operations the top two rams are used as pipe rams to seal against the deployment bar. The next two sets are used when running wire-line operations and the last is a shear and seal set for cutting either the deployment bar or the wire and then sealing in the event of a dangerous situation arising. The standard configuration of the rams outer seals are shown in Figure 4 and allows grease to be injected between the two pipe rams to maintain a positive barrier against well pressure if required and the same for when sealing on braided line if required. Figure 4: Ram Configuration The rams are driven by a hydraulic actuator, which consists of a piston with an indicator rod to provide visual confirmation of the position of the rams. A manual locking mechanism is also provided to ensure that when the BOP is OPS-2220 Rev K 5 User Manual Quin BOP Assembly All Sizes closed hydraulically during operations it cannot be opened again until the mechanism is deliberately withdrawn. Each of the actuators assemblies are identical on the Phuel deployment BOP and so can be positioned in any ram bore. This provides excellent flexibility for maintenance and redress of the equipment. OPS-2220 Rev K 6 User Manual Quin BOP Assembly All Sizes 4 Operation 4.1 Operating the Rams Note – Always ensure that the pressure across the rams has been equalised before opening. 4.1.1 Hydraulic Operation The BOP has been provided with hard piping to offer the required fire protection level. Two connections are required for each ram set for open and close. It is important that both connections are connected, as the fluid displaced by the movement of the piston must be allowed to pass through the valve system back to the reservoir. A Well Control Unit (WCU) is normally used to operate the BOP in an offshore environment. Refer to the relevant manual for that equipment for details of operation and connection. An alternative pump pack may be used for onshore maintenance work but the operation of this equipment is out with the scope of this manual. When closing the two sets of pipe rams to seal on the deployment bar, the manual hydraulic valves on the right hand side must be closed to allow the left hand rams to stroke out fully first. This ensures that the two rams are vertically aligned which is essential to avoid bending the bar or twisting it with respect to the lubricator axis. When the left hand rams are fully stroked (as seen by the position of the indicator rod), open the manual hydraulic valves and continue to pump closed, thus introducing the right hand rams to the bar. If the manual locks are required then follow the procedure below to ensure that they can be operated 4.1.2 Using the Locking Mechanism in Deployment Operations This procedure is what would be required to operate the BOP for offshore use With the deployment bar in the correct position (see the detection system manual) Close the manual hydraulic valves on the top two rams Pump the upper ram until fully closed Remove the pin from the actuator that has just been closed and pull the Locking Sleeve back to the lock position – refit the pin Open the top ram manual hydraulic valve Pump the upper ram closed until 2,000 psi is achieved Remove the pin from the actuator that has just been closed and pull the Locking Sleeve back to the lock position. If the Sleeve does not pull back then OPS-2220 Rev K 7 User Manual Quin BOP Assembly All Sizes increase the ram pressure slightly (to 2,500 psi approx) and then pull the sleeve back – refit the pin Pump the second ram until fully closed Remove the pin from the actuator that has just been closed and pull the Locking Sleeve back to the lock position – refit the pin Open the second ram manual hydraulic valve Pump the second ram closed until 2,000 psi is achieved Remove the pin from the actuator that has just been closed and pull the Locking Sleeve back to the lock position. If the Sleeve does not pull back then increase the ram pressure slightly (to 2,500 psi approx) and then pull the sleeve back – refit the pin The BOP is now closed around the deployment bar and deployment operations can continue as normal until the BOP is ready to be opened With the pressures equalised across the rams Ensure the both manual hydraulic valves are open Bleed off the ram closing pressures on both rams Remove the pin from the top two actuators and push the Locking Sleeve to the unlock position – refit the pin Remove the pin from the second two actuators and push the Locking Sleeve to the unlock position – refit the pin Pump the second rams fully open Ensure that the tool string weight is being taken by the wire to avoid the tool string suddenly dropping Pump the upper rams fully open The BOP is now open and deployment operations can continue as normal. It is important to remember that the fast lock must be fully withdrawn before the rams can be opened. No damage to the mechanism will occur if pressure is reversed with the lock in place – providing that the maximum operating pressure is not exceeded. 4.1.3 Common problems when using the Fast Lock mechanism It is important to remember that the locking mechanism cannot be withdrawn until it is safe to do so. It is not possible to release the locking mechanism if there are any loads being transferred back through the locking dogs. The following events can cause this to occur. Can’t lock the rams As the piston moves to close the rams, the grooves in the piston indicator move across the grooves in the dogs. In order to fully engage, the groove profiles must match exactly to allow the dogs to settle down enough for the OPS-2220 Rev K 8 User Manual Quin BOP Assembly All Sizes locking sleeve to pass over them. The mechanism is designed such that small deviations in pitch alignment are automatically adjusted when the sleeve is pulled back. In cases where the difference is high it can be difficult to apply enough force to cause the dogs to jump almost a full pitch and this prevents the rams from being locked. Usually all that is required is a small further movement of the piston to get the necessary alignment. Increasing the ram closing pressure even by 250 psi or so is enough to allow the locking mechanism to be activated. If the grooves in the piston indicator or the dogs are filled with debris then the dogs may not engage enough to allow the locking sleeve to pass over them. To avoid this occurring keep the grooves clean and debris free and ensure that these areas are cleaned before and after the operations. It is possible to unscrew the locking sleeve to expose the dogs and clean them during operations but this is not considered normal practice. Ensure that the dogs are placed back with the same orientation as each other – the orientation grooves should all be at the same end. Can’t unlock the rams If the hydraulic pressure is left on the rams when the rams are exposed to well pressure (or grease injection pressure) then the resulting movement of the rams squeezing together more, causes the piston to want to move forward. As it is locked from doing so by the dogs, the resulting load is passed through the dogs into the locking sleeve preventing it from moving. To release the load you need to bleed off the hydraulic pressure in the rams – this will return the piston back to its original position and relieve the load from the dogs – allowing the lock to be removed. 4.2 Equalising across the rams The Equalisation Valve is situated at each set of rams and allows the pressure to by-pass the closed ram seals and thus allows the pressure to be equalised. It is important to realise that the piston forces on the ram seals are significant so it is not possible for the hydraulic actuator to open the rams even with small differential pressure. It is therefore essential that the pressure be equalised before the rams are opened. To open the equalisation valve insert a 5/16” or 8mm hex key into the valve. Turn anti-clockwise slowly by one half to one turn. The movement of fluid should be noticeable either by sound or by the vibration felt through the key. It is recommended that the valve be left opened until the rams have been withdrawn. To close the valve, use the same key and tighten in a clockwise direction. There is no need to use excessive force when closing as doing so may result OPS-2220 Rev K 9 User Manual Quin BOP Assembly All Sizes in damage to the seal face. Always ensure that the valve is closed when attempting to seal pressure across the rams. Figure 5: Using a 5/16 A/F Key to equalise pressure across rams OPS-2220 Rev K 10 User Manual Quin BOP Assembly All Sizes 4.3 Injecting pressure between rams To provide a positive pressure barrier, fluid (grease) is injected between two sets of opposing rams. Simply connect the outlet of the fluid pump to the connection on the injection port. An optional gauge port is provided to allow a pressure gauge to be connected so that the pressure can be monitored. This is necessary due to the presence of the check valve that prevents well pressure escaping into the fluid pumping system. The check valve therefore prevents the injected pressure from being bled back and so may prevent the pump system gauge from displaying the actual pressure between the rams. The gauge connection is an autoclave SF250CX port so fittings to attach to the gauge will be readily available from hydraulic fitting suppliers. The check valve can be disabled by referring to section 5.9 and re-building without the ball and spring. Ensure that the final system still meets any obligatory safety requirements before using in a well pressure environment. Gauge Connection (SF250CX) Gauge Check Valve Circuit Layout Injection Port 1/2” NPT Figure 6: Injection Assembly OPS-2220 Rev K 11 User Manual Quin BOP Assembly All Sizes 4.4 Fitting the Magnet Detector The magnet detector simply slides into the bore provided by the non-magnetic Sensor Housing. It most cases the weight of the cable is not sufficient to pull the sensor out, but just in case the sensor can be retained by the means of two ¼-20 UNC x 1.5” long screws. Always ensure that the sensor has been pushed fully home as even a small distance can have a large effect on the sensor detection ability. Refer to the specific bar operating manual to determine which sensor positions are to be used for the deployment operation as different bar configurations may require different detection positions be used. S ensor H ousing D etector 1/4-20 S crew Figure 7: Fitting the Detector OPS-2220 Rev K 12 User Manual Quin BOP Assembly All Sizes 4.5 Job Planning 4.5.1 Before the Job Check that the certification is within date and that the scheduled maintenance is up to date. Examine the BOP Assembly, to make sure that it is good operating order and assembled with the Rams in the correct orientation for the desired operation. Functioning of the Rams may be checked, by running both Rams to the closed position. Do not exceed the maximum operating pressure when closing the Rams. Pressure test the rams from the direction of the well (or applied) pressure that is expected during the operation. This also verifies that the rams are in the correct orientation. Check the fast lock system is operational, by closing the Rams and pulling the handles to operate the locks. Remember to push the handles back to release the locking system first before opening with hydraulic pressure. 4.5.2 During the Job Special care should be taken that the Rams are fully open when passing any equipment through them. The impact of a collar hitting a Ram may damage the Ram to such an extent that the Ram may no longer Seal, or prevents it from fully opening. Only lift the BOP using suitable lift caps. Do not sling or attach lifting equipment to the crash frame to lift the BOP assembly. Care should be taken to completely remove any residual pressure or accumulated pressure existing on Lubricator equipment above the BOP, before disconnecting the Lubricator or opening the window. Hydraulic Hose ends should never be allowed to drop in to dirt or grit, or otherwise become contaminated with foreign matter. Any dirt or grit introduced into the BOP is very injurious to the equipment. If hoses become dirty, they should be cleaned thoroughly with solvent and dried. Only clean Hydraulic fluid should be used (Shell Tellus 22 is recommended) to operate the BOP. The use of mixed types, dirty, or very old fluid of unknown origin is not recommended. When one of these conditions is known or suspected, the hydraulic system should be flushed with solvent and the hydraulic fluid replaced. 4.5.3 After the Job After each job, the BOP should be stripped down, thoroughly cleaned, repaired as may be required and redressed (redress procedures are in section 5). OPS-2220 Rev K 13 User Manual Quin BOP Assembly All Sizes 5 Maintenance 5.1 Introduction Regular maintenance of the equipment using Phuel redress kits or approved spares is essential to its continued safe operation. Ensure that the pre and post job operating procedures are followed and that maintenance records are kept. 5.2 Schedule The maintenance schedule may be governed by international or company standards and the following is considered to be the minimum requirements. 5.2.1 Pre & Post Job Refer to Section 4.5.1 and Section 4.5.3 for details. 5.2.2 Yearly Disassemble BOP (para 5.5 to 5.10) clean and degrease all components. Inspect the condition of sealing surfaces and surface coatings, repair/replace as necessary. Re-coat threads and sealing surfaces if necessary. Contact Phuel if in doubt. Replace all elastomeric seals. Re-assemble BOP (para 5.5 to 5.10). Pressure Test to maximum working pressure and 300 psig per API 6A – PSL3 (Witnessed by certifying authority where applicable). Inspect paintwork and repair where necessary. 5.2.3 Five Yearly Yearly maintenance, plus the following. Carry out surface NDE on all component threads and damaged surfaces. Pressure Test to maximum test pressure and 300 psig per API 6A – PSL3 (Witnessed by certifying authority where applicable). 5.3 Safety This product contains high pressures, when in operation. Failure of any part may cause injury. Welding, corrosion, rough handling, or other abuse may affect the Integrity of this product. Many of the components are heavy and should not be lifted without lifting aids. Wear appropriate personal protective equipment. Do not over exert yourself while using torque wrenches. Use appropriate mechanical advantages when available. OPS-2220 Rev K 14 User Manual Quin BOP Assembly All Sizes Ensure that all tools and equipment are in good condition and are suitable for intended use. 5.4 Tools The following tools are required. Non marking Memac Chain Wrench. Other pipe wrenches may be used but will mark equipment. Piston Seal Sub Assembly Tool (Part No. 900-1577-400). Allen Key’s (7/32, 5/16” & 3/8” long version for removing Actuators from the BOP). Adjustable Spanner’s. External Circlip Pliers. ¼”-20 UNC Socket Head Cap Screw x 1” Long. Pair of Long Nose Pliers. Large Flat ended Screwdriver. Hide or Rubber Mallet. Silicon Grease. Seal Grease Oil spillage-cleaning kits. 5K Hydraulic pump and Gauge to operate Actuators. Lifting equipment/Aids, as required. 5.5 Ram Seal Redress Note: If rams are required to be removed ensure they have been pumped forward until only 2” of the indicator rod is visible 5.5.1 Access Rams This procedure results in the removal of the actuator assembly from the BOP body in order to gain access to the rams. Ensure Rams are fully opened. Break hydraulic lines to the Actuator. Oil is likely to bleed out of lines once broken. Back off the Actuator from the BOP using the extended 3/8” Allen Key in the Cap Screw heads on the Locking Sleeve. Do not loosen the cap screws during this process. Once the thread is fully disengaged, pull the Actuator fully back to the End Stops. Figure 8: Accessing the rams OPS-2220 Rev K 15 User Manual Quin BOP Assembly All Sizes 5.5.2 Ram Removal (not required to redress ram seals) Remove Ram from Actuator, by sliding the Ram off the Ram Tee. 5.5.3 Ram Seal Redress Remove the Cap Screw (6) on the Guide (2) or Shear Blade (2) (whichever Ram is being re-dressed). Un-screw the two Cap screws (5) on the Ram to remove Inner Seal (4). Remove Outer Seals (3), by using a flat-ended screwdriver to lever the seal from the groove. Take care not to damage the metal seal face of the Ram. The Ram is now completely stripped down. Clean and inspect all parts for evidence of damage or excessive wear. Check the seals and replace if required. Repair or replace any damaged or worn parts. If the seals are to be redressed use the parts from the specified redress kit. Assemble Outer Seals (3) by pushing the tab into the slot in the ram and working it around the radius of the ram. Tap home using a rubber or hide mallet and if required use a screwdriver to lever the second tab over the edge of the slot. Take care not to significantly damage Seal during assembly but expect that some slithers of rubber will be produced as the corners of the rubber seals are removed by the assembly operation. Tap all around the circumference of the seal to ensure that it is bedded into the groove and that the seal is not protruding above the ram diameter. Slide the Inner Seals (4) into Ram, make up Cap Screws (5) and gently tighten. Check that there is still some float in the seals as this is essential for the correct operation of the rams. Back off the cap screws slightly if required to get the seals to float. Assemble the Guide (2) (or Shear Blade (2), whichever is being assembled), apply thread lock such as Loctite to the Cap Screw (6) makeup and tighten. W ire-line R am P ipe R am S hear R am Figure 9: BOP Rams OPS-2220 Rev K 16 User Manual Quin BOP Assembly All Sizes 5.5.4 Re-attach to BOP Body If the rams were removed from the actuator (Section 5.5.2) then slide the ram back onto the Tee taking careful note of the orientation of the rams depending on its intended use for the BOP assembly. (i.e. if pressure is to be held from below then the outer seal must be on top – otherwise it must be on the bottom). Attach a hydraulic pump to the open port of the actuator and pump the rams back into the recess in the actuator ensuring that the ram does not hang up on the actuator front face. When fully back remove the hydraulic pump. Note - It is still possible to assemble the actuator to the BOP without pumping back the rams but more effort may be required to allow the thread to make up. Apply a generous coating of grease to the inner and outer seals. Push the Actuator back into BOP Body taking care that the edges of the guide pass into the seal bore and make-up the thread using a 3/8” hex key in the cap head screws to provide the torque. Making up the thread will drive the actuator assembly fully home. Note – When making up Actuator thread into the BOP Body, ensure the Hydraulic line fittings line up, with the Actuator Lines, as the Actuator is being made up. Make up the hydraulic fittings hand tight. Do not over tighten as this causes problems when disassembling again later. The Ram Assembly is now fully made up. Repeat this procedure for each ram seal that need to be replaced. 5.6 Actuator Redress This procedure results in the complete redress procedure of an Actuator assembly. 5.6.1 Removal of the Locking Dogs This might be required to solve manual locking problems or as part of the pre and post job routines Remove the pin (30) from the Support Sleeve (2) Unscrew the Lock Sleeve (11) from the Support Sleeve (2) to gain access to the Dogs Remove the o-ring (25) while preventing the lowermost dogs from dropping and remove the dogs (9) (Assembly is the reverse to this but ensure that the orientation grooves line up around the circumference) OPS-2220 Rev K 17 User Manual Quin BOP Assembly All Sizes 5.6.2 Access & Remove Rams Remove the rams as described in the section 5.5.2 and remove the ram from the actuator. Replace ram seals if required. 5.6.3 Remove the Actuator & Strip Down Remove End Stops and Cap Screws from Slide Rod’s. Support the weight of the actuator and expect the centre of gravity to be at the bracket that contains the slide bushes. Slide the Actuator off the Slide Rods and place in a pipe vice gripping on the Housing. Take care not to damage the hydraulic lines that are still attached. Remove Ram Key Plate Cap Screws (26). Remove the Ram Tee (12) by lifting up and sliding out. Remove the Ram Key Plate (13). Remove O-ring (24) from Housing (1). Remove the locking dogs (9). See section 5.6.1 Remove indicator rod (10). Back off Cap Collar (8) and remove. Remove support sleeve (2). Withdraw Cylinder Cap (7) and remove ‘O’ ring (21) and ‘T’ seal (20) Drive Piston (6) back out of Housing (1) using a wooden or plastic block, and remove T-Seal (18). Remove O-rings (22) and (23) and 2 x T-Seals (19). Un-screw bearing support bracket (5) and remove from Housing (1). Un-screw locking sleeve (3) and remove The Actuator is completely stripped down, clean and inspect all parts for evidence of damage or excessive wear. Discard all rubber seals and backups and replace them with new ones from the specified redress kit. Repair or replace any damaged or worn parts. 5.6.4 Actuator Re-assembly Before actual Assembly begins, all parts should be carefully cleaned, inspected and greased, using good quality lightweight grease. Use new seals from the appropriate redress kit and check that the dates are within a useable period. Ensure that seals are not damaged or excessively stretched during assembly. When fitting T-Seals ensure that the back-ups are oriented with the splits at 180 apart and that they are sitting down correctly. Trim the scarf cut with a sharp blade if required to get them to sit down correctly. Fit Screws (27) to Locking Sleeve (3) Fit Locking Sleeve (3) to Housing (1) then fit Bearing Support Bracket (5) and hold in place using Set Screws (23) OPS-2220 Rev K 18 User Manual Quin BOP Assembly All Sizes Insert Ball Slide (15) into Bearing Support Bracket (5) and fit External Circlips (16) Fit 2 x T-Seals and backups (19) and O-Rings (22) and (23) to Seal Sub (14). Fit Seal Sub (14) into Housing (1) Fit T-seal and backup (18) to Piston (6). Slide Piston carefully into Seal Sub and Housing taking care not to damage the seals Fit T-seal and backups (20) and O-Ring (21) to Cylinder Cap (7) and carefully insert into Housing (1) pushing down until sitting on top of Piston. Fit Support Sleeve (2) and Screw (29) (Ensure Screw is flush to Support Sleeve when fitted Cylinder cap may need to be pushed further into Housing to allow proper fit) Fit Cap Collar (8) Carefully insert Indicator Rod (10) into Cylinder Cap and screw into top of Piston Fit Dog Housing and Locking Dogs (9) (See Section 5.6.1) Fit Handles (17) to Lock Sleeve (11) Fit Ram Key Plate (13) and Ram Tee (12) Fit Ram Key Plate Screws (26) 5.6.5 Final Assembly Lift the Actuator at the bracket, and make-up onto Slide Rods. It is best to engage one bearing at the start of the slide rod and then lower and rotate the assembly on the crane until the second slide rod can be engaged. Slide the redressed Ram onto Ram Tee (12). Follow the instructions in Section 5.5.4 to re-attach the actuator to the BOP. 5.7 Shear Actuator Redress This procedure results in the complete redress procedure of an Actuator assembly. 5.7.1 Removal of the Locking Dogs This might be required to solve manual locking problems or as part of the pre and post job routines Remove the pin (26) from the Support Sleeve (9) Unscrew the Lock Sleeve (10) from the Support Sleeve (9) to gain access to the Dogs Remove the o-ring (20) while preventing the lowermost dogs from dropping and remove the dogs (7) (Assembly is the reverse to this but ensure that the orientation grooves line up around the circumference) OPS-2220 Rev K 19 User Manual Quin BOP Assembly All Sizes 5.7.2 Access & Remove Rams Remove the rams as described in the section 5.5.2 and remove the ram from the actuator. Replace ram seals if required. 5.7.3 Remove the Actuator & Strip Down Remove End Stops and Cap Screws from Slide Rod’s. Support the weight of the actuator and expect the centre of gravity to be at the bracket that contains the slide bushes. Slide the Actuator off the Slide Rods and place in a pipe vice gripping on the Housing. Take care not to damage the hydraulic lines that are still attached. Remove Ram Key Plate Cap Screws (21). Remove the Ram Tee (11) by lifting up and sliding out. Remove the Ram Key Plate (12). Remove O-ring(17) from Seal Sub (2). Remove the locking dogs (7). See Section 5.6.1 Remove indicator rod (8). Back off Cap Collar (6) and remove. Remove support sleeve (9). Withdraw Cylinder Cap (5) and remove ‘O’ ring (19) and ‘T’ seal (15) Drive Piston (4) back out of Housing (1) using a wooden or plastic block, and remove T-Seal (14). Un-screw the Piston Seal Sub (2) from the Housing (1) using the Piston Seal Sub Assembly Tool (900-1577-400). Remove O-ring (18), T-Seals (16). Un-screw bearing support bracket (13) and remove from seal sub (2). Un-screw locking sleeve (3) and remove The Actuator is completely stripped down, clean and inspect all parts for evidence of damage or excessive wear. Discard all rubber seals and backups and replace them with new ones from the specified redress kit. Repair or replace any damaged or worn parts. 5.7.4 Actuator Re-assembly Before actual Assembly begins, all parts should be carefully cleaned, inspected and greased, using good quality lightweight grease. Use new seals from the appropriate redress kit and check that the dates are within a useable period. Ensure that seals are not damaged or excessively stretched during assembly. When fitting T-Seals ensure that the back-ups are oriented with the splits at 180 apart and that they are sitting down correctly. Trim the scarf cut with a sharp blade if required to get them to sit down correctly. Fit Screws (22) to Locking Sleeve (3) OPS-2220 Rev K 20 User Manual Quin BOP Assembly All Sizes Fit Locking Sleeve (3) to Seal Sub (2) then fit Bearing Support Bracket (13) and hold in place using Set Screws (23) Insert Ball Slide (28) into Bearing Support Bracket (13) and fit External Circlips (29) Fit 2 x T-Seals and backups (16) and O-Rings (18) and (17) to Seal Sub (2). Place the Housing (1) in a suitable pipe vice and grip on the diameter where the hydraulic fittings are, taking care not to damage the fittings. Make-up the Piston Seal Sub (2) using Piston Seal Sub Assembly Tool. Fit T-seal and backup (14) to Piston (4). Slide Piston carefully into Seal Sub and Housing taking care not to damage the seals Fit T-seal and backups (15) and O-Ring (19) to Cylinder Cap (5) and carefully insert into Housing (1) pushing down until sitting on top of Piston. Fit Support Sleeve (9) and Screw (24) (Ensure Screw is flush to Support Sleeve when fitted Cylinder cap may need to be pushed further into Housing to allow proper fit) Fit Cap Collar (6) Carefully insert Indicator Rod (8) into Cylinder Cap and screw into top of Piston Fit Dog Housing and Locking Dogs (7) (See Section 5.6.1) Fit Handles (17) to Lock Sleeve (10) Fit Ram Key Plate (12) and Ram Tee (11) Fit Ram Key Plate Screws (21) 5.7.5 Final Assembly Lift the Actuator at the bracket, and make-up onto Slide Rods. It is best to engage one bearing at the start of the slide rod and then lower and rotate the assembly on the crane until the second slide rod can be engaged. Slide the redressed Ram onto Ram Tee (11). Follow the instructions in Section 5.5.4 to re-attach the actuator to the BOP. 5.8 Equalisation Block Redress This procedure results in the complete dis-assembly and re-assembly of an Equalisation Block Assembly for redress purposes. 5.8.1 Disassembly Back off the six Cap Screws (6) holding the Equalisation Sub (1) on the BOP Body. Pull the Block from the BOP Body. (If its difficult to remove try screwing the longer screw in to the tapped hole where the button screw (5) is fitted to gain more leverage Remove the O-rings (7). Remove Button Head Screw (8) and Nordlock washer (10). Back off, remove Equalisation Valve (2), and remove O-Rings (4). OPS-2220 Rev K 21 User Manual Quin BOP Assembly All Sizes Remove the valve seat 8 using a hex key The Equalisation Block is completely stripped down. Clean and inspect all parts for evidence of damage or excessive wear. Discard the O-Ring seals and replace them with new ones. Repair or replace any damaged or worn parts. 3 1 9 6 10 5 7 8 4 2 Figure 10: Exploded View of Equalisation Assembly OPS-2220 Rev K 22 User Manual Quin BOP Assembly All Sizes 5.8.2 Re- Assembly Before actual Assembly begins, all parts should be carefully cleaned and greased using good quality lightweight grease. Ensure that seals are not damaged or excessively stretched during assembly. Use new seals from the specified redress kit and check that the dates are within a useable period. Insert the valve seat into the block and screw fully in but do not over tighten as the hex can be easily damaged and become difficult to remove again Invert the Equalisation Valve (2) and screw into the Equalisation Sub (1). Using two pieces of string assemble the O-Rings (4). Be very careful not to cut or damage the O-Ring while assembling. Remove the Equalisation Valve (2) from the Equalisation Sub (1), and assemble in the correct position as shown. Gently tighten. Assemble the Button Head Screw (5) with Nordlock Washer (10) and tighten. Assemble the O-Rings (7) and lightly grease. 5.8.3 5.9 Final Assembly Mount Equalisation Sub (1) on BOP Body and apply thread locking substance such as Loctite to Cap Screws (6) together with the lock washers (9). When making up Cap Screws, make-up one, then do the opposite, continue doing this until all six are made up. Tighten Screws. Grease Injection Assembly Redress This procedure results in the complete dis-assembly and re-assembly of a Grease Injection Assembly for redress purposes. 5.9.1 Disassembly Back off the three Cap Screws (8) holding the Grease Injection Sub (1) on the BOP Body. Gently pull the Grease Injection Sub (1) out of the Body. Remove the O-ring (7). Back-off Hollow Lock Screw (2), remove Compression Spring (3) and Check Valve (6). Remove the Autoclave Gland (5) from the Grease Injection Sub (1), and remove the Autoclave Plug (4). The Grease Injection Assembly is completely stripped down, clean and inspect all parts for evidence of damage or excessive wear. Discard the O-Ring seals and replace with new one. Repair or replace any damaged or worn parts. OPS-2220 Rev K 23 User Manual Quin BOP Assembly All Sizes Figure 11: Grease Injection Assembly 5.9.2 Re-assembly Before actual Assembly begins, all parts should be carefully cleaned, inspected and greased, using good quality lightweight grease. Ensure that seals are not damaged or excessively stretched during assembly. Use new seals from the specified redress kit and check that the dates are within a useable period. Insert Check Valve (6), followed by the Compression Spring (3) into Grease Injection Sub (1). Make-up the Hollow Lock Screw (2), ensure the Screw is flush to sub flush to the Spigot face. Make up Autoclave Plug (4) and the Autoclave Gland (5) into the Grease Injection Sub (1) and tighten by hand. Assemble the O-Ring (7). 5.9.3 Final Assembly Push the Grease Injection Sub (1) into the BOP Body ensuring correct orientation. Apply thread lock substance such as Loctite to Cap Screws (8) make up and tighten. 5.10 Sensor Housing Redress This procedure results in the complete Dis-Assembly of a Sensor Housing Assembly for redress. 5.10.1 Disassembly Back off and remove the Cap Screws (16). OPS-2220 Rev K 24 User Manual Quin BOP Assembly All Sizes Screw in a ¼” Socket Head Cap Screw into one of the Sensor holes on the Sensor Housing (7) face. Using a pair of Pliers, grip the ¼” Screw, head and ease the Sensor Housing (7) out of the BOP Body. Remove the ¼” Cap Screw. Remove O-Ring (17). The Sensor Housing is completely stripped down, clean and inspect for evidence of damage or excessive wear. 5.10.2 Re-assembly Before actual Assembly begins, all parts should be carefully cleaned, inspected and greased, using good quality lightweight grease. Ensure that the seal is not damaged or excessively stretched during assembly. Use new seals from the specified redress kit and check that the dates are within a useable period. Assemble O-Ring (17). Gently push the Sensor Housing (7) into the BOP Body, make-up the Cap Screws (16) and tighten. 1/4” CAP SCREW MAGNET DETECTOR Figure 12: Sensor Housing components OPS-2220 Rev K 25 User Manual Quin BOP Assembly All Sizes 5.11 Maintenance Record Sheet Date Type of Performed Performed Maintenance By Verified By Comments Table 2: Maintenance Record OPS-2220 Rev K 26 User Manual Quin BOP Assembly All Sizes 6 Testing All testing is to be carried out in the designated test area and by suitably qualified and competent personnel. WARNING: Trapped air requires considerable time to compress and when it is compressed is highly dangerous. It has enough stored energy to separate parts with considerable force 6.1 BOP Using Appropriate test caps blank off either end of the BOP Fill with test fluid and bleed off any air in the system Apply a pressure of 500 psi and ensure pressure holds for a minimum of 10 minutes Increase pressure to 10,000 psi (Maximum Working Pressure), allow to stabilise and maintain this pressure until it is evident there are no apparent leaks. .(Testing to be carried out to Test pressure when decreed by maintenance schedule) Remove pressure and remove the top test blank Close the upper wireline rams Apply a pressure of 500 psi and ensure pressure holds for a minimum of 10 minutes Increase pressure to 10,000 psi (Maximum Working Pressure), allow to stabilise and maintain this pressure until it is evident there are no apparent leaks. Release pressure Remove hollow lock screw, spring and ball bearing from upper grease injection port Ensure test fluid is above the top wireline ram Close both wireline rams Apply a pressure, (through the grease injection port) of 500 psi and ensure pressure holds for a minimum of 10 minutes Increase pressure to 10,000 psi (Maximum Working Pressure), allow to stabilise and maintain this pressure until it is evident there are no apparent leaks. Release pressure, open rams and re-assemble the upper grease injection port Close upper Pipe ram Apply a pressure of 500 psi and ensure pressure holds for a minimum of 10 minutes Increase pressure to 10,000 psi (Maximum Working Pressure), allow to stabilise and maintain this pressure until it is evident there are no apparent leaks. Release pressure OPS-2220 Rev K 27 User Manual Quin BOP Assembly All Sizes Remove the hollow lock screw, spring and ball bearing from the grease injection port between the 2 pipe rams (3rd from the top) Close both pipe rams Apply a pressure, (through the grease injection port) of 500 psi and ensure pressure holds for a minimum of 10 minutes Increase pressure to 10,000 psi (Maximum Working Pressure), allow to stabilise and maintain this pressure until it is evident there are no apparent leaks. Release pressure, open rams and re-assemble the upper grease injection port Close Shear Ram Apply a pressure of 500 psi and ensure pressure holds for a minimum of 10 minutes Increase pressure to 10,000 psi (Maximum Working Pressure), allow to stabilise and maintain this pressure until it is evident there are no apparent leaks. Bleed off pressure, drain test fluid and dry Remove test caps and plug Apply coating of de-watering solution to protect the bore and threads 6.2 Actuator Connect both ports to a suitable pump system (preferably with two way valve and reservoir). Use a good quality hydraulic fluid (Tellus 22). Pump into the open port to fill the system and drive the piston fully back. Do exceed the maximum operating pressure of the cylinder (3,000 psi). Reverse the direction of the valve and pump the piston to the fully open position to displace any remaining air for the system. Increase pressure to 3,000 psi and maintain for 10 minutes to ensure that all seals are holding. Reverse the valve and pump the piston to the closed position. Increase the pressure to 3,000 psi and maintain for 10 minutes to ensure that all seals are holding. Strip down and replace any seals that are leaking until this test can be achieved successfully. Remove the pump. 6.3 Equalisation Block The Equalisation Block Assembly can either be tested along with the final BOP assembly or can be individually tested using test Fixtures, which must be purchased from Phuel separately. This procedure assumes the use of the test fixtures. Attach the test fixture and make up all six bolts. Blank off Port 2 and attach a hand pump and gauge pump to port 1. With the valve open fill the fixture and pressure test to 10,000 psi for 5 minutes. Bleed off. Pressure test to 300-500 psi for 10 minutes then OPS-2220 Rev K 28 User Manual Quin BOP Assembly All Sizes increase pressure to 10,000 psi for 10 minutes. Bleed off. This test checks that all of the seals are functioning correctly Close the valve without exerting excessive force and repeat the pressure test. This test verifies that the metal seal is working. Remove the test fixture and use the same o-rings (6) when assembling to the BOP. P ort # 2 V alve P ort #1 Figure 13: Test Fixture Layout 6.4 Grease Injection Assembly The Grease Injection Assembly can either be tested along with the final BOP assembly or can be individually tested using test Fixtures, which must be purchased from Phuel separately. This procedure assumes the use of the test fixtures. Attach the test fixture and make up all three bolts.(see Figure 14) Attach a pump and gauge to port 3. Pressure test to 10,000 psi for 5 minutes. Bleed off. Pressure test to 300-500 psi for 10 minutes then increase pressure to 10,000 psi for 10 minutes. Bleed off. This test checks that all of the seals are functioning correctly. OPS-2220 Rev K 29 User Manual Quin BOP Assembly All Sizes P o rt # 3 In jectio n P o rt Figure 14: Testing Set Up On completion of all maintenance ensure the maintenance record sheet (Para 5.11) is completed OPS-2220 Rev K 30 User Manual Quin BOP Assembly All Sizes 7 Parts List and Drawings Item Number 1 2 3 4 5 6 7 8 9 10 11 12 13 14 15 16 17 18 19 Part No 195-2049-480 190-2247-HH0 190-2190-HH0 190-1863-HH0 190-2787-HV0 190-1765-HH0 190-1764-HH0 190-1766-HH0 190-1671-174 190-1672-174 206-1860-NI5 195-2203-STL SHC-0586-HTS 801-0119-V90 CSU-0585-HTS WNL-0580-STL 195-1745-AB7 195-1964-A2H SHC-0752-HTS Quantity 1 8 2 5 4 2 2 1 20 20 6 1 12 6 20 12 24 24 8 Description QUIN BOP BODY 6-3/8 ACTUATOR ASSEMBLY SHEAR ACTUATOR ASSY Equalization Block Assembly Grease Injection Assembly PIPE RAM ASSY (PAIR) WIRE-LINE RAM ASSY (PAIR) SHEAR RAM ASSY (PAIR) SLIDE ROD END STOP Sensor Housing CRASH FRAME Soc Hd Cap Size 1/2 Length 1.25 in O-Ring - B.S Size 119 C'Sink Soc Hd Size 1/2 Length 1 in Nord Lock Washer (M12) THREADED STUD HEX NUT - 1.125-8 UN Soc Hd Cap Size 1 Length 3.5 in Table 3: BOP Parts List Part No 195-2220-HH0 OPS-2220 Rev K 31 User Manual Quin BOP Assembly All Sizes Figure 15: BOP Assembly Drawing 195-2220-HH0 OPS-2220 Rev K 32 User Manual Quin BOP Assembly All Sizes Item Number 1 2 3 4 5 6 7 8 9 10 11 12 13 14 15 16 17 18 19 Part Number 195-1832-880 190-1932-HH0 190-2190-HH0 190-1863-HH0 190-2787-HV0 190-1879-HH0 190-1880-HH0 190-1881-HH0 190-1671-174 190-1672-174 206-1860-NI5 195-1862-STL SHC-0586-HTS 801-0119-V90 CSU-0585-HTS WNL-0580-STL 195-1963-AB7 195-1964-A2H SHC-0752-HTS Quantity 1 8 2 5 4 2 2 1 20 20 6 1 12 6 20 12 24 24 8 Description QUIN BOP BODY ACTUATOR ASSEMBLY SHEAR ACTUATOR ASSY Equalisation Block Assembly Grease Injection Assembly Wire-Line Ram Assembly PIPE RAM ASSEMBLY Shear Ram Assembly SLIDE ROD END STOP SENSOR HOUSING Welded BOP Frame Soc Hd Cap Size 1/2 Length 1.25 in O-Ring - B.S Size 119 C'Sink Soc Hd Size 1/2 Length 1 in Nord Lock Washer (M12) STUD - 1.125-8 UN X 6.500 LONG HEX NUT - 1.125-8 UN Soc Hd Cap Size 1 Length 3.5 in Table 4: BOP Parts List Part No 195-1878-HH0 OPS-2220 Rev K 33 User Manual Quin BOP Assembly All Sizes Figure 16: BOP Assembly Drawing 195-1878-HH0 OPS-2220 Rev K 34 User Manual Quin BOP Assembly All Sizes Item Number 1 2 3 4 5 6 Part No 190-1706-480 190-1709-B21 190-1715-H70 190-3689-H90 190-1739-B7M SHC-0582-B7M Quantity 2 4 2 2 4 4 Description WIRE-LINE RAM WIRE-LINE GUIDE OUTER SEAL RAM INNER SEAL RAM SHOULDER SCREW Soc Hd Cap Size 1/2 Length 0.625in Table 5: Wireline Ram Assembly Parts List Part No 190-1764-HH0 Item Number Part Number 1 190-1854-480 2 190-1857-B21 3 190-2035-H70 190-2020-H90 4 5 6 190-1934-B7M SHC-0582-B7M Quantity 2 4 2 2 4 4 Description PIPE RAM Wire-Line Ram Guide RAM OUTER SEAL RAM INNER SEAL - SIZE 6.00 RAM SHOULDER SCREW Soc Hd Cap Size 1/2 Length 0.625in Table 6: WireLine Ram Assembly Parts List Part No 190-1879-HH0 Item Number 1 2 3 4 5 6 Part No 190-1707-480 190-1710-STL 190-1715-H70 190-1748-H90 190-1739-B7M SHC-0582-B7M Quantity 2 4 2 2 4 4 Description PIPE RAM PIPE RAM GUIDE Outer Seal PIPE INNER SEAL RAM SHOULDER SCREW Soc Hd Cap Size 1/2 Length 0.625in Table 7: Pipe Ram Assembly Parts List Part No 190-1765-HH0 Item Number Part Number 1 190-1854-480 2 190-1858-M20 3 190-1715-H70 190-1961-H90 4 5 6 190-1934-B7M SHC-0582-B7M Quantity 2 4 2 2 4 4 Description PIPE RAM PIPE GUIDE Outer Seal PIPE INNER SEAL - SIZE 5.13 RAM SHOULDER SCREW Soc Hd Cap Size 1/2 Length 0.625in Table 8: Pipe ram Assembly Parts List Part No 190-1880-HH0 OPS-2220 Rev K 35 User Manual Quin BOP Assembly All Sizes Item Number 1 2 3 4 5 6 Part No 190-1708-480 190-1705-STL 190-1715-H70 190-3689-H90 190-1739-B7M SHC-0587-HTS Quantity 2 1 2 2 4 2 Description SHEAR RAM SHEAR BLADE SET OUTER SEAL RAM INNER SEAL RAM SHOULDER SCREW Soc Hd Cap Size 1/2 Length 1.5 in Table 9: Shear Ram Assembly Parts List Part No 190-1766-HH0 Item Number Part Number 1 190-2643-480 2 190-2647-STL 3 190-1715-H70 190-2020-H90 4 5 6 190-1934-B7M SBC-2691-304 Quantity 2 1 2 2 4 2 Description SHEAR RAM SHEAR BLADE SET Outer Seal RAM INNER SEAL - SIZE 6.00 RAM SHOULDER SCREW BUTTON HEAD SOC SCREW M12X30 Table 10: Shear Ram Assembly Parts List Part No 190-1881-HH0 OPS-2220 Rev K 36 User Manual Quin BOP Assembly All Sizes W ire-line R am P ipe R am S hear R am Figure 17: Ram Assembly Drawings OPS-2220 Rev K 37 User Manual Quin BOP Assembly All Sizes Item Number 1 2 3 4 5 6 7 8 9 10 11 12 13 14 15 16 17 18 19 20 21 22 23 24 25 26 27 28 29 30 31 Part No 190-2070-480 190-1969-480 190-2069-480 190-1607-480 190-1929-480 190-1967-480 190-1649-480 190-1971-480 190-1928-480 190-1968-480 190-1774-STL 190-1611-480 190-1612-480 190-1608-STL 190-1756-STL 190-1954-STL 802-2161-H85 802-2162-H85 802-1931-H85 801-0345-V90 801-0342-V90 801-0344-V90 801-0439-V90 801-0227-V90 SHC-0503-B7M SHC-0585-HTS SDU-0582-HTS SHC-0502-HTS 190-1970-304 190-2188-STL Quantity Description 1 HOUSING 1 SUPPORT SLEEVE 1 LOCKING SLEEVE NOT USED 1 Bearing Bracket 1 PISTON 1 CYLINDER CAP 1 CAP COLLAR 6 LOCKING DOG 1 INDICATOR ROD 1 LOCK SLEEVE 1 RAM TEE 1 Ram Key Plate 1 Piston Seal Sub 2 Ball Slide ( TK-25-UU) 4 EXTERNAL CIRCLIP (EXT-0400) 2 HANDLE 1 PISTON T-SEAL 4.000 2 ROD T-SEAL 1.625 1 ROD T-SEAL FOR 1.250 ROD DIA 1 O-Ring - B.S Size 345 1 O-Ring - B.S Size 342 1 O-Ring - B.S Size 344 1 O-Ring - B.S Size 439 1 O-Ring - B.S Size 227 2 Soc Hd Cap Size 1/4 Length 0.5 in 6 Soc Hd Cap Size 1/2 Length 1 in 3 Set Screw Dog Point Size 1/2 Length 0.625 in 3 Soc Hd Cap 1/4 UNC x 0.38 Long 1 QUICK RELEASE PIN (FPSC5-35R) 1 LANYARD 8" x 10.35mm RING ID Table 11: Actuator Parts List Part No 190-2247-HH0 OPS-2220 Rev K 38 User Manual Quin BOP Assembly All Sizes Figure 18: Actuator Assembly Drawing (190-2247-HH0) OPS-2220 Rev K 39 User Manual Quin BOP Assembly All Sizes Item Number 1 2 3 4 5 6 7 8 9 10 11 12 13 14 15 16 17 18 19 20 21 22 23 24 25 26 27 28 29 30 31 Part No 190-1643-480 190-1969-480 190-1777-480 190-1574-480 190-1607-480 190-1929-480 190-1967-480 190-1649-480 190-1971-480 190-1928-480 190-1968-480 190-1774-STL 190-1611-480 190-1612-480 190-1608-STL 190-1756-STL 190-2342-304 802-2162-H85 802-2161-H85 802-1931-H85 801-0345-V90 801-0342-V90 801-0344-V90 801-0439-V90 801-0227-V90 SHC-0503-B7M SHC-0585-HTS SDU-0582-HTS SHC-0502-HTS 190-1970-304 190-2188-STL Quantity 1 1 1 1 1 1 1 1 6 1 1 1 1 1 2 4 2 2 1 1 1 1 1 1 1 2 6 3 3 1 1 Description Housing SUPPORT SLEEVE LOCKING SLEEVE SPLIT RING Bearing Bracket PISTON CYLINDER CAP CAP COLLAR LOCKING DOG INDICATOR ROD LOCK SLEEVE RAM TEE Ram Key Plate Piston Seal Sub Ball Slide ( TK-25-UU) EXTERNAL CIRCLIP (EXT-0400) HANDLE (PART No GN310-12-100-E-NI) ROD T-SEAL 1.625 PISTON T-SEAL 4.000 ROD T-SEAL FOR 1.250 ROD DIA O-Ring - B.S Size 345 O-Ring - B.S Size 342 O-Ring - B.S Size 344 O-Ring - B.S Size 439 O-Ring - B.S Size 227 Soc Hd Cap Size 1/4 Length 0.5 in Soc Hd Cap Size 1/2 Length 1 in Set Screw Dog Point Size 1/2 Length 0.625 in Soc Hd Cap 1/4 UNC x 0.38 Long QUICK RELEASE PIN (FPSC5-35R) LANYARD 8" x 10.35mm RING ID Table 12: Actuator 190-1932-HV0 Parts List OPS-2220 Rev K 40 User Manual Quin BOP Assembly All Sizes Figure 19: Actuator Assembly 190-1932-HV0 OPS-2220 Rev K 41 User Manual Quin BOP Assembly All Sizes Item Number 1 2 3 4 5 6 7 8 9 10 11 12 13 14 15 16 17 18 19 20 21 22 23 24 25 26 27 28 29 Part No 190-2072-480 190-2071-480 190-2069-480 190-2073-480 190-1967-480 190-1649-480 190-1971-480 190-1928-480 190-1969-480 190-1968-480 190-1774-STL 190-1611-480 190-1607-480 802-2163-H85 802-1931-H85 802-2162-H85 801-0439-V90 801-0354-V90 801-0345-V90 801-0227-V90 SHC-0503-B7M SHC-0585-HTS SDU-0582-HTS SHC-0502-HTS 190-1954-STL 190-1970-304 190-2188-STL 190-1608-STL 190-1756-STL Quantity 1 1 1 1 1 1 6 1 1 1 1 1 1 1 1 2 1 1 1 1 2 6 3 3 2 1 1 2 4 Description SHEAR PISTON HOUSING SHEAR SEAL SUB LOCKING SLEEVE SHEAR PISTON CYLINDER CAP CAP COLLAR LOCKING DOG INDICATOR ROD SUPPORT SLEEVE LOCK SLEEVE RAM TEE Ram Key Plate Bearing Bracket PISTON T-SEAL 5.500 ROD T-SEAL FOR 1.250 ROD DIA ROD T-SEAL 1.625 O-Ring - B.S Size 439 O-Ring - B.S Size 354 O-Ring - B.S Size 345 O-Ring - B.S Size 227 Soc Hd Cap Size 1/4 Length 0.5 in Soc Hd Cap Size 1/2 Length 1 in Set Screw Dog Point Size 1/2 Length 0.625 in Soc Hd Cap 1/4 UNC x 0.38 Long HANDLE QUICK RELEASE PIN (FPSC5-35R) LANYARD 8" x 10.35mm RING ID Ball Slide ( TK-25-UU) EXTERNAL CIRCLIP (EXT-0400) Table 13: Shear Actuator Parts List Part No 190-2190-HH0 OPS-2220 Rev K 42 User Manual Quin BOP Assembly All Sizes Figure 20: Shear Actuator Assembly OPS-2220 Rev K 43 User Manual Quin BOP Assembly All Sizes Item Number 1 2 3 4 5 6 7 8 9 10 Part Number 190-1861-480 190-1781-316 190-1758-316 801-0011-V90 SBC-0542-HTS SHC-0551-HTS 801-0113-V90 190-2823-PEK WLK-0540-304 WNL-0540-316 Quantity 1 1 1 2 1 6 2 1 6 1 Description Equalization Block Equalization Valve AFO Plug O-Ring - B.S Size 011 Button Hd Screw Size 3/8 Length 0.5 in Soc Hd Cap Size 3/8 Length 2 in O-Ring - B.S Size 113 Valve Seat Spring Lock Washer 3/8 Nordlok Washer Size 3/8 Table 14: Equalising Block Assembly Parts List Part No 190-1863-HH0 Figure 21: Equalisation Block Assembly OPS-2220 Rev K 44 User Manual Quin BOP Assembly All Sizes Item Number 1 2 3 4 5 6 7 8 Part Number 190-1716-480 190-1703-STL 190-1749-STL 190-1760-316 190-1761-316 190-2786-PEK 801-0117-V90 SHC-0551-HTS Quantity 1 1 1 1 1 1 1 3 Description GREASE INJECTION SUB Hollow Lock Screw 3/4-16 (MAC-765) COMP SPRING (C5515650) AutoClave Plug (CPX40) Autoclave Gland (CGLX40) CHECK CONE SEAL O-Ring - B.S Size 117 Soc Hd Cap Size 3/8 Length 2 in Table 15: Grease Injection Assembly Parts List Part No 190-2787-HV0 Figure 22: Grease Injection Assembly Drawing OPS-2220 Rev K 45 User Manual Quin BOP Assembly All Sizes Figure 23: General Layout with crash frame OPS-2220 Rev K 46 User Manual Quin BOP Assembly All Sizes Figure 24: General Layout of hydraulics OPS-2220 Rev K 47 User Manual Quin BOP Assembly All Sizes Item Supplier 1 Hydrasun 2 Hydrasun 3 Hydrasun 4 Phoenix Beattie 5 Hydrasun 6 Hydrasun 7 Hydrasun 1 – 4 CLOSE 5 OPEN 5 CLOSE 3/8 TUBE X ¼ NPT NPT MALE CONNECTOR 6MSC4N 3/8 TUBE X 3/8 3/8 TUBE X 3/8 3/8 TUBE X ½ 3/8 TUBE X ½ NPT MALE BULKHEAD NPT NPT NPT NPT CONNECTOR 6MBC6N 6MBC6N 8MBC8N 8MBC8N 3/8 NPT X 3/8 ½ NPT X ½ ½ NPT X ½ 3/8 NPT X 3/8 NPT NPT NPT NPT NPT STREET ELBOW 45 6-6SVE 6-6SVE 8-8SVE 8-8SVE 3/8 FEMALE 3/8 MALE ½ FEMALE ½ MALE QUICK RELEASE COUPLING ASSY QR74AC5-06S QR74AC5-08SS CAP PLUG CAP PLUG DUST CAP/PLU QR74-PC-06QR74-PP-08QR74-PP-08QR74-PP-06-PVC PVC PVC PVC 3/8 TUBE UNION TEE 6ET6 3/8 TUBE KELF SEAT BALL VALVE 6A-B6LJ2-SSP 3/8 OD – 20 SWG TUBE – 316 STAINLESS STEEL (0.036” WALL THICKNESS) Description 1 – 4 OPEN Table 16: Hydraulics Parts List OPS-2220 Rev K 48 User Manual Quin BOP Assembly All Sizes 8 Spares 8.1 Available Spare Kits Use only spares supplied or approved by Phuel Oil Tools Ltd. It is recommended that sufficient quantities of the following spares be maintained to ensure that the equipment is always available when required. Elastomeric spares are supplied in Viton material as standard. Other materials are available please specify when ordering. Part No. Qty Item Description RDK-2247-HH0 8 RDK-2190-HH0 2 Redress Kit for 190-2247-HV0 Actuator Redress Kit for Shear Actuator RDK-1863-HH0 5 RDK-1759-HH0 4 801-0119-V90 6 Redress Kit for Equalisation Assembly Redress Kit for Grease Injection Assembly O-Ring Comments All seals required for a full redress. All seals required for a full redress All seals required for a full redress. All seals required for a full redress. For Sensor Housing Table 17: BOP Redress Kit Part No. RDK-2220-HV0 Qty Item Description RDK-1932-HH0 Part No. 8 RDK-2190-HH0 2 Redress Kit for 190-1932-HV0 Actuator Redress Kit for Shear Actuator RDK-1863-HH0 5 RDK-1759-HH0 4 801-0119-V90 6 Redress Kit for Equalisation Assembly Redress Kit for Grease Injection Assembly O-Ring Comments All seals required for a full redress. All seals required for a full redress All seals required for a full redress. All seals required for a full redress. For Sensor Housing Table 18: BOP Redress Kit Part No. RDK-1878-HV0 Item Number Part No. 18 19 20 21 22 23 24 25 802-2162-H85 802-2161-H85 802-1931-H85 801-0345-V90 801-0342-V90 801-0344-V90 801-0439-V90 801-0227-V90 Qty 2 1 1 1 1 1 1 1 Item Description ROD T-SEAL 1.625 PISTON T-SEAL 4.000 ROD T-SEAL FOR 1.250 ROD DIA O-Ring - B.S Size 345 O-Ring - B.S Size 342 O-Ring - B.S Size 344 O-Ring - B.S Size 439 O-Ring - B.S Size 227 Table 19: Actuator Redress Kit Part No. RDK-2247-HV0 OPS-2220 Rev K 49 User Manual Quin BOP Assembly All Sizes Item Number Part No. 18 19 20 21 22 23 24 25 802-2162-H85 802-2161-H85 802-1931-H85 801-0345-V90 801-0342-V90 801-0344-V90 801-0439-V90 801-0227-V90 Qty 2 1 1 1 1 1 1 1 Item Description ROD T-SEAL 1.625 PISTON T-SEAL 4.000 ROD T-SEAL FOR 1.250 ROD DIA O-Ring - B.S Size 345 O-Ring - B.S Size 342 O-Ring - B.S Size 344 O-Ring - B.S Size 439 O-Ring - B.S Size 227 Table 20: RDK-1932-HV0 Part No. Qty 802-2163-H85 802-1931-H85 802-2162-H85 801-0439-V90 801-0354-V90 801-0345-V90 801-0227-V90 Item Description 1 1 2 1 1 1 1 Comments PISTON T-SEAL 5.500 ROD T-SEAL FOR 1.250 ROD DIA ROD T-SEAL 1.625 O-Ring - B.S Size 439 O-Ring - B.S Size 354 O-Ring - B.S Size 345 O-Ring - B.S Size 227 Table 21: Shear Actuator Redress Kit No RDK-2190-HH0 Part No. Qty 801-0108-V90 801-0112-V90 1 2 Item Description O-Ring O-Ring Comments For Equalisation Valve. For Equalisation Block. Table 22: Equalisation Block Assembly Redress Kit Part No. RDK-1863-HH0 Part No. Qty 801-0117-V90 1 Item Description O-Ring Comments For Grease Injection Body Table 23: Grease Injection Assembly Redress Kit Part No. RDK-2787 HV0 Part No. Qty Item Description 1 1 1 1 1 Outer Ram Seal Pipe Inner seal Size 5 1/8 Inner Wire-line Seal – 6.0 Inner Pipe Seal – 6-3/8 Inner Wire-line Seal – 6-3/8 190-1715-H70 190-1961-H90 190-2020-H90 190-1748-H90 190-3689-H90 Or 190-2998-H90 Comments For All Phuel 6-3/8 BOP Rams For use in 5 1/8 BOP Ram For Use in 5 1/8 BOP Ram To suit 1.38 Dia Bar Multi-line - blind to 7/16 dia wire Table 24: Ram Seals (order individual parts as required) OPS-2220 Rev K 50 User Manual Quin BOP Assembly All Sizes Part No. 190-1705-STL 190-2647-STL Qty Item Description 1 1 Shear Blade Set (pair) – 6-3/8 Shear Blade Set (pair) – 5-1/8 Comments Blades for 1.38 dia Bar Blades for 1.38 dia Bar Table 25: Shear Blades (order by pair as required) Individual seals and parts may be ordered as required. See the parts list in the next section for part numbers. 8.2 Test Fixtures The following test fixtures are available for order directly from Phuel Oil Tools Ltd Part No. 900-1577-400 900-1806-400 900-1807-480 900-1808-STL Item Description Seal Sub Assy Tool Pressure Test Fixture Flange End Cap 3/8 Hex Key Handle Comments For Removal of Piston Seal Sub For Testing or Equalisation/Injection Block For blanking end connections (7-1/16 BX) For removal of rams from body Table 26: Test Fixtures 8.3 Part Number Deviations In recent times Phuel has standardised the supply of elastomers in viton material and during that process of change it is possible that some part numbers in the kits previously supplied may differ from that on the specifications above. In general the last three digits of the part number identify the material and the hardness of the seal. If a redress kit has been supplied before the standardisation it is still acceptable to use the seals supplied providing that the difference in the part number is only in the last three digits. For example a requirement for O-Ring 801-0108-V90 may be substituted for a part 801-0108-H70 if that was previously supplied in a kit marked for the assembly in question. This allows the use of previously supplied redress kits and provides for stock management over the period of standardisation. OPS-2220 Rev K 51 User Manual Quin BOP Assembly All Sizes Appendix A Increasing the Shearing Capacity of the BOP Introduction In some operations it may be necessary to increase the shearing capacity of the shear rams so that stronger deployment bars can be cut. To achieve this, without increasing the piston area of the actuators, a minibooster system must be added to the shear ram hydraulic circuit. This method avoids the need to change the operating pressures of the BCU, which are normally limited to 3,000 psi. Method The hydraulic circuit shown below replaces the standard circuit for the shear rams only. Shear Ram Actuators H 1 PILOT 2 R IN IN 3 IN Open OPS-2220 Rev K Close A-1 User Manual Quin BOP Assembly All Sizes Item 1 Part Number HC2W-1,5-A-1S Qty 1 2 CKCB-XCN 1 3 VH36B-D-6T-5-S 1 Description Minibooster (x1.5) Pilot Check Valve 3/8 (3:1 Ratio) Check Valve 3/8” . Crack 5psi, 6000psi Manufacturer Minibooster Hudraulics AS Sun Hydraulics DK-LOK Table A-1. Bill of Materials (Manufacturer is only suggested) Technical Explanation The minibooster consists of an oscillating pump together with several free flow through check valves integrated into one small package. When fluid enters the inlet (IN) it freely passes through the booster until the outlet pressure builds up to the match that of the inlet. When that happens, the internal valves close and the oscillating pump then increases the pressure at the outlet up to the magnification factor selected (1.5). The pump discharges fluid through the return port (R) while its operating. The pump automatically operates when there is drop in the outlet pressure. The remaining circuit manages the supply and return of the minibooster so that the rams can still be closed and opened as normal. When closing, the delivered fluid enters the actuators through the minibooster only, the low pressure fluid is then returned through the open port. When opening, the open pressure will force open the pilot check valve so that the low pressure fluid can be returned through the close port. A separate check valve prevents the open fluid entering the minibooster in the reverse direction. Implementation The modification of the hydraulic circuit may be implemented locally using appropriately skilled mechanics. The minibooster should be supported on the frame of the BOP using a suitable clamp and bracket. These components used should be sourced locally. The implementation work must be tested before being released and the implementation should be documented with a list of parts used, test report and declaration of conformity. Testing must ensure that the outlet of the minibooster is reaching the desired magnification factor. This should be verified by attaching a gauge on the outlet while cycling the actuators to the closed position. Sufficient open and close cycles should be completed to confirm that the BOP is operating correctly. OPS-2220 Rev K A-2 User Manual Quin BOP Assembly All Sizes Typical Installation Example Figure 25: Clamping of the Minibooster to the BOP frame Figure 26: Clamping of the Minibooster to the BOP frame OPS-2220 Rev K A-3