1
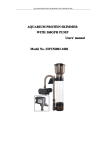
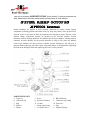
Thank you for purchasing “SUPER REEF OCTUPUS” protein skimmer. For optimum performance and
safety, please read this instruction manual carefully and keep it handy for future reference.
SUPER REEF OCTOPUS
XP2000I Internal
Protein skimmers are applied to most saltwater aquariums to remove certain organic
compounds, including proteins and amino acids, by using the polarity of the protein itself,
from the water to stop most of them decomposing into nitrogenous waste. Because of the
intrinsic charge, water-borne proteins are attracted to the air-water interface. Protein
skimmers work by infecting numerous tiny bubbles into the water chamber, which present an
enormous air-water interface for the protein molecules to cling to. The more tiny bubbles
reside in the chamber, the more proteins it absorbs. Protein skimming is the only way of
physical filtration that gets rid of the organic compounds before its decomposition, lightening
the load on the biological filter and improving the water’s redox potential.
PARTS CHECK LIST:
a. Top cover
b. Collection cup
c. Plug
d. Silencer
e. Holder
f.
g.
h.
i.
j.
Screw
Reaction Chamber
Air hose
Pump output oring
Air intake device
k.
l.
m.
n.
o.
BB 2000 Pump
Collection cup O Ring
Gate valve
Pipe
Optional Fittings
Installation
1. Remove the skimmer and all the parts from the package. Check to insure all parts are
accounted for. There are 2 orings included and already installed: 1 is a white collection
cup oring (l) and 2 is a black pump outlet oring (i).
2. Attach air intake device (j) to the pump (k). Affix small soft air hose (h) onto air intake or
venturi. Attach pump to skimmer body according to the illustration. Make sure black
pump outlet oring is seated inside union.
3. Setup water outlet pipe system according to illustration. Start with inserting small pipe (n)
into elbow attached to chamber. Attach gate valve (m) onto pipe (n). Attach silencer
holder (e) to body by the screw (f) provided. Pull off either black cap of silencer (d). Slide
silencer (d) into holder (e). Snap black cap back onto silencer (d) once it is in holder (e).
Attach air hose (h) to silencer (d). Glue can be used to attach pipes but it is not necessary.
4. Inset the collection cup with top cover onto the skimmer chamber. Make sure the white
collection cup O-ring is in place. The additional hard hose can be attached to drain or the
drain plug (c) can be inserted.
5. Put the skimmer in sump and plug it in. Water level in sump should be 6”-10” as long as
it is not covering the water outlet. Turn the gate valve to adjust the water level inside the
skimmer. The water level inside the skimmer should be an inch below the collar or top of
the chamber for the initial setup.
6. Please allow 3-4 weeks for break in. Then adjust the gate valve to your water level
preference for skimming.
Maintenance
Collection Cup: It should be cleaned at least once a week, depending on the organic load.
Cleaning will enhance the extraction substantially.
Reaction Chamber: Take apart skimmer and clean every 6 months recommended.
Pump: Take apart pump and clean every 4 months recommended. Use a vinegar/water
solution for cleaning off excess build up. The parts included with the pump are the venturi,
clear volute cover with 3 screws, and pinwheel impeller with oring.
Safety Tips
1. Do not allow the skimmer pump to run dry as it will melt the pump.
2. Do not touch the plug with wet hands.
3. Do not clean the skimmer with any chemicals that include alcohol or ammonia as acrylic
crazing can occur.
Warranty
Super Reef Octopus skimmers have a 3 year warranty on craftsmanship and Bubble Blaster
pumps. We will take responsibility for the products as long as it’s been installed and used
properly. Consumable spare parts are not applicable to the warranty.
If your Reef Octopus product does not appear to be working correctly or be defective, please
contact your local dealer. Or you can contact us at 985-781-9078 or [email protected]