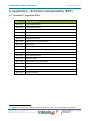
1
® IntesisBox IBOX-KNX-ENO-A1 Application’s Program Version: 2.3 Plugin’s Version: 1.0.0.3 User's Manual Issue Date: 30/11/2012 r1.2 eng IntesisBox® KNX – EnOcean User's manual r1.2 eng © Intesis Software S.L. 2012. All Rights Reserved. Information in this document is subject to change without notice. The software described in this document is furnished under a license agreement or nondisclosure agreement. The software may be used only in accordance with the terms of those agreements. No part of this publication may be reproduced, stored in a retrieval system or transmitted in any form or any means electronic or mechanical, including photocopying and recording for any purpose other than the purchaser’s personal use without the written permission of Intesis Software S.L. Intesis Software S.L. Milà i Fontanals, 1 bis 08700 Igualada Spain TRADEMARKS All trademarks and trade names used in this document are acknowledged to be the copyright of their respective holders. © Intesis Software S.L. - All rights reserved This information is subject to change without notice IntesisBox® is a registered trademark of Intesis Software SL URL Email tel http://www.intesis.com [email protected] +34 938047134 2 / 47 IntesisBox® KNX – EnOcean User's manual r1.2 eng Gateway for integration of EnOcean devices into KNX TP-1 (EIB) control systems and vice versa. Order Codes: IBOX-KNX-ENO-A1 IBOX-KNX-ENO-A1C © Intesis Software S.L. - All rights reserved This information is subject to change without notice IntesisBox® is a registered trademark of Intesis Software SL URL Email tel http://www.intesis.com [email protected] +34 938047134 3 / 47 IntesisBox® KNX – EnOcean User's manual r1.2 eng INDEX 1 Presentation ........................................................................................................................ 6 2 Quick setup ......................................................................................................................... 7 3 Integration examples ........................................................................................................... 8 4 3.1 IntesisBox® EnOcean Air Conditioner integration .......................................................... 8 3.2 Light actuator integration .............................................................................................. 9 3.3 Window contact integration ......................................................................................... 10 Connection ........................................................................................................................ 11 4.1 Connection of the interface to the KNX bus ................................................................ 11 4.2 Connection of the EnOcean interface ......................................................................... 11 4.2.1 Placement ............................................................................................................ 11 4.2.2 Screening zones .................................................................................................. 12 4.2.3 Penetration Angle ................................................................................................ 12 4.2.4 Distance between receiver and sources of interference ....................................... 13 4.2.5 Use of repeaters .................................................................................................. 13 5 IBOX-KNX-ENO-A1 plugin for ETS ................................................................................... 15 5.1 Gateway mapping view ............................................................................................... 16 5.1.1 Adding / Erasing EnOcean devices from ETS ...................................................... 18 5.1.2 General device settings ....................................................................................... 20 5.1.3 Communication objects parameters ..................................................................... 20 5.1.4 Enable and disable communication objects ......................................................... 21 5.1.5 Add a new catalogue ........................................................................................... 22 5.2 6 Remote EnOcean Teaching/Learning ......................................................................... 23 Device programming and monitoring buttons..................................................................... 27 6.1 Learn/Teach EnOcean devices ................................................................................... 27 6.2 Erase EnOcean devices ............................................................................................. 28 6.2.1 Erase current integrated device. .......................................................................... 28 6.2.2 Erase all devices in a Device Node ...................................................................... 28 6.3 Monitor mode.............................................................................................................. 28 6.4 Programming KNX physical address .......................................................................... 29 7 Technical Specifications .................................................................................................... 30 8 Appendix A – EnOcean Family Communication Objects Tables ....................................... 31 8.1 AC interface ................................................................................................................ 31 8.2 Digital Input................................................................................................................. 34 8.3 Central Controllers: Lights, blinds and temperature .................................................... 35 8.4 Gas and Particles Sensor ........................................................................................... 37 8.5 Temperature sensor ................................................................................................... 37 © Intesis Software S.L. - All rights reserved This information is subject to change without notice IntesisBox® is a registered trademark of Intesis Software SL URL Email tel http://www.intesis.com [email protected] +34 938047134 4 / 47 IntesisBox® KNX – EnOcean User's manual r1.2 eng 8.6 Heating actuators ....................................................................................................... 38 8.7 Humidity Sensors........................................................................................................ 40 8.8 Light Sensors.............................................................................................................. 41 8.9 Metering ..................................................................................................................... 42 8.10 Occupancy Sensors.................................................................................................... 43 8.11 Window and Door Sensors ......................................................................................... 43 8.12 Rocker Switch and Key Card ...................................................................................... 44 8.13 Room Operating Panel ............................................................................................... 44 9 Appendix A – EnOcean interoperability (EEP) ................................................................... 46 9.1 IntesisBox® supported EEPs ....................................................................................... 46 10 Appendix B - IBOX-KNX-ENO-A1 HMI .............................................................................. 47 © Intesis Software S.L. - All rights reserved This information is subject to change without notice IntesisBox® is a registered trademark of Intesis Software SL URL Email tel http://www.intesis.com [email protected] +34 938047134 5 / 47 IntesisBox® KNX – EnOcean User's manual r1.2 eng 1 Presentation IntesisBox® IBOX-KNX-ENO-A1 allows a complete and natural integration of EnOcean devices into KNX control systems and vice versa. Main features: Reduced dimensions. Quick and easy installation. External power not required. Supplied through the KNX bus. Fully bidirectional. Supporting up to 253 KNX communication objects. Up to 32 simultaneous channels (or device nodes) and up to 5 devices per channel. Fast and easy integration with IntesisBox® EnOcean gateways for air conditioning. Easy way to add new EnOcean devices through our catalogue file. Internal LCD to setup/monitor EnOcean devices. EnOcean devices quality signal reception shown in the gateway LCD. Intuitive and easy setup thanks to the ETS plugin with no need of any external software. Multiple objects for control and status (bit, byte, characters…) with KNX standard datapoint types. Status objects for every control available. © Intesis Software S.L. - All rights reserved This information is subject to change without notice IntesisBox® is a registered trademark of Intesis Software SL URL Email tel http://www.intesis.com [email protected] +34 938047134 6 / 47 IntesisBox® KNX – EnOcean User's manual r1.2 eng 2 Quick setup Figure 2.1 IBOX-KNX-ENO-A1 / A1C integration example Due to the flexibility of the gateway and the plugin, some of the following steps can be done in a different order. If you are familiar with KNX and EnOcean technologies you will be aware of that. Therefore, next we present a typical configuration process, but it is not the only way to do it. 1. Connect IBOX-KNX-ENO-A1 to the KNX bus (section 4.1) and check EnOcean devices location (section 4.2). 2. Open the IntesisBox® IBOX-KNX-ENO-A1 plugin in the ETS (section 5). 3. Add new Device(s) Node(s) (section 5.1.1). a. Manually: Using Plugin’s families and devices list. b. Remotely: Using Plugin’s Discover property. 4. Select the communication objects to be used and other parameters. This step can be omitted if working with the default objects and parameters (sections 5.1.2, 5.1.3 and 5.1.4). 5. Download the application program. This can be done through the ETS download parameter section or through the Plugin’s Download parameters button (section 5.2) 6. Teach/Learn EnOcean devices. a. Manually: Using EnOcean device and/or gateway buttons (section 6). b. Remotely: Through the plugin (section 5.2) 7. Close the plugin and apply changes when asked. 8. Link the group address from the communication object of the KNX device with the communication object inside the IBOX-KNX-ENO-A1. Next, you can see specific examples integrating IntesisBox® EnOcean Air Conditioner interfaces, light actuators and window contacts using our plugin and the gateway. © Intesis Software S.L. - All rights reserved This information is subject to change without notice IntesisBox® is a registered trademark of Intesis Software SL URL Email tel http://www.intesis.com [email protected] +34 938047134 7 / 47 IntesisBox® KNX – EnOcean User's manual r1.2 eng 3 Integration examples In order to show how you can use our gateway with EnOcean products and how they can be monitored and controlled through KNX, or vice versa (from KNX to EnOcean), next you have different examples showing different integration scenarios. 3.1 IntesisBox® EnOcean Air Conditioner integration IBOX-KNX-ENO-A1 Figure 3.1 IBOX-KNX-ENO-A1 / A1C and IntesisBox Air Conditioner integration example Next, there is a step by step example on how to integrate IntesisBox® EnOcean AC interfaces into KNX through our gateway. 1. Connect IBOX-KNX-ENO-A1 to the KNX bus and check EnOcean devices location. 2. Open the IntesisBox® IBOX-KNX-ENO-A1 plugin in the ETS. 3. Click on the “Add Device Node” button. 4. Select the first option to integrate a physical EnOcean device (already selected by default). 5. Select “Air Conditioner Interfaces” in the device family menu. 6. Select the Air Conditioner Interface you want to integrate in the EnOcean devices menu. 7. Click on “Add device Node” (the window will be closed). 8. Select the communication objects to be used (this step can be omitted if working with the default objects). 9. Set profile F in the IntesisBox® AC interface (ROT1, see IntesisBox Air Conditioner interface manual for more information). 10. In the IntesisBox® AC interface press the teach-in button (PB1). The IBOX-KNX-ENO-A1 receives the signal, stores the device in the selected channel and replies to the IntesisBox® AC interface that stores its ID. 11. IBOX-KNX-ENO-A1’s display indicates that the device has been linked as the index of devices increases in the selected node. 12. IntesisBox® AC interface and the IBOX-KNX-ENO-A1 are linked and ready to be used. © Intesis Software S.L. - All rights reserved This information is subject to change without notice IntesisBox® is a registered trademark of Intesis Software SL URL Email tel http://www.intesis.com [email protected] +34 938047134 8 / 47 IntesisBox® KNX – EnOcean User's manual r1.2 eng 3.2 Light actuator integration IBOX-KNX-ENO-A1 Figure 3.2 IBOX-KNX-ENO-A1 / A1C and light actuator integration example Below there is an example on how to integrate an EnOcean light actuator controlled into KNX through our gateway. 1. Connect IBOX-KNX-ENO-A1 to the KNX bus (see 4.1) and check EnOcean devices location (see 4.2). 2. Assuming that we have a KNX actuator with free-potential contacts, and also that in the channel 1 from this actuator we have the 1/1/1 group address already linked. 3. Open the IntesisBox® IBOX-KNX-ENO-A1 plugin in the ETS. 4. Click on the Add Device Node button. 5. Select the second role option to simulate an EnOcean device. 6. Select “Rocker Switch and Key Card” in the family device list. 7. Select the Rocker Switch you want to simulate to control the EnOcean light actuator from the available in the device list. 8. Click on Add device Node (the window will be closed). 9. Select the communication objects to be used (this step can be omitted if working with the default objects). 10. Move to the Remote EnOcean Teaching/Learning tab and click on the Download Parameters button (a message window will pop-up indicating process progress). 11. Go to Remote EnOcean Teachings tab and click on the arrow present in the Learn column. A pop-up message will appear indicating that you have to press the Learn button of the EnOcean device you want to control (in this case the light actuator). The EnOcean device will receive the signal from the IBOX-KNX-ENO-A1 and will store its ID. This process can also be done through the plugin interface (see section 6). 12. Close the plugin (changes will be saved automatically). 13. Download the application program. 14. The EnOcean device (the light actuator in this case) and the IBOX-KNX-ENO-A1 are linked and ready to be used together with the KNX installation. © Intesis Software S.L. - All rights reserved This information is subject to change without notice IntesisBox® is a registered trademark of Intesis Software SL URL Email tel http://www.intesis.com [email protected] +34 938047134 9 / 47 IntesisBox® KNX – EnOcean User's manual r1.2 eng 3.3 Window contact integration IBOX-KNX-ENO-A1 Figure 3.3 IBOX-KNX-ENO-A1 / A1C and Window Contact integration example In order to see an example, we are going to proceed with the integration of an EnOcean Window contact with a free-potential contact from a KNX actuator. In this case, chipID information is set up using the gateway buttons and not the plugin. 1. Connect IBOX-KNX-ENO-A1 to the KNX bus and check EnOcean devices location. 2. Assuming that we have a KNX actuator with free-potential contacts, and also that in the channel 1 from this actuator we have the 1/1/1 group address already linked. 3. Open the IntesisBox® IBOX-KNX-ENO-A1 plugin in the ETS. 4. Click on the Add Device Node button. 5. Select the first option to integrate a physical EnOcean device (already selected by default). 6. Select “Window and Door Sensor” in the devices family menu. 7. Select “Window Contact” from the available in the device list. 8. Click on Add Device Node (the window will be closed). 9. Select the communication objects to be used (this step can be omitted if working with the default objects). 10. Move to the Remote EnOcean Teaching/Learning tab and click on the Download Parameters button (a message window will pop-up indicating process progress). This process can be omitted as this is automatically done when closing the plugin. 11. Close the plugin (changes will be saved automatically). 12. Then link the group address 1/1/1 from the communication object of the KNX actuator with the communication object of the Window contact inside the IBOX-KNX-ENO-A1. 13. Download the application program. 14. Finally you only have to link the EnOcean Window Contact by pressing the gateway Learn/Teach button (an “L” appear in the LCD) and pressing learn (LRN) button in the EnOcean device. 15. The EnOcean device (the windows contact in this case) and the IBOX-KNX-ENO-A1 are linked and ready to be used together with the KNX installation. © Intesis Software S.L. - All rights reserved This information is subject to change without notice IntesisBox® is a registered trademark of Intesis Software SL URL Email tel http://www.intesis.com [email protected] +34 938047134 10 / 47 IntesisBox® KNX – EnOcean User's manual r1.2 eng 4 Connection 4.1 Connection of the interface to the KNX bus Disconnect power of the KNX bus. Connect the interface to the KNX TP-1 (EIB) bus using the KNX standard connector (red/grey) of the interface, respect polarity and then reconnect power of the KNX bus. KNX Prog: KNX programming button Erase: Erase button CAB Teach: Learn/Teach button Up: Up button KNX Prog CON Down: Down button CON: KNX connector Erase J1-J2 KNX TP-1 (EIB) bus CAB: KNX cable DISP DISP: Display Teach MOD: EnOcean module MOD J1-J2: For future use LID: IntesisBox device LID Down Up LID Figure 4.1 Device description and connection to KNX bus Then it will start an initialization process, IntesisBox-KNX-ENO-A1 will be printed on the IntesisBox® device display for a few seconds (see the location of the display in Figure 4.1). The normal operation starts when display turns OFF. It is important to bear in mind that changes made during the initialization process will not have effect until it finishes. 4.2 Connection of the EnOcean interface EnOcean protocol runs in a wireless mode, so no wiring is needed during the connection stage. To connect EnOcean devices with the IBOX-KNX-ENO-A1 EnOcean interface, please follow instructions in this manual and recommendation below. 4.2.1 Placement The IntesisBox® interface antenna has a better sensibility when the device is placed vertically, and therefore this is the preferred position when placed (antenna zone should be located in the bottom side, floor side, once the device is fixed to the wall). The coverage distance (see Table 4.1) of the signal emitted by the IntesisBox®, or by any other EnOcean device, is determined by the room geometry and where they are placed. As an example, long narrow corridors with wide walls are an adverse situation. People or other obstacles can reduce the coverage distance too. Therefore, is advised to always think in the worst possible scenario to decide the placement of the device to ensure a good stability in the radio system. © Intesis Software S.L. - All rights reserved This information is subject to change without notice IntesisBox® is a registered trademark of Intesis Software SL URL Email tel http://www.intesis.com [email protected] +34 938047134 11 / 47 IntesisBox® KNX – EnOcean Coverage distance < 30 m < 20 m < 10 m <1m User's manual r1.2 eng Conditions Under ideal conditions: broad room, no obstacles, good antenna design and good antenna positions. The room is filled with furniture and people and penetration through up to 5 dry walls or up to 2 brick walls or up to 2 aero concrete walls. Identical to the previous case but the receiver is placed to a room corner or range along a narrow floor. Metal-reinforced ceilings at upright penetration angle (in strong dependence of reinforcement density and antenna positions). ® Table 4.1 IntesisBox coverage distance 4.2.2 Screening zones It is important not to place the device in a place where the airwaves must go through a metallic object as they create a screening zone where the receivers are not going to be able to receive the EnOcean telegrams. This situation is shown in Figure 4.2a. Figure 4.2 a) Screening zone b) Solution with a repeater The situation of one of the receivers does not allow it to receive the transceiver telegrams. To solve this situation the use of a repeater outside the screening zone (Figure 4.2b) is recommended. The telegrams will be retransmitted from there to the receiver. 4.2.3 Penetration Angle This is the angle in which the airwaves reach a certain object they need to go through. The transmission to the other side of the object would be better as this angle gets closer to 90º, being this the best transmission situation. In Figure 4.3a a receiver in a situation where the penetration angle is too close to 0º is shown. The solution to that problem can be seen in Figure 4.3b using a repeater in a different position. Figure 4.3 a) Penetration angle b) Solution with a repeater © Intesis Software S.L. - All rights reserved This information is subject to change without notice IntesisBox® is a registered trademark of Intesis Software SL URL Email tel http://www.intesis.com [email protected] +34 938047134 12 / 47 IntesisBox® KNX – EnOcean User's manual r1.2 eng 4.2.4 Distance between receiver and sources of interference The distance between EnOcean receivers, as it is the IntesisBox® and other transmitters (e.g. GSM / DECT / wireless LAN) or high frequency sources of interference (computers, audio and video equipment) should be higher than 50 centimeters. However, EnOcean transmitters can be installed next to any other high-frequency transmitters without any problem. 4.2.5 Use of repeaters In case of a poor radio reception, it may be helpful to use a repeater. EnOcean repeaters do not require any configuration, only a line-power supply is needed. A poor radio signal is received, refreshed and transmitted again, so nearly a double radio range can be achieved. Special EnOcean repeaters which can be switched to 2-level function allow two repeaters to be cascaded. In order to configure one of the devices which are linked with the IBOX-KNX-ENO-A1/C as a repeater (the device will perform its normal function in parallel with the repeater function) see device manual to get more information on how to configure it as repeater. Nevertheless, it is advisable to avoid configuring a device as a repeater if it is not necessary due to the fact that radio traffic will increase unnecessarily. A repeater can be configured as 1-level or 2-level repeater. The difference between them is that 1-level repeaters can only repeat original telegrams and 2-level repeaters can repeat original and repeated telegrams. It is important to bear in mind that some telegrams cannot be repeated, like pings. Although it will be possible to write and read from a device which needs a repeater to communicate, there are certain commands which will not work without direct communication (see EnOcean device user manual for more information). The following are the requirements in order to configure a device as a repeater: - There must be direct communication with the device to be configured as a repeater, which means that original telegrams from the device must be received by the device itself, not repeated ones. - There must be another device besides the one to be configured as a repeater, and its original telegrams must be either not received or received with poor signal strength (less than -80dBm). Next, there is a description of each repeater type and the different scenarios where they can apply. A. Repeater 1-level In Figure 4.4a, device B has a poor signal strength (< -80 dBm) and device A has direct communication with good signal strength. In this situation, telegrams from device B might be lost. The solution is shown in Figure 4.4b, where device A has been set as a 1level repeater. © Intesis Software S.L. - All rights reserved This information is subject to change without notice IntesisBox® is a registered trademark of Intesis Software SL URL Email tel http://www.intesis.com [email protected] +34 938047134 13 / 47 IntesisBox® KNX – EnOcean User's manual r1.2 eng IBOX-KNX-ENO-A1 IBOX-KNX-ENO-A1 Figure 4.4 a) Poor signal strength of device B b) Solution with device A as a repeater B. Repeater 2-level In Figure 4.5a can be seen how device B has poor signal strength and device C has no communication. The problem is been solved in Figure 4.5b, where device B has been set as 1-level repeater and device A as 2-level repeater. So telegrams from device C would be repeated by device B and repeated again by device A. Important! This configuration is recommended just in the case that there is no communication between device C and A, otherwise it would be enough setting device A as 1-level repeater. IBOX-KNX-ENO-A1 IBOX-KNX-ENO-A1 Figure 4.5 a) No communication in device C b) Solution with device A and B as repeaters It might happen, in a situation similar to the one in Figure 4.5, that there is no communication with device B. Therefore it is not possible to configure device B as a repeater. © Intesis Software S.L. - All rights reserved This information is subject to change without notice IntesisBox® is a registered trademark of Intesis Software SL URL Email tel http://www.intesis.com [email protected] +34 938047134 14 / 47 IntesisBox® KNX – EnOcean User's manual r1.2 eng 5 IBOX-KNX-ENO-A1 plugin for ETS IBOX-KNX-ENO-A1 is a fully compatible KNX device which must be configured and setup using standard KNX tool ETS and our specific plugin. ETS database for this device and the specific plugin can be downloaded from: http://www.intesis.com/down/eib/IBOX-KNX-ENO-A1.zip Please consult the README.txt file, located inside the downloaded zip file, to find instructions on how to install the database. Once the database is imported, the plugin can be accessed when editing parameters. To get access to parameters edition you can right click on the gateway icon in the device tree (see Figure 5.1) and then select Edit Parameters. Another option would be to click on the Parameters tab, located in the project screen, and then pressing the specific parameter dialog (see Figure 5.2). Figure 5.1 ETS Project managing screen Figure 5.2 ETS Project managing screen IBOX-KNX-ENO-A1 plugin is divided in 2 main sections: Gateway mapping and Remote EnOcean Teachings (see Figure 5.3). By default, users will be always directed to the Gateway mapping view. © Intesis Software S.L. - All rights reserved This information is subject to change without notice IntesisBox® is a registered trademark of Intesis Software SL URL Email tel http://www.intesis.com [email protected] +34 938047134 15 / 47 IntesisBox® KNX – EnOcean User's manual r1.2 eng 5.1 Gateway mapping view In this section, users will be able to add, erase and manage devices and their parameters. In Figure 5.3 different available options are shown. 1 2 9 3 10 11 4 6 5 7 12 13 8 Figure 5.3 Plugin Gateway mapping screen 1 Add Device Node: Adds a new EnOcean device (in detail in section 5.1.1). 2 Remove Device Node: Removes an EnOcean device selected from the list (in detail in section 5.1.1). 3 EnOcean device nodes list (Plugin-tree view): List of EnOcean devices added and their communication objects. Communication objects can be enabled or disabled directly from this list (in detail in section 5.1.4) 4 Expand: Expands the list of devices and communication objects. 5 Collapse: Hides the list of devices and communication objects. 6 Hide/Show disabled KNX objects: Allows showing or hiding all the disabled objects. This is useful to easily see only all the enabled communication objects and manage them. © Intesis Software S.L. - All rights reserved This information is subject to change without notice IntesisBox® is a registered trademark of Intesis Software SL URL Email tel http://www.intesis.com [email protected] +34 938047134 16 / 47 IntesisBox® KNX – EnOcean 7 User's manual r1.2 eng Resources: Provides information about free channels and communication objects available. a. KNX communication objects: KNX communication objects used from total. b. EnOcean channels: Channels used from total available. 1 8 Plugin version: It indicates the current plugin version. 9 EnOcean Device: Name/type of the selected device (as it appears in the LCD screen). 10 General device settings: General parameters values of the integrated device. More details in section 5.1.2. In case that the added device needs/has the option of setting some initial values, you can click on the Edit initial data… link. When clicking, new windows will pop-up showing editable parameters. In this same window, there is also a link to the EEP specification document, so field value specifications for each parameter can be found. Figure 5.4 Initial data to transmit screen 1 11 KNX communication objects settings: List of editable parameters for enabled communication objects. More details about communication object settings can be found in section 5.1.3 . 12 Reset configuration: Resets current configuration erasing all nodes and communication objects in the project. Text below the button indicates when the last configuration was saved. 13 Import catalogue: Imports an IKE (IBOX-KNX-ENO) file with all available EnOcean devices. Text below the button indicates current catalogue version. All EnOcean devices occupy 1 channel except AC interfaces, which occupy 3 channels. © Intesis Software S.L. - All rights reserved This information is subject to change without notice IntesisBox® is a registered trademark of Intesis Software SL URL Email tel http://www.intesis.com [email protected] +34 938047134 17 / 47 IntesisBox® KNX – EnOcean User's manual r1.2 eng 5.1.1 Adding / Erasing EnOcean devices from ETS The Add Device Node button adds new EnOcean devices to be simulated or integrated into KNX. When clicking on the Add Device Node button, a new window pops-up (see Figure 5.5). 1 2 3 4 5 6 Figure 5.5 Add device pop up screen 1 KNX-ENO gateway role: Select one of the radio buttons to get integration from KNX to EnOcean or from EnOcean to KNX. KNX-ENO integrates an existing EnOcean device to KNX: Adds a new physical EnOcean device to the current configuration. KNX-ENO simulates an EnOcean device: Adds a new simulated EnOcean device. An EnOcean device is simulated from KNX (e.g. An EnOcean window contact could be simulated by using a KNX binary input contact). 2 Discover device: Click on the Discover device button and on the teaching/learning button of your EnOcean device. This will automatically select your device from the ones in the list2 and will add the ChipID information3. 3 Choose a family device: Select the group from the list that owns the EnOcean device to be integrated to find the proper device faster and in an easy way. 4 Choose the EnOcean device: Select the EnOcean device to be integrated from the list. 5 Add device: Adds the selected EnOcean device. 6 Cancel: Cancel the process. 2 In some cases, the application is not capable of establishing a one-to-one relation. In these cases, user only has to decide which is the precise device, but doesn’t have to look for the whole catalogue, as a preselecting is done by the plugin. 3 This is not available for the rocker buttons and the AC devices. In these cases you will need to use the standard teach/learn process in the Remote EnOcean Teachings tab of this same plugin. © Intesis Software S.L. - All rights reserved This information is subject to change without notice IntesisBox® is a registered trademark of Intesis Software SL URL Email tel http://www.intesis.com [email protected] +34 938047134 18 / 47 IntesisBox® KNX – EnOcean User's manual r1.2 eng The process to add a device is quite simple and can be done in two different ways: a. Manually: You only have to look into the list for the EnOcean device family of the device to be added, then select the device and finally click on the Add Device Node button. To add new devices just repeat the process as many times as EnOcean devices you want to integer or simulate. b. Remotely: Press Discover Device button on the plugin and then press the teaching/learning (LRD) button on the EnOcean device that you want to integrate. Remember that this function is only available for the integration of EnOcean devices and not for the simulation scenario. Please, keep in mind that rocker buttons need a specific operation when teaching, as A0 button of the rocker needs to be pushed to ensure proper switch position is configured (see Figure 5.6). Figure 5.6 Indication on a rocker ChipID addition To add another device, click again on the teaching/learning (LRD) button. Once you finish adding devices, click on the Done button if you don’t want to wait for the countdown to finish. To erase an EnOcean device you have to select it in the plugin tree-view and click on the Remove Device Node button. The plugin will ask you for confirmation. Figure 5.7 Confirm erasing an EnOcean device screen In case you want to erase all the devices and device nodes, click on the Reset Configuration button. This action will erase all current configuration including devices, device nodes and chipID information. © Intesis Software S.L. - All rights reserved This information is subject to change without notice IntesisBox® is a registered trademark of Intesis Software SL URL Email tel http://www.intesis.com [email protected] +34 938047134 19 / 47 IntesisBox® KNX – EnOcean User's manual r1.2 eng 5.1.2 General device settings For each EnOcean device, there is a list of general settings that can be configured to ease the setup process. The list of available settings is listed in the KNX communication objects settings part of the screen. Bellow, there is a list of all available parameters. Keep in mind that these parameters will appear depending on the EnOcean device selected. Not all parameters are available for all EnOcean devices. a. Wait for data integrity before transmitting to EnOcean: When selected, no data will be transmitted to the EnOcean interface until all data needed by the device is received from the KNX interface. b. EnOcean periodic output update: Indicates the period (in seconds) that the existing values will be sent from the EnOcean part cyclically. It can be switched off (disable) or set with following values: 30s, 1 min, 2 min, 5 min, 10 min, 20 min, 30 min or 40 min. c. Edit initial data: Click on the link to pop-up a configuration window where default or initial values can be set according to each EnOcean device. Check the link to the EEP list to know exactly with type and range of values can be applied in each case. d. Hide controls of KNX periodic updates: When selected, KNX periodic input update parameter for each communication object is not shown. e. Contact: Indicates the functionality of the gateway when receiving messages from the EnOcean device. Different options are: i. Report last value reported by any device ii. Report “Open” only when all devices report “Open” iii. Report “Closed” only when all devices report “Closed” f. Groupings: Used to select the working mode of the rocker buttons. For each button and for each channel (pair of buttons) you have 4 different modes: none, switching, dimming or shutter/blind. More information about these modes and the associated DTP can be found in section 8.12. 5.1.3 Communication objects parameters Depending on the communication object, certain parameters can be set up. Next, you have the list of those available parameters grouped as integrated devices and simulated devices. A. Integrated devices Device Parameter Description General KNX periodic input update Indicates the period (in seconds) that the existing values will be read from KNX cyclically. (0= disabled; values from 10 to 2550, multiple of 10) Room Operating Panel Minimum/Maximum temperature setpoint Indicates the maximum and minimum setpoint temperature desired in the project. (Expressed in ºC, range may vary depending on each device) Switching operation: Rocker Switch Short/long pulse threshold Dimming operation for short (long) pulse: © Intesis Software S.L. - All rights reserved This information is subject to change without notice IntesisBox® is a registered trademark of Intesis Software SL Functionality of the button when pressed. (On, Off or Toggle) Amount of time the button needs to be pressed to be interpreted as a long pulse. (Expressed in ms) Functionality of the button when pressed and dimming mode is selected. (On (increase), Off (decrease) or Toggle) URL Email tel http://www.intesis.com [email protected] +34 938047134 20 / 47 IntesisBox® KNX – EnOcean Dimming increase step value (on long pulse): Dimming decrease step value (on long pulse) Dimming periodic step value sending (on long pulse) Shutter/Blind operation Shutter/Blind method Shutter/Blind vanes adjustment time Shutter/Blind operation (top button / bottom button) Send temperature Send value User's manual r1.2 eng Defines the step value for the increase step when dimming mode is selected and long pulse is carried out. Defines the step value for the decrease step when dimming mode is selected and long pulse is carried out. Defines the amount of time that it takes to move from one step to the next one when the button is constantly pressed. This parameter will help in achieving a smoother dimming effect if combined with small step values. Functionality of the button when pressed. (Up, Down or Toggle) Functionality of the button when pressed. (Move-Step or Step-Move-Step) Defines the amount of time that it takes to move from one position to the next one. Functionality of the button when pressed. (UP-Down or Down-UP) Writes a KNX temperature value. (Expressed in ºC, range may vary depending on each device) Writes a KNX value. (values from 0 to 255) B. Simulated devices Device Parameter Description General KNX periodic output update Indicates the period (in seconds) that the existing values will be sent to KNX cyclically. (0= disabled; values from 10 to 2550, multiple of 10). Room Operating Panel Minimum/Maximum temperature setpoint Indicates the maximum and minimum setpoint temperature desired in the project. (Expressed in ºC, range may vary depending on each device) On button Off button Increase button Rocker Switch Decrease button Min. to max. intensity time Up button Down button Functionality of the button when pressed. (On message is simulated) Functionality of the button when pressed. (Off message is simulated) Functionality of the button when pressed. (Increase message is simulated) Functionality of the button when pressed. (Decrease message is simulated) Indicates the time elapsed , expressed in ms, between the minimum and maximum intensity value Functionality of the button when pressed. (Up message is simulated) Functionality of the button when pressed. (Down message is simulated) 5.1.4 Enable and disable communication objects Once we have one or several EnOcean devices, these and their communication objects will appear in the plugin tree-view (expand the devices in order to see the communication objects or click on Expand button). Figure 5.8 Plugin tree view © Intesis Software S.L. - All rights reserved This information is subject to change without notice IntesisBox® is a registered trademark of Intesis Software SL URL Email tel http://www.intesis.com [email protected] +34 938047134 21 / 47 IntesisBox® KNX – EnOcean User's manual r1.2 eng The greyed communication objects are disabled. To enable these objects just click on them with the mouse right-button and select Enable. To disable them, repeat the same process but selecting Disable. Figure 5.9 Enable Disable EnOcean devices To check the datapoint type (DPT) and the functionality for each communication object simply point the mouse over the desired object and this information will appear. This is very useful in order to know which value sent from KNX enables the desired feature associated to the communication object. A summary of this information can be found on the section 8 of this document. Figure 5.10 Communication object DPT information In some cases, when grouping is active for instance, enabling and disabling communication objects from the device tree is not allowed. Therefore, if you are trying to disable/enable a communication object from a rocker button, make sure that you use the General settings section to do it and not right clicking on the device tree directly. 5.1.5 Add a new catalogue Our catalogues include all available EnOcean devices that can be integrated into KNX through our gateway. When new products are included in the catalogue this file has to be updated to configure the gateway using these new products. To do it so, please download the latest version of the catalogue through our web site. Then click on the Import Catalogue button and select the location of the file that has to be imported (see Figure 5.11 for more details). © Intesis Software S.L. - All rights reserved This information is subject to change without notice IntesisBox® is a registered trademark of Intesis Software SL URL Email tel http://www.intesis.com [email protected] +34 938047134 22 / 47 IntesisBox® KNX – EnOcean User's manual r1.2 eng Figure 5.11 Importing new catalogue Remember that you can only use IKE files provided by Intesis Software S.L. 5.2 Remote EnOcean Teaching/Learning Once you have customized device parameters and communication objects, it is time to import EnOcean device chip information to establish proper communication between our KNX-ENO device and the EnOcean devices. IBOX-KNX-ENO-A1 offers two different modalities to Learn/Teach EnOcean devices. You can program them by pressing the Teaching button on the device itself (see section 6) or you can use the remote option of our plugin. In case you want to Teach/Learn EnOcean devices manually, you just have to close the KNXENO plugin and download your configuration as usual from ETS. On the other hand, if you want to carry out the Teaching/Learning process remotely, please go to the Remote EnOcean Teaching/Learning tab (see Figure 5.12). 2 1 3 4 Figure 5.12 Remote EnOcean Teaching/Learning screen © Intesis Software S.L. - All rights reserved This information is subject to change without notice IntesisBox® is a registered trademark of Intesis Software SL URL Email tel http://www.intesis.com [email protected] +34 938047134 23 / 47 IntesisBox® KNX – EnOcean 1 User's manual r1.2 eng Upload chipIDs: When pressing this button, information regarding Chip IDs stored in the gateway is sent to the ETS plugin. A progress bar message will appear indicating the uploading status. Figure 5.13 Uploading Chip ID Once information is imported a finish message will pop-up, indicating successful results for the operation. Figure 5.14 Confirmation message after Chip ID upload This step has to be performed every time a device (or devices) is (are) added or erased using the gateway and you want them to be shown in the plugin. 2 Download chipIDs: When pressing this button, information regarding Chip IDs stored in the ETS plugin is downloaded to the gateway. If gateway parameters were not synchronized, the plugin will ask the user to synchronize information at both sides before proceeding with Chip ID downloading. Figure 5.15 Devices data not synchronized message Text below the button indicates whether information in the ETS has been synchronized or not with the information in the gateway. If information is not synchronized, text will appear red (see Figure 5.16) indicating there is no synchronism between plugin information and gateway information. Figure 5.16 Chip IDs not synchronized message As well as with the Upload chipIDs button, during downloading process a window will pop-up indicating the uploading status. Figure 5.17 Downloading Chip ID © Intesis Software S.L. - All rights reserved This information is subject to change without notice IntesisBox® is a registered trademark of Intesis Software SL URL Email tel http://www.intesis.com [email protected] +34 938047134 24 / 47 IntesisBox® KNX – EnOcean User's manual r1.2 eng This is an important step and it has to be performed every time a device (or devices) is (are) added or erased. 3 Download parameters: Before starting Uploading/Downloading Chip IDs, information on the gateway and the ETS should be synchronized. The text below the button will indicate if the system is synchronized or not. Figure 5.18 Parameters not synchronized message In case it is not, please proceed to download parameters pressing the button. When doing so, the plugin will warn the user about the procedure, so previous configuration will be erased. Figure 5.19 Warning message regarding overwriting previous configuration When downloading parameters you have the option to carry out a full download or a partial download. When check box is not enabled, a partial download is carried out (just downloading the modifications with respect the previous integration configuration). On the other hand, when the Full Download checkbox is enabled it downloads the complete integration configuration and parameters. Download process lasts some seconds and when finished the added devices will be shown in the LCD KNX-ENO device display (press the up/down buttons of the gateway to see them). 4 Device table: In this table all devices integrated in the project will appear letting the user learn or erase Chip ID information from them. Basically, information shown is: Device Node Name: Provides information about the name of the node where the device is setup. chipID_1-2-3-4-5: Provides information about the Chip ID of the integrated (or simulated) EnOcean devices in each node. Up to 5 different devices can be added in a single node. Learn: When pressing this arrow, a countdown time starts in which you can press the teach button from your EnOcean device (the one that you want to integrate) so the gateway can learn the Chip ID. © Intesis Software S.L. - All rights reserved This information is subject to change without notice IntesisBox® is a registered trademark of Intesis Software SL URL Email tel http://www.intesis.com [email protected] +34 938047134 25 / 47 IntesisBox® KNX – EnOcean User's manual r1.2 eng Figure 5.20 Learning process If devices are learned before countdown reaches the end, you can press the Done button so the countdown stops. When the arrow is in the opposite directions (see Figure 5.21), implies that the device is simulated, so instead of learning the device it has to be taught. To do it so, press the arrow. Then a pop-up message will appear indicating that you have to press the Learn button of your EnOcean device and after that the information of the IBOX-KNX-ENO-A1 will be taught and stored in the EnOcean device. Figure 5.21 Teaching process Erase: When pressing on the trash icon a new window will pop-up (see Figure 5.22). On this screen, user will see all Chip IDs from the associate node and will be able to delete each Chip ID individually. Remember to press the Save changes button before closing the window. Figure 5.22 Erasing process © Intesis Software S.L. - All rights reserved This information is subject to change without notice IntesisBox® is a registered trademark of Intesis Software SL URL Email tel http://www.intesis.com [email protected] +34 938047134 26 / 47 IntesisBox® KNX – EnOcean User's manual r1.2 eng 6 Device programming and monitoring buttons IBOX-KNX-ENO-A1 includes programming buttons in case you want to program or monitor devices without the help of our ETS plugin. In Figure 6.1 you can see the available buttons and below you can find an explanation about them. 1 2 3 5 4 Figure 6.1 IBOX-KNX-ENO-A1 interior view 1 KNX Prog Button: Button used to program the KNX physical address into the gateway. 2 Erase Button: Button used to erase linked EnOcean devices and nodes. 3 Learn/Teach button: Button used to link and monitor EnOcean devices. 4 Up arrow button: Browse configured device list in an ascending way. 5 Down arrow button: Browse configured device list in a descending way. More information about programming buttons and all functionalities available can be found in section 10. 6.1 Learn/Teach EnOcean devices When learning EnOcean devices are linked with the gateway, Teach button from our gateway has to be pressed and an “L” appears on the right side of the LCD display. Then the gateway will be in “Learn” mode. In order to link an EnOcean device with the device appearing in the LCD display, click on the Learn/Teach button from the EnOcean device and it will be linked. It is possible to check that the device has been learned in the numeric indicator of the LCD display. When learning IntesisBox gateways for AC, the process will last few seconds and meanwhile the “ongoing” text will be shown in the LCD. In the specific case of rocker buttons, keep in mind that the A0 button needs to be pressed in order to link the device properly and in a coherent way (see Figure 6.2). © Intesis Software S.L. - All rights reserved This information is subject to change without notice IntesisBox® is a registered trademark of Intesis Software SL URL Email tel http://www.intesis.com [email protected] +34 938047134 27 / 47 IntesisBox® KNX – EnOcean User's manual r1.2 eng Figure 6.2 Indication on the rocker button that has to be pushed during teaching process In case of teaching process, first press the Learn button of the EnOcean device that has to learn the IBOX-KNX-ENO-A1 chipID. Once the device is ready to receive other EnOcean devices information, press the Teach button of our gateway. A “T” appears on the right side of the LCD display indicating Teaching process is running. For more information on how to activate the Learn mode of the EnOcean device, please consult its user manual. 6.2 Erase EnOcean devices Three different erase modes are available: erase the current device, erase all devices in the current device node and erase all devices from all nodes. 6.2.1 Erase current integrated device. First, use the arrow buttons (UP/DOWN) to move up to de desired device that you want to erase. When pressing the Erase button an “E” appears on the right side of the LCD display. Then the gateway will be in “Erase” mode. To erase the desired EnOcean device, click on the de Learn/Teach button from the device and it will be erased. It is possible to check that the device has been erased in the numeric indicator of the LCD display. This mode is only available for integrated devices, not for simulated ones. 6.2.2 Erase all devices in a Device Node If pressed long (more than 2 seconds) an option to erase the whole node will be shown (press Erase button again to confirm). In case you want to erase all devices in a node, please push the Erase button for 2 seconds. The device will ask for erasing the current node. By pressing again the Erase button, we will erase all devices in that node. The node itself will not be erased. This can only be done through the plugin. On the other hand, if you want to erase all devices in all nodes, push buttons 2,3,4 and 5 at the same time. Display will prompt a message asking for erasing all nodes. By pressing Erase button, all devices from all nodes will be erased. Remember that nodes themselves will not be erased. This can only be done through the plugin. 6.3 Monitor mode If pressing the Learn/Teach button long (more than 2 seconds) the gateway will enter in Monitor Mode. In this mode is possible to check the signal quality from each EnOcean device linked. © Intesis Software S.L. - All rights reserved This information is subject to change without notice IntesisBox® is a registered trademark of Intesis Software SL URL Email tel http://www.intesis.com [email protected] +34 938047134 28 / 47 IntesisBox® KNX – EnOcean User's manual r1.2 eng To do so, simply enter to this mode, and press the Learn/Teach button from the EnOcean device you want to check. A value in % will appear in the LCD indicating the signal strength. Also the node and device number will be shown. An extra function that is also available for visualization information improvement is the contrast function. This function can be activated by pushing UP and Down buttons simultaneously for more than 2 seconds. After that, by pressing the Up and Down buttons you will be able to increase or decrease the display contrast. 6.4 Programming KNX physical address In order to configure the gateway’s physical address on the KNX side, you need to use the ETS and the KNX Prog button. To do it so, go to the ETS download section (see Figure 6.3). Figure 6.3 Download section on ETS Depending on the changes you have done, the ETS will ask you to press the programming button (see Figure 6.4). Push the KNX Prog button once (internal LED will turn on in red color). After that, configuration process will start. Once download is finish, the gateway LED will turn off automatically. Figure 6.4 Press KNX Prog button message © Intesis Software S.L. - All rights reserved This information is subject to change without notice IntesisBox® is a registered trademark of Intesis Software SL URL Email tel http://www.intesis.com [email protected] +34 938047134 29 / 47 IntesisBox® KNX – EnOcean User's manual r1.2 eng 7 Technical Specifications Enclosure Material: ABS (UL 94 HB). 2,5 mm thickness Size: 70 x 100 x 28 mm Weight: 80g Color: White Power supply 29V DC, 7mA Supplied through KNX bus. Mounting Wall. LED indicators (internal) 1 x KNX programming. LCD Display (internal) Push buttons 2x8 Characters STN Positive (Yellow-green) Reflective type Without backlight 1 x KNX programming. 2 x LCD display control 1 x Erase EnOcean devices 1 x Teach / Learn EnOcean devices Operating Temperature From 0ºC a 40ºC Operating humidity <93% HR, no condensation Stock humidity <93% HR, no condensation RoHS conformity Compliant with RoHS directive (2002/95/CE). IBOX-KNX-ENO-A1: Certifications CE conformity to EMC directive (2004/108/EC) and Low-voltage directive (2006/95/EC) o EN 301489-1 V1.8.1 o EN 60950-1 o EN 50491-3 o EN 50090-2-2 IBOX-KNX-ENO-A1C: FCC (ID: SZV-STM300C) IC (ID: 5713A-STM300C) © Intesis Software S.L. - All rights reserved This information is subject to change without notice IntesisBox® is a registered trademark of Intesis Software SL URL Email tel http://www.intesis.com [email protected] +34 938047134 30 / 47 IntesisBox® KNX - EnOcean User's manual r1.2 eng 8 Appendix A – EnOcean Family Communication Objects Tables 1 8.1 AC interface TOPIC On/Off Mode Fan Speed NAME LENGTH DATAPOINT TYPE DPT_NAME DPT_ID FLAGS R FUNCTION W T U Control_ On/Off 1 bit DPT_Switch 1.001 W T 0 - Off; 1-On Control_ Mode 1 byte DPT_HVACContrMode 20.105 W T 0 - Auto; 1 - Heat; 3 - Cool; 9 - Fan; 14 - Dry Control_ Mode Auto 1 bit DPT_Bool 1.002 W T 1 - Auto Control_ Mode Heat 1 bit DPT_Bool 1.002 W T 1 - Heat Control_ Mode Cool 1 bit DPT_Bool 1.002 W T 1 - Cool Control_ Mode Fan 1 bit DPT_Bool 1.002 W T 1 - Fan Control_ Mode Dry 1 bit DPT_Bool 1.002 W T 1 - Dry Control_ Fan Speed / 14 Speeds 1 byte DPT_Scaling 5.001 W T % Control_ Fan Speed / 14 Speeds 1 byte DPT_Enumerated 5.010 W T 1 - Speed 1; 2 - Speed 2; 3 Speed 3; …; 14 Speed 14 Control_ Fan Speed Manual/Auto 1 bit DPT_Bool 1.002 W T 0 - Manual; 1 - Auto Control_ Fan Speed 1 1 bit DPT_Bool 1.002 W T 1 - Fan Speed 1 Control_ Fan Speed 2 1 bit DPT_Bool 1.002 W T 1 - Fan Speed 2 Control_ Fan Speed 3 1 bit DPT_Bool 1.002 W T 1 - Fan Speed 3 Control_ Fan Speed 4 1 bit DPT_Bool 1.002 W T 1 - Fan Speed 4 Control_ Fan Speed 5 1 bit DPT_Bool 1.002 W T 1 - Fan Speed 5 1 In case of a simulated EnOcean device, Control_ objects become Status_ objects and vice versa, except the Control_ and Status_ objects for AC interfaces, HVAC devices and Rocker Switch devices. © Intesis Software S.L. - All rights reserved This information is subject to change without notice IntesisBox® is a registered trademark of Intesis Software SL URL Email tel http://www.intesis.com [email protected] +34 938047134 31 / 47 IntesisBox® KNX - EnOcean Vanes Temperature User's manual r1.2 eng Control_ Vane Position 1 byte DPT_Scaling 5.001 W T % Control_ Vane Position / 5 Positions 1 byte DPT_Enumerated 5.010 W T 1 - Position 1; 2 - Position 2; 3 Position 3; 4 - Position 4; 5 Position 5 Control_Vane Manual/Auto 1 bit DPT_Bool 1.002 W T 0 – Position 1; 1 - Auto Control_ Vane Position 1 1 bit DPT_Bool 1.002 W T 1 - Position 1 Control_ Vane Position 2 1 bit DPT_Bool 1.002 W T 1 - Position 2 Control_ Vane Position 3 1 bit DPT_Bool 1.002 W T 1 - Position 3 Control_ Vane Position 4 1 bit DPT_Bool 1.002 W T 1 - Position 4 Control_ Vane Position 5 1 bit DPT_Bool 1.002 W T 1 - Position 5 Control_ Vane Swing 1 bit DPT_Bool 1.002 W T 0 – Position 1; 1 - Swing Control_ Setpoint 1 byte DPT_Scaling 5.001 W T (ºC) Control_ Setpoint 2 bytes DPT_Value_Temp 9.001 W T (ºC) Control_ Temperature 2 bytes DPT_Value_Temp 9.001 W T (ºC) Control_ Ambient Temperature 2 bytes DPT_Value_Temp 9.001 W T (ºC) Control_ Window Contact 1 bit DPT_OpenClose 1.009 W T 0 - Open; 1 - Closed Control_ Window Contact 1 bit DPT_Window_Door 1.019 W T 0 - Closed; 1 - Open Control_ External disablement 1 bit DPT_Bool 1.002 W T 0 - False; 1 - True Control_ External disablement 1 bit DPT_Enable 1.003 W T 0 - Disable; 1 - Enable Control_ Disable Remote Control 1 bit DPT_Bool 1.002 W T 0 - False; 1 - True Control_ Disable Remote Control 1 bit DPT_Enable 1.003 W T 0 - Disable; 1 – Enable Window External Locking © Intesis Software S.L. - All rights reserved This information is subject to change without notice IntesisBox® is a registered trademark of Intesis Software SL URL Email tel http://www.intesis.com [email protected] +34 938047134 32 / 47 IntesisBox® KNX - EnOcean On/Off User's manual r1.2 eng Status_ On/Off 1 bit DPT_Switch 1.001 R T 0 - Off; 1-On Status_ Mode 1 byte DPT_HVACContrMode 20.105 R T 0 - Auto; 1 - Heat; 3 - Cool; 9 - Fan; 14 - Dry Status_ Mode Auto 1 bit DPT_Bool 1.002 R T 1 - Auto Status_ Mode Heat 1 bit DPT_Bool 1.002 R T 1 - Heat Status_ Mode Cool 1 bit DPT_Bool 1.002 R T 1 - Cool Status_ Mode Fan 1 bit DPT_Bool 1.002 R T 1 - Fan Status_ Mode Dry 1 bit DPT_Bool 1.002 R T 1 - Dry Status_ Fan Speed / 14 Speeds 1 byte DPT_Scaling 5.001 R T % Status_ Fan Speed / 14 Speeds 1 byte DPT_Enumerated 5.010 R T 1 - Speed 1; 2 - Speed 2; 3 Speed 3; …; 14 Speed 14 Status_ Fan Speed Manual/Auto 1 bit DPT_Bool 1.002 R T 0 – Manual; 1 - Auto Status_ Fan Speed 1 1 bit DPT_Bool 1.002 R T 1 - Speed 1 Status_ Fan Speed 2 1 bit DPT_Bool 1.002 R T 1 - Speed 2 Status_ Fan Speed 3 1 bit DPT_Bool 1.002 R T 1 - Speed 3 Status_ Fan Speed 4 1 bit DPT_Bool 1.002 R T 1 - Speed 4 Status_ Fan Speed 5 1 bit DPT_Bool 1.002 R T 1 - Speed 5 Status_ Vane Position 1 byte DPT_Scaling 5.001 R T % Status_ Vane Position / 5 Positions 1 byte DPT_Enumerated 5.010 R T 1 - Position 1; 2 - Position 2; 3 Position 3; 4 - Position 4; 5 Position 5 Status_Vane Manual/Auto 1 bit DPT_Bool 1.002 R T 0 – Position 1; 1 - Auto Status_ Vane Position 1 1 bit DPT_Bool 1.002 R T 1 - Position 1 Status_ Vane Position 2 1 bit DPT_Bool 1.002 R T 1 - Position 2 Status_ Vane Position 3 1 bit DPT_Bool 1.002 R T 1 - Position 3 Mode Fan Speed Vanes © Intesis Software S.L. - All rights reserved This information is subject to change without notice ® IntesisBox is a registered trademark of Intesis Software SL URL Email tel http://www.intesis.com [email protected] +34 938047134 33 / 47 IntesisBox® KNX - EnOcean User's manual r1.2 eng Status_ Vane Position 4 1 bit DPT_Bool 1.002 R T 1 - Position 4 Status_ Vane Position 5 1 bit DPT_Bool 1.002 R T 1 - Position 5 Status_ Vane Swing 1 bit DPT_Bool 1.002 R T 0 – Position 1; 1 - Swing Status_ Setpoint 1 byte DPT_Scaling 5.001 R T (ºC) Temperature Status_ Setpoint 2 bytes DPT_Value_Temp 9.001 R T (ºC) Status_ Temperature 2 bytes DPT_Value_Temp 9.001 R T (ºC) Alarm Status_ Alarm State 1 bit DPT_Alarm 1.005 R T 0 – No alarm; 1 - Alarm Error Status_ Error code 2 bytes DPT_Value_2_Ucount 7.001 R T AC error (0 - no error) Status_ Window Contact 1 bit DPT_OpenClose 1.009 R T 0 - Open; 1 - Closed Status_ Window Contact 1 bit DPT_Window_Door 1.019 R T 0 - Closed; 1 - Open Status_ External disablement 1 bit DPT_Bool 1.002 R T 0 - False; 1 - True Status_ External disablement 1 bit DPT_Enable 1.003 R T 0 - Disable; 1 - Enable Status_ Disable Remote Control 1 bit DPT_Bool 1.002 R T 0 - False; 1 - True Status_ Disable Remote Control 1 bit DPT_Enable 1.003 R T 0 - Disable; 1 – Enable Window External Locking 8.2 Digital Input TOPIC NAME LENGTH DATAPOINT TYPE FLAGS DPT_NAME DPT_ID FUNCTION R W T U Alarm Status_Low Batery Alarm 1 bit DPT_Alarm 1.005 R T 0 – No alarm; 1 - Alarm Input Status_ Input State 1 bit DPT_OpenClose 1.009 R T 0 – Open; 1 – Close © Intesis Software S.L. - All rights reserved This information is subject to change without notice ® IntesisBox is a registered trademark of Intesis Software SL URL Email tel http://www.intesis.com [email protected] +34 938047134 34 / 47 IntesisBox® KNX - EnOcean User's manual r1.2 eng 8.3 Central Controllers: Lights, blinds and temperature DATAPOINT TYPE TOPIC NAME FLAGS LENGTH FUNCTION DPT_NAME DPT_ID 1 bit DPT_Enable 1.003 R T 0 – Disable; 1 – Enable 1 byte DPT_Scaling 5.001 R T % 1 bit DPT_Bool 1.002 R T 0 – Switching; 1 - Dimming Status_ Illumination 2 bytes DPT_Value_Lux 9.004 R T lux Status_ Illumination Setpoint 1 byte DPT_Scaling 5.001 R T % Status_ Magnet Contact 1 bit DPT_OpenClose 1.009 R T 0 – Open; 1 – Close Status_ Power Relay 1 bit DPT_Switch 1.001 R T 0 – Off; 1 - On Status_ Power Relay Timer 1 bit DPT_Enable 1.003 R T 0 – Disable; 1 – Enable Status_ Repeater 1 bit DPT_Enable 1.003 R T 0 – Disable; 1 – Enable Status_ Occupancy 1 bit DPT_Occupancy 1.018 R T 0 – Not occupied; 1 – Occupied 2 bytes DPT_Value_Temp 9.001 R T ºC Status_ Alarm 1 bit DPT_Alarm 1.005 R T 0 – No alarm; 1 - Alarm Status_ Automatic/Override 1 bit DPT_Bool 1.002 R T 0 – Auto; 1 - Override 1 byte DPT_Scaling 5.001 R T % 1 bit DPT_Switch 1.001 R T 0 – Off; 1 – On 1 bit DPT_Heat/Cool 1.100 R T 0 – Cooling; 1 – Heating 1 byte DPT_ErrorClass_HVAC 20.012 R T 1 – Heat; 3 – Cool; 6 - Off 1 bit DPT_Bool 1.002 R T 0 – Normal; 1 – Auto 1 byte DPT_Scaling 5.001 R T % Status_ Daylight Harvesting Status_ Dimming Level Status_ Switching/Dimming Load R W T U Light Status_ Actual Setpoint Status_ Control Variable Temperature Status_ Controller Mode On/Off Status_ Controller Cool/Heat Status_ Controller Mode Status_ Fan Man/Auto Status_ Fan Stage © Intesis Software S.L. - All rights reserved This information is subject to change without notice ® IntesisBox is a registered trademark of Intesis Software SL URL Email tel http://www.intesis.com [email protected] +34 938047134 35 / 47 IntesisBox® KNX - EnOcean User's manual r1.2 eng Status_ Fan Stage Available 1 bit DPT_Bool 1.002 R T 0 – False; 1 – True Status_ Normal /Hold-off Stop 1 bit DPT_Bool 1.002 R T 0 – Normal; 1 – Hold-off Status_ Room Occupancy 1 bit DPT_Occupancy 1.018 R T 0 – Not occupied; 1 – Occupied Status_ Room Occupancy Frost 1 bit DPT_Bool 1.002 R T 0 – False; 1 – True Status_ Room Occupancy Mode 1 byte DPT_OccMode 20.003 R T HVAC Control Mode Status_ Temperature 2 bytes DPT_Value_Temp 9.001 R T ºC Status_ Control Variable 1 byte DPT_Scaling 5.001 R T % Status_ Controller Mode Off/Auto 1 bit DPT_Bool 1.002 R T 0 – Off; 1 – Auto Status_ Controller Cool/Heat 1 bit DPT_Bool 1.002 R T 0 – Cooling; 1 – Heating 1 byte DPT_ErrorClass_HVAC 20.012 R T 1 – Heat; 3 – Cool; 6 - Off Status_ Normal/Hold–off Stop 1 bit DPT_Bool 1.002 R T 0 – False; 1 – True Status_ Room Occupancy 1 bit DPT_Occupancy 1.018 R T 0 – Not occupied; 1 – Occupied Status_ Room Occupancy Mode 1 byte DPT_OccMode 20.003 R T HVAC Control Mode Status_ Dimming Value 1 byte DPT_Scaling 5.001 R T % Status_ Ramping Time 2 bytes DPT_Time_Periodic_Sec 7.005 R T Seconds Status_ Absolute/Relative Range 1 bit DPT_Bool 1.002 R T 0 – Absolute; 1 – Relative Status_ Store Final Value 1 bit DPT_Bool 1.002 R T 0 – False; 1 – True Status_ Switching Command 1 bit DPT_Switch 1.001 R T 0 – Off; 1 – On 1 byte DPT_Scaling 5.001 R T % Status_ Fan Man/Auto 1 bit DPT_Bool 1.002 R T 0 – Man; 1 – Auto PHC 5 Status_ Setpoint Shift 2 bytes DPT_Value_Tempd 9.002 R T ºK PHC 6 Status_ Locked 1 bit DPT_Bool 1.002 R T 0 – Unlocked; 1 – Locked PHC 1 PHC 2 PHC 3 Status_ Controller Mode Status_ Fan Stage PHC 4 © Intesis Software S.L. - All rights reserved This information is subject to change without notice ® IntesisBox is a registered trademark of Intesis Software SL URL Email tel http://www.intesis.com [email protected] +34 938047134 36 / 47 IntesisBox® KNX - EnOcean User's manual r1.2 eng Status_ Delay/Duration 1 bit DPT_Bool 1.002 R T 0 – Delay; 1 - Duration Status_ Switching Command 1 bit DPT_Switch 1.001 R T 0 – Off; 1 – On 2 bytes DPT_Time_Periodic_Sec 7.005 R T Seconds Status_ Time 8.4 Gas and Particles Sensor DATAPOINT TYPE TOPIC NAME FLAGS LENGTH FUNCTION DPT_NAME DPT_ID R W T U Status_ Concentration1 2 bytes DPT_AirQuality 9.008 R T ppm Status_ Concentration2 2 bytes DPT_AirQuality 9.008 R T ppm 2 bytes DPT_Value_Temp 9.001 R T ºC 2 bytes DPT_Value_Humidity 9.007 R T % Particles Temperature Status_Temperature Humidity Status_ Humidity 8.5 Temperature sensor DATAPOINT TYPE TOPIC NAME Temperature Status_Temperature Humidity Status_ Humidity © Intesis Software S.L. - All rights reserved This information is subject to change without notice ® IntesisBox is a registered trademark of Intesis Software SL FLAGS LENGTH FUNCTION DPT_NAME DPT_ID R W T U 2 bytes DPT_Value_Temp 9.001 R T ºC 2 bytes DPT_Value_Humidity 9.007 R T % URL Email tel http://www.intesis.com [email protected] +34 938047134 37 / 47 IntesisBox® KNX - EnOcean User's manual r1.2 eng 8.6 Heating actuators TOPIC NAME FLAGS FUNCTION DPT_ID 1 byte DPT_Scaling 5.001 R T % Status_ Service On/Off 1 bit DPT_Switch 1.001 R T 0 – Off; 1 - On Status_ Energy/Input Enabled 1 bit DPT_Enable 1.003 R T 0 – Disable; 1 – Enable Status_ Energy Storage. Changed 1 bit DPT_Bool 1.002 R T 0 – False; 1 - True Status_ Batery Capacity 1 bit DPT_Alarm 1.005 R T 0 – No alarm; 1 - Alarm Status_ Cover State 1 bit DPT_OpenClose 1.009 R T 0 – Open; 1 – Close Status_ Temperature Sensor Failure 1 bit DPT_Bool 1.002 R T 0 – False; 1 - True Status_ Window Contact 1 bit DPT_Window_Door 1.019 R T 0 - Closed; 1 - Open Status_ Actuator obstructed 1 bit DPT_Bool 1.002 R T 0 – False; 1 - True Status_ Temperature 2 bytes DPT_Value_Temp 9.001 R T ºC Control_ Poisition Setpoint 1 byte DPT_Scaling 5.001 R T % Control _ Temperature Setpoint 2 bytes DPT_Value_Temp 9.001 R T ºC Control _ Temperature RC 2 bytes DPT_Value_Temp 9.001 R T ºC Control _ Run Init Sequence 1 bit DPT_Bool 1.002 R T 0 – False; 1 - True Control _ Lift Set 1 bit DPT_Bool 1.002 R T 0 – False; 1 - True Control _ Valve Open 1 bit DPT_Bool 1.002 R T 0 – False; 1 - True Control _ Valve Close 1 bit DPT_Bool 1.002 R T 0 – False; 1 - True Control _ Reduction of Energy Consumption 1 bit DPT_Bool 1.002 R T 0 – False; 1 - True Control_ Setpoint Inverse 1 bit DPT_Bool 1.002 R T 0 – False; 1 - True © Intesis Software S.L. - All rights reserved This information is subject to change without notice ® DATAPOINT TYPE DPT_NAME Status_ Current Position Kieback &Peter Battery Powered / Thermokon Battery Powered LENGTH IntesisBox is a registered trademark of Intesis Software SL R W T U URL Email tel http://www.intesis.com [email protected] +34 938047134 38 / 47 IntesisBox® KNX - EnOcean Status_ Actual Value User's manual r1.2 eng 1 byte DPT_Scaling 5.001 R T % 1 bit DPT_Bool 1.002 R T 0 – False; 1 - True Status_ Valve Position 1 byte DPT_Scaling 5.001 R T % Status_ Temperature 2 bytes DPT_Value_Temp 9.001 R T ºC Control _ Position Setpoint 1 byte DPT_Scaling 5.001 R T % Control _ Temperature Setpoint 2 bytes DPT_Value_Temp 9.001 R T ºC Control _ Temperature RC 2 bytes DPT_Value_Temp 9.001 R T ºC Control _ Setpoint Inverse 1 bit DPT_Bool 1.002 R T 0 – False; 1 - True Control _ Valve Setpoint 1 byte DPT_Scaling 5.001 R T % Status_ Control Variable 1 byte DPT_Scaling 5.001 R T % Status_ Fan Stage 1 byte DPT_Scaling 5.001 R T % Status_ Fan Man/Auto 1 bit DPT_Bool 1.002 R T 0 – Man; 1 – Auto Status_ Setpoint Shift 2 bytes DPT_Value_Tempd 9.002 R T ºK Status_ Controller Mode Off/Auto 1 bit DPT_Bool 1.002 R T 0 – Off; 1 - Auto Status_ Controller Mode Cool/Heat 1 bit DPT_Heat/Cool 1.100 R T 0 – Cooling; 1 – Heating 1 byte DPT_HVACContrMode 20.105 R T 1 - Heat; 3 - Cool; 6 - Off Status_ Normal/Hold-off Stop 1 bit DPT_Bool 1.002 R T 0 – Normal; 1 – Hold-off Status_ Room Occupancy Frost 1 bit DPT_Bool 1.002 R T 0 – False; 1 - True Status_ Room Occupancy 1 bit DPT_Occupancy 1.018 R T 0 – Not occupied; 1 – Occupied 1 byte DPT_OccMode 20.003 R T HVAC Control Mode Status_ Setpoint Inverse Spartan Temperature Control Status_ Controller Mode Status_ Room Occupancy Mode © Intesis Software S.L. - All rights reserved This information is subject to change without notice ® IntesisBox is a registered trademark of Intesis Software SL URL Email tel http://www.intesis.com [email protected] +34 938047134 39 / 47 IntesisBox® KNX - EnOcean User's manual r1.2 eng 8.7 Humidity Sensors DATAPOINT TYPE TOPIC NAME FLAGS LENGTH FUNCTION DPT_NAME DPT_ID R W T U Status_ Humidity 2 bytes DPT_Value_Humidity 9.007 R T % Status_ Humidity Setpoint 2 bytes DPT_Value_Humidity 9.007 R T % Status_ Humidity 1 byte DPT_Scaling 5.001 R T % Status_ Temperature 2 bytes DPT_Value_Temp 9.001 R T ºC Temperature Status_ Setpoint 1 byte DPT_Scaling 5.001 R T ºC Status_ Setpoint 2 bytes DPT_Value_Temp 9.001 R T ºC Status_ On/Off Button 1 bit DPT_Switch 1.001 R T 0 – Off; 1 - On Status_ Slide Switch 1 bit DPT_Switch 1.001 R T 0 – Off/Night/PosI; 1 – On/Day/Pos0 Status_ Occupancy Button 1 bit DPT_Occupancy 1.018 R T 0 – Not occupied; 1 – Occupied Status_ Occupancy Enablement 1 bit DPT_Enable 1.003 R T 0 – Disable; 1 – Enable Status_ Fan Speed Manual/Auto 1 bit DPT_Bool 1.002 R T 0 – Man; 1 – Auto Status_ Fan Speed On/Off 1 bit DPT_Switch 1.001 R T 0 – Off; 1 - On Status_ Fan Speed Stage 1 byte DPT_Scaling 5.001 R T % Status_ Fan Speed Stage 1 byte DPT_Enumerated 5.010 R T 1 - Speed 0; 2 - Speed 1; 3 Speed 2; …; 6 Speed 5 Humidity Control Occupancy Fan Speed © Intesis Software S.L. - All rights reserved This information is subject to change without notice ® IntesisBox is a registered trademark of Intesis Software SL URL Email tel http://www.intesis.com [email protected] +34 938047134 40 / 47 IntesisBox® KNX - EnOcean User's manual r1.2 eng 8.8 Light Sensors TOPIC NAME LENGTH DATAPOINT TYPE FLAGS DPT_NAME DPT_ID FUNCTION R W T U Status_Illumination 1 2 bytes DPT_Value_Lux 9.004 R T lux Status_Illumination 2 2 bytes DPT_Value_Lux 9.004 R T lux Status_Illumination Setpoint 2 bytes DPT_Value_Lux 9.004 R T lux 1 bit DPT_Bool 1.002 R T 0 – False; 1 – True Status_Supply Voltage 2 bytes DPT_Value_Volt 9.020 R T mV Status_Supply Voltage Error Code 1 byte DPT_Enumerated 5.010 R T Error Code Status_ Temperature 2 bytes DPT_Value_Temp 9.001 R T ºC 1 byte DPT_Scaling 5.001 R T ºC 2 bytes DPT_Value_Temp 9.001 R T ºC Status_ On/Off Button 1 bit DPT_Switch 1.001 R T 0 – Off; 1 - On Status_ Slide Switch 1 bit DPT_Switch 1.001 R T 0 – Off/Night/PosI; 1 – On/Day/Pos0 Status_ Occupancy Button 1 bit DPT_Occupancy 1.018 R T 0 – Not occupied; 1 – Occupied Status_ Occupancy Enablement 1 bit DPT_Enable 1.003 R T 0 – Disable; 1 – Enable Status_ Occupancy PIR 1 bit DPT_Occupancy 1.018 R T 0 – Not occupied; 1 – Occupied Status_ Fan Speed Manual/Auto 1 bit DPT_Bool 1.002 R T 0 – Man; 1 – Auto Status_ Fan Speed On/Off 1 bit DPT_Switch 1.001 R T 0 – Off; 1 - On Status_ Fan Speed Stage 1 byte DPT_Scaling 5.001 R T % Status_ Fan Speed Stage 1 byte DPT_Enumerated 5.010 R T 1 - Speed 1; 2 - Speed 2; 3 Speed 3; …; 6 Speed 5 Illumination Status_ Illumination Over Range Voltage Temperature Status_ Setpoint Status_ Temperature Setpoint Control Occupancy Fan Speed © Intesis Software S.L. - All rights reserved This information is subject to change without notice ® IntesisBox is a registered trademark of Intesis Software SL URL Email tel http://www.intesis.com [email protected] +34 938047134 41 / 47 IntesisBox® KNX - EnOcean User's manual r1.2 eng 8.9 Metering TOPIC Electricity (AMR) Counter (AMR) Gas (AMR) Water (AMR) NAME DPT_NAME FLAGS DPT_ID FUNCTION R W T U 1 byte DPT_Value_Temp 5.006 R T General Status_ Power W 4 bytes DPT_Value_Power 14.056 R T Watts Status_ Active Energy 4 bytes DPT_ActiveEnergy_kWh 13.013 R T KWh Status_ Counter 4 bytes DPT_Value_4_Count 13.001 R T Counter Status_ Frequency 4 bytes DPT_Value_Frequency 14.033 R T Hz Status_ Measurement Channel 1 byte DPT_Enumerated 5.010 R T Enumeration Status_ Volume 4 bytes DPT_Value_Volume 14.076 R T m3 Status_ Volume Flow 4 bytes DPT_Value_Volume_Flux 14.077 R T m3/s Status_ Tariff info 1 byte DPT_Value_Temp 5.006 R T Tariff info Status_ Volume 4 bytes DPT_Value_Volume 14.076 R T m3 Status_ Volume Flow 4 bytes DPT_Value_Volume_Flux 14.077 R T m3/s Status_ Tariff info 1 byte DPT_Value_Temp 5.006 R T Tariff info Status_ Temporary default 1 byte DPT_Scaling 5.001 R T % 1 bit DPT_Bool 1.002 R T 0 – Absolute; 1 – Relative Status_ Power Usage 1 byte DPT_Scaling 5.001 R T % Status_ Timeout Setting 2 bytes DPT_Time_Period 7.007 R T Hours Status_ DR Level 1 byte DPT_Enumerated 5.010 R T Counter Status_ Random Start Delay 1 bit DPT_Bool 1.002 R T 0 – Absolute; 1 – Relative Status_ Random End Delay 1 bit DPT_Bool 1.002 R T 0 – Absolute; 1 – Relative Status_ Min/Max Power Usage 1 bit DPT_Bool 1.002 R T 0 – Absolute; 1 – Relative © Intesis Software S.L. - All rights reserved This information is subject to change without notice ® DATAPOINT TYPE Status_Tariff Info Status_ Absolute/relative Power Usage Demand Respond LENGTH IntesisBox is a registered trademark of Intesis Software SL URL Email tel http://www.intesis.com [email protected] +34 938047134 42 / 47 IntesisBox® KNX - EnOcean User's manual r1.2 eng 8.10 Occupancy Sensors DATAPOINT TYPE TOPIC Illumination Voltage NAME Occupancy LENGTH FUNCTION DPT_NAME DPT_ID R W T U Status_Illumination 2 bytes DPT_Value_Lux 9.004 R T lux Status_Supply Voltage 2 bytes DPT_Value_Volt 9.020 R T mV 2 bytes DPT_Value_Temp 9.001 R T ºC Status_ On/Off Button 1 bit DPT_Switch 1.001 R T 0 – Off; 1 - On Status_ Occupancy Button 1 bit DPT_Occupancy 1.018 R T 0 – Not occupied; 1 – Occupied Status_ Occupancy PIR 1 bit DPT_Occupancy 1.018 R T 0 – Not occupied; 1 – Occupied Status_ Occupancy 1 bit DPT_Occupancy 1.018 R T 0 – Not occupied; 1 – Occupied Temperature Status_ Temperature Control FLAGS 8.11 Window and Door Sensors DATAPOINT TYPE TOPIC Window Contact NAME DPT_ID R W T U 1 bit DPT_OpenClose 1.009 R T 0 - Open; 1 - Closed Status_ Contact 1 bit DPT_Window_Door 1.019 R T 0 - Closed; 1 - Open 1 bit DPT_Window_Door 1.019 R T 0 – Close, 1 – Open 1 bit DPT_Bool 1.002 R T 0 – False, 1 – True Status_ Window Ventilation © Intesis Software S.L. - All rights reserved This information is subject to change without notice ® FUNCTION DPT_NAME Status_ Contact Window Door Status_ Window Door Window Ventilation FLAGS LENGTH IntesisBox is a registered trademark of Intesis Software SL URL Email tel http://www.intesis.com [email protected] +34 938047134 43 / 47 IntesisBox® KNX - EnOcean User's manual r1.2 eng 8.12 Rocker Switch and Key Card TOPIC Button Channel Key Card NAME LENGTH DATAPOINT TYPE FLAGS DPT_NAME DPT_ID FUNCTION R W T U Status_ Button X5 - Switching 1 bit DPT_Switch 1.001 R T 0 – Off; 1 - On Status_ Button X5 - Dimming - On/Off 1 bit DPT_Switch 1.001 R T 0 – Off; 1 - On Status_ Button X5 - Dimming – Step 4 bits DPT_Control_Dimming 3.007 R T % Status_ Button X5 – Shutter/Blind – Step 1 bit DPT_UpDown 1.008 R T 0 – Step Up; 1 – Step Down Status_ Button X5 – Shutter/Blind - Move 1 bit DPT_ UpDown 1.008 R T 0 – Move Up; 1 – Move Down Status_ Channel Y6 - Switching 1 bit DPT_Switch 1.001 R T 0 – Off; 1 - On Status_ Channel Y6 - Dimming - On/Off 1 bit DPT_Switch 1.001 R T 0 – Off; 1 - On Status_ Channel Y6 - Dimming – Step 4 bits DPT_Control_Dimming 3.007 R T % Status_ Channel Y6 – Shutter/Blind – Step 1 bit DPT_ UpDown 1.008 R T 0 – Step Up; 1 – Step Down Status_ Channel Y6 – Shutter/Blind - Move 1 bit DPT_ UpDown 1.008 R T 0 – Move Up; 1 – Move Down Status_Key Card Inserted 1 bit DPT_Bool 1.002 R T 0 – False; 1 - True 8.13 Room Operating Panel TOPIC NAME LENGTH DATAPOINT TYPE FLAGS DPT_NAME DPT_ID FUNCTION R W T U Status_Temperature 2 bytes DPT_Value_Temp 9.001 R T ºC Status_Temperature Setpoint 2 bytes DPT_Value_Temp 9.001 R T ºC Temperature 5 6 X indicates the button index Y indicates the channel index © Intesis Software S.L. - All rights reserved This information is subject to change without notice ® IntesisBox is a registered trademark of Intesis Software SL URL Email tel http://www.intesis.com [email protected] +34 938047134 44 / 47 IntesisBox® KNX - EnOcean Humidity Illumination User's manual r1.2 eng Status_ Setpoint 1 byte DPT_Scaling 5.001 R T % Status_ Setpoint 2 bytes DPT_Value_Temp 9.001 R T ºC Status_ Humidity 2 bytes DPT_Value_Humidity 9.007 R T % Status_ Humidity 1 byte DPT_Scaling 5.001 R T % Status_ Humidity Setpoint 2 bytes DPT_Value_Humidity 9.007 R T % Status_Illumination 2 bytes DPT_Value_Lux 9.004 R T lux Status_Illumination Setpoint 2 bytes DPT_Value_Lux 9.004 R T lux Status_ Illumination Over Range 1 bit DPT_Bool 1.002 R T 0 – False; 1 – True Status_ On/Off Button 1 bit DPT_Switch 1.001 R T 0 – Off; 1 - On Status_ Slide Switch 1 bit DPT_Switch 1.001 R T 0 – Off/Night/PosI; 1 – On/Day/Pos0 Status_ Occupancy Button 1 bit DPT_Occupancy 1.018 R T 0 – Not occupied; 1 – Occupied Status_ Occupancy Enablement 1 bit DPT_Enable 1.003 R T 0 – Disable; 1 – Enable Status_ Contact State 1 bit DPT_OpenClose 1.009 R T 0 - Open; 1 - Closed Status_ Contact State 1 bit DPT_Window_Door 1.019 R T 0 - Closed; 1 - Open Status_ Fan Speed Manual/Auto 1 bit DPT_Bool 1.002 R T 0 – Manual; 1 - Auto Status_ Fan Speed 1 byte DPT_Scaling 5.001 R T % Status_ Fan Speed 1 byte DPT_Enumerated 5.010 R T 0-Position 0; 1-Position 1; 2-Position 2; 3-Position 3 Status_ Fan Speed Stage 1 byte DPT_Scaling 5.001 R T % Status_ Fan Speed Stage 1 byte DPT_Enumerated 5.010 R T 1 - Speed 1; 2 - Speed 2; 3 Speed 3; …; 6 Speed 5 Status_Supply Voltage 2 bytes DPT_Value_Volt 9.020 R T mV Status_Supply Voltage Error Code 1 byte DPT_Enumerated 5.010 R T Error Code Control Occupancy Contact Fan Speed Voltage © Intesis Software S.L. - All rights reserved This information is subject to change without notice ® IntesisBox is a registered trademark of Intesis Software SL URL Email tel http://www.intesis.com [email protected] +34 938047134 45 / 47 IntesisBox® KNX - EnOcean User's manual r1.2 eng 9 Appendix A – EnOcean interoperability (EEP) 9.1 IntesisBox® supported EEPs EEP 7 8 7 EEP description [F6-02-xx] Light and Blind Control [F6-03-xx] Light and Blind Control [F6-04-01] Position Switch, Home and Office Application (Key Card Activated Switch) [F6-10-00] Mechanical Handle [D5-00-01] Contacts and Switches [A5-02-xx] Temperature sensors [A5-04-01] Temperature and Humidity Sensor [A5-06-xx] Light Sensor [A5-07-xx] Occupancy Sensor [A5-08-xx] Light, Temperature and Occupancy Sensor [A5-09-xx] Gas Sensor [A5-10-xx] Room Operating Panel [A5-11-xx] Controller Status [A5-12-00] Automated meter Reading (AMR) [A5-20-xx] HVAC Components [A5-30-xx] Digital Input [A5-37-xx] Energy Management [A5-38-xx] Central Command 8 EnOcean Equipment Profiles (EEP) v2.1 The gateway can replace the controllers of the HVAC Components, but no the EnOcean devices themselves. © Intesis Software S.L. - All rights reserved This information is subject to change without notice ® IntesisBox is a registered trademark of Intesis Software SL URL Email tel http://www.intesis.com [email protected] +34 938047134 46 / 47 IntesisBox® KNX - EnOcean User's manual r1.2 eng 10 Appendix B - IBOX-KNX-ENO-A1 HMI © Intesis Software S.L. - All rights reserved This information is subject to change without notice IntesisBox® is a registered trademark of Intesis Software SL URL Email tel http://www.intesis.com [email protected] +34 938047134 47 / 47