1
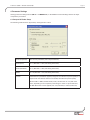
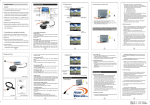
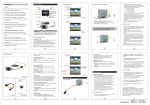
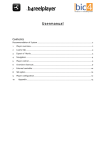
‘How To’ Guide
AVCHD Converter Utility
Converting AVCHD files to the
Canopus HQ AVI/HDV/MPEG2 files
desktop.grassvalley.com
professional.grassvalley.com
© 2008 Thomson. All rights reserved.
Grass Valley is a trademark of Thomson.
All other trademarks are properties of their respective holders. All specifications are subject to change without notice.
‘How to’ Guide - AVCHD Converter
Table of Contents
Introduction..................................................................................................................................... 3
1. Installation................................................................................................................................... 4
2. Preview......................................................................................................................................... 7
2.1 Previewing............................................................................................................................................................... 7
2.2 Previewer Settings................................................................................................................................................... 8
3. Convert......................................................................................................................................... 9
3.1 Conversion settings................................................................................................................................................. 9
3.2 Converting............................................................................................................................................................. 10
4. Parameter Settings.................................................................................................................... 12
4.1.Canopus HQ Codec Setup.................................................................................................................................... 12
4.2.MPEG2 Settings..................................................................................................................................................... 13
Appendix........................................................................................................................................ 14
Page 2
‘How to’ Guide - AVCHD Converter
Introduction
Panasonic and Sony jointly announced the creation of the AVCHD format in 2006 as a “consumer” HD recording
format for camcorders using ‘red-laser’ 8cm DVD recording media. AVCHD uses MPEG-4 AVC/H.264 compression
and encoding for video recording.
Because AVCHD encoding is more complex than MPEG-2-based compression schemes (for example HDV), it
requires considerably more processing power to decode a stream. This means that realtime playback is difficult,
even with today’s CPU processing power.
The AVCHD Converter utility is provided by Grass Valley for the purpose of converting AVCHD files to the superfast, high quality Canopus HQ codec for realtime editing in EDIUS.
Also, converting to HDV and MPEG2 PS are supported as the new feature in version 3 of this utility.
This utility requires EDIUS version 3.0 or later, or EDIUS Neo version 1.0 or later. It has been tested with both
Panasonic and Sony variants of AVCHD files. This utility is provided “free of charge” to EDIUS users and as such, it
is not covered within the scope of technical support. The AVCHD converter will also work as a plug-in with Sony’s
Picture Motion Browser software. Please refer to the manufacturer’s manual for more information.
The AVCHD converter utility is comprised of two elements:
• AVCHDPRV file viewer – the source file preview utility
• AVCHD2HQ converter – the conversion utility and configuration panel
Important Note: These applications will only work on systems that have a licensed, full version of EDIUS or
EDIUS Neo installed.
Page 3
‘How to’ Guide - AVCHD Converter
1. Installation
The AVCHD Converter utility is compatible with Windows XP and Windows Vista operating systems.
By double-clicking the setup.exe application found within the extracted ZIP archive, you will be guided through the
following sequence of setup screens:
Note:
-First of all, if the earlier version of this utility is installed in your system, remove it via ‘Add or Remove Programs’.
-If you are installing this software in Windows Vista system, a User Account Control dialog box may appear. Simply
click Continue button to continue the installation.
Page 4
‘How to’ Guide - AVCHD Converter
Page 5
‘How to’ Guide - AVCHD Converter
Once installation is complete, two shortcut icons will now be available on your desktop:
Page 6
‘How to’ Guide - AVCHD Converter
Page 7
2. Preview
AVCHD files can be previewed to check the content before converting.
Note: Multiple core processors (Intel Core 2 Quad or better) are required, for a smooth preview.
2.1 Previewing
Drag and drop the AVCHD (.M2TS or MTS) file onto the ‘AVCHDPRV’ icon or right-click the desired AVCHD file and
select Preview or Preview with AVCHDPRV from the popup menu.
or
The AVCHDPRV application will automatically open and begin preview playback of the chosen file.
‘How to’ Guide - AVCHD Converter
2.2 Previewer Settings
If double-clicking AVCHDPRV icon, AVCHD previewer Setting screen appears. You can configure AVCHD previewer
on this panel.
By checking the options in this panel, to select the following behavior.
Audio
The audio of chosen file is mixed down to two channels.
Video
The source video is playbacked in deinterlace mode.
Software
Lessening CPU load make up for lowering preview quality in order to preview smoothly.
Hardware-Use FIRECODER Blu
If the FIRECODER Blu is installed into your system, it is used for hardware decoder.
Hardware-Change to software mode if no available hardware
Decode mode is changed to software mode automatically if the card is already being used for another previewing
or converting.
Page 8
‘How to’ Guide - AVCHD Converter
3. Convert
3.1 Conversion settings
If double-clicking AVCHD2HQ icon, AVCHD converter Setting screen appears. You can configure AVCHD converter
on this panel.
Target Folder
By clicking Select button, the following screen will appear and to specify where you would like the converted file to
be saved:
Do not select ‘My Computer’ if you import a source footage from your camera or media directlry. If ‘My
Computer’ is selected, source footage might be lost by overwriting exported file.
Page 9
‘How to’ Guide - AVCHD Converter
Check boxes in Target Folder
By checking the options in this panel, to select the following behavior.
-Inherit folder structures
If the source file has sub-folder, inherit the folder structure to the destination folder.
-Save into EDIUS Project Folder when EDIUS is running
If EDIUS (version 4.5 or later) or EDIUS Neo (version 1.0 or later) is installed, the converted file is saved into EDIUS
project folder.
Output Format
Check options to select the video and audio format of exported file. Also, by clicking HQ set.. or MPEG2 set..
button to set compression parameters for Canopus HQ AVI or MPEG2 program stream.
(Refer to ‘Parameter settings’ chapter to know the detail of each parameter).
Right click
If this is checked, all free CPU cores are assigned to one conversion.
Hardware-Use FIRECODER Blu
If the FIRECODER Blu is installed into your system and this is checked, it is used for decode of the chosen file.
Hardware-Change to software mode if no available hardware
When this is checked, decode mode is changed automatically if the card is already being used for another
previewing or converting.
3.2 Converting
AVCHD files can be converted to Canopus HQ AVI or HDV or MPEG 2 in two ways:
3.2.1 Drag and drop
Drag and drop AVCHD file - or files, as this works for multiple files too - onto the AVCHD2HQ icon. If your CPU has
multiple cores, all cores are used to be able to convert in the shortest time, using this method.
Page 10
‘How to’ Guide - AVCHD Converter
Page 11
3.2.2 Right-clicking
Right-click the highlighted AVCHD file – or files, as this also works for multiple files – and select Convert with AVCHD2HQ
from the popup menu. When using this method, if you choose more than one file to convert, and your CPU has multiple
cores, each core will convert a separate file within the queue(if the Right click option in AVCHD converter Settings is
checked, all free cores are assigned to one conversion).
Note: If you plan to use other applications while converting, make sure the number of files you select to convert is at
least one less than the number of cores that your multi-core CPU has.
Regardless of whichever method is used to convert the file(s), the following dialog box will appear with a progress meter,
indicating that the conversion has started.
‘How to’ Guide - AVCHD Converter
4. Parameter Settings
Clicking parameter setting buttons (HQ set.. and MPEG2 set..) in the AVCHD converter Settings window to adjust
compression parameters.
4.1.Canopus HQ Codec Setup
The following window will be appeared by clicking HQ set.. button.
Online (SuperFine)
Not currently selectable (future implementation)
Online (Fine)
Q = 4; Max Size = 40% (see setting info below)
Online (Standard)
Q = 5; Max Size = 30% (see setting info below)
Offline
Q = 19; Max Size = 4% (see setting info below)
Custom
Q indicates the quantization applied, and gives an indication of picture quality. It is
important to note that the lower the Q number, the better the picture quality.
Because HQ is a VBR (variable bitrate) codec, the data size can vary with each
frame, depending on the complexity of the image. In order to cap the data size,
the Max Size limiter can be applied, from 7% (minimum) to 100% (maximum).
Page 12
‘How to’ Guide - AVCHD Converter
4.2.MPEG2 Settings
The following window will be appeared by clicking MPEG2 set.. button.
Audio
Set the audio format either MPEG1 Layer2 or Dolby AC3.
Size
Select footage size. no change means same as source, and SQ, LB and ECmeans
as follows.
SQ: Squeeze conversion LB: Letter box conversion EC: Edge clop conversion
Pull down
If the chosen file has 24fps, you can enable pull down conversion.
Bitrate
Set the bitrate of converted file.
Page 13
‘How to’ Guide - AVCHD Converter
Appendix
The AVCHD Converter input/output specifications are as follows:
Input
AVCHD Transport Stream (.m2ts, .mts)
Format
AVCHD (1920x1080i/1920x1080p/1440x1080i/1440x1080p/1280x720p)
Audio Type
Dolby Digital (5.1ch/2ch)
Output
Canopus HQ AVI, HDV, MPEG2 program stream
Format
Canopus HQ (1920x1080i/1920x1080p/1440x1080i/1440x1080p/1280x720p)
HDV (1440x1080, 1280ix720p, 720x480/576p)
MPEG2 Program stream (1920x1080, 1440x1080, 1280x1080, 1280x720, 960x720,
720x480/576, 704x480/576, 352x480/576, 352x240/288)
Audio Type
WAVE 16-bit PCM 6ch/2ch (AVI)
MPEG1 Layer2(HDV, MPEG2 Program stream)
Dolby AC3 (MPEG2 Program stream)
Page 14