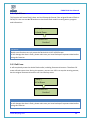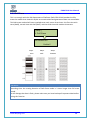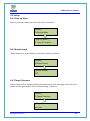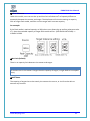
1
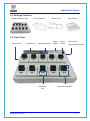
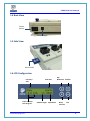
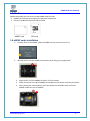
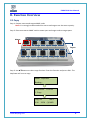
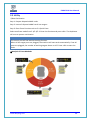
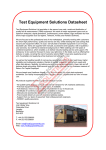
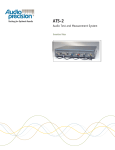
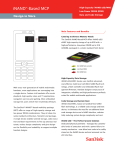
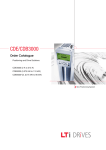
DediProg User Manual 12/2014 EMMC-S10 eMMC Duplicator User Manual Version 1.0 © DediProg Technology Co., Ltd 2014 All right reserved. EMMC-S10 User Manual Table of Content Disclaimer of Warranties ................................................................................................................................ 2 Notice & Reminder ............................................................................................................................................ 2 I. Product Overview ..................................................................................................................................... 4 II. Function Overview.................................................................................................................................... 8 2.1 Copy ....................................................................................................................................................... 8 2.2 Compare ............................................................................................................................................ 10 2.3 Copy & Compare ............................................................................................................................. 10 2.4 Information ...................................................................................................................................... 11 2.5 Utility .................................................................................................................................................. 12 2.6 Setup ................................................................................................................................................... 16 2.7 Log Manager .................................................................................................................................... 23 III. How to Use eMMC Cards ..................................................................................................................... 26 IV. Function Table ......................................................................................................................................... 28 V. Specification ............................................................................................................................................. 30 VI. Revision History ..................................................................................................................................... 31 Important notice: This document is provided as a guideline and must not be disclosed without consent of DediProg. However, no responsibility is assumed for errors that might appear. DediProg reserves the right to make any changes to the product and/or the specification at any time without notice. No part of this document may be copied or reproduced in any form or by any means without prior written consent of DediProg. www.dediprog.com 1 EMMC-S10 User Manual Disclaimer of Warranties eMMC are made specifically for data backup with legal authorities from copyright owners. Any unauthorized action of copyright is strictly prohibited, and the manufacturer disclaims all warranties or representations of illegal actions by users. The manufacturer also disclaims any liability for any loss or damage due to not being able to perform its undertakings or provide any of the services attributable to any events or circumstances beyond our control. Users agree and accept all statements above as soon as purchasing our products. This manual contains materials that should be intended for personal use, all right reserved. No part of this manual may be reproduced, transmitted or transcribed without the expressed written permission of the manufacturer. The information present in this manual is subject to change without prior notice. Notice & Reminder ※ Important Notice Read the complete operation instruction carefully contributes to better operation. Make sure the master device is correct and workable. To guarantee data consistency, we highly recommend the capacity of master and targets should be the same. It is strongly suggested to use “Copy &Compare" to achieve a perfect duplication. ※ Safety Precautions The warranty will expire if damage is incurred resulting from non-compliance with theses operating instructions. Store the equipment safely when not in used and keep out of the reach of children and infants. Turn off the power before replace the socket. Do not turn off the power while processing the firmware update. Use only approved power sources. The product is only suitable for operation in dry, dust free, clean environment. Do not allow liquids or foreign objects to enter. Failure to do so may severely damage your duplicator. www.dediprog.com 2 EMMC-S10 User Manual ※ Preparation Tips Make sure to use stable power supply. Please use at clean & dry environment. Please keep the environment well ventilated. When the duplicator operates, it is normal for the machine to heat up. Please do not move the device during duplication to ensure better operation. Please do not remove memory cards during operation to avoid damage. Please use power supply of its original manufacturer to ensure working normal. ※ Safety for Static Electricity Eliminate Static Electricity: Static electricity may cause duplication error. Please pay attention to the duplicator environment and operators’ equipment. It is recommended to purchase static electricity elimination equipment’s to avoid static electricity shock when stay in high static electricity. ※ Notice Symbols Special items, procedures, or notes should be noticed by users before operation. ◎「Note」 : It refers to related operations on the duplicator, special details, tips to know, suggestions or more effective operation. ◎「Caution」: To avoid mistakes, please follow operations instructions carefully. www.dediprog.com 3 EMMC-S10 User Manual I. Product Overview EMMC-S10 eMMC card duplicator is designed for eMMC memory cards. It has friendly operating interface and professional features with the replaceable socket module. EMMC-S10 is significantly increases production efficiency. EMMC-S10 provides copy, compare and erase functions. Real testing for transmission speed is up to 6.2GB per minute and does not degrade with all ports full loaded. It supports Boot partition, RPMB partition, and user area copy. With special professional log function, EMMC-S10 allows to record tasks processing of each port, including tasks time, result, eMMC card number and other info. Provide the best management reports for shipment tracking, analysis capacity, yield, etc. 1.1 Features ※Super high copying speed - Support transmission speed up to 6.2GB/min for each port. ※High compatibility - Support to copy Boot partition, RPMB partition, and Enhanced Partition and User data area. High compatible with eMMC version 4 / 4.1 / 4.4 / 4.41 / 4.51 and above ※Quick copy mode: Support format of FAT16 / 32 / 64, NTFS and Linux ext2 / 3 / 4… etc. ※Two copy modes : - Support to select Quick Copy, Whole Area. ※Three profession Erase modes: - Quick Erase, Full Erase, DoD Erase. ※Log management - Log report records all tasks and details for source control and other management. ※Support advanced function - Individual changeable socket: easy to switch to different size of eMMC socket. Exclusive event log report management records all tasks and details for better production control. Smart LED indicator shows clear working status and result. High speed bit-by-bit hardware comparison. www.dediprog.com 4 EMMC-S10 User Manual 1.2 Package Contents EMMC-S10 Main Unit Power Adapter Power Cord User Manual 1.3 Front View SD card Slot LCD Monitor Function Buttons Red/Green LED www.dediprog.com Power Supply Power Switch OK/Confirm Shortcut/Fast button Removable module 5 EMMC-S10 User Manual 1.4 Back View Power Switch Power Supply 1.5 Side View SD Card Slot 1.6 LCD Configuration Function/ Task Time elapsed/ Task Progress www.dediprog.com Total Size Slowest Target Copied Size UP/ Backward Confirm Next/ Forward Exit 6 EMMC-S10 User Manual 1.7 Media Media compatible for the series include eMMC and SD cards. eMMC card: Master and targets for copy and comparison. SD card: Updated firmware to SD card and eMMC card SD card 1.8 eMMC cards installation Find the Pin1 of the eMMC. (Most of eMMC has the mark on the Pin 1) Identify the Pin1 of the eMMC card socket. (with the grey triangle mark) Align the Pin 1 of the eMMC to the Pin 1 of the socket. Slope and insert one side of eMMC card and press the whole card into the socket. After placing the card properly, press the whole set of holder down to fix the eMMC card to the set of module. www.dediprog.com 7 EMMC-S10 User Manual II. Function Overview 2.1 Copy Step 1: Prepare source and target eMMC cards. Note: It is strongly recommended the source and targets are the same capacity. Step 2: Place one source eMMC card to master port and target cards to target ports. Master Targets Step 3: Use▲▼buttons to select copy function. Enter the function and press <OK>. The duplicator will start to copy. eMMC Duplicator Booting… 2014/05/05 11:55:00 1. Copy Copy x4 149 G 0:30 100% (3)149G www.dediprog.com 8 EMMC-S10 User Manual Step 4: Completion! Copy results and duplication time will show on LCD at the end of tasks. • During process of duplication, every port captures in real-time and message shown on LCD and calculates CRC64 code. 12 • Once copy operation is completed, the system will immediately show comparison results between source and targets. The red light will flash when error occurs. • It is able to record real-time checksum code output to Log report. • CRC64 code: During duplication, each port will simultaneously record written message and calculate checksum Pass:3 Fail:1 0:30 CRC: F5F0D0611A4B79A0 *Set up before duplication Set the operating environment before you use the functions. Check chapter 2.6.8 eMMC setting for detail setting information. [1] Copy area [2] If need to copy boot partition, RPMB partition. www.dediprog.com 9 EMMC-S10 User Manual 2.2 Compare Compare function is to check the correctness of copying result bit to bit. Step 1: Prepare master and target cards to compare after duplication finished. Step 2: Use ▲▼ buttons to select “2. Compare”. Step 3: Press <OK>. The duplicator will start to compare. Step 4: Completion! Comparing results and spending time will show on LCD at the end of tasks. Note: It is highly recommended select Copy & Compare function to verify the results automatically after duplicator. 2014/05/05 11:55:00 2.Compare Compare x1 149 G 0:30 100% (3)149G 2.3 Copy & Compare This function combined the copy and compare in one touch. It will automatically run the comparing task after copying finished. This function is reducing the repetitive job and time. 2014/05/05 11:55:00 3.Copy&Compare Copy x1 0:30 100% www.dediprog.com 149G (3)149G 10 EMMC-S10 User Manual 2.4 Information 2.4.1 eMMC Chip Info. This function will show the eMMC cards’ basic information such as file format, content size, and total capacity. Press ▲▼ buttons to check the information of each flash media including the source. [ Information ] 1. eMMC Chip Info. [#01] FAT 3816M 100M Note: Executing this function will not delete the content or format of flash media. 2.4.2 System Info. This function will show the information of the duplicator’s system, including model number and firmware version. [ Information ] 2. System Info. eMMC Duplicator 10 Ver: 2.32.1 www.dediprog.com 11 EMMC-S10 User Manual 2.5 Utility ※Data Sanitization Step 1: Prepare disposal eMMC cards. Step 2: Insert all disposal eMMC cards into targets. Step 3: Enter Erase Function such as 5.1 Quick Erase Select one Erase mode from 5.1/5.2/5.3. Enter the function and press <OK>. The duplicator will start to process sanitization. Note: The source port will not execute erasing function. When all the target ports are plugged, the machine will start tasks automatically. If not all ports are plugged, the number of working targets shows on LCE. Press <OK> to start the tasks. ※Analysis of Erase Methods www.dediprog.com 12 EMMC-S10 User Manual 2.5.1 Quick Erase This function will erase flash’s data, and it will keep the format if the original format of flash is FAT16/32. User can use ▲ ▼ buttons to check each flash media’s erasing status, progress and information. [ Utility ] 1.Quick Erase Do ERASE ALL Confirm? Caution: Quick erase function can only erase the flash which is FAT 16/32 format. It will damage the data in flash, please make sure you have backup all important data before using this function. 2.5.2 Full Erase It will completely erase the whole flash media, including format and content. Therefore full erase will take more time. During the process, you can use <ESC> to stop the erasing process, but the original format and content can’t be read any more. [ Utility ] 2.Full Erase Do ERASE ALL Confirm? Caution: It will damage the data in flash, please make sure you have backup all important data before using this function. www.dediprog.com 13 EMMC-S10 User Manual 2.5.3 DoD Erase This is to comply with the USA Department of Defense (DoD 5220.22-M) standard to fully erase the media three times bit-by-bit to overwrite data and guarantees data not recoverable. This DoD erase method will erase methods over each sector three times: the first time with zeros (0x00), second time with 0xFF(0xFF) and the third time with random characters. [ Utility ] 3. DoD Erase Do ERASE ALL Confirm? Step1. Step2. Step3. 0x00 0xFF Random Caution: Spending time: the erasing duration of DoD Erase mode is 3 times longer than full erase mode. It will damage the data in flash, please make sure you have backup all important data before using this function. www.dediprog.com 14 EMMC-S10 User Manual 2.5.4 System Upgrade Update the system’s firmware version via SD socket to SD card. Please save the un-zipped latest BIOS to your SD card. Do not put it under any folder; put it on root directory. 1-Select function, 5.4 System Update, and press <OK>, it will automatically start system updating. 2-When finished, please turn off the system for 5 seconds. 3-Restart the system and the new version of firmware will finish uploading process. [ Setup ] 4.System Upgrade Searching BIOS.. 2.5.5 Calc. CRC64 This function will calculate the CRC64 value of the flash media plugged in the master port. The CRC64 calculating area will base on the “copy area” that you set. If you set “Data Only”, this function will calculate data area only; if you set “whole media”, the CRC64 value will be calculated based on the whole size of flash media. Be aware that even two flash cards have the same data, if the capacity has any difference, their CRC64 value will be different. [ Utility ] 5.Calc. CRC64 CRC64 = F5F0D0611A4B79A0 www.dediprog.com 15 EMMC-S10 User Manual 2.6 Setup 2.6.1 Start-up Menu Reset any function shown first, when the eraser is turned on. [ Setup ] 1.Start-up Menu [ Start-up Menu ] 3. Copy & Compare 2.6.2 Button Sound Choose whether to enable a beep or not when a button is pressed. [ Setup ] 2.Button Sound [ Bound Sound ] OFF 2.6.3 Target Tolerance Set the tolerance % of capacity difference between the master and target. There are three models of settings as below, and the default setting is "No limit". [ Setup ] 3.Target Tolerance [ Target Tolerance ] No Limit www.dediprog.com 16 EMMC-S10 User Manual ⦿Allow Tolerance Under this model, users can set the up and low limit of tolerance % of capacity difference separately between the master and target. The duplicator will view the setting as capacity limit of target flash media, and filter out the target with incorrect capacity. For example: If the flash media is marked capacity as 2GB, when user allows the up and low tolerance to be 1 %, then the workable capacity of target flash media will be : (99%X2GB~101%X2GB) => 1.98GB~2.02GB. ⦿No Limit (Default) There is no capacity limit between the master and target. Note: If the data size in the master is larger than the capacity of target, it might lead to incomplete copy. ⦿100%Same The capacity of targets has to be exactly the same as the source, or it will not be able to execute any function. www.dediprog.com 17 EMMC-S10 User Manual 2.6.4 Power Off Time Between Copy & Compare This setting is to prevent from any data loss because of unstable flash, we strongly recommend you to enter this function to set the time gap of power supply between copy and compare. Time gap can be set from 0 to 15 seconds. The default setting is "3". [ Setup ] 4.Power OFF Time B [ Power OFF Time B 15 2.6.5 Language Set the system’s language interface. [ Setup ] 5.Language [ Language ] English 2.6.6 Lock Key Set to use “OK” and “ESC” keys only or not. [ Setup ] 6.Lock key [Lock key ] Do NOT Lock Key www.dediprog.com OR [Lock key ] Do NOT Lock Key 18 EMMC-S10 User Manual 2.6.7 Adjust Clock Adjust the clock of duplicator showed on the LCD monitor. Enter default password to use this function. [ Setup ] 7.Adjust Clock 2014/05/05 12:02:02 2.6.8 eMMC setting The setting is to select whether copy or skip certain protection area, system booting area or user-defined area. 2.6.8.1 User Area Set to copy data area or whole media. This setting is to select “Data” or “Whole” as your copy area. While setting to copy data only, the system will only copy data area. While setting to copy whole area, the system will copy the whole flash media. Copy data only area: Quick Copy/Compare Set to copy source card’s data area instead of the whole media. It takes shorter time. The system will analyze the source and identify the data area to copy. As long as the source data within the target space, the copy will be processed. FAT16/32/64, NTFS, ext2/3/4, HFS/HFS+/HFX are supported for this copy mode. Only 120GB data will be copied. www.dediprog.com 19 EMMC-S10 User Manual Copy Whole area: support all formats Copy the whole source media, no matter of the content, format, partition or empty space. This mode does not analyze the data. It takes much longer than Data Area Copy. [ eMMC Setting ] 1.User Area [ User Area ] Only Copy Data Entire 500GB will be copied. It takes much longer time suitable for special format cards or unloadable area. Note: If the source format is NTFS or Linux, to make sure the target could be operated normally, the target capacity must be equal or bigger than the source device. When doing whole media copy, the duplicator will not care the capacity difference between master and targets. Hence, you should be careful about the data in the target devices after copying. www.dediprog.com 20 EMMC-S10 User Manual 2.6.8.2 Boot Partition System booting/starting area (Boot Partition): support all formats Set to copy or skip booting area. Boot partition refers to the OS booting system files. You can select “Do not copy” to escape the area. [ eMMC Setting ] 2. Boot Partition [ Boot Partition ] Do Not Copy 2.6.8.3 RPMB Partition Protected area, replay-protected memory-block partition, (RPMB Partition): support all formats. Set to copy or skip secure data area. RPMB partition refers to code protection area, RPMB (replay protect memory block). You can select “Do not copy” to escape the area. [ eMMC Setting ] 3. RPMB Partition [ RPMB Partition ] Copy www.dediprog.com 21 EMMC-S10 User Manual 2.6.8.4 Enhanced CSD Set to copy or skip built-in Enhanced CSD values of eMMC. You can also select “Do not copy” to escape the area. [ eMMC Setup ] 4. Enhanced CSD [Enhanced CSD ] Do Not Copy 2.6.8.5 Select Speed Set the copy speed. Two modes could be chosen: 1.High Speed/ 2.Normal Speed. The default setting is normal speed. [ eMMC Setup ] 5. Select Speed [Select Speed] High Speed 2.6.9 Set to Default Restore all parameters to the factory default settings. [ Setup ] 9.Set to Default Warning: Restore to Default? www.dediprog.com 22 EMMC-S10 User Manual 2.7 Log Manager Log report management is a very important management tool to assist users in monitoring, recording working status of each port and managing the whole erasing/duplication process and the result. After finishing all the task of the erase, enter function “7. Log Manager”, and then choose among range options, to export log report of day, to recent log report or to select a period of time. Export log via SD socket to SD memory card. 2014/05/05 11:55:00 7.Log Manager [ Log #1-#39 ] 1.Out Today Report 2.7.1 Out Today Report Export log report of today to SD card. Select “1. Out Today Report” and press <OK> button to output all logs of today to SD card and read it in computer. [ Log #1-#39 ] 1.Out Today Report Output Log… www.dediprog.com 23 EMMC-S10 User Manual 2.7.2 Out Recent Report Export log report of today via SD socket. Select “2. Out Recent Report” and press <OK> button to output all logs of recent 28 days to SD card and read it on computer. [ Log #1-#39 ] 2.Out Recent Report Output Log… 2.7.3 Out Period Date Export log report of today via SD socket. Select “3. Out Period Date” and press <OK> button to output all logs of selected date range to SD card and read it on computer. [ Log #1-#39 ] 3.Out Period Date Output Log… 2.7.4 Advanced Function Use advanced function of log manager to clear all logs, and to reset password. For first time using the system, enter the factory default password to enter. The default password is “123456”. [ Log #1-#39 ] 4.Advanced Function Enter Password: == >123456 www.dediprog.com 24 EMMC-S10 User Manual 2.7.4.1 Clear ALL Log After users entering password, the log report saved in the duplicator can be wiped out. [ Advanced Function ] 1.Clear ALL Log Warning: Clear ALL Log? 2.7.4.2 Setup Password Users can reset password to protect log records. The factory default password is “123456”. [ Advanced Function ] 2.Setup Password [ Advanced Function ] == >1111 Note: It can save up to 130,000 logs at one time. One record is equal to one recorded log. Highly recommend to reset log password for security of log data. www.dediprog.com 25 EMMC-S10 User Manual III. How to Use eMMC Cards ※FAQ Operate eMMC Install eMMC Question Reasons / Answers The direction may be put in wrong direction. eMMC card is Why it failed to perform one type of SD card of IC pattern. The shape is either any function after putting square or rectangle; it fails to perform when put in wrong eMMC to socket? direction. Use the Pin 1 as the identification position. After finding How to place eMMC card the Pin 1 position of eMMC, then apply to the first corner into the socket correctly? of the socket holder. The Pin 1 of eMMC card normally has one dot in the front (green arrow). On the back it has one triangle point (red arrow) How to identify the Pin1 of eMMC card (Port 1)? On Pin 1 of the socket, there is a grey triangle mark as the identification mark. How to identify the first IC-Port 1 port of the eMMC socket? Put the Pin1 of eMMC card to the grey mark location. How to place eMMC card into the socket? To which position? www.dediprog.com 26 EMMC-S10 User Manual IC Socket Holder There are 4 kinds of size for eMMC IC Why is IC failed to load into socket.(BGA153-11.5x13, BGA169-12x16, 12x18, 14x18) It the holder? can perform only when the size of IC is correct to match socket holder. The holder cannot be replaced alone, only to replace the How to replace wrong size whole set with the removable socket. After removing the holder? How to replace whole set, replace a new correct size of socket together bad socket holder? with the holder. Before copy, what else Setting suggestions before copy tasks as following: need to setup?(6.8 eMMC 6.8.1 User Area: select to copy data area only. Notice Setting about copy 6.8.2 Boot Partition: select to Copy. 6.8.3 RPMB Partition: select to Copy. settings) www.dediprog.com 27 EMMC-S10 User Manual IV. Function Table Function Sub-function & Description 1. Copy Copy data from master to targets. (There are copy modes and partitions selection at function 6.8 eMMC setting.) 2. Compare Compare data between the master and targets to make sure copy accuracy 3. Copy & Compare Compare data automatic immediately after completing copy task. 4.1 eMMC Chip Info Show eMMC information of data, file format, content size and capacity. 4. Information 4.2 System Info Show information of the duplicator system, including machine model number and software version. 5.1 Quick Erase Erase Index of eMMC cards, taking very short time. 5. Utility 6. Setup 5.2 Full Erase Erase data bit-by-bit for the whole eMMC cards, including format and content, taking longer time than Quick Erase. 5.3 DoD Erase Erase eMMC cards three times complying with USA Department of Defense’s standard. 5.4 System Upgrade Update system firmware via SD socket to SD card. 5.5 Calc. CRC64 Calculate the CRC64 value of eMMC in the master port and compare with targets. 6.1.1 Copy 6.1.2 Compare 6.1.3 Copy & Compare 6.1 Start-up Menu Select which function is shown firstly when turn 6.1.4 Information on the system. 6.1.5 Utility 6.1.6 Setup 6.1.7 Log Manager 6.2.1 OFF 6.2 Button Sound Select to turn button sound on or off. 6.2.2 ON 6.3.1 No Limit 6.3 Target Tolerance Set the tolerance % of capacity gap between the 6.3.2 100% Same master and targets. The default is no limit. 6.3.3 Allow Tolerance www.dediprog.com 28 EMMC-S10 User Manual 6.4 Power Off Time Between Copy & Compare Set the power-off time between Copy and Compare when execute function, Copy & Compare, capable of setting 0/1/2/3/…/15. 6.5 Language Set system language interface. 6.6 Lock Key Set to use “OK” and “ESC” keys only or not. 6.7 Adjust Clock Reset displayed time on LCD. 6. Setup Only Copy Data 6.7.1 User Area Set copy area of the source card. Copy Whole Area 6.7.2 Boot Partition Do Not Copy Set whether copy booting area of Copy the source. 6.7.3 RPMB Partition Do Not Copy 6.8 eMMC Setting Set whether copy Secure data area Copy of the source. 6.7.4 Enhanced CSD Do Not Copy Set to copy or skip built-in Copy Enhanced CSD values of eMMC. High Speed 6.7.5 Select Speed Set the copy speed of eMMC Normal Speed 6.9 Set to Default Back to original manufacturer setting. 7.1 Out Today Report Export today’s log records. 7.2 Out Recent Report Export the log records in recent 1day to 28 days. 7.3 Out Period Date 7.Log Manager Export the log records in a specific date. 7.4.1 Clear ALL Log 7.4 Clean out the log records after entering the Advanced Function password. Enter password to enter the 7.4.2 Setup Password function. Set up the password for cleaning log records. www.dediprog.com 29 EMMC-S10 User Manual V. Specification Name eMMC Flash Duplicator Model EMMC-S10 Target 1:9 (10-port) Copy Speed 6.2GB/min (104MB/sec) Flash media eMMC 4.3/4.4/4.41/4.5/5.0 and above Module Device Compatible Buffer Operation Type Operating System Support Format Copy Function Compare Function Erase Function Language Display Function buttons LED Indicator DoD Erase Power Temperature range Humidity range Safety & Certification www.dediprog.com Individual socket, removable module 12x16x1.4 mm (169 ball) 11.5x13x1.3mm (153 ball) 12x18x1.4 mm (169 ball) On board memory Stand-alone operation USB drive output log All (Windows, Linux, Other stand-alone systems) Fast Copy: FAT16/32, NTFS, Linux (Ext2/Ext3/Ext4) Whole Copy: All formats User area copy: Quick copy, Whole area Boot partition, RPMB partition High speed bit-by-bit comparison Quick Erase, DoD Erase English 2x16 LCD display ▲(UP), ▼(DOWN), OK(Enter), ESC(Exit) LED (Red/Green) on each slot Yes Switching P/S ; 100~240V 50/60Hz ; 12V / 5A Working temperature: 5℃~45℃ Storage temperature: -20℃~85℃ Working humidity: 20%~80% Storage humidity: 5%~95% CE, FCC, RoHS 30 eMMC EMC10 User Manual VI. Revision History Date Version 10/01/2014 1.0 Changes Initial English version release DediProg Technology Co., Ltd - Taiwan Headquarter TEL: 886-2-2790-7932 FAX: 886-2-2790-7916 4F., No.7, Ln. 143, Xinming Rd., Neihu Dist., Taipei City 114, Taiwan - Shanghai Office TEL: 86-21-5160-0157 FAX: 86-21-6126-3530 Room 503, Block E, No.1618, Yishan Road, Shanghai, China Technical Support:[email protected] Sales Support:[email protected] www.DediProg.com Information furnished is believed to be accurate and reliable. However, DediProg assumes no responsibility for the consequences of use of such information or for any infringement of patents or other rights of third parties which may result from its use. Specifications mentioned in this publication are subject to change without notice. This publication supersedes and replaces all information previously supplied. All rights reserved Printed in Taiwan. www.dediprog.com 31