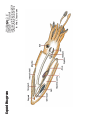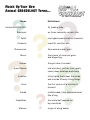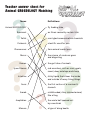
1
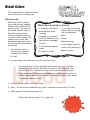
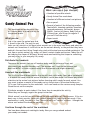
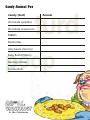
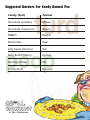
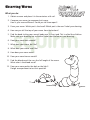
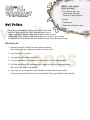
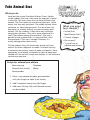
Fake Animal Scat
What you do:
Hand out the Animal Scat Identification Charts. Explain
to the students that scat is the name for poo that is found
in the wild. This chart shows the scat from different wild
animals. The first column of animals are herbivores, which
means that they only eat plants. The middle column shows
carnivores, or meat-eating animals. The last column lists
omnivores, or animals that eat a mixture of plants and
animals. Ask the students if they notice any similarities
among the herbivores. (The scat is more round and it is
small.) How about among the carnivores? (The scat is
pointed at one or both ends. It is long and thin.) And
the omnivores? (This scat is variable. However, it is
usually oblong rather than round.)
Tell the students they will choose one animal scat from
each of the three categories to model. Distribute the clay
or oatmeal poo mixture, sheets of paper, and pencils. Once
completed, a scat model is placed on a sheet of paper and
labeled with the animal’s name and whether it is an herbivore,
carnivore or omnivore.
Recipe for oatmeal poo mixture
Measuring cup
Teaspoon
Oatmeal (not instant)
Water
Cocoa powder
1. Place 1/2 cup oatmeal on plate; grind oatmeal
with your fingers to make it less chunky.
2. Add 2 teaspoons cocoa; mix with fingers.
3. Add water little by little until oatmeal mixture
can be molded.
in the Classroom
What you need
(per student)
• Animal Scat
Identification Chart
• 3 sheets of paper
• Pen or pencil
• 1/2 cup of clay or
oatmeal poo mixture
Animal Scat
Identification Chart
in the Classroom
Herbivore
Carnivore
Omnivore
Rabbit
Fox
Raccoon
Round, slightly squashed pellets
of finely chewed plant material.
Dark brown, tan or black
depending on food.
Note tapered ends and hair in scat.
Fox scat will almost always have
these two features, and it may be
thicker or thinner depending on food,
animal, and level of decomposition.
Note blunt ends and uniform
thickness, like a Tootsie Roll. Scat
will contain berries, seeds, corn
and perhaps crayfish parts.
Deer
Coyote
Opossum
Vary in size but are generally
squashed spheres with a slight taper.
There will generally be a small pile.
Entirely vegetative and quite
uniform in consistency.
Very similar to fox, but larger.
A large fox and a small coyote
may have identical scat.
Uneven and variable due to
changing food sources. May contain
hair or berries. Often in small
segments. Not commonly found.
Porcupine
Mountain Lion (Puma, Cougar)
Rat
Somewhat variable in shape, but
usually oblong. Contain a great
deal of wood pulp. Individual scat
may be connected by thin strands.
Chords with uniform diameter.
May contain fur or feathers. Scats
rarely seen since cats cover it up.
Dark brown or black, even
consistency. Small, oval pellets.
Blood Colors
This can be done as a demonstration
or as an activity in small groups.
in the Classroom
What you do:
When you think of blood
what color do you imagine?
People mostly think of red
because that is the color of
our blood and the color of
blood for many animals.
However, blood also comes
in several colors besides red.
Today we will make fake
blood that represents each
of the different blood colors
for animals.
1. Into the bowl, place 1/4
cup of corn syrup and
2 spoonfuls of water.
Stir well
What you need (per group)
• 1 teaspoon cornstarch
• Red and blue food
coloring
• Droppers (if you don’t
have the food coloring
that comes in dropper
bottles)
• 1 teaspoon powdered
cocoa
• 2 spoonfuls water
• 1/4 cup clear corn syrup
(type used for cooking,
not for pancakes)
• Bowl
• Spoon
• Measuring cup
• 3 small paper cups (or
other small containers)
• Marker or pen
2. Use your spoon to divide your mixture into the 3 cups.
Let’s look at one of the cups.What color would you say this blood
would be? Some animals actually have clear or whitish blood. Can
anyone think of an animal that may have clear blood? Most insects
have clear blood. That is because blood color comes from tiny bits of
metal in blood. However, insects do not have any metal in their blood.
Can anyone name an insect?
blood
3. On one of your cups, write Insect blood.
4. Now… To one of the unlabelled cups, add 1/2 teaspoon of cornstarch. Stir well.
5. Add 4 drops of red food coloring. Stir.
What color did you make? It is a light red.
6. To make it a deeper red, add
2 pinches of powdered cocoa.
Stir very well.
What animals have red
blood? Animals with backbones, or vertebrates, have
red blood. The “red” in red
blood cells comes from a
pigment called hemoglobin.
“Hemo” comes a Greek word for
blood. The pigment has iron molecules in it. Oxygen combining with
the iron in hemoglobin makes the
blood rust to turn it a red color.
7. Use your pen to label the red blood cup,
Vertebrate blood.
8. In the last cup add a pinch of cornstarch and stir.
9. Add 4 drops of blue food coloring.
Did anyone know that some animals have blue blood, especially when
it is exposed to oxygen? Can you guess what animals might have blue
blood? Lobsters, crabs, pillbugs, shrimp, octopus, crayfish, scallops,
barnacles, snails, small worms (except earthworms), clams, squid, slugs,
mussels, horseshoe crabs, most spiders. None of these animals have
backbones. Some of these animals are Mollusks, like the snails. Some
are Annelids, like the small worms. Some are Arachnids, like the spiders.
Some are Crustaceans, like the crabs. Copper metal gives some animals
stylish blue blood. This blue blood chemical is called hemocyanin.
blood
10. Label your blue blood cup with one of the blue-blooded groups: Arachnids,
Annelids, Mollusks, or Crustaceans.
Now who can name an animal with clear blood? With red blood?
With blue blood? What is the part in blood that determines the color?
Yes, it is whether or not there is metal in the blood and the type of metal.
What you need (per student)
• Handout of possible animals
• Candy Animal Poo worksheets
in the Classroom
• Handout of different animal scat pictures
Candy Animal Poo
poo
This workshop can be done as a class
or it can be done at a table set up for
the general public.
What you do:
• Pen or pencil
• Several of each of the following candies:
Tootsie Rolls, chocolate sprinkles, chocolatecovered macaroons, Raisinettes, brown
M&M’s, licorice jelly beans, Baby Ruth or
O’Henry bars, mini-kisses (or regular if
you can’t find the minis)
• Paper towels
Scat is the name for animal poo that
is found in the wild. The way the scat
looks can tell scientists a lot about what animals are in the area, how many and what the
animals eat. Sometimes it is difficult to see the animals directly, so the poo that they leave
behind is the next best thing. People who study wild animal poo are called scatologists. The
scat from a certain animal, say a dog, will have a certain shape and texture. Today we will
be studying the shapes of different animal waste and matching that shape to something
you may enjoy in your everyday life, candy.
dookie
Distribute the handouts
These are the animals that we will explore today and the pictures of their scat.
How would you describe the deer scat? The raccoon scat? How do the raccoon and
deer scat differ? Is there a type of candy that the raccoon scat might resemble?
Hand out the worksheets
This is a list of the different candies that we will work with today. Your job as scatologists
is to match the candy with the animal that has a similar poo shape. You should pay careful
attention to the animal scat pictures before choosing which candy for each animal. You
may want to place a sample of the candy scat on the picture of the animal before you
fill in your final answers on the worksheet. I will now hand out the various candy samples.
Please do not eat the samples.
Distribute samples to each student. Give them time to complete the activity.
When they are through, regain the group’s attention.
caca
Which animal’s scat did you think looked like chocolate sprinkles? Take answers. If the students vary in their answers, have each student explain why they chose that candy. If the
explanation is valid, the choice is fine. There are really no “correct” answers. I thought the
mouse scat looked like chocolate sprinkles.
Continue through the rest of the worksheet
You have been observant scatologists today. Now you can go ahead and eat
your candy scat models.
Candy Animal Poo
Candy (Scat)
Chocolate sprinkles
turd
Animal
Chocolate macaroons
M&M’s
Raisinettes
Jelly beans (licorice)
poop
Baby Ruth/O’Henry
Hershey’s Kisses
Tootsie Rolls
in the Classroom
Suggested Answers for Candy Animal Poo
Candy (Scat)
Chocolate sprinkles
turd
Animal
Mouse
Chocolate macaroons
Beaver
M&M’s
Rabbit
Raisinettes
Deer
Jelly beans (licorice)
Rat
poop
Baby Ruth/O’Henry
Human
Hershey’s Kisses
Elk
Tootsie Rolls
Raccoon
in the Classroom
Creepy Crawly Collection
This is bigger than an insect collection. Insects only have
six legs. In this collection, you can have 8-legged critters,
or arachnids, such as spiders. You can also have manylegged crawlies, called arthropods, such as millipedes.
Everyone in your class can bring in bugs to add to
the collection. How fun!
What you do:
1. Collect a bunch of bugs at home. And you
don’t even have to kill them. You can find
dead creepy crawlies in light fixtures, lamps
and along window sills.
2. Line the box or bag with a paper towel. Place
your bugs into the container. Bring all of the
bugs to school even if you have more than
one of some kinds, since you can give your
extras to someone else.
3. Place a small ball of clay in the center of a
cardboard square.
4. Remove a bug from the container.
in the Classroom
What you need
(per student)
• Dead creepy crawlies
(from home)
• Bag or box (from home)
• Paper towel (from home)
• Clay
• Paperclips
• Small squares of tag
board or cardboard
• Pen or marker
• Books or pictures for
bug identification
5. Bend a paperclip to make part of it straight.
6. Very carefully spear the bug underneath with the
paperclip. Try not to push the metal all the way through
the bug; just push the paperclip in enough to hold the bug.
7. Stick the curved end of the paperclip into the clay.
8. Use books, pictures or a bug expert to find the type of bug that you have.
9. Use a pen or marker to label the cardboard with the name of the bug.
10. If you have more, mount a
different bug into a new
cardboard square with clay
and a paperclip. Don’t forget to label the cardboard
with the name of the bug.
11. Admire your creepy crawly
collection.
What you need:
in the Classroom
Fish Printing
Workshop
Preparation
• 2-4 different types of fish (small, flat flounder or
scup work well), fresh or frozen (rubber fish can be
used). Depending upon the size of the group, you
will need at least one fish for every 5 participants.
• Ink or paint (water-soluble block printing ink,
acrylic paint, etc.)
• Paper (rubbing paper, rice paper, construction
paper, etc.) OR white T-shirts OR T-shirt material
cut into squares
• Small paintbrush for each fish printing station
The surface of the fish must
• Newspapers
be thoroughly cleaned
• Paper towels
because mucus and dirt will
obscure the detail. Wash
• Pens or making pens
the fish in soap (e.g. dish
detergent) and water until
the mucus is gone. If fish
are to be used right away,
wash and pat dry. For use later, wash, dry, and freeze fish in plastic bags.
Defrost approximately two hours before use.
The day of the workshop, cover the fish printing tables with
newspaper. Place the paint brushes and paints at each station.
Designate a drying station for the prints. Set up a paper
table with pens or markers for signing and labeling the
prints. If possible, it is best if the participants do not
sit at the print stations, but rather at separate tables
or on the floor until the printing begins.
Workshop
Introduction
With the participants seated on the floor or at tables away from the print area,
as a display, hold up one of the fish that will be used in the printing.
All fish are vertebrates, which means that they have a backbone.
The external anatomy of a fish is very different from our own,
because they move and live in water, and we live on land.
For example, fish have “noses” (called nares) that don't
look anything like our own, yet their purpose is to
smell chemicals in the water.
What can we say about how a fish moves by looking
at its body shape or form? What body parts of the fish
are similar to humans? What body parts are different?
Fish Printing
The Japanese art of fish printing is called Gyotaku
(Gyo means fish, Taku means print). The Chinese began
making fish prints over 600 years ago as a means of
recording fish catches. It was developed into an art
form by the Japanese.
Demonstrate while you go over the steps
of fish printing.
1. Choose which fish you would like to print.
2. With a small brush gently paint one side of the fish with ink/paint. Make sure all areas
are covered including the fins. Use very little ink. Brush from the head of the fish to
the tail. Most people use too much ink the first time, so be careful. After removing
excess ink from your brush, brush gently from the tail toward the head. This will
catch the ink along the edge of the scales and spines, producing sharper detail.
3. Take paper and gently but firmly press down on the fish. Rub evenly over all areas,
especially the head and fins. Be careful to not move the paper while pressing.
4. Carefully lift the paper up, making sure the fish does not move and smear the print.
5. Wipe the excess ink/paint off with a paper towel.
Make sure to wipe from the head to the tail.
6. Don’t forget to sign your print and label it with the name of the fish.
7. Place your Gyotaku on the drying area.
If you have time, try another print. If
you choose to make Gyotaku T-shirts,
the students can make another print
on a clean section of the shirt.
Can You Jump as High as a Flea?
Fleas are blood-sucking insects. To get to their dinner,
they often have to jump. Fleas are amazingly skilled at
jumping. They are very tiny, but they can jump 150 times
their height. To find out how high that would be for you,
try the activity.
What you do:
1. Measure your height in inches. If you know your height
in feet, then multiply that number by 12 to get inches.
2. A flea can jump about 150 times its height. Calculate
how many inches that would be for you to jump as high
as a flea. To do this, multiply your height by 150.
3. To see how long that jump would have to be, use the
measuring tape to mark the length on the ground.
Unless you have a very large room to work in, you
may need to go outside to do this.
4. It is probably easy to see you can’t jump
that far in one leap. Find out how many
leaps it takes you to make one flea jump.
Aren’t fleas incredible? If they could only
learn how to dribble a basketball.
in the Classroom
What you need
(per group)
• Measuring tape
• Calculator
• Paper
• Pencil
A Meal of Mealworms
Depending upon which recipe you choose,
the ingredients will vary.
in the Classroom
Obtaining and preparing mealworms
You can purchase mealworms from pet stores, bait shops or
online. If your mealworms are packed in bran or cornmeal,
there is no need to purge. However, if they are packed in
newspaper or paper, remove the paper completely and add
cornmeal. Allow the mealworms to eat the cornmeal for
24 hours or longer.
yum
What you need
(per class):
• Colander
• Water
About 1-1.5 hours before the activity, put the mealworms
in a colander and rinse well with tap water. Place onto a
paper towel and pat dry. Remove any dead mealworms.
Dead worms will be darker in color. Put the cleaned mealworms into a plastic bag and freeze for 15 minutes.
• Paper towels
Roasting the Mealworms If you are making the Mealworm
Crispies, take the cleaned insects from the freezer and place
on a baking sheet covered with paper towels. Bake at 200°F
for 1 hour.
• Measuring cup
What you do:
• Cornmeal
• Freezer
• Plastic bag
• Measuring spoons
yum
1. Ask the students “What animals eat insects?” Take answers. If none of the students
mention humans, ask “What about humans?”
2. Ask the class if anyone has ever eaten insects either by accident or on purpose.
3. Tell the students that insects are eaten by people all over the world except for North
America and Europe. And in North America, the Native Americans and settlers did eat
insects. In fact, there are over 1,462 recoded species of edible insects. Insects are high
in protein and low in fat. So they are quite healthy. The only reason people don’t think
of insects as a food source is because of how they were raised. For example, if they were
born in Thailand, they may eat silkworm pupae, or they would eat grasshoppers if they
were born in Japan or China or Mexico.
yum
4. Tell the students that today they will try eating insects. They will try mealworms.
Show the students the frozen or roasted mealworms. Tell the class that mealworms
are the pupa or larval stage of a grain-eating beetle.
5. Remove several mealworms for the students to observe.
6. Explain how the mealworms were obtained and prepared.
7. Depending upon which recipe you chose, proceed with the cooking.
Mealworm Crispies
1/4 cup margarine
Stove or hotplate
4 cups mini marshmallows Saucepan
3 cups crispy cereal
Spoon
3 cups roasted mealworms 9x13 greased pan
In a saucepan, melt margarine and marshmallows.
Remove from heat and add crispy cereal and roasted
mealworms. Stir. Spread into a 9x13 greased pan. Cool
Spicy Mealworm Crunchies
2 tsp cayenne
6 cups party mix (optional)
1 tsp black pepper
Stove or hot plate
1 cup mealworms
Saucepan
6 Tbsp butter or margarine Spoon
Place everything but the party mix into a saucepan.
Stir continuously until the mealworms are golden
brown. Drain and serve. Or if desired, add the mealworm mixture to party mix and serve.
yum
8. After the students have eaten the mealworms, ask “How did they taste?” “Would
you ever eat mealworms again?” “Would you ever consider eating other bugs?”
9. Tell the students the proper word for insect eating is Entomophagy. “Entomo-”
means insect and “phag” means to eat.
Observing Worms
What you do:
1. Obtain a worm and place it in the container with soil.
in the Classroom
2. Compare your worm to someone else’s worm.
How is your worm different? Could you tell them apart?
3. Draw your worm. Which part is the head? Which part is the rear? Label your drawing.
4. How can you tell the top of your worm from the bottom?
squirm
5. Find the band circling your worm’s body near its front end. This is called the clitellum.
Make sure your drawing has a clitellum. Label the clitellum on your drawing.
6. Does your worm look smooth?
7. What does your worm feel like?
8. What does your worm smell like?
9. How does your worm move?
10. Does your worm have a mouth?
11. Find the blood vessel the runs the full length of the worm.
What color is the blood vessel?
12. Does your worm prefer the dark or the light?
Design an experiment to test this question.
Teacher Answer Sheet
for Observing Worms
2. Answers will vary.
3. The head part of a worm is more pointed, and
the rear is flattened. A student may also notice
that the worm moves head first.
4. The top is darker than the bottom. A student may
also notice that the worm keeps the bottom side
down in the soil.
in the Classroom
What you need
(per student)
• Earthworm
5. The clitellum should be labeled on the worm drawing.
• Plastic container or
lid filled with soil
6. A worm has bumps or rides, so it does not look smooth.
• Pencil
7–9. Answers will vary.
10. A worm has a mouth but it may be difficult for the students to see.
11. The blood vessel is purple.
12. Answers will vary.
One-Meter Hike
There are many creatures right under your feet – an
entire world in the grass and the garden. In this activity,
you will take a one-meter hike. For you this may not seem
very long, but imagine you are a small creature like an ant.
This would be a very long and exciting adventure.
What you do:
1. Find a patch of grass or garden.
in the Classroom
What you need
(per group)
• Meter stick
2. Place your meter stick on the ground. This is the length
of your hike.
• Magnifying glass
(optional)
3. Pretend you are a very small creature, such as an ant.
Place your eyes very close to the ground and begin your
hike. If you have a magnifying glass, use it to observe
closely during your hike.
• Patch of grassy area
or garden area
4. Draw what your world would look like if you were
the size of an ant.
5. Draw any insects you see. Draw interesting objects,
such as rocks or shells or bird poo. Draw any large
animals that may cross your path, such as birds or worms.
• Paper
• Pencil
What you need
(per group)
in the Classroom
• Owl pellets (you can
order these through
scientific supply houses)
• Water
• Toothpicks
Owl Pellets
vomit
• Bone identification chart
Owls eat small rodents, reptiles and birds. They swallow their prey whole. An owl’s stomach acids aren’t
strong enough to digest bones or hair. Owls vomit up the
indigestible stuff about 24 hours after they eat. If you want to look
for owl pellets, look under the tree where an owl roosts during the day.
What you do:
1. Inspect the pellet. Note the size and any features
that might help you figure out where it came from.
bones
2. Soak the pellet in water.
3. Very gently, pull apart your pellet.
4. Use the toothpicks to separate the bones from the fur and feathers.
5. Roll the last bits of fur between your fingers to find tiny bones or teeth
that may have been overlooked.
6. Try to lay out or reconstruct the skeletons of the animals you found.
How many animals did you find in each pellet? Can you identify the animals?
Bone Identification Chart
in the Classroom
skull
jaw
metacarpal (“finger”)
shoulder blade
radius
humerus
rib
vertebra
ulna
femur (thigh)
hip bone
fibula
tail vertebra
Please feel free to photocopy this for your students.
tibia
metatarsal
(toe)
Teacher Instructions for
“Which Sea Creature Am I?”
What you do:
in the Classroom
After handing out the “Which Creature Am I?”
descriptions, give the students some time to complete
their drawings. When they have finished, have
several students share their drawings with the class.
Point out any inaccuracies. If any student actually
drew a sea star, show it to the class and slowly go
over the description to show that it fits.
What you need
Share with the class a picture of a sea star.
• Books or pictures of sea
animals, including a sea star
• Pens or crayons
• Paper
• Handouts of the sea star
Instruct each student to choose a sea animal, such
description
as a hagfish, sea anemone, tubeworm, octopus, eel,
slug, snail, shark. Have the students look up pictures
of the animals in books or have pictures available
for the students. Give each student time to write a
description of the animal chosen. Students can then swap descriptions
with partners or they can volunteer to read their descriptions
to the class to see if others can make drawings from their description.
Which Sea Creature Am I?
Draw an animal from the following description.
It has no head or brain. Most animals of this kind have five
in the Classroom
or more arms, but no fingers. Attached to the bottom of
each arm are feet, but no legs. The feet are usually in pairs and one animal can have over
1000 feet. In the center of the feet is this animal’s toothless mouth. This animal is often
covered with bumps or little spines. It comes in various colors, such as purple, red and yellow.
in the Classroom
Snail Trails
Snails slime along from the snow line to beneath the sea.
Snails like damp places, but they can survive without water
by hiding out inside of their shells. They actually plug up
their shell opening to seal themselves off.
What you need
(per group)
• Snail
• Clear rigid plastic
What you do:
1. Find a snail. Morning or evening is usually the best
time to go snail hunting. Snails really like gardens.
The best time of year is during the spring or summer.
2. Lift the snail gently by the shell. Place it in a box or jar
to bring to school. Feed your snail lettuce.
3. Remove your snail from the container. Place the snail
on a sheet of clear plastic.
slimy
4. Hold up the plastic to observe the snail as it crawls. If the
snail won’t move, place some lettuce at one end of the plastic.
5. Place objects on the plastic in the path of the snail.
Watch the snail glide across the objects.
6. Observe from above and below the snail.
7. If you feel really brave, place the snail on your hand.
Feel the creature slime across your palm.
8. Return the animal to a moist area. Away from your garden
would be the best bet.
• Pebbles, marbles or
other small items
• Lettuce
Squid Dissection Workshop
In order to preserve them overnight, the squid can
be frozen and thawed the next morning. Frozen
squid can easily be obtained at Chinese markets
and from local supermarkets, often in the frozen
food section. If obtaining them from the local supermarket
and/or if the package is marked “Calamari” make sure that
they are whole squid and not just “tubes and tentacles.”
On the day of the workshop, organize the dissection
tools for each group. Set up the cooking corner. Crack
the eggs into a bowl and stir. Pour the seasoned flour
mixture into the plate.
in the Classroom
For the Workshop
you need (for a
group of 2 or 3)
• 2 paper plates
• 1 pair of clean scissors
Workshop:
Introduction
Organize the students into groups of 2 or 3.
• 4 toothpicks
• 1 hand lens (optional)
• 1 scrap of paper
• Squid diagrams
Who has ever heard of a squid? What do you know
about squid? Take answers from the students.
• 1 squid
Hand out the squid diagrams.
Everybody needs clean hands for this because we are going to eat the squid
at the end of the class!
As the students wash their hands, place the dissecting materials on the tables.
External anatomy:
Place the squid right side up on the plate. You should have the mid-ventral ridge
facing you with the tentacles at the top.
1. Arms and tentacles. Are they the same size? Do they look alike? How many arms
are there? How many tentacles are there? Take answers for each of the questions.
2. Look at the suckers with the hand lens. Notice all the small teeth in a ring
around the suckers. They are used to hold the prey. Squid capture their
prey with the tentacles and bring it to the arms to be held until the prey
stops struggling.
3. Look inside the circle of the arms and tentacles. The small black dot
is the beak. Use a toothpick to push the tissue back from around it. Can
you see the 2 halves? It looks like a parrot beak, and is very powerful.
It is used to tear pieces from the prey.
4. The eyes are much like our own, but the lens is shaped like a football.
What is the shape of our eyes? Squid can tell the difference between
light and dark, blue and yellow.
5. The main part of the body containing all the organs is called
the mantle. It is the pocket of skin that covers the body. The
mantle is covered in pigment cells called chromatophores. Squids
can change color rapidly and they use this to camouflage themselves,
to attract mates, and to communicate with each other.
6. The squid has two fins on the mantle near the pointed end of its body.
The fins are used as stabilizers and to propel the squid.
7. The siphon is a short tube with one opening on the head between the
eyes and the other end just under the mantle collar. The siphon propels
the squid through the water in the opposite direction to which the siphon
is pointing, much like jet propulsion. To use this jet propulsion, the squid
takes in water through the large opening and then closes off the opening.
The only way the water can escape is through the smaller siphon. The
mantle muscles contract and the water comes out with enough force
to propel the squid through the water at about 20 miles per hour!
Internal Anatomy:
Make sure your squid is placed back on the plate with
the mid-ventral ridge side up. We are now going to look inside.
1. Cut open the mantle of the squid directly down the midline starting at the mantle
opening near the siphon and continuing down the length of the body to the tip.
Spread back the sides of the mantle to expose the internal organs. Be sure to lift up
with the scissors when cutting so as not to cut into the internal organs of the squid.
3. The yellowish liver is a long organ in the center of the body that runs up toward
the head. The liver provides digestive enzymes.
4. The ink sac is located on the rectum and looks much like a small silver fish or thin
black line depending on how full the sac is. Very carefully, snip the sac at both ends
and place it on the plate next to your squid. After the ink sack is removed, dip the tip
of a toothpick into the ink sac and try writing your name on the scrap paper. The ink
is the pigment which artists call sepia ink. Squids squirt ink from the sac to protect
themselves from attackers.
5. The gills are 2 white, feathery structures found within the mantle cavity.
What is the purpose of the gills?
6. At the base of each gill is a branchial heart (also called the gill heart)
which pumps blood from the body up to the gills to be oxygenated. Each
of these hearts is quite small and slightly yellowish in color. Squid actually
have 3 hearts! The third heart is larger and located between the two branchial
hearts. This is called the systemic heart and pumps oxygenated blood from the
gills to the rest of the body.
7. The squid is supported by a structure called a pen. This structure is the remnant shell.
To locate the pen, lift up the head and place it down over the top of the organs of the
body. Underneath where the head was lying on the plate, you will now notice a pointed
area right along the midline of the body. This is the tip of the pen. Grasp this tip and
pull until the pen comes free of the mantle. The pen is as long as the mantle and is
shaped like a transparent feather.
Now to prepare the squid for eating:
1. Remove the fins by grasping the mantle in one hand and the fins in the other and
pulling to remove the fins.
2. The arms and tentacles are eaten. Cut them off the mouth and eye area, keeping
all of the tentacle and arms joined in one large ring. Place the arms and tentacles
onto your clean plate.
3. Grasp the squid’s head in one hand and pull it down over the body toward the pointed end.
This should pull most of the internal organs off in one piece. Remove the gills separately.
4. Now turn the mantle over and peel off all the colored
skin. You should be left with cleaned white mantle.
Place the cleaned mantle onto your plate with the
arms and tentacles. Cut the mantle into strips, starting
from the bottom of the mantle to the tip.
5. Discard all the internal organs.
6. Take the cleaned squid on the clean paper plate
over to “cooking corner.”
Cooking Corner
1. Coat the squid strips and the tentacles with egg,
and then roll them in the seasoned flour mix.
2. Preheat the pan with a tablespoon of oil
3. Add the seasoned squid and stir for about 1 minute
or until the meat begins to curl
4. Remove from the oil and place onto paper towels
For the Cooking
Corner you need
• Electric wok or hotplate
and frying pan
• Spatula
• Knife
• 3 eggs
• 5 tablespoons olive oil
• 3 cups seasoned flour
(such as Dixie Fry)
or mix 1 cup of flour +
2 cups breadcrumbs +
1 teaspoon pepper
• 1 lemon or cocktail
sauce (optional)
• Bowl
5. Garnish with lemon or cocktail sauce if desired
• Plate
You may need to add more oil depending upon the
amount of squid to be cooked.
• Paper towels
Squid Diagram
in the Classroom
Match Up Your New
Animal GROSSOLOGY Terms...
in the Classroom
?
Terms
Animal GROSSOLOGY
Ruminant
Pellet
Proboscis
Pheromones
Mucus
?
?
Definitions
fly feeding tube
an illness caused by certain ticks
scent glad communication chemicals
scientific word for poo
farm animal waste (poo)
the science of creatures gross
and disgusting
?? ?
Rumen
Lyme Disease
Intestine
Feces
Scarab
Amphibian
Manure
the gut tube of animals
cud munchers, such as cows, goats,
camel, deer, antelope and sheep
sticky liquid that slimes the inside
and outside of many living things
the first section of a ruminant’s
stomach
cold-blooded, slimy skinned animal,
like a frog
the waste ball spewed out
by some birds
a type of dung beetle
Teacher answer sheet for
Animal GROSSOLOGY Matching
in the Classroom
?
Terms
Animal GROSSOLOGY
Ruminant
Pellet
Proboscis
Pheromones
Mucus
?
?
Definitions
fly feeding tube
an illness caused by certain ticks
scent glad communication chemicals
scientific word for poo
farm animal waste (poo)
the science of creatures gross
and disgusting
?? ?
Rumen
Lyme Disease
Intestine
Feces
Scarab
Amphibian
Manure
the gut tube of animals
cud munchers, such as cows, goats,
camel, deer, antelope and sheep
sticky liquid that slimes the inside
and outside of many living things
the first section of a ruminant’s
stomach
cold-blooded, slimy skinned animal,
like a frog
the waste ball spewed out
by some birds
a type of dung beetle