1
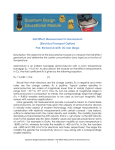
Document version control Version Version Information Date V 1.1 Initial version Apr 28th 2014 Legal All rights reserved. The information contained in this document is confidential. It may also be proprietary and trade secret to EZ Metrology. Without the prior written approval of EZ Metrology no part of this document may be reproduced or transmitted to person or persons outside your organization, in any form or by any means, including but not limited to electronic, mechanical, photocopying or recording or stored in any retrieval system of whatever nature. Use of any copyright notice does not imply unrestricted public access to any part of this document. From time to time we may present updated versions of this document in order to make corrections, clarifications, or other changes. These updated versions will supersede any earlier versions of the document. Crystal Glen Center Suite 600 39555 Orchard Hill Place Novi Mi 43375 Phone: 248-348-5771 Fax: 248-348-5760 [email protected] EZSpeed Calibrator © EZ Metrology, 2014 Manual v1.1 Table of Contents 1. Getting Started........................................................................................................................... 4 1.1. Precautions .......................................................................................................................... 4 1.2. Component Description ....................................................................................................... 5 2. Operation .................................................................................................................................... 6 2.1. Leveling ............................................................................................................................... 6 2.2. Taking Measurements ......................................................................................................... 7 3. Technical Information ............................................................................................................... 9 3.1. Principle of Calibration ......................................................................................................... 9 3.2. Calculation of Calibration Factor and Error Checking ......................................................... 12 3.2.1.Calibration Process ...................................................................................................... 12 3.2.2.Error Checking ............................................................................................................. 13 3.3. Specifications and Characteristics....................................................................................... 13 4. Warranty Information ................................................................................................................ 14 Page 2 of 16 EZSpeed Calibrator © EZ Metrology, 2014 Manual v1.1 Table of Figures Figure 1: Calibrator – Full Assembly................................................................................................ 4 Figure 2: Height Adjustment Assembly............................................................................................ 6 Figure 3: How to Adjust Height ........................................................................................................ 6 Figure 4: Positioning ........................................................................................................................ 7 Figure 5: Proper Crossbar Release ................................................................................................. 7 Figure 6: Various Arm Positions ...................................................................................................... 8 Figure 7: Pressing Release Switch .................................................................................................. 8 Figure 8: Measurement Displayed ................................................................................................... 8 Figure 9: Principle of Operation ....................................................................................................... 9 Figure 10: Geometry of motion of calibrator arm and laser projection .......................................... 10 Figure 11: Example Table for Calibration ...................................................................................... 12 Figure 12: Example Table for Error Checking ............................................................................... 13 Page 3 of 16 EZSpeed Calibrator © EZ Metrology, 2014 Manual v1.1 1. Getting Started Before using the device please go through the user manual instructions carefully. The EZSpeed Calibrator is used to calibrate the EZSpeed device to confirm repeatability, reproducibility, accuracy, and precision of the EZSpeed device. 1.1. Precautions: i) Always place the calibrator on a firm, level surface for easier use. ii) Do not operate without correctly leveling the calibrator using the level gauge and height adjustment feet. iii) Do not obstruct the motion of moving parts as it will affect the speed readings taken. CAUTION!!! Do not attempt to open/loosen any part of the calibrator unless instructed by supplier to do so. Doing this may cause the loss of nominal calibrator readings. iv) Do not bend the rebound breaking clip too much or too frequently. This will weaken the clip and cause loss of functionality. Page 4 of 16 EZSpeed Calibrator © EZ Metrology, 2014 Manual v1.1 1.2. Component Description: The following image shows the calibrator along with its various components: 𝑦 𝑥 Figure 1: Calibrator – Full Assembly a. b. c. d. e. f. g. h. i. j. k. Base Platform X-Axis Level Height Adjustment Y-Axis Level Height Adjustment Swinging Arm Crossbar Release Switch Rebound Breaking Clip Balance Level Distance Markers Serial Number Sticker Nominal Values Sticker Mounting surface for components For leveling along the x-axis For leveling along the y-axis Weighted arm for measurement Crosses EZSpeed lasers Locks arm into starting position Prevents arm from bouncing back Shows the calibrator levelness Placement of EZSpeed Designated serial number Nominal speeds shown in mm/s Page 5 of 16 EZSpeed Calibrator © EZ Metrology, 2014 Manual v1.1 2. Operation 2.1. Leveling: 1) Place the calibrator on a leveled firm surface that does not wobble and does not have a steep gradient. 2) Adjust the two feet at the left of the calibrator by loosening the silver adjustment knob and raising or lowering the loose adjustment nut until the bubble along the x-axis is between the two black lines as shown. 3) Adjust the foot at the right of the calibrator in the same manor until the bubble along the y-axis is between the two black lines as shown. Figure 2: Height Adjustment Assembly Figure 3: How to Adjust Height Page 6 of 16 EZSpeed Calibrator © EZ Metrology, 2014 Manual v1.1 2.2. Taking Measurements 1) Mount the EZSpeed such that the rear of the device is lined up with the desired distance marker (D1, D2, D3). See the EZSpeed Manual for mounting instructions. Figure 4: Positioning for D1 (left) and 3 Positions of EZSpeed on Calibrator (right) 2) Lift the arm out of the cradle by the crossbar. Figure 5: Proper Crossbar Release 3) Lock the arm into the desired position (high, medium, low) using the release switch. Figure 6: Various Arm Positions Page 7 of 16 EZSpeed Calibrator © EZ Metrology, 2014 4) Manual v1.1 Press the release lever firmly to drop the measurement arm. Figure 7: Pressing release switch 5) The speed measurement will appear on the EZSpeed display. Figure 8: Measurement displayed Page 8 of 16 EZSpeed Calibrator © EZ Metrology, 2014 Manual v1.1 3. Technical Information 3.1. Principle of Calibration: Figure 9: Laser projection in actual and ideal situation The main principle of operation of the EZSpeed is based on the measurement of velocity by dividing distance over time. When a surface moves perpendicular to the lasers, it will trigger each one at different times. When it crosses the first laser, its light is reflected back at the object. When this light falls on a light dependent resistance (LDR) diode, this circuit starts an internal timer. A similar signal is generated when the object crosses the second laser and the timer is stopped. Thus the timer calculates the time difference between the two incidences which is the time taken for the object to cross the second laser after the first laser is triggered. In an ideal situation If this time = t in seconds, and the distance between the laser (which is a constant of 35mm) = d, the velocity in mm/s is given by: In a realistic situation however, since the projected distance is , there is an error in the velocity calculation. Hence if time take is now t’ and the projected distance is x, the measured velocity will be This is because the EZSpeed cannot measure the projected distance and assumes it to be same as in case of a realistic situation. Thus to adjust this to get back the correct value of velocity, we use the above 2 equations to get Here the factor (x’/d) is known as the calibration factor. Theoretical method for estimation: The calibration factor can be estimated by using simple principles of geometry and newton’s laws applied to free fall motion. Assuming the calibrator arm to fall freely under gravity in a straight line (neglecting frictional and rotational factors), let the arm fall from a designated height ‘h’ from the initial release point to the point where it crosses the second laser (see fig below). Page 9 of 16 EZSpeed Calibrator © EZ Metrology, 2014 Manual v1.1 Figure 10: Geometry of motion of calibrator arm and laser projection Since the EZ speed uses a time calculation for velocity reference, we calculate that time taken to fall from height ‘h’ is given by: √ where ‘g’ is acceleration due to gravity. The above equation will give time taken to fall from pt. ’A’ to pt. ‘G’. the time take to fall to pt. ‘C’ can be calculated by subtracting height ‘d’ from ‘h’ and will be given by: √ Hence the total time taken to move from pt. ‘C’ to pt. ‘G’ can be calculated by subtracting (ii) fro (i): √ √ Hence the nominal velocity that the EZ speed would calculate in an ideal situation would be: √ √ √ ( √ ) Substituting for ‘t’ using eqn. (i), we get, √ ( ( ( ) ) ) Similarly for a non-ideal situation, the time measure by EZ speed will be the time taken from B to G can be calculated as: √ √ (Continued on next page) Page 10 of 16 EZSpeed Calibrator © EZ Metrology, 2014 Manual v1.1 Hence the velocity calculated by EZ speed will be given by: √ √ √ √ ( ) Solving for ‘x’, we get ( ( ) ) We also know that From (viii) and (ix), we get ( ( ) ) From (v) and (x) we get ( ( ) ) ( ( ( ) ( ) ) ( ( ) ( ) ) ) ( ( ( ) ( ) )( ) ) ( ) ( ) ( ( ) ( ) )( ) Hence we get ( ) ( )( ) Substituting for t using (i), we get ( )( √ ) We can now use the above formula, put in value of calculated velocity at any given distance ‘D’ and using nominal value of velocity , we can calculate the skew angle .We can now simply use eqns. (ix), (vii) and (iv) to get ( ( √ √ ) ) This way, the calibration factor takes into account the natural skewing that occurs between the lasers. Realistically, they are not perfectly parallel and the actual projected distance between them at a certain distance away from the device could be greater or less than 35mm. Note: The above theorem does not take into consideration factors due to friction and curvature of the path of the arm. In real situations, those factors will also have to be taken into account Page 11 of 16 EZSpeed Calibrator © EZ Metrology, 2014 Manual v1.1 3.2. Calculation of Calibration Factor and Error Checking: The EZ Speed calibrator can be used to calculate the calibration factor and to check errors in actual measurements. By placing the EZSpeed at different distances and measuring and comparing the values measured by EZSpeed to the nominal value, we can calculate calibration factor for devices that are not calibrated or check error in calibrated devices. 3.2.1 Calibration Process: 1) Place the EZSpeed in any one of the locations D1, D2 and D3 (refer to topic 2.2 –taking measurements). 2) Starting with the lowest speed setting –take 10 readings at each distance and each speed and tabulate your results Here is an example below: Figure 11: Example Table for Calibration 3) Calculate the average of all readings at a particular speed and compare with the nominal. 4) Each speed setting will have different calibration factors based on the geometry of motion. 5) Once the data has been collected, you can share the data with the distributer / supplier who will calculate the calibration factor and give a code. 6) Input this code in the device to calibrate it. CAUTION!!! Do not attempt to tune device by entering random codes. Doing this may lock the device permanently and may render it inoperable. Page 12 of 16 EZSpeed Calibrator © EZ Metrology, 2014 Manual v1.1 3.2.2 Error Checking: Simple error checking can be performed by using the calibration also. 1) Repeat Steps 1 and 2 as above. 2) Calculate the difference of 10 readings and take the maximum difference in reading (see example below: Figure 12: Example Table for Error Checking 3) Calculate you error using the formula: | | By calibration standards, a calibrated device should not have an error of more than 5% from the nominal CAUTION!!! In case device gives erratic reading, do not attempt to open/repair or tune the device, and contact the supplier immediately 3.3. Specifications and Characteristics: Physical Characteristics Dimensions L480mm x H238mm x D150mm Weight 3.094kg Accuracy 99% Units mm/sec Page 13 of 16 EZSpeed Calibrator © EZ Metrology, 2014 Manual v1.1 4. Warranty Information Each device is inclusive of a two year warranty. Some services and repairs are covered within the warranty period free of charge. To know about the detail of warranty terms and conditions, contact the supplier. ----------------------------------------------------------------------------------------------------------------------------- ----- NOTES Page 14 of 16 EZSpeed Calibrator © EZ Metrology, 2014 Manual v1.1 CALIBRATION TABLE Speed Setting 'L' (low speed) Nominal= ______mm/s D3 Net average Speed Setting 'M' (Medium speed) Nominal = ______mm/s D1 Net average Speed Setting 'H' (High speed) Nominal = _______ mm/s Speed setting Serial number 1 2 3 4 5 6 7 8 9 10 Avg 1 2 3 4 5 6 7 8 9 10 Avg 1 2 3 4 5 6 7 8 9 10 Avg Distance Setting D2 Net average Page 15 of 16 EZSpeed Calibrator © EZ Metrology, 2014 Manual v1.1 ERROR CHECKING TABLE D1 Speed (v) Error (Δv) Speed Setting 'L' (low speed) Nominal= ______mm/s Speed setting Serial number 1 2 3 4 5 6 7 8 9 10 Distance Setting D2 Speed (v) Error (Δv) Speed Setting 'M' (Medium speed) Nominal = ______mm/s Speed Setting 'H' (High speed) Nominal = _______ mm/s 1 2 3 4 5 6 7 8 9 10 Error (Δv) Net Maximum Max error 1 2 3 4 5 6 7 8 9 10 D3 Speed (v) % age = Net Maximum Max error % age = Net Maximum Max error % age = Page 16 of 16