1
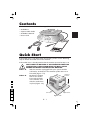
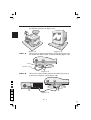
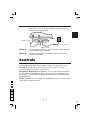
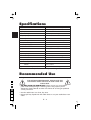
English
100
95
75
25
5
0
100
95
75
25
5
0
Contents
The audio base contains the following additional items.
• Audio Base
• Captive Audio Cable
• Audio Base Manual
• Power Cord
Quick Start
If the audio base is not attached to the monitor, please use the following
steps to attach the audio base to the monitor.
If the audio base is already attached to the monitor proceed to Step 1-B.
100
MAKE SURE THE MONITOR IS DISCONNECTED FROM THE
SYSTEM AND IS UNPLUGGED FROM THE WALL OUTLET
BEFORE ANY WORK IS DONE ON THE MONITOR.
STEP 1-A.
With the monitor unplugged from your system and the
wall outlet, carefully turn the monitor upside down on a
firm table (Figure 1-A).
Bottom of
STEP 2-A.
Position the locking
monitor
tabs on the audio
base with the holes
in the monitor and
slide the audio base
in place (Figure 2-A).
95
75
25
Firm Table
Figure 1-A
5
0
Top of monitor
E-1
STEP 3-A.
STEP 1-B.
Having successfully installed your audio base, carefully turn
the monitor right side up (Figure 3-A).
Figure 3-A
Figure 2-A
Connect one end of the short power cord to the connector on
the audio base and the other end to the monitor (Figure 1-B).
AC OUT
Short Power Cord
STEP 2-B.
Figure 1-B
Connect the captive audio cable to the audio (line) output
jack of your computer system (Figure 2-B).
100
95
75
25
Figure 2-B
5
0
E-2
STEP 3-B.
Connect one end of the long power cord to the AC-IN
connector on the audio base and the other end into the
AC wall outlet (Figure 3-B).
AC IN
Short Power Cord
Long Power Cord
STEP 4-B.
STEP 5-B.
Figure 3-B
Reconnect your monitor to your computer system as shown
in the monitor User’s Manual.
Turn on the audio base and adjust the controls for best
sound performance.
Controls
Power: Press the power button to turn the audio base on or off. An
indicator light next to the power button will glow to show power is on.
Volume: Turn this control clockwise to increase volume level and
counterclockwise to decrease volume level.
Headphone Output Jack: Headphones can be used to listen to audio in
private. When the headphone plug is inserted into the headphone jack,
the speakers are automatically disconnected and sound is heard through
the headphones.
100
NOTE: Headphones not included. The headphone plug required is a mini
stereo type measuring 3.5mm.
95
75
25
5
0
E-3
Specifications
Speakers
Two 2.2 inch / 57mm full range
Power
1 + 1 Watts @ 8 Ohms with 10% THD
Input Impedance
≥ 10k Ohms
Input Sensitivity
500mV input for full output
Frequency response
150Hz - 10kHz
Power Requirements
AC 100-240V
Current Rating
3.15A (Audio 0.15A. AC OUT 3A)
Headphone Jack Type
3.5mm Stereo
Audio Input Plug Type
3.5mm Stereo
Dimensions
260mm (W) x 45mm (H) x 243mm (D)
Weight
0.72kg
Environmental Considerations
Operating Temperature
30% to 80% (Non-Condensing)
Altitude
0 to 3.000 m
Storage Temperature
Humidity
Altitude
System Hardware Requirements
Note:
0° C to +35° C
Humidity
-20° C to +60° C
10% to 90%
0 to 13.700 m
PC or MAC with sound capabilities
Technical specifications are subject to change without notice.
Recommended Use
Safety Precautions and Maintenance
100
95
75
25
5
0
FOR OPTIMUM PERFORMANCE, PLEASE NOTE THE
FOLLOWING WHEN SETTING UP AND USING THE
AUDIO BASE:
• DO NOT OPEN THE AUDIO BASE. There are no user serviceable
parts inside and opening or removing covers may expose you to
dangerous shock hazards or other risks. Refer all servicing to qualified
service personnel.
• Use the audio base in a clean, dry area.
• Do not spill any liquids into the audio base or use your audio base near
water.
E-4
• Do not insert objects of any kind into the audio base slots, as they may
touch dangerous voltage points, which can be harmful or fatal or may
cause electric shock, fire or equipment failure.
• Do not place any heavy objects on the power cord. Damage to the cord
may cause shock or fire.
• Keep the audio base away from high capacity transformers, electric
motors and other devices such as external speakers or fans, which may
create strong magnetic fields.
• To separate the equipment from the power source you have to remove
the plug from the inlet socket.
• When operating the audio base with its AC 220-240V worldwide power
supply, use a power supply cord that matches the power supply voltage
of the AC power outlet being used. The power supply cord you use
must have been approved by and comply with the safety standards of
your country. (Type H05VV-F should be used except in UK)
NOTE:
The audio base is to be used only with NEC MultiSync
monitors.
• In UK, use a BS-approved power cord with molded plug and a black
(5A) fuse installed for use with this audio base. If a power cord is not
supplied with this audio base, please contact your supplier.
Immediately unplug your audio base from the wall outlet and refer
servicing to qualified service personnel under the following conditions:
• When the power supply cord or plug is damaged.
• If liquid has been spilled, or objects have fallen into the audio base.
• If the audio base has been exposed to rain or water.
• If the audio base has been dropped or the cabinet damaged.
• If the audio base does not operate normally by following operating
instructions.
• Allow adequate ventilation around the audio base so
that heat can properly dissipate. Do not block ventilated
openings or place the audio base near a radiator or
other heat sources.
100
95
75
CAUTION
25
• The power cable connector is the primary means of
detaching the system from the power supply. The audio
base should be installed close to a power outlet which is
easily accessible.
• Handle with care when transporting. Save packaging
for transporting.
5
0
E-5
Troubleshooting
Symptoms
Possible
Problem
Solution
Note
No sound
from
speakers
No power to
unit.
Make sure all connecting
plugs between the audio
base and computer are
fully seated. Make sure
the wall power outlet or
power strip has power.
Make sure the power
switches on the power
strip and audio base are
turned on.
Provided power has been
verified, it is possible to
test to unit by
disconnecting the audio
cable that is connected
to the computer and
reconnecting it to an
alternate audio power
source such as a
portable CD player.
Volume level on
sound card or
other audio
source may be
too low.
Check volume level of
sound card, audio source
and windows mixer and
raise as necessary.
Check with and alternate
audio source ad
mentioned above.
Volume is too
low.
Make sure the volume
control is not at zero.
Speaker is
being
overdriven by
an amplified
audio source.
Make sure the audio
base is connected to
line-out jack
(unamplified) of sound
card and not speaker-out
jack (amplified).
Volume level on
sound card or
other audio
source may be
too high and
causing speaker
to be overdriven.
Check volume level of
sound card or audio
source and lower as
necessary.
Sound card or
specific sound
file/ track may
be root of
problem.
Check speakers with
another audio source
(CD-ROM player) to see
if sound card or specific
file/track may be the
problem.
Audio cable is
not properly
connected.
Make sure the audio
connector properly
inserted in the audio jack
on the rear side.
Distortion
(i.e. static,
hissing
crackling)
100
95
75
Sound from
only one
speaker
25
5
0
E-6
Depending on your
sound card, you may
also turn off the
amplified on the sound
card (check your sound
card manual).
For this check, disconnect
speakers from sound
card and plug into
headphone jack on front
of CD-ROM player or
alternate line-level audio
source.