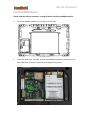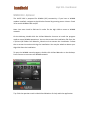
1
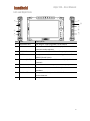
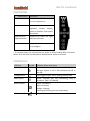
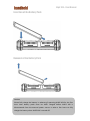
Algiz 10X – User Manual ALGIZ 10X User Manual Algiz 10X – User Manual Safety Precautions Warning Always completely disconnect the power cord from the device before you uncover the device and work on the hardware. Do not connect the electronic device with a power socket while the power is on. Sensitive electronic components can be damaged by sudden power surges. Only experienced electronics personnel should open mechanical housing. Caution Always ground yourself to remove any static charge before touching the printed circuit board. The electronic devices are very sensitive to static electricity. For safety purposes, please use a grounding wrist strap at all times. Place all electronic components in a static-dissipative surface or static-shielded bag when they are outside of the chassis. Algiz 10X – User Manual Index Part 1:................................................................................................................... 1 Identifying Algiz 10X ............................................................................................. 1 Getting Started ..................................................................................................... 1 What’s in the Box ................................................................................................... 2 Specification ........................................................................................................... 3 COM Port Assignment ............................................................................................ 4 Boot Options .......................................................................................................... 4 Factory Reset ......................................................................................................... 4 Front Side ............................................................................................................... 5 Left and Right Side ................................................................................................. 6 Rear Side ................................................................................................................ 7 Function Keys ......................................................................................................... 8 LED Indicators ........................................................................................................ 8 Part 2:................................................................................................................... 9 Using Algiz 10X ..................................................................................................... 9 AC Power .............................................................................................................. 10 Battery Power ...................................................................................................... 10 Insertion of the Battery Pack ............................................................................... 11 Removal of the Battery Pack ................................................................................ 11 Charging the Battery ............................................................................................ 11 Battery Care ......................................................................................................... 12 Battery Power System.......................................................................................... 12 Charging the Battery ............................................................................................ 12 UL Safety .............................................................................................................. 12 Power Supply ....................................................................................................... 13 Starting Algiz 10X ................................................................................................. 14 Screen Calibration ................................................................................................ 14 Installing WWAN Module .................................................................................... 15 Installing SIM Card, SD Card ................................................................................. 16 Part 3:.................................................................................................................. 17 Software .............................................................................................................. 17 Hot-Tab ................................................................................................................ 18 Adjusting the LCD Brightness ............................................................................... 18 Adjusting the Speaker Volume............................................................................. 19 Battery Status....................................................................................................... 19 WLAN ................................................................................................................... 20 Algiz 10X – User Manual Bluetooth ............................................................................................................. 20 WWAN (3G) - Optional......................................................................................... 21 GPS ...................................................................................................................... 22 Camera ................................................................................................................. 24 External GSM Antenna ......................................................................................... 24 External GPS Antenna .......................................................................................... 25 System Information.............................................................................................. 25 Part 4:.................................................................................................................. 26 Regulatory Information ........................................................................................ 26 FCC Compliance Statement.................................................................................. 27 FCC Warning ......................................................................................................... 27 Caution: ................................................................................................................ 27 FCC RF Radiation Exposure .................................................................................. 28 CE Declaration of Conformity .............................................................................. 28 Part: 5.................................................................................................................. 29 Algiz 10X Care ...................................................................................................... 29 Battery Protection Tips ........................................................................................ 30 Touchscreen Protection Tips ............................................................................... 31 Algiz 10X Care....................................................................................................... 32 Cleaning the Exterior............................................................................................ 32 Connectors ........................................................................................................... 33 Copyright Notice .................................................................................................. 33 Trademark Acknowledgement............................................................................. 33 Disclaimer............................................................................................................. 33 Customer Service ................................................................................................. 34 Algiz 10X – User Manual Part 1: Identifying Algiz 10X Getting Started 1 Algiz 10X – User Manual What’s in the Box Item Description One 2 Cell Li-Ion Battery Pack 12V Adapter w/ standard power cord. Standard type, 1.8M Screen protector film Algiz 10X Quick start guide 2 Algiz 10X – User Manual Specification ALGIZ 10X is a rugged Tablet tablet PC designed for use in various challenging environments, e.g. field work, outdoor activities and construction sites. With its rugged design, ALGIZ 10X is able to withstand shocks, vibrations, high humidity as well as high/ low temperatures. System Processor Intel® Atom™ Processor N2800 BIOS AMI System BIOS Chipset Intel® NM10 Express Chipset Memory SODIMM, DDR3 1600 4GB LAN Controller Broadcom BCM57780 Gigabit-LAN Storage SATA interface support Mini-PCIe interface SSD 128GB Audio Audio-out / Audio-in / Microphone-in. Internal Speaker Display Specification Size 10.1” (16:9) Resolution 1366 x 768 Brightness 600 cd/m2 (typ.) Touch 4W Resistive Touch I/O Connectors Left Side 1xDC Power Jack, 1xVGA, 1xUSB,1xRS232 Right Side 1xLAN, 1xUSB, 1xMic/Audio Jack, 1xSIM Card Slot, 1xMicro SD Card Slot Bottom Side Pogo-pin for docking Rear Side Service Window Buttons and Indicators Control Button Power On/Off, Menu, Up, Down, Left, Right, Enter, 3 Programmable Hotkeys LED Indicators Power Status, SSD Status, RF Device Status, Battery Status, GPS Status 3 Algiz 10X – User Manual COM Port Assignment COM1 RS232 COM2 B+ Power & UART Wafer COM3 GPS COM6 3G COM7 3G COM8 3G COM11 Docking Station COM12 Docking Station Boot Options F1 Initiate factory reset F2 Enter BIOS F3 - Factory Reset The Algiz 10X has a built-in recovery utility that can be used to reset your computer’s SSD disk to its factory state. Press F1 during booting when the Handheld logo screen appears. Follow the instructions on the screen to continue with the factory reset. Caution: This procedure will erase all data on your disk. 4 Algiz 10X – User Manual Front Side Ref. Item Description 1 LED Display The tablet PC uses a high-brightness LED TFT LCD. Use a soft cloth without chemical liquids to clean the display panel. 2 Front Microphone Receives sound to make voice recordings. 3 Light Sensor Senses the ambient light for automatic adjustment of the display backlight. The features can be enabled through the OSD Control Keypad. 4 OSD Control Keypad The OSD Control Keypad provides hotkeys with all functions including Power On/Off, Menu, Up, Down, Left, Right, Enter and programmable hotkeys. 5 Algiz 10X – User Manual Left and Right Side 1 ○ 5 ○ 6 ○ 7 ○ 8 ○ 3 ○ 9 ○ 4 ○ Ref. Item Description 1 DC Power Jack DC plug for supplying power to the device 2 VGA For connection to external display devices such as monitors and projectors 3 USB 2.0 Port Can be connected to USB-interface peripherals 4 RS232 Accepts external connections using the interface of RS232 (D-sub 9 pins) 5 Ethernet(RJ45) Port For connection to an Ethernet 10/100/1000-based network 6 USB 2.0 Port Can be connected to any USB-interface peripherals 7 Combo Audio Jack For connection to a set of headphones or external speakers. 8 SIM Card Slot Accepts a SIM Card, use the WWAN feature to connect to the Internet. 9 Micro SD Card Slot Accepts a Micro SD Card for additional features. 6 Algiz 10X – User Manual Rear Side 2 ○ Ref. Item 1 Stylus Pen 2 Service Window 1 ○ Description User-accessible compartment. Algiz 10X – User Manual Function Keys Components Description Power Button* Hold down for 4 seconds to turn the computer on. Menu Menu button to control: brightness, volume, battery, power to modules, and system information. Up/Down/Left/ Right/OK Button Control of up, down, left, right and Enter functions. F1 – F3 3 programmable buttons. Press F1 to configure. * If computer does not respond you can power it off by holding down the Power Button until the LEDs are switched off. Hold down for about 10 seconds. LED Indicators LED Term Symbol Indicator Status Description Power mode Green: System is on No light: System is off or LED indicators are off in Hot-tab. Storage Status Flashing green light: SSD is reading/writing data Radio Status Green: Indicates that any transmitting radio is turned on. (WiFi, BT, WWAN) Battery Status Green: Full battery Red: Low battery Orange: Charging Flashing red: Running on Hot-swap battery GPS Status Green: GPS is on. Algiz 10X – User Manual Part 2: Using Algiz 10X Algiz 10X – User Manual Before turning the unit on, make sure that the tablet is either connected to AC power or the battery. AC Power The Algiz 10X power supply is comprised of two parts, the power adapter and the battery. The power adapter converts AC power from a wall outlet to the DC power required by the Algiz 10X. Your Algiz 10X comes with a universal AC-DC adapter. That means that you may connect the power cord to any 100V-120V as well as 220V-240V outlets without using power converters. Different countries may require an adapter to be used to connect the supplied standard AC power cord to a different standard. Battery Power The Algiz 10X is designed to work with two types of battery. A standard battery with 5300mAh and an extended battery with double the capacity. A fully charged battery pack will provide several hours of battery life. Among other factors, the battery life is especially dependent on the battery’s condition, tablet usage, as well as the temperature. Algiz 10X – User Manual Insertion of the Battery Pack Removal of the Battery Pack Caution Please fully charge the battery in advance of operating ALGIZ 10X for the first time. New battery packs must be 100% charged before ALGIZ 10X is disconnected from the external power source. It takes a few hours to fully charge the battery when ALGIZ 10X is turned off. Algiz 10X – User Manual Charging the Battery Before you use your Handheld tablet PC, you need to charge the battery. The battery begins to charge as soon as the Handheld tablet PC is connected to the external power source. Please fully charge the batteries before using them for the first time. The new battery should be fully charged before the tablet PC is disconnected from the external power source. The battery pack is fully charged when the battery LED indicator turns OFF. It takes about a couple of hours to fully charge the battery when the Handheld tablet PC is turned OFF. Battery Care The Handheld tablet battery pack, like all rechargeable batteries, has a limit on the number of times it can be fully recharged. Fully draining and charging the battery once a day will allow the batteries to last for over a year, but rechargeable time limits are based on the ambient temperature, humidity and how your tablet PC is used. The ideal ambient temperature range is between 10°C and 29°C (50°F and 85°F). Battery Power System This tablet PC is designed to work with two removable battery packs placed inside the battery pack compartment. A fully charged battery pack will provide several hours of battery life, which can be extended further by configuring power management in Windows. Charging the Battery When the power adapter is plugged in, the battery automatically recharges regardless of whether your tablet PC is in the ON or OFF mode. It takes a couple of hours for the battery to be fully charged when the power is OFF and twice as long when the tablet PC is in use. When the charger LED indicator lights up orange, charging is required. The battery is charging when the red LED is permanently on. When the LED turns OFF, the battery pack is fully charged. UL Safety UL Classification: Class I mark: with respect to electric shock; Fire and hazardous material only in accordance with the regulations of UL-60950 and CAN/CSA C22.2 No. 601.1. Algiz 10X – User Manual Power Supply The power for the Handheld rugged tablet PC is supplied by the power adapter and battery pack, the power rating and manufacturer information are listed as below. For safety reasons, the adapter must be connected to ground (earth). Power Adapter Manufacturer: EDAC Power Electronics Co Ltd Model: EA11001C-120 Input Rated: 100-240Vac, 1.8A, 50-60Hz. Output Rated: DC 12V, 6.66A. Battery Pack Manufacturer: T-Gee Electronic Co., Ltd Model: ALG10X-08A Rated: 5300mAh DC 7.4V Caution! Do not attempt to fix or replace the battery, as this may cause an explosion! Only use the specified battery and follow the instructions in the manufacturer's user manual. Algiz 10X – User Manual Starting Algiz 10X Note: you will be asked to enter the Microsoft Windows license number which can be found under the main battery. Press the power button for 4-6 seconds to power on the Algiz 10X. Follow the Microsoft Windows on-screen instructions to get started with Windows. The screen calibration may not be accurate the first time you start the computer. Follow this procedure to calibrate the touchscreen: Screen Calibration 1. Open Control Panel > Hardware and Sound > Tablet PC Settings 2. Click Calibrate and follow instructions 3. Repeat step 1 and 2 until you are satisfied with the calibration Algiz 10X – User Manual Installing WWAN Module Please read the safety precautions on page 3 before installing a WWAN module. 1. Insert the WWAN module into the top mini PCIe slot. 2. Install the antennas. The Algiz 10X has two WWAN antennas connected to the Gobi 3000 card. Install the antennas according to the picture. Algiz 10X – User Manual Installing SIM Card, SD Card Remove the SIM/SD card cover on the right side. This cover is secured with two screws. Insert the SIM card according to picture. Algiz 10X – User Manual Part 3: Software Algiz 10X – User Manual Hot-Tab Algiz 10X has a pre-installed control application, Hot-Tab. The control application is used to monitor and control features such as brightness, volume, battery status, power to modules and system information. The control application is accessed by pressing menu on the Algiz 10X. Press menu multiple times to navigate through Hot-tab. You can use the arrows on the control panel to navigate within the OSD menu. To exit Hot-Tab: Double tap outside of the Hot-Tab window or click the “x” in the top right corner. Adjusting the LCD Brightness The Brightness Control is accessed by pressing menu once. Use the left and right arrow keys to adjust the LCD brightness. Check Auto Brightness to activate automatic brightness. With this item checked, Algiz 10X will adjust the LCD brightness based on the ambient light. Algiz 10X – User Manual Adjusting the Speaker Volume The Speaker Control is accessed by pressing menu twice. Use the left and right arrow keys to adjust the volume. Battery Status The Battery status is accessed by pressing menu 3 times. Press the Menu button three times to view the battery status. The Algiz 10X has a replaceable Main battery as well as a second built-in hot-swap battery. The hot-swap battery will activate once the main battery is empty or unplugged. Algiz 10X – User Manual WLAN Algiz 10X can connect to IEEE 802.11 b/g/n networks operating on 2.5GHz. The Function Control is accessed by pressing menu 4 times. Check Wi-Fi to turn the Wi-Fi radio on. Uncheck Wi-Fi to turn it off. Bluetooth Depending on your application, the Bluetooth module can give you capability for short-range wireless communication between devices without requiring a cable connection. The transmission can pass through walls, pockets and briefcases as long as the two devices are within a range of around 10 meters. The Function Control is accessed by pressing menu 4 times. Check Bluetooth to turn the Bluetooth radio on. Uncheck Bluetooth to turn it off. Algiz 10X – User Manual WWAN (3G) - Optional The ALGIZ 10X is prepared for WWAN (3G) connectivity. If you have a WWAN modem installed, navigate to the Wireless Control by pressing menu 4 times. Check 3G to switch WWAN radio on/off. Note: You must install a SIM card in order for the Algiz 10X to access a WWAN network. On the desktop, double-click the AirCard Watcher shortcut to install the program used to control WWAN operations. You can also access the installation file from the C:\Drivers\3G folder. Run Watcher_Generic.msi to execute the installation. Follow the on-screen instructions during the installation. You may be asked to reboot your Algiz 10X after the installation. To open the WWAN control program, double click AirCard Watcher on the desktop. Press Connect to connect to a WWAN network. Tip: Click the question mark inside AirCard Watcher for help with the application. Algiz 10X – User Manual GPS Algiz 10X is equipped with a dedicated GPS receiver for optimum performance. The Function Control is accessed by pressing menu 4 times. Check GPS to turn the GPS receiver on. Uncheck GPS to turn it off. The GPS evaluation software, U-Center, is accessed by double-clicking the U-Center icon available on the desktop. Set the port to COM3 * COM4 on some units with S/N range: OW1340011278 - OW1340011377 Algiz 10X – User Manual Set Baudrate to 9600 GPS will now start looking for satellites to calculate its position. This procedure may take from a few seconds to a few minutes depending on satellite positions, interference, environmental factors and radio noise. Tip: See the U-Center manual for more information about this GPS evaluation software. Algiz 10X – User Manual Camera The ALGIZ 10X has a built-in 5-megapixel camera. The Function Control is accessed by pressing menu 4 times. Check Camera to turn the Camera on. Uncheck Camera to turn it off. Press F1 and click the Camera icon to start the Camera. In the settings you can control the destination folder for saved pictures or videos, previews, as well as image resolution. External GSM Antenna The Function Control is accessed by pressing menu 4 times. Check 3G Antenna (auto) to activate an external antenna installed on the vehicle dock Alg10X-05A. When this item is checked, Alg10X will automatically switch to the external antenna when the unit is docked. Do not check this item unless you have an external antenna installed on your Alg10X-05A vehicle dock. Uncheck 3G Antenna (auto) to turn this feature off. Algiz 10X – User Manual External GPS Antenna The Function Control is accessed by pressing menu 4 times. Check GPS Antenna (auto) to activate an external antenna installed on the vehicle dock Alg10X-05A. When this item is checked, Alg10X will automatically switch to the external antenna when the unit is docked. Do not check this item unless you have an external antenna installed on your Alg10X-05A vehicle dock. Uncheck GPS Antenna (auto) to turn this feature off. System Information Press the Menu button five times to view system information. Please have this information ready if you are contacting Handheld support. Algiz 10X – User Manual Part 4: Regulatory Information Algiz 10X – User Manual FCC Compliance Statement This device complies with Part 15 of the FCC Rules. Operation is subject to the following two conditions: 1. This device must not cause harmful interference, and 2. This device must be able to withstand any interference received, including interference that may cause undesired operation. FCC Warning This equipment has been tested and found to comply with the limits for a Class B digital device, pursuant to Part 15 of the FCC Rules. These limits are designed to provide reasonable protection against harmful interference in a residential installation. This equipment generates, uses and can radiate radio frequency energy and, if not installed and used in accordance with the instructions, may cause harmful interference to radio communications. However, there is no guarantee that interference will not occur in a particular installation. If this equipment does cause harmful interference to radio or television reception, which can be determined by turning the equipment off and on, the user is encouraged to try to correct the interference by one or more of the following measures: • Reorienting or relocating the receiving antenna. • Increasing the distance between the equipment and the receiver. • Connecting the equipment to adifferent outlet from that to which the receiver is connected. • Consulting the dealer or an experienced radio/TV technician for help. Caution: To comply with the limits for an FCC Class B computing device, always use the shielded signal cord supplied with this unit. The Federal Communications Commission warns that changes or modifications to the unit not expressly approved by the party responsible for compliance could invalidate the user’s authority to operate the equipment. Algiz 10X – User Manual FCC RF Radiation Exposure This equipment complies with the FCC RF radiation exposure limits stipulated for an uncontrolled environment. This device and its antenna must not be co-located or operated in conjunction with any other antennas or transmitters. To comply with FCC RF exposure compliance requirements, the antenna used for this transmitter must be installed so as to provide a separation distance of at least 20 cm from all persons and must not be co-located or operated in conjunction with any other antennas or transmitters. CE Declaration of Conformity It is hereby confirmed that this equipment complies with the requirements set out in the Council Directive on the Approximation of the Laws of the Member States relating to Electromagnetic Compatibility (89/336/EEC), Low-voltage Directive (73/23/EEC) and the Amendment Directive (93/68/EEC), as well as the procedures set out in European Council Directive99/5/EC and 89/3360EEC. Emission Tests Immunity Tests EN55022: 2010 EN55024: 2010 Harmonic Current Emissions EN61000-3-2: 2006/A2: 2009 Electrostatic Discharge IEC 61000-4-2: 2008 Voltage Fluctuations and Radio-Frequency, IEC 61000-4-3: 2006/A1: Electromagnetic Field 2007/A2: 2010 Electrical Fast Transient/ Burst IEC 61000-4-4: 2012 Surge IEC 61000-4-5: 2005 RF Common Mode IEC 61000-4-6: 2008 EN61000-3-3: 2008 Flicker Product Name: Algiz 10X Warranty: 12 Months Power Frequency IEC 61000-4-8: 2009 Magnetic Field Safety of Information EN60950-1: 2006/A11: 2009/A1: Voltage Dips and Voltage Technology Equipment 2010/A12: 2012 Variations IEC 61000-4-11: 2004 In accordance with 2004/108/EC, 2006/95/EC and 93/68/EEC Algiz 10X – User Manual Part: 5 Algiz 10X Care Algiz 10X – User Manual Battery Protection Tips The recommended temperature range for charging the battery pack is -5℃ ~ 35 ℃. To avoid damage to the battery, recharge the battery pack when it is nearly discharged. When recharging, the battery pack should be fully charged. The battery pack is a consumable product and the following factors will shorten its life: Frequently charging the battery pack Using, charging or storing the battery at high temperatures A high ambient temperature will cause the temperature of the battery pack to rise. Avoid charging the battery pack inside a closed vehicle and in hot weather conditions. Charging will also not start if the battery pack is not within the allowed temperature range. Charging the battery pack with the system’s power off is recommended. To maintain the battery pack’s operating efficiency, store it in a cool dark place removed from the tablet PC and with 30 % ~ 40 % charge remaining. Avoid installing or removing the battery pack when the Algiz 10X is in Standby mode. Charging time will be prolonged when the Algiz 10X is turned on. • No debris, combustibles or chemicals should be allowed near the battery while charging. Extra caution is required when charging the battery in non-commercial conditions. • The battery should only be used in accordance with the instructions for use, storage and recharging as set out by this manual. • • Improper use of the battery may result in fire or explosion. Do not use incompatible batteries or chargers. The use of incompatible Algiz 10X – User Manual batteries or chargers may result in risks such as fire, explosion, leaks, etc. If you have any questions about batteries or the charger, contact Handheld. • Do not attempt to disassemble, open, bend, modify, puncture or smash the product or the battery. • If you drop the device hard on a solid surface, the battery may overheat. • Extra care must be taken to avoid short circuiting, connect a metal conductor to the battery terminals. • Special attention must be paid to avoid modification, resetting, inserting foreign bodies into the battery, exposing the battery to water or other liquids, fire, explosion and other risks. • • • Do not allow children to handle the battery unsupervised. Used batteries must be disposed of in accordance with local regulations. Do not burn the battery. • If the battery has been swallowed, immediately contact a doctor. • If the battery leaks, be careful not to allow the fluid to come into contact with skin or eyes. If battery fluid comes into contact with skin or eyes, rinse using plenty of water and seek immediate medical advice. • If you suspect damage to the device or the battery, contact Handheld. Touchscreen Protection Tips Avoid applying excessive force to the display, use only your finger or the supplied touchscreen stylus pen on the display. The recommended force shall not exceed 200gf. Take care to protect the screen from scratches. Only use a plastic pen designed for touchscreens or the stylus provided. Never use pens, pencils or other sharp objects on the screen. To clean the touchscreen, wipe the screen with a clean, soft, lint-free cloth. Algiz 10X – User Manual It is recommended that the screen is protected using protective film (one sheet of protective film is supplied with the product). Advantages of using protective film include the following: o o o o Protects the screen from scratches and grooves. More realistic feel when writing and touching Protects the screen from damage caused by abrasion and foreign bodies. Extends the lifespan of the touchscreen. Your Handheld product screen is made from glass. Do not apply excessive force to the screen. Using the touchscreen at low temperatures (less than 5 ℃) may cause a slower response time, which is normal. A normal response time will be restored once the unit returns to room temperature. Use only detergents or cleaners intended for computers. Take care not to allow any excess liquid to enter the gaps around the screen. To avoid scratches, wipe using a dry non-abrasive cloth. Algiz 10X Care Protect your Handheld product from extreme temperature changes. When the temperature is high, do not leave the device on the dashboard of a vehicle and keep well away from any heat sources. Do not use or store your Handheld product in dirty, humid or wet conditions that are beyond the product specifications. To maximize battery life and performance, replace the battery periodically. The battery life depends on its use. Cleaning the Exterior Use only detergents or cleaners intended for computers. Algiz 10X – User Manual Connectors 1. Remove the battery 2. Soak the end of a swab with isopropyl alcohol and rub across the connector pins. 3. Be careful not to leave any residue on the connectors. 4. This process should be repeated approximately three times. Note: If isopropyl alcohol is not available, use computer cleaning detergent or a pencil eraser (rubber), taking care not to leave any foreign bodies on the pins. Copyright Notice Copyright © 2010 Handheld Group AB, ALL RIGHTS RESERVED. No part of this document may be reproduced, copied, translated or transmitted in any form or by any means, electronic or mechanical, for any purpose, without the prior written permission of the original manufacturer. Trademark Acknowledgement Brand and product names are trademarks or registered trademarks of their respective owners. Disclaimer Handheld Group AB reserves the right to make any product changes without notice, including to circuits and/or software described or contained in this manual, in order to improve design and/or performance. Handheld Group AB assumes no responsibility or liability for the use of the described product(s), conveys no license or title under any patent, copyright, or mask works rights to these products and makes no representations or warranties that these products are free from patent, copyright, or mask works rights infringement, unless otherwise specified. Applications described in this manual are for illustration purposes only. Handheld Group AB makes no representation or warranty that such applications will be suitable for the specified use without further testing or modification. Algiz 10X – User Manual Customer Service Support is provided by Handheld. Visit our website at www.handheldgroup.com to find updated information about the product. You can also contact your distributor, sales representative or our customer support center for further assistance. If you contact our customer support center please have the following information ready before you call: - Product serial number - Peripheral attachments - Software (OS, version, application software, etc.) - Description of complete problem - The exact wording of any error messages with print screen images In addition to this, free technical support is available from our engineers during working hours. We are always ready to provide advice on application requirements or specific information about the installation and operation of any of our products. Please do not hesitate to call or e-mail us. Manufacturer: Handheld Group AB Address: Handheld Group AB, Kinnegatan 17 A, S-531 33, Lidköping, Sweden TEL: +46 (0) 510-54 71 70 FAX: +46 (0) 510-282 05