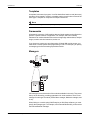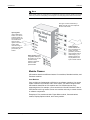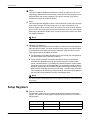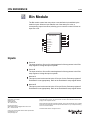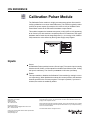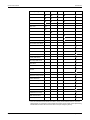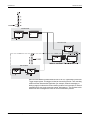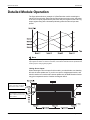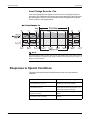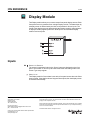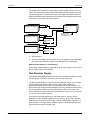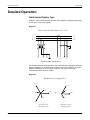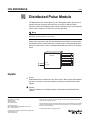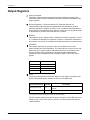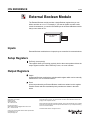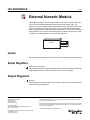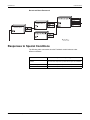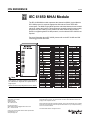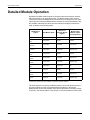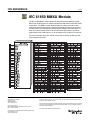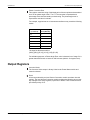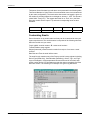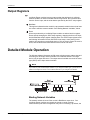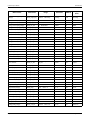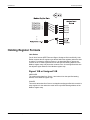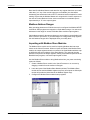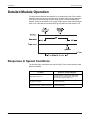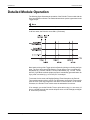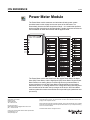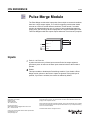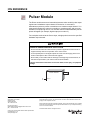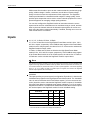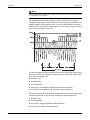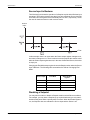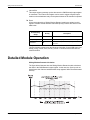
1
ION Reference ION Architecture & ION Modules Reference guide 70002-0290-03 09/2010 Hazard Categories and Special Symbols Read these instructions carefully and look at the equipment to become familiar with the device before trying to install, operate, service or maintain it. The following special messages may appear throughout this manual or on the equipment to warn of potential hazards or to call attention to information that clarifies or simplifies a procedure. The addition of either symbol to a “Danger” or “Warning” safety label indicates that an electrical hazard exists which will result in personal injury if the instructions are not followed. This is the safety alert symbol. It is used to alert you to potential personal injury hazards. Obey all safety messages that follow this symbol to avoid possible injury or death. DANGER indicates an imminently hazardous situation which, if not avoided, will result in death or serious injury. WARNING indicates a potentially hazardous situation which, if not avoided, can result in death or serious injury. CAUTION indicates a potentially hazardous situation which, if not avoided, can result in minor or moderate injury. CAUTION CAUTION used without the safety alert symbol, indicates a potentially hazardous situation which, if not avoided, can result in property damage. NOTE Provides additional information to clarify or simplify a procedure. Please Note Electrical equipment should be installed, operated, serviced and maintained only be qualified personnel. No responsibility is assumed by Schneider Electric for any consequences arising out of the use of this material. Contents Introduction ............................................................................................... 9 Alert Module ........................................................................................... 23 Analog Input Module............................................................................... 39 Analog Output Module ............................................................................ 45 AND/OR Module ..................................................................................... 51 Arithmetic Module ................................................................................... 57 Averaging Module................................................................................... 85 Bin Module.............................................................................................. 89 Calibration Pulser Module ...................................................................... 93 Clock Module .......................................................................................... 99 Communications Module ...................................................................... 107 COMTRADE Module ............................................................................ 115 Convert Module .................................................................................... 119 Counter Module .................................................................................... 123 Data Acquisition Module ....................................................................... 129 Data Monitor Module ............................................................................ 131 Data Recorder Module ......................................................................... 137 DDE Input Module ................................................................................ 145 Diagnostics Module .............................................................................. 149 Difference Summation Module ............................................................. 157 Digital Input Module .............................................................................. 163 Digital Output Module ........................................................................... 169 Display Module ..................................................................................... 175 Display Options Module........................................................................ 181 Distributed Boolean Module ................................................................. 185 Distributed Numeric Module ................................................................. 189 Distributed Pulse Module...................................................................... 193 Disturbance Analyzer Module............................................................... 197 Disturbance Direction Detection Module .............................................. 201 DNP Slave Export Module .................................................................... 205 DNP Slave Import Module .................................................................... 211 DNP Slave Options Module .................................................................. 217 Event Log Controller Module ................................................................ 225 External Boolean Module ..................................................................... 229 External Numeric Module ..................................................................... 231 External Pulse Module.......................................................................... 233 Factory Module ..................................................................................... 235 Feedback Module ................................................................................. 241 FFT Module .......................................................................................... 245 Flicker Module ...................................................................................... 247 Harmonics Analyzer Module................................................................. 253 Harmonics Evaluation Module .............................................................. 259 Harmonics Measurement Module......................................................... 263 IEC 61850 GGIO Cust AI Module......................................................... 267 IEC 61850 GGIO Cust DI Module ........................................................ IEC 61850 GGIO Exp Module .............................................................. IEC 61850 GGIO Onb Module.............................................................. IEC 61850 MHAI Module ...................................................................... IEC 61850 MMTR Module .................................................................... IEC 61850 MMXU Module .................................................................... IEC 61850 MSQI Module...................................................................... IEC 61850 MSTA Module ..................................................................... Instr Xformer Correction (ITC) Module ................................................. Integrator Module ................................................................................. Launching Module ................................................................................ Log Acquisition Module ........................................................................ Log Export Module ............................................................................... Log Mail Module ................................................................................... Log Monitor Module .............................................................................. LonWorks Export Module ..................................................................... Maximum Module ................................................................................. LonWorks Import Module ..................................................................... Mains Signaling Evaluation Module...................................................... Minimum Module .................................................................................. Modbus Export Module......................................................................... Modbus Import Module ......................................................................... Modbus Master Device Module ............................................................ Modbus Master Map Module ................................................................ Modbus Master Options Module........................................................... Modbus Slave Module .......................................................................... One-Shot Timer Module ....................................................................... Periodic Timer Module.......................................................................... Power Harmonics Module .................................................................... Power Meter Module ............................................................................ Power Quality Aggregator Module........................................................ Profibus Slave Export Module .............................................................. Pulse Merge Module............................................................................. Pulser Module....................................................................................... Query Module ....................................................................................... Relative Setpoint Module...................................................................... Sag/Swell Module ................................................................................. Scheduler Module................................................................................. Scroll Module ........................................................................................ Security Options Module ...................................................................... Security User Module ........................................................................... Setpoint Module.................................................................................... Signal Limit Evaluation Module ............................................................ Sliding Window Demand Module.......................................................... SNMP Mapping Module........................................................................ Store Module ........................................................................................ 269 271 275 281 289 293 299 303 307 313 317 321 325 331 337 343 349 353 359 363 367 379 391 397 403 407 413 417 421 425 433 439 443 447 453 455 461 473 489 493 497 501 511 515 521 523 Symmetrical Components Module........................................................ System Log Controller Module ............................................................. Thermal Demand Module ..................................................................... Time of Use Module ............................................................................. Transient Module .................................................................................. Trending and Forecasting Module ........................................................ Voltage Selection Module ..................................................................... Waveform Recorder Module................................................................. Web Page Module ................................................................................ XML Import Module .............................................................................. 527 531 533 537 547 555 559 563 569 573 ION Reference Page 8 © 2008 Schneider Electric. All rights reserved. Introduction This introductory chapter provides background information on ION™ architecture and its modular structure. The subsequent sections of this document detail ION module specifications and configuration parameters, and are intended for use by personnel with a thorough understanding of ION architecture, ION meters, and the systems in which they are deployed. NOTE Modification of ION modules is usually not necessary. ION meters are preconfigured at the factory with a comprehensive set of default functions which are sufficient for most applications. Additional information Other useful resources that supplement this ION Reference include: Online help — available from the Help menu in ION Enterprise™ or ION Setup software. The help files assist you by describing how certain tasks are performed in the software. ION Device Templates — available for download from the Schneider Electric website. This file contains factory configuration information for the various ION meters, with the data organized according to the different firmware versions available for those meters. The ION Device Templates lists the different types of ION modules that are available on a particular ION meter. Meter User Guides — available for download from the Schneider Electric website. A CD containing meter technical documentation can also be ordered from the website. Technical Notes — available for download from the Schneider Electric website, these documents provide a more in-depth look into the applications, services and other aspects related to the ION meter, ION Enterprise or ION Setup software, or energy management systems. © 2009 Schneider Electric. All rights reserved. Page 9 Introduction ION Reference Safety Precautions HAZARD OF ELECTRIC SHOCK, EXPLOSION, OR ARC FLASH • Apply appropriate personal protective equipment (PPE) and follow safe electrical work practices. • This equipment must only be installed and serviced by qualified electrical personnel. • Turn off all power supplying this equipment before working on or inside equipment. • Always use a properly rated voltage sensing device to confirm the power is off. • Replace all devices, doors and covers before turning on power to this equipment. • Do not use ION meters or software for critical control or protection applications where human or equipment safety relies on the operation of the control circuit. • ION modules and registers must only be configured by personnel with a thorough understanding of ION architecture and the system in which the meters and software are installed. • Be familiar with the contents, including the warnings, of this document and the contents of the meter’s technical documentation. • Incorrectly configured ION modules may render the meter non-functional. Do not modify a module’s configuration without understanding the impact to the meter and any associated devices. Failure to follow these instructions will result in death, serious injury or equipment damage. Page 10 © 2009 Schneider Electric. All rights reserved. ION Reference Introduction ION Architecture This section covers the basics of ION architecture, focusing on the different ION modules. ION modules are the functional building blocks of ION architecture. The functions or features available in the ION meter are a result of the logical groups and links between different types of ION modules. Each module is specialized to perform a specific task, contain data and instructions on how to manage that data. By combining (or linking) several modules together, you can create custom functions for your power monitoring system. ION modules that are linked together to perform a specialized task are collectively referred to as a "framework". A framework defines a specific ION meter (or ION Enterprise or ION Setup software) function, such as the Demand and Energy framework, or the Power Quality framework. These different functional frameworks are then grouped together for a particular ION meter, and are collectively referred to as the "device template". Each ION meter has its own device template that defines its metering/monitoring capabilities. You can change the default factory configuration on the ION meter by changing the settings (i.e., setup registers) of certain ION modules inside the meter. You can add, change, or delete functionality by changing the way the ION modules are linked in the meter. There are a number of ways to do this: From the meter front panel. Use the meter’s front panel or remote display to change basic power meter settings such as Volts Mode, PT and CT primary and secondary ratings, as well as communications settings such as unit ID, baud rate and protocol. Only a limited number of ION modules (e.g., those used for basic setup) can be accessed from the front panel or remote display. Using ION Setup. ION Setup configuration software is available as a free download from the Schneider Electric website. Advanced Mode in ION Setup lets you access and modify the settings for any ION module inside an ION meter. ION Setup is particularly useful for configuring a TRAN meter (i.e., one that does not come with a front panel or remote display). Using Designer. Designer is the component of ION Enterprise that graphically shows how the different ION modules are linked together in a framework. In addition to giving you the ability to change the settings of any ION module, Designer also lets you change existing links between modules, add new links, add new modules or delete them. Designer helps you visualize the logic when you are programming custom functionality in the ION meter. See the section “Configuration Tools” on page 21 for more details. © 2009 Schneider Electric. All rights reserved. Page 11 Introduction ION Reference Overview ION architecture is the foundation of every component in an ION system. As information moves within and between meters and other devices in your power monitoring system, this architecture defines the information pathways. ION meters ship with factory-configured architecture. ION architecture is modular to allow you to create custom applications in your meter. ION7550 Meter template Framework Nodes ION architecture begins at the node. A node is any device or processing location on a network, such as a server, workstation, printer, or in this case, an ION meter. Because it resides on a network, each node must have a unique network address. In the ION network, there are also "software nodes" where data is collected, stored, and processed when interacting with components of the ION Enterprise network, such as the Virtual Processor and the Log Inserter. The behavior of the node is defined by its template. Page 12 © 2009 Schneider Electric. All rights reserved. ION Reference Introduction Templates A template is the meter’s program; it is a file that defines how the node (the meter) operates. Once created in a meter, a template can be reused in other meters of the same type. A template is composed of multiple frameworks. NOTE Every ION device is shipped with a factory-configured template. Frameworks A framework is a group of ION modules that are linked together and configured to perform a specific function or application. For example, the Power Quality framework can monitor disturbances such as voltage sags and transients, analyze surges, monitor real-time harmonics, and so on. If you choose to create your own frameworks of linked ION module groups, you must follow a certain syntax while programming in ION. For example, you specify a manager type before accessing a particular module. Managers Manager Power Meter Manager ION managers act as directories of the modules available in the node. They are at the top of the hierarchy, providing organization for all the modules. There is one manager for each type of module (Power Meter manager, Maximum manager, and so on). When linking to a module using ION Enterprise or ION Setup software, you must specify the manager type. For example, to link External Boolean #3, you first select the External Boolean manager. © 2009 Schneider Electric. All rights reserved. Page 13 Introduction ION Reference ION Modules ION modules are the building blocks of ION architecture. Each module type has a unique function that corresponds to part of a conventional power monitoring system. The subsequent sections of the ION Reference detail the characteristics of each specific module type. See the section “ION Modules” on page 14 for general information on modules and registers. Virtual Processor The Virtual Processor is a powerful component of ION Enterprise software that lets you add functionality not normally available in your ION meter. The Virtual Processor runs as a service on a computer that is running ION Enterprise software. The Virtual Processor is equipped with a variety of ION modules — some are the same ION module types that are available on the ION meters, while others are unique to the Virtual Processor. You must use Designer to create and link ION modules in the Virtual Processor. These modules can then be linked to other ION modules outside the Virtual Processor, including those modules contained inside ION meters. This interconnecting feature of the Virtual Processor makes it possible for you to design custom energy management applications such as data aggregation, data integrity monitoring, and alerting. ION Modules The Integrated Object Network (ION) architecture offers many different types of ION modules. Each type of module type has a unique function corresponding to part of a traditional electromechanical power meter or providing additional functionality. By combining (or linking) several modules together, you can create custom functions (frameworks) to suit your particular applications. Some examples of individual modules include: Power Meter modules, which provide the functionality of a discrete power measuring instrument, like a traditional electromechanical kW meter. Maximum modules, which are analogous to a peak register, and can keep track of the peak demand for any programmed parameter. Data Recorder modules, which behave as traditional strip chart recorders, and can be used to track variations in current flow. All ION modules share a similar structure. Each module on the ION meter is identified by a unique module label. Most modules provide processed data through an output register. ION modules receive data through inputs, and any module that is user-configurable offers one or more setup registers. Available module types and the maximum quantity allowable for each type of module depends on the meter. Not all modules are available on all meters. See the online ION Device Templates documentation for device-specific information. Page 14 © 2009 Schneider Electric. All rights reserved. ION Reference Introduction NOTE Some module names are configured to be compatible with third-party protocols. Modifying the module name may cause loss of third-party protocol support or the third-party protocol data to be inaccurate. Each type of module is defined by a name. Generally, this name implies the function of the module. Input registers receive data into the module. You can link modules together by assigning the input of one module to the output or setup register of another module. Data received through a module’s input is then processed by the module. Setup registers contain configuration settings for the module. You can use a module’s setup registers to determine how the module processes data. Output registers contain data that has been processed by the module. The data provided by a module’s output registers may be used directly (e.g., for displaying values) or it may be passed to the input of another module. Module Classes ION modules have three different classes: Core modules, Standard modules, and Persistent modules. Core Modules Core modules are fundamental to ION device or software operation. You cannot create or delete Core modules, and in some cases, you cannot configure them. ION modules classified as Core modules are Core modules across every supporting device; for example, a Core module in the Virtual Processor is also a Core Module in the Log Inserter. Some core modules exist only in certain devices or software components. Examples of Core modules include: Power Meter module, Communications module, Display Options module, and Factory module. © 2009 Schneider Electric. All rights reserved. Page 15 Introduction ION Reference Standard Modules Standard modules are reusable ION modules that can be created, edited or deleted from your device frameworks. The majority of ION modules in a device or software are Standard modules. You can create or delete Standard modules as needed if your meter's security settings allow it and if you have not used up all the available modules of that type (refer to “Maximum Number of Modules” on page 16). Examples of Standard modules include: AND/ OR module, External Pulse module, Integrator module, and Digital Output module. Persistent Modules Similar to Core modules in they cannot be created or deleted, Persistent modules are Standard modules that have been converted to Core modules. These modules are created at the factory and cannot be removed from the meter’s template. An example of a Persistent module is the External Pulse module used for meter resets, which pulses when the Demand Reset switch is pressed on the meter. Online and Offline Modules The terms "online" and "offline" describe whether a module is currently active or inactive. A module is online when it is functioning normally (monitoring its input and updating its output registers). When you configure a meter, the affected modules are temporarily taken offline while you are programming changes to these modules. Once they have been programmed and the changes saved, the modules then return online. Normally this is a routine procedure, but certain circumstances can prevent a module from going back online. For example, if the meter lacks sufficient processing power to operate the module, or if the module has been configured incorrectly, the module will remain offline. The ‘Not Available’ Value If an ION module lacks a required input link, or its input link is invalid, the module's output registers contain no data and are set to NOT AVAILABLE, for example a lineto-neutral measurement for a 3-wire Delta system. The NOT AVAILABLE value helps to distinguish between cases where a register contains a value like 0 or OFF, and cases where no actual value is stored. The NOT AVAILABLE value propagates through all linked modules. Maximum Number of Modules Each ION device supports a limited number of ION modules. Once a meter has reached the maximum number of modules of a certain type, no new modules of that type can be created. If more modules are required, you can only make room for new modules by deleting any existing modules of the same type that you no longer require. Refer to the ION Device Templates document for the latest information regarding ION module counts on all meter platforms and firmware versions. Page 16 © 2009 Schneider Electric. All rights reserved. ION Reference Introduction Module Security Some ION meters have implemented security schemes that prevent certain modules, usually modules that provide revenue data, from being configured or deleted. ION meters that use this security scheme are ordered as revenue-class meters with hardware locking. For more information, refer to the ION System Security technical note and your meter’s technical documentation. Register Classes To link the input of one module to the output register of another module, the input and output must have the same register class. Some inputs allow more than one register class for handling different types of data. The following register classes are in ION architecture: Address Allows you to specify a destination address to which the module sends output data. Boolean Contains a logical true (ON, or “1”) or false (OFF, or “0”). Calendar Contains setup information in the Scheduler module. Enumerated Allows you to select from a list of several options. Typically only setup registers are enumerated registers. Event Log Contains the assembled contents of all the event registers of all modules in the ION meter or software node. The Event Log Controller module uses this class of register to provide a log of the events occurring on the device. Event Records all the events produced by a module. An event is simply any occurrence in the system that is logged in the Event register. The contents of an event register include: A timestamp of when the event occurred. The priority of the event. The cause of the event. Any values or conditions associated with the cause. The effect of the event. Any values or conditions associated with the effect. The Event Log Controller module takes the Event registers from all the modules in the device and assembles them into the Event Log. © 2009 Schneider Electric. All rights reserved. Page 17 Introduction ION Reference Log Contains a timestamped list of numeric, Boolean or waveform data. Typically, modules that record data (e.g. Data Recorder, Waveform Recorder) have Log output registers. Numeric Array Contains an array of numeric values. Numeric Bounded Contains a number bounded by a high and low limit. Typically only setup registers are numeric bounded registers. Numeric Contains a single numeric value. It can be any value within the range capabilities of the device. Pulse Contains a pulse, or instantaneous trigger signal. This class of register is normally used for resetting, pulsing or triggering functions. String Contains text strings. Text strings can consist of any combination of numbers, letters and spaces, excluding double-quote characters ( " ). In addition, the text must not end with a backslash character ( \ ). Backslashes elsewhere in the text are permissible, as is a backslash at the end of the string if it is followed by a space character. String register applications include formulas (Arithmetic module) and device information (Factory module). Page 18 © 2009 Schneider Electric. All rights reserved. ION Reference Introduction Programming Considerations Some ION module registers have specific or specialized functions that require configuration considerations in addition to the “Safety Precautions” on page 10. Port setup register: This register defines the hardware port used by the module.. CAUTION HAZARD OF MISAPPLICATION (MISUSE) Because mechanical relays have limited lifetimes, mechanical KYZ relays are typically not suitable for energy pulsing applications. For energy pulsing applications, consider using Form A output in KYZ mode. Failure to follow this instruction can result in equipment damage. HAZARD OF UNINTENDED OPERATION • Do not use ION meters for critical control or protection applications where human or equipment safety relies on the operation of the control circuit. • The electrical signal on the output is DC. Make sure proper polarity is observed when wiring external devices to the analog output ports. (Analog Output module) • An unexpected change of state of the digital outputs can result when supply power to the meter is interrupted or after a meter firmware upgrade. (Digital Output module) • Be sure you are familiar with the warnings at the beginning of this document, as well as those presented in your meter’s technical documentation. Failure to follow these instructions can result in death, serious injury or equipment damage. Record input register: When this register is pulsed, data is recorded by the meter. CAUTION HAZARD OF EQUIPMENT DAMAGE • If you increase the rate that Record is pulsed from the factory default setting, it may cause premature failure of the meter’s flash memory. • Do not modify this register and connected modules without a thorough understanding of the impact on the meter’s flash memory. Failure to follow these instructions can result in premature flash memory failure. © 2009 Schneider Electric. All rights reserved. Polarity setup register: This register defines the sign of a measured value. Changing the polarity of a measured value can affect modules that are linked to this register in unanticipated ways. The polarity setting may be lost because the values are squared, or only the value and not the polarity is provided to linked modules. For example, when interpolating V2 in a V1/V3 system, if V1 is inverted then V2 may be interpolated incorrectly. Page 19 Introduction ION Reference Labels (module and register names): You can edit labels for modules and their input, output and setup registers. However, some labels are specifically configured to support third-party protocols, and modifying those labels may cause loss of third-party protocol support or the third-party protocol data to be inaccurate. ION Module Advanced Features This section provides detailed information on more advanced features of ION modules and brief instructions on using Designer. Module Update Rate The update (refresh) rate for a standard ION module is once per second. Some ION meters are equipped with high speed ION modules that can update as often as once every half-cycle. If you link a standard ION module to a high speed ION module, the update rate is determined by the slower module. To take advantage of the fast update rate, only choose high speed modules in your high speed framework. NOTE The number of high speed modules is limited, so use them only when necessary. Time-Sensitive Modules Some ION module setup registers require you to specify a time interval. For a standard module with an update rate of once per second, choose a value that is a multiple of this update rate (e.g., 1s, 2s, 3s, etc.). Since high speed modules update every cycle (or every half-cycle in some ION meters), make sure you specify a time interval that allows for frequency drifts. If the frequency drifts to a higher value, the module updates faster. Therefore, specify a value that is slightly faster than the module update rate. For example, if a high speed module is used on a 60 Hz system and the module updates once per cycle, you must specify a time interval that is slightly faster than the module update rate (i.e., a value lower than 16.7 milliseconds). Event Priorities Every event that occurs inside an ION module is recorded and has a particular priority number assigned to it. In general, a severe event is assigned a higher number than a normal or typical event. The events are arranged and prioritized by the Event Log Controller module. You can set a priority cutoff for event logging; any event that is equal or less than the cutoff value you specify is ignored/discarded. This allows you to eliminate unnecessary records that would otherwise appear in the Event Log. Page 20 © 2009 Schneider Electric. All rights reserved. ION Reference Introduction The table below shows an example of how different ION events are categorized and prioritized. Events are grouped according to type and severity. Event Group Description Priority Number Reset Module reset or re-synchronized 5 Setup Change Module setup changes (setup register changes, label changes, input handle changes) 10 Input Register Change Inputs of certain modules change value (e.g., input to And/Or module changes) 15 I/O State Change I/O state changes (e.g., relay closes) 20 Information Module produces important user information 25 Warning Module produces a notification 30 EN50160 Event An EN50160 Counter has increased (This event only applies to ION meters with EN50160 statistics monitoring capabilities.) 50 Failure A serious problem has occurred 255 Configuration Tools Two software tools can be used to configure ION modules: Designer component of ION Enterprise. ION Setup. For more information refer to the ION Setup or ION Enterprise online help, or download the documentation from www.powerlogic.com. © 2009 Schneider Electric. All rights reserved. Page 21 Introduction Page 22 ION Reference © 2009 Schneider Electric. All rights reserved. ION REFERENCE 09/2008 Alert Module The main purpose of the Alert module is to send a message to a server, prompt it to contact the site that initiated the alert, and then upload that site’s logs. The Alert module can also be configured to send a message to a pager — this allows you to alert key personnel about certain alarm conditions so they can act on them. Email is another medium over which alerts can be sent. The Alert module sends an alert whenever its Trigger input is pulsed (except for Outage Dialback card alerts, where the Trigger input is left unlinked). You can connect this input to any module that produces a pulse output. You can use modules that monitor alarm conditions such as changes in relay status and power quality problems (surges, sags, swells, outages). For example, you can connect the Trigger input to the output of a Setpoint module, thereby allowing the Alert module to send an alert when the setpoint condition is reached. The Alert module requires access to either a modem (a dedicated modem or a modem handling a loop of meters), or Ethernet (for the Alert module email capabilities). Alert Module Source 1 Pending Sending Lockout Source 4 Trigger Reset Enable Success Fail Event The Alert module is particularly useful for remote sites that are not continuously connected to the SCADA network. If a high-priority event (i.e. an alarm condition) occurs while the SCADA system is not connected, the Alert module can contact the server and initiate an unscheduled dial-up to retrieve the event information. The Alert module can also notify personnel of the event by sending a message to a pager or email address. Schneider Electric 2195 Keating Cross Road Saanichton, BC Canada V8M 2A5 Tel: 1-250-652-7100 For technical support: [email protected] (00) + 1 250 544 3010 Contact your local Schneider Electric sales representative for assistance or go to www.powerlogic.com ION, PowerLogic and Schneider Electric are trademarks or registered trademarks of Schneider Electric in France, the USA and other countries. Other trademarks used are the property of their respective owners. Electrical equipment should be installed, operated, serviced, and maintained only by qualified personnel. No responsibility is assumed by Schneider Electric for any consequences arising out of the use of this material. © 2008 Schneider Electric. All rights reserved. Alert Module ION Reference Inputs Source 1, Source 2, Source 3, Source 4 Source inputs allow you to include values from your system in the module’s outgoing message string. Any numeric bounded, Boolean or numeric register can be linked to a Source input. Trigger For Outage Dialback alerts, the Trigger input must be left unlinked; see “Alerting with the Outage Dialback Alert Card” in the “Detailed Module Operation” section. All other alerts need the Trigger input linked. When the Trigger input receives a pulse, the alert is sent using the parameters defined in the module’s setup registers. The Trigger input should be directly linked to the pulse output register of the ION module that is monitoring the desired trigger condition. Immediately after a Trigger pulse is received, the current values held at the Source inputs are saved. Then, one of the following occurs: If the Alert module is presently inactive, the Pending register turns on and the alert remains pending until the communications channel is free and no lockouts are in effect. When the channel is free, the sending process begins. NOTE Only ION and Modbus protocols share the communication channel with other protocols (such as the alert protocol). This means that if a protocol other than ION or Modbus is running, the Alert module cannot send its alert. If the Alert module is currently sending or waiting to send an alert (i.e. either the Pending or Sending register is ON), then all pulses received on that module’s Trigger input during that time are discarded. An event is logged only during sending. Reset All pending alerts are cleared when the Reset input is pulsed. Only alerts that are actually transmitting are allowed to complete. Alerts are also cleared if they have failed and are waiting to make another attempt. NOTE All pulses appearing at the Trigger input are cleared when the Reset input is pulsed, regardless of whether the Enable input is ON or OFF. Enable This input enables or disables the Alert module by setting it to ON or OFF. When the module is disabled, it disregards any new pulses on the Trigger input. This input is optional; if you leave it unlinked, the module is enabled by default. Page 24 © 2008 Schneider Electric. All rights reserved. ION Reference Alert Module Setup Registers The Alert module’s setup registers allow you to define the elements included in the message, and set up the message’s transmission parameters. Message This string register contains the text of the alert to be sent. You can use up to a maximum of 120 alphanumeric characters in your message string. Values and names from registers linked to the module’s Source inputs can be included in the message by referencing them in the message string. To include the name of the output register linked to the Source input, use the form %Nn, where N is the label of the output register linked to the Source input, and n is the Source input number. Similarly, to include the value from the linked output register, use the form %Vn, where V is the value from the linked output register, and n is the Source input number. For example, to indicate that the Power Meter module output kW tot that is linked to the Alert module Source input #2 provides a value of 147.60, the string in the Message register can look like this: Alert %N2 = %V2 The above string results in an outgoing message that looks like this: Alert kW tot = 147.10 If you want the actual percent sign, “%”, to appear in the message, you must insert an additional % in front of it. For example, if you link the I1 Harmonic Analyzer module’s Total HD register to the Alert module’s Source input #1, and you want the alert to display, “THD for I1 is currently x%” (where x is the value appearing at Source input 1), then the string might look like this: THD for I1 is currently %V1%% For a timestamp, % Tt will insert trigger time in "UNIX Time." UNIX Time = the number of seconds since 1970 Jan 1. Priority This numeric bounded register allows you to set an alert’s priority, from 0 (lowest priority) to 255 (highest priority). Destination This string register identifies the alert’s destination. If the alert is sent out over a modem, enter the dialing string that the modem will dial (the dial command, ATD, is provided by the module if it is missing in the string). The destination string can include any numbers required by the local phone system (i.e. PBX system ‘line out’ numbers), calling card numbers and telephone extensions. The comma character (,) is used to pause the dialing operation. The duration of the pause depends on your modem’s configuration; most modems use a default pause of 2 seconds for each comma (multiple commas may be used in succession to achieve longer pauses). Most modems allow you to configure the pause duration through an ‘S’ register. Consult your modem’s user manual for details. © 2008 Schneider Electric. All rights reserved. Page 25 Alert Module ION Reference Enter the email address, if the alert is sent out via the meter's optional SMTP email. A maximum of 50 characters (including spaces) can be used. If you want to send an alert to more than one email address you must set up a distribution list (your email server must allow email to be sent to groups via SMTP) or use an "Inbox Assistant" to forward messages. A maximum of 50 characters (including spaces) can be used. Type This register is used to specify the type of destination you want to alert. Valid types are EMAIL, ASCII, ALPHANUMERIC PAGER, NUMERIC PAGER, MV90, and ION ALERT/ PEGASYS. Your selection affects how the Alert module sends out the message. EMAIL The meter uses the onboard SMTP email service. If your meter does not support this feature, this enumeration is not present. If you set the Type setup register to EMAIL, you must set the Port setup register to ETHERNET or the Alert module will go offline. ASCII Similar to setting the type to ION ALERT, this setting allows you to send out an ASCII message. However, this alert type will not wait for any acknowledgment — the message is sent only once. It records a successful send when the modem establishes a connection and the message is sent through. ALPHANUMERIC PAGER The Alert module uses Telocator Alphanumeric Protocol (TAP) v1.8 to send a message to the pager number specified in the PagerNum setup register. You must use a modem that can handle communications parameters with the paging service's modem and still be able to maintain the meter-to-modem parameters. TAP is specified to use even parity, seven data bits, one stop bit and 300 or 1200 baud. In contrast, the meter-to-modem parameters might use the protocol, no parity, eight data bits, one stop bit and 9600 baud. The modem you use must be able maintain meter-to-modem parameters and handle the conversion. Any alphanumeric pager messages over 64 characters long are truncated to the first 61 characters, followed by "...". Alphanumeric pagers only support 7-bit characters; any 8-bit character (for example, "ë") is replaced with a blank space NUMERIC PAGER Selecting Numeric Pager configures the module to send only the Destination string to the modem. Because of its simplicity, this is probably an unreliable way to send an alert page. Suppose the pager's phone number is 123-4567, and you want the message "99" to appear (i.e. your numeric code to inform you that an alert has been sent). You can try entering "123-4567,,,,,99" into the Destination setup register (each comma represents a two-second pause in the dialing string). NOTE If you select Numeric Paging, the Alert module is not able to detect if the send failed. The Alert module waits 6 seconds before resetting the modem, since a numeric page is completed in approximately the same amount of time. When an alert is sent, the modem dials "123-4567" and waits 10 seconds, then finishes by dialing "99". The Alert module then records a successful send Page 26 © 2008 Schneider Electric. All rights reserved. ION Reference Alert Module (regardless of whether the page went through or not). You have to experiment with how many commas (pauses) you need to include - this must correspond to the amount of time the paging service needs to answer the phone. MV90 Selecting the MV90 alert type allows the meter to communicate to Itron's MV90 software. This type is only allowed if the currently selected port is set to "ODB" (Outage Dial Back) - it is not supported with the normal internal modem or external modems. This alert type is only triggered on power outage of the meter itself. For information on configuring MV90 to accept the alert, consult the MV90 and ION Technology technical note. ION ALERT / PEGASYS When a remote meter is not connected to your network, the Alert module provides a means of notifying the network that it should contact the meter and upload records. The module uses a simple ASCII protocol to send the alert. Typically, you will be running the Alarm Server to receive alerts. You can also use other applications to accept the message and reply back. Use the following message format: “BEGIN ALARM <contents of Location setup register> <timestamp of alert> <alert priority> <message> END” The reply sent back by the application receiving the alert is simply, " ACK". The Alert module sends the same message up to five times as it waits for the acknowledgment. If the Alert module receives an acknowledgment, it records a successful send; otherwise it records a failed attempt. Email From This register specifies the email address that appears in the From: field on the email. The default value of this register is ALERT<ALERT MODULE NUMBER> @ <METER SERIAL NUMBER> — for example, Alert3@PK-9910A010-00. This register must be altered in cases where the receiving SMTP server only accepts emails from valid Internet domains (i.e. SomeName.COM). This string may be up to 80 characters long. Pager Num This register holds your pager access number, provided by your paging company. A maximum of 16 characters can be used. Com Port This register allows you to specify the communications port that is used to send the alert. If the device has only one valid communications port, no selection is required. For devices with multiple communications ports, the ports that support the Alert module appear as valid selections. NOTE If you set the Com Port setup register to ETHERNET, the Type setup register must be set to EMAIL or the module will go offline. © 2008 Schneider Electric. All rights reserved. Page 27 Alert Module ION Reference Attempts This register sets the number of times that the module attempts to connect. Valid Attempts are from 1 to 15. Retry Time If the modem is unable to establish communications on the first attempt, and the Attempts setup register holds a value greater than one, the value in this register sets the amount of time (in seconds) the module waits before attempting to dial again. Retry Time can range from 5 to 86400 seconds. For Outage Dialback alerts, the recommended Retry Time setting is 120 seconds; the maximum time that the Outage Dialback card will wait to retry dialing is 1800 seconds (30 minutes). Lockout Time The Lockout Time setting specifies a different interval for Outage Dialback card alerts than for all other alerts. For successfully sent alerts (other than Outage Dialback card alerts), the Lockout Time specifies a period (in seconds) that all Alert modules wait before another alert transmission can begin. Triggers received by Alert modules remain pending until the lockout expires. Lockout Time begins after the alert succeeds (lockout will not occur if the messaging attempt fails). Lockout Time can range from 0 to 86400 seconds. NOTE If you set the Type setup register to ION a value greater than zero. ALERT, the Lockout Time setup register must also be set to For Outage Dialback card alerts, the Lockout Time register specifies the amount of time that you want the meter powered off before the Outage Dialback alert is sent. For Outage Dialback alerts, the recommended Lockout Time setting is 120 seconds; the maximum lockout time is 1800 (30 minutes). Location This setup register only applies to PEGASYS or ION ALERT type of alert (see the Type setup register). The Location register identifies the meter that is sending the alert. The name of the meter is entered into this register, exactly as it appears in the Management Console. Modem Init This register holds the initialization string used by the modem while the alert is being sent. If your site's modem is an ION meter internal modem, this Modem Init overrides the Communications module's Modem Init setup register for the duration of the site's dialout. For Outage Dialback alerts, set the modem initialization code as follows: Page 28 0 = Bell 212A (1200 baud) 1 = Bell 103 (300 baud) 2 = V.22 (1200 baud) 3 = V.21 (300 baud) © 2008 Schneider Electric. All rights reserved. ION Reference Alert Module 6, or leave the setting blank = V.22bis (2400/1200 baud). This is the default, and will work for most installations. Output Registers Pending This Boolean register turns on if the module receives a pulse on its Trigger input. Once the communications channel becomes available, this register turns off and the module starts sending the alert. Sending This Boolean register is on once the module has access to the communications channel, and remains on while the alert is being sent. Sending turns off once the transmission is finished (successfully or not). Lockout This Boolean register turns on if lockout is in effect. Lockout only occurs after the alert is successfully sent and the Lockout Time setup register is set to a value greater than zero. If the Lockout Time setup register is set to zero, Lockout is always off. If the device contains other Alert modules that have pending alerts, then their pending status remains until the first Alert module's Lockout period expires. (Lockout turns off after its lockout period has expired; see the Lockout Time setup register). You must enter a value in the Lockout Time setup register if you want to send the alert to the ION Alert Monitor (see Destination and Type setup registers). This allows the client software an opportunity to dial back to the site. If there is no lockout period, then the other Alert modules will send the next alert immediately after the communications channel is cleared (thereby, not giving the client software a chance to dial back). Success This output register produces a pulse when the alert has been successfully sent. Fail This output register produces a pulse if the final attempt to send the alert fails. Event Events produced by the Alert module are recorded in the Event register. Possible events and their associated priority numbers are shown in the following table. Event Priority Group © 2008 Schneider Electric. All rights reserved. Priority Description Reset 5 A module reset has occurred. Setup Change 10 Input links, setup registers or labels have changed. Alert Trigger pulsed 25 A pulse was received on the Trigger input. Alert Reset pulsed 25 A pulse was received on the Reset input. Page 29 Alert Module ION Reference Event Priority Group Priority Description Pending Send canceled 25 Pending Send canceled due to Reset. Retry canceled 25 Retry canceled due to Reset. Lockout canceled 25 Lockout canceled due to Reset. Com Port Channel Busy 25 Attempt has failed due to a busy com channel. Modem initialization failed 30 Attempt failed because modem initialization failed. Dial failed 30 Attempt failed because dial failed (busy phone line or no response from the modem). Message send failed 30 Attempt failed because the alert could not be sent. Event message indicates if Retry Time begins or if the final attempt has failed. Alert sent, no lockout 25 Alert sent successfully — no lockout configured. Alert sent, lockout begins 25 Alert sent successfully — configured lockout began. Lockout period ends 25 Configured lockout period is over. Retry 25 Attempt failed (starting retry) Final Retry 30 Final retry has failed Email Send Failed 30 An email message did not send. The logged event will contain some indication of the reason for the failure. The Event output register stores the following information for each ION event: time stamp, priority, cause, effect, and any values or conditions associated with the cause and effect. Page 30 © 2008 Schneider Electric. All rights reserved. ION Reference Alert Module Detailed Module Operation Below are the general steps you need to follow to have the Alert module at a remote site inform your system of a high-priority event. Serial Communications Alerting 1. Read and understand the ION Alert Monitor section in ION Enterprise Help, or in the ION Enterprise User Guide. 2. Create an Alert module in one of the meters at the remote site. 3. Link the module's Trigger input to another ION module that produces a pulse when the exceptional event occurs. 4. Configure the Alert module (see Setup Registers section) so it is able to establish communications through the modem, and into the site that is serviced by the ION Alert Monitor. 5. Make sure the ION Alert Monitor service is started. Now, when the Trigger input is pulsed, the Alert module establishes communications with the ION Alert Monitor and sends the alert message. The Alert module then disconnects. The ION Alert Monitor examines the message, extracts the meter node name and uses it to determine which site this meter belongs to. ION Alert Monitor then notifies the Connection Manager to reconnect to the site. Once the ION Alert Monitor is connected, the Log Inserter uploads the site's logs. The Alert module can be in one of the following states: inactive - no pulses have occurred at the Trigger input. pending - a pulse occurred at the Trigger input, but some other module has control of the communications channel. sending - the Alert module has control of the communications channel and is attempting to send the alert to the destination. lockout - the Alert module is keeping control of the communications channel (i.e. allowing the ION Alert Monitor time to dial back in to this remote site). retry - an alert attempt has failed and the module is waiting for the Retry Time to expire before making another attempt. Special Consideration for RS-485 Communications Because RS-485 is a master-slave communications protocol, some limitations apply when using Alert modules. You can have multiple Alert modules in a single device, but only one device in an RS-485 loop can use these modules. RS-485 does not provide for reliable collision detection, and multiple alerts from different meters may fail. © 2008 Schneider Electric. All rights reserved. Page 31 Alert Module ION Reference Alerting on a Single ION Device The diagram below shows an ION meter framework that incorporates alerting. The output from a Sliding Window Demand module is monitored so that an alert is sent when the predicted demand value goes above a certain limit. A Setpoint module is determines the high-limit condition and sends a pulse to trigger the Alert module. When the pulse is received, the message is sent. The example shows Alert module #1 configured to send a message to the ION Alert Monitor. A second module (Alert module #2) sends a message to a paging system. Note that Alert module #2 also receives the PredDemand value from the Sliding Window Demand module. The alert message sent is, "Current PredDemand is x", where x is the Sliding Window Demand module's predicted demand value. When the first alert is sending, the Pending output register on Alert module #2 turns on, and it waits for the communications channel to become available. When transmission is completed for Alert module #1, Alert module #2 starts sending to the ION Alert Monitor (note that there was no lockout period set for Alert module #1). The Pending output register for Alert module #2 turns off, and its Sending output register turns on. When the ION Alert Monitor receives the alert, it informs the system to dial back to the site to upload logs. Since the Lockout Time setup register for Alert module #2 is set to 15, it prevents other alerts from interrupting the ION Alert Monitor while it is dialing back to the site, for a period of 15 seconds. Page 32 © 2008 Schneider Electric. All rights reserved. ION Reference Alert Module Alerting with Multiple IEDs Alerting can be implemented in a loop of networked devices. An alert trigger can originate from any device on the loop, provided those devices have the ability to produce a digital signal. NOTE Some meters require an optional I/O board or device to provide digital outputs. Assume the ION7330 meters are monitoring setpoint conditions. The ION7550 meter's Digital Input modules are used to receive digital data, as shown in the diagram. A Pulse Merge module is used to process the pulses produced by the two Digital Input modules. The output of the Pulse Merge module is then used to trigger the ION7550's Alert module. This configuration sends an alert whenever the setpoint condition on either ION7330 is met. ION7330 Meter ION7550 Meter ION7330 Meter © 2008 Schneider Electric. All rights reserved. Page 33 Alert Module ION Reference Specifying a Lockout Time Lockout Time is particularly useful when Alert modules are used to communicate with the ION Alert Monitor. You must ensure there is enough time between outgoing alerts for the ION Alert Monitor to connect to the site. When it is contacted, the ION Alert Monitor waits for the Alert module to disconnect, and then it calls the site back. The connection time is determined by the Connection Manager options. It is possible for message triggers to occur in rapid succession, yet it may not be appropriate to have the ION Alert Monitor connect to the site every few minutes. Furthermore, if outgoing messages (to pagers or to other software components) are occurring rapidly, the communications channel remains busy, and the system might not get a chance to dial back in to the site. NOTE When trigger pulses are received during a lockout period, they are not discarded; they are prevented from attempting to connect until the lockout period expires. By specifying a Lockout Time, you can keep the communications channel open after the system is contacted, ensuring it is able to connect. Specifying a Lockout Time also ensures ION Alert Monitor will not respond to a second request to dial in until a minimum time period has elapsed. Some testing is required to determine the correct Lockout Time for your sites. A network consisting of numerous devices that perform data and waveform recording takes considerably longer to upload data than one that consists of a few transducers. Lockout Time for Outage Dialback Alerts The Lockout Time for Outage Dialback Alerts is the amount of time that you want the meter powered off before the Outage Dialback Alert is sent. For the Outage Dialback feature, the recommended maximum setting is 120 seconds. Alerting with the Outage Dialback Alert Card The Outage Dialback alert card lets meters alert an operator during a power outage, informing the operator that the meter is shutting down. A short ASCIIbased message can be sent as an alert to PEGASYS, ION Enterprise or MV90, or via a pager. A pager alert message can be directed automatically to an email address and/or a voice line with a third party system provided as a service by a paging company or other software. The Outage Dialback alert card uses a modem that is powered independently from the rest of the meter when a power outage occurs. This allows enough time for the modem to dial-out an alert. Page 34 © 2008 Schneider Electric. All rights reserved. ION Reference Alert Module NOTE The Outage Dialback card is a legacy feature originally ordered with the meter internal modem option. The Outage Dialback alert card delivers these types of alerts: Numeric Pager Alphanumeric Pager PEGASYS (for alerts to PEGASYS software) ION Alert (for alerts to ION Enterprise software) MV90 ASCII Selection between modes is made with the Alert module Type setup register. Setting Up your Meter for Outage Dialback Alerts Except for a few settings particular to Outage Dialback alerts, you can set up your meter for Outage Dialback alerts the same way you set up your meter for other alerts. The settings particular to Outage Dialback alerts are: COM Port setup register — set this register to Outage Dialback. Lockout Time setup register — set this register to the amount of time that you want the meter powered off before the Outage Dialback alert is sent. For the Outage Dialback feature, the recommended maximum setting is 120 seconds; the maximum lockout time is 1800 seconds (30 minutes). Modem Init register — set the modem initialization code as follows: 0 = Bell 212A (1200 baud) 1 = Bell 103 (300 baud) 2 = V.22 (1200 baud) 3 = V.21 (300 baud) 6, or leave the setting blank = V.22bis (2400/1200 baud). This is the default, and will work for most installations. Trigger input — ensure that this register is unlinked; the power outage triggers the Outage Dialback alert. The recommended maximum settings for the Attempts, Retry Time and Lockout Time registers for the Outage Dialback feature are suggested in the section below. Creating an Alert Module for Outage Dialback Alerts With ION Setup advanced mode or Designer, follow these steps to set up your meter to send Outage Dialback alerts: 1. Create an Alert module. © 2008 Schneider Electric. All rights reserved. Page 35 Alert Module ION Reference 2. Configure these Alert module setup registers as indicated: Message — type in the text for the Outage Dialback alert.; you can use 128 characters maximum. Priority — type in the alert’s priority from 0 (lowest) to 255 (highest). Destination — type in the dialing string that the modem will dial. Type — specify the type of destination you want to alert: ASCII, ALPHANUMERIC PAGER, NUMERIC PAGER, MV90, or ION ALERT/PEGASYS. Pager Number — type in your pager access number, provided by your paging company. Com Port — select Outage Dialback. Attempts — type in the number of times that the module will attempt to connect. For Outage Dialback alerts, the recommended setting is 1 – 5 attempts. Retry Time — type in the amount of time (in seconds) that the module waits before attempting re-dial after a failed attempt. For Outage Dialback alerts, the recommended Retry Time setting is 120 seconds; the maximum time that the Outage Dialback card will wait to retry dialing is 1800 seconds (30 minutes). Lockout Time — type in the amount of time that you want the meter powered off before the Outage Dialback alert is sent. For Outage Dialback alerts, the recommended maximum setting is 120 seconds; the maximum lockout time is 1800 seconds (30 minutes). Location — this register identifies the meter that is sending the alert. Type in the name of the meter exactly as it appears in the network configuration file. Modem Init — set modem initialization code as follows: 0 = Bell 212A (1200 baud) 1 = Bell 103 (300 baud) 2 = V.22 (1200 baud) 3 = V.21 (300 baud) 6, or leave the setting blank = V.22bis (2400/1200 baud). This is the default, and will work for most installations. 3. Ensure that the Alert module Trigger input is unlinked. 4. Save. When a power outage occurs, the Alert module waits the amount of time specified in the Lockout Time setup register, checks that the power is still out, then sends an alert. Alerting Via Email Follow the steps below to send email alerts from your meter. Note that your meter must support emailing (with a correctly configured SMTP server): 1. Create an Alert module. 2. Configure these Alert module setup registers as indicated: Page 36 Message – type in the text of the alert to be emailed. © 2008 Schneider Electric. All rights reserved. ION Reference Alert Module Destination – type in the destination email address. Type – select Email. Com Port – select Ethernet. Location – type in a custom string; this is optional, and appears in the email. Email From – type in an address that you want the email to appear from. This may be required as some SMTP servers only accept emails from valid addresses. 3. Create an ION module that will produce a pulse on its Trigger output when the exceptional event occurs (for example, a Setpoint module pulses its Trigger output when the setpoint condition is reached). 4. Link the Alert module’s Trigger input to the Trigger output of the module created in step 3. 5. Send and save. When the Trigger input is pulsed, the Alert module establishes communications with the SMTP mail server, and emails the alert message. Responses to Special Conditions The following table summarizes how the Alert module behaves under different conditions. Condition Response of Output Register If any of the Source input values are NOT AVAILABLE. The %Vn value is replaced by N/A. After the module is re-linked or its setup registers are changed. If module is sending the alert is sent with the previous settings. If the module is in any other state the changes take effect upon the next alert trigger. When an alert is sending, the module is relinked, its setup registers are changed, its Reset input is pulsed, or its Enable input is disabled. The alert completes the current attempt. It pulses the Success register if that attempt is successful. When the device is started or powered-up (either the first time, or after a shut-down). Pending, Sending and Lockout output registers are FALSE. A module in the Sending state at power-down is automatically re-triggered at power-up. ION and Modbus protocols are the only protocols that support the Alert module; these protocols allow the Alert module to take over the use of the meter communications port so an alert can be sent. © 2008 Schneider Electric. All rights reserved. Page 37 Alert Module Page 38 ION Reference © 2008 Schneider Electric. All rights reserved. ION REFERENCE 09/2008 Analog Input Module The Analog Input module takes an analog signal from a hardware port, scales it and makes the scaled result available in its output register. This allows you to measure and store analog information (for example, the output of a transducer that is measuring steam pressure). Analog Input Module ScaledValu Event Inputs Analog Input modules have no programmable inputs. Setup Registers The Analog Input module’s setup registers allow you to define a scaling factor for the values taken from the hardware port, and select the hardware input port. Zero Scale This numeric bounded register defines what value appears in the ScaledValu output register when the lowest possible value from the hardware is applied. Full Scale This numeric bounded register defines what value appears in the ScaledValu output register when the highest possible value from the hardware is applied. Port This enumerated register defines which hardware port is providing the signal. Refer to the appropriate device User Guide for a list of available ports. Schneider Electric 2195 Keating Cross Road Saanichton, BC Canada V8M 2A5 Tel: 1-250-652-7100 For technical support: [email protected] (00) + 1 250 544 3010 Contact your local Schneider Electric sales representative for assistance or go to www.powerlogic.com ION, PowerLogic and Schneider Electric are trademarks or registered trademarks of Schneider Electric in France, the USA and other countries. Other trademarks used are the property of their respective owners. Electrical equipment should be installed, operated, serviced, and maintained only by qualified personnel. No responsibility is assumed by Schneider Electric for any consequences arising out of the use of this material. © 2008 Schneider Electric. All rights reserved. Analog Input Module ION Reference Output Registers ScaledValu (scaled value) This numeric register contains the scaled version of the hardware input (as defined by the Zero Scale and Full Scale setup registers). Event Events produced by an Analog Input module are written into this register. Possible events and their associated priority value are shown in the following table. Event Priority Group Setup Change Priority 10 Description Input links, setup registers or labels have changed. The Event output register stores the following information for each ION event: time stamp, priority, cause, effect, and any values or conditions associated with the cause and effect. Page 40 © 2008 Schneider Electric. All rights reserved. ION Reference Analog Input Module Detailed Module Operation The figure below illustrates the operation of an Analog Input module. The hardware port presents the module with a percentage value relative to the hardware limits. The Analog Input module then takes the percentage and maps it to the Zero Scale and Full Scale range. The resultant is written to the ScaledValu output register. In this example, the input coming from the port is 50% of the possible input value. The Analog Input module takes this value and calculates what it corresponds to on the new scale. In this case, 50% on the new scale is the value 75. DEVICE Highest possible value of input 1 Analog signal from specified port ScaledValu Analog Input Module 75 Zero Scale = 50 Full Scale = 100 Event register .5 0 Lowest possible value of input To determine the desired Zero Scale and Full Scale values, an analysis of the system is required. The analog hardware input range is represented by the values Az (the lowest input the hardware can register) and Af (the highest input the hardware can register). Between these two values Ax represents the analog source minimum value. The scaled system configuration will have a Zero Scale (the scaled output equivalent to Az) and Full Scale (the scaled output equivalent to Af) limits with a value of X between these representing the scaled equivalent to Ax. The relationship between the hardware input and scaled output is linear, so a graph can represent the six points used to produce the operation: © 2008 Schneider Electric. All rights reserved. Page 41 Analog Input Module ION Reference The mathematical relationship between the values is shown by the following equation: Af – Aa- = --------------------------------------------------------FullScale – X ------------------Af – Az FullScale – ZeroScale Example: An analog input module is linked to a 0 to 20 mA hardware port to monitor a steam pressure sensor ranging between 0 to 20 psi. The pressure sensor signal is 4 to 20 mA. Az = 0 mA Af = 20 mA Ax = 4 mA Full Scale = 20 psi X = 0 psi Calculate the Zero Scale setup register value: 20mA – 4mA- = ---------------------------------------------20psi – 0psi --------------------------------20mA – 0mA 20psi – ZeroScale ZeroScale = – 5psi 20mA ZeroScale = 20psi – 20psi --------------- 16mA The Analog Input module setup registers are programmed as follows: Full Scale = 20psi Zero Scale = -5psi This will produce a 0 to 20 psi output represented by a 4 to 20 mA signal. DEVICE Highest possible value of input 20mA Analog signal from specified port ScaledValu Analog Input Module 10psi 12mA (60%) 0 Lowest possible value of input Page 42 Zero Scale = 20 Full Scale = -5 Event register © 2008 Schneider Electric. All rights reserved. ION Reference Analog Input Module Responses to Special Conditions The following table summarizes how the Analog Input module behaves under different conditions. Condition When the device is started or powered-up (either the first time or after a shut-down) © 2008 Schneider Electric. All rights reserved. Response of Output Register The Output register’s value matches the value at the Analog Input port on the connected device. Page 43 Analog Input Module Page 44 ION Reference © 2008 Schneider Electric. All rights reserved. ION REFERENCE 12/2009 Analog Output Module The Analog Output module takes a Source input value and scales it to the appropriate values for output to an analog hardware port. It also provides the scaled value as an output register that can be accessed by other modules. HAZARD OF UNINTENDED OPERATION • Do not use ION meters for critical control or protection applications where human or equipment safety relies on the operation of the control circuit. • The electrical signal on the output port is DC. Make sure proper polarity is observed when wiring external devices to the analog output ports. • Be sure that you are familiar with the warnings at the beginning of this document, as well as those presented in your meter’s technical documentation. Failure to follow these instructions can result in death, serious injury or equipment damage. Analog Output Module Normalized Event Source Inputs Source The Analog Output module takes the value of this input, scales it and sends it to a hardware port. It must be a numeric register from another module’s output registers. Linking this input is mandatory. Schneider Electric 2195 Keating Cross Road Saanichton, BC Canada V8M 2A5 Tel: 1-250-652-7100 For technical support: [email protected] (00) + 1 250 544 3010 Contact your local Schneider Electric sales representative for assistance or go to www.powerlogic.com ION, PowerLogic and Schneider Electric are trademarks or registered trademarks of Schneider Electric in France, the USA and other countries. Other trademarks used are the property of their respective owners. Electrical equipment should be installed, operated, serviced, and maintained only by qualified personnel. No responsibility is assumed by Schneider Electric for any consequences arising out of the use of this material. © 2009 Schneider Electric. All rights reserved. Analog Output Module ION Reference Setup Registers The Analog Output module’s setup registers are used to define a scaling factor for the value taken from the Source, and to assign a hardware output port for this module. Zero Scale This numeric bounded register should be set to the value on the Source input that corresponds to the minimum possible output on the analog hardware port. Full Scale This numeric bounded register should be set to the value on the Source input that corresponds to the highest possible output on the analog hardware port. Port This enumerated register determines to which hardware port the output is sent. Output Registers Normalized This numeric register contains a normalized value (i.e. between 0 and 1) proportional to the state of the output on the analog hardware port. For example, if the Source input is 50 and the Zero Scale and Full Scale setup registers are set to 0 and 200 respectively, the value in the Normalized output register will be 0.25. Event Events produced by an Analog Output module are written into this register. Possible events and their associated priority value are shown in the following table. Event Priority Group Setup Change Priority 10 Description Input links, setup registers or labels have changed. The Event output register stores the following information for each ION event: time stamp, priority, cause, effect, and any values or conditions associated with the cause and effect. Page 46 © 2009 Schneider Electric. All rights reserved. ION Reference Analog Output Module Detailed Module Operation The figure below illustrates the operation of the Analog Output module. The Source input falls between the Zero Scale and Full Scale values. It is scaled and the result is sent to the specified hardware port (the Port setup register can be set to whatever is appropriate). The Normalized output register provides information about the state of the hardware; in this case, the output on the hardware port is at 83%. If at any point the input rises above the value specified in the Full Scale setup register, the output remains at the Full Scale value and the maximum possible value is sent to the hardware port. Likewise, if the input falls below the value specified in the Zero Scale register, the output remains at the Zero Scale value and the lowest possible value is sent to the hardware port. If the Analog Output module is linked to a numeric source and that source changes to NOT AVAILABLE, the module's Normalized output register retains the last known value. However, if the Analog Output module's Source input is changed (re-linked) to a source that is NOT AVAILABLE, the module's Normalized output register changes to zero. To determine the Zero Scale and Full Scale values an analysis of the system is required. The analog hardware output range is represented by the values Az (lowest output the hardware can produce) and Af (highest output the hardware can produce) while between these two limits Aa represents the external system minimum value. The scaled system input is bounded by Zero Scale (the scaled input equivalent to Az) and Full Scale (the scaled input equivalent to Af) limits. A value of X between these represents the scaled equivalent to Aa. The relationship between the module input and hardware output is linear, so a graph can represent the six points used to produce the operation: © 2009 Schneider Electric. All rights reserved. Page 47 Analog Output Module ION Reference The mathematical relationship between the values are shown by the following equation: FullScale – X – Ha--------------------------------------------------------- = Hf ------------------FullScale – ZeroScale Hf – Hz Example: The meter is monitoring a 0 to 120 kW system and outputs the real power over a 0 to 20 mA analog output. The receiving device is expecting the 0 to 120 kW signal to be represented by a 4 to 20 mA output. The Full Scale and Zero Scale registers need to be set up to scale the output accordingly. The variables for the module operation are: Full Scale = 120 kW X = 0 kW Af = 20 mA Az = 0 mA Aa = 4 mA Solve for Zero Scale: 120kW – 0kW 20mA – 4mA --------------------------------------------------- = ---------------------------------120kW – ZeroScale 20mA – 0mA 20mA ZeroScale = 120kW – 120kW ---------------------------------- 20mA – 4mA ZeroScale = – 30kW Page 48 © 2009 Schneider Electric. All rights reserved. ION Reference Analog Output Module The Analog Output module setup registers are programmed as follows: Full Scale = 120 kW Zero Scale = -30 kW This will produce a 0 to 120 kW output represented by a 4 to 20 mA signal. Responses to Special Conditions The following table summarizes how the Analog Output module behaves under different conditions. Condition © 2009 Schneider Electric. All rights reserved. Response of Output Register If the Source input is NOT AVAILABLE The Output register holds the last value obtained while the Source input was available. When the device is started or powered up (either the first time, or after a shutdown) The Output register’s value matches the hardware port’s value. Supported analog output devices hold the lowest values in their operating range at power-up. Refer to the Technical Specifications for the analog output device you are using. Page 49 Analog Output Module Page 50 ION Reference © 2009 Schneider Electric. All rights reserved. ION REFERENCE 09/2010 AND/OR Module AND/OR modules are flexible tools that allow you to logically link together Boolean registers. You can then initiate an action based on the condition of a combination of these registers. A common application for this module is “ORing” multiple setpoints to the same Digital Output module which may control a relay external to the device. An AND/OR module monitors a number of Boolean registers and performs an AND/ NAND or OR/NOR calculation on them. The calculation result, which is also a Boolean variable, is written into the Result register. For example, you may want to monitor the condition of three other Boolean registers and respond only if they are all ON at the same time. You can also control if the AND/OR modules produce events. Inputs Source 1 to Source 8 All AND/OR modules can have up to eight Source inputs. The AND/OR module uses these inputs to calculate the Result output register. You can have multiple Source inputs for each AND/OR module. NOTE Different ION meters support a different number of Source inputs. These inputs must be Boolean output registers from other modules. You only need to link the first Source input for the module to operate; linking the remaining inputs is optional. Schneider Electric 2195 Keating Cross Road Saanichton, BC Canada V8M 2A5 Tel: 1-250-652-7100 For technical support: [email protected] (00) + 1 250 544 3010 Contact your local Schneider Electric sales representative for assistance or go to www.powerlogic.com ION, PowerLogic and Schneider Electric are trademarks or registered trademarks of Schneider Electric in France, the USA and other countries. Other trademarks used are the property of their respective owners. Electrical equipment should be installed, operated, serviced, and maintained only by qualified personnel. No responsibility is assumed by Schneider Electric for any consequences arising out of the use of this material. © 2010 Schneider Electric. All rights reserved. AND/OR Module ION Reference LatchReset If the UpdateMode setup register is set to LATCHING, pulsing this register sets the PrevLatchResult value to be equal to the instantaneous value of the Result output register, and resets the Result output register. Setup Registers Mode This register specifies the type of logical evaluation to be performed. It is an Enumerated register allowing you to select AND, OR, NAND or NOR. EvLog Mode This register specifies if changes in the Result output register are recorded as events in the Event output register. If you select LOG ON, these events are logged. If you select LOG OFF, these events are not included in the Event output register. (Note that in either case, linking the module and changing setup registers are still logged as events in the Event register.) Update Mode This register specifies whether the And/Or module is LATCHING or INSTANTANEOUS. If you select INSTANTANEOUS, the PrevLatchResult output is N/A. If you select LATCHING, the Result output register will latch when true and the PrevLatchResult register will store the Result value from the latest LatchReset pulse. NOTE In LATCHING mode, the Result output register will latch when true, and remain true until it gets reset by a pulse on the LatchReset input. Output Registers Result This Boolean register contains the result of the AND, OR, NAND, or NOR calculation. If Update Mode is set to LATCHING, this output will be calculated until it becomes TRUE, and will stay TRUE until LatchReset is pulsed. Trigger Every time the Result output register changes from OFF to ON, the Trigger output register generates a pulse. NOTE No Trigger pulse is generated for ON to OFF transitions. InverseResult This Boolean register contains the inverse (opposite) value to the instantaneous value of Result. Page 52 © 2010 Schneider Electric. All rights reserved. ION Reference AND/OR Module PrevLatchResult If Update Mode is set to LATCHING, this register contains the Result value when LatchReset was last pulsed. If Update mode is set to INSTANTANEOUS, this register value is N/A. Event Events produced by the AND/OR module are recorded in the Event register. Possible events and their associated priority numbers are shown in the table below. Event Priority Group Priority Description Setup Change 10 Input links, setup registers or labels have changed. Input Register Change 15 Boolean input has changed.* Information 25 NOT AVAILABLE input caused output to go NOT AVAILABLE. * These events are only recorded if the EvLog Mode setup register is set to LOG ON. The Event output register stores the following information for each ION event: time stamp, priority, cause, effect, and any values or conditions associated with the cause and effect. © 2010 Schneider Electric. All rights reserved. Page 53 AND/OR Module ION Reference Detailed Module Operation Depending on what you select for the module’s Mode setup register, the module performs the logical calculations as shown in the following diagrams (zeroes and ones represent Boolean OFF and ON conditions, respectively): The first row illustrates how the module operates an AND operation. The Result output will be ON only if all inputs are ON (Result is OFF if at least one input is OFF). The second row illustrates how the module operates a NAND operation. The Result output will be OFF only if all inputs are ON (Result is ON if at least one input is OFF). The third row illustrates how the module operates an OR operation. The Result output will be ON if at least one input is ON (Result is OFF only if all inputs are OFF). The last row illustrates how the module operates a NOR operation. The Result output will be OFF if at least one input is ON (Result is ON only if all inputs are OFF). Using the Module The following steps outline how to use an AND/OR module. It is not necessary to do these steps in order; for example, you could configure all the setup registers first, and then link to another module later. 1. The first step in using an AND/OR module is to determine what values you want to compare, i.e. your Source inputs. 2. The next step is to determine what kind of evaluation you want the module to perform. You can select AND, OR, NAND, or NOR via the Mode setup register. 3. Changes in the Result output register can be logged by selecting the LOG ON option using the EvLog Mode setup register. Page 54 © 2010 Schneider Electric. All rights reserved. ION Reference AND/OR Module NOTE Ensure that the Source inputs you choose all have the same update rate. If you mix high-speed and high-accuracy inputs, the AND/OR module operates at the slowest update rate. Once you link an AND/OR module to its sources, they are evaluated and the Boolean result is written into the Result output register. Every time the Result changes from OFF to ON, a pulse is generated in the Trigger output register. Example The example below illustrates how you can link an AND/OR module to the Boolean output registers of two other modules. Module 1 (ON) AND/OR Module Result (ON) Source 1 Source 2 Module 2 (OFF) Mode setup register set to OR Responses to Special Conditions The following table summarizes how the AND/OR module behaves under different conditions. Condition If the Source input is NOT AVAILABLE The Result output register depends on Source input combinations (see the diagram and table below). After the module is re-linked or its setup registers are changed The Result output register is NOT AVAILABLE. When the device is started or powered-up (either the first time, or after a shut-down) The Result output register is NOT AVAILABLE. Mode © 2010 Schneider Electric. All rights reserved. Response of Output Register AND/OR Module Behavior AND If any input is OFF, the output is OFF. If inputs are either ON or NOT AVAILABLE, the output is NOT AVAILABLE. NAND If any input is OFF, the output is ON. If inputs are either ON or NOT AVAILABLE, the output is NOT AVAILABLE. OR If any input is ON, the output is ON. If inputs are either OFF or NOT AVAILABLE, the output is NOT AVAILABLE. NOR If any input is ON, the output is OFF. If inputs are either OFF or NOT AVAILABLE, the output is NOT AVAILABLE. Page 55 AND/OR Module Page 56 ION Reference © 2010 Schneider Electric. All rights reserved. ION REFERENCE 12/2009 Arithmetic Module The Arithmetic module allows you to apply defined mathematical and logical functions to the inputs, and updates its output registers with the results of the calculations. A wide variety of defined functions are provided, and virtually any type of calculation can be performed. Many calculations require previous values of a variable in addition to the current value in order to establish a rate of change. The Arithmetic module stores x previous values read at each Source input (the number of previous values, x, depends on the ION device you are using, and these values are easily referenced in Arithmetic module formulas). Arithmetic Module Source n Enable Result 1 ... ... Source 1 Result m Reset CalculateNow Event Inputs Source 1 - n These are the inputs upon which the Arithmetic module’s calculations can be performed. They can be numeric or Boolean registers from any other module’s outputs. Linking these inputs is optional; any input you do not link will not have a value available for use in calculations. The number of Source inputs available depends on the ION device you are using as follows: Node Type Maximum Number of Source Inputs ION meters 8 Virtual Processor 50 Schneider Electric 2195 Keating Cross Road Saanichton, BC Canada V8M 2A5 Tel: 1-250-652-7100 For technical support: [email protected] (00) + 1 250 544 3010 Contact your local Schneider Electric sales representative for assistance or go to www.powerlogic.com ION, PowerLogic and Schneider Electric are trademarks or registered trademarks of Schneider Electric in France, the USA and other countries. Other trademarks used are the property of their respective owners. Electrical equipment should be installed, operated, serviced, and maintained only by qualified personnel. No responsibility is assumed by Schneider Electric for any consequences arising out of the use of this material. © 2009 Schneider Electric. All rights reserved. Arithmetic Module ION Reference Enable This input enables or disables the Arithmetic module (by setting it to ON or OFF, respectively). Calculations on the formulas contained in the setup registers are not performed when the module is disabled. This input is optional; if you leave it unlinked, the module is enabled by default. Reset This input resets the Arithmetic module. It can be linked to a pulse output from any other module’s output. This input is optional; if you leave it unlinked, it never receives a pulse. When a reset occurs, all previous Source input values become NOT AVAILABLE, and all previous formula result values are set to zero. Note that the Reset input overrides the Enable input: a reset clears previous values even when the module is disabled. NOTE The Reset input still functions if the module’s Enable input is OFF. CalcNow (calculate now) The Arithmetic module performs the calculations contained in its setup registers when this input is pulsed. This input can be the pulse output of any other module. If CalculateNow is not linked, the formulas contained in the module’s Formula setup registers will be calculated as follows: For ION meters, the module calculates once every second (this corresponds to the default update rate of Arithmetic modules). For the Virtual Processor, the module calculates 10 times per second (this corresponds to the default value for the Virtual Processor’s module update period, 100 milliseconds). If you change the Virtual Processor’s module update period (this is one of the global parameters you can change through the Virtual Processor Setup utility), the calculation frequency will change accordingly. If you want to set the calculation frequency to once every 1 second, create a Periodic Timer module, set its frequency (once per second), and link its output register to the Virtual Processor Arithmetic module’s CalculateNow input. NOTE The Virtual Processor’s module update period can be viewed from the Factory module’s Modl Period setup register. Setup Registers Formula 1 to Formula m The Arithmetic module has one Formula setup register for each Result output register. The number of setup registers depends on the ION device; refer to the following table: Node Type Page 58 Setup Register Register Bounds ION meter Formula 1 to Formula 8 Must not exceed 49 characters in length Virtual Processor Formula 1 to Formula 8 Must not exceed 249 characters in length © 2009 Schneider Electric. All rights reserved. ION Reference Arithmetic Module The formula you enter in a setup register does not need to reference the corresponding Source input, or any input at all. As long as the formula uses correct syntax (as discussed later) the Result output corresponding to that setup register will be updated with the result of the calculation. Conversely, you can reference any Source input (or combination of Source inputs) in any setup register. NOTE The number of setup registers, Source inputs and Result output registers depends on the ION device you are using. The number of Source inputs can be different than the number of Result outputs, but there will always be a setup register for each Result output. For example, consider the formula SUM(S2:S5) entered into setup register 1. The result of this calculation will be the sum of the Source inputs 2 through 5. This result will be written into the Result 1 output register, even though the calculation is not related to Source input 1. Output Registers Result 1 - m These output registers contain the results calculated by the formulas in their corresponding setup registers. The number of Result outputs available to an Arithmetic module matches the number of Formula setup registers; refer to Setup Registers above. Unlike other modules, the Arithmetic module’s output registers do not depend directly on inputs. A Result output will be NOT AVAILABLE only if its corresponding Formula setup register contains one of the following: a formula that references a NOT AVAILABLE Source input a formula that results in a number that can’t be displayed (such as a complex number) no formula at all Event Any events produced by the Arithmetic module are recorded in the Event register. Possible events and their associated priority numbers are shown in the following table. Event Priority Group Priority Description Reset 5 A module reset has occurred. Setup Change 10 Input links, setup registers or labels have changed. The Event output register stores the following information for each ION event: time stamp, priority, cause, effect, and any values or conditions associated with the cause and effect. © 2009 Schneider Electric. All rights reserved. Page 59 Arithmetic Module ION Reference Formula Rules Discussions in this section refer to operators and operands. In the simplest form, a formula’s operator is the function being performed, and its operand is the number or expression the function is being applied to. For example, in the formula arcsin(S1), the operator is the function arcsin and the operand is S1, the reference to the value held in Source input 1. Formulas can have multiple operators, and many of the supported operators can have multiple operands. Certain rules must be followed when entering formulas into the Arithmetic module’s setup registers. In most cases these rules are identical to those followed in conventional mathematics. The following paragraphs detail the rules used in the Arithmetic module, and define the terms used to describe references, functions and syntax errors. The remainder of this section provides definitions and syntax requirements for the reference operators, functions and constants that can be used in the Arithmetic module. Numbers, Expressions and Booleans The sections that follow refer to numbers, expressions and Booleans when describing a function’s usage. A number can be a constant or a reference to a Source input, previous Source input, current result or previous result value. In any case, number is defined as any real number. An Expression is a mathematical “sentence”, containing operators and numbers, that can be evaluated into a number. All of the Arithmetic module’s supported functions accept expressions as well as numbers as valid operands. Booleans are a special class of number, representing TRUE or FALSE. Any non-zero number, or expression that equals a non-zero number, is TRUE. Zero, or any expression that equals zero, is FALSE. Arithmetic operators will also return TRUE or FALSE depending on whether their conditions are met; for example, S1=S2 will return TRUE (1) if S1 is equal to S2, or FALSE (0) if S1 and S2 are not equal. Operator Associativity and Precedence The following table shows the associativity and precedence of mathematical operators. Arithmetic module associativity and precedence conforms to that used in conventional mathematics. Operator Associativity Precedence + or - (unary minus) right to left first power or ^ left to right second * or / left to right third + or - left to right fourth =, <, >, <=, >=, <>, !=, ~= left to right fifth The operators in the above table execute with the associativity and precedence shown, provided there are no extra parentheses included in the formula. You can change the precedence of mathematical operators by placing the expressions that Page 60 © 2009 Schneider Electric. All rights reserved. ION Reference Arithmetic Module you want evaluated first inside a set of parentheses. Formulas that include multiple sets of parentheses are evaluated “from the inside out;” the expression contained in the innermost set of parentheses is evaluated first. Syntax Errors in Formulas After the formula is entered it must be sent to the ION device to be checked for syntax errors. It is recommended that a Send & Save operation is performed after each formula is written. The following examples show formulas with syntax errors and their resulting error messages. The brackets containing the error will appear in the formula near where the error was detected. NOTE The examples below contain syntax errors that can only occur with certain ION devices. 1. This statement has a minus sign in the wrong place: sum(p1(1:10),p2(1:10),p3(-1:4)) and results in the following error message: "sum(p1(1:10),p2(1:10) {Syntax error near here} ,p3(-1:4))" 2. This statement uses an unsupported previous level; namely 0: sum(p1(1:10),p2(1:10),p3(0:4)) and results in the following error message: "sum(p1(1:10),p2(1:10),p3(0:4) {Previous level, 0, is not supported} )" 3. This statement uses an unsupported previous level; namely 11. This happens to be larger than the level set for the ION device being used. sum(p1(1:10),p2(1:11),p3(1:4)) and results in the following error message: "sum(p1(1:10),p2(1:11) {Previous level, 11, is not supported} ,p3(1:4))" 4. This statement’s syntax is correct, but it needs too much internal storage. This is because the Arithmetic module expands all address ranges and previous ranges. sum(p1(1:10),p2(1:10),p3(1:10),p4(1:10)) and results in the following error message: "Expanded address ranges caused overflow in internal storage." Reference Definitions References allow you to use values from Source inputs, previous Source inputs, formula results and previous formula results in your formulas. Ranges of values can also be referenced. Definitions and syntax requirements for the supported references and reference operators are provided in this section. The following table summarizes the available reference operators: © 2009 Schneider Electric. All rights reserved. Page 61 Arithmetic Module ION Reference Reference Description Usage S Source input value Sinput# : address range Sinput#1:Sinput#2 P previous Source input value Pinput#(previous#) or Pinput#(previous range) : previous range previous#1:previous#2 R current formula result Rformula# PR previous formula result PRformula# Referencing Source Input Values Current values held in Source inputs Source 1 through Source n are referenced in formulas using the letter S and the number of the input. For example, Source 1 is referenced by the expression S1, and Source 8 is referenced with S8. The letter S can be uppercase or lowercase. The address range operator can be used to simplify formulas when referencing Source input values. S (Source input) Syntax: Sinput# Where input# is the Source input number. Example: S1 references Source input 1 : (address range) The Address Range operator provides a way to specify a sequential range of Source input references without having to type each one into the formula. Syntax: Sinput#1:Sinput#2 Where: Sinput#1 is the beginning of the sequential range of Source inputs. Sinput#2 is the end of the sequential range of Source inputs. Example: SUM(S1:S5) returns the sum of the range S1, S2, S3, S4, S5 Page 62 © 2009 Schneider Electric. All rights reserved. ION Reference Arithmetic Module Referencing Previous Source Inputs Values A number of previous Source input values are stored in the ION device’s memory and are available for use in Arithmetic module formulas (the number of previous values retained in memory depends on the ION device you are using): Node Type Previous Values Held in Buffers ION meter Up to 10 Virtual Processor Up to 60 NOTE By default, Source input values shift to previous values at the update rate of the ION device (usually once per second). When a current Source shifted to previous input 1, all existing previous values shift one step back, and the last previous value is discarded. You can control when input values shift to previous values by linking the CalculateNow input to another module’s pulse output register. See the CalculateNow input description for details. Source input values are shifted to previous values in one of two ways, depending on whether the CalculateNow input is linked or unlinked. If CalculateNow is unlinked, input values shift one step back at the update rate of the ION device (see Setup Registers). If CalculateNow is linked, input values shift one step back only when the CalculateNow input is pulsed. Previous values are referenced using the form Px(y), where x represents the Source input number and y is the number of steps back from the current value. For example, P3(2) calls the second previous value from Source input 3. Range operators can be used to simplify formulas when referencing previous Source input values. P (previous) The Previous operator allows you to specify the value held by a Source input in previous calculation cycles. Syntax: Pinput#(previous#) Where: input# is the Source input number. previous# is the number of steps back from the current Source input value. Examples: P1(1) calls the value from input 1, 1 step back from the current value P5(6) calls the value from input 5, 6 steps back from the current value SUM(P3(1:4)) will return the sum of previous values 1 through 4 from Source input 3 (see previous range function) © 2009 Schneider Electric. All rights reserved. Page 63 Arithmetic Module ION Reference : (previous range) The Previous Range operator provides a way to specify a sequential range of previous Source input values inside the Previous function without having to type each value into the formula. Syntax: previous#1:previous#2 Where: previous#1 is the first in the sequential range of previous Source input values. previous#2 is the last in the sequential range of previous Source input values. Example: P1(1:4) references the Source input 1 previous values 1, 2, 3 and 4 steps back from the current value (see the Previous function) Referencing Current and Previous Formula Results A Result reference provides the result of the formula in another setup register, evaluated in the current calculation cycle of the module. To use Result, the formula referenced must be in a ‘preceding” setup register; for example, a formula in setup register 5 can reference the result from formulas in setup registers 1, 2, 3 or 4. It cannot reference results from formulas in setup registers 6 or higher. This is because the module evaluates the formulas in sequence, from setup register 1 on. NOTE The result operator is particularly useful for long equations. For example, you can use Formula1 to enter the first half of an equation; then you can continue the formula in Formula2 by using R1 to represent the result of Formula1. Similar to Result, the Previous Result operator allows you to reference the result of a formula that was evaluated in the previous calculation cycle of the module. This is especially useful for calculating accumulations. Previous Result only goes back one step; no facility exists to reference previous formula results from 2 or more steps back. R (result) The Result operator allows you to call results from formulas in other setup registers. Results are returned from formulas evaluated in the current calculation cycle. Syntax: Rformula# Where formula# is the Result output number. Examples: R4 calls the value from Result output register 4 (valid only if used in setup register 5 or higher) R6 calls the value from Result output register 6 (valid only if used in setup register 7 or higher) Page 64 © 2009 Schneider Electric. All rights reserved. ION Reference Arithmetic Module PR (previous result) The Previous Result operator allows you to call previous results from formulas in other setup registers. Previous results are returned from formulas evaluated in the previous calculation cycle. Note that the Previous Result operator will return zero if the previous result referenced is a NOT AVAILABLE value. Previous result operators can be used in all formulas (unlike Result operators). Syntax: PRformula# Where formula# is the Result output number. Examples: PR4 calls the previous value from Result output register 4. S1 + PR1 in the Formula 1 setup register will accumulate the values appearing at Source input S1 in the Result 1 output register. The values at S1 are accumulated every time the module updates. Function Definitions There are four types of functions that can be used in the Arithmetic module, classified by the number of operands they may contain. Syntax requirements for each function are detailed in this section. Single-Operand Functions Single-operand functions operate on a single number, expression or Boolean operand. The following table summarizes the available functions. Single-operand Function © 2009 Schneider Electric. All rights reserved. Description Usage abs absolute value abs(number) arccos arccosine function arccos(number) arcsin arcsine function arcsin(number) arctan arctangent function arctan(number) C_to_F temperature conversion C_to_F(number) cos cosine function Cos(number) F_to_C temperature conversion F_to_C(number) ln natural logarithm ln(number) log10 base 10 logarithm log10(number) not Boolean NOT not(Boolean) sin sine function sin(number) sqrt square root sqrt(number) tan tangent function tan(number) - unary minus -number or -(expression) Type_J linearization Type_J(number) Type_K linearization Type_K(number) Page 65 Arithmetic Module ION Reference Single-operand Function Description Usage Type_R linearization Type_R(number) Type_RTD linearization Type_RTD(number) Type_T linearization Type_T(number) Ceil integer ceiling function ceil(number) Floor integer floor function floor(number) NOTE Function operators can be entered using any combination of uppercase or lowercase letters. Note that number can be replaced by expression in the above table, except in the case of the unary minus function. ABS Returns the absolute value of a number or expression. Syntax: ABS(number) Where number is the real number for which you want the absolute value. Examples: ABS(-50) equals 50 ABS(50) equals 50 ARCCOS Returns the arccosine of a number or expression. Arccosine is the inverse of cosine; the angle returned from the arccos function is the angle whose cosine is the original number entered into the function. The angle returned from the arccos function is given in radians, and will be in the range 0 <= x <= PI. Syntax: ARCCOS(number) Where number is the cosine of the angle you want and must be in the range -1 <= number <= 1. Examples: ARCCOS(-0.5) equals 2.094395 (2PI/3 radians) ARCCOS(-0.5)*180/PI equals 120 (degrees) ARCSIN Returns the arcsine of a number or expression. Arcsine is the inverse of sine; the angle returned from the arcsine function is the angle whose sine is the original number entered into the function. The returned angle is given in radians in the range -PI/2 <= x <= PI/2. Page 66 © 2009 Schneider Electric. All rights reserved. ION Reference Arithmetic Module Syntax: ARCSIN(number) Where number is the sine of the angle you want, and must be in the range -1 <= number <= 1. Examples: ARCSIN(-0.5) equals -0.5236 (-PI/6 radians) ARCSIN(-0.5)*180/PI equals -30 (degrees) ARCTAN Returns the arctangent of a number or expression. Arctangent is the inverse of tangent; the angle returned from the arctan function is the angle whose tangent is the original number entered into the function. The returned angle is given in radians in the range -PI/2 < x < PI/2. Syntax: ARCTAN(number) Where number is the tangent of the angle you want. Examples: ARCTAN(1) equals 0.785398 (PI/4 radians) ARCTAN(1)*180/PI equals 45 (degrees) C_to_F Returns the temperature in degrees Fahrenheit for each number in degrees Celsius. Syntax: C_to_F(number) Where number is the temperature in Celsius for which you want the Fahrenheit equivalent. Example: C_to_F(16.6) equals 61.88 CEIL Returns the closest integer value that is greater than or equal to number. Syntax: ceil(number) Where number is the value you want the ceiling of. Examples: Ceil(12.73) equals 13 Ceil(-5.5) equals -5 © 2009 Schneider Electric. All rights reserved. Page 67 Arithmetic Module ION Reference Ceil (6.0) equals 6.0 COS Returns the cosine of a number or expression. Syntax: COS(number) Where number is the angle in radians for which you want the cosine. Examples: COS(1.047) equals 0.500171 COS(60*PI/180) equals 0.5, the cosine of 60 degrees F_to_C Returns the temperature in degrees Celsius of a number in degrees Fahrenheit. Syntax: F_to_C(number) Where number is the temperature in Fahrenheit for which you want the Celsius equivalent. Example: F_to_C(61.88) equals 16.56 Floor Returns the closest integer value that is less than or equal to number. Syntax: Floor(number) Where number is the value for which you want the floor of. Examples: Floor(12.73) equals 12 Floor(-5.7) equals –6.0 Floor (6.0) equals 6.0 LN Returns the natural logarithm of a number or expression. Syntax: LN(number) Where number is the positive real number for which you want the natural logarithm. Example: LN(86) equals 4.454347 Page 68 © 2009 Schneider Electric. All rights reserved. ION Reference Arithmetic Module LOG10 Returns the base 10 logarithm of a number or expression. Syntax: LOG10(number) Where number is the positive real number for which you want the base 10 logarithm. Examples: LOG10(86) equals 1.934498451 LOG10(10) equals 1 LOG10(10^5) equals 5 NOT Returns the reverse value of a Boolean. If the Boolean is FALSE, NOT returns TRUE; if the Boolean is TRUE, NOT returns FALSE. Syntax: NOT(Boolean) Where Boolean can be evaluated to TRUE (non-zero) or FALSE (0). Examples: NOT(0) equals TRUE NOT((1+1)=2) equals FALSE SIN Returns the sine of the number or expression. NOTE The expression SIN(PI) will return 1.22E-16, a number very closely approximating zero. The Arithmetic module interprets this number as non-zero, so it will return TRUE if used as a Boolean test. Syntax: SIN(number) Where number is the angle in radians for which you want the sine. Examples: SIN(PI) equals 1.22E-16, which is approximately zero (the sine of PI is zero) SIN(PI/2) equals 1 SIN(30*PI/180) equals 0.5, the sine of 30 degrees SQRT Returns the square root of a number or expression. © 2009 Schneider Electric. All rights reserved. Page 69 Arithmetic Module ION Reference Syntax: SQRT(number) Where number is the positive number for which you want the square root. If number is negative, the associated Result output register will be NOT AVAILABLE. Examples: SQRT(16) equals 4 SQRT(-16) makes the associated Result output NOT AVAILABLE TAN Returns the tangent of a number or expression. Syntax: TAN(number) Where number is the angle in radians for which you want the tangent. Examples: TAN(0.785) equals 0.99920 TAN(45*PI/180) equals 1 - (unary minus) Returns the arithmetic inverse of a number or expression. Syntax: -number -(expression) Where: number is the positive real number for which you want the arithmetic inverse. expressions you want the inverse of must be enclosed in parentheses. Examples: -56 equals “minus 56” (the arithmetic inverse of 56) -(SIN(13.265)) equals the arithmetic inverse of SIN(13.265) Type_J (thermocouple linearization) Returns the linearized (corrected) value for a Type J thermocouple measurement. The ScaledValu output of an Analog Input module must be referenced, and the setup registers for the Analog Input module must be left at their default values. Linearized temperature is returned in degrees Celsius. Page 70 © 2009 Schneider Electric. All rights reserved. ION Reference Arithmetic Module NOTE Refer to the Thermocouple Linearization discussion in the “Detailed Module Operation” section of this module description for more on ION module settings and hardware configuration. Syntax: Type_J(S#) Where # is the number of the Source input that is connected to the Analog Input module’s ScaledValu output. Example: Type_J(S1) returns the linearized measurement of the Type J thermocouple connected to an input device monitored by and Analog Input module. The Analog Input module’s ScaledValu output is connected to the Arithmetic module’s Source input #1. Type_K (thermocouple linearization) Returns the linearized (corrected) value for a Type K thermocouple measurement. The ScaledValu output of an Analog Input module must be referenced, and the setup registers for the Analog Input module must be left at their default values. Linearized temperature is returned in degrees Celsius. Syntax: Type_K(S#) Where # is the number of the Source input that is connected to the Analog Input module’s ScaledValu input. Example: Type_K(S2) returns the linearized measurement of the Type K thermocouple signal linked to Source input 2 Type_R (thermocouple linearization) Returns the linearized (corrected) value for a Type R thermocouple measurement. The ScaledValu output of an Analog Input module must be referenced, and the setup registers for the Analog Input module must be left at their default values. Linearized temperature is returned in degrees Celsius. Syntax: Type_R(S#) Where # is the number of the Source input that is connected to the Analog Input module’s ScaledValu input. Example: Type_K(S1) returns the linearized measurement of the Type R thermocouple signal linked to Source input 1 Type_RTD (RTD linearization) Returns the linearized (corrected) value for a Resistance Temperature Detector measurement. The ScaledValu output of an Analog Input module must be © 2009 Schneider Electric. All rights reserved. Page 71 Arithmetic Module ION Reference referenced, and the setup registers for the Analog Input module must be left at their default values. Linearized temperature is returned in degrees Celsius. Syntax: Type_RTD(S#) Where # is the number of the Source input that is connected to the Analog Input module’s ScaledValu input. Example: Type_RTD(S4) returns the linearized measurement of the Resistance Temperature Detector’s signal linked to Source input 4 Type_T (thermocouple linearization) Returns the linearized (corrected) value for a Type T thermocouple measurement. The ScaledValu output of an Analog Input module must be referenced, and the setup registers for the Analog Input module must be left at their default values. Linearized temperature is returned in degrees Celsius. Syntax: Type_T(S#) Where # is the number of the Source input that is connected to the Analog Input module’s ScaledValu input. Example: Type_T(S3) returns the linearized measurement of the Type K thermocouple signal linked to Source input 3 Binary or Two-Operand Functions Binary functions operate on two numbers, expressions or Booleans. The following table summarizes the available functions. Binary Function / Usage division number/number DIV integer divide Div(number, number) = equals number=number > greater than number>number >= greater than or equal number>=number < less than number<number <= less than or equal number<=number MOD modulus Mod(number, number) - minus number-number * multiplication number*number <>, ~=, != does not equal number<>number number~=number number!=number + addition number+number exponent POWER(number, number) number^number POWER, ^ Page 72 Description © 2009 Schneider Electric. All rights reserved. ION Reference Arithmetic Module NOTE Binary operators can be typed into the formula string with or without spaces between operators and operands. It is recommended that spaces are not used, as each space wastes one character in the formula. Note that number can be replaced by expression in the above table. = (equals) The equals operator is used to test if one number or expression is equal to another. Syntax: number1=number2 The result will be TRUE if number1 is equal to number2, and will be FALSE if number1 does not equal number2. / (divide) The divide operator is used to divide one number or expression by another. Syntax: number1/number2 Where: number1 is the original value (dividend). number2 is the value that number1 is divided by (divisor). NOTE If number2 is zero (0), the corresponding Result output will become NOT AVAILABLE. DIV (integer divide) The divide operator will return the integer portion of the result of dividing one number by another. Syntax: Div(number1,number2) Where: number1 is the number you want to be divided. number2 is the number you want to divide by. Examples: Div(10.5,10) equals 1 Div(27.25,5) equals 5 Div(10,2.5) equals 4 © 2009 Schneider Electric. All rights reserved. Page 73 Arithmetic Module ION Reference > (greater than) The greater than operator is used to test if one number or expression is greater than another. Syntax: number1>number2 The result will be TRUE if number1 is greater (larger) than to number2, and will be FALSE if number1 is less than or equal to number2. >= (greater than or equal) The greater than or equal operator is used to test if a number or expression is greater than or equal to another. Syntax: number1>=number2 The result will be TRUE if number1 is greater (larger) than or equal to number2, and will be FALSE if number1 is less than number2. < (less than) The less than operator is used to test if one number or expression is less than another. Syntax: number1<number2 The result will be TRUE if number1 is less than number2, and will be FALSE if number1 is greater than or equal to number2. <= (less than or equal) The less than or equal operator is used to test if one number or expression is less than or equal to some other number or expression. Syntax: number1<=number2 The result will be TRUE if number1 is less than or equal to number2, and will be FALSE if number1 is greater than number2. - (minus) The minus operator is used to subtract one number or expression from another. Syntax: number1-number2 Where number2 is subtracted from number1. MOD (modulus) The modulus operator will give you the remainder of a divide operation. Syntax: Mod(number1,number2) Examples: Mod(10.5,10) equals 0.5 Page 74 © 2009 Schneider Electric. All rights reserved. ION Reference Arithmetic Module Mod(27.25,5) equals 2.25 Mod(10,2.5) equals 0 * (multiply) The multiplication operator is used to multiply one number or expression by another. Syntax: number1*number2 Where number1 and number2 are multiplied together. <> (not equal) The not equal operator is used to test if one number or expression is not equal to another. Syntax: number1<>number2 number1~=number2 number1!=number2 The result will be TRUE if number1 does not equal number2, and will be FALSE if number1 does equal number2. + (plus) The addition operator is used to add one number or expression to another. Syntax: number1+number2 Where number1 and number2 are added together. power Raises a number or expression to the power of another number or expression. Syntax: POWER(number1, number2) number1^number2 Where number1 is the base number. number2 is the exponent. Examples: POWER(6,2) equals 36 © 2009 Schneider Electric. All rights reserved. Page 75 Arithmetic Module ION Reference 6^2 equals 36 4^5/4 equals 5.656854 Tertiary or Three-Operand Functions Tertiary functions operates on three operand expressions. The IF function is the only tertiary operator supported in the Arithmetic module. Tertiary Function IF Description if conditional Usage if (Boolean, number, number) Note that number can be replaced by expression in the above table. IF Returns one number if the Boolean test evaluates TRUE (evaluates to a non-zero number), and another number if it evaluates FALSE (evaluates to 0). NOTE The IF function is unique in that it can return a valid result when one of its operands is a reference to a NOT AVAILABLE Source input. For example, in the expression IF(S1, S2, S3), if S1 is TRUE, then S2 is returned. In this case, if S3 is NOT AVAILABLE, the function will still return S2 as a valid result. However, if S1 is FALSE, the function will attempt to return S3, and the result will be NOT AVAILABLE. Syntax: IF(Boolean, number1, number2) Where: Boolean can be evaluated to TRUE (non-zero) or FALSE (0). number1 is the value that is returned if Boolean is TRUE. number2 is the value that is returned if Boolean is FALSE. Example: IF(S1>S2, S3, S4) returns S3 if S1>S2, or returns S4 if S1<=S2 Multiple-Operand Functions Multiple-operand functions operate on a list of operands. The following table summarizes the available functions. Multiple-operand Function Page 76 Description Usage AND Boolean AND AND(Boolean1, Boolean2…Boolean n) AVG average AVG(number1, number2…number n) MAX maximum MAX(number1, number2…number n) MIN minimum MIN(number1, number2…number n) OR Boolean OR OR(Boolean1, Boolean2…Boolean n) RMS root mean square RMS(number1, number2…number n) © 2009 Schneider Electric. All rights reserved. ION Reference Arithmetic Module Multiple-operand Function Description Usage SUM summation SUM(number1, number2…number n) SUMSQ square of the sum SUMSQ(number1, number2…number n) Note that number can be replaced by expression in the above table. AND Returns TRUE if all Booleans are TRUE; returns FALSE if one or more Booleans is FALSE. Syntax: AND(Boolean1,Boolean2, ...) Where Boolean1,Boolean2, ... are 1 to n conditions you want to test that can be either TRUE (non-zero) or FALSE (0). Examples: AND(1, 1) equals TRUE AND(1, 0) equals FALSE AND(2+2=4, 2+3=5) equals TRUE If S1:S3 contains the values that evaluate to TRUE, FALSE, and TRUE, then: AND(S1:S3) equals FALSE AVG Returns the average (arithmetic mean) of the numbers or expressions. Syntax: AVG(number1, number2, ...) Where number1, number2,... are 1 to n numbers for which you want the average. Examples: If S1:S5 contains the numbers 10, 7, 9, 27, and 2, then: AVG(S1:S5) equals 11 AVG(S1:S5, 5) equals 10 MAX Returns the maximum value in a list of numbers or expressions. Syntax: MAX(number1, number2, ...) Where number1, number2,... are 1 to n numbers for which you want the maximum. Examples: © 2009 Schneider Electric. All rights reserved. Page 77 Arithmetic Module ION Reference If S1:S5 contains the numbers 12, 7, 9, 27, and 2, then: MAX(S1:S5) equals 27 MIN Returns the minimum value in a list of numbers or expressions. Syntax: MIN(number1, number2, ...) Where number1, number2,... are 1 to n numbers for which you want the minimum. Examples: If S1:S5 contains the numbers 42, 7, 9, 27, and 2, then: MIN(S1:S5) equals 2 MIN(S1:S5, 0) equals 0 OR Returns TRUE if any Boolean is TRUE; returns FALSE if all Booleans are FALSE. Syntax: OR(Boolean1,Boolean2,…) Where Boolean1,Boolean2, ... are 1 to n conditions that can be either TRUE (nonzero) or FALSE (0). Examples: OR(1) equals TRUE (non-zero) OR(1+1=1,2+2=5) equals FALSE (0) RMS Returns the Root Mean Square of the numbers or expressions. Syntax: RMS(number1, number2, ...) Where number1, number2,... are 1 to n numbers for which you want the Root Mean Square. Examples: RMS(2,3) equals 2.549510 SUM Returns the sum of the numbers or expressions. Syntax: SUM(number1, number2, ...) Where number1, number2,... are 1 to n numbers for which you want the sum. Page 78 © 2009 Schneider Electric. All rights reserved. ION Reference Arithmetic Module Examples: SUM(3, 2) equals 5 SUM(S2:S5) equals the sum of Source inputs 2, 3, 4 and 5 SUMSQ Returns the sum of the squares of the numbers or expressions. Syntax: SUMSQ(number1, number2,...) Where number1, number2,... are 1 to n numbers for which you want the sum of the squares. Example: SUMSQ(3, 4) equals 25 Constants Arithmetic module formulas can include the following constant: Constant PI Description The constant PI: the relationship of a circle’s circumference to its diameter. PI The constant PI is equal to 3.14159265358979, accurate to 15 digits. Syntax: PI Example: 4*PI equals 4 times PI, or 12.5664 © 2009 Schneider Electric. All rights reserved. Page 79 Arithmetic Module ION Reference Detailed Module Operation The Arithmetic module is capable of a wide variety of calculations with seven digit precision. To illustrate a typical application, the following example shows how to use the Arithmetic module to calculate the cost of fuel per kilowatt ($/kW) and the cost of fuel per kilowatt-hour ($/kWh) for a simple mechanical generation system comprised of a diesel generator. The cost per second ($/second) consumed by the system is also included. Before programming the module, create your formulas on paper and test them. Remember to check the units of the quantities used in the formula to ensure they are balanced correctly. The first step is to identify the components of your formula; the constants and variables required to achieve the results. In this example, the $/kW and $/kWh values are based on the cost of fuel, the fuel flow rate, and the instantaneous kW. These values are as follows: Formula Component Source Units fuel cost constant, currently 0.30 $/l fuel flow rate analog input attached to a flow sensor on the generator’s fuel line l/min instantaneous kW Power Meter module’s kW total output kW Next, the modules must be linked to provide the fuel flow rate and the kW total. The resulting framework will look like this: As the fuel cost is constant, it can be entered directly into the formula as a numeric value. The fuel flow rate will be read at Source input 1, so it will be referenced in formulas as S1. Note that S1 has units of l/min which must be converted to l/sec to balance with the units of the other quantities (dividing by 60 will convert 1/min to 1/ sec). The instantaneous kW will be read at Source input 2, so it will be referenced as S2. To generate the results, $/kW, $/kWh, and $/second being consumed by the system, setup registers must be programmed with the appropriate formula for each result we want. The formulas you need are as follows: Page 80 © 2009 Schneider Electric. All rights reserved. ION Reference Arithmetic Module Setup Register Formula 1 (S1/60) * .3 / S2 2 (S1/60) * .3 3 ((S1/60) * .3) * 3600/S2 Remember that the module will place the result of the calculation in the Result output corresponding to the setup register (i.e. Result 1 will hold the result of the formula in setup register 1). Thermocouple Linearization The Arithmetic module’s thermocouple operators are designed for use with Grayhill type J, K, R, T thermocouples, and RTD input devices, that have zero-scale and full-scale temperatures that match those shown in the following table. Type Zero Scale (°C) Full Scale (°C) Lowest Valid Output (°C) Highest Valid Output (°C) J 0 700 0 760 K -100 924 0 1370 R 0 960 0 1000 T -200 224 -160 400 RTD -50 350 -50 350 The table above also shows the lowest and highest temperature values that are valid results from the linearization operators. Linearization operators will return NOT AVAILABLE if they result in temperatures outside of the ranges shown. In addition to a properly rated thermocouple or RTD, linearization also requires the following: An ION7700 with external Grayhill analog input devices Designer software Use the following procedure to get a linearized temperature measurement from one of the supported thermocouples or RTD: 1. Connect the appropriate thermocouple to a Grayhill analog Input device, and connect this input device to the ION7700 meter’s external I/O board. 2. Using Designer software, add an Analog Input module to the ION7700. 3. Configure the Port setup register of the Analog Input module appropriately for the hardware port where you have connected the thermocouple or RTD. Leave the Zero Scale and Full Scale setup registers at their default values. The default values are: Zero Scale = 0, Full Scale = 1. 4. Connect the ScaledValu output register of the Analog Input module to one of the Source inputs of the Arithmetic module. 5. Create a formula in an Arithmetic module setup register that uses the linearization operator for the type of thermocouple you are using. The operator © 2009 Schneider Electric. All rights reserved. Page 81 Arithmetic Module ION Reference should reference the source input you have linked to the ScaledValu output register of the Analog Input module. 6. Save the changes you’ve made to the ION7700 and exit Designer. Below is another typical application for the Arithmetic module. This illustrates how a simple time-of-use framework can be implemented to calculate the cost of energy consumption. Let’s say your power provider charges you different energy rates during different times of the day: Time of day Rate ($/kWh) 12:00 AM to 8:00 AM $0.05 8:00 AM to 5:00 PM $0.12 5:00 PM to 12:00 AM $0.08 In this example, the Scheduler module’s Output Profile #1 to #3 setup registers are set to turn ON during the times listed above. The Integrator modules are linked to the kW tot output of the Power Meter module — these Integrators calculate energy (kWh). The Enable input of each Integrator is linked to the Scheduler’s Status output #1 through #3, respectively. Each Integrator therefore monitors the kWh use ONLY during the time periods assigned to them by the Scheduler. The Arithmetic module’s Formula #1 to #4 setup registers are set to calculate the cost during each time period, as well as the total cost: Page 82 © 2009 Schneider Electric. All rights reserved. ION Reference Arithmetic Module Formula Result S1*.05 Energy cost during 12:00 AM to 8:00 AM S1*.12 Energy cost during 8:00 AM to 5:00 PM S1*.08 Energy cost during 5:00 PM to 12:00 AM SUM(R1:R3) Total energy cost for above (Result 1 through 3) The External Pulse module is linked to the Reset inputs of the Integrator modules. This allows you to manually clear the Integrators (for example, you may want to clear it on a daily, weekly or monthly basis). Responses to Special Conditions The following table summarizes how the Arithmetic module behaves under different conditions. Condition © 2009 Schneider Electric. All rights reserved. Response of Output Register If the Source inputs are NOT AVAILABLE Any formulas that reference a NOT AVAILABLE Source input will return a NOT AVAILABLE value to the corresponding Result output. Note: the IF function can reference NOT AVAILABLE inputs and still provide a valid Result output. Refer to the IF function description for details. If the Enable input is OFF The Result output registers hold the last calculated values. After the module is re-linked or its setup registers are changed The Result output registers are NOT AVAILABLE, until the formulas are recalculated. When the device is started or powered-up (either the first time, or after a shut-down) The Result output registers are NOT AVAILABLE, until the formulas are recalculated. Page 83 Arithmetic Module Page 84 ION Reference © 2009 Schneider Electric. All rights reserved. ION REFERENCE 09/2008 Averaging Module The Averaging module provides simple averaging functionality, and on some meters, sum of squares functionality. Input values are accumulated over time, and when pulsed (or every second, depending on user configuration), the module calculates the average value of the inputs and provides those values to the corresponding output registers. Inputs Inputs 1-16 Theses values are averaged by the module. They must be a numeric or bounded numeric register from any other module’s outputs. You must link at least one of these inputs. Operate Now When this register is not linked, the module averages the input values every second. When this register is linked, the module will only average the input values when the Operate Now input is pulsed. Reset When this register is pulsed, the module output values will be reset to 'Not Available' and internals cleared. Linking this input is mandatory; the module will not go online if left unlinked. Schneider Electric 2195 Keating Cross Road Saanichton, BC Canada V8M 2A5 Tel: 1-250-652-7100 For technical support: [email protected] (00) + 1 250 544 3010 Contact your local Schneider Electric sales representative for assistance or go to www.powerlogic.com ION, PowerLogic and Schneider Electric are trademarks or registered trademarks of Schneider Electric in France, the USA and other countries. Other trademarks used are the property of their respective owners. Electrical equipment should be installed, operated, serviced, and maintained only by qualified personnel. No responsibility is assumed by Schneider Electric for any consequences arising out of the use of this material. © 2008 Schneider Electric. All rights reserved. Averaging Module ION Reference Enable This register enables the module. When set to No, the outputs will be set to 'Not Available'. Default is Yes. Setup Registers The Averaging module has the following setup register: Calc Mode This register specifies which type of averaging the module performs. Average Mode is simple averaging, while RMS Mode uses sum of squares (RMS). The default is Average Mode. Output Registers The Averaging module has the following output registers: Outputs 1-16 These registers hold the averaged values of the inputs, after they have been calculated. NOTE When connecting the outputs to a Data Recorder module, the Record Complete output of the Data Recorder module must be connected through a Feedback module to the Reset input of the Averaging module. See the “Detailed Operation” section for more information. Event Events produced by the module are recorded in this output register. Possible events and their associated priority numbers are shown in the following table. Event Priority Group Priority Description Reset 5 A module reset has occurred. Setup Change 10 Input links or labels have changed. The Event output register stores the following information for each ION event: time stamp, event priority, event’s cause, event’s effect, and conditions associated with the event’s cause and effect. Page 86 © 2008 Schneider Electric. All rights reserved. ION Reference Averaging Module Detailed Operation A framework that makes use of the Averaging module is shown in the following diagram. The Modbus Master Device module provides imported kW values from a Modbus slave device (Submeter1). The Averaging module calculates the average of all stored kW values only when the Successful Read register pulses the Operate Now register. This ensures the data is not stale. The resulting output value is linked to the Data Recorder, which records the value every 15 minutes (as triggered by the Periodic Timer module). Every time a record is written, the Record Complete register pulses and, via a Feedback module, triggers the Averaging module’s Reset register. All previous values for kW are erased and the process begins again. Responses to Special Conditions The following table summarizes how the Averaging module behaves under different conditions. Condition © 2008 Schneider Electric. All rights reserved. Responses An input goes N/A The corresponding output is N/A and internal value is reset. When the device is started or powered-up (either the first time, or after a shutdown) All output registers are N/A and internal values are reset. Page 87 Averaging Module Page 88 ION Reference © 2008 Schneider Electric. All rights reserved. ION REFERENCE 09/2008 Bin Module The Bin module counts how many times a user-defined rule is satisfied by the module’s inputs. When an input satisfies one of the twenty-five rules, a corresponding output increments, allowing you to count the number of times an input met a rule. Bin Module Bin 1 Bin 2 Source A Source B Nominal A Nominal B Bin 25 Event Evaluate Enable Reset Inputs Source A The input value from Source A is tested against all of the arguments in the Rule setup registers. Linking this input is optional. Source B The input value from Source B is tested against all of the arguments in the Rule setup registers. Linking this input is optional. Nominal A This input is used as the nominal value of Source A in the Rule setup registers if Eval Mode A is set appropriately. Refer to the Eval Mode A setup register below. Nominal B This input is used as the nominal value of Source B in the Rule setup registers if Eval Mode B is set appropriately. Refer to the Eval Mode B setup register below. Schneider Electric 2195 Keating Cross Road Saanichton, BC Canada V8M 2A5 Tel: 1-250-652-7100 For technical support: [email protected] (00) + 1 250 544 3010 Contact your local Schneider Electric sales representative for assistance or go to www.powerlogic.com ION, PowerLogic and Schneider Electric are trademarks or registered trademarks of Schneider Electric in France, the USA and other countries. Other trademarks used are the property of their respective owners. Electrical equipment should be installed, operated, serviced, and maintained only by qualified personnel. No responsibility is assumed by Schneider Electric for any consequences arising out of the use of this material. © 2008 Schneider Electric. All rights reserved. Bin Module ION Reference Evaluate A pulse at this input triggers the Bin module’s evaluation: the values at the inputs are tested against the Rules setup registers, then the output registers are updated accordingly. Enable This input enables or disables the Bin module. When disabled, the module will not update the Bin 1 to Bin 25 output registers, and will ignore pulses at the Evaluate input. This input is optional; if you leave it unlinked, the module will be enabled by default. Reset This input resets the module’s Bin outputs to NOT AVAILABLE until an Evaluate pulse is received. This input is optional; if you leave it unlinked, this input will never receive a pulse. Setup Registers Rule 1 to Rule 25 These strings specify the rules that Source A and Source B are tested against. If a Rule is met, its corresponding Bin output is incremented. For Rule string syntax, refer to “Specifying Rules”. Eval Mode A This register defines whether the rules testing Source A are relative to Nominal A. When this register is set to VALUE, the Rules’ numeric arguments are in absolute terms; if this register is set to PERCENTAGE, the Rules are in terms of a percentage of Nominal. Refer to “Evaluation Modes”. Eval Mode B Similar to Eval Mode A, this register defines whether the rules testing Source B are relative to Nominal B, or absolute. Refer to the Eval Mode A register above. EvPriority This register allows you to set a custom priority level to certain events written to the Event output register. When EvPriority is zero, no event is written. Refer to the Event output register description for details. Output Registers Bin 1 to Bin 25 Once the Evaluate input is pulsed and Rule n is satisfied by the Source inputs, Bin n is incremented by one. The Bin module continues to increment its Bin outputs each time their corresponding Rules are met by the Source inputs, until the module is disabled or reset. Event All events produced by the module are written into this register. Possible events and their associated priority numbers are shown in the table below: Page 90 © 2008 Schneider Electric. All rights reserved. ION Reference Bin Module Event Priority Group Priority Description Setup Change 10 Input Links, setup registers or labels have been changed. Event * A Bin output was incremented. * The EvPriority setup register defines the priority of these events. The Event output register stores the following information for each ION event: time stamp, priority, cause, effect, and any values or conditions associated with the cause and effect. © 2008 Schneider Electric. All rights reserved. Page 91 Bin Module ION Reference Detailed Module Operation When the Bin module receives a pulse on its Evaluate input, it checks whether any of the Rule setup registers are satisfied by the values of the Source inputs. The Source inputs may be relative to their corresponding Nominal inputs depending on the Eval Mode setting (refer to “Evaluation Modes”). If Rule n is satisfied by the inputs, then the Bin n output is incremented. Specifying Rules The rules are specified using variables (A for Source A, B for Source B), numbers, mathematical operands, and the ‘&’ symbol. The ‘&’ symbol allows you to test both Source A and Source B in the same rule. NOTE Spaces are required between variables, values, operands and the & symbol. Valid operands include: == equal to < less-than > greater-than <= less-than or equal to >= greater-than or equal to For example, to specify a rule where Bin 1 increments when Source A is greater than 15, the Rule 1 setup register is: A > 15 Note that the spaces between the variable, number, and operator are required. Use the ‘&’ symbol to test both Source A and Source B in the same Rule. For example, to specify Bin 12 to increment when Source A is greater-than 20 and less-than 40; and Source B is greater-than or equal to 50; set Rule 12 to: 20 < A < 40 & B >= 50 (spaces required) Evaluation Modes The Eval Mode setup registers define whether the numbers in the rules are absolute, or relative to the nominal. When set to PERCENTAGE, the numeric arguments in the Rule setup registers are interpreted as percentages of the Nominal input. For example, if the Rule 1 setup register is set to A < 50, then the Bin 1 output will increment if Source A is less-than 50% of Nominal A. When the Eval Mode setup registers are set to VALUE, the numeric arguments are absolute, and the Nominal inputs are not used to evaluate that particular Rule. Page 92 © 2008 Schneider Electric. All rights reserved. ION REFERENCE 09/2010 Calibration Pulser Module The Calibration Pulser module is a highly accurate energy pulser often used for verifying calibration on revenue-class ION meters. This module is typically used to connect the power outputs (for example, kW, kVAR or kVA) of the Meter Units Power Meter module to the ION meter’s hardware output channel. This module integrates the instantaneous power (in kW, kVAR or kVA) appearing at its Source input, then sends one complete pulse or KYZ transition to the output hardware channel each time the integrated power (i.e., the energy in Wh, VARh or VAh) reaches the value defined by the Kt (pulse weight) setup register. Inputs Source All Calibration Pulser modules have one Source input. This numeric input is usually linked to the kW, kVAR, or kVA outputs from the MU Power Meter module. Linking this input is mandatory. The Source input must be in kW units (not Watts). Enable This input enables or disables the Calibration Pulser module (by setting it to ON or OFF respectively). When disabled the module will not send pulses to the hardware channel specified in the Port setup register. This input is optional; if you leave it unlinked, the module is enabled by default. Schneider Electric 2195 Keating Cross Road Saanichton, BC Canada V8M 2A5 Tel: 1-250-652-7100 For technical support: [email protected] (00) + 1 250 544 3010 Contact your local Schneider Electric sales representative for assistance or go to www.powerlogic.com ION, PowerLogic and Schneider Electric are trademarks or registered trademarks of Schneider Electric in France, the USA and other countries. Other trademarks used are the property of their respective owners. Electrical equipment should be installed, operated, serviced, and maintained only by qualified personnel. No responsibility is assumed by Schneider Electric for any consequences arising out of the use of this material. © 2010 Schneider Electric. All rights reserved. Calibration Pulser Module ION Reference Setup Registers OutputMode This register specifies whether the output signal is a complete pulse (PULSE) or a change of state transition (KYZ). Pulse Width This register defines the output pulse ON time (i.e., how many seconds the pulse that is sent to the output hardware channel stays on). For example, this can correspond to the time period that an LED is lit. Kt (pulse weight) This register defines the weight of the output pulse (i.e., how many energy units in Wh, VARh or VAh are accumulated before the module sends an output pulse to the hardware channel). A typical industry standard for energy pulsing is one pulse per 1.8 energy units (Wh, VARh or VAh). Kt units are measured in Watt-Hours. Int Mode The table below describes different integration modes for the Calibration Pulser: Mode Description forward Used for imported energy – only positive Source values are considered for output pulsing. reverse Used for exported energy – only negative Source values are considered for output pulsing. absolute Used to obtain the absolute values of imported and exported energy - both positive and negative Source values are considered positive and added for output pulsing. net Used to obtain the difference between imported and exported energy (negative Source values are subtracted from positive Source values). For ION8800 meters, this mode acts the same as absolute mode. Port This register specifies to which hardware port the output pulse is sent, usually an LED output for verification testing. Some meters have internal mechanical relays. Refer to your meter documentation for a list of available ports. CAUTION HAZARD OF MISAPPLICATION (MISUSE) Because mechanical relays have limited lifetimes, mechanical KYZ relays are typically not suitable for energy pulsing applications. For energy pulsing applications, consider using Form A outputs in KYZ mode. Failure to follow this instruction can result in equipment damage. Page 94 © 2010 Schneider Electric. All rights reserved. ION Reference Calibration Pulser Module Output Registers Overload This Boolean register turns ON if the pulse train duty cycle goes above 47.5% (i.e., if the pulse ON time becomes greater than the pulse OFF time). Disk Position This register indicates how much energy has accumulated since the last time the module pulsed. Disk Revolution Complete The module sends a pulse to this register when the accumulated energy reaches the value defined by the Kt setup register. This register is typically linked to hardware output port used for energy pulse counting. Event Any events produced by the Calibration Pulser module are recorded in the Event register as follows: Event Priority Group Setup Change Priority 10 Description Input links, setup registers or labels have changed. The Event output register stores the following information for each ION event: time stamp, priority, cause, effect, and any values or conditions associated with the cause and effect. © 2010 Schneider Electric. All rights reserved. Page 95 Calibration Pulser Module ION Reference Detailed Module Operation The Calibration Pulser module is commonly used in energy pulsing applications. The module’s Source input is typically linked to the kW, kVAR or kVA output registers of the MU (meter units) Power Meter module. The Kt setup register defines the pulse weight, i.e., how much energy accumulates (in Wh, VARh or VAh depending upon its input) before the module sends a complete pulse or KYZ transition to the hardware channel specified in the Port setup register. In simple terms, the Kt setup register defines (in Watt-hours) the size of the container that collects energy. The Disk Position register indicates how much energy has been collected in this container (similar to a car’s fuel tank gauge). For example, if you want the Calibration Pulser module to pulse once every time it accumulates 1.8 Wh of energy, you would enter a value of 1.8 in the Kt setup register. If you want to module to pulse once every time it accumulates 1.8 kWh of energy, you would enter a value of 1800 (since 1.8 kWh = 1800 Wh). When the container is full, the module sends a pulse to the Disk Revolution Complete output register, and the container is emptied. Output Mode: PULSE When the OutputMode setup register is set to PULSE, the module sends a complete pulse to the output hardware port each time the Kt value is reached. NOTE The Pulse Width setup register defines the ON time of the output pulse (e.g., how long an LED should remain lit). Page 96 © 2010 Schneider Electric. All rights reserved. ION Reference Calibration Pulser Module In the above diagram, each trigger in the top graph (Module’s output pulse) represents one pulse sent to the Disk Revolution Complete output register. The bottom graph illustrates how the pulse appears at the output hardware channel. The Pulse Width setup register defines the ON time of this pulse. When the module is operating in Normal state, the output pulse’s duty cycle is less than 47.5%. If the output pulse’s duty cycle reaches 47.5% or above, the module goes into Overload state. When this happens, the Overload output register turns ON, the hardware channel remains ON, and the module does not send any more pulses to the output hardware channel. The module returns to Normal state when the duty cycle drops below 47.5%. Normal State (Normal pulsing) Pulse duty cycle < 47.5% Overload State (No pulse sent to output) Pulse duty cycle > 47.5% The duty cycle for the output pulse is calculated as follows: Duty cycle changes when the value at the Source input changes. Depending on the Kt and Pulse Width settings, the value appearing at the Source input causes the duty cycle to reach 47.5%. This maximum Source value (Max Source) can be calculated using the following formula: For example, if you set the Kt register to 1800 (one pulse per 1800 Wh), and you set the Pulse Width to 0.050 seconds, the module will be able to support normal pulsing as long as the Source input does not exceed 61,560 W (calculated Max Source). The Overload output will turn ON when the instantaneous value at the Source input reaches or exceeds this value. To prevent the module from going to Overload state, set the Pulse Width to just slightly greater than the minimum ON time period required for the output hardware channel (e.g. LED) to recognize it as a valid pulse. Otherwise, the pulse weight (Kt) setup register needs to be redefined (i.e. it needs to be increased). © 2010 Schneider Electric. All rights reserved. Page 97 Calibration Pulser Module ION Reference Output Mode: KYZ When the OutputMode setup register is set to KYZ, the module triggers the output hardware port to change state (i.e. changes its state from OFF to ON, and viceversa) each time the Kt value is reached. NOTE For KYZ mode, the Pulse Width setup register defines the minimum amount of time that the output pulse must stay ON in order for the output hardware channel to recognize it as a valid pulse. In the above diagram, each trigger in the top graph (Module’s output pulse) represents one pulse sent to the Disk Revolution Complete output register. The bottom graph illustrates how the KYZ transitions (changes of state) appears at the output hardware channel. In KYZ mode, the Pulse Width setup register is ignored; it is only used for calculating the maximum source value (i.e., Max Source, see formula below). When the module is operating in Normal state, the output pulse triggers the hardware channel to change state (OFF to ON, or vice-versa). If the value at the Source input reaches the Max Source value, the module goes into Overload state. When this happens, the Overload output register turns ON, the hardware channel remains ON, and the module does not send any more KYZ transitions to the output hardware channel. The module returns to Normal state when the Source input drops below the Max Source value. This value can be calculated using the following formula: For example, if you set the Kt register to 1800 (one pulse per 1800 Wh), and you set the Pulse Width to 0.050 seconds, the module will be able to support normal KYZ pulsing as long as the Source input does not exceed 123,120 W (calculated Max Source). The Overload output will turn ON when the instantaneous value at the Source input reaches or exceeds this value. To prevent the module from going to Overload state, set the Pulse Width to just slightly greater than the minimum ON time period required for the output hardware channel (e.g. LED) to recognize it as a valid KYZ transition. Otherwise, the pulse weight (Kt) setup register needs to be redefined (i.e., it needs to be increased). Page 98 © 2010 Schneider Electric. All rights reserved. ION REFERENCE 09/2010 Clock Module The Clock module provides the corrected local time required by the ION Scheduler module and Time of Use module. The module obtains the Coordinated Universal Time (UTC) from the ION device and converts it to local time, taking time zones and Daylight Savings into account. NOTE For the purposes of configuring the Clock module, Coordinated Universal Time (UTC) can also be thought of as Greenwich Mean Time (GMT), and references to NTP in ION devices should be interpreted as SNTP. The Clock module uses the UNIX time. This time format specifies the number of seconds that have elapsed since January 1, 1970, at 12:00 a.m. (UTC). The UNIX time format is required when entering time values into the module's Daylight Savings setup registers. Schneider Electric 2195 Keating Cross Road Saanichton, BC Canada V8M 2A5 Tel: 1-250-652-7100 For technical support: [email protected] (00) + 1 250 544 3010 Contact your local Schneider Electric sales representative for assistance or go to www.powerlogic.com ION, PowerLogic and Schneider Electric are trademarks or registered trademarks of Schneider Electric in France, the USA and other countries. Other trademarks used are the property of their respective owners. Electrical equipment should be installed, operated, serviced, and maintained only by qualified personnel. No responsibility is assumed by Schneider Electric for any consequences arising out of the use of this material. © 2010 Schneider Electric. All rights reserved. Clock Module ION Reference Inputs Source The Clock module's input receives the Coordinated Universal Time (UTC) from the ION device or externally from the line (see the Clock Source setup register below). This input is fixed at the factory and cannot be linked to other output registers. Setup Registers The availability of setup registers depends on which ION node you are working with; refer to your documentation. NOTE The Clock module in the Virtual Processor uses the host computer's clock to determine local time. Therefore, no setup registers are available except the DST Offset register, which is only used for regional variances. In Designer, a format option is available when editing some of the Clock module's setup registers. This option converts the UNIX time format (the format required by the setup registers) to a conventional time format (years, days, hours, and seconds). When editing a Clock module time interval or date setup register, click the Format button located at the bottom of the Modify Numeric Bounded Register window. You are presented with the following window: Select this option when modifying registers requiring time intervals such as DST Offset and TZ Offset. Select this option when modifying registers requiring time specific dates such as DST Start and DST End. The Interval Format area is used to enter settings that require intervals such as TZ Offset and DST Offset. The Date/Time Format area is used to enter settings that require specific dates such as DST Start and DST End. TZ Offset The TZ Offset setup register is used to specify the time zone applicable to the area you are in. The TZ offset value is obtained by adding or subtracting from Greenwich Mean Time (GMT). Page 100 © 2010 Schneider Electric. All rights reserved. ION Reference Clock Module NOTE For the purposes of configuring the Clock module, Coordinated Universal Time (UTC) can also be thought of as Greenwich Mean Time (GMT). To obtain the TZ offset value, refer to your computer system’s Control Panel. Inside the Control Panel is the Date/Time applet that reports the settings currently in effect on your workstation. Double-click on the Date/Time icon, and you will see a display similar to the following: Timezone information is reported with respect to the GMT; the above graphic shows that (GMT -08.00) represents Pacific Time. DST Start Every DST Start register holds a start time for Daylight Savings Time for a one year span. DST Start must be specified in the UNIX time format. DST End Every DST End register holds an end time for Daylight Savings Time for a one year span. DST End must be specified in the UNIX time format. DST Offset The DST Offset setup register holds the Daylight Savings Time offset applicable to your location. The Daylight Savings Time offset is the amount of time that the clock is moved forward when Daylight Savings Time begins. For example, the DST offset in North America is one hour. If the DST Offset register is set to zero (0), the DST feature is disabled, and no warning messages are sent to the Event register when the DST period expires. Time Sync Source The Time Sync Source register is used to specify which communications port will be used to receive time synchronization signals. Only signals received on the port selected will be used to synchronize the device’s internal clock; time signals on all other ports will be ignored. Time Sync Type The Time Sync Type register specifies whether time synchronization signals are received in Universal time (UTC) or Local time. By default, Time Sync Type is set to UTC for Site Server time synchronization. Set Time Sync Type to LOCAL if time sync signals are received in Local time (some DNP masters and GPS receivers use Local time). © 2010 Schneider Electric. All rights reserved. Page 101 Clock Module ION Reference Clock Source If your device has a Clock Source register you can set the Clock module to synchronize externally (from the line frequency), from a communications channel, or internally (the default). If your device does not support the Clock Source setup register, then synchronization is always internal. GPS Time Synchronization: To implement GPS Time Synchronization, set the Clock Source setup register to COMM. Then specify which port will receive time synchronization signals by setting the Time Sync Source setup register. Finally, specify the receiver that you want to use by selecting it from the Protocol setup register in the receiving port’s Communications module. NOTE Ensure that the Quality character of the GPS receiver is enabled. Contact your GPS vendor for instructions. IRIG-B GPS Time Synchronization: To implement GPS Time Synchronization via IRIG-B, set the Clock Source setup register to COMM and the Time Sync Source setup register to IRIG-B. The meter will accept input from any GPS receiver that outputs unmodulated IRIG-B time code data. Use GPS Quality Flag Set this Boolean register to USE FLAG or IGNORE FLAG to determine the meter’s GPS time synchronization behavior. USE FLAG: the meter will only accept GPS time syncs if the GPS Quality character value is true or locked (indicating that the GPS has locked onto a satellite source). IGNORE FLAG: the meter will accept GPS time syncs regardless of the GPS receiver's Quality character value (the GPS does not need to be locked onto a satellite source). Enable NTP Time Sync This enumerated register enables NTP time synchronization when set to YES, and disables it when set to NO; default is NO. NOTE Setting this register to YES causes the meter to ignore all ION Enterprise time syncs. NTP Time Sync Interval This register specifies the frequency at which the meter will attempt to time synchronize via NTP. Values between 60 seconds and 1 year are acceptable; default is 1 day (86,400 seconds). NTP Time Synchronization: To implement NTP time synchronization, you must first specify the NTP Server IP address in the Communications module. In the Clock module, make sure the Enable NTP Time Sync register is set to YES and the Time Sync Source setup register is set to ETHERNET. Note that NTP Time Sync Type must be set to UTC for NTP time synchronization to work. Finally, enter the NTP Time Sync Interval value in seconds. Page 102 © 2010 Schneider Electric. All rights reserved. ION Reference Clock Module Output Registers All Clock modules have the following output registers: UnivTime This register contains the uncorrected UTC that is read from the ION device. The UTC is reported in the UNIX time format — the number of seconds elapsed since 12:00 A.M. January 1, 1970. LocalTime This register contains the local time, corrected to reflect the values input in the TZ Offset and DST Offset setup registers. The Local Time is reported in the UNIX time format—the number of seconds since 12:00 A.M. January 1, 1970. NOTE Linking UnivTime or LocalTime to the inputs of an Arithmetic module can yield unexpected results. DSTFlag This Boolean register turns ON when Daylight Savings is in effect, and changes to OFF when Daylight Savings is not in effect. Year This numeric output register contains the year (local time) in calendar format. Month This numeric output register contains the month (local time) in calendar format. Day This numeric output register contains the day (local time) in calendar format. Hour This numeric output register contains the hour (local time) in calendar format. Minute This numeric output register contains the minute (local time) in calendar format. Second This numeric output register contains the second (local time) in calendar format. Day of Week This numeric output register contains the day of the week (local time) in calendar format. The format for Day of Week is as follows: 0 – Monday 1 – Tuesday 2 – Wednesday 3 – Thursday © 2010 Schneider Electric. All rights reserved. Page 103 Clock Module ION Reference 4 – Friday 5 – Saturday 6 – Sunday New Year This pulse output register generates a pulse when a new year starts. New Month This pulse output register generates a pulse when a new month starts. New Day This pulse output register generates a pulse when a new day starts. New Hour This pulse output register generates a pulse when a new hour starts. New Minute This pulse output register generates a pulse when a new minute starts. Startup (Virtual Processor only) This pulse output register produces a single pulse when the Virtual Processor starts. Event All events produced by the Clock module are recorded in the Event register. Possible events and their associated priority numbers are shown in the following table. Event Priority Group Priority Description Setup Change 10 Input links, setup registers or labels have changed. Information 25 DST period Start or End has occurred. Warning 30 DST Start and End times require reprogramming. NOTE The Clock module will issue a warning immediately after the last DST period expires, reminding you to program the next DST Start or End time. This warning, which is sent to the Event register, repeat every 24 days until the new DST Start or End is programmed. If DST is disabled (the DST Offset is set to zero), no warnings are issued. The Event output register stores the following information for each ION event: time stamp, priority, cause, effect, and any values or conditions associated with the cause and effect. Detailed Module Operation The Clock module receives a Coordinated Universal Time and converts it to Local Time, based on the values input into the TZ Offset and DST Offset setup registers, Page 104 © 2010 Schneider Electric. All rights reserved. ION Reference Clock Module and whether DST is enabled or not. The corrected local time in the LocalTime output register is automatically read by the Scheduler module (the modules are linked by default, but they can be unlinked). The Clock module provides both the UTC and the local time as numeric outputs that can be linked to other modules. Both values are in the UNIX time format. In addition, the Clock module provides local time as numeric outputs in calendar format: Year, Month, Day, Hours, Minutes, Seconds, and Day of Week. These outputs can be linked to other modules. The Clock module generates the following output register pulses: New Year, New Month, New Day, New Hour, and New Minute. These outputs can be linked to other modules. The setting in the Time Sync Source register is used to implement time synchronization. This register must be set to the communications port that is used to receive time sync signals. If this register is not set to a valid communications port, no time synchronization will be performed. Responses to Special Conditions The following table summarizes how the Clock module behaves under different conditions. Condition Response of Output Register After the module is re-linked or its setup registers are changed. All output registers are NOT AVAILABLE. When the device is started or powered-up (either the first time, or after a shut-down). All output registers are NOT AVAILABLE. Time Sync Source register not set to “IRIG-B” (on IRIG-B equipped meters) IRIG-B Time syncs are ignored. Clock Sync Source register not set to “IRIG-B” (on IRIG-B equipped meters) IRIG-B time syncs perform a discrete time set, rather than altering the clock. NOTE For discrete time sets, the meter clock is only adjusted if it differs from the received timestamp by more than 1 second. © 2010 Schneider Electric. All rights reserved. Page 105 Clock Module Page 106 ION Reference © 2010 Schneider Electric. All rights reserved. ION REFERENCE 09/2010 Communications Module The Communications module allows you to set up the communications interfaces of the meter. Every communications port of an ION meter is controlled by a single Communications module. Refer to the documentation of your ION meter for the register bounds and factory defaults of your meter's communications ports, and the types of communications ports supported. Module names and registers display according to the communications options that you have ordered for your meter. NOTE References to NTP in ION devices or documentation should be interpreted as SNTP. Communications Module Event Inputs Communications modules have no programmable inputs. Setup Registers This table shows which setup registers apply for each communications type. Setup Register RS-232 RS-485 Infrared Internal Modem Ethernet Protocol 1 Baud Rate Unit ID RTS Delay Schneider Electric 2195 Keating Cross Road Saanichton, BC Canada V8M 2A5 Tel: 1-250-652-7100 For technical support: [email protected] (00) + 1 250 544 3010 Contact your local Schneider Electric sales representative for assistance or go to www.powerlogic.com ION, PowerLogic and Schneider Electric are trademarks or registered trademarks of Schneider Electric in France, the USA and other countries. Other trademarks used are the property of their respective owners. Electrical equipment should be installed, operated, serviced, and maintained only by qualified personnel. No responsibility is assumed by Schneider Electric for any consequences arising out of the use of this material. © 2010 Schneider Electric. All rights reserved. Communications Module ION Reference Setup Register RS-232 RS-485 Infrared Internal Modem Ethernet Rx Timeout Serial Port Comm Mode HshakeMode RTS Level CTS Level RS485 Bias Modem Init Answer Hours Answer Hours Rings Non Answer Hours Rings IP Address IP Boot Option Subnet Mask Default Gateway Primary DNS Server Secondary DNS Server NTP Server SMTP Server SMTP Connection Timeout SMTP Port Number Webserver Config Access Enable Webserver Default Web Page Enable SNMP Modbus TCP Idle Timeout 10/100BaseT Port Config 100BaseFX Port Config ARP Cache Timeout TCP Keep Alive Minutes 1 Page 108 This is the internal baud rate between the meter's circuitry and the modem, NOT the connection speed between your ION meter's internal modem and another remote modem. When implementing a ModemGate, this baud rate must be the same as the port hosting the gateway. © 2010 Schneider Electric. All rights reserved. ION Reference Communications Module Protocol This register specifies the communications protocol for the device. Options may include ION, third party protocols such as Modbus and DNP, infrared pulsing for Infrared ports, or any of several GPS protocols if the port can be used for GPS time synchronization. Baud Rate This register specifies the baud rate at which the device is communicating. It should be set to correspond with the baud rate of the connected workstation or external modem. When using an internal modem, this setting defines the baud rate between the internal modem and the meter's internal circuitry. When implementing a ModemGate with your internal modem, set the baud rate of the internal modem's port to the same settings as the port hosting the gateway. NOTE A meter's external modem will cease to communicate if the COM port's baud rate is set outside of the external modem's working range. If this occurs, you must reset the COM port's baud rate locally; use the front panel of the meter. Unit ID This register specifies the communications identification (ID) for the device. Every device should be assigned a unique Unit ID. RTS Delay This register specifies: for RS-232 ports, the transmission delay in seconds after the RTS has been asserted when Hshake Mode is RTS with delay. for all other ports, the delay in seconds before the transmission (Tx) of the packet. Rx Timeout (receive timeout) Specifies the timeout for receiving an entire message from a device. The supported range is from 0.1 to 15 seconds. The default value is 2. NOTE This register only affects ION, Modbus Master and DNP protocols. All other protocols will ignore any user defined values and instead use a default of 1.8 seconds. Serial Port This register determines the parity and stop bits for the serial port. The default is 8N1 (8 data bits, no parity, 1 stop bit). Comm Mode (or Mode) This register specifies what communications standard the hardware channel (COM port) employs. This register's list depends on what options are installed on your ION meter; for example, COM1 may only allow RS-232 or RS-485, or COM3 may allow either optical or modem communications. Refer to your ION meter's documentation for more details. © 2010 Schneider Electric. All rights reserved. Page 109 Communications Module ION Reference HshakeMode (handshake mode) This register specifies the handshake mode the device is using when the Comm Mode is set to RS-232. Selecting RTS/CTS instructs the device to wait for a clearto-send (CTS) signal to be asserted before sending data to the computer. Selecting RTS with delay instructs the device to wait for a specified amount of time after asserting the RTS signal before sending data to the computer. RTS Level This register indicates the active logic level (normal or inverted) asserted by the RTS line when the Comm Mode register is set to RS-232. CTS Level This register indicates the active logic level (normal or inverted) asserted by the CTS line when the Comm Mode register is set to RS-232 and Hshake Mode is RTS/CTS. RS485 Bias This register controls the biasing option on the RS-485 bus. When the meter is acting as a Master on this port, this should be set to ON. When acting as Slave, it should be set to OFF. Default setting is OFF. Modem Init This register defines the initialization string sent to the meter's modem when the modem is dialed up. You should not change the contents of this register unless you are familiar with AT commands. Refer to your meter's documentation for a list of available AT commands. Answer Hours This string register defines the times and dates of the modem's answer hours. When a call is made to the ION device's modem, the values in this setup register are compared with the internal clock's Local Time output register. If the Local Time falls within the Answer Hours, the modem will answer the incoming call in the number of rings defined in the Answer Hour Rings setup register. Otherwise, the modem will answer after the number of rings defined in the Non Answer Hour Rings setup register. The user-defined Answer Hours string can be up to 50 characters, and can define more than one time period. The following syntax is used when configuring the Answer Hours: Syntax Mon Tue Wed Thu Fri Sat Sun Page 110 Description These are the valid days of the week syntax for the Answer Hours setup register. nn:nn The colon is used between two numbers to specify a time of day. Times of day are in 24-hour format. , Commas are used to separate different days of the week, or times of day. — The dash is used to create intervals between two days of the week or two times of day. © 2010 Schneider Electric. All rights reserved. ION Reference Communications Module Syntax Description @ The “at” symbol is used to denote the times of day for the days of the week. . The period is used to show the end of one answer hours time period. More than one time period can be set in the Answer Hours setup register. For example, the syntax for an answer hours of Mondays to Fridays, 6:00 AM to 8:45 AM is: MON-FRI@06:00-08:45. When entering time periods that cross day boundaries (i.e., cross over 12:00 AM), you must use separate time periods. A valid entry for Answer Hours for Mondays at 11:00 PM to Tuesdays at 1:00 AM is: MON@23:00-23:59.TUE@00:00-01:00. Answer Hours of 11:00 AM to 2:00 PM and 8:00 PM to 11:00 PM on Mondays, Wednesdays, Fridays, and Saturdays would be: MON,WED,FRI-SAT@11:00-14:00,20:00-23:00. Note that any answer hours period must fall within the same day. Answer Hours Rings The number of rings before the modem will answer during the times specified in the Answer Hours setup register. Valid entries for this register are 0-255 rings; an entry of 0 rings disables answering. Non Answer Hours Rings The number of rings before the modem will answer if the time falls outside the Answer Hours. Valid entries for this register are 0-255 rings; an entry of 0 rings will disable answering. IP Address This register specifies the IP address of the ION device. Each device on an Ethernet network requires a unique IP address. Your Network Administrator should provide the value for this register. NOTE The IP address must be set correctly before connecting to the Ethernet network. Failure to do so may result in network problems. IP Boot Option This register specifies how the IP Address, Subnet Mask, Default Gateway and SMTP Server registers are updated. When set to BootP (Bootstrap Protocol), these values can be updated automatically by a BootP server on your network. When set to Manual, values for the IP Address, Subnet Mask, Default Gateway and SMTP Server registers must be entered manually. Your Network Administrator can provide additional information regarding BootP. © 2010 Schneider Electric. All rights reserved. Page 111 Communications Module ION Reference Subnet Mask This register specifies the subnet mask value. A value in this register is only required if subnetting is applicable to your network. Default Gateway This register specifies the default gateway for your network. A value in this register is only required if communications between multiple Ethernet networks is applicable. Primary DNS Server This register specifies the IP address of the primary DNS server that the meter sends name queries to. This value must be an IP address in the format aaa.bbb.ccc.ddd. Domain name resolution is required if a fully qualified domain name has been entered for either the SMTP server address or the NTP server address. NOTE References to NTP refer to the SNTP subset of NTP functions. Secondary DNS Server This register specifies the IP address of the secondary DNS server that the meter sends name queries to. This value must be an IP address in the format aaa.bbb.ccc.ddd. Domain name resolution is required if a fully qualified domain name has been entered for either the SMTP server address or the NTP server address. NOTE References to NTP refer to the SNTP subset of NTP functions. NTP Server Use this register to specify the IP address of the NTP server that the meter synchronizes its clock to. This value may be either an IP address in the format aaa.bbb.ccc.ddd or the fully qualified domain name of an NTP server (for example, ntp.cs.mu.oz.au). The name is limited to 80 alphanumeric characters, dot and dash allowed. NOTE References to NTP refer to the SNTP subset of NTP functions. NOTE If you enter a fully qualified domain name for the NTP server you must also specify a DNS server. SMTP Server This register specifies the IP address of the email server that the meter sends outgoing email to. This value may be either an IP address in the format aaa.bbb.ccc.ddd or the fully qualified domain name of an SMTP server (for Page 112 © 2010 Schneider Electric. All rights reserved. ION Reference Communications Module example, smtp.yourcompany.com). The name is limited to 80 alphanumeric characters, dot and dash allowed. NOTE If you enter a fully qualified domain name for the SMTP server you must also specify a DNS server. SMTP Connection Timeout This defines the time period the meter will wait when establishing a connection to an SMTP server. The default setting is 60 seconds, which is sufficient time if the SMTP server resides on your local network. If the SMTP server is accessed using a dial-up connection, you should increase the SMTP Connection Timeout value to allow the meter sufficient time to establish the connection. The exact value depends on the speed of your dial-up process. SMTP Port Number This specifies the meter port used to communicate with an SMTP server. Valid settings are 25 and the 49152-65535 private port range; default is 25. Webserver Config Access (webserver configuration access) This register determines whether or not you can configure your meter through a browser. Valid entries are Enable or Disable. This register is set to Enable by default. Enable Webserver This register enables or disables the webserver entirely. Values for this register are YES and NO. The webserver is enabled by default (the value is set to YES). Default Web Page The web page that appears at http://<meterIPaddress> (i.e. the web page that appears when you only specify the device and not the page). This register must identify a valid page on the device. The value range for this register is 1-85 characters with no spaces or slashes. The default web page in the meter is Operation.html. Enable SNMP This register enables or disables communication with the meter via SNMP (Simple Network Message Protocol). Modbus TCP Idle Timeout This register determines the number of seconds the device maintains a Modbus TCP/IP connection after that connection becomes idle. Set this register based on how long to wait before closing an idle connection to make it available for a new connection. The range (in seconds) is 0—65535; 0 (zero) seconds disables the timeout feature. 10/100BaseT Port Config This register controls the maximum link speed and duplexing of the Base-T Ethernet connection (RJ45 connector). Speed options are 10BASE-T or 100BASETX. Duplex options are half-duplex or full-duplex. The default setting is AutoNegotiate (Auto), which automatically configures your Ethernet connection to the fastest possible setting. © 2010 Schneider Electric. All rights reserved. Page 113 Communications Module ION Reference 100BaseFX Port Config This register controls the duplexing of the fiber Ethernet connection (SC connectors). The two settings are Half-Duplex and Full-Duplex; default setting is Full-Duplex. ARP Cache Timeout This specifies the amount of time after which an address for a device or workstation is deleted from the meter’s ARP (Address Resolution Protocol) table. The ARP table holds a limited number of addresses for network devices; deleting entries in the table makes room for new entries. The range (in minutes) is 1—65000. TCP Keep Alive Minutes This specifies the interval at which the meter sends signals to devices or workstations communicating with it via a TCP connection, keeping that connection alive. The range (in minutes) is 0—65535; 0 (zero) disables the feature and no signals are sent. NOTE If you are configuring this module, choose the Numeric Bounded Format as other formats may indicate incorrect time units. Output Registers All forms of the Communications module have the following output register: Event Any events produced by the Communications modules are recorded in the Event register. Typical events and their associated priority numbers are shown in the table below. Event Priority Group Priority Description Setup Change 10 Input links, setup registers or labels have changed. Information 25 Time Sync signal acquired. Information 25 Time set requested. Information 25 Time set performed. Information 25 Time sync signal lost. The Event output register stores the following information for each ION event: time stamp, priority, cause, effect, and any values or conditions associated with the cause and effect. Page 114 © 2010 Schneider Electric. All rights reserved. ION REFERENCE 09/2010 COMTRADE Module The COMTRADE module maps ION waveforms into COMTRADE format and saves the COMTRADE waveform records into the meter’s internal FTP server. Because this module is specific to supporting COMTRADE, it can be deleted if COMTRADE is not required. NOTE The connected Waveform Recorder modules’ Source, Format and Record Delay Cycles setup registers can only be changed when the COMTRADE module’s Enable/Disable setup register is set to DISABLE. If the connected Waveform Recorder modules are not configured identically, the COMTRADE module will not go online. Refer to the COMTRADE and ION Technology technical note for more information. Inputs Waveform Trigger 1...Waveform Trigger 6 These must be connected to a Record Complete output on a Waveform Recorder module. When a Record Wform input is triggered, the waveforms from that Waveform Recorder module is mapped to COMTRADE format. The COMTRADE waveform record is stored in the meter’s internal FTP server. Schneider Electric 2195 Keating Cross Road Saanichton, BC Canada V8M 2A5 Tel: 1-250-652-7100 For technical support: [email protected] (00) + 1 250 544 3010 Contact your local Schneider Electric sales representative for assistance or go to www.powerlogic.com ION, PowerLogic and Schneider Electric are trademarks or registered trademarks of Schneider Electric in France, the USA and other countries. Other trademarks used are the property of their respective owners. Electrical equipment should be installed, operated, serviced, and maintained only by qualified personnel. No responsibility is assumed by Schneider Electric for any consequences arising out of the use of this material. © 2010 Schneider Electric. All rights reserved. COMTRADE Module ION Reference Reset Pulsing this input will delete all COMTRADE records from the meter’s internal FTP server. If the RecordMode setup register is set to STOP-WHEN-FULL, the module will reset so that Records Left is equal to Depth and the meter will generate new COMTRADE records. Setup Registers The COMTRADE module has the following setup registers. Depth This register determines the maximum number of COMTRADE records that will be stored on your meter’s internal FTP server. The higher you set this number, the more memory is required. Note that the format of the linked Waveform Recorder module affects how much memory a single record uses. Record Mode This register determines the recording mode, defining what happens when the maximum number of COMTRADE records is reached. If you select CIRCULAR, the newest values get recorded and the oldest are dropped. If you select STOP-WHENFULL, the COMTRADE module stops generating COMTRADE records when it reaches capacity, and you must pulse the Reset input to clear the module so that it will generate COMTRADE records. Module Enable This register determines if the COMTRADE module is operating or not. If the COMTRADE module is online, this register must be set to DISABLED in order to modify the connected Waveform Recorder modules’ Format and Record Delay Cycles setup registers, or the Source input registers. Output Registers Log State If RecordMode is set to STOP-WHEN-FULL, this register value will be TRUE when the maximum number of COMTRADE records are stored (when the module is full), as defined by the Depth setup register. Records Left If RecordMode is set to STOP-WHEN-FULL, this register indicates the number of additional COMTRADE records that this module can store before it becomes full. If this register contains a negative value, it indicates the number of times the module has been triggered beyond the full state. If RecordMode is set to CIRCULAR, this register is NOT AVAILABLE. Record Complete This output is pulsed whenever a COMTRADE record is created and saved to the meter’s internal FTP server. Page 116 © 2010 Schneider Electric. All rights reserved. ION Reference COMTRADE Module Event Any events produced by the COMTRADE module are recorded in the Event register. Possible events and their associated priority numbers are shown in the table below. Event Priority Group Setup change © 2010 Schneider Electric. All rights reserved. Priority 10 Description Input links, setup registers or labels have changed. Page 117 COMTRADE Module Page 118 ION Reference © 2010 Schneider Electric. All rights reserved. ION REFERENCE 09/2008 Convert Module The Convert module takes a numeric or Boolean input and generates outputs in numeric, Boolean, and pulse formats. This module is useful for creating control and status signals for other modules. For example, if you want to trigger separate events when a Setpoint module goes active and inactive, you can use the Convert module to convert the Status output of the Setpoint module to two distinct pulses (an ON pulse and an OFF pulse). Convert Module Numeric Out Boolean Out Source On Pulse Off Pulse Enable Event Inputs Source This input is linked to the register that you want to convert. It can be any Boolean, numeric or numeric bounded register from any other module. Enable This input enables or disables the Convert module by setting it ON or OFF respectively. If you disable a Convert module, the inputs are ignored and the Numeric Out and Boolean Out registers are NOT AVAILABLE. Linking this input is optional; if you leave it unlinked, the module will be enabled by default. Schneider Electric 2195 Keating Cross Road Saanichton, BC Canada V8M 2A5 Tel: 1-250-652-7100 For technical support: [email protected] (00) + 1 250 544 3010 Contact your local Schneider Electric sales representative for assistance or go to www.powerlogic.com ION, PowerLogic and Schneider Electric are trademarks or registered trademarks of Schneider Electric in France, the USA and other countries. Other trademarks used are the property of their respective owners. Electrical equipment should be installed, operated, serviced, and maintained only by qualified personnel. No responsibility is assumed by Schneider Electric for any consequences arising out of the use of this material. © 2008 Schneider Electric. All rights reserved. Convert Module ION Reference Setup Registers N/A Conversion This setup register controls how “N/A” source inputs are handled by the Convert module. Selectable options available in this register are: None, Convert to 0, and Convert to 1. Output Registers Numeric Out If the source is a numeric or numeric bounded register, the input value passes through to its corresponding Numeric Out register. If the source is a Boolean register, the Numeric Out register will contain a value of 1 if the input value is TRUE, and 0 if the input value is FALSE. Boolean Out If the source is a numeric register, the Boolean Out register will be TRUE if the numeric input is non-zero, or FALSE if it is zero. If the source is a Boolean register, the input value passes through to the Boolean Out register. On Pulse If the source is a numeric or numeric bounded register, the On Pulse register generates a pulse when the numeric input changes from zero to non-zero. If the source is a Boolean register, the On Pulse register generates a pulse when the Boolean input changes from FALSE to TRUE. No pulses are generated if the Source input goes from NOT AVAILABLE to TRUE or FALSE, or from NOT AVAILABLE to non-zero or zero. Off Pulse If the source is a numeric register, the Off Pulse register generates a pulse when the numeric input changes from non-zero to zero. If the source is a Boolean register, the Off Pulse register generates a pulse when the Boolean input changes from TRUE to FALSE. No pulses are generated if the Source input goes from NOT AVAILABLE to TRUE or FALSE, or from NOT AVAILABLE to non-zero or zero. Event All events produced by a Convert module are written into this register. Possible events and their associated priority numbers are shown in the table below. Event Priority Group Setup Change Priority 10 Description Input links, setup registers or labels have changed. The Event output register stores the following information for each ION event: time stamp, event priority, event's cause, event's effect, and conditions associated with the event's cause and effect. Page 120 © 2008 Schneider Electric. All rights reserved. ION Reference Convert Module Responses to Special Conditions The following table summarizes how the Convert module behaves under different conditions. © 2008 Schneider Electric. All rights reserved. Condition Response of Output Register When the module is first created The Numeric Out and Boolean Out registers are NOT AVAILABLE, and the On Pulse and Off Pulse registers will not pulse until the inputs are linked and evaluated. If the Enable input is OFF The Numeric Out and Boolean Out registers are NOT AVAILABLE. The On Pulse and Off Pulse registers will not pulse. After the module is re-linked The Numeric Out and Boolean Out registers are NOT AVAILABLE, and the On Pulse and Off Pulse registers will not pulse until the inputs are evaluated. Source input is NOT AVAILABLE The Numeric Out and Boolean Out registers are NOT AVAILABLE. The On Pulse and Off Pulse registers will not pulse until the Source input becomes available again. Page 121 Convert Module Page 122 ION Reference © 2008 Schneider Electric. All rights reserved. ION REFERENCE 09/2008 Counter Module The Counter module provides a facility to count how many times a certain event occurs. It increases or decreases its output by a specified amount every time it is triggered. Counter Module Count Enable Reset Accumulatr Rollover Event Inputs Count When this input receives a pulse, it either increases or decreases the number in the Accumulatr output register by an amount defined by the Multiplier setup register. Linking this input is mandatory. Enable When this input is ON, the module is enabled; when it is set to OFF, the module is disabled, counting stops, and the Accumulatr output register retains the last value it received. This input is optional; if you leave it unlinked, the module will be enabled by default. Reset When this input receives a pulse, it resets the Counter module, and sets the Accumulatr output register to the value in the Preset setup register. Linking this input is optional; the module will still operate if you leave this input unlinked. NOTE The Reset input will still function if the module’s Enable input is OFF. When the module receives simultaneous reset and count pulses, the module resets before counting. Schneider Electric 2195 Keating Cross Road Saanichton, BC Canada V8M 2A5 Tel: 1-250-652-7100 For technical support: [email protected] (00) + 1 250 544 3010 Contact your local Schneider Electric sales representative for assistance or go to www.powerlogic.com ION, PowerLogic and Schneider Electric are trademarks or registered trademarks of Schneider Electric in France, the USA and other countries. Other trademarks used are the property of their respective owners. Electrical equipment should be installed, operated, serviced, and maintained only by qualified personnel. No responsibility is assumed by Schneider Electric for any consequences arising out of the use of this material. © 2008 Schneider Electric. All rights reserved. Counter Module ION Reference Setup Registers The setup registers of the Counter module control the magnitude and direction of the count. Multiplier This register specifies the amount to increase (or decrease) the output for every incoming count. By default, Multiplier is set to ONE. Count Mode This register determines if the module increments or decrements the value in the output register. Select UP to set the mode to increasing value (count up) and DOWN to set the mode to decreasing value (count down). By default, Count Mode is set to UP. Preset This register specifies what value the Accumulatr output register should be reset to in the event of a reset pulse or rollover. (A rollover occurs when the Accumulatr output reaches the value specified in the RollValue setup register.) By default, the Preset register is set to zero. NOTE The Accumulatr output will be set to the value in the Preset setup register at startup. RollValue (rollover value) When the Accumulatr output register reaches the value specified by the RollValue setup register, the Result output register will be reset to the value in the Preset setup register. Setting this register to zero disables the Rollover feature (no rollovers will occur). By default, this register is set to zero. Output Registers Accumulatr (accumulator) This numeric variable register contains the accumulated count. Highest count (up or down) is ±1 x 1099. See note in “Detailed Module Operation” section. Rollover This register generates a pulse every time the Accumulatr output reaches the value specified in the RollValue setup register. Event Any events produced by the Counter module are recorded in the Event register. Possible events and their associated priority numbers are shown in the table below. Event Priority Group Page 124 Priority Description Reset 5 A module reset has occurred. Setup Change 10 Input links, setup registers or labels have changed. © 2008 Schneider Electric. All rights reserved. ION Reference Counter Module The Event output register stores the following information for each ION event: time stamp, priority, cause, effect, and any values or conditions associated with the cause and effect. © 2008 Schneider Electric. All rights reserved. Page 125 Counter Module ION Reference Detailed Module Operation When a pulse is received on the Count input, the Counter module updates the Accumulatr output register by the amount defined in the setup registers. The Rollover output will send a pulse when the Accumulatr output value reaches RollValue setup register value. NOTE The module updates the Accumulatr output register every time the Count input is pulsed, up to a value of 16,777,216. It is therefore recommended that the Roll Value register be set below 16,777,216. The figures below illustrate the operation of a Counter module. These examples indicate how the setup registers affect what value is written in the Accumulatr output register, and when Rollover pulses are sent. Example 1 — Standard Operation Note that the value at the Accumulatr output never actually reaches the RollValue; instead, when RollValue is reached, the output jumps to the Preset value. The Rollover pulse is sent the instant the Preset value is written into the Accumulatr output. Example 2 — Overshooting the RollValue The module’s operation must be considered carefully if the range defined by Preset and RollValue registers is not directly divisible by the Multiplier value. This type of configuration will cause the RollValue to be “overshot”. Page 126 © 2008 Schneider Electric. All rights reserved. ION Reference Counter Module As shown above, the Accumulatr does not lose counts if the RollValue is overshot. Instead, when the count goes above the RollValue, the amount of the overshoot (the remainder) is added to the Preset value and the Accumulatr value is updated. The Rollover pulse is sent when the Preset + remainder value is written into the Accumulatr output. Example 3 — Count-to-Zero Note that the RollValue is set to –1 to create a count-to-zero function. Responses to Special Conditions The following table summarizes how the Counter module behaves under different conditions. Condition Response of Output Register After the module is re-linked or its setup registers are changed The Accumulatr output register value is set to the Preset setup register value. When the device is started or powered-up (either the first time, or after a shut-down) The Accumulatr output register retains the value it held at shutdown. Illegal Counter Setup Values Some combinations of setup register values constitute illegal setups. If the Counter module is setup with illegal values, the module will not go online when the device starts up. Illegal setup combinations are as follows: 1. The Multiplier setup register cannot be set to zero. 2. The module will not operate if Preset equals RollValue (unless both registers are set to zero, disabling rollover). 3. The Multiplier value must be smaller than the absolute value of the Preset value minus the RollValue. If the Multiplier were larger than the range between Preset and RollValue, rollover would occur with every count. 4. The count must always move towards the RollValue, unless RollValue is set to zero. Any combination of setup register values that cause the module to count away from the RollValue are not permitted. © 2008 Schneider Electric. All rights reserved. Page 127 Counter Module Page 128 ION Reference © 2008 Schneider Electric. All rights reserved. ION REFERENCE 09/2008 Data Acquisition Module The Data Acquisition module performs analog to digital conversions of input signals. It converts the waveforms that are being sampled by the device into numeric array format. Output 1 .... Data Acquisition Module Output N Inputs and Setup Registers The Data Acquisition module has no programmable inputs and no setup registers. Output Registers Output All Data Acquisition modules have an output register for every input they are sampling. Each output register contains sampled points of a waveform in numeric array format. NOTE No event messages are created by the Data Acquisition module. Schneider Electric 2195 Keating Cross Road Saanichton, BC Canada V8M 2A5 Tel: 1-250-652-7100 For technical support: [email protected] (00) + 1 250 544 3010 Contact your local Schneider Electric sales representative for assistance or go to www.powerlogic.com ION, PowerLogic and Schneider Electric are trademarks or registered trademarks of Schneider Electric in France, the USA and other countries. Other trademarks used are the property of their respective owners. Electrical equipment should be installed, operated, serviced, and maintained only by qualified personnel. No responsibility is assumed by Schneider Electric for any consequences arising out of the use of this material. © 2008 Schneider Electric. All rights reserved. Data Acquisition Module ION Reference Response to Special Conditions The following table summarizes how the Data Acquisition module behaves under different conditions. Condition When the device is started or powered-up (either the first time, or after a shutdown) Page 130 Response of Output Register All output registers are NOT AVAILABLE. © 2008 Schneider Electric. All rights reserved. ION REFERENCE 09/2008 Data Monitor Module The Data Monitor module provides a means of alerting you about communication problems that may occur between the Virtual Processor and any other node referenced by the Data Monitor’s Source inputs. This module is designed to be used in conjunction with the distributed control modules: Distributed Boolean module Distributed Numeric module Distributed Pulse module NOTE For time-critical applications such as distributed control, it is highly recommended that you have one Virtual Processor dedicated for these tasks. Use a different Virtual Processor to perform other noncritical functions. The Data Monitor module ensures that the above modules’ control decisions will be made based only on fresh, valid data. Any communication problem occurring between the Data Monitor module and the module it is monitoring will be indicated at the Data Monitor’s output registers. Data Monitor Module Status Worst Case Update Trigger Source 32 Event ... Source 1 Enable Schneider Electric 2195 Keating Cross Road Saanichton, BC Canada V8M 2A5 Tel: 1-250-652-7100 For technical support: [email protected] (00) + 1 250 544 3010 Contact your local Schneider Electric sales representative for assistance or go to www.powerlogic.com ION, PowerLogic and Schneider Electric are trademarks or registered trademarks of Schneider Electric in France, the USA and other countries. Other trademarks used are the property of their respective owners. Electrical equipment should be installed, operated, serviced, and maintained only by qualified personnel. No responsibility is assumed by Schneider Electric for any consequences arising out of the use of this material. © 2008 Schneider Electric. All rights reserved. Data Monitor Module ION Reference Inputs Source 1...32 Each of the Source inputs can be linked to a Boolean, numeric or pulse output register of a module on another node. The Data Monitor checks for any communication problem occurring between itself and the modules connected to its Source inputs. Typically the Source inputs of the Data Monitor module will contain the data from remote nodes that are used by the Virtual Processor to make control decisions. NOTE You cannot link the Data Monitor’s Source inputs to modules contained in the same node as the Data Monitor module. Enable This input allows you to manually enable or disable the Data Monitor module. Linking this input is optional; if you leave it unlinked, the module will still operate and the Enable input will default to ON. Setup Registers Worst Case Limit This register defines the threshold for what is considered to be an acceptable time between updates (in seconds). The value you enter here is used by the module to determine what constitutes a communication problem or timing violation. EvPriority (event priority) This register allows you to assign a priority level for the following event produced by the Data Monitor module: Status output register changed from ON to OFF. Output Registers Status This Boolean register will be ON under normal working conditions. If the update rate of any of the Source inputs falls below the threshold defined in the Worst Case Limit setup register, this register will switch to OFF, indicating a communication problem or timing violation. This output will be NOT AVAILABLE if no Source inputs have been linked or if the Enable input is linked, but turned OFF. Trigger Every time the Status output register changes from ON to OFF, the Trigger output register generates a pulse. NOTE No pulse is generated for OFF to ON transitions. Page 132 © 2008 Schneider Electric. All rights reserved. ION Reference Data Monitor Module Worst Case Update Every time the module operates, it checks the time to read from each of the linked Source inputs. The Worst Case Update register holds the value (in seconds) of the maximum time the module took to read from all its Source inputs. This value is equivalent to the maximum time the module has taken to read from all its linked Source inputs. To capture the maximum value over a period of time, link the Source input of a Maximum module to the Worst Case Update register. You can then view the maximum value using Vista. Event Any event produced by the Data Monitor module is recorded in the Event register. Possible events and their associated priority numbers are shown in the table below: Event Priority Group Priority Description Setup Change 10 Input links, setup registers or labels have changed. Status Register Change * Boolean output has changed from ON to OFF. One source is not responding within the timeframe set by Worst Case Limit setup register. * The priority of these events is determined by the value in the EvPriority setup register. The Event output register stores the following information for each ION event: time stamp, event priority, event's cause, event's effect, and conditions associated with the event's cause and effect. © 2008 Schneider Electric. All rights reserved. Page 133 Data Monitor Module ION Reference Detailed Module Operation The Data Monitor module monitors the time between updates for each of the Source inputs. If the update period of any of the Source inputs exceeds the value specified in the Worst Case Limit setup register, the Status output register will turn OFF, and a pulse will be sent to the Trigger output register, indicating a communication problem. The Event register identifies which of the Source inputs is responsible for this problem. The slowest update rate (for all inputs) is held in the Worst Case Update output register. The Data Monitor module provides a means of verifying that all sources connected to it are responding in a timely manner. Consider the following example. Example The following illustration shows how a control framework can be used to detect temperature extremes, switch on other equipment, and alert personnel of communication problems: Consider this situation where a thermometer is monitoring the internal temperature of a piece of equipment. The thermometer’s output is connected to an analog input port on the ION7500. An Analog Input module is used to configure this port. The output of the Analog Input module is connected to a Setpoint module; this Setpoint module is used to initiate the control action. The Status output of the Setpoint module is then used to link the Source inputs of the Distributed Boolean module and Data Monitor module in the Virtual Processor. The Distributed Boolean module is used for controlling the data appearing at the Switch register of the External Boolean module in the ION7330. Now assume that another device, the ION7330, is used to control a fan switch. An External Boolean module is used provide data for the ION7330’s Digital output port. A Digital Output module is used to configure this port. To ensure that communication between the ION7330 and the Virtual Processor is active, an output register from the ION7330 (e.g. State output from the Digital Output module) is used to link another Source input on the Data Monitor module. How it works When the specified temperature limit is reached (according to how you configure the Setpoint module’s setup registers), the Status output register on the Setpoint module turns ON, which then turns the Distributed Boolean module ON. The Data Monitor module is used to detect communication problems between the Virtual Processor and other nodes (in this case, the ION7330 and ION7500). The Status output register on the Data Monitor is linked to the Activate input of the Distributed Boolean module. If data is not arriving at the Virtual Processor in a timely manner (i.e. the time limit specified in the Data Monitor’s Worst-case Update setup register is exceeded), the Data Monitor’s Status register will turn OFF. This will then turn the Distributed Boolean module OFF, which in turn disables the External Boolean module in the ION7330 (thus preventing an undesirable control action). Page 134 © 2008 Schneider Electric. All rights reserved. ION Reference Data Monitor Module ION7550 Meter Virtual Processor ION7330 Meter When the Data Monitor’s status switches from ON to OFF, it generates a pulse at its Trigger output register. This trigger is linked to a Launching module. The Launching module will then start another application (for example, network messaging or dialing a pager) to indicate the communication problem. In this example, a network message will be sent to the computer named “Workstation1.” The operator at this station can then investigate the cause of the communication problem. © 2008 Schneider Electric. All rights reserved. Page 135 Data Monitor Module Page 136 ION Reference © 2008 Schneider Electric. All rights reserved. ION REFERENCE 12/2009 Data Recorder Module Data Recorder modules allow you to record and store different kinds of data. They can be configured to start recording under a specified circumstance. Possible applications for Data Recorder modules include power interruption analysis, historical trending, and creating coincidental Min/Max logs. The Data Recorder module records the values of its Source inputs each time its Record input is pulsed and stores them in a log register. The log register contains a timestamped record of the values of the inputs at each trigger point. Data Recorder Module ... Source 1 Source 16 Data Log Log State Records Left Enable Record Complete Record Rearm Event Inputs Source These are the inputs whose values are recorded. Each time the Record input is pulsed, the values of the Source inputs are stored in the Data Log output register. There are sixteen Source inputs. The following are the types of registers that the Source inputs can be linked to: For ION meters, Source inputs can be linked to Boolean, numeric or numeric bounded registers. For the Virtual Processor, Source inputs can be linked to Boolean, numeric, numeric bounded or string registers. You only need to link the first Source input for the module to operate. Linking the remaining Source inputs is optional. Schneider Electric 2195 Keating Cross Road Saanichton, BC Canada V8M 2A5 Tel: 1-250-652-7100 For technical support: [email protected] (00) + 1 250 544 3010 Contact your local Schneider Electric sales representative for assistance or go to www.powerlogic.com ION, PowerLogic and Schneider Electric are trademarks or registered trademarks of Schneider Electric in France, the USA and other countries. Other trademarks used are the property of their respective owners. Electrical equipment should be installed, operated, serviced, and maintained only by qualified personnel. No responsibility is assumed by Schneider Electric for any consequences arising out of the use of this material. © 2009 Schneider Electric. All rights reserved. Data Recorder Module ION Reference Enable This input enables or disables the Data Recorder module (by setting it to ON or OFF respectively). If you disable a Data Recorder module, it disregards pulses to the Record input. Linking this input is optional; if you leave it unlinked, the Enable input will default to ON and the module will still operate. Record When this register is pulsed, the source inputs are copied to the Data Log output register. Note that if the RecordMode setup register is set to STOP-WHEN-FULL, and the Data Log register is full, no data will be copied. Linking this input is mandatory. Rearm When this register is pulsed and the RecordMode setup register is set to STOPWHEN-FULL, the Data Recorder module will reset to allow full capacity. If the RecordMode setup register has been set to CIRCULAR, pulses on the Rearm input are ignored. The Rearm input must be linked if the module’s RecordMode setup register is set to STOP-WHEN-FULL. Pulsing the Rearm input will reset the log so that new records can be recorded. If the Rearm input is not pulsed, no new records will be loaded into the log. NOTE Rearm can be left unlinked only if CIRCULAR mode is used exclusively. Setup Registers The setup registers of the Data Recorder module determine how much information the module can store. Depth This numeric bounded register determines the maximum number of entries in the output log. You must enter a value here in order for the Data Recorder to function. RecordMode This register determines the recording mode, defining what happens when the Data Log output register is full. If you select CIRCULAR, the newest values get recorded and the oldest are dropped (FIFO). If you select STOP-WHEN-FULL, the Data Recorder module stops writing new values into the Data Log output register when it reaches its depth. NOTE When RecordMode is set to STOP-WHEN-FULL, each Data Recorder module’s Rearm input should be linked to an exclusive pulse register (i.e. the pulse register is NOT shared with other Data Recorder modules). Sharing a pulse register with multiple Data Recorder Rearm inputs can lead to loss of logged data. Insert Outage Records The Insert Outage Records setup register allows you to decide how the meter handles logged information after a power outage. For more information, refer to “Insert Outage Records: Detailed Operation” on page 142. Page 138 © 2009 Schneider Electric. All rights reserved. ION Reference Data Recorder Module Output Registers Data Log This register contains a log of the values at the inputs, recorded each time the Record input is pulsed. Its capacity is determined by the setup registers. Log State This register indicates when the Data Log register is full. If the RecordMode setup register is set to STOP-WHEN-FULL and the Data Log register has reached its depth, this register is ON (its default ON label is Full). When the RecordMode setup register is set to CIRCULAR, or when the RecordMode is set to STOP-WHEN-FULL but the Data Log register has not yet reached its depth, the Log State register is OFF (its default OFF label is Not Full). Records Left When the RecordMode setup register is set to STOP-WHEN-FULL, the Records Left register indicates the number of additional data records that this module can store before it reaches the Full state. If this register contains a negative value, it indicates the number of times the module has been triggered beyond the Full state. When the RecordMode setup register is set to CIRCULAR, this register is NOT AVAILABLE. Record Complete This output will generate a pulse when the data at the Source inputs have been successfully recorded. Event Any events produced by the Data Recorder module are recorded in the Event register. Possible events and their associated priority numbers are shown in the table below. Event Priority Group Setup Change Priority 10 Description Input links, setup registers or labels have changed. The Event output register stores the following information for each ION event: time stamp, priority, cause, effect, and any values or conditions associated with the cause and effect. © 2009 Schneider Electric. All rights reserved. Page 139 Data Recorder Module ION Reference Detailed Module Operation The figure below shows an example of a Data Recorder module recording the values of 4 Source inputs. Each time the Record input receives a pulse, the values of the Source inputs (represented by the black dots) are copied into the Data Log output register along with a timestamp indicating when the Record input was pulsed. NOTE If you re-link any of the inputs or make any changes to the setup registers, the contents of the Data Log output register are cleared. To save the information, ensure that the data has first been uploaded before re-linking inputs or changing setup registers. Linking Source Inputs When choosing the Source inputs for this module, you should make sure that they all have the same update rate. If you link one input to a high-speed module, and then link another to a module with a slower update rate, the Data Recorder module may give unexpected results. Consider the diagram below: The curved line represents the values read from the HighSpeed Power Meter module. The straight line represents the values read from the Power Meter module. Page 140 © 2009 Schneider Electric. All rights reserved. ION Reference Data Recorder Module In this example, the Data Recorder has been set to record every 0.5 seconds. The black dots (curved line) represent the voltage values from the High-Speed Power Meter module (high speed means updates occur once per half-cycle). The other line represents the same voltage parameter, but taken from the Power Meter module (the small boxes indicate when the one-second update occurred). Notice how the recorded values differ between the two modules, even though they are the same parameter. Source Record 1 value Record 2 value Record 3 value H.S. Power Meter module 123.0 127.3 120.08 Power Meter module 120.0 120.0 105.9 In most recording configurations, this situation should not be a concern. Nonetheless, it is recommended that you avoid configurations that mix modules with different update rates. Using the Record Complete Output The Record Complete output can be used in combination with the Feedback module to automatically reset other modules once recording is complete. Refer to the “Detailed Module Operation” section of the “Feedback Module” description for more information. Setting Up a Data Recorder Module for your Application The following steps outline how to use a Data Recorder module. It is not necessary to do these steps in order; for example, you could set the setup registers first and not actually link the recorder to another module until later. 1. Determine what values you want to record. These will become your Source inputs. You can link these values (which are the outputs from other modules) now or you can wait until later. 2. Specify when, or under what condition, you want these values recorded. You must select another module with an output register that generates a pulse. This pulse defines when values are recorded. For example, if you link the pulse output of the Periodic Timer module to the Record input, your Source inputs will be recorded at regular intervals (in effect producing an interval snapshot log). 3. If you want, you can link the Enable input to another module that will determine when the module is operational. For example, if you link to an External Boolean module, you can manually enable or disable the Data Recorder module. If you leave the Enable unlinked, the module is enabled by default. 4. Determine how much data you want to store. This will be limited by how many Source inputs you are recording, as well as how many Data Recorder modules (and other modules requiring memory to store data) you are using. You can set the Depth setup register to the number of entries you want to store. Note that you will receive an error message if the device has insufficient memory for the Depth you requested. In this case, you would need to select a smaller depth, or free up memory used by other modules. 5. Determine how new data will be recorded in the Data Log output register, either as CIRCULAR (FIFO) or STOP-WHEN-FULL. You can set the RecordMode setup © 2009 Schneider Electric. All rights reserved. Page 141 Data Recorder Module ION Reference register to CIRCULAR to overwrite the oldest records with new ones, or you can set RecordMode to STOP-WHEN-FULL, so subsequent pulses at the Record input are ignored. 6. If you are in STOP-WHEN-FULL mode, you must clear the Data Log register when it is full by sending a pulse to the Rearm input. You can also pulse the Rearm input any time you want to clear the Data Log register.You could do this manually via an External Pulse module or develop a framework that would pulse the Rearm input automatically. Insert Outage Records: Detailed Operation The Data Recorder module Insert Outage Records option lets you determine how the meter handles logged information after a power outage. Upon the restoration of power, the meter can determine how many logged intervals have been missed due to the power outage, and based upon this programming option, can either leave the logs missing (this is the default functionality) or can fill in the missing logs with zero values. The Insert Outage Records option helps ensure that customer software applications that cannot handle missing information receive data logs for the entire time span, regardless of outages. The Data Recorder module Insert Outage Records register can be set to: Yes – Zero Fill Enabled Yes – Zero Fill Disabled No Each of these Insert Outage Records register settings is described below, and is accompanied by a diagram. In each diagram, the Data Recorder module has two Source inputs linked: Source 1 is linked to an Integrator module Result output (energy values). Source 2 is linked to a module other than an Integrator module. NOTE The diagrams illustrate a system where the Integrator module resets to zero at the start of each interval. Typically, a framework is configured to reset the Integrator module to zero after each value is logged; this may not be required for your application. Insert Outage Records = Yes – Zero Fill Enabled If the Insert Outage Records register is set to Yes – ZERO FILL ENABLED, the missing records are generated such that each parameter in the log has a value of zero. If the Data Recorder is configured to record any energy values (Integrator module Result output registers), the first missed data record will contain the energy values at the time the power was interrupted. This is done to ensure that the energy values are stored in the appropriate time interval. Refer to the following diagram. Page 142 © 2009 Schneider Electric. All rights reserved. ION Reference Data Recorder Module Insert Outage Records = Yes - Zero Fill Enabled Power Outage 1:00 1:15 1015.3 Source 1 Integrator module energy value 1:30 900.7 360.8 300.1 1:45 2:00 2:30 2:45 3:00 3:15 527.3 0 0 0 850.5 750.4 0* 0 0 0 240.2 420.7 Record 4 Record 5 Source 2 Record 1 Record 2 * Record 3 Record 6 Record 7 Record 8 Record 9 This will be the Source 2 value at power-up. Many modules initialize their outputs to N/A at power-up, in which case this value will be zero. Insert Outage Records = Yes – Zero Fill Disabled If the Insert Outage Records register is set to Yes – ZERO FILL DISABLED, then the Data Recorder will not generate any missing records other than the energy value data record mentioned previously. Refer to the diagram below. Insert Outage Records = Yes - Zero Fill Disabled Power Outage 1:00 Source 1 Integrator module energy value 1:15 1:30 1015.3 900.7 360.8 300.1 1:45 2:00 2:30 2:45 3:00 3:15 527.3 850.5 750.4 0* 240.2 420.7 Source 2 Record 1 Record 2 * © 2009 Schneider Electric. All rights reserved. Record 3 Record 4 Record 5 Record 6 Missing Records Record 7 Record 8 Record 9 This will be the Source 2 value at power-up. Many modules initialize their outputs to N/A at power-up, in which case this value will be zero. Page 143 Data Recorder Module ION Reference Insert Outage Records = No If the Insert Outage Records register is set to NO, then no missing records are generated. This implies that any energy value accumulated at the time the power was interrupted is carried over to the first interval that is logged after the power resumes. Refer to the diagram below. NOTE The Insert Outage Records functionality does not work if the Data Recorder module Source inputs are linked to modules that are triggered in high speed or modules that are triggered asynchronously (i.e., without a consistent interval.) Responses to Special Conditions This table summarizes how the Data Recorder module acts under different conditions. Condition Page 144 Response of Output Register If the inputs are NOT AVAILABLE All output registers hold the last values obtained when inputs were available. If the Enable input is OFF The Data Log register retains the data that was logged before the Enable input became FALSE. The Log State register is unaffected. After the module is re-linked or its setup registers are changed All logged data in the Data Log register is deleted. When the device is started or powered-up (either the first time or after a shutdown) The Data Log register retains the data it held at shutdown. © 2009 Schneider Electric. All rights reserved. ION REFERENCE 09/2008 DDE Input Module Dynamic data exchange (DDE) is a protocol that allows two Windows NT applications to communicate and exchange data. The two programs involved in the interaction are called the server and the client. The DDE server is the application that supplies the data, and the DDE client is the application that receives the data. The DDE Input module acts as a DDE client when it extracts information from a DDE server application such as Microsoft Excel. The DDE Input module can be linked to the DDE server through setup registers. For example, you can specify an Excel spreadsheet item in the setup registers, and then any value you enter for this item can instantly appear in the Virtual Processor. DDE Input Value Status Event Inputs There are no inputs in a DDE Input module. Setup Registers To initiate a link with the DDE server, the client (the DDE Input module) must request a server name, followed by a topic name, and an item name. You have to specify these names in the following setup registers. Server This register specifies the DDE server application that the module is connected to. For example, the server name for Microsoft Excel is EXCEL. Schneider Electric 2195 Keating Cross Road Saanichton, BC Canada V8M 2A5 Tel: 1-250-652-7100 For technical support: [email protected] (00) + 1 250 544 3010 Contact your local Schneider Electric sales representative for assistance or go to www.powerlogic.com ION, PowerLogic and Schneider Electric are trademarks or registered trademarks of Schneider Electric in France, the USA and other countries. Other trademarks used are the property of their respective owners. Electrical equipment should be installed, operated, serviced, and maintained only by qualified personnel. No responsibility is assumed by Schneider Electric for any consequences arising out of the use of this material. © 2008 Schneider Electric. All rights reserved. DDE Input Module ION Reference Topic The topic identifies a file or node name. In the case of file-based DDE server applications such as Microsoft Excel, the topic is typically a file name with a .XLS extension, i.e. name.XLS. Item This register specifies the element in the DDE server application that contains the data. In the case of an Excel file, the item is the spreadsheet cell identifier, which is a row number and a column number. For example, B5 is entered as r5c2 for row 5, column 2. Output Registers Value This Numeric register contains the value read from the DDE server. It will automatically be updated each time the server issues a new value. The value becomes NOT AVAILABLE whenever the DDE link goes down or the module is linked to a new DDE server. Status This Boolean output register shows the status of the DDE link. ON indicates a live link to the DDE server. OFF indicates a “broken” link. This register shows the NOT AVAILABLE value if one of the setup registers is blank. Event All events produced by the DDE Input module are recorded in the Event register. Possible events and their associated priority numbers are shown in the table below. Event Priority Group Setup Change Priority 10 Description Input links, setup registers or labels have changed. The Event output register stores the following information for each ION event: time stamp, priority, cause, effect, and any values or conditions associated with the cause and effect. Page 146 © 2008 Schneider Electric. All rights reserved. ION Reference DDE Input Module Detailed Module Operation Once you have specified the setup register values, and the DDE server is successfully linked, the data identified in the Item setup register should appear in the Value output register. For the server to link successfully, the server must be in the location specified. If you want to verify the location of your DDE server, open the Windows NT Explorer and check the directory structure and file name. If the module senses that the link with the DDE server is broken, it automatically runs a routine to reconnect as soon as the server is available. Upon reconnection, most DDE servers will automatically update the Value output register with the new value in the DDE application. If your DDE server does not update the register, you may have to go to the DDE application and enter a new number for the Value register to access, or set the application to automatically update links. A DDE link transfers data in textual exchange format, meaning that the DDE Input module receives text and converts the text to a number. A framework that makes use of DDE Input module is shown in the next diagram. To perform a real time cost calculation, you can set up an Arithmetic module to accept a value from an Excel spreadsheet and a meter reading from an IED node. This way, you can calculate the current cost of electricity using your utility’s tariff structure that is detailed in your Excel file. The tariff structure may include demand and time-of-use penalties. The result is a real time display of actual electricity costs. © 2008 Schneider Electric. All rights reserved. Page 147 DDE Input Module ION Reference Responses to Special Conditions The following table summarizes how the DDE Input module behaves under different conditions. Condition Page 148 Response of Output Register After the module is re-linked or its setup registers are changed The Value output register is NOT AVAILABLE. The Status output register shows the current status of the DDE link. When the device is started or powered-up (either the first time, or after a shut-down) The Value output register is NOT AVAILABLE. The Status output register shows the current status of the DDE link. © 2008 Schneider Electric. All rights reserved. ION REFERENCE 09/2010 Diagnostics Module The Diagnostics module provides real-time information about the status of the ION meter. The module keeps track of various operating parameters and updates its output registers with the current values read from the meter. A few of the Diagnostics module’s output registers provide information that can assist you with the application and maintenance of your ION meter. Most of the module’s outputs, however, contain advanced diagnostic information that is useful only when a Technical Support Engineer is assisting you in troubleshooting your meter. Schneider Electric 2195 Keating Cross Road Saanichton, BC Canada V8M 2A5 Tel: 1-250-652-7100 For technical support: [email protected] (00) + 1 250 544 3010 Contact your local Schneider Electric sales representative for assistance or go to www.powerlogic.com ION, PowerLogic and Schneider Electric are trademarks or registered trademarks of Schneider Electric in France, the USA and other countries. Other trademarks used are the property of their respective owners. Electrical equipment should be installed, operated, serviced, and maintained only by qualified personnel. No responsibility is assumed by Schneider Electric for any consequences arising out of the use of this material. © 2010 Schneider Electric. All rights reserved. Diagnostics Module ION Reference Input The Diagnostics module has no programmable inputs. Setup Registers The Diagnostics module has no setup registers. Output Registers Diagnostics module output registers differ across ION meter platforms, therefore not all output registers listed below may be available on your meter. # Unused Labels (number of unused labels) This register indicates how many unused (available) labels there are in the device. For example, the ION7330 allows a maximum of 200 custom labels. Prc Pwr Used (processing power used) This register indicates what percentage of the device’s processor power is being used by functioning ION modules. Battery Remaining This register contains an approximation of the time remaining in the service life of the device’s clock battery.The accuracy of the estimated time remaining will vary based upon the product’s powered-up and power-down time, and environmental conditions. For ION7550, ION7650, ION8600, and ION8800 meters, battery remaining is indicated in percentage units. All other meters indicate battery remaining in minutes. FreeLogMemory This register indicates what amount of the Total Log Mem, in kilobytes (kB), is currently unused and available for new logging operations. TotalLogMemory This register indicates the total amount of memory, in kilobytes (kB), that is available in the device for Event, Data Recorder and Waveform Recorder logs. Time Sync Source This register will be ON if the internal clock synchronizes with the line frequency and OFF if the internal clock synchronizes with its own internal crystal. GPS Receiver Status This register will be ON if the GPS receiver is locked onto a time source, and OFF if the lock is lost. This information is received directly from the GPS receiver. This register will be NOT AVAILABLE if GPS time synchronization is not used. Hardware Lockable This Boolean register will be ON if the device is hardware lock capable. Page 150 © 2010 Schneider Electric. All rights reserved. ION Reference Diagnostics Module Hardware Locked This Boolean will be ON if the ION device is hardware lockable and it currently has the hardware lock enabled. IEC68150 State This register indicates whether the ION device is able to communicate using the IEC 61850 protocol. Password Enabled This Boolean will be ON if the Password security is enabled. Time Sync Count This register indicates how many time synchronization signals have been received. The value increases with each signal received. Time Since Last Time Sync This register displays the amount of time, in seconds, since the last time synchronization signal was received. Time Sync Diag (time sync diagnostics) This register displays the difference, in microseconds, between a time synchronization signal and the time in the device’s clock. The value displayed is a sliding window average over the last five time synchronization signals received. Time Sync Status This register will be ON if a time synchronization signal has been acquired, and OFF if the signal has been lost. The Diagnostics module calculates the average interval for the last five signals received, and considers the signal lost if no signals are received in two times the average interval. Event Any events produced by the Diagnostics module are recorded in the Event register. Possible events and their associated priority numbers are shown in the table below. Event Priority Group Priority Description/Possible Causes Setup Change 10 Input links, setup registers or labels have changed. Warning 30 A link to a destroyed register was detected at startup. Failure 255 Internal data structure corruption detected at start-up; serial EEPROM corruption detected; Xpress Card failure detected; DSP problem detected; Watchdog Timer reset has occurred. The Event output register stores the following information for each ION event: time stamp, priority, cause, effect, and any values or conditions associated with the cause and effect. Client CommError This register generates a pulse every time a communication error occurs between a server node and the Virtual Processor Client subsystem. © 2010 Schneider Electric. All rights reserved. Page 151 Diagnostics Module ION Reference Client Period This register indicates how much time (in milliseconds) the Virtual Processor’s Client Polling Period has taken to process responses from the server nodes. Client Load This register indicates the percentage of the Virtual Processor’s Client Polling Period was used to process responses to updates from the server nodes. Client Timeout This register generates a pulse whenever a timeout occurs on the Virtual Processor’s Client Polling Period. Client Update This register generates a pulse every time the Virtual Processor’s Client Polling Period responds to an update from a server node. Module Load This register indicates the percentage of the Virtual Processor’s Module Update Period required to run all its ION modules. Module Period This register indicates the time between successive updates of Virtual Processor Module Update Period, which updates ION modules inside the Virtual Processor. Module Update This register generates a pulse every time the Virtual Processor’s Module Update Period starts updating its modules. Saver Period This register indicates the Virtual Processor’s Configuration Saver Period, in seconds, in which VIP.CFG and VIP.BAK are alternately updated. Saver Load This register indicates the percentage of the Virtual Processor’s Configuration Saver Period required to save the entire Virtual Processor configuration. Saver Update This register generates a pulse every time the Virtual Processor’s Configuration Saver Period backs up the configuration files. Server Period This register indicates the period (in milliseconds) at which the Virtual Processor’s Server Polling Period sends updated information to client nodes. Server Load This register indicates the percentage of the Virtual Processor’s Server Polling Period was required to process updates for the client nodes. Server Update This register generates a pulse every time the Virtual Processor’s Server Polling Period sends updates to all of its client nodes. Page 152 © 2010 Schneider Electric. All rights reserved. ION Reference Diagnostics Module Insert Efficiency The Log Server uses a cache to minimize the overhead of inserting records into the database. Insert Efficiency is a measure of the cache’s effectiveness, expressed as a percentage. If the Log Server’s performance is becoming poor and the Insert Efficiency value falls below 65%, you may want to increase the cache size. See below. Insert Cache Size The default size of the cache, mentioned above, is 100. This value can be increased to accommodate large systems. To do this, use the –C<number> command line argument when starting the Log Server. Note that increasing the cache size increases the memory consumption by both the Log Server and the database server. Diagnostics Schema This schema output provides three database tables that describe the nodes and logs in your system. The tables are: NODEPERF This setting provides aggregated performance statistics on a per-node basis. Many of the statistics provided are the same as those available from the Log Monitor module. Additional statistics are as follows: Column Name Value Description Node name The name of the node Responding YES/NO Will be YES if the node is responding to communications; NO if it is not. Also, the value will be NO if any node it depends on is not responding (for example, a Virtual Processor Data Recorder with remote inputs). recordID number The record’s identification number (this can be ignored by user) NODEINFO This setting provides basic information about a node, and the current status of any communications initiated by the Log Server. The columns in the NodeInfo table are: Column Name Value Description Node name The name of the node Device Type name The type of device Serial Number number The device’s serial number Average Update Interval time in seconds The average time between updates for the node Time Since Update time in seconds The time since the Log Server received its last update from the node OR the time since the last request was sent © 2010 Schneider Electric. All rights reserved. Page 153 Diagnostics Module ION Reference Column Name Value Description Comm Status see description The Log Server’s view of a node’s state: SENT – a new or altered request has been sent to the node ALIVE – regular polling updates are being received UNKNOWN – Log Server has not yet determined comm status RE-SENT – update from node not received in allotted time, request has be sent again and the Log Server is waiting for response DEAD – resent request timed out (or comm error has occurred) ERROR – node responded with “bad request” TIMEOUT – node responded with “timeout” INVALID PID – node responded with “invalid PID” FAULT – node responded with unrecognized error condition Aggregate Setup Count number The most recent setup count received Requested IONs number The number of ION objects that have been requested; can return NONE, a number, or CACHE, meaning that only the contents of the cache have been requested Request Status see description The status of the request (see next row for R.U.T. description): READY – no request pending, R.U.T. seconds since last update REQUESTING – request sent R.U.T. seconds ago RETRYING – request failed, will retry in R.U.T. seconds BLOCKED – resource unavailable, will send when resources freed (request has been BLOCKED for R.U.T. seconds) PROCESSING – request being processed for R.U.T. seconds ABANDONED – request took too long and has been abandoned UNKNOWN – Log Server is in an unknown state Request Update Time (R.U.T.) time in seconds The amount of time since Request Status changed, OR the amount of time until Request Status changes (reference depends on Request Status value) Request Details text If applicable, a description of a node problem Record ID number The record’s identification number (this can be ignored by user) LOGPERF This setting provides performance statistics for individual logs. Many of the statistics provided are the same as those available from the Log Monitor module. Additional statistics are as follows: Column Name Value Description Node name The name of a node Log Handle number Internal log identifier Responding YES/NO YES if the node is responding to communications; NO if it is not. Also, the value will be NO if any node it depends on is not responding (for example, a Virtual Processor Data Recorder with remote inputs). recordID number The record’s identification number (this can be ignored by user) Power Down Time This register contains the number of seconds the meter was previously powered down for. Power Up Pulse This register outputs a pulse after the meter has powered up. Page 154 © 2010 Schneider Electric. All rights reserved. ION Reference Diagnostics Module The following output registers contain diagnostic information for use by Technical Support only. Some of these registers are not available on all devices. © 2010 Schneider Electric. All rights reserved. AD Status Display Temp OneSec Time Cal Period External Temp Partials Calc Time Factory Power Ups CalConst FreeContLogMemory Sec Period Cyc Period Main Board Temp Cycle Time Meter Clock Ticks Security State v50Av1s v50Mn1s v50AvHS v50MnHS v50Cnt Task Number Free Task Stack BIST Status Meter Status Time Synch since last time synch Page 155 Diagnostics Module ION Reference Detailed Module Operation You can link the output registers of the Diagnostics module to the inputs of other modules. For example, you may want to display a warning message when a communication error occurs between the Virtual Processor client subsystem and a server node. To generate this warning, you can connect the Client Communications Error output register to the input of a Launching module, specifying in the Launching module which program will run the warning message. Responses to Special Conditions The following table summarizes how Diagnostics module behaves under different conditions. Condition Page 156 Response of Output Register When a meter is started or powered-up Output registers are updated from the meter. When a Virtual Processor is started All Output registers are Not Available. © 2010 Schneider Electric. All rights reserved. ION REFERENCE 09/2008 Difference Summation Module This module is currently only available in the Virtual Processor. The Difference Summation Module is used to keep a running sum of the changes in the Source input. It is a hybrid of the Counter and Integrator modules, in which the Source input is numeric, rather than a pulse, and, unlike the Integrator, elapsed time is not used in the calculation. The Delta value does not get calculated until there is a valid Previous Source value. There will not be a valid Previous Source value until the Source input has been read twice. The Source and Previous Source values are used to calculate the Delta and the Delta is then used to calculate the Summation output register as follows: Delta = Source - Previous Source Summation = previous Summation + Delta If the Source RollValue input is linked, the Source RollValue input will be used to determine Rollover value of the Source input as described in the case below: If the Source RollValue input is linked and Abs(Source) < Abs(Previous Source), Delta = (Source + Source RollValue) - Previous Source. If the Source RollValue input is not linked, the calculation will proceed as described previously. When the module is first created, the Summation, Previous Source and Delta output registers will all remain at 0 until two iterations of the module operate function. Difference Summation Module Source Summation Previous Source Delta Source RollValue Rollover Enable Event Reset Schneider Electric 2195 Keating Cross Road Saanichton, BC Canada V8M 2A5 Tel: 1-250-652-7100 For technical support: [email protected] (00) + 1 250 544 3010 Contact your local Schneider Electric sales representative for assistance or go to www.powerlogic.com ION, PowerLogic and Schneider Electric are trademarks or registered trademarks of Schneider Electric in France, the USA and other countries. Other trademarks used are the property of their respective owners. Electrical equipment should be installed, operated, serviced, and maintained only by qualified personnel. No responsibility is assumed by Schneider Electric for any consequences arising out of the use of this material. © 2008 Schneider Electric. All rights reserved. Difference Summation Module ION Reference Inputs Source This input is the value that is monitored for changes. It must be linked to a numeric output register of another module. Linking this input is mandatory. Source RollValue This input is used to accommodate Source input rollovers. It is designed to be linked to the RollValue setup register of the module used for the Source input. If this input is linked, it will be used to calculate the Delta (and thus the Summation output register value) as follows: If Abs(Previous Source + Source RollValue) > Deadband, Delta = (Source + Source RollValue) - Previous Source Enable When this input is OFF, the Summation output register does not update. The Delta and Previous Source do continue to update, and when the module is re-enabled, the Summation output will update immediately based on the next change in the Source input. This module is enabled by default. Reset When this input is pulsed, all output registers are set to zero. The next update will occur after two operate cycles, when Previous Source and Delta can be determined. Setup Registers RollValue When the Summation output register reaches the value specified the RollValue setup register, the Summation output register will rollover (be set to zero). Setting this register to zero disables the rollover feature (no rollovers will occur). Deadband The Deadband setup register allows the user to set a deadband to accommodate source jitter and prevent detection of spurious source rollovers. A source rollover will only be detected if the source values moves backwards by an amount greater then the Deadband setup register. Output Registers Summation This numeric register contains the result of the summation of the changes in value at the Source input. If the current Source input is less than the Previous Source value, and the Source RollValue input is linked, the value at the Source RollValue input is added to the current Source input value before calculating the Delta. The Summation will rollover (reset to zero) if the value in the RollValue setup register is reached. Page 158 © 2008 Schneider Electric. All rights reserved. ION Reference Difference Summation Module Previous Source This numeric register contains the previous value detected at the Source input. Delta This numeric register contains the difference between the current Source input and the Previous Source output register. Rollover This register generates a pulse every time the Summation register reaches the value specified in the RollValue setup register. Event Any events generated by the Difference Summation module are recorded in the Event register. Possible events and their associated priority numbers are shown in the table below. Event Priority Group Priority Description Reset 5 A module reset has occurred. Setup Change 10 Input links, setup registers or labels have changed. The Event output register stores the following information for each ION event: time stamp, priority, cause, effect, and any values or conditions associated with the cause and effect. © 2008 Schneider Electric. All rights reserved. Page 159 Difference Summation Module ION Reference Detailed Module Operation The Source input is read once and then again to obtain a value for Previous Source. The Source and Previous Source values are used to calculate the Delta and the Delta is used to calculate the Summation as follows: Delta = Source - Previous Source Summation = Summation + Delta The Source RollValue input will be used to determine Rollover value of the Source input as described in the case below: If the Source RollValue input is linked and Abs(Source) < Abs(Previous Source), Delta = (Source + Source RollValue) - Previous Source. If the Source RollValue input is not linked, the calculation will proceed normally. No value will appear in the Summation or Delta output registers until two iterations of the module operate function. Summation, Delta and Previous Source all appear as output registers. These output registers all hold their values at shutdown. When the Summation output register reaches the value specified by the RollValue setup register, the Summation output register will be set to zero and the Rollover output register will pulse. If RollValue is set to zero, no rollovers will occur. Reaching the RollValue - When the RollValue is reached exactly, the Summation output register will go to zero and the Rollover output register will pulse. Overshooting the RollValue by Less Than RollValue - If the RollValue is exceeded by less than RollValue, the excess is written to the Summation output register and the Rollover output register will pulse. Overshooting the RollValue by More Than RollValue - If the RollValue is exceeded by more than RollValue, Delta mod RollValue is written to the Summation output register. The Rollover output register will pulse Delta/RollValue times. Reset will function independently of the state of Enable input. Consider the case in which an energy quantity, provided by pulses from an external source, must be allocated in real-time between two tariffs, On Peak and Off Peak. The following framework uses the Difference Summation module to implement a solution. Page 160 © 2008 Schneider Electric. All rights reserved. ION Reference Difference Summation Module In this framework, the Counter module converts input pulses into the energy quantity of interest. The Scheduler module dictates which of the two tariffs is active - On Peak or Off Peak. The Difference Summation modules are used to allocate the energy quantity between the tariffs. On Peak Scheduler Module Output 1 Output 2 Off Peak On Peak Difference Summation Module Summation On Peak Source Source RollValue Enable Wh Counter Module Accumulatr RollValue Off Peak Difference Summation Module Summation Off Peak Source Source RollValue Enable Multiplier=1.5 Count Mode=Up Preset=0 RollValue=1000 The Counter module Accumulatr output register, which holds the energy quantity, is linked to the Source input for each Difference Summation module. The Scheduler module output that corresponds to the On Peak condition is linked to the Enable input of On Peak Difference Summation module and the output that corresponds to the Off Peak condition is linked to the Enable input of the Off Peak Difference Summation module. Under this configuration, the Summation output register of the On Peak Difference Summation module is updated according to the source energy quantity when the On Peak condition is true. Likewise, Summation output register of the Off Peak Difference Summation module is updated when the Off Peak condition is true. © 2008 Schneider Electric. All rights reserved. Page 161 Difference Summation Module ION Reference Responses to Special Conditions The following table summarizes how the Difference Summation module behaves under different conditions. Condition Page 162 Response of Output Register Input not available Summation stops; Sum, Previous Source, Delta outputs hold current values. When input becomes available, module carries on normally Enable input is OFF Everything but the Summation output continues to update. When turned back ON, carry on based on new Source and current Previous Source, which has continued to update while Summation ON was OFF Reset input is pulsed All outputs are set to zero. Module will require two readings at the Source input before the output registers are updated RollValue is reached Summation output register resets to zero. Rollover output register pulses Module is re-linked or setup registers changed Same as a Reset Virtual Processor is restarted Output registers retain the values they had at shutdown. On startup, Previous Source is assigned Previous Source + Delta. First new Summation will be based on this as Previous Source value © 2008 Schneider Electric. All rights reserved. ION REFERENCE 12/2009 Digital Input Module The Digital Input module detects input signals on a device’s digital input port. Digital inputs are typically used in applications such as circuit breaker status monitoring or pulse counting. Digital Input Module State Trigger Event Inputs The Digital Input module has no programmable inputs. Setup Registers The setup registers define how the Digital Input module interprets the external signal. Input Mode This register determines how the module processes the signal appearing at the device’s digital input port. Select KYZ to detect transition pulses (i.e., when the signal changes from ON-to-OFF or OFF-to-ON). Select PULSE to detect complete pulses. Select A/C to detect analog signals (where the ON condition is based on the presence of an AC signal with a frequency range of 5 to 210 Hz). Schneider Electric 2195 Keating Cross Road Saanichton, BC Canada V8M 2A5 Tel: 1-250-652-7100 For technical support: [email protected] (00) + 1 250 544 3010 Contact your local Schneider Electric sales representative for assistance or go to www.powerlogic.com ION, PowerLogic and Schneider Electric are trademarks or registered trademarks of Schneider Electric in France, the USA and other countries. Other trademarks used are the property of their respective owners. Electrical equipment should be installed, operated, serviced, and maintained only by qualified personnel. No responsibility is assumed by Schneider Electric for any consequences arising out of the use of this material. © 2009 Schneider Electric. All rights reserved. Digital Input Module ION Reference EvLog Mode (event log mode) This register specifies if changes in the State output register are recorded as events in the Event output register. If you select LOG ON, these events are logged in the Event output register. If you select LOG OFF, these events are not logged. NOTE Setup register changes are always logged in the Event output register. Event Priority This numeric bounded register allows you to assign a priority level to changes in the State output register. To record State changes in the Event Log, the Event Priority register value must be greater than the value set in the Event Log Controller module’s Cutoff register. If Event Priority is set to zero (0), State changes will not be logged. NOTE Events associated with changes to the module’s State output are recorded only if the EvLog Mode register is set to LOG ON. If EvLog Mode is set to LOG OFF, these events will not be recorded, regardless of priority. Polarity This register specifies whether the signal from hardware is inverted (INVERTING) or not (NON-INVERTING). This setup register is ignored when Input Mode is set to A/C. Debounce This numeric bounded register allows you to compensate for mechanical contact bounce by defining (in seconds) how long the external signal must remain in a certain state to be considered a valid state change. This setup register is ignored when Input Mode is set to A/C. NOTE Specifying a debounce time of less than 1 second will cause the Digital Input module, and all ION modules linked to it, to update at 1 cycle intervals. Specifying a debounce time of 1 second or longer will change the update rate to once per second. Port This register defines which hardware port on the ION device is associated with the Digital Input module. Refer to your ION device’s documentation for a list of available ports. Page 164 © 2009 Schneider Electric. All rights reserved. ION Reference Digital Input Module Output Registers State This Boolean register contains the present debounced state of the input. Trigger If the Input Mode setup register is set to PULSE, the Trigger output register generates a pulse for each complete pulse detected (i.e., each time the hardware changes to the baseline state). If Input Mode is set to KYZ, a pulse is generated each time the signal changes state (from ON-to-OFF or from OFF-to-ON). If Input Mode is set to A/C, this register generates a pulse each time an A/C signal is applied or removed. Event The Event register records all events produced by the Digital Input module. The table below shows possible events and their associated priority numbers: Event Priority Group Priority Description Setup Change 10 Input links, setup registers or labels have changed. I/O State Change 1 - 255 Priority set by Event Priority. Input transaction logged.* Failure 255 Frequency of digital input device too high; input device shut down. * These events are only recorded if the EvLog Mode setup register is set to LOG ON and the Event Priority register is set to a value greater than the Event Log Controller module’s Cutoff register. The Event output register stores the following information for each ION event: time stamp, event priority, event's cause, event's effect, and conditions associated with the event's cause and effect. © 2009 Schneider Electric. All rights reserved. Page 165 Digital Input Module ION Reference Detailed Module Operation Specifying a Debounce Time Debounce is the time delay you program in the module so that intermediate noise states (e.g., from a switch operation) are ignored. The value you set for the Debounce setup register depends on the type of signal or input device you are monitoring. For solid state dry contacts, 0 to 5 ms is typical. For mechanical dry contacts, 1 to 80 ms is typical. Signal in steady state for a period greater than the debounce time Incoming signal Debounce = 5 ms State output response after debounce time State output No change to State output NOTE Some input devices may already have a built-in debounce time (sometimes referred to as a Turn On or Turn Off time). Refer to the appropriate ION device User Guide for more detailed information. Pulse Mode If you set Input Mode to PULSE, a pulse is generated at the Trigger output when the State output changes from OFF-to-ON. No pulse is generated when State changes from ON-to-OFF. ON Digital input signal OFF ON State output OFF Trigger output (Input Mode = PULSE) NOTE To trigger ON-to-OFF transitions in pulse mode, set the Polarity register to INVERTING. Page 166 © 2009 Schneider Electric. All rights reserved. ION Reference Digital Input Module KYZ Mode If you set Input Mode to KYZ, a pulse is generated at the Trigger output for each change of state transition, i.e. from OFF-to-ON and from ON-to-OFF transitions. ON Digital input signal OFF ON State output OFF Trigger output (Input Mode = KYZ) A/C Mode If you set Input Mode to A/C, the digital input port is configured to detect the presence of an A/C waveform that is within the frequency range of 5 to 210 Hz. The next illustration shows how a digital input can be used to monitor the operation of a fan. When the fan turns on (T2), a pulse is generated on the Trigger output register, and the State output register changes to ON. When the fan turns off (T3), the State output register changes to OFF, and another pulse is generated on the Trigger output. . © 2009 Schneider Electric. All rights reserved. Page 167 Digital Input Module ION Reference Setting the EvLog Mode For status or equipment monitoring applications, the EvLog Mode setup register is typically set to LOG ON, so events associated with changes to the State output are recorded. For energy pulsing applications, this setup register is typically set to LOG OFF. Responses to Special Conditions The following table summarizes how the Digital Input module behaves under different conditions. Page 168 Condition Response of Output Register When the device is started or powered-up (either the first time or after a shut-down) The State output matches the state of the hardware port if the Input Mode is set to KYZ or PULSE. The State output will be OFF if the Input Mode is set to A/C. © 2009 Schneider Electric. All rights reserved. ION REFERENCE 09/2010 Digital Output Module The Digital Output module acts as an intermediary between another module in the device and a hardware port. It takes a Boolean input and sends it out a hardware channel as a constant level or a pulse. This provides the ability to signal and control external digital devices (such as relays) from the meter. HAZARD OF UNEXPECTED DIGITAL OUTPUT STATE CHANGE • Do not use ION meters for critical control or protection applications where human or equipment safety relies on the operation of the control circuit. • An unexpected change of state of the digital outputs can result when the supply power to the meter is interrupted or after a meter firmware upgrade. • Be sure that you are familiar with the warnings at the beginning of this document, as well as those presented in your meter’s technical documentation. Failure to follow these instructions can result in death, serious injury or equipment damage. Schneider Electric 2195 Keating Cross Road Saanichton, BC Canada V8M 2A5 Tel: 1-250-652-7100 For technical support: [email protected] (00) + 1 250 544 3010 Contact your local Schneider Electric sales representative for assistance or go to www.powerlogic.com Digital Output Module State Source Force ON Force OFF Normal Mode Event ION, PowerLogic and Schneider Electric are trademarks or registered trademarks of Schneider Electric in France, the USA and other countries. Other trademarks used are the property of their respective owners. Electrical equipment should be installed, operated, serviced, and maintained only by qualified personnel. No responsibility is assumed by Schneider Electric for any consequences arising out of the use of this material. © 2010 Schneider Electric. All rights reserved. Digital Output Module ION Reference Inputs At least one of these inputs must be linked. Read the descriptions below to select the input appropriate for your application. Refer to “Detailed Module Operation” on page 172 for more information. Source When linked, the Boolean value appearing at the input is sent to the hardware port specified by the Port setup register. If you leave this input unlinked, the hardware port is controlled only by the Force ON and Force OFF inputs. Force ON When pulsed, this input forces the hardware port on, regardless of the Source input state, and the Force ON and Force OFF inputs control the hardware port. The hardware port specified in the Port setup register is pulsed on for the amount of time entered in the PulseWidth setup register. NOTE If the PulseWidth setup register is zero, the hardware port is continuously on until a pulse is received on the Force OFF input. Force OFF When pulsed, this input forces the specified hardware port off, regardless of the Source input state, and the Force ON and Force OFF inputs control the hardware port. The Force OFF input is only valid if the PulseWidth setup register is set to zero, and will be ignored if the PulseWidth setup register is non-zero. Normal If the hardware port is being controlled by the Force ON input, pulsing this input changes hardware port control to the Source input. The Normal register is only valid if the PulseWidth setup register is set to zero, and is ignored if the PulseWidth setup register is non-zero. Setup Registers The setup registers of the Digital Output module define what kind of output the module produces and on which hardware port. EvLog Mode (event log mode) This register determines whether hardware port state changes are logged in the Event output register. If you select LOG ON, these events are logged; if you select LOG OFF, these events are not included in the Event register. The events associated with linking the module and changing setup registers are always logged regardless of the EvLog Mode register setting. Polarity This register controls whether the module inverts the input before sending it to the hardware port (INVERTING) or not (NON-INVERTING). Page 170 © 2010 Schneider Electric. All rights reserved. ION Reference Digital Output Module PulseWidth This register specifies the on time of the output pulse sent to the hardware port (how many seconds the digital output is on). If this register is set to zero, the hardware port is set to continuously on. Port This register determines to which hardware port the pulse or output signal is sent. Some meters have internal mechanical relays. Refer to your meter documentation for a list of available ports. CAUTION HAZARD OF MISAPPLICATION (MISUSE) Because mechanical relays have limited lifetimes, mechanical KYZ relays are typically not suitable for energy pulsing applications. For energy pulsing applications, consider using Form A outputs in KYZ mode. Failure to follow this instruction can result in equipment damage. Output Registers State This register reflects the present status of the hardware port. Refer to “Detailed Module Operation” on page 172 for more information. Mode This Boolean register indicates which input controls the hardware port. If the Force ON and Force OFF inputs control the hardware port, the Mode register is ON. If the Source input controls the hardware port, the Mode register is OFF. Event All events produced by a Digital Output module are written into this register. Possible events and their associated priority numbers are shown in the table below. Event Priority Group Priority Description Setup Change 10 Input links, setup registers or labels have changed. I/O State Change * 20 Output forced ON, forced OFF or forced NORMAL; output transaction has occurred. * These events are only recorded if the EvLog Mode setup register is set to LOG ON. The Event output register stores the following information for each ION event: time stamp, priority, cause, effect, and any values or conditions associated with the cause and effect. © 2010 Schneider Electric. All rights reserved. Page 171 Digital Output Module ION Reference Detailed Module Operation A primary function of the Digital Output module is to physically control the operation of a relay or device connected to the meter’s digital output port. This figure illustrates the basic operation of a Digital Output module, showing the operation of all the possible inputs when the PulseWidth is equal to zero and when the Pulsewidth is non-zero. Source Force ON PulseWidth is zero Force OFF Normal State (Polarity = non-inverting) State (Polarity = inverting) Source Force ON PulseWidth is non-zero PulseWidth State When configuring the Digital Output module, consider the characteristics of your external relay or device, such as whether it is normally closed or open (for your meter’s digital output characteristics, refer to the meter’s Installation Guide). You can use the Polarity setup register to ensure the State correctly reflects the actual state of the external relay or device, or you can modify the State register’s on/off labels. Page 172 © 2010 Schneider Electric. All rights reserved. ION Reference Digital Output Module The following table lists the combinations of Digital Output inputs and Polarity settings, and the result sent to the hardware port and shown in the State output register: Relay Type Input to Digital Output Module Polarity State Output* Normally Open ON Non-Inverting ON Normally Open OFF Non-Inverting OFF Normally Closed ON Inverting ON Normally Closed OFF Inverting OFF * The ON/OFF State output register labels are user-configurable. Responses to Special Conditions The following table summarizes how the Digital Output module behaves under different conditions. Condition © 2010 Schneider Electric. All rights reserved. Response of Output Register If the Source input is NOT AVAILABLE The output registers retain the state they held when the Source input was available. The module still responds to Force On and Force Off pulses. Note: If the Port setup register is set to NOTUSED, Output registers will be NOT AVAILABLE. When the device is started or poweredup (either the first time, or after a shut-down) The output registers are OFF (O). All force conditions (i.e. Force On or Force Off) are discarded. Note: If the Port setup register is set to NOTUSED, Output registers will be NOT AVAILABLE. Page 173 Digital Output Module Page 174 ION Reference © 2010 Schneider Electric. All rights reserved. ION REFERENCE 09/2008 Display Module The Display module allows you to create custom front panel display screens. Each front panel screen is generated from a single Display module. The data shown by a display screen is determined by the links to the module’s Source inputs. The format of the display screen is determined by the Display module’s setup registers. A display activates (appears) when the Show input of its associated Display module receives a pulse. Inputs Source 1 to Source n The numeric parameters linked to the Source inputs are displayed on the front panel. The number of Source inputs linked must match the setting made in the Screen Type setup register. Show 1 to m The Display module’s Source data is sent to the front panel screen when the Show input is pulsed. If the platform doesn’t support Show inputs, then the display screen is activated automatically. Schneider Electric 2195 Keating Cross Road Saanichton, BC Canada V8M 2A5 Tel: 1-250-652-7100 For technical support: [email protected] (00) + 1 250 544 3010 Contact your local Schneider Electric sales representative for assistance or go to www.powerlogic.com ION, PowerLogic and Schneider Electric are trademarks or registered trademarks of Schneider Electric in France, the USA and other countries. Other trademarks used are the property of their respective owners. Electrical equipment should be installed, operated, serviced, and maintained only by qualified personnel. No responsibility is assumed by Schneider Electric for any consequences arising out of the use of this material. © 2008 Schneider Electric. All rights reserved. Display Module ION Reference Setup Registers Some Display module setup registers are not available in all ION meters. Refer to your meter documentation to see which registers are available on your meter, and to verify register options and factory default information. Screen Type This register specifies the way that the linked parameters are displayed on the front panel screen. Some choices for this register include: the number of parameters to display, display the measurement with a timestamp, display a scaled value, or display the measurements as a vector diagram. To configure a Display module as Trend Display, set the Screen Type setup register to Data Log Trend - Log Source 1 to 4. Softkey Number If applicable, this register assigns a softkey number to the display screen. See your meter documentation for more details. Softkey Name If applicable, this register assigns a softkey name to the display screen. See your meter documentation for more details. Screen Title If applicable, this register assigns a title to the display screen. See your meter documentation for more details. Status Bar Option This register allows you show or hide the Status Bar on a front panel display screen. See your meter's documentation for details on the Status Bar. Screen Resolution This register allows you to configure the leading zeros and decimal point in a numeric display. For example, the number 276.3443 can be configured in one of the following ways, depending on the selection you set in the Screen Resolution setup register: Value 276.3443 Screen Resolution 1.x = 276.3 1234.xx = 0276.34 123456. = 000276. If the Screen Resolution setup register is set to DEFAULT, the Display module uses the resolutions defined in the Display Options module. Last Digit Mode This register lets you specify whether to truncate or round a value’s last digit. Numbers round up at 5 or greater, and round down from 1 to 4. A truncated value disposes of any digits after the number of decimal places that you have specified in the Screen Resolution setup register. Page 176 © 2008 Schneider Electric. All rights reserved. ION Reference Display Module Screen Resolution = 1.xxx Value = 276.35192 Rounded = 276.352 Truncated = 276.351 Source 1 Title to Source 4 Title The parameter value on a display screen is the value of an output connected to the Display module Source input. By default, the displayed parameter’s title is the label of the output connected to the Source input. The Display module Source Title setup registers let you change parameter default titles to titles that better describe your system. For example, if “KWh Net” is linked to the first Source input, you could change its display name by setting Source 1 Title to “kWh Net West.” A maximum of 15 characters is permitted. Output Registers Event All events produced by the Display module are recorded in the Event output register. Possible events and their priority are shown in the following table: Event Priority Group Setup Change Priority 10 Description Setup registers or labels have been changed. The Event output register stores the following information for each ION event: time stamp, event priority, event’s cause, event’s effect, and any values or conditions associated with the cause and effect. © 2008 Schneider Electric. All rights reserved. Page 177 Display Module ION Reference Detailed Module Operation Trend Display With Trend Display, you can view graphed historical data of up to four different parameters simultaneously. In addition, a Trend Display log screen displays data logs for any graphed parameter. Users who are familiar with the ION architecture, Designer, and Vista can configure Display modules for Trend Display. In Designer, the required modules are created and linked. In Vista, the minimum and maximum values are allocated for the data plotted in Trend Display. Trend Display Framework Setup You can configure any Display module as Trend Display by choosing the Screen Type setup register as ”Data Log Trend - Log Source 1 to 4”, and by linking the Display module inputs appropriately. 1. From the toolbox, drag and drop a Display module into the node diagram. (Alternatively, you can use a Display module that already exists in the node diagram.) 2. Right–click the Display module setup register, and program the Screen Type with ”Data Log Trend - Log Source 1 to 4”. 3. From the toolbox, drag and drop two External Numeric modules into the node diagram. You are now ready to link the Display module’s Source inputs. In Trend Display mode, the Display module’s Source inputs accept only three parameters: Data Log, Numeric (minimum), and Numeric (maximum). Source Input Module Type Description Data Log Data Recorder Provides historical data. Numeric (Minimum) External Numeric Sets up the minimum value for the displayed data. Numeric (Maximum) External Numeric Sets up the maximum value for the displayed data. 4. Link the Display module’s Source inputs in this order: Page 178 Source input 1 – link to a Data Recorder module’s Data Log output. Source input 2 – link to an External Numeric module’s Numeric output. (In Vista you assign a minimum value for the graphed data in Trend Display). Source input 3 – link to an External Numeric module’s Numeric output. (In Vista you assign a maximum value for the graphed data in Trend Display). © 2008 Schneider Electric. All rights reserved. ION Reference Display Module The diagram below shows the correct way to link the Display modules’s Source inputs. The arrow at the bottom centre of the Display module indicates the setup register configuration. The dotted line boxes to the right of the External Numeric modules indicate that the modules have the minimum and maximum data values set up later in Vista, with Vista control objects. Data Display Module Source 1 Source 2 Source 3 Data Recorder Module External Numeric Module Numeric Screen Type: Data Log Trend Log Source 1 to 4 Minimum Value Vista Control Object External Numeric Module Numeric Maximum Value Vista Control Object 5. Save and send. 6. Close the node diagram and go to Vista. There, you program control objects with the minimum and maximum values for the data plotted in Trend Display. Data Recorder Behavior in Trend Display Even though a Data Recorder module has up to 16 Source inputs, only the first 4 Source inputs show in Trend Display. Disk Simulator Display The Disk Simulator display simulates the behavior of a mechanical watt-hour meter indicating power received or delivered by the direction of the pulse. The Disk Simulator feature is supported by the Calibration Pulser module output register labeled Disk Position. When pulsed, Disk Position outputs the accumulated quantity (kWh, kVAh, etc.) associated with its parent module. The Disk Position outputs accumulated quantities only if the Calibration Pulser module Port setup register specifies a physical hardware port that is connected to the meter. If the port is not specified, then the Disk Position output is zero even if there is a non-zero accumulated quantity. If the input accumulates positively (i.e. delivered power or energy), and the Calibration module Int Mode register is set to FORWARD, TOTAL or NET, then the Disk Simulator revolves from left to right. If the input accumulates negatively (i.e. received power or energy) and the Int Mode register is set to REVERSE, then the Disk Simulator revolves from right to left. © 2008 Schneider Electric. All rights reserved. Page 179 Display Module ION Reference The Calibration module Disk Position output is always a positive numeric value regardless of the module’s Int Mode setting (FORWARD, REVERSE, etc.). Disk Simulator Framework Setup 1. Create a new Display module, and choose the type as Disk Simulator. 2. Connect the new Display module’s first input to the Calibration Pulser module’s Disk Position output that you want to monitor for its pulsing interval. 3. To include the newly added screen to the ALT screen list, connect the Display module’s Show1 and Show2 inputs to the Scroll module’s last available Trigger outputs in ALT Scroll UP and ALT Scroll Down (respectively). You can determine the last available Trigger by right-clicking on the output to discover the Triggers’ owners. 4. Increase the Scroll module’s Wraparound setup register by 1 to include the new screen. 5. Configure the remaining display settings according to your needs. Although the Disk Simulator display is intended to show the disk behavior of mechanical watt-hour meters, this feature can be used to monitor any accumulated meter quantity over the time. To do this, connect the Display module’s first input to the meter quantity, and connect the second input to the maximum value that you expect the displayed quantity to be bounded by (this could be any ION output register or an External Numeric module register). In this case, (i.e. the Display module is not connected to a Calibration Pulser module) the Disk Simulator revolves from left to right. NOTE The inputs to the Disk Simulator display are always positive. If the value exceeds the maximum scale value assigned in the second input, then nothing is displayed except labels and the disk rectangle. Page 180 © 2008 Schneider Electric. All rights reserved. ION REFERENCE 09/2008 Display Options Module The Display Options module controls attributes of a front panel display. It is a core module that cannot be deleted, copied, or linked. It is configured by altering the contents of its setup registers. Display Options Module Event Inputs The Display Options module has no inputs. Setup Registers Some Display Options module setup registers are not available in all ION meters. AutoScroll This register holds the number of seconds that a screen remains on the front panel display before scrolling to the next screen. PF Symbol This register specifies how the power factor data is labeled. Digit Grouping This register determines how groups of three digits are separated. Date Format This register determines how the date is shown. Schneider Electric 2195 Keating Cross Road Saanichton, BC Canada V8M 2A5 Tel: 1-250-652-7100 For technical support: [email protected] (00) + 1 250 544 3010 Contact your local Schneider Electric sales representative for assistance or go to www.powerlogic.com ION, PowerLogic and Schneider Electric are trademarks or registered trademarks of Schneider Electric in France, the USA and other countries. Other trademarks used are the property of their respective owners. Electrical equipment should be installed, operated, serviced, and maintained only by qualified personnel. No responsibility is assumed by Schneider Electric for any consequences arising out of the use of this material. © 2008 Schneider Electric. All rights reserved. Display Options Module ION Reference Volts Resolution This register determines the number of decimal places of accuracy that voltage readings display. Current Resolution This register determines the number of decimal places of accuracy that current readings display. Power Resolution This register determines the number of decimal places of accuracy that power readings display. Contrast This register holds the global contrast setting for the meter display. Backlight Timeout This register holds the number of seconds that the backlight of the front panel display stays on after the last press of a front panel button. Display Update Time This register controls how frequently the screen data values are updated. DST Options This register controls whether or not the display time value should reflect daylight savings time (DST). Demand Lockout Timeout This register determines the minimum time allowed between consecutive demand resets. Display Scaling Factor Any Display module that is set to display scaled parameters (see the Display module's Screen Type setup register) divides or multiplies its parameters by this Display Scaling Factor before displaying them. Scaling by division or multiplication is selected in the Display Scaling Mode. Display Scaling Mode This register specifies whether parameters are divided or multiplied by the Display Scaling Factor before displaying them. Division is the default. Front Panel Programming This register defines whether or not to allow meter configuration changes through the device's front panel. Some meters do not even show the meter's settings when this register is set to disallow changes. Delta Vector Display Type This register determines how vector diagrams are displayed on the meter's front panel. Two settings are available: Page 182 Instrument (vectors appear 60 degrees apart - showing the actual voltage and current values that the meter is measuring). System (vectors appear 120 degrees apart - showing true system operation even though IB and VCA are calculated values). © 2008 Schneider Electric. All rights reserved. ION Reference Display Options Module This register only applies when the meter is in Delta mode. See the Detailed Operation section for more information. Test Mode Timeout This register holds the number of seconds that the device remains in TEST mode before automatically reverting to NORM mode. This timer resets if a front panel button is pressed or a setup register is altered. Display Mode This register controls whether or not the screens displayed on the front panel are programmable via Display modules. Language This register controls which language is used to display information on the front panel. The default is English. Measurement Symbols This register determines which set of measurement symbols are used on the front panel -- IEEE (Vll, Vln, kW, kVAR, kVA) or IEC (U, V, P, Q, S). Time Format This register determines what format time is displayed in on the front panel -- 24 hour or 12 hour. Output Registers Event All events produced by Display Options modules are recorded in the Event register. Possible events and their priority are shown in the following table: Event Priority Group Setup Change Priority 10 Description Setup registers or labels have been changed. The Event output register stores the following information for each ION event: time stamp, event priority, event’s cause, event’s effect, and any values or conditions associated with the cause and effect. © 2008 Schneider Electric. All rights reserved. Page 183 Display Options Module ION Reference Detailed Operation Delta Vector Display Type Diagrams 1 and 2 below illustrate how the vector diagram is displayed depending on the value of this setup register. Diagram 1 Form 35 and 35S 3-Wire Delta, 2 PTs, 2 CTs L I N E A L O A D B C V1 V3 Vref I11 I31 I12 I32 Meter terminal connections. For the wiring diagram illustrated above, the vector diagram is displayed as shown below in Diagram 2. If the Delta Vector Display Type is set to System, the vector diagram is displayed as per the figure on the left. The figure on the right corresponds to the Instrument setting. Diagram 2 ABC Rotation, Q1, Lagging PF (-) VCA VCB IC IC VAB IB IA VAB OR IA VBC System (Vectors 120 Degrees apart) Page 184 Instrument (Vectors 60 Degrees apart) © 2008 Schneider Electric. All rights reserved. ION REFERENCE 09/2008 Distributed Boolean Module When the Boolean module is activated, the Boolean value at the Source input is written to the ION node you have specified. The module updates the value every time the value changes state or, if the value is not changing, at a regular interval. When used in conjunction with the other Arithmetic and External Control modules, the Distributed Boolean module becomes a powerful tool for automated plant-wide demand or power factor control, including load shedding and start-up of auxiliary power. NOTE It is highly recommended that you use a Data Monitor module in conjunction with this module. See the Data Monitor module description for an example. Distributed Boolean Module Status Initiate Write Source Acknowledge Activate Time to update Write Now Event Inputs Source All Distributed Boolean modules have one Source input. This input must be a Boolean output register from another module. The value in the register linked to this input is written to the node address specified in the Destination setup register. Schneider Electric 2195 Keating Cross Road Saanichton, BC Canada V8M 2A5 Tel: 1-250-652-7100 For technical support: [email protected] (00) + 1 250 544 3010 Contact your local Schneider Electric sales representative for assistance or go to www.powerlogic.com ION, PowerLogic and Schneider Electric are trademarks or registered trademarks of Schneider Electric in France, the USA and other countries. Other trademarks used are the property of their respective owners. Electrical equipment should be installed, operated, serviced, and maintained only by qualified personnel. No responsibility is assumed by Schneider Electric for any consequences arising out of the use of this material. © 2008 Schneider Electric. All rights reserved. Distributed Boolean Module ION Reference Activate This input allows you to manually activate or deactivate the Distributed Boolean module. By linking the Status output of a Data Monitor module to this input, the Distributed Boolean module will be automatically disabled if the data at the Source input becomes out-of-date, thus preventing a control action based on old data. Linking this input is mandatory. WriteNow Linking this input to a pulse/trigger source forces the module to operate in pulsedriven mode, that is, the module will only write to the Destination register when it detects a pulse at this input. NOTE The WriteNow input is automatically disabled when the value at the Activate input is OFF. If this input is not used (not linked), the modules writes whenever the Source input changes state, as well as at regular intervals (as specified in the module’s Refresh Time setup register). Setup Registers Destination This setup register contains the location of the register to which the value at the Source input will be written. It displays a list of available nodes, module managers, modules and output registers from which you can select. Typically, you will select the output register of an External Boolean module. Refresh Time This register specifies the time (in seconds) between updates of the Destination register with the value contained in the source register. If set to zero, the Destination register will only be updated when the source input changes state. However, if the WriteNow input is linked, this feature is disabled. EvPriority (event priority) This register allows you to assign priority levels to specific event conditions. Output Registers Status An ON value indicates the normal working condition. An OFF value indicates timeouts, communication errors, or other failures that may occur at that instant when the module is trying to write to the destination address. A NOT AVAILABLE value indicates that either the module’s Activate input is not linked, or it has an OFF value. Initiate Write This output will generate a pulse at that instant when the Distributed Boolean module sends its Source input value to the address specified in the Destination setup register. Page 186 © 2008 Schneider Electric. All rights reserved. ION Reference Distributed Boolean Module Acknowledge This output will generate a pulse after a successful write, i.e. when the Distributed Boolean module receives an acknowledgement from the device specified in the Destination setup register. Time to Update This numeric output register reports the time (in seconds) between an Initiate Write pulse and the resulting Acknowledge pulse. Event This output register is used to record the module’s successful and/or unsuccessful attempts in writing to the Destination register. Event Priority Group Priority Description Setup Change 10 Input links, setup registers or labels have changed. Source Value Change * Write initiated (send the message). Source Value Change * Write overwritten (Source changed before the last write got through. Resend with a new value and discard previous attempt). Write Succeeded * Write complete and the destination has been updated. Write Failed Write Timeout Got Comm Error Got Invalid Node * Write did not complete and destination was not changed. * The priority of these events is determined by the value in the EvPriority setup register. The Event output register stores the following information for each ION event: time stamp, priority, cause, effect, and any values or conditions associated with the cause and effect. © 2008 Schneider Electric. All rights reserved. Page 187 Distributed Boolean Module ION Reference Detailed Module Operation When this module is activated, it writes the value at the Source input to the node address specified in the Destination setup register. This module can operate in two different modes, pulse-driven or event-driven. When the Write Now input is linked, the module is in pulse-driven mode and the Destination register will receive an update only when a pulse is received at the Write Now input. If the Write Now input is not linked, the module is in event-driven mode. In this mode, the Destination register will be written whenever the Source input changes state (from OFF to ON or vice-versa). As well, if the Refresh Time setup register contains a non-zero value, the Destination register will be ‘refreshed’ at the rate specified in the Refresh Time setup register. This ensures that the data contained in the Destination register is always accurate and current. Page 188 © 2008 Schneider Electric. All rights reserved. ION REFERENCE 09/2008 Distributed Numeric Module The Distributed Numeric module allows you to automatically transfer data from a Virtual Processor to another ION node such as an IED or different Virtual Processor. When the Distributed Numeric module is enabled, the numeric value present at the Source input is written to the ION node you have specified. The module continuously monitors the Source input value. If the Source changes by an amount exceeding the value defined in the Update Threshold setup register, the new value will immediately be copied to the address defined in the Destination node. NOTE It is highly recommended that you use a Data Monitor module in conjunction with this module. See the Data Monitor module description for an example. If the Source input value is stable, i.e. within the limits defined by Update Threshold, then the Destination node will be refreshed at a regular interval (this interval is defined by the Refresh Time setup register). When used in conjunction with the other Arithmetic and External Control modules, the Distributed Numeric module becomes a powerful tool for automated plant-wide demand or power factor control, including load shedding and start-up of auxiliary power. Ditributed Numeric Module For technical support: [email protected] (00) + 1 250 544 3010 Contact your local Schneider Electric sales representative for assistance or go to www.powerlogic.com Initiate Write Source Acknowledge Activate Time to update Write Now Schneider Electric 2195 Keating Cross Road Saanichton, BC Canada V8M 2A5 Tel: 1-250-652-7100 Status Event ION, PowerLogic and Schneider Electric are trademarks or registered trademarks of Schneider Electric in France, the USA and other countries. Other trademarks used are the property of their respective owners. Electrical equipment should be installed, operated, serviced, and maintained only by qualified personnel. No responsibility is assumed by Schneider Electric for any consequences arising out of the use of this material. © 2008 Schneider Electric. All rights reserved. Distributed Numeric Module ION Reference Inputs Source All Distributed Numeric modules have one Source input. The numeric value at this input is written to the node address you specify in the Destination setup register. Activate This input allows you to manually activate or deactivate the Distributed Numeric module. By linking the Status output of a Data Monitor module to this input, the Distributed Numeric module will be automatically disabled if the data at the Source input becomes out-of-date, thus preventing a control action based on old data. Linking this input is mandatory. NOTE The WriteNow input is automatically disabled when the value at the Activate input is OFF. WriteNow Linking this input to a pulse/trigger Source forces the module to operate in pulsedriven mode, that is, the module will only write to the Destination register when it detects a pulse at this input. If this input is not used (not linked), the module writes whenever the Source input changes by an amount exceeding the value defined in the Update Threshold setup register, as well as at regular intervals (as specified in the module’s Refresh Time setup register). Setup Registers These registers control the operation of the module. Destination This register allows you to specify a node and register to where the value at the Source input will be written. This register displays the available nodes, module managers, modules and output registers from which you can select. Typically, you will select the output register of an External Numeric module. Update Threshold This numeric bounded register specifies a deadband for the Source input. When the Source input changes by an amount exceeding the Update Threshold value, the Destination node is updated with the new value. NOTE If the WriteNow input is linked, then the Update Threshold and Refresh Time setup registers are not used. Page 190 © 2008 Schneider Electric. All rights reserved. ION Reference Distributed Numeric Module In the illustration below, time zero indicates the current value appearing at the Source input. “X” indicates the times when the module updates and overwrites the current value. This happens whenever the last written value increases or decreases by an amount greater than the specified threshold value. Refresh Time This register specifies how frequently the node is updated with a new Source input value. Specifying a value of zero in this register disables the Refresh Time feature. EvPriority (event priority) This register allows you to assign priority levels to specific event conditions. Output Registers Status An ON state indicates the normal working condition. An OFF state indicates timeouts, communication errors, or other failures that may occur at that instant when the module is trying to write to the destination address. A NOT AVAILABLE value indicates that either the module’s Activate input is not linked, or it has an OFF value. Initiate Write This output will generate a pulse when the Distributed Numeric module sends its Source input value to the address specified in the Destination setup register. Acknowledge This output will generate a pulse after a successful write, i.e. when the Distributed Numeric module receives an acknowledgement from the device specified in the Destination setup register. Time to Update This numeric output register reports the time (in seconds) between an Initiate Write pulse and the resulting Acknowledge pulse. © 2008 Schneider Electric. All rights reserved. Page 191 Distributed Numeric Module ION Reference Event This output register is used to record the module’s successful and/or unsuccessful attempts in writing to the Destination register. Event Priority Group Priority Description Setup Change 10 Input links, setup registers or labels have changed. Source Value Change * Write initiated (send the message). Source Value Change * Write overwritten (Source changed before the last write got through. Resend with a new value and discard previous attempt). Write Succeeded * Write complete and the destination has been updated. Write Failed Write Timeout Got Comm Error Got Invalid Node * Write did not complete and destination was not changed. * The priority of these events is determined by the value in the EvPriority setup register. The Event output register stores the following information for each ION event: time stamp, priority, cause, effect, and any values or conditions associated with the cause and effect. Detailed Module Operation When the Distributed Numeric module is activated, the numeric value appearing at the Source input is written to the register specified by the Destination setup register. The Update Threshold setup register determines by what amount the current value must change before a new value is written. For example, if the Update Threshold is set to 5, and the current value at the Source input is 100, the module will write the new value if the Source value drops below 95 or rises above 105. When this module is activated and the Source input receives a new value that is below or above the limits defined by the Update Threshold value, the Distributed Numeric module automatically writes this new value to the register specified in the Destination setup register. If the value at the Source input is stable or within the threshold limit you specified, the module periodically updates the value at the rate you specify in the Refresh Time register. This ensures that the value at the output register is always accurate and current. If the Write Now input is linked, the Update Threshold and Refresh Time setup registers have no effect on the module, and the module only updates the Destination setup register when a pulse is detected at the WriteNow input. Page 192 © 2008 Schneider Electric. All rights reserved. ION REFERENCE 09/2008 Distributed Pulse Module The Distributed Pulse module allows you to automatically transfer pulses from a Virtual Processor to another ION node such as an IED or different Virtual Processor. When the Distributed Pulse module is enabled, a pulse occurring at the Source input is written to the ION node you have specified. NOTE It is highly recommended that you use a Data Monitor module in conjunction with this module. See the Data Monitor module description for an example. When used in conjunction with the other Arithmetic and External Control modules, the Distributed Pulse module becomes a powerful tool for automated plant-wide demand or power factor control, including load shedding and start-up of auxiliary power. Distributed Pulse Module Status Initiate Write Acknowledge Time to update Source Activate Event Inputs Source All Distributed Pulse modules have one Source input. When a pulse is detected at this input, it is written to the node address you specify in the Destination setup register. Activate This input allows you to manually activate or deactivate the Distributed Pulse module. Schneider Electric 2195 Keating Cross Road Saanichton, BC Canada V8M 2A5 Tel: 1-250-652-7100 For technical support: [email protected] (00) + 1 250 544 3010 Contact your local Schneider Electric sales representative for assistance or go to www.powerlogic.com ION, PowerLogic and Schneider Electric are trademarks or registered trademarks of Schneider Electric in France, the USA and other countries. Other trademarks used are the property of their respective owners. Electrical equipment should be installed, operated, serviced, and maintained only by qualified personnel. No responsibility is assumed by Schneider Electric for any consequences arising out of the use of this material. © 2008 Schneider Electric. All rights reserved. Distributed Pulse Module ION Reference By linking the Status output of a Data Monitor module to this input, the Distributed Pulse module will be automatically disabled if the data at the Source input becomes out-of-date, thus preventing a control action based on old data. Linking this input is mandatory. Setup Registers Destination This register allows you to specify a node and register to which the value at the Source input will be written. This register displays the available nodes, module managers, modules and output registers from which you can select. Typically, you will select the output register of an External Pulse module. EvPriority (event priority) This register allows you to assign priority levels to specific event conditions. Output Registers Status This Boolean register indicates the status of the last write. An ON state indicates that the last write succeeded. An OFF state indicates time-outs, communication errors, or other failures. A NOT AVAILABLE value indicates that the module’s Activate input was not linked. InitiateWrite This output will generate a pulse at that instant when the Distributed Pulse module sends its Source input value to the address specified in the Destination setup register. Acknowledge This output will generate a pulse after a successful write. This occurs when the Distributed Pulse module receives an acknowledgement from the device specified in the Destination setup register. Time to Update This numeric output register reports the time (in seconds) between an Initiate Write pulse and the resulting Acknowledge pulse. A NOT AVAILABLE value indicates that the module’s Activate input was not linked. Page 194 © 2008 Schneider Electric. All rights reserved. ION Reference Distributed Pulse Module Event This output register is used to record the module’s successful and/or unsuccessful attempts in writing to the Destination register. For each event type written into the Event register, the following priority information is included: Event Priority Group Priority Description Setup Change 10 Input links, setup registers or labels have changed. Source Value Change * Write initiated (send the message). Source Value Change * Write overwritten (Source changed before the last write got through. Resend with a new value and discard previous attempt). Write Succeeded * Write complete and the destination has been updated. Write Failed Write Timeout Got Comm Error Got Invalid Node * Write did not complete and destination was not changed. * The priority of these events is determined by the value in the EvPriority setup register. The Event output register also contains the time stamp, priority, cause, effect, and any values or conditions associated with the cause and effect of the event. Detailed Module Operation When this module is enabled and the Source input detects a pulse, the Distributed Pulse module automatically writes this information to the address specified in the Destination setup register. © 2008 Schneider Electric. All rights reserved. Page 195 Distributed Pulse Module Page 196 ION Reference © 2008 Schneider Electric. All rights reserved. ION REFERENCE 09/2008 Disturbance Analyzer Module The Disturbance Analyzer module monitors three inputs for disturbances. These disturbances are defined as a percentage deviation from a nominal value. When a disturbance is detected, the module provides pulses to indicate the start and end of the disturbance, as well as which input the disturbance occurred on. Numeric characteristics, such as the magnitude and duration of the disturbance, are also provided. Inputs Source 1, Source 2, Source 3 These three Source inputs are analyzed by the module. If the Source inputs deviate (as per the Pickup and Dropout setup register below) from the Nominal input, the disturbance is analyzed, and the data is reflected on the output registers. At least one Source input must be linked (unlinked Sources produce N/A on their corresponding outputs). NOTE Generally, the Disturbance Analyzer module’s three Source inputs are linked to phase voltages (for example, Source 1 would be linked to phase A voltage). Schneider Electric 2195 Keating Cross Road Saanichton, BC Canada V8M 2A5 Tel: 1-250-652-7100 For technical support: [email protected] (00) + 1 250 544 3010 Contact your local Schneider Electric sales representative for assistance or go to www.powerlogic.com ION, PowerLogic and Schneider Electric are trademarks or registered trademarks of Schneider Electric in France, the USA and other countries. Other trademarks used are the property of their respective owners. Electrical equipment should be installed, operated, serviced, and maintained only by qualified personnel. No responsibility is assumed by Schneider Electric for any consequences arising out of the use of this material. © 2008 Schneider Electric. All rights reserved. Disturbance Analyzer Module ION Reference Nominal This input is linked to the nominal value of the three Source inputs (for example, nominal system voltage). As such, this input is generally linked to an unchanging value. This input must be linked or the module will not function. Enable This input enables or disables the module’s operation. If this input is set to FALSE, then all output registers become NOT AVAILABLE. This input is optional; if you leave it unlinked, the module will be enabled by default. Reset This input resets the module’s outputs to NOT AVAILABLE. The outputs remain N/A until the inputs are evaluated again. This input is optional; if you leave it unlinked, the input will never receive a pulse. Setup Registers Pickup The Pickup defines the percentage a Source input must deviate from the Nominal in order to be classified as a disturbance. You can set the percentage to less-than or greater-than 100, but never exactly 100. When the percentage is set to larger than 100, the module will track those disturbances that swell above the Nominal. For example, if Nominal is set to a value of 200, and Pickup is set to 110, a Source input value greater-than 220 is classified as a disturbance. Dropout The additional amount that a signal must recover in order to signal the end of the event. This can also be defined as the amount of hysteresis. If the module is evaluating a swell condition, then the Dropout percentage must be less-than the Pickup percentage. Conversely, the Dropout must be greater-than the Pickup for a sag condition. EvPriority This register allows you to set a custom priority level to certain events written to the Event output register. When EvPriority is zero, no event is written. Refer to the Event output register description for details. Output Registers Extreme 1, Extreme 2, Extreme 3 The extreme value detected during the last disturbance on Source A, Source B, or Source C respectively. This value is reflected as a percentage of the Nominal value; for example an Extreme 1 value of 85 denotes a 15% sag from Nominal on Source 1. Duration 1, Duration 2, Duration 3 The duration, in seconds, of the last detected event on Source A, Source B, or Source C respectively. Page 198 © 2008 Schneider Electric. All rights reserved. ION Reference Disturbance Analyzer Module Duration All The duration, in seconds, of the last detected event that all linked sources where in an event. DistStart 1, DistStart 2, DistStart 3 A pulse output indicating the end of a disturbance on Source A, Source B, or Source C respectively. DistAllStart A pulse output indicating the beginning of a disturbance on all linked sources, i.e., when all linked sources cross the threshold. DistEnd 1, DistEnd 2, DistEnd 3 This pulse output indicates the end of a disturbance on Source A, Source B, or Source C respectively. DistAllEnd A pulse output indicating the beginning of a disturbance on all linked sources, i.e., when one linked source returns to within the threshold. Limit Exceeded 1, Limit Exceeded 2, Limit Exceeded 3 This output remains TRUE while there is a disturbance in progress on Source A, Source B, or Source C, respectively; otherwise it is FALSE. Limit Exceeded All This output remains TRUE while there is a disturbance in progress on all linked sources simultaneously; otherwise it is FALSE. Event All events produced by the module are written into this register. Possible events and their associated priority numbers are shown in the table below: Event Priority Group Priority Setup register change 10 Description Input Links, setup registers or labels have been changed. The Event output register stores the following information for each ION event: time stamp, priority, cause, effect, and any values or conditions associated with the cause and effect. Other events and their priorities are as follows: Event © 2008 Schneider Electric. All rights reserved. Priority Description DistStart 1, DistStart 2, or DistStart 3 pulses * Disturbance start. DistEnd 1, DistEnd 2, or DistEnd 3 pulses * Disturbance end. Source n = N/A AND Limit Exceeded n = TRUE * Source input goes N/A while disturbance in progress on that phase. Page 199 Disturbance Analyzer Module ION Reference Event Priority Description Nominal = N/A or <0 AND Limit Exceeded n is TRUE * Nominal value is N/A during a disturbance. Enable = FALSE AND Limit Exceeded n = TRUE * Module is disabled during a disturbance. Reset is pulsed AND Limit Exceeded n = TRUE * Module is reset during a disturbance. * The priority of these Events are set in the EvPriority setup register. Detailed Module Operation The Disturbance Analyzer module can be used to detect interruptions as described in the IEC 61000-4-30 standard. Page 200 © 2008 Schneider Electric. All rights reserved. ION REFERENCE 09/2008 Disturbance Direction Detection Module The purpose of this module is to determine the direction of a disturbance, relative to the meter. Analyzing disturbance direction detection information from multiple meters in a power monitoring system enables the location of the cause of the disturbance to be determined more quickly and accurately. When a disturbance pulse is received, the module runs the Disturbance Direction Detection algorithm. The algorithm analyzes the input data to determine the direction of a disturbance. It also assigns a confidence score to the results of its analysis. The direction information and the confidence level are output as an event, recorded in the Event Log. The event log record has the same timestamp as the disturbance that triggered the Disturbance Direction Detection module, even though the results of the algorithm may appear in the event log after the disturbance is over. Schneider Electric 2195 Keating Cross Road Saanichton, BC Canada V8M 2A5 Tel: 1-250-652-7100 For technical support: [email protected] (00) + 1 250 544 3010 Contact your local Schneider Electric sales representative for assistance or go to www.powerlogic.com ION, PowerLogic and Schneider Electric are trademarks or registered trademarks of Schneider Electric in France, the USA and other countries. Other trademarks used are the property of their respective owners. Electrical equipment should be installed, operated, serviced, and maintained only by qualified personnel. No responsibility is assumed by Schneider Electric for any consequences arising out of the use of this material. © 2008 Schneider Electric. All rights reserved. Disturbance Direction Detection Module ION Reference Inputs V1, V2, V3 These inputs are linked to the outputs of the Data Acquisition module. These links cannot be changed. Sag/Swell Dist (Disturbance) Start Trigger This input register is of the pulse class and is intended to be connected to the Sag/ Swell module DistStart output register. A pulse received on this register indicates to the module that a Sag/Swell has occurred and activates the disturbance direction detection algorithm to determine the direction of the disturbance. While the algorithm is running, any further pulse to this input is ignored. Sag/Swell Sub Trigger V1, Sag/Swell Sub Trigger V2, Sag/Swell Sub Trigger V3 These input registers are of the pulse class and are intended to be connected to the Sag/Swell module’s SubV1Trig, SubV2Trig and SubV3Trig outputs, respectively. A pulse on one of these inputs, in conjunction with a pulse on the Sag/ Swell Dist Start Trigger, indicates to the module on which phase a sag/swell disturbance alarm has occurred. Any pulses that are not received in conjunction with a pulse on the Sag/Swell Dist Start Trigger are ignored. Transient Trigger V1, Transient Trigger V2, Transient Trigger V3 These input registers are of the pulse class and are intended to be connected to the Transient module’s TranV1Trig, TranV2Trig and TranV3Trig outputs, respectively. A pulse on one of these inputs indicates to the module on which phase a transient disturbance alarm has occurred and activates the disturbance direction detection algorithm to determine the direction of the disturbance. While the algorithm is running, any further pulses to these inputs are ignored. If a sag/swell and a transient alarm are triggered simultaneously, the module analyzes the disturbance as a sag/swell. Enable This input enables or disables the module’s operation. When linked to another module’s Boolean output, it turns the module on and off. If the module is off, it ignores any disturbance pulses it receives and the output registers display NOT AVAILABLE or, in the case of the Analysis Complete register, ZERO. This input is optional—if left unlinked, the module is enabled by default. Setup Registers EvPriority This register allows you to set a custom priority level for certain events generated by the module and written to the Event output register. See the Event output register description for details. Page 202 © 2008 Schneider Electric. All rights reserved. ION Reference Disturbance Direction Detection Module Output Registers Analysis Complete This output is pulsed when the disturbance direction detection algorithm has finished its analysis and new disturbance direction information is available in the output registers. Direction Detected V1, Direction Detected V2, Direction Detected V3 These Boolean output registers are updated when the disturbance direction detection algorithm is complete. A value of TRUE (1) indicates that a disturbance and its direction were detected on the channel. A value of FALSE (0) indicates that no disturbance or direction were detected on the channel. Direction This register’s value is updated when a disturbance direction is detected. A value of -1 indicates the disturbance is upstream, a value of 1 indicates a disturbance is downstream, and a value of 0 indicates the disturbance direction is indeterminate. Confidence This register expresses, as a numeric value, the confidence score of the determined direction of the disturbance. The output value is a score from 0 to 100, determined using a points system, that indicates the level of confidence in the direction determined by the algorithm. The following table shows how the confidence score is translated into the confidence written to the Event output register: Score Level 0–9 Indeterminate 10–29 Low 30–69 Medium 70–100 High Event All events produced by the module are written into this register. Possible events and their associated priority numbers are shown in the table below: Event Priority Group Priority Description Setup register change 10 Input Links, setup registers or labels have been changed. DDD Event * Disturbance Direction detected. * The priority of these Events are set in the EvPriority setup register. The Event output register stores the following information for each ION event: time stamp, priority, cause, effect, and any values or conditions associated with the cause and effect. © 2008 Schneider Electric. All rights reserved. Page 203 Disturbance Direction Detection Module ION Reference Responses to Special Conditions The following table summarizes how the module behaves under different conditions. Condition If the Enable input is OFF Page 204 Response of Output Register The output registers are NOT AVAILABLE or ZERO, depending on the register. © 2008 Schneider Electric. All rights reserved. ION REFERENCE 09/2008 DNP Slave Export Module This module takes the value of a register and creates a DNP object that can be read by a DNP Master device. DNP Slave Export Module Source 1 Event Source 2 Source 3 Source 4 The Distributed Network Protocol Version 3.0 (DNP 3.0) is an open protocol used in the electric utility industry for communications and interoperability among substation computers, RTUs, IEDs, and Master Stations. An ION device can be integrated into a DNP network through the DNP Slave Import, Export and Options modules. The DNP Slave Export module converts ION data to DNP format, responding to Master requests for DNP data objects and freeze operations. Each of the module’s Source inputs maps to a DNP point, with its associated DNP data objects. NOTE Complete documentation of the DNP protocol is available through the DNP User’s Group: www.dnp.org The DNP Slave Export module supports four “categories” of DNP data objects: static, event, frozen static, and frozen event. A DNP static object is the real-time value of a data point, for example, phase A voltage. A DNP event object is generated when the static object exceeds a deadband threshold. A DNP frozen static object represents the value of the static object at the moment when a DNP Master issues a “freeze” command. Similarly, a DNP frozen event object is produced upon the Master issuing a “freeze” command. Schneider Electric 2195 Keating Cross Road Saanichton, BC Canada V8M 2A5 Tel: 1-250-652-7100 For technical support: [email protected] (00) + 1 250 544 3010 Contact your local Schneider Electric sales representative for assistance or go to www.powerlogic.com ION, PowerLogic and Schneider Electric are trademarks or registered trademarks of Schneider Electric in France, the USA and other countries. Other trademarks used are the property of their respective owners. Electrical equipment should be installed, operated, serviced, and maintained only by qualified personnel. No responsibility is assumed by Schneider Electric for any consequences arising out of the use of this material. © 2008 Schneider Electric. All rights reserved. DNP Slave Export Module ION Reference The ION-to-DNP data flow created by the DNP Slave Export module is shown below. DNP Frozen Event Object is not supported on the ION7330. There are three DNP groups available: Binary Input, Binary Counter, and Analog Input. You can choose one or more of the above categories within each DNP “group”. For example, you can decide to make static and frozen Binary Input objects available to the DNP Master through one DNP Slave Export module. The DNP Slave Export module maps ION data to these DNP objects through its StaticObj, EventObj, FrozStaObj, and FrozEvtObj setup registers. Inputs Source 1-4 The DNP Slave Export module reads the values on all 4 inputs and makes them available as 4 DNP Static objects. These objects are then available to requests from the DNP Master. Event, Frozen Static, and Frozen Event objects can also be derived from the Static objects, as defined by the module’s setup registers. At least 1 of the 4 inputs must be linked for the module to operate. DNP objects will only be created for linked inputs. Freeze The Freeze input acts internally as though a DNP freeze command were executed on the communications port. The input freezes all objects that are allowed to be frozen according to the module setup. Setup Registers The available setup registers vary between ION devices; refer to your product documentation for available setup registers, register bounds, and factory default information. If the combination of options you choose is invalid, the module will not assume operation, and an error message will appear in the configuration software. Page 206 © 2008 Schneider Electric. All rights reserved. ION Reference DNP Slave Export Module BasePoint The Base Point maps the module’s Source 1 input to a DNP point number. The DNP Master can then read the Static, Frozen, and Event objects associated with this DNP point (Frozen and Event objects inherit their point numbers from the Static objects from which they are derived). Each subsequent Source input, and its related DNP point, is addressable by the appropriate offset from this Base Point. DNP does not allow any overlaps in the DNP point numbers within a DNP group (Binary Input/Output, Counter, or Analog Input/Output). If you have already configured other DNP Slave Export modules with the same StaticObj, FrozenObj, and EventObj register settings, you must refer to the previous module’s Base Point register to extrapolate the appropriate Base Point number for this new module. If this is your first DNP Slave Export module, use zero for the Base Point. StaticObj (static object) This register defines the DNP Static objects’ group to which all the module’s Source inputs are converted. The module provides these Static objects to the DNP Master in a Class 0 poll. NOTE The default variation of all DNP Static objects in the ION device is defined by the DNP Slave Options module. EventObj (event object) This register defines, for all Source inputs, whether or not a DNP Event object can be created for the Static object chosen above. A DNP Event object is generated when the Static object exceeds a deadband threshold, which is specified in the Deadband setup register. The DNP Master can retrieve these Event objects in a Class 1, 2, or 3 poll. Deadband This register is the absolute value by which a DNP Static object can change before a DNP Event object is created. Full scale is defined by the DNP Zero and DNP Full setup registers. Note that this register is only applicable if Event objects are enabled. FrozStaObj (frozen static object) This register defines, for each Source input, whether or not a DNP Frozen Static object is generated when the DNP Master issues a “freeze” command. (The Master can obtain these Frozen Static objects in a Class 0 poll.) You can only choose a Frozen object if you have chosen the Counter or Analog Input object for the StaticObj register (a “Frozen Binary input” is not defined in DNP). FrozEvtObj (frozen event object) This register defines, for each Source input whether or not a DNP Frozen Event object is generated when the DNP Master issues a “freeze” command. (The Master can obtain these Frozen Event objects in a Class 1, 2, or 3 poll). © 2008 Schneider Electric. All rights reserved. Page 207 DNP Slave Export Module ION Reference EventClass This register specifies which Class the Master must poll to retrieve the DNP Event objects and DNP Frozen Event objects from this module. Your options are: Class 1, 2, or 3. Scaling The Scaling register determines whether or not the DNP Slave Export module scales its data for the DNP Master. If Scaling is set to ON, the ION Zero, ION Full, DNP Zero, and DNP Full setup registers are used to scale the data; if Scaling is set to OFF, no scaling is performed, and the values in the ION Zero, ION Full, DNP Zero, and DNP Full registers are ignored. IONZero, IONFull These registers specify the input range for all Source inputs. Any value less than the ION Zero setting will be treated as an ION Zero value, and any values exceeding the ION Full value will be treated as an ION Full value. NOTE These registers also define the full scale for the Deadband setup register. DNPZero, DNPFull These registers specify the output range of the data for the DNP Master. This ensures that the Master will receive valid data even if, for example, the values at the Source inputs are 32-bit, and the Master can only handle 16-bit values. The values for the DNP Master are linearly interpolated from the input range specified in the ION Zero and ION Full registers. Output Registers Freeze Complete This output pulses after the freeze input has pulsed and the freeze has completed internally. A typical use case is to connect this output to a feedback module and use the feedback module to reset a data source once that data has been frozen. Event ION events are recorded in this Event output register, including setup register changes. Possible ION events include changes to input links, setup registers or labels (all with a priority of 10). The Event output register stores the following information for each ION event: time stamp, event priority, event’s cause, event’s effect, and conditions associated with the event’s cause and effect. This Event output register should not be confused with DNP event objects. Page 208 © 2008 Schneider Electric. All rights reserved. ION Reference DNP Slave Export Module Detailed Module Operation DNP Functions Supported The table below is a summary of the DNP functions supported by the DNP Slave Export module. Function Description DNP Slave Response Functions Confirm Message fragment confirmation used in IED responses. No response to this message is required. Response IED responds to a Master request message. DNP Master Transfer Functions Confirm Message fragment confirmation used in Master requests. No response to this message is required. Read Master requests particular objects from IED; IED responds with requested objects that are available. Immediate Freeze IED copies the specified objects to a freeze buffer and responds with status of the operation. Immediate Freeze -No Acknowledge IED copies the specified objects to a freeze buffer, but does not respond with a status message. Freeze and Clear IED copies the specified objects to a freeze buffer, then clears the objects and responds with status of the operation. Freeze and Clear -No Acknowledge IED copies the specified objects to a freeze buffer, then clears the objects but does not respond with a status message. Delay Measurement Master requests data from the IED in order to calculate the IED’s communication delay and use it for time synchronization. The IED responds with the Time Delay object. DNP Master Freeze Functions DNP Master Time Synchronization Functions DNP Point Numbering In DNP, you address data with “point” numbers. Each Source input corresponds to a DNP point number. DNP requires a contiguous address range, with no overlaps in the point numbers within a DNP group, so if you use more than one DNP Slave Export module with the same DNP object settings, you have to keep a record of the last point number you used in the previous DNP Slave Export module and enter that number plus 1 in the subsequent module’s Base Point setup register. © 2008 Schneider Electric. All rights reserved. Page 209 DNP Slave Export Module ION Reference Scaling Four setup registers (ION Zero, ION Full, DNP Zero, and DNP Full) may be used to scale an Source input range to an output range for the DNP Static Object. The following diagram shows how the scaling operation works. Any Source input values below 5000 will be scaled to the DNP Static Object as a value of 50; any reading in excess of 200 000 will be scaled to 2000. Responses to Special Conditions The following table summarizes how the DNP Slave module behaves under different conditions. Condition Page 210 Response of DNP Object If the Source input is NOT AVAILABLE The static value will be zero. After the module is re-linked or its setup registers are changed All DNP event object buffers are cleared and Frozen Static objects are set to 0. Module is deleted All DNP event object buffers are cleared and Frozen Static objects are set to 0. When the device is powered-up All DNP event object buffers are cleared and Frozen Static objects are set to 0. © 2008 Schneider Electric. All rights reserved. ION REFERENCE 09/2008 DNP Slave Import Module This module takes the value of a DNP object written by a DNP Master device and writes it into an ION register. DNP Slave Import Module AnalogOut Relay1 Relay2 Event The Distributed Network Protocol Version 3.0 (DNP 3.0) is an open protocol used in the electric utility industry for communications and interoperability among substation computers, RTUs, IEDs, and Master Stations. An ION device can be integrated into a DNP network through the DNP Slave Import, Export and Options modules. A DNP Slave Import module can map either DNP Analog Output or Binary Output objects to ION numeric and Boolean values. The DNP Slave Import module also enables the device to react to control commands from the DNP Master. Complete documentation of the DNP protocol is available through the DNP User’s Group (on the web at www.dnp.org). This documentation includes the Application Layer Protocol Description, Data Link Layer Protocol Description, Transport Functions, Data Object Library, and DNP 3.0 Subset Definitions. Inputs The DNP Slave Import module does not have any inputs. Schneider Electric 2195 Keating Cross Road Saanichton, BC Canada V8M 2A5 Tel: 1-250-652-7100 For technical support: [email protected] (00) + 1 250 544 3010 Contact your local Schneider Electric sales representative for assistance or go to www.powerlogic.com ION, PowerLogic and Schneider Electric are trademarks or registered trademarks of Schneider Electric in France, the USA and other countries. Other trademarks used are the property of their respective owners. Electrical equipment should be installed, operated, serviced, and maintained only by qualified personnel. No responsibility is assumed by Schneider Electric for any consequences arising out of the use of this material. © 2008 Schneider Electric. All rights reserved. DNP Slave Import Module ION Reference Setup Registers The setup registers and their options are listed below. If the combination of options you choose is invalid, the module will not assume operation, and an error message will appear in the configuration software. These setup registers allow you to define a DNP object. In DNP, objects are defined by a point and a group. DNPPoint This register specifies the point number of the DNP object to which you want to map the module. Note that DNP does not allow any overlaps in the DNP point numbers within a DNP group (Binary Output or Analog Output). If you have already configured other DNP Slave Import modules, you must refer to the previous module’s DNPPoint setup register to extrapolate the appropriate point number for this new module. If this is your first DNP Slave Import module, use zero for the point number. DNPObjGrp (DNP object group) This specifies the group of the DNP object to which you want to map the module. Refer to your device documentation for setup register defaults and choices. NOTE The default variation of all Analog output status objects in the ION device is defined by the DNP Slave Options module. Relay Mode This specifies the method of accessing trip/close relays. This setup register only applies to Binary Output objects. Refer to your device documentation for setup register defaults and choices. Output Registers AnalogOut This register provides the ION numeric equivalent to the DNP object received from the Master. DNP Analog Output objects are converted to a numeric value. If the DNPObjGrp setup register is set to BINARY OUTPUT, this output register will be N/A. Relay1 This register goes ON or OFF when the module receives an Operate or Direct Operate function from the DNP Master according to the table in the Control Relay Block Implementation section that follows. NOTE See the section “Control Relay Block Implementation” for details on the operation of the Relay 1 and Relay 2 output registers. If the DNPObjGrp setup register is set to ANALOG OUTPUT, this output register will be N/A. This output register can be used for controlling latching or trip/close relays. Page 212 © 2008 Schneider Electric. All rights reserved. ION Reference DNP Slave Import Module Relay2 This register goes ON or OFF when the module receives an Operate or Direct Operate function from the DNP Master according to the table in the Control Relay Block Implementation section that follows. If the DNPObjGrp setup register is set to ANALOG OUTPUT or Relay Mode is set to 1 POINT PER ADDRESS this output register will be N/A. This output register is only used for closing a trip/close relay when 2 POINTS PER ADDRESS are used. Event ION events are recorded in this output register. Possible ION events include changes to setup registers or labels (both which have a priority of 10). NOTE This ION Event output register should not be confused with DNP event objects. The Event output register stores the following information for each ION event: timestamp, event priority, event’s cause, event’s effect, and conditions associated with the event’s cause and effect. © 2008 Schneider Electric. All rights reserved. Page 213 DNP Slave Import Module ION Reference Detailed Module Operation The following table summarizes all the functions that the DNP Master can perform when it writes to the DNP Slave Import module. DNP Master Transfer Functions Function Description Confirm Message fragment confirmation used in Master requests. No response to this message is required. Read Master requests particular objects from IED; IED responds with requested objects that are available. For Analog Outputs, the value of the AnalogOut output register is returned as the status. For Binary Outputs, the OR’d value of the Relay1 & Relay2 output registers are returned as the status. For Class 0 polls, status of all Analog and Binary Outputs are returned. DNP Master Control Functions Function Description Select Select (or arm) output points (controls, setpoints, analog outputs) at IED but do not activate them; IED responds with the status of the output points selected. When it receives the SELECT message, the IED starts a timer and must receive an OPERATE message before the timer expires to activate these outputs. Operate Activate the IED’s outputs that were previously selected with the SELECT function; respond with the status of the outputs. Direct Operate Activate the IED’s outputs without a preceding SELECT message; IED responds with the status of the outputs. Direct Operate - No Acknowledge Activate the IED’s outputs without a preceding SELECT message; but IED does not respond with the status of the outputs. NOTE Class 0 polls return DNP status objects for both Analog and Binary Output objects. Page 214 © 2008 Schneider Electric. All rights reserved. ION Reference DNP Slave Import Module Control Relay Block Implementation This implementation follows the recommendations of the DNP Users Group document Control Relay Output Block Explanation and Recommended Usage (August 30, 1995). Function Desired Fields of Control Relay Output Block Object Setup Register Behaviour of Output Registers Code (Bits 0-3) Trip/Close (Bits 6&7) On-time* Relay Mode Relay 1 Relay 2 Latching Relay ON Latch On (3) NULL (0) ignored ignored ON No change Latching Relay OFF Latch Off (4) NULL (0) ignored ignored OFF No change Unpaired Momentary Relay (e.g Pushbutton, Alarm) Pulse On (1) NULL (0) X ms ignored ON (for X ms) No change Trip Breaker/Relay, Raise Transformer Tap Pulse On (1) Trip (2) X ms ignored ON (for X ms) No change Close Breaker/Relay, Lower Transformer Tap Pulse On (1) Close (1) X ms 1 point per address ON (for X ms) No change Close Breaker/Relay, Lower Transformer Tap Pulse On (1) Close (1) X ms 2 points per address No change ON (for X ms) * Note that the minimum On-time supported is 20 ms for the ION7700, ION7550, ION7650, and ION8600 meters and 2 seconds for ION7300 series meters. Responses to Special Conditions The following table summarizes how the DNP Slave Import module behaves under different conditions. Condition © 2008 Schneider Electric. All rights reserved. Response of Output Registers Module is first created All output register are N/A. If the setup registers are changed (i.e. the module is mapped to a different DNP object) If DNPObjGrp is ANALOG OUTPUT the AnalogOut output register is set to 0 and is updated on receipt of the next Master request to this point. If DNPObjGrp is BINARY OUTPUT, the Relay output registers go OFF and are updated on receipt of the next Master request to this point. On device power up Output registers will remain at the last updated value. Page 215 DNP Slave Import Module Page 216 ION Reference © 2008 Schneider Electric. All rights reserved. ION REFERENCE 09/2008 DNP Slave Options Module The DNP Slave Options module allows you to specify options for supporting the DNP protocol on ION meters. It also provides information about the availability of event buffer space. Each DNP Slave Options module’s settings apply to one session. A session consists of all incoming and outgoing DNP Master/Slave traffic on one of the meter’s communications ports. Each ION device can have a maximum of three concurrent sessions; one for each serial port, up to three using Ethernet, or a combination of both. Combinations available will depend on the meter’s communications options. The Distributed Network Protocol Version 3.0 (DNP 3.0) is an open protocol used in the electric utility industry for communications and inter operability among substation computers, RTUs, IEDs, and Master Stations. An ION meter can be integrated into a DNP network through the ION DNP Slave Import, Export and Options modules. Complete documentation of the DNP protocol is available through the DNP User’s Group (on the web at www.dnp.org). This documentation includes the Data Link Layer Protocol Description, Transport Functions, Application Layer Protocol Description, and Data Object Library, and DNP 3.0 Subset Definitions. DNP Slave Options Module BinInEv FrzCntEv CntChangeEv FrzAIEv AIChangeEv Event Schneider Electric 2195 Keating Cross Road Saanichton, BC Canada V8M 2A5 Tel: 1-250-652-7100 For technical support: [email protected] (00) + 1 250 544 3010 Contact your local Schneider Electric sales representative for assistance or go to www.powerlogic.com ION, PowerLogic and Schneider Electric are trademarks or registered trademarks of Schneider Electric in France, the USA and other countries. Other trademarks used are the property of their respective owners. Electrical equipment should be installed, operated, serviced, and maintained only by qualified personnel. No responsibility is assumed by Schneider Electric for any consequences arising out of the use of this material. © 2008 Schneider Electric. All rights reserved. DNP Slave Options Module ION Reference Inputs The DNP Slave Options module has no inputs. Setup Registers The setup registers of this module define settings that apply to all DNP Slave Import and DNP Slave Export modules for a session. The available setup registers vary between ION products; refer to your product documentation for available setup registers, register bounds, and factory default information. Each of the setup registers described below are listed by DNP group. Binary Inputs BinInStatic (binary input static) This register defines the variant that is returned in a class 0 poll for all Binary Input Static objects for a session. (These objects are created using DNP Slave Export modules.) BinInEvents (binary input events) This register defines the variant that is returned in a class 1-3 poll for all Binary Input Event objects for a session. (These objects are enabled by configuring DNP Slave Export modules.) BinInEvDepth (binary input event depth) This read-only register defines the maximum number of Binary Input events that can be stored for a session. When this buffer fills up, new events overwrite the oldest events. Binary Counters BinCntStatic (binary counter static) This register defines the variant that is returned in a class 0 poll for all Binary Counter Static objects for this session. (These objects are created using DNP Slave Export modules.) FrzCntStatic (frozen counter static) This register defines the variant that is returned in a class 0 poll for all Frozen Counter Static objects for a session. (These objects are created using DNP Slave Export modules.) FrzCntEvents (frozen counter events) This register defines the variant that is returned in a class 1-3 poll for all Frozen Counter Event objects for a session. (These objects are enabled using DNP Slave Export modules.) FrzCntEvDepth (frozen counter event depth) This read-only register defines the maximum number of Frozen Counter events that can be stored for a session. When this buffer fills up, new events overwrite the oldest events. Page 218 © 2008 Schneider Electric. All rights reserved. ION Reference DNP Slave Options Module CntChangeEvents (counter change events) This register defines the variant that is returned in a class 1-3 poll for all Counter Change Event objects for a session. (These objects are enabled using DNP Slave Export modules.) CntChangeEvDepth (counter change event depth) This read-only register defines the maximum number of Counter Change events that can be stored for a session. When this buffer fills up, new events overwrite the oldest events. Analog Inputs AIStatic (analog input static) This register defines the variant that is returned in a class 0 poll for all Analog Input Static objects for a session. (These objects are created using DNP Slave Export modules.) FrzAIStatic (frozen analog input static) This register defines the variant that is returned in a class 0 poll for all Frozen Analog Input Static objects for a session. (These objects are created using DNP Slave Export modules.) FrzAIEvents (frozen analog input events) This register defines the variant that is returned in a class 1-3 poll for all Frozen Analog Input Event objects for a session. (These objects are enabled using DNP Slave Export modules.) FrzAIEvDepth (frozen analog input event depth) This read-only register defines the maximum number of Frozen Analog Input events that can be stored for a session. When this buffer fills up, new events overwrite the oldest events. AIChangeEvents (frozen analog input change events) This register defines the variant that is returned in a class 1-3 poll for all Analog Input Change Event objects for a session. (These objects are enabled using DNP Slave Export modules.) AIChangeEvDepth (analog input change event depth) This read-only register defines the maximum number of Analog Input Change events that can be stored for a session. When this buffer fills up, new events overwrite the oldest events. Analog Outputs AOStatic (analog output static) This register defines the variant that is returned in a class 0 poll for all Analog Output Block objects for a session. (These objects are created using DNP Slave Import modules.) © 2008 Schneider Electric. All rights reserved. Page 219 DNP Slave Options Module ION Reference Control Options SelectTimeout The SelectTimeout setup register specifies the Select Before Operate time-out period in seconds, for a session. Communication Options TimeSyncPeriod This register defines the number of seconds between device requests for time syncs. It allows the device to control when it is time synched by the Master. NOTE The Clock module’s TimeSyncSource register determines the source for meter time syncs. When the source for time synchronization (i.e. COM1) matches a communication port with a DNP Slave Options module attached, the meter will use any time sync messages received to time sync the meter. If the source for time sync is not for the current port, the meter will still request a time sync but will ignore the time sync message. For more information on time synchronization see the Clock Module section. ALFragSize (application layer fragment size) This register defines the maximum application layer fragment size, in bytes, that the device can send to the Master for this session. This register is useful for minimizing data errors on noisy lines. It does not affect the total size of the device’s response message. DLAck (data link acknowledge) This register determines when the device will request data link layer acknowledgements from the Master for this session. If set to ALWAYS, the device will always request data link layer acknowledgements. If set to MULTI-PACKET ONLY, the device will only request acknowledgement messages when sending multipacket responses. If set to NEVER, the device will never request data link layer acknowledgements for this session. NOTE In DNP TB1998-04002, “DNP Confirmation and Retry Guidelines”, it is recommended that DNP Acknowledgements NOT be used; use App Layer Confirmations instead. DLTimeout (data link time-out) This register determines how long the data link layer waits for an acknowledgement message from the Master for this session. DLNumRetries (data link number of retries) This register specifies how many times the device tries to re-send a data link layer packet after failing to receive a data link layer acknowledgement from the Master for this session. CommPort (communications port) This register defines which communication port this DNP Slave Options module’s settings will be applied to. Page 220 © 2008 Schneider Electric. All rights reserved. ION Reference DNP Slave Options Module NOTE Only one DNP Slave Options module can be assigned to each serial communication port. ApplCnfrm (application layer confirmation) This register determines if the device will request that the application layer response be confirmed or not for this session. The default is to confirm only event data responses. The other option is to confirm all application layer responses. MasterIPAddr (master IP address) This register defines the IP address of the DNP Master that will be allowed to connect to the session. This allows different configurations to be used for different Masters over TCP/IP. Allowed values are a dotted IP address, None or an empty string. None and an empty string indicates that any IP address can connect to this session. The default is None. NOTE If the MasterIPAddr register is set to None or blank (allowing any Master to connect to this session), then it is not guaranteed what state any outstanding events will be in. To be certain of a consistent state, set this register to the IP address of the SCADA meter. Unsolicited Response Options All unsolicited response registers are inactive unless the UnsolEnable register is Enabled. UnsolEnable (unsolicited response enable) Enables or disables unsolicited responses for this session. Currently, the only option is Disabled. UnsolClassMask (unsolicited class mask) This register defines which event classes can trigger an unsolicited response for this session. The default is All Classes. UnsolMaxRetries (unsolicited response maximum retries) This register defines the number of unsolicited response retries for this session before the device stops trying. The range is 0-100 attempts; default is 1. The value of zero indicates infinite retries. NOTE In order to minimize data collision and communication conflict, each session picks a random wait period between 1 and 10 seconds. This value determines how long the meter waits after an event is created before the first unsolicited response is attempted. This helps prevent multiple devices from responding simultaneously if any system-wide event occurs. UnsolRetryPeriod (unsolicited response retry period) This register defines the time period between retry attempts for this session. The range is 1-864,000 seconds (10 days); default is 60. © 2008 Schneider Electric. All rights reserved. Page 221 DNP Slave Options Module ION Reference UnsolDestAddress (unsolicited response destination address) This register defines the DNP Master unit ID address that the unsolicited response will be sent to for this session. The range is 1-65,519; default is 3. Output Registers NOTE When a DNP Master successfully reads any DNP Event object from the device, the Event object will be cleared from its associated buffer and the capacity of that buffer will increase. The DNP Slave Options module has the following output registers: BinInEv (binary input event) This register indicates the current capacity of the Binary Input Event Object buffer for this session. It specifies how many DNP Event objects can be stored before overflow occurs. When the buffer is full, this register will run into negative numbers to indicate how many DNP Event objects have been overwritten. FrzCntEv (frozen counter event) This register indicates the current capacity of the Frozen Counter Event Object buffer for this session. It specifies how many DNP Event objects can be stored before overflow occurs. When the buffer is full, this register will run into negative numbers to indicate how many DNP Event objects have been overwritten. CntChangeEv (counter change event) This register indicates the current capacity of the Counter Change Event Object buffer for this session. It specifies how many DNP Event objects can be stored before overflow occurs. When the buffer is full, this register will run into negative numbers to indicate how many DNP Event objects have been overwritten. FrzAIEv (frozen analog input event) This register indicates the current capacity of the Frozen Analog Input Event Object buffer for this session. It specifies how many DNP Event objects can be stored before overflow occurs. When the buffer is full, this register will run into negative numbers to indicate how many DNP Event objects have been overwritten. AIChangeEv (analog input change event) This register indicates the current capacity of the Analog Input Change Event Object buffer for this session. It specifies how many DNP Event objects can be stored before overflow occurs. When the buffer is full, this register will run into negative numbers to indicate how many DNP Event objects have been overwritten. Event ION events for this session are recorded in this output register. Possible ION events include changes to setup registers or labels (both which have a priority of 10). NOTE This ION Event output register should not be confused with DNP event objects. Page 222 © 2008 Schneider Electric. All rights reserved. ION Reference DNP Slave Options Module The Event output register stores the following information for each ION event: time stamp, event priority, event’s cause, event’s effect, and conditions associated with the event’s cause and effect. Responses to Special Conditions The following table summarizes how the DNP Slave Options module behaves under different conditions: Condition © 2008 Schneider Electric. All rights reserved. Responses Module goes online. All DNP Event buffers and Frozen Static objects are cleared, depths reset to defaults. Event buffer is full. Oldest events are overwritten by new events. When the device is started or powered-up (either the first time, or after a shut-down). All DNP Event buffers and Frozen Static objects are cleared, depths reset to defaults. Page 223 DNP Slave Options Module Page 224 ION Reference © 2008 Schneider Electric. All rights reserved. ION REFERENCE 09/2008 Event Log Controller Module The Event Log Controller module provides a history of all the events that have occurred on the device. Possible applications for the Event Log Controller module include a complete sequence-of-events record for: breaker and transfer switch operations alarm conditions equipment starts and stops The Event Log Controller module monitors the Event output registers of other modules for new event records. Any new events are stored in the Event Log output register in internal non-volatile memory. Event Log Controller Event Log Inputs The Event Log Controller module’s inputs are the Event output registers from other modules in the device. These inputs are fixed at the factory and cannot be linked to other output registers. Schneider Electric 2195 Keating Cross Road Saanichton, BC Canada V8M 2A5 Tel: 1-250-652-7100 For technical support: [email protected] (00) + 1 250 544 3010 Contact your local Schneider Electric sales representative for assistance or go to www.powerlogic.com ION, PowerLogic and Schneider Electric are trademarks or registered trademarks of Schneider Electric in France, the USA and other countries. Other trademarks used are the property of their respective owners. Electrical equipment should be installed, operated, serviced, and maintained only by qualified personnel. No responsibility is assumed by Schneider Electric for any consequences arising out of the use of this material. © 2008 Schneider Electric. All rights reserved. Event Log Controller Module ION Reference Setup Registers Some setup registers are not available with certain ION devices; refer to your product documentation to see which registers are supported. Depth This register defines the number of events which can be stored in the Event Log output register. The higher you set this number, the more events the Event Log can store at once and the more memory it requires. Note that if the Depth register is set to 0, all event logging will be disabled. NOTE When the Depth register is re-programmed, all events stored in the Event Log register will be lost. Cutoff This register allows you to specify which events you want to log, based on event priority. Events with priority values less than or equal to the Cutoff you specify will not be logged. Cutoff supersedes Protection; any events with priority values equal or below the Cutoff value will not be logged, regardless of the value entered into the Protection register. Output Registers Event Log This register stores the device’s event information. The Event Log register is circular; once the log is full, adding additional event records will result in the loss of the oldest event records. The Event Log offers protection from losing important events. Events with an Event Priority higher than that set in the Protection Priority setup register are summarized and saved rather than overwritten. The information in the Event Log register is accessible via communications. Page 226 © 2008 Schneider Electric. All rights reserved. ION Reference Event Log Controller Module Detailed Module Operation This figure illustrates the operation of the Event Log Controller module. Changing one of the Event Log Controller module’s setup registers constitutes an event (with a pre-defined priority of 10). The Event Log Controller writes these events directly into the Event Log; it does not require an Event output register. Response to Special Conditions The following table summarizes how the Event Log Controller behaves under different conditions. Condition © 2008 Schneider Electric. All rights reserved. Response of Output Register After the module is re-linked or its setup registers are changed All logged data in the Event Log register is deleted. When the device is started or powered-up (either the first time, or after a shut-down) The Event Log register retains the data it held at shutdown. Page 227 Event Log Controller Module Page 228 ION Reference © 2008 Schneider Electric. All rights reserved. ION REFERENCE 09/2008 External Boolean Module The External Boolean module provides a single Boolean register that you can define as either ON or OFF. For example, if you want to disable a module under certain circumstances, you can link its Enable input to an External Boolean module that you can switch to OFF. External Boolean Module Switch Event Inputs External Boolean modules have no inputs; they are controlled via communications. Setup Registers EvPriority (event priority) This register allows you to assign a priority level to the events produced when the output register is written. When EvPriority is zero, no event is written. Output Registers Switch All External Boolean modules have a single switch register which can be manually switched ON or OFF via communications. Event All events produced by an External Boolean module are written into this register. Possible events and their associated priority numbers are shown in the table below. Schneider Electric 2195 Keating Cross Road Saanichton, BC Canada V8M 2A5 Tel: 1-250-652-7100 For technical support: [email protected] (00) + 1 250 544 3010 Contact your local Schneider Electric sales representative for assistance or go to www.powerlogic.com ION, PowerLogic and Schneider Electric are trademarks or registered trademarks of Schneider Electric in France, the USA and other countries. Other trademarks used are the property of their respective owners. Electrical equipment should be installed, operated, serviced, and maintained only by qualified personnel. No responsibility is assumed by Schneider Electric for any consequences arising out of the use of this material. © 2008 Schneider Electric. All rights reserved. External Boolean Module ION Reference Event Priority Group Priority Description Setup Change 10 Setup register or labels have changed. Output Value Written * The Switch output is written. * The priority of this event is determined by the value in the EvPriority setup register. The Event output register stores the following information for each ION event: time stamp, priority, cause, effect, and any values or conditions associated with the cause and effect. Responses to Special Conditions The following table summarizes how the External Boolean module behaves under certain conditions. Page 230 Condition Response of Output Register When the device is started or powered-up (either the first time, or after a shut-down) The Switch output register retains the value it held at shutdown. © 2008 Schneider Electric. All rights reserved. ION REFERENCE 09/2008 External Numeric Module This module provides a numeric register that you can set to a certain value. This can be useful for testing frameworks that have an initial numeric input. For example, if you have created a framework that performs a function based on the value of I avg from the Power Meter module, you can test it with known values before actually linking it to the I avg register. In addition, if your device has Analog Output modules, you can use an External Numeric module to specify the current or voltage you want to deliver to some external equipment. External Numeric Module Numeric Event Inputs External Numeric modules have no inputs; they are controlled via communications. Setup Registers EvPriority (event priority) This register allows you to assign a priority level to the events produced when the output register is written. When EvPriority is zero, no event is written. Output Registers Numeric External Numeric modules have a single numeric register which can be manually controlled via communications. Schneider Electric 2195 Keating Cross Road Saanichton, BC Canada V8M 2A5 Tel: 1-250-652-7100 For technical support: [email protected] (00) + 1 250 544 3010 Contact your local Schneider Electric sales representative for assistance or go to www.powerlogic.com ION, PowerLogic and Schneider Electric are trademarks or registered trademarks of Schneider Electric in France, the USA and other countries. Other trademarks used are the property of their respective owners. Electrical equipment should be installed, operated, serviced, and maintained only by qualified personnel. No responsibility is assumed by Schneider Electric for any consequences arising out of the use of this material. © 2008 Schneider Electric. All rights reserved. External Numeric Module ION Reference Event All events produced by an External Numeric module are written into this register. Possible events and their associated priority numbers are shown in the table below. Event Priority Group Priority Description Setup Change 10 Setup register or labels have changed. Output Value Written * A value is written to the Numeric output register. * The priority of this event is determined by the value in the EvPriority setup register. The Event output register stores the following information for each ION event: time stamp, priority, cause, effect, and any values or conditions. Responses to Special Conditions The following table summarizes how the External Numeric module behaves under certain conditions. Condition When the device is started or powered-up (either the first time, or after a shut-down) Page 232 Response of Output Register The Numeric output register retains the value it held at shutdown. © 2008 Schneider Electric. All rights reserved. ION REFERENCE 09/2008 External Pulse Module This module provides a pulse register that can be configured to pulse on demand. This allows you to manually trigger any module in the device that accepts a pulse input. For example, you can reset counters or timers, or pulse external equipment (if your device has Pulser modules). External Pulse Module Trigger Event Inputs External Pulse modules have no inputs; they are controlled via communications. Setup Registers EvPriority (event priority) This register allows you to assign a priority level to the events produced when the output register is written. When EvPriority is zero, no event is written. Output Registers Trigger External Pulse modules have a single trigger register which is manually controlled via communications. Schneider Electric 2195 Keating Cross Road Saanichton, BC Canada V8M 2A5 Tel: 1-250-652-7100 For technical support: [email protected] (00) + 1 250 544 3010 Contact your local Schneider Electric sales representative for assistance or go to www.powerlogic.com ION, PowerLogic and Schneider Electric are trademarks or registered trademarks of Schneider Electric in France, the USA and other countries. Other trademarks used are the property of their respective owners. Electrical equipment should be installed, operated, serviced, and maintained only by qualified personnel. No responsibility is assumed by Schneider Electric for any consequences arising out of the use of this material. © 2008 Schneider Electric. All rights reserved. External Pulse Module ION Reference Event All events produced by an External Pulse module are written into this register. Possible events and their associated priority numbers are shown in the table below. Event Priority Group Priority Description Setup Change 10 Setup register or labels have changed. Output Value Written * A pulse is written to the Trigger output register. * The priority of this event is determined by the value in the EvPriority setup register. The Event output register stores the following information for each ION event: time stamp, priority, cause, effect, and any values or conditions associated with the cause and effect. Responses to Special Conditions The following table summarizes how the External Pulse module behaves under different conditions. Condition When the module is started or powered-up (either the first time or after a shut-down) Page 234 Response of Output Register Trigger output registers do not “contain” a pulse at startup. © 2008 Schneider Electric. All rights reserved. ION REFERENCE 09/2008 Factory Module The Factory module allows you to view your meter’s type, revision number, serial number, and installed options. Registers are also provided for you to input your name, address or any other information you want to store onboard the meter. Most of the Factory module’s registers contain calibration constants used at the factory. These registers can be viewed but they cannot be changed. Factory Module Event Inputs The Factory module has no programmable inputs. Setup Registers The setup registers available in the Factory module depend on the ION device you are using. Consult your meter user documentation for details. ION Version This read-only register stores the ION version number. NOTE The ION Version does not correlate to firmware versions. Compliance This read-only register stores the ION software compliance of the meter. Schneider Electric 2195 Keating Cross Road Saanichton, BC Canada V8M 2A5 Tel: 1-250-652-7100 For technical support: [email protected] (00) + 1 250 544 3010 Contact your local Schneider Electric sales representative for assistance or go to www.powerlogic.com ION, PowerLogic and Schneider Electric are trademarks or registered trademarks of Schneider Electric in France, the USA and other countries. Other trademarks used are the property of their respective owners. Electrical equipment should be installed, operated, serviced, and maintained only by qualified personnel. No responsibility is assumed by Schneider Electric for any consequences arising out of the use of this material. © 2008 Schneider Electric. All rights reserved. Factory Module ION Reference Device Type This read-only register shows the type of meter that is in operation. Template This read-write register indicates the template (or framework) that is loaded into the meter. Default Template This read-only register indicates the original factory default template of the meter. Metering FW Revision This read-only register is for internal use only. Feature Set This read-only register describes the feature set of the meter. Options This read-only register lists the options included with the attached meter. Revision This read-only register stores the revision number of the meter. Serial Number This read-only register holds the serial number of the meter. Alt PT Prim, Alt PT Sec, Alt CT Prim, Alt CT Sec, Alt I4 Prim, Alt I4 Sec These read-write registers contain alternate scaling values for the PT, CT and I4 primaries and secondaries, to allow scaling of operational values on revenuelocked meters. For more information refer to your meter’s User Guide. Owner This configurable string is available for storing the name of the meter’s owner. Device Name This configurable string is used as the name attribute in the GeneratedBy and Device elements of XML attachments. The default value is "EnterDeviceNameHere" — this must be changed in order to allow the Log Export module to go online (see the Gatewayed Device Name setup register for the Log Export module). The value range can be up to 80 characters with no spaces and no slashes but can include a dash (hyphen) or a dot (period). Device Namespace This configurable string is used as the namespace attribute in the GeneratedBy and Device elements of XML attachments. The default value is "EnterDeviceNamespaceHere" — this must be changed in order to allow the Log Export module to go online (see the Gatewayed Device Namespace setup register for the Log Export module). The value range can be up to 80 characters with no spaces and no slashes but can include a dash (hyphen) or a dot (period). Page 236 © 2008 Schneider Electric. All rights reserved. ION Reference Factory Module NOTE A namespace uniquely identifies a set of names so that there is no ambiguity when objects with different origins but the same names are mixed together. A namespace is commonly given the name of a Uniform Resource Identifier (URI) - such as a web site address - both because the namespace may be associated with the site or page of that URI (for example, a company name) and because a URI is likely to be a unique name. Tag1 This configurable string register is available for storing additional information, such as the name or address of the owner’s organization. Tag2 This configurable string register is available for storing additional information, such as the name or address of the owner’s organization. NomFreq This register contains the expected frequency of operation for the meter. MAC Address This read-only register holds the Media Access Control (MAC) address of the meter. Vnominal, Inominal, V4nominal, I4nominal, I5nominal These registers set the nominal voltage and current used for harmonics calculations when a Harmonics Display Mode or THD Display Mode register is set to PERCENT NOMINAL. For more information on the Display Mode registers, see the Harmonics Measurement and Harmonics Analyzer module descriptions. Modl Period (module period) This register contains the Virtual Processor’s module update period, expressed in milliseconds. Supported range is 50 to 1 x 10⁹ milliseconds. NOTE To change the values for Modl Period, Save Period, Serv Period or Clnt Freq, run the Virtual Processor Setup utility located in the ION Enterprise Management Console under Tools > System > ION Virtual Processor Setup. Save Period (saver period) This register contains the Virtual Processor’s configuration saver period, that is, the period (in seconds) at which VIP.CFG and VIP.BAK are alternately updated. Supported range is 10 to 1 x 10⁹ seconds. Serv Period (server period) This register contains the Virtual Processor’s server polling period, that is, the period (in milliseconds) at which the Virtual Processor server subsystem sends updated information to client nodes. Clnt Freq (client frequency) This register specifies the client polling frequency, that is, how often the Virtual Processor client subsystem polls server nodes for information. © 2008 Schneider Electric. All rights reserved. Page 237 Factory Module ION Reference Calibration Constants The following list of numeric registers displays available calibration constants. Calibration constants are default settings used during factory calibration. Some ION devices do not support some of these registers. V1Ncal I5Ocal_2 I5_Force I5Kcal CT1 V Nominal Alt1 CT1 Cal Const B Alt2 CT1 Name Tag V2Ncal I1Ncal_q I1cal I5Kcalv CT1 Cal Const A Alt1 CT1 Cal Const C Alt2 CT2 Comp Type V3Ncal I2Ncal_q I1Kcal I5Ncal CT1 Cal Const B Alt1 CT1 Name Tag Alt2 CT2 I Nominal V4Ncal I3Ncal_q I1Off I5Ucal CT1 Cal Const C Alt1 CT2 Comp Type Alt2 CT2 V Nominal I1Ncal I1Ocal_q I1Ucal V1cal CT1 Name Tag Alt1 CT2 I Nominal Alt2 CT2 Cal Const A I2Ncal I2Ocal_q I1x20cal V1Ocal CT2 Comp Type Alt1 CT2 V Nominal Alt2 CT2 Cal Const B I3Ncal I3Ocal_q I20nominal V2cal CT2 I Nominal Alt1 CT2 Cal Const A Alt2 CT2 Cal Const C I1Ocal V1Ncal_o I2cal V2Ocal CT2 V Nominal Alt1 CT2 Cal Const B Alt2 CT2 Name Tag I2Ocal V2Ncal_o I2Kcal V3cal CT2 Cal Const A Alt1 CT2 Cal Const C Alt2 CT3 Comp Type I3Ocal V3Ncal_o I2Off V3Ocal CT2 Cal Const B Alt1 CT2 Name Tag Alt2 CT3 I Nominal I4Ocal V4Ncal_o I2Ucal V4Ocal CT2 Cal Const C Alt1 CT3 Comp Type Alt2 CT3 V Nominal I5Ocal I1Ncal_o I2x20cal VX_Force CT2 Name Tag Alt1 CT3 I Nominal Alt2 CT3 Cal Const A V1Ncal_2 I1Ocal_o I3cal Vx1cal CT3 Comp Type Alt1 CT3 V Nominal Alt2 CT3 Cal Const B V2Ncal_2 I2Ncal_o I3Kcal Vx1dc CT3 I Nominal Alt1 CT3 Cal Const A Alt2 CT3 Cal Const C V3Ncal_2 I2Ocal_o I3Ocal Vx2cal CT3 V Nominal Alt1 CT3 Cal Const B Alt2 CT3 Name Tag V4Ncal_2 I3Ncal_o I3Off Vx2dc CT3 Cal Const A Alt1 CT3 Cal Const C CT1bSmooth I1Ncal_2 I3Ocal_o I3Ucal Vx3cal CT3 Cal Const B Alt1 CT3 Name Tag CT1cSmooth I2Ncal_2 I4Ocal_o I3x20cal Vx3dc CT3 Cal Const C Alt2 CT1 Comp Type CT2aSmooth I3Ncal_2 I5Ocal_o I4cal Vx4cal CT3 Name Tag Alt2 CT1 I Nominal CT2bSmooth I1Ocal_2 V_Force I4Kcal Vx4dc Alt1 CT1 Comp Type Alt2 CT1 V Nominal CT2cSmooth I2Ocal_2 V4_Force I4Ncal NomFreqNum Alt1 CT1 I Nominal Alt2 CT1 Cal Const A CT3aSmooth I3Ocal_2 I_Force I4Off CT1 Comp Type Alt1 CT1 V Nominal Alt2 CT1 Cal Const B CT3bSmooth I4Ocal_2 I4_Force I4Ucal CT1 I Nominal Alt1 CT1 Cal Const A Alt2 CT1 Cal Const C CT3cSmooth Page 238 © 2008 Schneider Electric. All rights reserved. ION Reference Factory Module Output Registers Event All events produced by the Factory module are recorded in the Event register. Possible events and their associated priority numbers are shown in the table below. Event Priority Group Setup Change Priority 10 Description Input links, setup registers or labels have changed. The Event output register stores the following information for each ION event: time stamp, priority, cause, effect, and any values or conditions associated with the cause and effect. Responses to Special Conditions The following table summarizes how the Factory module behaves under different conditions. Condition When the meter is started or powered-up (either the first time, or after a shutdown). © 2008 Schneider Electric. All rights reserved. Response of Output Register All output registers retain the values they held when the meter was shutdown. Page 239 Factory Module Page 240 ION Reference © 2008 Schneider Electric. All rights reserved. ION REFERENCE 09/2008 Feedback Module The Feedback module allows you to create circular linkages within an ION module framework. The module outputs a pulse each time it receives a pulse. Feedback Module Pulse Out Source Enable Event Inputs Source This input is linked to the register that you want to Feedback. It can be a pulse register from any other module. Enable When this input is ON, the module is enabled; when it is set to OFF, the module is disabled and pulses received at the Source input are ignored. This input is optional; if you leave it unlinked, the module will be enabled by default. Setup Registers Feedback modules have no setup registers. Output Registers Pulse Out The Pulse Out register echoes the Source input. Pulses received at the Source input are relayed to the Pulse Out register immediately. Schneider Electric 2195 Keating Cross Road Saanichton, BC Canada V8M 2A5 Tel: 1-250-652-7100 For technical support: [email protected] (00) + 1 250 544 3010 Contact your local Schneider Electric sales representative for assistance or go to www.powerlogic.com ION, PowerLogic and Schneider Electric are trademarks or registered trademarks of Schneider Electric in France, the USA and other countries. Other trademarks used are the property of their respective owners. Electrical equipment should be installed, operated, serviced, and maintained only by qualified personnel. No responsibility is assumed by Schneider Electric for any consequences arising out of the use of this material. © 2008 Schneider Electric. All rights reserved. Feedback Module ION Reference Event All events produced by a Feedback module are written into this register. Possible events and their associated priority numbers are shown in the table below. Event Priority Group Setup Change Priority 10 Description Input links or labels have changed. The Event output register stores the following information for each ION event: time stamp, event priority, event's cause, event's effect, and any values or conditions associated with the cause and effect. Detailed Module Operation The Feedback module generates one pulse on its output if one or more pulses occurred on its Source input since the module last operated. Note that this module operates once per second for ION devices. Using the Module The Feedback module is used to create closed-loop, or circular, paths in ION frameworks. This allows you to pulse a module that initiated a process by returning its output pulse to one of its inputs. Some frameworks can be simplified or enhanced with the Feedback module. For example, feedback can be used to automatically reset a Maximum module immediately after a maximum value has been recorded. Without feedback, resets must be performed on preset schedules, or by control actions initiated by system operators. The following diagram shows how a feedback loop can be used to automatically reset a Maximum module after a maximum has been logged. A similar technique can be used to automatically reset Minimum, Counter and Integrator modules. Page 242 © 2008 Schneider Electric. All rights reserved. ION Reference Feedback Module Record and Reset Framework Responses to Special Conditions The following table summarizes how the Feedback module behaves under different conditions. Condition © 2008 Schneider Electric. All rights reserved. Response of Output Register When the module is first created The Pulse Out output will not pulse until the inputs are evaluated. If the Enable input is OFF The Pulse Out output will not pulse. After the module is re-linked The Pulse Out output will not pulse until the inputs are evaluated. Page 243 Feedback Module Page 244 ION Reference © 2008 Schneider Electric. All rights reserved. ION REFERENCE 09/2008 FFT Module The FFT module performs Fast Fourier Transforms on waveforms sampled by the Data Acquisition module. This module prepares the waveforms for input into other harmonics analysis and measurement modules. FFT Module FFT Event Source Enable Inputs Source The Source inputs to each FFT module are factory-linked to the outputs of the Data Acquisition module, and cannot be changed. Enable The Enable input is factory-linked and cannot be altered. Setup Registers The FFT module has no setup registers. Output Registers FFT The output FFTs can be linked to the following modules: Harmonics Analyzer, Harmonics Evaluation, Harmonics Measurement, Mains Signaling Evaluation, Power Harmonics, Symmetrical Components, Transient and Waveform Recorder. Schneider Electric 2195 Keating Cross Road Saanichton, BC Canada V8M 2A5 Tel: 1-250-652-7100 For technical support: [email protected] (00) + 1 250 544 3010 Contact your local Schneider Electric sales representative for assistance or go to www.powerlogic.com ION, PowerLogic and Schneider Electric are trademarks or registered trademarks of Schneider Electric in France, the USA and other countries. Other trademarks used are the property of their respective owners. Electrical equipment should be installed, operated, serviced, and maintained only by qualified personnel. No responsibility is assumed by Schneider Electric for any consequences arising out of the use of this material. © 2008 Schneider Electric. All rights reserved. FFT Module ION Reference Event All events produced by the module are written into this register. Possible events and their associated priority numbers are shown in the table below: Event Priority Group Priority Setup Change 10 Description Input Links, setup registers or labels have been changed. The Event output register stores the following information for each ION event: time stamp, priority, cause, effect, and any values or conditions associated with the cause and effect. Responses to Special Conditions The following table summarizes how the FFT module behaves under different conditions. Condition Page 246 Response of Output Register If the inputs are NOT AVAILABLE The output registers are NOT AVAILABLE. When the device is started or powered-up (either the first time, or after a shut-down) The output registers are NOT AVAILABLE. © 2008 Schneider Electric. All rights reserved. ION REFERENCE 09/2008 Flicker Module A flicker disturbance is a repetitive low-frequency modulation of system voltage; these disturbances are usually caused by a large fluctuating load somewhere within the power system. Lighting systems typically "flicker" when such disturbances occur. The Flicker module measures these flicker disturbances as defined in IEC Standard 61000-4-15. A user-defined model of a typical lighting system is selected, and then the module evaluates short-term (Pst) and long-term (Plt) flicker severity. Flicker Module V1 V2 V3 V1 Delta V2 Delta V3 Delta Volts Mode NomFreq NomF req Phase 1 Pst Phase 1 Plt Phase 2 Pst Phase 2 Plt Phase 3 Pst Phase 3 Plt Pst Update Plt Update Seconds Until Pst Update Seconds Until Plt Update Enable Reset Event Inputs V1, V2, V3 These inputs are linked to the Vln a, Vln b, Vln c outputs respectively of the HS Power Meter module, and cannot be changed. V1 Delta, V2 Delta, V3 Delta These inputs are linked to the Vll ab, Vll bc, Vll ca outputs respectively of the HS Power Meter module, and cannot be changed. VoltsMode This input is linked to the Volts Mode setup register of the Power Meter module, and cannot be changed. The Flicker module behaves differently depending on what Volts Mode setting your meter has. Refer to “Detailed Module Operation” below for details. Schneider Electric 2195 Keating Cross Road Saanichton, BC Canada V8M 2A5 Tel: 1-250-652-7100 For technical support: [email protected] (00) + 1 250 544 3010 Contact your local Schneider Electric sales representative for assistance or go to www.powerlogic.com ION, PowerLogic and Schneider Electric are trademarks or registered trademarks of Schneider Electric in France, the USA and other countries. Other trademarks used are the property of their respective owners. Electrical equipment should be installed, operated, serviced, and maintained only by qualified personnel. No responsibility is assumed by Schneider Electric for any consequences arising out of the use of this material. © 2008 Schneider Electric. All rights reserved. Flicker Module ION Reference NomFreq This input is linked to the NomFreq setup register of the Factory module, and cannot be changed. This input can be used to define which lamp type is being modeled by the Flicker module; refer to the Lamp Type setup register description below. Enable This input enables or disables the Flicker module. Disabling the module sets all the module’s outputs to N/A (NOT AVAILABLE). When the module is re-enabled, the flicker calculations are re-initialized, and the outputs remain N/A until the next full Pst Period expires. The Plt outputs also remain as N/A until the next full Plt Period expires. The module will not respond to any inputs other than Enable or Reset while Enable is FALSE. This input is optional; if you leave it unlinked, the module will be enabled by default. Reset This input discards all the data collected for the pending flicker calculations and sets the Flicker module's Pst and Plt output registers to N/A (NOT AVAILABLE). The Pst output registers remain N/A until the next full Pst Period expires; similarly, the Plt outputs will remain as N/A until the next full Plt Period expires. This input is optional; if you leave it unlinked, the input will never receive a pulse. Setup Registers Pst Period This register defines the number of seconds between successive Pst Update, Phase 1 Pst, Phase 2 Pst, and Phase 3 Pst output register updates. Plt Period This register defines the number of seconds between successive Plt Update, Phase 1 Plt, Phase 2 Plt, and Phase 3 Plt output register updates. Plt Period must be an integer multiple of the Pst Period. Lamp Type This register defines the type of lamp the Flicker module emulates when it calculates flicker severity. The list of available Lamp Type settings contains lamps that comply with IEC Standards and/or Draft IEEE adoptions. Another available setting for Lamp Type includes AUTOMATIC; when AUTOMATIC is selected, the NomFreq input is used to define the characteristics of the emulated Lamp Type. Details on each setting are described in “Detailed Module Operation” below. Output Registers Phase 1 Pst, Phase 2 Pst, Phase 3 Pst These three outputs provide short-term flicker severity over the last Pst Period for Phase 1, Phase 2, and Phase 3 respectively. Note that the definition for each Phase depends on your meter's Volts Mode setting (refer to “Detailed Module Operation”). Page 248 © 2008 Schneider Electric. All rights reserved. ION Reference Flicker Module Seconds Until Pst Update The number of seconds remaining until the Flicker module will produce a new evaluation of Pst for all valid phases. Pst Update This output register will be pulsed when new Pst values are generated on the Phase 1 Pst, Phase 2 Pst, and/or Phase 3 Pst outputs. Phase 1 Plt, Phase 2 Plt, Phase 3 Plt These three outputs provide long-term flicker severity over the last Plt Period for Phase 1, Phase 2, and Phase 3 respectively. Note that the definition for each Phase depends on your meter's Volts Mode setting (refer to “Detailed Module Operation” below). Seconds Until Plt Update The number of seconds remaining until the Flicker module will produce a new evaluation of Plt for all valid phases. Plt Update This output register will be pulsed when new Plt values are generated on the Phase 1 Plt, Phase 2 Plt, and/or Phase 3 Plt outputs. Event Any events produced by the Flicker module are recorded in the Event register. Possible events and their associated priority numbers are shown in the following table. Event Priority Group Setup Change Priority 10 Description Input links, setup registers or labels have changed. The Event output register stores the following information for each ION event: time stamp, priority, cause, effect, and any values or conditions associated with the cause and effect. © 2008 Schneider Electric. All rights reserved. Page 249 Flicker Module ION Reference Detailed Module Operation The Flicker module uses voltage measurements from the High-Speed Power Meter module to provide flicker calculations based on a user-defined lamp type. The module outputs both short-term and long-term flicker severity for up to three phases (the phases are dependent on the Volts Mode setting of your meter; see below). These outputs are predictions of the level of flicker which would be perceived by an observer of a lighting system which is affected by the voltage disturbances. The short-term evaluation of flicker (Pst), usually evaluated over 10 minutes, is an indication of the perceived short-term severity of the flicker. Pst values of 1.0 are commonly accepted as the “threshold of irritability” of a flickering lamp — if Pst is less than 1.0, the flickering of a lamp is not likely to be irritable. The Flicker module collects its Pst results over a longer period (typically 2 hours), and uses this data to calculate a Plt value. Plt values greater than 0.65 indicate that the flickering lamp is likely to be irritable. Lamp Types Flicker severity is a function of the lighting system used — the Flicker module's Lamp Type setup register provides a number of accepted lamp types which are used in an IEC-style flicker measurement system. This setup register also contains an AUTOMATIC setting: the module uses lamps based on the nominal frequency of the power system you are measuring from. Your ION device may contain the following settings for Lamp Type: 230V-50Hz-60W Incandescent The Flicker module will model a 230V, 60W incandescent light bulb for a system voltage frequency of 50Hz. If this setting is used for a 60Hz system, your Pst and Plt evaluations will be erroneous. 120V-60HZ-60W INCANDESCENT (Draft) The Flicker module will model a 120V, 60W incandescent light bulb for a system voltage frequency of 60Hz. If this setting is used for a 50Hz system, your Pst and Plt evaluations will be erroneous. Automatic The Flicker module will determine which lamp type to model based on its NomFreq input as follows: if NomFreq is 50Hz, then the Flicker module will model a 230V, 60W incandescent lamp, as described by IEC Standard 61000-4-15. If NomFreq is 60Hz, then the Flicker module will model a 120V, 60W incandescent lamp, as described in the Draft IEEE adoption of the IEC standard for 120V systems. Volts Mode The Flicker module's VoltsMode input is connected to the Volts Mode setting of your meter's Power Meter module. This setting defines which voltage inputs are used by the module to calculate flicker values, and which outputs will be available from the module as follows: Page 250 © 2008 Schneider Electric. All rights reserved. ION Reference Flicker Module 9S - 4 Wire/Delta or 4W-Wye V1, V2, and V3 inputs are used. All Flicker module outputs are available. 35S - 3 Wire or Delta V1 Delta, V2 Delta, and V3 Delta inputs are used. All Flicker module outputs are available. 36S - 4 Wire Wye or 3W-Wye V1 and V3 inputs are used. Phase 1 Pst, Phase 1 Plt, Phase 3 Pst, Phase 3 Plt outputs are available. Single V1 and V2 inputs are used. Phase 1 Pst, Phase 1 Plt, Phase 2 Pst, Phase 2 Plt outputs are available. Demo No inputs are used. All outputs are N/A. © 2008 Schneider Electric. All rights reserved. Page 251 Flicker Module Page 252 ION Reference © 2008 Schneider Electric. All rights reserved. ION REFERENCE 09/2008 Harmonics Analyzer Module The Harmonics Analyzer module provides detailed harmonics calculations for a voltage or current input on the device. This information is valuable for power quality analysis, selecting properly rated transformers, and fault detection. The Harmonics Analyzer module can have output register values with the following information: individual harmonic distortion Crest-Factor (for current inputs) total harmonic distortion Phasor Magnitude total odd harmonic distortion Phasor Angle total even harmonic distortion Outputs as Percentages K-Factor (for current inputs) NOTE Not all meter models or firmware versions will have all of these outputs -- see the “Output Registers” table for details. Schneider Electric 2195 Keating Cross Road Saanichton, BC Canada V8M 2A5 Tel: 1-250-652-7100 For technical support: [email protected] (00) + 1 250 544 3010 Contact your local Schneider Electric sales representative for assistance or go to www.powerlogic.com ION, PowerLogic and Schneider Electric are trademarks or registered trademarks of Schneider Electric in France, the USA and other countries. Other trademarks used are the property of their respective owners. Electrical equipment should be installed, operated, serviced, and maintained only by qualified personnel. No responsibility is assumed by Schneider Electric for any consequences arising out of the use of this material. © 2008 Schneider Electric. All rights reserved. Harmonics Analyzer Module ION Reference Inputs Enable All Harmonics Analyzer modules have one programmable input called the Enable input. When this register is set to ON, the module is enabled; when it is set to OFF, the module is disabled and it ceases to calculate harmonics and update its output registers. This input is optional; if you leave it unlinked, the module will be enabled by default. The Source input of Harmonics Analyzer modules is fixed. It receives data either from the voltage or current. Setup Registers Harmonics Analyzer modules have the following setup registers: Harmonics Display Mode This register specifies how the individual harmonic distortion output values are displayed. Choices include: Engineering units Percentages of the fundamental, nominal (Factory module) or RMS. THD Display Mode This register specifies how the total harmonic distortion output values are displayed. Choices include percentages of the fundamental, nominal (Factory module) or RMS. Page 254 © 2008 Schneider Electric. All rights reserved. ION Reference Harmonics Analyzer Module Output Registers The output registers of the Harmonics Analyzer modules have the following capabilities: Meter ION7300, ION7330 ION7350 ION7550, ION7650 ION7700 ION8300 ION8400, ION8500 ION8600 ION8800 Total HD • • • • • • • • Tot EvenHD • • • • • • • • Tot OddHD • • • • • • • • K Factor • • • • • • • • • • • • • • • • Output Register Crest Factor • HD1…HDn • • • • Phasor Magnitude • • • Phasor Angle • • • n (the highest harmonic supported) 15 31 63 63 31 63 63* 63 * The highest harmonic (n) supported in the ION8600C meter is 31. HD1...HDn (harmonic distortion 1…n) These registers contain the harmonic distortion of the input for each individual harmonic. Total HD (total harmonic distortion) This register contains the total harmonic distortion of the input. An FFT is performed on the sample waveform to determine the harmonic components of the signals. They are then used in the following formula: 1 Total H D f1 k f n n2 2 100% where: k = the highest harmonic order number n = the harmonic order number f1 = the magnitude of the fundamental fn = the magnitude of the nth harmonic Tot EvenHD (total even harmonics distortion) This register contains the total even harmonic distortion of the input. Tot OddHD (total odd harmonics distortion) This register contains the total odd harmonic distortion of the input. © 2008 Schneider Electric. All rights reserved. Page 255 Harmonics Analyzer Module ION Reference K Factor This register contains the K-Factor of the input signal. It is available only for current inputs. An FFT is performed on the sample current waveform to determine the harmonic components of the signals. They are then used in the following formula: k f n 2 n K Factor n 1 k f where 2 k = the highest harmonic order number n = the harmonic order number fn = the magnitude of the nth harmonic n n 1 Crest Factor This register contains the Crest Factor of the input signal. It is available only for current inputs. Phasor Magnitude This register contains the magnitude, in engineering units, of the fundamental component. It is available for current and voltage inputs. Phasor Angle This register contains the phase, in degrees, of the fundamental component, relative to V1. It is available for current and voltage inputs. HD Outputs as Percentages This boolean register indicates if individual harmonic distortion values are being displayed as percentages. On = YES and Off = NO. Event Any events produced by the Harmonics Analyzer module are recorded in the Event register. Possible events and their associated priority numbers are shown in the table below. Event Priority Group Setup Change Priority 10 Description Input links, setup registers or labels have changed. The Event output register stores the following information for each ION event: time stamp, event priority, event's cause, event's effect, and conditions associated with the event's cause and effect. Page 256 © 2008 Schneider Electric. All rights reserved. ION Reference Harmonics Analyzer Module Effect of Meter Configuration on Harmonics The Volts Mode setting of the devices require PT and CT configurations that prevent the calculation of certain harmonics. The following table outlines these considerations. Volts Mode Setting Affected Harmonics Modules Delta All outputs of V2 and I4 are NOT AVAILABLE. 3W-WYE All outputs of V2 are NOT AVAILABLE. Single Phase All outputs of V3 and I3 are NOT AVAILABLE. Responses to Special Conditions The following table summarizes how the Harmonics Analyzer module behaves under different conditions. Condition Response of Output Register If the Source input is NOT AVAILABLE All output registers are NOT AVAILABLE. If the Enable input is OFF All output registers are NOT AVAILABLE. When the device is started or powered-up (either the first time, or after a shut-down) All output registers are NOT AVAILABLE. If the RMS value or fundamental component is zero *All harmonics for that channel is zero. * Applies to V1, V2, V3, I1, I2, I3. For I4, all harmonics will be zero only if the RMS value is zero. If the fundamental component is zero, the harmonics will be N/A. © 2008 Schneider Electric. All rights reserved. Page 257 Harmonics Analyzer Module Page 258 ION Reference © 2008 Schneider Electric. All rights reserved. ION REFERENCE 09/2008 Harmonics Evaluation Module This module provides statistical data which can be used to evaluate harmonics and inter-harmonics standards compliance. The Harmonics Evaluation module receives its input from an FFT module (either voltage or current), analyzes the harmonics and inter-harmonics, and provides evaluation data. Harmonics Evaluation Module Source Max Demand Valid Evaluate Enable Reset Num Valid Num Invalid Num Exceeded Num TD Exceed Event Inputs Source The Source input must be linked to the FFT output of an FFT module (typically a voltage FFT). Max Demand If this input is linked, the module will calculate its distortion percentages based on this input; this input is typically used when calculating TDD. If left unlinked, the module will calculate distortion percentages based on the magnitude of the fundamental. Linking this input is optional. Valid When the Evaluate input is pulsed, the module checks the state of Valid, and updates the output registers accordingly; refer to “Detailed Module Operation” below. Linking this input is optional. Schneider Electric 2195 Keating Cross Road Saanichton, BC Canada V8M 2A5 Tel: 1-250-652-7100 For technical support: [email protected] (00) + 1 250 544 3010 Contact your local Schneider Electric sales representative for assistance or go to www.powerlogic.com ION, PowerLogic and Schneider Electric are trademarks or registered trademarks of Schneider Electric in France, the USA and other countries. Other trademarks used are the property of their respective owners. Electrical equipment should be installed, operated, serviced, and maintained only by qualified personnel. No responsibility is assumed by Schneider Electric for any consequences arising out of the use of this material. © 2008 Schneider Electric. All rights reserved. Harmonics Evaluation Module ION Reference Enable This input enables or disables the module’s operation. If this input is set to FALSE, then the outputs will not be updated, and pulses at the Evaluate input will be ignored. This input is optional; if you leave it unlinked, the module will be enabled by default. Evaluate A pulse at this input triggers the module to perform its statistical evaluation, and update its output registers. This input must be linked for the module to go online. Reset This input resets the module’s outputs to NOT AVAILABLE until the next evaluation occurs. Linking this input is optional; if you leave it unlinked, the input will never receive a pulse. Setup Registers Limits This register specifies the allowable threshold percentages for the individual harmonic/inter-harmonic frequencies. Each harmonic frequency’s (#2 to #40) threshold is entered into this string register as follows: hNN-XX.XXX;hMM-YY.YYY, where NN and MM are harmonic numbers (2 to 40), XX.XXX and YY.YYY are threshold percentages (0 to 100). For example, if you want to specify the 2nd harmonic threshold as 1.4%, the 3rd harmonic threshold as 2.1%, and the 5th harmonic threshold as 6.2%, the Limits setup register string would read h2-1.4;h3-2.1;h5-6.2. If no value is specified for a harmonic, then it will not be evaluated. More than one specification for a single harmonic is not permitted. The same syntax applies when the module is operating in inter-harmonics mode (refer to the Eval Type setup register). The only distinction is that h2 refers to the inter-harmonic frequencies between the fundamental and the 2nd harmonic. Similarly, h3 refers to the frequencies between the 2nd and 3rd harmonic. TD Limit This register specifies the allowable threshold for total distortion (either THD or TDD, depending on whether the Max Demand input is linked) as a percentage. This register is ignored if the module is evaluating inter-harmonics (see Eval Type below). NOTE TDD = Total Demand Distortion, THD = Total Harmonic Distortion Page 260 © 2008 Schneider Electric. All rights reserved. ION Reference Harmonics Evaluation Module Eval Type This register specifies whether the module is performing a harmonic or an interharmonic evaluation. EvPriority This register allows you to set a custom priority level to certain events written to the Event output register. When EvPriority is zero, no event is written. Refer to the Event output register description for details. Output Registers Num Valid Number of valid evaluation periods; refer to “Detailed Module Operation” below. Num Exceed The number of evaluation intervals (with sufficient valid samples) where one or more of the individual frequencies exceeded their specified limits. Num Invalid Number of invalid evaluation periods; refer to “Detailed Module Operation” below. Num TD Exceed The number of evaluation intervals (with sufficient valid samples) where the TD value exceeded its specified limit. This output is NOT AVAILABLE during interharmonic evaluation. Event All events produced by the module are written into this register. Possible events and their associated priority numbers are shown in the table below: Event Priority Group Priority Description Setup Change 10 Inputlinks, setup registers or labels have been changed. Num Exceeded Event * The Num Exceeded counter was incremented. Num TD Exceeded Event * The Num TD Exceeded counter was incremented. * The Priority of these Events is defined by the Event Priority setup register. The Event output register stores the following information for each ION event: time stamp, priority, cause, effect, and any values or conditions associated with the cause and effect. © 2008 Schneider Electric. All rights reserved. Page 261 Harmonics Evaluation Module ION Reference Detailed Module Operation The Harmonics Evaluation module compares the Source input, averaged between evaluation pulses, to the limits specified in the setup register. Once Evaluate is pulsed, the module checks the state of the Valid input. If Valid is FALSE, then the Num Invalid is incremented. If Valid is TRUE then the module calculates the average value for each frequency, compares each against the Limit, and increments the Num Exceed output register if required. In harmonics mode, if the TD value is beyond its bound, then the Num TD Exceeded counter is incremented (the Num TD Exceeded counter reads NOT AVAILABLE in inter-harmonics mode). Response to Special Conditions A pulse on the reset input causes the module outputs to be reset to zero. Averaging will begin at the start of the next one-second interval. Page 262 © 2008 Schneider Electric. All rights reserved. ION REFERENCE 09/2008 Harmonics Measurement Module This module measures the magnitude and phase of harmonic frequencies. Alternatively, the Harmonics Measurement module can be set to provide the magnitude of inter-harmonic frequencies. Total Harmonic Distortion (THD), Total Even Harmonic Distortion (TEHD), and Total Odd Harmonic Distortion (TOHD) are always calculated; THDcap and THDind are calculated if you are measuring voltage. There are no phase or Total measurements offered when the module is set to evaluate inter-harmonics. Inputs Source The Source can only be linked to the FFT output of a FFT (V1, V2, V3, I1, I2, or I3 FFT) module. Schneider Electric 2195 Keating Cross Road Saanichton, BC Canada V8M 2A5 Tel: 1-250-652-7100 For technical support: [email protected] (00) + 1 250 544 3010 Contact your local Schneider Electric sales representative for assistance or go to www.powerlogic.com ION, PowerLogic and Schneider Electric are trademarks or registered trademarks of Schneider Electric in France, the USA and other countries. Other trademarks used are the property of their respective owners. Electrical equipment should be installed, operated, serviced, and maintained only by qualified personnel. No responsibility is assumed by Schneider Electric for any consequences arising out of the use of this material. © 2008 Schneider Electric. All rights reserved. Harmonics Measurement Module ION Reference Max Demand If this input is linked, the module will calculate its THD, TEHD, and TOHD percentages based on this input (i.e. total demand distortion). Otherwise, it will calculate them based on the magnitude of the fundamental. Linking this input is optional. NOTE This input is only used if the Display Mode is set to ‘Magnitude Outputs Displayed as Percentages’ or the THD Display Mode is set to ‘Percentages’. Evaluate A pulse at this input triggers the module to perform its statistical evaluation, and update its output registers. The phase, THDcap, and THDind outputs are not available when this input is active. If this input is not linked, the module updates its outputs as it did previously. This input cannot be linked when Aggregate Mode is set to 4-30 150/180 Cycle mode or 4-30 10 Minute mode. This input is intended to be pulsed at either 15 second or 10 minute intervals. Setup Registers Measure Type This setup register specifies whether the module is performing a harmonics or inter-harmonics measurement. Aggregate Mode (or Aggregation Method) If the Evaluate input is linked, this setup register specifies whether output values represent either: maximum Tvs values, or average Tvs values. If the Evaluate input is unlinked and 'Tvs Aggregation' or 'Tvs Maximums' is selected, the Aggregation method will default to 4-30 150/180 Cycle. If '4-30 150/180 Cycle' or '4-30 10 Minute' is selected, the Evaluate input cannot be linked. Display Mode (or Calculation Type) This setup register specifies how the individual magnitude output values are displayed. Choices include: Engineering units Percentages - displayed as percent of the Max Demand input (if this is linked), and percent of fundamental if not linked. Percent of the fundamental, nominal (Factory module) or RMS. THD Display Mode This setup register specifies how the total harmonics output values (THD, TOHD and TEHD) are displayed. Choices include: Page 264 © 2008 Schneider Electric. All rights reserved. ION Reference Harmonics Measurement Module Percentages - displayed as percent of the Max Demand input (if this is linked), and percent of fundamental if not linked. Percent of the fundamental, nominal (Factory module) or RMS. Output Registers Magnitude 1 to Magnitude 50 These 50 output registers provide the magnitude of each harmonic or interharmonic. When the module is operating in inter-harmonics mode, magnitude identifies the signal component between the (n-1) and (nth) harmonic; for example, Magnitude 2 specifies the inter-harmonic band between the fundamental and the 2 nd harmonic. Phase 1 to Phase 50 These 50 output registers provide the phase angle of each harmonic; the angles are relative to the angle of the fundamental of V1. This measurement is not available when the Measure Type is set to evaluate inter-harmonics. Total HD (150 180 Cycles) The phase signal's total harmonic distortion. This measurement is not available when the Measure Type is set to evaluate inter-harmonics. Total Ind HD The phase signal's total inductive harmonic distortion. This measurement is not available when the Measure Type is set to evaluate inter-harmonics or connected to a Current FFT module. Total Cap HD The phase signal's total capacitive harmonic distortion. This measurement is not available when the Measure Type is set to evaluate inter-harmonics or connected to a Current FFT module. Total Even HD (total even harmonics distortion) This register contains the total even harmonic distortion of the input. Total Odd HD (total odd harmonics distortion) This register contains the total odd harmonic distortion of the input. Event All events produced by the module are written into this register. Possible events and their associated priority numbers are shown in the table below: Event Priority Group Priority Setup Change 10 Description Input links, setup registers or labels have been changed. The Event output register stores the following information for each ION event: time stamp, priority, cause, effect, and any values or conditions associated with the cause and effect. © 2008 Schneider Electric. All rights reserved. Page 265 Harmonics Measurement Module ION Reference Detailed Module Operation The module performs harmonic analysis using the method outlined in the standard IEC 61000-4-7 Harmonic and interharmonics Class I and II. The frequency resolution is 5 Hz. NOTE Magnitude and Phase outputs are accessible on the ION7550 / ION7650 meter’s Harmonics display using the buttons on the meter's front panel. Page 266 © 2008 Schneider Electric. All rights reserved. ION REFERENCE 09/2010 IEC 61850 GGIO Cust AI Module The IEC 61850 GGIO Custom Analog module can be configured to map up to 16 user-selected ION numeric register values into IEC 61850 analog values. Only one instance of this module can exist. Because this module is specific to supporting the IEC 61850 protocol, it can be deleted if IEC 61850 is not required. For more information about IEC 61850, please refer to the IEC 61850 and ION Technology protocol document. Schneider Electric 2195 Keating Cross Road Saanichton, BC Canada V8M 2A5 Tel: 1-250-652-7100 For technical support: [email protected] (00) + 1 250 544 3010 Contact your local Schneider Electric sales representative for assistance or go to www.powerlogic.com ION, PowerLogic and Schneider Electric are trademarks or registered trademarks of Schneider Electric in France, the USA and other countries. Other trademarks used are the property of their respective owners. Electrical equipment should be installed, operated, serviced, and maintained only by qualified personnel. No responsibility is assumed by Schneider Electric for any consequences arising out of the use of this material. © 2010 Schneider Electric. All rights reserved. IEC 61850 GGIO Cust AI Module ION Reference Inputs The GGIO Custom Analog module is configurable through ION software to map up to 16 analog values from ION to IEC 61850. Analog Input 1-16 These registers can be connected to any numeric register. Setup Registers The GGIO Custom Analog module has no setup registers. Output Registers These registers are formatted and named according to IEC 61850 protocol standards. Modifying these register labels may cause issues with your IEC 61850 data. AnIn1.instMag ... AnIn16.instMag These registers contain the Analog Input 1 - 16 input values,. AnIn1.mag ... AnIn16.mag These registers are taken from the Analog Input 1 - 16 inputs, and are used in IEC 61850 for deadband and report triggering functions. Page 268 © 2010 Schneider Electric. All rights reserved. ION REFERENCE 09/2010 IEC 61850 GGIO Cust DI Module The IEC 61850 GGIO Custom Digital module can be configured to map up to 16 user-selected ION Boolean register values into IEC 61850 digital values. Only one instance of this module can exist. Because this module is specific to supporting the IEC 61850 protocol, it can be deleted if IEC 61850 is not required. For more information about IEC 61850, please refer to the IEC 61850 and ION Technology protocol document. Schneider Electric 2195 Keating Cross Road Saanichton, BC Canada V8M 2A5 Tel: 1-250-652-7100 For technical support: [email protected] (00) + 1 250 544 3010 Contact your local Schneider Electric sales representative for assistance or go to www.powerlogic.com ION, PowerLogic and Schneider Electric are trademarks or registered trademarks of Schneider Electric in France, the USA and other countries. Other trademarks used are the property of their respective owners. Electrical equipment should be installed, operated, serviced, and maintained only by qualified personnel. No responsibility is assumed by Schneider Electric for any consequences arising out of the use of this material. © 2010 Schneider Electric. All rights reserved. IEC 61850 GGIO Cust DI Module ION Reference Inputs The GGIO Custom Digital module is configurable through ION software to map up to 16 digital values from ION to IEC 61850. Digital Input 1-16 These registers can be connected to any boolean register. Setup Registers The GGIO Custom Digital module has no setup registers. Output Registers These registers are formatted and named according to IEC 61850 protocol standards. Modifying these register labels may cause issues with your IEC 61850 data. Ind1.stVal ... Ind16.stVal These registers contain the Digital Input 1 - 16 input values. Event Events produced by the module are recorded in the Event register. Possible events and their associated priority numbers are shown in the following table. Event Priority Group Priority Description Reset 5 A module reset has occurred. Setup Change 10 Input links, setup registers or labels have changed. Information 25 NOT AVAILABLE AVAILABLE. input caused output to go NOT The Event output register stores the following information for each ION event: time stamp, priority, cause, effect, and any values or conditions associated with the cause and effect. Page 270 © 2010 Schneider Electric. All rights reserved. ION REFERENCE 09/2010 IEC 61850 GGIO Exp Module The IEC 61850 GGIO Expansion I/O module represents the GGIO_Exp Logical Node in the IEC 61850 protocol. It maps the appropriate ION values to the IEC 61850 counterparts. The GGIO_Exp Logical Node provides status information for up to 4 analog inputs and 8 digital inputs, depending on the physical input/ output expansion option on your meter. This module allows IEC 61850 control of the outputs. Only one instance of this module can exist. Because this module is specific to supporting the IEC 61850 protocol, it can be deleted if IEC 61850 is not required. NOTE This module is configured as part of the meter’s implementation of the IEC 61850 protocol and should only be undertaken by personnel with a thorough understanding of ION and IEC 61850 protocols, and the system in which the meter is installed. For more information about IEC 61850, please refer to the IEC 61850 and ION Technology protocol document. Schneider Electric 2195 Keating Cross Road Saanichton, BC Canada V8M 2A5 Tel: 1-250-652-7100 For technical support: [email protected] (00) + 1 250 544 3010 Contact your local Schneider Electric sales representative for assistance or go to www.powerlogic.com ION, PowerLogic and Schneider Electric are trademarks or registered trademarks of Schneider Electric in France, the USA and other countries. Other trademarks used are the property of their respective owners. Electrical equipment should be installed, operated, serviced, and maintained only by qualified personnel. No responsibility is assumed by Schneider Electric for any consequences arising out of the use of this material. © 2010 Schneider Electric. All rights reserved. IEC 61850 GGIO Exp Module ION Reference Inputs The GGIO Expansion I/O module inputs are designed to be connected to the outputs of the Analog Input and Digital Input modules, depending on the physical I/O expansion option of the meter and the Control Mode setup register settings. NOTE Use the IEC 61850 CID file that matches your meter’s I/O expansion option. Analog Input 1-4 These registers are connected to the ScaledValu output register of the Analog Input module, which reflects the scaled version of the analog input value. These registers are only valid when configuring meter I/O expansion cards that have analog inputs. Digital Input 1-8 These registers are connected to the State outputs of the Digital Input modules, which reflect the current state of the Digital Input module’s Source input. These registers are only valid when configuring meter I/O expansion cards that have digital inputs. Setup Registers The IEC 61850 GGIO Expansion module has no setup registers. Page 272 © 2010 Schneider Electric. All rights reserved. ION Reference IEC 61850 GGIO Exp Module Output Registers These registers are formatted and named according to IEC 61850 protocol standards. AnIn1.instMag ... AnIn4.instMag These registers contain the instantaneous value of the analog inputs, and are taken from the Analog Input 1 - 4 inputs. AnIn1.mag ... AnIn4.mag These registers contain the deadbanded value of the analog inputs, taken from IEC 61850 and from the Analog Input 1 - 4 input registers. ISCS01.stVal ... ISCS04.stVal These registers are the value of the analog outputs, taken from IEC 61850. Refer to “Detailed Module Operation” for more information. Ind1.stVal ... Ind8.stVal These registers are the status of Digital Input modules 1 through 8, taken from the Digital Input 1-8 inputs. Event Events produced by the module are recorded in the Event register. Possible events and their associated priority numbers are shown in the following table. Event Priority Group Priority Description Reset 5 A module reset has occurred. Setup Change 10 Input links, setup registers or labels have changed. Information 25 NOT AVAILABLE AVAILABLE. input caused output to go NOT The Event output register stores the following information for each ION event: time stamp, priority, cause, effect, and any values or conditions associated with the cause and effect. © 2010 Schneider Electric. All rights reserved. Page 273 IEC 61850 GGIO Exp Module ION Reference Detailed Module Operation The GGIO Expansion I/O module allows IEC 61850 control of the Analog Output modules. Analog Output module control through IEC 61850 HAZARD OF UNINTENDED OPERATION • Do not use ION meters for critical control or protection applications where human or equipment safety relies on the operation of the control circuit. • The electrical signal on the output port is DC. Make sure proper polarity is observed when wiring external devices to the analog output ports. • Be sure that you are familiar with the warnings at the beginning of this document, as well as those presented in your meter’s technical documentation. Failure to follow these instructions can result in death, serious injury or equipment damage. For IEC 61850 control of the Analog Output module, the associated IEC 61850 control attribute (ctlval) is taken from IEC 61850 and written to the corresponding ISCSO.stVal output register. The ISCSO.stVal output register is connected to the Source input register on the Analog Output module, which controls the state of the meter’s analog output. Page 274 © 2010 Schneider Electric. All rights reserved. ION REFERENCE 09/2010 IEC 61850 GGIO Onb Module The IEC 61850 GGIO Onboard I/O module represents the GGIO_Onb Logical Node in the IEC 61850 protocol. It maps the appropriate ION values to the IEC 61850 counterparts. The GGIO_Onb Logical Node provides status information for the 8 onboard digital inputs and control capability or status information for the 7 onboard digital outputs, and can be used for IEC 61850 digital output control. Only one instance of this module can exist. Because this module is specific to supporting the IEC 61850 protocol, it can be deleted if IEC 61850 is not required. NOTE This module is configured as part of the meter’s implementation of the IEC 61850 protocol and should only be undertaken by personnel with a thorough understanding of ION and IEC 61850 protocols and the system in which the meter is installed. For more information about IEC 61850, please refer to the IEC 61850 and ION Technology protocol document. Schneider Electric 2195 Keating Cross Road Saanichton, BC Canada V8M 2A5 Tel: 1-250-652-7100 For technical support: [email protected] (00) + 1 250 544 3010 Contact your local Schneider Electric sales representative for assistance or go to www.powerlogic.com ION, PowerLogic and Schneider Electric are trademarks or registered trademarks of Schneider Electric in France, the USA and other countries. Other trademarks used are the property of their respective owners. Electrical equipment should be installed, operated, serviced, and maintained only by qualified personnel. No responsibility is assumed by Schneider Electric for any consequences arising out of the use of this material. © 2010 Schneider Electric. All rights reserved. IEC 61850 GGIO Onb Module ION Reference Inputs The GGIO Onboard I/O module inputs are designed to be connected to the outputs of the Digital Input modules and the Digital Output modules. Digital Output Status 1-7 These registers must be connected to the State outputs of the Digital Output modules for the meter’s onboard digital outputs if the corresponding Control Mode setup register is set to ION INPUT. These registers must not be connected if the corresponding Control Mode setup register is set to IEC 61850 CTLVAL. Refer to “Detailed Module Operation” for more information. NOTE Certain onboard digital outputs are not accessible through IEC 61850. Digital Input 1-8 These registers are connected to the State outputs of the Digital Input modules for the meter’s onboard digital inputs), which reflect the current debounced state of the digital input. Setup Registers SPCS01 - SPCS07 Control Mode This register determines the source of the SPCSO1.stVal - SPCSO7.stVal output register values as follows: If Control Mode is set to ION INPUT, the corresponding SPCSO.ctVal output register value is taken from the Digital Output Status input register. If Control Mode is set to IEC 61850 CTLVAL, the corresponding SPCSO.ctVal output register value is taken from IEC 61850. Refer to “Detailed Module Operation” for more information. Page 276 © 2010 Schneider Electric. All rights reserved. ION Reference IEC 61850 GGIO Onb Module Output Registers These registers are formatted and named according to IEC 61850 protocol standards. SPCS01.stVal ... SPCS07.stVal These registers are the status of onboard digital outputs, either taken from the Digital Output Status input register or from IEC 61850, depending in the corresponding Control Mode setup register value. Refer to “Detailed Module Operation” for more information. Ind1.stVal ... Ind8.stVal These registers are the status of the onboard digital inputs, taken from the Digital Input 1-8 registers. Event Events produced by the module are recorded in the Event register. Possible events and their associated priority numbers are shown in the following table. Event Priority Group Priority Description Reset 5 A module reset has occurred. Setup Change 10 Input links, setup registers or labels have changed. Information 25 NOT AVAILABLE AVAILABLE. input caused output to go NOT The Event output register stores the following information for each ION event: time stamp, priority, cause, effect, and any values or conditions associated with the cause and effect. © 2010 Schneider Electric. All rights reserved. Page 277 IEC 61850 GGIO Onb Module ION Reference Detailed Module Operation The GGIO Onboard I/O module allows IEC 61850 to control the meter’s Digital Output modules, or to read the status of the meter’s Digital Output modules, depending on the SPCSO Control Mode setup register value. NOTE The Digital Input and Digital Output modules must be completely configured in order for IEC 61850 status or control functions to work properly. Digital Output module control through IEC 61850 HAZARD OF UNEXPECTED DIGITAL OUTPUT STATE CHANGE • Do not use ION meters for critical control or protection applications where human or equipment safety relies on the operation of the control circuit. • An unexpected change of state of the digital outputs can result when the supply power to the meter is interrupted or after a meter firmware upgrade. • Be sure that you are familiar with the warnings at the beginning of this document, as well as those presented in your meter’s technical documentation. Failure to follow these instructions can result in death, serious injury or equipment damage. If the SPCSO Control Mode setup register is set to IEC 61850 CTLVAL, the associated IEC 61850 control attribute (ctlval) is taken from IEC 61850 and written to the corresponding SPCSO.stVal output register. The SPCSO.stVal output register is connected to the Source input register on the Digital Output module, which controls the state of the meter’s digital output. The associated Digital Output Status input must not be linked, or else the module will not go online. Page 278 © 2010 Schneider Electric. All rights reserved. ION Reference IEC 61850 GGIO Onb Module Digital Output module status to IEC 61850 If the SPCSO Control Mode setup register is set to ION, the Digital Output Status input register is connected to the Digital Output module’s State output register. The SPCSO.stVal output register is taken from the associated Digital Output Status input register value. The Digital Output status is read by IEC 61850 © 2010 Schneider Electric. All rights reserved. Page 279 IEC 61850 GGIO Onb Module Page 280 ION Reference © 2010 Schneider Electric. All rights reserved. ION REFERENCE 09/2010 IEC 61850 MHAI Module The IEC 61850 MHAI module represents the Harmonics (MHAI) Logical Node in IEC 61850 protocol. It maps the appropriate ION values to their IEC 61850 counterparts. The MHAI Logical Node provides calculated harmonics and related values for voltage and current. These values are generally used for power quality purposes.Only one instance of this module can exist. Because this module is specific to supporting the IEC 61850 protocol, it can be deleted if IEC 61850 is not required. For more information about IEC 61850, please refer to the IEC 61850 and ION Technology protocol document. NOTE In this graphic, the output registers for the magnitude and instantaneous magnitude are represented as a single register. Please refer to the Output Registers section for details. Schneider Electric 2195 Keating Cross Road Saanichton, BC Canada V8M 2A5 Tel: 1-250-652-7100 For technical support: [email protected] (00) + 1 250 544 3010 Contact your local Schneider Electric sales representative for assistance or go to www.powerlogic.com ION, PowerLogic and Schneider Electric are trademarks or registered trademarks of Schneider Electric in France, the USA and other countries. Other trademarks used are the property of their respective owners. Electrical equipment should be installed, operated, serviced, and maintained only by qualified personnel. No responsibility is assumed by Schneider Electric for any consequences arising out of the use of this material. © 2010 Schneider Electric. All rights reserved. IEC 61850 MHAI Module ION Reference NOTE This module is configured as part of the meter’s implementation of the IEC 61850 protocol. Manual creation and configuration of this module, or modification of an existing module, is an advanced feature that should only be undertaken by personnel with a thorough understanding of ION and IEC 61850 protocols, and the system in which the meter is installed. Inputs By default, the MHAI module inputs are the outputs of Harmonics Measurement module (if present), the Harmonics Analyzer module, and the Power Meter module. This module uses values from the Harmonics Analyzer modules, as these modules are present in all supported ION meters. If Harmonics Measurement modules are available, their values will be used instead. Please refer to “Detailed Module Operation” on page 286. V1 HAR ... V4 HAR These registers are connected to any numeric output register on the corresponding Harmonics Analyzer module. Refer to “Detailed Module Operation” on page 286 for more information. I1 HAR ... I5 HAR These registers are connected to any numeric output register on the corresponding Harmonics Analyzer module. Refer to “Detailed Module Operation” on page 286 for more information. V1 HME ... V3 HME These registers are connected to any numeric output register on the corresponding Harmonics Measurement module (if the Harmonics Measurement module is present). These registers must either be all connected or all disconnected to their corresponding Harmonics Measurement modules for the MHAI module to go online. Refer to “Detailed Module Operation” on page 286 for more information. I1 HME ... I3 HME These registers are connected to any numeric output register on the corresponding Harmonics Measurement module (if the Harmonics Measurement module is present). These registers must either be all connected or all disconnected to their corresponding Harmonics Measurement modules for the MHAI module to go online.Refer to “Detailed Module Operation” on page 286 for more information. Freq This input is linked to the Freq output register on the Power Meter module, which contains the system frequency (fundamental frequency of phase A voltage). NOTE The Hz input is not affected by the Harmonics Measurement or Harmonics Analyzer modules. Page 282 © 2010 Schneider Electric. All rights reserved. ION Reference IEC 61850 MHAI Module Setup Registers The MHAI module has no setup registers. Output Registers These registers are formatted and named according to IEC 61850 protocol standards. By default, this module uses values from the Harmonics Analyzer modules, as these modules are present in all supported ION meters. If Harmonics Measurement modules are available, their values will be used instead. Please refer to “Detailed Module Operation” on page 286. NOTE The IEC 61850 harmonics arrays are only available using IEC 61850 protocol. Refer to “Detailed Module Operation” on page 286 for more information. Hz.instMag, Hz.mag These registers contain the instantaneous and deadbanded values for system frequency. Units are Hz. NOTE The system frequency outputs are not affected by the Harmonics Measurement or Harmonics Analyzer modules. Hkf.phsA.instCVal, Hkf.phsA.cVal, Hkf.phsB.instCVal, Hkf.phsB.cVal, Hkf.phsC.instCVal, Hkf.phsC.cVal, Hkf.neut.instCVal, Hkf.neut.cVal, Hkf.net.instCVal, Hkf.net.cVal These registers contain the instantaneous and deadbanded K factor values for phases A, B and C, including neutral and net values. Depending on the Power Meter module’s Volts Mode, some or all of these registers may be NOT AVAILABLE. Refer to the Power Meter module for more information. ThdA.phsA.instCVal, ThdA.phsA.cVal, ThdA.phsB.instCVal, ThdA.phsB.cVal ThdA.phsC.instCVal, ThdA.phsC.cVal, ThdA.neut.instCVal, ThdA.neut.cVal ThdA.net.instCVal, ThdA.net.cVal These registers contain the instantaneous and deadbanded values for current total harmonic distortion for phases A, B and C, including neutral and net values. Depending on the Power Meter module’s Volts Mode, some or all of these registers may be NOT AVAILABLE. Refer to the Power Meter module for more information. © 2010 Schneider Electric. All rights reserved. Page 283 IEC 61850 MHAI Module ION Reference ThdOddA.phsA.instCVal, ThdOddA.phsA.cVal, ThdOddA.phsB.instCVal, ThdOddA.phsB.cVal, ThdOddA.phsC.instCVal, ThdOddA.phsC.cVal, ThdOddA.neut.instCVal, ThdOddA.neut.cVal, ThdOddA.net.instCVal, ThdOddA.net.cVal These registers contain the instantaneous and deadbanded values for current total odd harmonic distortion for phases A, B and C, including neutral and net values. Depending on the Power Meter module’s Volts Mode, some or all of these registers may be NOT AVAILABLE. Refer to the Power Meter module for more information. ThdEvnA.phsA.instCVal, ThdEvnA.phsA.cVal, ThdEvnA.phsB.instCVal, ThdEvnA.phsB.cVal, ThdEvnA.phsC.instCVal, ThdEvnA.phsC.cVal, ThdEvnA.neut.instCVal, ThdEvnA.neut.cVal, ThdEvnA.net.instCVal, ThdEvnA.net.cVal These registers contain the instantaneous and deadbanded values for current total even harmonic distortion for phases A, B and C, including neutral and net values. Depending on the Power Meter module’s Volts Mode, some or all of these registers may be NOT AVAILABLE. Refer to the Power Meter module for more information. ThdPhV.phsA.instCVal, ThdPhV.phsA.cVal, ThdPhV.phsB.instCVal, ThdPhV.phsB.cVal, ThdPhV.phsC.instCVal, ThdPhV.phsC.cVal, ThdPhV.neut.instCVal, ThdPhV.neut.cVal These registers contain the instantaneous and deadbanded values for voltage total harmonic distortion for phases A, B and C, including neutral values. Depending on the Power Meter module’s Volts Mode, some or all of these registers may be NOT AVAILABLE. Refer to the Power Meter module for more information. ThdOddPhV.phsA.instCVal, ThdOddPhV.phsA.cVal, ThdOddPhV.phsB.instCVal, ThdOddPhV.phsB.cVal, ThdOddPhV.phsC.instCVal, ThdOddPhV.phsC.cVal, ThdOddPhV.neut.instCVal, ThdOddPhV.neut.cVal These registers contain the instantaneous and deadbanded values for voltage total odd harmonic distortion for phases A, B and C, including neutral values. Depending on the Power Meter module’s Volts Mode, some or all of these registers may be NOT AVAILABLE. Refer to the Power Meter module for more information. ThdEvnPhV.phsA.instCVal, ThdEvnPhV.phsA.cVal, ThdEvnPhV.phsB.instCVal, ThdEvnPhV.phsB.cVal, ThdEvnPhV.phsC.instCVal, ThdEvnPhV.phsC.cVal, ThdEvnPhV.neut.instCVal, ThdEvnPhV.neut.cVal These registers contain the instantaneous and deadbanded values for voltage total even harmonic distortion for phases A, B and C, including neutral values. Depending on the Power Meter module’s Volts Mode, some or all of these registers may be NOT AVAILABLE. Refer to the Power Meter module for more information. HCfA.phsA.instCVal, HCfA.phsA.cVal, HCfA.phsB.instCVal, HCfA.phsB.cVal, HCfA.phsC.instCVal, HCfA.phsC.cVal, HCfA.neut.instCVal, HCfA.neut.cVal, HCfA.net.instCVal, HCfA.net.cVal These registers contain the instantaneous and deadbanded values for current crest factors for phases A, B and C, including neutral and net values. Depending on the Power Meter module’s Volts Mode, some or all of these registers may be NOT AVAILABLE. Refer to the Power Meter module for more information. Page 284 © 2010 Schneider Electric. All rights reserved. ION Reference IEC 61850 MHAI Module ThdPPV.phsAB.instCVal, ThdPPV.phsAB.cVal, ThdPPV.phsBC.instCVal, ThdPPV.phsBC.cVal, ThdPPV.phsCA.instCVal, ThdPPV.phsCA.cVal These registers contain the instantaneous and deadbanded values for voltage total harmonic distortion for phases A, B and C. ThdOddPPV.phsAB.instCVal, ThdOddPPV.phsAB.cVal, ThdOddPPV.phsBC.instCVal, ThdOddPPV.phsBC.cVal, ThdOddPPV.phsCA.instCVal, ThdOddPPV.phsCA.cVal These registers contain the instantaneous and deadbanded values for voltage total odd harmonic distortion for phases A, B and C. ThdEvnPPV.phsAB.instCVal, ThdEvnPPV.phsAB.cVal, ThdEvnPPV.phsBC.instCVal, ThdEvnPPV.phsBC.cVal, ThdEvnPPV.phsCA.instCVal, ThdEvnPPV.phsCA.cVal These registers contain the instantaneous and deadbanded values for voltage total even harmonic distortion for phases A, B and C. © 2010 Schneider Electric. All rights reserved. Page 285 IEC 61850 MHAI Module ION Reference Detailed Module Operation By default, the MHAI module inputs are linked to Harmonics Analyzer modules, which are present on all supported meters. The MHAI module inputs are also connected to Harmonics Measurement modules if they are present on your meter. Values from the Harmonics Measurement modules are used preferentially if they are available; otherwise the values from the Harmonics Analyzer modules are used, as shown in the following table. MHAI Output register 1 ION Module Name Harmonics Analyzer Module register Harmonics Measurement Module register (used if present) Hkf.phsA/B/C/neut/net I1/I2/I3/I4/I5 K Factor N/A ThdA.phsA/B/C/neut/ net1 I1/I2/I3/I4/I5 Total HD Total HD ThdOddA.phsA/B/C/ neut/net1 I1/I2/I3/I4/I5 Tot OddHD Total Odd HD ThdEvnA.phsA/B/C/ neut/net1 I1/I2/I3/I4/I5 Tot EvenHD Total Even HD ThdPhV.phsA/B/C/ neut1 V1/V2/V3/V4 Total HD Total HD ThdOddPhV.phsA/B/ C/neut1 V1/V2/V3/V4 Tot OddHD Total Odd HD ThdEvnPhV.phsA/B/ C/neut1 V1/V2/V3/V4 Tot EvenHD Total Even HD HCfA.phsA/B/C/neut/ net I1/I2/I3/I4/I5 Crest Factor N/A ThdPPV.phsAB/BC/ CA V1/V2/V3 Total HD Total HD ThdOddPPV.phsAB/ BC/CA V1/V2/V3 Tot OddHD Total Odd HD ThdEvnPPV.phsAB/ BC/CA V1/V2/V3 Tot EvenHD Total Even HD Neutral and net values are only available on Harmonics Analyzer modules. The input registers are used by the MHAI module to access all the harmonics (150) output registers on the connected Harmonics Analzyer or Harmonics Measurement module and populate IEC 61850 arrays with the harmonics values as shown in the following table. These arrays are only accessible from IEC 61850. Page 286 © 2010 Schneider Electric. All rights reserved. ION Reference IEC 61850 MHAI Module IEC 61850 Harmonic arrays and sources The harmonics arrays will be populated from the appropriate module based on whether the meter is configured to Wye volts mode (line to neutral voltage) or Delta volts mode (line to line voltage). IEC 61850 Harmonic array Harmonics Analyzer Module registers Harmonics Measurement Module register (used if present) HA.phsA(1-50).mag HA.phsB(1-50).mag HA.phsC(1-50).mag HA.neut(1-50).mag1 HA.net(1-50).mag1 HD1 - HD50 Magnitude 1 - Magnitude 50 HA.phsA(1-50).ang HA.phsB(1-50).ang HA.phsC(1-50).ang HA.neut(1-50).ang1 HA.net(1-50).ang1 Not Available Phase 1 - Phase 50 Wye volts mode HPhV.phsA(1-50).mag HPhV.phsB(1-50).mag HPhV.phsC(1-50).mag HPhV.neut(1-50).mag1 HD1 - HD50 Magnitude 1 - Magnitude 50 HPhV.phsA(1-50).ang HPhV.phsB(1-50).ang HPhV.phsC(1-50).ang HPhV.neut(1-50).ang1 Not Available Phase 1 - Phase 50 Delta volts mode 1 © 2010 Schneider Electric. All rights reserved. HPPV.phsAB(1-50).mag HPPV.phsBC(1-50).mag HPPV.phsCA(1-50).mag HD1 - HD50 Magnitude 1 - Magnitude 50 HPPV.phsAB(1-50).ang HPPV.phsBC(1-50).ang HPPV.phsCA(1-50).ang Not Available Phase 1 - Phase 50 Neutral and net values are always from the Harmonics Analyzer module. Page 287 IEC 61850 MHAI Module Page 288 ION Reference © 2010 Schneider Electric. All rights reserved. ION REFERENCE 09/2010 IEC 61850 MMTR Module The IEC 61850 MMTR module represents the Metering (MMTR) Logical Node in IEC 61850 protocol. It maps the appropriate ION values to their IEC 61850 counterparts. The MMTR Logical Node provides the calculated energy from voltage and current measurements. These energy values are generally used for billing purposes. Only one instance of this module can exist. Because this module is specific to supporting the IEC 61580 protocol, it can be deleted if IEC 61850 is not required. NOTE This module is configured as part of the meter’s implementation of the IEC 61850 protocol. Manual creation and configuration of this module, or modification of an existing module, is an advanced feature that should only be undertaken by personnel with a thorough understanding of ION and IEC 61850 protocols, and the system in which the meter is installed. For more information about IEC 61850, please refer to the IEC 61850 and ION Technology protocol document. Schneider Electric 2195 Keating Cross Road Saanichton, BC Canada V8M 2A5 Tel: 1-250-652-7100 For technical support: [email protected] (00) + 1 250 544 3010 Contact your local Schneider Electric sales representative for assistance or go to www.powerlogic.com ION, PowerLogic and Schneider Electric are trademarks or registered trademarks of Schneider Electric in France, the USA and other countries. Other trademarks used are the property of their respective owners. Electrical equipment should be installed, operated, serviced, and maintained only by qualified personnel. No responsibility is assumed by Schneider Electric for any consequences arising out of the use of this material. © 2010 Schneider Electric. All rights reserved. IEC 61850 MMTR Module ION Reference Inputs By default, the MMTR module inputs are connected to the outputs of specific, energy-related Integrator modules. NOTE If input registers are changed, the new inputs must have the same units as the original inputs. TotVAh This register is connected to the output of the kVAh del-rec Integrator module, which is the net apparent energy since the last reset. Units are kVAh. TotWh This register is connected to the output of the kWh del-rec Integrator module, which is the net real energy since the last reset. Units are kWh. TotVArh This register is connected to the output of the kVARh del-rec Integrator module, which is the net reactive energy since the last reset. Units are kVARh. SupWh This register is connected to the output of the kWh del Integrator module, which is the real energy supplied to the meter since the last reset. Units are kWh. SupVArh This register is connected to the output of the kVArh del Integrator module, which is the reactive energy supplied to the meter since the last reset. Units are kVARh. DmdWh This register is connected to the output of the kWh rec Integrator module, which is the real energy demand since the last reset. Units are kWh. DmdVArh This register is connected to the output of the kVARh rec Integrator module, which is the reactive energy demand since the last reset. Units are kVARh. Setup Registers The MMTR module has no setup registers. Page 290 © 2010 Schneider Electric. All rights reserved. ION Reference IEC 61850 MMTR Module Output Registers These registers are formatted and named according to IEC 61850 protocol standards. These registers have the same units as their corresponding inputs. TotVAh.actVal This register contains the net apparent energy (kVAh del-rec) since the last reset, taken from the TotVAh input. TotWh.actVal This register contains the net real energy (kWh del-rec) since the last reset, taken from the TotWh input. TotVArh.actVal This register contains the net reactive energy (kVARh del-rec) since the last reset, taken from the TotVArh input. SupWh.actVal This register contains the real energy supply (kWh del), taken from the SupWh input. SupVArh.actVal This register contains the reactive energy supply (kVARh del), taken from the SupVArh input. DmdWh.actVal This register contains the real energy demand (kWh rec), taken from the DmdWh input. DmdVArh.actVal This register contains the reactive energy demand (kVARh rec), taken from the DmdVArh input. Event Events produced by the module are recorded in the Event register. Possible events and their associated priority numbers are shown in the following table. Event Priority Group Priority Description Reset 5 A module reset has occurred. Setup Change 10 Input links, setup registers or labels have changed. Information 25 NOT AVAILABLE AVAILABLE. input caused output to go NOT The Event output register stores the following information for each ION event: time stamp, priority, cause, effect, and any values or conditions associated with the cause and effect. © 2010 Schneider Electric. All rights reserved. Page 291 IEC 61850 MMTR Module Page 292 ION Reference © 2010 Schneider Electric. All rights reserved. ION REFERENCE 09/2010 IEC 61850 MMXU Module The IEC 61850 MMXU module represents the Measurement (MMXU) Logical Node in IEC 61850 protocol. It maps the appropriate ION values to their IEC 61850 counterparts. The MMXU Logical Node provides per-phase and total current, voltage and power flows normally used for operational purposes such as power flow supervision and management, measurement displays, state estimation, etc. Only one instance of this module can exist. Because this module is specific to supporting the IEC 61850 protocol, it can be deleted if IEC 61850 is not required. For more information about IEC 61850, please refer to the IEC 61850 and ION Technology technical note. Schneider Electric 2195 Keating Cross Road Saanichton, BC Canada V8M 2A5 Tel: 1-250-652-7100 For technical support: [email protected] (00) + 1 250 544 3010 Contact your local Schneider Electric sales representative for assistance or go to www.powerlogic.com ION, PowerLogic and Schneider Electric are trademarks or registered trademarks of Schneider Electric in France, the USA and other countries. Other trademarks used are the property of their respective owners. Electrical equipment should be installed, operated, serviced, and maintained only by qualified personnel. No responsibility is assumed by Schneider Electric for any consequences arising out of the use of this material. © 2010 Schneider Electric. All rights reserved. IEC 61850 MMXU Module ION Reference NOTE This module is configured as part of the meter’s implementation of the IEC 61850 protocol. Manual creation and configuration of this module, or modification of an existing module, is an advanced feature that should only be undertaken by personnel with a thorough understanding of ION and IEC 61850 protocols, and the system in which the meter is installed. Inputs NOTE If input registers are changed, the new inputs must have the same units of measure as the original input. By default, the MMXU module inputs are the outputs from the Power Meter module. NOTE Refer to the Power Meter module for detailed output register descriptions. TotW This register is connected to the kW tot output register on the Power Meter module. Units are kW. TotVAr This register is connected to the kVAR total output register on the Power Meter module. Units are kVAR. TotVA This register is connected to the kVA total output register on the Power Meter module. Units are kVA. TotPF This register is connected to the PF sign tot output register on the Power Meter module. The value can range from 0 to 100 and -100 to 0. Hz This register is connected to the Line Freq output register on the Power Meter module. Units are Hertz. PPV.phsAB, PPV.phsBC, PPV.phsCA These registers are connected to the Vll ab, Vll bc, and Vll ca output registers on the Power Meter module. Units are Volts. PhV.phsA, PhV.phsB, PhV.phsC These registers are connected to the Vln a, Vln b, and Vln c output registers on the Power Meter module. Units are Volts. Page 294 © 2010 Schneider Electric. All rights reserved. ION Reference IEC 61850 MMXU Module PhV.neut This register is connected to the V4 output register on the Power Meter module. Units are Volts. A.phsA, A.phsB, A.phsC These registers are connected to the I a, I b and I c output registers on the Power Meter module. Units are Amps. A.neut This register is connected to the I4 output register on the Power Meter module. Units are Amps. A.net This register is connected to the I5 output register on the Power Meter module. Units are Amps. W.phsA, W.phsB, W.phsC These registers are connected to the kW a, kW b and kW c output registers on the Power Meter module. Units are kW. VAr.phsA, VAr.phsB, VAr.phsC These registers are connected to the kVAR a, kVAR b and kVAR c output registers on the Power Meter module. Units are kVAR. VA.phsA, VA.phsB, VA.phsC These registers are connected to the kVA a, kVA b and kVA c output registers on the Power Meter module. Units are kVA. PF.phsA, PF.phsB, PF.phsC These registers are connected to the PF sign a, PF sign b and PF sign c output register on the Power Meter module and are expressed as a numeric values from 0 to 100. Setup Registers The MMXU module has no setup registers. © 2010 Schneider Electric. All rights reserved. Page 295 IEC 61850 MMXU Module ION Reference Output Registers These registers are formatted and named according to IEC 61850 protocol standards. These registers have the same units as their corresponding inputs. TotW.instMag, TotW.mag These registers contain the instantaneous and deadbanded total real power, taken from the TotW input. TotVAr.instMag, TotVAr.mag These registers contain the instantaneous and deadbanded total reactive power, taken from the TotVAr input. TotVA.instMag, TotVA.mag These registers contain the instantaneous and deadbanded total apparent power, taken from the TotVA input. TotPF.instMag, TotPF.mag These registers contain the instantaneous and deadbanded total power factor, taken from the TotPF input. Hz.instMag, Hz.mag These registers contain the instantaneous and deadbanded frequency, taken from the Hz input. PPV.phsAB.instCVal.mag, PPV.phsAB.cVal.mag, PPV.phsBC.instCVal.mag, PPV.phsBC.cVal.mag, PPV.phsCA.instCVal.mag, PPV.phsCA.cVal.mag These registers contain the instantaneous and deadbanded RMS line-to-line voltages, taken from the PPV.phsAB, PPV.phsBC and PPV.phsCA inputs. PhV.phsA.instCVal.mag, PhV.phsA.cVal.mag, PhV.phsB.instCVal.mag, PhV.phsB.cVal.mag, PhV.phsC.instCVal.mag, PhV.phsC.cVal.mag These registers contain the instantaneous and deadbanded RMS line-to-neutral voltages, taken from the PhV.phsA, PhV.phsB and PhV.phsC inputs. PhV.neut.instCVal.mag, PhV.neut.cVal.mag These registers contain the instantaneous and deadbanded RMS neutral voltage, taken from the PhV.neut input. A.phsA.instCVal.mag, A.phsA.cVal.mag, A.phsB.instCVal.mag, A.phsB.cVal.mag, A.phsC.instCVal.mag, A.phsC.cVal.mag These registers contain the instantaneous and deadbanded RMS currents, taken from the A.phsA, A.phsB and A.phsC inputs. A.neut.instCVal.mag, A.neut.cVal.mag These registers contain the instantaneous and deadbanded RMS neutral current, taken from the A.neut input. A.net.instCVal.mag, A.net.cVal.mag These registers contain the instantaneous and deadbanded RMS net current, taken from the A.net input. Page 296 © 2010 Schneider Electric. All rights reserved. ION Reference IEC 61850 MMXU Module W.phsA.instCVal.mag, W.phsA.cVal.mag, W.phsB.instCVal.mag, W.phsB.cVal.mag, W.phsC.instCVal.mag, W.phsC.cVal.mag These registers contain the instantaneous and deadbanded active power, taken from the W.phsA, W.phsB and W.phsC inputs. VAr.phsA.instCVal.mag, VAr.phsA.cVal.mag, VAr.phsB.instCVal.mag, VAr.phsB.cVal.mag, VAr.phsC.instCVal.mag, VAr.phsC.cVal.mag These registers contain the instantaneous and deadbanded reactive power, taken from the VAr.phsA, VAr.phsB and VAr.phsC inputs. VA.phsA.instCVal.mag, VA.phsA.cVal.mag, VA.phsB.instCVal.mag, VA.phsB.cVal.mag, VA.phsC.instCVal.mag, VA.phsC.cVal.mag These registers contain the instantaneous and deadbanded RMS apparent power, taken from the VA.phsA, VA.phsB and VA.phsC inputs. PF.phsA.instCVal.mag, PF.phsA.cVal.mag, PF.phsB.instCVal.mag, PF.phsB.cVal.mag, PF.phsC.instCVal.mag, PF.phsC.cVal.mag These registers contain the instantaneous and deadbanded power factor, taken from the PF.phsA, PF.phsB and PF.phsC inputs. Event Events produced by the module are recorded in the Event register. Possible events and their associated priority numbers are shown in the following table. Event Priority Group Priority Description Reset 5 A module reset has occurred. Setup Change 10 Input links, setup registers or labels have changed. Information 25 NOT AVAILABLE AVAILABLE. input caused output to go NOT The Event output register stores the following information for each ION event: time stamp, priority, cause, effect, and any values or conditions associated with the cause and effect. © 2010 Schneider Electric. All rights reserved. Page 297 IEC 61850 MMXU Module Page 298 ION Reference © 2010 Schneider Electric. All rights reserved. ION REFERENCE 09/2010 IEC 61850 MSQI Module The IEC 61850 MSQI module represents the Sequences and Imbalances (MSQI) Logical Node in IEC 61850 protocol. It maps the appropriate ION values to their IEC 61850 counterparts. The MSQI Logical Node is used to represent the sequences in a three/multi-phase power system. Sequence calculations are made available on the meter through the Symmetrical Components ION modules. Only one instance of this module can exist. Because this module is specific to supporting the IEC 61580 protocol, it can be deleted if IEC 61850 is not required. For more information about IEC 61850, please refer to the IEC 61850 and ION Technology protocol document. Schneider Electric 2195 Keating Cross Road Saanichton, BC Canada V8M 2A5 Tel: 1-250-652-7100 For technical support: [email protected] (00) + 1 250 544 3010 Contact your local Schneider Electric sales representative for assistance or go to www.powerlogic.com ION, PowerLogic and Schneider Electric are trademarks or registered trademarks of Schneider Electric in France, the USA and other countries. Other trademarks used are the property of their respective owners. Electrical equipment should be installed, operated, serviced, and maintained only by qualified personnel. No responsibility is assumed by Schneider Electric for any consequences arising out of the use of this material. © 2010 Schneider Electric. All rights reserved. IEC 61850 MSQI Module ION Reference NOTE This module is configured as part of the meter’s implementation of the IEC 61850 protocol. Manual creation and configuration of this module, or modification of an existing module, is an advance feature that should only be undertaken by personnel with a thorough understanding of ION and IEC 61850 protocols, and the system in which the meter is installed. Inputs By default, the MSQI module inputs are linked to the outputs of the current and voltage Symmetrical Components modules. NOTE If input registers are changed, the new inputs must have the same units of measure as the original input. I PosSeqMag, I PosSeqPhs These registers are linked to the PosSeqMag and the PosSeqPhs output registers of the current Symmetrical Components module, which provide the magnitude of positive sequence current and the phase angle of positive sequence current, respectively. Units are Amps. I NegSeqMag, I NegSeqPhs These registers are linked to the NegSeqMag and the NegSeqPhs output registers of the current Symmetrical Components module, which provide the magnitude of negative sequence current and the phase angle of negative sequence current, respectively. Units are Amps. I ZeroSeqMag, I ZeroSeqPhs These registers are linked to the ZeroSeqMag and the ZeroSeqPhs output registers of the current Symmetrical Components module, which provide the magnitude of zero sequence current and the phase angle of zero sequence current, respectively. Units are Amps. V PosSeqMag, V PosSeqPhs These registers are linked to the PosSeqMag and the PosSeqPhs output registers of the voltage Symmetrical Components module, which provide the magnitude of positive sequence voltage and the phase angle of positive sequence voltage, respectively. Units are Volts. V NegSeqMag, V NegSeqPhs These registers are linked to the NegSeqMag and the NegSeqPhs output registers of the voltage Symmetrical Components module, which provide the magnitude of negative sequence voltage and the phase angle of negative sequence voltage, respectively. Units are Volts. Page 300 © 2010 Schneider Electric. All rights reserved. ION Reference IEC 61850 MSQI Module V ZeroSeqMag, V ZeroSeqPhs These registers are linked to the ZeroSeqMag and the ZeroSeqPhs output registers of the voltage Symmetrical Components module, which provide the magnitude of zero sequence voltage and the phase angle of zero sequence voltage, respectively. Units are Volts. Setup Registers The MSQI module has no setup registers. Output Registers These registers are formatted and named according to IEC 61850 protocol standards. These registers have the same units as their corresponding inputs. SeqA.c1.instCVal.mag, SeqA.c1.instCVal.ang These registers provide the instantaneous magnitude and phase angle for positive sequence current, derived from the I PosSeqMag and I PosSeqPhs inputs. SeqA.c1.cVal.mag, SeqA.c1.cVal.ang These registers provide the deadbanded magnitude and corresponding phase angle for positive sequence current, derived from the I PosSeqMag and I PosSeqPhs inputs. The phase angle is the angle at the time the deadbanded magnitude was set. SeqA.c2.instCVal.mag, SeqA.c2.instCVal.ang These registers provide the instantaneous magnitude and phase angle for negative sequence current, derived from the I NegSeqMag and I NegSeqPhs inputs. SeqA.c2.cVal.mag, SeqA.c2.cVal.ang These registers provide the deadbanded magnitude and corresponding phase angle for negative sequence current, derived from the I NegSeqMag and I NegSeqPhs inputs. The phase angle is the angle at the time the deadbanded magnitude was set. SeqA.c3.instCVal.mag, SeqA.c3.instCVal.ang These registers provide the instantaneous magnitude and phase angle for zero sequence current, derived from the I ZeroSeqMag and I ZeroSeqPhs inputs. SeqA.c3.cVal.mag, SeqA.c3.cVal.ang These registers provide the deadbanded magnitude and corresponding phase angle for zero sequence current, derived from the I ZeroSeqMag and I ZeroSeqPhs inputs. The phase angle is the angle at the time the deadbanded magnitude was set. © 2010 Schneider Electric. All rights reserved. Page 301 IEC 61850 MSQI Module ION Reference SeqV.c1.instCVal.mag, SeqV.c1.instCVal.ang These registers provide the instantaneous magnitude and phase angle for positive sequence voltage, derived from the V PosSeqMag and V PosSeqPhs inputs. SeqV.c1.cVal.mag, SeqV.c1.cVal.ang These registers provide the deadbanded magnitude and corresponding phase angle for positive sequence voltage, derived from the V PosSeqMag and V PosSeqPhs inputs. The phase angle is the angle at the time the deadbanded magnitude was set. SeqV.c2.instCVal.mag, SeqV.c2.instCVal.ang These registers provide the instantaneous magnitude and phase angle for negative sequence voltage, derived from the V NegSeqMag and V NegSeqPhs inputs. SeqV.c2.cVal.mag, SeqV.c2.cVal.ang These registers provide the deadbanded magnitude and corresponding phase angle for negative sequence voltage, derived from the V NegSeqMag and V NegSeqPhs inputs. The phase angle is the angle at the time the deadbanded magnitude was set. SeqV.c3.instCVal.mag, SeqV.c3.instCVal.ang These registers provide the instantaneous magnitude and phase angle for zero sequence voltage, derived from the V ZeroSeqMag and V ZeroSeqPhs inputs. SeqV.c3.cVal.mag, SeqV.c3.cVal.ang These registers provide the deadbanded magnitude and corresponding phase angle for zero sequence voltage, derived from the V ZeroSeqMag and V ZeroSeqPhs inputs. The phase angle is the angle at the time the deadbanded magnitude was set. Event Events produced by the module are recorded in the Event register. Possible events and their associated priority numbers are shown in the following table. Event Priority Group Priority Description Reset 5 A module reset has occurred. Setup Change 10 Input links, setup registers or labels have changed. Information 25 NOT AVAILABLE AVAILABLE. input caused output to go NOT The Event output register stores the following information for each ION event: time stamp, priority, cause, effect, and any values or conditions associated with the cause and effect. Page 302 © 2010 Schneider Electric. All rights reserved. ION REFERENCE 09/2010 IEC 61850 MSTA Module The IEC 61850 MSTA module represents the Metering Statistics (MSTA) Logical Node in IEC 61850 protocol. It maps the appropriate ION values to their IEC 61850 counterparts. The MSTA Logical Node provides metering statistics, such as average, minimum and maximum values. Only one instance of this module can exist. Because this module is specific to supporting the IEC 61580 protocol, it can be deleted if IEC 61850 is not required. NOTE This module is configured as part of the meter’s implementation of the IEC 61850 protocol. Manual creation and configuration of this module, or modification of an existing module, is an advanced feature that should only be undertaken by personnel with a thorough understanding of ION and IEC 61850 protocols, and the system in which the meter is installed. For more information about IEC 61850, please refer to the IEC 61850 and ION Technology protocol document. Schneider Electric 2195 Keating Cross Road Saanichton, BC Canada V8M 2A5 Tel: 1-250-652-7100 For technical support: [email protected] (00) + 1 250 544 3010 Contact your local Schneider Electric sales representative for assistance or go to www.powerlogic.com ION, PowerLogic and Schneider Electric are trademarks or registered trademarks of Schneider Electric in France, the USA and other countries. Other trademarks used are the property of their respective owners. Electrical equipment should be installed, operated, serviced, and maintained only by qualified personnel. No responsibility is assumed by Schneider Electric for any consequences arising out of the use of this material. © 2010 Schneider Electric. All rights reserved. IEC 61850 MSTA Module ION Reference Inputs By default, the MSTA module inputs are linked to the outputs of the related Maximum, Minimum and Sliding Window Demand modules. NOTE If input registers are changed, the new inputs must have the same units of measure as the original input. AvVA This register is linked to the output register of the kVA tot mean Sliding Window Demand module, which provides the average apparent power value. Units are kVA. MaxVA This register is linked to the output of the kVA tot mx Maximum module, which provides the maximum apparent power value. Units are kVA. MinVA This register is linked to the output of the kVA tot mn Minimum module, which provides the minimum apparent power value. Units are kVA. AvW This register is linked to the output register of the kW tot mean Sliding Window Demand module, which provides the average real power value. Units are kW. MaxW This register is linked to the output of the kW tot mx Maximum module, which provides the maximum real power value. Units are kW. MinW This register is linked to the output of the kW tot mn Minimum module, which provides the minimum real power value. Units are kW. AvVAr This register is linked to the output register of the kVAR tot mean Sliding Window Demand module, which provides the average reactive power value. Units are kVAR MaxVAr This register is linked to the output of the kVAR tot mx Maximum module, which provides the maximum reactive power value. Units are kVAR. MinVAr This register is linked to the output of the kVAR tot mn Minimum module, which provides the minimum reactive power value. Units are kVAR. Page 304 © 2010 Schneider Electric. All rights reserved. ION Reference IEC 61850 MSTA Module Setup Registers The MSTA module has no setup registers. Output Registers These registers are formatted and named according to IEC 61850 protocol standards. These registers have the same units as their corresponding inputs. AvVA.instMag, AvVA.mag These registers contain the instantaneous and deadbanded values for the average apparent power, derived from the AvVA input. MaxVA.instMag, MaxVA.mag These registers contain the instantaneous and deadbanded values for the maximum apparent power, derived from the MaxVA input. MinVA.instMag, MinVA.mag These registers contain the instantaneous and deadbanded values for the minimum apparent power, derived from the MinVA input. AvW.instMag, AvW.mag These registers contain the instantaneous and deadbanded values for the average real power, derived from the AvW input. MaxW.instMag, MaxW.mag These registers contain the instantaneous and deadbanded values for the maximum real power, derived from the MaxW input. MinW.instMag, MinW.mag These registers contain the instantaneous and deadbanded values for the minimum real power, derived from the MinW input. AvVAr.instMag, AvVar.mag These registers contain the instantaneous and deadbanded values for the average reactive power, derived from the AvVAr input. MaxVAr.instMag, MaxVAr.mag These registers contain the instantaneous and deadbanded values for the maximum reactive power, derived from the MaxVAr input. MinVAr.instMag, MinVAr.mag These registers contain the instantaneous and deadbanded values for the minimum reactive power, derived from the MinVAr input. © 2010 Schneider Electric. All rights reserved. Page 305 IEC 61850 MSTA Module ION Reference Event Events produced by the module are recorded in the Event register. Possible events and their associated priority numbers are shown in the following table. Event Priority Group Priority Description Reset 5 A module reset has occurred. Setup Change 10 Input links, setup registers or labels have changed. Information 25 NOT AVAILABLE AVAILABLE. input caused output to go NOT The Event output register stores the following information for each ION event: time stamp, priority, cause, effect, and any values or conditions associated with the cause and effect. Page 306 © 2010 Schneider Electric. All rights reserved. ION REFERENCE 09/2008 Instr Xformer Correction (ITC) Module The Instrument Transformer Correction (ITC) module is a core module that allows you to correct for inaccuracies in the current transformers (CTs) and potential transformers (PTs). There is an Instr Xformer Correction module for each current and voltage input into the meter. Instr Xformer Correction Module Source Corrected Value Event Enable The primary application for instrument transformer correction is to apply correction factors for ratio errors and phase angle errors to instrument transformers. Instrument transformer correction reduces or eliminates the need to replace transformers in installations where high-accuracy is required. Inputs Source The Instr Xformer Correction module takes the value of this input from the Data Acquisition module. This link cannot be changed. For Instr Xformer Correction modules that are correcting current inputs this source input is I1, I2, I3, I4, or I5. For the Instr Xformer Correction modules that are correcting voltage inputs, this source is V1, V2, V3, or V4. Enable The Enable input is factory-linked and cannot be altered. Schneider Electric 2195 Keating Cross Road Saanichton, BC Canada V8M 2A5 Tel: 1-250-652-7100 For technical support: [email protected] (00) + 1 250 544 3010 Contact your local Schneider Electric sales representative for assistance or go to www.powerlogic.com ION, PowerLogic and Schneider Electric are trademarks or registered trademarks of Schneider Electric in France, the USA and other countries. Other trademarks used are the property of their respective owners. Electrical equipment should be installed, operated, serviced, and maintained only by qualified personnel. No responsibility is assumed by Schneider Electric for any consequences arising out of the use of this material. © 2008 Schneider Electric. All rights reserved. Instr Xformer Correction (ITC) Module ION Reference Setup Registers Secondary Nominal Rating This setup register allows you to input the secondary rated nominal current or voltage value depending upon whether the Instr Xformer Correction module is correcting CT or PT. For current inputs, the secondary nominal rating is typically 5A or 1A depending on the CT. For PTs, a secondary nominal voltage rating may range from 63.5 VAC line to neutral to 347 VAC line to neutral or 600 VAC line-toline. The default value for current inputs depends upon the framework (5A or 1A); the default value for voltage nominal is 120VAC. The allowable range for a CT secondary nominal rating is between 0.001-20A. The allowable range for a PT secondary nominal rating is between 0.1-1000VAC. Ratio Correction Type This enumerated register determines what type of modeling is performed to correct the CT or PT ratio. The selectable values are NONE or PIECE-WISE LINEAR. Ratio Correction Data This register contains a string of delimited pairs of test points and associated Ratio Correction Factors (RCF) for the CT or PT. The test point is expressed as a percentage of the rated secondary nominal rating. The definition of RCF is: RCF = True Ratio/Marked Ratio Percent Error = (RCF -1) x100% Ratio Correction Factor (RCF) is expressed as a decimal value. Example test data points are as follows: Test Point (% nominal) RCF 100 0.998 50 1.000 25 1.001 10 1.003 1 1.008 0.2 1.010 The input for this data would be: {100,0.998},{50,1.0},{25,1.001},{10,1.003},{1,1.008},{0.2,1.010} For validation purposes, the RCF value is deemed out of range if it is greater than 2.0 or less than 0.0. Phase Correction Type The enumerated phase correction type register determines what type of modeling is performed to correct the phase angle of the CT or PT. The values that can be selected are: NONE, or PIECE-WISE LINEAR. Page 308 © 2008 Schneider Electric. All rights reserved. ION Reference Instr Xformer Correction (ITC) Module Phase Correction Data This register contains a string of delimited pairs of the test points and associated error for the phase angle of the CT or PT. The test point is expressed as a percentage of the rated secondary nominal rating. The phase angle error is expressed a real value in minutes. For example, a typical test on an instrument transformer may reveal the following results: Test Point (% nominal) Phase Angle Error (Minutes) 100 3 50 6 25 10 10 13 1 25 0.2 40 The input for this data would be: {100,3},{50,6},{25,10},{10,13},{1,25},{0.2,40} For validation purposes, a Phase Angle Error value is deemed out of range if it is greater than 600 minutes or less than -600 minutes (which is 10 degrees error). Output Registers Corrected Value The Corrected Value output is factory linked to the Power Meter module and cannot be altered. Event All events produced by an Instr Xformer Correction module are written into this register. The Instr Xformer Correction module considers the following as an event: any changes to the setup registers, input links or labels. These events all have a pre-defined priority of 10. © 2008 Schneider Electric. All rights reserved. Page 309 Instr Xformer Correction (ITC) Module ION Reference Detailed Module Operation The Instr Xformer Correction module is a core module. There is an Instr Xformer Correction module for each current input (I1, I2, I3, I4 and I5 where available) and for each voltage input to the meter (V1, V2, V3, and V4, where available). NOTE The correction affects only the 1-second values in the Power Meter module. No high-speed, harmonics, or waveform values are affected by the correction. Select whether this module corrects the source input using either ION Setup or the Designer component of ION Enterprise. You can select the Ratio Correction Type and the Phase Angle Correction Type. The enumerated Correction Types are: NONE or PIECE-WISE LINEAR. These enumerated Correction Types are discussed in the following paragraphs. Selecting NONE If you select NONE, this module does not apply any correction to the source input of the module. Selecting PIECE-WISE LINEAR If you select PIECE-WISE LINEAR, a secondary nominal value must be entered. The default secondary current nominal value is 5A. The default secondary voltage nominal value is 120VAC. Next you must enter in the Ratio Correction and Phase Angle Test Data. This test data is entered in a string of delimited pairs in a bracket and comma delimited format in sequential descending order. For Ratio Correction Test, the string of points is based on the pairing of the secondary input test point and the associated Ratio Correction Factor (RCF). The input test point is assumed to be based on the fundamental (i.e. the 50Hz or 60Hz component) of the input source of the meter. The pair has the following syntax: {<input test point (%)>, <RCF>} Sample Ratio Correction Test Test Point (% nominal) Page 310 RCF 100 0.998 50 1.000 25 1.001 10 1.003 1 1.008 0.2 1.010 © 2008 Schneider Electric. All rights reserved. ION Reference Instr Xformer Correction (ITC) Module The input for this data would be: {100,0.998},{50,1.0},{25,1.001},{10,1.003},{1,1.008},{0.2,1.010} For Phase Angle Test data the string of points is based on the pairing of the input test point and the associated Phase Angle error in minutes. The input test point is assumed to be based on the fundamental, i.e. the 50Hz or 60Hz component, of the input source. The pair has the following syntax: {<input test point (%)>, <minutes>} Determining Ratio Correction Factor Ratio Correction Factor (RCF) is calculated as follows: VP = VS x RCF x " Marked Ratio" VP RCF = VS x " Marked Ratio" Determining Correction Angle As shown in the example below, if the secondary voltage (Vs) is leading the primary voltage, the correction angle is negative. Enter a negative number. If the secondary current (Is) is lagging the primary current, the correction angle is positive. Enter a positive number. © 2008 Schneider Electric. All rights reserved. Page 311 Instr Xformer Correction (ITC) Module Page 312 ION Reference © 2008 Schneider Electric. All rights reserved. ION REFERENCE 09/2008 Integrator Module The Integrator module takes the integral of a specified source value (Integrand) over time (Divisor). The equation below represents the module's operation. Integrand R n = ----------------------- + R n – 1 Divisor Once divided, the integrand is added to the previous result of R n. The update rate of the ION meter determines how often R n is calculated. The remainder value (the amount left over when the integrand is not an even multiple of the divisor) is stored inside the module to be added into the next integrand. Refer to “Example” on page 316. The most common application of the Integrator module is to calculate energy values, such as: Real energy, or kW hours (kWh) Reactive energy, or kVAR hours (kVARh) Apparent energy, or kVA hours (kVAh) Integrator Module Result Trigger Rollover Enable Reset Rollover Count . Integrand Update Outputs Interval Reset Schneider Electric 2195 Keating Cross Road Saanichton, BC Canada V8M 2A5 Tel: 1-250-652-7100 For technical support: [email protected] (00) + 1 250 544 3010 Contact your local Schneider Electric sales representative for assistance or go to www.powerlogic.com Trigger Count Event ION, PowerLogic and Schneider Electric are trademarks or registered trademarks of Schneider Electric in France, the USA and other countries. Other trademarks used are the property of their respective owners. Electrical equipment should be installed, operated, serviced, and maintained only by qualified personnel. No responsibility is assumed by Schneider Electric for any consequences arising out of the use of this material. © 2008 Schneider Electric. All rights reserved. Integrator Module ION Reference Inputs Integrand This input is the value which is integrated. It must be linked to a numeric output register of another module. Enable This input enables or disables integration - when disabled, the module stops updating the Result output register. The Integrator module is enabled by default. NOTE The Reset input will still function if the module's Enable input is OFF. Reset Pulsing this input resets the Result, Rollover Count and Trigger Count output registers to zero. It also resets the remainder value to zero. The Integrator module may be reset even if it is disabled. Update Outputs This pulse register is intended to be pulsed each 15 minutes to allow accurate validation in MV90. It can be set to pulse at any interval. Interval Reset Pulsing this input resets the Result, Rollover Count and Trigger Count registers to zero. The remainder value is carried over into the next interval. Setup Registers Divisor This numeric bounded register specifies the value, in seconds, by which the Integrand is divided before it is added to the Result. For example, to calculate kWh, the Divisor register would be set to 3600. Int Mode The table below describes the modes of integration that may be selected. Mode Description forward Used for imported energy - only positive integrands are added to the Result output. reverse Used for exported energy - only negative integrands are added to the Result output. absolute Used to obtain the absolute values of imported and exported energy - both positive and negative integrands are added to the Result output. net Used to obtain the difference between the imported and exported energy (a net export of energy is displayed as a negative number). Valu/Pulse This numeric bounded register defines the value the Result must increase (or decrease) by for a pulse to be generated on the Trigger output. Setting this register to zero disables the feature (no pulses will be output from the Trigger register). Page 314 © 2008 Schneider Electric. All rights reserved. ION Reference Integrator Module RollValue When the Result output register reaches the value specified by the RollValue setup register, the Result output register will rollover (be reset to 0). Setting this register to zero disables the Rollover feature (no rollovers will occur). Output Registers Result This numeric register contains the result of the integration. The Result will rollover (reset to zero) if the value in the Rollvalue setup register is reached. Trigger This register generates a pulse every time the Result output increases or decreases by the value specified in the Valu/Pulse setup register. If the Result increases by double the Valu/Pulse register, two pulses are generated, etc. NOTE The Trigger output functions the same in NET mode as it does when the ABSOLUTE mode is used. Rollover This register generates a pulse every time the Result output reaches the value specified in the RollValue setup register. Rollover Count This register increments each time the Rollover output is pulsed. Trigger Count This register increments each time the Trigger output is pulsed. Event Any events produced by the Integrator module are recorded in the Event register. Possible events and their associated priority numbers are shown in the table below. Event Priority Group Priority Description Reset 5 A module reset has occurred. Setup Change 10 Input links, setup registers or labels have changed. The Event output register stores the following information for each ION event: time stamp, priority, cause, effect, and any values or conditions associated with the cause and effect. © 2008 Schneider Electric. All rights reserved. Page 315 Integrator Module ION Reference Detailed Module Operation The figure below illustrates the operation of the Integrator module. Typically, the Integrand would be a measurement from one of the output registers of the Power Meter module. Integrating power measurements such as kW provides accumulating energy values in the Result register. If the value in the Result output register increases by an uneven multiple of the Valu/Pulse, the remainder value is carried over to the next update time. Example If Valu/Pulse = 10 and the Result increases by 17, then only 1 pulse will be generated by the Trigger register. The remainder value of 7 is carried over to contribute to the pulse calculation at the next time interval. If Reset is pulsed, Result, Trigger Count and the remainder value will be set to zero. If Interval Reset is pulsed, Result and Trigger Count will be set to zero. The remainder value of 7 will be carried over to contribute to the pulse calculation at the next time interval. Responses to Special Conditions The table below summarizes how the module behaves under different conditions. Condition Page 316 Response of Output Register Input NOT AVAILABLE Integrating stops and the Result output holds the current value. Enable input is OFF Integrating stops and the Result output holds the current value. Module is re-linked or setup registers changed The Result, Rollover Count and Trigger Count outputs go to zero. Meter is started or powered-up The output registers retain the values they held at shutdown. © 2008 Schneider Electric. All rights reserved. ION REFERENCE 09/2008 Launching Module The Launching module starts an executable program when the module’s Launch input is pulsed. A setup register allows you to specify the name of the program and any command line parameters you wish. The Launching module can launch as many instances of the program as computer resources will allow. Launching Module Event Source Enable Launch Inputs Source 1 to Source 4 This input is used as part of the command line that runs a program. You can link it to a numeric, Boolean or text output register. This input is optional; if you leave it unlinked the module will continue to operate. NOTE See “Detailed Module Operation” section for how the Source input is incorporated into the command line. Enable This input enables or disables the Launching module by setting it ON or OFF respectively. If you disable a Launching module, pulses on the Launch inputs are ignored. Linking this input is optional; if you leave it unlinked, the module will be enabled by default. Launch When this input is pulsed, the Launching module launches the program specified in the RunCommand setup register. This input must be linked for the module to operate. Schneider Electric 2195 Keating Cross Road Saanichton, BC Canada V8M 2A5 Tel: 1-250-652-7100 For technical support: [email protected] (00) + 1 250 544 3010 Contact your local Schneider Electric sales representative for assistance or go to www.powerlogic.com ION, PowerLogic and Schneider Electric are trademarks or registered trademarks of Schneider Electric in France, the USA and other countries. Other trademarks used are the property of their respective owners. Electrical equipment should be installed, operated, serviced, and maintained only by qualified personnel. No responsibility is assumed by Schneider Electric for any consequences arising out of the use of this material. © 2008 Schneider Electric. All rights reserved. Launching Module ION Reference Setup Registers RunCommand This register specifies the command to be launched when the Launch input is pulsed. Launch Mode When this register is set to INTERACTIVE, the user sees a visual indication on the desktop when the Launching module starts the program or process (e.g. the program is launched in a new window). When set to NOT INTERACTIVE, the launched program or process runs in the background (i.e. the program runs, but is not visible on the desktop). Output Registers Event All events produced by a Launching module are written into this register. Possible events and their associated priority numbers are shown in the table below. Event Priority Group Priority Description Setup Change 10 Input links, setup registers or labels have changed. Information 25 Pulse received on Launch input; program launch successful; program launch not successful. The Event output register stores the following information for each ION event: time stamp, priority, cause, effect, and any values or conditions associated with the cause and effect. Page 318 © 2008 Schneider Electric. All rights reserved. ION Reference Launching Module Detailed Module Operation When the Launch input is pulsed, the Launching module attempts to execute the command entered in the RunCommand setup register. For the program to successfully run, the executable file must be in the location specified, and the syntax of the command specified in the RunCommand register must be correct. If you do not use the Source input, the command specified in the RunCommand register behaves just as if you typed it on a DOS command line. To test your RunCommand entry, open a Command prompt window, then type in the command exactly as you typed it in the RunCommand setup register. NOTE The Launching module can only start the program. If the program does not quit on its own, you have to do it manually. RunCommand Syntax If the directory in which the program resides is in your PATH variable, you can specify just the name of the program. For example, cmd.exe If the directory in which the program resides is not in your PATH variable, you must include the program's full path name. For example, d:\apps\myprogram.exe The program can be on a local drive or in a directory on another computer on the network if the directory is shared. If it is shared, you will be able to see that computer and directory in Windows Explorer. You can either map a network drive to the directory, or reference it with the computer name. For example: f:\networkdir\myprogram.exe or \\COMPUTERNAME\DIR\myprogram.exe If the program you want to launch accepts command line parameters, you can include them as part of the RunCommand text. For example, if you want to run a program and have it open a specific data file, you might type: d:\apps\myprogram.exe -Fdatafile.txt Incorporating the Source Input When entering the command line into the RunCommand setup register, you can include the Source input values. You can do this by linking the Launching module’s Source inputs (to other modules’ output registers) and incorporating the %V1, %V2, %V3 or %V4 variables in the RunCommand line. When the Launch input is pulsed, the variables will be replaced with the values contained in the registers that you linked to the Source inputs to. This way, you can include dynamic values in © 2008 Schneider Electric. All rights reserved. Page 319 Launching Module ION Reference your command line for programs that can accept command line parameters. For example, you might link a Source input to an output register that reports the voltage on phase A and have the Launching module start a pager program that pages you and reports what the voltage is. Value variables are identified in the command line by a % sign before the variable name (variable names are V1 to V4 — this corresponds to Source inputs #1 to #4). The following example displays the value of Source input #1 at the end of your message: d:\commapps\page.exe 555-4712 %V1 If you fail to include the % sign before the variable name, it will not be replaced with the value on the Source input. NOTE Following is the syntax used to display data appearing at Source inputs #1 to 4: Source #1:%V1 Source #2:%V2 Source #3:%V3 Source #4:%V4 If you want the actual text "%V1" to appear in the command line (rather than replaced by the value), you must insert an additional % sign in front of it. For example, to produce the following command line: d:\commapps\page.exe 555-4712 TotalHD %Value=25 the RunCommand setup register would look like this: d:\commapps\page.exe 555-4712 TotalHD %%Value=%V1 Responses to Special Conditions The following table summarizes how the module behaves under different conditions. Condition Page 320 Response of Module If Source is not linked The module will operate normally but, if used, the Value variable will be NOT AVAILABLE. If Source is NOT AVAILABLE The module will operate normally but the Value variable will be N/A. If the Enable input is OFF The module will ignore pulses on the Launch input. When the Virtual Processor is started The module will assess inputs; if there is a pulse on the Launch input, it will attempt to start the program specified in the RunCommand setup register. If RunCommand has an invalid command and the Launch input is pulsed The module will write an event indicating that the command failed to execute. © 2008 Schneider Electric. All rights reserved. ION REFERENCE 09/2008 Log Acquisition Module NOTE Log Server” has been renamed to “Log Inserter” for ION Enterprise 5.0 and later versions. The Log Acquisition module collects data from field devices, the Virtual Processor, and/or Log Inserter, and inserts it into the ION database. Log Acquisition modules can be enabled or disabled as required to provide control over the Log Inserter’s operation. The Log Acquisition module can be configured to automatically find all logs in the system. You can also configure the Log Acquisition module to automatically find logs in a site, or you can specify individual logs to upload by explicitly linking the Log Acquisition module’s Log inputs. Log Acquisition Module Log Schema ... Source 1 Source n Enable Inputs Log 1…N These inputs can be linked to any data or event log register in any node in the network. The Log Acquisition module supports an unlimited number of inputs. Enable When this input is set to ON, the module is enabled; when it is set to OFF, the module is disabled and logs are not uploaded. This input is optional; if you leave it unlinked, the module is enabled by default. Schneider Electric 2195 Keating Cross Road Saanichton, BC Canada V8M 2A5 Tel: 1-250-652-7100 For technical support: [email protected] (00) + 1 250 544 3010 Contact your local Schneider Electric sales representative for assistance or go to www.powerlogic.com ION, PowerLogic and Schneider Electric are trademarks or registered trademarks of Schneider Electric in France, the USA and other countries. Other trademarks used are the property of their respective owners. Electrical equipment should be installed, operated, serviced, and maintained only by qualified personnel. No responsibility is assumed by Schneider Electric for any consequences arising out of the use of this material. © 2008 Schneider Electric. All rights reserved. Log Acquisition Module ION Reference Setup Registers Connection String (available only on ION Enterprise 5.0 and later versions) This register specifies the connection string of the SQL Server 2000 or MSDE 2000 database to which the Log Inserter connects when placing data into the ION database and to which the Query Server connects when retrieving data from the ION database. The connection string you enter must exist and be properly configured in order for logging to take place. Data Source (available only on PEGASYS and ION Enterprise 4.5 and earlier versions) This register specifies the name of the ODBC data source to which the Log Server connects when placing data into or retrieving data from the database. The ODBC data source you choose must exist and be properly configured in order for logging to take place. Log Source This register sets the Log Inserter’s configuration mode by specifying which logs to read. If this register is set to ALL, the module reads all logs in the system, and automatically reads new logs when devices are added to the ION Enterprise system. If the Log Source register is set to INPUT LOGS, the module only reads those log registers that are explicitly linked to its Log inputs. You may also configure the Log Source register so it automatically reads only the logs associated with a particular site, or only those associated with software nodes such as the VIP. NOTE If your ION Enterprise system has multiple Log Inserters, the ALL setting will not be available. Any overlap (i.e. duplicate inputs) are processed on a first-come, first-served basis. Output Registers NOTE The Log Schema output register only applies to PEGASYS and ION Enterprise 4.5 and earlier versions. The Log Schema output register does not exist in ION Enterprise 5.0 and later versions. Log Schema This database register refers to the actual database schema (set of tables) that is created by the Log Server in the database server. You will need to refer to the Log Schema register if you want to view the data using Vista. Page 322 © 2008 Schneider Electric. All rights reserved. ION Reference Log Acquisition Module Detailed Operation To configure the Log Acquisition module to write data to the database, you must set the Data Source setup register to a valid connection string for the ION database. NOTE For ION Enterprise 4.5 and earlier, you must set the Data Source setup register to a valid ODBC Data Source Name for the ION software database. Setting the Log Source register to INPUT LOGS allows you to pick and choose which log registers you want to log. For example, if you want to log data from two Data Recorders, link the Log Acquisition module’s Log inputs to the Data Log output registers of each Data Recorder. If you set the Log Source setup register to a site name, all log registers at that site will be automatically uploaded by the Log Acquisition module. If you have multiple sites in your ION Enterprise network, you may want to control logging on a per-site basis. For example, if you have two sites that you want to individually log data, create two Log Acquisition modules, and then configure one module’s Log Source setup register to one site, and configure the other module’s Log Source setup register to the other site. For most systems, however, the Log Inserter’s Auto-Mode should be used to automatically configure system logging. To do this, set the Log Source setup register to ALL. NOTE If one or more links have already been made to a Log Acquisition module’s inputs, the Fast Linker dialog will not appear when the input is clicked again. To invoke the Fast Linker when linking a previously configured module, hold down the Ctrl key and click the input. If you are manually linking log registers to your Log Acquisition modules, the task of linking all of your log registers is simplified by using Fast Linker (a built-in utility). In Designer, when you click on a Log Acquisition module’s input for the first time, a dialog appears asking if want to perform a Fast Link. If you choose no, the Fast © 2008 Schneider Electric. All rights reserved. Page 323 Log Acquisition Module ION Reference Linker dialog does not appear, and you can link individual inputs one at a time. If you choose YES, the Fast Linker dialog appears: NOTE If the Data Source setup register makes reference to an invalid connection string (or in the case of ION Enterprise 4.5 and earlier versions, an ODBC data source that does not exist), the Log Inserter will not start. In the Fast Linker dialog, select the node or nodes you want to link. All log registers on the nodes you select will be automatically linked to the Log Acquisition module. You can choose to link only Data, Waveform or Event logs, or any combination of these, by checking the appropriate boxes. The Data Source register must be configured with a valid connection string. NOTE For ION Enterprise 4.5 and earlier versions, the Data Source register must be configured with a valid ODBC data source name (DSN). All of the DSNs in your system that are based on the Sybase SQL Anywhere 5.0 driver will appear in the setup register’s list box. Note that DSNs will appear as valid options in the Data Source setup register whether they are configured properly or not. In case the Log Server does not start properly, edit the Log Server icon properties. In the Shortcut tab, “Target” box, include a –s <DSN> -S at the end (angle brackets not included; replace DSN with the default data source name). The –s <DSN> option sets the default DSN. The -S option forces all existing data sources to be set to the default DSN at startup. To add control to your Log Inserter’s operation, you can add an External Boolean module to the Log Inserter, and link its switch output to the Enable input of the Log Acquisition module. The Boolean module’s switch output can be used to create an ON/OFF button in Vista that allows you to enable or disable the Log Acquisition module. The Log Inserter will not attempt to retrieve logs that are linked to a disabled Log Acquisition module (other communications with the node will continue). Page 324 © 2008 Schneider Electric. All rights reserved. ION REFERENCE 09/2008 Log Export Module The Log Export module delivers XML data gathered from one or more meters to a user-defined destination. Log Export Module Sending Records Sent Success Source Send Fail Event Enable NOTE Before the Log Export module can work, you need to properly configure certain setup registers in both the Factory module and Ethernet (Communications) module. The Factory module requires you to configure the Device Namespace and Device Name registers, while the Ethernet (Communications) module must have the SMTP Server register configured correctly. Inputs Source This input is linked to the Data Log output of a Data Recorder module. The data from this Data Log output is transported as an XML message. Linking this input is mandatory. Enable If the Enable input is FALSE, the Log Export module will not respond to pulses arriving at the Send input. Linking this input is optional. If this is left unlinked, the module is enabled by default. Send When a pulse arrives at the Send input, the Log Export module sends all Source data records that have not previously been sent. Linking this input is mandatory. Schneider Electric 2195 Keating Cross Road Saanichton, BC Canada V8M 2A5 Tel: 1-250-652-7100 For technical support: [email protected] (00) + 1 250 544 3010 Contact your local Schneider Electric sales representative for assistance or go to www.powerlogic.com ION, PowerLogic and Schneider Electric are trademarks or registered trademarks of Schneider Electric in France, the USA and other countries. Other trademarks used are the property of their respective owners. Electrical equipment should be installed, operated, serviced, and maintained only by qualified personnel. No responsibility is assumed by Schneider Electric for any consequences arising out of the use of this material. © 2008 Schneider Electric. All rights reserved. Log Export Module ION Reference Setup Registers Destination This is the Uniform Resource Identifier (URI) of the destination. Current support is limited to email URIs (e.g. mailto:[email protected]). The default value is "ENTER DESTINATION ADDRESS", which means you must specify a destination in order for the module to go online. The destination string can be anywhere between 0 and 80 characters. NOTE You must include mailto: as a prefix to the email address string in order to send records via email. For example, an entry such as mailto:[email protected] is a valid Destination value. Max Send Records This register contains the maximum number of data records that the Log Export module attempts to send in any single message. The default value is set to 0, essentially disabling the module. This register must be changed to a non-zero value for the Log Export module to go online. Email From This register contains the address that appears in the From: field of the email sent by the Log Export module. This register only applies to messages sent via email. The default value depends on which Log Export module you are using and the meter's serial number. Email arriving from a meter have a default format similar to LogExport<module number>@<serial number>. Some SMTP servers only accept emails from valid Internet domains, so you may be required to alter the default address. You can use a maximum of 80 characters. Gatewayed Device Namespace The string value in this register is used as the namespace attribute in the Device element of XML messages generated by the module. The default value is Default. When it is set to Default, the namespace attribute of the Device element inherits the value from the Factory module's Device Namespace setup register. The value range for this string is up to 80 characters; these characters must be alphanumeric but can also include a dash (hyphen) or a dot (period). Refer to the MeterM@il Internal Email Client Feature technical note for an example that illustrates the use of this register. NOTE A namespace uniquely identifies a set of names so that there is no ambiguity when objects with different origins but the same names are mixed together. A namespace is commonly given the name of a Uniform Resource Identifier (URI) - such as a web site address - both because the namespace may be associated with the site or page of that URI (for example, a company name) and because a URI is likely to be a unique name. Page 326 © 2008 Schneider Electric. All rights reserved. ION Reference Log Export Module Gatewayed Device Name The string value in this register is used as the name attribute in the Device element of XML messages generated by the module. The default value is Default. When it is set to Default, the name attribute of the Device element inherits the value from the Factory module's Device Name setup register. The value range for this string is up to 80 characters; these characters must be alphanumeric but can also include a dash (hyphen) or a dot (period). Refer to the MeterM@il Internal Email Client Feature technical note for an example that illustrates the use of this register. NOTE The Factory module's Device Name and Device Namespace setup registers must be changed from their defaults in order for the Log Export module to go online. NOTE If only one meter is used for sending XML data, then Gatewayed Device Name and Gatewayed Device Namespace can remain at Default: the meter's Factory module can supply the necessary identification since there are no gatewayed devices. However, these registers are particularly important when a device is collecting data from multiple gatewayed devices via Modbus Master - each gatewayed device's XML data can be uniquely identified. Gatewayed Device Type This value is used as the type attribute in the Device element of XML messages generated by the module. The default value is Default. When set to Default, the type attribute of the Device element inherits the value from the Factory module's DeviceType register. The value range is 0-80 characters with no spaces or slashes. Characters must be alphanumeric but can also include a dash (hyphen) or a dot (period). MIME Type This register's value is used for the MIME (Multipurpose Internet Mail Extension) type in the header that accompanies the XML message. The default value is application/xml. The value range is 0-80 characters with no spaces. Attachment Extension This register's value specifies the extension to use in the filename for the XML message attachment. The default is "mma", though the value range can be 0-20 characters. This setup register only applies to emails. Output Registers Sending A value of TRUE at this output indicates the module is in the process of sending a message. If further pulses arrive at the Send input while the module is in this state, they will be ignored and an Event will be generated. Records Sent This output indicates the number of records sent in the last successful message transmission. © 2008 Schneider Electric. All rights reserved. Page 327 Log Export Module ION Reference Success This output pulses when the module successfully sends a message. Fail This output pulses when the module fails to send a message. Event Any events produced by the Log Export module are recorded in the Event register as follows: Event Priority Group Priority Description Send pulsed while already sending 30 A pulse arrived on the Send input while the module was already in the sending state Email send failed 30 An email message failed to be sent successfully, for any number of reasons. The logged event will contain some indication of the reason for the failure. Send pulsed but no records to send 30 A pulse arrived at the Send input, but the Data Recorder which is linked to the Source input of the Log Export Module does not contain any unsent data records. The Event output register stores the following information for each ION event: time stamp, priority, cause, effect, and any values or conditions associated with the cause and effect. Page 328 © 2008 Schneider Electric. All rights reserved. ION Reference Log Export Module Detailed Module Operation The applications for this module are numerous. Presented below are frameworks you can implement in your meter to utilize the Log Export module. Sending Data Via Email The following illustration shows how to create the basic framework for sending data to a specified email address via the Log Export module. Periodic Timer Module Trigger Data Recorder Module Log Export Module Data Log Record Complete Source Record Source Send The Data Recorder module's Source inputs record the data you want and store these values in the module's Data Log output register every time the module's Record input is pulsed by a Periodic Timer module. (These Source inputs can be linked to the boolean, numeric, or numeric bounded registers of ION devices.) When the values have been successfully recorded, the Data Recorder module's Record Complete output pulses the Send input of the Log Export module. When this pulse arrives at the Send input, the Log Export module sends all its Source data records that have not previously been sent to the email address specified in the Destination setup register. In the previous framework, data is sent to the destination email address as it is gathered. It is also possible to create a framework that allows a certain number of data records to be accumulated in the Data Recorder module before the "batch" is sent to the destination email address. A sample framework is illustrated below. Periodic Timer Module 1 Trigger Data Recorder Module Record Log Export Module Source Send Depth = 12 Period = 5 minutes Periodic Timer Module 2 Data Log Trigger Period = 60 minutes This sample framework allows 12 data records to be accumulated in the Data Recorder before it is sent from the meter to the email destination. The first Periodic Timer module has its Trigger output connected to the Data Recorder module's Record input, while a second Periodic Timer module has its Trigger linked to the © 2008 Schneider Electric. All rights reserved. Page 329 Log Export Module ION Reference Send input of the Log Export module. Rather than the Data Recorder module's Record Complete pulsing the Log Export module every time the data log is successfully recorded (as seen in the previous example), the Periodic Timer modules control when the data is sent. Page 330 © 2008 Schneider Electric. All rights reserved. ION REFERENCE 09/2008 Log Mail Module NOTE The Log Mail module is available only on certain meters (those with older firmware). The Log Export module completely replaces the Log Mail module in newer meters. The Log Mail module is designed to take data from a Data Recorder module, format it as an email message, and deliver that email message to an address specified by the user. Log Mail Module Sending Records Sent Success Source Send Fail Event Enable Inputs Source This input is linked to the Data Log output of a Data Recorder module. The data from this Data Log output will be transported via email. Linking this input is mandatory. Enable If the Enable input is FALSE, the Log Mail module will not respond to pulses arriving at the Send input. Linking this input is optional. If this is left unlinked, the module is enabled by default. Send When a pulse arrives at the Send input, the Log Mail module emails all Source data records that have not previously been sent. Linking this input is mandatory. Schneider Electric 2195 Keating Cross Road Saanichton, BC Canada V8M 2A5 Tel: 1-250-652-7100 For technical support: [email protected] (00) + 1 250 544 3010 Contact your local Schneider Electric sales representative for assistance or go to www.powerlogic.com ION, PowerLogic and Schneider Electric are trademarks or registered trademarks of Schneider Electric in France, the USA and other countries. Other trademarks used are the property of their respective owners. Electrical equipment should be installed, operated, serviced, and maintained only by qualified personnel. No responsibility is assumed by Schneider Electric for any consequences arising out of the use of this material. © 2008 Schneider Electric. All rights reserved. Log Mail Module ION Reference Setup Registers Email Address This register contains the destination email address that the data logs will be sent to. The default value of this register is "ENTER EMAIL ADDRESS" - the module will not go online unless the Email Address register is changed. You can only enter one Email Address per Log Mail module. The Email Address can be a maximum of 80 characters long. NOTE Make sure you set the SMTP Address setup register in the Ethernet Communications module. Max Send Records This register contains the maximum number of data records that the Log Mail module will attempt to send in any single email. The default value is 0 - the module will not go online unless this register is changed to a non-zero value. Email From This register contains the address that appears in the From: field of the email sent by the Log Mail module; refer to “Detailed Module Operation” for default values. Some SMTP servers only accept emails from valid Internet domains, so you may be required to alter the default address. You can use a maximum of 80 characters. Output Registers Sending A value of TRUE at this output indicates the module is in the process of sending an email. If further pulses arrive at the Send input while the module is in this state, they will be ignored and an Event will be generated. Records Sent This output indicates the number of records sent in the last successful email. Success This output pulses when the module successfully sends an email. Fail This output pulses when the module fails to send an email. Event Any events produced by the Log Mail module are recorded in the Event register as follows: Page 332 Event Priority Group Priority Send Pulsed While Already Sending 30 Description A pulse arrived on the Send input while the module was already in the sending state © 2008 Schneider Electric. All rights reserved. ION Reference Log Mail Module Event Priority Group Priority Description Email Send Failed 30 An email message failed to be sent successfully, for any number of reasons. The logged event will contain some indication of the reason for the failure. Send Pulsed But No Records To Send 30 A pulse arrived at the Send input, but the Data Recorder which is linked to the Source input of the Log Mail module does not contain any unsent data records. The Event output register stores the following information for each ION event: time stamp, priority, cause, effect, and any values or conditions associated with the cause and effect. © 2008 Schneider Electric. All rights reserved. Page 333 Log Mail Module ION Reference Detailed Module Operation The following section details the format of the emails sent by the Log Mail module. You can customize some of the properties of the email including the information in the email’s header and body. A discussion on a few Log Mail applications follows. Viewing Email Data Logs The meter emails logged data daily, hourly, or at any interval that your ION software administrator sets up. The data log email shows the following: Page 334 name of the data log device (meter) type meter serial number meter owner additional user-defined meter identification information labeled “Tag1” and “Tag2”; Tag1 and Tag2 are meter settings for information of your choice record number UTC (Universal Coordinated Time) that the data was recorded names of the logged data fields (e.g. Vln a, Vln b, Vln c) numeric values of the logged data © 2008 Schneider Electric. All rights reserved. ION Reference Log Mail Module The last two lines of the data log email above are represented in the following table. The Record Number is 0 (the number of records emailed at one time is determined by the meter configuration). The time that the data record was logged is given as the number of seconds elapsed since midnight on January 1, 1970. This format is called “UNIX Time (UTC).” The logged data fields Vln a, Vln b, Vln c (the Data Recorder module Source inputs 1–3) and each corresponding value are also indicated. Record Number 0 UTC 970093500 Vln a 117.3777 Vln b 116.9874 Vln c 117.0674 Customizing Emails Some information in the email header and body can be customized to meet your system requirements. The email’s header is comprised of the following elements within the module and your meter: From:LogMail <module number> @ <meter serial number> To:Email Address setup register Subject:[metermail] <Data Recorder number from output > from meter <serial number> Date:Date and Time the email left the meter The email’s body contains many of the Factory module’s setup registers including DeviceType (Read Only), Serial Number (Read Only), Owner, Tag1, and Tag2. Logs are arranged in comma-separated columns at the end of the email; each record number and its UTC timestamp precede the values recorded by the Data Recorder module. The following is an example of a typical Log Mail email: © 2008 Schneider Electric. All rights reserved. Page 335 Log Mail Module ION Reference Using the Log Mail Module The applications for this module are numerous. Presented below are frameworks you can implement in your meter to utilize this module. Emailing Data as its Recorded Presented below is the base framework you can use to send the contents of a Data Recorder module via email. Data Recorder Module Log Mail Module Data Log Record Complete Record Rearm Source Send The link from the Record Complete output to the Send input ensures that every time new data is recorded in the Data Recorder, it is sent out via email. Emailing Numerous Records Periodic Timer Module 1 Trigger Data Recorder Module Record Log Mail Module Source Send Depth = 12 Period = 5 minutes Periodic Timer Module 2 Data Log Trigger Period = 60 minutes This sample framework allows 12 data records to be accumulated in the Data Recorder before it is sent from the meter to the email server. The Periodic Timer modules connected to the Record and Send inputs ensure the timing. Page 336 © 2008 Schneider Electric. All rights reserved. ION REFERENCE 09/2008 Log Monitor Module The Log Monitor module provides statistics that describe the Log Server’s operation and performance. By viewing the Log Monitor’s output values in Vista, you can quickly see if performance problems exist with any input, meter or site, and determine if your system’s setup could be fine-tuned to improve performance. Log Monitor outputs can also be used to create advanced control operations, such as the automatic disconnection of a modem site after data has been uploaded. NOTE In order to provide statistics for a specific Log, Node or Site, at least one output register from the Log, Node or Site must be linked to the Log 1…n input. The outputs of the Log Monitor module depend on how the Log Source setup register is configured. The Log Monitor can be configured to provide statistics on specific logs, specific nodes (IEDs), entire sites, multiple sites, or aggregate statistics for all logs referenced by the Log Server. Log Monitor Module ... Log 1 Log n Schneider Electric 2195 Keating Cross Road Saanichton, BC Canada V8M 2A5 Tel: 1-250-652-7100 For technical support: [email protected] (00) + 1 250 544 3010 Contact your local Schneider Electric sales representative for assistance or go to www.powerlogic.com Caught Up Avg Retrieval Time Falling Behind Avg Processing Time Total Logs Logs Restored Pending Records Managed Logs Outstanding Recs Configured Logs Records Processed Confirmed Logs Rec Generation Rate Inaccessible Logs Rec Retrieval Rate Stat Comp Time ION, PowerLogic and Schneider Electric are trademarks or registered trademarks of Schneider Electric in France, the USA and other countries. Other trademarks used are the property of their respective owners. Electrical equipment should be installed, operated, serviced, and maintained only by qualified personnel. No responsibility is assumed by Schneider Electric for any consequences arising out of the use of this material. © 2008 Schneider Electric. All rights reserved. Log Monitor Module ION Reference Inputs All log Monitor modules have a single input type. An unlimited number of input links are supported. Log 1…n The Log Monitor’s Log inputs can be connected to the data log, waveform log or event log output registers of any other module. Only a single log has to be linked to this input to create statistics for entire nodes or sites (see the Logs setup register description). Linking this input is optional. Setup Registers Log Source The Log Source setup register is used to select which logs the Log Monitor should use to calculate statistics on. The following selections are available: ALL: all logs referenced by the Log Server will be included. No log registers need to be linked to the Log Monitor’s inputs. Input Logs: only the logs explicitly linked to the Log Monitor will be included. Input Nodes: all logs from each node that has a log register linked to the Log Monitor will be included. Only one log from a node needs to be linked to the Log Monitor for all logs from that node to be included. If logs from multiple nodes are linked to the Log Monitor, all logs from all nodes referenced will be included in the calculations. Input Sites: all logs from all nodes at each site that has a log register linked to the Log Monitor will be included. Only one log register from the site needs to be linked to the Log Monitor for all logs at that site to be included. If logs from multiple sites are linked to the Log Monitor, all logs from all of the sites referenced will be included in the calculations. SiteName: individual sites can be selected by name. All logs from the selected site will be included in the calculations, regardless of whether any log registers from the specified site are linked to the Log Monitor. SiteName (software nodes): allows you to select only logs generated by software nodes (Virtual Processors and Log Servers) at the specified site. By default, the Logs register is set to ALL. No log registers need to be linked to the Log Monitor in this configuration; all logs referenced by the Log Server will be included in the performance calculations. Log Types This register allows you to select which types of logs to include in performance calculations. Currently only ALL (all log types) is supported. Data Sources This register allows you to select logs from specific data sources for performance calculations. Currently only ALL (all data sources) is supported. Page 338 © 2008 Schneider Electric. All rights reserved. ION Reference Log Monitor Module Output Registers Caught Up This Boolean register is OFF if any records are outstanding, or if any configuration information is outstanding, or if any log has not yet been restored, or if any records are expected in the next minute. Otherwise, this register is ON. NOTE The values of the Caught Up and Falling Behind output registers are only calculated on demand. These values will be NOT AVAILABLE for five minutes after they are initially requested. Falling Behind This Boolean register is ON if the minimum number of records that are outstanding increases over the last minute. If the minimum number of records is zero, remains constant, or decreases, AND all logs are restored and there is no more outstanding configuration information to be uploaded, then this register is OFF. If none of the previous conditions apply, then the Falling Behind register is NOT AVAILABLE. NOTE The descriptions in this section discuss records and logs. A record is a single piece of data with a unique timestamp. A log is a collection of records. Logs can also be considered as the output of a waveform recorder, data recorder or event log controller module. A log can include records from multiple sources. Total Logs This register holds the total number of logs matching the Log Monitor module’s configuration in the Log Server. Total Logs includes all of the logs that have been restored and all logs that are waiting to be restored. Pending Records This register holds the number of records that have been requested but have not yet been received. This value does not include all of the records that the Log Server knows about; it only includes those records that the Log Server has sent requests for. Outstanding Records This register holds the number of records that the Log Server has not yet uploaded. Outstanding Records does not include records from logs that are not configured or not restored. Processed Records This register holds the total number of records that have been uploaded. Rec Generation Rate (records generation rate) This register holds an estimate of how many records are becoming available, reported in records/minute. Rec Retrieval Rate (records retrieval rate) This register holds an estimate of how many records are being retrieved per minute. © 2008 Schneider Electric. All rights reserved. Page 339 Log Monitor Module ION Reference Avg Retrieval Time This register holds the average amount of time, in seconds, between when the time the Log Server requests a record and the time that record is received. Avg Processing Time This register holds the average amount of time, in seconds, that it takes for the Log Server to convert a record and insert it into the database. Logs Restored This register holds the number of logs that have been restored. A log is considered restored when the Log Server has determined its current configuration information. If current configuration information is not available, the Log Server will query the database and restore the log. If the information is not available in the database, the Log Server will request it from the node. Managed Logs This register holds the number of logs that are managed by enabled Log Acquisition modules. Configured Logs This register holds the number of logs that are known to have properly configured inputs. The Configured Logs value includes all configured logs, whether they are enabled or not (either enabled or disabled on the node, or monitored by an enabled or disabled Log Acquisition module). Confirmed Logs This register holds an estimate of the number of logs for which the Log Server has complete configuration information. Confirmed Logs have the matching configuration information both in the node and in the database. Inaccessible Logs This register holds an estimate of how many logs are not responding to requests made by the Log Server. Inaccessible Logs are on nodes that are not responding to communications; disabled logs or logs not restored do not affect the value in this register. NOTE Communication problems on a recorder with remote inputs render logs “inaccessible”. For example, if you link modules in a Virtual Processor to modules on other remote devices, the logs will be inaccessible if a communication problem occurs between the Virtual Processor and the devices. Stat Comp Time (statistics computation time) This register holds the length of time, in seconds, that it takes the Log Monitor module to compute the statistics in its output registers. If the number in this register steadily increases, you may wish to redistribute logging demand or add another Log Server. Page 340 © 2008 Schneider Electric. All rights reserved. ION Reference Log Monitor Module Detailed Module Operation The Log Monitor has been designed to make configuration easy. By default, no log registers are linked to its inputs, and Logs, Log Types and Data Sources setup registers are set to ALL. In this configuration, all logs that the Log Server references are included in the performance calculations. This provides aggregate statistics for all logs on a per Log Server basis. The Log Monitor can be configured to provide statistics on any combination of log registers, nodes, workstations and sites. This provides a definable level of detail that you can use to examine specific areas in your system, or aggregate statistics based on any grouping you like. Log registers from other software components or IEDs must be linked to the Log Monitor’s inputs in order to use the Input Logs, Input Nodes or Input Sites settings in the Logs setup register. Only one log register needs to be linked to get performance statistics for the entire node (Input Node setting) or the entire site (Input Sites setting). If Input Logs is selected, only those log registers linked to the Log Monitor’s inputs will be included in the performance calculations. © 2008 Schneider Electric. All rights reserved. Page 341 Log Monitor Module Page 342 ION Reference © 2008 Schneider Electric. All rights reserved. ION REFERENCE 09/2008 LonWorks Export Module The LonWorks Export module allows your ION meter to provide data to a LonWorks network. It converts ION register values to LonWorks output network variables. As discussed below, these output network variables must be one of the standard network variable types (SNVTs) as specified by the SNVT setup register. LonWorks Export Module Source BindState Event nvo_LON_Export_xx For more information about LonWorks networks, visit the LonMark website at www.LonMark.org. Output Network Variable Name The name of the network variable is determined by the module’s label. Although the default label will work, it is good practice to use custom label names that identify the data source and LonWorks variable type. For example, if the module’s Source input is linked to the Power Meter module’s output register Vln a, a descriptive output network variable name would be nvoVln_a. Inputs Source This input value is converted to a LonWorks output network variable and delivered to the LonWorks network. The data type of the output network variable is defined by the SNVT setup register. You must link the Source input for the LonWorks Export module to function. Schneider Electric 2195 Keating Cross Road Saanichton, BC Canada V8M 2A5 Tel: 1-250-652-7100 For technical support: [email protected] (00) + 1 250 544 3010 Contact your local Schneider Electric sales representative for assistance or go to www.powerlogic.com ION, PowerLogic and Schneider Electric are trademarks or registered trademarks of Schneider Electric in France, the USA and other countries. Other trademarks used are the property of their respective owners. Electrical equipment should be installed, operated, serviced, and maintained only by qualified personnel. No responsibility is assumed by Schneider Electric for any consequences arising out of the use of this material. © 2008 Schneider Electric. All rights reserved. LonWorks Export Module ION Reference Setup Registers Send Time This register specifies the maximum number of seconds that can elapse before the output network variable is updated. In other words, the output network variable will be updated at a frequency dictated by this setup register, even when the source remains constant. Specifying 0 disables this parameter. Each time the network variable is updated, Send Time is reset. Send Delta This register specifies how much the Source input must change before the output network variable is updated. It is specified as an absolute value. If you specify 0, the output network variable will be updated every time the Source input changes. The output network variable will be updated if the following condition is true: Source current – Network Variable previous > Send Delta Update Rate Examples: The Send Delta and Send Time setup registers are not mutually exclusive. The following table illustrates how the combination of the two register values influences the module’s operation. Conditions Update Response Send Time = 0 Send Delta = 0 Update the network variable every time the Source input changes Send Delta = 5 Send Time = 0 Only update the network variable if Source differs from the previous value of the network variable by ±5 units Send Delta = 0 Send Time = 5 Update the network variable every time Source changes or, if Source is not changing, every 5 seconds Send Delta = 7 Send Time = 3 Update the network variable if Source differs from the previous value of the network variable by ±7 units or, after 3 seconds have elapsed since the last network variable update SNVT This register defines Standard Network Variable Type (SNVT). Two nodes in a LonWorks network can only share information if they export/import the same data type. The SNVT indicates what kind of data the LonWorks Export module is placing onto the LonWorks network. In effect, the SNVT associates a unit with the data value. For example, if you want to covert an ION register reporting energy (kWh) to a network variable, set the SNVT setup register to SNVT_elec_kwh. Refer to the table of supported SNVTs towards the end of this module description. More details about each SNVT can be found in the LonMark’s SNVT Master List. Be aware that if the LonWorks Export module’s network variable is currently bound (i.e. BindState is ON), you cannot change this setup register. You must first unbind the network variable using LonWorks Network Manager software. Page 344 © 2008 Schneider Electric. All rights reserved. ION Reference LonWorks Export Module Output Registers LonWorks Export modules have an output register that delivers the LonWorks network variables. A network variable has two components: the converted value from the Source input, and the units that are specified by the SNVT setup register. BindState This register indicates that the module’s output network variable is bound to at least one other LonWorks network variable. See “Binding Network Variables”, below. Event All events produced by a LonWorks Export module are written into this register. Events include changing the SNVT setup registers, changing the links to its input, and the BindState output register changing state. The Event output register stores the following information for each ION event: time stamp, event priority (in this module, all events have a pre-defined priority of 10), the event’s cause, the event’s effect, and conditions associated with the event’s cause and effect. Detailed Module Operation The following diagram illustrates an ION meter collecting power-system data and converting it to an output network variable in a LonWorks network. The target device is in the upper left corner. The output network variable must be of the same type (SNVT) as the input network variable. NOTE If you create any new LonWorks Export modules or you change their SNVT types, you will have to reinstall and reconfigure the device on the LonWorks Network for your changes to be detected. Binding Network Variables The network variable is bound if the module’s BindStatus output is ON. Your LonWorks Export modules may already be bound to certain common measurements (and further configuration may not be necessary). By default, the © 2008 Schneider Electric. All rights reserved. Page 345 LonWorks Export Module ION Reference LonWorks Export module will use the SNVT_not_used (the first register in the SNVT setup register list). Binding and unbinding network variables is accomplished with LonWorks Network manager tools. There are a number of tools available, each with their own configuration procedures. Refer to the documentation of network tools you are using for more details. Supported SNVTs The ION7300-LONFT’s LonWorks Import and LonWorks Export modules support the following SNVTs: Measurement SNVT Name Range Resolution SNVT # Exception Value SNVT_not_used Current (integer) SNVT_amp -3276.8 .. 3276.7 A Current (float) SNVT_amp_f -1E38 .. 1E38 A Current [milli] (integer) SNVT_amp_mil -3276.8 .. 3276.7 mA Phase/Rotation [degree] (integer) SNVT_angle_deg -359.98 .. 360.00 deg Phase/Rotation (float) SNVT_angle_f Energy, thermal (float) 1 -3276.8 A 48 -1E38 A 0.1 mA 2 -3276.8 mA 0.02 deg 104 655.34 deg -1E38 .. 1E38 radians 49 -1E38 rads SNVT_btu_f -1E38 .. 1E38 BTU 67 -1E38 BTU Energy, thermal [kilo] (integer) SNVT_btu_kilo 0 .. 65535 kBTU 1 kBTU 5 0 kBTU Energy, thermal [mega] (integer) SNVT_btu_mega 0 .. 65535 MBTU 1 MBTU 6 0 MBTU Count, event (integer) SNVT_count 0 .. 65535 counts 1 count 8 0 counts Count, event (float) SNVT_count_f -1E38 .. 1E38 counts 51 -1E38 counts Count, incremental (integer) SNVT_count_inc -32768 .. 32767 counts 9 -32768 counts Count, incremental (float) SNVT_count_inc_f -1E38 .. 1E38 counts 52 -1E38 counts Energy, electrical [kilo] (integer) SNVT_elec_kwh 0 .. 65535 kWh 1 kWh 13 0 kWh Energy, electrical (integer) SNVT_elec_whr 0 .. 6553.5 Wh 0.1 Wh 14 0 Wh Energy, electrical (float) SNVT_elec_whr_f 0 .. 1E38 Wh 68 0 Wh Flow (integer) SNVT_flow 0 .. 65534 l/s 15 65535 l/s Flow (float) SNVT_flow_f -1E38 .. 1E38 l/s 53 -1E38 l/s Frequency (float) SNVT_freq_f -1E38 .. 1E38 Hz 75 -1E38 Hz Frequency (integer) SNVT_freq_hz 0 .. 6553.5 Hz 0.1 Hz 76 0 Hz Level, continuous (integer) SNVT_lev_cont 0 .. 100% 0.50% 21 0% Level. continuous (float) SNVT_lev_cont_f 0 .. 100% 55 0% Level, discrete SNVT_lev_disc ST_OFF, ST_LOW .. ST_ON ¼ level 22 ST_NUL Level, percent SNVT_lev_percent -163.84% .. 163.83% 0.005% or 50 ppm 81 163.835% Power (integer) SNVT_power 0 .. 6553.5 W 0.1 W 27 0W Page 346 0.1 A 1 count 1 l/s © 2008 Schneider Electric. All rights reserved. ION Reference Measurement LonWorks Export Module SNVT Name Range Resolution Power (float) SNVT_power_f -1E38 .. 1E38 W Power [kilo] (integer) SNVT_power_kilo 0 .. 6553.5 kW Pressure - absolute (float) SNVT_press_f 0 .. 1E38 Pa Pressure - gauge (integer) SNVT_press_p -32768 .. 32766 Pa Power factor (integer) SNVT_pwr_fact -1.0 .. 1.0 Power factor (float) SNVT_pwr_fact_f -1.0 .. 1.0 Angular Velocity [RPM] (integer) SNVT_rpm 0 .. 65534 revs/min Temperature (integer) SNVT_temp -274 .. 6279.5 °C Temperature (float) SNVT_temp_f -273.17 .. 1E38 °C Temperature [HVAC] (integer) SNVT_temp_p -273.17 .. 327.66 °C Time - elapsed (float) SNVT_time_f -1E38 .. 1E38 s Time - elapsed (integer) SNVT_time_sec 0.0 .. 6553.4 s Voltage (integer) SNVT_volt -3276.8 .. 3276.7 V Voltage (float) SNVT_volt_f -1E38 .. 1E38 V Voltage [milli] (integer) SNVT_volt_mil -3276.8 .. 3276.7 mV Exception Value SNVT # 57 -1E38 W 28 0 kW 59 0 Pa 1 Pa 113 32767 Pa 0.00005 98 -1 99 -1 1 rev/min 102 65535 revs/min 0.1 °C 39 -274 °C 63 -273.17 °C 105 327.67 °C 64 -1E38 s 0.1 s 107 6553.5 s 0.1 V 44 -3276.8 V 66 -1E38 V 47 -3276.8 mV 0.1 kW 0.1 °C 0.1 mV Responses to Special Conditions Condition Response Module is first created (module’s default configuration) The network variable will be set to zero and the SNVT setup register will be set to SNVT_not_used. If the SNVT setup register is set to anything other than SNVT_not_used, the network variable will be set to its exception value. * Source input is not linked The network variable will be set to the exception value and will not be updated. Source input is NOT AVAILABLE The network variable will be set to the exception value and is updated according to the Send Time and Send Delta setup registers. If Source input is outside the range supported by the SNVT The network variable will have its minimum possible value (if Source is too small) or its maximum possible value (if Source is too large). During a firmware upgrade The network variable will retain the last updated value. Module is deleted The network variable will be forced to the exception value. * Some SNVT types support a specific exception value. Others will go to their min value to indicate an exception. NOTE If the network variable is bound, you cannot delete the LonWorks Export module. You must first unbind it using a LonWorks network manager. © 2008 Schneider Electric. All rights reserved. Page 347 LonWorks Export Module Page 348 ION Reference © 2008 Schneider Electric. All rights reserved. ION REFERENCE 09/2008 Maximum Module The Maximum module records the maximum value reached by a single numeric variable. It can be reset and enabled or disabled. Maximum Module Source Enable Reset Maximum Trigger Event Inputs Source This input is monitored for a maximum value. It must be a numeric variable register from any other module’s outputs. Linking this input is mandatory. The Maximum module ignores any source that is NOT AVAILABLE. Enable This input enables or disables the Maximum module (by setting it to ON or OFF respectively). When a Maximum module is disabled, it disregards any new maximum values at the Source input. This input is optional; if you leave it unlinked, the module is enabled by default. Reset This input resets the Maximum module, setting the Maximum output register to NOT AVAILABLE. The module can be reset even if it is disabled. This input must be a pulse register from any other module’s outputs. This input is optional; if you leave it unlinked, it will by default never receive a pulse. NOTE The Reset input will still function if the module’s Enable input is OFF. Schneider Electric 2195 Keating Cross Road Saanichton, BC Canada V8M 2A5 Tel: 1-250-652-7100 For technical support: [email protected] (00) + 1 250 544 3010 Contact your local Schneider Electric sales representative for assistance or go to www.powerlogic.com ION, PowerLogic and Schneider Electric are trademarks or registered trademarks of Schneider Electric in France, the USA and other countries. Other trademarks used are the property of their respective owners. Electrical equipment should be installed, operated, serviced, and maintained only by qualified personnel. No responsibility is assumed by Schneider Electric for any consequences arising out of the use of this material. © 2008 Schneider Electric. All rights reserved. Maximum Module ION Reference Setup Registers Maximum modules have no setup registers. Output Registers Maximum This numeric variable register contains the maximum value attained by the Source input, since the last reset. Trigger Each time a new maximum value occurs, the Trigger output register generates a pulse. Event Any events produced by the Maximum module are recorded in the Event register. Possible events and their associated priority numbers are shown in the table below. Event Priority Group Priority Description Reset 5 A module reset has occurred. Setup Change 10 Input links, setup registers or labels have changed. The Event output register stores the following information for each ION event: time stamp, priority, cause, effect, and any values or conditions associated with the cause and effect. Page 350 © 2008 Schneider Electric. All rights reserved. ION Reference Maximum Module Detailed Module Operation The figure below illustrates the operation of a Maximum module. As long as the Enable input is ON, it monitors a numeric variable and every time the variable reaches a new maximum, the Maximum module stores that value and generates a pulse. Responses to Special Conditions The following table summarizes how the Maximum module behaves under different conditions. Condition © 2008 Schneider Electric. All rights reserved. Response of Output Register If the Source input is NOT AVAILABLE The Maximum output retains the value it held when the Source input was available. If the Enable input is OFF The Maximum output retains the value it held when the Source input was available. After the module is re-linked or its setup registers are changed The Maximum register is NOT AVAILABLE. When the module is started or powered-up (either the first time, or after a shut-down) The Maximum output register retains the value it held at shutdown. Page 351 Maximum Module Page 352 ION Reference © 2008 Schneider Electric. All rights reserved. ION REFERENCE 09/2008 LonWorks Import Module The LonWorks Import module allows your ION meter to accept data from a LonWorks network. It takes a LonWorks input network variable and converts it to an ION register. As discussed below, the input network variable must be one of the standard network variable types (SNVTs) as specified by the SNVT setup register. Netvar LonWorks Import Module nvo_LON_Import_xx BindState Event The LonWorks Import module, together with the LonWorks Export module, allows an ION meter to be integrated into a LonWorks network. Once you have imported data from another LonWorks-compatible device and converted it to ION, you can manipulate the data using the advanced features of your ION meter, thus extending the capabilities of the LonWorks network. Additionally, you can expand the I/O capabilities of your meter by adding LonWorks-compatible I/O devices. Inputs The input is a network variable from a LonWorks network. Each LonWorks Import module has one network variable associated with it. Setup Registers SNVT This register defines Standard Network Variable Type (SNVT) that the module imports. It indicates to the LonWorks Network Manager what kind of data the module is expecting. In effect, it associates a unit with the value. For devices on a LonWorks network to be logically connected, they must use the same data type (i.e. the same SNVT). Schneider Electric 2195 Keating Cross Road Saanichton, BC Canada V8M 2A5 Tel: 1-250-652-7100 For technical support: [email protected] (00) + 1 250 544 3010 Contact your local Schneider Electric sales representative for assistance or go to www.powerlogic.com ION, PowerLogic and Schneider Electric are trademarks or registered trademarks of Schneider Electric in France, the USA and other countries. Other trademarks used are the property of their respective owners. Electrical equipment should be installed, operated, serviced, and maintained only by qualified personnel. No responsibility is assumed by Schneider Electric for any consequences arising out of the use of this material. © 2008 Schneider Electric. All rights reserved. LonWorks Import Module ION Reference By specifying a particular SNVT, you are implicitly defining the kind of data the module will be handling. For example, if a device on the LonWorks network delivers a network variable representing temperature, and this is the value you want to convert to an ION register, you must set this setup register to SNVT_temp_f. For a detailed description of each SNVT, refer to LonMark’s SNVT Master List, or visit LonMark’s website at www.LonMark.org (note however that the LonWorks Import module only supports those SNVTs listed in its SNVT setup register). Output Registers All LonWorks Import modules have the following output registers: Netvar This numeric register contains the value of the input SNVT (see the SNVT setup register description) accepted by the module. BindState This register indicates that the input network variable imported by the module is bound to at least one other output network variable. Event All events produced by the module are written into this register. Events mark changes to the SNVT setup register, input links, and the state of the BindState output register. The following information is stored for each ION event: time stamp, event priority (in this module, all events have a pre-defined priority of 10), the event’s cause, the event’s effect, and conditions associated with the event’s cause and effect. Page 354 © 2008 Schneider Electric. All rights reserved. ION Reference LonWorks Import Module Detailed Module Operation The figure below illustrates the operation of a LonWorks Import module. The LonWorks device delivers its data to the network in the form of an output network variable. The ION meter contains a LonWorks Import module whose SNVT setup register has been set to match the SNVT of the network variable. NOTE If the network variable is bound, you cannot delete the LonWorks Import module. You must first unbind it using a LonWorks network manager tool. The Network Manager recognizes the two devices and binds (performs the logical connection) between them. Thus, the data is imported from the LonWorks network, converted to an ION register and made available to the advanced features of the ION device. LonWorks Device Existing LonWorks Devices Output Network Variable ION Enterprise Workstation Input Network Variable Network Manager Tool You must create and configure all the LonWorks Import modules you plan to use before installing the device on the LonWorks Network. If you create any new LonWorks Import modules or you change their configuration, you will have to reinstall the device on the LonWorks Network for your changes to be detected. Supported SNVTs The ION7300-LONFT’s LonWorks Import and LonWorks Export modules support the following SNVTs: Measurement SNVT Name Range Resolution SNVT # Exception Value SNVT_not_used Current (integer) SNVT_amp -3276.8 .. 3276.7 A Current (float) SNVT_amp_f -1E38 .. 1E38 A Current [millie] (integer) SNVT_amp_mil -3276.8 .. 3276.7 mA © 2008 Schneider Electric. All rights reserved. 0.1 A 0.1 mA 1 -3276.8 A 48 -1E38 A 2 -3276.8 mA Page 355 LonWorks Import Module Measurement ION Reference SNVT Name Range Phase/Rotation [degree] (integer) SNVT_angle_deg -359.98 .. 360.00 deg Phase/Rotation (float) SNVT_angle_f Energy, thermal (float) Resolution 104 655.34 deg -1E38 .. 1E38 radians 49 -1E38 rads SNVT_btu_f -1E38 .. 1E38 BTU 67 -1E38 BTU Energy, thermal [kilo] (integer) SNVT_btu_kilo 0 .. 65535 kBTU 1 kBTU 5 0 kBTU Energy, thermal [mega] (integer) SNVT_btu_mega 0 .. 65535 MBTU 1 MBTU 6 0 MBTU Count, event (integer) SNVT_count 0 .. 65535 counts 1 count 8 0 counts Count, event (float) SNVT_count_f -1E38 .. 1E38 counts 51 -1E38 counts Count, incremental (integer) SNVT_count_inc -32768 .. 32767 counts 9 -32768 counts Count, incremental (float) SNVT_count_inc_f -1E38 .. 1E38 counts 52 -1E38 counts Energy, electrical [kilo] (integer) SNVT_elec_kwh 0 .. 65535 kWh 1 kWh 13 0 kWh Energy, electrical (integer) SNVT_elec_whr 0 .. 6553.5 Wh 0.1 Wh 14 0 Wh Energy, electrical (float) SNVT_elec_whr_f 0 .. 1E38 Wh 68 0 Wh Flow (integer) SNVT_flow 0 .. 65534 l/s 15 65535 l/s Flow (float) SNVT_flow_f -1E38 .. 1E38 l/s 53 -1E38 l/s Frequency (float) SNVT_freq_f -1E38 .. 1E38 Hz 75 -1E38 Hz Frequency (integer) SNVT_freq_hz 0 .. 6553.5 Hz 0.1 Hz 76 0 Hz Level, continuous (integer) SNVT_lev_cont 0 .. 100% 0.50% 21 0% Level. continuous (float) SNVT_lev_cont_f 0 .. 100% 55 0% Level, discrete SNVT_lev_disc ST_OFF, ST_LOW .. ST_ON ¼ level 22 ST_NUL Level, percent SNVT_lev_percent -163.84% .. 163.83% 0.005% or 50 ppm 81 163.835% Power (integer) SNVT_power 0 .. 6553.5 W 0.1 W 27 0W Power (float) SNVT_power_f -1E38 .. 1E38 W 57 -1E38 W Power [kilo] (integer) SNVT_power_kilo 0 .. 6553.5 kW 28 0 kW Pressure - absolute (float) SNVT_press_f 0 .. 1E38 Pa 59 0 Pa Pressure - gauge (integer) SNVT_press_p -32768 .. 32766 Pa 1 Pa 113 32767 Pa Power factor (integer) SNVT_pwr_fact -1.0 .. 1.0 0.00005 98 -1 Power factor (float) SNVT_pwr_fact_f -1.0 .. 1.0 99 -1 Angular Velocity [RPM] (integer) SNVT_rpm 0 .. 65534 revs/min 1 rev/min 102 65535 revs/min Temperature (integer) SNVT_temp -274 .. 6279.5 °C 0.1 °C 39 -274 °C Temperature (float) SNVT_temp_f -273.17 .. 1E38 °C 63 -273.17 °C Temperature [HVAC] (integer) SNVT_temp_p -273.17 .. 327.66 °C 105 327.67 °C Time - elapsed (float) SNVT_time_f -1E38 .. 1E38 s 64 -1E38 s Time - elapsed (integer) SNVT_time_sec 0.0 .. 6553.4 s 0.1 s 107 6553.5 s Voltage (integer) SNVT_volt -3276.8 .. 3276.7 V 0.1 V 44 -3276.8 V Voltage (float) SNVT_volt_f -1E38 .. 1E38 V 66 -1E38 V Voltage [milli] (integer) SNVT_volt_mil -3276.8 .. 3276.7 mV 47 -3276.8 mV Page 356 0.02 deg Exception Value SNVT # 1 count 1 l/s 0.1 kW 0.1 °C 0.1 mV © 2008 Schneider Electric. All rights reserved. ION Reference LonWorks Import Module Responses to Special Conditions Condition Response Module is first created If the SNVT setup register is set to SNVT_not_used, Netvar will be set to zero. If the SNVT setup register is set to anything else, Netvar will be set to its exception value. * The module’s network variable is not bound Netvar will be set to the network variable’s exception value. * Output network variable was there but got deleted Netvar will remain at the last updated value. On device power up Netvar will remain at the last updated value. * Some SNVT types support a specific exception value; others will go to their minimum value to indicate an exception. NOTE If the network variable is bound, you cannot delete the LonWorks Import module. You must first unbind it using a LonWorks network manager. © 2008 Schneider Electric. All rights reserved. Page 357 LonWorks Import Module Page 358 ION Reference © 2008 Schneider Electric. All rights reserved. ION REFERENCE 09/2008 Mains Signaling Evaluation Module This module is designed to monitor the magnitude of a specific frequency with respect to the fundamental. The module averages the 1-second magnitude at a specified frequency over an evaluation period, and determines its compliance against a specified limit. Each time the limit is exceeded, the module increments an output register. NOTE This module is designed to evaluate compliance with the mains signal voltage portion of the EN50160 and IEC 61000-4-30 standards. Inputs Source The module receives this input from a voltage FFT (V1, V2, or V3) module. Valid When the Evaluate input is pulsed, the module checks the state of Valid, and updates the output registers accordingly; refer to “Detailed Module Operation” below. Linking this input is optional. Schneider Electric 2195 Keating Cross Road Saanichton, BC Canada V8M 2A5 Tel: 1-250-652-7100 For technical support: [email protected] (00) + 1 250 544 3010 Contact your local Schneider Electric sales representative for assistance or go to www.powerlogic.com ION, PowerLogic and Schneider Electric are trademarks or registered trademarks of Schneider Electric in France, the USA and other countries. Other trademarks used are the property of their respective owners. Electrical equipment should be installed, operated, serviced, and maintained only by qualified personnel. No responsibility is assumed by Schneider Electric for any consequences arising out of the use of this material. © 2008 Schneider Electric. All rights reserved. Mains Signaling Evaluation Module ION Reference Enable This input enables or disables the module’s operation. If this input is set to FALSE, then the outputs will not be updated, and pulses at the Evaluate will be ignored. This input is optional; if you leave it unlinked, the module will be enabled by default. Evaluate A pulse at this input triggers the module to perform its statistical evaluation, and update its output registers. This input must be linked for the module to go online. Reset This input resets the module’s outputs to NOT AVAILABLE until the next evaluation occurs. Linking this input is optional; if you leave it unlinked, the input will never receive a pulse. Setup Registers Frequency This register specifies the signal frequency of interest. The minimum frequency is 5Hz; maximum frequency differs depending on meter model and firmware. Limit This register specifies the allowable signal voltage threshold as a percentage of the fundamental. EvPriority This register allows you to set a custom priority level to certain events written to the Event output register. When EvPriority is zero, no event is written. Refer to the Event output register description for details. Output Registers Num Valid The number of valid evaluation intervals. Num Invalid The number of invalid evaluation intervals. Num Exceed The number of valid (see Num Valid) evaluation intervals where the specified frequency exceeded the specified limit. Signal Freq Mag The signal frequency magnitude is output to this register when the Evaluate input is pulsed. This register = N/A if the Valid input is linked and is FALSE. Fundamental Freq Mag The fundamental frequency magnitude is output to this register when the Evaluate input is pulsed. This register = N/A if the Valid input is linked and is FALSE. Page 360 © 2008 Schneider Electric. All rights reserved. ION Reference Mains Signaling Evaluation Module Event All events produced by the module are written into this register. Possible events and their associated priority numbers are shown in the table below: Event Priority Group Priority Description Setup Change 10 Input Links, setup registers or labels have been changed. N Exceeded Event * The N1 counter was incremented. * The priority of this event is defined in the Event Priority setup register. The Event output register stores the following information for each ION event: time stamp, priority, cause, effect, and any values or conditions associated with the cause and effect. Detailed Module Operation The module accumulates 1-second averages of the Source input. Once Evaluate is pulsed, the module checks the state of the Valid input. If Valid is FALSE, then the Num Invalid is incremented. If Valid is TRUE then the average percent distortion is calculated for the interval and compared against the Limit. If the Limit is exceeded, the Num Exceed output register is incremented. © 2008 Schneider Electric. All rights reserved. Page 361 Mains Signaling Evaluation Module Page 362 ION Reference © 2008 Schneider Electric. All rights reserved. ION REFERENCE 09/2008 Minimum Module The Minimum module records the minimum value reached by a single Numeric Variable. The minimum can be reset and enabled or disabled. Minimum Module Source Enable Reset Minimum Trigger Event Inputs Source This input is monitored for a minimum value. It must be a numeric variable register from any other module’s outputs. Linking this input is mandatory. The Minimum module ignores any source that is NOT AVAILABLE. Enable This input enables or disables the Minimum module (by setting it to ON or OFF respectively). When a Minimum module is disabled, it disregards any new minimum values in the Source input. This input is optional; if you leave it unlinked, the module is enabled by default. Reset This input resets the Minimum module, setting the Minimum output register to NOT AVAILABLE. The module can be reset even if it is disabled. This input must be a pulse register from any other module’s outputs. This input is optional; if you leave it unlinked, it will by default never receive a pulse. NOTE The Reset input will still function if the module’s Enable input is OFF. Schneider Electric 2195 Keating Cross Road Saanichton, BC Canada V8M 2A5 Tel: 1-250-652-7100 For technical support: [email protected] (00) + 1 250 544 3010 Contact your local Schneider Electric sales representative for assistance or go to www.powerlogic.com ION, PowerLogic and Schneider Electric are trademarks or registered trademarks of Schneider Electric in France, the USA and other countries. Other trademarks used are the property of their respective owners. Electrical equipment should be installed, operated, serviced, and maintained only by qualified personnel. No responsibility is assumed by Schneider Electric for any consequences arising out of the use of this material. © 2008 Schneider Electric. All rights reserved. Minimum Module ION Reference Setup Registers Minimum modules have no setup registers. Output Registers Minimum This numeric variable register contains the minimum value attained by the Source input, since the last reset. Trigger Each time a new minimum value occurs, the Trigger output register generates a pulse. Event Any events produced by the Minimum module are recorded in the Event register. Possible events and their associated priority numbers are shown in the table below. Event Priority Group Priority Description Reset 5 A module reset has occurred. Setup Change 10 Input links, setup registers or labels have changed. The Event output register stores the following information for each ION event: time stamp, priority, cause, effect, and any values or conditions associated with the cause and effect. Page 364 © 2008 Schneider Electric. All rights reserved. ION Reference Minimum Module Detailed Module Operation The figure below illustrates the operation of a Minimum module. As long as the Enable input is ON, it monitors a numeric variable and every time the variable reaches a new minimum, the Minimum module stores that value and generates a pulse. Responses to Special Conditions The following table summarizes how the Minimum module behaves under different conditions. Condition © 2008 Schneider Electric. All rights reserved. Response of Output Register If the Source input is NOT AVAILABLE The Minimum output register retains the value it held when the Source input was available. If the Enable input is OFF The Minimum output register retains the value it held when the Source input was available. After the module is re-linked or its setup registers are changed The Minimum output register is NOT AVAILABLE. When the device is started or powered-up (either the first time, or after a shut-down) The Minimum output register retains the value it held at shutdown. Page 365 Minimum Module Page 366 ION Reference © 2008 Schneider Electric. All rights reserved. ION REFERENCE 09/2008 Modbus Export Module The Modbus Export module writes data to any device that supports the Modicon Modbus communications protocol. This feature gives you greater flexibility and control over existing devices on your network. For example, you can configure this module to control a relay on a remote power meter. You can configure a Modbus Export module with up to 64 inputs per module using Virtual Processor. Some meters have Modbus master capability that you configure using Designer. There are 16 Source inputs on the meter. There are some registers that are only available on the meter or in the Virtual Processor; these registers are specified in brackets throughout the text. NOTE When configured, the Modbus Export module behaves in a similar fashion to a Modbus controller. However, each module can write data to only one Modbus slave device, over a specified range of its address registers. Inputs Source 1... Source N These inputs hold the values that are written to the appropriate Modbus registers, as configured in the module’s setup registers. You must link at least one of these inputs. Schneider Electric 2195 Keating Cross Road Saanichton, BC Canada V8M 2A5 Tel: 1-250-652-7100 For technical support: [email protected] (00) + 1 250 544 3010 Contact your local Schneider Electric sales representative for assistance or go to www.powerlogic.com ION, PowerLogic and Schneider Electric are trademarks or registered trademarks of Schneider Electric in France, the USA and other countries. Other trademarks used are the property of their respective owners. Electrical equipment should be installed, operated, serviced, and maintained only by qualified personnel. No responsibility is assumed by Schneider Electric for any consequences arising out of the use of this material. © 2008 Schneider Electric. All rights reserved. Modbus Export Module ION Reference Enable This input is used to switch the Modbus Export module ON or OFF. When OFF is selected the module does not function. NOTE Even if the Enable input is not connected, the module is enabled, by default. WriteNow When connected to a trigger source, the module writes data when it detects a pulse at this input. If left unconnected, the module does not write. If the module is pulsed while it is 'pending,' the input data that is current at the time of the most recent pulse is written to the Modbus slave. Setup Registers Connection (or COMM Port on some meters) This register maps the connection to a setup register on the Modbus Master Options Module. Choose Serial Connection 1-4 or TCP Connection 1-10 (if available). Device Name (only on Virtual Processor) This register contains the address name indicating the Modbus device the module writes to. This name must be defined in the Virtual Processor setup and belong to a Modbus site. Slave Addr (slave address) (only on the meter) The module writes to the Modbus device using a numeric address specified in this register. The valid address range is 0-247. A zero (0) value is a broadcast write. Reg Addr (register address) The module writes to the Modbus register map using a starting address specified in this register. Request Type This specifies if the write request is sent to a single register or multiple. Format This register defines what format of data the module follows when writing to the Modbus registers. Refer to your ION device documentation for setup register choices and bounds. The choices include: Format Page 368 Type Range # of Modbus registers used Unsigned 16B Integer 0 to 65 535 1 Signed 16B Integer -32 768 to 32 767 1 Unsigned 32B Integer 0 to 4 294 967 295 2 Unsigned 32B Little Endian Integer 0 to 4 294 967 295 2 © 2008 Schneider Electric. All rights reserved. ION Reference Modbus Export Module Format Type Range # of Modbus registers used Signed 32B Integer -2 147 483 648 to 2 147 483 647 2 Signed 32B Little Endian Integer -2 147 483 648 to 2 147 483 647 2 Unsigned 32 B M10k Integer 0 to 65 535 999 2 Unsigned 32 B M10k Little Endian Integer 0 to 65 535 999 2 Signed 32 B M10k Integer -32 767 999 to 32 767 999 2 Signed 32 B M10k Little Endian Integer -32 767 999 to 32 767 999 2 Packed Boolean Integer 0 to FFFF (Boolean inputs) 2 IEEE Float Floating Point - 3.402823466x1038 to 3.402823466x1038 2 IEEE Float Little Endian Floating Point - 3.402823466x1038 to 3.402823466x1038 2 Both Unsigned and Signed 32B-M10k refer to the Modulo10000 formats. This format breaks a 32-bit value into two 16-bit registers, according to the following relationship: register_high (higher-order register) = value/10 000 register_low (lower-order register) = value modulus 10 000 Hence the 32-bit value can be retrieved by the following calculation: value = register_high x 10 000 + register_low Scaling YES indicates that scaling is to be applied to data before writing to the Modbus registers; NO indicates data is written without scaling. No scaling is allowed for IEEE Float, IEEE Float Little Endian or Packed Boolean formats. For more information on scaling, see the Common Modbus Registers protocol document. IONInMinScale (ION input minimum scale) If scaling is applicable, this register specifies the lower limit of the ION register value. IONInMaxScale (ION input maximum scale) If scaling is applicable, this register specifies the upper limit of the ION register value. ModbusOutMinScale (Modbus output minimum scale) If scaling is applicable, this register specifies the scaled lower limit of the Modbus value. ModbusOutMaxScale (Modbus output maximum scale) If scaling is applicable, this register specifies the scaled upper limit of the Modbus value. © 2008 Schneider Electric. All rights reserved. Page 369 Modbus Export Module ION Reference Output Registers Busy (only on the meter) Busy output is ON when the module is transmitting a write request. WriteNow pulses are ignored until busy is OFF. Pending (only on the meter) Pending output is ON when a write operation is in progress. Another write request is not issued until pending is OFF. Status This register indicates the status of communication between ION and Modbus protocols. A value of one (ON) indicates that the last communications attempt succeeded; OFF indicates it did not. Successful Write This output generates a pulse whenever the module successfully writes data. Unsuccessful Write This output generates a pulse whenever the module does not write a request because of either a communications error or a Modbus exception. Exception Code This register contains the Modbus exception code returned by the slave when invalid requests are made. Update Period This register indicates the delay from the time the module receives a WriteNow request to when it updates its outputs with the results of the write operation. Event All events produced by the Modbus module are recorded in the Event register. Possible events and their associated priority numbers are shown in the following table. Event Priority Group Priority Description Setup change 10 Input links, setup registers or labels have changed Request to write 255 Overwrite previous request Communications Lost * Displays what caused communications loss Resuming communications * Indicates when communications link is re-established Write Now Pulsed While Busy (on meter only) 30 A pulse arrives at the WriteNow input while the module is in the process of transmitting a previous request. The new request is ignored. * The priority of this event depends on how you configure the EvPriority setup register. Page 370 © 2008 Schneider Electric. All rights reserved. ION Reference Modbus Export Module The Event output register stores the following information for each ION event: time stamp priority cause effect any values or conditions associated with the cause and effect Modicon Modbus Two classes of Modbus data, namely Coil and Holding Register, are supported by the Modbus Export module. Coils are single-bit registers used to indicate ON (1) or OFF (0) conditions. Holding Registers are 16-bit registers used to store and retrieve data. NOTE For further details, refer to your Modicon Modbus Communications Protocol document, or visit their website at www.modicon.com If you specify the Reg Addr to begin with a zero (0), data is exported in a coil register format. If you specify the Reg Addr to begin with four (4), data is exported as one of the holding register formats described below. The following outlines the function codes that the Modbus Export module uses to support the classes of Modbus data: Function Name Function Code Register Address FORCE_SINGLE_COIL 05 0XXXX(X) PRESET_SINGLE_REGISTER 06 4XXXX(X) FORCE_MULTIPLE_COILS 15 0XXXX(X) PRESET_MULTIPLE REGISTERS 16 4XXXX(X) The following illustrates how the Modbus Export module maps its inputs to the Modbus register map, according to the chosen Modbus format. NOTE The module automatically chooses the Function Code based on the RegAddr setup register value, and based on the Request Type for 4xxxx class requests. The following outlines the different Modbus formats supported by the Modbus Export module, as well as the maximum number of Modbus registers the Modbus Export module is able to write to per request: © 2008 Schneider Electric. All rights reserved. Page 371 Modbus Export Module ION Reference Single Register Modbus Format Signed 16B Unsigned 16B Virtual Processor Meter Multiple Registers Virtual Processor Meter 1 1 64 registers/ 64 values 16 registers/ 16 values N/A N/A 122 registers/ 61 values 16 registers/ 8 values 1 register/ 16 values 1 register/ 16 values 4 registers/ 64 values 1 register/ 16 values Signed 32B Signed 32B Little Endian Unsigned 32B Unsigned 32B Little Endian Signed 32B-M10k Signed 32B-M10k Little Endian Unsigned 32B-M10k Unsigned 32B-M10k Little Endian IEEE Float IEEE Float Little Endian Packed Boolean Coil Register Format NOTE You can configure the Modbus Import and Export modules using Designer. The ION meter Modbus Master limitations are described throughout this text. For each write request, function code 05 (Force_Single_Coil) allows the module to write to only one coil register (Modbus starting address). For function code 15 (Force_Multiple_Coil), the module writes data to multiple Modbus addresses, up to a maximum of 64 (16 on the meter). For function code 15, the Modbus Export module writes data to the Modbus register in a similar fashion to the 16 bit signed (unscaled) or 16 bit unsigned (unscaled) format. The module writes the following data to the Modbus Coil register: Page 372 One (1) for any numeric non-zero or Boolean TRUE value appearing at the module’s input. Zero (0) for numeric zero or Boolean FALSE value appearing at the module’s input. © 2008 Schneider Electric. All rights reserved. ION Reference Modbus Export Module Holding Register Formats Little Endian For all 32-bit formats (IEEE Float and Signed, Unsigned 32-bit and M10k), Little Endian reverses the two registers (not the bits within the registers) where the data is written. For example, data from Source 1 (as described above), places the contents of the 16 least significant bits into the specified starting address of the Modbus register map, and places the contents of the 16 most significant bits into the adjacent higher address of the Modbus register map. Signed 16B or Unsigned 16B UNSCALED The module takes data from Source 1 and writes it into the specified starting address of the Modbus register map. SCALED The module takes data from Source 1 and applies scaling specified in the module’s setup registers. It then writes the result into the specified starting address of the Modbus register map. © 2008 Schneider Electric. All rights reserved. Page 373 Modbus Export Module ION Reference The 16-bit Modbus Register Map illustrates how the module maps its Source inputs to the Modbus register map. IEEE Float IEEE Float is a floating point format. It does not support scaling. The module takes data from Source 1, places the contents of the 16 most significant bits into the specified starting address of the Modbus register map, and places the contents of the 16 least significant bits into the adjacent higher address of the Modbus register map. See the 32-bit Modbus Register Map for details. Signed 32B or Unsigned 32B UNSCALED The module takes data from Source 1, places the contents of the 16 most significant bits into the specified starting address of the Modbus register map, and places the contents of the 16 least significant bits into the adjacent higher address of the Modbus register map. SCALED The module takes data from Source 1 and applies the scaling you specified in the module’s setup registers. It then places the contents of the 16 most significant bits into the specified starting address of the Modbus register map, and places the contents of the 16 least significant bits into the adjacent higher address of the Modbus register map. Page 374 © 2008 Schneider Electric. All rights reserved. ION Reference Modbus Export Module The 32-bit Modbus Register Map illustrates how the module maps its Source inputs to the Modbus register map. 32-bit Modbus Register Map Signed 32B-M10k or Unsigned 32B-M10k The module maps data in a similar fashion as the 32 bit signed or 32 bit unsigned format (see 32-bit Modbus Register Map above). UNSCALED The module takes data from Source 1 and divides the value by 10000. It then takes the quotient and places it into the specified starting address of the Modbus register map, and places the remainder into the adjacent higher address of the Modbus register map. SCALED The module takes data from Source 1, applies scaling specified in the module’s setup registers, then divides this value by 10000. It then takes the quotient and places it into the specified starting address of the Modbus register map, and takes the remainder and places it into the adjacent higher address of the Modbus register map. Packed Boolean The module writes to the appropriate bit position in the Modbus register map as follows: One (1) for any numeric non-zero or Boolean TRUE value. Zero (0) for numeric zero or Boolean FALSE value. The module takes data from Source 1, translates and places the appropriate data into the most significant bit position of the specified starting address of the Modbus register map. © 2008 Schneider Electric. All rights reserved. Page 375 Modbus Export Module ION Reference Next, it takes data from Source 2, translates and places the appropriate value into the second most significant bit of the same Modbus register. It continues this pattern until the contents of Source 16 is translated and placed into the least significant bit of that Modbus register. For a module on the Virtual Processor, the appropriate value is taken from Source 17, translated and placed into the most significant bit position of the adjacent higher address of the Modbus register map, etc., until all your specified Source inputs have been written, as illustrated below: Packed Boolean Modbus Register Map Page 376 © 2008 Schneider Electric. All rights reserved. ION Reference Modbus Export Module Detailed Module Operation 1. To set up communications between the Virtual Processor and Modbus slave, you must first enter the Modbus device information in the Virtual Processor Setup utility. Select a unique name for the Modbus device and map this string variable to the Modbus device address. You use this name later on when setting up the module Device Name setup parameter. NOTE When a Modbus Export module broadcasts, it sends messages to all devices on all sites connected to the Virtual Processor or meter. However, slave devices do not respond to broadcast messages, therefore the Virtual Processor or meter does not receive acknowledgement of a successful send. After a broadcast, Status goes ON, while, Update Period and Exception Code output registers are NOT AVAILABLE. To set up communications between the ION meter (as a Modbus master) and Modbus slave, use Designer to configure the communications port (COM port and baud rate) on the Modbus Master capable meter. Ensure the Modbus Master protocol is active on the communications channel that connects the Modbus master capable meter to a slave device on the Modbus network. 2. After you add and set up a Modbus Export module to your framework, switch on the Enable input (if this input is linked) to initiate communication with the Modbus device. The Source 1 through Source N inputs contain the data to be placed into the specified Modbus device’s registers. 3. Connect the WriteNow input to a trigger source. Triggering the WriteNow input instructs the module to immediately send a write request to the Modbus Slave device. The data appearing at the module’s Source inputs are copied to the appropriate Modbus registers, according to how the Modbus Export module’s setup registers are configured. The Status output register indicates if the ION to Modbus communications line is active, and the Successful Write output register generates a pulse, indicating a successful transfer of information from ION to Modbus. © 2008 Schneider Electric. All rights reserved. Page 377 Modbus Export Module ION Reference Responses to Special Conditions The following table summarizes how the Modbus Export module behaves under different conditions. Condition Page 378 Response of Output Register After the module is re-linked or its setup registers are changed The Status, Exception Code and Update period registers are NOT AVAILABLE. Busy = NO Pending = NO When the device is started or powered-up (either the first time, or after a shut-down) The Status, Exception Code and Update period registers are NOT AVAILABLE. Busy = NO Pending = NO © 2008 Schneider Electric. All rights reserved. ION REFERENCE 09/2008 Modbus Import Module The Modbus Import module reads data from an ION meter or third-party device that supports the Modicon Modbus communications protocol. This data can then be used by other ION modules. The module supports the following Modbus data formats: 16-bit unsigned 16-bit signed 32-bit unsigned 32-bit signed 32-bit unsigned Modulo 10000 32-bit signed Modulo 10000 Packed Boolean IEEE Float Also, "Little Endian" support is available for Float and 32-bit formats. Schneider Electric 2195 Keating Cross Road Saanichton, BC Canada V8M 2A5 Tel: 1-250-652-7100 For technical support: [email protected] (00) + 1 250 544 3010 Contact your local Schneider Electric sales representative for assistance or go to www.powerlogic.com Modbus, ION, PowerLogic and Schneider Electric are trademarks or registered trademarks of Schneider Electric in France, the USA and other countries. Other trademarks used are the property of their respective owners. Electrical equipment should be installed, operated, serviced, and maintained only by qualified personnel. No responsibility is assumed by Schneider Electric for any consequences arising out of the use of this material. © 2008 Schneider Electric. All rights reserved. Modbus Import Module ION Reference You can configure a Modbus Import module with up to 64 value output registers per module with Virtual Processor. Some meters have Modbus master capability that you can configure with Designer. There are 16 Value output registers on the meter. There are some registers that are only available on the meter or in the Virtual Processor; these registers are specified in brackets throughout the text. NOTE When configured, the Modbus Export module behaves in a similar fashion to a Modbus controller. However, each module can read data from only one Modbus slave device, over a specified range of its address registers. The maximum number of Modbus registers the Modbus Import module can read depends on the Modbus format used. Inputs Enable This input is used to switch the Modbus Import module ON or OFF. When OFF is selected the module does not function. NOTE Even if the Enable input is not connected, the module will be enabled, by default. ReadNow When connected to a trigger source, the module reads data when it detects a pulse at this input. If left unconnected, the module polls the Modbus devices continuously. Setup Registers Connection (or COMM Port on some meters) This register maps the connection to a setup register on the Modbus Master Options Module. Choose Serial Connection 1-4 or TCP Connection 1-10 (if available). Device Name (only on Virtual Processor) This register contains the address name indicating which Modbus device the module reads data from. This name must first be defined in the Virtual Processor Setup and belong to a Modbus site. OR Slave Addr (slave address) (only on ION meters) This register contains the numeric address indicating which Modbus device the module reads data from. The valid slave address range is 1–247. Page 380 © 2008 Schneider Electric. All rights reserved. ION Reference Modbus Import Module Reg Addr (register address) The module communicates to a starting address in the Modbus register map. You specify this starting address in Reg Addr. NumReg (number of registers) This register specifies the number of Modbus registers read by the module. Format This register defines what format of data the module follows when reading from the Modbus registers. The choices include: Format Type Range # of Modbus registers used Unsigned 16B Integer 0 to 65 535 1 Signed 16B Integer -32 768 to 32 767 1 Unsigned 32B Integer 0 to 4 294 967 295 2 Unsigned 32B Little Endian Integer 0 to 4 294 967 295 2 Signed 32B Integer -2 147 483 648 to 2 147 483 647 2 Signed 32B Little Endian Integer -2 147 483 648 to 2 147 483 647 2 Unsigned 32 B M10k Integer 0 to 65 535 999 2 Unsigned 32 B M10k Little Endian Integer 0 to 65 535 999 2 Signed 32 B M10k Integer -32 767 999 to 32 767 999 2 Signed 32 B M10k Little Endian Integer -32 767 999 to 32 767 999 2 Packed Boolean Integer 0 to FFFF (Boolean inputs) 2 3.402823466x1038 IEEE Float Floating Point to 3.402823466x1038 2 IEEE Float Little Endian Floating Point - 3.402823466x1038 to 3.402823466x1038 2 Both Unsigned and Signed 32B-M10k refer to the Modulo10000 formats. This format breaks a 32-bit value into two 16-bit registers, according to the following relationship: register_high (higher-order register) = value/10 000 register_low (lower-order register) = value modulus 10 000 Hence the 32-bit value can be retrieved by the following calculation: value = register_high x 10 000 + register_low Scaling YES indicates that scaling is applied to data before being placed in the value outputs; NO indicates data is transferred without scaling. No scaling is allowed for IEEE Float, IEEE Float Little Endian or Packed Boolean formats. © 2008 Schneider Electric. All rights reserved. Page 381 Modbus Import Module ION Reference ModbusInMinScale (Modbus input minimum scale) If scaling is applicable, this register specifies the lower limit of the Modbus register value. ModbusInMaxScale (Modbus input maximum scale) If scaling is applicable, this register specifies the upper limit of the Modbus register value. IONOutMinScale (ION output minimum scale) If scaling is applicable, this register specifies the scaled lower limit of the ION value. IONOutMaxScale (ION output maximum scale) If scaling is applicable, this register specifies the scaled upper limit of the ION value. Output Registers Value 1...Value N Value 1 register contains the first data value read from the Modbus slave. Value N contains the last data value. The total number of values read from one ReadNow request depends on how you set up the NumReg and Format registers (see the previous section, “Setup Registers”). Pending (meter only) Pending output is ON if the module is waiting for a response from the slave device. Status This Boolean register indicates the status of communication between Modbus and ION. A value of one (ON) indicates that the last communications attempt succeeded; OFF indicates it did not. Successful Read This output generates a pulse whenever the module successfully reads data. Unsuccessful Read (only on the meter) This output generates a pulse whenever the module does not read data because of either a communications error or a Modbus exception. Exception Code This register contains the Modbus exception code returned by the slave when invalid requests are made. Update Period This register contains data indicating the following: Page 382 Polling mode: When the module is polling the Modbus devices, this register specifies the time between updates. Event-driven mode: When the module receives a ReadNow request, this register specifies how much time elapse between receiving the ReadNow request and updating the value outputs. © 2008 Schneider Electric. All rights reserved. ION Reference Modbus Import Module Event All events produced by the Modbus module are recorded in the Event register. Possible events and their associated priority numbers are shown in the following table. Event Priority Group Priority Description Setup Change 10 Input links, setup registers or labels have changed Communications Lost * Displays what caused communications loss Resuming Communications * Indicates when communications link is re-established * The priority of this event depends on how you configure the EvPriority setup register. Modicon Modbus Four classes of Modbus data, namely Coil, Input, Input Register, and Holding Register, are supported by the Modbus Import module. Coils and Inputs are singlebit registers used to indicate ON (1) or OFF (0) conditions. NOTE For further details, refer to your Modicon Modbus Communications Protocol document, or visit their website at www.modicon.com Input Registers and Holding Registers are 16-bit registers used to store and retrieve data. The following list shows results if specify the Reg Addr to begin with: zero (0), data is imported as Coil Status one (1), Input Status four (4), Holding Registers three (3), Input Register The following outlines the function codes that the Modbus Import module uses to support the classes of Modbus data: Function Name Function Code Register Address READ_COIL_STATUS 01 0XXXX(X) READ_INPUT_STATUS 02 1XXXX(X) READ_HOLDING_REGISTERS 03 4XXXX(X) READ_INPUT_REGISTERS 04 3XXXX(X) NOTE The module automatically chooses the Function Code based on the RegAddr setup register value. © 2008 Schneider Electric. All rights reserved. Page 383 Modbus Import Module ION Reference The following outlines the different Modbus formats supported by the Modbus Import module, as well as the maximum number of registers the Modbus Import module is able to read per read request: Single Register Multiple Registers Modbus Format Signed 16B Unsigned 16B Virtual Processor Meter Virtual Processor Meter 64 registers / 64 values 16 registers / 16 values 64 registers / 64 values 16 registers / 16 values 124 registers / 62 values 32 registers / 16 values 124 registers / 62 values 32 registers/ 16 values 4 registers / 64 values 1 register / 16 values 4 registers / 64 values 1 register/ 16 values Signed 32B Signed 32B Little Endian Unsigned 32B Unsigned 32B Little Endian Signed 32B-M10k Signed 32B-M10k Little Endian Unsigned 32B-M10k Unsigned 32B-M10k Little Endian IEEE Float IEEE Float Little Endian Packed Boolean The following sections illustrate how the Modbus Import module maps its output Value registers to the Modbus register map, according to the chosen Modbus format. Page 384 © 2008 Schneider Electric. All rights reserved. ION Reference Modbus Import Module Coil and Input Status Format For Modbus coil and input registers, the Modbus Import module maps its output Value register in a similar fashion to the 16-bit signed or 16-bit unsigned format. Holding and Input Register Formats Little Endian For all 32-bit formats (IEEE Float and Signed, Unsigned 32-bit and M10k), Little Endian reverses the two registers (not the bits within the registers) where the data is written. For example, data from the specified starting address of the Modbus register map is copied into the Value 2 output register and the remaining data is copied into the Value 1 output register. Signed 16B or Unsigned 16B UNSCALED The module takes data from the specified starting address of the Modbus register map and copies it into the Value 1 output register; the remaining registers are coped into Value 2,..., Value N. SCALED The module takes data from the specified starting address of the Modbus register map, places it in a temporary register, applies scaling specified in the module’s setup registers, then transfers the result into the Value 1 output register. © 2008 Schneider Electric. All rights reserved. Page 385 Modbus Import Module ION Reference The following 16-bit Modbus Register Map illustrates how the module maps its Value outputs to the Modbus register map: 16-bit Modbus Register Map IEEE Float IEEE Float is a floating point format. It does not support scaling. The module takes data from the specified starting address and the adjacent higher address of the Modbus register map. It copies the contents of the first address into the 16 most significant bit positions on Value 1 output register and copies the contents of the second address into the 16 least significant bit positions of the Value 1 output register. Value 1 is interpreted as a floating point number. See the next illustration (32-bit Modbus Register Map) for details. Signed 32B or Unsigned 32B UNSCALED The module takes data from the specified starting address and the adjacent higher address of the Modbus register map. It copies the contents of the first address into the 16 most significant bit positions on Value 1 output register and copies the contents of the second address into the 16 least significant bit positions of the Value 1 output register. SCALED The module takes data from the specified starting address and the adjacent higher address of the Modbus register map. It copies the contents of the first address into the 16 most significant bit positions of a temporary register and copies the contents of the second address into the 16 least significant bit positions of this temporary register. The module then applies the scaling you specified in the module’s setup registers and transfers the result into Value 1 output register. The 32-bit Modbus Register Map (on page 387) illustrates how the module maps its Value outputs to the 32-bit Modbus register map. Page 386 © 2008 Schneider Electric. All rights reserved. ION Reference Modbus Import Module Signed 32B-M10k or Unsigned 32B-M10k The module maps its Value output registers to the Modbus register map in a similar fashion as the 32-bit signed or 32-bit unsigned format. UNSCALED The module takes data from the specified starting address and the adjacent higher address of the Modbus register map. It then takes the contents of the first address (most significant) and multiplies this value by 10000. It then takes the product and adds the contents of the second address (least significant). The result is placed into the Value 1 output register. The module repeats this process for the remaining Value registers. SCALED The module takes data from the specified starting address and the adjacent higher address of the Modbus register map. It takes the contents of the first address (most significant) and multiplies this value by 10000. It then takes the product and adds to it the contents of the second address (least significant). The result is placed into a temporary register. The module then applies scaling specified in the module’s setup registers and transfers the result into Value 1 output register. The module repeats this process for the remaining Value registers. 32-bit Modbus Register Map Packed Boolean The module takes data from the specified starting address and copies the contents of the most significant bit into the Value 1 output register. It then takes the contents of the second most significant bit from the starting address and copies it into the Value 2 output register, etc., until the least significant bit is copied into the Value 16 output register. For a module on the Virtual Processor, remaining registers are copied into the next available outputs. The most significant bit of the second register is copied into © 2008 Schneider Electric. All rights reserved. Page 387 Modbus Import Module ION Reference Value 17 output register, etc. See the Packed Boolean Modbus Register Map below: Packed Boolean Modbus Register Map Page 388 © 2008 Schneider Electric. All rights reserved. ION Reference Modbus Import Module Detailed Module Operation To set up communications between the Virtual Processor and Modbus, you must first enter the Modbus device address information in the Virtual Processor Setup utility. Select a unique name for the Modbus device and map this string variable to the Modbus device’s address. You use this name later on when setting up the module’s Device Name setup parameter. To set up communications between the meter and Modbus, use Designer to configure the communications port (COM port and baud rate) on the Modbus Master capable meter. Ensure the Modbus Master protocol is active on the communications channel that connects the Modbus master capable meter to a slave device on the Modbus network. The Modbus Import module is automatically enabled after you have added, set up and saved your framework. Linking the Enable input gives you the option to turn the module on or off. NOTE The frequency of polling depends on a number of variables (e.g. baud rate, number of devices on the communication loop, etc.); devices are polled in a sequential manner. If the ReadNow input is not connected, the module starts polling the registers on the Modbus device. Triggering the ReadNow input instructs the module to immediately send a read request to the Modbus Slave device. When the request is serviced, the values from the Modbus registers are copied to the Value output registers of the module. The Status output register indicates if the Modbus to ION communications line is active. The Successful Read output register generates a pulse whenever the module completes a successful transfer of information from the Modbus slave to the master. The Value 1 through Value N output registers is updated for each read cycle. © 2008 Schneider Electric. All rights reserved. Page 389 Modbus Import Module ION Reference Responses to Special Conditions The following table summarizes how the Modbus Import module behaves under different conditions. Condition Page 390 Response of Output Register If the Enable input is NOT AVAILABLE The Value 1…N are NOT AVAILABLE. The Status register is set to N/A. Pending = N/A After the module is re-linked or its setup registers are changed The Value 1…N, Status, Exception Code and Update period registers are NOT AVAILABLE. Pending = NO When the device is started or powered-up (either the first time, or after a shut-down) The Value 1…N, Status, Exception Code and Update period registers are NOT AVAILABLE. Pending = NO Receive timeout (i.e. Modbus Import module sends a request, but does not receive a reply) Output registers holds the current values. The Virtual Processor displays a message in its window. The meter pulses an unsuccessful read. © 2008 Schneider Electric. All rights reserved. ION REFERENCE 09/2008 Modbus Master Device Module The Modbus Master Device module reads data from an external Modicon Modbus RTU slave device. Up to 32 values can be imported, scaled, and labeled for use by other ION modules. A map, defined by an associated Modbus Master Map module, determines what data is read from the slave device and how that data is formatted. NOTE Before working with the Modbus Master Device module, consult the “Modbus Master Map Module” description in this document. The Modbus Master Device module operates in two different modes: In Polling mode (Read Now input not connected) it places a Modbus request in the queue every second if it is not waiting on a previous response. In Read Now mode, upon a Read Now pulse, it places a Modbus request in the queue if it is not waiting on a previous response. The Modbus Master Device module works in tandem with the Modbus Master Map module. See the “Detailed Operation” section for more information. Schneider Electric 2195 Keating Cross Road Saanichton, BC Canada V8M 2A5 Tel: 1-250-652-7100 For technical support: [email protected] (00) + 1 250 544 3010 Contact your local Schneider Electric sales representative for assistance or go to www.powerlogic.com Modbus, ION, PowerLogic and Schneider Electric are trademarks or registered trademarks of Schneider Electric in France, the USA and other countries. Other trademarks used are the property of their respective owners. Electrical equipment should be installed, operated, serviced, and maintained only by qualified personnel. No responsibility is assumed by Schneider Electric for any consequences arising out of the use of this material. © 2008 Schneider Electric. All rights reserved. Modbus Master Device Module ION Reference Inputs The Modbus Master Device module has the following inputs: Enable This input switches the module ON and OFF. When set to OFF, the outputs are set to 'N/A’. The default setting is ON. This input is not required. Read Now When pulsed, this register places a Modbus request in the queue if it is not waiting on a previous response. If left unconnected, the module polls the Modbus devices continuously. This input is not required. Setup Registers The Modbus Master Device module has the following setup registers: Connection This register maps the connection to a setup register on the Modbus Master Options Module. Choose Serial Connection 1-4 or TCP Connection 1-10 (if available). Slave Addr (slave address) This register contains the numeric address of the Modbus slave device from which the module reads data. The valid slave address range is 1–247; default is 1. Device Type This string register defines the slave device type. The string can have a maximum of 20 alphanumeric characters; dot and dash allowed. NOTE The Device Type setup register entry must match exactly the Device Type setup register entry of a Modbus Master Map module in order to operate. Both of these Device Type registers are case sensitive. Slave Name This string register contains the Modbus slave device sub-name. This is for uniquely identifying Modbus Master Device module output registers with common 'Device Types'. This string can have a maximum of eight alphanumeric characters; dot and dash allowed. Comms Error Count This register defines the number of consecutive unsuccessful reads required before a communications error is sent. The valid range is 1-255; default is 1. Comms Error Output Value This register defines how stale data is overwritten in the event of a communications error. The default setting is Old Value. Page 392 © 2008 Schneider Electric. All rights reserved. ION Reference Modbus Master Device Module Output Registers Outputs 1-32 These registers contain the imported Modbus data for other ION modules to use. The output labels are derived from other registers as shown below: <label><bit number>@<slave name>[value] The label is acquired from the Modbus Master Map module’s Device Map register. The bit number applies to Packed Boolean formats only. The slave name is set in the Slave Name setup register. Pending An ON STATE INDICATES the module is waiting for a response from the slave device. Status This Boolean register indicates the status of communication between the Modbus master (the ION device using this module) and the associated Modbus slave. A value of ON indicates that a recent communications attempt succeeded; OFF indicates consecutive communications errors have occurred as specified in the Comms Error Count setup register. Successful Read This output generates a pulse whenever the module successfully reads data. Unsuccessful Read This output generates a pulse whenever the module fails to read data (because of either a communications error or a Modbus exception). Exception Code This register contains the Modbus exception code returned by the slave device when invalid requests are made. This value is reset once a valid request is received. Update Period This register contains data indicating the following: Polling mode: When the module is polling the Modbus devices, this register specifies the time between updates. Read Now mode: When the module receives a ReadNow request, this register specifies how much time elapsed between receiving the ReadNow request and updating the value outputs. Event ION events are recorded in this output register. Event Priority Group Priority Description Reset 5 A module reset has occurred. Setup Change 10 Input links, setup registers or labels have changed. The Event output register stores the following information for each ION event: time stamp, event priority, event’s cause, event’s effect, and conditions associated with the event’s cause and effect. © 2008 Schneider Electric. All rights reserved. Page 393 Modbus Master Device Module ION Reference Detailed Operation The Modbus Master Device module works in tandem with the Modbus Master Map module; it will not function without it. In order for the Modbus Master Device module to function properly, the meter’s Protocol setup register in the Communications module must be set to Modbus Master. This defines the serial port used to access the Modbus slave devices. See the Modbus and ION Technology technical note for more information. In the example below, two ION6200 meters (Submeter1 and Submeter2) act as Modbus Slave devices and provide Modbus values to an ION7500 meter (acting as the Modbus Master device). Submeter1 is linked to Modbus Master Device module 1 (the meter’s Unit ID of 101 is entered in the Modbus Master Device module’s Slave Addr register) while Submeter2 is linked to Modbus Master Device module 2. Modbus Master Device ION7500 Meter Page 394 © 2008 Schneider Electric. All rights reserved. ION Reference Modbus Master Device Module Modbus Master Device module 1 collects Modbus data (Vln a) from Submeter1, while Modbus Master Device module 2 collects Modbus data (Vln a) from Submeter2. These two Device modules then use the decoding information available from the Modbus Master Map module 1 to translate the Modbus information into values other ION modules can use. Notice the Device Type register of all three modules is set to 6200. This “links” the Modbus Master Map module to the two Modbus Master Device modules. Responses to Special Conditions Possible events are shown in the following table. Condition © 2008 Schneider Electric. All rights reserved. Responses The Enable input is N/A The Value 1...N registers are N/A The Status register is set to N/A The Pending register is set to N/A After the module is re-linked or its setup registers are changed The Value 1...N, Status, Exception Code and Update Period registers are N/A The Pending register is set to NO When the device is started or powered-up (either the first time, or after a shutdown) The Value 1...N, Status, Exception Code and Update Period registers are N/A The Pending register is set to NO When there are Comms Error Count consecutive receive time-outs or Modbus exceptions (i.e. Modbus Master Device module sends a request but does not receive a reply or receives a Modbus exception) Output registers are set to the Comms Error Output value until a successful read occurs Page 395 Modbus Master Device Module Page 396 ION Reference © 2008 Schneider Electric. All rights reserved. ION REFERENCE 09/2008 Modbus Master Map Module The Modbus Master Map module provides a common location to hold the setup information needed for decoding a Modbus response (i.e. label, Modbus register address, formatting, scaling, etc.). One Modbus Master Map module holds information that can be used by several Modbus Master Device modules. Modbus Master Device modules are linked to (or associated with) a Modbus Master Map module when you specify the same Device Type for both the Modbus Master Map and the Modbus Master Device modules. For more information about Modbus and the ION architecture, see the “Modicon Modbus” section of the Modbus Import module. Input Registers The Modbus Master Map module has no inputs. Setup Registers The Modbus Master Map module has the following setup registers: Device Type This string register defines the slave device type. The string can have a maximum of 20 alphanumeric characters; dot and dash allowed. Schneider Electric 2195 Keating Cross Road Saanichton, BC Canada V8M 2A5 Tel: 1-250-652-7100 For technical support: [email protected] (00) + 1 250 544 3010 Contact your local Schneider Electric sales representative for assistance or go to www.powerlogic.com Modbus, ION, PowerLogic and Schneider Electric are trademarks or registered trademarks of Schneider Electric in France, the USA and other countries. Other trademarks used are the property of their respective owners. Electrical equipment should be installed, operated, serviced, and maintained only by qualified personnel. No responsibility is assumed by Schneider Electric for any consequences arising out of the use of this material. © 2008 Schneider Electric. All rights reserved. Modbus Master Map Module ION Reference NOTE The Device Type setup register entry must match exactly the Device Type setup register entry of a Modbus Master Device module in order to operate. Both of these Device Type registers are case sensitive. Device Map This string register contains the label, Modbus address, format and scaling information for each Modbus register. You can store mapping information for up to 32 Modbus registers within any 125 Modbus register block. String example for an ION6200: LbVln a,SR40100,FUINT16,NR1,S0.1,O0, LbVln b,SR40101,FUINT16,NR1,S0.1,O0, LbVln c,SR40102,FUINT16,NR1,S0.1,O0, LbVln avg,SR40103,FUINT16,NR1,S0.1,O0, LbVll ab,SR40104,FUINT16,NR1,S0.1,O0, LbVll bc,SR40105,FUINT16,NR1,S0.1,O0, LbVll ca,SR40106,FUINT16,NR1,S0.1,O0, LbVll avg,SR40107,FUINT16,NR1,S0.1,O0, LbI a,SR40108,FUINT16,NR1,S0.1,O0, LbI b,SR40109,FUINT16,NR1,S0.1,O0, LbI c,SR40110,FUINT16,NR1,S0.1,O0, LbI avg,SR40111,FUINT16,NR1,S0.1,O0, LbI dmd,SR40112,FUINT16,NR1,S0.1,O0, LbI pk dmd,SR40113,FUINT16,NR1,S0.1,O0, LbI 4,SR40114,FUINT16,NR1,S0.1,O0, LbFreq us,SR40115,FSINT16,NR1,S1,O0, LbPF sign tot us,SR40116,FSINT16,NR1,S1,O0, LbkW tot,SR40120,FSINT16,NR1,S1,O0, LbkVAR tot,SR40121,FSINT16,NR1,S1,O0, LbkVA tot,SR40122,FSINT16,NR1,S1,O0, LbkWh del,SR40138,FU32-2143,NR2,S1,O0, LbkWh rec,SR40140,FU32-2143,NR2,S1,O0, LbkVARh del,SR40142,FU32-2143,NR2,S1,O0, LbkVARh rec,SR40144,FU32-2143,NR2,S1,O0, LbkVAh del+rec,SR40146,FU32-2143,NR2,S1,O0, One line of an example string: Each line contains commas and prefixes for each component (e.g. Label). You must always include these commas and prefixes in each line, in the exact places as above. Page 398 © 2008 Schneider Electric. All rights reserved. ION Reference Modbus Master Map Module Label (prefix Lb) This string field (minus the prefix) will be used within the output label on the associated Modbus Master Device module. A maximum of 15 alphanumeric characters are allowed. Starting Modbus Register (prefix SR) This determines the starting Modbus register that will be read and decoded by the associated Modbus Master Device module. NOTE All SR entries in the Device Map register must be from within the same function code. See the table below for supported Modbus addresses and their functions: Function Name Function Code Register Address READ_COIL_STATUS 01 0XXXX(X) READ_INPUT_STATUS 02 1XXXX(X) READ_HOLDING_REGISTERS 03 4XXXX(X) READ_INPUT_REGISTERS 04 3XXXX(X) Format (prefix F) This determines what format of data is followed when reading from this Modbus register(s). See the table below for supported Modbus formats: Format Description Type Acceptable Range # of Modbus registers Scaling/ Offset? UINT16 16-bit unsigned Integer 0 to 65535 1 Yes SINT16 16-bit signed Integer -32768 to 32767 1 Yes UINT32 32-bit unsigned Integer 0 to 4294967295 2 Yes SINT32 32-bit signed Integer -2147483648 to 2147483647 2 Yes S32-2143 32-bit signed LE Integer -2147483648 to 2147483647 2 Yes U32-M10k-4321 32-bit unsigned M10k Integer 0 to 65535999 2 Yes U32-M10k-2143 32-bit unsigned M10K LE Integer 0 to 65535999 2 Yes S32-M10k-4321 32-bit signed M10K Integer -32767999 to 32767999 2 Yes S32-M10k-2143 32-bit signed M10K LE Integer -32767999 to 32767999 2 Yes PackedBool Packed Boolean Integer 0 to FFFF (Boolean inputs) 1 No IEEEFloat IEEE Float Floating Point - 3.402823466x1038 to 3.402823466x1038 2 No SwappedFloat IEEE Float Little Endian (LE) Floating Point - 3.402823466x1038 to 3.402823466x1038 2 No © 2008 Schneider Electric. All rights reserved. Page 399 Modbus Master Map Module ION Reference M10k refers to the Modulo10000 formats. This format breaks a 32-bit value into two 16-bit registers, according to the following relationship: register_high (higher-order register) = value/10 000 register_low (lower-order register) = value modulus 10 000 Therefore, the 32-bit value can be retrieved by the following calculation: value = register_high x 10 000 + register_low Register Size (prefix NR) This determines the size or number of registers that will be read and decoded. One register is 16-bit, two are 32-bit. Valid values are 1 and 2. Scaling (prefix S) This determines the scaling that will be applied to the Modbus values. This is used to compensate for scaling applied by the Modbus Slave device. The scaling value is divided into the Modbus value (see formula below). Valid values are +/- 1 x 10⁶ to +/- 1 x 10⁻⁶. A scaling value of one (S1) means no scaling will be applied (Modbus value will be divided by one) Offset (prefix O) This determines the offset that will be applied to the Modbus values. This is used to compensate for offset applied by the Modbus Slave device. The offset value is subtracted from the Modbus value (see formula below). Valid values are +/- 1 x 10⁶. Offset and Scaling Applied The following formula is applied to the value, when scaling and offset is used: For example: If the value read from the slave device is 2000, the offset is 0, and the scaling is 0.1, the output value would be 20,000. NOTE If the Device Map string register is configured incorrectly, Designer will produce a Device Map Setup Error when Sending & Saving. The message will advise where the error occurs in the string. Additionally, the Modbus Master Map module will go offline and any associated Modbus Master Device modules outputs will be N/A, until the error is corrected. Page 400 © 2008 Schneider Electric. All rights reserved. ION Reference Modbus Master Map Module Output Registers Event ION events are recorded in this output register. Event Priority Group Priority Description Reset 5 A module reset has occurred. Setup Change 10 Setup registers or labels have changed. The Event output register stores the following information for each ION event: time stamp, event priority, event’s cause, event’s effect, and conditions associated with the event’s cause and effect. Detailed Operation The Modbus Master Map module works in tandem with the Modbus Master Device module. In the example below, two ION6200 meters (Submeter1 and Submeter2) act as Modbus Slave devices and provide Modbus values to an ION7500 meter (acting as the Modbus Master device). Submeter1 is linked to Modbus Master Device module 1 (the meter’s Unit ID of 101 is entered in the Modbus Master Device module’s Slave Addr register) while Submeter2 is linked to Modbus Master Device module 2. Modbus Master Device module 1 collects Modbus data (Vln a) from Submeter1, while Modbus Master Device module 2 collects Modbus data (Vln a) from Submeter2. These two Device modules then use the decoding information available from the Modbus Master Map module 1 to translate the Modbus information into values other ION modules can use. Notice the Device Type register of all three modules is set to 6200. This “links” the Modbus Master Map module to the two Modbus Master Device modules. © 2008 Schneider Electric. All rights reserved. Page 401 Modbus Master Map Module ION Reference Modbus Master Device ION7500 Meter Page 402 © 2008 Schneider Electric. All rights reserved. ION REFERENCE 09/2008 Modbus Master Options Module The Modbus Master Options module is a core module that maps any serial or Ethernet TCP connection from Modbus Import, Modbus Export and Modbus Master Device modules to a serial communications port or Ethernet TCP socket. For meters with Modbus gateway capability, it also maps the Modbus Gateway Connection register to that connection. You cannot delete this module or add another. For more information on implementing the Modbus protocol (and Modbus Mastering), see the Modbus and ION Technology technical note, available from the website. For more information on using your meter as a Modbus gateway, see your meter’s User Guide. Input Registers The Modbus Master Options module has no inputs. Schneider Electric 2195 Keating Cross Road Saanichton, BC Canada V8M 2A5 Tel: 1-250-652-7100 For technical support: [email protected] (00) + 1 250 544 3010 Contact your local Schneider Electric sales representative for assistance or go to www.powerlogic.com Modbus, ION, PowerLogic and Schneider Electric are trademarks or registered trademarks of Schneider Electric in France, the USA and other countries. Other trademarks used are the property of their respective owners. Electrical equipment should be installed, operated, serviced, and maintained only by qualified personnel. No responsibility is assumed by Schneider Electric for any consequences arising out of the use of this material. © 2008 Schneider Electric. All rights reserved. Modbus Master Options Module ION Reference Setup Registers The Modbus Master Options module has the following setup registers: Serial Connection 1-4 These enumerated registers map serial connections to serial communications ports. Choose None (default) or a communication port on your device that supports the Modbus Master Options module (for example, COM1, COM2, COM3 or COM4). TCP Connection 1-10 These string registers contain the IP address and port number for the TCP connections, for example 123.45.67.89:502. Up to 10 unique IP addresses can be mapped to Modbus master over Ethernet/TCP. Modbus Gateway Connection This enumerated register is configured if you want to use your meter as a Modbus gateway to communicate with downstream serial devices. If you want to use the meter as a Modbus gateway, it must be set to the Serial Connection register (above) that is mapped to the COM port used to communicate with the serial devices. That COM port must be configure to use Modbus Master protocol. The default setting is GATEWAY DISABLED, which disables the gateway functionality and allows the meter to respond to any Unit ID for Modbus TCP (port 502) or Modbus RTU (port 7701) requests. This is different from the GATEWAY ENABLED - NO CONNECTION setting, which sets the meter to respond only to Unit ID 255 and enables the gateway functionality even though no downstream devices are setup. Exception Code This enumerated register determines the exception code that is returned if a downstream device fails to respond to a request. The exception code in current Modbus implementation is 0x0B. However, some legacy devices require the exception code to be 0x0A. ModGate Process Broadcasts This enumerated register determines how broadcast messages (with the Unit ID = 0) are handled by the meter acting as a Modbus gateway. When set to NO (the default), the gateway meter sends the broadcast message to the downstream serial devices but ignores the message itself. When set to YES, the gateway meter processes the message itself and forwards it to the downstream devices. Output Registers Serial Status Connection 1-4 These boolean output registers indicate the status of the serial connections, using TRUE (YES) or FALSE (NO). TRUE indicates that the serial connection is configured in at least one Modbus Import module, Modbus Export module, or Modbus Master Device module, and that the communication port is set to the Modbus Master protocol. Page 404 © 2008 Schneider Electric. All rights reserved. ION Reference Modbus Master Options Module TCP Status Connection 1-10 These boolean output registers indicate the status of the Ethernet TCP connections, using TRUE (YES) or FALSE (NO). TRUE indicates that the TCP connection is configured in at least one Modbus Import module, Modbus Export module, or Modbus Master Device module. Event ION events are recorded in this output register. Event Priority Group Priority Description Reset 5 A module reset has occurred. Setup Change 10 Setup registers or labels have changed. The Event output register stores the following information for each ION event: time stamp, event priority, event cause, event effect, and conditions associated with the event’s cause and effect. Detailed Operation This module provides settings that affect the following modules for that particular session: Modbus Import Module Modbus Export Module Modbus Master Device Module Modbus Master Map Module Module Update Rate The update rate of the Modbus Import, Modbus Export and Modbus Master Device modules depends upon many factors, such as: Master and Slave loading serial and TCP parameters such as Receive Timeout and Transmit Delay serial and TCP baud rate and loading in the serial line or Ethernet number of requests to be performed For more information about Modbus and the ION architecture, see the “Modicon Modbus” section of the Modbus Import module. © 2008 Schneider Electric. All rights reserved. Page 405 Modbus Master Options Module Page 406 ION Reference © 2008 Schneider Electric. All rights reserved. ION REFERENCE 09/2008 Modbus Slave Module The Modbus Slave module makes the values in ION registers available to a Modbus master device. Each module can be set to map up to 16 values to a specified Base Address in the Modbus holding register address range. The module is also able to present the data in numerous formats (16-bit integer, 32-bit integer, Modbus formats, and Packed Boolean). Modbus Slave Module Source 1 Source 2 . . . Source 16 Modbus Value 1 Modbus Value 2 . . . Modbus Value 32 Modbus Base Modbus Link Event The Modbus standard describes a popular communications methodology that allows devices made by different manufacturers to communicate with each other. The Modbus Slave module allows an ION device to be integrated into a Modbus network. Data measured or calculated by ION devices can be made available to other devices on the Modbus network and further manipulated or analyzed. NOTE With the Virtual Processor and advanced meters, you can create Modbus Master functionality. Refer to the Modbus Export and Modbus Import modules. See the Schneider Electric web site for a copy of the Modbus register map document for your device. Schneider Electric 2195 Keating Cross Road Saanichton, BC Canada V8M 2A5 Tel: 1-250-652-7100 For technical support: [email protected] (00) + 1 250 544 3010 Contact your local Schneider Electric sales representative for assistance or go to www.powerlogic.com Modbus, ION, PowerLogic and Schneider Electric are trademarks or registered trademarks of Schneider Electric in France, the USA and other countries. Other trademarks used are the property of their respective owners. Electrical equipment should be installed, operated, serviced, and maintained only by qualified personnel. No responsibility is assumed by Schneider Electric for any consequences arising out of the use of this material. © 2008 Schneider Electric. All rights reserved. Modbus Slave Module ION Reference Inputs Source 1 to Source 16 The Modbus Slave module takes the numeric or Boolean value on each input and makes it available to READ requests from the Modbus master. You may link any or all Source inputs to the output registers of other ION modules. Setup Registers Format This register defines what format of data the module follows when writing to the Modbus registers. The choices include: Format Type Range # of Modbus registers used Unsigned 16B Integer 0 to 65 535 1 Signed 16B Integer -32 768 to 32 767 1 Unsigned 32B Integer 0 to 4 294 967 295 2 Signed 32B Integer -2 147 483 648 to 2 147 483 647 2 Unsigned 32 B M10k Integer 0 to 655 350 000 2 Signed 32 B M10k Integer -327 680 000 to 327 670 000 2 Packed Boolean Integer 0 to FFFF (Boolean inputs) 2 38 Unsigned 16B Input Mode* Integer - 3.402823466x10 to 3.402823466x1038 2 * For meters, Unsigned 16B Input Mode allows data to be written to the Modbus Slave module. When Unsigned 16B Input Mode is selected for the Format register, the Modbus Slave module supports 32 16-bit unsigned registers; however, scaling is not supported (i.e. scaling does not affect the output values). See the "Importing with Modbus Slave Modules" section below. NOTE For any 32-bit or Packed Boolean format, the 32-bit equivalent to the module's input uses two consecutive output registers (low address register contains high-order word). For Packed Boolean, only the first output register contains a valid response. Both Unsigned and Signed 32B-M10k refer to the Modulo10000 formats. This format breaks a 32-bit value into two 16-bit registers, according to the following relationship: register_high (higher-order register) = value/10 000 register_low (lower-order register) = value modulus 10 000 Hence the 32-bit value can be retrieved by the following calculation: Page 408 value = register_high x 10 000 + register_low © 2008 Schneider Electric. All rights reserved. ION Reference Modbus Slave Module BaseAddr (base address) This register specifies the lowest address that the Modbus master can use to READ the data stored in the ModVal #1 output register. Each subsequent output register is addressable by the appropriate offset from this base address. Scaling This register specifies whether or not the output values will be scaled. If Scaling is set to YES, then the values in the InZero, OutZero, InFull and OutFull registers are used to scale the output values; if it is set to NO, no scaling is performed, and the values in the InZero, OutZero, InFull and OutFull registers are ignored. InZero, InFull These registers specify the input range for all values to which the module is linked. Any value less than the InZero setting will be treated as an InZero value, and any values exceeding the InFull value will be treated as an InFull value. OutZero, OutFull These registers specify the output range for all values available from this module. The output values are linearly interpolated from the input range. Output Registers Modbus Slave modules have the following output registers: ModVal 1…32 (Modbus value) There are 32 ModVal output registers, each of which contains one 16-bit integer value. These ION registers can be used to confirm the data in the Modbus register map (the data being presented to the Modbus network by the module). The validity of data in these registers depends on the state of the corresponding input and the current values of the setup registers. The ModVal values can be signed or unsigned values, and may need to be interpreted in pairs to obtain 32-bit values. ModBase (Modbus base) This register indicates the address of the first value available to the Modbus master, which is stored in the ModVal #1 output register. ModLink (Modbus link) This register contains the next available Modbus holding register address, i.e. the first address following the last valid output register of this module. Refer to this register if you want to create a contiguous address range; enter the value in this register in the BaseAddr setup register of another Modbus Slave module. Event All events produced by the Modbus Slave module are recorded in the Event register. Possible events and their associated priority numbers are shown in the following table. Event Priority Group Setup Change © 2008 Schneider Electric. All rights reserved. Priority 10 Description Input links, setup registers or labels have changed. Page 409 Modbus Slave Module ION Reference The Event output register stores the following information for each ION event: time stamp, priority, cause, effect, and any values or conditions associated with the cause and effect. Detailed Module Operation Boolean Inputs & Packed Boolean Format If the Format setup register is set to Packed Boolean and the Source inputs are connected to Boolean inputs, the ModVal 1 register contains a 16-bit map for the Boolean inputs. The most significant bit (MSB) corresponds to the value linked to the Source 1 input, and the least significant bit corresponds to the value linked to the Source 16 input. All other output registers are NOT AVAILABLE. The scaling registers have no effect if Packed Boolean format is selected. If the Format setup register is set to Packed Boolean and some of the Source inputs are connected to numeric inputs, each non-zero numeric value is treated as a Boolean “1” and a zero numeric value is treated as a Boolean “0”. If the Format setup register is set to anything other than Packed Boolean and some of the Source inputs are connected to Boolean inputs, each Boolean “1” is placed in the corresponding output register as a numeric “1”and each Boolean “0” as a numeric “0” (each output uses 16 or 32 bits, depending on the Format setup register). The scaling registers have no effect on Source inputs linked to Boolean values. Scaling Four setup registers (InZero, InFull, OutZero and OutFull) may be used to scale a range of numeric input values to a specified output range. The following diagram shows how the scaling operation works. For example, suppose the Modbus Master needs 10-bit data for all inputs, and the kW reading is required. The Modbus Slave module Format register is set to use Unsigned 16-bit; the input range is specified as 5000kW to 20000 kW, and the output range is set from 0 to 1023 to give maximum resolution over this range. Any values for the kW register below 5000kW will be exported to the Modbus Master as a value of 0; any reading in excess of 20,000kW will be exported as a reading of 1023. The Modbus Master typically can apply the appropriate scaling and offset values necessary to interpret these values. Page 410 © 2008 Schneider Electric. All rights reserved. ION Reference Modbus Slave Module Note that if the Modbus Master reads data from any register that does not contain valid data (i.e. if any of the module inputs are not available), the data will be indicated by the hexadecimal value 0xFFFF; this should not be mistaken for a valid reading. Ensure that the Modbus Master can recognize this “invalid” response. In the case of Packed Boolean format, each unconnected or unavailable input is represented by a “0” in the output register. Modbus Address Ranges Many operating parameters of ION devices can be configured via Modbus WRITE commands. Setup registers are mapped to a fixed address range. You cannot use addresses in this range for access to Modbus Slave module output registers. Valid address ranges for the setup registers you are configuring are available in the User’s Guide for your device. If you use Designer to configure the setup registers, the valid address ranges will be displayed when you modify them. Importing with Modbus Slave Modules The Modbus Slave module can be used for importing Modbus data into some meters or the Virtual Processor. When no inputs are linked to the Modbus Slave module, the output registers show the contents of the fixed Modbus address map as defined by the setup registers of the Slave Module. The values at the map address are copied to the output registers, starting at the address specified in the BaseAddr setup register, until each output register is filled. Use the Modbus Slave module to bring Modbus data into your power monitoring system as follows: 1. Create a Modbus Slave module in the Virtual Processor or on a meter by dragging a module from the toolbox in Designer. 2. Leave the inputs of the Modbus Slave Module unlinked. The Modbus Slave module will not read the Modbus register map if any of its inputs are linked (the module will provide the linked data to the Modbus register map). 3. Configure the Modbus Slave module’s setup registers. © 2008 Schneider Electric. All rights reserved. Page 411 Modbus Slave Module ION Reference For the Virtual Processor, if the Format setup register is: 16 bit format, 16 bit data is put into each of the ModVal outputs. 32 bit format, two pieces of 16 bit data are combined into one 32 bit ModVal output register. Packed Boolean, then the data is put into the ModVal 1 output register in Packed Boolean form. For meters, the Format setup register can only be set to 16 bit unsigned format. 4. Enter the base Modbus address into the BaseAddr setup register. There is no scaling applied to any of the Modbus register map values so ignore the Scaling, InZero, InFull, OutZero, and OutFull setup registers. NOTE When using a meter's Modbus Slave module to show the Modbus map you must change the Format setup register to “Unsigned 16B Input Mode.” This is not necessary when using a Modbus Slave module in the Virtual Processor. You can now link the outputs of the Modbus Slave module to the inputs of other ION modules. Three such examples are: Data Recorder modules for data logging Setpoint and Relative Setpoint modules for alarming Distributed Numeric module for redistribution to ION meters (for automated plant-wide demand or power factor control) For more information on using the Modbus Slave module see the Modbus and ION Technology technical note, available from the Schneider Electric web site Responses to Special Conditions The following table summarizes how the Modbus Slave module behaves under different conditions. Condition Page 412 Response of Output Register If the Source input is NOT AVAILABLE The ModVal registers are set to N/A (NOT AVAILABLE). After the module is re-linked or its setup registers are changed The ModVal registers are NOT AVAILABLE. The ModBase register is equal to the BaseAddr setup register value. The ModLink register equals ModBase plus N. When the device is powered up after a shutdown (either the first time, or after a shut-down) The ModVal registers are NOT AVAILABLE. The ModBase register is equal to the BaseAddr setup register value. The ModLink register equals ModBase plus N. © 2008 Schneider Electric. All rights reserved. ION REFERENCE 09/2008 One-Shot Timer Module The One-Shot Timer module provides a time-delay function that can be used to postpone the operation of another module for a defined time period. Possible applications include: implementing a delay before recording a waveform delaying relay operation The One-Shot Timer module turns a Boolean register ON for a specified time period whenever its Start input is pulsed. At the end of this time period, an output pulse is generated. A One-Shot Timer can be disabled. One-Shot Timer Module Enable Start State Trigger Event Inputs Enable This input enables or disables the One-Shot Timer module. When the timer is running (i.e. if a pulse was received on the Start input but the time specified in the Duration setup register has not elapsed), disabling the module has no immediate effect. However, subsequent pulses on the Start input will be ignored. This input is optional; if you leave it unlinked, the module will be enabled by default. Start This input triggers the timer countdown. While the timer is counting down (i.e. when the State output register is ON) all input triggers are ignored; in other words, Start pulses cannot pre-empt the timer operation. Linking this input is mandatory. Schneider Electric 2195 Keating Cross Road Saanichton, BC Canada V8M 2A5 Tel: 1-250-652-7100 For technical support: [email protected] (00) + 1 250 544 3010 Contact your local Schneider Electric sales representative for assistance or go to www.powerlogic.com ION, PowerLogic and Schneider Electric are trademarks or registered trademarks of Schneider Electric in France, the USA and other countries. Other trademarks used are the property of their respective owners. Electrical equipment should be installed, operated, serviced, and maintained only by qualified personnel. No responsibility is assumed by Schneider Electric for any consequences arising out of the use of this material. © 2008 Schneider Electric. All rights reserved. One-Shot Timer Module ION Reference Setup Registers Duration This register specifies count-down length, in seconds, of the timer — the time between the moment that the Start input is pulsed and the appearance of a pulse on the Trigger output register. The State output register will remain ON for the length of time specified in the Duration setup register. Output Registers State This Boolean register changes to ON when a pulse is received on the Start input and remains on for the time specified in the Duration setup register. Once the duration has elapsed, the State output changes to OFF. Trigger Each time a pulse is received on the Start input and the time specified in the Duration setup register elapses, the One-Shot Timer module writes a pulse into the Trigger register. Event All events produced by a One-Shot Timer module are written into this register. Possible events and their associated priority numbers are shown in the table below. Event Priority Group Setup Change Priority 10 Description Input links, setup registers or labels have changed. The Event output register stores the following information for each ION event: time stamp, priority, cause, effect, and any values or conditions associated with the cause and effect. Page 414 © 2008 Schneider Electric. All rights reserved. ION Reference One-Shot Timer Module Detailed Module Operation The figure below illustrates the operation of an enabled One-Shot Timer module. When the pulse is received on the Start input, the State output register changes to ON for the time defined by the Duration setup register. Once the duration has elapsed, a pulse is generated on the Trigger output and the State output changes back to OFF. Note that the second pulse is ignored while the State output is ON. Responses to Special Conditions The following table summarizes how the One-Shot Timer module behaves under different conditions. Condition © 2008 Schneider Electric. All rights reserved. Response of Output Register If the Enable input is OFF If a Trigger pulse is in progress, the State output register remains ON for the duration of the pulse. If no pulse is in progress, State is OFF. After the module is re-linked or its setup registers are changed The State output register is OFF. Any Trigger pulse in progress is discarded. When the device is started or powered-up (either the first time, or after a shut-down) The State output register is OFF. Any Trigger pulse in progress is discarded. Page 415 One-Shot Timer Module Page 416 ION Reference © 2008 Schneider Electric. All rights reserved. ION REFERENCE 12/2009 Periodic Timer Module The Periodic Timer module provides a running timer that generates a pulse at programmable intervals. This pulse can be synchronized to the hour of the device’s internal clock or to an external pulse received on the Sync input. When used together with other modules, the Periodic Timer allows you to make events happen on a regular basis. For example, when used with a Recorder module, the Periodic Timer can be used to implement a snapshot log. Periodic Timer Module Enable Sync Trigger r Event Inputs Enable This input enables or disables the Periodic Timer module. When the module is disabled, no pulses are generated on the Trigger output register. Linking this input is optional; the module is enabled by default. Sync This input defines the starting point at which the Periodic Timer module begins timing. When a pulse is received on this input, the Periodic Timer starts timing from this new starting point. This input is optional; if you leave it unlinked, it will never receive a pulse. Setup Registers The setup registers of the Period Timer module determine at what point output pulses are generated. Schneider Electric 2195 Keating Cross Road Saanichton, BC Canada V8M 2A5 Tel: 1-250-652-7100 For technical support: [email protected] (00) + 1 250 544 3010 Contact your local Schneider Electric sales representative for assistance or go to www.powerlogic.com ION, PowerLogic and Schneider Electric are trademarks or registered trademarks of Schneider Electric in France, the USA and other countries. Other trademarks used are the property of their respective owners. Electrical equipment should be installed, operated, serviced, and maintained only by qualified personnel. No responsibility is assumed by Schneider Electric for any consequences arising out of the use of this material. © 2009 Schneider Electric. All rights reserved. Periodic Timer Module ION Reference Period This numeric bounded register specifies the number of seconds between pulses on the Trigger output register. Sync Mode This register determines whether the Trigger output generates a pulse when the Sync input is pulsed (TRIGGER ON SYNC) or if it waits for the first period to expire (NO TRIG ON SYNC). Output Registers Trigger When the module is enabled, this pulse register generates a pulse every time the period specified by the Period setup register expires. If the Sync input is linked and you have set the Sync Mode setup register to TRIGGER ON SYNC, the Trigger output will generate a pulse every time the Sync input is pulsed, in addition to pulsing each time the period expires. Event All events produced by a Periodic Timer module are written into this register. Possible events and their associated priority numbers are shown in the following table: Event Priority Group Priority Description Reset 5 A module resynch has occurred. Setup Change 10 Input links, setup registers or labels have changed. The Event output register stores the following information for each ION event: time stamp, priority, cause, effect, and any values or conditions associated with the cause and effect. Page 418 © 2009 Schneider Electric. All rights reserved. ION Reference Periodic Timer Module Detailed Module Operation The following figure illustrates the operation of the Periodic Timer module with the Sync input linked or unlinked. The marks indicate when a pulse is generated on the Trigger output. NOTE If the Sync input is linked, the module will start its period when the module goes online. In all four cases, the Period is set to 900 s (15 minutes). Note how the timing of the Trigger pulse is affected by linking or unlinking the Sync input. The Sync input controls whether the Trigger pulses occur on regular time boundaries (e.g. 7:45:00, 8:00:00, 8:15:00) or in-between (e.g. 7:37:45, 7:52:45, 8:07:45). Sync Mode controls whether a pulse is immediately generated when an Sync pulse is received (e.g. at 7:37:45) or if it is delayed. To account for time zone and Daylight Savings Time information, the Periodic Timer module needs to refer to a clock. For ION meters, the Periodic Timer module uses the Local Time output register of the device’s Clock module. For the Virtual Processor, the Periodic Timer module uses the workstation’s local time. If, for example, you set the Periodic Timer to pulse twice a day (i.e. once every 12 hours, or 43200 seconds), the module will pulse once at 12:00 midnight, and again at 12:00 noon (local time). © 2009 Schneider Electric. All rights reserved. Page 419 Periodic Timer Module ION Reference Responses to Special Conditions The following table summarizes how the Periodic Timer module behaves under different conditions. Condition Page 420 Response of Output Register If the Enable input is OFF No pulses will be generated at the output register. Power ON Pulses start when the module starts (goes online). When the module is re-linked or its setup registers are changed Pulses are generated as soon as the module goes online. © 2009 Schneider Electric. All rights reserved. ION REFERENCE 09/2008 Power Harmonics Module The Power Harmonics module provides an in-depth analysis of power system parameters for a selected harmonic. The module measures voltage and current levels for the selected harmonic, and derives kW, kVAR, kVA, Voltage Angle, Current Angle and Phase Angle values for each phase. Inputs V1FFT, V2FFT, V3FFT The V1FFT, V2FFT and V3FFT inputs are fixed. They receive phase voltage information from the FFT module. I1FFT, I2FFT, I3FFT The I1FFT, I2FFT, and I3FFT inputs are fixed. They receive phase current information from the FFT module. Enable All Power Harmonics modules have one programmable input called Enable. When this register is set to TRUE, the module is enabled. When it is set to FALSE, the module is disabled; it ceases to calculate power values and its output registers become N/A. This input is optional; if you leave it unlinked, the module will be enabled by default. Schneider Electric 2195 Keating Cross Road Saanichton, BC Canada V8M 2A5 Tel: 1-250-652-7100 For technical support: [email protected] (00) + 1 250 544 3010 Contact your local Schneider Electric sales representative for assistance or go to www.powerlogic.com ION, PowerLogic and Schneider Electric are trademarks or registered trademarks of Schneider Electric in France, the USA and other countries. Other trademarks used are the property of their respective owners. Electrical equipment should be installed, operated, serviced, and maintained only by qualified personnel. No responsibility is assumed by Schneider Electric for any consequences arising out of the use of this material. © 2008 Schneider Electric. All rights reserved. Power Harmonics Module ION Reference Setup Registers Harmonic Number This register specifies which harmonic to calculate parameters for. Any harmonic from the fundamental to the 63rd can be selected. The fundamental, or 1st harmonic, is selected by default. Output Registers V1, V2 and V3 These numeric output registers hold the RMS phase voltage values for the harmonic specified in the Harmonic Number setup register. I1, I2 and I3 These numeric output registers hold the RMS phase current values for the harmonic specified in the Harmonic Number setup register. kW1, kW2 and kW3 These numeric registers hold the RMS kW values for each phase at the harmonic specified in the Harmonic Number setup register. kW Total This numeric register holds the total RMS kW value for all phases at the harmonic specified in the Harmonic Number setup register. kVAR1, kVAR2 and kVAR3 These numeric registers hold the RMS kVAR values for each phase at the harmonic specified in the Harmonic Number setup register. kVAR Total This numeric register holds the total kVAR value for all phases at the harmonic specified in the Harmonic Number setup register. kVA1, kVA2 and kVA3 These numeric registers hold the RMS kVA values for each phase at the harmonic specified in the Harmonic Number setup register. kVA Total This numeric register holds the total kVA value for all phases at the harmonic specified in the Harmonic Number setup register. V1 Angle, V2 Angle and V3 Angle These numeric registers hold the voltage angle values (in degrees) for each phase at the harmonic selected in the Harmonic Number setup register. Voltage angles are given with respect to the position of the V1 fundamental harmonic. I1 Angle, I2 Angle and I3 Angle These numeric registers hold the current angle values (in degrees) for each phase at the harmonic selected in the Harmonic Number setup register. Current angles are given with respect to the position of the V1 fundamental harmonic. Page 422 © 2008 Schneider Electric. All rights reserved. ION Reference Power Harmonics Module Phase Angle1, Phase Angle 2 and Phase Angle 3 These numeric registers hold the phase angle value, in degrees, for each phase at the selected harmonic. The phase angle is given as the difference between the current and voltage angles for each phase. Event All events produced by a Power Harmonics module are written into this register. Possible events and their associated priority numbers are shown in the table below. Event Priority Group Setup Change Priority 10 Description Input links, setup registers or labels have changed. The Event output register stores the following information for each ION event: time stamp, event priority, event's cause, event's effect, and conditions associated with the event's cause and effect. © 2008 Schneider Electric. All rights reserved. Page 423 Power Harmonics Module ION Reference Detailed Module Operation The Power Harmonics module receives the phase voltage and current values measured by the IED. From these values, kW, kVA, kVAR, voltage angles, current angles and phase angles are calculated for the harmonic specified in the Harmonic Number setup register. Using these values, you can determine the magnitude and direction of harmonic power flow at any harmonic from the first to the 63rd. The basic procedure for analyzing harmonic power flow is as follows: 1. Choose the harmonic you want to analyze by specifying its number in the Harmonic Number setup register. 2. Use ION Enterprise, ION Setup or the ION device’s display to view the values in the module’s output registers. Module Accuracy NOTE The Power Harmonics module does not take external CT phase shift into account when calculating its output values. The various output values from the Power Harmonics module provide different levels of accuracy. Accuracy will typically decrease when values are derived from other quantities, as accuracy tolerances are cumulative. The accuracy of Phase Angle values will vary, as accuracy diminishes as the harmonic number increases. Review the accuracy limitations stated below when analyzing the module’s output values. Voltage values are accurate to within ±1% Current values are accurate to within ±1% kVA values are accurate to within ±2% Phase angle values are accurate to within (±0.5º x harmonic number) kW values are accurate to within [(kVA±2%)cos(±0.5º x harmonic number)] kVAR values are accurate to within [(kVA±2%)sin(±0.5º x harmonic number)] Responses to Special Conditions The following table summarizes how the Power Harmonics module behaves under different conditions. Condition Page 424 Response of Output Register If the Enable input is OFF or N/A The output registers are N/A. When the device is started or powered-up (either the first time, or after a shut-down) The output registers are N/A. © 2008 Schneider Electric. All rights reserved. ION REFERENCE 09/2008 Power Meter Module The Power Meter module measures and calculates all basic power system quantities based on the voltage and current inputs of the ION meter. It is automatically linked to the Data Acquisition module — the module that performs analog to digital conversions on the input signals. Together, these two modules are the link between all other ION modules and the physical world. The Power Meter module has three forms: the regular Power Meter, the Meter Units (MU) Power Meter, and the High Speed (HS) Power Meter. Regular Power Meter modules use scaling factors to obtain high-accuracy measurements of primary transformer levels. MU Power Meter modules display true secondary transformer levels; i.e. readings based on the voltage and current after they have been transformed to fall within the input ranges of the device. HS Power Meter modules update their measurement as fast as once per half-cycle (rather than once per second). Schneider Electric 2195 Keating Cross Road Saanichton, BC Canada V8M 2A5 Tel: 1-250-652-7100 For technical support: [email protected] (00) + 1 250 544 3010 Contact your local Schneider Electric sales representative for assistance or go to www.powerlogic.com ION, PowerLogic and Schneider Electric are trademarks or registered trademarks of Schneider Electric in France, the USA and other countries. Other trademarks used are the property of their respective owners. Electrical equipment should be installed, operated, serviced, and maintained only by qualified personnel. No responsibility is assumed by Schneider Electric for any consequences arising out of the use of this material. © 2008 Schneider Electric. All rights reserved. Power Meter Module ION Reference NOTE Not all ION devices support the High Speed Power Meter module. Inputs All Power Meter modules are enabled by default. They cannot be disabled. V1-V4 and I1-I5 These inputs are the sampled waveforms originating from your polyphase or single-phase power system. These Power Meter module inputs are linked to the Data Acquisition module’s outputs — these links cannot be changed. The physical connection for I4, I5, and V4 are not present on all ION meters. Those meters with connections for these inputs are generally used to monitor neutral and earth ground currents and voltage. I4 is generally connected to the neutral conductor in a Wye system, I5 is generally used for monitoring the earth-ground current, and V4 is typically used to measure the potential between neutral and earth-ground. Although all ION meters have an I4 output register, the I4 input is not always present. Those meters that do not have the I4 input derive I4 from a residual current calculation (see the I4 output register below). Refer to your ION device documentation for more information. Setup Registers The setup registers for the Power Meter module define the characteristics of the power system being monitored and influence the calculations that are performed. All Power Meter modules have the following setup registers: Volts Mode This register reflects the power system configuration and determines the mode of calculation (4W-Wye, 3W-Wye, or Delta, for example). The device may also offer a demonstration mode that generates dynamic artificial readings for all real-time measurement output registers. Refer to the appropriate device’s Installation document for details about which configuration is appropriate under different circumstances, as well as detailed wiring diagrams. PT Prim If potential transformers (PTs) are used on the voltage V1 - V3 inputs, this register should be set to the primary winding rating for the PTs. If direct connection is used, this register should be set to the full-scale ratings of the V1 - V3 inputs. NOTE You may ignore the PT and CT scaling factors when configuring the Meter Units Power Meter (MU Power Meter). Page 426 © 2008 Schneider Electric. All rights reserved. ION Reference Power Meter Module V4 PT Prim If a potential transformer (PT) is used on the V4 input, this register should be set to the primary winding rating for the PT. If direct connection is used, this register should be set to the full-scale rating of the V4 inputs. PT Sec If potential transformers (PTs) are used on V1 - V3 inputs, this register determines the secondary winding rating for the PTs. If direct connection is used, this register sets the full-scale ratings of the V1 - V3 inputs. V4 PT Sec If a potential transformer (PT) is used on the V4 input, this register determines the secondary winding rating for the PT. If direct connection is used, this register sets the full-scale rating of the V4 input. CT Prim This register should be set to the Current Transformer (CT) primary winding rating for inputs I1 - I3. CT Sec This register should be set to the Current Transformer (CT) secondary winding rating for inputs I1 - I3. I4 CT Prim, I5 CT Prim These registers should be set to the Current Transformer (CT) primary winding rating for inputs I4 and I5. The I5 CT Prim register will exist only on those meters that support I5. I4 CT Sec, I5 CT Sec These registers should be set to the Current Transformer (CT) secondary winding rating for inputs I4 and I5. The I5 CT Sec register will exist only on those meters that support I5. V1 – V4 Polarity These three registers should be set to the polarity of the V1, V2, and V3 Potential Transformers (PT), respectively. The V4 Polarity register will exist only on those meters that support V4. I1 – I5 Polarity These four registers should be set to the polarity of the I1, I2, I3, and I4 Current Transformers (CT), respectively. The I5 Polarity register will exist only on those meters that support I5. PhaseOrder This register defines the expected rotation of voltage phases. Phase Lbls This register determines the phase label formats given to the output registers. Probe Type This register determines the Current Probe Inputs setting. © 2008 Schneider Electric. All rights reserved. Page 427 Power Meter Module ION Reference kVA tot Method This register determines the method used to calculate kVA total. When set to Vector Sum, kVA total is calculated using this formula: √kWtotal2+ kVAR total 2 When set to Scalar Sum, kVA total is calculated using this formula: kVAa kVAb kVAc PF Sign Convention This register determines which sign convention, IEEE or IEC, is used for the PF Sign a, PF Sign b, PF Sign c and PF Sign tot output registers, and therefore how it is displayed on the front panel when the PF Symbol register in the Display Options module is set to “+/–”. The options are IEEE or IEC; see “Power Factor, Power and Energy Interpretation” for more details on how power factor is interpreted. Nominal Frequency This register sets the nominal frequency used by the meter. The options are 50Hz or 60Hz. Output Registers The output registers of the Power Meter module contain all the current and voltagebased values that are measured or calculated by the meter. All Power Meter modules have the following output registers: Vln a, Vln b, Vln c These three numeric registers contain the RMS line-to-neutral voltages on phase A, B, and C, respectively. Note that if Volts Mode is Delta, these outputs are NOT AVAILABLE. If Volts Mode is Single, Vln c is NOT AVAILABLE. Vln avg This numeric register contains the average of Vln a, Vln b and Vln c. Note that if Volts Mode is Single, this register will be set to the average of Vln a and Vln b only. If Volts Mode is Delta, this output is NOT AVAILABLE. Vll ab, Vll bc, Vll ca These three numeric registers contain the RMS line-to-line voltages from phases B to A, C to B, and A to C, respectively. If Volts Mode is Single then Vll bc and Vll ca will read NOT AVAILABLE. Vll avg This numeric register contains the average of Vll ab, Vll bc and Vll ca. Note that if Volts Mode is Single, this output is NOT AVAILABLE. I a, I b, I c These three numeric registers contain the RMS current of phases A, B, and C, respectively. Note that if Volts Mode is Single, Ic is NOT AVAILABLE. Page 428 © 2008 Schneider Electric. All rights reserved. ION Reference Power Meter Module I avg This numeric register contains the average of I a, I b and I c. Note that if Volts Mode is Single, this register averages I a and I b only. kW a, kW b, kW c These three numeric registers contain the real power for phases A, B, and C, respectively. Note that a negative value indicates reverse kW. If Volts Mode is Delta, kW a and kW b will be NOT AVAILABLE. If Volts Mode is Delta or Single, kW c is NOT AVAILABLE. kW total In Wye mode, this numeric register contains the sum of kW a, kW b, and kW c. Note that a negative value indicates reverse kW. If Volts Mode is Single, this register will contain the sum of kW a and kW b. kVAR a, kVAR b, kVAR c These three numeric registers contain the reactive power for phases A, B, and C, respectively. Note that a negative value indicates reverse kVAR. If Volts Mode is Delta, kVAR a and kVAR b will be NOT AVAILABLE. If Volts Mode is Delta or Single, kVAR c is NOT AVAILABLE. kVAR total In Wye mode, this numeric register contains the sum of kVAR a, kVAR b, and kVAR c. Note that a negative value indicates reverse kVAR. If Volts Mode is Single, this register will contain the sum of kVAR a and kVAR b. kVA a, kVA b, kVA c These numeric registers contain the RMS value of apparent power for phases A, B, and C, respectively. Note that if Volts Mode is Delta, kVA a and kVA b will be NOT AVAILABLE. If Volts Mode is Delta or Single, kVA c is NOT AVAILABLE. kVA total This numeric register contains the total apparent power over three phases, as determined by the kVA tot Method setup register. Quadrant 1, Quadrant 2, Quadrant 3, Quadrant 4 When the Quadrant output registers are ON, they indicate the quadrant where apparent power resides. The table below states the conditions that create the ON output in each register. kW kVAR Quadrant 1 kW >= 0 kVAR >= 0 Quadrant 2 kW < 0 kVAR >= 0 Quadrant 3 kW < 0 kVAR < 0 Quadrant 4 kW >= 0 kVAR < 0 Note that the Quadrant output registers are only available on the regular and Meter Units (MU) Power Meter modules. © 2008 Schneider Electric. All rights reserved. Page 429 Power Meter Module ION Reference PF sign a, PF sign b, PF sign c These three numeric registers contains the power factor on phase A, B, and C, respectively. The values can range from 0 to 100 and -100 to -0. A negative value indicates that the power factor is lagging. A positive value indicates that the power factor is leading. Note that if Volts Mode is Delta, PF sign a and PF sign b will be NOT AVAILABLE. Note that if Volts Mode is Delta or Single, PF sign c will be NOT AVAILABLE. NOTE Refer to the “Power Factor, Power and Energy Interpretation” diagrams at the end of this module description for visual details. PF sign tot In Wye mode, this numeric register contains the total power factor on phases A, B, and C. The value can range from 0 to 100 and -100 to -0. Note that if Volts Mode is Single, this register will contain the total PF on phases A and B. PF lead a, PF lead b, PF lead c These three numeric registers contain the leading power factor on phases A, B, and C, respectively. The value can range from 0 to 100. Note that if Volts Mode is Delta or the power factor is lagging, PF lead a and PF lead b will be NOT AVAILABLE. If Volts Mode is Delta or Single, or the power factor is lagging, PF lead c will be NOT AVAILABLE. PF lead tot In Wye mode, this numeric register contains the total leading power factor on phases A, B, and C. The value can range from 0 to 100. Note that if Volts Mode is Single, this register will contain the total leading power factor on phases A and B. If the total power factor is lagging, this register will be NOT AVAILABLE. PF lag a, PF lag b, PF lag c These three numeric registers contain the lagging power factor on phases A, B, and C, respectively. The values can range from 0 to 100. Note that if Volts Mode is Delta or the power factor is leading, PF lag a and PF lag b will be NOT AVAILABLE. If Volts Mode is Delta or Single, or the power factor is leading, PF lag c will be NOT AVAILABLE. PF lag tot In Wye mode, this numeric register contains the total lagging power factor on phases A, B, and C. The value can range from 0 to 100. Note that if Volts Mode is Single, this register will contain the total lagging power factor on phases A and B. If the total power factor is leading, this register will be NOT AVAILABLE. V unbal This numeric register contains the percentage deviation from Vln avg for the voltage phase having the greatest unbalance. It is calculated as follows: WYE MODE Largest Deviation from Vln avg Vln avg Page 430 DELTA MODE x 100% Largest Deviation from Vll avg Vll avg x 100% © 2008 Schneider Electric. All rights reserved. ION Reference Power Meter Module For example: Vln a = 13,700 V Vln avg = Vln b = 13,900 V Vln c = 13,700 V 13,700 + 13,900 + 13,700 3 = 41,300 3 = 13,767 V Vln B (13,900) has the largest deviation from Vln avg (13,767) ABS (Vln b – Vln avg) Vln avg x 100% = ABS (13,900 – 13,767) x 100% = 0.96% 13,767 I unbal This numeric register contains the percentage deviation from I avg for the current phase having the greatest unbalance. Largest Deviation from I avg I avg x 100% I4 All ION meters have the I4 numeric output register. If the ION meter has the I4 input (see Inputs above), this output register will contain the RMS current calculated using the I4 input. Those ION meters that do not have the I4 input derive I4 from a residual current calculation. I5 This numeric register contains the RMS current – calculated using the I5 input. This register is not present on those meters that do not have the physical connection for the I5 input. Phase Rev This Boolean register indicates if there is a Phase reversal. When the voltage phases do not rotate in the sequence specified by the PhaseOrder setup, this register is ON. Note that if Volts Mode is Single, this register is NOT AVAILABLE. Line Freq This numeric register contains the Fundamental frequency of phase A voltage. Event All events produced by a Power Meter module are written into this register. Events in the Power Meter module are any changes to the setup registers, input links or labels. These events all have a pre-defined priority of 10. © 2008 Schneider Electric. All rights reserved. Page 431 Power Meter Module ION Reference Power Factor, Power and Energy Interpretation Values for power factor and energy direction are interpreted according to the conventions shown in the diagrams below. Power Provider Power Consumer Delivered LINE Received V1 I11 ION Meter Page 432 I12 Imported LOAD Exported V1 I11 I12 ION Meter © 2008 Schneider Electric. All rights reserved. ION REFERENCE 12/2009 Power Quality Aggregator Module The Power Quality Aggregator module outputs the following Power Quality parameters: voltage aggregates, current aggregates, voltage over and under deviation aggregates, sliding reference voltage and power frequency. The Power Quality Aggregator module has pulse outputs for the three IEC 61000-4-30 Class A compliance (“4-30”) intervals (150/180 cycles, 10 minutes and 2 hours). NOTE Use the pulse outputs of the Power Quality Aggregator module (not a Periodic Timer module) to trigger downstream modules such as Data Recording modules in order to preserve aggregate data integrity. Schneider Electric 2195 Keating Cross Road Saanichton, BC Canada V8M 2A5 Tel: 1-250-652-7100 For technical support: [email protected] (00) + 1 250 544 3010 Contact your local Schneider Electric sales representative for assistance or go to www.powerlogic.com ION, PowerLogic and Schneider Electric are trademarks or registered trademarks of Schneider Electric in France, the USA and other countries. Other trademarks used are the property of their respective owners. Electrical equipment should be installed, operated, serviced, and maintained only by qualified personnel. No responsibility is assumed by Schneider Electric for any consequences arising out of the use of this material. © 2009 Schneider Electric. All rights reserved. Power Quality Aggregator Module ION Reference The Power Quality Aggregator module complies with the following sections of the IEC 61000-4-30 standard: 3.24 r.m.s. voltage refreshed each half-cycle, Urms (1/2) 4.4 Measurement aggregation over time intervals 4.5 Measurement aggregation algorithm 5.1 Power frequency 5.2 Magnitude of the supply voltage 5.4.4 Calculation of a sliding reference voltage 5.12 Measurement of underdeviation and overdeviation parameters A.6.3 Magnitude of current For more information on IEC 61000-4-30 implementation in ION meters, refer to the 4-30 Compliance and ION meters technical note. Inputs The Power Quality Aggregator module has the following inputs: VLN1, VLN2 and VLN3 These are linked to the Vln a, Vln b, and Vln c outputs of the High Speed Power Meter module and cannot be changed. VLL12, VLL23 and VLL31 These are linked to the Vll ab, Vll bc, and Vll ca outputs of the High Speed Power Meter module and cannot be changed. VoltsMode This register reflects the power system's configuration. This register is linked to the VoltsMode setup register on the High Speed Power Meter module and cannot be changed. The VoltsMode determines which High Speed Power Meter outputs (line to neutral or line to line) are used to calculate the outputs of the Power Quality Aggregator module. The table below shows what Power Quality Aggregator inputs are used for the 3 voltage aggregates based on the different VoltsMode settings. Volts Mode V1 V2 V3 4W-Wye V LN1 V LN2 V LN3 3W-Wye V LN1 V LN2 * V LN3 Delta V LL12 V LL23 V LL31 Single V LN1 V LN2 N/A Demo N/A N/A N/A * This value will be inaccurate if the voltages are unbalanced. Line to line (LL) values are used for systems that do not have a neutral. Line to neutral (LN) values are used for systems with a neutral. Page 434 © 2009 Schneider Electric. All rights reserved. ION Reference Power Quality Aggregator Module NomVolts This input specifies the nominal voltage of the power system. By default this register is linked to the Sag/Swell module’s NomVolts setup register. I1, I2 and I3 These are linked to the High Speed Power Meter module’s I a, I b and I c outputs respectively and cannot be changed. NomFreq This is linked to the NomFreq setup register of the Factory module and cannot be changed. Enable This input enables or disables the module. Linking this input is optional; if you leave it unlinked, the module will be enabled by default. Setup Registers This module has no setup registers. Output Registers The Power Quality Aggregator module contains the following output registers: V1 150 180 Cycle, V2 150 180 Cycle, and V3 150 180 Cycle These are the 150/180 cycle measurements for magnitude of supply voltage as described in 4-30 section 4.4. The output values are updated at the completion of each 150/180 cycle interval. NOTE V3 150 180 Cycle is set to N/A when VoltsMode is set to SINGLE I1 150 180 Cycle, I2 150 180 Cycle, and I3 150 180 Cycle These registers are used in the 150/180 cycle measurement for current, as described in 4-30 section 4.4. The output values are updated at the completion of each 150/180 cycle interval. V1, V2 and V3 OverDev 150 180 Cycles These are the overdeviation 150/180 cycle aggregates based on the 10/12 cycle overdeviation aggregates, as described in 4-30 section 5.12. The output values are updated at the completion of each 150/180 cycle interval. V1, V2 and V3 UnderDev 150 180 Cycles These are the underdeviation calculations based on the 10/12 cycle underdeviation aggregates, as described in 4-30 section 5.12. The output values are updated at the completion of each 150/180 cycle interval. 150 180 Cycle Pulse This register is pulsed at 150/180 cycle intervals. © 2009 Schneider Electric. All rights reserved. Page 435 Power Quality Aggregator Module ION Reference V1 10 Minute, V2 10 Minute, and V3 10 Minute These are the 10 minute interval aggregates of the basic measurement intervals (10/12-cycle) described in 4-30 section 4.4. The values are updated every 10 minutes. I1 10 Minute, I2 10 Minute, and I3 10 Minute These are the 10 minute interval aggregates of the basic measurement intervals (10/12-cycle) described in 4-30 section 4.4. The values are updated every 10 minutes. NOTE I3 10 Minute is set to N/A when VoltsMode is set to “SINGLE”. NOTE For the voltage and current 10 minute interval aggregates, if the 10 minute interval ends during a 10/12 cycle, the values will not update until the 10/12 cycle is completed. Therefore the interval may be 10 minutes plus up to one 10/12 cycle in length. V1, V2 and V3 OverDev 10 Minute These are the overdeviation calculations based on the 10 minute Vrms as described in 4-30 section 5.12. The values are updated every 10 minutes. V1, V2 and V3 UnderDev 10 Minute These are the underdeviation calculations based on the 10 minute Vrms as described in 4-30 section 5.12. The values are updated every 10 minutes 10 Minute Interval Pulse This register is pulsed every 10 minutes + maximum of 10/12-cycles. 2 Hour Interval Pulse This register is pulsed every 2 hours + maximum of 10/12-cycles. Power Frequency This is the ratio of the number of integral cycles counted during a 10 second clock interval, divided by the cumulative duration of the integer cycles. Individual cycles that overlap the 10 second boundary are discarded from the measurement as defined in 4-30 section 5.1. Power Frequency Channel This is a numeric register that can have the values 0, 1 or 2 depending on the channel frequency being measured (0=V1, 1=V2, 2=V3). Power Frequency Update This is pulsed when the Power Frequency has been updated, pulsed at approximately 10 second intervals synchronized to the clock. VLN1 Half-Cycle, VLN2 Half-Cycle, VLN3 Half-Cycle These are the L-N rms voltages measured over 1 cycle, commencing at a fundamental zero crossing, and refreshed every half-cycle as defined in 4-30 section 3.24. Page 436 © 2009 Schneider Electric. All rights reserved. ION Reference Power Quality Aggregator Module VLL12 Half-Cycle, VLL23 Half-Cycle, VLL31 Half-Cycle These are the L-L rms voltages measured over 1 cycle, commencing at a fundamental zero crossing, and refreshed every half-cycle as defined in 4-30 section 3.24. Sliding Reference Voltage This is calculated using the aggregate of V L1-N or V L1-L2, depending on the VoltsMode, as defined in 4-30 section 5.4.4. Event All events produced by the module are written into this register. Possible events and their associated priority numbers are shown in the table below: Event Priority Group Setup Change Priority 10 Description Input links, setup registers or labels have been changed. The Event output register stores the following information for each ION event: time stamp, priority, cause, effect, and any values or conditions associated with the cause and effect. © 2009 Schneider Electric. All rights reserved. Page 437 Power Quality Aggregator Module Page 438 ION Reference © 2009 Schneider Electric. All rights reserved. ION REFERENCE 09/2008 Profibus Slave Export Module The Profibus Slave Export module allows an ION device to be integrated into a Profibus network. This module makes ION register values available in a format that the Profibus master devices can recognize and use. Each module can map and scale up to six ION register values, which are then packaged into a Profibus DP response packet. Profibus Slave Export Module Profibus Value 1 Profibus Value 2 Profibus Value 6 Source 1 Source 2 Event Source 6 Inputs Source 1 to Source 6 The Profibus Slave Export module takes the numeric or Boolean value from Source inputs and makes them available to be read by the Profibus masters. You can link any or all Source inputs to the output registers of other ION modules. Setup Registers Scaling This register specifies whether or not the output values will be scaled. If Scaling is set to YES, then the values in the IonZero, ProfiZero, IonFull and ProfiFull registers are used to scale the output values; if it is set to NO, no scaling is performed. IonZero This register specifies the minimum value that can be read by Source inputs. If a Source input is less than IonZero, the value is set to IonZero. Schneider Electric 2195 Keating Cross Road Saanichton, BC Canada V8M 2A5 Tel: 1-250-652-7100 For technical support: [email protected] (00) + 1 250 544 3010 Contact your local Schneider Electric sales representative for assistance or go to www.powerlogic.com ION, PowerLogic and Schneider Electric are trademarks or registered trademarks of Schneider Electric in France, the USA and other countries. Other trademarks used are the property of their respective owners. Electrical equipment should be installed, operated, serviced, and maintained only by qualified personnel. No responsibility is assumed by Schneider Electric for any consequences arising out of the use of this material. © 2008 Schneider Electric. All rights reserved. Profibus Slave Export Module ION Reference IonFull This register specifies the maximum value that can be read by Source inputs. If a Source input is greater than IonFull, the value is set to IonFull. ProfiZero This register specifies the minimum value that will appear at any Profibus Value output register. If a value is less than ProfiZero, the output is set to ProfiZero. ProfiFull This register specifies the maximum value that will appear at any Profibus Value output register. If a value is greater than ProfiFull, the output is set to ProfiFull. Output Registers Profibus Value 1 to Profibus Value 6 There are six Profibus Value output registers, each containing a 32-bit signed integer value. These six values are further translated into the 32-byte block of data that is returned to the Profibus master on request. Event All events produced by the Profibus Slave Export module are recorded in the Event register. Possible events and their associated priority numbers are shown in the table below. Event Priority Group Setup Change Priority 10 Description Setup register or labels have changed. The Event output register stores the following information for each ION event: time stamp, priority, cause, effect, and any values or conditions associated with the cause and effect. Page 440 © 2008 Schneider Electric. All rights reserved. ION Reference Profibus Slave Export Module Detailed Module Operation Scaling Four setup registers (IonZero, IonFull, ProfiZero and ProfiFull) can be used to scale a range of numeric input values to a specified output range. The minimum and maximum values that can be read by the module are specified in the IonZero and IonFull setup registers; the Profibus Value output registers are scaled according to the limits specified in the ProfiZero and ProfiFull setup registers. Input values that fall between IonZero and IonFull are linearly interpolated to within the ProfiZero ProfiFull limits. For example, if the Profibus master requires kW data in the 5000kW to 20000kW range, and it is set to provide output values scaled between the range of 0 to 1023; if a value of 15000kW is read the Profibus Value output register reads 682. Any values for the kW register below 5000kW will be returned to the Profibus Master as a value of 0; any reading in excess of 20,000kW will be returned as a reading of 1023. The Profibus Master must apply the appropriate scaling and offset values necessary to interpret these measurements. Profibus-DP Messaging Protocol Profibus is a multi-master/slave communications protocol designed for use in power distribution, manufacturing or process automation. Profibus-DP (Decentralized Periphery) is a performance-optimized protocol that is dedicated to time-critical communications between automation systems and peripherals. Baud rates for the Profibus-DP can range from 9600 bps to 12Mbps. Each 32-bit value stored in the Profibus Slave Export output register, as well as in each block of data that the slave returns to the master is represented by a 32-bit signed integer, with values ranging from –2 147 483 648 to +2 147 483 647. Each block of data that is mapped by the Profibus Slave Export module consists of 8 bytes of setup and control data, plus 24 bytes of data representing the values contained in the ION registers that are linked to this module's inputs. Refer to the ION7300 Profibus DP Serial Communications Protocol Document for information. © 2008 Schneider Electric. All rights reserved. Page 441 Profibus Slave Export Module ION Reference Responses to Special Conditions The following table summarizes how the Profibus Slave Export module behaves under different conditions. Condition Page 442 Value returned by the Profibus Slave Export Module If the Source input is N/A 0 After the module is re-linked or its setup registers are changed New Value or 0 When the device is started or powered-up (either the first time, or after a shut-down) 0 © 2008 Schneider Electric. All rights reserved. ION REFERENCE 09/2008 Pulse Merge Module The Pulse Merge module takes input pulses from multiple sources and combines them into a single output register. It is useful for triggering modules that should execute as a result of several different conditions. In other words, if a module needs to be triggered when any one of a group of other modules generates an output pulse, you can merge all the output pulses to a single Pulse Merge module. The Pulse Merge module then outputs a pulse whenever it receives an input pulse. Pulse Merge Module Pulse In 1 Pulse Out Event ... Pulse In n Enable Inputs Pulse In 1 to Pulse In n A pulse received on any of these inputs causes Pulse Out output register to generate a pulse. At least one of these inputs must be linked for the module to operate. Enable This input enables or disables the Pulse Merge module. If you disable a Pulse Merge module, pulses on the Pulse In inputs are ignored. Linking this input is optional; if you leave it unlinked, the module is enabled by default. Schneider Electric 2195 Keating Cross Road Saanichton, BC Canada V8M 2A5 Tel: 1-250-652-7100 For technical support: [email protected] (00) + 1 250 544 3010 Contact your local Schneider Electric sales representative for assistance or go to www.powerlogic.com ION, PowerLogic and Schneider Electric are trademarks or registered trademarks of Schneider Electric in France, the USA and other countries. Other trademarks used are the property of their respective owners. Electrical equipment should be installed, operated, serviced, and maintained only by qualified personnel. No responsibility is assumed by Schneider Electric for any consequences arising out of the use of this material. © 2008 Schneider Electric. All rights reserved. Pulse Merge Module ION Reference Setup Registers EvLog Mode This setup register determines whether or not pulses received on the inputs are logged as events by the Event output register. If the module is enabled and the EvLog Mode register is set to LOG ON, an event is logged each time a pulse is received. The event indicates which input has been pulsed. If EvLog Mode is set to LOG OFF, these events are not logged. Note that in either case, the actions of linking the module inputs and changing setup registers are still logged as events in the Event output register. Output Registers Pulse Out This register outputs a pulse anytime a pulse is received at any of the Pulse In inputs. Event All events produced by a Pulse Merge module are written to this register. Possible events and their associated priority numbers are shown in the table below. Event Priority Group Priority Description Setup Change 10 Input links, setup registers or labels have changed. Input Register Change 15 Pulse received on Source input. * * These events are only recorded if the EvLog Mode setup register is set to LOG ON. The Event output register stores the following information for each ION event: time stamp, priority, cause, effect, and any values or conditions associated with the cause and effect. Page 444 © 2008 Schneider Electric. All rights reserved. ION Reference Pulse Merge Module Detailed Module Operation The primary function of the Pulse Merge module is to act like an OR gate for pulse outputs. As shown in the diagram below, you cannot link multiple output registers into a single input. Module A Module D Module B Module C The Pulse Merge module solves the problem because it outputs a pulse whenever one of its multiple inputs receives a pulse. The solution is illustrated in the diagram below. Module D is triggered by the Pulse merge module when any of Modules A, B, or C output pulses. Module A Pulse Merge Module Pulse Out Module D Pulse In 1 Pulse In 2 Pulse In 3 Module B Module C The figures below show the module operation under various input conditions. A single pulse on three separate inputs results in three pulses out: Pulse Merge Module Pulse Out Pulse Inputs ... © 2008 Schneider Electric. All rights reserved. Page 445 Pulse Merge Module ION Reference Three pulses on one input results in three pulses out: Pulse Merge Module Pulse Out Pulse Inputs ... Three pulses on one input and two pulses on a different input results in a total of five pulses out: Pulse Merge Module Pulse Out Pulse Inputs ... Responses to Special Conditions The following table summarizes how the Pulse Merge module behaves under different conditions. Condition Page 446 Response of Output Register When the module is first created The Pulse Out output will not pulse until the inputs are evaluated. If the Enable input is OFF The Pulse Out output will not pulse. After the module is re-linked or its setup registers are changed The Pulse Out output will not pulse until the inputs are evaluated. © 2008 Schneider Electric. All rights reserved. ION REFERENCE 12/2009 Pulser Module The Pulser module serves as a intermediary between other module’s pulse output registers and a hardware output channel on the device. It converts the instantaneous pulses to pulses or transitions on a hardware output channel. You must specify whether the output is a transition or complete pulse, and you must indicate if it will pulse high or low. You must also select on which hardware port the pulses will appear (for example, digital output port number 3). For each pulse received at the Source input, a single pulse is sent to the specified hardware output channel. HAZARD OF UNEXPECTED DIGITAL OUTPUT PULSE • Do not use ION meters for critical control or protection applications where human or equipment safety relies on the operation of the control circuit. • An unexpected pulse on the digital outputs can result when the supply power to the meter is interrupted or after a meter firmware upgrade. • Be sure that you are familiar with the warnings at the beginning of this document, as well as those presented in your meter’s technical documentation. Failure to follow these instructions can result in death, serious injury, or equipment damage. Pulser Module Event Source Schneider Electric 2195 Keating Cross Road Saanichton, BC Canada V8M 2A5 Tel: 1-250-652-7100 For technical support: [email protected] (00) + 1 250 544 3010 Contact your local Schneider Electric sales representative for assistance or go to www.powerlogic.com ION, PowerLogic and Schneider Electric are trademarks or registered trademarks of Schneider Electric in France, the USA and other countries. Other trademarks used are the property of their respective owners. Electrical equipment should be installed, operated, serviced, and maintained only by qualified personnel. No responsibility is assumed by Schneider Electric for any consequences arising out of the use of this material. © 2009 Schneider Electric. All rights reserved. Pulser Module ION Reference Inputs Source All Pulser modules have one input called the Source. This input can be the pulse output register from any other module. It is monitored for a pulse and when one is present, it sends a pulse to the specified hardware output channel. Setup Registers PulseWidth The PulseWidth numeric bounded register specifies the pulse on-time (i.e., the time period that an LED is lit or relay is closed) in seconds of the output sent to the hardware channel. OutputMode This register specifies whether the output is a complete pulse (PULSE) or a transition pulse (KYZ). Polarity If you have selected a complete pulse as the OutputMode, this register defines the output polarity of the pulses. It has no effect if you selected transition mode. Port This register specifies which hardware port the output appears on. Refer to your ION device’s documentation for a list of available ports. CAUTION HAZARD OF MISAPPLICATION (MISUSE) Because mechanical relays have limited lifetimes, mechanical KYZ relays are typically not suitable for energy pulsing applications. For energy pulsing applications, consider using Form A outputs in KYZ mode. Failure to follow this instruction can result in equipment damage. Output Registers The primary effect of the Pulser module is not to send a value to an output register but to send a pulse to the actual hardware. This makes it slightly different from most of the other modules. Pulser modules do however generate events and thus, they have an Event register. NOTE You do not need to use a Digital Output module to control the hardware device; the Pulser module can control the hardware device itself. Page 448 © 2009 Schneider Electric. All rights reserved. ION Reference Pulser Module Event Any events produced by the Pulser module are recorded in the Event register. Possible events and their associated priority numbers are shown in the table below. Event Priority Group Setup Change Priority 10 Description Input links, setup registers or labels have changed. The Event output register stores the following information for each ION event: time stamp, priority, cause, effect, and any values or conditions associated with the cause and effect. © 2009 Schneider Electric. All rights reserved. Page 449 Pulser Module ION Reference Detailed Module Operation The figure below illustrates the operation of the Pulser module. DEVICE Source input Pulse from another module's Trigger or Pulse output register. Pulser Module Event Register Characteristics of output pulse and destination port defined by setup registers. Each second, the Pulser module determines how many pulses it has received on its Source input and outputs a like number of pulses to the specified hardware output channel. Because the PulseWidth setup register limits the output pulse to a minimum width, the Pulser module may not always be able to output a pulse for every pulse it receives on its Source input. In these cases, the extra pulses are sent to the hardware output channel in the next second. In cases where the Pulser module can output the correct number of pulses, these pulses are spread evenly throughout the second. In the figure below, the PulseWidth is set to 0.100 seconds and the OutputMode is set to PULSE. This means that a maximum of 10 pulses can be output to the hardware channel in one second. Note that in the first second, the two output pulses are spread evenly across the second, rather than compressed into the first or last portion of the second. Page 450 © 2009 Schneider Electric. All rights reserved. ION Reference Pulser Module KYZ Mode If the OutputMode setup register is set to KYZ, the Pulser module will behave as illustrated below. Notice that the PulseWidth now becomes the minimum amount of time that the module will wait before recognizing the next pulse. If pulses are received before the PulseWidth time has elapsed, they will be queued and sent on the next cycle. Responses to Special Conditions The following table summarizes how the Pulser module behaves under different conditions. Condition © 2009 Schneider Electric. All rights reserved. Response of Output Register After the module is re-linked or its setup registers are changed Any pulses in progress are discarded. When the device is started or powered-up (either the first time, or after a shut-down) No pulses are sent to the hardware port, and all pending pulses are discarded. Page 451 Pulser Module Page 452 ION Reference © 2009 Schneider Electric. All rights reserved. ION REFERENCE 09/2008 Query Module The Query module retrieves logged data from the ION database and makes it available to ION clients such as Vista. Query modules work independently of the Log Inserter, therefore improving the overall performance of system data access. Inputs The Query module has no programmable inputs. Setup Registers Connection String This register specifies the SQL Server 2000 or MSDE 2000 database connection string that the Query Server uses to connect to the ION database. When setting up this register in Designer, the Connection Properties dialog box displays the following option boxes: Provider, Data Source or DSN, Initial Catalog, User ID, Password, and Connect Timeout. Provider This register lets you select the type of database the Query module uses to connect to the ION database: Provider Description LSProvider.SQLOLEDB Access to SQL databases (Schneider Electric type) LSProvider.MSDASQL Access to Sybase SQL databases (Schneider Electric type) SQLOLEDB Access to OLEDB/SQL Server databases (non-Schneider Electric type) MSDASQL Access to Sybase OLEDB/SQL Server databases (non-Schneider Electric type) Schneider Electric 2195 Keating Cross Road Saanichton, BC Canada V8M 2A5 Tel: 1-250-652-7100 For technical support: [email protected] (00) + 1 250 544 3010 Contact your local Schneider Electric sales representative for assistance or go to www.powerlogic.com ION, PowerLogic and Schneider Electric are trademarks or registered trademarks of Schneider Electric in France, the USA and other countries. Other trademarks used are the property of their respective owners. Electrical equipment should be installed, operated, serviced, and maintained only by qualified personnel. No responsibility is assumed by Schneider Electric for any consequences arising out of the use of this material. © 2008 Schneider Electric. All rights reserved. Query Module ION Reference Data Source or DSN This register defines the ODBC data source (for non-Sybase SQL databases) or DSN (for Sybase SQL databases) the Query module uses to connect to the ION database. For non-Sybase SQL databases a typical value for Data Source might be ComputerName\ION, while for a Sybase SQL databases a typical value for DSN might be ComputerName_PEGASYS (where "ComputerName" is the network name of the computer where the ION database resides). Initial Catalog This register applies to non-Sybase SQL databases only. This option is disabled for Sybase SQL databases. Initial Catalog defines the name of the database table; for example, “ION_Data”. User ID This register applies to non-Schneider Electric type databases only, and defines the user ID you enter to access the database. This option is disabled for Schneider Electric type databases, since Designer uses the ION Enterprise login credentials to access the database. Password This register applies to non-Schneider Electric type databases only, and defines the password you enter to access the database. This option is disabled for Schneider Electric type databases, since Designer uses the ION Enterprise login credentials to access the database. Connect Timeout This register defines the time limit (in seconds) for connecting to the database, before timing out. Output Registers Query Register This register links to the setup information you entered in the Connection String setup register, so you can link a Data Log Viewer object to it in Vista. Detailed Operation To create and set up a Query module, open the QUERYSERVER node in Designer. Modify the Connection String register settings to the values needed to connect to the database. After creating and setting up the Query module in Designer, create a Data Log Viewer object in Vista to view the data, then link the object to the Query module’s Query Register. Page 454 © 2008 Schneider Electric. All rights reserved. ION REFERENCE 09/2008 Relative Setpoint Module The Relative Setpoint module provides extensive control, secondary protection, and analysis capabilities by allowing you to initiate an action in response to a specific condition. It is particularly useful for performing actions based on differences between a value (e.g. kW on phase A) relative to a reference value (e.g. kW demand for all three phases). You can use the outputs from this module for demand control of equipment, or any other applications requiring setpoint activity relative to a varying value. A Relative Setpoint module monitors a single numeric Source input and compares it to a programmed setpoint condition (the value in the Nominal input). The setpoint condition is defined by pickup and dropout levels, relative to the Nominal input, and by a time delay. If the Source value falls outside the programmed range for the specified time, the setpoint condition is met; the Status output register changes to ON, the Over and Under outputs indicate whether an Over or Under setpoint condition exists, and a trigger pulse is generated. Relative Setpoint Module Status Over Under Trigger Source Nominal Enable Event Inputs Source This input is monitored for the setpoint condition. It can be a numeric register from any other module’s outputs. Linking this input is mandatory. Nominal This input provides a reference value for the setpoint. It can be either a numeric or numeric bounded setup or output register from any other module. Linking this input is mandatory. Schneider Electric 2195 Keating Cross Road Saanichton, BC Canada V8M 2A5 Tel: 1-250-652-7100 For technical support: [email protected] (00) + 1 250 544 3010 Contact your local Schneider Electric sales representative for assistance or go to www.powerlogic.com ION, PowerLogic and Schneider Electric are trademarks or registered trademarks of Schneider Electric in France, the USA and other countries. Other trademarks used are the property of their respective owners. Electrical equipment should be installed, operated, serviced, and maintained only by qualified personnel. No responsibility is assumed by Schneider Electric for any consequences arising out of the use of this material. © 2008 Schneider Electric. All rights reserved. Relative Setpoint Module ION Reference Enable This input enables or disables the Relative Setpoint module. Disabling the module forces the Status, Over and Under output registers to NOT AVAILABLE, overriding the Setpoint condition. This input is optional; if you leave it unlinked, the module will be enabled by default. Setup Registers Eval Mode This register determines how the values in the Over Pickup, Over Dropout, Under Pickup and Under Dropout setup registers are interpreted. It can be set to VALUE or PERCENTAGE. If Eval Mode is set to VALUE, the values in the Pickup and Dropout registers are interpreted as numbers, and these numbers are either added to or subtracted from the Nominal value. If Eval Mode is set to PERCENTAGE, the Pickup and Dropout values are interpreted as percentages of the Nominal value. Over Pickup This register, together with the Nominal input, defines the level that the Source input must exceed (for a time specified by SusUntlON) in order for the Status output to go ON (i.e. the setpoint becomes active). If Eval Mode is set to VALUE, the level required for the Status output to go ON is given by adding the Over Pickup value to the Nominal value (Nominal + Over Pickup). If Eval Mode is set to PERCENTAGE, the level required for the Status output to go ON is given by: Nominal 1 + OverPickup ---------------------------------- 100 Over Dropout This register, together with the Nominal input, defines the level that the Source input must fall below (for a time specified by SusUntlOFF) in order for the Status output to go OFF (i.e. the setpoint becomes inactive). If Eval Mode is set to VALUE, the level required for the Status output to go OFF is given by adding the Over Dropout value to the Nominal value (Nominal + Over Dropout). If Eval Mode is set to PERCENTAGE, the level required for the Status output to go OFF is given by: OverDropout Nominal 1 + ------------------------------------- 100 Under Pickup This register, together with the Nominal input, defines the level that the Source input must fall below (for a time specified by SusUntlON) in order for the Status output to go ON (i.e. the setpoint becomes active). If Eval Mode is set to VALUE, the level required for the Status output to go ON is given by subtracting the Under Pickup value from the Nominal value (Nominal - Under Pickup). If Eval Mode is set to PERCENTAGE, the level required for the Status output to go ON is given by: Nominal 1 – UnderPickup ------------------------------------- 100 Page 456 © 2008 Schneider Electric. All rights reserved. ION Reference Relative Setpoint Module Under Dropout This register, together with the Nominal input, defines the level that the Source input must exceed (for a time specified by SusUntlOFF) in order for the Status output to go OFF (i.e. the setpoint becomes inactive). If Eval Mode is set to VALUE, the level required for the Status output to go OFF is given by subtracting the Under Dropout value from the Nominal value (Nominal Under Dropout). If Eval Mode is set to PERCENTAGE, the level required for the Status output to go OFF is given by: Nominal 1 – UnderDropout ----------------------------------------- 100 SusUntlON (sustain until on) This register defines the amount of time in seconds the Source input must either exceed the Over Pickup level, or fall below the Under Pickup level, for the setpoint to become active (i.e. for the Status output register to change from OFF to ON). SusUntlOFF (sustain until off) This register defines the amount of time in seconds the Source input must be less than the Over Dropout level, and greater than the Under Dropout level, for the setpoint to become inactive (i.e. for the Status output register to change from ON to OFF). EvPriority (event priority) This register allows you to assign a priority level to the following events produced by the Relative Setpoint module: The Status output register changes to ON because the setpoint condition is met. The Source or Nominal input becomes NOT AVAILABLE while the Status output is ON. The Status output register changes to OFF because the setpoint condition is no longer met. The Relative setpoint module is reconfigured or disabled while the Status output register is ON. The priority level you specify applies to all of the above events. If the EvPriority setup register is set to zero (0), none of the above events will be logged. Output Registers Status This Boolean register is ON when the Setpoint condition is met, and OFF when the Setpoint condition is not met. If the Enable input is OFF, or if either the Source or Nominal inputs are NOT AVAILABLE, the Status output register will change to NOT AVAILABLE. Also, if any input link or any of the setup registers are changed while the Status register is ON, it will automatically change to OFF. © 2008 Schneider Electric. All rights reserved. Page 457 Relative Setpoint Module ION Reference NOTE If any changes are made to the Relative Setpoint module while the Status output register is ON, the Status output register will be forced OFF and the module’s inputs will be reevaluated for the setpoint condition. Over This Boolean register is ON if the setpoint condition is met with the Source input greater than the Nominal input. Under This Boolean register is ON if the setpoint condition is met with the Source input less than the Nominal input. Trigger When the Setpoint condition is met, the Trigger output register generates a pulse. Event Any events produced by the Relative Setpoint module are recorded in the Event register. Possible events and their associated priority numbers are shown in the table below. Event Priority Group Priority Setup Change 10 Input links, setup registers or labels have changed. 25 Extreme value was recorded while Status was ON and EvPriority was non-zero; Source or Nominal input became NOT AVAILABLE while Status was OFF; Source or Nominal input became NOT AVAILABLE while Status was ON and EvPriority was zero. * Setpoint condition started; Setpoint condition ended; setup changes made while Setpoint was ON; module disabled while Setpoint was ON; Source or Nominal input became NOT AVAILABLE while Status was ON. Information Relative setpoint Description * The priority of these events is defined in the EvPriority setup register. Page 458 © 2008 Schneider Electric. All rights reserved. ION Reference Relative Setpoint Module Detailed Module Operation The diagram below describes the Relative Setpoint setpoint operation for a typical over setpoint condition. It also shows the events and the values that are recorded during the operation of the setpoint. As shown in the diagram, the setpoint will change to an active state when the Source input exceeds the Over Pickup level for a period of time greater than SusUntlON. At this time, the Status and Over output registers change to ON. Both registers return to OFF when the Source input falls below the Over Dropout level for a period of time greater than SusUntlOFF. Similarly, if the Source input drops below the Under Pickup level for a period of time greater than SusUntlON, the Status and Under output registers change to ON. Both registers return to OFF when the Source input exceeds the Under Dropout level for a period of time greater than SusUntlOFF. NOTE The determination of the Over Pickup level is shown on the right. The Over Dropout, Under Pickup and Under Dropout levels are determined in a similar way. Refer to this module’s setup register descriptions for details. Pickup and Dropout Levels The pickup and dropout levels shown in the diagram are determined by the value of the Nominal input in combination with the Eval Mode, Pickup and Dropout setup registers. The following shows how the over pickup level is determined: © 2008 Schneider Electric. All rights reserved. If Eval Mode is set to VALUE, then the over pickup level is determined by adding the Nominal input to the value in the Pickup register. For example, if the Nominal input is a power reading of 200kW and the Over Pickup is set to 50kW, the setpoint will go active when the Source input exceeds 250kW. Page 459 Relative Setpoint Module ION Reference If Eval Mode is set to PERCENTAGE, then the over pickup level is determined as a percentage of the Nominal input. For example, if the Nominal input is a power reading of 200kW and the Over Pickup is set to 50%, the setpoint will go active when the Source input exceeds 300kW (since this is 50% more than 200kW). Event Timestamps The Time 1, Time 2 and Time 3 points shown on the diagram are the timestamps for the three events produced by the Relative Setpoint module: 1. The first event records the time (Time 1) at which the Status output register changes to ON, and the value of the Source input when the greatest difference between the Source input and the over or under pickup level is attained, during the SusUntlON period. 2. The second event records the time (Time 2) and the value of the Source input when the greatest difference between the Source input and the over or under pickup level is attained, while the setpoint is ON. 3. The third event records the time (Time 3) at which the Status output register changes to OFF, and the value of the Source input when the smallest difference between the source and nominal inputs is attained, during the SusUntlOFF period. Disabling a Relative Setpoint You may want to enable or disable a Relative Setpoint module under different conditions. For example, you may have a Relative Setpoint set up to shed loads and you only want it enabled during times when a penalty tariff is in effect. When the Enable register is OFF, the Relative Setpoint will not evaluate the Source input and the Status, Over and Under output registers become NOT AVAILABLE. Responses to Special Conditions The following table summarizes how the Relative Setpoint module behaves under different conditions. Condition Page 460 Response of Output Register If either the Source or Nominal input is N/A The Status, Over and Under output registers are N /A . If the Enable input is OFF The Status, Over and Under output registers are N /A . After the module is re-linked or its setup registers are changed The Status, Over and Under output registers are OFF until the inputs are evaluated. When the device is started or powered-up (either the first time, or after a shut-down) The Status, Over and Under output registers are OFF until the inputs are evaluated. © 2008 Schneider Electric. All rights reserved. ION REFERENCE 09/2008 Sag/Swell Module The Sag/Swell module monitors voltage inputs for disturbances, which are defined as one or more of the inputs straying above a high limit (swells) or below a low limit (sags or interruptions). When it detects a disturbance, the Sag/Swell module provides information about the entire disturbance. In addition, it breaks up the disturbance into discrete components, or sub-disturbances, to allow for a more detailed analysis. The Sag/Swell module can be used to detect ITI (CBEMA)-type disturbances. It determines the magnitude and the duration of each disturbance so that they may be plotted on a CBEMA curve using Vista. The primary application for the Sag/Swell module is voltage quality monitoring and analysis. For both utilities and their customers, poor voltage quality can have expensive results. Electrical equipment is designed to operate within certain voltage limits; if there is a disturbance in voltage, equipment can fail or sustain permanent damage. Computer equipment is especially sensitive to disturbances in voltage. Schneider Electric 2195 Keating Cross Road Saanichton, BC Canada V8M 2A5 Tel: 1-250-652-7100 For technical support: [email protected] (00) + 1 250 544 3010 Contact your local Schneider Electric sales representative for assistance or go to www.powerlogic.com ION, PowerLogic and Schneider Electric are trademarks or registered trademarks of Schneider Electric in France, the USA and other countries. Other trademarks used are the property of their respective owners. Electrical equipment should be installed, operated, serviced, and maintained only by qualified personnel. No responsibility is assumed by Schneider Electric for any consequences arising out of the use of this material. © 2008 Schneider Electric. All rights reserved. Sag/Swell Module ION Reference Utilities must often be able to prove to their customers that they are delivering high quality, reliable voltage. Likewise, customers must be able to assess voltage quality to ensure it meets the requirements of their equipment. The Sag/Swell module provides data for a detailed historical analysis of voltage quality. It also provides pulse outputs that can be used to control external equipment for a more proactive approach to managing voltage quality problems. You can also configure the Sag/Swell module to learn what values the source inputs need to reach for a disturbance to be considered a sag or a swell, and then either to place the learned values in the learned output registers for review or to begin using the learned values automatically. If enabled, learning can occur even if the module itself is not enabled. Inputs V1, V2, V3, V1 Delta, V2 Delta, V3 Delta V1, V2 and V3 are linked to the High Speed Power Meter module's Vln a, Vln b, and Vln c outputs, respectively. If the VoltMode setup register of the Power Meter module is set for a Wye system, the values from V1 to V3 are used to calculate the Sag/Swell module's output values. V1 Delta, V2 Delta and V3 Delta are linked to the High Speed Power Meter module's Vll a, Vll b, and Vll c outputs, respectively. If the VoltMode setup register of the Power Meter module is set for a Delta system, the values from V1 Delta to V3 Delta are used to calculate the Sag/Swell module's output values. NOTE The Sag/Swell module is intended for use with the voltage output registers and the VoltsMode setup register on the High-Speed Power Meter module. By default, all of the required links are made for you. You should not delete any of these links unless you have a special application. If the values appearing at the V1, V2, V3, V1 Delta, V2 Delta or V3 Delta inputs are negative, the results in the Sag/Swell module's output registers will be meaningless. VoltsMode This input specifies your power system’s configuration. By default, it is linked to the VoltsMode setup register on the High-Speed Power Meter module. The VoltsMode value is used to determine which Power Meter outputs (i.e. line-to-neutral or lineto-line) should be used to calculate the Sag/Swell module’s outputs. If the default link to the Power Meter’s VoltsMode setup register is deleted, V1 to V3 are used in Sag/Swell calculations. The table below shows which Power Meter module outputs are used as inputs to the Sag/Swell module for each VoltsMode setting. Volts Mode V1 V2 V3 9S - 4 Wire/Delta or 4W-Wye Vln a Vln b Vln c 36S - 4 Wire Wye or 3W-Wye Vln a Vln b * Vln c 35S - 3 Wire or Delta Vll ab Vll bc Vll ca Single Vln a Vln b N/A Demo N/A N/A N/A * This value will be inaccurate if the voltages are unbalanced. Page 462 © 2008 Schneider Electric. All rights reserved. ION Reference Sag/Swell Module Nominal This input specifies the nominal voltage of the power system. The Nominal input is read once per half-cycle. If this input is unlinked, the value in the Nom Volts setup register is used as the nominal voltage (see the Nom Volts setup register description in the next section). If this input is linked, the Nom Volts setup register is ignored. The nominal voltage input is unlinked in default templates. However, it is useful to link it to an appropriate power meter output (or the sliding Reference Voltage Register from the Power Quality Aggregator Module) if the nominal voltage of the monitored power system tends to drift. Enable This input enables or disables the module. Linking this input is optional; if you leave it unlinked, the module is enabled by default. Learn Now When this input is pulsed, it starts the learning process and the learning period begins. If a pulse is received while learning is in progress, the current learning period is aborted, any data in the learning-related output registers is reset and a new learning period begins. This input must be linked for learning to be enabled. If this input is pulsed, learning occurs even if the module is not enabled. Learning is stopped, and learning-related outputs become NOT AVAILABLE, when any setup of the module changes. To disable learning entirely, disconnect this input. Setup Registers These registers define what is interpreted as a disturbance and a sub-disturbance. Swell Lim This register specifies what limit any of the inputs must exceed for the DistState output register to change to TRUE. It is specified as a percentage of the nominal voltage. ANSI C84.1 1989 standard recommends a limit of 106% for Range B voltage levels IEC 61000-4-30 (2003-02) standard recommends a limit of 110% or greater. Set the Swell Lim to a value between 100 and 1000, inclusive. If learning is enabled, this register is overwritten by the learned values, either when you install the values in MANUAL MODE or when learning is complete in AUTOMATIC MODE. Sag Lim This register specifies what limit any of the inputs must fall below for the DistState output register to change to TRUE. It is specified as a percentage of the nominal voltage. ANSI C84.1 1989 standard recommends for Range B voltage levels a limit of 88% for load voltages and 92% for the service entrance IEC 61000-4-30 (2003-02) standard recommends a range of 85-90% © 2008 Schneider Electric. All rights reserved. Page 463 Sag/Swell Module ION Reference Set the Sag Lim to a value between 0 and 100, inclusive. If learning is enabled, this register is overwritten by the learned values, either when you install the values in MANUAL MODE or when learning is complete in AUTOMATIC MODE. ChangeCrit This register provides the means to sub-divide a disturbance into discrete subdisturbances. It specifies by how much an input must change during a disturbance to be considered a new sub-disturbance. The percentage you define is with respect to the nominal voltage, not the voltage at the time of the change. For example, if your nominal voltage is 120V and your ChangeCrit is 10%, any voltage drop of 12V or more during a disturbance marks a new sub-disturbance. NOTE Changes in voltage are only considered sub-disturbances while a disturbance is in progress. For example, if the Sag Lim is 95% and the ChangeCrit is 2%, a voltage drop to 97% of nominal is not considered a sub-disturbance; the drop exceeded the ChangeCrit but the voltage did not fall below the Sag Lim, therefore there was no disturbance. Hysteresis Hysteresis is the difference in magnitude between the start and end thresholds for a Sag/Swell. For example, a hysteresis of 5% means that a Sag with a threshold of 90% needs to reach 95% before the Sag is over and a Swell with a limit of 110% needs to reach 105% before the Swell is over. The purpose of hysteresis in the context of PQ measurements is to avoid counting multiple events when the magnitude of the parameter oscillates around the threshold level. A hysteresis value of 2% of Nominal is recommended by the IEC 61000-4-30 (2003-02) standard. Nom Volts This register specifies the nominal voltage of the power system you are monitoring. The value in this register is used only if the Nominal input is unlinked. By default, Nom Volts is set to zero. To enable the Power Quality features, enter a voltage that represents the nominal voltage for your power system (for example, 120). The Nom Volts value you enter is also used by the Transient and Power Quality Aggregator modules. Page 464 © 2008 Schneider Electric. All rights reserved. ION Reference Sag/Swell Module NOTE Nominal refers to the primary power system voltage (line-to-line voltage for Delta systems and line-toneutral voltage for Wye systems). The primary power system voltage is sometimes different than the PT Primary setup register value; i.e. when the PT Primary is used to indicate winding ratio rather than primary voltage. EvPriority This register allows you to assign a priority level to the following Sag/Swell events: The DistState output register changes to TRUE or FALSE. Setup changes made while a Disturbance is present. Module disabled while a Disturbance is present. Learn Install Mode This register specifies how the learned values are installed: MANUAL: Learning occurs but the module is not automatically configured with the learned values when learning is complete. The learned values are placed in the learned output registers for review and manual installation. AUTOMATIC: Learning occurs and the learned values are placed in the learned output registers. The module automatically starts using the learned values when learning is complete. Once the learned values are installed, either manually or automatically, the value of the learned output registers reverts to NOT AVAILABLE. Learn Duration This register specifies the learning duration in days. The allowable range is 1 to 365. The default is 30. Output Registers With the exception of the learned output registers, the following output registers provide data about a disturbance as a whole and about all the sub-disturbances that comprised it. The data provided by these registers is historical rather than realtime; the disturbance values are not calculated until the end of the disturbance, and the sub-disturbance values are not calculated until the end of the sub-disturbance. The pulse registers are provided to trigger Data Recorder modules so the values can be logged and later analyzed. The learned output registers show the results of the learning process. DistState This Boolean register is TRUE when the RMS value of one or more of the inputs strays outside the limits defined by the Swell Lim and Sag Lim setup registers. This situation is referred to as a 'disturbance'. DistState is FALSE when all inputs fall within the limits, taking into account hysteresis. DistStart This pulse register outputs a pulse when a disturbance is detected. © 2008 Schneider Electric. All rights reserved. Page 465 Sag/Swell Module ION Reference DistEnd This pulse register outputs a pulse when the RMS value of all inputs have returned to within the limits defined by the Swell Lim and Sag Lim setup registers. DistDur This register contains the duration of the last disturbance in seconds. DistV1Min, DistV2Min, DistV3Min These registers contain the minimum magnitude reached during the last disturbance on V1, V2 and V3, respectively. They are expressed as a percentage of the nominal voltage. For example, if V1 sags from 120 V nominal down as far as 90 V, the DistV1Min register will contain 75. DistV1Max, DistV2Max, DistV3Max These registers contain the maximum magnitude reached during the last disturbance on V1, V2, and V3, respectively. They are expressed as a percentage of the nominal voltage. For example, if V2 swells from 120 V nominal up as far as 150 V, the DistV2Max register will contain 125. DistV1Avg, DistV2Avg, DistV3Avg These registers contain the average magnitude during the last disturbance on V1, V2 and V3, respectively. They are expressed as a percentage of the nominal voltage. For example, on a 120 V nominal system, if the average V3 voltage throughout a disturbance is 30 V, the DistV3Avg register will contain 25. DistV1Engy, DistV2Engy, DistV3Engy These registers contain the energy delta during the last disturbance on V1, V2, and V3, respectively. They indicate how much extra energy was present during the disturbance or how much was lacking. These registers are expressed as a percentage of nominal voltage energy and are calculated according to the following formula (where V x is either V1, V2, or V3): DistNominal This register holds the nominal voltage value that was in effect at the beginning of a disturbance. SubV1Trig, SubV2Trig, SubV3Trig These pulse registers output a pulse at the boundary between sub-disturbances on V1, V2, and V3 respectively. This includes the beginning of the disturbance (which is also the beginning of the first sub-disturbance), the beginning of any new subdisturbances, and the return to normal voltage. NOTE Refer to the description of the ChangeCrit setup register for details about how a sub-disturbance is defined. Page 466 © 2008 Schneider Electric. All rights reserved. ION Reference Sag/Swell Module For example, there is a pulse on SubV1Trig when V1 falls outside the Swell Lim and Sag Lim setup registers, when a new sub-disturbance occurs on V1, and when V1 returns to within the Swell and Sag Limits. SubV1Avg, SubV2Avg, SubV3Avg These registers contain the average magnitude during the previous subdisturbance on V1, V2 and V3 respectively. These values can be used to plot the sub-disturbance on a Magnitude vs. Duration curve (such as CBEMA). SubV1Dur, SubV2Dur, SubV3Dur These registers contain the duration (in seconds) of the previous sub-disturbance on V1, V2 and V3 respectively. These values can be used to plot the subdisturbance on a Magnitude vs. Duration curve (such as CBEMA). Remaining Learning Time This register contains the remaining learning time, in seconds. It counts down from the Learn Duration to 0 (zero). When this value reaches zero, learning is complete. If the Stable Learning Time reaches one-quarter of the Learn Duration, this register jumps to zero and learning is complete. If learning has not started, the value of this register is NOT AVAILABLE. Stable Learning Time This register contains the time, in seconds, that has elapsed since a change in the learned values. When this value is equal to one-quarter of the Learn Duration, learning is complete. If learning has not started, the value of this register is NOT AVAILABLE. Learned Swell Lim (Learned Swell Limit) This numeric register contains the learned value for the Swell Lim setup register. When learning is in progress, this register is continually updated. This register becomes NOT AVAILABLE and learning stops when any setup is changed, for example, when the Learn Now input is unlinked or the value of the Sag Lim register is changed. Learned Sag Lim (Learned Sag Limit) This numeric register contains the learned value for the Sag Lim setup register. When learning is in progress, this register is continually updated. This register becomes NOT AVAILABLE and learning stops when any setup is changed, for example, when the Learn Now input is unlinked or the value of the Swell Lim register is changed. Event All events produced by a Sag/Swell module are written into this register. Possible events and their associated priority numbers are shown in the table below. Event Priority Group © 2008 Schneider Electric. All rights reserved. Priority Description Setup Change 10 Input links, setup registers or labels have changed, or learned values have been automatically installed. Information * NOT AVAILABLE input caused output to go NOT AVAILABLE while a disturbance was present. Page 467 Sag/Swell Module ION Reference Event Priority Group Priority Description Setpoint * Disturbance started; Disturbance ended; setup changed while a Disturbance was present; module disabled while a Disturbance was present. Install Failed 10 Automatic installation of a learned value failed because the value was invalid; invalid value is reported. Unable to Install 30 Automatic installation of learned values failed for an unknown, unrecoverable reason. * The priority of these events is determined by the value in the EvPriority setup register. The Event output register stores the following information for each ION event: time stamp, priority, cause, effect, and any values or conditions associated with the cause and effect. Detailed Module Operation A major concern about disturbances in power quality is the adverse effect sags and swells can have on electrical equipment. These effects can range from a momentary disruption in operation to permanent damage, all of which can be expensive. The severity of a sag or a swell in voltage is determined by a combination of how large it was and how long it lasted. A piece of equipment may be able to tolerate a large but short duration disturbance in voltage. Likewise, it may be able to tolerate a disturbance that is small but longer in duration. Power Tolerance Curves The ITI (CBEMA) curve is a power tolerance curve that describes what types of disturbances electrical equipment can typically ride through, and what types can cause equipment failure or damage. It plots the magnitude of the disturbance (in percentage) on the Y-axis and the duration of the disturbance on the X-axis. Disturbances that fall within the envelope defined by the upper and lower curve are typically not harmful to electrical equipment; disturbances that fall outside the envelope may disrupt or damage the equipment. Page 468 © 2008 Schneider Electric. All rights reserved. ION Reference Sag/Swell Module TYPE I TYPE II TYPE III The Sag/Swell module detects disturbances in this range The Transient module detects disturbances in these ranges 128 samples/cycle 130ms @ 60Hz 156ms @ 50Hz 256 samples/cycle 65ms @ 60Hz 78ms @ 50Hz 1 cycle NOTE The start of the transient detection window depends on the meter's sampling rate. Refer to your device's documentation. CBEMA is not the only power tolerance curve available. ANSI Standard C84.1 also defines a curve that places an upper and lower bound on voltage excursions of different durations. Both of these curves are available in the data log plotters in Vista. If you plot the magnitude and duration of the sub-disturbances detected by the Sag/Swell module, you can overlay either of these curves, or a custom power tolerance curve, to see if equipment might be affected by the sub-disturbance. © 2008 Schneider Electric. All rights reserved. Page 469 Sag/Swell Module ION Reference Disturbance Categories as Defined by IEEE The IEEE 1159 standard categorizes a wide range of electrical disturbances according to their typical duration and magnitude. The categories that are addressed by the Sag/Swell module include short-duration variations and longduration variations. The figure below summarizes these categories: Use the Transient module to detect disturbances in this range The Sag/Swell module detects disturbances in this range Transient Short Duration SWELL Long Duration Overvoltage 110% 100% NORMAL 90% Transient 0 0.5 cycle Short Duration SAG 1 cycle Long Duration Undervoltage 1 minute Sags and swells are described as short-duration variations; under and overvoltages are described as long-duration variations. When the voltage drops below 10% of the nominal voltage, it is called an interruption. As a disturbance progresses, it likely moves through several of these categories. It is not until the voltage has returned to the normal parameters that the disturbance can be categorized. Even then, a single disturbance often cannot be categorized because there were many. To address this, the ChangeCrit setup register allows you to break the disturbance into sub-disturbances. Disturbance Sub-Divisions Within a complex disturbance, the voltage may fluctuate before returning to within the limits defined by the Swell Lim and the Sag Lim setup registers. Disturbances such as these cannot be plotted on a Magnitude vs. Duration graph since there can be many different magnitudes throughout the disturbance, each one sustained for a different duration. To address this, the Sag/Swell module breaks the disturbance up into sub-disturbances so that each part of the disturbance can be recognized and analyzed independently. During a disturbance, if the voltage on an input changes by more than the amount specified in the ChangeCrit register, the corresponding SubTrig output register will pulse, marking the beginning of a new sub-disturbance. Page 470 © 2008 Schneider Electric. All rights reserved. ION Reference Sag/Swell Module NOTE The Sag/Swell module uses RMS values. Therefore, in each case, it takes a full cycle for a disturbance or a sub-disturbance to be detected. The highlighted circles indicate changes in the input that were less than the ChangeCrit setup register. In these cases, there was no new sub-disturbance. This diagram shows a sag disturbance on the V1 input. In this example, the nominal voltage is 120V, the ChangeCrit setup register is set to 10%, the Sag Lim is set to 94%, and the Hysteresis is set to 2%. T1 This is the beginning of the disturbance as well as the beginning of the first subdisturbance. At 75%, the voltage is far below the necessary sag limit of 94%. At this point, the output registers are: DistState = ON DisStart pulses SubV1Trig pulses SubV1Avg = Not Available (it was the period of normal operation) SubV1Dur = Not Available (it was the period of normal operation) T2 This is the beginning of the second sub-disturbance because the voltage has changed by more than 10% of nominal. At this point, output registers are: DistState = ON SubV1Trig pulses SubV1Avg = average magnitude of sub-disturbance 1 SubV1Dur = duration of sub-disturbance 1 © 2008 Schneider Electric. All rights reserved. Page 471 Sag/Swell Module ION Reference T3 This is the beginning of the third sub-disturbance because the voltage has changed by more than 10% of nominal. At this point, output registers are: DistState = ON SubV1Trig pulses SubV1Avg = average magnitude of sub-disturbance 2 SubV1Dur = duration of sub-disturbance 2 Note that with Hysteresis set to 2%, the voltage must reach 96% (94 + 2) before the sag is registered as over. T4 This is the return to normal operating parameters (within the Swell and Sag Limits). At this point, output registers are: DistState = OFF Distend pulses SubV1Trig pulses SubV1Avg = average magnitude of Sub-disturbance 3 SubV1Dur = duration of Sub-disturbance 3 Responses to Special Conditions The following table summarizes how the Sag/Swell module behaves under different conditions. Condition When the module is first created All numeric and Boolean output registers are NOT AVAILABLE. If V1, V2, V3, V1 Delta, V2 Delta or V3 Delta is not linked All numeric and Boolean output registers related to that input are NOT AVAILABLE. If V1, V2, V3, V1 Delta, V2 Delta or V3 Delta is All numeric and Boolean output registers related to that input are NOT AVAILABLE. NOT AVAILABLE Page 472 Response of Output Registers If the Enable input is OFF All numeric and Boolean output registers that are not related to learning are NOT AVAILABLE. After the module is re-linked or its setup registers are changed All numeric and Boolean output registers are NOT AVAILABLE. When the device is powered up (either the first time, or after a shutdown) All output registers are NOT AVAILABLE. If learning is not in progress and no learned values are waiting to be installed Learned output registers are NOT AVAILABLE. If V1, V2, V3 or V1 Delta, V2 Delta, V3 Delta or the Nominal input are NOT AVAILABLE, or there are any changes to the module’s setup Learning stops and is reset, and the learned output registers are NOT AVAILABLE. © 2008 Schneider Electric. All rights reserved. ION REFERENCE 09/2008 Scheduler Module The Scheduler module provides the ability to create up to eight periodic or aperiodic schedules for up to two years (24 months). You can use the Scheduler for: Time of Use Demand Control Load Shedding Logging Periodic Alarming On an ION meter, the Scheduler works in conjunction with the Clock module to automatically account for time zone variations and daylight savings times. On a Virtual Processor, the Scheduler module obtains the correct time from the computer on which the Virtual Processor is running. Scheduler Module Status 1 Status 5 Enable Start 1 Start 5 Time End 1 End 5 Status 2 Status 6 Start 2 Start 6 End 2 End 6 Status 3 Status 7 Start 3 Start 7 End 3 End 7 Status 4 Status 8 Start 4 Start 8 End 4 End 8 Event Schneider Electric 2195 Keating Cross Road Saanichton, BC Canada V8M 2A5 Tel: 1-250-652-7100 For technical support: [email protected] (00) + 1 250 544 3010 Contact your local Schneider Electric sales representative for assistance or go to www.powerlogic.com ION, PowerLogic and Schneider Electric are trademarks or registered trademarks of Schneider Electric in France, the USA and other countries. Other trademarks used are the property of their respective owners. Electrical equipment should be installed, operated, serviced, and maintained only by qualified personnel. No responsibility is assumed by Schneider Electric for any consequences arising out of the use of this material. © 2008 Schneider Electric. All rights reserved. Scheduler Module ION Reference Inputs Enable This input enables or disables the Scheduler module (by setting it to ON or OFF respectively). Any time this register changes from ON to OFF, all eight Status output registers are set to NOT AVAILABLE. It must be a Boolean register from any other module’s output. This input is optional; if you leave it unlinked, the module will be enabled by default. Time On an ION meter, this input is by default linked to the LocalTime output register of the Clock module. This provides the Scheduler with the correct local time (accounting for time zones and daylight savings time). If you unlink this input on an ION meter, the Scheduler will not function. NOTE Linking the Time input to an output register other than the LocalTime output register of the Clock module will cause undefined behavior in the Scheduler module. On a Virtual Processor, the Scheduler module gets the correct time from the computer on which the Virtual Processor is running. Linking this input is optional on the Virtual Processor. If you want the Scheduler on the Virtual Processor to use the same time as an ION meter, you can link the LocalTime output register of that ION meter’s Clock module to the Time input of the Scheduler on the Virtual Processor. Setup Registers Calendar Because of its sophisticated timing facilities, setting up the Scheduler module is more involved than setting up many of the other ION modules. The process of adding a Scheduler module to a node diagram in the Designer is the same as for other modules, and selecting setup registers is also the same. Once you have selected the Calendar setup register however, a more advanced configuration utility will appear. Output Registers The Scheduler module allows you to program up to eight groups of output registers. Each output group has a Status, a Start and an End output register. (Collectively, these three register are referred to as an output.) Status 1 to Status 8 These Boolean registers indicate when an interval is in progress. This register will be ON for the duration of the interval. Start 1 to Start 8 Each time an interval starts, the Start output register generates a pulse. These output registers also generate a pulse for each pulse activity. Page 474 © 2008 Schneider Electric. All rights reserved. ION Reference Scheduler Module NOTE See the Setup Registers section for details about profiles, intervals and pulses. End 1 to End 8 Each time an interval ends, the End output register generates a pulse. These output registers also generate a pulse for each pulse activity. Event Any events produced by the Scheduler module will be recorded in the Event register. Possible events and their associated priority numbers are shown below. Event Priority Group Priority Description Setup Change 10 Input links, setup registers or labels have changed. Warning 30 Calendar expiry pending in 30 days; Calendar expired. The Event output register stores the following information for each ION event: time stamp, priority, cause, effect, and any values or conditions associated with the cause and effect. © 2008 Schneider Electric. All rights reserved. Page 475 Scheduler Module ION Reference Detailed Module Operation The first screen to appear is the Scheduler screen with a tab for each of the 8 outputs. Under each tab is a calendar that displays the schedule for that output. When you first configure the Scheduler module, there are no schedules defined and the calendars are all blank. For each of the 8 outputs, you can define a schedule that defines the behavior of its Status, Start and End output registers for a period of two years. NOTE Each output includes a Status, Start and End output register. To define a schedule: Select a start date from when your 2 year calendar begins. Select which days in the calendar you want to use different daily profiles. Configure each daily profile, specifying when the outputs should be ON or OFF and when pulses should occur. Repeat for each output, or copy one output’s calendar over other outputs. (Profiles must be defined separately for each output.) Preview the schedules for each output. NOTE Once you have specified a start date, you can perform the other steps in any order. Page 476 © 2008 Schneider Electric. All rights reserved. ION Reference Scheduler Module Selecting a Start Date for the Schedule By default, a Scheduler module running on an ION meter has a start date of January 1, 1970. On a Virtual Processor, the default start date will depend on when the Scheduler module was created. In either case, you will need to change this date to the day you want your schedule to start. You will also need to change this date every two years when you reprogram the Scheduler module. NOTE The Scheduler modules will generate events in the device’s Event log when the programmed schedule is within 30 days of expiration. To change the start date: 1. Press the Start Date button at the bottom of the window. The following dialog box appears: 2. Type in the year, and select the month and day on which you wish the schedule to start. 3. Press the OK button. NOTE Changing the start date is an irreversible operation. If you had activities scheduled on days that are not part of the new calendar, you will lose them. The calendar in the main window will be updated; all days from the start date to 24 months after the start date will be active. Days prior to, and more than 24 months after the start date will be grayed out to indicate they are not included in the schedule. Assigning Profiles to Days in the Calendar The first step in programming a schedule is to select an output and apply profiles to the days in the calendar. This allows you to make an output behave a particular way on a certain type of day. For example, output 1 (Status 1, Start 1 and End 1) may control a module that you want to do one thing during the week, and something different on a weekend. © 2008 Schneider Electric. All rights reserved. Page 477 Scheduler Module ION Reference To select an output, click on its tab at the top of the Scheduler screen. Doublecheck the year box at the bottom of the window to ensure you are working in the correct year (there may be up to 3 years depending on your start date). To access the profiles for that output, click on the Profiles button. A palette appears showing each color-coded profile. Currently selected filter Currently selected profile Null profile When applying profiles to the calendar, you can do it to a range of days and use filters to speed up the task of programming. The filters allow you to apply the selected profile only to days matching the selected criterion (for example, all weekdays, or all weekends). The default is Daily which will apply the profile to all days in the selected range. NOTE When you point to a day in the calendar the cursor changes to a hand with a cross-hair. To apply a profile: 1. Click on the profile you want in the palette. (Its color appears at the top.) 2. If you want to select a single day in the calendar, double-click on it. 3. If you want to apply a profile across a range of days in the calendar, click on the first day of the range to which you want to apply the profile, then click on the final day of the range. If the final day is in a different year, use the year drop-box at the bottom of the screen to switch to another year. (You can also start with the final day and then click on the first day of the range.) To remove a profile from one or more days in the calendar, use the same procedure but select the null profile (i.e. the light gray box in the lower-right corner of the palette to paint over the existing profile. 4. The selected days in the calendar will change to the color of the selected profile (in accordance with the selected filter). If any of the days were already assigned a profile, you will be prompted to overwrite the existing profiles. Page 478 © 2008 Schneider Electric. All rights reserved. ION Reference Scheduler Module Repeat these steps until every day in the calendar for the selected output is “painted” with the appropriate color (i.e. each day is assigned the appropriate profile). Be sure to program the full 24 months. When you have set up the calendar for one output, you need to do the same for the other outputs that you plan to use. You can repeat the steps described above, or as a shortcut, you can copy the calendar from one output over top another. If you make a mistake applying profiles to the calendar, you can press the Undo button at the bottom of the window; this will undo only the most recent change. Copying Calendars from One Output to Another To copy an output’s calendar over to another output, hold down the Shift key and click on the tab of the output you wish to copy, then drag the cursor to the tab of the output you wish to overwrite. The complete calendar (all 24 months) of the first output will be copied to the second output. Note that only the calendar is copied; since each output has its own profiles, you will need to define profiles separately for each output NOTE When copying a calendar, the cursor will change to a hand with a box. Defining a Daily Profile A daily profile is a simply a 24 hour period that consists of activities, which can include intervals, pulses or both. An interval is characterized by a pulse on the Start output register, the Status register going ON for some period of time, then the End register pulsing and the Status register going back to OFF. A pulse is just the Start and End output registers pulsing simultaneously with no change in the Status output register. NOTE The Scheduler module supports a total maximum of 900 activities or pulses. This includes all profiles for all outputs. Each output has 15 daily profiles. To define a daily profile, either right-click on the profile in the Profiles palette, or right-click on a day in the calendar colored with the profile you wish to define. The following dialog box, referred to as a profile editor, appears: © 2008 Schneider Electric. All rights reserved. Page 479 Scheduler Module ION Reference The title bar indicates which profile you are editing and for which output. The numbers along the left side of the box represent a twenty-four hour clock. Before creating activities, you may want to assign a descriptive name to the profile to make it easier to remember where you plan to use it. For example, you may want to name it "Weekend". Creating custom labels for these profiles uses device memory, so there are a limited number of custom labels available. NOTE You cannot have more than one activity at the same time. If you want to schedule multiple events at the same time, you must use separate outputs. To create a name for the profile, type a name into the Profile Name box. It must be 15 characters or less. The name will appear in the Profile palette. To add an interval to the daily profile: 1. Press and hold down the Interval button and drag the interval cursor into the Daily Profile box (but not on top of an existing interval or pulse). A colored bar will appear. 2. Click on the colored bar and drag it until the top of the box is positioned where you want the interval to begin (i.e. the Start time). Dragging allows you to move in steps of 5 minutes. If you want to position the bar more precisely, use the Start box which provides 1 minute resolution. 3. To adjust the End time of the interval, click on the bottom sizing handle and drag it down to the point where you want the interval to end. Again, dragging gives you 5 minutes resolution. Use the End box to enter a more precise End time. Repeat steps 1-3 for each interval you want to add. Note that you cannot overlap intervals within a 24-hour period; they must be separated by at least 1 minute. If you try to start an interval while another one is in progress or if you try to drag one over a pulse, you will be warned that there is a conflict. Page 480 © 2008 Schneider Electric. All rights reserved. ION Reference Scheduler Module There is one exception to the aforementioned rule: you can create one interval that begins at 0:00 and another that ends at 24:00. If the profile is applied to two consecutive days, the two intervals are treated as a single interval that spans two days. For example, if you create an profile that looks like this, then apply it to a Monday, Tuesday, Wednesday & Thursday (and Friday has a NULL profile), the pulse outputs will behave as follows: Monday @ midnight Start pulses Monday @ 6 a.m. End pulses Monday @ 4 p.m. Start pulses Tuesday @ 6 a.m. End pulses Tuesday @ 4 p.m. Start pulses Wednesday @ 6 a.m. End pulses Wednesday @ 4 p.m. Start pulses Thursday @ 6 a.m. End pulses Thursday @ 4 p.m. Start pulses Thursday @ midnight End pulses If you create a single interval starting at 0:00 and ending at 24:00, then apply it to a contiguous range of days, there will be a Start pulse at midnight of the first day and an End pulse at midnight of the last day, but no pulses in-between. The intervals that span across day boundaries do not have to be in the same profile. If Monday is assigned Profile 1, which has an interval from 18:00 to 24:00 and Tuesday is assigned Profile 2, which has an interval from 0:00 to 8:00, there will be a Start pulse on Monday at 6 p.m., the Status output will go ON until Tuesday at 8 a.m., at which point the End output will pulse and the Status output will go OFF. To add a pulse to the daily profile: 1. Press and hold down the Pulse button and drag the pulse cursor anywhere into the Daily Profile box except on an existing interval or pulse. A line will appear. 2. Click on the line and drag it to where you want the pulse to occur. Dragging allows you to move in steps of 5 minutes. If you want to position the pulse more precisely, use the Start box which provides 1 minute resolution. 3. Repeat steps 1-2 for each pulse you want to add. To delete an activity: 1. Click on the interval or pulse you wish to delete and press the Delete button. The selected activity will disappear from the Daily Profile box. 2. If you want to deleted all the activities from an profile, click the Clear All button. Once you have created all the activities you want to comprise the profile and given the profile a descriptive name, press the OK button to save your changes and close the profile editor. If you press Cancel, your changes will be lost and the profile editor will close. © 2008 Schneider Electric. All rights reserved. Page 481 Scheduler Module ION Reference You can also press the Apply button if you want to save your changes but keep the profile editor open. This may be useful when you want to make adjustments to multiple profiles at the same time. For example, if you want to run motor A from 8:00 a.m. to 6:00 p.m. (i.e. during the day) and run motor B from 6:00 p.m. to 8:00 a.m. (i.e. at night) you would need to use 2 different outputs: one to control motor A and one to control motor B. You would then need to define profiles for both these outputs. If may be helpful to see both profiles at the same time to ensure there is no gap between when motor A turned OFF and motor B turned ON. Previewing Schedules If you are programming a complicated schedule, it may be difficult to keep track of all your outputs. Once you have created schedules for all the outputs you plan to use, you can preview these schedules in a chart format so you see when outputs are going ON and OFF and ensure there are no gaps or overlapping periods. This allows you to verify that the schedule you created is correct. For example, in the case described earlier, motor B is supposed to turn ON at the same time that motor A is turning OFF. If you want to ensure that there is no gap between these two events, and to see how they fit in with the rest of the outputs, you can preview the schedule by pressing the Preview button. A dialog box like the following will appear (in its default state it will show the outputs by day rather than by week): Page 482 © 2008 Schneider Electric. All rights reserved. ION Reference Scheduler Module Select which output’s schedules are going to be plotted. Select the part of the schedule you wish to view. By default, this is set to the start date. Intervals are indicated by horizontal lines in the color of the active profile. Pulses are indicated by vertical lines in the color of the active profile. Scroll back and forth through the schedule by day, week, or month. Specify if you want to view by day, week, or month. The default is day. You can have the preview box open at the same time as one or more profile editors and it will update automatically to reflect changes in the profiles. This allows you to make adjustments to your profiles and dynamically preview them. The check boxes at the top allow you to select which outputs you want to view so you can display any combination. Overlap and Gap The Overlap and Gap rows in the chart allow you to compare two or more outputs and display when they are all ON at the same time and when they are all OFF at the same time. In the motors example described earlier, if you decide that you want a 5 minute overlap between when the motors A and B turn ON and OFF to ensure that at least one of them is running all the time, you can edit the profile for output 2 to go ON at 7:55 a.m. and OFF at 6:05 p.m. If you press the Apply button in the profile editor, the profile editor will remain open and the preview box will update. You can see in the chart that each time output 1 goes OFF and output 2 goes ON, there is a line in the Overlap row to confirm that these outputs are indeed timed as you specified. © 2008 Schneider Electric. All rights reserved. Page 483 Scheduler Module ION Reference The Gap row is useful for showing if there are periods of time in your calendar during which no activities are scheduled. If you see a gap where you don’t expect one, you can go back to the output and either edit the profile in effect at that time, or assign a new profile to that day. You can preview a full day, week or month depending on which radio button you select. This allows you to see details or to get a broader view of your schedule. How Scheduled Intervals Affect the Output The Scheduler module itself has no awareness of the passage of time. It simply gets the correct time (from either the Clock module or the computer’s system clock) every minute and determines from the programmed schedule what each output register should do. In the case of intervals, the Scheduler determines the values of its outputs as follows: Condition Result If Status was OFF in the previous minute and an interval is scheduled Start pulses and Status is turned ON. If Status was ON in the previous minute and an interval is scheduled Status remains ON. If Status was OFF in the previous minute and no interval is scheduled Status remains OFF. If Status was ON in the previous minute and no interval is scheduled End pulses and Status is turned OFF. In the case of pulses, the Scheduler checks the time and if a pulse is scheduled for that minute, it will pulse both Start and End. Accounting for Daylight-Savings Time If the device’s Clock module (or the computer) is programmed to adjust for Daylight Savings Time, it is possible that scheduled activities may not happen as expected. In the Case of Pulses Pulses are more susceptible to Daylight Savings Time changes simply because of their short duration. Page 484 If there are pulses scheduled to occur during the time that is lost when the clocks are moved ahead, the pulses will be missed. (For example, if a pulse is scheduled for 12:05, and the clocks are moved ahead an hour at 12:00, the pulse will not happen because the clock jumps directly from 12:00 to 1:00.) If there are pulses scheduled to occur during the time that is gained when the clocks are moved backed, the pulses will occur twice. (For example, if a pulse is scheduled for 11:30, and the clocks are moved back an hour at 12:00, the pulse will happen once at 11:30 and then again an hour later.) © 2008 Schneider Electric. All rights reserved. ION Reference Scheduler Module In the Case of Intervals Different outcomes are possible in the case of intervals, depending on whether the time change jumps into, out of, or completely over an interval. Generally, when the clocks are moved forward, it is possible that intervals could be cut short or missed. When the clocks are moved back, it is possible that intervals will be repeated (either in part or in whole). When the Clock is Moved Forward If there are intervals scheduled to both start and end during the time that is lost when the clocks are moved ahead, they will be missed (just like a pulse described above). For example, if a 10-minute interval is scheduled for 12:05, and the clocks are moved ahead an hour at 12:00, the interval will not happen because the clock jumps directly from 12:00 to 13:00. If an interval is in progress and the clock is moved ahead to a time outside the interval, the duration of the interval will be cut short (i.e. you will lose the second part of the interval). For example, if a 1-hour interval starts at 11:30 but at 12:00 the clocks are moved ahead 1 hour, Status will go off and End will pulse after only a half an hour. If there is no interval in progress but the clock is moved ahead to a time inside an interval, the duration of the interval will be shorter than expected (i.e. you will lose the beginning part of the interval). For example, if a 1-hour interval starts at 12:30 but at 12:00 the clocks are moved ahead 1 hour, Status will go on when the clocks jump forward. Status will go OFF and End will pulse half an hour later. If an interval is in progress and the clock is moved ahead to a time inside the interval, the duration of the interval will be cut short (i.e. you will lose the second part of the interval). For example, if a 2-hour interval starts at 11:30 but at 12:00 the clocks are moved ahead 1 hour, Status will go off and End will pulse after only one hour. If an interval is in progress and the clock is moved ahead to a time inside another interval, the duration of both intervals will be cut short (i.e. you will lose the end of the first interval and the beginning of the second interval). © 2008 Schneider Electric. All rights reserved. Page 485 Scheduler Module ION Reference When the Clock is Moved Back If there are intervals scheduled to both start and end during the time that is gained when the clocks are moved back, they will be repeated. For example, if a 15-minute interval is scheduled for 11:30, and the clocks are moved back an hour at 12:00, the interval will happen twice that day because 11:30 happens twice. If an interval is in progress and the clock is moved back to a time outside the interval, the duration of the interval will be cut short (i.e. you will lose the second part of the interval) but then the complete interval will be repeated. For example, if a 1-hour interval starts at 11:30 but at 12:00 the clocks are moved back 1 hour, Status will go OFF and End will pulse after a half an hour, and then half an hour later, the complete interval will occur. If an interval has just completed, and then the clock is moved back to a time inside that interval, the second portion of the interval will be repeated. For example, if a 1-hour interval starts at 10:30 and ends at 11:30, but at 12:00 the clocks are moved back 1 hour, Start will pulse and Status will go on again for another half an hour. If an interval is in progress and the clock is moved back to a time inside the same interval, the middle part of the interval will be repeated. The Start and End pulses will occur at the correct times but Status will remain on for longer. For example, if a 3-hour interval starts at 10:00 but at 12:00 the clocks are moved back 1 hour, Status will stay on for 4 hours (instead of 3). Start will still pulse at 10:00 and End will still pulse at 1:00. If an interval is in progress and the clock is moved back to a time inside another interval: Page 486 the first interval starts and ends normally, then the second interval starts; the clocks are moved back and the last part of the first interval is repeated, as is the first part of the second interval; the second part of the second interval continues normally. © 2008 Schneider Electric. All rights reserved. ION Reference Scheduler Module Responses to Special Conditions The following table summarizes how the Scheduler module behaves under different conditions. Condition © 2008 Schneider Electric. All rights reserved. Response of Output Registers If the Time input is linked but NOT AVAILABLE All Status output registers contain NOT AVAILABLE. If the Enable input is OFF All Status output registers contain NOT AVAILABLE and no pulses occur. Page 487 Scheduler Module Page 488 ION Reference © 2008 Schneider Electric. All rights reserved. ION REFERENCE 09/2008 Scroll Module When linked to the Show inputs of Display modules, a Scroll module can determine the sequence and rate of scrolling of multiple front panel display screens. The Trigger output registers of the Scroll module pulse in succession at a predetermined speed. The Scroll module also allows you to temporarily freeze the scrolling action of the front panel display. Scroll Module Trigger 1 Trigger n Up Down Freeze Last Trigger Freeze State Event Enable Inputs Up If the module is scrolling, a pulse to the Up input will freeze scrolling. If the module is already frozen, the previous Trigger is pulsed and the freeze timer is reset. The result of pulsing the Up input depends on the state of the Scroll module’s Freeze State output register as follows: If the Freeze State output is OFF when a pulse is received on the Up input, the Freeze State output turns ON for the amount of time specified in the Freeze Time setup register. If the Freeze State is ON when a pulse is received on the Up input, two events occur: first, a pulse is generated on the Trigger output register numbered one less than the number stored in the Last Trigger output register (if the last trigger that was pulsed was Trigger 1, the Trigger selected in the Wraparound setup register is pulsed); second, the freeze timer is reset to the duration specified in the Freeze Time setup register. Schneider Electric 2195 Keating Cross Road Saanichton, BC Canada V8M 2A5 Tel: 1-250-652-7100 For technical support: [email protected] (00) + 1 250 544 3010 Contact your local Schneider Electric sales representative for assistance or go to www.powerlogic.com ION, PowerLogic and Schneider Electric are trademarks or registered trademarks of Schneider Electric in France, the USA and other countries. Other trademarks used are the property of their respective owners. Electrical equipment should be installed, operated, serviced, and maintained only by qualified personnel. No responsibility is assumed by Schneider Electric for any consequences arising out of the use of this material. © 2008 Schneider Electric. All rights reserved. Scroll Module ION Reference Down If the module is scrolling, a pulse to the Down input will freeze scrolling. If the module is already frozen, the next Trigger is pulsed and the freeze timer is reset. The result of pulsing the Down input depends on the state of the Scroll module’s Freeze State output register as follows: If the Freeze State output is OFF when a pulse is received on the Down input, the Freeze State output turns ON for the amount of time specified in the Freeze Time setup register. If the Freeze State is ON when a pulse is received on the Down input, two events occur: first, a pulse is generated on the output Trigger numbered one more than the number stored in the Last Trigger output register (if the Last Trigger output register contains the Trigger selected in the Wraparound setup register, then Trigger 1 is pulsed); second, the freeze timer is reset to the duration specified in the Freeze Time setup register. Freeze The effect of a pulse arriving on the Freeze input is dependent upon the Scroll module’s Freeze State output register as follows: If the Freeze State output is OFF when a pulse is received on the Freeze input, the Freeze State output turns ON for the amount of time specified in the Freeze Time setup register. If the Freeze State is ON when a pulse is received on the Freeze input, the display remains frozen for the entire duration specified in the Freeze Time setup register (i.e. the “freeze timer” is reset). Enable This input enables or disables the module’s inputs. When the Enable input is OFF, the module does not respond to any other inputs; no pulses are generated on the Trigger outputs, and the Freeze State is set to OFF. When the Enable input changes from OFF to ON, the module pulses its Trigger outputs in sequence, starting at the first Trigger. The Scroll module is enabled by default. Setup Registers Scroll Delay This register contains the time (in seconds) that will elapse between successive pulses on the Trigger outputs when the Scroll module is enabled. Wraparound This register contains the number of one of the Trigger outputs (e.g. Trigger 3). When this Trigger is pulsed, the Scroll module will return to the first Trigger (i.e. Trigger 1). For example, if the Wraparound is 3, the Trigger outputs will be pulsed in the following order: Trigger 1, Trigger 2, Trigger 3, Trigger 1, Trigger 2, etc. Generally, the number of Trigger outputs used by the Scroll module is entered here. Page 490 © 2008 Schneider Electric. All rights reserved. ION Reference Scroll Module Freeze Time This register contains the time (in seconds) that the Scroll module will remain “frozen”. The module becomes frozen when a pulse has been received on the Freeze, Up, or Down inputs. After the module has become frozen, any further pulses on the Freeze, Up or Down inputs will have the effect of resetting the timer that counts down the Freeze Time in seconds. Output Registers Trigger 1 — n These output registers are pulsed in sequence by the Scroll module. Up to 40 Trigger outputs can be linked. Last Trigger This numeric register contains the number of the last pulsed Trigger. Freeze State When this Boolean register is ON, the module is in the frozen state; scrolling will not commence for the duration specified in the Freeze Time setup register. Event All events produced by the Scroll module are recorded in the Event register. Possible events and their associated priority numbers are shown in the table below. Event Priority Group Setup Change Priority 10 Description Input links, setup registers or labels have changed. The Event output register stores the following information for each ION event: time stamp, priority, cause, effect, and any values or conditions associated with the cause and effect. © 2008 Schneider Electric. All rights reserved. Page 491 Scroll Module ION Reference Detailed Module Operation If two Scroll modules are active at the same time, then the results of the front panel display become unpredictable. The default framework uses AND/OR modules to ensure that no two Scroll modules are enabled at the same time. You should use a similar strategy when creating custom links with more than one Scroll module; see the following example: The External Boolean modules are the front panel buttons that must be pressed to access the two different sets of displays. The AND/OR modules ensure that the Scroll modules are never enabled at the same time. In this example, both AND/OR modules are configured to function as logical NOR gates — see the AND/OR module description for more details. Response to Special Conditions All numeric and Boolean outputs are NOT AVAILABLE in the following conditions: Page 492 The device is powered up. The module is disabled. Any changes are made to an ION setup register. © 2008 Schneider Electric. All rights reserved. ION REFERENCE 09/2008 Security Options Module The Security Options module is used to configure the behaviour of the advanced security system. The configuration of this module and the configuration of the Security User modules define the overall advanced security system setup. NOTE You must use ION Setup or ION Enterprise software to configure advanced security Security Options Event Inputs The Security Options module has no inputs. Setup Registers Enable Advanced Security This register is used to turn on the advanced security for the meter. The default value of this register is DISABLED. Once this register is successfully set to ENABLED, advanced security system is active. This means that all applications that interact with the meter must specify a username and password. The access capabilities of the different users are defined by the configuration of Security User modules (see the Security User module section). Schneider Electric 2195 Keating Cross Road Saanichton, BC Canada V8M 2A5 Tel: 1-250-652-7100 For technical support: [email protected] (00) + 1 250 544 3010 Contact your local Schneider Electric sales representative for assistance or go to www.powerlogic.com ION, PowerLogic and Schneider Electric are trademarks or registered trademarks of Schneider Electric in France, the USA and other countries. Other trademarks used are the property of their respective owners. Electrical equipment should be installed, operated, serviced, and maintained only by qualified personnel. No responsibility is assumed by Schneider Electric for any consequences arising out of the use of this material. © 2008 Schneider Electric. All rights reserved. Security Options Module ION Reference Allow Broadcast Timesyncs This register defines whether a username and password must be supplied to synchronize the time of the meter (when advanced security is enabled). By default this register is set to NO to indicate that a username and password must always be supplied by any software used to synchronize the meter time. If it is set to YES, then time synchronization can be performed without a username and password. If you need to synchronize the meter time with a third party protocol (e.g. Modbus), set this register to YES. Modbus Map Access This register limits access to the meter via the Modbus protocol. By default this register is set to NO. If the Enable Advanced Security register is set to Enabled then access via Modbus is limited to Modbus registers managed by Modbus Slave modules. In other words, all access to configuration and control registers will be blocked. The device will respond with Modbus exception value 2 if any attempt is made to read these registers. If this register is set to YES, then the entire Modbus Map can be accessed via communications. Web Access Read Security Only for devices which implement Advanced Security, this register defines whether to enforce read security on read access to HTML/XML pages. When set to YES (default) it enforces the read security. Factory Read This register specifies if the Factory user has read access permissions for the meter. If it is set to YES then the Factory user can read any parameter on the meter except the security configuration. If it is set to NO then the Factory user cannot read any meter parameters. It is set to YES by default. NOTE It is recommended that you leave the Factory registers set to YES (default), so that Technical Support can access the meter to correct any problems that may occur in the field. Factory Peak Demand Reset This register specifies if the Factory user has peak demand reset access permissions for the meter. If it is set to YES then the Factory user can reset the peak demand of any demand parameter. It is set to YES by default. Factory Time Sync Access This register specifies if the Factory user has time synchronization access permissions for the meter. If it is set to YES then the Factory user can set the time of the meter. It is set to YES by default. Factory Full Meter Config This register specifies if the Factory user has full meter configuration access permissions for the meter. If it is set to YES, then the Factory user can configure any programmable register on the meter except for registers related to the security setup, or registers that result in a Demand Reset or will place the meter in Test mode (those registers require additional security access levels). If it is set to NO then the Factory user cannot modify any registers on the meter. It is set to YES by default. Page 494 © 2008 Schneider Electric. All rights reserved. ION Reference Security Options Module Factory Test Mode Access This register specifies if the Factory user has test mode access permissions for the meter. If it is set to YES then the Factory user can put the meter into test mode. It is set to YES by default. Factory Security Config This register specifies if the Factory user has security configuration access permissions for the meter. If it is set to YES then the Factory user can configure advanced security for the meter. It is set to YES by default. Output Registers Event All events produced by the Security Options module are written into this register. Possible events and their associated priority numbers are shown below. For this module, events generated by setup changes will NOT indicate the new setup register values. This prevents security configuration information from being available to users who do not have security configuration rights. Event Priority Group Priority Setup Change 10 Description Input links, setup registers or labels have changed. The Event output register stores the following information for each ION event: time stamp, priority, cause, effect, and any values or conditions associated with the cause and effect. © 2008 Schneider Electric. All rights reserved. Page 495 Security Options Module ION Reference Detailed Module Operation The Security Options module is a core module that lets you customize the advanced security for the meter. When advanced security is enabled, all applications that interact with the meter must specify a username and password. The username, password, and security access permissions are allocated with the Security User modules; therefore, before you enable advanced security, configure the Security User modules (refer to the Security User module section). With ION Setup or Designer, access the Security Options module Enable Advanced Security setup register to enable the security system. The Factory user setup registers are for Technical Support use only. It is recommended that you leave these registers set to YES (default), so that Technical Support can access the meter to correct any problems that may occur in the field. The advanced security system primarily protects communications ports that use the ION protocol. Advanced security is also effective with the MV-90 protocol, provided that you have installed the appropriate Translation Interface Module (TIM). Contact UTS-Itron for a TIM that supports advanced security. With third party protocols that cannot supply a username and password (e.g. DNP, Modbus), advanced security functions in a limited capacity. Communication ports that use Modbus can access parameters related to the Modbus Slave module only (unless the Security Options module Modbus Map Access setup register is set to YES; in this case, the entire modbus map is accessible). Communications ports that are configured to use DNP are not protected by advanced security. Page 496 © 2008 Schneider Electric. All rights reserved. ION REFERENCE 09/2008 Security User Module The Security User modules are used to configure the access rights for users of the Advanced Security system. Each module corresponds to a user of the same number. For example, Security User module 1 defines the security access permissions for USER1 and Security User module 4 defines the security access permissions for USER4. Up to sixteen (16) users can be configured with access rights. NOTE You can configure Advanced Security using ION Setup or ION Enterprise. Security User Event Inputs The Security User module has no inputs. Setup Registers Read Access This register specifies if the user has read access permissions for the meter. If it is set to YES then the user can read any parameter on the meter except the security configuration. If it is set to NO then the user will be unable to read any meter parameters. It is set to YES by default. Schneider Electric 2195 Keating Cross Road Saanichton, BC Canada V8M 2A5 Tel: 1-250-652-7100 For technical support: [email protected] (00) + 1 250 544 3010 Contact your local Schneider Electric sales representative for assistance or go to www.powerlogic.com ION, PowerLogic and Schneider Electric are trademarks or registered trademarks of Schneider Electric in France, the USA and other countries. Other trademarks used are the property of their respective owners. Electrical equipment should be installed, operated, serviced, and maintained only by qualified personnel. No responsibility is assumed by Schneider Electric for any consequences arising out of the use of this material. © 2008 Schneider Electric. All rights reserved. Security User Module ION Reference NOTE The Read Access register must be set to YES before the following registers are enabled: Peak Demand Reset Access register, Full Meter Config Access register, Test Mode Access register, and the Security Config Access register. Peak Demand Reset Access This register specifies if the user has peak demand reset access permissions for the meter. If it is set to YES then the user can reset the peak demand of any demand parameter (note that the Read Access register also must be set to YES or it will not be possible to reset the peak demand). If the Peak Demand Reset Access register is set to NO then the user cannot reset any peak demand parameters on the meter. It is set to YES by default. Time Sync Access This register specifies if the user has time synchronization access permissions for the meter. If it is set to YES then the user can set the time of the meter. If it is set to NO then the user cannot set the time of the meter. It is set to YES by default. Full Meter Config Access This register specifies if the user has full meter configuration access permissions for the meter. If it is set to YES, the user can configure any programmable register on the meter except for registers related to the Security setup, or registers that result in a Demand Reset or will place the meter in Test mode (those registers require additional Security Access levels). Note that the Read Access register also must be set to YES or it is not be possible to configure a programmable register. It is set to YES by default. Test Mode Access This register specifies if the user has test mode access permissions for the meter. If it is set to YES then the user can put the meter into test mode (note that the Read Access register also must be set to YES or it is not be possible to put the meter into test mode). It is set to YES by default. Security Config Access This register specifies if the user has security configuration access permissions for the meter. If it is set to YES then the user can configure advanced security for the meter (note that the Read Access and the Full Meter Config Access registers also must be set to YES or it is not be possible to configure the advanced security). If the Security Config Access register is set to NO then the user will be unable view or configure the Security setup of the meter. It is set to YES by default. Page 498 © 2008 Schneider Electric. All rights reserved. ION Reference Security User Module Output Registers Event All events produced by the Security User module are written into this register. Possible events and their associated priority numbers are shown below. For this module, events generated by setup changes will NOT indicate the new setup register values. This prevents security configuration information from being available to users who do not have security configuration rights. Event Priority Group Priority Setup Change 10 Description Input links, setup registers or labels have changed. The Event output register stores the following information for each ION event: time stamp, priority, cause, effect, and any values or conditions associated with the cause and effect. © 2008 Schneider Electric. All rights reserved. Page 499 Security User Module ION Reference Detailed Module Operation Initially (or “out-of-the-box”), the meter is not configured with any Security User modules and its Advanced Security System (if available) is disabled. At this point, anyone who has access to the meter can configure the Advanced Security System. The system can be configured with ION Setup as well as Designer. A separate Security User module must be created and configured for each user ID and password. Before the Advanced Security System is enabled (via the Security Options module Enable Advanced Security setup register), you must configure the passwords for each module. This is done by right-clicking on the Security User module and selecting the “Change Password…” button. At this point, you are asked to enter the new password twice. Click OK to write the new password into the meter. Once the Security User modules have been configured and the Advanced Security System has been enabled, only users who have the Security Config Access setup register set to YES will be able to configure Security User modules. Page 500 © 2008 Schneider Electric. All rights reserved. ION REFERENCE 09/2008 Setpoint Module Setpoints provide extensive control, secondary protection and analysis capabilities by allowing you to initiate an action in response to a specific condition. Some possible applications for the Setpoint module include: demand control power quality monitoring fault detection activating alarms gated logging functions A Setpoint module monitors a single numeric or Boolean input for a specific condition. When the condition is met, the Status output register changes to ON and a trigger pulse is generated. You can configure the Setpoint module to learn values for the High Limit, Low Limit, SusUntlON and SusUntlOFF registers, and then either to place the learned values in the learned output registers for review or to begin using the learned values automatically. If enabled, learning can occur even if the module itself is not enabled. Schneider Electric 2195 Keating Cross Road Saanichton, BC Canada V8M 2A5 Tel: 1-250-652-7100 For technical support: [email protected] (00) + 1 250 544 3010 Contact your local Schneider Electric sales representative for assistance or go to www.powerlogic.com ION, PowerLogic and Schneider Electric are trademarks or registered trademarks of Schneider Electric in France, the USA and other countries. Other trademarks used are the property of their respective owners. Electrical equipment should be installed, operated, serviced, and maintained only by qualified personnel. No responsibility is assumed by Schneider Electric for any consequences arising out of the use of this material. © 2008 Schneider Electric. All rights reserved. Setpoint Module ION Reference Inputs Source This input is monitored for a specified condition, or setpoint condition. It can be either a numeric register or Boolean register from any other module’s outputs. Linking this input is mandatory. Enable This input enables or disables the Setpoint module. Disabling the module forces the Status output register to NOT AVAILABLE overriding the Setpoint condition. This input is optional; it you leave it unlinked, the module is enabled by default. Learn Now When this input is pulsed, it starts the learning process and the learning period begins. If a pulse is received while learning is in progress, the current learning period is aborted, any data in the learning-related output registers is reset and a new learning period begins. This input must be linked for learning to be enabled. If this input is pulsed, learning occurs even if the module is not enabled. Learning is stopped, and learning-related output registers become NOT AVAILABLE, when any setup of the module changes. To disable learning completely, disconnect this input. Setup Registers High Limit When the Eval Mode is GREATERTHAN, this register specifies what limit the Source input must exceed for the Status output register to change to ON. When the Eval Mode is LESSTHAN, it specifies what limit the Source input must exceed for the Status output register to change to OFF. If the Source input is Boolean, the value entered into this register is disregarded, and the High Limit is automatically set to 0. If learning is enabled, this register is overwritten by the learned values, either when you install the values in MANUAL MODE or when learning is complete in AUTOMATIC MODE. NOTE Do not set the Low Limit higher than the High Limit or the setpoint will oscillate. Low Limit When the Eval Mode is LESSTHAN, this register specifies what limit the Source input must fall below for the Status output register to change to ON. When the Eval Mode is GREATERTHAN, it specifies what limit the Source input must fall below for the Status output register to change to OFF. If the Source input is Boolean, the value entered into this register is disregarded, and the Low Limit is automatically set to 1. If learning is enabled, this register is overwritten by the learned values, either when you install the values in MANUAL MODE or when learning is complete in AUTOMATIC MODE. Page 502 © 2008 Schneider Electric. All rights reserved. ION Reference Setpoint Module SusUntlON (sustain until on) When the Eval Mode is GREATERTHAN, this register defines the amount of time in seconds the Source input must exceed the High Limit for the Status output register to change to ON. When the Eval Mode is LESSTHAN, this register defines the amount of time the Source input must fall below the Low Limit for the Status output register to change to ON. If learning is enabled, this register is overwritten by the learned values, either when you install the values in MANUAL MODE or when learning is complete in AUTOMATIC MODE. SusUntlOFF (sustain until off) When the Eval Mode is GREATERTHAN, this register defines the amount of time in seconds the Source input must fall below the Low Limit for the Status output register to change to OFF. When the Eval Mode is LESSTHAN, this register defines the amount of time the Source input must exceed the High Limit for the Status output register to change to OFF. If learning is enabled, this register is overwritten by the learned values, either when you install the values in MANUAL MODE or when learning is complete in AUTOMATIC MODE. Input Mode This register specifies how the value of the Source input is interpreted. When Input Mode is ABSOLUTE, the absolute value of the Source input is used in Setpoint calculations, and the high and low limits, if negative, are converted to their absolute values. When Input Mode is SIGNED, the Source input is taken to be a signed value. Eval Mode (evaluation mode) This register specifies the criterion by which the Source input is evaluated. It contains either the value LESSTHAN or GREATERTHAN. EvPriority (event priority) This register allows you to assign a priority level to the following events produced by the Setpoint module: The Status output register changes to ON because the setpoint condition is met. The Status output register changes to OFF because the setpoint condition is no longer met. The Setpoint module is re-linked, reset or disabled while the Status output register is ON. Setup registers are changed while the Status output register is ON. The priority level you specify applies to all of the above events. NOTE If the EvPriority is set to zero (0), the following events are not logged: Setpoint ON, Setpoint OFF, Setpoint extreme © 2008 Schneider Electric. All rights reserved. Page 503 Setpoint Module ION Reference Learn Install Mode This register specifies how the learned values are installed: MANUAL: Learning occurs but the module is not automatically configured with the learned values when learning is complete. The learned values are placed in the learned output registers for review and manual installation. AUTOMATIC: Learning occurs and the learned values are placed in the learned output registers. The module automatically installs and starts using the learned values when learning is complete. Once the learned values are installed, either manually or automatically, the value of the learned output registers becomes NOT AVAILABLE. Learn Duration This register specifies the learning duration in days. The allowable range is 1 to 365. The default is 30. Output Registers Status During normal operation, this Boolean register contains ON when the Setpoint condition is met and OFF when the Setpoint condition is not met. If the Enable input is OFF, the Status output register changes to NOT AVAILABLE. Also, if the Source input or any of the setup registers are changed while the Status register is ON, it automatically changes to OFF. NOTE If any changes are made to the Setpoint module while the Status output register is ON, the Status output register is forced OFF and the module is reevaluated for the setpoint condition. Trigger When the Setpoint condition is met, the Trigger output register generates a pulse. Remaining Learning Time This register contains the remaining learning time, in seconds. It counts down from the Learn Duration to 0 (zero). When this value is zero, learning is complete. If the Stable Learning Time reaches one-quarter of the Learn Duration, this register jumps to zero and learning is complete. If learning has not started, the value of this register is NOT AVAILABLE. Stable Learning Time This register contains the time, in seconds, that has elapsed since a change in the learned values. When this value is equal to one-quarter of the Learn Duration, learning is complete. If learning has not started, the value of this register is NOT AVAILABLE. Learned High Limit This numeric register contains the learned value for the High Limit setup register. When learning is in progress, this register is continually updated. This register becomes NOT AVAILABLE and learning stops when any setup is changed, for Page 504 © 2008 Schneider Electric. All rights reserved. ION Reference Setpoint Module example, when the Learn Now input is unlinked or the value of the Low Limit register is changed. Learned Low Limit This numeric register contains the learned value for the Low Limit setup register. When learning is in progress, this register is continually updated. This register becomes NOT AVAILABLE and learning stops when any setup is changed, for example, when the Learn Now input is unlinked or the value of the High Limit register is changed. Learned SusUntlON This numeric register contains the learned value for the SusUntlON setup register. When learning is in progress, this register is continually updated. This register becomes NOT AVAILABLE and learning stops when any setup is changed, for example, when the Learn Now input is unlinked or the value of the Low Limit register is changed. Learned SusUntlOFF This numeric register contains the learned value for the SusUntlOFF setup register. When learning is in progress, this register is continually updated. This register becomes NOT AVAILABLE and learning stops when any setup is changed, for example, when the Learn Now input is unlinked or the value of the High Limit register is changed. Event Any events produced by the Setpoint module are recorded in the Event register. Possible events and their associated priority numbers are shown in the table below. Event Priority Group Priority Description Setup Change 10 Input links, setup registers or labels have changed, or learned values were installed automatically. Information 25 Extreme value was recorded while Setpoint was ON; NOT AVAILABLE input caused output to go NOT AVAILABLE. Setpoint * Setpoint condition started; Setpoint condition ended; setup changes made while Setpoint was ON; module disabled while Setpoint was ON. Install Failed 10 Automatic installation of a learned value failed because the value was invalid; invalid value is reported. Unable to Install 30 Automatic installation of learned values failed for an unknown, unrecoverable reason. * The priority of these events is determined by the value in the EvPriority setup register. The Event output register stores the following information for each ION event: time stamp, priority, cause, effect, and any values or conditions associated with the cause and effect. © 2008 Schneider Electric. All rights reserved. Page 505 Setpoint Module ION Reference Detailed Module Operation The diagrams that follow illustrate the operation of a Setpoint module with different setup register configurations. The first two examples involve Source inputs that are numeric variables; the third example shows the operation of a Setpoint with a Boolean Source input. Eval Mode = GREATERTHAN The figure below shows how the SusUntlON and SusUntlOFF setup registers affect Setpoint operation when Eval Mode is GREATERTHAN. It also shows the events and the values that are recorded during the operation of a Setpoint. Source Input Time This Status output register of this Setpoint module changes to ON when input exceeds and remains over the value of the High Limit for a time longer than SusUntlON. This Status output register changes to OFF when the Source input falls below the value of the Low Limit for a time longer than SusUntlOFF. The differential between the high and low limits effectively produces a programmable level of operational hysterisis (or deadband). NOTE If you are monitoring the absolute value of a numeric Source, do not set the Low Limit to 0 (since the Source value will never be negative). In the above diagram, the timestamp 1, timestamp 2 and timestamp 3 points indicate the events produced by the Setpoint module: 1. The first event records the Status output register changing to ON and the extreme value attained during the SusUntlON period. 2. The second event records the extreme value attained by the Source input while the Status output register was ON. Page 506 © 2008 Schneider Electric. All rights reserved. ION Reference Setpoint Module 3. The third event records the Status output register changing to OFF and the extreme low value attained by the Source input during the SusUntlOFF period. Eval Mode = LESSTHAN This figure shows how Setpoints operate when Eval Mode is LESSTHAN. It also shows the different events and the values that are recorded during the operation of a Setpoint. Source Input Time This example differs from the first only in that the meanings of High Limit and Low Limit are reversed. The Status output register changes to ON when the Source input falls below the value of the Low Limit for a time longer than SusUntlON. The Status output register changes to OFF when the Source input exceeds and remains over the value of the High Limit parameter for a time longer than SusUntlOFF. Similar to the first example, the differential between the high and low limits produces an area of hysterisis, or deadband. NOTE If you are monitoring the absolute value of a numeric Source, do not set the Low Limit to 0 (since the Source value will never be negative). The Time 1, Time 2 and Time 3 points indicate the events produced by the Setpoint module. The same events are recorded as in the first figure. © 2008 Schneider Electric. All rights reserved. Page 507 Setpoint Module ION Reference Source Input is Boolean The following figure shows the operation of a Setpoint module with a Boolean input operating in GREATERTHAN mode. Note that if you have a Boolean Source, the High Limit and Low Limit registers are automatically set to 0 and 1, respectively. This is the case for both GREATERTHAN and LESSTHAN mode. Source Input Time In this example, there is an event when the Status output register changes to ON, and when it changes to OFF. There is also an event that reports the extreme value while the Status output register was ON; in the case of a Boolean Source, that value is simply ON. Changing the Eval Mode setup register inverts the Setpoint action when the Source input is Boolean. The following table summarizes the effects of changing Eval Mode: Source Input Status Output register Eval Mode on greaterthan on off greaterthan off on lessthan off off lessthan on Disabling a Setpoint You may want to enable or disable a Setpoint module under different conditions. For example, you may have a Setpoint set up to shed loads and you only want it enabled during times when a penalty tariff is in effect. When the Enable register is OFF, the Setpoint does not evaluate the Source input and the Status is N/A. Page 508 © 2008 Schneider Electric. All rights reserved. ION Reference Setpoint Module Using the Module The following steps outline how to use a Setpoint module. It is not necessary to do these steps in order; for example, you could set all the setup registers first and not actually link the Setpoint to another module until later. 1. The first step in using a Setpoint module is to determine what value you want to monitor. This becomes your Source input. You can link this value (which is the output from some other module) to your Setpoint immediately or you can wait until later. 2. You can also link the Enable input if you want to be able to enable or disable the Setpoint module. If you always want it enabled, you can leave this input unlinked as the module is enabled by default. 3. You must specify if you want to monitor the absolute value of the Source or the signed value. This is determined by the Input Mode setup register. 4. The next step is to define the behavior of the Setpoint: Your Status output register can change to ON if your Source value falls below a certain level. In this case you would set the Eval Mode to LESSTHAN. It can change to ON if the Source value rises above a certain level. In this case you would set the Eval Mode to GREATERTHAN. 5. After selecting your evaluation mode, you need to specify a high and low limit to define when the Setpoint activates or deactivates: For GREATERTHAN, the Status output register changes to ON when the Source exceeds the High Limit and inactive when the Source falls below the Low Limit. For LESSTHAN, the Status output register changes to ON when the Source falls below the Low Limit and goes inactive when the Source exceeds the High Limit. 6. The Setpoint module allows you to introduce time delays before the Setpoint activates or deactivates. You can specify that the condition you are monitoring must persist for a specified amount of time before the Setpoint is activated. You can also require a time delay before deactivating the Setpoint. By using these delays, you can protect the Setpoint from temporary spikes in the Source value. The times are entered in seconds. For example, you may want a Setpoint to activate if your current goes above 800 Amps, but only if it remains that high for more than five seconds. Likewise, you may want the Setpoint to deactivate when the current drops, but only if it has stayed below 750 Amps for at least ten seconds. In this case you would set SusUntlON to 5 and SusUntlOFF to 10. 7. You can also attach a priority level that applies to most of the events produced by a Setpoint module (see the Setup Registers section). These priority levels are logged along with the events and any associated values. 8. You can configure the module to learn the values to be used by the High Limit, Low Limit, SusUntlON and SusUntlOFF setup registers. © 2008 Schneider Electric. All rights reserved. Page 509 Setpoint Module ION Reference Responses to Special Conditions The following table summarizes how the Setpoint module behaves under different conditions. Condition If the Source input is NOT AVAILABLE Page 510 Response of Output Register The Status and learning-related output registers are NOT AVAILABLE If the Enable input is OFF The Status output register is NOT AVAILABLE. After the module is re-linked or its setup registers are changed The Status and learning-related output registers are NOT AVAILABLE. When the device is started or powered-up (either the first time, or after a shut-down) The Status output register is NOT AVAILABLE. Learning-related output registers are NOT AVAILABLE. If learning is not in progress and no learned values are waiting to be installed Learned output registers are NOT AVAILABLE. If the Source input is NOT AVAILABLE, or there is any change in the module’s setup Learning stops and is reset, and the learned output registers are NOT AVAILABLE. © 2008 Schneider Electric. All rights reserved. ION REFERENCE 09/2008 Signal Limit Evaluation Module The Signal Limit Evaluation module is designed to characterize signal deviations outside of a pair of user specified limits. These limits can also be specified as percentages of a nominal value. Signal Limit Evaluation Module Source Nominal Valid Evaluate Enable Reset Num Valid Num Invalid Num Exceed Event Inputs Source The Source input is the signal to be characterized. This input must be linked or the module will not function. Nominal The Nominal input is linked to the nominal value of the Source input quantity (for example, nominal system voltage), and as such, is generally linked to an unchanging value. This input must be linked if the Eval Mode setup register is set to PERCENTAGE. Valid When the Evaluate input is pulsed, the module checks the state of Valid, and updates the output registers accordingly; refer to “Detailed Module Operation” below. Linking this input is optional. Schneider Electric 2195 Keating Cross Road Saanichton, BC Canada V8M 2A5 Tel: 1-250-652-7100 For technical support: [email protected] (00) + 1 250 544 3010 Contact your local Schneider Electric sales representative for assistance or go to www.powerlogic.com ION, PowerLogic and Schneider Electric are trademarks or registered trademarks of Schneider Electric in France, the USA and other countries. Other trademarks used are the property of their respective owners. Electrical equipment should be installed, operated, serviced, and maintained only by qualified personnel. No responsibility is assumed by Schneider Electric for any consequences arising out of the use of this material. © 2008 Schneider Electric. All rights reserved. Signal Limit Evaluation Module ION Reference Enable This input enables or disables the module’s operation. If this input is set to FALSE, the output registers do not continue to update. This input is optional; if you leave it unlinked, the module will be enabled by default. Evaluate A pulse at this input triggers the module to perform its statistical evaluation, and update its output registers. This input must be linked for the module to go online. Reset This input resets the module’s outputs to NOT AVAILABLE until the next evaluation occurs. This input is optional; if you leave it unlinked, the input will never receive a pulse. Setup Registers Upper Limit This register specifies the maximum value the Source may attain before the Num Exceed output is incremented. If Eval Mode is set to PERCENTAGE, then the Upper Limit is a percentage of the Nominal. Lower Limit This register specifies the minimum value the Source may attain before the Num Exceed output is incremented. If Eval Mode is set to PERCENTAGE, then the Lower Limit is a percentage of the Nominal. Eval Mode This register specifies if the Upper Limit and Lower Limit setup registers are percentages of the Nominal input; if not, then the actual values in the registers are the limits. For example, an Upper Limit setting of 120 with Eval Mode set to PERCENTAGE means that any values from the Source input that are 20% greater than the Nominal will exceed the Upper Limit, causing the Num Exceed output register to increment. Average Source This register specifies whether the evaluation will be performed on the average of the Source values (collected between successive pulses on the Evaluate input), or on the Source input’s value at the time that the Evaluate input is pulsed. Average Nominal This register specifies whether the evaluation will be performed on the average of the Nominal values (collected between successive pulses on the Evaluate input), or on the Nominal input’s value at the time that the Evaluate input is pulsed. Discard Ratio If Average Source is set to YES, the Discard Ratio defines how many Source inputs may be NOT AVAILABLE before the entire evaluation period is considered invalid. For example, if the Discard Ratio is set to 30%, and 40 out of 100 measurements are N/A (40% bad data), the interval is considered invalid. The Discard Ratio also applies to the Nominal input values if Average Nominal is set to YES. Page 512 © 2008 Schneider Electric. All rights reserved. ION Reference Signal Limit Evaluation Module NOTE If the module invalidates the evaluation period based on the Discard Ratio, this overrides Valid inputs of TRUE. EvPriority This register allows you to set a custom priority level to certain events written to the Event output register. When EvPriority is zero, no event is written. Refer to the Event output register description for details. Output Registers Num Valid The number of evaluation intervals over which the Valid input remained TRUE. Num Invalid The number of evaluation intervals over which the Valid input was FALSE. Num Exceed This register contains the number of times that the Source input fell outside of the bounds defined in the Upper Limit and Lower Limit setup registers (note that the Eval Mode setup register defines whether these bounds are relative to the Nominal input, or absolute). Event All events produced by the module are written into this register. Possible events and their associated priority numbers are shown in the table below: Event Priority Group Priority Description Setup Change 10 Input Links, setup registers or labels have been changed. Num Exceed Event * The Num Exceed output was incremented. * The priority of this event is user-defined in the EvPriority setup register. The Event output register stores the following information for each ION event: time stamp, priority, cause, effect, and any values or conditions associated with the cause and effect. © 2008 Schneider Electric. All rights reserved. Page 513 Signal Limit Evaluation Module ION Reference Detailed Module Operation When a pulse is received on the Evaluate input, the module outputs are updated according to the following rules: Num Valid is incremented if the Valid input is TRUE. Num Invalid increments if: the Valid input is FALSE, or the Discard Ratio is exceeded while the module is averaging Source or Nominal. Num Exceed is incremented if the Valid input is TRUE and the Source input (or averaged Source inputs; see Average Source setup register) has exceeded the bounds specified in either the Upper Limit or the Lower Limit setup registers. A pulse on the Reset input causes the module outputs to be set to NOT AVAILABLE. Averaging will begin at the start of the next 1-second interval (if the module is averaging the Source or Nominal inputs). Page 514 © 2008 Schneider Electric. All rights reserved. ION REFERENCE 09/2008 Sliding Window Demand Module Power utilities generally bill commercial customers based on their energy consumption (in kWh) and their peak usage levels, called peak demand (in kW). Demand is a measure of average power consumption over a fixed time interval, typically 15 minutes. Peak (or maximum) demand is the highest demand level recorded over the billing period. Sliding window demand is one method of measuring demand. To compute sliding window demand values, the Sliding Window Demand module uses the sliding window averaging (or rolling interval) technique which divides the demand interval into subintervals. The demand is measured electronically based on the average load level over the most recent set of subintervals. This method offers better response time than fixed interval methods. Sliding Window Demand Module Source Enable Sync SWinDemand PredDemand Time Left Interval End Event Reset The Sliding Window Demand module calculates sliding window and predicted demand over a specified number of subintervals of a specific length. The module can be either internally or externally synchronized. For external synchronization, you would typically use the output from a Digital Input module as a Sync pulse. The module performs predicted sliding window demand by automatically predicting the value that each sliding window demand parameter will attain when updated at the start of the next interval. Schneider Electric 2195 Keating Cross Road Saanichton, BC Canada V8M 2A5 Tel: 1-250-652-7100 For technical support: [email protected] (00) + 1 250 544 3010 Contact your local Schneider Electric sales representative for assistance or go to www.powerlogic.com ION, PowerLogic and Schneider Electric are trademarks or registered trademarks of Schneider Electric in France, the USA and other countries. Other trademarks used are the property of their respective owners. Electrical equipment should be installed, operated, serviced, and maintained only by qualified personnel. No responsibility is assumed by Schneider Electric for any consequences arising out of the use of this material. © 2008 Schneider Electric. All rights reserved. Sliding Window Demand Module ION Reference Inputs Source This is the value for which sliding window demand and predicted sliding window demand are calculated. It must be a numeric register from any other module’s outputs. Linking this input is mandatory. Enable This input enables or disables the Sliding Window Demand module. Disabling the module turns all the module’s outputs to NOT AVAILABLE, and all the data collected for the current and previous subintervals is discarded. The SwinDemand output will remain NOT AVAILABLE until the number of subintervals indicated by the #SubIntvls setup register have expired. This input is optional; if you leave it unlinked, the module will be enabled by default. Sync This input receives a pulse which can be used for external synchronization of the module. The Sync input must be a pulse register from any other module’s output. This input is optional. NOTE In the Virtual Processor, the Sync register does not exist. Reset This input resets the SWinDemand and PredDemand output registers to NOT AVAILABLE. Note that the SwinDemand output will be NOT AVAILABLE until the number of subintervals indicated by the #SubIntvls setup register have expired. The PredDemand output will be NOT AVAILABLE until one subinterval before that. This input is optional; if you leave it unlinked, the input by default will never receive a pulse. Setup Registers Sub Intvl This numeric bounded register specifies the number of seconds in the sliding window demand subinterval. If the Sync input is linked, the Sub Intvl register is ignored for the sliding window demand calculation. It is however still used for the predicted sliding window demand calculation. If the frequency of the pulses on the Sync input is higher than the Sub Intvl setup register indicates, the PredDemand output may not be accurate (since it will not have enough time to reach its steady state value between subintervals). If the frequency is lower, PredDemand will act as though the Pred Resp is set to a faster value (i.e. the steady state will be reached before the end of the subinterval). #SubIntvls This numeric bounded register specifies the number of subintervals in the sliding window. Page 516 © 2008 Schneider Electric. All rights reserved. ION Reference Sliding Window Demand Module Pred Resp This numeric bounded register specifies the speed of the predicted demand output. It allows you to set the sensitivity of the demand prediction. Specify 99 for the fastest prediction speed. If you specify 0 (the slowest prediction speed), the PredDemand output will follow the SWinDemand output. A value between 70 and 99 is recommended for a reasonably fast response. Update Rate This register defines the update rate of the SWinDemand output register. The choices include: Every Second (default setting; SWinDemand calculations will be saved if a power outage occurs) End of Subinterval NOTE For Billing applications, the Update Rate setup register must be set to Every Second. Output Registers SWinDemand This numeric register contains the accumulated sliding window demand. If the Update Rate setup register is set to END OF SUBINTERVAL, and the module is relinked; the Reset input is pulsed; the module is disabled; or a setup register is changed, then the accumulated sliding window demand value will not be available until the number of subintervals specified in the #SunIntvls setup register have expired. If the Update Rate setup register is set to EVERY SECOND, then the accumulated sliding window demand value will be available within one second. PredDemand This numeric register contains the accumulated predicted demand. When the module is linked, the Reset input is pulsed, the module is disabled, or a setup register is changed, this register is NOT AVAILABLE until one less than the number of subintervals specified in the #SunIntvls setup register have expired. If the Sync input is not linked, unless the module was linked or Reset on a regular time boundary, the PredDemand value will be inaccurate until the SWinDemand output becomes valid. Time Left This numeric register contains the number of seconds remaining before the SwinDemand output will be written — the number of seconds remaining in the demand period. If the module is being synchronized by an external pulse (see the Sync input), instead of resetting on an internal time boundary, the Time Left value resets whenever the external sync input is pulsed. © 2008 Schneider Electric. All rights reserved. Page 517 Sliding Window Demand Module ION Reference Interval End This output register generates a pulse whenever the SWinDemand output register is overwritten. The Interval End register can be used to trigger a Digital Output module so that a hardware relay can be pulsed whenever the demand is updated. Event All events produced by a Sliding Window Demand module are written into this register. Possible events and their associated priority numbers are shown in the table below. Event Priority Group Priority Description Reset 5 A module reset has occurred. Setup Change 10 Input links, setup registers or labels have changed. Information 25 NOT AVAILABLE AVAILABLE. input caused output to go NOT The Event output register stores the following information for each ION event: time stamp, priority, cause, effect, and any values or conditions associated with the cause and effect. Detailed Module Operation Sliding Window Demand Calculation The figure below illustrates how the Sliding Window Demand module calculates the value in the SWinDemand output register. In this case, the Sync input is not linked (hence the Sub Intvl and #SubIntvls setup registers define the total demand interval). Page 518 © 2008 Schneider Electric. All rights reserved. ION Reference Sliding Window Demand Module The average demand for each of the six previous subintervals is calculated and these values are averaged across the number of subintervals (specified by the #SubIntvls setup register). In this example, the value in the SWinDemand output register from 2:00 to 2:05 is: 3.0 + 4.3 + 4.5 + 3.1 + 3.9 + 4.7 ‐‐‐‐‐‐‐‐‐‐‐‐‐‐‐‐‐‐‐‐‐‐‐‐‐‐‐‐‐‐‐‐‐‐‐‐‐‐‐‐‐‐‐‐‐‐‐‐‐‐‐‐‐‐‐‐‐‐‐‐‐‐‐‐‐‐‐‐‐‐‐‐‐‐‐ = 3.92 6 The Sliding Window Demand module allows you to match the power utility’s sliding window demand calculation technique. For sliding window measurements, the Sub Intvl register represents the length of the utility’s demand subinterval, while the #SubIntvl register represents the number of subintervals which make up the total demand interval. For example, with a 6 x 5 minute (30 minutes total) sliding window method, demand is the average power consumption over the last six 5-minute subintervals. This allows you to match virtually any type of sliding window measurement method used by the utilities (i.e. 2 x 15 minutes, 6 x 5 minutes, 1 x 30 minutes). Alternatively, you can use external synchronization (Sync input linked) to calculate sliding demand values. In this case, a new subinterval begins each time a pulse is received on the Sync input. Predicted Demand Calculation The Sliding Window Demand module predicts changes in demand based on the following formula: -----------------------------------------------------------------------------------------------------------------------------------------------------------------------------------------------------------------------------------------------------------------------------------------------------------------------------------------Thermal Avg Time Left in subinterval + Accumulated Value in Period + Prev SWD # of subintervals – 1 subinterval length - Total Sliding Window Demand Period The module automatically calculates the Thermal Average value used in the above formula. The Thermal Average starts at 0 when the Sliding Window Demand module powers up, and gets calculated every second based on the following formula: Thermal Avg PredBase – 1 + Source 100 – PredResp Thermal Avg = -------------------------------------------------------------------------------------------------- where PredBase = -------------------------------------- SubIntvl PredBase 100 The rate at which the Thermal Average responds to demand changes depends directly on the sensitivity of the demand prediction, which is programmed into the Pred Resp setup register. If Pred Resp is set to a higher value, Thermal Average will respond more quickly to changes in the module’s Source input (i.e. the higher the value for Pred Resp, the faster this module will predict). © 2008 Schneider Electric. All rights reserved. Page 519 Sliding Window Demand Module ION Reference Responses to Special Conditions The following table summarizes how the Sliding Window Demand module behaves under different conditions. Condition Response to Output Register If the Source input is N/A All output registers are N/A. When the device is started or powered-up (either the first time, or after a shutdown) All output registers are N/A. When the device is powered-up after a power outage and the Update Rate setup register is set to EVERY SECOND, the SWDemand calculation will continue from where it left off. This also applies to meter time syncs.* SWDemand value is available within 1 second. * There may be situations where a false peak is observed during a subinterval if the time synchronizes backwards and a power outage occurs, or the load drops to 0 (zero), following the time synchronization. Page 520 © 2008 Schneider Electric. All rights reserved. ION REFERENCE 09/2008 SNMP Mapping Module The SNMP Mapping module makes the values of the numeric output registers of other modules available to be read by SNMP manager software or hardware. The module maps meter parameters to SNMP object IDs. You can map up to 10 numeric inputs to each SNMP Mapping module. To read the values, the SNMP manager also needs a custom MIB file, available from Technical Support or for download from www.powerlogic.com. For more information on using SNMP with your meter, see your meter’s User Guide. Input Registers Source 1 to Source 10 The SNMP Mapping module makes these inputs available to SNMP manager software or hardware. These source inputs can be linked to the numeric outputs of other modules. The order of the linked inputs determines the object IDs parameters are mapped to in the custom MIB file. For example, the first input of the first SNMP mapping module (SMM1) is mapped to the first object ID in the MIB file. Setup Registers The SNMP Mapping module has no setup registers. Schneider Electric 2195 Keating Cross Road Saanichton, BC Canada V8M 2A5 Tel: 1-250-652-7100 For technical support: [email protected] (00) + 1 250 544 3010 Contact your local Schneider Electric sales representative for assistance or go to www.powerlogic.com ION, PowerLogic and Schneider Electric are trademarks or registered trademarks of Schneider Electric in France, the USA and other countries. Other trademarks used are the property of their respective owners. Electrical equipment should be installed, operated, serviced, and maintained only by qualified personnel. No responsibility is assumed by Schneider Electric for any consequences arising out of the use of this material. © 2008 Schneider Electric. All rights reserved. SNMP Mapping Module ION Reference Output Registers Event All events produced by this module are written to this register. Possible events and their associated priority numbers are listed in the table below. Event Priority Group Setup Change Priority 10 Description Input links or labels have changed. The Event output register stores the following information for each ION event: timestamp, event priority, cause, effect, and any values or conditions associated with the cause and effect. Responses to Special Conditions The following conditions cause the module to return an error to the SNMP client: Page 522 if the source inputs are not linked if the SNMP module associated with the OID number does not exist or is offline the module that is connected to the SNMP input is offline or no longer exists © 2008 Schneider Electric. All rights reserved. ION REFERENCE 09/2008 Store Module The Store module is used to store several register values. When the module’s Store input is pulsed, the values of the Source inputs are copied to the Source Out output registers. The Store Complete output register is pulsed once the store operation is complete. Store Module Source 1 Source n Enable Source Out 1 Source Out n Store Complete Event Store Reset Inputs Source 1 to Source n The values of the Source inputs and their timestamps are copied to the Source Out outputs when the Store input is pulsed. At least one Source input must be linked. NOTE These registers function differently when used in the Virtual Processor. See the “Detailed Module Operation” section for details. Enable When this input is OFF, the Store module is disabled and pulses received by the Store input are ignored. The Store module is enabled by default. Store When this input is pulsed, the values of the Source inputs are copied into their corresponding Source Out output registers. Links to the Store input are mandatory. Schneider Electric 2195 Keating Cross Road Saanichton, BC Canada V8M 2A5 Tel: 1-250-652-7100 For technical support: [email protected] (00) + 1 250 544 3010 Contact your local Schneider Electric sales representative for assistance or go to www.powerlogic.com ION, PowerLogic and Schneider Electric are trademarks or registered trademarks of Schneider Electric in France, the USA and other countries. Other trademarks used are the property of their respective owners. Electrical equipment should be installed, operated, serviced, and maintained only by qualified personnel. No responsibility is assumed by Schneider Electric for any consequences arising out of the use of this material. © 2008 Schneider Electric. All rights reserved. Store Module ION Reference Reset Pulsing this input clears the value in the Store module, and makes all Source Out output registers NOT AVAILABLE. NOTE The Reset input will still function if the module’s Enable input is OFF. Setup Registers The Store module has no setup registers. Output Registers Source Out 1 to Source Out n The value of the Source Out output register is that of the corresponding Source input value and its timestamp when the Store input was pulsed. Store Complete This output is pulsed when the Store module has successfully copied the values of the Source inputs to the Source Out output registers. Event Any events produced by the Store module are recorded in the Event register. Possible events and their associated priority numbers are shown in the table below. Event Priority Group Setup Change Priority 10 Description Input links, setup registers or labels have changed. The Event output register stores the following information for each ION event: time stamp, priority, cause, effect, and any values or conditions associated with the cause and effect. Detailed Module Operation The Store module functions slightly differently when used in the Virtual Processor. The Source Out register includes a timestamp as part of its value. This timestamp will be different depending on whether the module is used in the Virtual Processor or on the meter. See the example below. The Source 1 input of the Store module is linked to the Maximum output register of the Maximum module. The Maximum output register will have an associated timestamp (10:08 p.m.). When the Store input is pulsed (at 10:15 pm), both the value (50kW) and the timestamp (10:08 pm) of the Maximum Page 524 © 2008 Schneider Electric. All rights reserved. ION Reference Store Module output register will be propagated to the Source Out 1 output register of the Store module. This behavior is different when using the Store module in the Virtual Processor. Similar to the example above, the Source 1 input of the Store module is linked to the Maximum output register of the Maximum module and the Maximum output register will have an associated timestamp (10:08 pm). In the case of the Virtual Processor, however, when the Store input is pulsed (at 10:15 pm), only the value (50kW) of the Maximum output register is propagated to the Source Out 1 output register. The associated timestamp will be the time when the Store input was pulsed (10:15 pm). © 2008 Schneider Electric. All rights reserved. Page 525 Store Module ION Reference Responses to Special Conditions The following table summarizes how the Store module behaves under different conditions. Condition Page 526 Response of Output Register If the Source input is NOT AVAILABLE The corresponding Source Out output register is NOT AVAILABLE. After the module is re-linked or its setup registers are changed The Source Out output register is NOT AVAILABLE. When the device is started or powered-up (either the first time, or after a shutdown) The Source Out output register holds its value. If the Reset and Store inputs are pulsed simultaneously Store module would reset all of its values, store its Source inputs, and pulse the Store Complete output register. © 2008 Schneider Electric. All rights reserved. ION REFERENCE 09/2008 Symmetrical Components Module The Symmetrical Components module provides information about unbalanced voltages and currents in a polyphase power system. This allows you to identify or predict how electrical equipment might be affected. For example, some possible applications include reducing induced, circulating currents in motor windings, or preventing equipment damage, or even prolonging motor and transformer life. The Symmetrical Components module calculates the magnitude and phase angle of zero, positive and negative sequences of the fundamental components for either voltage or current. Inputs Source 1, Source 2, Source 3 The Source inputs of the Symmetrical Components modules are fixed to the outputs of either voltage or current FFT modules. Enable When this register is set to TRUE, the module is enabled; when it is set to FALSE, the module is disabled; it ceases to calculate zero, positive and negative sequences, and stops updating the output registers. This input is optional; if you leave it unlinked the module will be enabled by default. Schneider Electric 2195 Keating Cross Road Saanichton, BC Canada V8M 2A5 Tel: 1-250-652-7100 For technical support: [email protected] (00) + 1 250 544 3010 Contact your local Schneider Electric sales representative for assistance or go to www.powerlogic.com ION, PowerLogic and Schneider Electric are trademarks or registered trademarks of Schneider Electric in France, the USA and other countries. Other trademarks used are the property of their respective owners. Electrical equipment should be installed, operated, serviced, and maintained only by qualified personnel. No responsibility is assumed by Schneider Electric for any consequences arising out of the use of this material. © 2008 Schneider Electric. All rights reserved. Symmetrical Components Module ION Reference Setup Registers This module has no setup registers. Output Registers ZeroSeqMag (zero sequence magnitude) This register contains the zero sequence magnitude. On a meter that is 4-30 compliant, it will represent the aggregation over 150/180 cycles. ZeroSeqPhs (zero sequence phase angle) This register contains the zero sequence phase angle. On a meter that is 4-30 compliant, it will represent the aggregation over 150/180 cycles. PosSeqMag (positive sequence magnitude) This register contains the positive sequence magnitude. On a meter that is 4-30 compliant, it will represent the aggregation over 150/180 cycles. PosSeqPhs (positive sequence phase angle) This register contains the positive sequence phase angle. On a meter that is 4-30 compliant, it will represent the aggregation over 150/180 cycles. NegSeqMag (negative sequence magnitude) This register contains the negative sequence magnitude. On a meter that is 4-30 compliant, it will represent the aggregation over 150/180 cycles. NegSeqPhs (negative sequence phase angle) This register contains the negative sequence phase angle. On a meter that is 4-30 compliant, it will represent the aggregation over 150/180 cycles. ZeroSeqMag10m (zero sequence magnitude) This register contains the zero sequence magnitude, aggregated over a ten-minute harmonics interval. It is updated at the end of the interval. On a meter that is not 4-30 compliant, this register is not used. ZeroSeqPhs10m (zero sequence phase angle) This register contains the zero sequence phase angle, aggregated over a tenminute harmonics interval. It is updated at the end of the interval. On a meter that is not 4-30 compliant, this register is not used. PosSeqMag10m (positive sequence magnitude) This register contains the positive sequence magnitude, aggregated over a tenminute harmonics interval. It is updated at the end of the interval. On a meter that is not 4-30 compliant, this register is not used. PosSeqPhs10m (positive sequence phase angle) This register contains the positive sequence phase angle, aggregated over a tenminute harmonics interval. It is updated at the end of the interval. On a meter that is not 4-30 compliant, this register is not used. Page 528 © 2008 Schneider Electric. All rights reserved. ION Reference Symmetrical Components Module NegSeqMag10m (negative sequence magnitude) This register contains the negative sequence magnitude, aggregated over a tenminute harmonics interval. It is updated at the end of the interval. On a meter that is not 4-30 compliant, this register is not used. NegSeqPhs10m (negative sequence phase angle) This register contains the negative sequence phase angle, aggregated over a tenminute harmonics interval. It is updated at the end of the interval. On a meter that is not 4-30 compliant, this register is not used. Detailed Module Operation Ideally in a polyphase power system, phases A, B, and C of voltage and current are equal in magnitude, separated by 120°, and have a particular rotation. When this is not the case, the system is unbalanced and power use is inefficient. For example, when unbalanced power is applied to a motor, some of the power contributes to turning the motor in the proper direction (positive sequences), some of the power may contribute to the motor actually turning backwards (negative sequences), and some of the power may just cause heating (zero sequences). The Symmetrical Components module analyzes the unbalance and determines the magnitudes and phase angles of the positive, negative and zero sequences. These values are stored in the output registers. Responses to Special Conditions The following table summarizes how the Symmetrical Components module behaves under different conditions. Condition © 2008 Schneider Electric. All rights reserved. Response of Output Register When the device is started or powered-up (either the first time, or after a shutdown) All output registers are NOT AVAILABLE. If the inputs are NOT AVAILABLE All output registers are NOT AVAILABLE. If the Enable input is OFF All output registers are NOT AVAILABLE. Page 529 Symmetrical Components Module Page 530 ION Reference © 2008 Schneider Electric. All rights reserved. ION REFERENCE 09/2008 System Log Controller Module NOTE “Communications Server” has been renamed to “Communications Services”, and “Log Server” has been renamed to “Log Inserter” for ION Enterprise 5.0 and later versions. Every server running Communications Services has a SYSLOGS folder that contains system log files. All client applications that run on that server can write event records to the system log files. The Log Inserter uses the System Log Controller modules to transfer the system event records from the individual workstation system log files to the ION database. System Log Controller Module Event Log Inputs The System Log Controller module has no programmable inputs. Setup Registers Depth This numeric register identifies the maximum number of system events that the Log Inserter will retrieve from the system log files generated by the System Log service. System Log Source Select <system> from this enumerated register's list, or select the blank space to disable system logging. Schneider Electric 2195 Keating Cross Road Saanichton, BC Canada V8M 2A5 Tel: 1-250-652-7100 For technical support: [email protected] (00) + 1 250 544 3010 Contact your local Schneider Electric sales representative for assistance or go to www.powerlogic.com ION, PowerLogic and Schneider Electric are trademarks or registered trademarks of Schneider Electric in France, the USA and other countries. Other trademarks used are the property of their respective owners. Electrical equipment should be installed, operated, serviced, and maintained only by qualified personnel. No responsibility is assumed by Schneider Electric for any consequences arising out of the use of this material. © 2008 Schneider Electric. All rights reserved. System Log Controller Module ION Reference Cutoff This register allows you to specify which events you want transferred to the ION database from the system log files, based on event priority. Events with priority values less than or equal to the Cutoff you specify will not appear in the ION database. Output Registers Event Log The Event Log register contains the system event records for the workstation referenced in the System Log Source setup register that have been retrieved from the system log files by the Log Inserter. If the Log Inserter is run in auto-mode (the default configuration), this register is automatically linked to the Log Acquisition module. If the Log Inserter is not run in auto-mode, this register must be manually linked to a Log Acquisition module input to allow the system events to be transferred to the ION database. Detailed Module Operation The System Log Controller modules collect all of the system event messages generated by the ION applications on all of the workstations in your network. If the Log Inserter is run in auto-mode, a System Log Controller module is automatically created and configured for every workstation defined in your network configuration file. If the Log Inserter is not run in auto-mode, a System Log Controller module must be manually created, configured and linked to a Log Acquisition module using Designer. Page 532 © 2008 Schneider Electric. All rights reserved. ION REFERENCE 09/2008 Thermal Demand Module Power utilities generally bill commercial customers based on both their energy consumption (in KWh) and their peak usage levels, called peak demand (in KW). Demand is a measure of average power consumption over a fixed time interval, typically 30 minutes. Peak (or maximum) demand is the highest demand level recorded over the billing period. Thermal demand is one method of measuring demand. The Thermal Demand module calculates thermal demand over a specified length of time. It uses a method which is equivalent to thermal averaging. For thermal averaging, the traditional demand indicator responds to heating of a thermal element in a Watt-Hour meter. You can adjust the Thermal Demand module’s calculation to mimic this technique by changing the Time Const and Interval setup parameters. Thermal demand values can be calculated for any numeric variable. Thermal Demand Module Source ThrmDemand Event Enable Reset Inputs Source This is the input upon which the thermal demand calculation is performed. It must be a numeric register from any other module’s outputs. Linking this input is mandatory. Enable Disabling the THD module causes the Source input value to be replaced with zero. This will cause the demand output of the module to decay as a negative exponential function. Schneider Electric 2195 Keating Cross Road Saanichton, BC Canada V8M 2A5 Tel: 1-250-652-7100 For technical support: [email protected] (00) + 1 250 544 3010 Contact your local Schneider Electric sales representative for assistance or go to www.powerlogic.com ION, PowerLogic and Schneider Electric are trademarks or registered trademarks of Schneider Electric in France, the USA and other countries. Other trademarks used are the property of their respective owners. Electrical equipment should be installed, operated, serviced, and maintained only by qualified personnel. No responsibility is assumed by Schneider Electric for any consequences arising out of the use of this material. © 2008 Schneider Electric. All rights reserved. Thermal Demand Module ION Reference Reset This input resets the Thermal Demand module, setting the ThrmDemand output register to zero. It must be a pulse register from any other module’s outputs. This input is optional; if you leave it unlinked it will by default never receive a pulse. NOTE The Reset input will still function if the module’s Enable input is OFF. Setup Registers The setup registers of the Thermal Demand module allow you to adjust the thermal demand calculation to match a thermal averaging technique. Interval This register specifies the number of seconds in the thermal demand interval. Time Const This register specifies the rate at which the ThrmDemand output register responds to changes in the Source input. The higher the Time Const value, the faster the response time. Values commonly used are 63 and 90. Output Registers ThrmDemand This numeric variable register contains the accumulated thermal demand. Event Any events produced by the Thermal Demand module are recorded in the Event register. Possible events and their associated priority numbers are shown in the table below. Event Priority Group Priority Description Reset 5 A module reset has occurred. Setup Change 10 Input links, setup registers or labels have changed. Information 25 N/A input caused output to go NOT AVAILABLE. The Event output register stores the following information for each ION event: time stamp, priority, cause, effect, and any values or conditions associated with the cause and effect. Page 534 © 2008 Schneider Electric. All rights reserved. ION Reference Thermal Demand Module Detailed Module Operation The figure below illustrates the thermal demand calculation. When you change the values in the setup registers, the shape of the curve changes, allowing you to match a power utility’s demand calculation technique. Responses to Special Conditions The following table summarizes how the Thermal Demand module behaves under different conditions. Condition If the Source input is NOT AVAILABLE When the device is started or powered up (either the first time, or after a shut-down) © 2008 Schneider Electric. All rights reserved. Response of Output Register The ThrmDemand output register is NOT AVAILABLE. The ThrmDemand output register is NOT AVAILABLE. Page 535 Thermal Demand Module Page 536 ION Reference © 2008 Schneider Electric. All rights reserved. ION REFERENCE 09/2008 Time of Use Module The Time of Use module is used to store and monitor up to 20 years of seasonal rate schedules. The module compares its settings with the meter’s internal clock, and then changes its output registers to reflect the current season, day of the week, active rate, and active rate schedule. With this functionality, you can use this module to enable frameworks that measure energy and demand values for time periods with specific billing requirements. You can apply up to four seasonal rates to every year. Each season can be programmed with up to five rate schedules for holidays, weekends, weekdays, and other times. When a season ends, the rate schedules of the next season become active. This module operates one second after each minute boundary. Time Of Use Module Enable Time Rate A Status Weekday Status Rate B Status Weekend Status Rate C Status Alt 1 Status Rate D Status Alt 2 Status Rate Change Holiday Status Season 1 Status Schedule Change Season 2 Status Monday Status Season 3 Status Tuesday Status Season 4 Status Wednesday Status Season Change Thursday Status Self Read Friday Status Day Of Week Change Saturday Status Sunday Status Event Schneider Electric 2195 Keating Cross Road Saanichton, BC Canada V8M 2A5 Tel: 1-250-652-7100 For technical support: [email protected] (00) + 1 250 544 3010 Contact your local Schneider Electric sales representative for assistance or go to www.powerlogic.com ION, PowerLogic and Schneider Electric are trademarks or registered trademarks of Schneider Electric in France, the USA and other countries. Other trademarks used are the property of their respective owners. Electrical equipment should be installed, operated, serviced, and maintained only by qualified personnel. No responsibility is assumed by Schneider Electric for any consequences arising out of the use of this material. © 2008 Schneider Electric. All rights reserved. Time of Use Module ION Reference Inputs Enable This input enables or disables the Time of Use module (by setting it to TRUE or FALSE respectively). This input is optional; if you leave it unlinked, the module will be enabled by default. NOTE Linking the Time input to an output register other than the LocalTime output register of the Clock module will cause undefined behavior in the Time of Use module. Time On an ION meter, this input is by default linked to the LocalTime output register of the Clock module. This will provide the Time of Use module with the correct local time (accounting for time zones and daylight savings time). This input can be linked to the Universal Time output of the clock module, but there will not be corrections for daylight savings time or time zone offsets. If you unlink this input on an ION meter, the Time of Use module will not function. Setup Registers The Time of Use module setup register strings are used to define each season’s start and end dates, categorize different types of days where rates may differ (for example, when a holiday has different rates than a weekday), and the times that each rate will activate on a given day. The Time of Use module’s setup registers can be considered to belong to one of the following three different groups of setup registers: One type of setup register is used to define the day types used in the module (for example, the Weekdays setup register defines the days of the week). These setup registers include: Weekdays, Weekends, Alt 1 Days, Alt 2 Days, and Holidays. Another group of setup registers defines the Seasons’ start and end dates. If a season is active, its five rate schedules are applied. These setup registers include: Season 1, Season 2, Season 3, and Season 4. The settings in the third group of setup registers define each season’s rate schedules; rates with corresponding times are specified in these registers. The setup registers that hold these rate schedules for season 1 are: Season 1 Weekday Rates, Season 1 Weekend Rates, Season 1 Holiday Rates, Season 1 Alt 1 Rates, and Season 1 Alt 2 Rates. The Time of Use module compares the meter’s internal clock with the season, day, and time of day settings in these registers, and determines the applicable rate. The following syntax is used when configuring these setup registers: Page 538 © 2008 Schneider Electric. All rights reserved. ION Reference Time of Use Module Syntax Description Mon Tue Wed Thu Fri Sat Sun These are valid entries for days of the week; these entries are not case sensitive. Jan, Feb, Mar, Apr, May, Jun, Jul, Aug, Sep, Oct, Nov, Dec 2010 These are valid entries for months of the year; these entries are not case sensitive. A group of four numbers in a row specifies a year. Commas are used to separate different rate and date entries; the comma can also be used to denote the end of a rate schedule (refer to the Season 1 Weekday Rates setup register). , — The dash is used to create intervals between two dates. 14:00 The colon is used between two numbers to specify a time of day. Times of day are in 24hour format. A, B, C, D These are used to define up to four different rates in a rate schedule. Use these entries before a time to define when a rate starts. Refer to the Season 1 Weekday to Season 4 Weekday setup registers for details. Creating Time of Use Setup Register Strings The syntax provided in the table above is used to build strings of times and dates. The following rules must be applied when entering the Time of Use module’s date type setup registers: All Dates in a setup register must appear in chronological order. If any date string contains a perpetual date (i.e., dates that apply to every year), it must appear first in the setup register string. Perpetual dates cannot be entered as two separate ranges (for example, Sep 10 - Jan 10 is correct, whereas Sep 10 - DEC 10, DEC 11 - Jan 10 is incorrect). NOTE Do not enter date ranges in other setup registers that cross into this date range. Weekdays This register defines the days of the week for all seasons. The rates in the Season (1, 2, 3, or 4) Weekday Rates setup registers are used on these days. For example, to specify a global setting of Monday to Friday to be your weekdays for all seasons, enter the following syntax into the Weekdays setup register: Mon, Tue, Wed, Thu, Fri or Mon - Fri The rates specified in the Season Weekday Rates setup registers will be in effect every Monday at midnight to Friday until end-of-day. Weekends This register defines the weekend days for all seasons. The rates in the Season (1, 2, 3, or 4) Weekend Rates setup registers are used on these days. An example of a Weekends entry would be: © 2008 Schneider Electric. All rights reserved. Page 539 Time of Use Module ION Reference Sat-Sun Alt 1 Days This register defines a set of alternative dates for all seasons. These dates generally have different rates from weekdays, weekends, or holidays (for example, a company with a less expensive rate every Thursday). The rates in the Season (1, 2, 3, or 4) Alt 1 Rates setup registers are used on these days. Alt 1 Days take precedence over Weekdays, Weekends, and Alt 2 Days (not Holidays). If an Alt 1 Days entry falls on a day specified in the Weekdays, Weekends, or Alt 2 Days setup registers, the day is considered an Alt 1 Day, and the appropriate Season (1, 2, 3, or 4) Alt 1 Rates rate schedule applies. Alt 2 Days This register is similar in function to Alt 1 Days, but contains a different set of dates. Holidays This register defines the holidays for all seasons. The rates defined in the Season (1, 2, 3, or 4) Holiday Rates setup registers are used on these days. Holidays entries take precedence over all other day types. If a Holidays entry falls on a day specified in the Weekdays, Weekends, Alt 1 Days, or Alt 2 Days setup registers, the day is considered a Holiday, and the appropriate Season (1, 2, 3, or 4) Holiday Rates rate schedule applies. The following is an example of a Holidays setup register entry: Jan 1, Dec 25, Sep 3 2001, Sep 2 2002 This entry specifies the holidays as Christmas day (of every year), New Years day (of every year), and Labor Day for the years 2001 and 2002. Self Read Dates This setup register defines the dates and times that the Self Read output register will pulse (Refer to “Detailed Module Operation” below for examples). If no time is entered in this register, the Self Read output register will pulse on the date specified at 12:00 AM Season 1, Season 2, Season 3, Season 4 These setup registers define the dates that each season is active for. When a season is active, the Time of Use module will use the applicable rate schedules. If no seasons are specified, it is always considered Season 1, and the Season 1 rates are active all year round. When defining seasons, ensure that there are no overlaps of dates between seasons; for example, do not configure one season as January to June, and another season as February to July. Also ensure that every day of the year is covered by your seasons — if there are gaps between seasons, the module returns an error and will not function. To specify Season 2 to be active from January 1 to March 21 of the year 2001, and January 1 to March 22 of the year 2002, enter the following into the Season 2 setup register: Jan 1 2001 – Mar 21 2001, Jan 1 2002 – Mar 22 2002 You can specify a season’s start time on any given day. If you wanted your seasons to begin at 4:00 AM on the above days, Page 540 © 2008 Schneider Electric. All rights reserved. ION Reference Time of Use Module Jan 1 2001 4:00 – Mar 21 2001 4:00, Jan 1 2002 4:00 – Mar 22 2002 4:00 If you decide to use time references in your date settings, you must apply times to all dates in the register. Season 1 Weekday Rates, Season 2 Weekday Rates, Season 3 Weekday Rates, Season 4 Weekday Rates These setup registers specify seasonal weekday rates. (Note that weekdays are defined in the Weekdays setup register). This setup register requires a valid rate (A, B, C, or D) with a corresponding start time (refer to “Detailed Module Operation” below for details). The first rate must be specified at midnight (0:00); the last rate specified will remain in-effect until the end of the day. NOTE The first rate must start at midnight, and the last rate specified will be in effect until the end of the day. For example, to specify a weekday rate schedule in Season 3 where Rate A starts at the start of the day, Rate B starts at 8:00 AM, Rate C starts at 4:00 PM, and Rate D starts at 10:00 PM, enter the following into the Season 3 Weekday Rates setup register: A 0:00, B 8:00, C 16:00, D 22:00 Note that Rate D is in effect from 10:00 PM until midnight. The rate schedules can also be modified such that a rate change can be incorporated for any given date. Using the example above, if your weekday rates change on June 15th, 2003 to Rate A starting at midnight, and Rate B from 11:00 AM to the end of the day: A 0:00, B 8:00, C 16:00, D 22:00, June 15 2003, A 0:00, B 11:00 Season 1 Weekend Rates, Season 2 Weekend Rates, Season 3 Weekend Rates, Season 4 Weekend Rates These setup registers specify seasonal weekend rates. (Note that weekends are defined in the Weekends setup register). This setup register requires a valid rate (A, B, C, or D) with a corresponding start time (refer to “Detailed Module Operation” below for details). The first rate must be specified at midnight (0:00); the last rate specified will remain in-effect until the end of the day. Season 1 Alt 1 Rates, Season 2 Alt 1 Rates, Season 3 Alt 1 Rates, Season 4 Alt 1 Rates These setup registers specify a season’s daily rates during the days specified in the Alt 1 Days setup register. Season 1 Alt 2 Rates, Season 2 Alt 2 Rates, Season 3 Alt 2 Rates, Season 4 Alt 2 Rates These setup registers specify a season’s daily rates during the days specified in the Alt 2 Days setup register. © 2008 Schneider Electric. All rights reserved. Page 541 Time of Use Module ION Reference Season 1 Holiday Rates, Season 2 Holiday Rates, Season 3 Holiday Rates, Season 4 Holiday Rates These setup registers specify a season’s daily rates during the days specified in the Holidays setup register. Output Registers Rate A Status, Rate B Status, Rate C Status, Rate D Status These Boolean output registers indicate which rate is currently active (Rate A, B, C or D). Only one of the Rates can be active at a given time. These output registers can be used to enable energy and demand calculation frameworks on a rate by rate basis. Rate Change This register pulses each time the rate changes. NOTE The module’s various Change outputs will not pulse when the module first goes online; for example, going from no rate to Rate A. Similarly, the various Change outputs will not pulse when the module’s programmed times schedules expire (for example, after 20 years, the rate schedules will expire, changing Rate D to no rate). Season 1 Status, Season 2 Status, Season 3 Status, Season 4 Status These Boolean output registers indicate which season is currently active. These registers can be used to enable certain frameworks during a particular season. Season Change This register pulses every time the season changes. This output can be used to trigger a recording framework for seasonal billing data. Weekday Status, Weekend Status, Alternative 1 Status, Alternative 2 Status, Holiday Status These Boolean output registers indicate which rate schedules is currently active. These outputs can be used to enable certain frameworks when a particular rate schedule is active. Schedule Change This output pulses when the rate schedule changes. Monday Status, Tuesday Status, Wednesday Status, Thursday Status, Friday Status, Saturday Status, Sunday Status These Boolean output registers indicate the current day of the week. These outputs can be used to enable certain frameworks when a particular day of the week is active. Day Of Week Change This output pulses when the day of the week changes. Self Read This output pulses at the times specified in the Self Read Dates setup register. Page 542 © 2008 Schneider Electric. All rights reserved. ION Reference Time of Use Module Event Any events produced by the Time of Use module will be recorded in the Event register. Possible events and their associated priority numbers are shown in the table below. Event Priority Group Priority Description Setup Change 10 Input links, setup registers or labels have changed. Warning 30 Time of Use season expiry pending in 30 days. Time of Use seasons have expired. The Event output register stores the following information for each ION event: time stamp, priority, cause, effect, and any values or conditions associated with the cause and effect. Detailed Module Operation The Time of Use module will be partially configured at the factory. Check the setup registers to ensure that the settings match your Time of Use schedules. The following steps provide guidelines on how to proceed with advanced configuration of the Time of Use module: Define your seasons Enter valid date ranges into the Season setup registers. If you do not have variable rate schedules between seasons, you do not need to configure the Seasons — Season 1 will be the default, and all the Season 1 rates will be in-effect all year. If you have different seasons, enter their start and end dates. If your season is active on the same dates every year, you only need to enter a single range of dates in the appropriate Season setup register. If the active dates are different each year (for example, Season 3 becomes active every first Monday in August), the start dates must be individually specified for each year. Define your day types Enter valid weekdays in the Weekdays setup register and weekends in the Weekends setup register. If different rates apply to holidays, enter the appropriate dates in the Holidays setup register. If you have days where an alternative rate schedule will apply, define those days in the Alt 1 Days and Alt 2 Days setup registers. Define your rates for each season’s day type Enter rates (A, B, C, or D) with their corresponding activation times for each type of day. If you have only one season, and you did not configure the Season setup registers, you only need to enter the rate schedules in the Season 1 Weekday © 2008 Schneider Electric. All rights reserved. Page 543 Time of Use Module ION Reference Rates, Season 1 Weekend Rates, Season 1 Holiday Rates and Season 1 Alt 1 and 2 Rates (as applicable). Time of Use Example A seasonal rate schedule for the year 2002 is as follows: Seasons Four seasons, starting April 1, September 1, October 16 and December 1 Day Types Weekday rates are on Monday to Friday, all year long Weekend rates are on Saturday and Sunday, all year long The first Thursday in September, 2002 and October, 2002 have a set of special rates October 15 and November 15 of every year have another set of special rates Holiday rates fall on Hallowe’en, Veteran’s Day, Labor Day, Columbus Day, Thanksgiving Day, Christmas Day and New Year’s Day Rates For all seasons the weekday rates are: Rate A at the start of the day, Rate B starts at 8:00 AM, Rate C starts at 4:00 PM, and Rate D starts at 10:00 PM For Season 1 and Season 2, the weekend rates are Rate A all day long For Season 3 and Season 4, the weekend rates are Rate B all day long For all four seasons, the first set of alternative rates is Rate B all day long For all four seasons, the second set of alternative rates is Rate C at the start of the day, and Rate D starting at 6:00 PM. For all four seasons, the holiday rates are Rate D all day long The following table shows what entries would be required in the various Time of Use module’s setup registers for this example: Setup Registers Page 544 Setting Season 1 Apr 1 – Aug 31 Season 2 Sep 1 – Oct15 Season 3 Oct 16 – Nov 30 Season 4 Dec 1 – Mar 31 Weekdays Mon-Fri Weekends Sat-Sun Alt 1 Days Sep 5 2002, Oct 3 2002 Alt 2 Days Sep 15, Oct 15, Nov 15 Holidays Jan 1, Oct 31, Nov 11, Dec 25, Sep 2 2002, Oct 14 2002, Nov 28 2002 Season 1, 2, 3, and 4 Weekday Rates A 00:00, B 08:00, C 16:00, D 22:00 Season 1 and 2 Weekend Rates A 00:00 Season 3 and 4 Weekend Rates B 00:00 © 2008 Schneider Electric. All rights reserved. ION Reference Time of Use Module Season 1, 2, 3, and 4 Alt 1 Rates B 00:00 Season 1, 2, 3, and 4 Alt 2 Rates C 00:00, D 18:00 Season 1, 2, 3, and 4 Holiday Rates D 00:00 The following graphic depicts how the above settings would appear on the calendar months of September 2002 to November 2002. Response to Special Conditions The following table summarizes how the Time of Use module behaves under different conditions. Condition If the Enable input is OFF © 2008 Schneider Electric. All rights reserved. Response of Output Registers All Status output registers contain FALSE and no pulses occur. Page 545 Time of Use Module Page 546 ION Reference © 2008 Schneider Electric. All rights reserved. ION REFERENCE 09/2008 Transient Module The Transient module monitors the waveforms for all voltage phases and determines the magnitude and duration of a transient when one is detected on any phase. You can specify how large a disturbance has to be before it is considered a transient and recorded. The Transient module can be used to detect ITI (CBEMA)-type disturbances. The magnitude and duration information provided by this module can be displayed in a CBEMA plot using Vista to analyze the voltage disturbance characteristics of your power system. You can configure the Transient module to learn what threshold a disturbance needs to reach to be considered a transient, and then either to place the learned threshold value in the Learned Threshold register for review or to begin using the learned threshold value automatically. If enabled, learning can occur even if the module itself is not enabled. Schneider Electric 2195 Keating Cross Road Saanichton, BC Canada V8M 2A5 Tel: 1-250-652-7100 For technical support: [email protected] (00) + 1 250 544 3010 Contact your local Schneider Electric sales representative for assistance or go to www.powerlogic.com ION, PowerLogic and Schneider Electric are trademarks or registered trademarks of Schneider Electric in France, the USA and other countries. Other trademarks used are the property of their respective owners. Electrical equipment should be installed, operated, serviced, and maintained only by qualified personnel. No responsibility is assumed by Schneider Electric for any consequences arising out of the use of this material. © 2008 Schneider Electric. All rights reserved. Transient Module ION Reference Inputs V1-V3 These inputs are linked to the Data Acquisition module and cannot be changed. Nominal (nominal voltage) This input specifies the nominal voltage for your power system. By default, this input is linked to the NomVolts setup register in the Sag/Swell module, which holds the nominal system voltage used in your system. The threshold value (entered in the Threshold setup register) is specified as a percentage of the Nominal value, so this input directly affects the module’s tolerance. If your power system’s typical voltage levels vary from the NomVolts setting, you can link this input to any other register that provides a numeric value. Transient modules in most systems operate properly with this register linked to NomVolts. Linking this input is mandatory. NOTE Nominal refers to the primary power system voltage (line-to-line voltage for Delta systems and line-to-neutral voltage for Wye systems). The primary power system voltage is sometimes different than the PT Primary setup register value; i.e. when the PT Primary is used to indicate winding ratio rather than primary voltage. Enable When this input is TRUE, the module is enabled; when it is set to FALSE, the module is disabled and the output registers that are not related to learning become NOT AVAILABLE. This input is optional; if you leave it unlinked, the module is enabled by default. Learn Now When this input is pulsed, it starts the learning process and begins the learning period. If a pulse is received while learning is in progress, the current learning period is aborted, all data in the learning-related output registers is reset and a new learning period begins. This input must be linked for learning to be enabled. If this input is pulsed, learning occurs even if the module is not enabled. Learning is stopped, and learning-related outputs become NOT AVAILABLE, when any setup of the module changes. To disable learning completely, disconnect this input. Setup Registers Threshold This numeric bounded register allows you to specify how much the voltage can deviate from normal before a transient is recorded. The magnitude required for a transient to be recorded is specified as a percentage of the nominal voltage, plus 100. For example, a value of 120 causes the module to detect transients with a deviation that is greater than 20% from the nominal; transients with a deviation of 20% or less are not detected. Page 548 © 2008 Schneider Electric. All rights reserved. ION Reference Transient Module If learning is enabled, this register is overwritten by the learned values, either when you install the values in MANUAL MODE or when learning is complete in AUTOMATIC MODE. EvPriority This register allows you to assign a priority level to the events generated by the Transient module (see Event output register below). An event is generated when a transient is detected. Learn Install Mode This register specifies how the learned values are installed: MANUAL: Learning occurs but the module is not automatically configured with the learned values when learning is complete. The learned values are placed in the learned output registers to be manually installed. AUTOMATIC: Learning occurs and the learned values are placed in the learned output registers. The module automatically installs and starts using the learned values when learning is complete. Once the learned values are installed, either manually or automatically, the value of the learned output registers becomes NOT AVAILABLE. Learn Duration This register specifies the learning duration in minutes. The allowable range is 1 to 300. The default is 30. Output Registers TranV1Dur, TranV2Dur, TranV3Dur Theses numeric registers contain the duration of any transient detected on V1, V2 or V3, respectively, given in seconds. TranV1Max, TranV2Max, TranV3Max These numeric registers contain the maximum peak magnitude of the transient on V1, V2 or V3, respectively, given as a percentage of Nominal. For example, a maximum 20% deviation on V1 with respect to the Nominal (in either the positive or negative direction) will be reported as TranV1Max=120. TranV1Trig, TranV2Trig, TranV3Trig These registers output a pulse if a transient is detected on V1, V2 or V3 respectively. TranNominal This register holds the value at the Nominal input that was in effect at the beginning of a disturbance. AnyTrig If a transient is detected on any phase, this register outputs a pulse. This trigger is in addition to any of the individual phase triggers. © 2008 Schneider Electric. All rights reserved. Page 549 Transient Module ION Reference Remaining Learning Time This register contains the remaining learning time, in seconds. It counts down from the Learn Duration to 0 (zero). When this value reaches zero, learning is complete. If the Stable Learning Time reaches one-quarter of the Learn Duration, this register jumps to zero and learning is complete. If learning has not started, the value of this register is NOT AVAILABLE. Stable Learning Time This register contains the number of seconds that have elapsed since a change in the learned Threshold value. When this value is equal to one-quarter of the Learn Duration, learning is complete. If learning has not started, the value of this register is NOT AVAILABLE. Learned Threshold This numeric register contains the learned value for the Threshold setup register. When learning is in progress, this register is continually updated. This register becomes NOT AVAILABLE and learning stops when any setup is changed, for example, when the Learn Now input is unlinked or the value of the Threshold register is changed. Event All events produced by the Transient module are written into this register. Possible events and their associated priority numbers are shown in the table below. Event Priority Group Priority Description Setup Change 10 Input links, setup registers or labels have changed, or learned values were installed automatically. Setpoint * Transient detected; magnitude is reported. Install Failed 10 Automatic installation of a learned value failed because the value was invalid; invalid value is reported. Unable to Install 30 Automatic installation of learned values failed for an unknown, unrecoverable reason. * The priority of this event is determined by the value in the EvPriority Setup register. The Event output register stores the following information for each ION event: time stamp, priority, cause, effect, and any values or conditions associated with the cause and effect. Page 550 © 2008 Schneider Electric. All rights reserved. ION Reference Transient Module Detailed Module Operation The Transient module predicts what the shape of a “normal” waveform should be for each voltage phase. These predicted normal waveforms are compared to the actual real-time phase voltage waveforms that are measured by the meter. If the actual waveform deviates from the predicted waveform by an amount greater than the Threshold, a transient is recorded. The following diagram illustrates the normal and actual waveforms, and the use of the Threshold to determine whether or not a disturbance is considered a transient. A Threshold value of 130 is shown in the diagram. Threshold Calculation The threshold is calculated using the values in the module’s Nominal input and Threshold setup registers. The width of the threshold is determined by applying the value in the Threshold register as a percentage of the Nominal peak voltage. Nominal peak voltage is derived from the value at the Nominal input, as shown © 2008 Schneider Electric. All rights reserved. Page 551 Transient Module ION Reference below. Note that the threshold is applied in both directions from the predicted normal waveform. “NORMAL“ WAVEFORM Threshold Threshold The Threshold is defined by: Nominal Voltage x 2 x (Threshold - 100)% Nominal input Threshold setup register Transient Module Output Values The magnitude of a transient is reported as a percentage of nominal, added to 100. For example, if a transient is detected on V1 that is 40% larger in magnitude than the normal voltage, the TranV1Max register holds a value of 140. The duration is reported as the time in seconds during which the phase voltage is outside the threshold level. Duration (in seconds) 130% 100% Transient Magnitude (percentage of Normal) 130% The transient shown would measure about 140 Magnitude is reported as a percentage of nominal plus 100 to allow easy plotting of transient activity on CBEMA plots in Vista. Some experimentation may be required to determine the correct value for the Threshold setup register. If it is set too low, common waveform distortions may be interpreted as transients. If the Threshold is set too high, important transients could be missed. Page 552 © 2008 Schneider Electric. All rights reserved. ION Reference Transient Module Power Tolerance Curves The CBEMA curve is a power tolerance curve that describes what types of disturbances electrical equipment can typically ride through and what types can cause equipment failure or damage. It plots the magnitude of the disturbance (in percentage) on the Y-axis and the duration of the disturbance on the X-axis. Disturbances that fall within the envelope defined by the upper and lower curve are typically not harmful to electrical equipment; disturbances that fall outside the envelope may disrupt or damage the equipment. TYPE I TYPE II TYPE III The Sag/Swell module detects disturbances in this range The Transient module detects disturbances in these ranges 128 samples/cycle 130μs @ 60Hz 156μs @ 50Hz 256 samples/cycle 65μs @ 60Hz 78μs @ 50Hz 1 cycle NOTE The start of the transient detection window depends on the meter’s sampling rate. Refer to your device’s documentation. © 2008 Schneider Electric. All rights reserved. Page 553 Transient Module ION Reference Analyzing Data with Vista You can plot transient data on a CBEMA curve using Vista. Connect the magnitude and duration output registers of the Transient module (for example, TranV1max and TranV1dur) to the Source inputs of a Data Recorder module, and trigger the Data Recorder by connecting the Transient module’s AnyTrig output to the Data Recorder’s Record input. The Data Recorder module then records magnitude and duration data when a transient occurs. You can also capture the waveform that contains the transient activity by using the Transient module to trigger a Waveform Recorder module. Link the Transient module’s trigger output for the voltage phase you’re interested in (for example, TranV1Trig) to the Record input of the Waveform Recorder module. Ensure that the Waveform Recorder module’s Source input is linked to the appropriate phase voltage output on the Data Acquisition module, and set the Depth and Record Delay setup registers appropriately (refer to the Waveform Recorder module description). When a transient is detected on this phase, the corresponding waveform is recorded. You can also use a phase trigger (TranV1Trig, TranV2Trig or TranV3Trig) to trigger one or more Counter modules to keep track of the number of transients that occur on each voltage phase. Responses to Special Conditions The following table summarizes how the Transient module behaves under different conditions. Condition Page 554 Response to Output Register If the Source inputs are NOT AVAILABLE All output registers are NOT AVAILABLE. If the Nominal input is zero All output registers are NOT AVAILABLE. If the Enable input is OFF All output registers that are not related to learning are NOT AVAILABLE. When the device is started or poweredup (either the first time, or after a shutdown) All output registers are NOT AVAILABLE. If learning is not in progress and no learned values are waiting to be installed Learned output registers are NOT AVAILABLE. If V1, V2, or V3 or the Nominal input are NOT AVAILABLE, or there is any change in the module setup Learning stops and is reset, and the learned output registers are NOT AVAILABLE. © 2008 Schneider Electric. All rights reserved. ION REFERENCE 09/2008 Trending and Forecasting Module The Trending and Forecasting module enables you to record long-term changes in data. This allows you to forecast values such as demand so you can better manage things such as demand charges and time-of-use billing rates. Trend analysis can also be useful for predictive maintenance, by allowing you to see changes in load and power quality. Average, minimum, maximum and standard deviation data are logged for the source at the following intervals: Every hour for the last 24 hours Every day for the last month Every week for the last 8 weeks Every month for the last 12 months This data is used to graph trends and calculate forecasted values. The results can be viewed through the meter’s webpages by entering the meter’s IP address into your browser. For more information on viewing the Trending and Forecasting web pages for your meter, refer to your meter’s User Guide. Schneider Electric 2195 Keating Cross Road Saanichton, BC Canada V8M 2A5 Tel: 1-250-652-7100 For technical support: [email protected] (00) + 1 250 544 3010 Contact your local Schneider Electric sales representative for assistance or go to www.powerlogic.com ION, PowerLogic and Schneider Electric are trademarks or registered trademarks of Schneider Electric in France, the USA and other countries. Other trademarks used are the property of their respective owners. Electrical equipment should be installed, operated, serviced, and maintained only by qualified personnel. No responsibility is assumed by Schneider Electric for any consequences arising out of the use of this material. © 2008 Schneider Electric. All rights reserved. Trending and Forecasting Module ION Reference Inputs Source This source is logged for trending and forecasting. Data is logged at hourly, daily, weekly and monthly intervals and used to calculate forecasted values. The Source input can be linked to the numeric output register of any other module. This input must be linked for the Trending and Forecasting module to operate. If the input is re-linked or unlinked, all data logged for the previous source is deleted. NOTE If the Source is N/A, the module continues to run but no data is logged and no points are added to the webpage for the duration for which the Source is N/A. Setup Registers Start Day of Week This register sets which day is the start of a week for the purposes of this module. This day is used for determining weekly accumulated averages. The default is Monday. If you change this register, all currently accumulated data is deleted. Page 556 © 2008 Schneider Electric. All rights reserved. ION Reference Trending and Forecasting Module Detailed Module Operation Below is an overview of how the trending and forecasting data is accumulated: At the end of a 1-second interval, the present value of the source is added to a running sum of the current minute. The value is only added if it is valid; it is valid as long as the source input is not N/A for that 1-second interval. At the end of a 1-minute interval, the values accumulated within the last 60 seconds are averaged if there are more than 30 valid samples (at least 50% of the samples were valid during the 60 second interval). This average is then included with the 1-minute averages for the most recent 60 minutes. The 1second data is then reset. At the end of the hourly, daily, weekly and monthly intervals, the averages accumulated within that interval are averaged. This average is then included with the existing averages for the interval; for example, the hourly average is added to a data structure containing averages for the last 24 hours. The interval average is only valid if at least 50% of the values used to calculate the average are valid; i.e., for an hourly average to be valid and added, 30 or more minute values must have been valid. An algorithm is used to calculate forecasted values. The algorithm uses a profile value that is calculated from the accumulated averages. This profile value is used along with the previous 2 profile values to determine the forecasted values. Forecasted values are calculated for the next four intervals; i.e., if you are looking at the hourly graph, you will see forecasted values for the next four hours. It can take time for a module to build up enough data to create an adequate profile for a channel in order to display information on the Trending and Forecasting web page. The trending data and accumulated values are backed up to the meter’s nonvolatile memory every hour. Since the data needs to be accumulated over time in order to build a useful profile, it is important that it persists through power cycles. © 2008 Schneider Electric. All rights reserved. Page 557 Trending and Forecasting Module Page 558 ION Reference © 2008 Schneider Electric. All rights reserved. ION REFERENCE 09/2008 Voltage Selection Module The Voltage Selection module acts as a switch between two sets of phase voltages, providing a common set of voltages to other ION modules regardless of the configuration of the power system connected to the ION meter. The switching is based on the Volts Mode setup register from the Power Meter module, in conjunction with the Voltage Selection module’s setup registers. Voltage Selection Module Vll a Vll b Vll c Vll avg Vln a Vln b Vln c Vln avg Volts Mode V1 V2 V3 V avg Event Inputs Vll a, Vll b, Vll c, Vll avg These four inputs will appear on the V1, V2, V3, and V Avg output registers (respectively) when the Power Meter module’s Volts Mode is set to a power system using line-to-line voltages. If these optional inputs are left unlinked, and the Volts Mode specifies line-to-line voltages, their corresponding outputs are NOT AVAILABLE. These inputs are factory-linked to the Power Meter module. Vln a, Vln b, Vln c, Vln avg These four sources are similar to the Vll a, Vll b, Vll c, Vll avg inputs above, except that they appear on the outputs when the Volts Mode is set to a power system using line-to-neutral voltages. These inputs are factory-linked to the Power Meter module. Volts Mode This input is factory-linked to the Volts Mode setting of the Power Meter module. Schneider Electric 2195 Keating Cross Road Saanichton, BC Canada V8M 2A5 Tel: 1-250-652-7100 For technical support: [email protected] (00) + 1 250 544 3010 Contact your local Schneider Electric sales representative for assistance or go to www.powerlogic.com ION, PowerLogic and Schneider Electric are trademarks or registered trademarks of Schneider Electric in France, the USA and other countries. Other trademarks used are the property of their respective owners. Electrical equipment should be installed, operated, serviced, and maintained only by qualified personnel. No responsibility is assumed by Schneider Electric for any consequences arising out of the use of this material. © 2008 Schneider Electric. All rights reserved. Voltage Selection Module ION Reference Setup Registers V2 Behavior Some power system configurations require phase 2 voltage to be derived, rather than measured directly; this register provides the choice to propagate or suppress the calculated value when the meter is in DELTA mode. Use Vll Always If this register is set to TRUE, then the module will always propagate the line-to-line voltages, even when there are line to neutral voltages available. Output Registers V1, V2, V3 These outputs are either the Vln (a, b, c) inputs or the Vll (a, b, c) inputs, depending on the Volts Mode of the meter. V Avg This output is either the Vll avg input or the Vln avg input, depending on the Volts Mode of the meter. Event All events produced by the module are written into this register. Possible events and their associated priority numbers are shown in the table below: Event Priority Group Setup Change Priority 10 Description Input Links, setup registers or labels have been changed. The Event output register stores the following information for each ION event: time stamp, priority, cause, effect, and any values or conditions associated with the cause and effect. Page 560 © 2008 Schneider Electric. All rights reserved. ION Reference Voltage Selection Module Detailed Module Operation The purpose of the Voltage Selection module is to provide a single set of system voltages regardless of the power system you are monitoring. The following diagram illustrates how the inputs are directed into the outputs depending on the Volts Mode setting of the meter’s Power Meter module. Power Meter Module Voltage Selection Module Voltage Selection Module Vll a Vll a Vll a Vll b Vll b Vll b Vll c Vll c Vll avg Vll avg V1 V2 Vll c Vll avg Vln a Vln a V3 Vln b Vln b V Avg Vln c Vln c Vln c Vln avg Vln avg Vln avg Volts Mode = WYE © 2008 Schneider Electric. All rights reserved. Volts Mode = WYE V1 V2 Vln a V3 Vln b V Avg Volts Mode = DELTA Page 561 Voltage Selection Module Page 562 ION Reference © 2008 Schneider Electric. All rights reserved. ION REFERENCE 12/2009 Waveform Recorder Module The Waveform Recorder module records voltage or current waveforms from a polyphase power system. It provides a powerful method for analyzing the conditions occurring before, during, and after a power fluctuation or power supply interruption. It allows you to analyze power events, and it aids in power event location. The Waveform Recorder module can be configured to start recording under a specified circumstance and it can be enabled or disabled. Possible applications of the Waveform Recorder module include power quality monitoring and event analysis. Inputs Source This input can be linked to any of the outputs of the Data Acquisition module. Linking this input is mandatory. Enable This input enables or disables the Waveform Recorder module (by setting it to ON or OFF respectively). If you disable a Waveform Recorder module, it disregards the Record input. This input is optional; if you leave it unlinked the module will be enabled by default. Record When this register is pulsed, the waveform data in the Source input are copied to the Wform Log output register. Linking this input is mandatory. Schneider Electric 2195 Keating Cross Road Saanichton, BC Canada V8M 2A5 Tel: 1-250-652-7100 For technical support: [email protected] (00) + 1 250 544 3010 Contact your local Schneider Electric sales representative for assistance or go to www.powerlogic.com ION, PowerLogic and Schneider Electric are trademarks or registered trademarks of Schneider Electric in France, the USA and other countries. Other trademarks used are the property of their respective owners. Electrical equipment should be installed, operated, serviced, and maintained only by qualified personnel. No responsibility is assumed by Schneider Electric for any consequences arising out of the use of this material. © 2009 Schneider Electric. All rights reserved. Waveform Recorder Module ION Reference Rearm When this register is pulsed and the RecordMode setup register has been set to STOP-WHEN-FULL, the Waveform Recorder module will reset to allow full capacity. If the RecordMode setup register has been set to CIRCULAR, pulses on the Rearm input are ignored. Linking this input is mandatory if the module is set to STOP-WHENFULL. Setup Registers The setup registers of the Waveform Recorder module determine how many waveforms the module can store, as well as how the waveforms will be stored. Depth This register determines the maximum number of records in the output log. The higher you set this number, the more memory is required. Note that the format of the waveform data affects how much memory a single record uses. A large number of samples per cycle and a large number of cycles use more memory than a small number of samples per cycle and a small number of cycles. RecordMode This register determines the recording mode, defining what happens when the Wform Log output register is full. If you select CIRCULAR, the newest values get recorded and the oldest are dropped. If you select STOP-WHEN-FULL, the Waveform Recorder module stops writing new values into the Wform Log output register when it reaches capacity. NOTE When using STOP-WHEN-FULL record mode, each Waveform Recorder module’s Rearm input should be linked to an exclusive pulse register (i.e., the pulse register is NOT shared with other Waveform Recorder modules). Sharing a pulse register with multiple Waveform Recorder Rearm inputs can lead to a loss of logged data. Format This register defines the format of the resulting waveforms in the Wform Log output register. It specifies the number of samples per cycle and the number of cycles that are stored. For example, 128x14 specifies a format of 128 samples/cycle and 14 cycles stored. Record Delay Cycles This register defines the number of cycles that the module will wait, after a Record pulse is received, before recording a waveform. This value must be less than the number of cycles in the waveform (the number of cycles in the waveform is specified by the Format setup register). Page 564 © 2009 Schneider Electric. All rights reserved. ION Reference Waveform Recorder Module Output Registers Wform Log (waveform log) This register contains a log of the Source input waveforms recorded when the Record input was pulsed. The number of waveforms that can be stored is determined by the setup registers. Log State This register indicates when the Wform Log register is full. If the RecordMode setup register is set to STOP-WHEN-FULL and the Wform Log register has reached its depth, this register is ON (its default ON label is Full). When the RecordMode setup register is set to CIRCULAR, or when the RecordMode is set to STOP-WHEN-FULL but the Wform Log register has not yet reached its depth, the Log State register is OFF (its default OFF label is Not Full). Records Left When the RecordMode setup register is set to STOP-WHEN-FULL, the Records Left register indicates the number of additional waveform records that this module can store before it reaches the Full state. If this register contains a negative value, it indicates the number of times the module has been triggered beyond the full state. When the RecordMode setup register is set to CIRCULAR, this register is NOT AVAILABLE. Record Complete This output generates a pulse when a waveform has been successfully recorded. Event Any events produced by the Waveform Recorder module are recorded in the Event register. Possible events and their associated priority numbers are shown in the table below. Event Priority Group Setup Change Priority 10 Description Input links, setup registers or labels have changed. The Event output register stores the following information for each ION event: time stamp, priority, cause, effect, and any values or conditions associated with the cause and effect. © 2009 Schneider Electric. All rights reserved. Page 565 Waveform Recorder Module ION Reference Detailed Module Operation The following figure shows an example of a Waveform Recorder module recording the waveform on the Source input. Each time the Record input receives a pulse, the waveform data at the Source input are copied into the Wform Log output register along with a timestamp indicating when the Record input was pulsed. NOTE The Waveform Recorder has an inherent 1-cycle delay from trigger time to the time the record is stored. The waveform information at the Source input spans a certain amount of time (depending on the format specified in the Format setup register) and it is constantly being monitored. This effectively provides a window of observation, allowing you to capture a series of cycles before, during and after an event. Using the Record Delay Cycles Setup Register You may need to introduce a delay before triggering the Waveform Recorder to ensure you capture the desired span of data. If the Waveform Recorder is triggered immediately upon an event, the cycle in which the event occurs and the preceding cycles are recorded but the post-event cycles are missed. The Record Delay Cycles register can be used to introduce this delay, from 0 cycles to one less than the number of cycles in the waveform. NOTE To specify a delay greater than the number of cycles in the waveform, use a One-Shot Timer module to delay the Record input pulse. Page 566 © 2009 Schneider Electric. All rights reserved. ION Reference Waveform Recorder Module The following diagram illustrates how introducing a time-delay allows the window of observation to move until it contains the full range of event and post-event data. In the example below the Record Delay Cycles is set to 8. Input Record pulse received Waveform recorded if no delay is used (Record Delay Cycles set to zero). Waveform recorded with Record Delay Cycles setup register set to 8. NOTE If you re-link any of the inputs or make any changes to the setup registers, the contents of the Wform Log output register are cleared. If you wish to save the information, ensure the data has first been uploaded before re-linking inputs or changing setup registers. Responses to Special Conditions The following table summarizes how the Waveform Recorder module behaves under different conditions. Condition © 2009 Schneider Electric. All rights reserved. Response of Output Register When the device is started or powered-up (either the first time or after a shut-down) The output registers retain the value or state they held at shut-down. If the Source input is NOT AVAILABLE The output registers hold the last value obtained before the inputs became NOT AVAILABLE. If the Enable input is OFF The Wform Log register holds the logged data. Page 567 Waveform Recorder Module Page 568 ION Reference © 2009 Schneider Electric. All rights reserved. ION REFERENCE 09/2008 Web Page Module The Web Page module is used to create custom web pages for your power meter. Each meter comes with a set of default pages. With the Web Page module you can create additional pages with parameters you specify. These custom pages are available in both HTML and XML formats. For comprehensive information on using the Web Page module, see the WebMeter Internal Web Server Feature technical note. Inputs Source These inputs are the values that the Web Page module takes and displays on the custom web page. Setup Registers Page Title This register determines the title for the customized web (HTML) page. It also appears as an element on the XML page. The value range for this register is 0 to 80 characters. The default values are Web Page Module 1, Web Page Module 2, et cetera. Schneider Electric 2195 Keating Cross Road Saanichton, BC Canada V8M 2A5 Tel: 1-250-652-7100 For technical support: [email protected] (00) + 1 250 544 3010 Contact your local Schneider Electric sales representative for assistance or go to www.powerlogic.com ION, PowerLogic and Schneider Electric are trademarks or registered trademarks of Schneider Electric in France, the USA and other countries. Other trademarks used are the property of their respective owners. Electrical equipment should be installed, operated, serviced, and maintained only by qualified personnel. No responsibility is assumed by Schneider Electric for any consequences arising out of the use of this material. © 2008 Schneider Electric. All rights reserved. Web Page Module ION Reference Page Location This register specifies the location (or address) of the web page. The value range for this register is 0 to 80 alphanumeric characters (dash and dot allowed); the default values are webpage1 for Web Page Module 1, webpage2 for Web Page Module 2, et cetera. For example: If Page Location = webpage1 and meter IP Address = 192.168.1.5 then page would be located at http://192.168.1.5/webpage1.html (for HTML version) and http://192.168.1.5/webpage1.xml (for XML version). XSLT Stylesheet* This optional register specifies the URL where an XSLT stylesheet is located. This value is written to the XML web page, as a reference. When the XML page is loaded in the browser the stylesheet is applied to the XML code much like a Cascading Stylesheet (CSS) works with HTML. The value range can vary from 0 to 255 characters, and is blank by default. Gatewayed Device Namespace* The string value in this register is used as the namespace attribute in the Page element of XML pages generated by the module. The default value is Default. When it is set to Default, the namespace attribute of the Page element inherits the value from the Factory module's Device Namespace setup register. The value range for this string is up to 80 characters; these characters must be alphanumeric but can also include a dash (hyphen) or a dot (period). For examples, refer to the WebMeter Internal Web Server Feature technical note. NOTE A namespace uniquely identifies a set of names so that there is no ambiguity when objects with different origins but the same names are mixed together. A namespace is commonly given the name of a Uniform Resource Identifier (URI) - such as a web site address - both because the namespace may be associated with the site or page of that URI (for example, a company name) and because a URI is likely to be a unique name. Gatewayed Device Name* The string value in this register is used as the name attribute in the Page element of XML messages generated by the module. The default value is Default. When it is set to Default, the name attribute of the Page element inherits the value from the Factory module's Device Name setup register. The value range for this string is up to 80 characters; these characters must be alphanumeric but can also include a dash (hyphen) or a dot (period). NOTE If only one meter is used for sending XML data, then Gatewayed Device Name and Gatewayed Device Namespace can remain at Default: the meter's Factory module can supply the necessary identification since there are no gatewayed devices. However, these registers are particularly important when a device is collecting data from multiple gatewayed devices via Modbus Master - each gatewayed device's XML data can be uniquely identified. Page 570 © 2008 Schneider Electric. All rights reserved. ION Reference Web Page Module HTML Refresh Rate The register's value, which is inserted into an HTML META tag on the webpages, indicates how often to update the web page when viewed in a browser. The value range, specified in seconds, is 0 to 604800 (i.e. up to one week). A value of 0 indicates no refresh; this is the default value. Most users will not need to change this value. HTTP Expires This register specifies when the web page expires. This value is inserted into the HTTP header, providing a "caching clue" for proxy servers and browsers. The value range, specified in seconds, is 0 to 604800 (i.e. up to one week). The default value for this register is 2 seconds. Most users will not need to change this value. * These registers are only applicable for XML web pages. Output Registers Event All events produced by a Web Page module are written into this register. Possible events and their associated priority numbers are shown in the table below. Event Priority Group Setup Change Priority 10 Description Input links, setup registers or labels have changed. The Event output register stores the following information for each ION event: time stamp, priority, cause, effect, and any values or conditions associated with the cause and effect. © 2008 Schneider Electric. All rights reserved. Page 571 Web Page Module ION Reference Detailed Module Operation HTML Web Pages The Web Page module generates an HTML web page with the following information: Title Label Value Label Value Label Value Label Value Label Value Label Value This table automatically gets the data for "Label" and "Value" from the Source inputs. XML Web Pages The XML version of the web page will display only XML code in the browser unless it is linked to an XSLT stylesheet. The meter also maintains a catalog.xml page that contains links to all Web resources on the meter, including both the fixed pages and the Web Page module pages. This page is available for each meter at the URL, http://<meterIP>/ catalog.xml Page 572 © 2008 Schneider Electric. All rights reserved. ION REFERENCE 12/2009 XML Import Module The XML Import module is used to import numeric data from an XML file into ION. This module is intended for use by personnel with a working knowledge of XML and xPath. This module is available in the Virtual Processor. Inputs Enable When this input is OFF, the XML Import module is disabled and pulses received at the Read Now input are ignored. This module is enabled by default. Read Now When this input is pulsed, the file is loaded and the results of the xPath queries contained in the xPath Query setup registers are copied into their corresponding Data output registers. A link to the Read Now input is mandatory or else the module will not go online. Schneider Electric 2195 Keating Cross Road Saanichton, BC Canada V8M 2A5 Tel: 1-250-652-7100 For technical support: [email protected] (00) + 1 250 544 3010 Contact your local Schneider Electric sales representative for assistance or go to www.powerlogic.com ION, PowerLogic and Schneider Electric are trademarks or registered trademarks of Schneider Electric in France, the USA and other countries. Other trademarks used are the property of their respective owners. Electrical equipment should be installed, operated, serviced, and maintained only by qualified personnel. No responsibility is assumed by Schneider Electric for any consequences arising out of the use of this material. © 2009 Schneider Electric. All rights reserved. XML Import Module ION Reference Setup Registers URL This register specifies the location of the XML file. The value range for this register is 0 to 80 alphanumeric characters (dash and dot allowed). Here is an example url for a fictional weather website containing local weather data in XML format: http://www.myweather.com/xml/current_obs/myhometown.xml NOTE The url is displayed as a string of text in your web browser’s address or location bar. Namespace This register specifies the XML namespaces associated with the elements you query from the XML source. The value range for this register is 0 to 80 alphanumeric characters (dash and dot allowed). This information is only needed to resolve XML data or routing issues, and is usually not required. The xml namespace information is found in the xml source, and is listed on the lines beginning with “xmlns”. NOTE To view the xml source, navigate to the xml webpage using a web browser such as Microsoft Explorer. Right-click on the webpage and select View Source. Here is a namespace example using a fictional weather website: xmlns:mhome='http://www.myweather.org/myhometown' xmlns:mwork='http://www.myweather.org/myworktown' When entering the XML namespace, make sure you use the correct syntax, including the single quotes around the namespace URI and separating multiple namespaces with a single space. NOTE A namespace uniquely identifies a set of names so that there is no ambiguity when objects with different origins but the same names are mixed together. A namespace is commonly given the name of a Uniform Resource Identifier (URI) - such as a website address - both because the namespace may be associated with the site or page of that URI (for example, a company name) and because a URI is likely to be a unique name. Event Priority This register allows you to assign a priority level to the following events produced by the XML Import module: Page 574 The xPath query returned a NULL node (could not locate any data) The xPath query returned a non-numeric node © 2009 Schneider Electric. All rights reserved. ION Reference XML Import Module The priority level you specify applies to all of the above events. The default value is 128. XPath Query 1 to n The xPath query is used to retrieve the data from the xml file. Each query must return a single, numeric value. The content of this register must match the XML element of the data you want to retrieve. Here is an example query to get the temperature in degrees Celsius from a fictional weather website: /current_observation/temp_c This query will return 3.0 from the fictional weather website xml file excerpt shown below: <current_observation version=”1.0” xmlns:mhome=”http://www.myweather.org/myhometown”> ... <weather>overcast</weather> <temp_f>37.0</temp_f> <temp_c>3.0</temp_c> <relative_humidity>56</relative_humidity> ... </current_observation> NOTE XPath Query can only return numeric data or equations. In the example above, querying / current_obervation/weather will return an error. Output Registers Data 1 to n These registers contain the results of their associated XPath Query. Load Complete This register pulses when the XML file is successfully read. Event Events produced by the XML Import module are recorded in the Event register. Possible events and their associated priority numbers are shown in the following table. Event Priority Group * © 2009 Schneider Electric. All rights reserved. Priority Description Setup Change 10 Input links, setup registers or labels have changed. Custom * Query returned NULL node;query returned non-numeric node. Failure 255 File did not load or could not be parsed. The priority of these events is determined by the value in the Event Priority setup register. Page 575 XML Import Module ION Reference The Event output register stores the following information for each ION event: time stamp, priority, cause, effect, and any values or conditions associated with the cause and effect. Page 576 © 2009 Schneider Electric. All rights reserved. ION Reference XML Import Module Detailed Module Operation When the module's Read Now input is pulsed, the xml file referenced in the URL setup register is read, and any namespace information supplied in the Namespace setup register is applied. When the file has been read, the Load Complete output register pulses. The XPath Query specified in each XPath Query setup register is executed, and the result appears in the corresponding Data output register. For the module to function, the xml file must be located at the specified location or URL. If you want to verify the location of your xml file, open Windows Explorer and check the directory structure or check the URL. An example framework in the Virtual Processor that makes use of an XML Import module is shown in the next diagram. To track energy consumption against temperature, you can set up an XML Import module to get temperature information from a weather website, with a Periodic Timer module to trigger the XML Import Module’s Read Now register. This temperature information is stored in a Data Recorder module in the Virtual Processor. When combined with meter energy data, you can correlate energy usage and local temperature. Temperature kWh del int 10.2 15.875 13.0 12.033 8.7 17.794 NOTE The Arithmetic module does not perform any calculations on the data. You need the Arithmetic module in order to make a duplicate recording of the meter data within the Virtual Processor. Otherwise, you can incorporate the meter data from the meter’s data recorders. © 2009 Schneider Electric. All rights reserved. Page 577 XML Import Module ION Reference Responses to Special Conditions The following table summarizes how the XML Import module behaves under different conditions. Condition Page 578 Response of Output Register File cannot be read All Data outputs are n/a Query returned NULL or non-numeric node Corresponding data output is n/a After the module is re-linked or setup registers are changed All Data outputs are n/a When the Virtual Processor is first started or a module is newly created All Data outputs are n/a © 2009 Schneider Electric. All rights reserved. PowerLogic™ ION™ Reference ION Architecture & ION Modules Guide Schneider Electric 2195 Keating Cross Road Saanichton, BC Canada V8M 2A5 For technical support: [email protected] (00) + 1 250 544 3010 Contact your local Schneider Electric sales representative for assistance or go to www.schneider-electric.com ION, PowerLogic, ION Enterprise, Webmeter and Modbus are either trademarks or registered trademarks of Schneider Electric in France, the USA and other countries. Other trademarks used are the property of their respective owners. Electrical equipment should be installed, operated, serviced, and maintained only by qualified personnel. No responsibility is assumed by Schneider Electric for any consequences arising out of the use of this material. Document Number: 70002-0290-03 Document Date: 09/2010 Replaces 70002-0290-02 © 2010 Schneider Electric All Rights Reserved