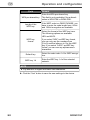
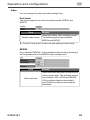
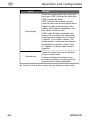
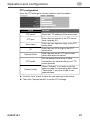
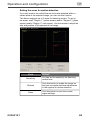
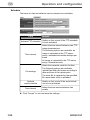
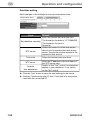
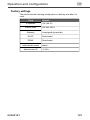
1
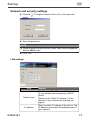
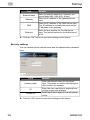
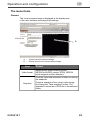
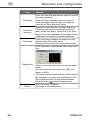
W I R E L E S S L A N WLAN IP-Kamera 150 Mbps d g Original-Bedienungsanleitung User manual 00053157 g Original user manual Table of Contents Introduction . . . . . . . . . . . . . . . . . . . . . 3 Foreword. . . . . . . . . . . . . . . . . . . . . . . . 3 Information on this user manual . . . . . . . . . . . . . . . . . . . . . 3 Copyright. . . . . . . . . . . . . . . . . . . . . . . . 3 Liability disclaimer4 Intended use . . . . . . . . . . . . . . . . . . . . . 4 Warnings . . . . . . . . . . . . . . . . . . . . . . . . 5 Safety . . . . . . . . . . . . . . . . . . . . . . . . . . 6 Danger of electric shock . . . . . . . . . . . . 6 Fundamental safety precautions . . . . . 7 Description . . . . . . . . . . . . . . . . . . . . . 8 Front view . . . . . . . . . . . . . . . . . . . . . . . 8 Rear view . . . . . . . . . . . . . . . . . . . . . . . 9 Installation and connection. . . . . . . 10 Safety guidelines. . . . . . . . . . . . . . . . . 10 Unpacking . . . . . . . . . . . . . . . . . . . . . . 10 Checking contents and packaging. . . . . . . . . . . . . . . . . . . 10 Requirements for operation . . . . . . . . 11 Requirements for place of operation . 11 Setting up . . . . . . . . . . . . . . . . . . . . . . 12 Fixing to a wall/ceiling. . . . . . . . . . . . . 12 Electrical connection. . . . . . . . . . . . . . 12 Connecting the mains adapter . . . . . . 13 Connecting the camera to the network (LAN). . . . . . . . . . . . . . . . . . . 13 Startup . . . . . . . . . . . . . . . . . . . . . . . . 13 Switching the device on and off . . . . . 13 Installation . . . . . . . . . . . . . . . . . . . . . . 14 Installing the software . . . . . . . . . . 14 Installing the configuration software. . . . . . . . . . . . . . . . . . . . . 17 Establishing connection to the device 19 IPCam Admin Utility . . . . . . . . . . . . . . 20 Network- and security settings . . . . . . . . . . . . . . . . . 21 LAN settings . . . . . . . . . . . . . . . . . 21 Security settings . . . . . . . . . . . . . . 22 58 Operation and configuration. . . . . . 23 Loading the user interface . . . . . . . . . 23 Login . . . . . . . . . . . . . . . . . . . . . . . . . . 24 The user interface. . . . . . . . . . . . . . . . 25 Language selection. . . . . . . . . . . . 25 Display area . . . . . . . . . . . . . . . . . 26 Menu bar. . . . . . . . . . . . . . . . . . . . 26 Menu items . . . . . . . . . . . . . . . . . . . . . 27 Camera . . . . . . . . . . . . . . . . . . . . . 27 LAN . . . . . . . . . . . . . . . . . . . . . . . . 29 WLAN . . . . . . . . . . . . . . . . . . . . . . 33 Video . . . . . . . . . . . . . . . . . . . . . . . 37 Email/FTP . . . . . . . . . . . . . . . . . . . 40 Motion detection . . . . . . . . . . . . . . 42 Schedule . . . . . . . . . . . . . . . . . . . . 44 System . . . . . . . . . . . . . . . . . . . . . 45 Utilities. . . . . . . . . . . . . . . . . . . . . . 47 Status . . . . . . . . . . . . . . . . . . . . . . 49 Account . . . . . . . . . . . . . . . . . . . . . 49 Log . . . . . . . . . . . . . . . . . . . . . . . . 50 Factory settings. . . . . . . . . . . . . . . . . . 51 Troubleshooting . . . . . . . . . . . . . . . . 52 Troubleshooting chart . . . . . . . . . . . . . 52 Frequently asked questions (FAQs). . 53 Appendix . . . . . . . . . . . . . . . . . . . . . . 55 Notes on disposal . . . . . . . . . . . . . . . . 55 Support and contact information . . . . 55 Technical data . . . . . . . . . . . . . . . . . . . 56 00053157 Introduction g Introduction Foreword Dear Customer, By purchasing this WLAN IP Camera 150 Mbps, you have decided in favour of a quality product from Hama that corresponds to the latest development standards with respect to technology and functional performance. Please read the information contained in this user manual to familiarise yourself quickly with the device and be able to make full use of its functions. We wish you a lot of pleasure with the device. Information on this user manual This user manual is an integral part of the WLAN IP Camera 150 Mbps (hereinafter referred to as device) and contains important information on the intended use, safety, connection and configuration of the device. Keep this user manual in a safe place and pass it on to any future owners together with the device. Copyright This documentation and the enclosed software is protected by copyright. Any duplication or reprinting, in whole or in part, as well as reproduction of any illustrations even in modified form is only permitted with the written approval of the manufacturer. Hama grants the buyer the non-exclusive right to use the enclosed software for the operation of the device. The Licensee may only make one copy of the software, which is only to be used for backup purposes. Unless otherwise indicated, all trademarks and logos mentioned are trademarks of Hama GmbH and are protected by law. Microsoft, Windows and the Windows logo are trademarks of Microsoft Corporation. All other product and company names are trademarks of their respective owners. 00053157 59 g Introduction Liability disclaimer All technical information, data and instructions on installation, operation of the device contained in this user manual represent the current status at the time of printing and are based on the best possible knowledge gained by experience and know-how. The manufacturer assumes no liability for damage or injury resulting from failure to observe the user manual, use for other than the intended purpose, unprofessional repairs, unauthorised modifications or use of non-approved spare parts. Intended use This device is intended to be used for surveillance of secluded or critical areas and for playback of recorded images via a computer connected to a network (LAN or WLAN) in closed rooms. Any use other than previously stated is considered as improper use. WARNING Danger resulting from improper use! If not used for its intended purpose or used in any other way, the device may be or become a source of danger. ► Only use the device for its intended purpose. ► Observe the procedures described in this user manual. No claims of any kind will be accepted for damage or injury resulting from use of the device for other than its intended purpose. The risk must be borne solely by the operator. NOTE ► It is not permitted to publish personal film material without prior permission of the persons concerned. ► Observe any special regulations on video surveillance in industrial, commercial and public areas. ► Video surveillance does not exempt you from your duty to exercise due diligence, or from your welfare and supervisory obligations. 60 00053157 Introduction g Warnings The following warnings are used in this user manual: DANGER A warning of this category indicates an impending dangerous situation. If the dangerous situation is not avoided, it may lead to serious injury or even death. ► Follow the instructions in this warning to avoid the danger of serious injury or even death. WARNING A warning of this category indicates a potentially dangerous situation. If the dangerous situation is not avoided, it may lead to injuries. ► Follow the instructions in this warning to avoid the risk of injury. CAUTION A warning of this category indicates potential material damage. If the situation is not avoided, it may lead to material damage. ► Follow the instructions in this warning to avoid material damage. NOTE ► A note indicates additional information that simplifies the use of the device. 00053157 61 g Safety Safety This device complies with the prescribed safety regulations. However, improper use can result in personal injury and/or damage to the device. Danger of electric current DANGER Danger to life by electric current! Contact with live wires or components could lead to serious injury or even death! Observe the following safety precautions to avoid electric shocks: ► Do not use this device if the mains adapter, power cable or plug is damaged. ► Do not open the housing of the mains adapter. Danger of electric shock if live connections are touched and/or the electrical and mechanical configuration is changed. 62 00053157 g Safety Fundamental safety precautions Observe the following safety instructions to ensure safe handling of the device: ■ Inspect the device for visible signs of damage before use. Do not use a damaged device. ■ Do not allow children to play with the device. ■ Persons who due to their physical, mental or motor response abilities are unable to operate the device may only use it under supervision or instruction by a responsible person. ■ Do not open the device. Unauthorised opening and repairs can lead to considerable danger for the user and cause serious damage to the device. Only allow qualified persons to carry out repairs. Improper repairs will void the warranty. ■ Repairs to the device during the warranty period may only be carried out by service centres authorised by the manufacturer, otherwise the warranty will become void in the event of subsequent damage. ■ Defective parts may only be replaced with original spare parts. Only original spare parts guarantee that the safety requirements are met. ■ Clean the housing of the device with a slightly damp cloth. Do not use any aggressive or abrasive cleaning agents or solvents. ■ Do pull on the power cable to remove the mains adapter from the mains socket ■ Electronic devices are delicate, so avoid knocks and blows. ■ Disconnect the mains adapter from the mains socket in the event of faults or during thunderstorms. 00053157 63 g Description Description D C AM E R UA INTERN A E ET L M OD Front view 2 3 4 WLAN antenna (integrated) 2 Camera lens 3 Blue LED: status 4 Green LED: network LED Description Lights up continuously: system is switched on Status Flashes slowly: camera is booting Flashes fast: camera is waiting for WPS connection Network Lights up continuously: network is connected Flashes: network access 64 00053157 g Description Rear view 5 6 POWER POWE / 7 LAN 8 5 Thread connection for tripods 6 Socket for the mains adapter 7 Reset/WPS button 8 RJ-45 network connection Designation Resetting WPS 00053157 Description Press the reset button for at least 5 seconds to revert to the factory settings. Briefly press the WPS button on the camera and the device to be connected to establish a wireless connection. 65 g Installation and connection Installation and connection Safety precautions DANGER Damage to the device or to persons could occur during startup of the device! Observe the following safety precautions to avoid danger: ► Never play with packaging material. Risk of suffocation. ► Keep the contents of this package away from children. The package contains small parts that can be swallowed by children. Unpacking Take all parts of the device including the user manual out of the box. Remove all packing materials from the device before using for the first time. Checking contents and packaging The device is supplied with the following components as standard: ● WLAN IP camera ● Tripod and installation material ● Mains adapter ● RJ-45 network cable ● Installations CD ● User manual NOTE ► Check for visible signs of damage or missing items on delivery. Report incomplete or damaged items to your supplier/retailer immediately. 66 00053157 Installation and connection g Requirements for operation The following requirements must be met for installation and operation of the device on your computer: ● A LAN or WLAN network connection with a data transfer speed of at least 10 Mbps. ● A computer with one of the following operating systems installed: – Microsoft® Windows 7 (32-bit or 64-bit edition), – Microsoft® Windows Vista (32-bit or 64-bit edition), – Windows XP® (32-bit or 64-bit edition) (Service Pack 2 or higher recommended). ● Pentium-class computer or notebook (2 GHz CPU or better if using 4 cameras simultaneously). ● At least 256 MB RAM and 50 MB free hard disk space. ● A CD-ROM drive. Requirements for the place of operation For safe and trouble-free operation of the device, the installation location must satisfy the following requirements: ■ When selecting the location for installation, make sure that the device is not subject to direct sunlight. ■ Ensure that nothing blocks the camera's field of vision. ■ When selecting the location for installation, make sure there are no blind spots. ■ Prior to installation at the chosen location, check that a reliable network connection can be established via WLAN. Walls and steel girders in the vicinity of the WLAN antenna can have an adverse affect on the wireless transmission. ■ The mains socket must be easily accessible so that the mains adapter can be quickly unplugged in the event of an emergency. 00053157 67 g Installation and connection Setting up Use the tripod supplied to set up the device or to mount on a wall or ceiling. Screw the tripod into the thread connection 5 on the back of the device. Fixing to a wall/ceiling Place the feet of the tripod onto the base and mark the drill holes. If the device is to be fixed to a wall, drill holes and insert the dowels supplied. Fix the feet of the tripod with the screws supplied. Screw the tripod into the thread connection 5 or the back of the device. Roughly align the camera. NOTE ► The exact alignment of the camera takes place after installing the configuration software onto your computer. Electrical connection For safe and trouble-free operation of the device, the following instructions have to be observed for the electrical connection: ■ The device is supplied with 5 Volt DC voltage via the mains adapter supplied. Always use the mains adapter supplied to connect the device to the mains supply. ■ Before connecting the device, compare the connection data (voltage and frequency) on the rating plate with those of your mains adapter. This data must correspond in order to avoid damage to the device. ■ Protect the adapter cable from hot surfaces and sharp edges. ■ Make sure that the power cable is not stretched tightly or twisted. ■ Do not allow the adapter cable to hang over edges (danger of tripping). ■ If the device is not to be used for a longer period of time, disconnect the mains adapter from the mains supply. 68 00053157 g Startup Connecting the mains adapter Insert the mains adapter plug into the socket 6 of the device. Insert the mains adapter into the mains socket. The 3 lights up. Status LED Connect the camera to the network (LAN) Connect the RJ-45 network cable supplied to the RJ-45 network connector 8 . Insert the other end of the network cable into the network socket or the switch/router. NOTE ► The network LED 4 lights up during connection to the network. ► The . network LED 4 flashes during access to the network. Startup Switching the device ON and OFF NOTE ► The device has no ON/OFF switch. Disconnect the mains adapter from the mains socket to switch off the device. 00053157 69 g Startup Installation In order to connect the WLAN IP Camera to your computer, the following steps must be performed in the specified order: 1) Install the configuration software using the installation programme supplied on the CD-ROM. 2) Establish a network connection. 3) Configure the device via the web browser. NOTE Before starting the installation, observe the following instructions: ► Save all data and close all running application programmes. ► If you already have another version configuration software installed on the computer, uninstall this first. Installing the software The following describes the installation of the software for the Windows XP, Windows Vista and Windows 7 operating systems. NOTE ► The installation is more or less the same for all the above operating systems. Any differences are explained in separate notes. ► The display of the menus may differ according to operating system. The following illustrations relate to a clean installation of the respective operating system. Place the programme and driver CD supplied into the CD drive of your computer. The installation programme starts automatically. 70 00053157 g Startup NOTE ► If you have deactivated the autoplay function and the installation programme does not start automatically, start the installation programme by double-clicking the "autorun.exe" file in the main directory on the CD. WINDOWS VISTA/ WINDOWS 7 ► Execution of the "autorun.exe" programme under Windows Vista and Windows 7 must be confirmed manually. Click the "Run autorun.exe" icon. The main menu of the installation programme is displayed. A B A B – Select language German, English, French – Exit program Select your preferred language for installation by clicking one of the displayed languages (A). If you wish to cancel the installation, click the "Exit / Beenden / Terminer" button (B). NOTE ► The following examples are based on the German language version. 00053157 71 g Startup The main menu of the installation programme is displayed. A B C D E F A B C D E F – – – – – – Start installation of the configuration software Start installation of the surveillance software Display user manual Search for updated drivers Install Adobe Reader Return to the "Welcome" page Click the button (A) to start installing the configuration software. Click the button (B) to start the installing the surveillance software. The documentation for the surveillance software is in PDF format and is located on the programme and driver CD. Click the button (C) to display this user manual in PDF format. NOTE ► Adobe Reader is required to display the user manual in PDF format. If the Adobe Reader is not already installed on your computer, you can install from the CD. Click the button (E) for this purpose. Click the button (D) to download the latest software and firmware from the Hama website. Click the button (F) to return to the "Welcome" page. 72 00053157 g Startup Installing the configuration software Click the "Admin Tool" in the main menu of the installation programme to start installing. The setup wizard is loaded. NOTE ► Loading the setup wizard can take a few seconds. Please wait until the setup wizard has started. WINDOWS VISTA/ WINDOWS 7 ► Under Windows Vista and Windows 7, click "Continue" in the "User account control" dialogue". Click the "Next" button. You can enter the target folder for the software installation, click on the "Browse" to search for a folder or use the standard folder. Click "Next" to continue. 00053157 73 g Startup Select which additional tasks are to be executed during installation by ticking the corresponding box. Click "Next" to start installing. The install files are unpacked and the configuration software is installed onto your computer. Click the "Finish" button to complete the installation, exit the install programme and start the "IPCam Admin Utility" programme. 74 00053157 g Startup Establishing connection to the device NOTE ► The device can be configured via the LAN connection in its default delivery state. Connect the device to your local network as described in the section Connecting the camera to the network (LAN). Start the "IPCam Admin Utility" programme by double-clicking the icon on the desktop. The programme searches the network for appropriate devices. Appropriate devices detected in the network are listed in the main window of the programme. NOTE ► If the device is not recognised after about 1 minute, check the power supply and network connection to the device. The yellow network LED 4 must light up constantly. 00053157 75 g Startup IPCam Admin Utility The following activities can be executed here. Select the desired device from the list by clicking it with the left mouse button. D A B A B C D C – – – – Search Camera: refreshes the device list Browse Camera via Web: starts the user interface Configure Camera: configures the network and security settings Language selection NOTE ► If no device was selected, only "Update the device list" (A) is available. 76 00053157 g Startup Network and security settings Click the below. "Configure Camera" button (C) on the menu bar Enter the password. NOTE ► When logging in for the first time, enter 1234 into the password field for admin User. Click "OK". LAN settings Field Network type IP address 00053157 Remark Switch on the "DHCP" control if IP addresses in your network are managed by a DHCP server. Switch on the "Static IP address" if IP addresses in your network are statically assigned. Enter the static IP address of the device. The IP address must match the address space of your network. 77 g Startup Field Network mask Gateway DNS Web port Remark Enter the subnet mask here. Normally you should enter 255.255.255.0 here. Enter the IP address of the gateway/router here. Enter the IP address of the DNS server here. This IP address is normally the same as the IP address of the gateway. Enter the port number for the Http server here. The default setting for the http protocol is 80. Click the "OK" button to save new settings to the device. Security settings You can determine the camera name and the administrator password here. Field Camera name ID Confirm ID Remark Enter the desired name for the device here. This name is used for identifying the device within the network. Enter the user name that is required here to login to the user interface. Enter the ID once again to rule out typing errors. Click the "OK" button to save new settings to the device. 78 00053157 Operation and configuration g Operation and configuration Loading the user interface The device is operated and set via your web browser (Internet explorer, Firefox or similar). NOTE ► In order to be able to use all functions of the device, ActiveX components must also be installed. Installation of these ActiveX components is performed by the web browser if necessary. Some browsers (e.g. Firefox) do not allow the installation of ActiveX components for security reasons. Alternatives for most of the functions are provided for this browser. The user interface can be loaded in two ways: Starting via "IPCam Admin Utility" Load the user interface for the desired device by clicking the left mouse button over the corresponding entry in the list of devices. or Load the user interface for the desired device by clicking the left mouse button over the corresponding entry in the list of devices in the menu bar and clicking the icon NOTE ► The programme loads Internet Explorer with the stated URL of the selected device. Starting via the web browser Load your web browser and enter the URL of the device into the address line of the web browser. e.g.: http://192.168.2.3 Confirm entry by pressing the Enter key. NOTE ► If you did not assign 80 as port number for the device during configuration, you must state the changed port before loading. http://192.168.2.3:port number 00053157 79 g Operation and configuration Login After loading the user interface of the device, the login page appears in the web browser. A B A B – User name input field – User ID input field Enter your user name into field A. Enter your user ID into field B. NOTE ► Pay attention to upper and lower case characters. ► When logging in for the first time enter admin into the filed and the password 1234 into the field. 80 00053157 g Operation and configuration The user interface The user interface of the device is displayed after successful login. C A B The user interface is set up as follows: A B C – Language selection – Display area – Menu bar Language selection Select the desired language via the language bar A. NOTE ► Parts of the user interface may be deactivated depending on the user group of the logged-in user (administrator, user and guest). More information in user management can be found in the section The menu items - account. 00053157 81 g Operation and configuration Display area The corresponding content of the selected menu item will be displayed in the user interface display area. Details on the content of the display area can be found in the section The menu items. Menu bar The following settings can be made via the menu bar. NOTE ► The menu bar is only active if the user belongs to the Admini strator user group. The Camera menu item is always active for all other user groups. Menu item Camera LAN Current camera image according to the settings Configure network settings WLAN Configure wireless network settings Video Configure video settings Email / FTP Motion detection Schedule Configure email and FTP server settings Setting up motion detection Create schedule System Configure general settings Status Displaying device information Account Log 82 Function Manage user accounts Display activity protocols 00053157 g Operation and configuration The menu items Camera The current camera image is displayed in the display area of the user interface according to the settings. A B A – Control panel for camera settings B – Display area for the current camera image Field Video format Remark Selecting the video encoding format: MPEG4 or MJPEG (motion JPEG). MPEG4 mode supports motion detection. Click the input field and select a folder for storing the snapshot. Snapshot 00053157 Create a snapshot of the current video image by clicking the "Take snapshot" button. The snapshot is stored as a JPEG-file in the selected folder. 83 g Operation and configuration Field Remark Click the input field and select a folder for storing the video recording. Recording Automatic exposure Full screen Click the "Start recording" button to begin a video recording. Stop the video recording by clicking the "Stop recording" button. Activate or deactivate the automatic exposure. There are three levels of automatic exposure: dark, normal and bright. Select one of the three options to set the brightness of the image. Select "deactivate" to switch off automatic exposure. Click this button to display the image over the entire screen (full screen mode). Double-click the image to exit full screen mode. Click this button to activate the video zoom function: Digital zoom Switch on the "activate" control to set the digital zoom. You can select a zoom factor from 100% (no zoom) to 400%. The green square marks the area of the image to be enlarged. If you wish to move this area, click the square and drag it to the desired location. Click the button Adjust to window 84 to exit the digital zoom Click this button to adjust the image to the window size. 00053157 Operation and configuration g LAN Settings are made in this window for the wired LAN network connection to the device. LAN Field Network type IP address 00053157 Remark Switch on the "DHCP" control if IP addresses in your network are managed by a DHCP server. Switch on the "Static IP address" if IP addresses in your network are statically assigned. Enter the static IP address of the device. The IP address must match the address space of your network. Subnet mask Enter the subnet mask here. Normally you should enter 255.255.255.0 here. Gateway Enter the IP address of the gateway/router here. Primary DNS Enter the IP address of the DNS server here. This IP address is normally the same as the IP address of the gateway. Secondary DNS Enter the IP address of a backup DNS server here. If the primary DNS server is not available, the device will then use this address. 85 g Operation and configuration Field Remark AV control port Enter the port number for video transfer. If a firewall is present in your network, you must enable the computer in the Internet to access the port number of the IP address of the device, otherwise it will not be possible to display the videos in the Internet. Web port Enter the port number for the Http server here. The default setting for the http protocol is 80. Click the "Use" button to save the new settings to the device. NOTE ► When changes to the network settings are made, data connection to the camera can be interrupted. In this case, restart the user interface. RTSP Settings are made here for the Real-Time Streaming Protocol. Field Activate RTSP RTSP port RTSP path RTP port space Remark Select "activate" to switch on the RTSP function and "deactivate" to switch it off. Enter the port number for the RTSP here. The default setting is 554. Enter the path for the RTSP stream here. Enter the port space for the RTP. The default setting is 50000 to 60000. Click the "Use" button to save the new settings to the device. 86 00053157 Operation and configuration g Dynamic DNS If your provider has not issued a fixed IP address, you can set up remote access to the device via an external service. Various providers exist that offer a dynamic DNS service. NOTE ► You will need a user account at dyndns.org (http://www. dyndns.org) before you can begin with the setup The following explains the settings for the dyndns.org provider. Field Remark Activate DDNS Select "activate" to switch on the dynamic DNS function and "deactivate" to switch it off. Provider Select the dynamic DNS Service provider here. Currently only dyndns.org is available. Host name User name ID Enter the the dynamic DNS host name here. Enter the corresponding user name for the DynDns account. Enter the corresponding password for the DynDns user account here. Enter the domain name for your DynDns user account here. Click the "Use" button to save the new settings to the device. 00053157 87 g Operation and configuration UPnP If the device in your home network environment is to be visible to all devices, the UPnP service must be activated. Field Activate UPnP Remark Select "activate" to switch on the UPnP service and "deactivate" to switch it off. Click the "Use" button to save the new settings to the device. NOTE ► The computers in your home network must be configured for network UPnP devices. Check under My Network Places-> Network tasks, whether "Hide icons for networked UPnP devices" is displayed. If not, select "Show icons for networked UPnP devices“ to display UPnP devices in your network places. LoginFree You can enter a file name here so that everyone can access the images captured by the device, who is familiar with the file name and its jpg extension. The jpg-image is stored on the web server of the camera and can subsequently be displayed via a browser. Field File name Remark Enter the file name here. If you don wish to use this function, leave the field empty. Click the "Use" button to save the new settings to the device. 88 00053157 Operation and configuration g WLAN Settings are made in this window for the WLAN network connection to the device. Field Self PinCode 00053157 Remark A random eight-digit PinCode is displayed here. If the router or access point that is used for establishing a connection supports the PinCode procedure, enter this code into the WPS configuration. 89 g Operation and configuration Field Remark If the router or access point that is used for establishing a connection supports the press button method: Configure by press button Click "Start PBC" and press the PBC button to connect to the router or access point. You can also press the Reset/WPS button 7 on the back of the device. Only press the button briefly. Pressing the Reset/WPS button longer than 5 seconds resets all device settings to factory default settings. Configure by PinCode If the access point has already generated an eight-digit PinCode, enter the code here and click "Start PIN" to connect. Wireless connection Select "Activate" if you wish to operate the device via WLAN and "Deactivate" to switch the function off. Network type Select the network connection type here: infrastructure for connection to a router/ access point. Adhoc for direct connection to another WLAN-capable device. 90 00053157 Operation and configuration Field g Remark Lists the available wireless networks within the range of the device. Click the "Update“ button to refresh the list. Available networks SSID Channel Click the wireless network in the "Connect" column that you wish to establish connection to. The SSID of the selected network is entered into the SSID field automatically. Enter the name of the wireless network here. This selection is only available for an ad hoc network. A fixed channel number between 1 and 13 must be set for the connection. Select the maximum speed for data transmission. Basic speed 00053157 It is recommend to select "Auto" so that the data transmission rate can be adjusted to the current signal strength and quality. Authentication The network authentication must match the settings for the network to which the connection is to be made. The following is available: none, open system, shared key system, WPA-PSK and WPA2-PSK. Encryption type Select the encryption type for your network from the list of available encryption methods. The following can be selected: none, WEP, TKIP and AES. 91 g Operation and configuration Field Remark Enter the WPA pre-shared key. WPA pre-shared key Length of the WEP key This field is only available if the authentication is WPA-PSK or WPA2-PSK. If the WEP code is a PASS PHRASE, you have to enter the code length here. 64-bit and 128-bit encryption are available. Select the format of the WEP key here. The following options are available: HEX and ASCII. WEP key format Default key WEP key 1-4 If you select "HEX" as WEP key format, you can only use the numbers from (0 to 9) and the letters a to f for the WEP key. If you select "ASCII" as WEP key format, you can use any alphanumeric characters. Select the code index 1-4 for WEP encryption. Enter the WEP key 1-4 of the selected network. NOTE ► Pay attention to upper and lower case characters. Click the "Use" button to save the new settings to the device. 92 00053157 Operation and configuration g Video You can change the video and audio settings here. Dual mode The device supports two video-encoding formats: MPEG4 and MJPEG. Field Default video format Remark Select the default video encoding format. The following options are available: MPEG4 and MJPEG. Click the "Use" button to save the new settings to the device. MPEG4 If you selected "MPEG4" as the standard video-encoding format,you set the parameters for the MPEG4 video encoder here. Field Video resolution 00053157 Remark Select the video resolution for the MPEG4 video encoder here. The following options are available: VGA, QVGA and QQVGA. VGA resolution displays more details than QVGA but requires more network bandwidth. 93 g Operation and configuration Field Remark Select the video quality here. There are two types: CBR (Constant Bit Rate) and VBR (Variable Bit Rate): Video quality CBR: video bit rate is fixed. You can select bit rate from the drop-down menu. Higher bit rates produce better video quality. If the network bandwidth is limited, select a lower bit rate. VBR: Video Bit Rate is available and based in the content to be transmitted. 5 settings are available. from “Lowest" "Highest". If you select "Lowest", the image quality is lower and less network bandwidth is necessary. Select "High" or "Highest" if a better video quality is required. Select the refresh rate for the MPEG4 video encoders here. Refresh rate A higher refresh rate provides more accurate information on movement but requires more network bandwidth. Click the "Use" button to save the new settings to the device. 94 00053157 Operation and configuration g MJPEG If you selected "MJPEG" as the standard video-encoding format, you can set the parameters for the MJPEG video encoder here. Field Video resolution Video quality Remark Select the video resolution for the MJPEG video encoder. The following options are available: VGA, QVGA and QQVGA. VGA resolution displays more details than QVGA but requires more network bandwidth. Select the video quality here. 5 settings are available. From “Lowest" "Highest". If you select "Lowest", the image quality is lower and less network bandwidth is necessary. Select "High" or "Highest" if a better video quality is required. Select the refresh rate for the MJPEG video encoder here. Refresh rate A higher refresh rate provides more accurate information on movement but requires more network bandwidth. Click the "Use" button to save the new settings to the device. 00053157 95 g Operation and configuration Email/FTP Email Enter the email settings for motion detection into this window. Field Email address of the recipient SMTP server SMTP port Email address of the sender. SSL SMTP authentication (if necessary) User name ID Remark Enter the email address of the recipient here. If there are several recipients, separate each email address with a semicolon. You can enter a maximum of 127 characters. Enter the name of the outgoing mail server here. Enter the port number of the outgoing mail server here (normally 25). Enter the email address of the sender here. Switch on the "activate" control if SSL encryption is necessary for the SMTP server. Switch on the "Deactivate“ control if the SMTP server does not support SSL. Switch on the "Activate" control if the SMTP server requires authentication before sending an email. Enter the SMTP user name for SMTP server authentication here. Enter the SMTP user ID for SMTP server authentication here. Click the "Use" button to save the new settings to the device. Then click "Send test email“ to test the email settings. 96 00053157 Operation and configuration g FTP configuration Enter the FTP settings for motion detection into this window. Field FTP server Remark Enter the FTP address of the server here. FTP port Enter the port number of the FTP server here (normally 21). User name Enter the user name for login to the FTP server here. ID Enter the user ID for login to the FTP server here. Remote folder Enter the path on the FTP server here, where files are to be saved. FTP mode Set the desired mode here. Further information can obtained from your FTP server provider. Passive mode Select "Activate" if you wish to use the passive mode for transmitting files. Select "Deactivate" if you do not wish to use passive mode. Click the "Use" button to save the new settings to the device. Then click "Upload test file" to est the FTP settings. 00053157 97 g Operation and configuration Motion detection Default settings The motion detection capability means that the device can also be used for security purposes. Any movement or changes in the surveillance area are detected and, depending on the settings, a video of the change/movement sent either by email or uploaded to an FTP server. Field Activate motion detection Remark Switch on the "Activate" control if motion detection is to be activated. Switch on the "Deactivate" control if motion detection is to be deactivated. Detection interval for the Select the time period in seconds benext event tween two motion detection events. Switch on this control if an email is to be Send snapshot via email sent when an event occurs. Email settings are made in the Email submenu. Email subject Send snapshot to FTP Enter a "Subject" for the email here in order to distinguish emails from this device from other emails. Switch on the "Yes" control to save the image onto the FTP server when an event occurs. The FTP server settings are performed in the FTP configuration submenu. Switch on the No" control to deactivate this function. Click the "Use" button to save the new settings to the device. 98 00053157 Operation and configuration g Setting the areas for motion detection If you only wish to be notified that an event was detected within a certain area of the acquired image, you can use this function. This device supports up to 3 areas for detecting motion. To set up the areas, mark "Region 1" (yellow square) and/or "Region 2" (green square) and/or "Region 3" (red square). Use the mouse to adjust the size and position of the squares to the image. Field Sensitivity Refresh Save 00053157 Remark You can set the sensitivity for detecting motion here. Click this button to update the image so that you can make real-time adjustments to the regions for motion detection. Click this button to save the current region settings. 99 g Operation and configuration Schedule The times for daily surveillance can be entered via a schedule. Field Activate FTP schedule Remark Switch on this control if the FTP schedule is to be activated. Select the time interval between two FTP image transmissions. Time interval The following options are available: an image is uploaded to the FTP server every x seconds/minutes/hours/days per frame. An image is uploaded to the FTP server every x frames/seconds. Select the overwrite mode for the files. File settings The following options are available: upload files with a file name according to date and time of the upload point. The older file is replaced by the specified file name when a file is uploaded. Activate email schedule Time interval Switch on this control if the email schedule is to be activated. Select the time interval between two emails. Click "Accept" to use and save the settings. 100 00053157 Operation and configuration g System Camera information You can determine the camera name and the administrator password here. Field Camera name ID Confirm ID Remark Enter the desired name for the device here. This name is used for identifying the device within the network. Enter the user name that is required here to login to the user interface. Enter the ID once again to rule out typing errors. Click the "Use" button to save the new settings to the device. 00053157 101 g Operation and configuration Date/time setting Make changes to the settings for time synchronisation here. Field Set date/time manually NTP server Time zone NTP server Activate time adjustment Remark Enter the desired date and time here. The format for the date is: YYYY/MM/DD The format for the time is: hh/mm/ss Switch this control on if the time on the device is to be synchronised with a time server. The device requires access to the Internet for this service. Select the desired time zone here. Enter the IP address or the host name of the NTP server here. Switch on the "Yes" control if summertime applies to your residence. If not, switch on the "No" control. Click the "Use" button to save the new settings to the device. Click the "Synchronise with PC time" if the time is to be synchronised with the connected PC. 102 00053157 Operation and configuration g Utility programmes On this page you can update the firmware and the user interface of the device, delete all settings, restart the device and switch the LEDs on or off. Update firmware Field Update firmware Remark Enter the path and file name (.bin) of the firmware here. NOTE ► Click "Search..." to search for the file. CAUTION Incorrect operation during firmware updating can render the device useless! Please observe the following notes to avoid rendering the device useless during a firmware update. ► Ensure that the firmware file matches the device. If in doubt, consult Hama product support. ► Before beginning a firmware update, establish connection to the device via a cable if there is danger of loss of WLAN connection during data transmission. ► The device must not be disconnected from the mains supply during updating. Check the file specifications again and begin updating by pressing the "Update" button. 00053157 103 g Operation and configuration Rest to default settings Click the "Reset" button to reset to factory default settings. NOTE ► All settings are lost when the device is reset and the device returns to its default factory settings! ► The user interface must also be reloaded after the device is reset. Restart device Click the "Restart" button to restart. NOTE ► The user interface must also be reloaded after the device has completed restarting. LED setting Switch off the device LEDs by pressing the "Switch off LED" button. NOTE ► Switching off the LEDs makes sense if you do not wish others to see that data is being transmitted. ► Click the "Switch on LED" button to switch them on . 104 00053157 Operation and configuration g Status This menu contains all information on this device such as firmware version, runtime, date/time and network information. Account User access to the device user interface can be managed in this window. Up to 16 users can be entered. Field User ID Confirm ID Authority 00053157 Remark Enter the name of the user into this window. Enter the corresponding ID here, Repeat the ID here. Select "User" so that this user can change the settings of the device. If you select "Guest", the user will only see the image. 105 g Operation and configuration Click the "Add" button to add a new user with the corresponding specifications. Click the "Change" button to change the specifications of an existing user. Click the "Remove" button to remove an existing user from the list. Log All device activity is logged. The system log file is displayed in the Log menu. Click "Update" to update the list. 106 00053157 Operation and configuration g Factory settings The device has the following configuration on delivery and after it is reset: Field IP address Subnet mask Gateway 192.168.2.3 255.255.255.0 Is assigned dynamically DHCP Deactivated DDNS Deactivated Administrator name Administrator ID 00053157 Remark admin <1234> 107 g Troubleshooting Troubleshooting Troubleshooting chart Before sending the device to after-sales service, use the following table to check whether you can remedy the problem yourself. Fault Possible cause Remedy Make sure the mains Mains adapter not adapter is plugged into the connected correctly mains socket and correctly connected to the device. No voltage from the Check the fuses. mains socket The device is not recognised by the "IPCam Admin Utility" programme Device is defective Contact customer service. LAN cable not connected correctly Check that the RJ-45 network cable is correctly connected. No connection to the hub/router The green . network LED 4 must light up constantly. Wrong IP address Make sure that the IP address matches the address space of your network . Wrong subnet mask Make sure that the subnet mask matches the address space of your network . Wrong WLAN settings Establish a connection to your device via LAN first of all. Set up the WLAN connection afterwards. NOTE ► If you cannot resolve the problem with the steps described above, please contact customer service. 108 00053157 g Troubleshooting Frequently asked questions (FAQs) Question: I have forgotten the administrator ID. What can I do? Answer: You have to reset the device to the factory default settings. Press the Reset/WPS button 7 on the device for at least 10 seconds. You can then use the standard user name admin and the ID 1234 to login again. NOTE ► All settings are lost when the device is reset and the device returns to its default factory settings! Question: How do I find out what the IP address and subnet mask of my computer is? Answer: Open Control Panel -> Network connections, open the context menu by right-clicking the Status menu item and select the corresponding network connection. Click the Support tab. The IP address and subnet mask of your computer are displayed. Question: Connection to the device is established. Why is the camera image not visible? Answer: If you are using Internet Explorer, the ActiveX components for displaying the image must be installed. Reinstall the "IPCam Admin Utility" programme if the ActiveX components are missing. Select ActiveX mode during login with the Internet Explorer. If you are using another browser, it is possible that ActiveX components cannot be used for security reasons. Select the the server push mode for the browser during login. 00053157 109 g Troubleshooting Question: The images stutter when displayed. Why is that? Answer: The following may be the cause: ● Insufficient network bandwidth. ● WLAN connection is poor. ● Computer or graphic card performance is insufficient. ● The number of users simultaneously accessing the camera is too high. Question: Access to the device is not possible via the Internet. What is the problem? Answer: The following may be the cause: ● The port number is being blocked by the firewall or antivirus software. ● Access via the Internet has been incorrectly configured. Question: Why are some of the programme functions not possible with some browsers? Answer: Some browsers doe not allow the use of ActiveX components. The functionality of the browser must be extended for ActiveX to use all of the programme functions. In this case, use Internet Explorer. 110 00053157 Appendix g Appendix Notes on disposal CAUTION Do not dispose of the device as normal household waste. Observe the disposal instructions in the user manual appendix. Recycling the packaging material for further use saves raw materials and reduces the waste. When no longer required, dispose of the packaging materials in accordance with the local regulations. NOTE ► Keep the packaging during the warranty period in order to be able to pack the device properly in the event of a warranty claim. Support and contact information For faulty products: In the event of product complaints, please contact your retailer or Hama product support. Internet/World Wide Web: Product support, new drivers or product information can be obtained from www.hama.com Support hotline – Hama product support: Tel. +49 (0) 9091 / 502-115 Fax +49 (0) 9091 / 502-272 Email: [email protected] 00053157 111 g Appendix Technical data Memory Flash 4 MB Flash RAM 32 MB SDRAM Image sensor/lens Image sensor 0.3 megapixel CMOS sensor Lens Fixed focus, F=2.8 Video Compression method JPEG and MPEG4 Refresh rate VGA,QVGA, QQVGA Communication Ethernet LAN 1 x 10/100 Mbps, RJ-45 Protocols supported HTTP, FTP, TCP/IP, SMTP, DHCP, DDNS, UPnP WLAN standard Encryption IEEE 802.11b (11 Mbps) IEEE 802.11n (150 Mbps) WEP / WPA / WPA2 Dimensions/weight Dimensions (L x H x W) 60 x 92 x 22 mm Weight (including accessories) approx. 195 g Electrical ratings Power supply 5 VDC, 1.0 A max. Power consumption 5 W (typical) Environmental conditions 112 Operating temperature range 0 ... 40 °C relative humidity 10 ... 90 % (non-condensing) 00053157 Appendix 00053157 g 113 d Hinweis zum Umweltschutz: Ab dem Zeitpunkt der Umsetzung der europäischen Richtlinie 2002/96/EG und 2006/66/EG in nationales Recht gilt folgendes: Elektrische und elektronische Altgeräte sowie Batterien dürfen nicht mit dem Hausmüll entsorgt werden. Der Verbraucher ist gesetzlich verpflichtet, elektrische und elektronische Geräte sowie Batterien am Ende ihrer Lebensdauer an den dafür eingerichteten, öffentlichen Sammelstellen oder an die Verkaufsstelle zurückzugeben. Einzelheiten dazu regelt das jeweilige Landesrecht. Das Symbol auf dem Produkt der Gebrauchsanleitung oder der Verpackung weist auf diese Bestimmungen hin. Mit der Wiederverwertung, der stofflichen Verwertung oder anderer Formen der Verwertung von Altgeräten/Batterien leisten Sie einen wichtigen Beitrag zum Schutz unserer Umwelt. g Note on environmental protection: After the implementation of the European Directive 2002/96/EU and 2006/66/EU in the national legal system, the following applies: Electric and electronic devices as well as batteries must not be disposed of with household waste. Consumers are obliged by law to return electrical and electronic devices as well as batteries at the end of their service lives to the public collecting points set up for this purpose or point of sale. Details to this are defined by the national law of the respective country. This symbol on the product, the instruction manual or the package indicates that a product is subject to these regulations. By recycling, reusing the materials or other forms of utilising old devices/Batteries, you are making an important contribution to protecting our environment. f Remarques concernant la protection de l’environnement: Conformément à la directive européenne 2002/96/CE et 2006/66/CE, et afin d‘atteindre un certain nombre d‘objectifs en matière de protection de l‘environnement, les règles suivantes doivent être appliquées: Les appareils électriques et électroniques ainsi que les batteries ne doivent pas être éliminés avec les déchets ménagers. Le pictogramme “picto” présent sur le produit, son manuel d‘utilisation ou son emballage indique que le produit est soumis à cette réglementation. Le consommateur doit retourner le produit/la batterie usager aux points de collecte prévus à cet effet. Il peut aussi le remettre à un revendeur. En permettant enfin le recyclage des produits ainsi que les batteries, le consommateur contribuera à la protection de notre environnement. C‘est un acte écologique. e Nota sobre la protección medioambiental: Después de la puesta en marcha de la directiva Europea 2002/96/EU y 2006/66/EU en el sistema legislativo nacional, se aplicara lo siguiente: Los aparatos eléctricos y electrónicos, así como las baterías, no se deben evacuar en la basura doméstica. El usuario está legalmente obligado a llevar los aparatos eléctricos y electrónicos, así como pilas y pilas recargables, al final de su vida útil a los puntos de recogida comunales o a devolverlos al lugar donde los adquirió. Los detalles quedaran definidos por la ley de cada país. El símbolo en el producto, en las instrucciones de uso o en el embalaje hace referencia a ello. Gracias al reciclaje, al reciclaje del material o a otras formas de reciclaje de aparatos/pilas usados, contribuye Usted de forma importante a la protección de nuestro medio ambiente. o Notitie aangaande de bescherming van het milieu: Ten gevolge van de invoering van de Europese Richtlijn 2002/96/EU en 2006/66/EU in het nationaal juridisch system, is het volgende van toepassing: Elektrische en elektronische apparatuur, zoals batterijen mag niet met het huisvuil weggegooid worden. Consumenten zijn wettelijk verplicht om electrische en elctronische apparaten zoals batterijen op het einde van gebruik in te dienen bij openbare verzamelplaatsen speciaal opgezet voor dit doeleinde of bij een verkooppunt. Verdere specificaties aangaande dit onderwerp zijn omschreven door de nationale wet van het betreffende land. Dit symbool op het product, de gebruiksaanwijzing of de verpakking duidt erop dat het product onderworpen is aan deze richtlijnen. Door te recycleren, hergebruiken van materialen of andere vormen van hergebruiken van oude toestellen/batterijen, levert u een grote bijdrage aan de bescherming van het mileu. i Informazioni per protezione ambientale: Dopo l’implementazione della Direttiva Europea 2002/96/EU e 2006/66/EU nel sistema legale nazionale, ci sono le seguenti applicazioni: Le apparecchiature elettriche ed elettroniche e le batterie non devono essere smaltite con i rifiuti domestici. I consumatori sono obbligati dalla legge a restituire I dispositivi elettrici ed elettronici e le batterie alla fine della loro vita utile ai punti di raccolta pubblici preposti per questo scopo o nei punti vendita. Dettagli di quanto riportato sono definiti dalle leggi nazionali di ogni stato. Questo simbolo sul prodotto, sul manuale d’istruzioni o sull’imballo indicano che questo prodotto è soggetto a queste regole. Riciclando, ri-utilizzando i materiali o utilizzando sotto altra forma i vecchi prodotti/le batterie, darete un importante contributo alla protezione dell’ambiente. k Υπόδειξη σχετικά με την προστασία περιβάλλοντος: Από τη στιγμή που η Ευρωπαϊκή Οδηγία 2002/96/EΕ και 2006/66/EE ενσωματώνεται στο εθνικό δίκαιο ισχύουν τα εξής: Οι ηλεκτρικές και οι ηλεκτρονικές συσκευές καθώς και οι μπαταρίες δεν επιτρέπεται να πετιούνται στα οικιακά απορρίμματα. Οι καταναλωτές υποχρεούνται από τον νόμο να επιστρέφουν τις ηλεκτρικές και ηλεκτρονικές συσκευές καθώς και τις μπαταρίες στο τέλος της ζωής τους στα δημόσια σημεία περισυλλογής που έχουν δημιουργηθεί γι’ αυτό το σκοπό ή στα σημεία πώλησης. Οι λεπτομέρειες ρυθμίζονται στη σχετική νομοθεσία. Το σύμβολο πάνω στο προϊόν, στο εγχειρίδιο χρήσης ή στη συσκευασία παραπέμπει σε αυτές τις διατάξεις. Με την ανακύκλωση, επαναχρησιμοποίηση των υλικών ή με άλλες μορφές χρησιμοποίησης παλιών συσκευών / Μπαταριών συνεισφέρετε σημαντικά στην προστασία του περιβάλλοντος. Στη Γερμανία ισχύουν αντίστοιχα οι παραπάνω κανόνες απόρριψης σύμφωνα με τον κανονισμό για μπαταρίες και συσσωρευτές. s Not om miljöskydd: Efter implementeringen av EU direktiv 2002/96/EU och 2006/66/EU i den nationella lagstiftningen, gäller följande: Elektriska och elektroniska apparater samt batterier får inte kastas i hushållssoporna. Konsumenter är skyldiga att återlämna elektriska och elektroniska apparater samt batterier vid slutet av dess livslängd till, för detta ändamål, offentliga uppsamlingsplatser. Detaljer för detta definieras via den nationella lagstiftningen i respektive land. Denna symbol på produkten, instruktionsmanualen eller på förpackningen indikerar att produkten innefattas av denna bestämmelse. Genom återvinning och återanvändning av material/batterier bidrar du till att skydda miljön och din omgivning. m Ympäristönsuojelua koskeva ohje: Siitä lähtien, kun Euroopan unionin direktiivi 2002/96/EU ja 2006/66/EU otetaan käyttöön kansallisessa lainsäädännössä, pätevät seuraavat määräykset: Sähkö- ja elektroniikkalaitteita ja paristoja ei saa hävittää talousjätteen mukana. Kuluttajalla on lain mukaan velvollisuus toimittaa sähkö- ja elektroniikkalaitteet niiden käyttöiän päätyttyä niille varattuihin julkisiin keräyspisteisiin tai palauttaa ne myyntipaikkaan. Tähän liittyvistä yksityiskohdista säädetään kulloisenkin osavaltion laissa. Näistä määräyksistä mainitaan myös tuotteen symbolissa, käyttöohjeessa tai pakkauksessa. Uudelleenkäytöllä, materiaalien/paristoja uudelleenkäytöllä tai muilla vanhojen laitteiden uudelleenkäyttötavoilla on tärkeä vaikutus yhteisen ympäristömme suojelussa. 996350 Version 1.5 q Wskazówki dotyczące ochrony środowiska: Od czasu wprowadzenia europejskiej dyrektywy 2002/96/EU i 2006/66/EU do prawa narodowego obowiązują następujące ustalenia: Urządzeń elektrycznych, elektronicznych oraz baterii jednorazowych nie należy wyrzucać razem z codziennymi odpadami domowymi! Użytkownik zobowiązany prawnie do odniesienia zepsutych, zniszczonych lub niepotrzebnych urządzeń elektrycznych i elektronicznych do punktu zbiórki lub do sprzedawcy. Szczegółowe kwestie regulują przepisy prawne danego kraju. Informuje o tym symbol przekreślonego kosza umieszczony na opakowaniu. Segregując odpady pomagasz chronić środowisko! h Környezetvédelmi tudnivalók: Az európai irányelvek 2002/96/EU és 2006/66/EU ajánlása szerint, a megjelölt időponttól kezdve, minden EU-s tagállamban érvényesek a következők: Az elektromos és elektronikai készülékeket és az elemeket nem szabad a háztartási szemétbe dobni! A leselejtezett elektromos és elektronikus készülékeket és elemeket, akkumulátorokat nem szabad a háztartási szemétbe dobni. Az elhasznált és működésképtelen elektromos és elektronikus készülékek gyűjtésére törvényi előírás kötelez mindenkit, ezért azokat el kell szállítani egy kijelölt gyűjtő helyre vagy visszavinni a vásárlás helyére. A termék csomagolásán feltüntetett szimbólum egyértelmű jelzést ad erre vonatkozóan a felhasználónak. A régi készülékek begyűjtése, visszaváltása vagy bármilyen formában történő újra hasznosítása közös hozzájárulás környezetünk védelméhez. c Ochrana životního prostředí: Evropská směrnice 2002/96/EG a 2006/66/EU ustanovujete následující: Elektrická a elektronická zařízení stejně jako baterie nepatří do domovního odpadu. Spotřebitel se zavazuje odevzdat všechna zařízení a baterie po uplynutí jejich životnosti do příslušných sběren. Podrobnosti stanoví zákon příšlušné země. Symbol na produktu, návod k obsluze nebo balení na toto poukazuje. Recyklací a jinými způsoby zužitkování přispíváte k ochraně životního prostředí. v Ochrana životného prostredia: Európska smernica 2002/96/EU a 2006/66/EU stanovuje: Elektrické a elektronické zariadenia, rovnako ako batérie sa nesmú vyhadzovať do domáceho odpadu. Spotrebiteľ je zo zákona povinný zlikvidovať elektrické a elektronické zariadenia, rovnako ako batérie na miesta k tomu určené. Symbolizuje to obrázok v návode na použitie, alebo na balení výrobku. Opätovným zužitkovaním alebo inou formou recyklácie starých zariadení/batérií prispievate k ochrane životného prostredia. p Nota em Protecção Ambiental: Após a implementação da directiva comunitária 2002/96/EU e 2006/66/EU no sistema legal nacional, o seguinte aplica-se: Os aparelhos eléctricos e electrónicos, bem como baterias, não podem ser eliminados juntamente com o lixo doméstico. Consumidores estão obrigados por lei a colocar os aparelhos eléctricos e electrónicos, bem como baterias, sem uso em locais públicos específicos para este efeito ou no ponto de venda. Os detalhes para este processo são definidos por lei pelos respectivos países. Este símbolo no produto, o manual de instruções ou a embalagem indicam que o produto está sujeito a estes regulamentos. Reciclando, reutilizando os materiais dos seus velhos aparelhos/baterias, esta a fazer uma enorme contribuição para a protecção do ambiente. u Охрана окружающей среды: С момента перехода национального законодательства на европейские нормативы 2002/96/EU и 2006/66/EU действительно следующее: Электрические и электронные приборы, а также батареи запрещается утилизировать с обычным мусором. Потребитель, согласно закону, обязан утилизировать электрические и электронные приборы, а также батареи и аккумуляторы после их использования в специально предназначенных для этого пунктах сбора, либо в пунктах продажи. Детальная регламентация этих требований осуществляется соответствующим местным законодательством. Необходимость соблюдения данных предписаний обозначается особым значком на изделии, инструкции по эксплуатации или упаковке. При переработке, повторном использовании материалов или при другой форме утилизации бывших в употреблении приборов Вы помогаете охране окружающей среды. В соответствии с предписаниями по обращению с батареями, в Германии вышеназванные нормативы действуют для утилизации батарей и аккумуляторов. t Çevre koruma uyarısı: Avrupa Birliği Direktifi 2002/96/EU ve 2006/66/EU ulusal yasal uygulamalar için de geçerli olduğu tarihten itibaren: Elektrikli ve elektronik cihazlarla piller normal evsel çöpe atılmamalıdır. Tüketiciler için, artık çalışmayan elektrikli ve elektronik cihazları piller, kamuya ait toplama yerlerine götürme veya satın alındıkları yerlere geri verme yasal bir zorunluluktur. Bu konu ile ilgili ayrıntılar ulusal yasalarla düzenlenmektedir. Ürün üzerinde, kullanma kılavuzunda veya ambalajda bulunan bu sembol tüketiciyi bu konuda uyarır. Eski cihazların geri kazanımı, yapıldıkları malzemelerin değerlendirilmesi veya diğer değerlendirme şekilleri ile, çevre korumasına önemli bir katkıda bulunursunuz. Yukarıda adı geçen atık toplama kuralları Almanya’da piller ve aküler için de geçerlidir. r Instrucţiuni pentru protecţia mediului înconjurător: Din momentul aplicării directivelor europene 2002/96/UE în dreptul național sunt valabile următoarele: Aparatele electrice şi electronice nu pot fi salubrizate cu gunoiul menajer. Consumatorul este obigat conform legii să predea aparatele electrice și electronice la sfârșitul duratei de utilizare la locurile de colectare publice sau înapoi de unde au fost cumpărate. Detaliile sunt reglementate de către legislaţia țării respective. Simbolul de pe produs, în instrucţiunile de utilizare sau pe ambalaj indică aceste reglementări. Prin reciclarea, revalorificarea materialelor sau alte forme de valorificare a aparatelor scoase din uz aduceți o contribuție importată la protecția mediului nostru înconjurător. j Anvisninger til beskyttelse af miljøet: Fra og med indførelsen af EU-direktiverne 2002/96/EF og 2006/66/EF i national ret gælder følgende: Elektrisk og elektronisk udstyr samt batterier må ikke bortskaffes sammen med almindeligt husholdningsaffald. Forbrugeren er lovmæssigt forpligtet til at aflevere udtjent elektrisk og elektronisk udstyr samt batterier til dertil indrettede, offentlige indsamlingssteder eller til forhandleren. De nærmere bestemmelser vedr. dette fastlægges af lovgivningen i det pågældende land. Symbolet på produktet, brugsvejledningen eller emballagen henviser til disse bestemmelser. Ved genbrug, genvinding eller andre former for nyttiggørelse af udtjent udstyr/batterier giver du et vigtigt bidrag til beskyttelse af miljøet. n Informasjon om beskyttelse av miljøet: Fra tidspunktet for omsetning av de europeiske direktivene 2002/96/EF og 2006/66/EF i nasjonal rett gjelder følgende: Elektriske og elektroniske apparater og batterier må ikke deponeres sammen med husholdningssøppelet. Forbrukeren er lovmessig forpliktet til å levere elektriske og elektroniske apparater og batterier til de offentlige samlestedene eller tilbake til stedet hvor produktene ble kjøpt. Detaljer angående dette reguleres av hvert land. Symbolet på produktet, bruksanvisningen eller emballasjen henviser om disse bestemmelsene. Med resirkulering, gjenbruk av stoffer eller andre former av gjenbruk av gamle apparater/batterier bidrar du betydelig til å beskytte miljøet vårt. Dieses Gerät darf in Frankreich nur in geschlossenen Räumen verwendet werden! Hiermit erklärt Hama GmbH & Co. KG, dass sich dieses Gerät in Übereinstimmung mit den grundlegenden Anforderungen und den übrigen einschlägigen Bestimmungen der Richtlinie 1999/5/EG befindet. Die Konformitätserklärung nach der R&TTE Richtlinie 99/5/EG finden Sie unter www.hama.com In France this device is only to be operated indoors! Hama GmbH & Co. KG hereby declares that this device is in compliance with the basic requirements and other relevant regulations of the 1999/5/EC guideline. You will find the declaration of conformity with R&TTE directive 99/5/EC on the internet at www.hama.com h Ez a készülék csak zárt helyiségben működtetethető Franciaországban! A Hama GmbH & Co. KG ezúton kijelenti, hogy a jelen készülék összhangban van az 1999/5/EK irányelv alapvető követelményeivel és az egyéb vonatkozó rendelkezésekkel. A 99/5/EK R&TTE irányelv szerinti megfelelőségi nyilatkozatot a www.hama.com címen találja meg. c L´utilisation en France de cet appareil est autorisée exclusivement dans des locaux fermés. La société Hama GmbH & Co. KG certifie que cet appareil est conforme aux exigences de base et aux dispositions de la directive 1999/5/EC en vigueur. Vous trouverez la déclaration de conformité à la directive R&TTE 99/5/CE sur www.hama.com En Francia este aparato solo puede utilizarse in espacios cerrados. Mediante la presente, Hama GmbH &Co. KG declara que este aparato cumple con los requisitos básicos y los demás reglamentos relevantes de la directiva 1999/5/CE. La declaración de conformidad según la directiva R&TTE 99/5/CE la encontrará en www.hama.com v o Dit toestel mag in Frankrijk alleen in droge en gesloten ruimtes gebruikt worden! Hiermee verklaart Hama GmbH & Co. KG, dat dit apparaat voldoet aan de vereisten en de overige relevante voorschriften van de richtlijn 1999/5/EG. De verklaring van overeenstemming conform de R&TTErichtlijn 99/5/EG vindt u op internet onder www.hama.com u i In Francia, questo apparechio può essere utilizzato soltanto in locali chiusi! Hama GmbH & Co. KG dichiara che questo apparecchio soddisfa i requisiti fondamentali ed è conforme alle norme vigenti della direttiva 1999/5/CE. La dichiarazione di conformità secondo la direttiva R&TTE 99/5/CE è disponibile sul sito www.hama.com Στη Γαλλία αυτή η συσκευή επιτρέπεται να λειτουργεί μόνο σε κλειστούς χώρους. Η εταιρία Hama GmbH & Co. KG δηλώνει πως η συσκευή αυτή εκπληρώνει τις βασικές απαιτήσεις και τις λοιπές σχετικές διατάξεις της οδηγίας 1999/5/EK Τη δήλωση συμμόρφωσης σύμφωνα με την οδηγία R&TTE 99/5/ΕΚ θα τη βρείτε στη διεύθυνση www.hama.com I Frankrike får den här apparaten bara användas inomhus! Hama GmbH & Co. KG försäkrar härmed att den här apparaten överensstämmer med de grundläggande kraven och övriga relevanta bestämmelser i direktivet 1999/5/EG. Försäkran om överensstämmelse enligt R&TTE-direktivet 99/5/EG hittar du på www.hama.com t Toto zařízení smí být ve Francii provozováno jen v zuavřených místnostech! Tímto firma Hama GmbH & Co. KG potvrzuje, že tento přístroj odpovídá základním požadavkům a ostatním relevantním předpisům směrnice 1999/5/ES. Prohlášení o shodě podle směrnice R&TTE 99/5/ES najdete na internetových stránkách www.hama.com Toto ziriadenie smie byť vo Francúzsku prevádzkované len v uzavretých miestnostiach! Spoločnosť Hama GmbH & Co. KG týmto prehlasuje, že tento prístroj zodpovedá základným požiadavkám a ostatným relevantným ustanoveniam Smernice 1999/5/ES. Vyhlásenie o zhode podľa smernice R&TTE 99/5/ES si môžete pozrieť na adrese www.hama.com Em França, este aparelho apenas pode ser utilizado em espaços fechados! A Hama GmbH & Co. KG declara, deste modo, que este aparelho respeita as exigências básicas e restantes requisitos relevantes da directiva 1999/5/CE. Pode consultar a declaração de conformidade, segundo a directiva R&TTE 99/5/CE, em www.hama.com Во Франции эксплуатация изделия разрешается только в сухих, закрытых помещениях! Компания Hama GmbH & Co. KG настоящим подтверждает, что данное изделие полностью соответствует основным требованиям, а также предписаниям и положениям нормативов 1999/5/EG. Заявление о соответствии товара нормам R&TTE 99/5/ EG см. на вебузле www.hama.com Bu cihaz sadece Fransa‘da kuru ve kapalı mekanlarda çalıştırılmalıdır! Hama GmbH & Co. KG bu cihazın 1999/5/EC Direktifi’nin ilgili talimatlarına ve bu direktif tarafından istenen koşullara uygunluğunu beyan eder. R&TTE Direktifi 99/5/EC’ye gšre uygunluk beyanı için www.hama.com adresine bakınız. g f e k s m q p r Acest aparat poate fi utilizat în Franþa numai în încãperi închise! Hama GmbH & Co. KG, declară prin prezenta ca acest aparat este în conformitate cu cerinţele esenţiale şi celelalte hotărâri relevante ale Directivei 1999/5/EC. Declaraţia de conformitate conform Directivei R&TTE 99/5/EC o găsiţi în Internet la www.hama.com j Denne anordning kan bruges i Frankrig kun i lukkede rum! Hama GmbH & Co. KG erklærer hermed, at dette apparat er i overensstemmelse med de grundlæggende krav og de øvrige, relevante bestemmelser i direktiv 1999/5/EF. Overensstemmelseserklæringen i henhold til direktivet om radio og teleterminaludstyr 99/5/ EF kan du finde på www.hama.com I Frankrike får dette apparatet kun brukes i lukkede rom! Med dette erklærer Hama GmbH & Co. KG at dette apparatet er i overensstemmelse med grunnleggende krav og relevante bestemmelser i direktiv 1999/5/EF. Du finner samsvarserklæringen i henhold til R&TTE-direktiv 99/5/EF under www.hama.com n Laitetta saa Ranskassa käyttää vain suljetuissa tiloissa! Hama GmbH & Co. KG vakuuttaa täten, että tämä laite on direktiivin 1999/5/EY perusvaatimusten ja muiden oleellisten säännösten mukainen. Radio- ja telepäätelaitteita koskevan direktiivin 99/5/EY mukainen vaatimustenmukaisuusvakuutus löytyy osoitteesta www.hama.com Urządzenia można we Francji użytkować tylko w zamkniętych pomieszczeniach! Hama GmbH & Co. KG oświadcza niniejszym, że urządzenie to spełnia podstawowe wymagania i pozostałe właściwe postanowienia dyrektywy 1999/5/WE. Deklaracja zgodności wg dyrektywy 99/5WE dotyczącej urządzeń radiowych i telekomunikacyjnych dostępna jest na stronie www.hama.com Hama GmbH & Co KG D-86651 Monheim/Germany www.hama.com All listed brands are trademarks of the corresponding companies. Errors and omissions excepted, and subject to technical changes. Our general terms of delivery and payment are applied. 00053157/10.10 d