1
The Gridbus Grid Service Broker and Scheduler
(v.2.4) User Guide
Krishna Nadiminti, Srikumar Venugopal, Hussein Gibbins, TianChi Ma and Rajkumar Buyya
Grid Computing and Distributed Systems (GRIDS) Laboratory,
Department of Computer Science and Software Engineering,
The University of Melbourne, Australia
Email:{kna,srikumar,hag,tcma,raj}@cs.mu.oz.au
http://www.gridbus.org/broker
1
1
INTRODUCTION .............................................................................................................................. 3
1.1
Grid Computing ....................................................................................................................... 3
1.2
Resource Brokers ................................................................................................................... 3
1.3
Gridbus Broker ........................................................................................................................ 3
1.4
Gridbus Broker Architecture .................................................................................................... 6
1.5
Broker Usage Scenarios ......................................................................................................... 7
1.6
Sample Applications of the Broker .......................................................................................... 7
2
INSTALLATION ................................................................................................................................ 7
2.1
Requirements.......................................................................................................................... 7
2.2
Installation process ................................................................................................................. 9
2.3
Recompiling the broker with ant ............................................................................................ 10
3
GETTING STARTED USING THE BROKER ................................................................................. 10
3.1
Command Line Interface (CLI - running the broker as a stand-alone program) .................... 10
3.2
Application Programming Interface (API) .............................................................................. 11
4
END-USER GUIDE......................................................................................................................... 12
4.1
Using the broker on the CLI with various flags ...................................................................... 12
4.2
The Broker input, output and configuration files .................................................................... 12
4.3
The Broker.properties configuration files............................................................................... 14
4.4
Logging with log4j ................................................................................................................. 16
4.5
The XPML application description file format ........................................................................ 17
4.6
The Resource description file................................................................................................ 20
4.7
How to set up persistence..................................................................................................... 24
5
PROGRAMMER'S GUIDE.............................................................................................................. 25
5.1
Design and Implementation................................................................................................... 25
5.2
Using the broker in your own applications............................................................................. 27
5.3
The Broker Properties Object................................................................................................ 27
5.4
Creating a Farming Engine ................................................................................................... 27
5.5
Setting up Jobs and Servers ................................................................................................. 28
5.6
Creating Jobs ........................................................................................................................ 29
5.7
Creating Server Instances..................................................................................................... 30
5.8
Invoking the Scheduler.......................................................................................................... 30
5.9
Using the broker in a web portal (portlets) ............................................................................ 32
5.10
What are portlets?................................................................................................................. 32
5.11
Why portlets are good for us ................................................................................................. 32
5.12
The Gridbus Broker portlets .................................................................................................. 32
5.13
Pre-requisites ........................................................................................................................ 33
5.14
Deploying and installing the broker portlets (with Gridsphere) .............................................. 33
5.15
The MyProxy Portlet.............................................................................................................. 36
5.16
The Gridbus Broker QoS Portlet ........................................................................................... 36
5.17
The Gridbus Broker Driver Portlet ......................................................................................... 37
5.18
The Gridbus Broker Resources Portlet ................................................................................. 39
5.19
The Gridbus Broker Monitor Portlet....................................................................................... 40
5.20
The Gridbus Broker Results Portlet....................................................................................... 43
5.21
All Done!................................................................................................................................ 44
6
MODIFYING OR ENHANCING THE BROKER CODE TO SUIT YOUR NEEDS ........................... 44
6.1
Application Interfaces / Application Description Interpreter APIs........................................... 45
6.2
Porting the broker for different low-level middleware ............................................................ 48
6.3
Schedulers ............................................................................................................................ 50
6.4
Persistence providers............................................................................................................ 50
6.5
Authentication mechanisms .................................................................................................. 51
6.6
Dispatchers ........................................................................................................................... 51
7
TROUBLESHOOTING.................................................................................................................... 52
8
KNOWN ISSUES / LIMITATIONS .................................................................................................. 53
9
FUTURE DEVELOPMENT PLANS ................................................................................................ 53
10
CONCLUSION AND ACKNOWLEDGMENTS ........................................................................... 54
REFERENCES......................................................................................................................................... 54
APPENDIX I ............................................................................................................................................. 56
2
1
INTRODUCTION
1.1
Grid Computing
A "Grid" is a type of parallel and distributed system that enables the sharing, selection, and
aggregation of geographically distributed "autonomous" resources dynamically at runtime
depending on their availability, capability, performance, cost, and users' quality-of-service
requirements. It should be noted that Grids aim at exploiting synergies that result from
cooperation - ability to share and aggregate distributed computational capabilities and deliver
them as service.
The next generation of scientific experiments and studies, popularly called as e-Science, is
carried out by large collaborations of researchers distributed around the world engaged in
analysis of huge collections of data generated by scientific instruments. Grid computing has
emerged as an enabler for e-Science as it permits the creation of virtual organizations that bring
together communities with common objectives. Within a community, data collections are stored or
replicated on distributed resources to enhance storage capability or efficiency of access. In such
an environment, scientists need to have the ability to carry out their studies by transparently
accessing distributed data and computational resources. This is where the concept of resource
brokers comes into picture.
1.2
Resource Brokers
A Resource on a grid could be any entity that provides access to a service. This could range from
Compute servers to databases, scientific instruments, applications and the like. In a
heterogeneous environment like a grid, resources are generally owned by different people,
communities or organizations with varied administration policies, and capabilities. Naturally
obtaining and managing access to these resources is not a simple task. Resource Brokers aim to
simplify this process by providing an abstraction layer to users who just want to get their work
done. In the field of Grids and distributed systems, resource brokers are software components
that let users access heterogeneous resources transparently, without having to worry about
availability, access methods, security issues and other policies. The Gridbus resource broker is a
resource broker designed with the aim of solving these issues in a simple way.
1.3
Gridbus Broker
The Gridbus broker is designed to support both computational and data grid applications. For
example, it has been used to support composition and deployment of neuroscience (computeintensive) applications and High Energy Physics (Belle) Data Grid applications on Global Grids.
The architecture of the broker has emphasis on simplicity, extensibility and platform
independence. It is implemented in Java and provides transparent access to grid nodes running
various middleware. The main design principles of the broker include:
Assume Nothing about the environment
No assumptions are made anywhere in the Broker code as to what to expect from the Grid
resource except for one - that the resource provides at least one way of submitting a job and if
running a flavour of Unix will provide at least a POSIX shell. Also, no assumption is made about
resource availability throughout an execution. The implications of this principle have a huge
impact throughout the broker such as
o The broker has no close integration with any of the middleware it supports. It uses
the minimum set of services that are required to run a job on a resource supported by
the middleware. The advantages of this are:
3
o
o
In a Grid with multiple resources configured differently, the broker tries to
make use of every resource possible by not imposing a particular
configuration requirement. For example, in the case of Globus 2.4, all is
required is that the GRAM service be set up properly on the resource.
The broker can run jobs on resources with different middleware at the
same time.
The broker need not be refactored if there is a new version of the
middleware.
The broker is able to handle gracefully jobs and resources failing throughout an
execution. The job wrapper and job monitor code is written to handle every failure
status possible. The scheduler does not fail if a resource drops out suddenly.
The failure of the broker itself is taken care of by the recovery module if persistence
has been configured.
Client-centric design
The scheduler has just one target: that is to satisfy the users' requirements especially if the
deadline and budget are supplied. Even in the absence of these, the scheduler strives to get the
jobs done in the quickest way possible. Thus, resources are evaluated by the scheduler
depending on how fast or slow they are executing the jobs submitted by the broker. In keeping
with Principle 1, the broker also does not depend on any metrics supplied by the resource - it
does its own monitoring.
Extensibility is the key
In Grid environments, transient behaviour is not only a feature of the resources but also of the
middleware itself. Rapid developments in this still-evolving field have meant that middleware goes
through many versions and unfortunately, interface changes are a norm rather than the
exception. Also, changing requirements of Grid users require that the broker itself be flexible
enough for adding new features or extending old ones. Thus, every possible care has been taken
to keep the design modular and clean. The advantages due to this principle:
o Extending broker to support new middleware is a zip – Requires implementation of
only three interfaces. (For more details refer to Programming section)
o Getting broker to recognize the new information sources is also easy
o The differences in middleware are invisible to the upper layers such as the scheduler
and vice versa. Thus any changes made in one part of the code remain limited to that
section and are immediately applicable. For example, after adding a new middleware,
the scheduler is immediately able to use any resource using that middleware.
o XPML is extensible. Adding any new constructs is easy, using the same reflection
framework (see Programming Section). You could also do away with XPML
altogether and implement your own favourite interface to describe applications.
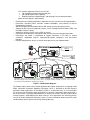
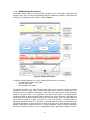
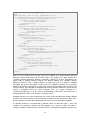
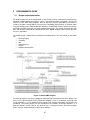
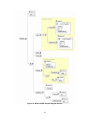
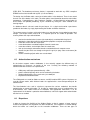
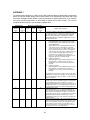
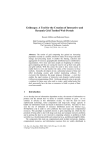
Figure 1 shows the block diagram of the broker. The main features of the Gridbus Broker
(version 2.4) are:
o Discovery of resources on the grid
o Transparent Access to computational resources running middleware such as:
Globus 2.4
Globus 3.2 (pre-WS)
Globus 4.0
Alchemi (1.0)
Unicore 4.1
XGrid v.1.0
o And queuing systems such as
Condor 6.6.9
OpenPBS 2.3.
Sun N1 Grid Engine 6 (SGE)
4
This includes support for all basic services like:
Job scheduling and execution for batch jobs
Job monitoring and status reporting
Gathering output of completed jobs, and directing it to user-defined locations.
[Note: Unicore support is experimental]
o
o
o
o
o
o
o
o
Economy based scheduling with built-in algorithms for cost, time and cost-time optimizations.
Data-aware scheduling which considers network bandwidths, and proximity of data to
Computational resources
XML-based application description format, XML-based resource description format
Support for data sources managed by systems such as Storage Resource Broker (SRB), and
the Globus Replica Catalog.
Support for queuing systems such as PBS on clusters
Persistence to enable failure management and recovery of an executing grid application
Extensibility: the broker is engineered to support extensions in the form of custom
schedulers, middleware plug-ins, application-description interpreters, and persistence
providers.
Platform independence, which is a natural consequence of a java implementation.
Home Node/Portal
Gridbus
Broker
Credential Repository
MyProxy
batch()
fork()
-PBS
-Condor
-SGE
-Alchemi
-XGrid
Data Catalog
Alchemi
Globus
Data Store
Job manager
Unicore
Access Technology
fork()
batch()
-PBS
-Condor
-SGE
SRB
Gridbus
agent
Grid FTP
Gateway
SSH
fork()
batch()
-PBS
-Condor
-SGE
-XGrid
Gridbus
agent
The Gridbus broker works with middleware such as Globus, UNICORE, Alchemi, XGrid; JobManagers such as Condor,
PBS; Data catalogs and also Data storage systems such as the Replica Catalog and SRB. It can also ssh to a remote
node and invoke the middleware or queuing system directly.
Figure 1 : Broker Block Diagram.
The Gridbus broker comes with a default application-description interpreter for a language called
XPML (eXtensible Parametric Modelling Language), which is designed to describe dynamic
parameter sweep applications on distributed systems in a declarative way. As such the broker
can easily execute parameter-sweep applications on the grid. A parameter sweep application is
one in which there is a program which operates on multiple sets of data, and each instance of the
running program is independent of the other instances. Such applications are inherently parallel,
and can be readily adapted to distributed system. For more information about research on grids
and distributed systems please refer to http://www.gridbus.org.
5
1.4
Gridbus Broker Architecture
The Gridbus broker follows a service-oriented architecture and is designed on object-oriented
principles with a focus on the idea of promoting simplicity, modularity, reusability, extensibility and
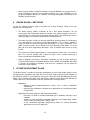
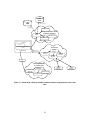
flexibility. The architecture of the broker is shown in Figure 2.
Figure 2 : Broker Architecture.
The broker can be thought of as a system composed of three main sub-systems:
• The application interface sub-system
• The core-sub-system
• The execution sub-system.
The input to the broker is an application-description, which consists of tasks and the associated
parameters with their values, and a resource description which could be in the form of a file
specifying the hosts available or information service which the broker queries. At the application
interface sub-system there is the application and resource-description. The app-description
interpreter and the resource discovery module convert these inputs into entities, called jobs and
servers with which the broker works internally in the core sub-system. A job is an abstraction for a
unit of work assigned to a node. It consists of a task, and variables. A variable holds the
designated parameter value for a job which is obtained from the process of interpreting the
application-description. A server represents a node on the grid, which could provide a compute,
storage, information or application service. The task requirements and the resource information
drive the discovery of resources such as computational nodes, application and data resources.
6
The resource discovery module connects to the servers to find out if they are available, and if
they are suitable for the current application. The broker uses credentials of the user supplied via
the resource description, whenever it needs to authenticate with a remote service / server. Once
the jobs are prepared and the servers are discovered, the scheduler is started. The scheduler
maps jobs (i.e. submits jobs using the actuator component in the execution sub-system) to
suitable servers based on its algorithm. The actuator is a middleware specific component which
dispatches the job to the remote grid node. On receiving a job submission, each server uses its
associated server-manager to actuate the middle-ware specific job-submitters (also known as
Agents). The job-monitor updates the book-keeper by periodically monitoring the jobs using the
services of the execution sub-system.
As they jobs get completed, the agents take care of clean up and gathering the output of the jobs.
The scheduler stops after all the jobs have been scheduled. The scheduling policy determines
whether failed jobs are restarted or ignored. Once all scheduling is complete, the broker waits till
all jobs are either completed or failed before exiting.
1.5
Broker Usage Scenarios
The broker can be made to operate in numerous different hardware and software configuration
scenarios. Some examples include forking jobs on the local machine, or SSH can be used to fork
jobs on a remote machine or submit to a remote queuing system without the need of Globus. For
more details on possible configurations please see APPENDIX I.
1.6
Sample Applications of the Broker
The Gridbus Broker has been used in Grid-enabling many scientific applications successfully in
collaboration with various institutions worldwide. Some of these are listed below:
•
•
•
•
•
•
Neuroscience (Brain Activity Analysis) [1] - School of Medicine, Osaka University, Japan
High Energy Physics [2] - School of Physics, University of Melbourne
Finance (Portfolio analysis) - Complutense University of Madrid, Spain [6]
Natural Language Engineering [3] - Dept. of Computer Science, University of Melbourne
Astrophysics [4] - School of Physics, University of Melbourne
Molecular Docking (Drug Discovery) [5] - WEHI, University of Melbourne
It has been also been utilised in several Grid demonstrations including the 2003 IEEE/ACM
Supercomputing Conference(SC 2003) HPC Challenge demonstration.
The programmer's perspective of the broker design and implementation including the extensibility
features, are described in detail in the section 5.
2
INSTALLATION
2.1
Requirements
Broker side (i.e. on the machine running the broker)
•
•
Java Virtual Machine 1.4 or higher
More info: http://www.java.com/
Valid grid certificates properly set up (if using remote Globus nodes)
By default the certificates are places in the <USER_HOME>/.globus directory
Where <USER_HOME> is the user's home directory.
7
For a user "belle" on a UNIX machine this would be:
/home/belle/.globus
For a user "belle" on a Windows NT/2000/XP machine this would be:
C:\Documents and Settings\belle\.globus
For more information on how to acquire and setup x.509 certificates, please consult:
http://www.globus.org/security/v1.1/certs.html
•
•
Additionally, some ports on the local node should be configured to be open so that the
jobs can connect back to the broker. Please refer to the Globus documentation for more
details.
Optional Components:
o Condor v.6.6.9 submit and execute packages (Required if running jobs on a local
cluster managed by a Condor system)
More info: http://www.cs.wisc.edu/condor/downloads/
o
OpenPBS v.2.3 (Portable Batch System), (Required if running jobs on a local
cluster managed by a PBS system)
More info: http://www.openpbs.org/
o
Network Weather Service (NWS) v.2.8 client tools (Required if running
applications that access remote data hosts)
More info: http://nws.cs.ucsb.edu/
[Note: NWS client tools are only available for *nix. Grid-applications that need
remote data can still be run using the broker on Windows, however, optimal
selection of data hosts is not assured, since the absence of NWS will mean the
broker cannot get that information by itself. We are working on some way to
avoid/workaround this dependency in future versions of the broker.]
o
SCommands Client tools v.3.x (for SRB, Storage Resource Broker) (Required if
running applications that need to access SRB data)
More info: http://www.sdsc.edu/srb/scommands/index.html
o
Access to a MySQL (v.3.x and above) database server installation (either on the
machine on which the broker is installed or a remote machine). (Required if using
the persistence feature of the broker. Recommended if you want more robust
failure recovery options. The broker will not be able to recover from crashes if
persistence is disabled.)
Remote Grid node side
For a compute resource:
•
Middleware installation which is one of:
o Globus 2.4 (more info: http://www.globus.org)
o Globus 3.2 (with the pre-WS globus-gatekeeper and gridftp services running)
o Globus 4.0
o Alchemi 1.0 (Cross-platform manager) (more info: http://www.alchemi.net
o Unicore Gateway 4.1 (experimental support within the broker)
(more info: http://www.unicore.org)
o Condor 6.6.9 (more info: http://www.cs.wisc.edu/condor/downloads/)
o Open PBS 2.3 (more info: http://www.openpbs.org/)
o SGE Sun N1 Grid Engine 6
8
•
(more info: http://www.sun.com/software/gridware/index.xml)
o XGrid Technical Preview 2 (experimental support for 1.0)
Optional Components on a compute resource:
o SRB (SCommands Client tools v.3.x) (Required if running applications that need
to access SRB data)
For a data host, one of the following services should be running:
•
•
SRB v.3.x OR
Globus GridFTP service
Additionally, the user should have permissions to access the remote resources. In case of
Globus, the user's credentials should be mapped to an account on the remote node. Please
consult the administrator of the resource for more details.
2.2
Installation process
Installing the broker is a simple process. The broker is distributed as a .tar.gz (and a .zip) archive
that can be downloaded from http://www.gridbus.org/broker/2.4/gridbusbroker2.4.tar.gz or
http://www.gridbus.org/broker/2.4/gridbusbroker2.4.zip. The installation just involves unzipping
the files to any directory and optionally setting the PATH environment variable to include the
broker executable script (gbb.sh or gbb.bat depending on your OS). Following are the steps to be
followed:
• Unzip the archive to the directory where you want to install the broker.
In case of Windows, you can use WinZip (if you download the .zip file) or WinRar (for the
.tar.gz)
In case of *nix, run the command:
$ tar –zxvf gridbusbroker.2.4.tar.gz
•
The following directory structure is created under the main gridbus-broker2.4 directory:
/<broker-install-directory>
/bin
(contains the broker executable binary)
/docs
(broker API docs)
/examples
(example files for using the broker)
/lib
(all the libraries needed to run the broker)
/manual
(manual to install and run the broker)
/src
(the broker source code)
/xml
(the xml schemas used by the inputs to the broker)
•
•
Set the GBB_HOME variable to the directory where you have installed the broker.
Additionally, it is recommended to have the directory gridbus-broker2.4/bin added to
the system PATH variable.
For example, for a Bash shell:
$ export PATH=$PATH:<broker-install-directory>/bin
•
Set the permissions for the gbb.sh executable:
$ chmod 755 gbb.sh
•
Test the installation by running the broker from a shell:
$ ./gbb.sh –test
9
If you see a message confirming that the configuration is ok, congratulations! You have
successfully installed the Gridbus broker on your machine. This, however, only confirms that you
have met the basic requirements on your machine to run the broker. To be sure that all the
features of the broker are functional, you will have to make sure the remote resources you have
access to, are set up properly. If the test shows any error messages please refer to the
"Troubleshooting" section of this manual.
2.3
Recompiling the broker with ant
The broker is distributed with the java source code. An Ant build file is provided, so running “ant”
will recompile the broker jar, and copy it to the “dist” directory. The class files built are copied to
the “build” directory.
3
GETTING STARTED USING THE BROKER
The Broker can be used as a stand-alone command-line program or it can be used in your own
Java programs or portals. This section describes the use of the Gridbus Broker in both modes.
3.1
Command Line Interface (CLI - running the broker as a stand-alone
program)
The broker can be invoked from the command line just like any other java program. The broker
distribution comes with a shell script (and a batch file for Windows) which just sets the correct
class path and then calls the broker with any command-line args passed to it. In this mode the
broker outputs its messages to both the console and a log file by default. This behaviour can be
modified by change the settings in the Broker.properties configuration file. When running the
broker on the command line, it needs the following inputs:
•
The Application Description:
The Application description is provided to the broker as an XPML file which describes the grid
application. The value for this input can be any absolute or relative path. The broker distribution
comes with some sample app-description files found in the examples directory. For example:
examples/calc/calc.xml
•
The Resource Description:
The Resource description specifies the available resources and describes their attributes. The
broker is pointed to the location of the resource description file which contains the resource
description in an xml format. The resource description file has a description of the resources that
are to be used by the broker for executing the grid application. The broker distribution has a
sample set of resources which are used by us for testing. This file may have to be modified to
specify the resources the user has access to. For example:
examples/calc/resources.xml
The following instructions assume the broker is being started from the directory where it was
installed since it uses relative paths to refer to the broker input files. It also assumes that the
PATH variable includes the broker binary. To run the broker with the default configuration, the
following command is used at the command prompt from the broker's installation directory:
For *nix:
10
<broker-install-dir>\$ gbb.sh -a=examples/calc/calc.xml
=examples/calc/resources.xml
For Windows:
C:\textbackslash<broker-install-dir> gbb.bat -a=examples calc\calc.xml
-r=examples\calc\resources.xml
Where <broker-install-dir> refers to the directory where the broker is installed.
This will now start the broker, and there should be some output scrolling by, which informs the
user about what the broker is doing. For more detailed description about available command-line
options/flags, please refer to the "User Manual" section. If invoked via the command-line, the
broker is always a non-interactive program. This behaviour can be altered to suit the user's needs
by using the broker APIs in programs built on top of the broker. The next section has some
information about how to do that.
3.2
Application Programming Interface (API)
The Gridbus broker is designed to be very flexible and extensible. It is targeted at both basic
usage and customisation, by providing programmers the ability to access most of the common
APIs which are used internally. Starting from version v.2.0, the full functionality of the XPML files
are available for programmatic access via the API. This makes it easy to integrate the broker into
your own programs. Using the broker in your programs is as simple as copying the
gridbroker.jar into a place where the libraries for your program are located and invoking a
single class to start the broker (in the simplest case, as shown below).
try{
//Create a new "Farming Engine"
GridbusFarmingEngine fe=new GridbusFarmingEngine();
//Set the App-description file
fe.setAppDescriptionFile("calc.xml");
//Set the Resource-description file
fe.setResourceDescriptionFile("resourceList.rl");
//Call the initialise method
fe.init();
//Start scheduling
fe.schedule();
/*
* The schedule method returns immediately after starting the
* scheduling. To wait for results / monitor jobs,
* use the following loop:
*/
while (!fe.isSchedulingFinished() && !fe.isSchedulingFailed());
catch (Exception e){
e.printStackTrace();
11
The samples provided with the broker distribution show some common ways in which the broker
can be invoked from a java program or a JSP application. The Programmers Manual section has
a more detailed explanation of how to use the common broker APIs. Programmers who want to
use the APIs are suggested to first read through the "User Manual" section and then go on to the
"Programmers Manual" section which has more detailed explanation of the broker architecture
and common APIs. The last section of the "Programmers Manual" also has descriptions of how to
extend the broker's APIs and build upon them to suit your needs.
4
END-USER GUIDE
4.1
Using the broker on the CLI with various flags
The broker provides the following usage options on the command-line:
gbb [-mode=startUpMode[-brokerID=<ID>]][-appdesc=XPML file
name][-bc=BrokerProperties file name][-resources=resources.xml or
resource list file name]
-help, -h
any other
-test, -t
-version,
-mode, -m
: Displays help on using the Broker on the
command-line. This option cannot be used in combination with
option.
: Tests the Broker installation and configuration. This
option cannot be used in combination with any other option.
-v : Displays the Broker version number. This option
cannot be used in combination with any other option.
: Sets the start up mode of the Broker. This option can
take the following values: "cli", "recover". If omitted, it
defaults to "cli" (command-line). If the mode is set to
"recover",
then -brokerID option is mandatory. The Broker looks to recover
that
broker instance whose brokerID is given in the -brokerID
option.
Currently the broker supports RDBMS-based persistence. So, the
database connection information needs to be specified in the
Broker
configuration file i.e Broker.properties, for recovery mode to
work.
-appdesc, -a : Specifies the app-description file to use. This
option overrides the APP_DESC_FILE setting in the
Broker.properties
config file.
-resources, -r : Specifies the resource description file. This option
overrides the RESOURCE_DESC_FILE setting in the
Broker.properties
config file.
-brokerconfig, -bc : Specifies the Broker configuration file to use.
If ommitted, the broker looks for a config file named
Broker.properties in the current directory.
4.2
The Broker input, output and configuration files
The main input and config files that are needed by the broker are as follows:
• The Broker.properties configuration file
• The XPML application description file format
• The Resource description file format
• Optionally a log4j.properties file to configure the broker logging.
Each of these files and their purpose is described in the subsections below.
12
The output files produced by the broker include:
• The execution logs from the broker itself (broker.log)
• The standard output and standard error files for each job that runs on the grid
• The script files generated by the broker for each job (these files exist only if the broker is
run in DEBUG mode. Otherwise they are deleted).
• Any other output files produced by the application that runs on the grid by the broker
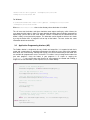
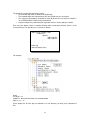
Each run of the broker creates a separate directory under a temporary directory, which is in the
current directory. This directory has a structure as follows:
GBB.<version-number>.TMP/
<broker-ID>/
<job-ID>/
stdout.<job-ID>
stderr.<job-ID>
.
.
.
broker.log
<other-temporary files>
For example:
where
version # is 2.4
brokerID is 93EF27FD-0A64-C8E1-4671-95FDD222EBD4
jobID is j1, j2 … j6
All the output files for each job are collected in its own directory, ensuring clean separation of
files.
13
[Note: The SAME directory structure (with a prefix “REMOTE.”) is also created on the remote side,
to achieve separation of files from different jobs.]
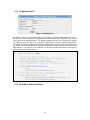
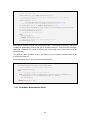
4.3
The Broker.properties configuration files
# Name of application description file
APP_DESC_FILE=examples/calc/calc.xml
# Name of resource description file
RESOURCE_DESC_FILE=examples/calc/resources.xml
DEADLINE=30 Dec 2010 22:16:00
BUDGET=500000.00
# Working directory. Empty value uses the current directory.
LOCALDIR=
# Maximum number of files to be processed for analysis: set to 0 for all
# files…
MAX_NUM_FILES=3
# The time interval in milliseconds for scheduler polling
POLLING_TIME=10000
# Specify the working environment, whether command-line (cli) or tomcat
# (web)
ENV=cli
SCHEDULE=default
# Persistance specific entries: optional
PERSISTENCE_MODE=db
DB_DRIVER=com.mysql.jdbc.Driver
DB_CONNECTIONSTRING=jdbc:mysql://localhost:3306/gridbusbroker
DB_USER=user
DB_PWD=password
NWS_NAMESERVER=belle.cs.mu.oz.au
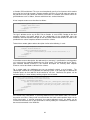
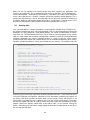
The broker can be configured in one of two ways, either by providing it with a Broker.properties
file containing all of the configuration values (described in this section), or by creating a
BrokerProperties object and using that when constructing an instance of a FarmingEngine
(described in section 5.3). The Broker can be configured via a standard java properties file (which
is just a plain text file with a name=value pairs one on each line). The default Broker.properties
file supplied with the distribution is shown below:
In the Broker.properties config file shown above, the broker is configured to look for the
application-description file named calc.xml in the examples/calc directory relative to the
current directory from where the broker is executing. The resource description option points to the
resources.xml in the same directory in this case.
[Note: The file names are case-sensitive or not depending on each operating system. *nix-es are
case-sensitive. Win9x is not. Win NT/2000/XP preserves case, but ignores them when reading /
accessing the files. It is advised, in general, to pay attention to the "case" of the name of these
files always, and set the values accordingly.]
14
The Broker configuration file ignores the lines starting with a "#", and considers them as
comments. Please note that the options are all specified in upper-case and the broker is
particular about the case-sensitivity.
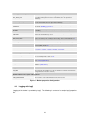
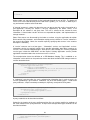
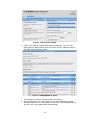
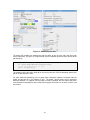
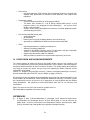
The configuration options available are described in the tables shown in Figure 3.
15
Broker.properties Configuration
APP_DESC_FILE
The relative/absolute path to the XPML application-description file that the broker will
use. When running the broker on the command-line, this is an option that is
mandatory
RESOURCE_DESC_FILE
The relative/absolute path to the resource description file. When running the broker
on the command-line, this is an option that is mandatory.
DEADLINE
The deadline to be used in economy-based scheduling. The deadline is specified in
the format: dd MMM yyyy HH:mm:ss.
BUDGET
The ”cost” of accessing a resource (i.e. price Per Job) used in economy-based
scheduling
LOCALDIR
The Working directory which the broker can use to find input files. An Empty value
means the current directory is used.
MAX_NUM_FILES
The Maximum number of files to be processed for during data-aware applications.
(Set to 0 for all files). This is mainly used for testing. The recommended value is 0.
POLLING_TIME
The time interval in milliseconds for scheduler polling. Default: 10000 if not given.
ENV
The property to specify the working environment, whether command-line (CLI) or
Tomcat (WEB). Default: CLI
SCHEDULE
The type of scheduling to use. (Default is the data scheduler). Possible values:
”cost”,”time”,”costtime”, ”costdata”, ”timedata”, “round-robin”
Persistence specific entries: optional
PERSISTENCE_MODE
Name of the persistence provider. Currently only the database provider is supported.
To use the DB-provider, set this to ”db”.
DB_DRIVER
The fully qualified name of the java database driver class. (for example, for mySQL
use: com.mysql.jdbc.Driver)
DB_CONNECTIONSTRING
The jdbc url connection string. (eg: jdbc:mysql://hostname:port/gridbusbroker for the
database ”gridbusbroker”)
DB_USER
The username of the database user
DB_PWD
The password of the database user. (we are working on storing the password in an
encrypted fashion, instead of clear text)
Network weather service specific entries: optional
NWS_NAMESERVER
The hostname of the Network Weather Service Name Server.
Figure 3 : Broker.properties Configuration.
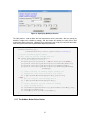
4.4
Logging with log4j
Logging of the broker is provided by log4j. The following is content of a sample log4j properties
file.
16
#-----------------------------------------------#
Log4j Properties
#-----------------------------------------------log4j.rootLogger=FATAL
log4j.logger.org.gridbus.alchemi=DEBUG, stdout, BrokerLog
log4j.logger.org.gridbus.broker=DEBUG, stdout, BrokerLog
log4j.logger.org.gridbus.broker.test=DEBUG
log4j.logger.org.gridbus.broker.persistence=DEBUG
log4j.logger.org.gridbus.broker.nws=INFO
log4j.logger.org.gridbus.broker.xpml=INFO
log4j.logger.org.gridbus.broker.xgrl=DEBUG
log4j.appender.stdout=org.apache.log4j.ConsoleAppender
log4j.appender.stdout.layout=org.apache.log4j.PatternLayout
# Pattern to output the caller's file name and line number.
log4j.appender.stdout.layout.ConversionPattern=%d [%t]-(%F:%L) - %m%n
log4j.appender.BrokerLog=org.apache.log4j.RollingFileAppender
log4j.appender.BrokerLog.File=GBB.2.4.1.TMP/broker.log
log4j.appender.BrokerLog.MaxFileSize=10000KB
# Keep five backup files
log4j.appender.BrokerLog.MaxBackupIndex=5
log4j.appender.BrokerLog.layout=org.apache.log4j.PatternLayout
log4j.appender.BrokerLog.layout.ConversionPattern=%d %p [%t] (%F:%L) - %m%n
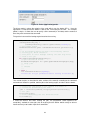
4.5
The XPML application description file format
XPML (eXtensible Parametric Modelling Language) is an XML-based language, which is used by
the broker to create jobs. Simply put, an XPML application description file is an XML file with
special elements as defined in the XML Schema that comes with the broker. XPML supports
description of parameter sweep application execution model in which the same application is run
for different values of input parameters often expressed as ranges. A simple application
description file is shown below:
An XPML app-description consists of three sections: "parameters", "tasks", and "requirements".
Parameters: Each parameter has a name, type and domain and any additional attributes.
Parameters can be of various types including: integer, string, gridfile and belong to a "domain"
such as: single, range, or file.
• A "single" domain parameter specifies a variable with just one value which is of the type
specified in the "type" attribute of the parameter element.
• A "range" domain specifies a parameter which can take a range of values. A range
domain parameter has a range element inside it. The range child element has "from", and
"to" and "step" attributes, which specify the starting, ending and step values of the range.
• A "file" domain parameter specifies a gridfile which is the URL of a remote grid file. A
gridfile url can have embedded wildcards which are resolved to the actual physical file
names by the broker file-resolver. A gridfile URL currently supports the URL protocols:
LFN and SRB.
[Note: The name of the child element must match with the value of the domain attribute of the
parameter element.]
17
<?xml version="1.0" encoding="UTF-8"?>
<xpml xmlns:xsi="http://www.w3.org/2001/XMLSchema-instance"
xsi:noNamespaceSchemaLocation="XMLInputSchema.xsd">
<parameter name="X" type="integer" domain="range">
<range from="1" to="3" type="step" interval="1"/>
</parameter>
<parameter name="time_base_value" type="integer" domain="single">
<single value="0"/>
</parameter>
<task type="main">
<copy>
<source location="local" file="calc"/>
<destination location="node" file="calc"/>
</copy>
<execute location="node">
<command value="./calc"/>
<arg value="$X"/>
<arg value="$time_base_value"/>
</execute>
<copy>
<source location="node" file="output"/>
<destination location="local" file="output.$jobname"/>
</copy>
</task>
</xpml>
A grid application can have any number of parameters. The number of jobs created is the product
of the number of all possible values for each parameter. In the example show above, parameter X
ranges from 1 to 3. The second parameter has a constant value "0". So, the number of jobs
created is 3 x 1 = 3 jobs. (the first parameter can take 3 possible values, and the second
parameter can have one possible value). In case "gridfile" type parameters are used, the number
of jobs can be ascertained only at runtime, since the broker has to actually resolve the file names
to physical files before creating one job for each file. A "gridfile" parameter can be defined as
shown below.
<parameter name="infile" type="gridfile" domain="file">
<file protocol="srb" mode="block" url="srb:/db*.jar" >
</parameter>
For multiple grid files, multiple <file> elements are placed within the <parameter> element, as
shown:
<parameter name="infile" type="gridfile" domain="file">
<file protocol="srb" mode="block" url="srb:/db*.jar"/>
<file protocol="lfn" mode="block"
url="lfn:/somedirectory/someotherdirectory/abc*.txt"/>
<file protocol="srb" mode="block"
url="srb:/sample/example/gridfile/stdout.j*"/>
</parameter>
An application can have only one task, with any number of commands in any order.
Tasks: A task consists of "commands" such as copy, execute, substitute etc.
18
•
•
•
A "copy" command specifies a copy operation to be performed. Each of the copy
commands has a source and destination file specified.
An "execute" command is where actual execution happens. The execute command
specifies an executable to be run on the remote node. It also specifies any arguments to
be passed to the command on the command-line.
A "substitute" command specifies a string substitution inside a text file. This operation is
used to substitute the names of user-defined variables, for example. Parameter names
can be used as variables with a "$" pre-fixed. Apart from this, certain special default
variables are also defined, such as :
o $OS which specifies the Operating system on the remote node
o $jobname which refers to the job ID of a job created by the broker.
The example XPML file shown above specifies a task with three commands. For the grid
application described in the file above there are no "requirements". With this applicationdescription, the broker creates 3 jobs, with job IDs j1, j2, and j3. Each job performs the same set
of operations (or commands) as specified in the "tasks" section. A copy command has a source
and a destination child element each with attributes: location, and file. The location can take the
values: "local" and "node". The "local" value is interpreted as the machine on which the broker is
executing, and "node" is understood by the broker as the remote node on which the job is going
to execute. These values are substituted at runtime.
A substitute command is meant for substitution of parameter (also known as "variables") values,
in local files which are then used during local operations / remote job execution. Typically, the
values of the parameters are determined at runtime, and there could be scenarios in which
certain input text files need to be tailored for each job using these parameter values. Any of the
<substitute location="local">
<source file="input">
<destination file="input.$jobname>
</substitute>
parameters can be used as a variable in the files used in a substitute command by pre-fixing "$"
to the parameter name. So, the parameter X, is the variable $X. A substitute command has
source and destination file names, and a location attribute which must be "local". The following is
an example of a substitute command:
In the substitute command shown above, the destination element itself has another variable
"$jobname" which refers to the job's unique id. So, after substitution, the input file is tailored to
each job and saved as input.j1, input.j2 etc... for each job. Requirements: Certain jobs need a
particular environment during execution. This environment needs to be setup before the job
actually starts executing on the remote node. For this purpose, the "Requirements" element is
provided. It can be used to specify a set of initialisation tasks, (and, in the future, conditions).
Requirements are of two types: node, and job. A "node" requirement is a set of tasks/conditions
that need to be satisfied before a node can be used for submission of jobs. So, a noderequirement is performed by the broker before any jobs are submitted to it. This is done once and
only once for each node. A "job" requirement is also a set of tasks/conditions which are to be
performed once for each job. Job requirements are currently not implemented in v.2.4 of the
broker. Requirements can be specified as follows:
<requirement type="node">
<!-- anything that can go inside a <task> element can go here -->
</requirement>
19
The type can be "node" or "job". As mentioned, only "node" is currently supported for this version.
The requirements element can have any number of commands in any order. It is similar to the
"task" element in that respect. The XPML language is undergoing improvements and refinements.
It is planned to include more advanced features like if conditions, loops, enumerated \textless
range lists, etc... in future versions.
For those interested, a detailed description of the XPML language schema and the interpretation
process is given in the Programmer's manual section.
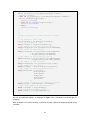
4.6
The Resource description file
The Resource description file is just an xml file describing the resources that can be used by the
broker, and their properties as defined in the resource description schema that comes with the
broker. The Resource description can be used to describe two types of entities - resources and
credentials (to access the resources). A resource, as defined currently can be of three types:
•
•
•
compute resources
storage resource (which function as data sinks)
services
A sample resource description is shown below.
20
<?xml version="1.0" encoding="UTF-8"?>
<xgrl
xmlns:xsi="http://www.w3.org/2001/XMLSchema-instance"
xsi:noNamespaceSchemaLocation="ResourceDescriptionSchema.xsd">
<credentials id="prox1" type="proxyCertificate">
<proxyCertificate source="local">
<local password="proxyPwd"/>
</proxyCertificate>
</credentials>
<credentials id="prox2" type="proxyCertificate">
<proxyCertificate source="myProxy">
<myProxy password="test" username="test"
host="myownserver.org"/>
</proxyCertificate>
</credentials>
<resource type="compute" credential="prox1">
<compute domain="remote">
<remote middleware="globus">
<globus hostname="belle.cs.mu.oz.au"/>
</remote>
</compute>
</resource>
<resource type="service" credential="prox2">
<service type="information">
<information type="srbMCAT">
<srbMCAT host="srbhost.cs.mu.oz.au" defaultResource="defres"
domain="dom" home="myhom" port="9999" />
</information>
</service>
</resource>
<resource type="service" credential="auth1">
<service type="information">
<information type="replicaCatalog">
<replicaCatalog replicaTop="top"
replicaHost="hostname.gridbus.org"/>
</information>
</service>
</resource>
</xgrl>
[Note: One can observe here, that the value of an attribute of a parent element generally
determines which child element can be place inside it. For example, the "type" attribute of a
"resource" element, determines whether a "compute", "storage" or "service" child element can
appear within a compute element. Likewise, the "domain" attribute of a "compute" element
determines which of "local", "remote" becomes its child, and so on. This pattern is followed
throughout the resource description schema. Also, the "credential" attribute of any resource
element is of particular significance. Its value points to the id of the credential which is to be used
for that resource. The separation of credential and resource elements within the schema helps to
specify a description where the same credential (such as a proxy certificate or a
username/password pair) is to be used for authenticating to more than one resource.(It is
common experience that such a situation is frequently seen.)]
Compute resources are servers to which the users' jobs can be submitted for execution. Storage
resources are used to store the results of execution, and hence can be considered as data sinks.
Service resources are those which provide generic services that can be used by the broker.
A "compute" resource is associated with a "domain" which can take two values - "local" and
"remote". Local resources could be the local computer, or a cluster (on which the broker is
running). It could be used to describe a resource which is running job-management systems such
21
as Condor, PBS and Alchemi. The user can also optionally specify a list of queues which need to
be used on the local job manager. Remote compute resources are used to represent nodes on
the grid which have a job-submission interface accessible via a network. So resources which run
grid-middleware such as Globus, Unicore and Alchemi etc. are described here.
A local compute resource can described as follows:
<resource type="compute" credential="auth1">
<compute domain="local">
<local type="pbs" />
</compute>
</resource>
The “type” attribute can be any of PBS, Fork or Condor. In case of PBS, Condor on the local
compute resource, the broker would use the configuration of the Condor/PBS client. No
credentials would be needed to fork jobs on the local node; however the attribute still needs to be
provided for the sake of complete conformance with the schema.
To describe a remote, globus node a description similar to the following, is used:
<resource type="compute" credential="prox2">
<compute domain="remote">
<remote middleware="globus">
<globus hostname="manjra.cs.mu.oz.au" version="4.0" />
</remote>
</compute>
</resource>
In the above resource description, the node manjra.cs.mu.oz.au is specified to be running globus
v.3.2, and uses the credential identified by the string "prox2". This would be the id of a "proxy"type credential defined elsewhere in the resource description file. Similarly other compute
resources can be described as defined in the schema.
For a remote node, the middleware type tag can optionally contain a set of queues. The
“jobmanager” attribute of this tag identifies the queuing system. If no queue tags are defined, the
available queues on that node will be discovered at run time. Otherwise, the queues can be
defined explicitly as shown below, providing a higher level of control.
<resource type="compute" credential="prox1">
<compute domain="remote" firewall="true">
<remote middleware="globus">
<globus hostname="lc1.apac.edu.au" jobmanager="jobmanager-pbs">
<queue name="express" cost="5" priority="1" limit="1"/>
<queue name="normal" cost="1" priority="2" limit="10"/>
</globus>
</remote>
</compute>
</resource>
If the cluster being submitted to, is restricting outbound access from worker nodes, the “firewall”
flag can be set to true. Doing so will instruct the broker that it will need to perform copies via the
cluster head node. If execute commands also require outbound access, the broker can be
instructed to execute these via the head node as well by adding the “remoteAccess” attribute to
the execute commands in the XPML file.
22
<execute location="node" remoteAccess="true">
...
</execute>
Worker nodes can copy and execute via the head node through the use of SSH. The broker will
source a file in the home directory on the node called “.gridbus_ssh”, if it exists, in order to pass
any environment variables to the head node.
A "storage" resource is a data sink where the user can opt to store the results of execution of a
grid application. Currently this feature is not fully supported by the broker. Hence, a full
description of this element is not given here. The user is referred to the schema for more
information. A future broker version will have an expanded description, and implementation of
storage resources.
[Note: Data sources are discovered by the broker at runtime, using the application description
which contains file parameters, and information catalog services defined as "service" elements in
the resource description. Hence, the need for explicitly specifying data sources in the resource
description is obviated.]
A "service" resource can be of two types - "information" services and "application" services.
Information services are typically entities which provide information about other resources or
services. These could be LDAP directories, web services, data catalogs etc. Currently supported
service types include the SRB MCAT and the Replica Catalog. Application services provide
applications hosted on nodes that can be accessed as a service.
The example below shows the definition of a SRB Metadata Catalog. This is modelled as an
information service which can be queried to extract data about available SRB storage resources
and files located on them.
<resource type="service" credential="prox2">
<service type="information">
<information type="srbMCAT">
<srbMCAT host="srbhost.cs.mu.oz.au" defaultResource="defres"
domain="dom" home="myhom" port="9999" />
</information>
</service>
</resource>
A "credentials" entry describes the user's authentication information that is used to access the
services provided by a grid resource. Credentials can be of the following types - x.509 based
proxy certificates, simple username/password pairs, MyProxy saved proxies or keystores.
<credentials id="prox1" type="proxyCertificate">
<proxyCertificate source="local">
<local password="proxyPwd"></local>
</proxyCertificate>
</credentials>
A proxy credential can be described as follows:
Optionally, the location of the user certificate and key files can also be specified as attributes of
the "local" element in the "proxyCertificate". A simple username/password -type credential can be
described as follows:
23
<credentials id="auth1" type="auth">
<auth username="test" password="pwd"/>
</credentials>
Every credential has to be given a unique "id" which is referred to by one or more resource
elements, as mentioned earlier.
4.7
How to set up persistence
The broker saves itself to a persistent store in order to recover from failure and to keep track of
the jobs and server status accurately. This helps in improving scalability when there are a large
number of jobs and/or servers.
The broker comes with a default persistence-provider, which saves the full broker-state
periodically to a dynamically generated HSQL database. The DB (database) persistence
providers are implemented using JDBC, and hence can support any JDBC compliant database in
PERSISTENCE_MODE=db
DB_DRIVER=org.hsqldb.jdbcDriver
DB_CONNECTIONSTRING=jdbc:hsqldb:hsqldb/persistence
DB_USER=user
DB_PWD=password
general. This section describes the procedure for configuring the broker to use persistence with
the two providers (HSQL and MySQL) that are supplied with the broker. The figure above shows
the settings for a HSQL database, in the default mode. In this mode, the user need not set up the
database. It is set up automatically at runtime by the broker, and the database runs in the same
process as the broker. The HSQL database can also be run as a separate process. For more
information about setting up a HSQL database, please refer to the HSQL manual.
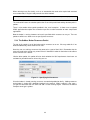
To use a MySQL database for persistence, the user needs to perform the following steps:
1. Installing and configuring the database (this step is optional, if the default HSQL DB is used).
2. Setting the appropriate properties in the configuration file Broker.properties
PERSISTENCE_MODE=db
DB_DRIVER=com.mysql.jdbc.Driver
DB_CONNECTIONSTRING=jdbc:mysql://somehost.cs.mu.oz.au:3306/gridbusbroker
DB_USER=user
DB_PWD=password
The figure above shows the connection string settings for a MySQL database. To install the
broker database for a MySQL database, the broker.sql script, included in the distribution should
be used. This will create a new database named "gridbusbroker" on the database server.
Additionally, an initialisation script named init.sql, provided with the broker distribution needs
to be run after the creation of the database. This sets up some initial values in the database, and
prepares it for use by the broker. It is recommended to create a separate user login on the
database server, for enabling access to this database. The second step is to set the following
properties in the broker config file, for example:
In the above example, the broker is configured to use the "db" or database persistence provider.
(Currently this is the only provider the broker supports.) The DB_DRIVER specifies the JDBC driver
class to used to connect to the database. The DB_CONNECTIONSTRING specifies the string used to
connect to the database server. The DB_USER, DB_PWD set the username and password for the
database login.
24
5
PROGRAMMER'S GUIDE
5.1
Design and Implementation
The Gridbus broker has been implemented in Java so that it can be used from the command line,
deployed in Web-enabled environments such as Tomcat-driven portals and portlets, and also be
used as an API within other programs built on top of the services provided by the broker. It
interfaces to nodes running Globus using the Java Commodity Grid (CoG) Kit, to Alchemi nodes
using the Alchemi Cross-Platform Manager Interface, to UNICORE using the Arcon client library,
to Condor and PBS using their respective command-line clients. This section describes the main
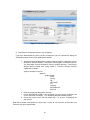
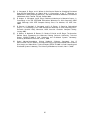
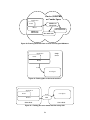
APIs and concepts related to the common broker APIs. Figure 4 below shows some of the main
classes in the broker.
The broker design is based on the architecture described above. The main entities in the broker
are:
• Farming Engine
• Scheduler
• Job
• ComputeServer
• Service
• DataHost and DataFile
Figure 4 : Broker UML Diagram.
The farming engine is the central component which maintains the overall state of the broker at all
times. It is the glue that binds all the components together. It acts as a container for the job and
server collections. It is the component that interacts with external applications and initiates the
scheduling. The farming engine can be considered as the broker's in-memory database, as it
holds the broker's current state at any point of time. If using persistence, the farming engine
keeps saving its state periodically to persistence storage.
25
The scheduler is a middleware independent component which maps jobs to nodes on the grid. It
doesn't need to worry about lower level details, and can schedule jobs based on metrics which do
not depend on the underlying platform. The broker comes with four built-in schedulers:
•
•
•
•
economy-based scheduler (DBScheduler)
data-aware scheduler (DataScheduler)
economy and data-aware scheduler (DBDataScheduler)
simple round-robin scheduler (RoundRobinScheduler)
For more details on the scheduler algorithms please refer to the Gridbus Broker paper at
http://www.gridbus.org/papers/gridbusbroker.pdf
A Job is an abstraction for a unit of work assigned to a node. As described in previous sections, it
consists of Variables and a Task. A variable holds the designated parameter value for a job. A
variable can hold a range of values or a set of values or a single value in which case it is called a
single variable. A task is the description of what has to be done by the job. It is composed of a set
of commands. There are three types of commands - Copy Command, Execute Command, and
Substitute Command. The Copy command instructs the broker to copy a file from the source to
the destination. It can be used for either copying the files from the broker host to the remote node
or vice versa.
The ComputeServer class describes a node on the grid and holds the properties for that node,
eg. its middleware, architecture, OS etc. It is a middleware independent entity and as been
extended for different middleware like Globus, Alchemi, Unicore, Condor, PBS, and also to allow
forking jobs on the local node. Each ComputeServer has an associated JobMonitor and
ComputeServerManager which are also middleware independent. A ComputeServer also has an
associated UserCredential object, which stores the credentials of the user for accessing services
provided by that ComputeServer. The JobMonitor is responsible for monitoring the execution of
all jobs submitted to the remote node corresponding to this ComputeServer. The
ComputeServerManager is the component that manages the job-submission. It uses a local
buffer, for this purpose, and when the job needs to be submitted to the remote node, it creates a
middleware-specific agent, and sends this agent to the remote node for execution. This is done
by invoking the appropriate middle-ware ComputeServer. The ComputeServerManager has been
extended to handle both stand-alone grid nodes, and clusters.
A typical submission and monitoring cycle for a job sent to a Globus node go through the
following steps: The Scheduler allocates i.e submits a Job to a ComputeServer. The
ComputeServer puts the job in its local job buffer and informs the ComputeServerManager. The
ComputeServerManager creates a globus-specific agent - a GlobusJobWrapper, and sends it to
the remote machine. The ComputeServerManager then asks the JobMonitor to include this job in
the list of jobs it monitors on that server. Since we are submitting to Globus here, the
ComputeServer to which the Scheduler allocates the job, would actually be an instance of the
GlobusComputeServer class, which extends the ComputeServer class. The job monitor
periodically queries job status (by calling the GlobusComputeServer), and raises status events for
all jobs whose status has changed. When the job is done/failed, the monitor stops monitoring that
job.
Data Hosts are nodes on which data files have been stored. These objects store the details of the
data files that are stored on them such as their path on the disk and the protocol used to access
them. The Data Host objects also maintain a list of the compute resources sorted in the
descending order of available bandwidth from the host. Data File objects store attributes of input
files that are required for an application such as size and location. A Data File object links to the
different Data Hosts that store that file. Overall, the broker is designed to be a loosely coupled set
of components working together. The classes in the broker can be grouped into the following
main categories:
26
•
•
•
•
•
Application-description Interpreters
Middleware support
Schedulers
Persistence providers
Other support utils and modules
By extending the classes in each group, the broker can transparently support many different appdescription formats, schedulers, middleware etc. For more information on how to develop one or
more these components please refer to the section "Modifying or Enhancing the broker to suit
your needs".
5.2
Using the broker in your own applications
This section expands on the brief description given in section 3.2 about how to program the
broker and use its services in your own application. Since the main APIs are already described in
the sections above, we begin here by looking at some simple examples of the usage of the broker
API in a java program.
5.3
The Broker Properties Object
A significant change from version 2.0 is the move away from a static (global) properties object. In
the past, the properties read in from the Broker.properties file were stored globally so that all
components (farming engine, compute servers, etc.) within the broker could make use of them.
This becomes a problem when multiple broker instances need to run within the same virtual
machine but with different configurations. To solve this, the use of the BrokerProperties object
has been modified and is no longer static. Now, a non-static broker properties object needs to be
created, and passed down within the broker to each component that needs configuration.
All the properties discussed in section 4.3 can be specified in the BrokerProperties object via the
API. An example of creating a properties object and setting the budget is shown below.
import org.gridbus.broker.farming.common.BrokerProperties;
...
// create a properties object with the "true" flag indicating
// that the default properties configuration is to be loaded.
BrokerProperties properties = new BrokerProperties(true);
// set the "BUDGET" to 500.00 units (Grid dollars).
properties.setProperty(BrokerProperties.BUDGET,"500.00");
How this is actually used will be detailed in the rest of section 5.2.
5.4
Creating a Farming Engine
The first step in invoking the broker is to create an instance of the "Farming Engine". This can be
achieved by the following code snippet:
//Create a new "Farming Engine"
GridbusFarmingEngine fe=new GridbusFarmingEngine();
27
This creates the farming engine, sets its configuration properties, and also configures the default
logging options. If a broker configuration file (Broker.properties) is found, the configuration
specified in that file will be loaded. Otherwise, a default set of values will be loaded. The default
values for the broker configuration are shown below:
ENV=""
DEADLINE = <1 day>
BUDGET = Long.MAX_VALUE
LOCALDIR = System.getProperty("user.dir")
SCHEDULE = "default"
TEMPDIR = ""
USE_PERSISTENCE = "false"
PERSISTENCE_MODE = "db"
DB_DRIVER = "com.mysql.jdbc.Driver"
DB_CONNECTIONSTRING = ""
DB_USER = ""
DB_PWD = ""
POLLING_TIME = "10000"
MAX_NUM_FILES = "0"
If non-default configuration properties are required, a BrokerProperties object can be created and
configured and then passed into the constructor of the farming engine.
// create new farming engine with specific properties
GridbusFarmingEngine fe = new GridbusFarmingEngine(properties);
Another way to create an instance of the farming engine is via the broker server. The broker
server aims to make managing multiple farming engines easier. This is useful in various
situations such as web portals. Below is an example of its usage.
// create key for identifying instance of farming engine based on
// a user ID and a project ID.
UserExperimentKey key = new UserExperimentKey("user1","project1");
// get broker server
GridbusBrokerServer gbbs = GridbusBrokerServer.getInstance();
// create/get farming engine that is mapped to the specified key
fe = gbbs.getGridbusFarmingEngine(key);
5.5
Setting up Jobs and Servers
After creating the farming engine, the next step is to setup the jobs and servers. This can be done
in two ways. One way is to create jobs from an application description file (currently only the
XPML format is supported). The other way to create jobs is to use the Task and Command APIs
which give the programmer more flexibility. Similarly servers can be setup using a resource list
file supplied to the farming engine, or using the ServerFactory APIs. To setup jobs and servers
using an application and resource description files use the following:
//Set the App-description file
fe.setAppDescriptionFile("calc.xml");
//Set the Resource-description file
fe.setResourceDescriptionFile("resourceList.rl");
28
[Note: Use the init method of the farming engine only when supplying the application- and
resource- description files. The init method fails if these files are not given. The init method itself
calls the two methods - initResources() and initJobs(), in that order. This order is to be maintained
strictly if the initResources() / initJobs() methods are explicitly called by another program. This is
because the initResources() sets up the broker with services which are queried, for example, to
find out the datahosts and datafiles needed by the jobs in an application. Creating servers in this
way will pass the properties object contained in the farming engine to the servers.]
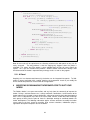
5.6
Creating Jobs
First, a new Job object is created. A job object is associated with Variables and a Taskwhich has
any number of commands which can have commands such as Copy,GCopy,MCopy,Execute,and
Substitute. For copy commands, (Copy,MCopy,GCopy), the source and destination file names
need to be set. The ExecuteCommand class can be used to execute programs on the remote
node. As shown above, the executable and arguments need to be set for the ExecuteCommand
Substitute commands are used to substitute variables in strings or text files locally, before
sending the job to the remote side. Variable objects can be created and added to a job as shown.
Variables are normally added as strings (even though they are numeric). The variable values can
Job currentJob = new Job();
currentJob.setJobID("j" + jobid);
//Create commands
//Command to Copy the program
CopyCommand copy = new CopyCommand();
copy.setSource(true,"workingDIR/calc",true);
copy.setDestination(false,"calc",true);
//Command to execute the program
ExecuteCommand exec = new ExecuteCommand(TaskCommand.EXECUTE_CMD);
exec.setExecutable("./calc");
exec.addArgument("$X");
exec.addArgument("$time_base_value");
//Command to collect the results
CopyCommand results = new CopyCommand();
results.setSource(false,"output",true);
results.setDestination(true,"output."+currentJob.getJobID(),true);
Task task = new Task();
task.addCommand(copy);
task.addCommand(exec);
task.addCommand(results);
currentJob.setTask(task);
currentJob.addVariable(new SingleVariable("$X", "1"));
currentJob.addVariable(new SingleVariable("$time_base_value", "0"));
also refer to filenames. The XPML interpreter has certain file-resolver APIs which are used to
resolve the physical filenames from those containing wildcard characters. These need to be used,
so that the DataHosts and DataFiles collections used in data-aware scheduling are properly set
up. (Please refer to the javadocs for further details on their usage.) Finally, after the task is set
and variables are added, this job is added to the list of jobs in the farming engine. The broker
retrieves the stdout and stderr of a job by default. Any other output files generated by the job,
however need to be explicitly copied back to the broker node (i.e. the machine running the
broker). Alternatively, the job outputs maybe copied to some other remote location by the job as
the last step after execution.
29
5.7
Creating Server Instances
Servers are created using the getComputeServer method of the ServerFactory class. This
creates a middleware-specific compute-server and returns it in the form of an instance of the
generic ComputeServer abstract class. The ServerFactory has various overloaded methods used
to create a ComputeServer instance. The least information needed is the hostname of the
ComputeServer. If the "type" of compute-server is not specified, it is assumed to be a Globus
compute-server. The (middleware) type of a compute-server is any one of the supported
middleware, currently: GLOBUS, ALCHEMI, UNICORE, FORK (local), CONDOR, PBS, SGE,
and SSH-based remote job-forking. The following code snippet shows the creation of a computeserver:
//Add servers to the farming engine (all are assumed to be Globus nodes
)
//set the credentials for each one
LocalProxyCredential lpc = new LocalProxyCredential();
lpc.setPassword("somepassword");
cs = sf.getComputeServer("belle.cs.mu.oz.au");
cs.setUserCredential(lpc);
fe.addServer(cs);
The first two lines of code set the credentials for the server. This can be avoided if using a
resource description file, in which the credentials are specified. When a compute-server is
created, the server is not alive, and the isAlive method returns false. The compute-server needs
to be started (in order to facilitate the discovery process), before any of its methods can be put to
good use. This can be done by calling the "start" method. The start method initiates the computeserver manager, and a job-monitor to keep track of job submission and status-updating
respectively. The manager performs an initialization of the compute-server properties by
"discovering" them. It does so by pinging the remote node, then connecting to it and querying it
for certain information. Once the properties are discovered, the isAlive flag is set to true. This
whole process is done on a separate thread for each server (i.e the start method returns
immediately). However, the farming engine makes sure the start method is called on all servers
before starting scheduling. So, in effect it is not necessary to call this method explicitly if the jobs
are scheduled to servers.
5.8
Invoking the Scheduler
To begin scheduling jobs, the schedule method needs to be called on the farming engine. This
will get the scheduler defined in the BrokerProperties object of the farming engine. As shown
earlier there are a number of ways in which to configure the farming engine. If the farming engine
is constructed without passing it a properties object, the default scheduler will be used. There are
two ways to override this behaviour. One of them is to set the SCHEDULE property of the
BrokerProperties class and then pass that to the constructor of the farming engine. The possible
values for this are- cost,time, costtime, costdata, timedata, default. The alternate method is to
explicitly set the scheduler for the farming engine using the SchedulerFactory class. The following
code shows how to do this:
30
//1. simply call the schedule method to call the default scheduler
fe.schedule();
//OR
//2. set the scheduling type / algorithm in the BrokerProperties
//before constructing the farming engine and calling the schedule
//method.
//for cost-optimizing scheduler...
BrokerProperties properties = new BrokerProperties();
properties.setProperty(BrokerProperties.SCHEDULE_ALGORITHM,"cost");
GridbusFarmingEngine fe = new GridbusFarmingEngine(properties);
fe.schedule();
//OR
//3. Explicitly create a scheduler object
Scheduler sch = SchedulerFactory.getScheduler("cost",fe);
fe.setScheduler(sch);
fe.schedule();
The schedule method of the farming engine starts the scheduler on a separate thread, and
returns immediately. The broker provides built-in mechanisms for job-status-monitoring and
updating of job statistics such as active-jobs, completed-jobs, failed-jobs etc. Once the scheduling
is started, the jobs get submitted to remote nodes, and as their status changes the JobMonitor for
each server updates the status and the scheduler updates the statistics. The JobMonitor uses
events to signal JobListeners about statusChanged events for jobs. To receive job-status events
the JobListener interface needs to be implemented.
The broker has a built-in logging system that uses the Apache log4j APIs. When the broker is
used via the command-line or the APIs, it creates a log file called broker.log in a temporary
directory created for each run of the broker. The temporary directory is of the form
GBB.<version.number>.TMP. In this temp directory are all the files generated by the broker and
the jobs it schedules, grouped in directories which are named after the job-ids. The broker logs
are useful for reviewing the broker output messages and debugging. Each job produces an
stdout.<jobid> and a stderr.<jobid> file containing the standard output and error. There is also
one shell file per job, in the directory. This is the file that actually gets executed on the remote
node. Apart from these files there are also any other outputs / files generated/copied back by the
job itself. On the remote node, each invocation of the broker creates the same directory structure
as shown in the figure below.
Inside this directory is one directory for each job that gets submitted to the remote node. Inside
each job's temp directory on the remote node, is all its input and output files. Normally, the broker
deletes the temp directories on the remote node after it completes execution on the node. The
shell files on the local side are also deleted. However, if the logger is set to DEBUG level, then
these shell files and remote directories are left alone, to assist in debugging.
This section has hopefully helped you to gain a reasonable understanding of the broker APIs to
get started on working with the broker. You are encouraged to have a look at the full java-docs for
the broker at http://www.gridbus.org/broker/2.4/docs/
31
5.9
Using the broker in a web portal (portlets)
The previous sections provided in-depth instruction on how to integrate the broker into Java
applications by making use of the broker API. This section will build on that knowledge and walk
through an example of how the broker could be used within a portlet environment, highlighting
any interesting details along the way. This guide assumes the programmer has some experience
working with a portlet framework (such as Gridsphere) and with portlet development.
5.10 What are portlets?
Portlets are reusable Web components that are used to compose web portals. A news oriented
portal may make use of a news article portlet, a weather portlet, a stock quote portlet and maybe
a search portlet. These portlets may be completely independent but are organised and presented
to the user together as a single web page. Portlet standards such as JSR168 enable developers
to create portlets that can be plugged into any portal supporting those standards.
5.11 Why portlets are good for us
Portlets are now becoming a very popular and prominent new technology. With the promotion of
reusability and portability (between different portlet frameworks) through standards (JSR168),
there is definitely a strong case for the use of portlets. A large number of portlet frameworks are
also available to meet varying demands.
5.12 The Gridbus Broker portlets
These Gridbus Broker portlets show off some of the broker’s features. The aim is to both provide
programmers with an example of what is possible with the broker so that much more advanced
portlets can then be developed, as well as providing the community with a set of reusable portlets
providing sophisticated yet simple Grid application management and execution, that can be
incorporated into any web portal.
The aim of this guide is to help deploy the example portlets and try to get them to run with
Gridsphere portlet framework. The portlets are JSR168 compliant, so even though they were
tested within Gridsphere, they should be portable to other frameworks.
32
5.13 Pre-requisites
This guide assumes that the programmer has a working installation of Gridsphere
(http://www.gridsphere.org). This means that you’ll also have an installation of Jakarta Tomcat
(http://jakarta.apache.org/tomcat). If this has not already done, it should be installed before
continuing.
It should be noted that due to the need for GSI security, the machine running the portal needs to
know about the CA certificates of any Grid resources that will be used. Globus cog will look for
certificates in the .globus directory under the current user’s user directory (both windows or *nix).
Make sure all required CA certificates are located in the appropriate directory taking into
consideration the user under which Gridsphere is executing as. The directory will be based on
the result of the System.getProperty("user.home") command. In Windows XP, you could expect
something like:
C:\WINDOWS\system32\config\systemprofile\.globus\certificates
Under Unix
/home/user/.globus/certificates
5.14 Deploying and installing the broker portlets (with Gridsphere)
Next, deploy the set of portlets according to the instructions for the portlet framework being used.
Two ways you can do this In Gridsphere are described below:
Note: If you have downloaded the source version of Gridsphere and have deployed Gridsphere
into a pre-existing Tomcat installation, $CATALINA_HOME will be the path to Tomcat. If you
installed Gridsphere packaged with Tomcat, then $CATALINA_HOME is the path to the
Gridsphere installation.
1) Deploying the web archive
a. Copy the “gridbusbroker.war” web archive into the $CATALINA_HOME/webapps
directory.
b. Restart Tomcat and the web archive will be automatically deployed.
c. Login to the Gridsphere portal and access the “Portlet Application Manager”
portlet, which is located under the “Portlets” submenu of the “Administration”
menu.
d. Deploy the gridbusbroker portlet webapp as shown in the diagram below. By
entering “gridbusbroker” in the “Deploy new portlet webapp” text field and clicking
“deploy”, Gridsphere becomes aware of the new portlets.
33
Figure 5 : Deploying the webapp.
e. Create a new group and add the gridbusbroker portlets to it. To access this
option go to the “Administration” menu, then to the “groups” submenu, and then
select the “create new group” option.
Figure 6 : Adding portlets to group.
f. Tell Gridsphere to create a Template layout for the portlets.
g. Go to the “Welcome” menu and tick the box next to the gridbusbroker portlet
webapp and then save, as shown below. A new menu will be displayed that will
give you access to the gridbusbroker portlet webapp.
34
Figure 7 : Configure group membership.
2) Deploying the Gridsphere project using “ant deploy”
If you have downloaded the source version of Gridsphere you can alternatively deploy the
Gridsphere project version of the gridbusbroker portlets.
a. Start by extracting gridbusbroker_project.tar into the projects subdirectory of your
Gridsphere source installation. The projects directory gets created when you run
“ant new-project” from the Gridsphere source installation directory. If the projects
directory doesn’t already exist, simply create it. The basic directory structure
should look as follows:
<path to Gridsphere source>/
/projects/
/gridbusbroker/
/build/
/config/
/lib/
/META-INF/
/src/
/webapp/
build.properties
build.xml
b. Enter the /projects/gridbusbroker/ directory
c. Ensure $CATALINA_HOME is correctly pointing to your Tomcat installation and
run the command “ant deploy”. This will deploy the gridbusbroker portlets.
d. Restart the Tomcat server and then follow steps c. to g. from “1) Deploying the
web archive”.
Now that the broker demo portlets are accessible, it is time to see what each of them does and
how they have been implemented.
35
5.15 The MyProxy Portlet
Figure 8 : Authentication.
By default a user will not be authorised to interact with any of the broker portlets yet. This is
because they need a valid proxy so that work can be done on the Grid. Initially the user will only
have access to the MyProxy portlet. The MyProxy portlet will allow users to specify the location
of a MyProxy server as well as the username and password of a proxy stored at that location.
The portlet will retrieve the proxy and make it available to the rest of the portlets by putting it into
the session (note that the object must be put into application scope or else it won’t be found by
other portlets). This proxy, or user credentials, will be later passed to the broker in order for it to
authenticate to other Grid resources.
GSSCredential cred = null;
MyProxy myproxy = null;
// connect to myproxy server.
myproxy = new MyProxy(host, Integer.parseInt(port));
// get the credential for this user.
cred = myproxy.get(username, password, 3600);
// store credential in session in application scope so
// other portlets can use it.
session.setAttribute("userCred",
cred,
PortletSession.APPLICATION_SCOPE);
// the user experiment key. Used with BrokerServer
// to identify an instance of the broker.
session.setAttribute("userKey",
new UserExperimentKey(cred.getName().toString(),""),
PortletSession.APPLICATION_SCOPE);
Using this portlet to retrieve a valid proxy will open up access to the other broker portlets.
5.16 The Gridbus Broker QoS Portlet
36
Figure 9 : Specifying Quality of Service.
The QoS portlet is used to define the QoS requirements for the execution. We can specify the
deadline, budget and scheduling strategy, and the broker will attempt to satisfy these QoS
requirements during execution. Although not a requirement, we create an instance of the broker
here, forcing the user to specify QoS before beginning execution.
// get key
UserExperimentKey key =
(UserExperimentKey) session.getAttribute("userKey");
// check if farming engine exists
// will exist if QoS has already been set.
if (!gbbs.farmingEngineExists(key)) {
// create broker properties
BrokerProperties properties = new BrokerProperties(true);
properties.setProperty(BrokerProperties.DEADLINE,deadline);
properties.setProperty(BrokerProperties.BUDGET,budget);
properties.setProperty(BrokerProperties.SCHEDULE_ALGORITHM,
schedAlgo);
// create instance of farming engine passing the
// properties. This will initialise QoS values.
fe = gbbs.getGridbusFarmingEngine(key,properties);
} else {
// get the instance that already exists
fe = gbbs.getGridbusFarmingEngine(key);
...
// need to manually set QoS values if farming
// engine already exists
fe.setScheduler(SchedulerFactory.getScheduler(schedAlgo,fe));
fe.setDeadline(deadline);
fe.setBudget(Float.parseFloat(budget));
}
5.17 The Gridbus Broker Driver Portlet
37
Figure 10 : Driver (Application) portlet.
The driver portlet is where the majority of the code which uses the broker API is. Here the
application is initialised and the broker is told to start it executing on the Grid. This example
portlet is simple – it allows the user to specify a Unix command (ie. /bin/date) and the number of
times they wish to execute that command.
First get the instance of the farming engine based on the user key.
// get user key
UserExperimentKey key =
(UserExperimentKey) session.getAttribute("userKey");
// get broker server
GridbusBrokerServer gbbs = GridbusBrokerServer.getInstance();
...
// if the farming engine has been initialised by earlier
// setting QoS, allow execution.
// else print an error message telling the user they first
// need to set QoS.
if (gbbs.farmingEngineExists(key)) {
// get instance of broker
GridbusFarmingEngine fe = gbbs.getGridbusFarmingEngine(key);
// setup jobs
...
// execute
...
} else {
res.setRenderParameter("qosMsg",
"Please set the Qos parameters before running the broker.");
}
Then create the jobs (as described in other sections of the manual) according to the command
and number of iterations specified, add the jobs to the farming engine, and then start the broker.
// create the jobs based on the command and number of
// iterations specified by the user.
jobs = createJobs(command, Integer.parseInt(iterations));
// set jobs
fe.setJobs(jobs);
// start scheduling jobs onto Grid resources
fe.schedule();
It should be obvious that when creating the jobs, the programmer could implement the
createJobs() method to create jobs that do anything that the broker would usually be able to
handle and not just to handle simple Unix commands.
38
When referring to any files locally, such as an executable that needs to be copied and executed
on a remote node, it may be handy to make use of the method:
javax.portlet.PortletContext.getRealPath(java.lang.String path)
This method will return the absolute path to the file and help avoid hard-coding absolute paths in
portlets.
There is also another driver portlet provided in the set of examples. It allows users to upload
XPML application description files and other input files to allow execution of more complicated
applications.
Now the broker is running, however we haven’t specified which resources to use yet. The next
portlet we will discuss allows users to specify these resources.
5.18 The Gridbus Broker Resources Portlet
The job of this portlet is to tell the broker which resources to run on. We may avoid this if we
want to automatically select resources for users.
Here the user can add any resources they want to be a part of their Grid. Remember that the
proxy will need to be valid on any resource that is identified in order for the broker to be able to
access it on the user’s behalf.
Like the driver portlet, this portlet will also check whether the QoS requirements have been set
and wont let you add resources unless they are set.
Figure 11 : Specifying Grid resources.
Since the broker is already running, resources are now being added on the fly. Adding resources
to the broker is simple and is detailed elsewhere in the manual. Within a portal it is the same –
just get the hostname from the form and add it to the farming engine. Note that the default
compute server type is globus.
39
// create a new server factory to create instances
// of our resource
ServerFactory sf = new ServerFactory();
// create instance of resource identified by the request
// parameter "host"
ComputeServer cs =
sf.getComputeServer(req.getParameter("host"));
// get the proxy created during authentication
ProxyCredential pc = new ProxyCredential();
pc.setProxy((GSSCredential) session.getAttribute("userCred"));
// pass proxy to resource
cs.setUserCredential(pc);
// initialise the resource
try {
cs.startup();
} catch (Exception e){}
// add the resource to the farming engine
fe.addServer(cs);
When adding resources prior to starting the broker with a FarmingEngine.schedule(), the call to
schedule will automatically initialise and start all available resources. If the resources have been
added after scheduling has started (as with the path of this guide) each resource will have to be
started manually.
This portlet has been extended so that it now allows the user to upload an XGRL format file for
specifying the resources.
Once uploaded the file can be passed to the farming engine
// pass XGRL file to farming engine
fe.setResourceDescriptionFile(tmpname);
// parse XGRL file and create resources
fe.initResources();
try{
// initialise each of the servers
for (Iterator it=fe.getServers().iterator();it.hasNext();){
ComputeServer cs = (ComputeServer) it.next();
cs.startup();
}
}catch(Exception e){}
5.19 The Gridbus Broker Monitor Portlet
40
Figure 12 : Monitoring execution.
The broker API provides the programmer with the ability to get all of the jobs and query their
status information. Using this, a simple monitor can be created to report the status of each of the
jobs being run.
// get farming engine
fe = gbbs.getGridbusFarmingEngine(key);
// get the current set of jobs
jobs = fe.getJobs();
The collection of the jobs then needs to be sent to the view (the JSP) for formatting, where each
job will be queried for its status.
For more advanced monitoring, we can gather other information about the execution from the
broker and present this in the monitor as well. The broker’s overall status can be queried to
determine whether it is stopped, running, failed, finished or complete. We can find out how much
of our deadline and budget has been used, how many jobs have been run on each resource, and
much more.
41
// get overall status of the broker
if (fe.getStatus() == GridbusFarmingEngine.READY) {
status = "ready";
} else if (fe.getStatus() == GridbusFarmingEngine.STARTED) {
if (fe.isSchedulingFailed()) {
status = "failed";
} else if (fe.isSchedulingFinished()) {
status = "finished";
} else {
status = "running";
}
}
...
//
// getting details of current execution status.
//
// get execution start time
Date startTime = fe.getStartDateStamp();
// get total number of jobs
long totalJobs = fe.getTotalJobCount();
// get number of jobs with prestage status
long prestageJobs = fe.getJobCount(Job.PRESTAGE);
// get number of jobs running
long runningJobs = fe.getJobCount(Job.SUBMITTED)
+ fe.getJobCount(Job.PENDING)
+ fe.getJobCount(Job.ACTIVE);
// get number of jobs waiting to be run
long readyJobs = fe.getJobCount(Job.UNSUBMITTED)
+ fe.getJobCount(Job.LOCAL_QUEUED);
// get number of jobs finished
long finishedJobs = fe.getJobCount(Job.DONE);
// get number of jobs failed
long failedJobs = fe.getJobCount(Job.FAILED);
// get number of jobs with unknown status
long unknownJobs = totalJobs - (
prestageJobs+
runningJobs+
readyJobs+
finishedJobs+
failedJobs
);
// get number of jobs either complete or failed
long donejobs = finishedJobs + failedJobs;
// get total budget for this execution
float totbudget = fe.getBudget();
// get total budget spent so far
float budspent = fe.getBudgetSpent();
...
We can also add other portlets, as displayed in Figure 12, to show detail of individual jobs or
resources.
Now the broker has finished executing, so now we can take a look at the output generated during
execution.
42
5.20 The Gridbus Broker Results Portlet
Figure 13 : Viewing results.
This portlet displays, and allows the user to download, the output generated by each of the jobs.
Note: On windows there is a known issue with the broker having trouble copying files to an
absolute path locally. This is due to globus GASS using https URIs and the inability to specify a
drive letter as part of that URI in Windows. Because of this, the outputs are copied over from the
broker’s working directory into a directory where they can be accessed by the web portal
whenever the results portlet is refreshed.
First the source and destination for the copy need to be set
// move results from brokers temp directory
// to results directory
File tempDir = new File(fe.getTempDirectory());
File resultsDir =
new File(getPortletConfig().getPortletContext().getRealPath(
"/files/results")+"/"+fe.getBrokerID());
The results are then copied into a unique directory based on the broker’s ID. This way, each run
will put results in a new directory.
43
try {
resultsDir.mkdirs();
File[] files = tempDir.listFiles();
for (int i = 0; i < files.length; i++) {
if (!files[i].getName().endsWith(".sh")
&& !files[i].getName().endsWith(".summ")) {
try{
File newFile =
new File(resultsDir.getAbsolutePath()
+"/"+files[i].getName());
BufferedInputStream bis =
new BufferedInputStream(
new FileInputStream(files[i]));
BufferedOutputStream bos =
new BufferedOutputStream(
new FileOutputStream(newFile));
int temp = 0;
// write the file
while ((temp=bis.read())!=-1) {
bos.write(temp);
}
bis.close();bos.close();
} catch (Exception e){}
}
}
} catch (Exception e) {
e.printStackTrace();
}
Now all the results will be copied over to a directory relative to the web portal so they can be
easily accessed.
The only problem is that the copying only happens when the portlet is
reloaded. This means that if the portlet is never reloaded then the files will never actually be
copied. This is just one solution to the problem. Another solution could involve starting a new
thread to monitor the broker’s output directory and copy results as soon as they appear.
5.21 All Done!
Hopefully this has demonstrated how easily the broker can be integrated into portals. To Gridenable a legacy application with a portlet interface, the programmer needs to just modify the
Driver and Results portlets to suit the needs of the application.
6
MODIFYING OR ENHANCING THE BROKER CODE TO SUIT YOUR
NEEDS
The Gridbus broker is an open-source effort, and any help from the community to improve the
broker / fix bugs / add new features etc. is always welcome. Contributions / enhancements to the
broker code may be included in future distributions, after being tested by the broker development
team. The v.2.x distribution ships with all the source code, and this section describes the design
main groups of APIs from the point of view of a developer wanting to contribute towards the
broker development. The following information applies to those who want to modify the broker
source code to suit their needs for example, write custom schedulers, middleware plug-ins,
application-description interpreters etc for the broker.
44
6.1
Application Interfaces / Application Description Interpreter APIs
The first step before running any grid-application would be to describe it in some form. This step
basically involves capturing the requirements and codifying them in a format that can be
interpreted by the broker. The design of the broker allows it to work with different application
descriptions, so long as there are appropriate "interpreters" which convert the description into
objects that the broker works with, i.e. the application description is mapped to the broker's core
objects such as jobs, servers, datahosts, datafiles etc. The default application description system,
based on XML is provided with the broker is XPML (Extensible Parametric Modeling Language).
The XPML schema is a bit texty and lengthy, so a graphical representation is shown in Figure 14,
Figure 15 and Figure 16.
Figure 14 : Broker XPML Schema Diagram.
The entire schema is not yet fully implemented in the broker. The XPML interpreter is designed to
be flexible so that changes in the schema are easily accommodated. It makes extensive use of
the Java reflection API. The entry point into the XPML interpreter is the parseXML method of the
XMLReader class. This loads an Interpreter class by reflection, and calls its process method. In
this case the XpmlInterpreter is loaded. The interpreter processes the parameters by calling the
ParameterProcessor class again using reflection, which in turn reflects on each element that
occurs inside a <parameter> element. The idea here is to be easily able to add extensions to the
schema, while minimizing the changes that need to be made to the interpretation process. So the
ParameterProcessor can call one of IntegerProcessor, StringProcessor, GridfileProcessor etc.
After all the parameters are parsed, the XpmlInterpreter parses the requirements and task, using
the RequirementProcessor and TaskProcessor. The TaskProcessor also uses reflection to parse
each Command.
So, methods like processCopy, processExecute etc is called by reflection. This makes it easy to
add a new type of command to the schema, and all that is needed would be to add a new
processXXXXX method to the TaskProcessor to handle the new command. The parameters are
tasks parsed are then converted into variables and added to jobs which are created by the
XpmlInterpreter. To make the broker work with different application description schemes, an
interpreter for the particular description needs to be written. The interpreter would ideally provide
methods similar to the XMLReader class. Currently strict interface requirements do not exist.
Programmers writing interpreters are encouraged to take a look at the code of the XMLReader
and create classes on similar lines. In future versions of the broker, it is planned to provide welldefined interfaces to write interpreters for other application descriptions.
45
Figure 15 : Broker XPML Schema Diagram Contd...
46
Figure 16 : Broker XPML Schema Diagram Contd...
47
6.2
Porting the broker for different low-level middleware
The current version of the broker supports Globus 2.4, Globus 3.2, Globus 4.0, Alchemi 1.0, and
Unicore 4.1 (experimental support). Each of the middleware plug-ins (except Globus 3.2) has its
own package in the broker; i.e the Globus related classes are in the
org.gridbus.broker.farming.common.globus
package,
Alchemi
related
classes
in
org.gridbus.broker.farming.common.alchemi and so on. So, to support a new middleware system,
one just needs to create some middleware specific classes which conform to a certain
specification. This section gives directions on how to implement a new middleware plug-in and a
brief description of the Globus implementation.
To support a new middleware, certain middleware specific classes need to be written for the
broker. These include a middleware specific ComputeServer class and JobWrapper class. The
ComputeServer abstract class needs to be extended and all the abstract methods are to be
implemented. These include:
•
•
•
•
discoverProperties
queryJobStatus
shutDownServer
updateStatus
Each ComputeServer has an associated ComputeServerManager which is a generic middleware
independent class which manages job submission to the ComputeServer, using a local job buffer.
The discoverProperties method is called when the ComputeServerManager is started. This
method is meant to set the middleware specific properties and initialize any other fields in the
ComputeServer sub-class. This method is used to set the "alive" status of the server. Typically
the server is pinged and queried for information in this method. If this method fails, it is assumed
that the server cannot be contacted, and it will not be considered to be alive. Only servers which
are alive are used during scheduling. The prepareJob method is meant to set the middleware
specific JobWrapper for the job, and also set the server for the job. The queryJobStatus is used
to query the status of a job executing on the remote node. It receives the job handle argument as
a generic Java Object. Using the job handle, the queryJobStatus is meant to find out the status of
the job, interpret its meaning and map it to one of the generic status codes defined in the Job
class. The status codes defined are all integers and the queryJobStatus is expected to return an
integer. The shutDownServer method is provided for any middleware specific clean up
procedures which need to be performed once for each server before closing down the broker.
The updateStatus method is meant for updating the status field of the ComputeServer. (This is
provided for future use, even though the current version of the broker doesn't really use the status
field. The broker mainly checks the isAlive method to determine the server status). In addition,
some of the methods of the ComputeServer can be overridden if the default implementation
doesn't suffice for a middleware specific server.
Te other part of a middleware plug-in involves creating a class that implements the JobWrapper
interface. The JobWrapper is the object that performs the actual process of sending the job to the
remote node and executing it there. The methods that need to be implemented are –
• execute
• terminate
The execute method typically reads in a Job, and iterates through all its commands and variables.
It then performs appropriate operations, such as creating scripts etc... to actually execute the
commands in a job's task. Before executing any command on the remote node, a temporary
directory should be created for each instance of the broker. The name of this directory is of the
form GBB.<version>.TMP. Each job is expected to create a sub-directory inside this broker-temp
directory on the node, named after the <jobID>. All the "commands" specified in the RunFile
package are expected to be implemented in some way. Support for accessing data from remote
datahosts, like SRB for example, also should be provided. The jobwrapper is expected to copy
48
back the standard output and standard error of each job as two seperate files with names of the
form : stdout.<jobID> and stderr.<jobID>. The broker's JobMonitor associated with each
ComputeServer checks for the existence of these files before reporting the job's status as DONE.
The copy back of the standard out and error are to be implemented such that they are the last
things the job does on the remote node. The job itself is submitted to the remote node in "batch"
mode, and a handle to the running job is returned and set via the setJobHandle method of the
job. The execute method is also expected to initiate the monitoring of the job, set its submitted
time-stamp, remote directory, and job-handle for the job:
job.getServer().startMonitoring(job);
job.setJobSubmittedTimestamp();
job.setRemoteDir("<set the remote dir here>");
job.setJobHandle("<some job-handle object obtained from the
middleware>");
The execute method therefore returns immediately after sending the job to the remote node and
starting execution. Since the job is expected to be submitted in batch mode, it doesn't wait till the
job returns from the node. (Note: In case the middleware doesn't yet support the submission of
batch jobs, and can only execute jobs interactively, the JobWrapper for the middleware may still
try to associate some job handle with it, and return immediately after the execute method, by
starting the interactive job on a seperate thread.) The terminate method is provided for any jobspecific clean-up operations that may need to be done on the remote side. The terminate method
is called by the JobMonitor after the job is reported done or failed.
As an example the Globus implementation is briefly described. The Globus implementation uses
the Cog kit v.1.2 for submission and management of jobs on a Globus node. The same set of
classes are used for both Globus v.2.4 and Globus v.3.2. The GlobusComputeServer class
extends the ComputeServer class and implements the abstract methods queryJobStatus,
discoverProperties, shutDownServer and updateStatus. It also stores the user's proxy that is
used for job-submission by the GlobusJobWrapper. The queryJobStatus method queries the job
on the remote side using the Gram class of the Cog-Kit. The following are the job-status
mappings for Globus:
GramJob.STATUS_STAGE_IN - Job.SUBMITTED
GramJob.STATUS_ACTIVE - Job.ACTIVE
GramJob.STATUS_UNSUBMITTED - Job.UNSUBMITTED
GramJob.STATUS_PENDING - Job.PENDING
GramJob.STATUS_FAILED - Job.FAILED
Any other status is mapped to - Job.UNKNOWN
The queryJobStatus is called periodically on a job, by the JobMonitor once every polling interval
which is determined by the broker configuration. The GlobusComputeServer implements the
discoverProperties by querying the MDS on the remote node. The information returned by the
query is used to set the properties for the compute server. If the discover properties fails or the
remote node cannot be contacted or ping-ed then the isAlive flag is set to false. The updateStatus
is implemented to do nothing specific for Globus currently.
The GlobusJobWrapper implements the JobWrapper interface and performs all the steps
mentioned above in the description of the implementation of the execute method. A standard *nix
shell script is created which includes *nix shell commands to implement the various commands in
the Runfile package. For example, copying files is achieved by using globus-url-copy on the
remote node and starting up a GASS server locally (one GassServer is started for each
GlobusComputeServer). SRB support is built-in by the use of SCommands which are a command
line client interface to SRB. A NodeRequirements job is implemented in a similar way, except that
49
it doesn't have its own job-directory inside the broker's temp directory on the remote node. All the
jobs create symbolic links to all files in the broker temp directory (which is the parent of each jobdirectory on the remote node). After the shell script is created, the job RSL is generated and the
job is submitted using Gram. A handle is obtained and set for the job, and the job monitor is
informed to start monitoring this job. The terminate method in the GlobusJobWrapper just deletes
the shell file which is stored locally. However, the shell file is not deleted if the broker is run in
"debug" mode (set using the logger level to DEBUG).
6.3
Schedulers
The scheduler is a middleware independent component and is only concerned with allocating
jobs to resources based on its internal algorithm. The design of the broker therefore allows
anyone to write their own scheduler, to implement a custom algorithm. Each scheduler is a class
in the org.gridbus.broker.scheduler package. The broker currently ships with three schedulers DBScheduler, DataScheduler and the DBDataScheduler. This section describes the way to write
a custom scheduler for the broker.
Every scheduler that works with the broker must inherit from the Scheduler class. The schedule
method is where the algorithm is implemented. The scheduler works with the jobs and servers
collections, and uses methods in the ComputeServer and Job class to find out information about
a server or a job. The DataHost and DataFile classes are used in data-aware scheduling (where
the scheduler takes into account the effect of moving data around the grid etc.). The
implementation of the schedule method depends entirely on the algorithm chosen. The only thing
that needs to be taken care of is to check whether a server is alive or not before submitting a job
to it (using the isAlive method).
The schedulers included with the broker are all "polling-based" schedulers which iterate through
the entire list of jobs ad servers to select the best server that can execute a job. For each poll, the
jobs which are still UNSUBMITTED are submitted to a suitable server if one is found. The
submission itself doesn't depend on any middleware specific operations, as that is handled by the
middleware plug-ins. The submitJob method of the ComputeServer class is used to submit a job
to a server. Apart from the schedule method, the scheduler may choose to override the
updateStats method to update the statistics for jobs and servers.
The farming engine selects a scheduler based on its algorithm "type". The SchedulerFactory
class is used by the farming engine to get the appropriate scheduler.
6.4
Persistence providers
The broker's persistence feature is designed to provide scalability and fail-safe operation. The
persistence model involved dumping the entire state and execution history of the running broker
periodically to persistent storage, so that the broker can be revived to its original state in case of a
crash or a failure on the broker side. The broker is able to be restarted from its last known state
and continue executing without much loss in terms of CPU time taken by the jobs that were being
executed on the grid. The broker recovery process also takes care that finished jobs should not
have to be run again. This feature becomes especially important when considering real-world
scenarios and grid economy. The persistence model provided is designed to use any persistence
storage provider such as a database, the local file-system etc. The Reader and Writer interfaces
define a base set of APIs that need to be implemented by any persistence provider. The State
class derives from the farming engine and is meant to represent the frozen state of the broker at
any point of time.
The default persistence that comes with the broker uses a relational database. The Reader and
Writer interfaces are implemented by the DBReader and DBWriter classes using the generic
50
JDBC APIS. The database-persistence feature is expected to work with any JDBC compliant
RDBMS and has been tested with mySQL (v.3.22 and above).
The design has the Broker table, central to all other entities in the database. There is one record
for each run of the broker in this table. The other tables store information about the main broker
components : ComputeServers, Jobs, Datahosts, Datafiles - all linked with the unique broker id.
All the tables are updated periodically, by the scheduler by calling the "store" method in the
farming engine.
If a database doesn't suit one's needs for persistence, it is a simple task to write a persistence
provider for the broker, by simply implementing the Reader and Writer interfaces.
The recovery process involves reviving the broker to a state that was last recorded on persistent
storage. The unique broker instance id is a required input for this mode of operation. The
recovery follows the steps outlined below:
•
•
•
•
•
•
•
•
6.5
read and create the broker instance (the state object) associated with the given id
populate the state object with the configuration properties used prior to the failure
create the servers from the saved state
create the datahosts and datafile objects from the saved state
create the variables, task and jobs from the saved state
start up the manager and monitor threads associated with each compute server
recover the jobs which are already running on the grid. (re-query status and recover job
outputs)
resume scheduling of jobs which are not submitted.
Authentication mechanisms
As the broker supports various middleware, it also naturally supports the different ways of
authenticating to resources, on behalf of the user. Currently the following methods of
authentication with resources are implemented:
•
•
•
•
x.509 proxy certificates generated locally x.509
proxies stored in MyProxy which can be retrieved by the broker
Simple authentication using a username / password pair
Keystore-based authentication
The x.509 proxies are used for Globus resources, and GSI-enabled SRB systems. Keystores are
used for Unicore nodes, while Alchemi nodes are supplied with a username/password pair for
authentication.
The UserCredential class and its subclasses represent the various credentials that handle
authentication to remote grid nodes. To be able to support other ways of authentication, the
UserCredential class would need to be extended, and appropriate mechanism is to be
implemented. As the broker is ported to more middleware, it will also support other authentication
mechanisms as needed.
6.6
Dispatchers
In order to increase the flexibility of the Gridbus Broker so that it supports a larger range of
resource configurations, the dispatcher has been introduced. The Dispatcher is a tunnel through
which the broker can submit jobs to the execution middleware. There are two types of
51
Dispatchers implemented in the current version:
1. Local Dispatcher: To be used in the case that the broker sits on the same node as the
middleware. The local Dispatcher needs no authentication. It will simply call the middleware
client and submit jobs directly to the middleware. Currently PBS, SGE, Condor, Globus and
fork can be supported by the local Dispatcher.
2. SSH Dispatcher: To be used when the broker sits on the node that is not a client of the
middleware. The SSH Dispatcher will connect to the client node through an SSH tunnel,
hence it requires the SSH client to be installed on the broker node, and SSH server to be
installed on the node holding the middleware client. Also, username and password will be
required. Currently PBS and fork can be supported by the SSH Dispatcher.
The Dispatcher class is an abstract class, but the two default implementations are provided. You
may create a new LocalDispatcher or SSHDispatcher (in the same package) as shown below
// remoteDir is any temp directory that used to store intermediate data
public LocalDispatcher(String remoteDir);
// host: the hostname of the SSH target node (remote client node)
// remoteDir: a temp directory on the remote node
// cred: a simple credential of username and password
public SSHDispatcher(String host,String remoteDir,SimpleCredential cred);
There are a number of ways a dispatcher can be attached to a compute server. A dispatcher can
be passed directly into the server’s constructor, passed to the server factory when creating a new
server or it can be set after construction. If no dispatcher is specified a local dispatcher is created
by default with the remote directory set to the broker’s working directory.
// use the local dispatcher with remote dir set to broker dir
ComputeServer cs = ComputeServer(String, String, Object);
// attach dispatcher to compute server
ComputeServer cs =
new ComputeServer(String, String, Object, Dispatcher);
// use server factory to create compute server with specific dispatcher
public ComputeServer getComputeServer(int type,
String hostname,
Dispatcher dispatcher);
// set dispatcher after construction
LocalDispatcher dispatcher = new LocalDispatcher("/dir");
cs.setDispatcher(dispatcher);
7
TROUBLESHOOTING
This section has some information on troubleshooting the broker. It will be kept up-to-date online
at :
http://www.gridbus.org/broker/2.4/manual
•
If you get a ClassNotFoundException while running the broker, please make sure the
broker jar and all other jar libraries are in the classpath
52
•
8
When using the broker in Gridsphere portlets running on Windows, the system-user.dir is
set to C:\windows\system32 since the portlet container runs as the SYSTEM user. So,
the broker temporary directory is created in the config\systemprofile subdirectory of the
Windows system directory.
KNOWN ISSUES / LIMITATIONS
As with any software made by anyone, the broker has its own limitations. Some of the most
obvious ones are listed here:
9
•
The broker expects Globus certificates to be in their default directories. So, the
usercert.pem and userkey.pem need to be located in the .globus directory in the user's
home directory. The next version of the broker will have APIs in the GridProxyUtil class to
specify the globus cert locations to override this default behaviour.
•
The broker considers all paths on the local node to be relative to either its local directory
or its temp directory as configured in the Broker.properties. This is mainly a problem if
using the XPML to specify the application description. The "copy" commands in the
XPML assume the paths are all relative to the local directory of the broker. This issue
does not arise when programming the broker, since an absolute path can be set using
the API.
•
The Unicore and XGrid implementation is not guaranteed to work, and is still shaky at
best. This issue will probably take a while to resolve, since it involves setting up a
Unicore, XGrid node and detailed testing.
•
Under a Windows environment, data-aware scheduling may not be highly optimised,
since the broker depends on Network Weather Service (NWS) for bandwidth data. NWS
is currently not available for Windows, and hence the scheduling may not reflect the
correctness of the algorithm.
FUTURE DEVELOPMENT PLANS
The Gridbus Broker is a project in continuous development. As part of the Gridbus project, it aims
to implement the innovations that come out of the research work performed by the members of
the GRIDS lab. Below is a brief about the current plans about the future development path of the
broker. (The list below mainly deals with new features. Obviously there will be work going on to
rid the broker of its current limitations and also improvement in existing features).
•
Middleware
o Support for other middleware/low-level services such as Clarens, NorduGrid,
CondorG etc.
o Implementing a middleware simulator to run applications on simulated grid nodes
using GridSim
•
Application Description Interfaces and Programming models
o Extensions to XPML to include enumerated types, conditions and loops, input
validation
o Support for new application description languages and programming models
such as JSDL, Grid superscalar, ASSIST, GAT.
o A new Grid-thread application programming model for creating distributed
applications that run on a global grid
53
•
Data services
o Improved support for SRB (Storage Resource Broker) datahosts including GSIenabled SRB, optimisation of selection of SRB datahosts, and multiple SRB
federations
•
Programmer support
o Cleaner and enhanced APIs for easier programmability
o The broker APIs available as a set of loosely coupled Web-services so that
programs written in any language can take advantage of
the services of the
Gridbus resource broker
o A plug-in for the Eclipse development environment to facilitate programming with
(and extending) the broker.
•
User friendly (GUI/Web-based) tools
o starting the broker
o job monitoring
o browsing and analysing the broker database and execution logs
o generation and modification of XPML and resource description XML
•
Others
o Improved performance, scalability and robustness
o Advanced scheduling algorithms
o Support for Grid Marker Directory service, VO directories and other information
services as Community Authorization Service(CAS).
o Support for grid-economy model via GridBank
o Ability to invoke any webservice using the broker dynamically at runtime
10 CONCLUSION AND ACKNOWLEDGMENTS
This manual attempts to explain the design of the Gridbus Broker, how to install, configure, and
use it. The programmer's manual aims to help programmers use the broker in their own programs
and how to extend the broker to tailor it to various situations. The Gridbus Broker team would be
very happy to answer any queries that you may have regarding the Broker. Relevant contact
information is given below.
Contact: Dr. Rajkumar Buyya([email protected]), Srikumar Venugopal([email protected]),
Krishna Nadiminti([email protected]), Hussein Gibbins ([email protected])
We would like to take this opportunity to acknowledge all the help and support extended to us by
all the members of the GRIDS lab, CSSE Department, Melbourne University. The Portlets section
was contributed by Hussein on the basis of his experience of using the Broker with the BioGrid
Portal development. We would like to thank Brett Beeson from QUT for his comments and
contributions.
[Note: The latest version of this manual will be available online at
http://www.gridbus.org/broker/2.4/manualv2.4.pdf]
REFERENCES
[1]
R. Buyya, S. Date, Y. Mizuno-Matsumoto, S. Venugopal, and D. Abramson, Neuroscience
Instrumentation and Distributed Analysis of Brain Activity Data: A Case for eScience on
Global Grids,. Journal of Concurrency and Computation: Practice and Experience, 2005.
[Online]. Available: http://www.gridbus.org/.raj/papers/neurogrid-ccpe.pdf
54
[2]
[3]
[4]
[5]
[6]
S. Venugopal, R. Buyya, and L. Winton, A Grid Service Broker for Scheduling Distributed
nd
Data-Oriented Applications on Global Grids, in Proceedings of the 2 Workshop on
Middleware in Grid Computing (MGC 04) : 5th ACM International Middleware Conference
(Middleware 2004), Toronto, Canada, October 2004.
B. Hughes, S. Venugopal, and R. Buyya, Grid-based Indexing of a Newswire Corpus,. in
Proceedings of the 5th IEEE/ACM International Workshop on Grid Computing (GRID
2004), Pittsburgh, USA: IEEE Computer Society Press, Los Alamitos, CA, USA., Nov.
2004.
B. Beeson, S. Melnikoff, S. Venugopal, and D. G. Barnes, A Portal for Grid-enabled
Physics,. In Proceedings of the 2005 Australasian Workshop on Grid Computing and eResearch (AusGrid 2005), Newcastle, NSW, Australia: Australian Computer Society,
January 2005.
H. Gibbins, K. Nadiminti, B. Beeson, R. Chhabra, B. Smith, and R. Buyya, The Australian
BioGrid Portal: Empowering the Molecular Docking Research Community, Technical
Report, GRIDS-TR-2005-9, Grid Computing and Distributed Systems Laboratory,
University of Melbourne, Australia, June 13, 2005.
Rafael Moreno-Vozmediano, Krishna Nadiminti, Srikumar Venugopal, Ana B
Alonso-Conde, Hussein Gibbins, and Rajkumar Buyya, Distributed Portfolio and Investment
Risk Analysis on Global Grids, Technical Report, GRIDS-TR-2005-14, Grid Computing and
Distributed Systems Laboratory, The University of Melbourne, Australia, Nov. 14, 2005.
55
APPENDIX I
The following table identifies a number of possible hardware/software configuration and provides
details on how the Gridbus Broker can be utilised within such configurations and what steps need
to be taken. Although Gridbus Broker is primarily designed to support global Grids, it can however
be used to schedule applications on local nodes or remote one or more clusters. This ensures
scalability of broker from the user desktops to global Grids.
OS Platform
Hardware Configuration
Microsoft
Windows
Series
UNIXlike
system
Single
server
Batch
cluster
LAN-based
distributed
system
*
*
*
*
*
*
*
*
*
*
*
*
*
*
Gridbus Broker Solution
If you have multiple systems whose configurations may
be varied, the broker can utilise these different systems at
the same time. Figure 17 shows the broker interacting
with three different hardware configurations and also
different OS platforms. Individual configurations are also
described in this table.
Install OpenPBS
(http://www.webmo.net/support/pbs.html) or PBS
Pro (http://www.openpbs.org/about_pbspro.html) or
Sun N1 Grid Engine
(http://www.sun.com/software/gridware/index.xml)
on the batch cluster, and enable the shared file
system. For the broker, use PBS or SGE resources
(refer to this manual). If the broker is not installed
on the head node of the cluster, configure the head
node to enable SSH (http://www.openssh.com/)
connections from outside. Then configure the
broker to use an SSH dispatcher instead of a local
dispatcher (which is the default setting).
If Globus Toolkit 2.4.x
(http://www.globus.org/toolkit/downloads/2.4.3/) has
been installed on the batch cluster, simply use
GLOBUS_2_4 resource in the broker (refer to this
manual).
If Globus Toolkit 3.x
(http://www.globus.org/toolkit/downloads/3.2.1/) has
been installed on the batch cluster, simply use
GLOBUS_3_0 resource in the broker (refer to this
manual).
For running the broker from a client of any of the above
middleware see Figure 20 and Figure 18. Executing from
a non-client will first require an SSH to a client node as
shown in Figure 19.
Use the Fork resource in the broker to submit and
execute jobs on the local machine Figure 21. If the broker
is not installed on the server, configure the server to
enable SSH (http://www.openssh.com) connections. Then
configure the broker to use an SSH dispatcher instead of
a local dispatcher (which is the default setting) Figure 22.
Install Alchemi 1.0.beta
(http://www.alchemi.net/1_0_0_beta.html) Manager on
the selected head node; install Alchemi 1.0.beta Executor
on the other nodes and make sure they’ve connected to
the manager. For the broker, use Alchemi resource which
will interact with the manager via web services or the
command line client (refer to this manual). See Figure 23,
Figure 24 below.
Install Condor (http://www.cs.wisc.edu/condor/) manager
on the selected head node; install Condor executor on the
other nodes and make sure they are configured to listen
to the manager. For the broker, use Condor resource
(refer to this manual). Connecting either from a client or
non-client is the same as described above.
56
Remote
Data
SRB
globus-url-copy
Sget/Sput
Execution Node
Cluster with Globus (fork
or PBS job manager)
Globus
Execution Node
Execution Node
Shared File System
Application
Portal
.Net Cluster
Broker
Client Node
Alchemi
Manager
Web Service
Alchemi
Executor
Alchemi
Executor
Alchemi
Executor
SSH
Cluster (SGE/PBS)
or Condor Space
Alchemi
Executor
Middleware
Head Node
Middleware
Client Node
Alchemi
Executor
Execution Node
Execution Node
Figure 17 : Global Grid - Utilising multiple hardware/software configurations at the same
time.
57
Remote
Data
SRB
globus-url-copy
Sget/Sput
Execution Node
Cluster with Globus (fork
or PBS job manager)
Application
Portal
Globus
Broker
Execution Node
Execution Node
Shared File System
Globus Client Node
Figure 18 : Running the broker from a Globus client.
Cluster (SGE/PBS)
or Condor Space
Middleware
Head Node
Middleware
Client Node
Execution Node
Execution Node
SSH
Application
Portal
Cluster (SGE/PBS)
or Condor Space
Broker
Client Node
Middleware
Head Node
SSH
Middleware
Client Node
Execution Node
Execution Node
Figure 19: Multi-clustering - Running the broker from a non-client of the target middleware.
58
Application
Cluster (SGE/PBS)
or Condor Space
Middleware
Head Node
Portal
Broker
Execution Node
Middleware
Client Node
Execution Node
Figure 20: Running the broker from a client of the target middleware.
Application
Single
Server
Portal
Broker
Fork
User Space
Figure 21: Forking jobs on the Local machine.
Application
Portal
Fork
Broker
User Space
SSH
Server Node
Client Node
Figure 22 : Forking jobs on a remote machine using SSH.
59
Alchemi
Executor
Application
.Net Cluster
Alchemi
Manager
Portal
Broker
Web Service
Alchemi
Executor
Alchemi
Executor
Client
Alchemi
Executor
Alchemi
Executor
Figure 23 : Running the broker to submit to Alchemi middleware via Web Services.
Alchemi
Manager
Application
Portal
.Net Space
Broker
Alchemi
Executor
Alchemi Client
Console
Alchemi
Executor
Figure 24 : Running the broker to submit to Alchemi using command line client.
60