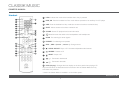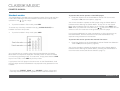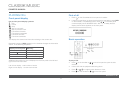
1
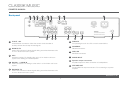
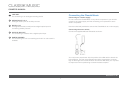
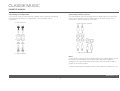
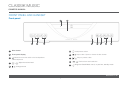
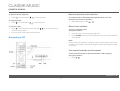
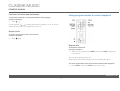
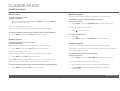
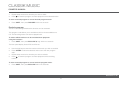
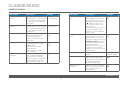
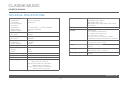
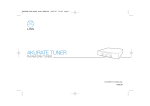
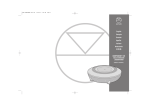
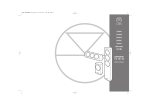
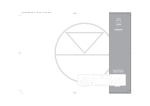
CLASSIK MUSIC
INTEGRATED MUSIC SYSTEM
OWNER’S MANUAL
CLASSIK MUSIC
OWNER’S MANUAL
COPYRIGHT AND ACKNOWLEDGEMENTS
Copyright © 2008 Linn Products Ltd. First edition May 2008.
Linn Products Limited, Glasgow Road, Waterfoot, Eaglesham, Glasgow,
G76 OEQ, Scotland, United Kingdom
All rights reserved. No part of this publication may be reproduced, stored in
a retrieval system, or transmitted, in any form or by any means, electronic,
mechanical, photocopying, recording, or otherwise, without the prior written
permission of the publisher.
The content of this manual is furnished for information use only, is subject to
change without notice, and should not be construed as a commitment by
Linn Products Limited. Linn Products Limited assumes no responsibility or
liability for any errors or inaccuracies that may appear in this manual.
Trade marks used in this publication: Linn, the Linn logo and Knekt are
registered trade marks of Linn Products Limited. Classik Music is a trade
mark of Linn Products Limited.
“DTS” is a registered trade mark of Digital Theater Systems, Inc.
Linn Products Limited disclaims any proprietary interest in trade marks and
trade names other than its own.
UK Registered Design no: 3021659
Pack 1412/E
www.l i nn.c o .uk
CLASSIK MUSIC
OWNER’S MANUAL
CONTENTS
INTRODUCTION
1
Disc types
1
CONNECTING
2
Unpacking
Voltage selection, fuses and mains lead
Positioning
Cleaning
Back panel
Connecting the Classik Music
2
2
2
2
3
4
FRONT PANEL AND HANDSET
7
Front panel
Handset
Handset modes
7
8
10
SOURCE SELECTION
11
PLAYING CDs
12
Front panel display
Basic operation
First of all
Navigating a CD
Next and previous track selection
Direct track selection
Fast search forwards and backwards
Fast scan forwards and backwards
Replay track
Using program modes to control playback
Repeat disc
Repeat track
12
12
12
13
13
13
13
14
14
14
14
15
Repeat section
Shuffle program
Include program
Exclude program
15
15
15
16
TUNER
17
About RDS
Setup
First of all
Tuning functions
AM and FM band selection
Frequency selection
Signal searching
Signal scanning
RDS tuning function
Preset functions
Automatic preset storage
Manual preset storage
Preset selection
Preset deletion
17
17
17
17
18
18
18
18
19
19
19
20
20
21
PRE-AMPLIFIER
22
Volume and muting
Balance adjustment
Bass and treble adjustment
22
23
23
RECORDING A SOURCE
25
Record lock
25
www.l i nn.c o .uk
CLASSIK MUSIC
OWNER’S MANUAL
USER OPTIONS
26
Changing the user options’ settings
Table of user options
26
26
TECHNICAL SPECIFICATIONS
28
GUARANTEE AND SERVICE
29
www.l i nn.c o .uk
CLASSIK MUSIC
OWNER’S MANUAL
INTRODUCTION
Disc types
Linn’s Classik products are designed to deliver the performance you might
expect of traditional component-based systems, but in a compact, discreet
and stylish package.
Discs marked with the following logos are fully compatible with your Classik
Music.
With the Classik Music integrated music system you have invested in a
product which gives outstanding audio performance with CDs and FM/
AM radio, and offers flexibility to adapt to your changing requirements. The
performance of your Classik Music can be upgraded in the future by adding
an external Linn CD player, tuner or pre- or power amplifier. It can even be
integrated into a professionally installed Linn multi-room system for enjoying
Linn quality music throughout your home.
Important:
Whilst every effort has been made to ensure universal compatibility with all
the above-listed disc types, it is impossible to guarantee full operation of
every function of the Classik Music with every disc that is on sale now or in
the future. We have tested many of the discs that are currently available but
many discs that are on sale at this time do not conform to the published and
accepted formal specifications. For this reason, we are unable to accept any
responsibility for the player being unable to playback any particular disc. If
you have discs that do not play on the Classik Music, which are subsequently
found to play on other brands of player, then this does not imply that the
unit is in any way at fault. There are web sites displaying details of discs that
have known playback problems and we suggest that you consult with this
published data before you make any judgments regarding the unit’s playback
abilities. We welcome the receipt of all suspect discs as this may assist us
in ensuring that the Classik Music continues to develop but cannot accept
discs from end-users on the basis that we have made any warranty about
being able to learn how to play them.
Add Linn loudspeakers to your Classik Music for optimum performance.
To find out more about Linn visit www.linn.co.uk.
Novelty discs
Do not play irregularly shaped discs (heart-shaped, business card size, etc.)
in the Classik Music as they may damage the player.
www.l i nn.c o .uk
1
CLASSIK MUSIC
OWNER’S MANUAL
CONNECTING
Positioning
Unpacking
You can position the Classik Music almost anywhere you find convenient,
but please consider the following points:
The Classik Music is supplied with the following:
•
The unit should be placed on a flat, stable and rigid surface.
•
Allow at least 10 cm (4”) of space to the sides, rear and above the
Classik Music for air circulation.
•
Never block the ventilation slots on the top or side of the unit.
•
The IR (infrared) sensor that receives the handset signals is quite
sensitive, so the unit should be kept out of direct sunlight to avoid false
operation. The IR beam from the handset will pass through semiopaque glass, so operation behind, for example, smoked-glass cabinet
doors is possible.
•
luminous handset
•
2 x AAA size batteries for the handset
•
pack of safety compliant speaker plugs
•
AM aerial
•
FM aerial
•
mains lead
We recommend that you retain all packaging in case you need to transport
the Classik Music at a later date.
Important:
Do not open the Classik Music’s disc drawer if the unit is behind glass doors
as this can damage the drawer’s mechanism.
Voltage selection, fuses and mains lead
Manual voltage selection on the Classik Music is not required as the Classik
Music will operate from any mains AC power. There are no user-replaceable
fuses inside the unit. The mains lead supplied may be fitted with a fused
plug according to local regulations. If this is the case, always replace this
fuse with another of the same type and rating. The Classik Music must
always be earthed when connected to the mains supply. Use the earthed
moulded mains lead supplied. Never use an unearthed plug or adaptor with
this unit.
Note regarding plasma and LCD screens
Plasma and large LCD screens emit IR frequencies that can interfere with the
IR remote operation of the Classik Music if the emitted IR hits the product’s
display. Take care not to place the Classik Music in a position where it faces
a plasma/LCD screen or otherwise allows the emitted IR to shine directly on
to it. A position below or directly adjacent to the screen will normally avoid
such interference.
Cleaning
Disconnect the Classik Music from the power supply before cleaning.
Remove dust and fingerprints with a soft, dry cloth. Avoid using domestic
cleaning products on the unit.
www.l i nn.c o .uk
2
CLASSIK MUSIC
OWNER’S MANUAL
Back panel
1
2
3
4
5
10
6
11
12
1
IR OUT 1 & 2
Infrared flasher connectors. Allow the control via the handset of
auxiliary devices that accept infrared signals
2
MAIN RX TX
Knekt LED indicators. Indicate signals being transmitted between units
in a Linn Knekt multi-room system
3
4
5
8
7
9
14
13
ACC
Accessory socket. For installing the unit in a Linn Knekt multi-room
system or for adding an infrared repeater
ROOM 1 - 4, MAIN IN
Knekt connectors. For linking to other units in a Linn Knekt multi-room
system
ROOM RX TX
Knekt LED indicators. Indicate signals being transmitted between units
in a Linn Knekt multi-room system
16
15
6
RS232 IN
For operating the unit via a PC or touch-screen device
7
FM AERIAL
FM aerial connector
8
GND, AM
AM aerial connectors
9
MAINS INPUT
10
Speaker output connectors
Amplified output for direct connection to loudspeakers
11
PRE-AMP OUT
Pre-amplifier line output connectors. For connecting to a power
amplifier
www.l i nn.c o .uk
3
CLASSIK MUSIC
OWNER’S MANUAL
12
Connecting the Classik Music
LINE OUT
For connecting to an analogue recording device
13
AUDIO IN AUX 1 & 2
Analogue audio inputs for auxiliary sources
14
DIG IN 1 & 2
One digital electrical (coaxial) and one digital optical input for
connecting auxiliary sources
15
OPTICAL DIG OUT
For connecting to a device with a digital optical input
16
EARTH GROUND
For connecting the unit to an earthing terminal if no mains earth is
available
Connecting to a mains supply
Do not connect the Classik Music or any other component in your hi-fi/AV
system to the mains supply until the connecting of components to each
other is completed.
Use the mains lead provided to connect the Classik Music to a mains supply.
Connecting the tuner aerials
Connect the supplied AM and FM aerials as shown.
You may have to experiment with the position of the AM aerial to obtain the
best reception. The end of the FM aerial should be connected to a wall as
high as the length of the aerial will allow. As with the AM aerial, you may have
to experiment with its positioning to obtain the best reception.
www.l i nn.c o .uk
4
CLASSIK MUSIC
OWNER’S MANUAL
Connecting to loudspeakers
If you are not using an external power amplifier and are therefore connecting
the Classik Music directly to loudspeakers, use the speaker output
connectors.
Connecting auxiliary sources
The Classik Music has two analogue and two digital inputs for connecting
other source products such as a DAB tuner, or the audio output from a
set-top box*, games console or camcorder.
TO LOUDSPEAKERS
FROM AUXILIARY SOURCES
FROM AUXILIARY SOURCES
TO LOUDSPEAKERS
Note:
If you connect a source product’s digital output to the Classik Music you will
be using the Classik Music to convert the audio signal from digital to
analogue. This may provide better audio quality than using the analogue
output on the source product.
* Cable-channel receiver, satellite receiver, HDTV receiver, Freeview box, etc.
www.l i nn.c o .uk
5
CLASSIK MUSIC
OWNER’S MANUAL
Connecting a recording device
If you wish to use a recording device such as a DAT recorder, connect it to
the LINE OUT connectors.
Connecting to an external power amplifier
If you wish to use an external power amplifier to feed audio signals to your
loudspeakers, connect the Classik Music’s PRE-AMP OUT to the external
power amplifier.
TO RECORDING DEVICE
TO POWER AMP INPUT
TO RECORDING DEVICE
Connecting to an external pre-amplifier
If you wish to listen to CDs via the digital-to-analogue converter in an
external pre-amplifier, connect the Classik Music’s OPTICAL DIG OUT to the
external pre-amplifier.
TO POWER AMP INPUT
TO EXTERNAL PRE-AMPLIFIER
www.l i nn.c o .uk
6
CLASSIK MUSIC
OWNER’S MANUAL
FRONT PANEL AND HANDSET
Front panel
1
3
4
2
5
6
7
8
9
1
Disc drawer
6
2
Front panel display
7
/
Stops a disc. Opens or closes the disc drawer
3
Mutes/unmutes the audio to the loudspeakers
and headphones
8
/
Plays or pauses a disc
9
,
4
,
Headphones socket
,
Previous/next track selection
Adjust the volume level
10
5
10
Brings the Classik Music out of, or puts into, standby mode
Change source
www.l i nn.c o .uk
7
CLASSIK MUSIC
OWNER’S MANUAL
Handset
1
2
3
4
6
18
7
19
20
9
21
22
10
23
11
24
12
25
13
26
14
27
15
LEDs Indicate the mode of the handset when a key is pressed
2
DVD, CD Puts the handset into Disc mode. Allows operation of an auxiliary Linn CD player
3
AMP Puts the handset into Amp mode (for access to functions marked in blue)
4
SHIFT Allows access to functions marked in red
5
STORE Stores CD playback and tuner information
17
5
8
1
16
Mutes/unmutes the audio to the loudspeakers and headphones
6
7
SCAN For scanning for tuner signals
8
PRESET For selecting tuner presets
9
SRC -, SRC + (source -, source +) Change source
10
, AUDIO ADJUST Plays a CD. Accesses adjustable audio features
11
, WHERE* Pauses a CD
12
, WHAT* Stops a CD
13
,
* Fast search backwards
14
,
* Fast search forwards
15
DISP (display) Changes the time display on the front panel when playing a CD
Keys and functions not listed above do not function with the Classik Music but may
with other Linn products.
* Used if the Classik Music is installed in a Linn Knekt system.
www.l i nn.c o .uk
8
CLASSIK MUSIC
OWNER’S MANUAL
16
, OFF Brings the Classik Music out of, or puts into, standby mode.
Sends ‘off’ (i.e. puts into standby) command to all available Linn equipment
17
Digits 0-9, shifted functions Numeric keys. Functions marked in red
,
18
19
Adjust the volume level
TUNE For selecting a tuner frequency
20 BAND Changes tuner band
21
/
/
/
For adjusting various features and settings
22
(‘select’) For selecting various features and settings
23
Opens/closes the disc drawer
24
, DO* Previous track selection
25
Next track selection
26
Fast scan forwards
27
Fast scan backwards
Keys and functions not listed above do not function with the Classik Music but may
with other Linn products.
* Used if the Classik Music is installed in a Linn Knekt system.
www.l i nn.c o .uk
9
CLASSIK MUSIC
OWNER’S MANUAL
Handset modes
To prevent this and to operate a Linn DVD player:
The Classik Music’s handset has two operating modes, Disc mode and Amp
mode. When listening to CDs the handset must be in Disc mode (to allow
operation of the , , etc. keys).*
•
•
You will now be able to operate the DVD player using the Classik Music’s
handset without affecting the Classik Music. To play CDs on the Classik
Music without affecting the DVD player, on the handset press SHIFT then
DVD. When you press one of the disc keys ( , , etc.) the handset will now
send out a CD command that will be ignored by the DVD player.
To put the handset in Disc mode, press DVD.
To access any of the keys marked in blue (e.g. AUDIO ADJUST) the
handset must be in Amp mode.
•
Enter User Options on the Classik Music and set DVD Commands
Accepted to No (see User Options, page 26).
To put the handset in Amp mode, press AMP.
If you have an additional Linn tuner connected to, or in the same room as,
the Classik Music, both the external tuner and the Classik Music may
respond to key presses from the handset.
To prevent this and to operate the external Linn tuner:
•
Enter User Options on the Classik Music and set Enable Auto Selection:
Tuner to Off (see User Options, page 26).
You will now be able to operate the external tuner via the Classik Music’s
handset without affecting the Classik Music, providing the Classik Music is
not on the tuner source (see Source Selection, page 11).
You may find that on occasion when using the handset that the Classik
Music does not respond as expected. The likely reason is that the handset
is in the wrong operating mode. To correct this, simply press either the DVD
key for Disc mode, or the AMP key for Amp mode.
If you have a Linn DVD player in the same room as the Classik Music, both
the DVD player and the Classik Music may respond to key presses from the
handset.
* The tuner keys (PRESET, SCAN, etc.), SOURCE -/+ keys, volume and
mute keys are always available, regardless of the mode the handset is in.
www.l i nn.c o .uk
10
CLASSIK MUSIC
OWNER’S MANUAL
SOURCE SELECTION
There are six sources available on the Classik Music: two internal sources
(disc and tuner) and four auxiliary sources (AUX 1, AUX 2, DIG 1 and DIG 2).
To select a source:
using the handset –
•
For the disc source, press the DVD key then any of the disc keys
( , , etc.).
•
For the tuner source, press any of the tuner keys (PRESET, SCAN,
etc.).
•
For auxiliary sources, repeatedly press or hold SRC – / SRC + until the
desired source is shown on the display, then press ‘select’.
using the front panel –
•
Repeatedly press / until the desired source is shown on the display.
Wait for a few seconds and the source will automatically be selected.
www.l i nn.c o .uk
11
CLASSIK MUSIC
OWNER’S MANUAL
PLAYING CDs
First of all
Front panel display
1.
Press
2.
If the front panel does not show the disc display (see below), press DVD
on the handset, or repeatedly press or hold / on the front panel
until the display shows SOURCE DISC. After a short delay the disc
display shown below appears on the front panel.
Key to front panel display symbols:
Play
Pause
Stop
Skip to next track
Skip to previous track
Fast search forwards
Fast search backwards
Fast scan forwards
Fast scan backwards
on the Classik Music’s front panel or handset.
Basic operation
The display also shows time information relating to the current disc.
Repeated presses of DISP (display) on the handset changes the information
shown, in the following sequence:
Display on front panel
(no symbol)
Meaning
Track elapsed time
Track remaining time
T
T
Total time elapsed
Total time remaining
Additional information for CDs is displayed on the front panel to the left and
right of the time information:
To play a CD:
•
Left of time display – total number of tracks
Right of time display – current track number
Press on the handset or
drawer.
•
Insert a CD with the playback side facing down.
•
Press
or
•
Press
on the handset or
/
/
on the front panel to open the disc
or nudge the disc drawer to close.
/
on the front panel.
www.l i nn.c o .uk
12
CLASSIK MUSIC
OWNER’S MANUAL
Next and previous track selection
To pause/resume playback:
•
Press
on the handset or
/
on the front panel.
To skip forwards or backwards through the tracks on a CD:
using the front panel or handset –
To stop playback:
•
Press
on the handset or
/
•
on the front panel.
To remove a CD:
•
Press on the handset or press and hold
the disc drawer opens.
•
Remove the CD then close the disc drawer.
Repeatedly press or hold
/
.
Direct track selection
/
on the front panel until
To play a particular track:
using the handset –
•
Enter the track number using the digit keys.
•
Press STORE or wait for a few seconds and the track will be selected
automatically.
Navigating a CD
Note:
A track cannot be selected if a program mode is active and the track is not
included in the program (see Include program and Exclude program, pages
15 and 16).
Fast search forwards and backwards
To fast search forwards or backwards while a CD is playing:
using the handset –
•
Hold
/
.
www.l i nn.c o .uk
13
CLASSIK MUSIC
OWNER’S MANUAL
Fast scan forwards and backwards
Using program modes to control playback
To fast scan forwards or backwards while a CD is playing:
using the handset –
•
Press
/
.
Further presses of / increases the speed of playback: 4x, 6x, 8x normal
speed. Another press returns playback to normal.
Replay track
To return to the start of the current track:
using the handset –
•
Press
(play).
Repeat disc
To repeat an entire CD:
using the handset –
•
While the CD is playing press SHIFT, then press DISC (1 key) within
two seconds.
The front panel display shows ALL.
When the CD has finished playing it will automatically play again.
To cancel repeat disc mode and continue with normal playback:
•
Press SHIFT, then press DISC within two seconds.
www.l i nn.c o .uk
14
CLASSIK MUSIC
OWNER’S MANUAL
Repeat track
Shuffle program
The CD must be stopped before this function can be accessed.
To repeat a specific track:
using the handset –
•
To shuffle the order in which tracks are played:
using the handset –
While the chosen track is playing press SHIFT, then press TRACK
(2 key) within two seconds.
•
The front panel display shows ONE.
Press SHIFT, then press SHUFFLE (4 key) within two seconds.
The front panel display shows SHF.
When the track has finished playing it will automatically play again.
•
Press
to start playback.
To cancel repeat track mode and continue with normal playback:
•
To cancel shuffle mode:
Press SHIFT, then press TRACK within two seconds.
Repeat section
•
Press
.
•
Press SHIFT, then press SHUFFLE within two seconds.
To repeat a specific section of a CD:
using the handset –
Include program
While the disc is playing select the start of the section to repeat –
The CD must be stopped before this function can be accessed.
•
This program mode allows you to select which tracks you wish to listen to
from those available on a CD.
Press SHIFT, then press A-B (3 key) within two seconds.
The front panel display shows A-.
Continue playback until you reach the end of the section to repeat –
•
To select which tracks are to be played:
using the handset –
Press SHIFT, then A-B within two seconds.
1.
Press SHIFT, then press INCLUDE (5 key) within two seconds.
When A-B has been pressed for the second time, A-B is shown on the
display and the chosen section automatically plays repeatedly.
The front panel display shows INC and P01:00.
To cancel repeat section mode and continue with normal playback:
2.
Use the digit keys to enter the number of the desired track.
•
3.
Press STORE to store the selection and move to the next
program step.
Press SHIFT, then press A-B within two seconds.
www.l i nn.c o .uk
15
CLASSIK MUSIC
OWNER’S MANUAL
4.
Repeat steps 2 and 3 for all tracks you wish to select.
5.
Press
to store the program and start playback of the selected tracks.
To clear a stored program or cancel include program mode:
•
Press SHIFT, then press INCLUDE within two seconds.
Exclude program
The CD must be stopped before this function can be accessed.
This program mode allows you to exclude tracks from those available on a
CD. The remaining tracks can then be played back.
To select which tracks are to be excluded from playback:
using the handset –
1.
Press SHIFT, then press EXCLUDE (6 key) within two seconds.
The front panel display shows EXC and P01:00.
2.
Use the digit keys to enter the number of the track you wish to exclude.
3.
Press STORE to store the selection and move to the next program
step.
4.
Repeat steps 2 and 3 for all tracks you wish to exclude.
5.
Press
tracks.
to store the program and start playback of the remaining
To clear a stored program or cancel exclude program mode:
•
Press SHIFT, then press EXCLUDE within two seconds.
www.l i nn.c o .uk
16
CLASSIK MUSIC
OWNER’S MANUAL
TUNER
First of all
About RDS
RDS (Radio Data System) information is transmitted in many countries for
stations in the FM band. The name of the station plus the programme type
(Pop Music, Light Classic, etc.) and perhaps the title of the programme or
piece of music being broadcast, are displayed on the Classik Music’s front
panel. In addition, RDS allows you to search the FM frequency for stations of
a particular type (see RDS tuning function, page 19).
Setup
1.
Press
on the Classik Music’s front panel or handset.
2.
Press any of the tuner keys on the handset (PRESET, SCAN,
TUNE or BAND). The tuner display appears on the front panel.
or
The first time a tuner key is pressed (PRESET, SCAN, TUNE or BAND) or
the tuner source is selected, the display shown below appears on the front
panel.
Repeatedly press or hold SRC - / SRC + on the handset, or / on the
front panel, until the display shows SOURCE TUNER. After a few
seconds the display will change to the tuner display above.
Tuning functions
The Classik Music must be set for the correct radio frequency range for your
country. Use the / keys on the handset to select your region (either
Europe, USA or Japan), then press ‘select’ on the handset. If you are
unsure of the correct setting for your country please contact your local Linn
retailer.
If you wish to change the region setting:
•
Press SHIFT, then press and hold SIGNAL (9 key) on the handset until
the Region? screen shown above is displayed.
•
Use the / keys on the handset to select the required region, then
press ‘select’.
www.l i nn.c o .uk
17
CLASSIK MUSIC
OWNER’S MANUAL
AM and FM band selection
Signal searching
To toggle between AM and FM:
This function allows you to search up or down the AM or FM band until a
signal is found.
•
Press BAND on the handset.
To search for signals:
using the handset –
The selected band is shown on the front panel display.
•
Repeatedly press and hold SCAN until the front panel display
shows SEARCH.
•
To search for the next signal, press
•
To search for the previous signal, press
Frequency selection
To increase or decrease the received frequency:
using the handset –
•
.
Press TUNE.
Signal scanning
TUNE is shown on the front panel display.
This function is the same as signal searching (see above) but scanning
continues automatically five seconds after a signal is found.
•
To increase the frequency, repeatedly press or hold
.
•
To decrease the frequency, repeatedly press or hold
.
To scan for signals:
using the handset –
or
•
.
Enter a frequency using the digit keys.
As you enter a frequency it is automatically adjusted to ensure it is valid. To
remove an incorrect digit, press .
•
Repeatedly press and hold SCAN until the front panel display shows
SCAN.
•
To scan upwards through the tuner band, press
•
To scan downwards through the tuner band, press
.
.
To select a station and terminate signal scanning:
•
Press SCAN.
www.l i nn.c o .uk
18
CLASSIK MUSIC
OWNER’S MANUAL
RDS tuning function
Preset functions
This function allows you to find stations by the type of programme being
broadcast (providing RDS is available in your location).
This section explains how to store and access stations as presets
(maximum of 200).
To search or scan for signals:
using the handset –
•
Repeatedly press and hold SCAN to choose either signal searching or
signal scanning (see Signal searching and Signal scanning, page 18).
•
Repeatedly press
on the handset. The front panel display cycles
through the various programme types.
•
When your chosen type is shown on the display, press to search/
scan upwards through the FM band, press to search/scan
downwards through the FM band.
To select a station and terminate signal searching/scanning:
•
Press SCAN.
Automatic preset storage
Note:
If no stations of a particular type are available the Classik Music will return to
the last station selected.
To automatically scan for all available stations and store them as
presets:
using the handset –
•
Select the band you wish to store presets from.
•
Press STORE.
•
Press SCAN twice. AUTOSTORE SEARCHING appears on the front
panel display.
Automatic preset storage will then start at the lowest frequency and continue
up to the highest frequency. As each station is found there is a pause of 5
seconds before the station is stored as a preset.
www.l i nn.c o .uk
19
CLASSIK MUSIC
OWNER’S MANUAL
•
To skip the 5 second pause and store the station as a preset, press and
hold . Scanning will then continue.
•
To skip the 5 second pause and not store the station as a preset,
press . Scanning will then continue.
3.
You are able to give each preset a name of up to 10 characters.
Enter a name using the following handset keys –
/
‘select’
Cycle through A-Z, 0-9 and commonly used symbols.
Switches between capital and non-capital letters.
digit keys Can be used to quickly access numbers and A-Z in the
same manner as a telephone key pad, e.g. repeatedly press
2 to access A/B/C/2, or 3 to access D/E/F/3, etc.
Scanning will stop automatically when the tuner reaches the highest
frequency in the band.
Notes:
In countries that transmit RDS, stations are stored using the station
name. In other countries, stored stations are automatically named by
radio band and the order in which they are stored (FM1, FM2, etc.).
•
When you have selected the desired letter/digit/symbol press
move to the next space.
•
To change or delete a character use the
/ keys until the character
flashes, then enter the new character, or press and hold to delete it.
You are able to give a preset a different name if you prefer (see Manual
preset storage, below).
•
To insert a character use the / keys to reach the position at which
you wish to insert the new character. Press and hold . The flashing
character and all others that follow it move one space to the right. Add
the new character.
4.
When you have finished entering the name for the preset, press
STORE.
Automatic preset storage must be carried out separately for the AM and FM
bands.
Previously stored stations will not be stored again.
Preset selection
Manual preset storage
To select a preset:
using the handset -
To manually store a station as a preset:
using the handset 1.
Set the tuner to the station you wish to store.
2.
Press STORE.
to
•
Press PRESET.
The front panel display shows PRESET.
The front panel display shows a flashing bar, below which is the following:
STORE:
0..9
TO EDIT
•
Repeatedly press or hold / . (Pressing cycles through the presets
numerically then alphabetically. Pressing reverses the order of the
cycle.)
www.l i nn.c o .uk
20
CLASSIK MUSIC
OWNER’S MANUAL
or
•
Press /
alphabet.
to select the last/first preset of each letter of the
or
•
Enter the first character of the preset’s name using the digit keys on the
handset, remembering that digit 2 accesses any preset that begins with
either A, B, C or 2, digit 3 accesses presets that begin with D, E, F or 3,
etc.
The front panel display shows the preset’s name.
Preset deletion
To delete a preset:
using the handset •
Press PRESET.
•
Use
•
Hold PRESET until PRESS
display.
•
Press ‘select’.
/
to select the preset you wish to delete.
TO CLEAR appears on the front panel
The display shows PRESET CLEARED.
To delete all presets:
using the handset •
Press then release PRESET.
•
Hold PRESET until PRESS
display.
•
Hold ‘select’ until the display shows ALL PRESETS CLEARED.
TO CLEAR appears on the front panel
www.l i nn.c o .uk
21
CLASSIK MUSIC
OWNER’S MANUAL
PRE-AMPLIFIER
To adjust the volume:
Volume and mute are always adjustable from the handset regardless of
the mode the handset is in. To access the other pre-amplifier functions the
handset must be in Amp mode.
•
To put the handset in Amp mode:
To exit from the volume display:
•
•
Repeatedly press or hold
/
.
The front panel displays the volume level.
Press AMP on the handset.
Press SRC – / SRC + on the handset or
/
on the front panel.
or
To return to operating the disc source on the Classik Music using the
handset, put the handset into Disc mode.
•
Wait a few seconds and the front panel will revert to its previous display.
To put the handset in Disc mode:
To mute or unmute the audio:
•
•
Press DVD on the handset.
Press
.
Note:
Connecting headphones to your Classik Music will automatically mute the
sound from the speaker and pre-amp output sockets.
Volume and muting
The volume range is from 0 to 100.
Important:
Please note that excessive volume can damage your hearing and your audio
equipment.
www.l i nn.c o .uk
22
CLASSIK MUSIC
OWNER’S MANUAL
Balance adjustment
To exit balance adjustment:
•
Press SRC – / SRC +.
or
•
Wait a few seconds and the front panel will revert to its previous display.
Bass and treble adjustment
This function allows you to shift the balance between the left and right
loudspeakers.
Balance range is from 10 increments to the left, to 10 increments to the
right, with neutral balance being 0.
To shift the balance (handset must be in Amp mode, see previous
page):
•
The adjustment range for bass and treble is -7 to +7, with neutral being 0.
Repeatedly press AUDIO ADJUST on the handset until the front panel
shows the balance display.
To adjust the level of bass or treble (handset must be in Amp mode,
see previous page):
•
•
Repeatedly press AUDIO ADJUST on the handset until the front panel
shows the bass or treble display.
To shift the balance to the left/right, repeatedly press or hold
/ on the handset.
www.l i nn.c o .uk
23
CLASSIK MUSIC
OWNER’S MANUAL
•
To increase the level of bass/treble, repeatedly press or hold
handset.
on the
•
To decrease the level of bass/treble, repeatedly press or hold
handset.
on the
To exit bass or treble adjustment:
•
Press SRC – or SRC +.
or
•
Wait a few seconds for the display to change to the current source
display.
www.l i nn.c o .uk
24
CLASSIK MUSIC
OWNER’S MANUAL
RECORDING A SOURCE
You are able to direct the disc, tuner or an auxiliary source signal from the
Classik Music to a recording device (such as a DAT recorder).
To direct a source signal to a recording device, simply select the desired
source using the handset or front panel. (The outputs of the Classik Music
always carry the audio signal of the currently selected source.)
Record lock
To prevent the source you are recording being changed while recording is in
progress, use the record lock feature.
To turn the record lock on:
using the handset –
•
With the name of the source you wish to record showing on the display;
press SHIFT, then press RECORD (8 key) within two seconds.
SOURCE (RECORD LOCKED) is shown on the display.
To turn the record lock off:
•
With the name of the source you are recording showing on the display,
press SHIFT, then press RECORD within two seconds.
(RECORD LOCKED) is no longer shown.
www.l i nn.c o .uk
25
CLASSIK MUSIC
OWNER’S MANUAL
USER OPTIONS
To exit user options mode:
•
Press
.
Changing the user options’ settings
The user settings are saved and the Classik Music turns on.
Table of user options
The following table shows the user options that are available, briefly
describes them and shows the available settings for each.
Default settings are shown below in bold and on the front panel display are
indicated with a *.
User option
Description
Set display brightness
Allows adjustment to the
Auto
brightness of the front panel
2% - 100%
display. When set to Auto the
unit will select a brightness
level based on the ambient
light level in the room (the
brighter the room, the brighter
the display will be).
Enable source memory
On: Each source has its own
volume, bass, treble, and
balance settings.
Off: All the sources use the
same volume, bass, treble,
and balance settings.
On
Off
Enable IR sensor
Enables/disables control of
the Classik Music from the
handset.
On
Off
To change the user options’ settings:
using the handset –
•
Put the Classik Music into standby mode by pressing
.
•
Hold
•
Repeatedly press or hold
or
to select the required user option.
•
Repeatedly press or hold
option.
or
to change the setting of the user
until the display shows User Options.
To restore a user option to its default value:
•
Select the required user option.
•
Press ‘select’.
Settings
www.l i nn.c o .uk
26
CLASSIK MUSIC
OWNER’S MANUAL
User option
Description
Set IR modulation:
IR out 1
36 kHz
Modulation frequency for
infrared flasher 1. If the default 6 to 1005 kHz
is not used then the frequency
is in the range 6 to 1005 kHz
(non-linear).
56 kHz
Modulation frequency for
infrared flasher 2. If the default 6 to 1005 kHz
is not used then the frequency
is in the range 6 to 1005 kHz
(non-linear).
Set IR modulation:
IR out 2
Settings
Configure ACC socket
Defines the use of the
accessory socket (ACC).
IR = infrared repeater
RCU = Linn Knekt remote
control unit
IR
RCU
Configure Knekt mode
Auto: Determines whether the
unit is being used in a Linn
Knekt system.
Main: See Linn’s Knekt
documentation.
Room: See Linn’s Knekt
documentation.
Auto
Main
Room
DVD commands
accepted
If a DVD player is in the same
room as the Classik Music
and you want the Classik
Music to ignore DVD handset
commands, set to No (see
Handset modes, page 10).
Yes
No
User option
Description
Settings
Enable auto-selection:
Disc
When set to On, if the
Classik Music is not on the
disc source and you press
one of the disc function keys
( , , etc.) the unit will
automatically switch to the
disc source.
When set to Off you will have
to select the disc source
before you can use the disc
function keys.
On
Off
Enable auto-selection:
Tuner
When set to On, if the
Classik Music is not on the
tuner source and you press
one of the tuner function keys
(PRESET, SCAN, etc.) the
unit will automatically switch
to the tuner source.
When set to Off you will have
to select the tuner source
before you can use the tuner
function keys.
On
Off
RS232 baud rate
Sets the baud rate for RS232
control.
9600
4800 to 230400
RS232 events
When set to On the Classik
Music passes information
regarding its internal status to
an external device that
accepts RS232 data.
On
Off
RS232 startup
message
When set to On the Classik
Music will output an RS232
tart message when it is
switched on.
On
Off
www.l i nn.c o .uk
27
CLASSIK MUSIC
OWNER’S MANUAL
TECHNICAL SPECIFICATIONS
Connector type
Headphone
Line outputs
Pre-amp outputs
Aux inputs
Digital inputs
Digital outputs
Speaker outputs
3.5 mm stereo jack
RCA phono
“
“
1 x coaxial RCA, 1 x optical TOSLINK
1 x optical TOSLINK
BFA
Input impedance
Aux inputs
100 kΩ
Input voltage
Aux inputs
2 V RMS
Headphones
Output level
Load impedance
4 V RMS
600 Ω
Power amplifier
75 W RMS per channel into 4 Ω
Power consumption
Standby
Rated
12 W
123 W
Compatible disc types
CD, CD-R, CD-RW
Compatible formats
LPCM, DTS CD
Tuner connectors
FM and AM aerial terminals
Tuner range
USA: FM 87.5 MHz to 108.5 MHz
AM 530 kHz to 1730 kHz
Japan: FM 75.5 MHz to 108.5 MHz
AM 522 kHz to 1629 kHz
Europe: FM 87.5 MHz to 108.5 MHz
AM 522 kHz to 1611 kHz
Tuner resolution
FM TUNE mode: 50 kHz
FM SCAN mode: 100kHz
AM TUNE mode: 1kHz
AM SCAN mode: 10kHz USA, 9 kHz Japan
and Europe
Tuner presets
200 user definable
Control
RS232 input
Linn accessory socket: RJ45
Linn Knekt main input: RJ45
Linn Connect: 4 x RJ45
IR out: 2 x 3.5 mm mono jack, variable
modulation frequency from 6 kHz to 1005 kHz
Dimensions
381 mm (W) x 80 mm (H) x 368 (D)
15” (W) x 3.1” (H) x 14.5” (D)
Weight
6.25 kg
13.8 lb
Shipping dimensions
520 mm (W) x 220 mm (H) x 480 (D)
20.5” (W) x 8.7” (H) x 18.9” (D)
Shipping weight
9 kg
19.8 lb
www.l i nn.c o .uk
28
CLASSIK MUSIC
OWNER’S MANUAL
GUARANTEE AND SERVICE
This product is guaranteed under the conditions which apply in the country
of purchase and your statutory rights are not limited. In addition to any
statutory rights you may have, Linn undertake to replace any parts which
have failed due to faulty manufacture. To help us, please ask your Linn
retailer about the Linn warranty scheme in operation in your country. In parts
of Europe, the United States of America and some other markets, extended
warranty may be available to customers who register their purchase with
Linn. You can register your product online at www.linn.co.uk
Linn Products Limited
Glasgow Road, Waterfoot, Eaglesham, Glasgow G76 0EQ, Scotland, UK
Phone: +44 (0)141 307 7777
Fax: +44 (0)141 644 4262
Helpline: 0500 888909
Email: [email protected]
www.linn.co.uk
Linn Incorporated
8787 Perimeter Park Boulevard, Jacksonville, FL 32216, USA
Phone: +1 (904) 645 5242
Fax: +1 (904) 645 7275
Helpline: 888-671-LINN
Email: [email protected]
www.linninc.com
Warning
Unauthorised servicing or dismantling of the product invalidates the
manufacturer’s warranty. There are no user serviceable parts inside the
product and all enquiries relating to product servicing should be referred to
authorised retailers only.
Technical support and information
For technical support, product queries and information, please contact either
your local retailer or one of the Linn offices opposite.
Linn Deutschland GmbH
Hühnerposten 1d, D-20097 Hamburg, Deutschland
Phone: +49-(0) 40-890 660-0
Fax: +49-(0) 40-890 660-29
Email: [email protected]
www.linn.co.uk
Full details of your local retailer/distributor can be found on the Linn web site:
www.linn.co.uk
Important
•
Please keep a copy of the sales receipt to establish the purchase date
of the product.
•
Please ensure that your equipment is insured by you during any transit
or shipment for repair.
www.l i nn.c o .uk
29