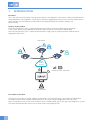
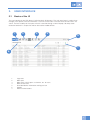
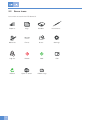
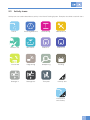
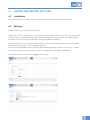
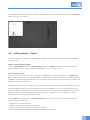
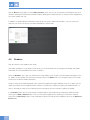
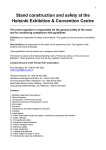
1
LM Dental Tracking System
Server User Manual
This manual is valid for:
Dental Tracking System’s Server 2.11.4.
This manual is connected to Dental Tracking System’s Reader and it is recommended to read
the Manual for Dental Tracking System Reader also.
Manufacturer, Marketing and Sales
LM-Instruments Oy
PL 88 (Norrbyn rantatie 8)
FI-21601 Parainen, Finland
Telephone: +358 2 4546 400
Fax: +358 2 4546 444
E-mail: [email protected]
Internet: www.lm-dental.com, www.dentaltracking.com
Copyright
Copyright 2015 LM-Instruments Oy. All rights reserved. The contents of this manual may be changed without
notice. No part of this manual may be reproduced in any form or by any means without permission in writing
from LM-Instruments Oy.
CONTENT
1. Introduction ............................................................................................................................................
2. User interface .........................................................................................................................................
2.1. Basics of the UI .............................................................................................................................
2.2. Server icons ..................................................................................................................................
2.3. Activity icons .................................................................................................................................
3. Glossary ..................................................................................................................................................
4
5
5
6
7
8
4. Taking server into use ........................................................................................................................... 11
4.1. Installation .................................................................................................................................... 11
4.2. Settings ........................................................................................................................................ 11
4.3. Users .............................................................................................................................................12
4.4. Activities – Icons .......................................................................................................................... 12
4.5. Article groups – Cycles ................................................................................................................ 13
4.6. Readers ........................................................................................................................................ 14
5. Using the server .....................................................................................................................................16
5.1. Login ............................................................................................................................................. 16
5.2. Reports ......................................................................................................................................... 16
5.3. Logs .............................................................................................................................................. 17
5.4. Instruments ...................................................................................................................................17
5.5. Editor function buttons ................................................................................................................ 18
5.6. Intrument sets .............................................................................................................................. 18
5.7. Template sets ............................................................................................................................... 19
5.8. Registering new instruments ....................................................................................................... 19
5.9. HID mode use and registering new instruments through the server ......................................... 19
6. Support .................................................................................................................................................... 20
1.
INTRODUCTION
Foreword
This is the user manual for Dental Tracking System Server. Later referred as “DTS Server”. Read and understand this
manual before you use the product. If there are any questions regarding the contents of this manual, please contact
LM-Instruments Oy. User Manual can be found on www.dentaltracking.com and latest updates can
be found there.
Purpose of the product
Dental Tracking System, DTS, is used to record and track (chosen) activities made to articles registered
in the system. Articles can be different kinds dental hand instruments or materials like dental fillings.
Dental Tracking System, DTS, is used to record and verify usage cycles of (chosen) activities made to articles
registered to the system.
END USERS
Dental
Tracking
System
REPORTS, LOGS, TRACKING
https://
SERVER USER
Description of the DTS
The DTS consists of one or several reader(s) connected to it. The communication is encrypted (HTTPS) between
the readers and the server. Readers record activities on the server and get configurations from the server.
Users can be given access to the server in order to access web-based UI, e.g. to view logs and configure the system.
The communication between server users and the server is encrypted (HTTPS).
4
5
2.
USER INTERFACE
2.1
Basics of the UI
The user interface for the DTS Server is built from basic UI elements. The main panel area is used to show
the logo, menu options and user information. The main content area is the area where all menu items are
shown. The best usability for the layout of the UI is reached through a normal laptop / desktop screen
resolution however it is responsive and can be used on mobile devices.
1
2
3
4
5
7
6
1.
2.
3.
4.
5.
6.
7.
Logo area
Menu area
Menu Extra, which opens a submenu, etc. for users
Main content area
User identification information and log out icon
Header
Editor function buttons
5
2.2
Server icons
Icons which are used in the DTS Server UI.
6
Repor ts
Logs
Readers
Materials
Extras
Users
Log out
Delete
Add
Refresh
Open in excel
Editor’s logs
Instruments
Settings
Edit
5
2.3
Activity icons
Activity icons are used to describe any activity in the Dental Tracking System. Examples of activities used with icons.
Rinse
Washing Machine
Autoclaving
Maintenance
Ultrasonic
Check-in
Check-out
End of life
Registering
Sharpening
Storage in
Storage out
Transpor t
Clinical use
Packing
Overlay exit
Example of
exit overlay
5
7
3.
GLOSSARY
Activity
An activity can be performed on a set of articles. Activities are usually part of one or more activity cycles, but
they can also be configured without a cycle. Such an activity can be performed on any article, and cannot be
part of a cycle.
An activity can also be configured as a "full set activity". This means that not all articles from a set need to be
detected; the system will apply the activity to all articles in the set of the detected article. This type of activity is
recommended only for sets that are somehow sealed, to avoid applying activities that actually are missing from
a set.
Article
An article is a taggable instrument or material. A tag is an identifier, which can be e.g. RFID, barcode or some
other unique identifier.
Article group
Articles can belong to only one article group. Groups are used to separate different types of articles, e.g.
diagnostic and restoration instruments. Groups themselves do not have attributes.
Cycle
A cycle can be set for each article group. A cycle is an ordered list of activities which need to be executed for
an article. Activities can be configured to be executed only once and marked as required or optional. Activities
not part of a cycle are thus not allowed for articles belonging to the group, except in activities without a cycle.
A maintenance reminder can be set for a cycle. When a maintenance reminder is set for an activity, skipping
that activity a set number of times will result in a user warning.
A sterile expiration can be set for a cycle. When it is set for an activity (usually Autoclaving) in a cycle,
performing any other activities in the cycle after the time limit will result in an error message.
Editor
Users with sufficient user rights may add or edit information on the server. Clicking the Add or Edit buttons will
open an editor box on which users may add or edit information.
Error
If a cycle is set for a group and an activity is performed in violation of the cycle rules, errors will be displayed on
the reader. Some of the errors can be forced, i.e. at least a supervisor-level user will be required to override.
The errors which can be forced are:
• Invalid activity sequence
• Repeating of an activity is not allowed
• Incomplete set
• Article expired
• Sterile expiration
8
5
If an error occurs in reading, the whole activity is discarded for all articles.
List of all error codes:
• Forbidden activity
• Invalid sequence (cycle)
• Incomplete set content
• Invalid user
• Invalid activity
• Unknown item (not registered)
• Repeating of activity not allowed
• Current user is not allowed to force activity
• Article disabled
• Article already registered.
• Article is not registered.
• Incomplete template set content
• Article expired
• Sterile expiration
HID mode
When the reader is in HID (Hardware Interface Device) mode, it is connected to a computer. In HID mode,
unknown instruments, such as those from a manufacturer other than LM-Instruments, may be added to the
system.
Instrument
An instrument is the most typical type of article.
Instrument set
An instrument set contains individual (tagged) instruments. Once set for an instrument, all activities must contain
all instruments from a set. A cycle can disable the set enforcement for some (optional) activities. Example: A set
can contain cutting and non-cutting instruments. The cycle for the cutting instruments includes a sharpening
activity, which is not applicable to the non-cutting instruments. In this case, the set enforcement can be disabled
for the sharpening activity, as it cannot be performed on all of the instruments in the set.
The container (cassette) of a set can be tagged, in which case the cassette must also remain the same. This is
optional.
Material
A material has the same attributes as an instrument, with quantity and expiry date as additional properties.
Materials cannot be part of sets. Typical activities for Materials are check in/out, which would be without a cycle.
Reader
A reader is an UHF (Ultra High Frequency) RFID (Radio Frequency Indentification) (Gen2) reader device which
communicates with a server. A reader needs to be configured for allowed activities which can be performed on it.
Table and unit readers are available. A table reader is meant for multireading, while a unit reader is meant for
reading one article at a time.
5
9
Reading transaction
Reading transactions are stored centrally on a server. A reading transaction contains the following information:
• Date and time of the reading
• Activity
• List of articles
• Instrument set, is available
• Information if the reading was forced by supervisor user
• Reader
• User
• Force reason (if reading was forced)
• Warnings (if occurred)
Server
Communicates with readers. Logs activities and e.g. verifies activity cycles. All communication is initiated by the
reader, i.e. the server can only send information to the readers as responses to messages from the readers.
Template set
Defines a set of instruments, identified by the instrument code and quantity. A template set can be thought of as
a "loose" set. Set enforcement disabling applies to template sets the same way as normal sets.
A tagged container should be defined for a template set.
Users
Local user management is supported.
User groups
User
Reader: Can perform normal activities.
Server: Can view information. Users view: Can only edit own information, cannot change user group.
Supervisor
Reader: Can force certain cycle error codes.
Server: Can edit information. Users view: Can only edit own information, cannot change user group.
Administrator
Reader: Can force certain cycle error codes.
Server: Can edit and remove information.
Warning
There can also be warnings related to cycle activities. Warnings do not prevent the performing of an activity.
View
Server content is divided into different views that can be selected from the panel at the top of the display. The
main views are Reports, Logs, Readers, Instruments, Materials and Settings. Extra menu displays additional
views, which are Users, Instruments sets, Template sets, Article groups, Activities and Cycles.
10
5
4.
TAKING THE SERVER INTO USE
4.1
Installation
The server installation is customer specific, please contact LM-Instruments Oy for more information.
4.2
Settings
7
There are three tabs on the server settings menu.
The first tab is the main settings menu, which shows the current server version. On this tab, you can select the
server time zone, language, reader UHF region (EU/US) and login policy for the readers. If the login requires a
PIN code, you can set a minimum code length. Settings take effect immediately.
On the second tab, you can update the reader software. This is done automatically. Making software updates
requires administrator rights. How to update the software:
Ensure that the download file name is according to the following template: update-v2.7.0.tar.aes (e.g. update
v2.7.0.tar.aes). Download the file and click on Save. The other fields will be filled in automatically.
The last tab contains a list of the users logged into the system.
5
11
4.3
Users
There must always be at least one user with administrator rights. User rights can also be granted to a number of
other users in addition to the administrator. User rights can be specified for each user. It is also possible to
separately specify whether a given user has the right to login to a reader, the server or both.
Users are managed in the Users view, which is located in the server Extra menu. You can add a new user by
clicking on the Add button or edit existing user information by selecting a user and clicking on the Edit button.
This will open the Edit user box.
In the Edit user box, the user's user group must be selected first (required). The user groups are Administrator,
Supervisor and User. An Administrator has full rights. A Supervisor has the right to edit information. A user may
only read information. Forced reading requires at least supervisor-level user rights.
After selecting a user group, enter the user's first name and last name (required) as well as the user's title in the
designated fields. There is a field for entering additional information.
In the Reader login configuration section, the RFID login and/or PIN code for the user to log in to the reader is/are
set. In the Server login configuration section, the server username and password are set.
4.4
Activities – Icons
Located in the Extra menu, the Activities view shows what activities are available for readers. In the Activities
view, you can check and edit predefined activities or add new activities.
If you want to add a new activity, click on the Add button. This will open the Edit activity box on the screen.
Assign a name to the activity (required). You can also set the direction of the activity. If you select In, the activity
must be carried out before using the device (such as an autoclave). If, on the other hand, you select Out, the
activity must be carried out after using the device. You can also select an icon for the activity. This icon will also
appear on the reader. Then, click on Save to save your information.
If you would like to edit an existing activity, select the desired activity with the mouse and then click on Edit. The
Edit activity box will open on the screen. Make the desired changes and then click on Save to save your
information.
12
5
If you would like to remove an activity, select the desired activity with the mouse and then click on the Remove
button. Click on Yes to confirm.
7
4.5
Article groups – Cycles
Creating a cycle always requires an article group. Therefore, an article group must always be created before
creating a cycle.
How to create an article group:
Go to the Extra menu and click on Article groups. Click on the Add button. Assign a name to the article
group (required). Once you have created the article group, you can create a cycle.
How to create a cycle:
Go to the Extra menu and select Cycles. Click on the Add button. This will open page 1/3 of the Edit cycle
box. Assign a name to the cycle (required). Select the article group you just created from the drop-down menu
(required). Then select the desired activities. You can add or remove activities and set activities in the order you
prefer by using the arrow buttons.
A register activity that is not included in the cycle itself can also be assigned to the cycle. A register activity may
only be carried out once. An end-of-life activity may also be assigned to a cycle. It can be carried out at any
time. Once the end-of-life activity is carried out, the reading of that instrument will be disabled in the system.
After this is done, it will no longer be possible to carry out new activities for that instrument. This can be
reversed by re-activating the instrument manually.
Click on Next to go to page 2/3 of the Edit cycle box. Here, you can set various parameters for the cycle
activities. The parameters are:
– Optional (Is the activity required?)
– Repeat allowed (Can the activity be repeated?)
– Ignore set check (Is the entire set included in the activity?)
– Check sterile expiration (Should sterility be checked during the activity?)
5
13
Click on Next to go to page 3/3 of the Edit cycle box. Here, you can set a maintenance reminder for the cycle
activities. Setting the maintenance reminder involves defining the number of times an activity can be skipped until
the system notifies the user.
In addition, a sterile expiration reminder can be set for the system. When the reminder is set, the system will
notify the user unless the activity has been repeated by a certain date.
4.6
Readers
How to connect a new reader to the server:
The reader establishes a connection to the server. As the server does not yet recognise the reader, the reader
information must be specified for the server as follows:
Go to the Readers view. Here, you will find a list of the readers in the system. The new reader will appear in the
list. Select the new reader with the mouse and then click on the Edit button. This will open a box on the screen
where you can edit the reader information.
Assign a name to the reader (required). Then specify the reader UHF region (EU/US). Once this is done, you can
select the activities for the reader based on where it is located. You should also specify the reader location, so
that it is possible to make an entry indicating the last location of all the instruments read by the reader.
In the Readers view, you can also remove a reader or edit its information by first selecting a reader and then
clicking on the Edit or Delete button. You can also check log data by first selecting an instrument and then
clicking on the View logs button. If you would like to create an Excel file of the table data, click on the Export to
Excel button.
14
5
7
5
15
5.
USING THE SERVER
5.1
Login
Login to the server requires a username and a password. The language for the user session can be selected
from the menu.
7
5.2
Reports
Log in to the system. This will open the Reports view, where you can check reports.
The first view contains a summary of data on all readings for the year under review. It also shows to what extent
various activities have been carried out during each week.
You can see the weekly information by moving your mouse over the desired week. You will also see how many
unique users have been in the system during that week. The number of forced readings is also displayed in red
on the chart.
In the upper left-hand corner under Please select a chart, there is a drop down menu you can use to find
various reports and define your search criteria. You can change the report's start and end week according to the
period desired for the report.
On the drop-down menu, select Average cycles by instrument group to show the average number of cycles
for each instrument group.
Select Instruments by latest activity to show the phase in which various instruments are currently being
used.
Select Instruments cycle count to show how many instruments there are in a given cycle count.
Select Instrument information by code to show the average cycle count by instrument type.
Select Force reasons to show an itemisation of the reasons for forced reading.
16
Select User group summary to show a summary of the number of users in various user groups.
Select Reader network uptime to see the network uptime or downtime of a given reader. The blue bar
indicates how many times the reader has been offline (offline count). The red bar indicates the network downtime
(in hours) and the green bar the network uptime (in hours). Ideally, the downtime/uptime bars will be mostly green
and the blue bars will be short.
5.3
Logs
In the Logs view, you can check the number of readings on the server in real time. Log view data is updated
every 30 seconds. If there are changes, a notification will be displayed in the upper right corner and the gray
arrow is changed to green. To refresh the logs, press the green arrow.
The screen contains basic information, such as the date and time of the reading as well as the number of
materials or instruments read.
In the Articles column, there is a summary of how many articles were read. Clicking the link opens a window
where the individual articles are displayed. There is an ”(I)”for Instrument or ”(M)” for Material in front of the article
name. Inside the box, click on the Latest readings link to check the most recent readings.
If you would like to add information shown in the log table or delete information from the screen (i.e. show or hide
table columns), move your mouse to the upper right-hand corner of the table. This will bring up a Settings button.
Click on the button. This will open a menu, from which you can choose the information to be displayed in the log
table.
If you would like to create an Excel file of the table data, click on the Export to Excel button.
5.4
Instruments
The Instruments view contains all registered instruments and their information.
Additional information may also be displayed as needed. Please note that some of the columns are hidden. Only
the most important columns are displayed by default.
If you would like to add information shown in the table or remove information from the screen, move your mouse
to the upper right-hand corner of the table. This will bring up a Settings button. Click on the button. This will open
a menu, from which you can select the information to be displayed in the table.
You can add an instrument by clicking on the Add button and filling in the required fields. You can remove an
instrument or edit its information by first selecting the instrument with the mouse and then clicking on the
Remove or Edit button. You can also check log data by first selecting an instrument and then clicking on the
View logs button. If you would like to create an Excel file of the table data, click on the Export to Excel button.
5
17
The Materials view is nearly identical to the Instruments view. The difference between the two views is what
kind of columns can be selected for the table. As opposed to the Instruments view, the Materials view
contains two extra columns: Quantity and Expiry date. Correspondingly, it does not contain certain
information, such as Cycles.
5.5
Editor function buttons
7
Each view has the same basic functions.
The Export to Excel button is used to create an Excel file which contains the same data as found on the page
itself.
The View logs button is found in some views. When you click on the Logs button, for example, in the user
view, a log showing the user login times will open. An Excel export file showing the log data can also be created.
Other buttons are Edit, Add and Remove. Sufficient user rights are required to use these functions.
5.6
Instrument sets
You can assign instruments to sets in the Instrument sets view located in the Extra menu.
If you would like to create a new instrument set, click on the Add button. This will open the Edit instrument set
box on the screen. You can assign the set various attributes: name, type, code, tag ID, location and additional
information. You can also specify whether the set will include all instruments.
When creating an instrument set, you can also make use of the reader's HID read tags. While in the Edit
instrument sets box, bring the cursor to the HID read tags field and, using the reader, read all the instruments
you want to add to the set. The number of instruments read will appear in the counter once you click outside
the field. You can use the same method when you want to add several instruments or material to the system by
using the editing boxes designated for this purpose.
If you would like to make changes to an existing instrument set, select the desired set with the mouse. Then,
click on the Edit button. This will open the Edit instrument set box, where you can, for example, add new
instruments to a set.
Each instrument in an instrument set has its own, individual tag. In other words, each instrument set contains
the individual instruments assigned specifically to it.
18
5.7
Template sets
In the Template sets view, which is located on the Extra menu, you can also create and edit template sets.
The template set differs from the instrument set in that it specifies certain types of instruments, whereas the
instrument set specifies individual instruments.
There is a dedicated editor for editing the content of template sets. You can access the editor by clicking on the
corresponding buttons in the Template sets view, which can be found on the Extra menu.
5.8
Registering new instruments
A new instrument with LM-Instruments’ information may be registered with the reader by performing an activity
permitted for it. This kind of activity is usually Maintenance or Autoclaving in.
When a new instrument is read by a reader for the first time, the counter will turn red. After completing the first
activity, the instrument will be registered and follow cycles.
You can check to see whether the instrument has been successfully registered by re-reading the instrument after
completing the first activity. Press the i button to ensure that the instrument is no longer unknown. Once this is
done, the counter will no longer turn red.
Normally, the reader does not issue error notifications. It may, however, issue an error notification if the first
activity is a 'Clinical use' type, as this kind of activity requires sterilised instruments.
5.9
HID mode use and registering new instruments through the server
When the reader is in HID mode, it is connected to a computer. In HID mode, unknown instruments, such as
those from a manufacturer other than LM-Instruments Oy, may be added to the system. Instruments are added
to the system through the server in the following manner:
Select HID mode by pressing the HID icon found in the upper left-hand corner of the reader display. Also, ensure
that the reader is connected to the computer.
Log in to the server and go to the Instruments view. Click on the Add button. This will open the Edit instruments
box. Activate the Tag ID field by clicking on it.
Place the desired instrument(s) on the reader. The reader will display the number of instruments it recognises and
the Tag IDs will appear in the Edit server box in the Tag ID field. Enter the required information in the other Edit
box fields and then click on the Save button. This will close the Edit box and the server will return to the
Instruments. The added instruments will now appear in the instrument table.
Once this is done, you can take the reader out of HID mode, log in to the reader and then select and perform
activities in the normal manner.
5
19
HID Mode on
7
6.
SUPPORT
In case some error situations occur, please contact the person responsible for DTS system support.
20
5
21
LMDental
7
LM-Instruments Oy
PL 88
88 (Norrbyn
(Norrbyn rantatie
rantatie 8)
8)
PL
FI-21601 Parainen,
Parainen, Finland
Finland
FI-21601
Tel. +358
+358 22 4546
4546 400
400
Tel.
Fax +358
+358 22 4546
4546 444
444
Fax
[email protected]
[email protected]
0615_1
www.lm-dental.com
www.lm-dental.com
www.dentaltracking.com
5
3