1
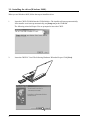
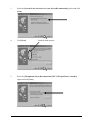
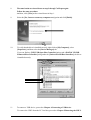
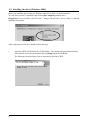
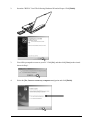
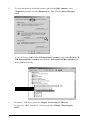
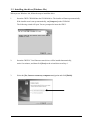
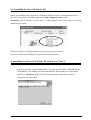
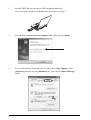
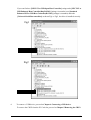
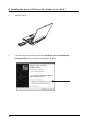
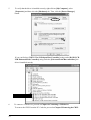
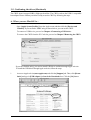
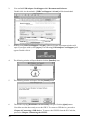
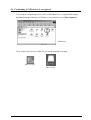
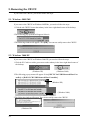
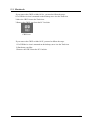
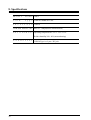
USB2.0 CardBus Host PC Card
CBU2
User’s Manual
March 2003
Rev.4.0
CBU2U
1. Introduction ........................................................................... 2
1-1. Features .......................................................................................................2
1-2.Restrictions ...................................................................................................2
1-3. System Requirements .................................................................................2
2. Before installing... .................................................................. 3
2-1. Package Confirmation ...............................................................................3
3. Setting up ................................................................................ 3
3-1. Installing the driver(Windows 98SE) ......................................................4
3-2. Installing the driver(Windows 2000) .......................................................8
3-3. Installing the driver(Windows Me) ........................................................ 11
3-4. Installing the driver(Windows XP)........................................................ 13
A. Installing the driver in Windows XP with Service Pack 1 .............. 13
B. Installing the driver in Windows XP without Service Pack 1 ........ 16
3-5. Confirming the driver(Macintosh) ........................................................ 19
A. When you use MacOS 9.x... ................................................................ 19
B. When you use MacOS X...................................................................... 21
4. Connecting a USB device .................................................... 22
4-1. Self-power device/Bus-power device .................................................... 22
4-2. Connecting a Bus-powered type of USB device to the CBU2 ........... 22
4-3. Confirming a USB device is recoginzed ............................................... 23
5. Removing the CBU2U ......................................................... 24
5-1. Windows 98SE/ME ................................................................................. 24
5-2. Windows 2000/XP ................................................................................... 24
5-3. Macintosh ................................................................................................. 25
6. Registration and Tech-support........................................... 26
6-1. How to Register ....................................................................................... 26
6-2. Software Update and Support ............................................................... 26
7. Options.................................................................................. 27
8. Specifications ....................................................................... 28
Appendix................................................................................... 29
1
1. Introduction
This User’s Guide describes how to install the RATOC USB2.0 CardBus PC Card
(called CBU2 in this User’s Guide).
The information in the README.TXT file on the CD-ROM may include the latest information.
Be sure to read the file as well.
1-1. Features
•EHCI(USB2.0) and OHCI(USB1.1) compliant host adapter CardBus PC Card.
•Included original USB2.0 Driver for WindowsMe/98SE.
•Fully compatible with Microsoft standard USB2.0 driver for WindowsXP.
•Adds two High Speed(480Mbps) USB2.0 ports to your laptop PC.
•Supports USB2.0 High-Speed HUB.
•Supports Low/Full/High Speed(1.5/12/480Mbps).
Switches automatically to the highest supported speed of the attached USB device.
•Supports Low/Full Speed (1.5/12Mbps) with Apple USB Supports drivers.
•Allows using USB1.1 and USB2.0 peripherals simultaneously.
•Supports Plug & Play and Hot-Swapping of USB1.1/2.0 device.
•Available USB Bus Power up to 300mA at two ports.
•Cable Power adapter(Sold Separately) is required for 500mA at each port.
•Dongle-less smart design.
•5 years warranty.
1-2.Restrictions
•When you remove a USB device and connect it again, you have to wait over 3 seconds before you
connect it again.
•This driver doesn’t support remote wake up from a USB device.
1-3. System Requirements
PC or PowerBook G4/G3* with CardBus-enabled PC Card slot.
•PC: WindowsXP/Me/2000/98SE
•Mac:MacOS X 10.1.x / 9.2.x
* Except PowerBookG3(November 1997, Machine/Gestalt ID:313).
This model doesn't support CardBus slot. Please check your Machine ID at Apple System Profiler
window.PowerBookG3(1998,1999,2000) are required.
* CBU2U works as the USB1.1 compatible host adapter with Apple USB Support drivers.
Not support USB2.0 High speed on Mac.
2
2. Before installing...
2-1. Package Confirmation
Check the package contents:
•CBU2 CardBus PC Card
•Software CD-ROM
•User’s manual
NOTE
If any of these items are missing from the CBU2 retail package, contact your supplier
immediately.
3. Setting up
A)If you are a Windows 98SE user-------------------------------------------- Proceed to Chapter 3-1.
B)If you are a Windows 2000 user-------------------------------------------- Proceed to Chapter 3-2.
C)If you are a Windows Me user---------------------------------------------- Proceed to Chapter 3-3.
D)If you are a Windows XP user---------------------------------------------- Proceed to Chapter 3-4.
E)If you are a Macintosh user------------------------------------------------- Proceed to Chapter 3-5.
3
3-1. Installing the driver(Windows 98SE)
When you use Windows 98SE, follow the steps to install the driver.
1.
Insert the CBU2 CD-ROM into the CD-ROM drive. The installer will start up automatically.
If the installer won’t start up automatically, run [Setup.exe] at the CD-ROM.
The following wizard will open. You are prompted to insert the CBU2.
2.
Insert the CBU2 PC Card. The following Hardware Wizard will open. Click [Next].
4
3.
Select the [Search for the best driver for your device(Recommended)] option and click
[Next].
4.
Click [Next].
5.
Select the [The updated driver(Recommended) NEC USB Open Host Controller]
option and click [Next].
Uncheck all the options.
5
6.
Click [Next].
If you are prompted to insert the Windows 98 CD-ROM, insert the CD-ROM and click
[OK] and insert the Windows 98 CD-ROM
Click the [Browse] button and specify a [Win98] folder at the CD-ROM and click [OK].
7.
6
Click [Finish].
8.
The same hardware wizard shown at step 2 through 7 will open again.
Follow the same procedure.
And then, click [Next] on the wizard shown in Step 1.
9.
Select the [Yes, I want to restart my computer now] option and click [Finish].
10.
To verify that the driver is installed correctly, right-click on [My Computer], select
[Properties], and then select the [Device Manager] tab.
If you can find two [NEC USB Open Host Controller] strings and a [RATOC CB USB
Enhanced Host Controller] string under the [Universal Serial Bus controllers], the driver
is installed correctly.
11.
To connect a USB device, proceed to Chapter 4.Connecting a USB device.
To remove the CBU2 from the PC Card slot, proceed to Chapter 5.Removing the CBU2.
7
3-2. Installing the driver(Windows 2000)
Before you install the driver, make sure Windows 2000 Service Pack 3 is already installed.
To verify Service Pack 3 is installed, right-click on [My Computer],and then select
[Properties]. If you can find a “Service Pack 3” string as shown below, Service Pack 3 is already
installed in your system.
After verifying Service Pack 3 is installed, follow the steps:
1.
8
Insert the CBU2 CD-ROM into the CD-ROM drive. The installer will start up automatically.
If the installer won’t start up automatically, run [Setup.exe] at the CD-ROM.
The following wizard will open. You are requested to insert the CBU2.
2.
Insert the CBU2 PC Card. The following Hardware Wizard will open. Click [Finish].
3.
You will be prompted to restart to your PC. Click [No], and then click [Next] on the wizard
shown in Step 1.
4.
Select the [Yes, I want to restart my computer now] option and click [Finish].
9
5.
To verify that the driver is installed correctly, right-click on [My Computer], select
[Properties], and then select the [Hardware] tab. Then, click the [Device Manager]
button.
If you can find two [NEC PCI to USB Open Host Controller] strings and a [RATOC CB
USB Enhanced Host Controller] string under the [Universal Serial Bus controllers], the
driver is installed correctly.
6.
10
To connect a USB device, proceed to Chapter 4.Connecting a USB device.
To remove the CBU2 from the PC Card slot, proceed to Chapter 5.Removing the
CBU2.
3-3. Installing the driver(Windows Me)
When you use Windows Me, follow the steps to install the driver.
1.
Insert the CBU2 CD-ROM into the CD-ROM drive. The installer will start up automatically.
If the installer won’t start up automatically, run [Setup.exe] at the CD-ROM.
The following wizard will open. You are prompted to insert the CBU2.
2.
Insert the CBU2 PC Card. Because some drivers will be installed automatically,
wait a few minutes, and then click [Next] on the wizard shown on Step 1.
3.
Select the [Yes, I want to restart my computer now] option and click [Finish].
11
3.
5.
To verify that the driver is installed correctly, right-click on [My Computer], select
[Properties], and then select the [Device Manager] tab.
If you can find two [NEC USB Open Host Controller] strings and a [RATOC CB USB
Enhanced Host Controller] string under the [Universal Serial Bus controllers], the
driver is installed correctly.
To connect a USB device, proceed to Chapter 4.Connecting a USB device.
To remove the CBU2 from the PC Card slot, proceed to Chapter 5.Removing the
CBU2.
NOTE
You may find a [RATOC CB USB Enhanced Host Controller] string with a green ? mark.
But this doesn’t affect the peformance of this CBU2 PC Card.
12
3-4. Installing the driver(Windows XP)
Before you install the driver, check to see if Windows XP Service Pack 1 is already installed or not.
To verify Service Pack 1 is installed, right-click on [My Computer],and then select
[Properties]. If you can find a “Service Pack 1” string as shown below, Service Pack 1 is already
installed in your system.
If the Service Pack 1 is already installed in your system, proceed to Section A.
If the Service Pack isn’t installed in your system, proceed to Section B.
A. Installing the driver in Windows XP with Service Pack 1
1.
If the Service Pack 1 is already installed in your system, insert the CBU2 CD-ROM into the
CD-ROM drive. The installer will start up automatically. If the installer won’t start up automatically, run [Setup.exe] at the CD-ROM. The following wizard will open. You are
prompted to insert the CBU2.
13
2.
Insert the CBU2. Because some drivers will be installed automatically,
wait a few minutes, and then click [Next] on the wizard shown on Step 1.
3.
Select the [Yes, I want to restart my computer now] option and click [Finish].
4.
To verify that the driver is installed correctly, right-click on [My Computer], select
[Properties], and then select the [Hardware] tab. Then, click the [Device Manager]
button.
14
If you can find two [NEC PCI to USB Open Host Controller] strings and a [NEC PCI to
USB Enhanced Host Controller(Bn)(RATOC)] string(n is a number) or a [Standard
Enhanced PCI to USB Host Controller(RATOC)] string(n is a number) under the
[Universal Serial Bus controllers] as shown Fig1 or Fig2, the driver is installed correctly.
Fig1
Fig2
4.
To connect a USB device, proceed to Chapter 4.Connecting a USB device.
To remove the CBU2 from the PC Card slot, proceed to Chapter 5.Removing the CBU2.
15
B. Installing the driver in Windows XP without Service Pack 1
1.
Insert the CBU2.
2.
The following wizard will open. Select the [Install the software automatically
(Recommended)] option and insert the bundled CD-ROM.
16
3.
The following wizard will open. Click [Continue Anyway].
4.
The following wizard will open. Click [Finish].
5.
You will be prompted to restart your PC. Click [Yes].
17
5.
To verify that the driver is installed correctly, right-click on [My Computer], select
[Properties], and then select the [Hardware] tab. Then, click the [Device Manager]
button.
If you can find two [NEC PCI to USB Open Host Controller] strings and a [RATOC CB
USB Enhanced Host Controller] string under the [Universal Serial Bus controllers], the
driver is installed correctly.
6.
18
To connect a USB device, proceed to Chapter 4.Connecting a USB device.
To remove the CBU2 from the PC Card slot, proceed to Chapter 5.Removing the CBU2.
3-5. Confirming the driver(Macintosh)
The CBU2 doesn’t support USB2.0 High speed on Mac. The CBU2 works as the USB1.1 compatible
host adapter. Please confirm your Mac is ready to use the CBU2 by following the steps:
A. When you use MacOS 9.x...
Open [Apple System Profiler] from the Apple menu and then click the [Devices and
Volumes]. If you can find a “USB” string as shown below, you can use the CBU2.
To connect a USB device, proceed to Chapter 4.Connecting a USB device.
To remove the CBU2 from the PC Card slot, proceed to Chapter 5.Removing the CBU2.
If you can’t find the string, you need to install USB driver available through Apple web site.
To install the USB driver through Apple web site, follow the steps:
1.
Access to Apple web site(www.apple.com) and click the [Support] tab. Then, click [Downloads] and type in [USB Adapter] at Search for Downloads box. Click the [Go] button.
19
2.
You can find USB Adapter Card Support 1.4.1 Document and Software.
Double-click it to download it. [USB Card Support 1.4.1.smi] will be downloaded.
3.
Double-click [USB Card Support 1.4.1.smi]. Software License Agreement window will
open. If you agree with it, click [Agree]. The following [USB Adapter Card Support] will
appear. Double-click it.
4.
The following window will open.Double-click the [Installer] icon.
5.
The following window will open.Click the [Install] button.
6.
The window saying [Installation was successful] will open.Click the [Quit] button.
Your Mac now has been ready to use the CBU2. To connect a USB device, proceed to
Chapter 4.Connecting a USB device. To remove the CBU2U from the PC Card slot,
proceed to Chapter 5.Removing the CBU2U.
20
B. When you use MacOS X...
Open [Applications], [Utilities] folder, and then start [Apple System Profiler].
If you can find a “USB” string as shown below, you can use the CBU2U.
To connect a USB device, proceed to Chapter 4.Connecting a USB device.
To remove the CBU2U from the PC Card slot, proceed to Chapter 5.Removing the
CBU2U.
21
4. Connecting a USB device
4-1. Self-power device/Bus-power device
There are two kinds of USB devices:
1.Self-power device:
This type of USB device gets power necessary to work itself through an outlet.
2.Bus-power device:
This type of USB device gets power necessary to work itself through an USB cable.
Each USB device of this type has its own current necessary to work itself. The maximum
current is 500mA. Here is an example.(Contact your device manufacturer for other devices)
Device
Manufacurer
•Mouse
Microsoft
•ImageScanner
Cannon
•CompactFlash Reader RATOC
•SmartMedia Reader RATOC
Model name
IntelliMouse
FB636U/630U
CF03U
SMA03U
consumption current
100mA
500mA
100mA
100mA
4-2. Connecting a Bus-powered type of USB device to the CBU2
The CBU2 has two USB ports and these ports can provide 300mA in total. If you
connect our AC Adapter(Solf Separately) to the CBU2U, the two ports can provide
500mA at each port. If you connect a Bus-powered type of USB device of which
cunsumption current is over 300mA, you need to use the AC Adapter(Sold Seperately.
Refer to Chapter 8 for purchase information). You don’t need to purchase it if you connect
a Bus-powered type of USB device of which consumption current is less than 300mA.
Here is an example.
•If you connect FB636U/630U made by Cannon described above, its consumption current
exceed 300mA. Therefore, you need to use the AC Adapter to provide 500mA.
•If you connect CF03U and SMA03U simultaneously, their consumtion current is 200mA
in total. Therefore, you don’t need to use the AC Adapter. You can use them without
the AC Adapter.
22
4-3. Confirming a USB device is recoginzed
If you connect a USB storage device such as a Hard Disk Drive, Compact Flash Adapter,
SmartMedia Adapter, MO drive on Windows, you can find its icon in [My Computer].
(Windows)
If you connect such a device on Mac, its icon will be mounted on desktop.
(Mac OS 9.x)
(Mac OS X)
23
5. Removing the CBU2U
If you remove the CBU2U, you need to follow the steps:
5-1. Windows 98SE/ME
If you remove the CBU2U on Windows 98SE/Me, you need to follow the steps:
1.Click the red CBU2U icon at the tasktray in the lower right-hand corner of the desktop.
2.The following pop-up menu will appear. Select it.
3.The following window will appear. Click [OK]. You can now safely remove the CBU2U.
5-2. Windows 2000/XP
If you remove the CBU2U on Windows 2000/XP, you need to follow the steps:
1.Click the PC Card icon with a green arrow at the tasktray in the lower right-hand corner of
the desktop.
(Windows XP)
(Windows 2000)
2.The following pop-up menu will appear. Select [NEC PCI to USB Enhanced Host Con
troller] or [RATOC CB USB Enhanced Host Controller].
(Windows XP)
(Windows 2000)
3.The following window will appear. You can now safely remove the CBU2U.
(Windows XP)
24
(Windows 2000)
5-3. Macintosh
If you remove the CBU2 on Mac OS 9.x, you need to follow the steps:
1.If a USB device icon is mounted on the desktop, move it to the Trash icon.
2.Move the CBU2 icon to the Trash icon.
3.Remove the CBU2 icon from the PC Card slot.
CBU2 icon
If you remove the CBU2 on Mac OS X, you need to follow the steps:
1.If a USB device icon is mounted on the desktop, move it to the Trash icon.
2.Shut down your Mac.
3.Remove the CBU2 from the PC Card slot.
25
6. Registration and Tech-support
6-1. How to Register
We highly recommend to register yourself as our customer through our on-line registration.
1. On the Internet, access our site (http://www.ratocsystems.com/english/)
2. Follow window menu guide to register.
3. Fill out and submit the registration form.
6-2. Software Update and Support
-Driver UpdateThe latest driver or utility software are subject to change for improvement or bug fix.
You can download the latest version from our web site.
(http://www.ratocsystems.com/english/)
-Technical SupportYou can get a Tech support from RATOC at the following.
(Open Monday - Friday, 9:30A.M. to 5:00P.M(PST))
RATOC Systems International,Inc. Tech support
Address: 1933 O’Toole Avenue Suite A109
SanJose, CA 95131, U.S.A.
Phone : (408)955-9400
Fax
: (408)955-9402
E-mail : [email protected]
Web
: http://www.ratocsystems.com/english/
NOTE:
Please include the following information to help us to assist you in the event of a problem:
•Our product name, serial number, and product description
•Host Computer Name, OS version
•Driver version
26
7. Options
Option is available (sold separately) at the web site:
1. http://www.ratocsystems.com/english/
2. http://www.firewireshop.com
-USB2-01
(USB2.0 cable(3 feet))
-AC05
(AC adapter)
If you have any questions about the option, contact to:
RATOC Systems Insternational, Inc. Tech Support
TEL : (408)955-9400
FAX: (408)955-9402
E-mail: [email protected]
27
8. Specifications
M o d e l
N a m e
CBU2
C a r d
T y p e
USB2.0 CardBus PC Card
I n t e r f a c e
USB2.0
USB data transfer rate 480/12/1.5 Mbps(HS/FS auto-detection)
E n v i r o n m e n t Operating temperature0°C/32°F - 55°C/131°F
Relative humidity 20% - 80% (noncondensing)
C o n n e c t o r
28
USB2.0 Type A x 2 port / DC jack
Appendix
Copyright
©2001 RATOC Systems,Inc. All rights reserved. No part of this publication may be reproduced, store in a retrieval
system, or transmitted in any form or by any means(electronic, mechanical, photocopying, recording or otherwise)
without the prior written consent of RATOC Systems,Inc.
Trademarks
-Windows is a registered trademark of Microsoft Corporation.
-Other brand and product names may be registered trademarks or trademarks of their respective holders.
Changes
The information in this User’s Manual is furnished for information only and is subject to change without notice.
RATOC Systems,Inc. reserves the right to make changes in the product design or product improvements without
reservations and without notification to its users. RATOC Systems,Inc. assumes no responsibility or liability for any
errors or inaccuracies that may appear in this document.
Regulatory Compliance Statements
I)FCC Compliance Statement
This equipment has been tested and found to comply with the limits for a Class B digital device,
pursuant to Part 15 of the FCC Rules. These limits are designed to provide reasonable protection
against harmful interference in a residential installation. This equipment generates, uses and can
radiate radio frequency energy and, if not installed and used in accordance with the instructions,
may cause harmful interference to radio communications. However, there is no guarantee that
interference will not occur in a particular installation. If this equipment does cause harmful
interference to radio or television reception, which can be determined by turning the equipment
off and on, the user is encouraged to try to correct the interference by one or more of the
following measures:
(1) Reorient or relocate the receiving antenna.
(2) Increase the separation between the equipment and receiver.
(3) Connect the equipment into an outlet on a circuit different from that to which the receiver is
connected.
(4) Consult the dealer or an experienced radio/TV technician for help.
Changes or modifications not expressly approved by the party responsible for compliance may
result in this unit not complying with FCC Rules Part 15.
II)European Union Compliance Statement
This device complies with EN55022 Class B/EN55024.
29
30


![PA-MLT2取扱説明書ダウンロード [日本語PDF 2.19MB]](http://vs1.manualzilla.com/store/data/006527868_2-55197d8cb102d0d013015f33f0673daa-150x150.png)