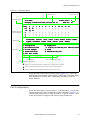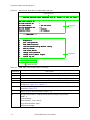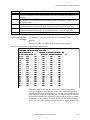
1
Verilink HDM 2180 User Manual October 1999 SYS DATA HDM 2180 NET P/N 880-503048-001-F LOCAL PRI EXT MANAGEMENT SNMP Copyright Notice Copyright 1999 Verilink Corporation. All rights reserved. This document does not create any express or implied warranty about Verilink or about its products or services. Verilink’s sole warranty is contained in its product warranty. The end-user documentation is shipped with Verilink’s products and constitutes the sole specifications referred to in the product warranty. Verilink has made reasonable efforts to verify that the information contained herein is accurate, but Verilink assumes no responsibility for its use or for any infringement of patents or other rights of third parties that may result. The customer is solely responsible for verifying the suitability of Verilink’s products for its use. Specifications are subject to change without notice. Trademarks Verilink is a registered trademark of Verilink Corporation. Access System 2000, WANscope, VeriStats, and FrameStart are trademarks of Verilink Corporation. Any named products herein are trademarks of their respective companies. FCC Requirements This equipment has been tested and found to comply within the limits for a Class A digital device pursuant to Part 15 of the Federal Communications Commission (FCC) rules. These limits are designed to provide protection against harmful interference in a commercial environment. This equipment generates, uses, and can radiate radio frequency energy and, if not installed and used in accordance with the user manual, can cause harmful interference to radio communications. There is no guarantee that interference will not occur in a particular installation. If this equipment causes harmful interference to radio or television reception—which can be determined by turning the equipment off and on—try to correct the interference by one or more of the following measures: • Reorient or relocate the receiving antenna. • Increase the separation between the equipment and receiver. • Connect the equipment into an outlet on a circuit different from that to which the receiver is connected. • Consult the dealer or an experienced radio/TV technician for help. This equipment complies with Part 68 of the FCC Rules. On the rear, side or bottom of the unit is a label that contains the FCC registration number and other information. If requested, provide this information to the telephone company. • All direct connections to the network lines must be made using standard plugs and jacks (compliant with Part 68). The following tables list the applicable registration jack universal order codes (USOCs), facility interface codes (FICs), and service order codes (SOCs). These are required to order service from the telco. For T1 interfaces: Port ID 1.544 1.544 1.544 1.544 Mbit/s Mbit/s Mbit/s Mbit/s SF SF, B8ZS ANSI ESF ANSI ESF, B8ZS REN/SOC 6.0N FIC 04DU9 04DU9 04DU9 04DU9 -BN -DN -1KN -1SN USOC RJ-48C jack For DDS interfaces: Port ID 56 kbit/s 64 kbit/s REN/SOC 6.0N FIC 04DU5 -56 04DU5 - 64 USOC RJ-48S jack • If the unit appears to be malfunctioning, inform the telco and disconnect it from the network lines until the source of trouble is determined to be your equipment or the telephone line . If your equipment needs repair, it should not be reconnected until it is repaired. • The unit has been designed to prevent harm to the network. If the telephone company finds that the equipment is exceeding tolerable parameters, it can temporarily disconnect service. In this case, the telephone company will provide you advance notice if possible. ii Verilink HDM 2180 User Manual • If the telephone company alters its equipment in a manner that can affect the use of this device, it must give you warning so that you have the opportunity to maintain uninterrupted service. You will be advised of your right to file a complaint with the FCC. • No customer is authorized to repair this equipment, regardless of warranty status. All repairs must be performed by Verilink or an authorized agent. It is the responsibility of users requiring service to report the need for service to Verilink or to one of our authorized agents. Lithium Battery English The lithium battery referred to in the following notices is contained inside the clock chip. DANGER! The battery can explode if incorrectly replaced! Replace only with the same or equivalent type recommended by the manufacturer. Dispose of used batteries according to the manufacturer’s instructions. DANGER! To avoid electrical shock in case of failure, the power supply must be installed by a professional installer. The terminal labeled with the ground symbol ( ) on the power supply must be connected to a permanent earth ground. CAUTION! Interconnecting circuits must comply with the requirements of EN60950:1992/A4:1997 Section 6.2 for telecommunications network voltages (TNV) circuits. Français ATTENTION! Une explosion peut se produire si la batterie est remplacée d’ une façon incorrecte! Remplacez-la seulement avec le même modêle de batterie ou un modèle équivalent selon les recommendations de manufacture. Disposez de les batteries usées selon les instructions de manufacture. ATTENTION! Pour éviter choc électrique en cas de insuccès, la provision de pouvoir doit êtré installé par un installeur professionnel. Le terminal de la provision de pouvoir, marqué du symbol de terre, ( ) doit connecté à un circuit de terre permanent. PRUDENT! Les circuits doivent êtré interconnectés de manière à ce que l’ équipement continue a êtré en agrément avec “EN60950:1992/A4:1997, Section 6.2, pour les circuits de voltage de liaisons d’ échanges (réseau) par les télécommunications (TNV),” après les connections de circuits. Españole ATTENCION! La bateria puede explotar si se reemplaza incorrectamente. Reemplace la bateria con el mismo tipo de bateria ó una equivalente recomendada por el manufacturero. Disponga de las baterias de acuerdo con las instrucciones del manufacturero. ATTENCION! Para evitar contacto con circuitos que electrocutan, la fuente de alimentación debe ser instalada por un técnico profesional. La terminal de la fuente de alimentación marcada con el símbolo de tierra ( ) debe ser conectada a un circuito de vuelta por tierra permanente. PELIGRO! Circuitos que se interconectan a la red de telecomunicaciones deben hacerse de tal manera que cumplan con los requisitos estipulados en las especificaciones “EN60950:1992/A4:1997, Sección 6.2, para los voltages de circuitos interconnectados a la Red de Telecomunicaciones (TNV),” despues de terminar las connecciones entre los circuitos. Verilink HDM 2180 User Manual iii Deutsch VORSICHT! Explosionsgefahr bei unsachgemäßem Ersetzen der Batterie! Batterie gleichen Typs und gleicher Qualität benutzen, wie vom Hersteller empfohlen. Entsorgung der Batterie nach Anweisung des Herstellers! VORSICHT, GEFAHR! Um keinen Schlag zu erhalten beim Versagen der electrischen Anlage, muss der Stromanschluss von einem Elektriker vorgenommen werden. Der elektrische Pol, versehen mit dem Erdsymbol ( ) muss am Stromanschluss permanent geerdet sein. VORSICHT! Schaltungen, die in den Geräten zusammengeschaltet sind, müssen weiterhin den Vorschriften EN60950:1992/A4:1997, Absatz 6.2 für Telecommunications Netz Spannung (TNV) Schaltkreize entsprechen. Canadian Requirements This digital apparatus does not exceed the Class A limits for radio noise emissions from digital apparatus set out in the Radio Interference Regulations of the Canadian Department of Communications. Le présent appareil numérique n’émet pas de bruits radioélectriques dépassant les limites applicables aux appareils numériques (de la class A) prescrites dans le Règlement sur le brouillage radioélectrique édicté par le ministère des Communications du Canada. The Industry Canada label indentifies CS-03 certified equipment. This certification means that the equipment meets certain telecommunications network protective, operational and safety requirements. Industry Canada does not guarantee the equipment will operate to the user’s satisfaction. Before installing this equipment, users should ensure that it is permissible to be connected to the facilities of the local telecommunications company. The equipment must also be installed using an acceptable method of connection. In some cases, the company’s inside wiring associated with a single line individual service may be extended by means of a certified connector assembly (telephone extension cord). The customer should be aware that compliance with the above conditions may not prevent degradation of service in some situations. Repairs to certified equipment should be made by an authorized Canadian maintenance facility designated by the supplier. Any repairs or alterations made by the user to this equipment, or equipment malfunctions, may give the telecommunications company cause to request the user to disconnect the equipment. Users should ensure for their own protection that the electrical ground connections of the power utility, telephone lines and internal metallic water pipe system, if present, are connected together. This precaution may be particularly important in rural areas. Caution: Users should not attempt to make such connections themselves, but should contact the appropriate electric inspection authority, or electrician, as appropriate. Safety Precautions This equipment is intended to be installed only in a Restricted Access Location that meets the following criteria: • Access can only be gained by service personnel or users who have been instructed about the reasons for the restrictions applied to the location and about any precautions that must be taken. • Access can only be gained through the use of a lock and key or other means of security, and is controlled by the authority responsible for the location. When handling this equipment, follow these basic safety precautions to reduce the risk of electric shock and injury: • Follow all warnings and instructions marked on the product and in the manual. • Unplug the hardware from the wall outlet before cleaning. Do not use liquid cleaners or aerosol cleaners. Use a cloth slightly dampened with water. • Do not place this product on an unstable cart, stand, or table. It may fall, causing serious damage to the product. • Slots and openings in the shelves are provided for ventilation to protect them from overheating. These openings must not be blocked or covered. Never place this product near a radiator or heat register. iv Verilink HDM 2180 User Manual • This product should be operated only from the type of power source indicated on the marking label and manual. If you are unsure of the type of power supply you are using, consult your dealer or local power company. • Do not allow anything to rest on the power cord. Do not locate this product where the cord will interfere with the free movement of people. • Do not overload wall outlets and extension cords, as this can result in fire or electric shock. • Never push objects of any kind into the shelves. They may touch dangerous voltage points or short out parts that could result in fire or electric shock. Never spill liquid of any kind on this equipment. • Unplug the equipment from the wall outlet and refer servicing to qualified service personnel under the following conditions: • When the power supply cord or plug is damaged or frayed. • If liquid has been spilled into the product. • If the product has been exposed to rain or water. • If the product has been dropped or if the cabinet has been damaged. Product Warranty Verilink’s product warranty covers repair or replacement of all equipment under normal use for a five-year period from date of shipment. Replacement products may be new or reconditioned. Any replaced or repaired product or part has a ninety (90) day warranty or the remainder of the initial warranty period, whichever is longer. Our in-house Repair Center services returns within ten working days. Customer Service Verilink offers the following services: • System Engineers at regional sales offices for network design and planning assistance (800) 837-4546 • Technical Assistance Center for free 24x7 telephone support during installation, maintenance, and troubleshooting (800) 285-2755 and [email protected]) • To return a product, it must be assigned a Return Materials Authorization (RMA) number before sending it to Verilink for repair (800) 926-0085, ext. 2282 • Maintenance contracts and leasing plans (800) 837-4546 • Technical Training on network concepts and Verilink products (800) 282-2755 and [email protected] • Web site (www.verilink.com) Publications Staff This manual was written and illustrated by David Gardner. Contributing writers include: Steve Rider, David Fradelis, Marie Metivier, Theresa Lau, and Barbara Termaat. Verilink HDM 2180 User Manual v vi Verilink HDM 2180 User Manual HDM 2180 Table of Contents 1: HDM 2180 DS3 DSU Overview ..................................................................................... 1-1 Applications ...................................................................................................................... 1-1 Features ............................................................................................................................. 1-1 Management Ports ...................................................................................................... 1-1 Front Panel LEDs ........................................................................................................ 1-2 High-Speed Serial Interface (HSSI) Port ...................................................................... 1-2 DS3 Network Ports...................................................................................................... 1-2 Timing Options .......................................................................................................... 1-2 Inband Management Channel ..................................................................................... 1-2 Far-End Alarm and Control......................................................................................... 1-3 Downloadable Upgrades............................................................................................. 1-3 Compatibility with Other Verilink Products............................................................... 1-3 Technical Description ....................................................................................................... 1-3 HDM 2180 Specifications .................................................................................................. 1-4 Regulatory Requirements ........................................................................................... 1-5 Agency Approvals ...................................................................................................... 1-6 Dual-Line Shelf Limitations ........................................................................................ 1-6 FCC Compliance ......................................................................................................... 1-7 2: HDM 2180 Quick Set-Up ................................................................................................ 2-1 Installation ........................................................................................................................ 2-1 Connect to Craft Port ................................................................................................. 2-2 Terminal Parameters .................................................................................................. 2-2 Logging On ................................................................................................................. 2-2 Port Configuration............................................................................................................. 2-3 Network Port .............................................................................................................. 2-4 HSSI Port Set-up.......................................................................................................... 2-5 3: Standalone HDM 2180 Management .......................................................................... 3-1 Using the Local Port .......................................................................................................... 3-1 HDM 2180 Craft Interface, Main Menu .............................................................................. 3-1 Administration Menu......................................................................................................... 3-3 Port Configuration Menu ................................................................................................... 3-5 DS3 Port Configuration Submenu .............................................................................. 3-6 HSSI Port Configuration ............................................................................................. 3-9 Port Diagnostics Menu and Submenus ..................................................................... 3-10 Loopbacks/ Diagnostics ........................................................................................... 3-11 Transmitting Diagnostics Alarms............................................................................. 3-12 Performance Monitoring Menu ........................................................................................ 3-14 DS3 NE Performance Monitoring Menu .................................................................... 3-15 Verilink HDM 2180 User Manual vii DS3 Layer Performance Alert Thresholds Submenu (24 Hr. NE) .............................. 3-18 Restore Manufacturing Default Config Menu .................................................................. 3-19 Alarm Monitoring ..................................................................................................... 3-20 Alarm Buffer ............................................................................................................. 3-21 4: HDM 2180 Management: Using NCM 2000 ............................................................... 4-1 ASCII Access Settings ........................................................................................................ 4-1 NCM Controller Menu (Main Menu) ................................................................................... 4-1 Shelf and Slot Parameters.................................................................................................. 4-3 HDM 2180 Card Administration ........................................................................................ 4-4 Configuration Menu .......................................................................................................... 4-5 Port Configuration Menu (DS3) .................................................................................. 4-6 HSSI Port Configuration Menu.................................................................................... 4-7 Remote End Setup ............................................................................................................. 4-8 Diagnostics Menu ............................................................................................................ 4-10 DS3 HSSI Status Report............................................................................................. 4-10 DS3 Port Status Report ............................................................................................. 4-11 Loopback Options Menu........................................................................................... 4-11 HDM Transmit Alarm Options.................................................................................. 4-13 Performance / Status Menu ............................................................................................. 4-14 Performance Threshold Setting Option Menu .......................................................... 4-15 Performance Report Options Menu .......................................................................... 4-16 Alarm Menu ..................................................................................................................... 4-16 Far End DS3 Port Identification ....................................................................................... 4-17 Manufacturing Info.......................................................................................................... 4-18 5: Standalone HDM 2180 SNMP Management ............................................................... 5-1 Setting Up Your TCP/IP Addresses ............................................................................. 5-1 Embedded Network Management System Using SNMP............................................... 5-2 HDM 2180 SNMP Physical Interfaces.......................................................................... 5-2 Management Protocols ............................................................................................... 5-2 MIB Interface Specifications ....................................................................................... 5-3 6: Troubleshooting ............................................................................................................. 6-1 What Elicits an Alarm ........................................................................................................ 6-1 The Alarms ........................................................................................................................ 6-1 Alarm Listings ................................................................................................................... 6-1 Alarm Description ...................................................................................................... 6-2 Classifications ............................................................................................................ 6-2 Problem Types ........................................................................................................... 6-2 What To Do About Alarms ................................................................................................. 6-2 Alarm Records ............................................................................................................ 6-3 Interpreting Alarms ........................................................................................................... 6-3 Critical Alarms ........................................................................................................... 6-3 Major Alarms .............................................................................................................. 6-3 Minor Alarms.............................................................................................................. 6-4 Front Panel LEDs................................................................................................................ 6-6 viii Verilink HDM 2180 User Manual LED Indicators............................................................................................................. 6-6 Performance Statistics ....................................................................................................... 6-6 Near-End Performance Parameters ............................................................................. 6-6 Far-End Performance Parameters................................................................................ 6-7 Alarm Parameters .............................................................................................................. 6-7 Near-End Alarms ......................................................................................................... 6-7 Far-End Alarms ........................................................................................................... 6-8 Verilink HDM 2180 User Manual ix x Verilink HDM 2180 User Manual Chapter 1 HDM 2180 DS3 DSU Overview This manual describes how to use the HDM 2180 DS3 DSU Craft interface. As part of Verilink’s AS2000 modular platform, the HDM 2180 DS3 DSU provides a connection between T3 circuits and data terminal equipment (DTE) and provides clear channel service for up to 28 T1 or 44.7 Mbit/s. Applications Clear-channel DS3 networking is used primarily with high-speed router backbones and mainframe channel extenders. The highspeed capabilities of clear-channel DS3 networking provide the bandwidth needed to meet the heavy demands of client-server applications, such as CAD/CAM, video imaging, data warehousing, data vaulting, and backup. When the HDM 2180 is installed between large data centers it can support mission-critical applications that mirror data between mainframe computers or backbone routers. Installing a DS3 circuit between data centers can ensure that information is copied to both locations. Figure 1-1 HDM 2180 Application DS3 HSSI LAN Router Access port SNMP HDM 2180 DS3 DSU 75Ω Network Service Provider DS3 75Ω HDM 2180 DS3 DSU HSSI Router LAN Access port 10BaseT Ethernet User-supplied computer running an SNMP network management application Features Features of the HDM 2180 include the following: Management Ports The HDM 2180 has enhanced SNMP-management when used with a Node Controller Module (NCM 2000) and can also be directly managed using the Craft (ASCII) interface through the Local port or using Telnet through the SNMP port. Verilink HDM 2180 User Manual 1-1 HDM 2180 DS3 DSU Overview Local ASCII Interface Port The Local port provides the Craft interface for configuration, control, and monitoring. A secondary function of this interface is to provide a debug monitor port for troubleshooting. This interface uses a 19.2 kbit/s rate and is asynchronous without hardware flow control. The HDM 2180 Local port is RS-232 compliant for a front-panel RJ-11 connector. SNMP Port The front panel of the HDM 2180 provides an RJ-45 SNMP port for direct Ethernet twisted-pair communication via Telnet. The HDM 2180 embedded SNMP supports SNMPv1 and is 10BaseT compliant. Front Panel LEDs Tri-color Network, Data Port, and System LEDs. High-Speed Serial Interface (HSSI) Port HSSI data port interface (DCE) for connection to DTE. DS3 Network Ports 75Ω coaxial TX and RX DS3 network ports. Timing Options The hardware supports three modes of system timing: • Internal—Reference timing derived from the free-running internal oscillator • Network—Reference timing derived from the incoming DS3 data stream • External—75Ω female BNC connector accepts external timing. The reference timing input accepts a TTL level DS3 rate clock. Inband Management Channel 1-2 Specialized support is provided for the inband management channel in C-bit parity applications. The three C-bits in M-subframe 5 of the DS3 frame are assigned as a 28.2 kbit/s terminal-toterminal path maintenance data link. The signal format used on this data link consists of messages using the Link Access Procedure on the D-channel (LAPD) protocol. A dedicated HDLC controller is built into the hardware for this 28.2 kbit/s LAPD data link. The controller supports polled, interrupt-driven operation. Verilink HDM 2180 User Manual HDM 2180 DS3 DSU Overview Far-End Alarm and Control Dedicated support is provided for Far End Alarm and Control (FEAC) signals in C-bit parity applications. The third C-bit in Msubframe 1 of the DS3 frame provides the FEAC signal. A bitoriented message protocol (16 bit length) is used on the FEAC data stream. Downloadable Upgrades As a member of the AS2000 product family, the HDM 2180 incorporates Verilink’s Advanced Programmable Architecture (APA). With APA, you can download upgraded firmware to all HDM modules on your shelves from a single NCM source into the modules’ onboard RAM via FTP. The firmware contained in the flash can also be field-replaced with upgraded chips. Compatibility with Other Verilink Products The HDM 2180 can reside on the same shelf with all other AS2000 products; however, it does not pass data on the midplane and does not use the TABS bus of the shelf midplane. The HDM 2180 is a standalone system that can also be managed through the ACP bus of the shelf midplane by an NCM 2000 module. Advantages of using the NCM module include: • Higher security on the network with four levels of access using password control (instead of only one access password). • Verilink’s proprietary overhead bandwidth signalling that enables you to configure and troubleshoot the far-end node without interference from repeaters in the network. (This overhead bandwidth requires the C-bit parity format.) • Up to three users can access the module at a time. • Using the Advanced Programmable Architecture (APA) to download upgrade firmware to all HDM 2180 modules within or cross-shelf from a single NCM source. • The HDM can be managed with a graphical user interface (GUI) using Verilink’s Node Manager software application. Technical Description The HDM 2180 consists of two components: • A front-panel module, which contains the DSU microprocessor including firmware in flash, and • A detachable rear-panel connector interface module (CDM 2180), which contains a high-speed serial interface (HSSI) data port and 75Ω coaxial transmit and receive network connectors for the DS3 network interface. Verilink HDM 2180 User Manual 1-3 HDM 2180 DS3 DSU Overview HDM 2180 Front Panel SYS NET HDM 2180 DATA Figure 1-2 LEDs Figure 1-3 SNMP MANAGEMENT Craft port CDM 2080 Rear Panel EXT TIMING INPUT INPUT DS-3 CDM 2080 311-101633-001 T1 TIMING HSSI 8-pin female circular DIN (Not Supported) 75Ω BNC female Figure 1-4 EXT PRI LOCAL RX TX 75Ω BNC female HSSI port Functional Block Diagram of HDM 2180 Components FRONT To SNMP Manager AS2000 shelf 10BaseT HDM 2180 Shelf 128-pin midplane connector Customer applicatio CDM 2080 TX DS3 Net HSSI RX DS3 Net 75Ω coaxial connection BACK HDM 2180 Specifications Table 1-1 Network Specifications Network Interface Type DS3 Line Rate Line rate: 44.736 Mbit/s ± 20 ppm Framing C-bit parity Line Code B3ZS 1-4 Verilink HDM 2180 User Manual HDM 2180 DS3 DSU Overview Input Signal -11.7 dBm to +6.2 dBm, level DS3 Output Signal -4.7 dBm to +3.6 dBm (DSX-3 cross-connect point) Impedance 75Ω ± 5% Connector BNC female, one each for TX and RX System Timing T3 (BNC), Network, or Internal Table 1-2 Data Port Specifications Data Ports Type HSSI, DCE only Line rate n × 1.578 Mbit/s, where n = 1 to 28 Physical interface 50-pin HSSI Hardware handshake Control leads supported for DTR, DSR, TM, LLA, LLB Table 1-3 Environmental Specifications Non-operating Temperature range -20 to + 80°C Maximum temperature change rate 8°C per hour Humidity 0% to 95% relative, non-condensing Vibration, in transport, withstand 0.5 G from 5 Hz 3.0 G from 50 Hz to 500 Hz Shock during shipping, withstand 20 msec, 25 G, half-sine shock pulse when mounted normally 80 G peak, half sine for 10 msec Operating Power consumption <15 Watts total, front and back modules Temperature range 0 to 50°C, 0% to 95% relative humidity, non-condensing Vibration Withstand 25 G @ 1 to 60 Hz with no service interruption Regulatory Requirements This product complies with the following regulatory specifications as they apply to telecommunications equipment: • FCC—Part 15, Subpart J, Class A: Computing devices • 15.810: Radiated Emission Verilink HDM 2180 User Manual 1-5 HDM 2180 DS3 DSU Overview • 15.812: Conducted Emission • UL 1459, 2nd Edition • CSA—C225 Technical References for Network Interface This product complies with the following industry standard specifications: AT&T PUB 54014 All AT&T TR-000499 Electrical interface ANSI T1.102 Electrical interface ANSI T1-107a C-bit parity framing format Technical references Complies with the following industry standard specification, which defines the operation of the high-speed serial interface channel: TIA TR30.2-SP2795—all specifications. Agency Approvals This product is certified by the following agencies to verify compliance with regulatory requirements as part of the certification process for the AS2000 product family: • FCC • UL • CSA Dual-Line Shelf Limitations These limitations apply when the HDM 2180 is used in a Dual-line shelf. They must be observed to prevent intermittant data loss. • Because of heat build-up, only one HDM 2180 may be used in a Dual-Line shelf. • Since the HDM 2180 draws more current than other AS2000 modules, two external power supplies must be used whenever an HDM 2180 is placed in a Dual-line shelf. The power supplies will not be fully redundant. • Whenever an HDM 2180 is used in a Dual-line shelf with an NCM 2000 controller module, the HDM 2180 must be in the first (left hand) slot and the NCM 2000 must be in the right hand slot. • When an HDM 2180 is used in a Dual-line shelf without an NCM 2000, the HDM 2180 must be mounted in the right hand slot (slot 2). 1-6 Verilink HDM 2180 User Manual HDM 2180 DS3 DSU Overview FCC Compliance For the HDM 2180 to comply with FCC Part 15, ferrites must be placed on the following cables to prevent EMI: • DS3 Transmit • DS3 Receive • DS3 External Timing Cable Fair-Rite Products corporation manufactures snap-on ferrites that will meet this criteria. Their part number is: • 0443167251 (Verilink P/N: 400-502821-001) Figure 1-5 Ferrite Placement for Satisfying FCC EMI Compliance TX DS3 Cables RX HSSI Port Power Supply PAC2910 120Vac CDM 2180 Ferrites HSSI Cable BNC Timing Cable In addition to the ferrites, the chassis ground must be connected to the signal ground on Terminal Block One (TB1) on the Multi-line Shelf (MLS), and the chassis ground must be connected to the signal ground on Terminal Block One (TB1) on the dual-line shelf (DLS). For the MLS, loosen the screws for connections 3 and 4 on the TB1, insert insulated jumper wire (14 AWG) into the slots, then tighten the screws for those slots to secure the wire. For the DLS, loosen the screws in the two slots in the TB1, insert the insulated jumper wire (14 AWG) into the slots, then tighten the screws for those slots to secure the wire. The following diagrams show the method and locations. Verilink HDM 2180 User Manual 1-7 HDM 2180 DS3 DSU Overview Figure 1-6 Terminal Block One on the MLS—Chassis Ground Connected to Signal Ground Jumper Wire R e m o ve co ve r fo r a c c e s s Figure 1-7 1 12 RTN 1 2 V o lt R e tu rn 2 CGND C h a s s is G ro u n d 3 CGND C h a s s is G ro u n d 4 GND S ig n a l G r o u n d 5 GND S ig n a l G r o u n d 6 GND S ig n a l G r o u n d 7 4 8 R T N B 4 8 V o lt R e tu rn B 8 48 B 4 8 V o lt B 9 48 B 4 8 V o lt B 10 4 8 R T N A 4 8 V o lt R e tu rn A 11 48 A 4 8 V o lt A 12 48 A 4 8 V o lt A T ie S ig n a l a n d C h a s s is G N D to g e th e r fo r s in g lee in s ta lla tio n s . Terminal Block One on a DLS (back view) Showing Ground Connection To Ground Ground Connection C A U T IO N P3 E x p a ns io n B u s P4 E x p a ns io n B u s The application card has the signal ground and chassis ground terminals connected within the printed circuit board. This additional connection has been made to prevent generation of unwanted electromagnetic interference (EMI). NOTE: When using the HDM modules in a Quint-line Shelf, be sure to leave open slots between the modules to allow for proper air circulation and heat dissipation (Figure 1-8). Figure 1-8 HDM Usage in Quint-line Shelf HDM 2180 HDM 2180 Empty Slots NCM or other module HDM placement in Quint-line Shelf—limit use to slots 1 and 3 or 2 and 4ONLY. Be sure to have open slots between the HDM modules for proper air circulation and heat dissipation. 1-8 Verilink HDM 2180 User Manual Chapter 2 HDM 2180 Quick Set-Up This chapter provides step-by-step procedures for setting up your HDM 2180 module. This quick configuration guide makes the following assumptions: • You are installing the HDM 2180 and an NCM 2000 module in a Dual-line Shelf. Two external PWR 2940 power supplies will be used. • You are putting a router on the HSSI port of the HDM 2180 that outputs data at 43 Mbit/s. • You are connecting a full T3 to the DS3 port. NOTE: The NCM 2000 controller module MUST be installed in Slot 2 of the shelf. The HDM 2180 MUST be installed in Slot 1 of the shelf. When an HDM 2180 and an NCM 2000 are used in a Dual-line shelf, two external power supplies are required. Figure 2-1 Example Configuration HDM 2180 DS3 Port Full T3 HSSI Port to Router 43 Mbit/s NCM 2000 Management Terminal/PC NOTE: These procedures may not match your configuration. Use this chapter as a guide for equipment installation. Chapter 3 has complete details on configuration covering all options. Installation Do the following before installing the HDM 2180: • Install all associated Access System 2000 shelves and power supplies, as outlined in the AS2000: The Basics manual. • Install and test the NCM module first. Verilink HDM 2180 User Manual 2-1 HDM 2180 Quick Set-Up NOTE: The node controller module (NCM 2000) is usually installed in slot 1 of shelf 1. However, for use with an HDM in a dual-line shelf, the NCM must be installed in slot 2. Connect to Craft Port Connect the modular (RJ-11) end of the Craft cable (P/N 458501788-008) to the port labeled LOCAL on the front panel of the NCM module. Connect the other end of the Craft cable to your PC or terminal. If your PC has a DB-9 COM port connector, use a standard PC-AT serial cable to complete the connection. Terminal Parameters Set your terminal, or terminal program, to • 19.2 kbit/s • 8 data bits • no parity • one stop bit • no flow control NOTE: For the most effective and efficient set-up, have all required planning data such as your intended use, network (telco) provider specifications, channel and line requirements, circuit configurations, and other important information handy. For your convenience, worksheets are provided in the manual, AS2000: The Basics, Chapter 2—”Site Planning”. Logging On 1. Press ENTER to display the pSH+> prompt and type “craft”. 2. Press ENTER to display the NCM Main Menu. The default password for the NCM gives the user Access Level 2 permissions. For a higher access level, see your NCM 2000 User Manual. 2-2 Verilink HDM 2180 User Manual HDM 2180 Quick Set-Up Figure 2-2 NCM Main Menu Firmware Version and Date of Release Node Address Menu Heading Area Node “Map” (Physical Location of Modules) Module Key Command List Access Level (1-4) -- VERILINK NCM CONTROLLER : FW Rev 4.18c, Feb 6 1998 15:51:38 -Site Name: Access Level: 2 Managing at NEAR end node [127.255.255.0] Node ID: 20 <- SLOT -> SHELF 1 2 3 4 5 6 7 8 9 10 11 12 13 0 ❶ ❷- ❸- - - - - - - - - - - 1 D [T] *N 2 3 4 KEY: A=DIDCSU, B=DIU/DBU, C=CSU, D=DIU, E=SDIU, F=DIU/DDS, G=DHDM, H=ATM/IMUX, I=IDCSU, J=PEP, K=DAC, L=HLM, M=IMUX, N=NCM, P=DPRI, Q=QUAD, R=SUBRATE, S=HSM, T=HDM, U=DCSU, V=VCU, X=QPRI S) shelf/slot O) administration C) configuration D) diagnostics P) performance/status F) display far end DS3 port identification B) circuit manager A) alarm R) remote end setup I) manufacturing info X) exit this screen A [127.255.255.0] [1,1] HDM 2180 > Node Address Data (Command) Entry Area Active NCM Master Designator ❶ ❷ ❸ Indicator for the type of shelf: M = Multi-line, Q = Quint-line, D = Dual-line Brackets around module letter ( [T] ) indicate current module selected Asterisk indicates that the NCM is the Main Controller in the shelf From the NCM Craft interface Main Menu (Figure 2-2), select the HDM application module using option S, Shelf/Slot. The Main Menu uses brackets to enclose the T, indicating the HDM is now the active module. Port Configuration From the Main Menu, select option C, “Configuration”, to start the configuration task. The Configuration Menu displays (Figure 2-3). The Configuration Menu is used to enable—or put in service—each of the ports and to configure the various port parameters. Verilink HDM 2180 User Manual 2-3 HDM 2180 Quick Set-Up Figure 2-3 Configuration Menu A [127.255.255.0] [1,1] HDM 2180 > c -- HDM 2180 CONFIGURATION MENU -P) Port Setup H) HSSI Setup x) Exit this screen A [127.255.255.0] [1,1] HDM 2180 > Network Port The DS3 network port is usually configured before the HSSI port. Press ENTER after typing each command letter. 1. Type “P”, to display the Port Configuration Menu (Figure 2-4) Figure 2-4 DS3 Configuration Menu A [127.255.255.0] [1,1] HDM 2180 > p -- HDM 2180 Port Configuration Menu -- Line Code B3ZS - AIS C-Bit 0 T) Timing Recover Clock B) Line Build Out Normal Cable <= 250 ft R) Performance Control Off M) Data Rate Mode Only NE D) Data Rate 22, (35.2 Mbps) E) Equipment ID L) Location ID F) Frame ID U) Unit ID A) Facility ID P) Port ID C) Circuit ID G) Test Sig ID I) Inband Control Disable X) Exit this screen A [127.255.255.0] [1,1] HDM 2180 > 2. Type “R” to toggle the Performance Control to On. 3. Type “M” to set the data rate for both Near End (NE) and Far End (FE) data ports simultaneously. 4. Type “D” to enter the data rate for the HDM module. Enter the maximum rate available, 28 T1, or 44.7 Mbit/s. 5. All ID parameters are optional. Enter them as your needs require. 6. Type “I” to enable inband. 7. Exit this menu and return to the Configuration Menu. 2-4 Verilink HDM 2180 User Manual HDM 2180 Quick Set-Up HSSI Port Set-up 1. Hook up the DTE (in this case, a router) to the HSSI port. 2. Type “H” to display the HSSI Configuration Menu. Figure 2-5 HSSI Configuration Menu A [127.255.255.0] [1,1] HDM 2180 > p -- HDM 2180 HSSI Configuration Menu -Test Mode Disabled P) Port Status IN SERVICE M) Configuration Mode Manual X) Exit this screen A [127.255.255.0] [1,1] HDM 2180 > 3. Type “M” to toggle the port to Automatic operation. 4. Type “P” to toggle the port In Service. 5. Type “X” to exit to the Configuration Menu. Your HDM 2180 is now configured and ready to be placed into service. Connect the DS3 cables to the network port. The three tri-color LEDs on the front panel (Network Port, Data Port, System) should be lit solid green to indicate the module is properly configured and equipment is operating normally. Verilink HDM 2180 User Manual 2-5 HDM 2180 Quick Set-Up 2-6 Verilink HDM 2180 User Manual Chapter 3 Standalone HDM 2180 Management This chapter describes the Craft interface menu options for a standalone HDM 2180 (no NCM 2000 controller module used for management). See Chapter 4 for HDM features using an NCM 2000 for management. Using the Local Port To access the HDM 2180 from an ASCII terminal: 1. Connect your ASCII terminal to the front panel Local port. 2. Set your terminal parameters to the following values: • 19.2 kbit/s • 8 data bits • no parity • one stop-bit • no flow-control Be sure that X-ON/X-OFF flow control is disabled. 3. Type “craft” and press ENTER. 4. At the PASSWORD: prompt, type “verilink” (in lower case) and press ENTER. The HDM 2180 Craft Interface Main Menu (Main Menu) is displayed. HDM 2180 Craft Interface, Main Menu The Main Menu is the starting point for all management tasks accessed directly through the HDM 2180 Craft interface. The menu title displays information such as the name and shelf/slot position of the HDM 2180 module, its firmware version, and date/time. The menu, with an explanation of each option, follows. Verilink HDM 2180 User Manual 3-1 Standalone HDM 2180 Management Figure 3-1 ASCII Screen: Main Menu via HDM 2180 Local Port Menu Heading Area -- VERILINK HDM 2180 CRAFT INTERFACE at[1,1]: FW Rev 3.3, Dec. 12, 1997 -Near End Location ID Far End Location ID Ds3 Node Address Ds3 Acp Backplane Bus Ds3 Acp Inband Loopback Status : : : : : : 127.255.255.0 C Enabled No Loopback Module Status --- MAIN MENU --P) D) C) O) B) R) A) W) T) X) performance diagnostics port configuration node administration restore manufacturing default config monitor alarms view alarm buffer change craft password change craft timeout length system log off Command List HDM > Command/Data Entry Area Table 3-1 HDM 2180 Craft Interface Menu Commands Command W Description P Performance—displays the Performance Monitoring Menu. Figure 3-9, Table 3-9. D Diagnostics—displays the Diagnostics Menu. Figure 3-6, Table 3-6. C Port Configuration—displays the Port Configuration Menu, Figure 3-3, Table 3-3. O Node Administration—displays the Administration Menu, Figure 3-2, Table 3-2. B Restore Manufacturing Default Config—displays the Restore Manufacturing Default Config Menu, Figure 3-14, Table 3-11. R Monitor Alarms—displays the Alarm Monitoring display that provides real-time alarm notification, Figure 3-15. A View Alarm Buffer—displays the Alarm Buffer Screen that provides a historical record of alarms up to the time of selection, Figure 3-16. Change Craft Password—displays field in which to change craft password: HDM > w Old Password: New Password (4-20 chars): Type New Password again: Password Changed. 3-2 Verilink HDM 2180 User Manual Standalone HDM 2180 Management Command T Description Change Craft Timeout Length—displays menu from which one can change the craft timeout period: HDM > t The current timeout length: 15 mins. Change (Y/N)? y Please enter new timeout length (5 - 30 min): 15 Timeout length is changed. X System Log-off—Logs you out of the HDM access. Although Table 3-1 above presents application management options in the order as they appear on the Main Menu, this manual discusses the options in the order that the options will be needed during initial set-up of the card. Administration Menu When you access the HDM 2180 for the first time after installation, various parameters must be set for the module to operate properly. Parameters such as the node address, site name, date/time, IP parameters, and firmware download are set in the node’s Administration Menu. For information about IP addresses, check with your system administrator. Type the command O from the Craft Interface Menu: O) node administration to display the Administration Menu. Figure 3-2 Node Administration Menu HDM > o --A) N) T) L) G) U) H) M) O) P) Q) C) W) F) B) X) ADMINISTRATION MENU --Node Address site name set time Local IP address Local Gateway IP address IP Subnet Mask Management host IP address Management trap IP address1 Management trap IP address2 Management trap IP address3 Management trap IP address4 community string - read community string - write DS3 flash download DS3 boot exit menu HDM > Verilink HDM 2180 User Manual 3-3 Standalone HDM 2180 Management Table 3-2 HDM 2180 Node Administration Options Command Description A Node Address—Use this command to change the local node address. This is not the Ethernet IP address but is the number on the prompt line [0.0.0.1]. The value for each node master must be unique. Never set first octet greater than 127. Will cause momentary reset as it updates database records. Used by Verilink’s Node Manager application to identify components within the system. HDM > a Node Address: 111.222.77.188. Change? (Y/N) >y Input New Node Address in Decimal, e.g. 127.2.5.0 > N Site Name—Limit entry to 19 or fewer characters. This is an optional field that can be used to describe the location of your particular node. HDM > n Site Name : VERILINK Corp, San Jose Change (Y/N)? y Please enter new Site Name (19): T Set Time—This sets the time on the node/module to a logical time to coincide with the rest of your equipment. HDM > t Enter today's date (GMT) (mm/dd/yyyy): L Local IP address—Enter the Ethernet IP address of the node, in the form: [0.0.0.0] For example: [192.94.45.242]. If, after configuring IP addresses, an error message appears including the text " sendto: new socket sendto fail:", there is an error in the IP addresses used. The Ethernet IP address and the SLIP IP address must reflect different network segments as per the subnet mask in use. Correct the error and reset the HDM module to stop the error messages. HDM > l HDM IP address: 192.94.45.208, New HDM IP address > G Local Gateway IP address—The IP address of your network gateway device. This might be a router which the HDM will use to reach an SNMP manager. Consult with your network administrator. A gateway address is only required if the HDM module will be communicating with other devices not on the same LAN segment. HDM > g HDM Local Gateway IP address: 0.0.0.0, New HDM Local GateWay IP address > U IP Subnet Mask—The Ethernet subnet mask is based on the IP address according to the standard rules for IP address classes (A,B,C etc). For a class C Ethernet IP address use a subnet mask of [255.255.255.0]. HDM > u HDM IP subnet mask address: 0.0.0.0, New HDM IP subnet mask address > H Management Host IP Address—This is the address of the PC running the Node Manager application. HDM > h Management Station IP address: 0.0.0.0, New IP address > M Management trap IP address1—This is an IP address to which alarm messages will be sent. This might be a copy of the Verilink Node Manager application or some other SNMP network manager. HDM > m Management Station #1 Trap IP address: 0.0.0.0, New Trap IP address > 3-4 Verilink HDM 2180 User Manual Standalone HDM 2180 Management Command Description O Management trap IP address2—This is an alternate IP address to which alarm messages will be sent. This might be a copy of the Verilink Node Manager application or some other SNMP network manager. HDM > o Management Station #2 Trap IP address: 0.0.0.0, New Trap IP address > P Management trap IP address3—This is an alternate IP address to which alarm messages will be sent. This might be a copy of the Verilink Node Manager application or some other SNMP network manager. HDM > o Management Station #3 Trap IP address: 0.0.0.0, New Trap IP address > Q Management trap IP address4—This is an alternate IP address to which alarm messages will be sent. This might be a copy of the Verilink Node Manager application or some other SNMP network manager. HDM > o Management Station #4 Trap IP address: 0.0.0.0, New Trap IP address > C Community String - read—A security feature that enables you to establish who may read the information on the HDM module. Default is “public”. You may set a different string up to 64 characters. Community string (Read): public Change (Y/N)? y Please enter new Read Community String (64): W Community String - write—A security feature that enables you to establish who may write or change the information on the HDM module. Default is “public”. You may set a different string up to 64 characters. HDM > w Community string (Write): public Change (Y/N)? F DS3 flash download—Writes a firmware upgrade to Flash RAM after it has been transferred to the HDM 2180 using FTP. HDM > f Current Booting Flash Partition: A Only Partition B can be upgraded. Do you really want to do so? !!! (Y/N) B DS3 Boot—Causes the HDM 2180 to re-boot from the selected partition. HDM > b Current Booting Flash Partition: A Enter Flash Partition for Booting (0 for Partition A or 1 for Partition B) > X exit menu—Returns you to the Main Menu, Figure 3-1. Port Configuration Menu Once you have established and set the HDM 2180’s IP addresses and other administrative parameters, the HDM 2180’s ports need to be configured before signals can be properly transmitted and received. Verilink HDM 2180 User Manual 3-5 Standalone HDM 2180 Management From the HDM Craft Interface Menu (Main Menu) choose C to display the Port Configuration Menu. Figure 3-3 Port Configuration Menu HDM > c PORT CONFIGURATION MENU --D) DS3 Port H) HSSI Port 1 X) exit menu HDM > Table 3-3 Port Configuration Menu Choices Command Description D DS3 Port—displays the DS3 Port Configuration Menu, Figure 3-4, Table 3-4. H HSSI Port—displays the HSSI Port Configuration Menu, Figure 3-5, Table 3-5. X exit menu—Returns you to the Main Menu, Figure 3-1. DS3 Port Configuration Submenu Figure 3-4 From the Port Configuration Menu, select D for the DS3 Port option to display the DS3 Port Configuration menu. Only the parameters with default values are required. DS3 Port Configuration Submenu HDM> d S) H) L) T) C) B) A) R) E) O) F) U) I) P) G) X) --- DS3 PORT CONFIGURATION --DS3 Port Performance Monitoring: Enabled DS3 Acp Inband: Disabled DS3 Line Type: C-Bit Framing DS3 Coding Type: B3ZS DS3 Clock Source: Internal Clock DS3 Cable Selection: Normal Cable DS3 AIS C-Bit Value: 0 Config DS3 NE Data Rate. NE Rate: 28, (44.7 Mbps) DS3 Port Equipment ID: DS3 Port Location ID: DS3 Port Frame ID: DS3 Port Unit ID: DS3 Port Facility ID: DS3 Port ID: DS3 Port Test Sig ID: exit menu HDM > 3-6 Verilink HDM 2180 User Manual Standalone HDM 2180 Management Table 3-4 DS3 Port Configuration Submenu Options Command Description S DS3 Port Performance Monitoring—Displays the current value and provides a prompt asking if you want to change the value. This value cannot be set from the Local Port on the HDM. It must be set using an NCM. HDM > s DS3 Port Performance Monitoring: Enabled Change (Y/N)? y Enter new Port Performance Monitoring ( 0 for Enabled or 1 for Disabled) > H DS3 ACP Inband—Displays the current value and provides a prompt asking if you want to change the value. If the ACP Inband is disabled, the ACP will not route through the DS3 network. HDM > h DS3 Acp Inband: Disabled. Change (Y/N)? y DS3 ACP Inband: Enabled L DS3 Line Type—Displays the current value. The HDM 2180 supports only the C-bit framing application. HDM > l Only CBit application is supported. T DS3 Coding Type—Displays the current value. The HDM 2180 supports only B3ZS line coding. This is a type of encoded signal. HDM > t Note: DS3 CSU only supports B3ZS Line Coding! C DS3 Clock Source—Displays the current timing source for the module and provides a prompt asking if you want to change the value as follows: HDM > c DS3 Port Clock Source: Recover Clock. Change (Y/N)? y Enter Tx Clock Source (0 for External T1 Clock or 1 for External T3 Clock or 2 for Internal Clock or 3 for Recover Clock) > B DS3 Cable Selection—Displays the current value and provides a prompt asking if you want to change the value. Normal is <250 ft, Long is >250 ft. HDM > b DS3 Port Cable Selection: Normal Cable. Change (Y/N)? y Enter Cable Selection(0 for Normal or 1 for Long Cable) > A DS3 AIS C-Bit Value—Displays the current value and provides a prompt asking if you want to change the value as follows: HDM > a DS3 AIS C-Bit Values: 0 Change (Y/N)? y Enter AIS C-Bit Value (0 for logic or 1 for SMDS application) > R Config DS3 NE Data Rate. NE Rate—Displays the current value and provides a prompt asking if you want to change the value as follows: HDM > r Warning!! Config NE only. FE rate could become inconsistent. Current DS3 Near End Port Rate : 28. Change (Y/N)? y Enter DS3 Near End Port Data Rate (1-28) > Verilink HDM 2180 User Manual 3-7 Standalone HDM 2180 Management Command Description E DS3 Port Equipment ID—An optional field in which to describe the type of DTE used. Displays the current value and provides a prompt asking if you want to change the value as follows (10 characters maximum): HDM > e Current DS3 Port Equipment ID: . Change (Y/N)? y Please enter new DS3 Port Equipment ID(10): O DS3 Port Location ID—An optional field in which to describe the location of the module. Displays the current value and provides a prompt asking if you want to change the value as follows (11 characters maximum): HDM > o Current DS3 Port Location ID: . Change (Y/N)? y Please enter new DS3 Port Location ID(11): F DS3 Port Frame ID—An optional field. Displays the current value and provides a prompt asking if you want to change the value as follows (10 characters maximum): HDM > f Current DS3 Port Frame ID: . Change (Y/N)? y Please enter new DS3 Port Frame ID(10): U DS3 Port Unit ID—An optional field. Displays the current value and provides a prompt asking if you want to change the value as follows (6 characters maximum): HDM > u Current DS3 Port Unit ID: . Change (Y/N)? y Please enter new DS3 Port Unit ID(6): I DS3 Port Facility ID—An optional field. Displays the current value and provides a prompt asking if you want to change the value as follows (38 characters maximum): HDM > i Current DS3 Port Facility ID: . Change (Y/N)? y Please enter new DS3 Port Facility ID(38): P DS3 Port ID—An optional field. Displays the current value and provides a prompt asking if you want to change the value as follows (38 characters maximum): HDM > p Current DS3 Port ID: . Change (Y/N)? y Please enter new DS3 Port ID(38): G DS3 Port Test Sig ID—An optional field. Displays the current value and provides a prompt asking if you want to change the value as follows (38 characters maximum): HDM > g Current DS3 Test Sig Generator ID: . Change (Y/N)? y Please enter new DS3 Port Test Sig Generator ID(38): X 3-8 exit menu—Returns you to the Port Configuration Menu, Figure 3-3. Verilink HDM 2180 User Manual Standalone HDM 2180 Management HSSI Port Configuration Figure 3-5 From the Port Configuration Menu, select H for the HSSI Port option to display the HSSI Port Configuration menu. HSSI Port Configuration Submenu --- HSSI PORT CONFIGURATION --Near End Data Rate : 10, (16.0 Mbps) Far End Connection is not established S) M) D) R) A) X) Port State : Out of Service Port Configuration Mode : Manual Mode Change NE & FE Data Rate Change Near End Data Rate Scrambling : Disabled exit menu HDM > Table 3-5 HSSI Port Configuration Menu Choices Command S Description HSSI Port State—When Configuration Mode (below) is Automatic, the Port State is an informational display. The HSSI data port is In Service when DTR is presented by the DTE and it is Out of Service when the DTE fails to assert DTR. When Configuration Mode (below) is set to Manual, the Port State command becomes a toggle. If Mode = Manual and Port State = OUT OF SERVICE, then issuing the Port State command will place the port IN SERVICE, whether or not any DTE is present and whether or not it is asserting DTR. Conversely, if Configuration Mode = Manual and the Port State = IN SERVICE, issuing the Port State command will place the port OUT OF SERVICE, stopping all user data. HDM > s HSSI Port State: IN SERVICE Change (Y/N)? y Enter new Port State ( 0 for IN SERVICE or 1 for OUT OF SERVICE) > M Configuration Mode—The Configuration Mode toggles between Automatic and Manual each time the Configuration Mode Command is issued. When Configuration Mode is Automatic, the Port State is an informational display. The HSSI data port is In Service when DTR is presented by the DTE and it is Out of Service when the DTE fails to assert DTR. When Configuration Mode is set to Manual, the Port State command becomes a toggle. If Mode = Manual and Port State = OUT OF SERVICE, then issuing the Port State command will place the port IN SERVICE, whether or not any DTE is present and is asserting DTR. Conversely, if Configuration Mode = Manual and the Port State = IN SERVICE, issuing the Port State command will place the port OUT OF SERVICE, stopping all user data. HDM > m HSSI Port Mode: Manual Mode Change (Y/N)? y Enter new configuration mode( 0 for MANUAL or 1 for AUTOMATIC) > D Change NE & FE Data Rate—When the HDM 2180 is communicating with a far-end HDM 2180, this option allows simultaneous changes in the data rate at both ends. R Change Near End Data Rate—This option always allows the data rate for the local HSSI data port to be changed, whether or not a circuit exists to any far-end HDM 2180. Verilink HDM 2180 User Manual 3-9 Standalone HDM 2180 Management Command Description A Scrambling—Changes the ones and zeroes in the bit stream according to a mathematical algorithm designed for compatibility with other DS3 DSU products. Must be used at both ends if used at one end. This feature is unrelated to encryption and has no impact on the security of user data. X exit menu—Returns you to the Port Configuration Menu, Figure 3-3. Port Diagnostics Menu and Submenus The Port Diagnostics Menu allows limited diagnostics with direct connection to the HDM 2180. From the HDM 2180 Craft Interface Menu (Main Menu), choose D to display the Port Diagnostics Menu. Figure 3-6 Port Diagnostics Menu --- PORT DIAGNOSTICS MENU --L) Perform Loopback Diagnostics T) Transmit Diagnostics Alarms A) Display Current Diagnostics Loopback Status N) Display Diagnostics Loopbacks History D) Display Diagnostics Alarms History H) Real-Time Display Hssi Status X) exit menu Table 3-6 Port Diagnostics Menu Commands Command Description L Perform Loopback Diagnostics—Displays the Port Loopback Diagnostics Menu, Figure 3-7, Table 3-7. T Transmit Diagnostics Alarms—Displays the Transmit Alarms Diagnostics Menu, Figure 3-8, Table 3-8. A Display Current Diagnostics Loopback Status—Displays the current loopback status for each port via the submenu set shown below. HDM > a DISPLAY CURRENT DIAGNOSTICS LOOPBACK STATE --D) Display current loopback state in the system X) exit menu HDM > d DS3 Port: No Loopback HSSI Port: No Loopback FEAC: Declare line loopback de_activate - DISPLAY CURRENT DIAGNOSTICS LOOPBACK STATE --- 3-10 D) Display current loopback state in the system X) exit menu Verilink HDM 2180 User Manual Standalone HDM 2180 Management Command N Description Display Diagnostics Loopbacks History—Log number, date reported, time reported, description. HDM > n -- LOOPBACK HISTORY BUFFER -----alarmlog num=1; 1-29-1997;7:22:44;Enable User Payload Loopback alarmlog num=2; 1-29-1997;7:23:8;Disable User Payload Loopback alarmlog num=3; 1-29-1997;7:23:56;Disable FAREND Payload Loopback alarmlog num=4; 1-29-1997;7:24:33;Enable User Equipment Loopback Hit Return to display diag loopback buffer again or X to exit D Display Diagnostics Alarms History—Log number, date reported, time reported, description. HDM > d --- TRANSMIT ALARM BUFFER -----alarmlog num=1; 1-29-1997;7:8:11;Enable AIS Alarm alarmlog num=2; 1-29-1997;7:8:11;Enable DS3 FEAC Loss of Signal Alarm alarmlog num=3; 1-29-1997;7:23:56;Enable Transmit Line Loopback Deact alarmlog num=4; 1-29-1997;7:23:56;Enable Transmit DS3 FEAC Line code Hit Return to display alarm buffer again or X to exit H Real-Time Display HSSI Status—Displays current state of the HSSI Leads. HDM > h --- HSSI STATUS ------ ( type X to exit ) Test: off, X Loopbacks/ Diagnostics Figure 3-7 DCE: on, DTE: off, LPBK A: off, LPBK B: off, exit menu—Returns you to the Main Menu, Figure Figure 3-1. By returning transmitted signals to their source for comparison, loopbacks allow you to check the accuracy of the data transmission. To access these diagnostic options, select L on the Port Diagnostics Menu to display the Port Loopback Diagnostics Menu. Port Loopback Diagnostics Menu HDM > l -- PORT LOOPBACK DIAGNOSTICS MENU --D) DS3 Port Loopback H) HSSI Port Loopback X) exit menu HDM > Verilink HDM 2180 User Manual 3-11 Standalone HDM 2180 Management Table 3-7 Port Loopback Diagnostics Menu Commands Command Description D DS3 Port Loopback—Select 0 to deactivate an existing loopback. Select 1 for a user payload loopback, which will cause the Net LED to turn amber. Select 2 for a user local loopback, which will cause the Data LED to turn amber. All data coming into/out of the port marked with the * is dropped. Note: All loopbacks will interrupt user data transmision. HDM > d DS3 Loopback: No Loopback Perform LoopBack (Y/N)? y Enter Loopback (0 for No Loopback or 1 for User Payload loopback or 2 for User Local Loopback) > User Payload Loopback HSSI DTE * DS3 Framer DS3 DS3 Framer DS3 User Local Loopback HSSI DTE H * HSSI Port Loopback—Select 0 to deactivate an existing loopback. Select 1 to start a user equipment loopback. When activated, the Data LED will turn amber. All data coming into/out of the port marked with the * is dropped. Note: All loopbacks will interrupt user data transmission. HDM > h HSSI Port LoopBack: No Loopback Perform Loopback (Y/N)? y Enter LoopBack (0 for No Loopback or 1 for User Equipment Loopback) > HSSI Port Loopback (User Equipment Loopback) HSSI DTE X DS3 * exit menu—Returns you to the Diagnostics Menu, Figure 3-6. Transmitting Diagnostics Alarms 3-12 DS3 Framer To verify that the far end (FE) can “see” alarms transmitted from the near end, select T from the Port Diagnostics Menu to display the Transmit Alarms Diagnostics Menu. This menu provides options for transmitting various types of alarms to the far end to verify proper functioning. Verilink HDM 2180 User Manual Standalone HDM 2180 Management Figure 3-8 Table 3-8 Transmit Alarms Diagnostics Menu HDM > t --- TRANSMIT ALARMS DIAGNOSTICS MENU --Y) Transmit Yellow Alarm ................... A) Transmit AIS Alarm ...................... S) Transmit IDLE Signal .................... F) Transmit FEBE ........................... E) Transmit FEAC DS3 EQUIPMENT FAILURE (SA). L) Transmit FEAC DS3 LOS/HBER Alarm ........ O) Transmit FEAC DS3 Out-Of-Frame .......... R) Transmit FEAC DS3 AIS Received .......... I) Transmit FEAC DS3 Idle Received ......... C) Transmit FEAC DS3 Common Eqpt. Fail ..... P) Transmit FEAC DS3 EQUIPMENT FAILURE (NSA) X) exit menu HDM > off on off off off on off off off off off Transmit Alarms Diagnostics Menu Options Command Description Y Transmit Yellow Alarm—Toggles transmission of RAI (Remote Alarm Indication signal) on and off to enable or disable transmission of the far end receive failure in the outgoing DS3 stream. HDM > y Perform Yellow Alarm(Y/N)? y Enter choice(0 for Enable or 1 for Disable) > A Transmit AIS Alarm—Toggles transmission of AIS (Alarm Indication Signal), a pattern of unframed all ones, on and off to notify the other end that an alarm is being received. HDM > a Perform AIS Alarm(Y/N)? y Enter choice(0 for Enable or 1 for Disable) > S Transmit IDLE Signal—Toggles transmission of idle code on and off. The idle signal is used for keeping the line active when no data signals are being sent. HDM > s Perform IDLE Signal Alarm(Y/N)? y Enter choice(0 for Enable or 1 for Disable) > F Transmit FEBE—Far-End Block Error—Toggles transmission of the Far End Block Error alarm message on and off, controlling the insertion of Far End Block Errors in the outgoing DS3 stream and emulating the alarm transmitted to the far end when a bit error is received. HDM > f Perform FEBE Alarm(Y/N)? y Enter choice(0 for Enable or 1 for Disable) > E Transmit FEAC DS3 EQUIPMENT FAILURE (SA)—Conditions to cause activation of this FEAC signal alarm are not defined for this module. HDM > e Perform Equipment FAIL SA Alarm(Y/N)? y Enter choice(0 for Enable or 1 for Disable) > Verilink HDM 2180 User Manual 3-13 Standalone HDM 2180 Management Command L Description Transmit FEAC DS3 LOS/HBER Alarm—A LOS failure is declared when an incoming LOS defect persists during a range of 2 to 10 seconds. The LOS failure is cleared when the LOS defect is absent for 20 seconds. HDM > l Perform LOS Alarm(Y/N)? y Enter choice(0 for Enable or 1 for Disable) > O Transmit FEAC DS3 Out-of-Frame—A Loss of Frame (LOF) failure is declared when the OOF defect persists during a range of 2 to 10 seconds. The LOF is cleared when the OOF defect is absent for 20 seconds. HDM > o Perform FEAC OOF Alarm(Y/N)? y Enter choice(0 for Enable or 1 for Disable) > R Transmit FEAC DS3 AIS Received—An Alarm Indication Signal failure is declared when an incoming AIS defect persists during a range of 2 to 10 seconds. The AIS is cleared when the AIS defect is absent for 20 seconds. HDM > r Perform AIS Receive Alarm(Y/N)? y Enter choice(0 for Enable or 1 for Disable) > I Transmit FEAC DS3 Idle Received—An Idle Signal condition is declared when the Idle Signal persists for 2 to 10 contiguous 1-second intervals. The Idle Signal condition is cleared when it has been absent for 20 seconds. HDM > i Perform FEAC IDLE Alarm(Y/N)? y Enter choice(0 for Enable or 1 for Disable) > C Transmit FEAC DS3 Common Eqpt. Fail—Conditions to cause activation of this FEAC signal alarm are not defined for this module. HDM > c Perform Transmit Common Equipment FAIL Alarm(Y/N)? y Enter choice(0 for Enable or 1 for Disable) > P Transmit FEAC DS3 EQUIPMENT FAILURE (NSA)—Conditions to cause activation of this FEAC signal alarm are not defined for this module. HDM > p Perform EQUIP FAIL (NSA) Alarm(Y/N)? y Enter choice(0 for Enable or 1 for Disable) > X exit menu—Returns you to the Diagnostics Menu, Figure 3-6. Performance Monitoring Menu Pressing P from the Main Menu displays the Performance Monitoring menu. This menu allows you to see the 24-hour and quarter-hour (15-minute) performance of the selected module for the near end (NE) and a locally-limited set of information for the far end (FE). 3-14 Verilink HDM 2180 User Manual Standalone HDM 2180 Management Figure 3-9 Performance Monitoring Menu --- PERFORMANCE MONITORING --L) DS3 NE Performance Monitoring F) DS3 Local FE Performance Monitoring C) DS3 24 Hr. Alerts Crossing Threshold (NE) Q) DS3 Qtr. Hr. Alerts Crossing Threshold (NE) A) DS3 24 Hr. Alerts Crossing Threshold (Local FE) B) DS3 Qtr. Hr. Alerts Crossing Threshold (Local FE) R) DS3 Reset NE Performance Counters S) DS3 Reset Local FE Performance Counters X) exit menu HDM > Table 3-9 Performance Monitoring Menu Command Choices Command Description L DS3 NE Performance Monitoring—Displays the DS3 NE Performance Monitoring menu, Figure 3-10. F DS3 FE Performance Monitoring—Displays the DS3 Layer Local FE Performance Monitoring menu, Figure 3-12. (“Local FE” refers to locally viewing Far End performance parameters.) C DS3 24 Hr Alerts Crossing Threshold (NE)—Displays the DS3 Layer Performance Alert Threshold menu, Figure 3-13. Q DS3 Qtr Hr Alerts Crossing Threshold (NE)—Displays the DS3 Qtr Hr Alerts Crossing Threshold menu. A DS3 24 Hr Alerts Crossing Threshold (Local FE)—Displays the DS3 24 Hr Local FE Alerts Crossing Threshold menu. (“Local FE” refers to locally viewing Far End performance parameters.) B DS3 Qtr Hr Alerts Crossing Threshold (Local FE)—Displays the DS3 Qtr Hr Local FE Alerts Crossing Threshold menu. (“Local FE” refers to locally viewing Far End performance parameters.) R DS3 Reset NE Performance Counters—Resets the DS3 NE Performance Counters. S DS3 Reset Local FE Performance Counters—Resets the DS3 Local FE Performance Counters. (“Local FE” refers to locally viewing Far End performance parameters.) X exit menu—Returns you to the HDM 2180 Craft Interface Menu (Main Menu), Figure 3-1. DS3 NE Performance Monitoring Menu Pressing L from the Performance Monitoring Menu displays the DS3 NE Performance Monitoring Menu. This menu displays the 24-hour near-end performance in 96 15-minute intervals for the parameters shown in the following figure and described in Table 3-10. Verilink HDM 2180 User Manual 3-15 Standalone HDM 2180 Management Figure 3-10 DS3 NE Performance Monitoring Menu --- DS3 NE Performance Monitoring --C) 24 hr. LCV E) 24 hr. LES S) 24 hr. LSES V) 24 hr. P-bit CV R) 24 hr. P-bit CV ES M) 24 hr. P-bit CV SES P) 24 hr. C-bit CV B) 24 hr. C-bit CV ES I) 24 hr. C-bit CV SES F) 24 hr. SEFS A) 24 hr. AISS U) 24 hr. UAS L) 24 hr. LOSS O) 24 hr. LOFS X) exit To display the data for any of the parameters listed in the DS3 NE Performance Monitoring Menu, type the letter command for that particular parameter. Table 3-10 Near End Performance Monitoring Menu Command Choices Command 3-16 Description C 24 hour LCV—Line Coding Violation. Displays the 24 hour NE LCV performance data register showing any near-end bipolar violation events or excessive zeros events. E 24 hour LES—Line Errored Second. Displays the 24 hour NE LES performance data register that shows any second in which one or more coding violations, or one or more loss-ofsignal errors occurred. S 24 hour LSES—Line Severely Errored Seconds. Displays the 24 hour NE LSES performance data register showing the seconds during which the NE was (at any point during the second) in the AIS state. V 24 hour P-bit CV—P-bit Coding Violation. Displays the 24 hour NE P-bit CV performance data register showing the occurrences of a received P-bit code on the DS3 M-frame, not identical to the corresponding near-end code. R 24 hour P-bit CV ES—P-bit Errored Seconds. Displays the 24 hour NE P-bit CV ES performance data register showing the seconds with one or more PCVs, or one or more out of frame errors or incoming AISs. M 24 hour P-bit CV SES—P-bit Severely Errored Seconds. Displays the 24 hour NE P-bit CV SES performance data register showing the seconds with 44 or more PCVs, or one or more Out of Frame errors or incoming AISs. P 24 hour C-bit CV—C-bit Coding Violation. Displays the 24 hour NE C-bit CV performance data register showing the near-end count of C-bit parity errors occurring during the designated time interval. B 24 hour C-bit CV ES—C-bit Errored Seconds. Displays the 24 hour NE C-bit CV ES performance data register showing the near-end seconds with one or more CCVs, or one or more out-of-frame errors or incoming AISs. I 24 hour C-bit CV SES—C-bit Severely Errored Seconds. Displays the 24 hour NE C-bit CV SES performance data register showing the near-end seconds with 44 or more CCVs or one or more out-of-frame errors or incoming AISs. F 24 hour SEFS—Severely Errored Framing Seconds. Displays the 24 hour NE SEFS performance data register which shows the near-end seconds with one or more out-offrame defects or incoming AISs. Verilink HDM 2180 User Manual Standalone HDM 2180 Management Command Description A 24 hour AISS—Alarm Indication Signal. Displays the 24 hour NE AISS performance data register showing the seconds during which the unit receives all-ones (AIS) code from the network. U 24 hour UAS—Unavailable Second. Displays the 24 hour NE UAS performance data register showing the near-end unavailable seconds during which the DS3 port is unable to receive or transmit traffic. L 24 hour LOSS—Loss of Signal Second. Displays the 24 hour NE LOSS performance data register showing the number of seconds in which the unit is in a loss-of-signal state. O 24 hour LOFS—Loss of Frame Seconds. Displays the 24 hour NE LOFS performance data register showing the total number of seconds the unit was in a loss-of-signal state. X exit menu—Returns you to the Performance Monitoring Menu. Performance Data Displays For example, to see the 24 hr NE LCV Performance Data: HDM > C The 24 Hour NE LCV Performance Data screen displays: Figure 3-11 24 Hour NE LCV Performance Data Display 24 HOUR NE LCV PERFORMANCE DATA 3-25-1996 10:52:04 Site Name: Verilink Corp, San Jose Valid Intervals 2 Seconds in Current Interval 424 NE LCV in 24 Hours 0 NE LCV in Current Interval 1: 0 17: 33: 49: 65: 81: 2: 0 18: 34: 50: 66: 82: 3: 19: 35: 51: 67: 83: 4: 20: 36: 52: 68: 84: 5: 21: 37: 53: 69: 85: 6: 22: 38: 54: 70: 86: 7: 23: 39: 55: 71: 87: 8: 24: 40: 56: 72: 88: 9: 25: 41: 57: 73: 89: 10: 26: 42: 58: 74: 90: 11: 27: 43: 59: 75: 91: 12: 28: 44: 60: 76: 92: 13: 29: 45: 61: 77: 93: 14: 30: 46: 62: 78: 94: 15: 31: 47: 63: 79: 95: 16: 32: 48: 64: 80: 96: - 0 The other selections from the Performance Monitoring Menu (Figure 3-9) and the performance monitoring submenus produce similar performance data displays. To exit any of the performance data displays, press the ENTER key. The screen will refresh with the performance monitoring submenus, which will be ready for other commands at the prompt. To move further up the menu hierarchy, press X to exit your current screen and move to higher menu levels. Verilink HDM 2180 User Manual 3-17 Standalone HDM 2180 Management DS3 Layer Local Far-End Performance Monitoring Submenu A subset of the far-end 24-hour performance parameters can be accessed by a near-end (local) connection. Typing F for the Local FE Performance Monitoring option from the DS3 Performance Monitoring Menu displays the DS3 Layer Local FE Performance Monitoring submenu. Selecting any of the options will display the performance of that parameter in 96 15-minute increments for the previous 24 hours. Figure 3-12 DS3 Layer Local FE Performance Monitoring Submenu HDM > f DS3 Layer Local FE PERFORMANCE MONITORING --P) 24 hour DS3 Layer C-bit CV B) 24 hour DS3 Layer C-bit CV ES I) 24 hour DS3 Layer C-bit CV SES U) 24 hour DS3 Layer UAS X) exit menu HDM > DS3 Layer Performance Alert Thresholds Submenu (24 Hr. NE) To change the threshold values for near-end 24-hour alerts, select C for the 24 Hr. Alerts Crossing Threshold (NE) option from the DS3 Performance Monitoring Menu to display the DS3 Layer Performance Alert Thresholds submenu. The values shown are defaults established in Bellcore Technical Reference, OTGR 5.1, TRTSY-000820. Figure 3-13 DS3 Layer Performance Alert Thresholds Submenu HDM > c DS3 Layer Performance Alert Thresholds --C) LCV threshold default value: 3865 E) LES threshold default value: 864 S) LSES threshold default value: 40 P) P-bit CV threshold default value: 3820 B) P-bit CV ES threshold default value: 864 I) P-bit CV SES threshold default value: 40 V) C-bit CV threshold default value: 3820 R) C-bit CV ES threshold default value: 864 M) C-bit CV SES threshold default value: 40 F) SEFS threshold default value: 8 A) AISS threshold default value: 8 U) UAS threshold default value: 10 L) LOS threshold default value: 8 O) LOFS threshold default value: 8 X) exit menu HDM > 3-18 Verilink HDM 2180 User Manual Standalone HDM 2180 Management Restore Manufacturing Default Config Menu To restore the manufacturing defaults for the HDM 2180, type the command B from the Main Menu selection: B) restore manufacturing default config The Restore Manufacturing Default Config Menu is displayed. Note that if you restore the manufacturing defaults after installing your card and after setting parameters and configuring the ports, you will have to reboot the board/module, and your system will be adversely affected. Figure 3-14 Restore Manufacturing Default Config Menu HDM > b --- RESTORE MANUFACTURING DEFAULT CONFIG MENU ---A) TX Diagnostic Alarms D) Day Alert Thresholds Q) Qrt. Hr. Alert Thresholds P) DS3 Port Configuration S) SNMP Configuration H) HSSI Port Configuration X) exit menu HDM > Table 3-11 Restore Manufacturing Default Config Menu Options Command A Description TX Diagnostic Alarms—Sets the transmission of diagnostic alarms to the manufacturing defaults. HDM > a Set TX Diagnostic Alarms to Manufacturing Default? (Y/N) >y TX Diagnostic Alarms value set to Default. System could be in Unknown State. Please REBOOT the board!! D Day Alert Thresholds—Sets the day (24-hour) alert thresholds to the manufacturing defaults. HDM > d Set Day Alert Thresholds to Manufacturing Default? (Y/N) >y Day Alert Thresholds value set to Default. System could be in Unknown State. Please REBOOT the board!! Q Qrt. Hr. Alert Thresholds—Sets the quarter hour (15-minute) thresholds to the manufacturing defaults. HDM > q Set Qrt. Hr. Alert Thresholds to Manufacturing Default? (Y/N) >y Qrt. Hr. Alert Thresholds value set to Default. System could be in Unknown State. Please REBOOT the board!! Verilink HDM 2180 User Manual 3-19 Standalone HDM 2180 Management Command P Description DS3 Port Configuration—Sets the DS3 Port Configuration to the manufacturing defaults. HDM > p Set DS3 Port Configuration to Manufacturing Default? (Y/N) >y DS3 Port Configuration value set to Default. System could be in Unknown State. Please REBOOT the board!! S SNMP Configuration—Sets the SNMP Configuration to the manufacturing defaults. HDM > s Set SNMP Configuration to Manufacturing Default? (Y/N) >y SNMP Configuration value set to Default. System could be in Unknown State. Please REBOOT the board!! H HSSI Port Configuration—This option sets the HSSI Port Configuration to the manufacturing defaults. HDM > h Set HSSI Port Configuration to Manufacturing Default? (Y/N) >y HSSI Port Configuration value set to Default. System could be in Unknown State. Please REBOOT the board!! X Alarm Monitoring exit menu—Returns you to the Main Menu, Figure 3-1. To see real-time, continuous alarm notifications, from the Main Menu, select: R) monitor alarms to display the Alarm Monitoring screen: Figure 3-15 Alarm Monitoring Menu HDM > r ------ ALARM MONITORING -----T: top menu alarms - D: diagnostics alarms - L: loopback alarms (Hit X to exit or Return to erase the screen) T: alarmlog num=15; 1-29-1997;7:15:11;(1/4 hour)DS3 UAS alert cross the threshold T: alarmlog num=16; 1-29-1997;7:15:11;(1/4 hour)DS3 FE UAS alert cross the threshold Below the title of the Alarm Monitoring Menu, there is a descriptor telling which alarm buffer each real-time alarm will be stored in. Each listed alarm will have a T, D, or L displayed in front of it. “T” alarms are stored under the “View alarm buffer” option found in the Main (top level) Menu. “D” alarms are stored under the “Display Diagnostics Loopbacks History” option in the Diagnostics Menu. “L” alarms are stored under the “Display Diagnostics Alarms History” option, also in the Diagnostics Menu. If no alarms are active, the display is empty. Once you press ENTER or you exit the real-time alarm display, the alarm message can be found in its respective buffer and is no longer visible in the real-time alarm monitoring screen. 3-20 Verilink HDM 2180 User Manual Standalone HDM 2180 Management Alarm Buffer To see a historical listing of alarms, type A from the Main Menu to display the Alarm Buffer. Press ENTER to re-display the Alarm Buffer, or press X to exit to the Main Menu. Figure 3-16 Alarm Buffer Display ------ ALARM BUFFER -----alarmlog num=1; 3-25-1996;11:17:1;declare Out of Frame in DS3 layer alarmlog num=2; 3-25-1996;11:17:3;declare DS3 layer Loss Of Frame alarmlog num=3; 3-25-1996;11:17:6;(1/4 hour)DS3 SEFS alert cross the threshold alarmlog num=4; 3-25-1996;11:17:6;(1/4 hour)DS3 LOFS alert cross the threshold alarmlog num=5; 3-25-1996;11:17:9;(1/4 hour)DS3 UAS alert cross the threshold Hit Return to display alarm buffer again or X to exit Verilink HDM 2180 User Manual 3-21 Standalone HDM 2180 Management 3-22 Verilink HDM 2180 User Manual Chapter 4 HDM 2180 Management: Using NCM 2000 ASCII Access Settings To access an HDM 2180 on the node from an ASCII terminal connected to the Local port on an NCM 2000: 1. Ensure that your terminal parameters are set to the following values: • 19.2 kbit/s • 8 data bits • no parity • one stop-bit • no flow-control Be sure that X-ON/X-OFF flow control is disabled. 2. Type “craft” and press ENTER. 3. At the PASSWORD: prompt, press ENTER. Until you change the password, the ENTER key is the default password. If you have changed the password or have been assigned a password, type the correct password (up to 8 characters, including spaces). The screen will display placeholders (******) as you type the password. After typing the password, press ENTER. The password of the NCM 2000 determines the level of access available with the various functions of the HDM 2180. See the NCM 2000 User Manual for more information about this security feature. NCM Controller Menu (Main Menu) The NCM Controller Menu (Main Menu) displays the contents of slots in the shelves of the selected node. This manual deals with the HDM 2180 module in particular and the NCM module with regard only to how the NCM module interacts with the HDM 2180 module. In the Main Menu: • A T will display at the intersection of rows and columns that designate the shelf/slot location of the HDM 2180 module. • The letter N displays the NCM module locations. Verilink HDM 2180 User Manual 4-1 HDM 2180 Management: Using NCM 2000 • The letter surrounded by brackets ( [ ] ) designates the location of the currently active module that can be referenced and modified using the displayed menu. • On initial log in, the brackets surround the module being used as the log-in access point (for example, the NCM). • The Main Menu option S (shelf/slot) is used to move to a desired module in the node. In Figure 4-1, the Main Menu shows an HDM 2180 (designated by T) in slot 1. From the S) shelf/slot command, the currently accessed module indicated by the square brackets ([ ]) has been changed to the HDM 2180 in slot 1. The asterisk next to the N indicates that the NCM 2000 module is the node master. The A at the beginning of the prompt line indicates that the NCM 2000 you are accessing is the active NCM master. Figure 4-1 NCM Controller Menu (Showing HDM 2180 at Shelf 1, Slot 1) Menu Heading Area Physical Location of Modules (Node Map) -- VERILINK NCM CONTROLLER : FW Rev 4.17, Dec 30 1997 12:33:20 Site Name: Access Level: 2 Managing at NEAR end node [127.255.255.0] Node ID: 0 SHELF 0 1 D 2 3 4 1 2 [T] *N - 3 - 4 - 5 - - - - <- SLOT -> 6 7 8 - - - 9 - 10 - 11 - 12 - 13 - - - - - - -- KEY:A=DIDCSU, B=DIU/DBU, C=CSU, D=DIU, E=SDIU, F=DIU/DDS, G=DHDM, H=ATM/IMUX, I=IDCSU, J=PEP, M=IMUX, N=NCM, P=DPRI, Q=QUAD, R=SUBRATE, T=HDM, U=DCSU, V=VCU, X=QPRI S) C) P) B) R) X) shelf/slot configuration performance/status circuit manager remote end setup exit this screen O) D) F) A) I) administration diagnostics display far end DS3 port id identification alarm manufacturing info Command List A [127.255.255.0] [1,1] HDM 2180 > Active NCM Master Designator Command/Data Entry Area When accessing the HDM 2180 via the NCM 2000, many of the Craft interface screens will differ from those accessed via the HDM 2180 Local Port (described in Chapter 3). 4-2 Verilink HDM 2180 User Manual HDM 2180 Management: Using NCM 2000 Using an NCM in your DS3 network offers several advantages: • Higher security on the network with four levels of access using password control. • Verilink’s proprietary overhead bandwidth enables you to configure and troubleshoot the far-end node without interference from repeaters in the network. The “inband channel” requires the C-bit parity format. • Up to three users can access the DS3 module at a time. The following commands are available on the Main Menu to set and manage many of the HDM 2180 parameters (for more extensive information about the NCM module, see the NCM 2000 User Manual): Table 4-1 HDM 2180 NCM Main Menu Commands Command Description S Shelf/slot: Use this command to navigate from one card to another. Table 4-2. O Administration, Figure 4-2, Table 4-3. C Configuration, Figure 4-3, Table 4-4. D Diagnostics, Figure 4-7, Table 4-8. P Performance/status, Figure 4-13, Table 4-12. F Display far end DS3 port identification, Figure 4-21. A Alarm, Figure 4-19. B Circuit manager—This option is not used with the HDM 2180. For more information on this option, see the NCM 2000 User Manual. R Remote end setup, Figure 4-6, Table 4-7. I Manufacturing info—Displays the firmware and hardware version information for the appropriate card, Figure 4-22. X Exit this menu and log out. Shelf and Slot Parameters When accessing the HDM 2180 via the NCM Module, this will always be the first option to be chosen before any parameters on the HDM 2180 can be monitored or modified. Once the shelf/slot address for an HDM 2180 has been selected from the Main Menu and the screen is refreshed by pressing the ENTER key, the Main Menu’s prompt will display the shelf/slot address of the HDM 2180. Verilink HDM 2180 User Manual 4-3 HDM 2180 Management: Using NCM 2000 Table 4-2 Shelf and Slot Parameters Command S Description Options Shelf: Use this field to select the shelf containing the HDM 2180 you want to access. 0-4 Slot: Use this field to select the slot containing the HDM 2180 you want to access. 1-13 (Multi-line) 1-5 (Quint-line) 1-2 (Dual-line) HDM 2180 Card Administration Once the shelf/slot address for the HDM 2180 has been selected from the Main Menu and the screen is refreshed by pressing the ENTER key, the Main Menu’s prompt will display the shelf/slot address of the HDM 2180. Selecting the command O displays the Card Administration Submenu. Figure 4-2 Card Administration Menu via NCM A [127.255.255.0] [1,1] HDM 2180 > o - - NCM CONTROLLER ADMINISTRATION MENU -2-06-97 16:27:43 Date/Time/Zone: Node Address: [127.255.255.0] Node ID: 0 Site Name: System Uptime: 0:00:00 --- HDM 2180 -- Card Administration -- [01,06] --O) switch over permanent P) change password Q) query firmware R) reset card Y) switch over once U) clear card configuration X) exit this screen A [127.255.255.0] [1,1] HDM 2180 > 4-4 Verilink HDM 2180 User Manual HDM 2180 Management: Using NCM 2000 Table 4-3 Card Administration Menu Commands Command Description Options O Switch over permanent—Use this option to designate partition A or B and its corresponding firmware version when you reboot the card. Assign a permanent partition to boot from in case of power failure. Before choosing a partition, ensure that a firmware version exists on both partitions using the Query Firmware command below. 1) A 2) B P Change Password—Use this option to assign a new password. Enter the password at the prompt. Then enter the new password and press the Enter key. Confirm the new password by reentering it. Passwords can be up to 16 characters. 16 characters max Q Query Firmware—Displays the firmware versions for the A and B partitions and which partition is in use. R Reset Card—Use this option to reboot the card. This option re-initializes the operation of the firmware currently executing in RAM. It resets the system registers and restarts the current firmware operation. Y Switch Over Once—Use this option mainly when testing new firmware versions. This option allows you to change from partition A to B or vice versa and overrides the partition specified in the “Switch Over Permanent” option, above. This option causes the specified flash to be loaded into memory and starts it; however, on the next cycling of power, the permanent partition will be again loaded and started. U Clear Card Configuration—Clears the configuration of the card and returns it to the default settings. 1) A 2) B [0.0.0.9] [1,5] HDM 2180 > u Clear card configuration on shelf 1 slot 5 (Y/N)? y Card configuration cleared Exit this Screen—Returns you to the Main Menu, Figure 4-1. X Configuration Menu Typing the command C from the Main Menu displays the Configuration Menu. This menu provides access to the menus used to configure your DS3 port or your HSSI port. Figure 4-3 Configuration Menu A [127.255.255.0] [1,1] HDM 2180 > c -- HDM 2180 CONFIGURATION MENU -P) Port Setup H) HSSI Setup x) Exit this screen A [127.255.255.0] [1,1] HDM 2180 > Table 4-4 Configuration Menu Commands Command P H X Description Port Setup—Displays the HDM 2180 Port Configuration Menu for the DS3 port, Figure 4-4, Table 4-5. HSSI Setup—Displays the HDM 2180 HSSI Port Configuration Menu, Figure 4-5, Table 4-6. Exit this Screen—Returns you to the Main Menu, Figure 4-1. Verilink HDM 2180 User Manual 4-5 HDM 2180 Management: Using NCM 2000 Port Configuration Menu (DS3) From the Configuration Menu, pressing P for the DS3 Port Set Up option will display the Port Configuration Menu which is used for setting the DS3 parameters. The line code is set at B3ZS and the Alarm Indication Signal (AIS) C-bit is set for 0 (zero). These options are used in the C-bit parity line type. Various alarm functions and performance monitoring functions are not available with the M13 line type. Figure 4-4 HDM 2180 Port Configuration Menu -- HDM 2180 Port Configuration Menu -- Line Type C-Bit Parity - Line Code B3ZS - AIS C-Bit 0 T) Timing Internal Clk B) Line Build Out Normal Cable R) Performance Control On M) Data Rate Mode Only NE D) Data Rate 28, (44.7 Mbps) E) Equipment ID equipID L) Location ID locID F) Frame ID frameID U) Unit ID unitID A) Facility ID facilityID P) Port ID portID C) Circuit ID circuitID G) Test Sig ID 9 I) Inband Control Disable X) Exit this screen [127.255.255.0] [1,6] HDM 2180 > Table 4-5 HDM 2180 Port Configuration Menu Command Description Options T Timing—Selecting this option will display the HDM 2180 Timing Configuration Menu, which will in turn give the various options for the timing. If the Synchronization option is selected, you will be presented with the three options listed below. 1) Recover 2) External T3 3) Internal Clk [0.0.0.9] [1,5] HDM 2180 > t -- HDM 2180 Timing Configuration Menu -Source Synchronization Auto Restore PRIMARY S) Recover Clock -- YES X) Exit this screen [0.0.0.9] [1,5] HDM 2180 > s Select Timing: 1) RECOVER 2) EXTERNAL T3 3) INTERNAL CLK B Line Build Out—Toggles between normal cable (less than 250 feet) and long cable (greater than 250 feet). The selection reflects the distance to an optical fiber multiplexer or T3 repeater on the network side. 1) Normal cable 2) Long cable R Performance Control—Toggles performance control On and Off, use of the Cbit channel for control of a far-end unit. 1) On 2) Off 4-6 Verilink HDM 2180 User Manual HDM 2180 Management: Using NCM 2000 Command Description M Data Rate Mode—Determines whether data rate changes made at this end are propagated to the remote DS3 module as well. Selecting both NE and FE is suggested. 1) NE/FE 2) Only NE D Data Rate—The bandwidth which will be made available to the DTE on the HSSI interface, expressed in increments of 1.6Mbit/s each. (21 × 1.6 = 33.6 Mbit/s). Enter a number within the range of 1 through 28. (28 represents 44.7 Mbit/s) 1—28 E Equipment ID—An optional parameter. Enter up to 10 characters to describe your DTE. It will also prompt if you want to clear the string. L Location ID—An optional parameter. Enter up to 11 characters to describe the location of your DTE. It will also prompt if you want to clear the string. F Frame ID—An optional parameter. Enter up to 10 characters to define the Frame ID. It will also prompt if you want to clear the string. U Unit ID—An optional parameter. Enter up to 6 characters to define the Unit ID. It will also prompt if you want to clear the string. A Facility ID—An optional parameter. Enter up to 38 characters to define the Facility ID. It will also prompt if you want to clear the string. P Port ID—An optional parameter. Enter up to 38 characters to define the Port ID. It will also prompt if you want to clear the string. C Circuit ID—An optional parameter. Enter up to 26 characters to define the Circuit ID. It will also prompt if you want to clear the string. G Test Sig ID—An optional parameter. Enter a single character to define the Test Sig ID. It will also prompt if you want to clear the string. I Inband Control—This option toggles between Enable and Disable for the FEAC (Far End Access and Control) test requests using the C-bit overhead. X Options 1) Enable 2) Disable Exit this screen—Returns you to the HDM Configuration Menu, Figure 4-3. HSSI Port Configuration Menu Figure 4-5 Selecting H from the Configuration Menu displays the HSSI Configuration Menu. HDM 2180 HSSI Configuration Menu -- HDM 2180 HSSI Configuration Menu -- P) M) A) X) Test Mode Disabled Port Status Configuration Mode Data Scramble Exit this screen OUT OF SERVICE Manual Disable A [127.255.255.0] [1,6] HDM 2180 > Verilink HDM 2180 User Manual 4-7 HDM 2180 Management: Using NCM 2000 Table 4-6 HSSI Configuration Menu Commands Command Description P Port Status—Toggles between In Service and Out of Service. When Configuration Mode (below) is Automatic, the Port Status is an informational display. The HSSI data port is in service when DTR is presented by the DTE and it is out of service when the DTE fails to assert DTR. When Configuration Mode (below) is set to Manual, the Port Status command becomes a toggle. If Mode = Manual and Port Status = OUT OF SERVICE, then issuing the Port Status command will place the port IN SERVICE, whether or not any DTE is present and is asserting DTR. Conversely, if Configuration Mode = Manual and the Port Status = IN SERVICE, issuing the Port Status command will place the port OUT OF SERVICE, stopping all user data. M Configuration Mode—The Configuration Mode toggles between Automatic and Manual each time the Configuration Mode Command is issued. When Configuration Mode is Automatic, the Port Status is an informational display. The HSSI data port is in service when DTR is presented by the DTE and it is out of service when the DTE fails to assert DTR. When Configuration Mode is set to Manual, the Port Status command becomes a toggle. If Mode = Manual and Port Status = OUT OF SERVICE, then issuing the Port Status command will place the port IN SERVICE, whether or not any DTE is present and is asserting DTR. Conversely, if Configuration Mode = Manual and the Port Status = IN SERVICE, issuing the Port Status command will place the port OUT OF SERVICE, stopping all user data. A Data Scramble—Changes the ones and zeroes in the bit stream according to a mathematical algorithm designed for compatibility with other DS3 DSU products. Must be used at both ends if used at one end. This feature is unrelated to encryption and has no impact on the security of user data. X Exit this Screen—Returns you to the HDM Configuration Menu, Figure 4-3. Remote End Setup Selecting R from the Main Menu displays the Data Link Layer Remote Configuration Menu. This option provides the ability to configure key communication characteristics of a DS3 module connected to the far-end of a DS3 port before enabling the inband on this DS3 port. Configuration of the site name, node address, node ID, and inband state permits you to establish initial communication between local and remote units without having to send operators to remote sites to enable inband communication. However, you are limited to one inband session at a time over a DS3 inband channel to the far-end NCM node. NOTE: If you plug in a new DS3 at the far end of a DS3 port, and accessing this menu displays an acceptable configuration of node ID and node address, using the "Update NCM Node Table" option will permit the immediate update of the NCM knowledge base. If you do not use the "Update NCM Node Table” option to make the NCM aware of the configuration of 4-8 Verilink HDM 2180 User Manual HDM 2180 Management: Using NCM 2000 remote DS3 units, you will be required to manually enter the information under the Administration Menu option "Node Selection". NOTE: If you erroneously save an incorrect configuration using "Update NCM Node Table" you will have to go to the Administration Menu option "Node Selection" to delete the incorrect information. Figure 4-6 Remote End Setup Menu A [100.94.46.50] [0,4] HDM 2180 > r --- Data Link Layer Remote Configuration --Port Node Address Node Id Name 1 100.94.46.50 0 VERILINK Corp, San B) Inband A) Node Address I) Node Id N) Sitename U) Update NCM Node Table X) Exit this screen A [100.94.46.50] [0,4] HDM 2180 > Table 4-7 Inband N/Y Remote End Setup Menu Commands Command Description B Inband—Toggles Enable/Disable for an inband channel between the NE and FE DS3 ports. 1) Enable 2) Disable A Node Address—Enter the appropriate Node Address according to instructions from your system administrator. www.xxx.yyy.zzz I Node ID—Enter the appropriate Node ID according to instructions from your system administrator. www.xxx.yyy.zzz N Site Name—Use no more than 19 alpha-numeric characters for this field. U Update NCM Node Table—This option enables you to save the node information in the local NCM for later use. This option should always be used before leaving this screen if changes have been made to the configuration. Using this option will update the information available under the Administration Menu option, "Node Selection". X Exit this screen—Returns you to the Main Menu, Figure 4-1. Verilink HDM 2180 User Manual Options 4-9 HDM 2180 Management: Using NCM 2000 Diagnostics Menu Selecting D from the Main Menu displays the Diagnostics Menu, which allows you to display status reports, to configure loopbacks, and to transmit test alarms. Figure 4-7 HDM 2180 Diagnostics Menu [127.255.255.0] [1,6] HDM 2180 > d -- HDM 2180 DIAGNOSTICS MENU -H) HSSI Status Report P) Port Status Report L) Loopback Configure T) Transmit Alarms X) Exit this screen [127.255.255.0] [1,6] HDM 2180 > Table 4-8 HDM 2180 Diagnostics Menu Commands Command Description H HSSI Status Report—Displays the DS3 HSSI Status Report, Figure 4-8, which gives the current status of the control leads and indicates whether or not the HSSI port is In Service. P Port Status Report—Displays the DS3 Port Status Report, Figure 4-10, which shows whether any alarm conditions or loopbacks are detected at the DS3 port. L Loopback Configure—Displays the HDM Loopback Options Menu, Figure 4-11, Table 4-9. T Transmit Alarms—Displays the HDM Transmit Alarms Menu, Figure 4-12, Table 4-10. X Exit this Screen—Returns you to the Main Menu, Figure 4-1. DS3 HSSI Status Report Figure 4-8 4-10 Pressing H from the Diagnostics Menu displays the DS3 HSSI Status Report for the HSSI Port. Pressing the ENTER key returns you to the Diagnostics Menu. DS3 HSSI Status Report [127.255.255.0] [1,6] HDM 2180 > h -- DS3 HSSI STATUS REPORT -CIM 2080 DS3 In Service Feature --------------------- State DCE Ready On DTE Ready Off Loopback A Off Loopback B Off Test Mode Off Equipment Loopback Off Press enter to continue Verilink HDM 2180 User Manual HDM 2180 Management: Using NCM 2000 Figure 4-9 DS3 Port Status Report Loopback A DTE or Test Set Loopback B DTE or Test Set Port 1 Framer Port 1 Framer Selecting P from the Diagnostics Menu displays the DS3 Port Status Report. Pressing the ENTER key returns you to the Diagnostics Menu. Figure 4-10 DS3 Port Status Report [127.255.255.0] [1,6] HDM 2180 > p -- DS3 PORT STATUS REPORT -ALARM ----------------------- State AIS No IDLE No Yellow Alarm Yes Frame Loss Yes Signal Loss Yes Local loopback Disabled Payload loopback Disabled FEAC loopback Disabled Far-End loopback Disabled Press enter to continue Loopback Options Menu Selecting L) Loopback Configure from the Diagnostics Menu displays the Loopback Options Menu. See (Table 4-9) for the types of loopbacks available. Figure 4-11 HDM 2180 Loopback Options Menu [127.255.255.0] [1,6] HDM 2180 > l -- HDM 2180 LOOPBACK OPTIONS MENU -A) Activate loopback D) Deactivate loopback X) Exit this screen [127.255.255.0] [1,6] HDM 2180 > Verilink HDM 2180 User Manual 4-11 HDM 2180 Management: Using NCM 2000 Table 4-9 HDM 2180 Loopback Options Menu Commands Command A Description Activate Loopback—Displays whether or not there’s an active test present, and will give options for activating various loopback tests. Options presented for activation are: “Local Loopbacks” 1) Local—Data Port LED will turn amber. DS3 Framer HSSI DTE DS3 * 2) Payload—Net Port LED will turn amber. HSSI DTE * DS3 Framer DS3 3) HSSI—Data Port LED will turn amber. HSSI DTE DS3 Framer DS3 * “Remote Loopbacks” 4) FEAC—Remote end Net LED turns amber. Note: This loopback is activated via overhead channel bits. All data coming into/out of the port marked with the * is dropped. Near End MLS HSSI DS3 Framer Far End DLS DS3 DS3 Framer HSSI * 5) Far-End—Remote end Net LED turns amber. Note: This loopback is activated via inband signaling bits. All data coming into/out of the port marked with the * is dropped. Near End MLS HSSI 4-12 DS3 Framer Far End DLS DS3 Verilink HDM 2180 User Manual DS3 Framer HSSI * HDM 2180 Management: Using NCM 2000 Command Description D Deactivate Loopback—Displays any active tests present, and gives options for deactivating various loopback tests. Options presented for deactivation are: 1) 2) 3) 4) 5) X Local Payload HSSI FEAC Far-End Exit this Screen—Returns you to the HDM 2180 Diagnostics Menu, Figure 4-7. HDM Transmit Alarm Options Selecting T from the Diagnostics Menu displays the HDM Transmit Alarm Options screen. By transmitting any of these alarms, you can verify if the far end is receiving the alarm signal. Figure 4-12 HDM Transmit Alarm Options Menu [127.255.255.0] [1,6] HDM 2180 > t -- HDM Transmit Alarm Options -1) Yellow Disabled 2) AIS Disabled 3) Idle Disabled 4) FEBE Disabled 5) FEAC No FEAC Alarm X) Exit this screen [127.255.255.0] [1,6] HDM 2180 > Verilink HDM 2180 User Manual 4-13 HDM 2180 Management: Using NCM 2000 Table 4-10 HDM Transmit Alarm Options Commands Command Description Options 1 Yellow—Toggles transmission of RAI (Remote Alarm Indication signal) on and off. Disabled Enabled 2 AIS—Toggles transmission of AIS (Alarm Indication Signal), a pattern of unframed all ones, on and off. Disabled Enabled 3 Idle—Toggles transmission of Idle code on and off. Disabled Enabled 4 FEBE—Toggles transmission of Far End Block Error alarm message on and off. Disabled Enabled 5 FEAC—Produces a submenu which allows the user to choose from a list of possible alarms that may be sent using the Far End Access and Control method for testing. 0) No FEAC Alarm 1) Equipment Failure SA 2) LOS/HBER 3) OOF 4) AIS Received 5) Idle Received 6) Equipment Failure NSA 7) Common Equipment Failure NSA X Exit this Screen—This command returns you to the HDM Diagnostics Menu, Figure 4-7. Performance / Status Menu Selecting P from the Main Menu displays the Performance/Status Menu. Figure 4-13 HDM 2180 Performance/Status Menu [127.255.255.0] [1,6] HDM 2180 > p -- HDM 2180 PERFORMANCE/STATUS MENU -T) Threshold Setting R) Report Selection X) Exit this screen [127.255.255.0] [1,6] HDM 2180 > Figure 4-14 HDM 2180 HSSI Performance/Status Menu Commands Command Description T Theshold Setting—Displays the HDM 2180 Performance Threshold Setting Option Menu, Figure 4-15, Table 4-11. R Report Selection—Displays the HDM 2180 Performance Report Options Menu, Figure 4-18, Table 4-12. X Exit this Screen—Returns you to the Main Menu, Figure 4-1. 4-14 Verilink HDM 2180 User Manual HDM 2180 Management: Using NCM 2000 Performance Threshold Setting Option Menu Selecting T) Threshold Setting from the Performance/Status Menu displays the Performance Threshold Setting Option Menu that enables you to select 15-minute and 24-hour threshold values for the DS3 port alarms. Figure 4-15 HDM 2180 Performance Threshold Setting Option Menu [127.255.255.0] [1,6] HDM 2180 > t -- HDM 2180 PERFORMANCE THRESHOLD SETTING OPTION MENU -M) 15 Minute Threshold H) 24 Hour Threshold X) Exit this screen [127.255.255.0] [1,6] HDM 2180 > Table 4-11 HDM 2180 Performance Threshold Setting Option Menu Commands Command M H X Description 15 Minute Threshold—Displays the HDM 2180 15-Minute Threshold Selector Menu, Figure 4-16. 24 Hour Threshold—Displays the HDM 2180 24-Hour Threshold Selector Menu, Figure 4-17. Exit this Screen—Returns you to the HDM 2180 Performance/Status Menu, Figure 4-13. 15 Minute Threshold Selector Menu Selecting M from the Performance Threshold Setting Option Menu displays the 15 Minute Threshold Selector Menu. The default values shown are used until they are changed by the user. Figure 4-16 HDM 2180 15 Minute Threshold Selector Menu [127.255.255.0] [1,6] HDM 2180 > m -- HDM 2180 15 MINUTE THRESHOLD SELECTOR MENU -A) FE_CCV 0 B) FE_CES 0 C) FE_CSES 0 D) FE_LUAS 0 E) LCV 387 F) LES 88 G) LSES 4 H) PCV 382 I) PES 86 J) PSES 4 K) CCV 382 L) CES 86 M) CSES 4 N) SEFS 2 O) AISS 2 P) LUAS 10 Q) LOSS 2 R) LOFS 2 X) Exit this screen [127.255.255.0] [1,6] HDM 2180 > 24 Hour Threshold Selector Menu Selecting H from the Performance Threshold Setting Options Menu displays the 24 Hour Threshold Selector Menu. The default values shown are used until they are changed by the user. Verilink HDM 2180 User Manual 4-15 HDM 2180 Management: Using NCM 2000 Figure 4-17 HDM 2180 24 Hour Threshold Selector Menu -- HDM 2180 24 HOUR THRESHOLD SELECTOR MENU -A) FE_CCV 0 B) FE_CES 0 C) FE_CSES 0 D) FE_LUAS 0 E) LCV 3865 F) LES 864 G) LSES 40 H) PCV 3820 I) PES 864 J) PSES 40 K) CCV 3820 L) CES 864 M) CSES 40 N) SEFS 8 O) AISS 8 P) LUAS 10 Q) LOSS 8 R) LOFS 8 X) Exit this screen [127.255.255.0] [1,6] HDM 2180 > Performance Report Options Menu Selecting R) Report Selection from the Performance/Status Menu displays the Performance Report Options Menu. Figure 4-18 HDM 2180 Performance Report Options Menu [127.255.255.0] [1,6] HDM 2180 > r -- HDM 2180 PERFORMANCE REPORT OPTIONS MENU -M) 15 Minute Report O) One Hour Report H) 24 Hour Report R) Reset Registers X) Exit this screen [127.255.255.0] [1,6] HDM 2180 > Table 4-12 HDM 2180 Performance Report Options Menu Commands Command Description M 15 Minute Report—Displays a listing of alarm records for the preceding 15 minutes. O One Hour Report—Displays a listing of alarm records for the preceding hour. H 24 Hour Report—Displays a listing of alarm records for the preceding 24 hours. R Reset Registers—Resets the alarm registers to zero. X Exit this Screen—Returns you to the HDM 2180 Performance/Status Menu, Figure 4-13. Alarm Menu Selecting A from the Main Menu displays the Alarm Menu. Selecting O) Display Alarm Buffer from the Alarm Menu displays the Alarm Buffer for the previous 15 minute period. Press q to quit and return to the Alarm Menu. Press X to exit the Alarm Menu and return to the Main Menu. 4-16 Verilink HDM 2180 User Manual HDM 2180 Management: Using NCM 2000 Figure 4-19 Alarm Menu A [127.255.255.0] [1,6] HDM 2180 > a -- HDM 2182 ALARM MENU -O) Display Alarm Buffer X) exit this screen A [127.255.255.0] [1,6] HDM 2180 > Figure 4-20 Sample Alarm Buffer Display A [0.0.0.2] [1,5] HDM 2180 > o * 0.0.0.2 HDM 2180 [01,05] Major alarm (24-hour) DS3 FE UAS alert cross the threshold * 0.0.0.2 HDM 2180 [01,05] Major alarm (24-hour) DS3 UAS alert cross the threshold * 0.0.0.2 HDM 2180 [01,05] Major alarm (24-hour) DS3 AIS alert cross the threshold * 0.0.0.2 HDM 2180 [01,05] Major alarm (24-hour) DS3 SEFS alert cross the threshold * 0.0.0.2 HDM 2180 [01,05] Info alarm Enable User Equipment Loopback * 0.0.0.2 HDM 2180 [01,05] Cleared alarm clear Yellow alarm in DS3 layer * 0.0.0.2 HDM 2180 [01,05] Cleared alarm Disable DS3 AIS Alarm -- MORE -- ('q' to quit) DS3 Port 3-24-98 DS3 Port 3-24-98 DS3 Port 3-24-98 DS3 Port 3-24-98 DS3 Port 3-24-98 DS3 Port 3-24-98 DS3 Port 3-24-98 5:25:50 5:25:50 5:25:50 5:25:48 5:22:00 5:21:30 5:21:30 Far End DS3 Port Identification When an NCM is used to manage an HDM2180, a portion of the DS3 overhead may be used to examine far-end information. Selecting F from the Main Menu displays the Far End Port Identification Information screen which shows port identification information associated with the node connected to the far end of the DS3 port on the module. Verilink HDM 2180 User Manual 4-17 HDM 2180 Management: Using NCM 2000 Figure 4-21 Far End Port Identification Information Display A [100.94.46.50] [0,4] HDM 2180 > f --- FAR END PORT IDENTIFICATION INFORMATION --Equipment Id : Cisco #4 Location Id : Boise ID Frame Id : Frame #7 Unit Id : XZ74-6 Facility Id : Main Idaho Office Port Id : Last rack, third row, top shelf Generator Id : XDDS3 87154 Press enter to continue Manufacturing Info Type “I” from the Main Menu to display the Manufacturing Information screen. This information is useful when calling in to the Technical Assistance Center. Figure 4-22 Manufacturing Information Display A [127.255.255.0] [1,1] HDM 2180 > i MANUFACTURING INFORMATION Main Card Revision RM) Rev A Date DM) 0/0/0 Serial number SM) 34545673 Manuf. Part No. MM) 2828394 Cage Code CM) 2352 Type TM) HDM 2180 Press enter to continue 4-18 RC) DC) SC) MC) CC) TC) CIM Rev A 0/0/0 235244365 98397597 34534 CIM 2080 Verilink HDM 2180 User Manual Chapter 5 Standalone HDM 2180 SNMP Management NOTE: Before using SNMP, Telnet, FTP, or other TCP/IP protocol, you must set your TCP/IP addresses first via the Craft interface of whichever module is the “controlling module” for the shelf. Use the Administration Menu to set the required TCP/IP addresses. Setting Up Your TCP/IP Addresses Before using Telnet for the first time with an HDM 2180 module, access the module locally via the Craft interface. 1. From the Main Menu, type O for the command: O) node administration The Administration Menu displays. 2. For a local Ethernet address, type the L command to get the prompt to enter the address value: L) Local IP Address 3. If using a router, you must enter the router’s IP address as the gateway using G) Local gateway IP address 4. If using SNMP Management, then enter the IP Address of the SNMP Manager as H) Management host IP address 5. The device to which alarm messages are to be sent, often the same as above, is entered as M) Management trap IP address 6. After these parameters have been set, reboot the module. Now you can log in via Telnet. NOTE: You must log out from a Telnet session if you want to use the ASCII terminal interface via the Craft port. Verilink HDM 2180 User Manual 5-1 Standalone HDM 2180 SNMP Management Embedded Network Management System Using SNMP The SNMP port connects to an Ethernet segment connected to a PC running a user-supplied SNMP application, such as Verilink’s Node Manager. Using such an application and depending on the Management Information Base (MIB) interfaces provided, you can configure, control, and monitor the performance of an HDM 2180 circuit HDM 2180 allows appropriate values to be assigned to and collected from the configuration management objects defined in the supported MIBs. An integrated (embedded) SNMP agent is used in the product. HDM 2180 is a separate manageable network entity under the SNMP management application protocol. All configuration, control, and monitoring elements handled via the ASCII terminal are available to the SNMP agent. The embedded management services provide information for network managers, system administrators, customer service, field service personnel, and engineers to manage the HDM 2180. HDM 2180 SNMP Physical Interfaces The only physical interface provided for SNMP on the circuit card assembly is a 10Base-T Ethernet twisted pair implementation. A SLIP interface is not supported. Management Protocols HDM 2180 embedded SNMP supports SNMPv1. These standard network management protocols support the following areas: • Implementation of standard MIBs • Implementation of enterprise-specific MIBs • Remote booting • Configuration Management • Operator-selected saving of card configuration management objects and default settings into non-volatile storage onboard • During normal restart, in the absence of valid non-volatile configuration management objects, the HDM 2180 assumes a default configuration. • Alarm and fault reporting and management, remote system diagnostics • Embedded management offers extensive diagnostics. Alarms are offered through SNMPv1 generic traps with additional alarm information available through Verilink enterprise specific traps. • HDM 2180 reports faults by sending the generic SNMPv1 traps to appropriate SNMPv1 node management systems. • Security Management 5-2 Verilink HDM 2180 User Manual Standalone HDM 2180 SNMP Management • HDM 2180 uses SNMPv1 community strings. • HDM 2180 provides filtering of SNMPv1 PDUs by source IP address for remote login password protection in rlogin/telnet. • Performance monitoring and management • Remote software upgrades as supported by Verilink APA • HDM 2180 uses the FTP/TCP/IP protocol stack to download upgrade software remotely to non-volatile code storage. MIB Interface Specifications HDM 2180 supports the following standard MIBs for card management: • Verilink Enterprise MIB (various RFCs) • DS3 MIB (RFC 1407 MIB) The mandatory groups in the DS-3 MIB, as defined by the IETF [25]. Verilink HDM 2180 User Manual 5-3 Standalone HDM 2180 SNMP Management 5-4 Verilink HDM 2180 User Manual Chapter 6 Troubleshooting What Elicits an Alarm The NCM 2000 module polls the HDM 2180 modules for alarms. If alarm reporting is enabled for the node and for the HDM 2180, the NCM retrieves and sends alarms to the Craft Interface, Node Manager, or an SNMP agent where they can be viewed. Alarms can also be automatically sent to a specified printer by setting up the printer address in the various management utilities menus. See the appropriate management utility user manual for information on how to do this. The Alarms The alarm list displays: • Whenever the system powers up and any module performs a self-test • Power supply input is lost • A default or user-designated threshold is exceeded • A Yellow Alarm is received from the network • An unframed all-ones or alarm indication signal (AIS) is reveived from the network • There is a loss of signal (LOS) or loss of frame (LOF) • A CSU or DIU loopback is present • A module fails • A module is removed from the shelf Alarm Listings On any of the various listings of the alarms being received by the NCM for the HDM, the alarm listing will generally show the following information about the alarms (This may vary depending on the management method you are using). Verilink HDM 2180 User Manual 6-1 Troubleshooting Alarm Description The Alarm Description column lists the text that is • printed on the display • sent to the alarm printer (if using Node Manager or SNMP agent) • saved to the alarm buffer/database Classifications Verilink classifies alarms into the following Severities: • Critical • Major • Minor • Warning • Info • Cleared Problem Types These classifications are further categorized into the Problem Types: • LOS—Loss of Signal • LOF—Loss of Frame • Error • Call Setup What To Do About Alarms Some alarms will clear after the user-configured timeout has expired. Other alarms require you to take corrective action. • If an alarm has been cleared, no other action is required. • If there is a loopback present (unless you are intentially testing), remove the loopback. (Only if the loopback is from your end. If it is from your telco, you may need to verify the loopback with them.) • If you have a Loss of Frame (LOF), you may have a telco or module problem. To test, do a Repeater Loopback (RLB) to test for LOF. If there is no LOF indicated by the test, the problem is with the telco. • If you have a Loss of Signal (LOS), check your router cables, power, and ports. 6-2 Verilink HDM 2180 User Manual Troubleshooting • If you have a Powerup Self-test Fail, reseat the module to see if it will power up and pass the self test. If it does not pass after repeated self tests, replace the module. Alarm Records Every alarm record that appears on your screen is “active” in the database until you do something about it. You can do the following with the alarm records: • Deactivating alarm records is a database management function. As long as an alarm is active, you can view it on screen, using one of the management options on the Craft interface or Node Manager. When you deactivate an alarm, it’s still in the database, but not viewable on screen. Deactivated alarms can be subsequently archived, printed, or deleted. • Archiving an alarm record stores it to a disk file you specify. • Printing an alarm record prints a copy of all active and deactivated alarms. • Deleting an alarm record removes it from the database. To delete an alarm, you must first deactivate it. Interpreting Alarms Fault conditions can result in critical, major, or minor alarms. In addition, a fault condition can also result in a Carrier Failure Alarm (CFA). Critical Alarms A critical alarm indicates that the node or components of the node have failed. The following alarms are classified as critical: • Alarm Indication Signal Second (AISS)—A second when the CSU receives an unframed all-ones Alarm Indication Signal (AIS) from the network. • Loss of Frame Second (LOFS)—A LOFS is the total number of seconds that the CSU was in the Loss of Frame (LOF) state. • Loss of Signal Second (LOSS)—A LOSS is a second during which the CSU is in a Loss of Signal (LOS) state. • Severely Errored Framing Second (SEFS)—The second in which two or more framing bit errors occur within a 3millisecond period. Major Alarms A major alarm indicates a condition where performance is seriously affected, for example, a T3 line failure. It prevents data from being reliably transmitted across the circuit. When a major alarm is Verilink HDM 2180 User Manual 6-3 Troubleshooting declared, the HDM 2180 module sends a message to the Craft interface and Node Manager (if used), lights the appropriate LED indicator, and trips the alarm relay (if connected). The following error conditions must persist for at least one second for a major alarm to be declared: • C-bit Severely Errored Seconds (CSES)—A CSES is a second with 44 or more CCVs or one or more Out of Frame defects or a detected incoming AIS. • P-bit Severely Errored Seconds (PSES)—A PSES is a second with 44 or more PCVs or one or more Out of Frame defects or a detected incoming AIS. This gauge is not increased when UASs are counted. • Local Unavailable Second (LUAS)—An unvailable second during which the local DS3 port is unable to receive or transmit traffic. • Line Severely Errored Second (LSES)—A second during which the port was (at any instance during the second) in the AIS state. Minor Alarms The following error conditions do not affect traffic along the DS3 line. They generate a minor alarm: • Power Supply Missing (in redundant power supply configurations)—This alarm indicates that one of the redundant power supplies has failed. • Remote Alarm Indication (RAI)—This alarm indicates that the remote end is in a state of alarm. A Remote Alarm or Remote Alarm Indication is the alarm a receiving channel bank or multiplexer sends to the other end of the circuit when it detects a Loss of Signal or Loss of Frame. There is a 2- to 3second integration period upon detection of LOS or LOF before an alarm is sent to the far-end equipment. This condition is also referred to as a Yellow Alarm. • Alarm Indication Signal (AIS)—Using an unframed all-ones bit pattern, an AIS alarm indicates that an alarm condition exists upstream in a circuit leading to the downstream equipment. This is also called an All-Ones Keep-Alive or Red Alarm Signal. An AIS defect is declared when there are 3 or fewer zeros in 512 bit times and an LOF defect. It is cleared when there are 3 or more zeros in two frames or the LOF defect no longer exists. • C-bit Coding Violation (CCV)—An error event that reflects the occurrence of received CP-bit parity errors during the accumulation interval. The CP-bits are not affected by customer-owned equipment and are therefore more accurate than P-bit parity. 6-4 Verilink HDM 2180 User Manual Troubleshooting • C-bit Errored Second (CES)—A CES is a second with one or more CCVs or one or more Out of Frame (OOF) defects or a detected incoming AIS. This gauge is not increased when UASs are counted. • Alarm Indication Signal Second (AISS)—A second when the CSU receives an unframed all-ones alarm indication signal (AIS) from the network. • Line Coding Violation (LCV)—An LCV error event is a count of both bipolar violations (BPVs) and excessive zeros (EXZs) occurring over the accumulation period. An EXZ increments the LCV by one regardless of the length of the zero string. • Line Errored Second (LES)—An LES is a second in which one or more LCVs occurred or one or more LOS defects. • Loss of Signal Second (LOSS)—A second during which the CSU is in a Loss of Signal (LOS) state. • P-bit Coding Violation (PCV)—A P-bit parity error event is the occurrence of a received P-bit code on the DS3 M-frame that is not identical to the corresponding locally-calculated code. • P-bit Errored Second (PES)—A PES is a second with one or more P-bit Coding Violations (PCVs) or one or more Out of Frame defects or a detected incoming AIS. This gauge is not increased when Unavailable Seconds (UASs) are counted. Verilink HDM 2180 User Manual 6-5 Troubleshooting Front Panel LEDs Figure 6-1 HDM 2180 Front Panel SYS NET 2180 DATA Craft port HDM LOCAL PRI EXT MANAGEMENT SNMP LEDs LED Indicators HDM 2180 provides three tri-color LEDs on the front panel: • Network Port • Data Port • System The LEDs use the following color codes: Solid Green Module is properly configured and equipment is operating normally. Flashing Green For the System LED, this indicates that the module is in “controller mode.” Solid Red Indicates a problem occurring within the equipment. Solid Amber Indicates test mode condition within the equipment. Performance Statistics The following network performance parameters can be stored within the HDM 2180 to support performance monitoring and statistics generation: Near-End Performance Parameters 6-6 The following near-end performance parameters are supported by HDM 2180: AISS Alarm indication signal second CCV C-bit coding violations CES C-bit errored seconds CSES C-bit severely errored seconds Verilink HDM 2180 User Manual Troubleshooting Far-End Performance Parameters LCV line code violations LES Line errored seconds LOFS Loss of frame second LOSS Loss of signal second LSES Line severely errored seconds PCV parity (P-Bit) code violations PES (P-bit) parity errored seconds PSES P-bit severely errored seconds SEFS Severely errored framing seconds UAS Unavailable seconds The following far-end performance parameters are supported by HDM 2180: CCV C-bit code violations CES C-bit errored seconds CSES C-bit severely errored seconds UAS Unavailable seconds Alarm Parameters The following network alarm parameters can be monitored and stored within the HDM 2180: Near-End Alarms The following near-end alarms are detected and reported: AIS Defect Alarm indication signal IS Idle signal LOF Loss of frame LOS Loss of signal OOF Out of frame Loss of Selected Tx clock Yellow Alarm Verilink HDM 2180 User Manual 6-7 Troubleshooting Far-End Alarms The following far-end alarms are detected and reported: FEBE Far end block error FEAC DS3 equipment failure (SA) FEAC DS3 LOS/HBER FEAC DS3 OOF FEAC DS3 AIS received FEAC DS3 IDLE received FEAC DS3 equipment failure (NSA) Common Equipment Failure (NSA) 6-8 Verilink HDM 2180 User Manual HDM 2180 Index A administration submenu 4-4 AISS 6-3, 6-5 AISS (Alarm Indication Signal Second) 6-3, 6-5 alarm buffer 3-21 Alarm Indication Signal 3-15 alarm indication signal second (AISS) 6-6 alarm monitoring 3-20 alarms 3-10, 3-12 applications 1-1 CAD/CAM 1-1 client-server 1-1 data centers 1-1 data warehousing 1-1 video imaging 1-1 ASCII craft interface menu (main menu) 3-1 ASCII terminal interface Local port 3-1 NCM 4-1 Cables 2-2 c-bit coding violation (CCV) 6-6 c-bit errored second (CES) 6-6 c-bit parity 1-2 c-bit severely errored second (CSES) 6-6 CCV 6-4 CCV (C-bit Coding Violation) 6-4 CES 6-5 CES (C-bit Errored Second) 6-5 clear card configuration 4-5 community string-read 3-5 community string-write 3-5 Connecting Terminal 2-2 craft timeout length 3-3 CSES 6-4 CSES (C-bit Severely Errored Second) 6-4 data centers 1-1 day alert thresholds 3-19 debug monitor port 1-2 diagnostics 3-10 downloadable upgrades 1-3 DS3 boot 3-5 F far-end control 1-3 ferrites 1-7 function block diagram 1-4 G grounding 1-7 H HSSI port configuration 3-20 I Installation 2-1 IP subnet mask 3-4 L C D DS3 flash download 3-5 DS3 port configuration 3-20 LCV 6-5 LCV (Line Coding Violation) 6-5 LES 6-5 LES (Line Errored Second) 6-5 line code violation (LCV) 6-7 line errored second (LES) 6-7 line severely errored second (LSES) 6-7 local gateway IP address 3-4 local IP address 3-4 Local port 3-1 LOFS 6-3 LOFS (Loss of Frame Second) 6-3 loopbacks 3-10 LOSS 6-5 LOSS (Loss of Signal Second) 6-3, 6-5 loss of frame second (LOFS) 6-7 loss of signal second (LOSS) 6-7 LSES 6-4 LSES (Line Severely Errored Second) 6-4 LUAS 6-4 LUAS (Local Unavailable Second) 6-4 M main menu Verilink HDM 2180 User Manual Index-1 parameters 4-6 major alarms 6-3 management host IP address 3-4 management information base (MIB) 5-2 management trap IP address 3-4 MIB 5-2 minor alarms 6-3 N NCM configuration menu 4-5 NCM Controller Menu 4-1 near-end performance parameters 6-6 node address 3-4 node administration 3-3 Node Manager 5-2 switch over once 4-5 switch over permanent 4-5 T TABS bus 1-3 Terminal 2-2 terminal block one (TB1) 1-8 timing 1-2 TX diagnostic alarms 3-19 U unavailable second (UAS) 6-7 P parameters main menu 4-6 parity (p-bit) code violation (PCV) 6-7 parity (p-bit) errored second (PES) 6-7 password 4-5 changing 3-2 p-bit severely errored second (PSES) 6-7 PCV 6-5 PCV (P-bit Coding Violation) 6-5 performance monitoring 3-14 PES 6-5 PES (P-bit Errored Second) 6-5 port configuration 3-5 PSES 6-4 PSES (P-bit Severely Errored Second) 6-4 Q qrt hr alert thresholds 3-19 query firmware 4-5 R regulatory requirements 1-5 reset card 4-5 restore manufacturing default configuration 3-19 S SEFS 6-3 SEFS (Severely Errored Framing Second) 6-3 set time 3-4 severely errored framing second (SEFS) 6-7 shelf and slot parameters 4-3 site name 3-4 snmp configuration 3-20 SNMP operation 5-1 SNMP physical interfaces 5-2 specifications 1-4 Index-2 Verilink HDM 2180 User Manual October 1999 P/N 880-503048-001-F VERILINK CORPORATION 127 JETPLEX CIRCLE, MADISON, ALABAMA 35758 TEL: (800) 837-4546