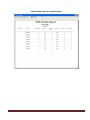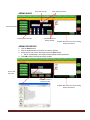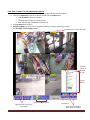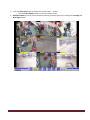
1
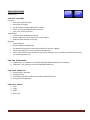
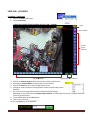
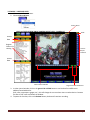
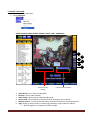
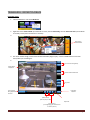
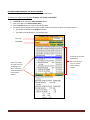
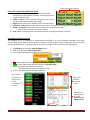
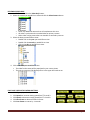
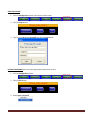
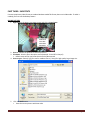
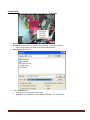
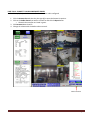
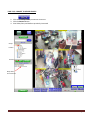
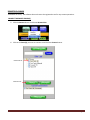
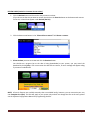
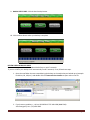
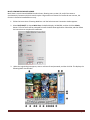
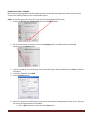
TRANSEARCH v3.2
User Manual
TRANSEARCH USER MANUAL
(Store Level Access)
TABLE OF CONTENTS
BASIC OPERATIONS
Live Mode ………………………………………………………………………………………………….….4
Video Only ……………………………………………………………………………………………..….4
Video and Data ……………………………………………………………………………………..….5
Multicam ………………………………………………………………………………………………….6
Instant Playback ………..…………………………………………………………………….……….7
Review Mode ……………………………………………………………………………………………….10
Video and Data ……………………………………………………………………………………….10
Video Only ……………………………………………………………………………………………..15
Shortcuts
…………………………………………………………………………………………………...18
Save
……………………………………………………………………………………………………..18
Print
……………………………………………………………………………………………………..20
Email ……………………………………………………………………………………………………..20
Backup Video and Data ………………………………………………………………………………..23
REMOTE ACCESS ……………………………………………………………………………………………..27
Client Access
……………………………………………………………………………………………...27
Remote Playback with Video Backup ………..…………………………………………….36
Web Access
……………………………………………………………………………………………...43
TRANSEARCH 3.2 USER MANUAL
Page 2
BASIC OPERATIONS
Transearch v3.2
PART ONE: LIVE MODE
Live Only
• Full screen Video Only view
• More than 16 cameras
• Can see IP Camera and standard CCTV cameras
• Limits: Live frames update 3-5fps per camera
• Print, save, email live pictures
Video & Data
• Interface data is displayed in real time
• Watch 2 registers at once, switch to any other register
• Video has same features as Live Only
Multicam
• Instant Playback
• Same Live data as Video & Data
• Can watch full frame for live video (up to 30fps x 16 cameras = 480fps)
• Access to standard CCTV camera setup and configuration
• Limits: No IP Cameras are available; can see only 16 cameras at once; limited to standard CCTV cameras;
can save Live pictures only
PART TWO: REVIEW MODE
1. Video & Data: This mode lets you review ARCHIVED VIDEO AND DATA simultaneously.
2. Video Only: This mode lets you review ARCHIVED VIDEO only.
PART THREE: SHORTCUTS
1. Saving Pictures and Video
2. Printing Pictures
3. Emailing Pictures (Not available in LIVE mode’s Multicam feature.
4. Printing or Emailing Reports
PART FOUR: BACKUP
1. Data
2. Video
3. Audio
4. Other Files
TRANSEARCH 3.2 USER MANUAL
Page 3
PART ONE: LIVE MODE
LIVE MODE: VIDEO ONLY
1. Click on the LIVE mode button.
2. Choose Video Only
VIDEO ONLY SCREEN (SINGLE CAMERA LAYOUT VIEW – CAMERA #1)
SCAN
Camera Name
Camera
Layout
Selection
Camera Numbers
3.
4.
5.
6.
7.
8.
9.
10.
Page forward and backward
Click on the Camera Layout button you want for multiple camera views.
By clicking on Camera Name you will be given several options.
Click on the Scan button to cycle through camera views.
Clicking on camera view then clicking another camera view will swap camera
positions.
Go to a full screen Single Camera view by double-clicking any image
depending on your current chosen camera layout selection. If camera goes full screen, click again and it will
return to previous layout.
To exit VIDEO ONLY click the Exit button.
Type in your password:_____________.
Hit your Enter key on the keyboard.
TRANSEARCH 3.2 USER MANUAL
Page 4
LIVE MODE: VIDEO AND DATA
1. Click on the LIVE mode button.
2. Choose Video and Data.
Camera Name
VIDEO and DATA SCREEN (SINGLE CAMERA LAYOUT VIEW – CAMERA #1)
SCAN
Pauses
Data
Register
Choices For
viewing
Camera
Layout
Selection
Pauses
Data
Select Camera Number
Page forward and backward
3. In either journal window, click on the green 1-24 or 25-48 button to see live data from different or
additional attached devices.
(POS, safes, temperature gauges, etc.), this will change the current select view to another device. Because
the data is LIVE it will scroll down the window.
4. To pause the live data, click on the Review button; the data will continue recording.
TRANSEARCH 3.2 USER MANUAL
Page 5
LIVE MODE: MULTICAM
1. Click on the LIVE mode button.
2. Choose Multicam.
VIDEO and DATA SCREEN (SINGLE CAMERA LAYOUT VIEW – CAMERA #1)
1
2
3
4
5
6
Select Camera by
Number
1.
2.
3.
4.
5.
6.
Camera Layout Selections
Video Record: Start / Stop recording video
Schedule: Sets up video schedule.
Video Config: Quick access to video and audio setup.
Camera Scan: Click the button to start the rotation through the screen division.
Network Servers: Click the button and enable connection for different remote applications.
Login: Brings up several options, including Login/Exchange, Logout, Minimize and Exit.
• Must be logged in as a supervisor to make changes.
TRANSEARCH 3.2 USER MANUAL
Page 6
TRANSEARCH: INSTANT PLAYBACK
PLAYBACK VIDEO
1.
Click the Live button and choose Multicam.
2.
Right click on the Camera Name you would like to review, choose Instant Play, then the amount of time you would like
to instantly review (from 10 seconds to 5 minutes).
3.
Right click on
Camera Name
4.
The screen should change, and the video should immediately begin to play. Use the available buttons to find the
frame/video you are looking for.
5.
Print or Save Frame (picture)
Camera Name
is displayed.
Frame Forward and Reverse
Play Video
Time currently
being played back
for video.
Exit Instant
Playback
Speed Control
(Slow as 1/8 up to 32x)
Play Audio
Zoom Control
(use magnifying glass to select area
to zoom in/out on)
TRANSEARCH 3.2 USER MANUAL
Page 7
Print Frame (picture)
1.
2.
3.
4.
Click the Stop control button.
Click the Print Frame (picture) control button.
In the Page Setup dialog box click the Print button to print to your default printer.
Click the OK button to close window.
Save Frame (picture)
1.
2.
3.
Click the Stop control button.
Click the Save Frame (picture) control button.
In the Save As dialog box, click the Desktop icon, type a File Name and click the Save button.
(You can also choose what items you want stamped on the image using the Stamp Text on the Image options.)
TRANSEARCH 3.2 USER MANUAL
Page 8
Exiting Instant Play
1.
Option 1: Click the Exit button.or right click on the picture and choose exit.
2.
Option 2: Right click on the picture and choose Exit.
(The Fullscreen video option is not supported in this version. If you accidently make that selection, you will see a
similar screen as below, just hit the ESC key (upper left corner) on your keyboard to return to the Instant Play window.)
NOTE: If you click your left mouse button on the picture during Instant Playback, secondary cameras will also display. The
camera number you are reviewing will determine how many secondary cameras will appear. If you are reviewing cameras 1-4
you can toggle the secondary cameras on and off by clicking on the picture. If you are reviewing camera 5 or greater than the
secondary cameras will toggle on but not toggle off (unless you exit Instant Playback and start over).
TRANSEARCH 3.2 USER MANUAL
Page 9
PART TWO: REVIEW MODE
1. Video & Data: This mode lets you review Video and Data simultaneously.
2. Video Only: This mode lets you review Video only.
REVIEW MODE: VIDEO AND DATA
1. Click on the REVIEW mode button.
2. Choose Video & Data.
VIDEO & DATA RECEIPT JOURNAL REVIEW
Video & Data Mode
Journal View: Specifies which
Register you are looking at.
Currently set to ALL REGISTERS
Search Controls
Simple
Advanced
Register
X-list
Left column shows
registers # 2 and 4.
Item Journal: Use scroll bar
to move up or down listing.
You can also use the Prev
Event and Next Event
buttons to select your
events line by line.
Highlighted receipt details are
shown in details window below.
(Example: Highlighted entry is for
Register 2 – Shift Change.
Selected Receipt Details
from clicking on search
results in Item Journal.
Playback Controls
for Video
TRANSEARCH 3.2 USER MANUAL
Page 10
REVIEWING AND SEARCHING THE RECEIPT JOURNAL
This mode lets you review archived Video and Data simultaneously.
To search the receipt Journal by date (Example: All receipts on 9/23/06)
1.
2.
3.
4.
In REVIEW mode, select the Video and Data button.
Enter your date in the Choose Search Date.
Click the Search button to recall all data for this date.
The receipt Journal appears in the Journal View, scroll to the event you want to review and click it.
• The receipt will display in the Register window.
• The video event will display in your camera view.
Enter date
Click Search
All receipts for the date
are displayed.
Click on the receipt
you want to view (it
will highlight it in
blue). The receipt
detail are displayed
in the bottom
window.
TRANSEARCH 3.2 USER MANUAL
Use the scroll bar to
move up or down
while reviewing
receipts.
Page 11
To perform a SIMPLE SEARCH (Example: All voided receipts on 9/23/06)
1.
2.
3.
5.
In REVIEW mode, select the Video and Data button.
Enter your date in the Choose Search Date.
Enter a keyword to search for in the Criteria box and click the Search button.
The receipt Journal appears in the Journal View, scroll to the event you want to review and click it.
• The receipt will be populated in the Register window below.
• The video event will be populated in your camera views.
Enter date
Enter search criteria
Click Search
All receipts for the date
are displayed.
Click on the receipt
you want to view (it
will highlight it in
blue). The receipt
detail are displayed
in the bottom
window.
TRANSEARCH 3.2 USER MANUAL
Use the scroll bar to
move up or down
while reviewing
receipts.
Page 12
To perform an ADVANCED SEARCH (Example: All voided receipts by Cashier #22 on 9/23/06)
1. In REVIEW mode, select the Video and Data button.
2. Click on the Advanced search button, drop down boxes will appear and Advanced will toggle to Simple.
3. Enter your date in the Choose Search Date.
4. Enter a keyword to search for in the Criteria box.
5. Enter your choice of Advanced search criteria:
6. Click the Search button.
7. The receipt Journal appears in the Journal View, scroll to the event you want to review and click it.
Enter date
Enter basic search criteria
Enter advanced search criteria
Click Search
All receipts for the date
are displayed.
Use the scroll bar to
move up or down
while reviewing
receipts.
Click on the receipt
you want to view (it
will highlight it in
blue). The receipt
detail are displayed
in the bottom
window.
TRANSEARCH 3.2 USER MANUAL
Page 13
Current Time Stamp and Speed
PLAY BACK VIDEO WITH CONTROL BUTTONS
1. Reverse / Pause / Play buttons plays video forwards and
backwards with the capability to pause. Data also plays and is
synchronized with video.
2. <Data and Data> button moves the receipt up or down, line by
line (used when dealing with a long receipt).
3. Replay button allows you to watch a video clip multiple times.
4. <Video and Video> buttons move video frame by frame. You can set your speed with the Seconds option.
5. Speed- and Speed+ buttons allow you to speed up or slow down your video.
• The current speed and time stamp is labeled.
6. Stop button will stop and return the video event back to the original starting time event.
REVIEWING THE EXCEPTION LIST
The Exception List is a compilation of saved searches specified by the Loss Prevention Manager. These quick
searches allow the manager to keep a watch list of items or events for daily review. If a particular item is not within
the specified boundaries, a red button appears so that the manager knows to check the item immediately.
1. In REVIEW mode, select the Video and Data button.
2. Enter your date in the Choose Search Date.
3. Click the green X-List button to bring up the Exception List.
4. RED buttons indicate items that should be checked immediately.
5. Green buttons indicate that the item is within the specified range.
6. Click a button to see the details for that item.
• The receipt Journal appears in the Journal View.
8. Scroll to the event you want to review and click it.
Click on Red or
Green button to
display journal
view of
corresponding
receipts.
9 Results for
NO SALES
listed in the
Journal.
Details for red
highlighted event
in Journal:
Register #2, NO
SALE at 5:54:32
TRANSEARCH 3.2 USER MANUAL
Page 14
REVIEW MODE: VIDEO ONLY
This mode lets you review ARCHIVED VIDEO only.
1. Click on the REVIEW mode button.
2. Choose Video Only.
VIDEO ONLY REVIEW
Video Only Mode
Day, Month,
Year Selection
Camera Selection
Frame
Selection
Playback Controls
for Video
TRANSEARCH 3.2 USER MANUAL
Page 15
REVIEWING VIDEO ONLY
1. In REVIEW mode, select the Video Only button.
2. Select the camera you would like to view and click the Select Camera button.
• Check any additional cameras that will complement this view.
• All video is synchronized to recorded video on primary camera.
• Other video may be present but not viewable on secondary cameras.
3. Select the date you would like to view:
• Double click on the year you would like to view.
• Double click the month you would like to view.
• Click on the day you would like to view.
4. Click on the time you would like to view.
• The video for that event will be populated in your camera views.
• The primary camera will be displayed first in the upper left hand corner.
PLAY BACK VIDEO WITH CONTROL BUTTONS
1. Click Play to play video clip.
2. Click Speed+ to increase viewing speed from ½x’s to 8x’s.
3. Click Speed- to decrease viewing speed from ½ x’sto 8x’s.
4. Click Next Frame to advance forward 1 frame..
5. Click Prev Frame to reverse by .1 seconds.
TRANSEARCH 3.2 USER MANUAL
Page 16
SWITCHING USERS
1. Click the Configuration button at the bottom of the screen.
2. Click the Login button.
3. Type in your User ID and password and click the Login button.
EXITING TRANSEARCH (You must have appropriate authorization to exit)
1. Click the Configuration button.
2. Click the Exit button.
3. Select Close Transearch.
TRANSEARCH 3.2 USER MANUAL
Page 17
PART THREE: SHORTCUTS
Converts proprietary video format to standard windows media file format; does not include audio. If audio is
needed, you must use the Backup feature.
SAVING PICTURES
1. Right click on the picture you want to save and click on Save Frame.
2. Save In: Choose the location to save the picture in.
3. File Name: Give the file a descriptive name (example: Drive Off on Pump 6)
• Default name will let you know what time the video started.
4. Save as type: Choose(*.jpg) for small or medium files or (*.bmp) for high quality large image size.
5.
Click the SAVE button.
• Saves the current picture with time code.
TRANSEARCH 3.2 USER MANUAL
Page 18
SAVING VIDEOS
1. Right click on the picture you want to save and click on Save Video.
2. Save In: Choose the location to save the picture in.
3. File Name: Give the file a descriptive name (example: Drive Off on Pump 6)
• Default name will let you know what time the video started.
4. Save as type: AVI file only.
5.
Click the SAVE button.
• Saves the current picture with time code.
• Depending on configuration, your video will be saved in 1-5 minute clips.
TRANSEARCH 3.2 USER MANUAL
Page 19
PRINTING PICTURES
1. Right click on the picture and click on PRINT FRAME.
2. Choose Half page for 320x240 resolution.
3. Choose Full page for 640x480 resolution.
4. Choose Hi and Low Res to print both resolutions.
EMAILING PICTURES (Not available in LIVE mode’s Multicam feature.)
1. Right click on the picture and click on EMAIL PICTURE.
2. Choose your email recipients from the Email Address List and click the TO>> button.
• Only approved recipients are listed.
3. Enter any other contacts you want to email or copy.
4. Enter your subject line and message and click SEND.
5. Click on CANCEL after sending to cancel the send.
6. Click on DONE once your email has been sent.
7. Click on CLEAR to clear document from queue.
PRINTING or EMAILING REPORTS
Gulfcoast Software Solutions offers extensive reporting capabilities. For a list of reports that are available for your
POS system, contact Gulfcoast at 727-449-2296. You can preview, print, and email reports.
1. Click on the Reports button on the bottom of the screen.
2. Select the date.
3. Select the report you want to print, preview, or email
TRANSEARCH 3.2 USER MANUAL
Page 20
4. Select the Print, Email, or Preview option from the Options Menu.
• If you select Print, the results report will be sent to your default printer.
• Use Add to Queue and Clear Queue when emailing multiple reports.
• For emailing, follow the procedures in the Emailing Pictures section.
• Report will be sent in a PDF format.
SAMPLE REPORT FOR EXCEPTION LIST
TRANSEARCH 3.2 USER MANUAL
Page 21
SAMPLE REPORT FOR SHIFT ANALYSIS REPORT
TRANSEARCH 3.2 USER MANUAL
Page 22
PART FOUR: BACKUP
Gulfcoast Software’s backup options allow you to backup data, video, audio, and playback software, and also allow
you to browse to any other resources you wish to backup.
STEP ONE:
1. To perform a backup Click on the Backup utility button.
2. If you want to exit the backup procedure, click the Backup button again.
STEP TWO
1. Select the drive on which you want to store the backup. (example below: C:OS1)
• You can backup to a CD, DVD, hard drive, or Flash Drive.
• On most DVDR’s, the front USB connectors are disabled.
• Drive D: Insert Media (CD or DVD) and Click Refresh. New Dual Layer DVD now supported.
• Available space must be greater than zero (0) to proceed.
Click when ready
to start backup.
Drives
for
backup
Click after inserting a
CD or DVD for backup.
Available Space Size
Backup Name
2. Right Click on the plus icon (+) next to the selected drive to see a selection of folders to save to.
• Option 1: Select the folder you wish to save to
• Option 2: Type a new folder name in the New Location field to create when the backup is started.
3. Enter a Backup Name.
4. Click Next Step.
• If button stays red it means no available space or backup name.
TRANSEARCH 3.2 USER MANUAL
Page 23
STEP THREE
1. Click on the button for the type of data you want to backup.
• Data: Date range for data backup
• Video: Date, Time Frame, Camera Views
• Audio: Date, Time Frame, Audio Channel
2. Click the ADD button after each item’s information is completed to add it to the display window.
• Available Space should be green; as you add items, your available space will decrease.
• If available space is zero (0) or negative, no more data may be added; you must remove some data
before continuing to the Next Step.
• NOTE: At any time you want to remove an item from the display window, simply click on that item
and click the Remove button. If you want to clear them all at once, click the Clear button.
Display Window
Advance to Start
Backup.
BACKING UP DATA
Click to add Data
Players are
automatically added.
Enter date range
for data backup.
Click Add to enter in
backup window.
Available Space will turn red when there is not
enough space to perform backup.
ADDING VIDEO
Click to add Video
Select Camera(s)
Click Add to enter in
backup window.
Available Space decreases when adding
backup information.
TRANSEARCH 3.2 USER MANUAL
Page 24
Enter date of audio
Enter audio time frame
ADDING AUDIO
Click to add Audio
Select Audio Channel(s)
Click Add to enter in
backup window.
Available Space decreases when adding
backup information.
ADDING OTHER FILES
1. Click the Other button.
2. Click the Browse button to find files you want to backup.
3. Locate the file you want to backup and click the Open button.
• The file is populated in the display window below the Browse button.
4. Click Add to add to the backup display window.
Click to add
other files
Click Add to enter in
backup window.
Available Space decreases when adding
backup information.
TRANSEARCH 3.2 USER MANUAL
Page 25
STEP FOUR
1. Click the Next Step button.
2. Begin the backup by clicking the Start Backup button.
• A progress bar will show the percentage (%) of backup completed.
3. You may Cancel the a backup at any time but if files have already started copying then clicking cancel will
not remove already copied files. Also, if backing up to CD or DVD, canceling may make the disk unusable.
4. Click the Done button when the backup is complete.
• The Done button will turn green when completed.
• When backing up to CD or DVD the disk will automatically pop out.
TRANSEARCH 3.2 USER MANUAL
Page 26
REMOTE CLIENT ACCESS
PART ONE: CONNECT TO REMOTE SERVER(S)
1.
2.
3.
4.
Click on Connect.
Click on Remote Sites.
Click on the Server(s) you want to connect to.
Click the Connect button.
Connect
Remotely
Remote
List of
servers
available
Connect
to server
Close Site
List
Site
Connection
Status
Disconnect
from server
Camera Layout Selections
Toggle Switch for
Video and Data
Sitefor
ListFull
Window
Toggle Switch
Screen Video Only
TRANSEARCH 3.2 USER MANUAL
Open and Close
Streams List to
view Registers
and Cameras
Exit out of
Transearch
Audio Volume Control
Page 27
PART TWO: CONNECT TO VIDEO ON REMOTE SERVER
1. Click the Streams List and then the plus signs (+) to open the Streams List options.
2. Click on the Camera(s) you wish to connect to and click the Open button.
• Click All Video to select all cameras.
• Cameras that are open are listed in green.
• Each camera view is labeled by camera name.
3. Click Streams List to close list.
4. Multiple cameras (up to 65) can be viewed by selecting a camera layout or by clicking
the Prev Page and Next Page buttons.
Camera Names in screen shot views
All Video
selects all
cameras
at once.
Camera
Names
Camera Layout Selections
Move between camera view
layout pages
TRANSEARCH 3.2 USER MANUAL
Streams List
Open and Close Streams
(Data, Video, and Audio)
Page 28
Click the Video Only button to display only camera views – no data.
• Click the Video & Data button to return to the data screen.
6. Multiple cameras (up to 65) can be viewed by selecting a camera layout or by clicking the Prev Page and
Next Page buttons.
5.
TRANSEARCH 3.2 USER MANUAL
Page 29
PART THREE: CONNECT TO DATA ON REMOTE SERVER
1. Click the Close Menu button to close the Site List.
2. Click the Sites button to select which remote server you want to view data from.
3. Click the Streams button to display the device you want data from.
Choose Site
and Device
you want to
view.
First
Data Stream
Display
Window
Choose Site
and Device
you want to
view.
Second
Data Stream
Display
Window
TRANSEARCH 3.2 USER MANUAL
Page 30
PART FOUR: CONNECT TO AUDIO ON REMOTE SERVER
Audio will only display in the Streams List for sites that have Audio configured.
1. Click the Streams List and then the plus signs (+) to open the Stream List options.
2. Click on the Audio channel you wish to connect to and click the Open button.
• Channels that are open are listed in green.
3. Click Streams List to close list.
4. Change the volume with the Audio volume controls.
Volume Controls
TRANSEARCH 3.2 USER MANUAL
Page 31
PART FIVE: CONNECT TO SERVER GROUPS
1. Click the Sites List button.
2. Click on the Group Folder you want to connect to.
3. Click the Connect button.
4. View Video, Data, and Audio as previously instructed.
Group
Folders
Connect
Group Sites
are connected
TRANSEARCH 3.2 USER MANUAL
Page 32
PART SIX: PRINT OR SAVE
To print a picture
1. Click on Camera Name and choose Print.
2. Choose Half Page or Full Page.
Camera Name
3. Choose which printer you want to use and click Print.
TRANSEARCH 3.2 USER MANUAL
Page 33
To save a picture
1. Click on Camera Name and choose Save.
Camera Name
2.
3.
4.
5.
Choose which file you want to save your picture in.
Name your file.
Choose your file type (*.bmp).
Click Save.
TRANSEARCH 3.2 USER MANUAL
Page 34
PART SIX: EXIT TRANSEARCH (Exits to Windows)
1. Click the Exit button and choose Exit Transearch.
NOTE: If you want to return to Review or Live mode just click their respective buttons. Only click this button if you
want to exit the Transearch software.
TRANSEARCH 3.2 USER MANUAL
Page 35
REMOTE PLAYBACK
Transearch v3.3 only: The software does not have to be registered to use for any remote operations.
CONNECT TO REMOTE SERVER(S)
5. Click the Connect button and choose Remote Sites.
6. Click on the Server(s) you want to connect to and click the Connect button.
Choose Server
Click Connect
TRANSEARCH 3.2 USER MANUAL
Page 36
REVIEW VIDEO (Limited to 1 camera view at a time)
1. Click the Review button and choose the site you want to review.
(If you do not see the site you want to review, then click on the Sites List button at the bottom and connect
to the site, it should now appear under Review (Site list).
2. Click the down arrow button in the “Please Select a camera” field choose a camera.
3. Select the date you want to review and click the Retrieve button.
You should see a progress bar as the data is being downloaded to your system, you may cancel the
download by clicking Stop. If for some reason the data fails to transfer, an error message will appear asking
if you want to redownload.
NOTE: All search features are available remotely that are available locally; however, you can customize your very
own Exception List (Xlist). This Xlist will apply to your system only and will not change the Xlist at the store, please
see the Software Configuration Manual for programming the Xlist.
TRANSEARCH 3.2 USER MANUAL
Page 37
4. Click on the journal item you want to review, the camera display should say Requesting Video and then start
displaying video. (Depending on your network bandwidth, this pause may be a few seconds to around 30
seconds).
•
•
•
•
•
•
•
•
Transearch will retrieve video as close to the time you requested as possible.
You may see video start to play and the words Buffering xx.xx%. Transearch will display its buffered video
as it comes in until it reaches the time you requested.
You will notice the time of each frame of video by looking at the upper left corner of the video display.
You can now use the all the standard Play, Reverse, etc buttons as if you are at the local store.
All Right-Click functionality (Print, Save Frame, Save Video) is also available remotely.
All video is buffered on a first come first serve basis, so there may be some delays as Transearch attempts to
keep up with your requests.
You may have to click Play/Reverse then Pause to get video to start downloading.
Occasionally, Transearch may not display any video, get stuck on a video, or stuck on requesting video,
please click the refresh button. This should cancel all download requests and allow you to start over. If for
some reason, the refresh does not work, you may have to close and reopen Transearch. There is an
automatic cache size of 500M set aside to store downloaded video.
TRANSEARCH 3.2 USER MANUAL
Page 38
REMOTE VIDEO BACKUP
1. Right click on the picture at the video spot you want to save and choose Save Video.
2. In the Save As dialog box choose Desktop in the Save In field and name your file (example: Remote Video
Backup). Click the Save button.
TRANSEARCH 3.2 USER MANUAL
Page 39
NOTE: You will receive a confirmation that your backup was successful. Click the OK button.
3. Click the Backup button at the bottom of the Transearch window.
4. BACKUP STEP ONE: Click the check box next to the backup drive you want to use (example: C: drive) and
click the green Next Step button. (For more instructions on backing up video, see the Transearch User
Manual: Backing Up Video section.)
5. BACKUP STEP TWO: Click the Other button.
TRANSEARCH 3.2 USER MANUAL
Page 40
6. In the Open file dialog box locate the file you saved earlier (example: Desktop), click on the file you backed
up (example: remote video backup), and click the Open button.
7. Click the Add button and you will see your type of data displayed in the next window. If you want to remove
this file, click on the name (“other”) and click the Clear button and start again. (Repeat this procedure if you
have multiple files to backup.)
8. Click the Players button (this will download the Transearch media player you need to play the file) and click
the check box for Playback Tools.
TRANSEARCH 3.2 USER MANUAL
Page 41
9. BACKUP STEP THREE: Click the Start Backup button.
10. Click the Done button when your backup is complete.
REVIEW VIDEO ON BACKUP DRIVE
You can review your video with Windows Media Player or with Transearch.
If you use a CD for your backup it will automatically install Transearch, if not, follow these steps:
1. Open the new folder that was created during the backup on the media that you backed up to (example:
hard drive, CD, USB, etc.) and double click the Transearch-Lite-Installer to open and run the file.
2. If you have any problems…..call our HELP DESK AT 727-449-2296 (8AM-5PM).
24hr Emergency Line: (727) 656-3585.
TRANSEARCH 3.2 USER MANUAL
Page 42
REMOTE WEB ACCESS USING WINDOWS XP AND IE6.0 ONLY
(These screen shots are based on Multicam version 8.1 which is shipped with our H264 capture card)
PART ONE: SET SECURITY SETTINGS FOR WEB SITE (FIRST TIME ACCESS USE)
1. Obtain your DVDR IP address from your Network Administrator.
IP Address:_____________________________________
2. Click on Tools option in the internet toolbar and select Internet Options.
3. Click on the Security tab.
4. Select the Web content zone icon for Trusted sites and then click on the Sites button.
5. Enter the IP address of the DVDR you are trying to connect to in the Add this Web site box and click the Add
button.
TRANSEARCH 3.2 USER MANUAL
Page 43
6. Uncheck the Require server verification box (verify the box is unchecked before proceeding).
7. Click OK.
PART TWO: STARTING WEBCAM (See “How to Start Webcam Server”, it is on by default)
Once the WebCam server at the GC-System is enabled, it is then possible to view images using a web browser at a
client PC or from a remote site; Microsoft Internet Explorer will be used as the browser.
1. To start the connection, open an IE browser.
2. Type the IP address of your webcam server into the URL address window and press enter.
3. The following window will display.
o
o
MPEG4 Encoder Viewer (used for Live Viewing only): Provides the most complete functionality of
the WebCam applications, allowing you to view up to sixteen cameras from different GV-Systems.
Remote Play Back/ViewLog: Downloads history files from the GV-System onto the client PC. There
are two choices of video players: Remote Playback and ViewLog.
TRANSEARCH 3.2 USER MANUAL
Page 44
4. Select MPEG 4 Encoder, and then click the Submit button to display the following window.
NOTE: An install program will run the first time you access the Mpeg4 Encoder Viewer.
5. Select the type of Internet Connection you’re using. Modem users are limited to Single Window, while
broadband users have the option of 1 or 2 Windows or Multi View. In this example, select 1 Window, and
then click the Submit button.
6.
Your IE browser starts loading the MPEG4 Encoder interface. When the loading is completed, click the Play
button and type a valid user ID and password.
TRANSEARCH 3.2 USER MANUAL
Page 45
SINGLE VIEW MPEG4 ENCODER VIEWER
No. Name
Description
1
Brings up these options: Alarm Notify, Data Rate Configure, Remote Config,
Option
Change Server, Show Camera Name and Image Enhance.
2
Change Camera
Selects the desired camera for display.
3
PTZ Control
Displays the two choices of PTZ control: PTZ Control Panel, PTZ Automation.
4
I/O Control
Displays the two choices of I/O control panels: I/O Control, Visual Automation.
5
Full Screen
Switches to full screen view.
6
File Save
Saves live video in the local computer.
7
Change Quality
Adjusts video quality in 4 levels.
8
Snapshot
Takes a snapshot of the displayed live video.
9
Audio
Enables live audio from the remote GV-System.
10
Microphone
Enables speaking to the remote GV-System.
11
Stop
Terminates the connection to the remote GV-System.
12
Play
Connects to the remote GV-System.
13
Countdown Timer Indicates the remaining time when you log in as Guest.
When the time is up, you will be logged out automatically.
Click the Back button to return to the Web server command panel.
TRANSEARCH 3.2 USER MANUAL
Page 46
MULTI VIEW MPEG4 ENCODER VIEWER
Multi View is a multi-channel MPEG4 Encoder Viewer, allowing users to view 4, 8, and 16 live cameras
simultaneously. Because multiple channels require a large amount of data to be transferred over Internet, this
function is limited to broadband users only.
1. Follow the instructions of Starting WebCam until the Select Internet Connection window appears.
2. Select DSL/CABLE/T-1, choose Multi View, the default display I s1024x768, and then click the Submit
button. First time users will be prompted to install the Multi View applications. Select Yes, and then follow
the instructions to complete the installation.
3.
When the Login dialog box appears, enter a valid user ID and password, and then click OK. This displays the
following Multi View window.
TRANSEARCH 3.2 USER MANUAL
Page 47
MULTI VIEW WINDOW CONTROLS
No. Name
Description
1.
Displays live video.
2.
3.
4.
5.
6.
7.
Monitoring Window
Host Server
UPnP Server
PTZ Control
8.
9.
10.
11.
12.
13.
I/O Control
Channel Status
ViewLog
ViewLog.
Configure
Edit Host
Camera Status
Host Information
Zoom in and out
Add/Remove Channel
14.
15.
16.
17.
18.
19.
20.
21.
22.
23.
24.
25.
polling.
Full Screen
Video Polling
Screen Divisions
Exit/Minimize
Speaker
Microphone
Stop
Play
Save
Quality
Snapshot
Save Camera to Multiple Host
.
Displays connected GV-Systems and their available cameras.
Displays all hosts on the same LAN.
Displays the PTZ control panel.
Displays the I/O control panel.
Indicates the general information of the selected channel.
Plays back recorded files of the remote GV-System by using the video player
Accesses system settings of the Multi View.
Adds, deletes or modifies GV-Systems.
Displays the camera status of the connected GV-Systems.
Displays the general information of the connected GV-Systems.
Zooms in or out the selected channel.
Adds or deletes the channels for video polling. Click the Add or Remove Channel
button and then click the desired channel to add to or remove from the video
Switches to a full screen view.
Rotates through the selected channels.
Sets screen divisions to 4, 8 or 16.
Closes or minimizes the Multi View window.
Enables speaking to a remote GV-System.
Enables live audio from a remote GV-System.
Terminates the connection to a GV-System.
Establishes the connection to a GV-System.
Saves live video.
Changes video resolution.
Takes a snapshot of the selected channel.
Saves the selected cameras and to create a Multiple Host.
4. Click the Back button to return to the Web server command panel.
TRANSEARCH 3.2 USER MANUAL
Page 48
REMOTE PLAY BACK / VIEWLOG
More than simply playing back recorded video/audio files, the Remote ViewLog function allows you to have full
access to the ViewLog features of the connected GV-System.
NOTE: An install program will run the first time you access the Mpeg4 Encoder Viewer.
1. Choose the Remote Play Back/ViewLog and click the Submit button.
2. On the Select Internet Connection, click on the ViewLog button, the default display is 1024x768,
and then click the Submit button.
Type the IP Address, ID and Password of the remote GV-System. Keep the default port as 5552, or modify it
if necessary.
4. In the Host Type field, select DVR.
5. Click the Connect button.
3.
6. When the connection is established, you will see the video player ViewLog appears on the screen. Then you
can access all ViewLog features for playback.
a. Click on file you want to view and click the Play button.
TRANSEARCH 3.2 USER MANUAL
Page 49