1
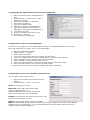
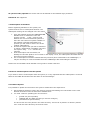
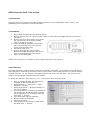
KIRK IP Interface Card - User’s Guide
1. Introduction
This guide helps you setting up the KIRK System 1500 IP on a Cisco CallManager. Please refer to your
CallManager user’s manual for general information.
2. Installation
1.
2.
3.
4.
5.
6.
7.
Power down the WMS (Wireless Mobility Server).
Remove the top cover by unscrewing the screws on both sides of the WMS and the screws at the
rear panel.
Remove the blind cover plate in front of the
slot closest to the power supply (please
refer to the figure at right).
Insert the KIRK IP Interface Card into the
slot 0 (see drawing) and mount the two
screws from the blind cover.
Put back the top cover.
Connect an RJ45 cable (not included)
between the KIRK IP Interface Card on the
back of the WMS and the LAN network.
Power up the WMS again.
Software and help files are available at: http://www.kirktelecom.com/voip.htm
3. IP Addresses
The KIRK IP Interface Card is configured with the IP address: 192.168.0.1 as a standard. This address has
to be changed for customizing the sub-net mask of the network. Start configuring the PC to the IP system’s
identical net mask, e.g. the address: 192.168.0.2 and sub-net mask: 255.255.255.0. The system is now
ready to be reached with a standard internet browser.
To change the address in the card to e.g. 10.1.1.150 please follow the steps below:
1.
2.
3.
4.
5.
6.
7.
8.
Start an Internet browser and address the
card with IP address 192.168.0.1
Select Gateway -> Config (user = admin,
password = ip1500)
Select IP Interfaces -> Ethernet Interface in
the pop up window
It is now possible to change the IP address of
the card and the IP address mask. Type the
new IP address in the ”IP address” field and
press save -> activate.
Type the default router if applicable
No other fields are supported
Select IP Interfaces
Type off service must be set to 0x68, 0xb8,
and press save -> activate.
4. Configuring the KIRK IP Interface Card to the CallManager
1.
Start an internet browser and address the
card
2. Select Gateway -> Config (user = admin,
password = ip1500)
3. Select DECT Interface -> GW-DECT
4. Set protocol to “Skinny”
5. Type the IP address of the
6. Gatekeeper. (Primary Call Manager IP)
7. Type the IP address of the alternate
Gatekeeper. (Secondary Call Manager IP)
8. Type DECT1 in HW ID
9. Check the “enable user directory” box
10. Press Save -> Activate
11. No other fields are supported.
5. Registration of Users on the CallManager
Users have to be registered on the CallManager as well as on the KIRK IP Interface Card. Please
follow the steps below to register users on the CallManager:
1.
2.
3.
4.
5.
6.
7.
8.
9.
10.
Start the CallManager software
Select "Device” -> ”phone”
Select ”add a new phone”
In the field “phone type” select “Cisco 7940” and press next
Type i.e. the handset serial number (without space) in the field ”MAC address”
Type a description of the handset in the field ”description”
Select ”Default” in device pool and press ”insert”
Type the extension number in the field ”directory number” and press ”insert”
Ensure that call waiting is turned off for all DECT Phones
Please note that the wireless system supports automatic registration
6. Subscription of Users on the KIRK IP Interface Card
How to register users on the IP card:
1.
2.
Open the IP Interface Card with an internet
browser
Select Gateway -> users -> new user
Name: some name you choose
Nickname: Prefix “SEP” and then the IPEI
number (without spaces), i.e.
SEP000770669569. This number must be the
same as the one given in the Call Manager
Number: The extension you choose for the phone. The
number must be unique, e.g. 320
Display: The stand-by display text of the handset
IPEI: The IPEI number of the handset is located in the battery casing of the handset. If the battery
compartment is not accessible i.e. on newer KIRK handsets, the IPEI number can be seen in the
display by typing *99984* ENTER (v).
AC (access code) optional: An access code can be defined for the handset login procedure.
Password: Not supported
7. Subscription of Handsets
Before registering handsets on the system, the
system must be set to “subscription allowed”. The
subscription setting can be changed in the info menu.
1.
2.
3.
4.
From the handset choose the SUBSCRIPTION
CREATE menu to subscribe to the new
system. Use the < and > keys to scroll
between the Id’s of the different systems if
there are more than one system available. If
the handset is already subscribed to 10
systems you will need to remove one of the
existing subscriptions.
Choose the system that you wish to subscribe
to. When a subscription is available, enter the
free system using < or > and the AC if
required.
If the subscription was successful, the
standby text and the speaker icon is shown in the display. If not, the subscription has failed and the
procedure must be repeated.
For re-subscription of a DECT handset that has previously been subscribed to the CallManager, it
may be necessary to reset the handset from the CallManager after subscribing the handset.
Please refer to the KIRK Z-3040 handset user’s guide for further reference.
8. Remove a Subscription from the System
If you wish to remove a subscription from the system, it is very important that the subscription is removed
FIRST on the KIRK IP Interface Card and then on the Call Manager.
9. Firmware Upload
It is possible to upload new firmware to the system. Please follow the steps below.
1.
2.
Put the KIRK IP Interface Card in ftp mode by pressing and holding the reset button on the card.
Release the button when the LED’s have flashed twice.
You need 3 files for uploading the new firmware:
•
•
•
gwload.exe (the ftp loader)
loadflash.bat (the batch file that you need to configure)
ipdect1500.bin (the firmware)
The first 2 files are to be placed in the same directory. The bin file is placed in a directory named
“bin” under the same directory as the first 2 files.
3.
Edit the bat file enabling it to comply with the IP address of the card, e.g.:
gwload /setip /i 10.1.1.163 /gwtype 1500 /prot bin\ipdect1500.bin
4.
Run the bat file. When the flash file has finished loading you will have to restart the WMS.
10. Pre Call Services
Activate Call-Forward-All:
Use this feature to send all calls from one telephone number to another telephone number. To
activate Call-Forward-All, follow these steps:
Procedure
Step 1 Press the hook key, and dial ** then 1 on your telephone keypad. You will receive a
confirmation tone.
Step 2 Enter the telephone number to which you want to send the calls. A confirmation tone will
sound.
Step 3 Hang up.
Cancel Call-Forward-All:
To cancel Call-Forward-All, follow these steps:
Procedure
Step 1 Press the hook key, and dial ** then 2 on your telephone keypad. You will receive a
confirmation tone.
Step 2 Hang up.
Call Pickup:
(NOT SUPPORTED FOR SRST)
To answer a phone in your call pickup group, follow these steps:
Procedure
Step 1 Press the hook key, and dial ** then 3 on your telephone keypad.
11. Note
Cisco charges users of the CallManager software a license fee for each IP Phone, soft phone or other
endpoint system (“IP Phone”) that connects into the Cisco CallManager software. This CallManager user
license fee applies regardless of the source (Cisco, Licensee or a third party) or the functionality of that IP
phone.
Licensee must communicate to Licensee’s field, channels and customers, in a form and manner approved in
advance by Cisco, the following information about the program: How to make payment of that CallManager
User License Fee under a particular part ID number. (URL to be provided to Licensee by Cisco or customers
may contact their Cisco Field representative to make payment).