1
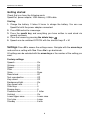
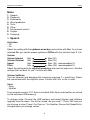
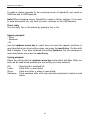
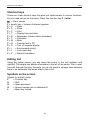
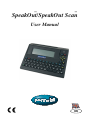
™
™
SpeakOut/SpeakOut Scan
User Manual
UK
Where to find Permobil
Head office of the Permobil Group
Permobil AB
Box 120, 861 23 Timrå, Sweden
Tel: +46 60 59 59 00. Fax: +46 60 57 52 50
E-mail: [email protected]
™
™
SpeakOut/SpeakOut Scan
User Manual
Produced and published by Permobil AB, Sweden
Edition 1, 2008-04
Order no: 205106-UK-0
SpeakOut User Manual
Contents
General description ..........................................................................................6
Overview of keys ..........................................................................................7
Connections on the right hand side..............................................................7
Getting started ....................................................................................................8
Starting ..........................................................................................................8
Settings ..............................................................................................................8
Factory settings ............................................................................................8
Menu ..................................................................................................................9
Speech ..........................................................................................................9
Keyboard ....................................................................................................11
Documents ..................................................................................................13
Word prediction ..........................................................................................14
Tools ............................................................................................................15
Other............................................................................................................18
Environment control ....................................................................................19
System ........................................................................................................22
Scanning..........................................................................................................
Shortcut keys ....................................................................................................24
Editing text ........................................................................................................24
Symbols on the screen ....................................................................................24
Battery ..............................................................................................................25
Capacity ......................................................................................................25
Warranty ..........................................................................................................26
Returning SpeakOut ........................................................................................26
Maintenance tips ..............................................................................................26
Technical specifications ....................................................................................27
5
SpeakOut User Manual
General description
General description
SpeakOut™ is a portable speech generator designed for people who are unable
to speak or have problems making themselves understood verbally.
The machine has two screens, one for the user and one for the conversation
partner. SpeakOut is fitted with a Qwerty keyboard.
The keys are easy to press and the screen has good contrast. Integrated speech
synthesis with male and female voices. SpeakOut has high storage capacity and
simple menu control with a number of practical functions.
6
SpeakOut User Manual
General description
Overview of keys
14
12
13
11
15
10
9
8
16
7
6
1
1.
2.
3.
4.
5.
6.
7.
8.
2
9.
10.
11.
12.
13.
14.
15.
16.
Shift
Space
Comma, full stop
New line
Read aloud
Alarm
Phone book
Delete
3
4
5
Menu
Navigating text and menus
Go back/Undo/Clear
Light meter
Confirm
Function key
Off
On
Connections on the right hand side
1
2
3
4
5
6
4. Power supply, charging
1. Line out
2. USB port 1 for printer, USB memory 5. PT-50 external IR transmitter/
adapter cable for switches
3. USB port 2 for PC
6. Reset
7
SpeakOut User Manual
Getting started
Getting started
Check that you have the following parts:
SpeakOut, power adapter, USB memory, USB cable.
Starting
1. Charge the battery. It takes 5 hours to charge the battery. You can use
SpeakOut with the power adapter connected.
2. Press ON and write a message..
3. Press the mouth key and everything you have written is read aloud via
speech synthesis.
4. Clear the screen by pressing the delete key=
5. Speech can be switched OFF/ON with the shortcut keys F + M.
Settings Press M to access the settings menu. Navigate with the arrow keys
and confirm a setting with Yes. Press No to go back/undo.
All settings can be selected with the arrow keys or the number of the setting you
want.
Factory settings
Speech ......................................On
Volume ......................................18
Speed ........................................15
Pitch ..........................................15
Voice..........................................Ryan
Read aloud ................................All
Text reproduction ......................Off
Key sound ................................Off
Background light........................On
Key repeat rate..........................1
Slow keys ..................................0
Bounce keys..............................0
Predictive text............................1 letter
Autotext ....................................On
Lower/Upper case ....................Lower case
Font size....................................Large
Standby ....................................5 min.
8
SpeakOut User Manual
Menu
Menu
1.
2.
3.
4.
5.
6.
7.
8.
9.
Speech
Keyboard
Documents
Word prediction
Tools
Other
Environment control
System
Scanning
1. Speech
Activation
• Off
• On
Select the setting with the up/down arrow key and confirm with Yes. If you have
selected On, you switch speech synthesis Off/On with the shortcut keys F + M.
Volume
Volume Internal
Min
Max (30)
Volume External
Min
Max (30)
Speed
Min.
Max. (30) recommended 15
Pitch
Min.
Max. (30) recommended 15
Select the setting with the right/left arrow key and use trial and error to find the
settings that are best for you. Confirm with Yes.
Volume Up/Down
You can increase and decrease the volume by pressing F + mouth key. Select
the sound level with the right/left arrow. Confirm with Yes, or No to undo.
Voice
• Ryan
• Heather
From program version 2.2.1 Ryan is installed. Both Ryan and Heather are stored
on the enclosed USB-memory.
To change voice; Connect the USB memory and select System and software
upgrade from the menu. You will be asked “are you sure?”. Press YES and you
can choose a voice. Press 0 for Ryan or 1 for Heather. Ensure that SpeakOut is
charged when you change voices.
9
SpeakOut User Manual
Menu
To make a system upgrade for the scanning version of SpeakOut, you need an
USB-hub and a USB-keyboard.
Note! When changing voices, SpeakOut is reset to factory settings. If you want
to save documents etc. you have to make a backup on the USB-memory.
Direct reply
You can reply Yes or No directly by pressing Yes or No.
Speech playback
• Word
• Sentence
• All
Use the up/down arrow key to select how you want the speech synthesis to
read aloud what you have written when you press the mouth key. Confirm with
Yes. Example: If you have selected the setting Sentence, the last sentence is
read aloud when you press the mouth key.
Typing playback
Select the setting with the up/down arrow key and confirm with Yes. What you
write will be read aloud according to the setting you have selected.
Off:
Letter:
Word:
Sentence:
Read aloud is switched off.
Each letter is read aloud.
Each word after a space is read aloud.
Each sentence after a full stop and other punctuation marks is read
aloud.
10
SpeakOut User Manual
Menu
2. Keyboard
Special characters:
” # $ ’ : ; < > [ ]
^ _ \ { | } €
Characters that are not on the keyboard can be found here. Enter your text.
If you need a special character, go to the Keyboard/Special characters menu.
Select the character with the arrow keys and confirm with Yes. The character is
inserted where the cursor is located.
You can also open the special characters menu with the shortcut keys F + Z.
Auditory feedback
• Off
• Weak
• Medium
• Strong
Select the setting for sound when you press the keys. Select the setting with the
up/down arrow key and confirm with Yes.
Key repeat rate
Min.
Max. (4)
Select the setting for keystroke repetition speed. Scale 0-1-2-3-4.
If you select the setting 0, there is no key repetition. Select the setting with the
right/left arrow key and confirm with Yes.
Slow keys
Min.
Max. (3)
Select the setting for how long a key must be held down before it is activated.
Scale 0-1-2-3. Select the setting with the right/left arrow key and confirm with
Yes.
Bounce keys
Min.
Max. (4)
Select the setting for how long a key is ignored after you have pressed it once.
Scale 0-1-2-3-4. Select the setting with the right/left arrow key and confirm with
Yes.
11
SpeakOut User Manual
Menu
Autotext
• Off
• On
The setting On generates an upper case letter after a full stop and other punctuation marks. Select the setting with the up/down arrow key and confirm with
Yes.
Lower/upper case
• Upper case
• Lower case
Select whether you want to write in UPPER CASE or lower case. If you select
upper case, the predictive text and the menu are also changed. Select the setting with the up/down arrow key and confirm with Yes.
Font size
• Small
• Big
Select the character size you want. If you select Medium, the predictive
text and the menu are also changed. Select the setting with the up/down arrow
key and confirm with Yes.
Small: 7 lines of text
Big:
3 lines of text
Menu font size
Choose witch font to use in the menus. If the user requires large font and has to
acces the menus, then choose large font. If the user requires small font or
doesn’t acces the menus choose small font.
When choosing a small font in the menus, you will be able to the entire menu
text. When choosing large font in the menus, some of the menu text will be cut
off to fit the screen.
12
SpeakOut User Manual
Menu
3. Documents
Open
Enter any letter in the storage name field and all documents saved for the letter
are opened. Then select the document required with the up/down arrow key
and confirm with Yes. All documents saved can be opened with shift and*.
You can also open a document with the shortcut keys F + O. This takes you
directly to the open function.
Press the function key F twice plus a letter to open a saved document under the
letter selected. Example: FF A (opens documents starting with A). All the documents saved under A are displayed on the screen. You can save several documents under each letter. When this function is used, “O” is displayed on the
screen.
Save
Enter the document you want to save, go to the Documents menu and press
Yes. Select Save and press Yes. Enter a storage name and confirm with Yes.
You can also save a document with the shortcut keys F + S. This takes you
directly to the save function.
Delete
A memory: Go to the Documents menu and press Yes. Select delete and press
Yes. Select a document and press Yes. Enter a storage name or the first letter
and press Yes. Select the document required with the up/down arrow key and
confirm with Yes.
All memories: Go to the Documents menu and press Yes. Select delete and
press Yes. Select all documents and press Yes. You will be asked: Delete all text
memories? Press Yes or No.
13
SpeakOut User Manual
Menu
4. Word prediction
Select this function if you want suggestions for words when you are writing.
Select the setting with the up/down arrow key and confirm with Yes. The words
suggested are displayed at the top of the screen. If the word you write is not in
the word list, you are asked, after you enter a space, whether you want to save
the new word. Confirm that you want to save a new word to the word list with 1.
The words are saved in order of frequency.
Activation setting
Off: Word prediction is switched off. No suggestion is made.
1 letter: Word prediction starts when you have entered one letter. Select the suggestion you want with the number keys.
2 letters: Word prediction starts when you have entered two letters. Select the
suggestion you want with the number keys.
3 letters: Word prediction starts when you have entered three letters. Select the
suggestion you want with the number keys.
Delete word
Word: Enter the word you want to delete from the word list. Confirm with Yes.
You have to enter the entire word.
14
SpeakOut User Manual
Menu
5. Tools
Time and date
Display time and date
The date and time are displayed on the screen and disappear automatically after
two seconds. You can also use the shortcut keys F + T.
Set time and date
New time (hhmm): Enter the time, for example 1512. Confirm with Yes.New date
(yymmdd): Enter the date, for example 050108. Confirm with Yes.
Reminders
Display reminders
All reminders are displayed with the date, the time and a text message.
Reminders are displayed in date order. Old reminders are deleted automatically.
Add reminder
Date (yymmdd): Enter the date, for example 050108. Confirm with Yes.Time
(hhmm): Enter the time, for example 1512. Confirm with Yes.Text: Enter the
reminder you want, for example that it is time to take medicine. Confirm with
Yes.
Add daily reminder
Time (hhmm): Enter the time, for example 1512. Confirm with Yes.Text: Enter
the reminder you want, for example that it is time to take medicine. Confirm with
Yes.
Remove reminder
All reminders are displayed with the date, the time and a text message. Select
the reminder with the up/down arrow key and confirm with Yes.
You can also access the reminders menu directly with the shortcut keys F + R.
At the time set for the reminder, SpeakOut emits a sound and the reminder and
time are read aloud and displayed on the screen. Press No to delete.
Repeat reminder: F + Space
15
SpeakOut User Manual
Menu
Phone book
Search
You can search for a name and number in the phone book. Confirm your selection with Yes. The search result is displayed on the screen.
Name: Enter the name and confirm with Yes. You can also enter the first letter
of the name you are searching for. All the entries saved for the letter are displayed on the screen.
Number: Enter the phone number you are searching for and confirm with Yes. If
you have saved phone numbers with the dialling code, all phone numbers with
the same dialling code are displayed on the screen when you search for a
dialling code.
Add
Name: Enter the name and confirm with Yes.
Number: Enter the phone number and confirm with Yes.
Change
Name: Enter the name and confirm with Yes.Everyone with that name is displayed on the screen. Select with the up/down arrow key and confirm the
change in the phone book with Yes.
New name: Enter the name and confirm with Yes.
New number: Enter the phone number and confirm with Yes.
Remove
Name: Enter the name and confirm with Yes.
Everyone with that name is displayed on the screen. Select with the up/down
arrow key and confirm the removal from the phone book with Yes.
You can also access the phone book directly by pressing the key with the
telephone receiver.
16
SpeakOut User Manual
Menu
Calculator
These arithmetical operations are available:
Addition +, subtraction -, multiplication *, division / and per cent %.
Press the Shift key and the number keys for the characters +, -, *, / or %. Press
Yes or New line to display the result. If you want to perform another calculation,
press the delete key and the screen is cleared.
You can also access the calculator directly with the shortcut keys F + C.
17
SpeakOut User Manual
Menu
6. Other
Print
Insert the USB cable for the SpeakOut in USB port 1 and the printer’s USB port.
Enter any text in the text editor or open a saved document and select the
Other/Print menu. Press Yes. To be able to print, the printer must have PCL3 or
higher. PCL3 is the basic level for printers that can accept ascii strings and then
print them. To find out whether your printer has PCL3, check the printer’s data
sheet and see what it says under printer language.
You can also access the print function directly with the shortcut keys F + P.
Contact us for an updated list of printers that can be used.
Transfer text to PC
Connect the USB cable to USB port 2 on the SpeakOut and to the computer’s
USB port. Open any word processing program on the computer and place the
cursor where you want to insert the text. Enter any text in the text editor or open
a saved document and select the Other/Transfer text to PC menu. Press Yes.
Transfer of text to PC worked with Windows 98, XP and 2000 when this manual was written. It may also work with other operating systems but this had not yet
been tested when this manual was written.
You can also access the transfer text to PC menu directly with the shortcut keys
F + N.
Standby
1. Off
2. 1 minute
3. 5 minutes
4. 10 minutes
5. 15 minutes
6. 30 minutes
Select the time you want for the standby function with the up/down arrow key
and confirm with Yes. SpeakOut enters sleep mode after the time selected to
save the battery when the machine is not in use. Press ON to activate the
machine again. It is recommended that you set a time so that the machine’s
operating time is as long as possible. Use trial and error to find the setting that
is best for you. SpeakOut uses a little power even in sleep mode.
18
SpeakOut User Manual
Menu
Backup
Backup: Using the USB memory supplied, you can make a backup of all settings
and all information saved. Connect the USB memory to USB port 1, select
Backup and press Yes.
Reset from backup: Connect the USB memory to USB port 1, select Reset from
backup and press Yes. SpeakOut restarts when the reset has been completed.
Sound Channels
1. Integrated loudspeaker
2. External amplifier
3. Internal loudspeaker and external amplifier
If the internal loudspeaker is not loud enough at maximum volume, you can connect an external amplifier with a loudspeaker to the line output (Line OUT).
You can also connect headphones.
Clock
1. Off
2. On
To switch the clock display on the screen off or on.
7. Environment control
1. Lights
2. Doors
3. Door phone
4. TV
5. Text TV
6. Video
7. CD/DVD
8. Telephone
You can access the environment control menu directly with the shortcut keys F + I.
You need a PT-50 IR transmitter to control your devices remotely from
SpeakOut. The PT-50 is a programmable remote control that replaces the
remote controls for your TV, video, DVD, etc. You enter the channels using the
PC software supplied with the PT-50. Separate user manual for the PT-50.
PT-50 IR Transmitter for SpeakOut
Product code: 1820252
19
SpeakOut User Manual
Menu
8. System
1.
2.
3.
4.
5.
6.
Factory settings
Battery calibration
Program version
Contrast
Software upgrade
Backlight
Factory settings
Select Factory settings to reset SpeakOut to the factory settings. Press Yes and
you will be asked: Reset to factory settings? Press Yes or No.
The factory settings and the basic word list are reset.
Battery calibration
When you select battery calibration, you are asked “Are you sure?”. Press Yes
or No. Battery calibration is performed only if you suspect that the battery indicator is displaying an incorrect value. If, for example, the value displayed is too
low although there is a lot of capacity left. Or if the indicator displays a value that
is too high and SpeakOut switches off too soon.
The purpose of the calibration is for the battery scale to be correct.
Proceed as follows:
1. Switch off the time set for the automatic off function.
2. Select calibration from the menu and press Yes. You are asked “Are you
sure?” Press Yes.
3. Leave SpeakOut on until it switches itself off.
4. Fully charge the battery.
5. Repeat points 3 and 4 once more.
Software version
The software version of SpeakOut is displayed on the screen.
Contrast
Adjusting the contrast of the screen. Select the setting you want with the
right/left arrow key and confirm with Yes.
Min.
Max. (100)
20
SpeakOut User Manual
Menu
Software upgrade
A software upgrade must only be performed by qualified personnel from the aids
centre or Permobil.
Backlighting
1. Automatic
2. Always on
Automatic: No backlighting is activated but the lighting is switched on if the ambient light conditions are poor.
Always on: The backlighting is activated and is switched off when you stop writing. It is switched on again as soon as you start writing.
21
SpeakOut User Manual
Menu
9. Scanning
• Connect to a USB keyboard to make settings.
• Settings menu - F1.
• Scroll menus with the arrow keys.
• Confirm your menu selection with Enter or a number.
• Back/Exit – Esc.
• Function key – F4.
• Warning signal - F8.
• Phone book - F9.
• AV – F12.
You can test the settings with the keyboard connected.
The adapter cable supplied has three connections:
• Switch 1
• Switch 2
• PT-50 IR transmitter
Connect the cable to the output for PT-50 on the right side of SpeakOut.
1. Scanning method
2. Scanning speed
3. Acceleration
4. Pause
5. Repetitions
6. Release
22
SpeakOut User Manual
Menu
Scanning method
Scanning method R/C Auto
1 switch, row/column. Automatically scans the rows until you press the switch to
select a row. Then scans the switches in the row until you press the switch to
select a button.
Start scanning by pressing switch 1.
Scanning method R/C Manual
2 switches, row/column. Switch 1 is used to move down row by row until you are
in the row you want. Press switch 2 to select the row you want. Press switch 1
to move along the row until you are on the switch you want. Press switch 2 to
select the switch you want. Start scanning by pressing the switch.
By holding down switch 1 you can increase the speed to move faster in the rows
and columns. To do this, you must have made the relevant setting under
Acceleration and selected high scanning speed.
Scanning speed
Setting 1–10. Select with the right arrow key or left arrow key.
Acceleration
1. Off
2. Fast
3. Faster
The scanning speed increases when switch 1 is held down. This applies only to
manual scanning with two switches.
Pause
Setting 0–10. Select with the right arrow key or left arrow key.
You can cancel by clicking once again within “the selection” and thus start again
if you have passed a selection.
Repetitions
Setting 1–10. Select with the right arrow key or left arrow key.
How many times the rows and columns are to be scanned before scanning
starts again. This applies only to automatic scanning with one switch.
Release
1. No
2. Yes
When you select “Yes”, the selection is activated when you release the switch
Yes.
23
SpeakOut User Manual
Menu
Shortcut keys
There are a few shortcut keys that give you rapid access to various functions.
So you need not go via the menu. Press the function key F + letter.
F
F
F
F
F
F
F
F
F
F
F
F
F
= Clear screen
+ mouth key = Volume of internal speaker
+ O = Open
+ S = Save
+ P = Print
+ T = Display time and date
+ R = Reminders (shows active reminders)
+ C = Calculator
+ M = Mute
+ N = Transfer text to PC
+ D = Turn off receiver display
+I
= Environment control
+ L = Lock menu key
+ Z = Special characters
Editing text
Using the yellow arrows, you can move the cursor in the text up/down and
right/left. The delete key deletes characters to the left of the cursor. Start a new
line with the new line key. Normally you do not need to change lines because
there is an automatic line break when a line is full.
Symbols on the screen
Symbol for battery status.
F
= Function key
S
= Shift
O
= Open document
G
= Screen number two is switched off
L
= Menu key locked
24
SpeakOut User Manual
Battery
Battery
-
-
-
-
The battery is specially designed for Permobil and is a Li-lon battery pack that
must not be replaced by another type. The battery is a consumable and
should only be changed by Permobil.
A battery symbol is displayed to the right on the screen. This indicates the
machine’s battery status. When the battery is dead, SpeakOut switches itself
off automatically.
It takes around 5 hours to charge a dead battery. You can use SpeakOut
while charging the battery.
Use only the battery charger supplied. The charging socket is on the right
side of the machine. Other chargers may damage the machine.
Charge the battery overnight. The battery benefits from always being as fully
charged as possible. Regular charging contributes to extending the life of the
battery.
The battery does not need to be discharged before you charge it. Charging
before full discharge does not damage the battery.
Battery life: 500-1000 charges.
Capacity
- The operating time after a charge depends on the time you have set for the
automatic off function and on how much the machine is used.
Approximately 10-20 hours of normal use.
Example: If the standby function is set to OFF, the machine has 10 hours of
operation. If it is set to 5 min., the machine has 15-20 hours.
- If you do not have enough light where the machine is used, the backlighting
on the screens is switched on. This requires more power, which results in a
shorter life.
Storage capacity:
10-15 million characters. This includes all storage, reminders, own words, documents, etc.
Important The battery is switched off automatically to prevent harmful discharge
causing the electronics to be disconnected. This occurs when the battery indicator shows empty. To start SpeakOut again, charge the battery. It takes around
1 minute before the system starts operating, i.e. has loaded the operating
system and word list.
If SpeakOut will not start, you have to disconnect the charger and reconnect it.
Reset the machine by pushing a paper clip into the reset hole on the right side
of SpeakOut.
25
SpeakOut User Manual
Warranty and maintenance
Resetting SpeakOut
If SpeakOut does not work correctly or if it hangs, you can restart it by inserting
a folded-out paper clip in the reset hole on the right side of the device.
Warranty
-
SpeakOut has a 2 year warranty from the invoice date.
The warranty does not apply to mechanical damage.
Returning SpeakOut
For technical information and repairs please contact your local dealer.
Maintenance tips
-
Do not drop SpeakOut on the floor.
Do not use solvents.
Use a damp cloth to wipe the machine.
Charge the battery overnight.
Avoid humid environments, temperatures over +50°C, strong sunlight or
cold below -30°C.
Use only cables supplied by Permobil.
26
SpeakOut User Manual
Technical specifications
Technical specifications
Dimensions: 24.5 x 19.5 x 5.2 cm.
Weight
1 kg.
Screens with backlighting:
1 LCD, 40 x 2 characters.
1 LCD graphic screen with 240 x 64 pixels.
Battery:
Lithium-ion
Connections:
1 power adapter
1 PT-50 IR transmitter
1 audio input, line out
1 USB for PC
1 USB for external unit, for example printer, USB memory.
27
SpeakOut User Manual
User notes
28
Order no: 205106-UK-0