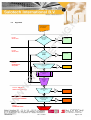
1
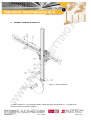
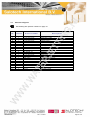
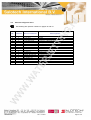
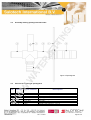
HOSE CATCHER
VE.90000-CST
USER MANUAL
Manufacturer
Version of document
Date of document
VE.90000-CST
Salotech International B.V.
Jan van der Heijdenstraat 44
3261 LE Oud-Beijerland
Tel: + 31 (0)186 621484
Fax: +31 (0)186 621113
Website: www.waterjetting.nl
1
05-2010
Rev 1. 05-2010
Page 1 of 27
Contents
1.
FOREWORD .................................................................................................................................... 4
1.1
USING THE MANUAL ..................................................................................................................... 4
1.2
GUARANTEE ................................................................................................................................ 4
1.3
SAFETY REGULATIONS ................................................................................................................. 5
1.4
INTENDED USE FOR THE VE.90000-CST ...................................................................................... 7
1.5
NORMS AND REGULATIONS........................................................................................................... 7
1.6
TIP MARKINGS ............................................................................................................................. 8
1.7
SAFETY PICTOGRAMS .................................................................................................................. 9
1.7.1
Pictograms on the equipment ............................................................................................ 9
1.8
PERSONAL PROTECTION EQUIPMENT .......................................................................................... 10
1.9
ALGORITHM............................................................................................................................... 11
2.
ASSEMLY DRAWING VE.90000-CST .......................................................................................... 13
2.1
2.2
2.3
2.4
2.5
2.6
3.
PARTS LIST OF FIGURE 1 ............................................................................................................ 14
ASSEMBLY DRAWING CARRIAGE ................................................................................................. 15
ASSEMBLY DRAWING CLAMP....................................................................................................... 16
PARTS LIST OF FIGURE 2 AND 3 .................................................................................................. 17
ASSEMBLY DRAWING SPLASHGUARD WITH HOLDER...................................................................... 18
PARTS LIST FOR HOLDER WITH SPLASHGUARD............................................................................. 18
ASSEMBLY AND USE .................................................................................................................. 19
3.1
3.2
ASSEMBLY DIRECTION ............................................................................................................... 20
SELECTION TABLE STOPPER ....................................................................................................... 22
4.
OPERATION .................................................................................................................................. 23
5.
MAINTENANCE ............................................................................................................................. 24
5.1
GENERAL .................................................................................................................................. 24
5.1.1
Preventative daily maintenance ....................................................................................... 25
5.2
PREVENTATIVE ANNUAL MAINTENANCE ....................................................................................... 25
5.3
SPARE PARTS............................................................................................................................ 25
6.
MALFUNCTIONS AND REPAIRS ................................................................................................. 26
6.1
7.
VE.90000-CST
MALFUNCTIONS VE.90000-CST ................................................................................................ 26
DISASSEMBLY AND REMOVAL ................................................................................................. 26
Rev 1. 05-2010
Page 2 of 27
This authorized English manual is a translation of the original Dutch manual. It is the property of
Salotech International B.V. No rights can be derived from this translation.
© Copyright 2010
Although Salotech International B.V. has taken great care in providing an accurate and – wherever
necessary – comprehensive description of particular components, it renounces all liability for damage
as a result of inaccuracies and/or insufficiencies found in this manual.
Salotech International B.V. retains the right to change, at any point in time, machine components or
the contents of this manual, without prior notice to the owner of the machine. No part of this
publication may be reproduced and/or made public via printing, photocopy, microfilm, audio tape,
electronic form or any other form, without prior written consent from Salotech International B.V.
Breaches are punishable by law and necessitate compensation.
VE.90000-CST
Rev 1. 05-2010
Page 3 of 27
1.
FOREWORD
We thank you for purchasing the VE.90000-CST. Working with high pressure equipment is
accompanied by certain risks. Thus it is in your best interest to first read the safety instructions in this
user manual and to then carefully implement them.
This manual contains descriptions about use, maintenance and repair of this equipment. Further, there
are also descriptions about the machine’s main components. The information in this manual is
important for safe and effective operation of this equipment.
If you are not familiar with the operation, the preventive maintenance etc. of the VE.90000-CST, then
please carefully read this user manual from start to finish. Keep this user manual to-hand for future
reference. The required information can be quickly found using the table of contents.
In this user manual, the words ‘machine’ and ‘equipment’ are used inter-changeably. Both words refer
to the VE.90000-CST. This is also the case with the words ‘user manual’, ‘document’ and ‘manual’; all
words refer to this document and accompanying appendices.
1.1
Using the manual
This manual has been written for authorized and technically-qualified persons. Tasks have only been
assigned to specific persons (technically qualified or not) in the chapters ‘maintenance' and
‘configuration’. All concerned parties must familiarize themselves with the contents of this user
manual. These persons are distinguished as follows:
Authorized persons are people who:
Have built up a certain level of knowledge via schooling or training and who have enough experience
to operate the machine.
Technically qualified persons are people who:
Are technically qualified and have sufficient technical knowledge via schooling and/or on-the-job
experience. Further, these persons are, due to their knowledge of mechanics, well aware of possible
risks and dangers (a mechanic, for example).
The word ‘operate’ means:
Configuring the VE.90000-CST, working with the equipment and performing simple maintenance
activities.
The aim/purpose of this user manual is to create safe and efficient interaction between people and the
machine.
1.2
Guarantee
The guarantee conditions and the conditions concerning liability can be found in the supply conditions
(Metal Union, submitted to the Registry at the District Court in Rotterdam).
VE.90000-CST
Rev 1. 05-2010
Page 4 of 27
1.3
Safety regulations
Safety is the first priority! Everyone is responsible for a clean, safe and well-lit workplace.
Immediately report danger and/or dangerous situations to your supervisor.
Salotech International B.V. advises you to train operators and maintenance personnel to operate,
maintain and troubleshoot for this equipment.
Operators must be at least 18 years old. Only personnel authorized by the equipment manager
may operate this machine or perform activities in the proximity of the machine.
It is strictly recommended that operators are familiar with the directives laid down by the Stichting
Industriële Reiniging (SIR) [Industrial Cleaning Foundation], and that they also possess a
certificate for ‘High Pressure Operator’ and/or have sufficient experience with high pressure
equipment.
It is paramount that the user is well aware, via training and/or experience (legally recognized), of
high pressure technology, high pressure cleaning and all accompanying safety measures – which
must be implemented in full.
Never use high pressure equipment with a maximum working pressure that is lower than the
maximum working pressure of the high pressure unit.
Use clean water (fresh or salt) with a maximum temperature of 40°C (110°F), in order to prevent
cavitation.
Never point the jet at people or animals. A high pressure liquid jet enters deep into the skin and
can lead to serious wounds, permanent injury and even death. Anyone who is struck by a high
pressure water jet must always seek immediate professional medical care.
All personnel assigned the task of operating the machine must be able to demonstrate that they
have read and understood those parts of the user manual that describe the machine’s operation
and safety considerations.
All personnel assigned the task of assembling, putting into operation, maintaining and/or repairing
the machine must be able to demonstrate that they have read and understood the entire manual.
The user(s) of the machine is (are), under all circumstances, responsible for the interpretation and
use of the manual. In cases of doubt, contact the supplier/manufacturer.
The manual must be kept in close proximity to the machine and must be easily accessible to
operators and maintenance personnel.
If prescribed configurations are altered or use is made of unauthorized spare parts or repair
methods, this absolves the manufacturer of any liability.
The surroundings of the machine must comply with Arbo regulations. The user is responsible for
taking steps to ensure that the machine can be operated safely and that the environment is
sufficiently illuminated.
It is forbidden to use the machine in an environment where there is a risk of explosion.
VE.90000-CST
Rev 1. 05-2010
Page 5 of 27
The machine’s safety features are in keeping with the latest technology
and are in accordance with the relevant European guidelines.
The equipment may not be modified without prior written consent from the manufacturer.
The owner of the machine is responsible for adhering to the instructions stated in this manual.
Safety features (e.g. screens) may never be removed or in any way disengaged.
VE.90000-CST
Rev 1. 05-2010
Page 6 of 27
1.4
Intended use for the VE.90000-CST
The VE.90000-CST is a specially constructed adjustable auxiliary tool for cleaning pipe bundles by
means of a jet hose with a cleaning nozzle, sometimes with an extension. All the pipes in the bundle
can be reached because of the X-Y construction. Jet hoses of different diameters can be used
because the interchangeable stoppers also have different diameters. A round transparent (Lexaan)
splashguard has been fixed on to protect the operator from splashback.
The VE.90000-CST is not intended to be mounted on vertical heat exchangers.
A maximum reaction force of 500N can be absorbed by the VE.90000-CST hose catcher.
Any other use of the equipment, without prior written consent from the manufacturer, absolves
the manufacturer of any responsibility or liability.
1.5
Norms and regulations
The CE mark on the machine’s type plate indicates that this equipment has been designed and
constructed in accordance with the requirements of the Machine directive (2006/42/EC) and the low
voltage directive (73/23/EEG). For an overview of the norms implemented during the design and
construction of the machine, please refer to the declaration of incorporation of partly completed
machinery (at the back of this user manual).
VE.90000-CST
Rev 1. 05-2010
Page 7 of 27
1.6
Tip markings
Tip markings are symbols in the user documentation and are not displayed on the machine. The
following tip markings are used to make you aware of risks and/or dangerous situations:
Tip: Suggestions and advice to make tasks easier.
Note: Additional information that makes you aware of possible problems.
Caution: Deviating from procedures can damage the machine/equipment.
Danger: Deviating from procedures can lead to serious injury.
Reference: Further information about this subject is available elsewhere in this manual.
VE.90000-CST
Rev 1. 05-2010
Page 8 of 27
1.7
Safety pictograms
Respect these signs; they have been placed for your own safety!
The risk analysis for this machine has indicated a number of safety measures for warning the user.
The used safety pictograms are repeated in the user manual and on the machine’s work instructions.
This clearly provides the user with an insight into the present risks. We have highlighted three different
pictogram types:
Prohibition sign: Not allowed to perform an action.
Obligation sign: Obligatory process or action by the user.
Warning sign: Making user aware of present danger.
1.7.1
Pictograms on the equipment
Regularly check that all pictograms are still visible and legible.
If pictograms are illegible, replace them!
Pictogram
or text
VE.90000-CST
Description
Position on the
equipment
Warning:
Risk of hand trapping. Only accessible to
technically-qualified personnel.
On the outer side of
protective shield
CE mark:
Indicates conformity with European
guidelines.
The CE mark is found
on the type plate of the
equipment.
Rev 1. 05-2010
Number
X
X
Page 9 of 27
1.8
Personal protection equipment
All operators and persons in close proximity must wear the following personal protection
equipment:
Body protection
A strong waterproof suit must complete protect against the characterization of the water
and debris. Arms and legs must be covered.
The pants must worn over the boots
Hand protection
Waterproof rubber gloves, laminate fabrics or with reinforced steel), which give enough
support to the cleaning equipment and have a long sleeve for a good connection on the
suit
Foot protection
Waterproof spraying boots with a steel cap, which protects to high pressure spray.
Recommend is boots with a special airspace on the foot. Also the boots need to have
enough support on a wet surface.
Face protection
All personnel must wear suitable head protection (plastic helmet). If possible, personnel
must wear a face visor. This must match against the capture of splashing spraying water
and pollutions. It must have dimensions and shape, so the complete face is protected
and give a clear sight during cleaning activities
It is not allowed to work with the face protection up and only wearing safety glasses
It is not useful to wear safety glasses under a face protector. Operator who wear glasses under the
face protector and need to wear the glasses, this has to be safety glasses special for the operator.
Ear protection
Use ear plugs or ear muffs to protect the ear (regularly in excess of 80 dB)). Ear protection
must be worn according to ARBO, ARAB / codex guidelines.
Protection of air passages
The air passages must be protected if this can prevent possible injuries.
VE.90000-CST
Rev 1. 05-2010
Page 10 of 27
1.9
Algorithm
Order assignment /
order acquisition
Level 1
Green zone
Level 2
Green zone
Level 3–
ORANGE Zone
Acceptable
Fully-automatic
remote control
possible
Semi-automatic
operator
protection
possible
Implementation
ok
Implementation
ok
Hose catcher + Hose sleeve on
cleaning hose
ok
Implementation
Demonstrable consultation
between Contractor and
Customer
Assessment
of extra
risks
Level 4 – RED Zone
HIGHLY DISCOURAGED
Level 5 – RED Zone
HIGHLY DISCOURAGED
Level 6
FORBIDDEN ZONE
VE.90000-CST
Cleaning hose /
Extension + Special
PPE
Cleaning hose with
marking ring or lance +
Special PPE
Implementation
ok
Implementation
ok
Cleaning hose
without marking
ring
Rev 1. 05-2010
Page 11 of 27
The high pressure hose must have hose sleeves at 5 to 20 cm from
each end.
A high pressure hose with a hose sleeve may only be used with the VE.90000-CST hose
catcher.
A high pressure hose with a marking ring may NOT be used with the VE.90000-CST hose
catcher.
Always select a stopper that corresponds with the hose size. It must be impossible for the
hose sleeve to fit through the opening in the stopper.
The high pressure hose must be fitted with a hose sleeve when working at level three of the
algorithm (chapter 1.9).
The hose sleeve must absorb the impact if the hose returns unchecked.
The person operating the lance or jet hose must be able to turn the high pressure water flow
on and off with a foot pedal.
If the length of the nozzle is less than the internal diameter of the pipe or tube to be cleaned,
an extension must be attached between the hose and the nozzle that is longer that the
diameter of the pipe or tube. This is to prevent a boomerang effect.
The operator must wear effective protective clothing when working manually with a jet hose or
a lance.
Make sure that the location of the First Aid post is known so that medical help can be called in
immediately if there is an accident.
VE.90000-CST
Rev 1. 05-2010
Page 12 of 27
2.
ASSEMLY DRAWING VE.90000-CST
Figure 1: assemby drawing
* Position numbers 8 – 12 (operating handles, cables and grips), and position 16 – 17 (clamps and
storage case) are not shown on figure 1.
VE.90000-CST
Rev 1. 05-2010
Page 13 of 27
2.1
Parts list of figure 1
See drawing with position numbers on page 13.
Nr
Am o u n t
0
1
2
3
4
5
6
7
8
9
10
11
12
13
14
15A
15B
15C
15D
15E
16
17
1
1
1
1
1
2
2
1
1
2
2
1
1
1
1
1
1
1
1
2
1
VE.90000-CST
Ar t i cl e n u mb e r
VE.90000-CST
SL.09-010-CST
SL.09-020-CST
SL.09-015-CST
SL.09-030B-CS
SL.07-075B-CS
D I N 9 3 1 . M1 6 x9 0
D I N 9 3 4 . M1 6
VE.90000-8
VE.90000-9
VE.90000-15
VE.90000-17-1
SL.09-050-CST
LSR-8951
LSR-8955
RV8-28-108-85
RV8-28-108-11
RV8-28-108-13
RV8-28-108-14
RV8-28-108-28
F916
11413
De s cr ip t io n
Hose catcher complete
Assembly plate
Carriage complete
F i xe d g u i d e
Tr a n s v e r s e g u i d e
Holder with splash guard version B
H e xa g o n a l b o l t M 1 6 x 9 0 - D I N 9 3 1
Nut M16 - DIN 934
Cable assembly + elbow
Cable assembly
Handgrip
Handle + adjusting bush
Hand grip
Locking pin handgrip
Locking pin sleeve
Stopper ø8,5
Stopper ø10,5
Stopper ø12,5
Stopper ø14
Stopper ø28
Clamp
Storage chest
Rev 1. 05-2010
Page 14 of 27
2.2
Assembly drawing carriage
See part list with position numbers on page 17.
A spacer (pos 10) must
placed between the wheel
and the plate on the side
of SL.09-025-CST
Attention. Two spacers
(pos 10) must be
placed between the
plate and the wheel
on the side of
SL.09-024-CST block.
Figure 2: Car assembly
VE.90000-CST
Rev 1. 05-2010
Page 15 of 27
2.3
Assembly drawing clamp
See part list with position numbers on page 17.
Figure 3: clamp assembly
Attention. Two spacers (figure 3: number 10) must be fitted on the side of SL.09-024 (figure 3:
number 7). One spacer (figure 3: number 10) must be placed on the side of SL.09-025 (figure 2:
number 1). See figure 1 for the assembly.
VE.90000-CST
Rev 1. 05-2010
Page 16 of 27
2.4
Parts list of figure 2 and 3
See drawing with position numbers on pages 15 and 16.
Nr
Am o u n t
1
2
3
4
5
6
7
8
9
10
11
12
13
14
15
16
17
18
1
4
1
4
4
2
1
4
2
12
4
4
8
4
4
8
8
2
VE.90000-CST
Ar t i cl e n u mb e r
SL.09-025-CST
SL.09-027
SL.09-020-3CS
SL.09-020-4CS
1434
SL.09-020-6CS
SL.09-024-CST
SL.09-020-8
DIN912.M6x20E
DIN125.M12ELV
MU.F1017
DIN6799.10A2
DIN985.M12ELVZ
DIN931.M1260E
VE.90000-20
SL.09-020-16
PCMF 161820 E
DIN7991M620EL
De s cr ip t io n
Guide block under
W he e l
Plate 10mm
Eccentric clamping bolt
Spring ø1.2 - L = 60
Gear rack block
Guide block
Guide axle ø10
Socket screw M6 x 20 DIN 912
W as h e r D I N 1 2 5 - A 1 3
Slide bearing
Locking ring for axle ø10 SS
L o c k i n g n u t M1 2
Bolt M12 x 60 DIN 931
Locking ring
Distance bushing
Slide bearing
Countersunk bolt M6 x 20 DIN 7991
Rev 1. 05-2010
Page 17 of 27
2.5
Assembly drawing splashguard with holder
Figure 4: Splashguard
2.6
Parts list for holder with splashguard
Nr
Am o u n t
0
1
2
3
4
5
6
7
1
1
1
1
1
1
1
2
VE.90000-CST
Ar t i cl e n u mb e r
SL.07.075B-CS
SL.07.060B-CS
FW . 6 6 8 2 3 8 6
FW . 6 6 8 2 0 7 8
FW . 6 6 7 0 1 6 2
SL.07-061
SL.07-062
A-050
De s cr ip t io n
Complete holder with splash guard version B
H o l d e r w i t h T- p i e c e v e r s i o n B
Pipe nipple 1 ¼”
Pipe nipple 1 ¼”
Hose coupling 1 ¼
Alu tube
L e xa a n s h e e t
Seeger ring DIN 471 - 50 x 2
Rev 1. 05-2010
Page 18 of 27
3.
ASSEMBLY AND USE
1. Determine the best cleaning method and assembly option on the basis of the situation. See
the algorithm for this
2. Fluse the hose through before fixing the cleaning nozzle. Then mount the nozzle.
3a Mount the assembly plate (figure 1: number 1) onto the heat exchanger. This can be done
directly or by using the clamps (figure 1: number 16) depending on the situation.
3b. Mount the fixed guide (figure 1: number 3) on the assembly plate.
3c. Turn the eccentric clamping bolts (figure 3: number 4) so that the arrow points downwards. It
now has maximum clearance.
3d. Mount the transverse guide (figure 1: number 4) over the fixed guide (figure 1: number 3)
clearance
Squeeze with one hand the operating handle, so there is some extra clearance. Place first the
wheels on the side with the gear rack on the guiding. Turn the complete assembly on the
guiding.
Figuur 5.2: Wheel is not clamped
Figuur 5.1: Clamped wheel
3e. Turn the eccentric bolts (figure 3: number 4) so that the clearance is minimal and the carriage
(figure 3) can move easily over the transverse guide (figure 1: number 4).
3f. Check the clearance on the transverse guide (figure 1: number 4). Tighten the eccentric
clamping bolts (figure 3: number 4) if necessary.
VE.90000-CST
Rev 1. 05-2010
Page 19 of 27
3.1
Assembly direction
It is possible to mount the hose catcher in a different position as shown in figure 6 This could be
necessary if there is limited space next to the heat exchange.
This is possible in two ways:
1. The fixed guide (figure 1: number 3) can be moved over the holes in respect to the assembly
plate (figure 1: number 1)
2. The assembly plate (figure 1: number 1) can be placed in any position (0°-360°).
Placing the assembly plate (figure 1: number 1) between 0° (figure 7) and 180° (figure 8) is
recommended.
In this way less dirt from the heat exchanger will fall onto the construction.
The handgrip (figure 1: number 12) can be turned so that the operation is horizontal again for ease of
use. Take the locking clip (figure 1: number 13) out and turn the handgrip (figure 1: number 12) to the
correct position and mount the locking clip (figure 1: number 13) again. Adjustment is possible in steps
of 90°.
Figure 6: Assembly heat exchanger 90°
VE.90000-CST
Rev 1. 05-2010
Page 20 of 27
Figure 7: Assembly heat exchanger 0°
Figure 8: Assembly heat exchanger 180°
VE.90000-CST
Rev 1. 05-2010
Page 21 of 27
3.2
Selection table stopper
In t er n a l d i am et e r o f
st o p p e r
8.5mm
10.5mm
12.5mm
14mm
28mm
Ho s e t o b e u se d
4/2
5/2
6/2
8/2
1/2” – NW 13
Ar t . N r
RV8-28-108-85
RV8-28-108-11
RV8-28-108-13
RV8-28-108-14
RV8-28-108-28
Always use the splashboard.
The person operating the high pressure hose also operates the (dump-style) foot pedal!
VE.90000-CST
Rev 1. 05-2010
Page 22 of 27
4.
OPERATION
1.
Select the correct stopper for the diameter of
the high pressure hose used. Make sure that
the hose sleeve cannot pass through the
opening in the stopper. If this is the case a
smaller stopper must be chosen.
2.
Loosen the aluminum bushing and feed the
high pressure hose through it. Place a stopper
of the correct diameter over the hose between
the hose sleeve and aluminum bushing,
tighten the aluminum bushing again.
3.
Position the hose catcher so that it stands
in the required position.
4.
Slide the high pressure hose into the first pipe to be cleaned.
5.
Activate the foot pedal, so that the high pressure water can flow through. Guide the high pressure
hose by hand.
6.
The foot pedal must be deactivated when the hose reaches the end of the pipe. The high
pressure hose is now unpressurized. Pull the high pressure hose back and put the hose catcher
in front of the next pipe.
Figure 9: stopper
Repositioning in a horizontal direction is recommended because the gravity in this direction is
cushioned by the guide. This increases the ease of use.
7.
Repeat steps 3 to 7. The whole pipe bundle can be cleaned like this.
8.
Everything that has been used must be cleaned and put away neatly when the pipe bundle has
been cleaned.
Do you still have questions or comments? Do not hesitate to contact us. You could also look at our
website www.salotech.nl, or at www.sir-safe.nl for information about the SIR.
VE.90000-CST
Rev 1. 05-2010
Page 23 of 27
5.
MAINTENANCE
Inspection and maintenance should take place in accordance with planned maintenance and
inspection tasks, as described in this manual. In addition to the stated safety instructions,
locally applicable safety instructions must also be adhered to.
Only use authorized spare parts and repair methods when replacing or repairing machine
components.
Concerned personnel are only permitted to perform tasks for which they have been trained.
This applies to maintenance and operating tasks. The owner of the machine is responsible for
retaining information regarding this training. Only well-trained and qualified personnel may
operate the equipment. Operators must be aware of all circumstances that may present
themselves, so that they can react quickly and effectively in case of emergency.
Maintenance may only be carried out by authorized personnel. Respect the safety regulations
stated in paragraphs 1.3 & 1.7.
After maintenance has been carried out, the VE.90000-CST must be tested to ensure that it
can be re-used safely.
5.1
General
If you need to check key components, this may involve greasing and performing a visual
check for slacking, wear, defects, fittings, leakage etc.
VE.90000-CST
Clean the outside of the VE.90000-CST (remove dirt, dust etc.)
Check the quality of screw threads. During assembly, use teflon tape on the exposed thread.
Make sure that the teflon tape has no protruding edges.
Ensure that connections are tight by using the correct spanners.
Check the VE.90000-CST for strange noises
Rev 1. 05-2010
Page 24 of 27
5.1.1
Preventative daily maintenance
The basis used to determine the equipment’s need for maintenance, are normal operating
conditions and normal surround temperatures. If the machine is used under severe operating
conditions or other extreme conditions, the frequency of the maintenance must – together with
the manufacturer – be mutually adjusted.
Periodic maintenance is necessary to safeguard safe future operation and to keep future
malfunctions to a minimum.
1.
2.
5.2
5.3
Visually check if there are pollutants in the VE.90000-CST.
Check the following before use:
Connections for leakage.
A leaking fitting can cause a high pressure spray. Always check that there are no leaks before
starting activities.
Preventative annual maintenance
Check the wheels annually for tears and/or cracks.
Grease the wheel axles and tighten the attachment nuts if necessary.
Spare parts
Spare parts for the VE.90000-CST are available via the internal sales service at Salotech International
B.V.
Salotech International B.V.
P.O. box 1589
3260 BB Oud-Beijerland
The Netherlands
T: +31 (0) 186 621484
F: +31 (0) 186 621113
Internet: www.waterjetting.nl
E-mail: [email protected]
VE.90000-CST
Rev 1. 05-2010
Page 25 of 27
6.
MALFUNCTIONS AND REPAIRS
This chapter describes all possible equipment malfunctions. Each malfunction is accompanied by a
cause and a solution. Some malfunctions are easy to resolve while others require a particular level of
technical know-how. These are clearly distinguished.
Only suitably qualified and trained personnel may perform tasks on the mechanical system.
Make sure that the VE.90000-CST is correctly switched off before resolving malfunctions.
After the malfunction has been resolved, VE.90000-CST must be tested to ensure that it can
be
re-used safely.
Technical malfunctions may only be resolved by technically-qualified personnel. This is
marked with a letter “T” next to the solution. If a malfunction can be resolved by operators, this
is indicated by the letter “B”.
If the malfunction cannot be resolved or if there are questions, then please contact technical services
at Salotech International B.V.
After catching a hose (hose will be broken) the VE.90000 has to complete inspected before it
will be use again. Particularly the stopper will be inspected on damage.
6.1
Malfunctions VE.90000-CST
The table below provides an overview of possible malfunctions.
Malfunction
Hose catcher does not
remain in required position
Unwanted occurrences
Operation is not possible
Hose will be damaged
7.
Cause
Possible solution
- Cable has broken off
T
- Replace the cable
- Too much play on the
gear rack
- Spring is broken
- Too much clearance on
the cables
- Stopper have sharp
edges
B
- Tighten eccentric clamping
bolts sufficiently
- Replace the spring
- Adjust the cables on the
Handgrip
- Replace the stopper
T
T
B
DISASSEMBLY AND REMOVAL
If components are replaced, all old components, materials and (liquid) substances must be disposed
of in accordance with applicable environmental regulations.
VE.90000-CST
Rev 1. 05-2010
Page 26 of 27
EC declaration of conformity of the machinery
Salotech International BV
Jan van der Heijdenstraat 44
3261 LE Oud-Beijerland
Tel: + 31 (0)186 62 14 84
Fax: +31 (0)186 62 11 13
Declares with full responsibility that the product
Hosecatcher VE.90000-CST
To which this declaration is applicable, is in accordance with the following norms:
Safety of machines – Principles for risk evaluation NEN-EN ISO 14121-1 (2007).
Safety of machines – Key terms general design principles
Part 1: Key terminology and methodology NEN-EN ISO 12100-1 (2003).
Safety of machines – Key terms general design principles
Part 2: Technical principles NEN-EN ISO 12100-2 (2003).
Safety of machines – System for acoustic and optical danger signals and information signals NEN-EN
981 (1997).
Safety of machines – Signals, markings and operation
Part 2: Requirements and markings NEN-EN ISO 61310-2 (1996).
In accordance with the latest version of: Machine Directive (2006/42/EC).
Signature:
Date:
Name: P. Bekkers
(Managing director)
Place: Oud-Beijerland, The Netherlands
VE.90000-CST
Rev 1. 05-2010
Page 27 of 27