1
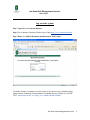
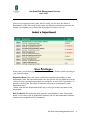
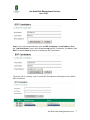
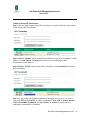
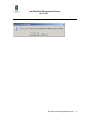
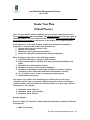
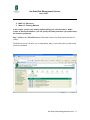
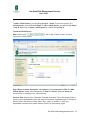
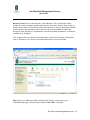
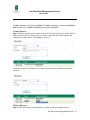
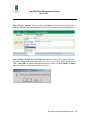
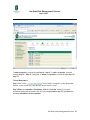
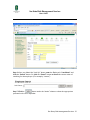
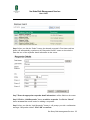
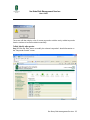
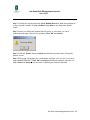
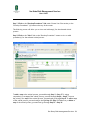
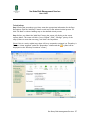
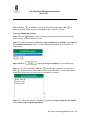
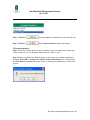
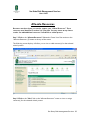
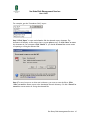
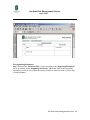
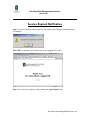
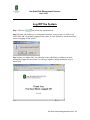
Sac State Risk Management Services
Users Guide
Sac State Risk Management Services
Business Continuity Plan System Users Guide
Table of Contents
Introduction
Log onto the system
Select a Department
User Privileges
Manage BCP Coordinators
Critical Processes
Manage Resources
Manage Responders
Develop Procedures
Allocate Resources
Supporting Documents
Submit Your Plan
Print Your Plan
Session Expired Notification
Logging Off
Be Prepared
2
3
4
4
5
10
16
19
25
30
33
38
40
44
45
46
Sac State, Risk Management Services 1
Sac State Risk Management Services
Users Guide
Introduction
A Business Continuity Plan is a written document, mandated by The Chancellor’s Office
Executive Order 1014, with specific guidelines for recovering your normal operational
procedures within a specified time frame. It is created to ensure that the capability exits
to continue essential functions across a wide range of disruptive events. With continuity, no
event can be allowed to interrupt the organization’s operations for any significant length
of time.
Everyone’s goal on this campus is to provide a safe and high quality educational
experience for our students. Any event, no matter how small, has the ability to disrupt our
job of educating students. A large scale disaster can seriously impact the ability of the
campus to continue operations at its present location for a significant period of time.
While having a plan in place does not guarantee success, it should make the disruptive
event much less, well, disruptive.
This software program was created by a Sac State student group* especially for our
campus. It will make the writing of your business continuity plan much easier and creates a
centralized location for storage of the plans. However, there are times when you may not
be able to access your electronic plan. In the last chapter, we will offer recommendations
for keeping your plan ready and available for any event that will disrupt your normal
operating procedures.
We know that writing a business continuity plan can be a difficult and time consuming
process. If you need assistance with the system or with writing your plan, please contact:
Kirtland Stout
Director, Risk Management & Business Continuity Planning
[email protected]
278-7233
*Designed and developed by Sac State Risk Management Services and students of the
College of Business Administration, Business Information Management Program: Enas
Alanisi, Annie Cheuk, Basant Gajjar, Sanjaya Nagahawatta, Vladimir Poroshin, and Carlos
Romero
Sac State, Risk Management Services 2
Sac State Risk Management Services
Users Guide
Log on to the system
Step 1. Open Microsoft Internet Explorer.
Step 2. Go to Business Continuity Planner Log-In Page: http://www.rms.csus.edu/bcp
Step 3. Enter your SacLink Username and Password*. Click “Login”.
*A Saclink account is required to use this system. If you do not have a Saclink account,
please contact Computing, Communications and Media Services (CCMS) at 916-2787337, [email protected]., or https://www.saclink.csus.edu/saclink/.
Sac State, Risk Management Services 3
Sac State Risk Management Services
Users Guide
Once you are logged into the system, the first screen you will see is the “Select a
Department” screen. There may be more then one department listed based on how the
account was originally set up. Select the department you need to work on.
User Privileges
At this point, you will be logged into the Business Continuity Planner system according to
your system privilege.
Department Head*: This is the person with full and complete responsibility for their
department’s plan. The Department Head is the only person who can submit the plan for
review. However, the Department Head may assign one or more “BCP Coordinators” to
actually write the plan. These BCP Coordinators will need to be assigned for each
department listed.
*Please note that the “Department Head” may or may not be the actual head of the
department.
BCP Coordinator: This person has been given the responsibility by their “Department
Head” to write all or part of the Business Continuity Plan for their department. Multiple
people can be assigned as BCP Coordinators.
Sac State, Risk Management Services 4
Sac State Risk Management Services
Users Guide
Manage BCP Coordinators
This can only be done by the “Department Head”.
Step 1. Click on the “BCP Coordinators” link under Department Options section.
The following screen will allow you to add, edit, and delete a BCP Coordinator.
Note: If the department does not have a BCP Coordinator assigned yet, the screen will
display a warning message asking you to designate a BCP Coordinator.
Sac State, Risk Management Services 5
Sac State Risk Management Services
Users Guide
Step 1. To add a BCP Coordinator, proceed through Step 2 – Step 6. To edit a BCP
Coordinator’s e-mail address, proceed through Step 7 – Step 8. To delete a BCP
Coordinator, proceed through Step 9 – Step 10.
To Add a BCP Coordinator:
Step 2. Click on the “
“BCP Coordinators” screen.
” link to add a BCP Coordinator on the
Step 3. After you click the “
” link, enter the Employee’s “Last
Name” and click the “Search” button. Click the “Cancel” button to cancel the current action
of searching for the employee.
Step 4. Click the “
” button under the “Action” column to select the appropriate
personnel as the BCP Coordinator.
Step 5. After you click the “Select” button, the BCP Coordinator’s First Name and Last
Name will populate to the First Name and Last Name fields on the “BCP Coordinators”
screen accordingly.
Sac State, Risk Management Services 6
Sac State Risk Management Services
Users Guide
Step 6. If not entered automatically, enter the BCP Coordinator’s e-mail address. Click
the “Add Coordinator” button when finished to add the BCP Coordinator. Or click the “Go
Back” button to cancel the process of adding the BCP Coordinator.
The screen will now display a list of current BCP Coordinators including the newly added
BCP Coordinator.
Sac State, Risk Management Services 7
Sac State Risk Management Services
Users Guide
To Edit or Delete BCP Coordinators:
Step 7. Click the “Edit” button on the “BCP Coordinators” screen to edit the e-mail address
of the selected BCP Coordinator.
Step 8. Click the “Update” button to save the modification of the BCP Coordinator’s e-mail
address. Or click “Cancel” to cancel the current action of modifying the BCP
Coordinator’s e-mail address.
Step 9. Click the “Delete” button on the “BCP Coordinator” screen to delete the selected
BCP Coordinator.
Step 10. It will prompt you a delete confirmation message: “Are you sure you want to
remove CHRISTINA A ROMERO as a BCP Coordinator?” Click “OK” to confirm deletion
of the selected BCP Coordinator. Or click “Cancel” to cancel the current action of
deleting the selected BCP Coordinator.
Sac State, Risk Management Services 8
Sac State Risk Management Services
Users Guide
Sac State, Risk Management Services 9
Sac State Risk Management Services
Users Guide
Create Your Plan
Critical Process
This is the most crucial- and most difficult- part of your plan. Critical Processes are
those essential functions that, if interrupted, will adversely impact the University’s goal of
educating students. The key is the process has to have an immediate negative effect or
serious long-term consequence to the mission of the campus if it no longer functions.
A Critical Process, or Essential Function, as defined in the Federal Preparedness
Circular 65, is a function that enables an organization to:
Provide vital or mission critical services
Exercise civil authority
Maintain the safety of the general public or
Sustain the industrial or economic base during an emergency
When writing your plan, focus on the following scenarios:
1. Local facility disruptions, typically single buildings
2. Region-wide disruptions affecting all or many government buildings in the
region
3. Disruption of a communications system
4. Disruption of access to vital records or databases
5. Disruption to availability of specialized equipment or systems, including
computing systems (other than traditional communications systems)
6. Loss of services from a vendor or another government agency
7. Unavailability of personnel
You must be very specific when identifying your critical processes. Don’t say
“hazardous waste”- that is too general. Separate the process into the critical parts
needed to make it work and clearly describe them. Each one of those steps will be a
critical process. For example:
1. Hazardous waste collection
2. Hazardous waste on-site holding
3. Hazardous waste disposal
Another example:
Don’t say “Math 101 Instruction”. Break down the specific items needed to fulfill that
critical process:
1. Math 101 Instructor
Sac State, Risk Management Services 10
Sac State Risk Management Services
Users Guide
2. Math 101 Classroom
3. Math 101 Teaching Material
In this section, you are only naming and describing your critical functions. Under
section 4- Develop Procedures- you will specify the exact procedures you need to keep
this function operational.
Step 1. Click on the “Critical Processes” link under Create Your Plan section (left side of
screen).
The following screen will allow you to add, delete, edit, or move the priority of the critical
process(es) selected.
Sac State, Risk Management Services 11
Sac State Risk Management Services
Users Guide
To add a critical process, proceed through Step 2 – Step 4. To move the priority of a
critical process, proceed through Step 5.To edit a critical process, proceed through Step 6
– Step 8. Otherwise, to delete a critical process, proceed through Step 9.
To Add a Critical Process:
Step 2. Click on the “
create new critical process.
” link on the “Critical Process” screen to
Step 3. Enter the name, description, survival time, and recovery time. Click the “Add
Critical Process” button when completed. Or click the “Cancel” button to cancel the
current action of creating a new critical process.
Survival Time: Known as the “Maximum Tolerable Downtime”. This is the length of time a
process can be unavailable before the campus experiences significant losses or disruption.
Survival time is the amount of time- hours, days, weeks, or months- in which your
department must have that specific business process up and running again.
Sac State, Risk Management Services 12
Sac State Risk Management Services
Users Guide
Recovery Time: Known as the “Recovery Time Objective”. This is the length of time
needed to recover disrupted systems and resources. How long- in hours, days, weeks, or
months- does it take to return that specific critical process to “normal” processing. Normal
processing does not necessarily mean it must be the exact procedure as before the
disruptive event, but that it is operational in some form (manual procedures vs. electronic
procedures for example).
Your critical process must be recovered before the survival of the campus is dependent
upon it. Therefore, your recovery time should be less then your survival time.
Step 4. After you clicked the “Add Critical Process” button, it will prompt you a
confirmation message: “Critical Process Added”. Click “OK” to continue.
Sac State, Risk Management Services 13
Sac State Risk Management Services
Users Guide
The screen will then display a list with the newly added critical process to indicate it has
been added successfully.
Step 5. Click the “ ” to move the priority of the critical process up or click “
move the priority of the critical process down.
” to
To make changes to a specific “Critical Process”:
Step 6. Click “Edit” button on the “Critical Process” screen to modify the details of the
selected critical process.
Step 7. Click the “Update Record” button to save the modification of the selected critical
process. Or click “Go Back” to discard the modification.
Step 8. After you clicked the “Update Record” button, it will give you a confirmation
message: “Record was Updated”. Click “OK” to continue.
Sac State, Risk Management Services 14
Sac State Risk Management Services
Users Guide
Step 9. Click the “Delete” button to delete the selected critical process on the “Critical
Process” screen. (For example, “Test Critical Process”)
Sac State, Risk Management Services 15
Sac State Risk Management Services
Users Guide
Manage Resources
Resources are those items which are needed to support your “Critical Processes”. As a
reminder, “Critical Processes” are those business processes that, if interrupted, will
adversely impact the University’s goal of educating students.
The “Resource Type” has been pre-populated. Please try to fit your department
resource into one of the available categories. However, if your resource will not fit
into any of the existing categories, please contact Kirtland Stout at x87233 or
[email protected] to request a new “Resource Type”.
You can return to this section at any time to add additional resources as needed.
Manage Resources
Step 1. Click on the “Resources” link under Create Your Plan section or the “Resources” (2)
button at the top of the screen.
The following screen display will allow you to add, delete, or edit resource(s) selected.
Sac State, Risk Management Services 16
Sac State Risk Management Services
Users Guide
To add a resource, proceed through Step 2. To edit a resource, proceed through Step 3 –
Step 4. Otherwise, to delete a resource, proceed through Step 5.
To Add a Resource:
Step 2. Select a resource type from the drop down list on the “Resources” screen. Enter a
name and description of the resource you want to add. Click the “Add” button when
completed to add resource. (For example, “A Test”)
The following screen will display a list of the current resources with the newly added
resource.
To Edit a Resource:
Step 3. Click “Edit” button on the “Resources” screen to edit the selected resource.
Sac State, Risk Management Services 17
Sac State Risk Management Services
Users Guide
Step 4. Click the “Update” button to save the modification of the selected resource. Or
click the “Cancel” button to cancel the current action of modifying the selected resource.
Step 5. Click the “Delete” button to delete the selected resource. The screen will prompt
you with a delete confirmation message: “Are you sure you want to delete the resource A
TEST?” Click “OK” to continue deleting the selected resource. Or click “Cancel” to cancel
the current action of deleting the selected resource.
Sac State, Risk Management Services 18
Sac State Risk Management Services
Users Guide
Manage Responders
The third step in writing your plan is to add responders. Responders are those people
within your department or immediate “family” that will have an assigned
responsibility in your business continuity plan. Responders will typically be the staff,
faculty, and administrators who work in your department. Any employee who will
have a job to do during a disruptive event should be listed here. You can return to this
section at any time to add additional personnel as needed.
When you add responder (employee) details, be sure to use their home address and
phone number. In a large scale emergency- especially one involving loss of
communications- there may be a necessity to respond to the homes of key personnel.
This information will remain confidential and protected.
Manage Responders
Step 1. Click on the “Responders” link under Create Your Plan section (left side of screen)
or the “Responders” (3) button on the radio button menu at the top of the screen.
The following screen will display to allow you to add, delete, or edit responder(s)
selected.
Sac State, Risk Management Services 19
Sac State Risk Management Services
Users Guide
To add responders, proceed through Step 2 – Step 9. To edit a responder, proceed
through Step 10 – Step 12. Otherwise, to delete a responder, proceed through Step 13 –
Step 14.
To Add Responders:
Step 2. Click on the “
” link to add a responder on the “Responder
Details” screen. Otherwise, skip this step and proceed to step 7.
Step 3. Enter the responder’s First Name, click the “Look Up” button if you need
assistance finding the responder. Skip this step and proceed to step 7 if you have the
detailed information of the responder.
Sac State, Risk Management Services 20
Sac State Risk Management Services
Users Guide
Step 4. After you clicked the “Look Up” button, enter the Employee’s “Last Name” and
click the “Search” button. Or click the “Cancel” button to cancel the current action of
searching for the employee. (For example, “romero”)
Step 5. Click the “
” button under the “Action” column to select the appropriate
personnel as the new responder.
Sac State, Risk Management Services 21
Sac State Risk Management Services
Users Guide
Step 6. After you click the “Select” button, the selected responder’s First Name and Last
Name will automatically populate on the “Responder Details” screen as shown below.
Enter the rest of the responder detail information on the screen.
Step 7. Enter the appropriate responder detail information in all the fields on the screen.
Step 8. Click the “Add Responder” button to add the responder. Or click the “Cancel”
button to cancel the current action for adding a responder.
Step 9. After you click the “Add Responder” button, it will prompt you with a confirmation
message: “Responder Added”. Click “OK” to continue.
Sac State, Risk Management Services 22
Sac State Risk Management Services
Users Guide
The screen will then display a list of current responders with the newly added responder
listed to indicate it has been added successfully.
To Edit/ Modify a Responder:
Step 10. Click the “Edit” button to modify the selected responder’s detail information on
the “Responder Details” screen.
Sac State, Risk Management Services 23
Sac State Risk Management Services
Users Guide
Step 11. Modify the appropriate fields. Click “Update Record” to save the modifications
to the responder’s details. Or click “Go Back” to go back to the “Responder Details”
screen.
Step 12. After you clicked the “Update Record” button, it will prompt you with a
confirmation message: “Record was Updated”. Click “OK” to continue.
Step 13. Click the “Delete” button to delete the selected responder on the “Responder
Details” screen.
Step 14. The screen will prompt you a confirmation message: “Are you sure you want to
delete ANNIE TESTING?” T Click “OK” to continue deleting the selected responder. Or
click “Cancel” to cancel the current action of deleting the selected responder.
Sac State, Risk Management Services 24
Sac State Risk Management Services
Users Guide
Develop Procedures
This section is where you will create step-by-step procedures for each individual
critical process.
There are four procedure types that you need to consider while creating your plan.
You may need to write a procedure for each of these situations under each critical
process.
1. People Unavailable: Your workers cannot get to the campus due to sickness, injuries, or
area damage. How will the job get done with few or no employees? Write your plans for
staff back up procedures.
2. Facilities Unavailable: Unable to access and use offices and classrooms- or worse- the
entire campus. Where will your staff work and how will you educate students? Write your
work around procedures here.
3. Emergency Action (EA Procedure): Preparedness is a crucial aspect of continuity.
What are your evacuation routes? Where does your staff meet and how do you account
for everyone? What are your procedures for sheltering in place? Use this section to write
your preparedness plans.
4. EOC Procedure (Emergency Operations Center): The EOC may be opened during a
critical event so that all crucial operations are managed from one central location. Do you
have EOC responsibilities during a disaster? If so, write your procedures here.
At minimum, a “People Unavailable” and “Facilities Unavailable” procedure should be
written for every critical process listed.
Below is a critical process we previously identified. These are the step-by-step procedures
for continuity of instruction for Math 101.
1. Math 101 Instructor- People Unavailable.
*Note- this is an example only- not a list of actual procedures. Your procedures
will be based on campus and department policies.
Sac State, Risk Management Services 25
Sac State Risk Management Services
Users Guide
Step 1. Click on the “Develop Procedures” link under Create Your Plan section, or the
“Develop Procedures” (4) button at the top of the screen.
The following screen will allow you to view and add step(s) for the selected critical
process
Step 2. Click on the “View” link on the “Develop Procedure” screen to view or add
procedure(s) for the selected critical process.
To add a step to the critical process, proceed through Step 3 – Step 5. To assign
responder(s) to a step of the critical process, proceed through Step 6 – Step 8. To move
the priority of a step of the critical process, proceed and go through Step 9. To edit a step
of the critical process, proceed and go through Step 10– Step 12. Otherwise, to delete a
step of the critical process, proceed and go through Step 13 – Step 14.
Sac State, Risk Management Services 26
Sac State Risk Management Services
Users Guide
To Add a Step:
Step 3. Select the procedure type. Next, enter the appropriate information for the Step
Description. Click the “Add Step” button to add step to the selected critical process. Or
click “Go Back” to discard adding step to the selected critical process.
Step 4. After you clicked the “Add Step” button, the screen will display as the screen
capture below. This screen will allow you to “Delete”, “Edit”, “Change” priority of the
steps (if there is more than one step), and “Add” the responders.
[Note: if this is a newly added step, there will be no responders assigned yet. Therefore, it
will show “None Assigned” under the “Responders” column and this “ ” symbol will be
displayed on the “Develop Procedures” screen.]
Sac State, Risk Management Services 27
Sac State Risk Management Services
Users Guide
Step 5. Click the “ ” to move the priority of the critical process up or click “
move the priority of the critical process down on the “Procedure” screen..
” to
To Assign/ Modify Responders:
Step 6. Click the “ ” button to assign or modify responders to the selected step of the
critical process on the “Procedure” screen.
Step 7. To assign responders(s), select the assign responder(s) by clicking on the name of
the available responder(s). (Note: To add additional responders, return to Section 3“Responders”)
Step 8. Click the “
” button to assign responder(s) to the selected step.
Step 9. To prioritize responders, Click the “ ” to move the responder up in priority or
click “ ” to move the responder down on the “Assign Responder” screen. Responders
should be prioritized by the order they are expected to respond.
Step 10. To remove the assigned responder(s), select the assign responder(s) by clicking
on the name of the assigned responder(s).
Sac State, Risk Management Services 28
Sac State Risk Management Services
Users Guide
Step 11. Click the “
” button to remove responder(s) for this selected step.
Step 12. Click the “
” button when finished assigned responder(s).
To Delete Responders:
Step 13. Click the “Delete” button on the “Procedures” screen to delete the selected step
of the critical process. (For Example: Delete the step “This is a Test.”)
Step 14. After you clicked the “Delete” button, it will prompt you a delete confirmation
message. Click “OK” to continue the deletion of the selected step of the critical process.
Or click “Cancel” to cancel the current action of deleting the selected step of the critical
process.
Sac State, Risk Management Services 29
Sac State Risk Management Services
Users Guide
Allocate Resources
Resources are those items you need to support your “Critical Processes”. These
resources were identified in section 2 of your plan. You may return at any time to
section 2 to add additional resources if needed for a critical process.
Step 1. Click on the “Allocate Resources” link under Create Your Plan section or the
“Allocate Resources (5) button at the top of the screen
The following screen display will allow you to view or add resource(s) for the selected
critical process.
.
Step 2. Click on the “View” link on the “Allocate Resources” screen to view or assign
resource(s) for the selected critical process.
Sac State, Risk Management Services 30
Sac State Risk Management Services
Users Guide
To allocate resource(s) to a critical process, proceed and go through Step 3 – Step 7.
To Add Resources:
Step 3. To assign the assigned resource(s), select the assign resource(s) by clicking on the
name of the available resource(s).
Sac State, Risk Management Services 31
Sac State Risk Management Services
Users Guide
Step 4. Click the “
” button to assign resource(s) to the critical process.
To Remove Resources:
Step 5. To remove the assigned resource(s), select the assign resource(s) by clicking on the
name of the allocated resource(s).
Step 6. Click the “
” button to remove resource(s) for this critical process.
Step 7. Click the “
” button when finished allocated resource(s).
Sac State, Risk Management Services 32
Sac State Risk Management Services
Users Guide
Supporting Documents
Step 1. Click on the “Supporting Documents” link under Create Your Plan section or the
“Supporting Documents (6) button at the top of the screen.
The following screen will allow you to add or delete supporting documents for the Business
Continuity Plan.
To add a supporting document, proceed through Step 2 – Step 4. To edit a supporting
document, proceed through Step 5 – Step 6. To Open/ Print/ Save a supporting
document, proceed through Step 7- Step 10. To delete a supporting document, proceed
through Step 11 – Step 12.
To Add a Supporting Document:
Step 2. Enter the Name and description of the supporting documents on the “Supporting
Documents” screen. Click “
selected network location.
” to find the document you want to upload from the
Sac State, Risk Management Services 33
Sac State Risk Management Services
Users Guide
Step 3. After you have selected the file to be uploaded, click “Open” to select. Or click
“Cancel” to cancel the current action of selecting a file to be uploaded.
Sac State, Risk Management Services 34
Sac State Risk Management Services
Users Guide
Step 4. Click the “Upload File” button to upload the selected file as a supporting
document for the Business Continuity Plan.
To Edit a Supporting Document:
Step 5. Click the “Edit” button on the “Supporting Documents” screen. This screen will allow
you to edit the Document Name and Description of the selected supporting documents for
the Business Continuity Plan.
Step 6. Click the “
” button to save the modification of the supporting document name
and description. Or click the “
” link to cancel the current action of modifying the
supporting document name and description.
To Open, Save or Print a Supporting Document:
Step 7. Click “Open” to open and view the selected document. The document will display
on the screen where you can print a copy. Or click “Save” to save this document in your
computer. Click “Cancel” if you decide to cancel the current action of opening or saving
the selected file.
Sac State, Risk Management Services 35
Sac State Risk Management Services
Users Guide
Step 8. To save, browse to a drive and a directory you want to save the file to. Click
“Save” to save the Status report to the destination network directory. Or click “Cancel” to
cancel the current action of saving the selected file.
Sac State, Risk Management Services 36
Sac State Risk Management Services
Users Guide
Step 9. Click “Save” to continue saving the supporting document to the designated
network directory. Or click “Cancel” to cancel the current action of saving the document
to the designated network directory.
Step 10. After you have saved the selected file, to open the file, go to “
My
Computer” to browse to a drive and a directory that you had saved the file to. Doubleclick the file “
” to open and view the file.
To Delete a Supporting Document:
Step 11. Click the “Delete” button on the “Supporting Documents” screen to delete the
selected document.
Step 12. After you click the “Delete” button, it will prompt you with a delete confirmation
message: “Are you sure you want to delete this file?” Click “OK” to continue deleting the
selected supporting documents. Or click “Cancel” to cancel the current action of deleting
the selected supporting documents.
Sac State, Risk Management Services 37
Sac State Risk Management Services
Users Guide
Submit Your Plan
Step 1. Click on the “Submit Your Plan” link under Create Your Plan section or the
“Submit Your Plan” (7) button at the top of the screen.
Note: Only the Department Head can submit the Business Continuity Plan.
The following screen will allow you to review your plan. The “ ” indicates any incomplete
procedures. You will have to correct those problems before you can submit your Business
Continuity Plan.
Submit your Plan:
Step 2. If you are the department head, you can submit your plan for Risk Management
Services to review by clicking the “Submit” button.
Sac State, Risk Management Services 38
Sac State Risk Management Services
Users Guide
Step 3. After you click the “Submit” button, it will prompt you with a confirmation message:
“Are you sure you want to Submit you plan for review?” Click “OK” to continue
submitting your Business Continuity Plan for review. Or click “Cancel” to cancel the
current action of submitting your Business Continuity Plan for review.
Step 4. After you click “OK”, your completed Business Continuity Plan will be submitted to
Risk Management Services for review. Your department status will change to “Under
Review” as shown below, and the “Select” button will be disabled.
Sac State, Risk Management Services 39
Sac State Risk Management Services
Users Guide
Print Your Plan
Step 1. Click on the “Print Your Plan” link under Create Your Plan section or the “Print
Your Plan” (8) button at the top of the screen.
To open and view the report(s), proceed through Step 3. To save a report, proceed
through Step 4 – Step 6. To save/ print supporting documents, proceed to Step 7.
Print your Plan:
Step 2. Select the report you want to use, click the “Get Report” button to open and view
the selected report.
Sac State, Risk Management Services 40
Sac State Risk Management Services
Users Guide
For example, get the “Procedures Only” report
Step 3. Click “Open” to open and view the file the selected report document. The
document will display on the screen where you can print a copy. Or click “Save” to save
this document in your computer. Click “Cancel” if you decide to cancel the current action
of opening or saving the selected file.
Step 4. To save, browse to a drive and a directory you want to save the file to. Click
“Save” to save the Status report to the destination network directory. Or click “Cancel” to
cancel the current action of saving the selected file.
Sac State, Risk Management Services 41
Sac State Risk Management Services
Users Guide
Step 5. Click “Save” to continue saving the Status report document to the designated
network directory. Or click “Cancel” to cancel the current action of saving the Status
report document to the designated network directory.
Step 6. After you have saved the selected file, to open the file, go to “
My
Computer” to browse to a drive and a directory that you had saved the file to. Doubleclick the file “
” to open and view the file.
In this case, the screen will display as follows.
Sac State, Risk Management Services 42
Sac State Risk Management Services
Users Guide
Print Supporting Documents
Step 7. Return to the “Print Your Plan” screen and click on the “Supporting Documents”
link or go directly to the “Supporting Documents” (6) screen. Click on the supporting
document you wish to view. Follow the same procedure as above to save or print a copy
of each document.
Sac State, Risk Management Services 43
Sac State Risk Management Services
Users Guide
Session Expired Notification
Step 1. If you are inactive in the system for “20” minutes, the following message prompt
will display:
Click “OK” to continue. It will redirect you to the “logged off” screen.
Step 2. You can log in again by simply clicking the “Log In Again” link.
Sac State, Risk Management Services 44
Sac State Risk Management Services
Users Guide
Log Off the System
Step 1. Click the “
” link on the top right hand side.
Step 2. System will prompt you a confirmation message: “Are you sure you want to Log
Off?” Click “OK” to continue logging off the system, or click “Cancel” to cancel the current
action of logging off the system.
Step 3. After you clicked “OK”, the following screen will display to indicate you have
successfully logged off the system. You can log in again by simply clicking the “Log In
Again” link.
Sac State, Risk Management Services 45
Sac State Risk Management Services
Users Guide
Be Prepared
Following the instructions under “Print Your Plan”, you should have a printed copy of
your Business Continuity Plan, along with saving an electronic copy on your
computer.
There are several recommendations for making sure your plan is ready and accessible
during an emergency. The more you complete, the better prepared you will be.
1. Keep a paper copy of your plan and all supporting documents in your office.
Better yet, create a “Grab and Go” binder (see below for instructions).
Make sure all employees know the location of the plan or binder.
2. Keep a paper copy, or grab and go binder, at the home of every “key”
employee. (A key employee is a member of your office who has significant duties
during an emergency or is a “back-up” to someone who does)
3. Keep an electronic copy of the plan and supporting documents on your office
computer.
4. Keep an electronic copy of the plan and supporting documents on your
department server.
5. Keep an electronic copy of the plan and supporting documents on your laptop,
which is password protected.
6. Keep an electronic copy of the plan and supporting documents on a USB drive,
which is password protected and carried with you at all times.
“Grab and Go” binder
This is a binder that contains everything you may need to continue operations during
a disruptive event. The main document contained within this binder will be the Business
Continuity Plan you created for your department. Other items you may want to include
are:
1. All “Supporting Documents” from Business Continuity System
2. Campus map
3. Area maps- useful for finding alternate routes to and from campus if the “normal”
route is inaccessible
4. Contact Numbers (vendors, outside agencies, staff, etc)- if not listed in your
Business Continuity Plan
5. Campus phone book
6. Floor plans of your building
7. Equipment instructions (if not under “supporting documents”). Useful if the employee
who normally operates a piece of equipment is not available.
Note: part of
your work-around procedures should include proper training for all back-up
Sac State, Risk Management Services 46
Sac State Risk Management Services
Users Guide
employees in the safe operation and use of equipment. No employee should use
equipment- even in an emergency- if they have not been properly trained to do
so.
8. Purchasing: copies of fiscal year purchase orders, written instructions for the
purchase of supplies, procurement card information, hard copy requisition form,
hard copy direct payment form, etc.
9. Payroll: hard copies of all employee time sheets, list of employee ID numbers,
hard-copies of student time sheets.
10. General Forms: hard copies of any form your department uses that is not included
in “supporting documents”.
11. Procedures: department specific written policies and procedures if not included in
“supporting documents”.
Any procedure that is completed electronically should have a manual back-up
procedure. Key employees should be trained in this manual procedure and all
instructions and forms relating to that process should be included in your plan.
Sac State, Risk Management Services 47