1
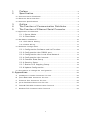
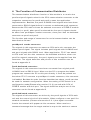
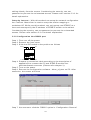
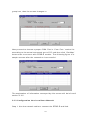
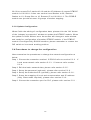
DTBR-E Ethernet
Communication
Distributor
User’s Manual
FATEK AUTOMATION CORP.
3/13/2002
Ver. 1.2
1.
2.
Preface . . . . . . . . . . . . . . . . . . . . . . . . . . . . . . . . . . . . . . . . . . . . . . . . . . . . . . . . . . . . . . . . . . . . . . . . . . . . . . . . . . . . . 2
Specification . . . . . . . . . . . . . . . . . . . . . . . . . . . . . . . . . . . . . . . . . . . . . . . . . . . . . . . . . . . . . . . . . . . . . . . . . . . . 3
2.1 Communication Distributor ...............................................................3
2.2 Ethernet Serial Interface .................................................................3
2 . 3 C o m m o n Sp e c i f i c a t i o n s . . . . . . . . . . . . . . . . . . . . . . . . . . . . . . . . . . . . . . . . . . . . . . . . . . . . . . . . . . . . . . . . . . . 3
3.
4.
5.
Outline . . . . . . . . . . . . . . . . . . . . . . . . . . . . . . . . . . . . . . . . . . . . . . . . . . . . . . . . . . . . . . . . . . . . . . . . . . . . . . . . . . . . . . 4
The Function of Communication Distributor . . . . . . . . . . . . . . . . . . . 5
The Function of Ethernet Serial Converter . . . . . . . . . . . . . . . . . . . . . 6
5.1Application Architecture....................................................................6
5.1.1 Server Mo de . . . . . . . . . . . . . . . . . . . . . . . . . . . . . . . . . . . . . . . . . . . . . . . . . . . . . . . . . . . . . . . . . . . . . . . 7
5.1.2 Cli e nt Mod e . . . . . . . . . . . . . . . . . . . . . . . . . . . . . . . . . . . . . . . . . . . . . . . . . . . . . . . . . . . . . . . . . . . . . . . . 8
5 . 2 H a r d w a r e I n s ta l l a t i o n . . . . . . . . . . . . . . . . . . . . . . . . . . . . . . . . . . . . . . . . . . . . . . . . . . . . . . . . . . . . . . . . . . . . 1 0
5.2.1 DIP Switch Setting ............................................................... 10
5 . 2 . 2 C a b l e W i r i n g . . . . . . . . . . . . . . . . . . . . . . . . . . . . . . . . . . . . . . . . . . . . . . . . . . . . . . . . . . . . . . . . . . . . . . . 11
5 . 3 S o ft w a r e C o n f i g u r a t i o n . . . . . . . . . . . . . . . . . . . . . . . . . . . . . . . . . . . . . . . . . . . . . . . . . . . . . . . . . . . . . . . . . . 1 2
5.3.1 Con figura tion So ft ware and i ts F u nction . . . . . . . . . . . . . . . . . . . . . . . . . . . . 1 2
5.3.2 Con figura tion thru RS23 2 port . . . . . . . . . . . . . . . . . . . . . . . . . . . . . . . . . . . . . . . . . . 1 3
5.3.3 Con figura tion thru Local Are a Net work . . . . . . . . . . . . . . . . . . . . . . . . . . . . . . 1 4
5.3.4 Con figura tion thru Int ernet . . . . . . . . . . . . . . . . . . . . . . . . . . . . . . . . . . . . . . . . . . . . . . . . 1 5
5.3.5 Co mmo n Da ta Setu p . . . . . . . . . . . . . . . . . . . . . . . . . . . . . . . . . . . . . . . . . . . . . . . . . . . . . . . . . 1 6
5.3.6 S ec uri t y Set u p . . . . . . . . . . . . . . . . . . . . . . . . . . . . . . . . . . . . . . . . . . . . . . . . . . . . . . . . . . . . . . . . . . 1 8
5 . 3 . 7 Sta ti o n & I P m a p p i n g S e t u p . . . . . . . . . . . . . . . . . . . . . . . . . . . . . . . . . . . . . . . . . . . . . . 1 9
5.3.8 Upd ate Con fig uratio n . . . . . . . . . . . . . . . . . . . . . . . . . . . . . . . . . . . . . . . . . . . . . . . . . . . . . . . . 2 1
5.4 Procedures to change the configuration .......................................... 21
6. Appendices . . . . . . . . . . . . . . . . . . . . . . . . . . . . . . . . . . . . . . . . . . . . . . . . . . . . . . . . . . . . . . . . . . . . . . . . . . . . . . . . . . . . 2 2
A
port0&port1 Combo-Connector Pin-Out ........................................... 22
B
port0 Dedicated Connector Pin-Out ................................................ 22
C
Ethernet Port Connector Pin-Out .................................................... 22
D
port2 Dedicated-Connector Pin-Out ................................................ 23
E
FA C O N / T C P / U D P C o m m u n i c a t i o n P r o t o c o l . . . . . . . . . . . . . . . . . . . . . . . . . . . . . . . . . . . . . . 2 3
F
Modbus/TCP Communication Protocol ............................................. 23
1
1. Preface
The network communication with its flexible connectivity and mobility can
easily penetrate the barrier of the information island. Though at early
days, most of the network systems are deployed in commercial
environment, but as the evolution of the manufacture technology, the
requirement of CIM/CAM is prevailing. To reach this goal how to provide a
reliable and accessible medium is a key. Because the network
communication has the characteristics as demand, so can be found
nowadays in the industrial segment and used to bridge the communication
between the management level and field level. To meet this trend, FATEK
provides a Network interface module DTBR-E, which is an economic and
effective network solution for FACON FB-PLC.
Besides the network function, DTBR-E also is a serial communication
distributor for port0 and port2.
The function block of the DTBR-E module is shown at below.
RS-485
(Port 2)
ETHERNET
(Port 1)
或
(Port 2)
D + D FG
9
8
7
6
5
4
3
2
1
E
TN
HE
ET
R
RR
SS
Gnd
24
38
25
Vcc
DB-15M
15
14
RS-232
(Port 0)
RS-232
(Port 1)
+
HCMOS
(Port 0)
9
8
7
6
15
14
13
12
11
10
9
5
4
3
2
1
R
S
2
3
2
13
Vcc
H
C
M
O
S
Gnd
8
7
6
5
4
3
2
1
2
12
11
10
9
8
7
6
5
4
3
2
1
2. Specification
2.1 Communication Distributor
Communication Port
S i g n a l L e ve l
C o n n e c t o r Typ e
port0, port1 combo-port
port0 – HCMOS, port1 – RS232
DB15 Female
port0 port
RS232
DB9 Female
port2 port
RS485
3 p i n Te r m i n a l B l o c k
2.2 Ethernet Serial Interface
Characteristics
Description
1 0 B a s eT, I E E E 8 0 2 . 3
Network Interface
Tra n s m i s s i o n
Protocol
TC P 1 , U D P, I P, A R P
Application Protocol
FA CO N / TC P 1 / U D P, M o d b u s / TC P 2
In d i c a t o r s
L i n k L E D, Tra n s m i t L E D
Re c e i v e L E D
Signal Connector
DB9 Female Connector
C P U C o n n e c t e d Po r t
port1(RS232) or port2(RS485)
S e c u r i ty M e c h a n i s m
Authorized IP
C o n f i g u ra t i o n To o l
W i n d o w s - b a s e d c o n f i g u ra t i o n s o f t w a r e
TC P 1 C o n n e c t i o n s
Max. 8 connections simultaneous
Note
1
: O n l y D T B R - E w i t h f i r m w a r e v e r s i o n a ft e r V 1 . 3 ( i n c l u d e ) s u p p o r ts T C P
Note
2
: O n l y D T B R - E w i t h f i r m w a r e v e r s i o n a ft e r V 1 . 5 ( i n c l u d e ) s u p p o r ts
M o d b u s / T C P.
2.3 Common Specifications
Characteristics
Description
Current Consumption
5V 200mA from CPU
Dimension
140x48x73mm (LxWxD)
3
3. Outline
The outline of DTBR-E module is shown at right
and described at follow:
1 E t h e r n e t c o n n e c t o r : To m e e t t h e a n t i - v i b r a t i o n
4
requirement of industrial environment, instead of
using regular RJ-45 connector but using
D - S u b c o n n e c t o r.
1
5
2 port0 connector: The signals in this
connector have been converted from
H-CMOS to RS232 level.
2
3 port0&port1combo-connector: This connector
includes the H-CMOS signals of port0 and RS232
signals of port1.
3
Normally used for connection of FP-07
t o p e r f o r m t h e s ta t u s m o n i t o r i n g a n d
p r o g r a m e n t r y.
4 port2 connector: The signal level of this connector is of RS485, which can
be driven by CPU main unit or by the control circuit of DTBR-E module.
5 Sta t u s i n d i c a t o r s : T h e L E D i n d i c a t o r s a r e u s e d f o r i n d i c a t i n g o f n e t w o r k
a c t i v i t y. W h e n t h e w i r i n g t o H u b o f t h i s m o d u l e i s p r o p e r l y c o n n e c t e d t h e r e d
L N K L E D w i l l b e l i t . W h e n e v e r d e t e c ts t h e s i g n a l d r i v e n b y o t h e r m o d u l e t h e
green RX LED will be lit. Whenever there has a message transmitted by this
module, the red TX LED will be lit.
4
4. The Function of Communication Distributor
The communication distributor function of this module is to re-wire the
port0 and port2 signals mixed in the CPU communication connector to the
respective connectors for port0 and port2 to ease the application
implementation. Besides, the port0 H-CMOS level signals also have been
converted to RS232 signal before it connect to dedicated port0 connector.
Because the CPU main unit can be selected to connect to DTBR-E module
with port1 or port2, when port2 is selected the free port1 signals should
be taken from port0&port1 combo connector, since port1 has no dedicated
connector as port0 and port2.
The function and usage of connectors for serial communication can be
described as follows
port0&port1 combo connector:
The signals in this connector are same as CPU main unit connector but
without port2 signal. The signal includes port0 signals with H-CMOS level
and port1 signals with RS232 level. When application, FP-07 can attach
to CPU main unit thru this connector. As described at before, when use
port2 for network connection, the port1 signals can be applied from this
connector. The signal definition and pin-out of this connector can be
found at appendix A.
Port0-dedicated connector:
The signals in this connector have been converted from original port0
H-CMOS level to RS232 level. When use the PC to program the ladder
program can connect the PC to this port directly. It must be pointed out
that when FP-07 connects to port0&port1 combo connector, this connector
is disabled. Besides the main function described as above, port0 can also
be used for network configuration. When the setting of DIP switch is at
configuration mode(Please refer section 5.3.2) can talk with CPU of
DTBR-E module with this port. The signal definition and pin-out of this
connector can be found at appendix B .
port2-dedicated connector:
The signals of this connector are driven by the port2 signals of CPU main
unit and the control circuit of this module. When configure to use port2 for
network connection (Please refer section 5.2.1) the signal converted
from/to the network will appear at this connector. When receive a
command message that the target station is map to the station at remote
5
(Please refer section 5.3.7) the control circuit in this module will convert
the command message and send it to the network.
If configure the port1 for network connection, this connector can be used
as normal port2. The signal definition and pin-out of this connector can be
found at appendix D.
5. The Function of Ethernet Serial Converter
The principle of Ethernet serial converter is to take this module as
medium and receive all the messages intend to the PLC covered by this
module from network then convert to the serial signal that can be
accepted by PLC and transmit it thru port1 or port2. The operation is
completely transparent, in other words, The CPU cannot distinguish the
message is from local or network, the reply message is the same with
normal RS232communication. When the DTBR-E module receives the
reply message of PLC will pack the message into network data packet
then send it to the network . It must emphasis here that the network
environment is complicated and not adequate for real time data transfer
and can be use mainly for monitoring but not for control. The main reason
to use the network for factory communication is for its connectivity. The
application, which required to access one processor at same time by
multiple clients, previous was difficult to implement by RS232 and RS485
can now easily achieve by network solution .
5.1Application Architecture
Base on the different requirements of network application this module
provides two operating modes –Server Mode and Client Mode.
When operates at server mode, the DTBR-E module will wait for the
message coming from the network. After decode the received message it
will send the message thru serial port to the PLC main unit. The reply
message from the PLC will intercept by this module and packed into data
packet then transmit to the network hence complete a server mode
transaction.
When operates at client mode, the DTBR-E module will wait for the
message coming from the serial port. If the received message is for the
PLC located at the remote site connected by network, the DTBR-E module
will pack the message into data packet for network transmission and send
6
it to network. After send the message to network the DTBR-E module will
wait for the reply message coming from network, when it receives the
reply message it will direct the message to serial port for PLC hence
complete a client mode transaction. The network connection of DTBR-E
module depicted in the figures at following chapter, for clarity, will only be
drawn by a direct link. Actually the network interface of the DTBR-E is
10BaseT, which should attach with Hub in order to connect with network.
5.1.1 Server Mode
When operates at server mode, the single PLC connected with
RS232 interface or the stations connected by RS485 are all work at
slave mode, which will wait for command message passively and
reply the command. Follows are example of server mode application
This is the simplest server mode
Station A
a p p l i c a t i o n . Wo r k s ta t i o n A a n d
Station B
w o r k s ta t i o n B a r e m a s t e r t h a t c a n
send the command message actively
to FB-PLC, Upon receiving the command
message, DTBR-E will send the
message thru the port1 to FB-PLC.
When there are more than one message
FB-CPU
intended to send to FB-PLC, the DTBR-E
module will save the additional messages
DTBR-E
into the message queue then send it to FB-PLC
in orders (Must wait for the reply message before send the next command)
t h e r e f o r e t h e r e w i l l n o c o n f l i c ts .
When work at this mode, there is no need to write any program in PLC for
operation.
Multiple PLC connection
Station A
Station B
FB-CPU
DTBR-E
FB-CPU
FB-485P2
ST. #1
FB-CPU
FB-485P2
ST. #2
7
ST. #n
Under this application architecture, The PLCs connect the DTBR-E with
the RS485 interface of port2. The work station A and work station B are
master that can send the command message actively to FB-PLC, Upon
receiving the command message from the network, DTBR-E will re-send
the message to FB-PLC thru port2 interface. When the message appears
at RS485 line, each PLC will compare the target station embed in
message against its own station ID. If the result is true then it will reply
according to the command message. The reply message will intercept by
the DTBR-E module and re-pack then send to the network. When there
are more than one message intended to send to FB-PLC, the DTBR-E
module will save the additional messages into the message queue then
send it to FB-PLC in orders (Must wait for the reply message before send
the next command) therefore will not have conflicts . When work at this
mode, there is no need to write any program in PLC for operation.
5.1.2 Client Mode
While work at client mode, the DTBR-E will wait the command message at
port1 or port2. When it finds the message is for the PLC station located at
remote site(Please refer section 5.3.7 for setting) then it will pack the
message according to the content of port mapping table and send it to the
network. After that, DTBR-E module will keep an eye on network for the
reply message. Upon receiving the reply message, the DTBR-E module
will decode the message then send back to PLC thru serial port hence
complete a client mode transaction. When work at this mode, the single
PLC connected by RS232 interface or the master station of PLC LINK
connected by RS485 interface are all operated at master mode, which
means it use LINK instruction mode0 to send the command actively. The
client mode also can be further divided into standard mode and virtual
server mode. Explanation as follows
5 . 1 . 2 . 1 Sta n d a r d C l i e n t M o d e
When work at this mode, the master PLC connected with DTBR-E module
can use L INK inst ru ction mo d e0 send t he co mma nd messa ge to othe r PL C.
The target PLC that master PLC intend to command can be a local slave
PLC connected by RS485 interface to master PLC or a PLC located at
8
remote site with sever mode DTBR-E connection. There is a “Station to
network address translation table” in the DTBR-E module when work at
client mode. This table includes the information about the mapping of
local station and remote station, the user should set this table according
to the actual application deployment (Please refer section 5.3.7 for table
setting). While operation, the DTBR-E will constantly inspect the received
message, if the station number in the message can be found in the
translation table that means the message is going to route to network, the
DTBR-E module will first replace the station number in message
according to the translation table then re-calculate and update the check
sum of translated message and encapsulate it in network data packet and
finally send it to the network. After received the reply message from
network, the DTBR-E module will perform the translation of message at
the reverse order. First it will replace station number in message to the
original station number and then re-calculate and update the check sum
of message then send it to serial port. A standard client mode network
application is shown as follows.
Station A
FB-CPU Group #2
Server Mode
FB-485P2
ST. #1
DTBR-E
Client Mode
ST. #n
ST. #2
FB-485P2
ST. #1
FB-485P2
FB-485P2
ST. #n
ST. #2
FB-CPU Group #1
In the above figure, there are two groups of PLC. The PLCs in each group
are linked together by RS485 interface and then attach to a DTBR-E
module for network accessibility. The station number 1 of group 1 is a
master PLC, which not only can command the other PLCs of same group
but also can access the PLCs of group 2 with the help of two DTBR-E
bridging. The DTBR-E module attached to group 2 PLC is configured as
server mode, which means all the PLCs cover by this module are work as
slave PLC and wait for the command passively. It must emphasis that the
9
PLCs under standard client mode DTBR-E module can’t access by other
master devices thru network communication. The role of this kind of
DTBR-E module is very similar to Fire Wall. Only the messages from
inside or the corresponding reply messages can be accepted by DTBR-E
module, other messages will be blocked. The security of client mode
operation is very high. Based on the reason described above, the
workstation A can only access the PLCs of group 2 . It’s noted that, from
the view point of master PLC, the station number of station #2 of group 2
is not 2, otherwise it can’t distinguish it from the local station of #2. This
can be overcame by the introduction of translation table.
5 . 1 . 2 . 2 Vi r t u a l S e r ve r M o d e
Though high security is the key feature of standard client mode, can’t
accessed by other devices thru network is also a drawback. To take the
balance between the security and connectivity, the DTBR-E provides a
virtual server mode to meet the both end. While working at this mode, the
DTBR-E module emulates a PLC with station number of 255. There are
only R0~R1999 can be accessed of this virtual PLC. When the command
message is for station 255, the DTBR-E will interpret the message and act
upon that message; this is true for all the messages whether it comes
from serial port or from network. The DTBR-E module act as a medium,
the status of PLCs can store in it for outside world access. The outside
world can put the command status in it for PLCs access. The virtual
server mode is an option for client mode DTBR-E, which means while act
as virtual server the master PLC still can access the slave PLCs that
attached to network.
5.2 Hardw are Installation
5.2.1 DIP Sw itch Setting
When remove the front cover of DTBR-E module can see a DIP switch
(SW1) with 4 switches shown at below. The setting of this DIP switch
explains at follow
NOR
P1
The switch can be divided into two groups,
1-2 is a group, 3-4 is another group.
1 2 3 4
When all the switches of 1-2 all set to ‘CFG’ position
, the DTBR-E is work at configuration mode. At this
mode can setup the network configuration of
10
CFG
P2
DTBR-E thru port0 (Please refer section 5.3.2) .
Normally the 1-2 switches should all set to ‘NOR’ position.
3-4 switches can be used to select the serial port for PLC connection.
When the switches 3-4 all set to ‘P1’ position, the DTBR-E module will
communicate with PLC by port1 interface. When the switches 3-4 all set
to ‘P2’ position, the DTBR-E module will communicate with PLC by port2
interface.
The DIP sw itch is set in factory before shipment as follow s:
1-2 at ’NOR’ position, 3-4 at ’P1’ position.
5.2.2 Cable Wiring
Serial Communication distributor:
Please refer Appendix A, B, D for the signal names and pin-out of port0,
port2 dedicated connector and port0&port1 combo connector.
Netw ork Connection:
There are two accessory connector come with DTBR-E module. One is
solder type D-sub 9-pin male connector the other is a gender changer of
DB9 to RJ-45. It’s strongly recommended to use the D-sub connector
while application, which has a better performance on anti-vibration. Only
considering the convenience or for test purpose can use the gender
changer of DB9 to RJ-45.
Please use the CAT5 UTP (un-shielded twisted pair) cable for network
connection. The best recommendation is using the CAT5 STP(shielded
twisted pair) cable 。
The wiring of cable to DB9 male connector is listed as below.
Wire Color
White+Orange
Orange
White+Green
Green
DB9 Pin No. RJ-45 Pin No.
1
1
2
2
3
3
6
6
Please refer appendix C for the signal names and pin-out of network
connector.
11
5.3 Softw are Configuration
5.3.1 Configuration Softw are and its Function
T h e r e i s a a c c o m pa n y s o ft w a r e ”dtbre_cfg.exe” to aid the configuration of
DTBR-E module. This software is a windows-based software and has following
functions:
Basic module Information setup- Includes IP (Network address),
gateway, netmask, baud rate, operating mode, module name, module
description.
Security setup- Setup authorized IP. With this function, only the
command message issue by the host with authorized IP can be accepted
by DTBR-E module. Hence can prevent the unintended access and keep
the system secure. There are 10 set of IP group can be set. Each group
can contain one or more consecutive IPs.
Local station to remote station mapping- The operating of FB-PLC
networking is purely transparent. When access the remote slave PLC by
executing the LINK instruction of mode0 and with the help of DTBR-E
module, the master PLC does not know the remote PLC is connected by
network. In other words, the maximum number of slave station is still 254.
When DTBR-E module work at client mode, in order to translate the local
station into remote station, must first setup the translation table.
Considering the convenience for variety application, there are three
methods can be used to setup the network configuration.
Setup by RS232 interface - This kind of setup is thru port0-dedicated
connector. It should first set the DIP switch (Please refer section 5.2.1) to
proper position before can perform the setup. With this method can set
the configuration without password, so when the password is missing can
use this method to fixed it. Please refer section 5.3.2 for further
explanation.
Setup by local area netw ork – This is the most convenient method for
network configuration. When operating, the configuration software will
scan all the DTBR-E modules attached to the network. All the scanned
DTBR-E modules will be shown in the table on the screen with the
regarded basic information. The user can pick the DTBR-E module to be
12
editing directly from the screen. Considering the security, can set
password to prevent the unintended access. Please refer section 5.3.3 for
detail explanation.
Setup by Internet – With this method can setup the network configuration
thru Internet. Most often is used to setup the station mapping or
authorized IP. While use this method, can only setup one DTBR-E at a
time and must specify the IP address of DTBR-E module to be edited.
Considering the security, can set password to prevent the unintended
access. Please refer section 5.3.4 for detail explanation.
5.3.2 Configuration thru RS232 port
Step 1. First turn off the power.
Step 2. Remove the front cover.
Step 3. Slide the DIP switch to the position as follows
NOR
P1
1 2 3 4
CFG
P2
Step 4. Prepare a connection cable according to the description of
appendix B to connect the PC and DTBR-E module thru
port0-dedicated connector (Please refer chapter 3).
Step 5. Turn on the power.
Step 6. Execute the configuration software - dtbre_cfg.exe on PC. After
execution, the screen will show
Step 7. Use mouse to click the ’RS232’ option in ’Configuration Channel’
13
group box, then the screen changes to
Now proceed to choose a proper COM. Port in ’Com. Port:’ combo list
according to the actual connected port of PC and then click ’Get Map’
button start to connect with DTBR-E module. The following figure is a
sample screen after the connection is successful.
The explanation of information conveyed by this screen will be left until
section 5.3.5.
5.3.3 Configuration thru Local Area Netw ork
Step 1. Use the network cable to connect the DTBR-E and Hub.
14
Step 2. Connect the PC to network and execute the software dtbre_cfg.exe . Use the mouse click the ’Intranet’ option in the ’Configuration
Channel’ group box, then the screen changes to
Click the ’Scan Map’ button then start the scanning of DTBR-E module. All
the modules detected will be shown in the table. The remaining
procedures will be left until section 5.3.5.
5.3.4 Configuration thru Internet
Step 1. Connect the DTBR-E module and Hub with twisted Ethernet cable.
Step 2. Connect the PC to network and execute the network configuration
software - dtbre_cfg.exe. Use the mouse point to the ’Internet’ option
buttons within the ’Configuration Channel’ group box and click it then
the screen will be shown as below
15
At this time can input the remote IP address of the DTBR-E module
desired for configuration. After click the ‘Get Map’ button, it will start to
connect DTBR-E module. When the connection is established will show
the information regard the connected DTBR-E module in the table at the
middle of window.
5.3.5 Common Data Setup
Whenever the connection is established, it will show the information
rega rd the conn ecte d DT BR-E mod ule i n th e ta bl e at t he middle of wi ndow,
no matter what the connection method is selected. At that time, can
double click the line where the desired DTBR-E is located or single click
the line and click ’Properties..’ button to perform the configuration. If
configured by RS232 or password not setting or correct password were
entered will show the screen as below
Follows are the description of each field shown in above
Firmw are Version: Denotes the software version of DTBR-E module for
configuration.
IP Address: IP address of DTBR-E module for configuration.
Subnet Mask: Subnet mask of DTBR-E module for configuration.
Gatew ay: The IP address of gateway for DTBR-E module for
configuration.
Host Name: For documentation, can be used to distinguish DTBR-E
module. At most can consist of 11 characters.
16
Com men t : For d ocu me ntation , can be u s ed to dis tinguish DTBR-E mo dule.
At most can consist of 21 characters.
Operation mode: Client or server mode selection.
Protocol: There are two communication protocols were supported in this
module. Modbus or Facon. Modbus can be choosed only when the
operation mode is set to Server mode while the Facon mode can be used
in both modes.
Baud Rate: Communication speed between DTBR-E and PLC with 9600,
19200 and 38400 bps three options 。
Remote Config. Enabled: For security, when this option is checked will
allow the configuration thru the Internet. It must be checked when intent
to configure the network configuration according to the method described
in section5.3.4. It’s strongly recommended to set the password when
enable the remote configuration to prevent the leakage of security hole.
Please leave this option un-checked if remote configuration is not
necessary.
Import-Export button: Can use the Export function to save entire setup
data of DTBR-E module to file or use the Import function to retrieve the
setup data stored in file to ease the editing job of configuration.
The contents enclose in the box at below can be skipped for the beginner
Advanced Setup: This setting can only need to be performed when at
server mode, click ’Advance Setup’ button to start setup and the screen
will be shown
Message Time Out: The time-out time for PLC, the default setting is
300ms. DTBR-E module will wait for the same amount time of this field
before the PLC can reply the command message.
Transaction delay: The minimal delay time for DTBR-E to send the next
command message after it receives a reply message from PLC. The
default setting is 0ms. This setting is used for the applications that
connect multiple PLCs with diverse scan time by RS485.
17
5.3.6 Security Setup
For security of DTBR-E operation, besides the disable/enable control of
remote configuration, also provides following measures to work with
Passw ord Protection- Continues from last screen, click the ’Password’
tab to set the password. The screen changes to
Please input the new password at ’New Password’ and ’Confirm Password’
edit field and click the ’Change’ button to complete the setting of new
password. Please click the ’Remove’ button if password protection is not
necessary.
The setting of access right- Use the setting of authorized IP to prevent
the illegal access of data. After click the ’Access Control’ tab, the screen
changes to
Move the cursor to the ‘Grant IP’ table and click the right mouse button
18
then the screen will appear a pop-up menu as shown below
Click ’Add’ to add one set of authorized IP. Click ’Del’ to delete a set of
authorized IP. Click ‘Edit’ to modify an existed authorized IP data. After
click the ’Add’ function the screen changes to
With this dialog to define a set of consecutive authorized IP addresses.
Please input the first IP address of the consecutive IP addresses in
the ’Grant IP’ field and input the size of IP addresses in ‘Group Size’
filed.
5.3.7 Station & IP mapping Setup
This setting can only need to perform when DTBR-E module is work at
client mode. When the working mode is set to client mode the basic
configuration data page changes to
It has an additional ‘Port Mapping’ tab when compare with server mode,
19
after click the ‘Port Mapping’ tab the screen changes to
Move the cursor to the table locating in the center of window then click
the right mouse button then the screen appears a pop-up menu as shown
below
Click ’Add’ to add one station mapping data. Click ’Del’ to delete a station
mapping data. Click ‘Edit’ to modify an existed station mapping data. After
click the ’Add’ command the screen changes to
Following are the description of each field shown in above
Local Station:
The station number of local PLC
Remote Station: The station number of remote PLC
Remote IP: The IP address of DTBR-E module connected by the remote
PLC.
Group Size: With execute this dialog once can define a group of station
mapping, for example, if we want to map the local PLC station number
20
20~29 to remote PLC station10~19 and the IP Address of remote DTBR-E
module is 192.168.1.3 then can set the Local Station to 20, Remote
Station to 10, Group Size to 10, Remote IP to 192.168.1.3. The DTBR-E
module can provide at most 19 groups of station mapping.
5.3.8 Update Configuration
When finish the editing of configuration data, please click the ’OK’ button
of the “adaptor ’s properties” window to update the DTBR-E module. When
the update is finish without error the screen will change to main window
and ready for configuration of another DTBR-E module. If the DTBR-E
module is configured by RS232 interface, please remember to restore the
DIP switch to its normal working position.
5.4 Procedures to change the configuration
Now summarize the procedures to change the network configuration at
below.
Step 1. Choose the connection method. If RS232 refer to section 5.3.2 . If
Local area network refer section 5.3.3 . If Internet refer section
5.3.4 .
Step 2. Edit the basic network data, please refer section 5.3.5 .
Step 3. Setup the password (optional), please refer section 5.3.6 .
Step 4. Setup the authorized IP (optional), please refer section 5.3.6 .
Step 5. Setup the mapping of local and remote station and IP address
(Only client mode required), please refer section 5.3.6 .
Step 6. Choose the connection port for PLC, please refer section 5.2.1 .
21
6. Appendices
A
port0&port1 Combo-Connector Pin-Out
Type
Power
port0
port1
Signal name
Pin No.
Flow
6,13
11
15
10
9
8
12
14
1
2
3
4
Input
Output
Output
Input
Input
Output
Output
Input
GND
+5V
+24V
FG
RX0
TX0
TE0 *
EN0 *
RX1
TX1
RTS1
CTS1
Note: TE0 – ‘High’ when port0 is transmitting data.
EN0 – port0 will be disabled when this signal is ‘low’.
B
port0 Dedicated Connector Pin-Out
Type
Power
port0
C
Signal name
Pin No.
GND
RX0
TX0
5
3
2
Flow
Input
Output
Ethernet Port Connector Pin-Out
Signal Name
TX+
TXRX+
RX-
Pin No.
1
2
3
6
22
Flow
Output
Output
Input
Input
Color
White+Orange
Orange
White+Green
Green
D
port2 Dedicated-Connector Pin-Out
D+
D-
FG
D+ : TX,RX positive signal
D- : TX,RX negative signal
FG: Framing ground
E
FACON/TCP/UDP Communication Protocol
The communication protocol of FACON/TCP/UDP embeds the FACON
serial communication message in the TCP or UDP packet. The port
number used to convey the FACON/TCP/UDP message is 500.
F
Modbus/TCP Communication Protocol
The document of communication protocol of Modbus/TCP can be
accessed at the web site http://www.modbus.org . The port number used
to convey the Modbus/TCP message is 502.
23