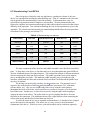
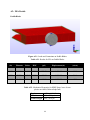
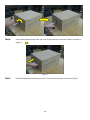
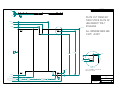
1
Paper Folding Device Team Catalyst Team Members: Alex Berger Adam Deel JD Litten Mike Mulroy Robbie Gildenblatt Brad Delaney Jared Rich Wednesday, June 10th, 2009 Paper Folding Device for the Handicapped Team Catalyst has taken it upon themselves to design and manufacture a device to assist in the task of z-folding a Wally’s & Wimpy’s Football Digest to less than 5/8” thick for a broad range of handicapped employees at SW Resources in Parkersburg, WV. We researched, designed, prototyped, tested, and refined a manually operated folding device that incorporates an automated roller all inside a safe, transportable unit. Based on team testing the device is capable of increasing production from 170 papers/hr to 240 papers/hr while also allowing workers with more severe disabilities to complete the task due to the simple operation of the machine. Table of Contents Page 1.0 Introduction…………………………………………………………..……………………..3 1.1 Initial Needs Statement……………………………………………………………………...3 2.0 Customer Needs Assessment………………..………………………………………………4 2.1 Weighting of Customer Needs……………………………...………………………5 2.2 Revised Needs Statement………………………….………………………………..6 3.0 Benchmarking, Standards, and Target Specifications…………..…………………………..6 3.1 Benchmarking……………………….………………………………………………6 3.2 Target Specifications, Constraints, and Design Criteria……….…………………..11 4.0 Concept Generation……….…….…………………………………………………………12 4.1 Problem Clarification…….…..…………………………………….………………12 4.2 Patent Searching……………………….……………………………….………….13 4.3 Concept Generation……………………………………………………….……….14 5.0 Concept Screening and Evaluation………………….…………………….……………….22 6.0 Final Design Concept…………….………………………………………….…………….24 7.0 Prototype Design, Development, and Testing……………………………….…………….26 7.1 FMEA………………………………………………………………….…………..26 7.2 Mock-ups and Experiments………………………….……………….……………29 7.3 Prototype Construction…………………………………………………………….33 7.4 Prototype Testing…………………………………………………………………..37 8.0 Final Design/Design Refinement…………………………………………………………..39 8.1 Final Design……………………………..……………………………...........…….39 8.2 Design Refinement………………………………..…………………….…………42 8.3 Manufacturing Costs/DFMA………………………………………………………43 9.0 Conclusions……………….…………………………………………………….………….44 References…………………………………………………………………………..……………45 Appendix…………………………………………………………………………………………46 A1 FMEA Worksheets…………………………………………………………………46 A2 FEA Details………………………………………………………………………...55 A3 Cost Worksheets…………………………………………………………………...61 A4 User Manual…………………………………………………………………….….66 A5 Assembly/Part Drawings…………………………………………….……………..77 2 1.0 Introduction The basis of this report is founded on the general idea that many citizens throughout the world are disabled and are seeking employment assistance. Being physically or mentally handicapped makes it difficult for individuals to perform tasks required in employment. Companies and employers have goals and objectives to meet, and many times hiring a disabled person may hinder them from reaching that goal efficiently. This poses a problem to society as all people have the basic needs of life that must be fulfilled. Many of these needs require money in order to buy goods and provide shelter but not every disabled person is capable of employment due to their handicap. In fact, in 2005-2007 only 36.7% of the U.S. population was employed that had any disability compared to the 74.6% employment rate for citizens with no disabilities (U.S. Census Bureau). The percentage of citizens employed decreases as disability severance increases. With this in mind, it has been taken upon the senior mechanical engineering class to find an achievable solution to help disabled citizens’ find/maintain/improve employment through the assistance of mechanical devices and/or processes. As engineers, we seek to improve the quality of life for all and help assist in others needs. Although no single person is capable of accomplishing all the tasks in life, we as a team, are going to take it upon ourselves to try to help disabled people in the employment environment. To assist our class in our problem solving we will be partaking in a design competition held by the National Industries for the Severely Handicapped. This organization (NISH) has specific guidelines and requires that students work with people or organizations that deal with people of severe disabilities in the employment environment. The design or task at hand must be orientated towards helping current employees improve their work skills or helping someone who is currently unemployed become employable. As the class is divided into 8 design teams, it was decided that our team, Team Catalyst, would work with a non-profit organization called SW Resources. They are located in Parkersburg, WV and hire a broad range of disabled employees in order to complete certain jobs. Many of their workers deal with packaging, mailing, sign making, and various assemblies. After continuous communication and follow up trips to SW, we decided to work with their mail department employees to formulate our project. Once the problem is clearly defined and a solution is required, the design process will begin. Not only will our team help define the problem and design a solution, but we will prototype the project and deliver it to the customer for testing and feedback. Proper changes will be made accordingly and the revisions will be made in order to give SW a working prototype that they can use for their employees. 1.1 Initial Needs Statement Society has a demanding need for assistance in the employment environment for those of the physically and mentally handicapped nature. In order to maintain or engage in active employment, those with disabilities require assistive technologies, devices, or processes. These technologies will allow them to improve efficiency, help perform certain tasks, or improve their physical abilities so that employment quality and opportunities are increased. 3 2.0 Customer Needs Assessment Team Catalyst has chosen to work with SW Resources. This company hires people with disabilities. The team is working specifically with Mail Plus, a division of SW Resources. The customer needs were collected from communication with SW Resources which included trips and emails. During these trips the team talked with Kellie Conrad and various workers in Mail Plus. The team discussed with these people the problem they are having. This problem involves the Wally’s and Wimpy’s weekly football digest, which must be z-folded and placed in an envelope. The total package must be less than 5/8 inch thick. The team observed the workers performing the task using the current solution. After this was observed the team discussed the process with the workers and found out what they liked and disliked about the current solution. The team also discussed any solutions the workers might have to the problem. After these observations and discussions the team came up with the following customer needs list. Table 2.1. Initial Customer Needs List. Flatten Papers Ability to Handle Staples Ability to Handle Various Thicknesses Increase Efficiency Safe 500/hour total process (based on unknown number of people) Fold Papers in Different Configurations Stuff in Envelope Manually Driven Using the initial customer needs list a more specific hierarchal customer needs list was created. This list shows more specific needs to better define the customer requirements. The information in this list was created using benchmarking research and the discussions with the workers at Mail Plus. 4 Table 2.2. Hierarchal Customer Needs List. 1. Flatten 1.1 5/8” thick 2. Fold 2.1 Z-Fold 2.2 Fold variability 3. Stuff in Envelope 4. Ease of Use 4.1 Manually driven 5. Safety 5.1 No sharp corners 5.2 No pinch points 5.3 No additional safety equipment required 6. Quality 6.1 Design life of machine 6.2 Finished product low failure rate 7. Speed 7.1 Maintain productivity with someone with less than 100% functionality 8. Staples 8.1 Fold with stables in paper 8.2 Flatten with staples in paper 9. Size 9.1 Fit on table top 9.2 Store easily 10. Weight 10.1 Easy mobility 10.2 Storage 11. Appearance 2.1 Weighting of Customer Needs Table 2.3 was constructed to define the importance of each requirement for the customer. These values were determined during team discussions and benchmarking. The team rated the requirements one through five with one being the least important and five being the most important. The ratings were based on the observations and discussions with the works at Mail Plus. 5 Table 2.3. Requirement Importance. Requirement Flatten Z-Fold Stuff in Envelope Ease of Use Safety Quality Fold Variability Speed Staples Size Weight Appearance Weight 5 5 5 5 5 5 2 4 4 2 3 1 2.2 Revised Needs Statement Create a low cost device for SW Resources to fold Wally’s & Wimpy’s newspapers and pack them in an envelope, focusing on ease of use to allow people with a broad range of disabilities to perform the task safely. 3.0 Benchmarking, Standards and Target Specifications 3.1 Benchmarking The entire group was given the task of searching for current solutions. Each member was responsible for finding four current solutions or ideas. Our search took place primarily on Google scholar. The research turned up many reports and patents on automated machines. While these didn’t provide any direct aid to the project, many ideas spawned from this research in some way or another. In resource 1, the device was a complex system of cams and deflectors. This system, though, was limited to only a letter sized piece of paper. 6 Resource 1 Resource 2 was a layout of different fold types. As we are looking into possibly making the fold operations more diverse within our own device, it will be important to know the different folds. Single (Half, V) fold Letter (C) fold 7 Z (Accordion) fold Double Parallel fold Half Accordion Cross Fold (Fold-out, Engineering) fold (French, Right) fold Gate fold Resource 2 Resource 3 involves a device where the paper is folded between plates that come together and compress the paper into the appropriate fold. This device is also fully encased which will satisfy a concern of safety and size. It also has a slot where the paper exits; this provides a good location for an envelope loading jig of some sort. Resource 3 Resource 4 is a device that looks as though it’s for folding long continuous strips, but it seems that it may be modifiable such that it could work with inputting something to be folded. Though it only shows it happening on one side, this may be able to be modified to do both sides. Another possibility is after its run through once, the user could grab it, flip it over, and run it through again for the other side to get the z fold. It also appears to already incorporate compressive rollers to get a good crease. 8 Resource 4 Resource 5 is an older paper folding machine found on Wikipedia. It may hold some manual devices, systems, and/or operations to aid our final design in the aspect of manual operation. Resource 5 After looking at the different resources and different automated machines, we have picked four of them to get an idea of their relative sizes, weight, cost, speed, fold variability, and if their design had the ability to handle staples or not. With comparing these specifications we could determine a comparable size, cost, and functionality needed for our project design. 9 Table 3.1. Benchmarking of Existing Paper Folding Machines. Feature Size Weight Cost Speed Staples #Sheets/fold Fold variability 207M Martin Yale P7400 10560 Dahle FD 305 20.9"x40.5"x19.5" 70 lbs. $2,339 10,500 sheets/hr no - 20"x13"x10" 20 lbs. $457 4,000 sheets/hr yes 3 12"x22"x16" 20 lbs. $259 4,000 sheets/hr yes 3 12"x5.6"x12.5" 15 lbs. $535 1,200 sheets/hr yes 3 6+ 4 4 1 Figure 3.1. Left to Right: 207M Paper Folder & Martin Yale P7400 (Officezone.com, 2008). Figure 3.2. Left to Right: 10560 Dahle & FD 305 Paper Folder (Officezone.com, 2008). 10 3.2 Target Specifications, Constraints and Design Criteria We have set target specifications based on customer specified desires for which our device must meet. The first, set by SW Resources, is that it must be capable of completing the task at a rate of 125/hour. This specification is set on the idea that this machine could account for one person on a four person team working at a rate of completing 500 in a single hour. It must fold the papers in a z-fold, a specification set by the newspaper publishing company which contracts SW Resources to perform this task. The final product, newspaper and envelope must be less than 5/8” thick in order for the post office to mail the product. SW Resources also set the specification that it must be able to handle staples. Their current machine can’t support the folding of papers with staples because the staples jam the machine and destroy the roller components. A maximum of 1% of the newspapers put through the machine are allowed to fail. Modes of failure include: an improper fold, the final product not being within specification, the paper not being inserted into the envelope correctly or at all, or the news paper could rip. Other modes of failure are to be determined. There are also criteria which our team would like to keep our design within. These include a 3’ x 3’ footprint such that the device can sit easily on a tabletop or other type of stand. The device can be no heavier than 15 lbs. This will enable easy transport and storage of the device. The design cost will be more expensive, but the manufacturing cost should be less than $150.00. This means that the labor and materials to make another device if they so choose is less than $150.00. Also, the device should be adaptable, specifically the folding section. The device will hopefully be able to support multiple folds, including but not limited to: half folds, C-folds, and others which are too be determined later. Table 3.2. Customer requirements and target specifications. Customer Requirements Flatten papers Ability to handle staples Ability to handle various thicknesses Increase efficiency General safety Target Specifications 500/hr crease rate Z-fold 5/8" max final product thickness Handle standard staples 1% failure rate 11 4.0 Concept Generation •Loaded into machine •by hand, automatically? Folding •Flatten paper to 5/8" thick •In envelope? •Z‐fold •Variable folding? •One step? Holding Envelope •Automatically? •By hand? Flattening 4.1 Problem Clarification The Flow chart above shows the four tasks that the device must complete. The first is how the paper is going to be held. There are several possibilities, but the most likely are to manually load the machine or to have some kind of feed system. The feed system could be belt driven or possibly spring fed such as a magazine for a firearm. Next is folding the paper. There is a required z-fold to meet the requirements, but if there is the ability to fold in different configurations it could open of the range of uses. The z-fold requires two main folds in opposite directions. If this could be accomplished in one step with a simple motion it could simplify the folding task for the user. The third step is flattening the folded paper until it meets the required 5/8” thickness. There are several possibilities including a manual crank, automatic rollers or some type of press. It is important to remember that if the paper is not flattened while in the envelop it needs to be flattened enough to include the envelope thickness in the overall 5/8” requirement. The last major task of the project is the envelope. The paper must be folded and placed into an envelope and still be under 5/8” thick. It is possible to fold the paper and flatten it before putting it into the envelope or it could be folded, put into the envelope then flattened. There is consideration of manually putting the folded paper into the envelope after flattening, but it is undetermined whether it will be done by hand or automatically. 12 Manual • Safe • Could cause fatigue • Faster? Electrical • Some safety issues • Motor edurance? • Complex Figure 4.1: Required Energy. There will be some type of energy to operate the device continually. The whole device could be manually cranked which would reduce any hazards of electricity, cords etc. Manually operating the device could cause fatigue in the user and slow down productivity. If some type of motor was used it would have to be safe and be able to run throughout the day, possibly continuously. 4.2 Patent Searching There were several patents researched and discovered relating to the design of our paper folding device. Several patents pertain to the actual method of folding, while others pertain subjected parts used within the system. The first patent discovered is for a folding machine that uses rollers attached by gears and is powered by a single motor. This patent can be found at http://www.freepatentsonline.com/ 4573672.html. Another patent that was discovered through research was a creasing-folding machine used to fold paper and bookbinding articles. It has a feed unit, feed path, a creasing unit and a folding unit. This patent can be found at http://www.freepatentsonline.com/5905935.html. A patent for another folding method can be found at http://www.freepatentsonline.com/ 20060089246.html. There are two paper stop drive assemblies of similar construction, each providing for the automatic positioning of the respective paper stops. In both paper stop drive assemblies, a potentiometer provides an electronic feedback to a microprocessor on the current position of a belt with the paper stop. The microprocessor then activates a motor that moves the belt with the paper stop to a new position defined by the user input. The automatically-adjustable 13 paper stops require the input from a user on the type of fold and paper, but not the user's intervention in the adjustment of the paper stops. Another patent researched was for a finisher connected to a digital copying machine that folds output paper into a z-fold. This is not quite applicable for our use but has claims for the zfolding technique. This can be found at http://www.patentgenius.com/patent/3995849.html. Another researched patent was found from http://www.patentgenius.com/patent/ 3995849.html. The machine is a sheet folding machine of the type having three elongated rollers and a pocket, said pocket having a pair of elongated lip members extending parallel to the axes of said rollers and into a space provided between two of said rollers, said lip members forming between them an elongated opening for guiding between them a sheet, such as a paper sheet or a carton, to be folded into the pocket, elements defining opposite walls of said pocket, one of the wall elements having a portion adjoining the opening of the pocket and secured to one of the lip members adjustably in a direction transversely to the opening and extending into close proximity to an entrance surface of the respective lip member, whereby the width of said opening is adjustable to different sheet thicknesses without changing the position of the lips relative to each other and to said rollers. 4.3 Concept Generation As a team, we decided to each come up with at least 2 or more conceptual designs and not discuss our ideas until we held a meeting. This would allow ourselves not to get stuck on one idea too early and roll with our first idea. This allows for 14+ conceptual designs to determine the best design to begin refining. We then had a group meeting to collaborate our ideas. As the group meeting progressed, we agreed on several ideas to incorporate in our integrated designs. Some of the initial designs that were used in integrated designs are shown below: 14 Figure 4.2: Folding template & modified paper shredder. 15 Figure 4.3: Manual folding template. 16 Figure 4.4: Rolling “assembly line” design. Figure 4.5: Folding template pushed against static wall. 17 Figure 4.6: Moveable folding wall. 18 Figure 4.7: 'Paper Clip' Holder By taking elements from various conceptual designs we were able to come up with some integrated designs shown below. The first integrated concept, shown in Figure 4.8, includes the folding template idea with a stationary wall. The paper is held down with a wire fork and then the plates are pushed together. Once folded, the compressed paper could be passed through the rollers directly into an envelope. One problem that has been discussed is the ability of the rollers to successfully grab the paper out from the folded template. This has been seen as a difficult issue to overcome, as the plates will need to be tight to assure creased edges. 19 Figure 4.8: Integrated design concept 1. The second integrated concept, shown in Figure 4.9, involves a roller system that is all driven by one wheel. It is folded in the template on tracks and is carried to the roller system and then fed to an envelope at the end of the roller. The advantage here is that all the steps are done by one control, the wheel. One problem that has been identified is difficulties in linking everything together on the same drive train. 20 Figure 4.9: Integrated design concept 2. The third idea, shown in Figure 4.10, uses a fork that is the width of the fold to grip the paper in the center. There is a spring loaded top that presses down on the fork so that when it is rotated 180 degrees it will fold the top and bottom portions of the z-fold. One problem we have discussed is being able to turn the fork while still applying enough pressure from the top to successfully compress the paper. 21 Figure 4.10: Integrated design concept 3: Box and fork. 5.0 Concept Screening and Evaluation To determine the best conceptual design, we created feasibility charts for each of the three integrated designs. The variables that were rated were how well it would flatten, fold, and stuff in the envelope, ease of use, safety, fold failure, fold variability, speed, staples, size, weight, and appearance. Each variable was rated with a number, 1 being least important and 5 being critical to our customer. These numbers were based by unanimous agreement during a group meeting. These numbers were then multiplied by a number from zero to five (in red below)— zero meaning doesn’t satisfy the requirements and five meaning exceeds requirements. This number was voted on by each member of the group and averaged. The total was then calculated for each concept. The design with the lowest number theoretically has the best potential of satisfying the customers and our needs. The three feasibility charts are shown below: 22 Table 5.1: Feasibility Chart for Integrated Design 1. Flatten 5(4) Fold Variability 2(1) Fold 5(4) Speed 4(4) Stuff in Env. 5(1) Staples 4(5) Ease of Use 5(4) Size 2(4) Safety 5(3) Weight 3(3) Fold Failure 5(4) Appearance 1(2) TOTAL 157 Table 5.2: Feasibility Chart for Integrated Design 2. Flatten 5(4) Fold Variability 2(1) Fold 5(4) Speed 4(4) Stuff in Env. 5(2) Staples 4(5) Ease of Use 5(5) Size 2(5) Safety 5(4) Weight 3(4) Fold Failure 5(4) Appearance 1(4) TOTAL 179 23 Table 5.3: Feasibility Chart for Integrated Design 3. Flatten 5(4) Fold Variability 2(3) Fold 5(3) Speed 4(3) Stuff in Env. 5(1) Staples 4(5) Ease of Use 5(2) Size 2(4) Safety 5(1) Weight 3(3) Fold Failure 5(4) Appearance 1(2) TOTAL 132 As one can see, Integrated Design 3 had the lowest total score, resulting in the most feasible design to proceed with. 6.0 Final Design Concept Figures 6.1, 6.2, and 6.3 show Solid Edge images of the final design concept. Instead of using a fork, a paddle was made using rapid prototyping software which allowed for a sturdier holding device. To make sure that the paddle is aligned correctly every time, the handle of the paddle is fixed inside the front wall and only allowed to rotate and move in and out due to a fixed pin and guide. The guide is a groove cut into the handle of the paddle which allows the fixed pin to travel in. The box is cut to exact dimensions in order to fit the paper squarely on the opposite side of insertion to minimize error and to simplify the design for the user to operate. Inside the box are two moveable plates. The lower plate is spring loaded and both plates move along four guide pins. As the paddle rotates 180 degrees, the moveable plates provide enough resisting force to crease the paper on both sides simultaneously while minimizing the input force for the user. Once folded, the user moves the paddle forward along the groove and pin, and the paper is automatically fed into rollers powered by a motor. The rollers crease the paper as it travels through the rollers and out the back into a bin. 24 Figure 6.1. Solid Edge image of final concept. Figure 6.2. Side view Solid Edge image of final concept. 25 Figure 6.3. Back view Solid Edge image of final concept. 7.0 Prototype Design, Development and Testing 7.1 FMEA Before any mock ups or prototypes were built several failure modes & effect analyses (FMEA) were conducted to validate our concept selection. This was broken down into our main subassemblies which consisted of the moveable plates/springs/box assembly, roller assembly, and the paddle assembly. An evaluation was performed on each assembly per instructions provided by Dr. Kremer via the Senior Design website. These worksheets can be found in the appendix labeled “FMEA Worksheets.” Several failure modes were identified and the most relevant ones were chosen to evaluate in detail. After these evaluations were performed a few changes were implemented into the concept for the possibility of being used in the prototype. The main result of the FMEA analysis led to several design mock ups to validate whether the design would work in a crude prototype which is discussed in section 7.2 below. For the FMEA evaluations we used a rating system using scores of 1-10. One represents a low severance or probability and a 10 is the highest or most severe/likely. A more thorough description of the rating system is explained on the Senior Design website at: http://www.ent.ohiou.edu/~me470/SnrDesign05_06/me471/FMEA&Reliability06.pdf. 26 The main failure modes identified and evaluated are as follows: Paddle Assembly • Deflection/Fracture of Paddle • Material Wear (Groove and Press-Fit Pin) Box/Plates/Spring Assembly • Pins/Plates seize • Improper Insertion of paper • Corrosion/Wear of springs Roller Assembly • Paper jams • Gear Fracture • Motor Failure • Electrical Hazard • Motor Overheating After evaluation each of the assemblies, we came up with a few recommendations to our design that could help reduce the risk priority number and therefore potentially make the design better. For the paddle assembly we decided to make a press-fit pin that would sit in the front lower wall rather than on the paddle handle. This ensures an easy replacement in case the pin would break and would not require a new handle; just a cheap, easily-available pin. We also decided to ensure a material was selected that had low wear properties and low friction to keep wear minimal. With this in mind we decided to use HDPE because it is strong and lightweight while still providing a smooth surface and good wear properties. Its strength will be evaluated further through FEA analysis to confirm is it suitable for the paddle blades and will not fracture or deflect too much. The roller assembly FMEA yielded a few possible additions to the design. To avoid gear fracture and to keep costs down we elected to pursue a track belt pulley system. This allows for easy replacement and is cheaper than gears. This would also assist in avoiding motor failure and/or overheating. If a paper jam were to occur the motor would continue to run but not turn and could burn out the motor. With a pulley systems, if the torque were to get too high the belt may snap rather than a gear, pulley, or having the motor burn up. A pulley system is yet to be selected but we could select one that would break at a certain force/torque. It is also being considered to cool the motor in order to prevent overheating. In order to protect the motor from electrical hazards the motor will be encased and “waterproofed” but will have vent holes to avoid heat buildup. A safety switch will also be implemented on the box to shut off the rollers when the top lid is opened to avoid any safety hazards. This top lid will assist when there is a paper jam so that the operator may open the device and remove the paper or remove any necessary components if needed. 27 The outer box assembly with the plates and springs was the last subassembly to be evaluated on our device. The main concern for this was improper loading of the paper and the possibility of the moveable plates seizing. After FMEA we considered using lubrication on the guide pins and moveable plates. This would help prevent seizing and jamming of the plates against the guide pins. It would also be recommended that a supervisor regularly check and clean the guide pins to avoid dust and dirt build up. A maintenance schedule would help ensure the pins are lubed as necessary as well as cleaned. Another main concern was the loading of the paper into the box. Via FMEA analysis we can concluded that it may be necessary for some guide ramps or rails to load the paper into the slot. We also considered using a clear material such as plexi-glass on the opposite wall so the user can see visually on both sides if the paper is loaded properly. The box will be designed so that the paper will sit flush with the outside of wall that it is loaded so that the user can see that it is straight. The plexi-glass would ensure that the paper did indeed go all the way through the paddle and is sitting flush with the opposite wall. Comparisons of the risk priority numbers before and after FMEA are shown in Table 7.1 below. This table reflects how we think the design changes will benefit the overall design and improve performance, safety, reliability, and ease of use. We only selected a few of the potential failures as we decided these would be the most significant and be of our highest concerns as the design and prototype progress. All other potential failures and analyses may be found in the appendix under “FMEA Worksheets.” 28 Table 7.1. FMEA Overview Paddle Fracture Improper Loading Paper Jam Motor Failure Severity 9 9 5 5 5 5 10 8 Probability Of Occurrence 2 1 8 6 9 7 2 2 Prob. failure is det. & prevented 5 3 2 2 4 4 5 2 Risk priority number 90 27 80 60 180 140 100 32 Initial Design After Refinements 7.2 Mock-ups and Experiments To validate the final design several mock-ups and experiments were conducted. These included a rapid prototype paddle, mock-up of movable plates, roller gap testing apparatus, and a force test on the handle. The rapid prototype paddle was used to validate the overall concept of the paper folding device. Could a paper be folded with the paddle? To test this, a paper was placed between the two blades of the paddle. The paddle was placed flat against a table and a book was placed on top of the paddle. The paddle was rotated while keeping it against the table and the book. The results from this test showed that the paddle did indeed fold the paper in a z-fold. 29 Figure 7.1. Initial paddle prototype. To test the design feature of the movable plates moving up and down along four guide pins without seizing, a mock-up was constructed using plywood, steel tubing for guide pins and four springs. Two pieces of ply wood were used for stationary supports for the top and bottom of the guide pins. Two more pieces of plywood were used as the movable plates. Four holes were drilled into the plates precisely to the diameter of the guide pins. The apparatus was put together with the springs between the movable plates and the stationary supports. The rapid prototype paddle was placed between the movable plates and rotated. On this attempt the movable plates seized up. The holes in the movable plate were slowly cut into slots testing between each enlarging into the movable plates did not seize when the paddle was rotated. This showed that the movable plates needed to have slots cut for the guide pins to allow for smooth operation and no seizing. Figure 7.2. Moveable plates/guide pins mock-up. 30 For the roller experiment, the gap must allow the paper to be easily fed and grabbed without the paper jamming or adding unwanted creases. The rollers must be able to easily pull the paper out of the paddle. If this does not occur the user will have to remove the paper which could be a potential safety hazard. If the paper does not go through the rollers it will not be the correct thickness. The gap must also be close enough to flatten the paper to a final thickness of less than 5/8”. If the paper is not flatten enough the machine will fail its task. To find the correct roller gap and apparatus was constructed that can allow the thickness of the rollers to be adjusted multiple times until something works. In Figure 7.3 below a device is shown with a fixed base that has the motor mounted on it. The fixed supports have a hole through them to allow for a fixed bottom roller. There will also be a slot in the supports above the fixed roller to allow the top roller to be adjusted up and down. Figure 7.3. Roller testing apparatus. The following procedure was used to find the optimal roller gap: 1. Set the fixed bottom on the table and attach to the table if needed with c-clamps. 2. Set the adjustable top roller at initial height from the bottom roller. 3. Push paper through by hand and record thickness of paper and distance from the center of both rollers. 4. Adjust rollers accordingly and repeat measurement until a constant thickness of less than 5/8” thick is achieved for at least ten or more tests. 5. Once the thickness is achieved calculate the required gear ratio needed 6. Mount gears on both rollers and motor 7. Test the thickness produced with the motor and record results. Adjust if needed and repeat 5-7. 31 Table 7.2: Roller testing data. Roller Gap Thickness AVG 0.0625 0 0 0 0 0 0 0 0 0 0 0 0.125 0.310 0.332 0.280 0.305 0.295 0.315 0.325 0.313 0.290 0.300 0.307 0.25 0.385 0.322 0.485 0.385 0.375 0.440 0.380 0.420 0.395 0.400 0.399 0.375 0.442 0.462 0.553 0.525 0.475 0.462 0.510 0.430 0.440 0.510 0.481 Table 7.2 is used to test for convergence for the thickness of the paper after folding to the specific criteria needed. This table shows that all gaps tested crease the paper under our upper specification limit of .625”. We will be using the 1/8” thickness to provide the optimum amount of thickness possible without paper-jamming. The main objective of the force experiment is to measure the amount of force that is required by the customer to turn the handle 180 degrees. The purpose of this experiment is to find the ease of use necessary to rotate the paddle and to minimize the opposing force of the springs. The easier it is to turn the handle, the broader a range of customers can use the device. This experiment will show if different springs are required or a longer lever are needed to reduce the force necessary to rotate the paddle. The Vernier Lab Pro was used to measure the force applied to the handle to turn it. The procedure for testing the maximum force on the paddle handle is as follows: 1. Attach a force gauge to the end of the paddle handle using welding wire. 2. Pull the force gauge perpendicular with respect to the handle and blades (at a 90 degree angle). 3. Record results using the digital force gauge program. 4. Make note of any elastic deformation, cracking, and/or complete failure. 32 25 20 Force (N) 15 10 5 0 0 0.5 1 1.5 2 2.5 Time (min) Figure 7.4: Paddle Testing Data Figure 7.4 shows the force recorded during the experiment. This force represents the input force of the user to rotate the paddle 180 degrees. Through 20 rotations, the max force recorded was about 23 N which converts to 5.17 pounds-force. This was much less than what was expected, which was designed for 10 pounds. This concludes our design will not cause problems with user fatigue. 7.3 Prototype Construction The prototype paper folding device was constructed using four sub-assemblies. These consisted of the roller setup, paddle, electrical system, and outer box. Creating these subassemblies allowed for easy changes to be made to these specific sub-assemblies without affecting the others. Drawings of manufactured parts are located in the appendix. The outer box subassembly consists of 7 parts, the bottom, left side, right side, back, top front, bottom front, and top. These are made from 1/2” medium density fiberboard (MDF). The two front pieces are 1” thick which requires that two ½” pieces be glued together. The outer box is held together with #10 wood screws 1½” long. See Appendix A5. Outer Box Assembly Procedure 1. Rough cut four pieces of ½” MDF 1” larger than specified in drawing for the top front and bottom front 2. Glue two of these pieces together to create two 1” thick pieces 33 3. Cut 1” thick pieces for front per drawings #10, 11 4. Cut MDF for right side of box per drawing #17 5. Cut slot in right side for loading per drawing #17 6. Cut mortises for hinges and guide rod supports per drawing #17 7. Cut MDF for left side of box per drawing #18 8. Drill holes for motor and motor cover in left side per drawing #18 9. cut mortises for guide pin supports per drawing #18 10. Cut MDF for bottom of box per drawing #5 11. Drill holes for guide pin and roller setup in bottom per drawing #5 12. Cut MDF for back of box per drawing #6 13. Cut slot in back per drawing #6 14. Cut top of box per drawing #13 15. Cut mortises for hinges per drawing #13 16. Clamp sides to bottom and mark holes for screws 17. Drill holes for #10 wood screws 1½” long 18. Screw sides to bottom 19. Clamp back to sides of box 20. Mark and drill holes for #10 wood screws 1½” long 21. Screw back to sides 22. Clamp bottom front to box 23. Mark and drill holes for #10 wood screws 1½” long 24. Screw bottom front to sides of box 25. Clamp top front to box 26. Mark and drill holes for #10 wood screws 1½” long 27. Screw top front to sides of box 28. Screw hinges to top of box 29. Screw hinges to right side of box 30. Mark holes in side of top and left side for latches 31. Screw latches to the side of top and left side The paddle consists of five parts, the two blades, handle, lever and knob. The lever and handle are cut from aluminum round stock, and the blades are made from HDPE. The CNC mill was used to make the blades and handle. See Appendix A5. Paddle Assembly Procedure 1. Rough cut 3/8” thick HDPE for paddle blades 2. Using CNC mill cut out blades per drawing #16 3. Cut 1” diameter aluminum rod to length for handle per drawing #1 4. Using CNC mill cut tab at end of handle, groove, and drill and tap hole for lever per drawing #1 5. Cut ½” diameter aluminum rod to length for lever per drawing #14 6. Thread ends of lever ½-13 7. Screw knob onto lever 8. Screw lever into handle 9. Using #10-32 flat head machine screws place handle tab between blades and screw together 34 The roller setup consists of two PVC rollers, an aluminum frame, and a belt system. The rollers were cut from 2” diameter PVC to 5 ¾” long. On each end of the rollers 1” deep holes were tapped with a left hand ¼ - 20 tap. These threaded holes were used to screw in the axles for the rollers. They were threaded left handed because of the direction the rollers rotate. If they were not left handed the motor would unscrew the axles as it rotated which is not desired. By using the left hand threads the motor is constantly tightening the axles into the rollers. The axles are made out of ¼” stainless steel rod which was also used for the guide pins for the movable plates. The sides of the roller setup were constructed from ¼” thick by 1 ½” wide aluminum bar stock. The CNC mill was used to add two holes in each side. Bearings were press fit into these holes. The top support of the roller setup was made with 1/8” thick by 1 ½” wide aluminum bar stock. This was connected to the sides using 1” aluminum angle stock and #10-32 machine screws 3/8” long. The angle stock was also placed at the bottom of the sides of the roller setup. These are used to attach the roller setup to the outer box. See Appendix A5. Roller Setup Assembly Procedure 1. Cut aluminum roller frame stock to length per drawings #23,24 2. Using CNC mill cut bearing seats 3. Drill and tap holes for #10-32 machine screws per drawing #23,24 4. Cut PVC stock for rollers to length per drawing #50 5. Using lathe drill hole 1” deep for ¼-20 tap in ends of PVC 6. Tap hole ¼-20 left handed 7. Cut ¼” stainless steel rod to length for roller axles per drawings #26,7 8. Thread ends of axles ¼-20 left handed per drawings #26,7 9. Screw axels into rollers 10. Cut rubber film to fit on roller 11. Using super glue attach rubber to the roller with the drive axle 12. Press fit bearings into bearing seats 13. Attach aluminum angle pieces to the sides of the roller setup 14. Insert axles through bearings on roller sides 15. Attach top support to roller setup 16. Cut 1/4” stainless steel rod for idler pulley shaft per drawing #20 17. thread end of idler shaft ¼-20 per drawing #20 18. screw idler shaft into side of roller setup 19. Slide pulleys onto axles and tighten set screws on the two roller axles 20. Put belt around pulleys 21. Slide coupler onto drive axle The electrical sub-assembly consists of the wiring harness and switches. Electrical System Assembly Procedure 1. Cut 1 piece of 16 gauge wire 15” long 2. Cut 2 pieces of 16 gauge wire 6” long 3. Cut 2 pieces of 16 gauge wire 3” long 4. Soldier 15” long wire and one 6” long wire to push button switch 5. Attach male quick connectors to ends of these wires 35 6. Soldier the two 3” long wires to the toggle switch 7. Attach female quick connectors to ends of these wires 8. Attach a male quick connector to one end of the fuse holder 9. Attach a female quick connector to one end of the fuse holder 10. Attach a male quick connector to one lead on the motor 11. Attach a female quick connector to one lead on the motor 12. Final connections will be made during final assembly The four sub-assemblies are added together during the final assembly. The movable plates are added as well as the motor and motor cover. Final Assembly Procedure 1. Screw motor onto left side of outer box 2. Screw push bottom switch holder to left side of out box making sure that button is slightly higher than top edge of the left side of outer box 3. Slide motor cover over motor and screw into left side of box 4. Add wiring harness using wiring diagram 5. Slide coupling onto motor shaft and tighten set screw 6. Screw roller setup to bottom of box using pre drilled holes 7. Align coupling halves and tighten set screws 8. Cut ¼” stainless steel rod for guide pins to length per drawing #9 9. Insert guide pins into holes in bottom of box 10. Slide springs over guide pins 11. Cut HDPE for movable plates per drawings #4, 19 12. Using CNC mill cut slots and groove in movable plates per drawings #4,19 13. Place bottom movable plate over guide pins on top of springs 14. Cut 2” diameter PVC to length for bushing per drawings #2 15. Use lathe to drill hole through bushing and groove in bushing per drawing #2 16. Drill hole for handle guide pin in bushing per drawing #2 17. Remove top front of outer box. 18. Place handle guide pin in bottom front of outer box 19. Remove lever from handle 20. Slide handle through bushing aligning groove in handle with hole in bushing for handle guide pin 21. Insert bushing over handle guide pin and into bottom front of outer box 22. Screw top front of box back in place 23. Reinstall lever onto handle 24. Place top movable plate on guide pins on top of paddle 25. Put springs on guide pins 26. Cut 1 ½” wide by 1/8” thick aluminum bar stock to length for guide pin supports per drawings 27. Cut holes in guide pin supports per drawing #3 36 28. Insert guide pin supports into mortises in left and right sides of box making sure guide pins go into holes in supports 7.4 Prototype Testing After the prototype was constructed, team testing began. During this testing several problems appeared. The first problem arose with the loading of the paper through the side slot. It was difficult to insert the paper because it either hit the top or bottom movable plate or the paper had trouble going through the paddle. The paper hitting the movable plates arose from material selection. After the groove was cut across the plates internal stresses were released that caused the plates to bow. This bowing prevented the plates from sitting flush with the paddle. The bowing also caused the plates to cover the loading slot. To solve this problem with the prototype stop tabs were added to the side of the box which prevented the movable plates from covering up the loading slot. Figure 7.5 shows these tabs. Stop tab Figure 7.5: Movable plate bowing. To allow for easier insertion into the paddle larger chamfers were sanded into the blades. This created a bigger opening in a ramp for the paper to slide into. See Figure 7.6. 37 Chamfer size Figure 7.6: Paddle blade chamfer. After the handle had been rotated and the paper was folded the handle was pushed forward to feed the paper into the rollers. This is where the next problem arose. As the paper went through the rollers it bunched up, and when the end of the paper reached the rollers it would no longer go through the rollers. This problem occurred because the already creased end of the paper was last part of the paper to go through the rollers. This crease prevented the paper that was bunching up from smoothing out because it had nowhere to go. To try to fix this problem the paper was inserted with the creased end going in first. This fixed the problem of the bunching and jamming of the paper in the rollers. It however created another problem; the z-fold did not come out straight. See Figure 7.7. The paddle is shorter than the paper which makes the paper hang out so when it is pushed forward the rollers can grab the paper. By placing the precreased end of the paper toward the rollers first meant that this creased end did not get folded over the paddle. When the paper was pushed into the rollers it creased at random spots, which made a crooked z-fold. The decision was made to turn the paper around again and make the pre creased end go through the rollers last. To fix the original problem the roller gap was increased until the paper no longer bunched up. This increased roller gap still flattens the paper to less than 5/8”. 38 Bunching when pre‐creased end went through rollers last Crooked fold when pre‐ creased end went through Figure 7.7: Paper folds. 8.0 Final Design/Design Refinement 8.1 Final Design For a description of operation and maintenance of the design, see the user manual located in Appendix A4. The final design concept chosen was a wooden box that houses a rotating paddle, two moveable plates, and a set of rollers driven by an AC motor. MDF wood was chosen because it is cheap. Also, it is easy to make rough cuts with MDF which was acceptable since we did not require tight tolerances. Figure 8.1 shows the basic structure of the device which includes: the 4” handle on the paddle to decrease the amount of user input, the slot opening for the newspaper to slide into, and the hinged top portion of the box for easy maintenance access. Figure 8.1. Newspaper folding device. 39 The handle for the paddle was designed for optimum user comfort and ease of use. The 4” extension arm provides a mechanical advantage so that on average the user only needs to input 5 pounds of force. The ball on the end of the handle also adds additional ergonomics for the user while rotating the paddle. The slot on the side of the box was designed so that the user will know the newspaper is properly loaded when the end of the newspaper is flush with the outside wall where the slot is located. The dimensions of the box were made specifically for this feature so that the newspaper is correctly oriented with the paddle to ensure proper location for creasing. Hinges were used for the top of the box to allow the supervisor to easily perform maintenance on the device or clear any paper jams that may occur. This provides access to all the moving components of the assembly when needed, but also protect the user from potential injuries. The main part of the design is made up of a HDPE paddle blade which holds the newspaper and two HDPE moveable plates which provide the initial crease for the z-fold as seen in Figure 8.2 below. HDPE was chosen because it is lightweight and is smooth. Smoothness was necessary to allow the paper to slide easily off the paddle. The opening on the side of the paddle is chamfered to allow the newspaper to slide through easily without jamming up. The width of the paddle was designed so that the z-fold was uniform with an overall width of 4.5”. The overall length of the paddle blade was made 1” shorter than the newspaper to provide an overhang for the rollers to easily grab and pull the paper off the paddle. Figure 8.2. Front view of the z-fold process (roller sub-assembly removed). Figure 8.3 shows a detailed view of one of the moveable plates. The main function of the moveable plate is to provide constant pressure on the newspaper when the paddle is rotated. This gives the newspaper the initial z-fold prior to entering the rollers. There is a long recess in the plate which was made to align the paddle correctly. It also was made to ensure that the paper does not catch on the lip of the paddle where the chamfers are located. This keeps the newspaper from jamming during loading. 40 The next feature of the moveable plate is the slotted holes where the guide-pins are inserted. Guide-pins are used to restrict the travel for the moveable plates in any other direction other than vertical. Slotted holes were used to prevent the plates from seizing during operation. This allows the plates to have some side-to-side motion which eliminates any chance of seizing. Figure 8.3. Detailed view of the moveable plate and spring loaded feature. Figure 8.3 also shows the spring loaded feature for the bottom moveable plate. These springs allowed the plates to return to their original position so that the paper was oriented correctly. The correct springs were chosen by determining the proper spring constant that would keep the plate in constant contact with the paddle at all times. Tabs on the side of the box were also incorporated to make sure that the bottom plate does not block the slot where the newspaper is inserted. The final feature of the design includes the rollers, pulley system, AC motor, and a safety contact switch as seen in Figure 8.4. The rollers are made from a 2” diameter stock of PVC coated with a rubber film for extra friction when pulling the newspaper off of the paddle. An AC motor with a built in gear box was used to drive the bottom roller. A pulley system was then used to drive the top roller in the opposite direction of the bottom roller. Pulleys were used instead of gears because they were cheaper and easier to install. While gears would be more reliable, we decided that fabricating our own gears (which would have been necessary) would be too costly and time consuming. A flexible coupling was used to connect the drive shaft to the roller to compensate for the misalignment of shafts. The main reason for the roller system is to provide the final crease in the z-fold and flatten it to the required thickness. There is also a contact switch located at the top of the box where the top-hinged lid closes. This switch was used so that if the roller system is in operation it will automatically shutoff if the lid is opened. This will prevent anyone from getting their limbs or articles of clothing caught in the rollers. 41 Figure 8.4. Pulley system, drive shaft coupling, safety switch, and AC motor. 8.2 Design Refinement There are a few changes that we thought we could make to our design to improve its performance. Due to time and monetary constraints, however, we were not able to follow through with these changes. One change to the prototype we decided on was to change the material of the moveable plates. As discussed earlier, when the HDPE was cut the plates bowed. This caused problems in our prototype operation. For the final design, we decided to use MDF instead of the HDPE. We considered several other materials to switch to, such as steel and a different plastic than HDPE. We decided that steel or another metal would cause the plates to be too heavy and require too much force to turn the paddle. We decided not to use another plastic since there could be a chance that the plastic would bow again when it was cut. We initially decided to use HDPE because we wanted a smooth surface to allow the paper to slide off easily. However, we believe that wood with treatment to make it smoother (such as polyurethane) would be sufficiently smooth to allow the paper to slide off easily. Since the surface area of the plates is small, there would not be much time required to apply the coating. Even with the extra time to apply the coating, the material costs would still be lower since MDF is much cheaper than HDPE. This would cause the cost with the material change to be the same or lower than for the prototype. Another change from our prototype to the final design is to add springs to the roller assembly. During testing, we had problems with the paper getting jammed in between the rollers due to too small of a gap. Adding springs to the top rollers would solve this problem. When the paper is pushed through the rollers, the force of the paper will push the rollers up while the rollers apply the necessary force to crease the paper. This will prevent the paper from getting jammed in the rollers. Another way to fix this problem is to use a motor with higher torque. A higher torque motor would better drive the rollers and a paper jam would be less likely. Another problem we encountered during testing was the loading of the paper into the side slot. The frayed edges of the newspaper often got caught on the side of the box which caused the paper to load incorrectly or not at all. A solution to this would be to add guides to the slot, similar to guides for loading paper into a printer. This would allow for easier loading of the paper and could be used as storage for a stack of papers waiting to be folded. 42 8.3 Manufacturing Costs/DFMA Since our project is limited to only one application, a production volume of only one device was considered in deciding the manufacturing cost. Table 8.1 summarizes the costs and time required for the manufacturing of each sub-assembly. To determine these costs, we specified each operation needed to complete a sub-assembly. We then determined the time required to complete each operation and assigned a labor and overhead cost based on the relative difficulty of the operation. Cost worksheets detailing the cost of each operation are given in the Appendix. The construction and assembly for manufacturing should follow the same procedure as outlined for the prototype (see Section 7.3). Table 8.1. Manufacturing cost and time. Sub‐assembly Total Time Labor/Overhead Cost Materials Cost Total Cost Outer box 4 $112.50 $21 $133.50 Paddle 2.67 $124 $33 $155 Plates 1.58 $64 $57 $121 Rollers 1.83 $60 $198 $258 Electrical system 1.42 $43 $32 $75 Whole assembly 11.5 $403.50 $341 $742.50 The main components of the outer box and paddle assemblies were the labor costs (labor time). To keep these costs down, we used the same screw sizes throughout the whole MDF box. We also eliminated the need for tight tolerances. This reduced the amount of different operations which in turn kept the labor time and cost down. The paddle was made from several separate pieces, including the two blades. This made the paddle assembly easy to manufacture and assemble, which made the labor and overhead costs lower than if we had made the paddle from one piece of material. The driving cost in the roller assembly was the materials cost. The materials were so expensive due to the number of different materials that were used (motor, PVC, aluminum, silicone rubber, etc.). One way we tried to reduce this was by using the same fasteners throughout the whole roller frame, which would lower costs due to economy of scale and also lower labor costs. Another way we lowered costs was by using the spider shaft coupling to connect the motor to the rollers. The spider shaft is a special coupling that allows for some flexibility in the connection. This eliminates the need for a tight tolerance when connecting the rollers to the motor and therefore lowers labor time and cost. To make the entire device easy to assemble and manufacture, we decided to use a hinged top for the outer box sub-assembly. This allows for very easy access to all of the internal components of the device. With easy access, each sub-assembly can be worked on separately. 43 This lowers the total time needed to assemble the whole device and therefore lowers the labor costs. 9.0 Conclusions From these results we have concluded that our current design does not fully meet our projects objectives and therefore it will not benefit SW Resources to deliver the product as is. The main factor in this decision is that it currently is not easy to use. Our goal was to create a design that would allow less functioning workers to be able to work in the mail room at the paper folding station. After coming across the bowing issues and not having the groove cut into the paddle handle there are too many issues that make this product difficult to use. Table 9.1 shows which specifications we achieved and which ones we failed to meet. Table 9.1. Specifications Pass/Fail table. Customer Needs Flatten < 5/8" Thick Z-Fold Fold Variability Stuff in Envelope Ease of Use Safety Quality Speed Accepts Staples Compact Size Low Weight Appearance Success X X Failure X X X X X X X X X X We were able to meet the flattening less than 5/8” thick specification, but we also had some issues with the paper jamming in the rollers and bunching the newspaper that would need to be addressed before delivery. The quality of the fold was a success, but there are still some issues with the occasional wrinkling of the paper that occurs. This could potentially be corrected by adding a spring mechanism into the rollers to prevent buckling in the paper. The fold variability and stuffing into an envelope was not a big priority. However, safety was a big concern and we were able to succeed on this specification by enclosing all the components in a wooden box and included a safety switch on the hinged lid. This allows a supervisor to be able to clear a paper jam or perform maintenance on the machine, but disengages the roller system so that fingers and/or clothing do not get caught. Also, there are not any sharp corners or pinch-points that the user could get injured on. Overall, we succeeded by meeting most of our specifications, but the failure in the ease of use specification is too important to overlook. If we had more money and time this problem could potentially be solved by adding the groove into the paddle handle and using a stronger material for the moveable plates to solve the bowing issue. However, this still may not be the 44 solution and the risk is too large to continue with the design. As the project stands now it is not user friendly and the overall cost is too high to move forward into production. References US Census Bureau (2005-2007) http://factfinder.census.gov/servlet/STTable?_bm=y&-geo_id=01000US&qr_name=ACS_2007_3YR_G00_S1801&-ds_name=ACS_2007_3YR_G00_ Resource 1: http://www-personal.umich.edu/~awtar/MS/paper-fold.htm Walczyk, Prof. Daniel. "Paper Folding Mechanism". October 21, 2008 http://www-personal.umich.edu/~awtar/MS/paper-fold.htm Resource 2: http://www.officezone.com/folding_guide.htm#folds Office Zone. “What are the different kinds of paper folds?” October 21, 2008. http://www.officezone.com/folding_guide.htm#folds Resource 3: http://www.google.com/patents?id=D9MwAAAAEBAJ&pg=PA1&dq=%22paper+foldin g%22&source=gbs_selected_pages&cad=0_1#PPA1,M1 Resource 4: http://www.google.com/patents?id=Tnl9AAAAEBAJ&printsec=abstract&zoom=4&dq= paper+folder#PPA1,M1 Resource 5: http://en.wikipedia.org/wiki/Folding_machine Figure 1: Left: Office Zone. “207M Paper Folder.” http://www.officezone.com/pdffiles/ProductBrochure.php?PageName=mbm-207m-paper-folder (Accessed October 21, 2008). Right: Office Zone. “Martin Yale P7400 Paper Folder,” http://www.officezone.com/pdffiles/Product-Brochure.php?PageName=my7400 (Accessed October 21, 2008). Figure 2: Left: Office Zone. “10560 Dahle Paper Folder,” http://www.officezone.com/pdffiles/ProductBrochure.php?PageName=dahle10560 (Accessed October 21, 2008). Right: Office Zone. “FD 305 Paper Folder,” http://www.officezone.com/pdffiles/ProductBrochure.php?PageName=fd305-desktop-folder (Accessed October 21, 2008). 45 Appendix A1: FMEA Worksheets Subsystem 1: Box/Movable Plates/Spring Subassembly Failure Modes and Effects Analysis for Safe, Reliable, Effective Designs Step 1: Provide a description of the full system including all subsystems and accessories in all modes of operation (including storage, setup, transportation, operation, cleaning, maintenance, etc.). If possible please include sketches with users in operating positions for the main operating modes. This information can be included here or as an attachment to this document. Subsystem 1: Box/Moveable Plates/Springs Step 2: Identify all potential failures and safety hazards for the system in each mode of operation. A failure is any undesirable occurrence associated with the system. If multiple failure modes have a common root cause, please compile them together and identify the root cause. Potential Failures: • Pins/plates seize o Lack of lubrication, dirt/dust build up, improper tolerances, spring failure • Springs fatigue/fracture o Improper spring constant, overuse • Plate wear o Friction from paddle on plate face, guide pin hole wear • Paper loads incorrectly o Paddle interferes when paper is loaded, friction causes paper to bunch, improper tolerances, plate and paddle don’t sit flush • Doesn’t fold paper correctly o Paper slips off paddle, not enough weight/spring constant not sufficient, improper paddle position, paddle edges not straight Safety Failures: • Pinch points o Springs/rods/plates/paddle • Maintenance o While lubricating guide pins, springs etc. 46 Step 3: For all significant potential failure modes in step 2, complete an FMEA table to determine the type of action necessary to achieve acceptable risk level, and the priority of the action compared to the other failure modes. Potential Failure 1 – lack of lubrication, dirt/dust build up, improper tolerances, spring failure causing the plates to seize and not allow for smooth movements up and down to apply constant pressure. Operating mode when failure could occur During rotation of paddle Potential Failure Mode Pins/plates seize Rating Level: 0‐5, 5 being the most severe Initial Evaluation After Action Results Potential Effect of Failure (Severity, SEV) 6 6 5 2 Current Controls for Detection and Prevention (Probability that failure is detected and prevented, DET) Risk Priority Number (RPN=SEV*OCC*DET) 6 6 Potential Cause(s) / Mechanism(s) of Failure (Probability of occurrence, OCC) 180 72 1. Include some discussion/justification for the rating for severity (SEV) This is the main working mechanism in the design. If it fails to move, the paper cannot be folded although failure would be resolved with a simple fix. 2. Include some discussion/justification for the rating for probability of occurrence (OCC) There is bound to be dust and dirt build up and will require some lubrication, otherwise this could potentially happen often. 3. Include some discussion/justification for the rating for probability of detection (DET) It’s easy to detect because the plates will stop moving which would indicate failure. This can be prevented with proper maintenance. 4. Recommended actions to achieve acceptable risk: Make specific recommendations for action and include some discussion of the alternatives that were considered, the person(s) responsible for completing the actions, and the completion date. Recommend that supervisor cleans and lubes the guide pins. 5. Notes on Completed Actions: Materials were selected (HDPE Plates & SS Guide pins) which will not require lubrication but may require cleaning for dust/dirt purposes. 47 Potential Failure 2 – paper fails to load into the paddle correctly due to friction in the plates or improper tolerances allowing the paddle to sit flush in between the two plates. Operating mode when failure could occur When loading the paper into the device Potential Failure Mode Paper loads incorrectly Initial Evaluation After Action Results Potential Effect of Failure (Severity, SEV) 6 6 Potential Cause(s) / Mechanism(s) of Failure (Probability of occurrence, OCC) 4 2 Current Controls for Detection and Prevention (Probability that failure is detected and prevented, DET) Risk Priority Number (RPN=SEV*OCC*DET) 6 4 144 48 6. Include some discussion/justification for the rating for severity (SEV) If the paper doesn’t load correctly then it cannot be folded or could ruin the paper. It is not a 10 or near 10 because the paper could possibly be removed and loaded again. 7. Include some discussion/justification for the rating for probability of occurrence (OCC) If the plates are made correctly with the right tolerances and width between them then this shouldn’t occur very often. It was rated a 2 because if the plates do not seat correctly then this could cause failure, which should be detected during testing. 8. Include some discussion/justification for the rating for probability of detection (DET) It will be hard to determine if the paper is crinkled up inside but should be prevented by the design on the box dimensions because they are the same width as the newspaper. 9. Recommended actions to achieve acceptable risk: Make specific recommendations for action and include some discussion of the alternatives that were considered, the person(s) responsible for completing the actions, and the completion date. Testing will determine how well the paper loads and any adjustments that may be needed. Alternatives include different ways to load the paper. Possible plexi‐glass wall opposite of loading side to improve visibility to identify problems loading. 10. Notes on Completed Actions: Paddle was chamfered steeper and gap between paddle and plates is reduced to avoid the potential of the newspaper sliding under or over the paddle. 48 Subsystem 2: Paddle Assembly Failure Modes and Effects Analysis for Safe, Reliable, Effective Designs Step 1: Provide a description of the full system including all subsystems and accessories in all modes of operation (including storage, setup, transportation, operation, cleaning, maintenance, etc.). If possible please include sketches with users in operating positions for the main operating modes. This information can be included here or as an attachment to this document. The paddle assembly consists of the top and bottom blade, the handle with tab, the screws and lastly the lever arm that is attached to the handle. Different modes of operation consist of inserting paper, rotating handle (and assembly), and transition (or pushing) of the paddle towards the roller assembly. Step 2: Identify all potential failures and safety hazards for the system in each mode of operation. A failure is any undesirable occurrence associated with the system. If multiple failure modes have a common root cause, please compile them together and identify the root cause. • • • • • • Improper insertion of paper into paddle Paper crinkling during folding process Paddle ceasing or un‐moveable Material wear of assembly components Improper fold of the paper Excess deflection or fracture of paddle Step 3: For all significant potential failure modes in step 2, complete an FMEA table to determine the type of action necessary to achieve acceptable risk level, and the priority of the action compared to the other failure modes. 49 Potential Failure 1 – improper insertion of paper into paddle, causing device to be inoperable. Operating mode when failure could occur Paper Loading Potential Failure Mode Improper insertion of paper Initial Evaluation After Action Results Potential Effect of Failure (Severity, SEV) 5 5 Potential Cause(s) / Mechanism(s) of Failure (Probability of occurrence, OCC) 7 7 Current Controls for Detection and Prevention (Probability that failure is detected and prevented, DET) Risk Priority Number (RPN=SEV*OCC*DET) 3 3 105 105 1. Include some discussion/justification for the rating for severity (SEV) No danger but mechanism won’t complete task properly. (Inoperable) 2. Include some discussion/justification for the rating for probability of occurrence (OCC) Testing hasn’t been complete so to be conservative we are assuming it will likely be somewhat of a problem. 3. Include some discussion/justification for the rating for probability of detection (DET) The box is designed so that the paper will fit perfectly in the box and be aligned. Therefore it will be visually detectable if the paper isn’t loaded properly. 4. Recommended actions to achieve acceptable risk: Make specific recommendations for action and include some discussion of the alternatives that were considered, the person(s) responsible for completing the actions, and the completion date. Smooth surfaces along with proper design should allow this problem to be minimal. Testing will dictate any changes that must be made. 5. Notes on Completed Actions: Design of box, paddle, and plates all are generated in order to reduce this risk but until further testing no other changes can be made. 50 Potential Failure 2 – Paper crinkling during folding process. Operating mode when failure could occur Feeding Rollers Potential Failure Mode Crinkling of paper/ripping Initial Evaluation After Action Results Potential Effect of Failure (Severity, SEV) 5 5 Potential Cause(s) / Mechanism(s) of Failure (Probability of occurrence, OCC) 7 7 Current Controls for Detection and Prevention (Probability that failure is detected and prevented, DET) Risk Priority Number (RPN=SEV*OCC*DET) 10 10 350 350 6. Include some discussion/justification for the rating for severity (SEV) No danger but may ruin product. 7. Include some discussion/justification for the rating for probability of occurrence (OCC) To be conservative the occurrence is assumed rather high as we think this will be one of our larger issues. 8. Include some discussion/justification for the rating for probability of detection (DET) This is rated high because the box is enclosed and there is no way to tell if there is an issue until the paper is already ruined or not fed into the rollers. 9. Recommended actions to achieve acceptable risk: Make specific recommendations for action and include some discussion of the alternatives that were considered, the person(s) responsible for completing the actions, and the completion date. Ensure smooth surfaces and design rollers to be close to paddle assembly to reduce travel distance. 10. Notes on Completed Actions: N/A 51 Potential Failure 3 – Paddle seizing or unmoveable. Operating mode when failure could occur Folding and Feeding Potential Failure Mode Ceased mobility of paddle Initial Evaluation After Action Results Potential Effect of Failure (Severity, SEV) 5 5 Potential Cause(s) / Mechanism(s) of Failure (Probability of occurrence, OCC) 6 6 Current Controls for Detection and Prevention (Probability that failure is detected and prevented, DET) Risk Priority Number (RPN=SEV*OCC*DET) 1 1 30 30 1. Include some discussion/justification for the rating for severity (SEV) No danger but device will not function properly and will not complete the task. 2. Include some discussion/justification for the rating for probability of occurrence (OCC) As testing is completed and changes can be made this occurrence should be minimal but until prototype is made we’ll assume it rather likely to happen eventually or initially. 3. Include some discussion/justification for the rating for probability of detection (DET) You will physically and visually be able to tell if the paddle is not moving as the handle will not turn. 4. Recommended actions to achieve acceptable risk: Make specific recommendations for action and include some discussion of the alternatives that were considered, the person(s) responsible for completing the actions, and the completion date. Ensure maintenance is performed regularly and springs are selected to allow paddle rotation. Select material with low friction coefficients. 5. Notes on Completed Actions: N/A 52 Potential Failure 4 – Improper fold of paper Operating mode when failure could occur Folding Potential Failure Mode Improper Fold Initial Evaluation After Action Results Potential Effect of Failure (Severity, SEV) 4 4 Potential Cause(s) / Mechanism(s) of Failure (Probability of occurrence, OCC) 6 6 Current Controls for Detection and Prevention (Probability that failure is detected and prevented, DET) Risk Priority Number (RPN=SEV*OCC*DET) 10 10 240 240 1. Include some discussion/justification for the rating for severity (SEV) No danger but device will not complete task as desired but still may work. 2. Include some discussion/justification for the rating for probability of occurrence (OCC) As many things could cause this it is assumed to occur but no testing has been completed yet. 3. Include some discussion/justification for the rating for probability of detection (DET) As the paddle will be enclose in the box it will be hard to see if the paper is not folding properly until after it has come out of the rollers. 4. Recommended actions to achieve acceptable risk: Make specific recommendations for action and include some discussion of the alternatives that were considered, the person(s) responsible for completing the actions, and the completion date. Test to ensure it folds properly. Possibly selecting clear materials to visually allow folding process? 5. Notes on Completed Actions: N/A 53 Potential Failure 5 – Excess deflection or fracture of paddle. Operating mode when failure could occur Folding Potential Failure Mode Excess Deflection/fracture of paddle Initial Evaluation After Action Results Potential Effect of Failure (Severity, SEV) 9 9 Potential Cause(s) / Mechanism(s) of Failure (Probability of occurrence, OCC) 6 6 Current Controls for Detection and Prevention (Probability that failure is detected and prevented, DET) Risk Priority Number (RPN=SEV*OCC*DET) 7 7 378 378 1. Include some discussion/justification for the rating for severity (SEV) Inoperable completely and possibly risk of safety hazard with sharp edges and debris. 2. Include some discussion/justification for the rating for probability of occurrence (OCC) May be possible to break but material selection and further testing should reduce this. 3. Include some discussion/justification for the rating for probability of detection (DET) Some detection may be visually, audibly, or physically possible but if it is minor and inside of box it will be hard to detect. 4. Recommended actions to achieve acceptable risk: Make specific recommendations for action and include some discussion of the alternatives that were considered, the person(s) responsible for completing the actions, and the completion date. Conduct thorough analysis to ensure material selection and sizes will reduce the chance of this happening. 5. Notes on Completed Actions: N/A 54 A2: FEA Details Paddle Blade: Figure A2.1: Loads and Constraints on Paddle Blades Table A2.1: Results for FEA on Paddle Blades Mesh (in) 0.0787 Elements 33992 Nodes 22779 DOF 68337 Max Stress (psi) 427.86 Max Displacement(in) 1.48E-03 % difference (stress) N/A 0.0591 66005 51562 154686 513.43 1.49E-03 18.18 0.0394 176226 146505 439515 638.17 1.50E-03 21.66 0.0295 210856 198201 594603 684.58 1.50E-03 7.02 Table A2.2: Mechanical Properties for HDPE (http://www.k-macplastics.net/data%20sheets/hdpe.htm) 0.0338 - 0.0348 lb/in³ Density 3480 - 6530 psi UTS Yield Strength 2180 - 4350 psi 55 Figure A2.1: Displacement Locations in Blades (Displacement factor of 5) Fatigue in handle tab/paddle blades connection: Figure A2.4. Loads and constraints on handle tab/paddle blades connection. 56 Table A2.1: FEA Results for Blade/Handle Connection # Handle von Blades von Mises Stress Mises Stress Displacement Aspect Mesh Size (in) Nodes DOF (psi) (psi) (in) Ratio 0.5 2120 6360 1650.2 208.3 0.0014 17 0.25 2153 6459 1684 259 0.0016 22 0.125 6607 19821 2828.6 379.7 0.0018 11 0.063 33998 101994 3242.6 521.2 0.0018 8 0.032 221335 664005 3876.8 756.2 0.0018 4 251710 755130 4240.8 821.8 0.0018 13 .032 with .025 refine pts Figure A2.2: Handle Tab Stress 57 Table A2.2: FEA results for handle. run mesh size nodes elements max stress max disp 1 .25" abs 982 2613 2 .125" abs 2715 5070 3 w/ local refinement to .1 2685 4562 4 w/ local refinement to .05 3808 8560 5 w/ local refinement to .01 13108 40611 1369 1696 1522 2321 2227 0.0002 0.0002 0.0002 0.0002 0.0002 Figure A2.6: Max stress for handle. 58 Figure A2.7: Stress vs. time for handle (non-linear analysis). Figure A2.8: Loads and constraints on top plate 59 Table A2.5: Results for FEA on top plate Mesh (in) 0.5 Elemen ts 636 DOF 2070 Max Stress (psi) 579.05 Max Displacement(in) 0.0363 % difference (stress) N/A Nodes 690 0.25 2357 2454 7362 667.48 0.0421 14.19 0.1 13659 13854 41562 676.77 0.0468 1.38 0.075 24214 2441 73233 681.32 0.0473 0.670 Figure A2.9: Deflection of top plate. 60 A3: Cost Worksheets Table A3.1. Cost details for electrical system. Operation 1 Operation 2 Operation 3 Assemble electrical system and safety switch Assemble entire system Insp & Clean Up a. total time to complete operation(s) in hours 1 0.1666 0.25 b. labor rate for the operation ($/hr) c. Labor cost = axb d. basic overhead factor e. Equipment factor f. Special operation/tolerance factor g. labor/overhead/equipment cost = c x (1+d+e+f) h. purchased materials/components cost 12 12 12 $12 1 0.5 0 $2 1 0.5 0 $3 1 0.5 0 $30 $5 $8 $32 $0 $0 Electrical System and Final Assembly Total Cost = 61 $74 Table A3.2. Cost details for outer MDF box. Outer MDF Box Operati on 1 Operati on 2 Operati on 3 Operati on 4 Operation 5 Operati on 6 Operation 7 Operati on 8 Cutting to size Cut out slots Knotchi ng Drilling Assembly Cutting PVC Turning/Dril ling on Lathe Insp & Clean Up 1 0.5 1 0.5 0.5 a. total time to complete operation(s) in hours 0.25 0.1666 67 0.2 b. labor rate for the operation ($/hr) 12 12 12 12 12 12 15 12 c. Labor cost = axb $12 $6 $12 $6 $6 $2 $3 $3 d. basic overhead factor e. Equipment factor 1 1 1 1 1 1 1 1 0.5 0 0.5 0 0.5 0 0.5 0 0.5 0.5 0.5 0.5 0 0 0 0 f. Special operation/tolerance factor g. labor/overhead/equi pment cost = c x (1+d+e+f) $30 $15 $30 $15 $15 $5 $8 $8 h. purchased materials/component s cost $21 $0 $0 $0 $7 $3 $0 $0 Total Cost = 62 $156 Table A3.3. Cost details for moveable plates/guide pins. Operatio n1 Operatio n2 Operatio n3 Operation 4 Operatio n5 Operation 6 Operatio n7 Rough cut into two pieces Set-Up CNC/Mil l Milling Cut Aluminu m for guide pin frame Drill holes in guide pin frame Cut stock into 4 pieces for guide pins Insp & Clean Up a. total time to complete operation(s) in hours 0.083 0.25 0.75 0.0833 0.0833 0.083 0.25 b. labor rate for the operation ($/hr) c. Labor cost = axb d. basic overhead factor e. Equipment factor f. Special operation/tolerance factor g. labor/overhead/equipme nt cost = c x (1+d+e+f) h. purchased materials/components cost 12 12 20 12 12 12 12 $1 1 0.5 0 $3 1 0 0.25 $15 1 0.5 0.25 $1 1 0.5 0 $1 1 0.5 0 $1 1 0 0.25 $3 1 0 0.25 $3 $7 $41 $2 $2 $2 $7 $40 $0 $0 $11 $0 $6 $0 Moveable Plates/Guide Pins 63 Total Cost = $121 Table A3.4. Cost details for paddle assembly. Operat ion 1 SetUp CNC/ Mill Operat ion 2 Mill out sheet Operat ion 3 cut alumin um for handle Operat ion 4 Set-Up CNC/ Mill Operat ion 5 mill end of handle Operat ion 6 drill and tap hole in handle Operati on 7 Cut lever to length Operat ion 8 Tap end of lever a. total time to complete operation(s) in hours 0.25 1 0.1666 0.25 0.333 0.333 0.1666 0.1666 b. labor rate for the operation ($/hr) 12 20 12 12 20 12 12 c. Labor cost = axb d. basic overhead factor e. Equipment factor f. Special operation/toleranc e factor $3 $20 $2 $3 $7 $4 1 1 1 1 1 0.5 0.5 0.5 0.5 0.25 0.25 0 g. labor/overhead/eq uipment cost = c x (1+d+e+f) $8 $55 h. purchased materials/compon ents cost $0 $10 Paddle Assembly Operat ion 9 Assem ble Paddle and Handl e 0.0833 3 Operat ion 10 Insp & Clean Up 12 12 12 $2 $2 $1 $3 1 1 1 1 1 0.5 0.5 0.5 0.5 0.5 0.5 0.25 0.25 0 0 0 0 0 $5 $8 $18 $10 $5 $5 $2 $8 $15 $0 $0 $0 $6 $0 $2 $0 64 Total Cost = 0.25 $157 Table A3.5. Cost details for roller assembly. Operati on 1 Rough cut into two pieces Operati on 2 Set-Up CNC/ Mill Operati on 3 Turn down Diamet ers Operati on 4 Apply Rubber Film Operati on 5 Cut Alumin um for Frame Operati on 6 Drill holes and thread a. total time to complete operation(s) in hours b. labor rate for the operation ($/hr) c. Labor cost = axb d. basic overhead factor e. Equipment factor f. Special operation/tolerance factor g. labor/overhead/equi pment cost = c x (1+d+e+f) h. purchased materials/compone nts cost 0.083 0.25 0.166 0.0833 0.333 12 12 20 12 $1 1 $3 1 $3 1 0.5 0 0.5 0.25 $3 $40 Roller Assembly Assemble Frame/Rollers/ Motor Operati on 8 Insp & Clean Up 0.5 0.1666 0.25 12 12 12 12 $1 1 $4 1 $6 1 $2 1 $3 1 0.5 0.25 0.5 0 0.5 0 0.5 0 0.5 0 0.5 0 $8 $9 $2 $10 $15 $5 $8 $0 $10 $15 $23 $0 $110 $0 65 Operation 7 Total Cost = $258 A4: User Manual Paper Folding Device User Manual Table of Contents 1.0. How to Operate the Device ........................................................................................................................................... 67 2.0. How the System Works ................................................................................................................................................. 69 3.0. Maintenance .................................................................................................................................................................. 72 3.1. Electrical System ................................................................................................................................................ 72 3.2. Roller System ..................................................................................................................................................... 73 3.3. Paddle Assembly ................................................................................................................................................ 73 3.4. Moveable Plates ................................................................................................................................................ 74 4.0. Replacement Parts List .................................................................................................................................................. 75 66 1.0. How to Operate the Device Step 1: Ensure handle lever is in proper starting position as shown in Figure 1. Figure 1 Step 2: Load newspaper into slot of box as shown in Figure 2. The paper should be orientated so that the Wally’s and Wimpy’s name is face up and the creased edge is facing towards you as shown in Figure 3. You Facing This Way Figure 2 Figure 3 Step 3: Rotate handle of paddle 180 degrees clockwise (left to right) as shown in Figures 4 & 5. 67 Figure 4 Figure 5 Step 4: Push handle forward (away from you) until it stops and can’t move any further as shown in Figure 6. Figure 6 Step 5: Pull handle backward (towards you) until it can’t move any further as shown in Figure 7. 68 Figure 7 Step 6: Rotate handle of paddle 180 degrees counterclockwise (right to left) as shown in Figures 7 & 8. Step 7: Figure 7 Figure 8 Repeat steps 1 through 6 to fold additional newspapers 2.0. How the System Works 1.) When paper is loaded into the device it will go in between two moveable plates and paddle blades. The interior box dimensions are made to fit the paper exactly so that it aligns centered and in the correct position. 69 Hinged Paddle Handle Slot to load 2.) Once the paper is loaded correctly, the paddle handle is rotated 180 degrees. The rotating motion causes the paddle blade to be in contact with the moveable plates at all times. This folds the paper on both sides in opposite directions, creating the z‐fold. Paddle Bottom Plate 3.) The bottom moveable plate is supported by springs to hold it in position and force the plate against the paddle during folding. The springs are located on the 4 corners of the plate for even distribution. 70 Support Springs 4.) Once the paper is folded it is fed into a roller system that is driven by 75 rpm AC motor. The Rollers flatten the paper to the required thickness and eject the paper out of the back of the device. The motor is housed outside the device for easy maintenance and replacement. The motor will also turn off, stopping the rollers, if the lid is open. This is achieved by a safety switch under the lid. Motor Housing Rollers and Pulleys Safety Switch 5.) Once the paper is extracted out of the back of the device the paper is in the required z‐fold for packaging and is ready to be placed into an envelope. 71 3.0. Maintenance 3.1. Electrical System All the electrical components are constructed in a closed loop system, and are regulated by a 3 Amp fuse. The trouble shooting process for the electrical system is summarized below. Refer to Tables 1 and 2 for each individual part number. Item 1 – 3 Amp fuse: This fuse regulates the current through the electrical system, and will break the circuit connection in the instance of a power surge to protect the motor and the rest of the electrical system. It is located in the bottom corner of the box next to the roller system encased in a black connector. If the system does not turn on make sure the fuse has not been blown by removing it from the black encasing. Item 2 – Power switch: This switch turns the system on allowing it to draw power from the wall outlet. It is located on the outside of the motor encasement next to the power cord. If the system does not turn on make sure the device is plugged into the wall and that the power switch is switched on. Item 3 – Safety switch: This contact switch is a safety feature located in the top corner of the box. It turns the system off when the lid is open. If the system is not running make sure the lid is closed properly such that it contacts the switch. This safety feature will allow work to be done inside the box without the system running, however, when working inside the box make sure the power switch is turned off before performing any maintenance or work inside the box. Item 4 – Motor: The motor drives the roller system, in order for this to happen, the device must be plugged in, power switch on, the fuse in the on position, and the lid shut to contact the safety 72 switch. If this does not occur, turn the power switch off and unplug the cord from the wall. Then open the lid and check the wiring. Make sure all the wires are securely connected to each component; if they are secure the motor may need to be replaced. 3.2. Roller System The roller system is located in the rear of the box, and consists of two rollers, the rubber film on the lower roller, the mounts, the motor drive connection, and the track belt system. The trouble shooting process for the roller system is summarized below. Refer to Tables 1 and 2 for each individual part number. Item 1 – Motor drive connector: This connection connects the drive arm of the motor to the bottom roller. If the system isn’t operating make sure there is a good connection between the shaft of the motor and that of the roller. Item 2 – Rubber film: The rubber film on the lower roller aids in pulling the paper from the paddle. If it begins to wrinkle or tear away from the roller it will need to be replaced. First remove the current layer and wet the roller with acetone to remove left over adhesive. Wipe it down and sand it lightly to remove any leftover adhesive. Once all the adhesive is removed, and the roller is dry, roll on a new piece of rubber and let set for 30 minutes to ensure proper bonding with the adhesive. Item 3 – Pulleys: If the pulleys break they will need to be replaced. See Tables 1 and 2 for replacement part information. Item 4 – Track Belt: If the track belt breaks or the connection begins to slip due to stretching, a new belt will need to be made. See Tables 1 and 2 for replacement part information. Cut the belt to 14 inches. Then glue the ends together with super glue and let set for 20 minutes to ensure proper bonding with the glue. 3.3. Paddle: The paddle is made of five parts: the knob, the handle, the shaft, and the two blades. The trouble shooting process is summarized below. Refer to Tables 1 and 2 for each individual part number. Item 1 – Knob: This knob screw onto the end of the handle for grip, if it becomes loose or off, screw it back on, if unable to it may require being replaced. Item 2 – Handle: The handle acts as a lever arm, and screws into the shaft. If it becomes loose or removed, then screw it back into the shaft if you are able, if not then it may require being replaced. Item 3 – Shaft: The shaft goes into the box to join with the blades. It may become difficult to move, and if so simply lubricate the shaft and the groove with dry graphite lubricant to ease the movements. Item 4 – Blades: The two blades may over time become warped or bent, if this occurs remove the three screws and remove them. They will need to be replaced with new paddle blades. 73 3.4. Movable Plates: The movable plate assembly consists of an upper plate and a lower plate, the guide rods, and eight springs. The trouble shooting process is summarized below. Refer to Tables 1 and 2 for each individual part number. Item 1 – Guide Rods: There are four guide rods that keep the plates moving in the proper direction, if one of these should become bent or broken, it will need to be replaced. Item 2 – Plates: If a plate should happen to become warped bent or broken, it will need to be replaced to maintain the ability to create an acceptable fold. If the fold starts to become undesirable or if the paper starts to become difficult to load check the plates for this occurrence. Item 3 – Springs: The springs support the bottom plate, allowing it to maintain contact with the paddle blades. If the paper starts to become difficult to load, look to see if the bottom plate is sagging and not contacting the blade while in the rest position, if so the springs have fatigued and will need to be replaced. 74 4.0. Replacement Parts List Table 1. Replacement parts (manufactured). Part number 1 2 3 4 5 6 7 8 9 10 11 12 13 14 15 16 17 18 19 20 21 22 23 24 25 26 Part name Handle Handle bushing Guide pin support Bottom plate Box bottom Box back Drive pin Guide pin and motor support Guide pin Box front top Box front bottom Motor housing Box lid Lever Roller Top paddle blade Bottom paddle blade Slotted box side Box side 2 Top plate Idler Shaft Roller Asm Top Top Angle Roller Asm Right Roller Asm Left Roller Asm Bottom 75 Table 2. Replacement parts list/bill of materials (purchased) part number part supplier Supplier ID cost per qnty. P1 P2 P3 P4 P5 P6 P7 knob Ball Bearings AC Motor 1/4" Coupling 5/16" Coupling Flex. Spider 1/4" Aluminum Bar Stock 36" Length 61095K45 6455K2 6142K48 6408K111 6408K112 6408K84 8975K563 $1.39 $14.87 $48.48 $2.33 $2.33 $1.52 $11.09 1 4 1 1 1 1 1 P8 Springs N/A $6.05 8 P9 P10 P11 P12 P13 P14 P15 P16 P17 P18 P19 P20 P21 P22 P23 P24 P25 P26 P27 P28 Track Belt 0.5" x 36" Pulleys 1.25" dia. Acetal PVC 2" x 24" round stock Rubber Film 18"x12"x1/32" HDPE 24"x48"x3/8" Stainless Steel 72"x1/4" barstock Aluminum 36"x1" barstock 10pk small wire clips 10pk Wire Connectors #18 gauge wire Power Cord Rocker Switch Inline Fuse Holder 4pk 3A fuse push button switch 8‐32 x 3/8" machine screw 8‐32 x 3/4" machine screw 2pk 2" Narrow Hinge Snap Latch #10 ‐ 1.5" Mcmaster Mcmaster Mcmaster Mcmaster Mcmaster Mcmaster Mcmaster Century Springs Mcmaster Mcmaster Mcmaster Mcmaster Mcmaster Mcmaster Mcmaster Radio Shack Radio Shack Radio Shack Radio Shack Radio Shack Radio Shack Radio Shack Radio Shack Lowe's Lowe's Lowe's Lowe's Lowe's 7891K5 57105K16 8745K26 8622K41 8671K34 89535K21 6750K193 2781668 6403133 2781226 6102876 2750694 2701281 2701025 2751566 57842 57844 196300 51960 68374 $17.26 $7.61 $15.54 $33.92 $46.51 $7.76 $33.02 $2.99 $2.19 $6.99 $7.99 $2.99 $2.69 $2.99 $2.99 $1.18 $1.18 $2.56 $5.04 $5.47 1 3 1 1 1 1 1 1 1 1 1 1 1 1 1 1 1 1 2 1 76 9 3 19 10 4 18 6 Paddle Asm. 11 17 5 Outer Box Assembly 16 1 14 P1 Paddle Assembly Part Num 1 14 16 P1 Part Name Handle Lever Paddle Blades Knob P24 P24 21 22 22 23 24 P24 20 P24 15 P10 26 26 P2 P2 P24 7 P24 15 26 25 25 Roller Assembly Quantity 1 1 1 2 2 2 3 1 1 3 1 4 12 Roller Setup Parts List Part Number Discription 23 Right Side 24 Left Side 21 Top Brace 22 Top Bracket 25 Mounting Bracket 15 Roller 26 Roller Shaft 7 Dirve Shaft 20 Idler Shaft P10 Pulleys P9 Belt P2 Bearings P24 8-32 Machine Screws REV .500 i 0.005 A B A REVISION HISTORY DESCRIPTION DATE APPROVED .500 1.000 1.000 1.500 7.000 i 0.005 B .491 3.001 i 0.005 C C B .502 O .307 R .500 NAME Brad DRAWN CHECKED ENG APPR MGR APPR TEAM CATALYST DATE 06/09/09 UNLESS OTHERWISE SPECIFIED DIMENSIONS ARE IN INCHES ANGLES ±1.0° 3 PL ±0.005 Ohio University Senior Design Team 2 TITLE Handle SIZE DWG NO D 1 FILE NAME: 001_Handle(partnum1).dft SCALE: WEIGHT: SHEET 1 OF 1 REV REV REVISION HISTORY DESCRIPTION DATE APPROVED O 2.000 O 1.000 O 1.500 Cut from 2" Round Stock PVC A O .125 .250 .750 1.000 NAME Brad DRAWN CHECKED ENG APPR MGR APPR TEAM CATALYST DATE 06/09/09 UNLESS OTHERWISE SPECIFIED DIMENSIONS ARE IN INCHES ANGLES ±1.0° 3 PL ±0.005 Ohio University Senior Design Team 2 TITLE Handle Bushing SIZE DWG NO D 2 FILE NAME: 002_HandleBushing(partnum2).dft SCALE: WEIGHT: SHEET 1 OF 1 REV REVISION HISTORY DESCRIPTION REV DATE APPROVED .250 1.375 1.000 13.500 O .250 A DETAIL A NAME Brad DRAWN CHECKED ENG APPR MGR APPR DATE 06/09/09 UNLESS OTHERWISE SPECIFIED DIMENSIONS ARE IN INCHES ANGLES ±2.0° 2 PL ±0.05 3 PL ±0.005 TEAM CATALYST TEAM 2 TITLE Top Guidepin Support SIZE DWG NO D 3 REV FILE NAME: 003_GUIDEPINSUPPORT(partnum3).dft SCALE: WEIGHT: SHEET 1 OF 1 REV REVISION HISTORY DESCRIPTION DATE APPROVED .375 .125 PLATE CUT FROM 3/8" THICK STOCK PLATE OF HIGH DENSITY POLY ETHALENE C 12.750 3.844 5.594 6.594 ALL INTERIOR RADII ARE 0.125" +0.005" A .500 .750 .500 A 13.000 11.500 DETAIL A SLOT CLEARANCE CUT FOR 1/4" DIA STOCK TYPICAL 1.000 2.000 8.406 10.750 B NAME Brad DRAWN CHECKED ENG APPR MGR APPR DATE 06/09/09 UNLESS OTHERWISE SPECIFIED DIMENSIONS ARE IN INCHES ANGLES ±2.0° 2 PL ±0.05 3 PL ±0.005 TEAM CATALYST TEAM 2 TITLE Bottom Movable Plate SIZE DWG NO D 4 REV 0 FILE NAME: 004_bottom_plate_DRAFT(partnum4).dft SCALE: WEIGHT: SHEET 1 OF 1 REV .500 A REVISION HISTORY DESCRIPTION DATE APPROVED 4x O .250 `.375 12.500 Cut from 1/2" thick MDF 8x O .145 `1.000 Board 5.250 x4 typical 1.000 x4 typical B A 16.000 NAME Brad DRAWN CHECKED ENG APPR MGR APPR TEAM CATALYST DATE 06/09/09 UNLESS OTHERWISE SPECIFIED DIMENSIONS ARE IN INCHES ANGLES ±1.0° 3 PL ±0.005 Ohio University Senior Design Team 2 TITLE Box Bottom SIZE DWG NO D 5 FILE NAME: 005_BoxBottom(partnum5).dft SCALE: WEIGHT: SHEET 1 OF 1 REV REVISION HISTORY DESCRIPTION REV DATE APPROVED PIECE CUT FROM 1/2" STOCK MEDIUM DENSITY FIBER WOOD INTERIOR RADII 0.125" +/- 0.005" DETAIL E .500 c E .250 14.000 4.250 5.000 1.875 .500 A 7.750 3.625 1.000 DETAIL D COUNTER SUNK #10 SCREW HOLES 4 SETS TYPICAL D n 0.050 B B NAME Brad DRAWN CHECKED ENG APPR MGR APPR TEAM CATALYST DATE 06/09/09 UNLESS OTHERWISE SPECIFIED DIMENSIONS ARE IN INCHES ANGLES ±1.0° 3 PL ±0.005 Ohio University Senior Design Team 2 TITLE Box Back SIZE DWG NO D 6 FILE NAME: 006_BOXBACK(partnum6).dft SCALE: WEIGHT: SHEET 1 OF 1 REV REV REVISION HISTORY DESCRIPTION DATE APPROVED 1/4-20 UNC O .250 3.750 2.750 NAME Brad DRAWN CHECKED ENG APPR MGR APPR TEAM CATALYST DATE 06/09/09 UNLESS OTHERWISE SPECIFIED DIMENSIONS ARE IN INCHES ANGLES ±1.0° 3 PL ±0.005 Ohio University Senior Design Team 2 TITLE Drive Shaft SIZE DWG NO D 10 FILE NAME: 007_DriveShaft(partnum7).dft SCALE: WEIGHT: SHEET 1 OF 1 REV REV REVISION HISTORY DESCRIPTION DATE APPROVED O .250 A 7.625 NAME Alex DRAWN CHECKED ENG APPR MGR APPR TEAM CATALYST DATE 06/09/09 UNLESS OTHERWISE SPECIFIED DIMENSIONS ARE IN INCHES ANGLES ±1.0° 3 PL ±0.005 Ohio University Senior Design Team 2 TITLE Guide Pins SIZE DWG NO D 9 FILE NAME: 009_GuidePin_(Part-Num_9).dft SCALE: WEIGHT: SHEET 1 OF 1 REV REV 6.750 2x .250 C .750 B O .125 `.250 .250 x4 typical REVISION HISTORY DESCRIPTION DATE APPROVED Cut from 1" thick MDF Board 14.000 R 1.000 R .750 4x O .190 `1.000 O.500 B 1.000 x4 typical 3.875 A NAME Brad DRAWN CHECKED ENG APPR MGR APPR TEAM CATALYST DATE 06/09/09 UNLESS OTHERWISE SPECIFIED DIMENSIONS ARE IN INCHES ANGLES ±1.0° 3 PL ±0.005 Ohio University Senior Design Team 2 TITLE Box Front Top SIZE DWG NO D 10 FILE NAME: 010_BoxFrontTop(partnum10).dft SCALE: WEIGHT: SHEET 1 OF 1 REV REV REVISION HISTORY DESCRIPTION DATE APPROVED CUT FROM 3/4" STOCK MEDIUM DENSITY FIBER WOOD DETAIL B B .250 R .500 7.250 1.000 B DETAIL A COUNTER SUNK #10 SCREW HOLES 4 TYPICAL 3.875 n 0.050 C A C 14.000 NAME Brad DRAWN CHECKED ENG APPR MGR APPR TEAM CATALYST DATE 06/09/09 UNLESS OTHERWISE SPECIFIED DIMENSIONS ARE IN INCHES ANGLES ±1.0° 2 PL ±0.05 3 PL ±0.050 Ohio University Senior Design Team 2 TITLE Box Front Bottom SIZE DWG NO D 11 FILE NAME: 011_BOXFRONTbottom(partnum11).dft SCALE: WEIGHT: SHEET 1 OF 1 REV REV 4.875 REVISION HISTORY DESCRIPTION DATE APPROVED 5.000 3.250 3.125 B .125 A 4.125 4.250 .125 NAME JD DRAWN CHECKED ENG APPR MGR APPR TEAM CATALYST DATE 06/09/09 UNLESS OTHERWISE SPECIFIED DIMENSIONS ARE IN INCHES ANGLES ±1.0° 3 PL ±0.005 Ohio University Senior Design Team 2 Motor Housing SIZE DWG NO D 12 FILE NAME: 012_MotorHousing(partnum12).dft SCALE: WEIGHT: SHEET 1 OF 1 REV 14 REV REVISION HISTORY DESCRIPTION DATE APPROVED 2 17.5 5 0.12 0.5 .14 0 O B A DETAIL B 0.5 4.5 DETAIL A NAME DATE DRAWN bd805104 06/09/09 CHECKED ENG APPR MGR APPR UNLESS OTHERWISE SPECIFIED DIMENSIONS ARE IN INCHES ANGLES ±1.0° 3 PL ±0.005 TEAM CATALYST Ohio University Senior Design TITLE Box Lid SIZE DWG NO 13 A2 FILE NAME: 013_Lid(partnum13).dft SCALE: WEIGHT: SHEET 1 OF 1 REV REV REVISION HISTORY DESCRIPTION DATE APPROVED O .375 CUT FROM 3/8" DIA ALUMINUM STOCK B A 4.000 .500 DETAIL A THREADED END TYPICAL NAME Brad DRAWN CHECKED ENG APPR MGR APPR TEAM CATALYST DATE 06/09/09 UNLESS OTHERWISE SPECIFIED DIMENSIONS ARE IN INCHES ANGLES ±1.0° 3 PL ±0.050 Ohio University Senior Design Team 2 TITLE Handle Lever SIZE DWG NO D 14 FILE NAME: 014_LEVER(partnum14).dft SCALE: WEIGHT: SHEET 1 OF 1 REV REV REVISION HISTORY DESCRIPTION DATE APPROVED 1/4-20 UNC`1.000 Typical O 2.000 4.750 5.750 1.000 NAME Brad DRAWN CHECKED ENG APPR MGR APPR TEAM CATALYST DATE 06/09/09 UNLESS OTHERWISE SPECIFIED DIMENSIONS ARE IN INCHES ANGLES ±1.0° 3 PL ±0.005 Ohio University Senior Design Team 2 TITLE Roller SIZE DWG NO D 15 FILE NAME: 015_Rollerpartnum(15).dft SCALE: WEIGHT: SHEET 1 OF 1 REV REV .344 .250 REVISION HISTORY DESCRIPTION DATE APPROVED .250 E .344 A Cut from 3/8" thick plate stock of High Density Poly Ethalene R .094 .077 DETAIL A D .333 X 9.18° DETAIL B .500 .333 .875 .594 B 1.750 2.250 2.750 .406 4.500 4.167 3.625 C 3X O .134 10.000 10.500 11.000 4.500 NAME Brad DRAWN CHECKED ENG APPR MGR APPR TEAM CATALYST DATE 06/09/09 UNLESS OTHERWISE SPECIFIED DIMENSIONS ARE IN INCHES ANGLES ±1.0° 3 PL ±0.005 Ohio University Senior Design Team 2 TITLE Paddle Blade SIZE DWG NO D Paddle Blade 16 REV 0 FILE NAME: 016_PaddleBlade_DRAFT(partnum16).dft SCALE: WEIGHT: SHEET 1 OF 1 REVISION HISTORY DESCRIPTION REV O .138 4.125 APPROVED 3.000 .250 3.625 DATE 2" wide x 0.125" ` slots 1.000 1.000 .250 .500 B 5.931 * 4.931 * DETAIL A 10.931 * 11.931 * O .145 Typical 16.000 A .928 x2* .928 2.803 * 4.803 * 6.678 B 6.678 x2* O .500 Typical 1.000 5.250 10.750 O .190 Typical 15.000 *Note: Dimensions are to nearest edgeline of screw hole NAME Alex DRAWN CHECKED ENG APPR MGR APPR DATE 06/09/09 UNLESS OTHERWISE SPECIFIED DIMENSIONS ARE IN INCHES ANGLES ±1.0° 3 PL ±0.005 TEAM CATALYST Ohio University Senior Design Team 2 TITLE Outer Box Side Load SIZE DWG NO 17 D FILE NAME: 017_SideLoad_(Part-Num_17).dft SCALE: WEIGHT: SHEET 1 OF 1 REV REVISION HISTORY DESCRIPTION REV 1.000 12.000 DATE APPROVED B 15.000 16.000 .250 1.000 .250 2.875 4.875 6.750 1.313 A C A 1.000 5.250 10.750 15.000 O .190 Typical O .438 O .138 x4 .500 *Note: dimensions are to nearest edgeline of screw holes O .500 Typical 1.562 1.562 DETAIL A NAME Alex DRAWN CHECKED ENG APPR MGR APPR DATE 06/09/09 UNLESS OTHERWISE SPECIFIED DIMENSIONS ARE IN INCHES ANGLES ±1.0° 3 PL ±0.005 TEAM CATALYST Ohio University Senior Design Team 2 TITLE Outer Box Side SIZE DWG NO 18 D FILE NAME: 018_Side_(Part-Num_18).dft SCALE: WEIGHT: SHEET 1 OF 1 REV .375 REV .125 C 8.906 7.094 6.094 13.000 REVISION HISTORY DESCRIPTION DATE APPROVED PLATE CUT FROM 3/8" THICK STOCK PLATE OF HIGH DENSITY POLY ETHALENE ALL INTERIOR RADII ARE 0.125" +0.005" D A 12.500 .750 11.500 .500 .500 .500 DETAIL D SLOT CLEARANCE CUT FOR 1/4" DIA STOCK TYPICAL 1.000 2.219 4.344 10.969 12.750 B NAME Brad DRAWN CHECKED ENG APPR MGR APPR DATE 06/09/09 UNLESS OTHERWISE SPECIFIED DIMENSIONS ARE IN INCHES ANGLES ±2.0° 2 PL ±0.05 3 PL ±0.005 TEAM CATALYST TEAM 2 TITLE Top Plate Draft Top Movable Plate SIZE DWG NO D 19 FILE NAME: 019_top_plate_DRAFT(partnum19).dft SCALE: WEIGHT: SHEET 1 OF 1 REV 0 REV REVISION HISTORY DESCRIPTION DATE APPROVED 1.750 1.500 A 1/4-20 UNC O .250 NAME Brad DRAWN CHECKED ENG APPR MGR APPR TEAM CATALYST DATE 06/09/09 UNLESS OTHERWISE SPECIFIED DIMENSIONS ARE IN INCHES ANGLES ±1.0° 3 PL ±0.005 Ohio University Senior Design Team 2 TITLE Idler Shaft SIZE DWG NO D 20 FILE NAME: 020_Idler_Shaft_(partnum20).dft SCALE: WEIGHT: SHEET 1 OF 1 REV REVISION HISTORY DESCRIPTION REV DATE APPROVED 6.000 5.500 .500 A 1.125 1.125 .375 1.500 .375 4X O .216 B .125 Use Standard 1.5" X .125" Aluminum Stock as Width and Thickness NAME Brad DRAWN CHECKED ENG APPR MGR APPR TEAM CATALYST DATE 06/09/09 UNLESS OTHERWISE SPECIFIED DIMENSIONS ARE IN INCHES ANGLES ±1.0° 3 PL ±0.005 Ohio University Senior Design Team 2 TITLE Top Support Roller Assembly SIZE DWG NO D 21 REV FILE NAME: 021_Top_support_roller_assembly(partnum21).dft SCALE: WEIGHT: SHEET 1 OF 1 REV REVISION HISTORY DESCRIPTION DATE APPROVED 1.500 2X #10-32 UNF 2X O .216 .125 1.000 Use Standard 11" X 1" X .125" Aluminum Angle Stock NAME Brad DRAWN CHECKED ENG APPR MGR APPR TEAM CATALYST DATE 06/09/09 UNLESS OTHERWISE SPECIFIED DIMENSIONS ARE IN INCHES ANGLES ±1.0° 3 PL ±0.005 Ohio University Senior Design Team 2 TITLE Top Angle Roller Assembly SIZE DWG NO D 22 REV FILE NAME: 022_top_angle_roller_assembly_(partnum22).dft SCALE: WEIGHT: SHEET 1 OF 1 REV REVISION HISTORY DESCRIPTION DATE APPROVED 1.125 .375 4X #10-32 UNF D 6.750 6.125 2X O .312 2X O .625 -.002 ` .188 4.500 2.375 B .375 .750 1.125 .500 A 1.500 .250 "D" Press Fit for Bearings Use Standard 1.5" X .25" Aluminum Stock as Width and Thickness NAME Brad DRAWN CHECKED ENG APPR MGR APPR TEAM CATALYST DATE 06/09/09 UNLESS OTHERWISE SPECIFIED DIMENSIONS ARE IN INCHES ANGLES ±1.0° 3 PL ±0.005 Ohio University Senior Design Team 2 TITLE Right Side Roller Assembly SIZE DWG NO D 23 REV FILE NAME: 023_Right_Side_Roller_Assembly_(partnum23).dft SCALE: WEIGHT: SHEET 1 OF 1 1.125 .375 REV REVISION HISTORY DESCRIPTION DATE APPROVED 4X #10-32 UNF 2X 1/4-20 UNC D 6.750 2X O .312 6.125 2X O .625 - .002 ` .188 5.520 4.500 2.375 B .375 .750 1.125 .500 A 1.500 .250 "D" Press Fit for Bearings Use Standard 1.5" X .25" Aluminum Stock as Width and Thickness NAME Brad DRAWN CHECKED ENG APPR MGR APPR TEAM CATALYST DATE 06/09/09 UNLESS OTHERWISE SPECIFIED DIMENSIONS ARE IN INCHES ANGLES ±1.0° 3 PL ±0.005 Ohio University Senior Design Team 2 TITLE Left Side Roller Assembly SIZE DWG NO D 24 REV FILE NAME: 024_Left_Side_Roller_Assembly_(partnum24).dft SCALE: WEIGHT: SHEET 1 OF 1 REV REVISION HISTORY DESCRIPTION DATE APPROVED 1.500 1.000 2X O .250 2X O .216 .125 1.000 Use Standard 11" X 1" X .125" Aluminum Angle Stock NAME Brad DRAWN CHECKED ENG APPR MGR APPR TEAM CATALYST DATE 06/09/09 UNLESS OTHERWISE SPECIFIED DIMENSIONS ARE IN INCHES ANGLES ±1.0° 3 PL ±0.005 Ohio University Senior Design Team 2 TITLE Bottom Angle Roller Assembly SIZE DWG NO D 25 REV FILE NAME: 025_Bottom_angle_roller_assembly_(partnum25).dft SCALE: WEIGHT: SHEET 1 OF 1 REV REVISION HISTORY DESCRIPTION DATE APPROVED 1/4-20 UNC O .250 2.500 1.500 NAME Brad DRAWN CHECKED ENG APPR MGR APPR TEAM CATALYST DATE 06/09/09 UNLESS OTHERWISE SPECIFIED DIMENSIONS ARE IN INCHES ANGLES ±1.0° 3 PL ±0.005 Ohio University Senior Design Team 2 TITLE Roller Shaft SIZE DWG NO D 26 FILE NAME: 026_RollerShaft(partnum26).dft SCALE: WEIGHT: SHEET 1 OF 1 REV