1
CEROS
7 inch Tablet PC
User Manual
cERos cREATE
4GB
'
Contents
1
1
Overview
--
.
.'1 Appearance and Keys..
1.2 Basic Operation
1.2.1 Switch
-- ..2
-2
-2
-2
-- 2
-- 2
.
ON
1.2.2 Unlock the Screen .
.2.3 Lock the screen
.
'1
1.2.4 Switch OFF
1
'I
.2.5 Restart the device.
.2.6 Battery charging.
.
.
....
1.2.10 Browse the file in the device.
'l .2.11 Startup programs
1.2.12 Closeprograms
1.2.'l
3
1.2.14
1 .2.15
1 .2.16
1.2.17
1.2.18
..
4
Preface
4
5
5
Screen operation
5
Home screen.
5
.
Screen gestures
Security setting .
5
.
Display setting
WirelessAnd Network Settings
1.3 Technical specifications . . .... ...
product.
2. The functions information of this man ual is subject to the prod uct
itself; we will keep developing new functions. The information in this manual is subject to change without any prior notice.
3. The Company will not be responsible for any loss of personal da-
3
3
.2.8 Use T-Flash card. . .
'l .2.9 Connected to the
computer.
1. Thanks very much for purchasing the CEROS Create. Before
using this product, please read the manual carefully.
We will consider that you have read this manual when you use this
ta and damage caused by incorrect operation of software/Hardware, artificial damages, replacement of batteries or any other accident. To avoid loss of your data, please backup your data to your computer at any time.
4. We can not control any dispute from users'misunderstanding or
incorrect operation against the manual, the Company will not take
any relevant responsibility for any accidental loss potentially occurring in the process of using this manual.
5. Please do not repair it by yourself, otherwise, we will not provide
you with after-sale service.
6-Our Company reserves the final explanation right to this manual
and other relevant information.
- --2
.
1.2.7 Switch input methods
'I
1
1
Disclaimer
6
7
8
11
Dear Customers,
Thanks very much for purchasing our product! This device is builtin high performance Wifi receiver module, supporting external 3G
USB-DONGLE wireless network card, turning on the broadband
wireless networks, breaking through the restraint of network cable;
it will bring you into the portable media player world and fulfill your
entertainment needs. lt also support picture browsing, E-book Reader, games, online chat and other functions, various settings will
fully show your individuality.
Safety notices
This manual contains important information, in order to avoid
accidents, please read this manual carefully before you use
this product.
. Please do not let the player fall or rub or compact with hard objects during using, or it may cause surface scratch ofthe player, battery loose, data lose or damages of other hardware.
. Never let this product expose to the humid environment or rain
as the water leaked into may disable it to the extent beyond maint_
enance.
o You are recommended nottousethe headsetwith largevolume
continuously, please adjust the volume to the size of appropriate
security and control the using time to avoid the damage to your he_
aring, as excessive volume will cause permanent hea-ring damage.
. .Please do not cut offthe power abrupfly during software update
and download, or it may cause date loss and system error.
. Please don't turn on the device where the wireless equipment
is forbidden or when the usage of the device will cause interferenc_
e and danger. Please observe any relevant restrictions.
. Please use original accessories and batteries, do not use
incompatible products.
. Please don't use the devtce in gas station or nearby the fuel and chemicals.
. Please don't use this product when you are driving or walking in
the street, or it may cause an accident.
. Please do not scrape the TFT screen, it may be damaged and
can not be display anything.
. Never clean the device with any chemicals and detergent, or it
will damage the product surface and corrode the spray paint
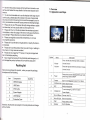
1. Overview
1.1 Appearance and Keys
ffii,k
Symbol
/Volume
Welcome to purchase this product , when you open the package
acceptance of the following:
Components
DescriDtion
Press the leftside of the keyshorfly js reduce
volume functlon
Volume-
Packing list
Item
Name
+
Press the right side ofthe key shorily is increase
volume function
,
2
Power
Press shortly to enter sleeping/waking up mode,
press long to switch ON/OFF
Stereo earnhone ia^L
Quantity
CEROS Create
1
A
Camera
Earphone Jack
2
USB Cable
1
5
MIC
Build-in microphone
J
OTG Cable
I
4
PowerAdapter
Charger port
1
To avoid damaging , use the included
Power Adapter
1
A
User Manual
1
Protective Case
1
Attention: Accessories are subject to the real products and change
without notice.
Built - in 0.3 Meqapixel camera (Front / Back
7
l\.4icro
USB port
8
l\.4icro
SD Card
I
Rest
Press shortlv to reset
Speaker
Built-in Speaker
10
Connect with PC
Micro SD Card Slot
1.2 Basic Operation
1.2.1 Switch ON
When the device is in the OFF mode, press and hold "Power" key
for 3 seconds to enter the And roid startup progress bar, then you
can enter to the system desktop.
'l
.2.2 Unlock the screen
Please press and drag
ocked automatically.
theu
icon to
the!,
the battery is fully charged at the first time. On charge the power
indicating lamp of the device is in high light blue color, the desktop
icon of the battery E keep rolling which shows it is connect to the
charger. This device is not recommended to charge with USB port,
please use the adapter.
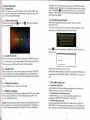
1.2.7 Switch input methods
then the LCD will unl-
The device support handwriting, number, letter, pinyin etc.
switching follow:
Click any text in pul area of the working program interface, it will
popping input keyboard interface, as shown below:
Press E, then it will popping "tnput Method" switch interface, as
shown below:
1.2.3 Lock the screen
When the device is in the ON mode, press the "POWER" key shortly. the system will lock the screen and enter the save power mode.
Then the screen is OFF but the system still in operation.
1.2.4 Switch OFF
When the device is in the ON mode, press and hold the "POWER"
key for 3 seconds, the screen will display the power off interface,
choose the power off item to confirm, the system will shut automatically.
1.2.5 Restart the device
Press "RESET" key and the device will reset.
edrod keyha.d len,nqs
Select the input method you want here.
[Noted] After newly install input method, you should ,,settings>Language & input>KEYBOARD & INPUT IVETHODS", then you can
use.
1.2.8 Use Micro SD card
. lnsert Micro SD card
1.2.6 Battery charging
lnsert the Micro SD card into the slot in direction of the device,s
bottom shell until you hear a sound of click.
lnsert the micro port of the battery adaptor into 220V AC slot on the
device, and connect the other side with the power socket. Then,
you can charge the device.
ln this MID device you can view and use the needed files in
catalogue of "MENU">"File manager"> "SD Card,,.
[Note] This device is not recommended to use USB interface to charge, please must use the special power adapter for charging. You should charge the batteryforat leastS-12 hours to make sure
.
Browse files in the memory card
. Remove Micro SD card
Close all open files from the Micro SD, then enter into,,MENU,,>
"SETTINGS">"TF card and & device storage", click,,Unmount SD
card" ,System will prompt that Micro SD card was removed safely.
Tap with your fingertips to the pop-up Micro SD Card
1. 2. 11 Startup programs
INote]
Click all the application icon you want to start and it can switch on.
applied in one direction.
2- Do not remove the Micro SD card before Unmounted it, or the
card may be damaged.
3. lf the memory card is write-protected, data will not be formatted
and written, please remove the write protection before such opera-
Press the icon ! continuously or the "ESC" key, the device will close the active program. You can also use the corresponding function in the management currently running applications to close the
program.
1. Do not insert the Micro SD card by force, this card can only be
tions
4. Major brands memory card is recommended to avoid the card is
not compatible to this device.
1.2.9 Connected to the computer
One end of the USB line connect to the com puter, the other end
connect the MID device, select "Settings>Developer options>USB
debugging", the device will connect with computer, and you can
copy files to the device.
1.2. 12 Close programs
1.2. 13 Screen operation
o
Zoom in and zoom out: ln applications which support zoom
gestures, such as photo / lE browser / mail and map etc. you can
zoom in or out the screen contents by opening or closing your two
fingers.
. Rolling: ln applications which support rolling gestures, such as
photo / lE browser/ mail and map etc. you can scroll the screen
contents by sliding yourfingers on the screen. lf you wantto stop
the rolling screen, you just need to touch it.
1.2.14 Home screen
. Switch home screen
1.2.10 Browse the file in the device
Click " Explorer"
pl,
You can see the files in the device
ln the home state, you can change the home interface by sliding
your fingers on the screen quickly.
. Custom Home Screen
Press the blank area on the home screen interface for a few seconds, it will appear "Choose wallpaperfrom" menu, then you can set
the home screen.
. Move application icons in screen
Press the icons of applications you need to move for several seconds, it will enter into the moving model (the icon of application will
be turn big), then drag the icon to desired position directly.
.
Move application icons screen to screen
Press the icons of applications you need to move for several seconds, and you can drag the icon to the left side or right side.
.
Delete applications
Press the icon of application you need to remove for several seconds, drag the icon to "x" (when the icon was turn big, the bottom of
screen will appear "x", then you can delete the application.
1.2. 15 Screen gestures
.
Click
When you need to input by the on-screen keyboard, you just need
to select applications or press the button on the screen, then click
the items.
o
Click "Continue" and draw again to confirm it
Press
-l
When you want to start the available options of a proiect(such as
web page Iink), you only need to press the project.
.
Slide
Sliding on the interface with your fingers to make vertical or horizo_
ntal dragglng action.
. Drag
Before you start dra_gging, you must press the items with yourfingers,.and can not let fingers leave the screen before dragging to thie
desired position.
o
Rotation
Changing the screen orientation by rotating the device laterally.
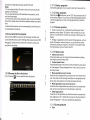
1.2.1 6
Security setting
You can set the unlock pattern, each time you open or wake your
MID device, you must draw pattern to unlock the screen. ln,,Settin_
gs>Securily>Screen lock", it support many unlockways.,,slide/
Face U nlock/Pattern/Pl N/Password".
lf use the "pattern", as below:
1. You must ensure the four-point connection when you draw the
unlock pattern-
3. Cilck "confirm" to complete unlock pattern designing.
4. Each time you open or waking your MID device, you must draw
pattern to unlock the screen.
1. 2. 17 Display setting
Click "Settings > Display", you can set the brightness/ wallpaper/
Auto rotate screen/ sleep/ font size of the screen.
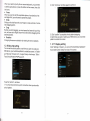
1.2. 18 Wireless And Network Settings
a) WlFl
Click "Settings>Wi-Fi", turn on the wifi, the device will find availabl_
e wireless network in the right interface.
Select the desired wireless network, the system will direcfly conne_
ct the.network or popup the password input window according to network access security settings. please consult your wireless net_
work administrator for the password.
B) Use 3G internet
This device supports the 3G wireless lnternet access. lnsert the
3G USB- Dongle into the USB-Host port, it will connect with the
lnternet after search the 3G signal.
Notel Please choose the generalized 3G Dongle in lhe market. lt is
recommended that bring the device when you bought the 3G
Dongle and have a test
.
C) Nilain functions-lnternet
Touch f lcon to surf the net.
Google is the default start page.
Touch the input field to display the keyboard
Touch
!
after entering a website address to open the
website.
lNoteI
The Android keyboard has few options for settings such as:
keyboard language, numbers and icons etc.
The lnternet browser can open fourwebsites simultaneously;
Touch ! and the menu will be displayed as follows:
Touch "Refresh" to refresh the current web page.
Touch "New tab" and a new website will be displayed.
Touch "New incognito tab" and a new blank website will be
displayed.
Touch "Share page" to Share this page to others.
Touch "Find on page" to enter new web address.
Touch "Request desktop site" to make it default web.
Touch "Save for offline reading" to read it when offline.
Touch "Page info" to check the web information.
Touch "Settings" to enter in browser settings.
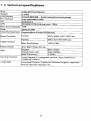
1.
3 Technical specifications
itze
,Vdoht
CD Display
,C lnterface
]S
lL190x W115x HlOlmm!
-0 inch 8OO'a8O: - 5 odint
.rnaeitiea r^,,^h
{iqh sD€sd Micrc USB
\ndreid 4.2
]PU
lard Drive Capacity 4GB
IAM
japacrty Expansaon
!,lusic Function
/ldeo Function
,hoto browse
WIFI
Camera Function
)DR3 512M8
iuD9ort Micro SD card 32GBamaxl
:ormat
ilP3,/WMA/AAC,UOGG
:ormat
,lKVlAVl,/RM/MP4 etc.
rrax, Reaolutions
920x1080
etc
,PGlBMP,/PNG,/GlF etc.
iupport
lO2.11}lldln
Transmission rale
Vlax 54Mbps
ilork Frequency
2.4GHz
Front Camera 0-3 megapixel camera , Back Camera 0.3
megapixel camera
limplified Chinese/Traditional Chinese/English/Japanese/
rrench/German/Spanish etc