1
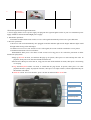
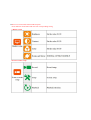
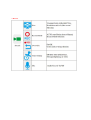
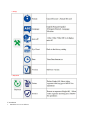
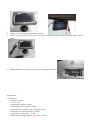
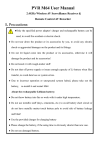
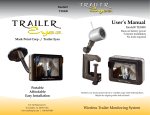
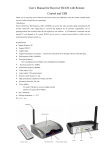
2.4GHZ REVERSING DVR CAMERA KIT
with 4.3” monitor
QM-3850
Ⅱ. Safety
Receiver should be fixed on automobile console or front windshield. LCD screen should not be collided and
CMOS camera should keep clean
Vehicle traveling data recorder is mainly to save the video file for a few seconds before and after accident
,rather than records video for the whole journey .4G card can save HD video around 40 minutes ,which is good
enough for normal use purpose
Insert the USB cable (not included) when connecting product into computer ,the system default is U disk ,which
can copy ,cut and paste ,delete and browsing video .Insert this device into USB port of computer and
removable disk will be pop up on your computer after a couple of seconds.
Do not expose this unit under the direct sunlight for a long period of time. Park in the shade to avoid damaging
the LCD.
Ⅲ. Contents:
No.
1
Component
name
Camera and
Transmitter
Pictures
Required amounts of
complete machine
1
2
Mainframe
Receiver
1
3
Vehiclemounted
support
1
4.
Power line
1
5
Mounting
Accesorries
1
Ⅳ. Product operation and signal instructions
1. Power supply mode: receiver power supply can plug into the cigarette lighter socket of your car. Transmitter power
supply should be connected with taillight power supply.
2. Transmitter operations:
Transmitter would transmit 2.4G wireless reverse video signal automatically when reverse gear shift starts.
3. Receiver operations:
3.1 Receiver will work automatically once plugged in and the indicator light will be bright. Indicator light would
be bright when storing video and images.
3.2. When receiver receives 2.G wireless reverse video signal, the screen would be switched to reverse picture.
3.3 Function instructions of receiver buttons:
♦ Menu/Back. Short press it for menu or back to last level. Long press it for video files protection or delete
function in replay mode.
♦ Page up/ Record. In menu, it would turn the page up. In picture, short press it to start and stop the video. In
playback, short press it for fast forward and fast backword.
♦ Power/enter. Short press it for turn on , long press for turn off the machine. In menu, short press it for entering
or verifying.
♦ Page down/Playback/volume. In menu, it would turn the page down. In picture, short press it to enter
playback interface quickly. In playback interface, short press it to adjust volume (volume adjustment only for
the machine with audio).
♦ Guard line on/off. In reverse interface, press it to turn on and turn off the Guard line.
Menu/Back
Up/Record
Power/Enter
Down/Playback
Guard line
3.4 Receiver's menu mode Function Description
Press different menu button and enter into corresponding setting
◊ Display setup
◊ Event recorder setup
◊ Record
◊ Setup
◊ Playback
Ⅴ. Installation
1. Install the receiver as follows:
2. Install receiver and station and windshield as follows:
3. Connect one end of receiver power line to main engine and the other end to car DC12V cigarette power socket as
follows:
4. Install transmitter to car tail and power line on reversing lights as follows:
Specifications:
A. Transmitter:
1. Voltage: 8-15VDC
2. Current: 0.2A
3. Transmitting frequency:2.4GHZ
4. Transmitting power: maximum 10dBm
5. Reversing camera resolution ratio: 30W pixels (VGA)
6. Emission wavelength of infrared ray: 850nm
7. Visual range of infrared ray: ≥1.5M
8. Infrared LED lighting conditions: Illuminancy: ≤5Lux
B: Receiver:
1. Voltage: 8-15VDC
2. Power current: ≤0.5A
3 Power consumption: ≤5 W
4. Shutdown current: <1mA
5. Receiving frequency: 2414Mhz
6. Receive sensibility: < -85dBm
7.LCD: 4.3″
8. LCD resolution: H*V (480x3RGBX272)
9. COMS lens resolution: HD 720P
C. General:
1. Transmission distance: ≥50M
2. Working temperature: -10/+50℃
3. Storage temperature: -20/+60℃
4. USB2.0
5. MICRO SD card above CLASS4, up to 32GB