1
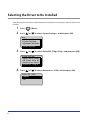
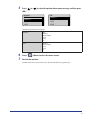
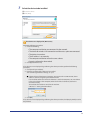
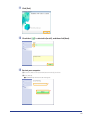
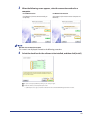
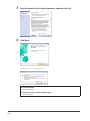
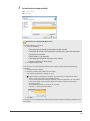
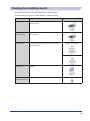
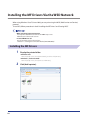
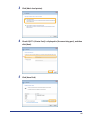
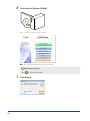
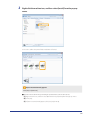
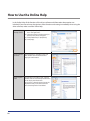
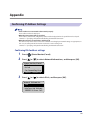
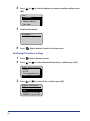
English
MF Driver Installation Guide
User Software CD-ROM. . . . . . . . . . . . . . . . . . . . . . . . . . . . . . . . . . . . . . . . . . . . . . . . . . . . . . . . . . . . . . . . . . . 1
About the Drivers and Software . . . . . . . . . . . . . . . . . . . . . . . . . . . . . . . . . . . . . . . . . . . . . . . . . . . . . . . . . . . . . . . . . . . 1
Supported Operating Systems. . . . . . . . . . . . . . . . . . . . . . . . . . . . . . . . . . . . . . . . . . . . . . . . . . . . . . . . . . . . . . . . . . . . . 1
Selecting the Driver to Be Installed. . . . . . . . . . . . . . . . . . . . . . . . . . . . . . . . . . . . . . . . . . . . . . . . . . . . . . . . 2
Installing the Driver/Software . . . . . . . . . . . . . . . . . . . . . . . . . . . . . . . . . . . . . . . . . . . . . . . . . . . . . . . . . . . . 4
Installing the MF Drivers and MF Toolbox. . . . . . . . . . . . . . . . . . . . . . . . . . . . . . . . . . . . . . . . . . . . . . . . . . 5
Installing with [Easy Installation]. . . . . . . . . . . . . . . . . . . . . . . . . . . . . . . . . . . . . . . . . . . . . . . . . . . . . . . . . . . . . . . . . . . 5
Installing with [Custom Installation] . . . . . . . . . . . . . . . . . . . . . . . . . . . . . . . . . . . . . . . . . . . . . . . . . . . . . . . . . . . . . . 12
USB cable connection (Only when connecting with USB). . . . . . . . . . . . . . . . . . . . . . . . . . . . . . . . . . . . . . . . . . 22
Checking the installation results. . . . . . . . . . . . . . . . . . . . . . . . . . . . . . . . . . . . . . . . . . . . . . . . . . . . . . . . . . . . . . . . . . 23
Installing the MF Drivers Via the WSD Network. . . . . . . . . . . . . . . . . . . . . . . . . . . . . . . . . . . . . . . . . . . 24
Installing the MF Drivers. . . . . . . . . . . . . . . . . . . . . . . . . . . . . . . . . . . . . . . . . . . . . . . . . . . . . . . . . . . . . . . . . . . . . . . . . . 24
Setting WSD. . . . . . . . . . . . . . . . . . . . . . . . . . . . . . . . . . . . . . . . . . . . . . . . . . . . . . . . . . . . . . . . . . . . . . . . . . . . . . . . . . . . . 30
How to Use the Online Help. . . . . . . . . . . . . . . . . . . . . . . . . . . . . . . . . . . . . . . . . . . . . . . . . . . . . . . . . . . . . 32
Appendix . . . . . . . . . . . . . . . . . . . . . . . . . . . . . . . . . . . . . . . . . . . . . . . . . . . . . . . . . . . . . . . . . . . . . . . . . . . . . 33
Confirming IP Address Settings. . . . . . . . . . . . . . . . . . . . . . . . . . . . . . . . . . . . . . . . . . . . . . . . . . . . . . . . . . . . . . . . . . . 33
Confirming IPv4 address settings. . . . . . . . . . . . . . . . . . . . . . . . . . . . . . . . . . . . . . . . . . . . . . . . . . . . . . . . . . . . . 33
Confirming IPv6 address settings. . . . . . . . . . . . . . . . . . . . . . . . . . . . . . . . . . . . . . . . . . . . . . . . . . . . . . . . . . . . . 34
How to Check the Windows Vista/7/Server 2008 Processor Version. . . . . . . . . . . . . . . . . . . . . . . . . . . . . . . . . 36
Uninstalling the Software . . . . . . . . . . . . . . . . . . . . . . . . . . . . . . . . . . . . . . . . . . . . . . . . . . . . . . . . . . . . . . . . . . . . . . . . 37
To uninstall the printer/fax/scanner driver. . . . . . . . . . . . . . . . . . . . . . . . . . . . . . . . . . . . . . . . . . . . . . . . . . . . 37
To uninstall the MF Toolbox. . . . . . . . . . . . . . . . . . . . . . . . . . . . . . . . . . . . . . . . . . . . . . . . . . . . . . . . . . . . . . . . . . 38
Illustrations and displays used in this manual are which of MF5980dw unless specified.
User Software CD-ROM
About the Drivers and Software
MF Drivers
Printer driver
You can print from an application using the machine by installing the
printer driver on your computer. You can process print data at high speed by
compressing the print data using the computer's processing capability.
Fax driver
(fax model only)
If you install the fax driver on your computer, you can select "Print" from an
application, select the Canon fax driver as a printer, and specify the output
destination and options. The fax driver converts the data into an image that
conforms to standard fax protocols so that the data can be printed or saved
using the recipient's fax machine.
Scanner driver
You can use the machine as a scanner if you install the scanner driver on your
computer.
Network Scan Utility
This software is required for using the scan functions via a network. This
software is installed with the scanner driver.
MF Toolbox
MF Toolbox is a program which allows you to easily open an image scanned
by the scanner in an application, attaching the scanned image to an e-mail,
and storing the scanned image in a hard disk.
Additional Software Programs
Presto! PageManager
This is the software for managing the scanned images.
Supported Operating Systems
: available : not available
Windows 2000/XP
Windows Vista/7
Windows Server 2003/
Server 2008
Printer driver
*
Fax driver
*
Scanner driver
Network Scan Utility
*
*
MF Toolbox
Presto! PageManager
* Available only with a network connection.
1
Selecting the Driver to Be Installed
After selecting the connection method between the machine and a computer, select the driver to be
installed.
1
2
3
4
Press [
Press [
] (Menu).
] or [
] to select <System Settings>, and then press [OK].
Menu
USB Direct Print Se...
Printer Settings
Adjustment/Maintena...
System Settings
Press [
] or [
] to select <Select PDL (Plug-n-Play)>, and then press [OK].
System Settings
Memory Media Storag...
USB Direct Print On...
Secure Print Settin...
Select PDL (Plug-n-...
Press [
] or [
] to select <Network> or <USB>, and then press [OK].
Select PDL (PnP)
Network
USB
2
5
Press [
[OK].
] or [
] to select the printer driver you are using, and then press
Network
FAX
UFRII LT
UFRII LT (XPS)
PCL5
USB
UFRII LT
UFRII LT (XPS)
PCL5
PCL6
Selectable page description language
6
7
Network
FAX
UFRII LT
UFRII LT (XPS)
PCL5
PCL6
PS
USB
UFRII LT
UFRII LT (XPS)
PCL5
PCL6
PS
Press [
] (Menu) to close the menu screen.
Restart the machine.
Turn OFF the machine and wait for at least 10 seconds before turning it ON again.
3
Installing the Driver/Software
The method of installation is differ depending on the connection method or environment.
Connection method
USB connection
Network connection
Installation method
See “Installing the MF Drivers and MF Toolbox,” on p. 5.
IPv4 environment
See “Installing the MF Drivers and MF Toolbox,” on p. 5.
IPv6 environment*
See “Installing the MF Drivers Via the WSD Network,” on p. 24.
* You may not use the scan function in the IPv6 environment.
4
Installing the MF Drivers and MF Toolbox
If you are operating in the IPv6 environment, you may not install the drivers or software following
the procedures below.
Refer to “Installing the MF Drivers Via the WSD Network” (See p. 24) to install MF Drivers.
You may not use the scan function in the IPv6 environment.
Install the software to use the machine.
••If you are using a 64-bit operating system
The MF driver and MF Toolbox for 64-bit operating systems may not be supplied depending on your country
or region.
••User rights for logging on to Windows
Log on as a user with administrative rights.
••When installing via USB connection
Connect the USB cable after the software installation.
Make sure that the power of the machine is turned ON when connecting the USB cable.
••When installing via network connection
Before starting the installation, check the following.
-- The computer and machine are connected via the network.
-- The power of the machine is turned ON.
-- The IP addresses are properly set up.
••Installing the e-Manual
The e-Manual is not installed by selecting [Easy Installation].
To install the e-Manual, select [Custom Installation] on p. 12.
* If the User Manual CD-ROM is supplied with the machine, install the e-Manual from the User Manual CD-ROM.
Installing with [Easy Installation]
1
Insert the User Software CD-ROM.
5
2
Click [Easy Installation].
To install the following software and manuals that cannot be installed with [Easy Installation], select
[Custom Installation] (See p. 12).
••Presto! PageManager
••e-Manual
* If the User Manual CD-ROM is supplied with the machine, install the e-Manual from the User Manual CD-ROM.
* The options to be displayed differ depending on your country or region.
If the above dialog box does not appear
Windows 2000, XP, and Server 2003
1. From the [Start] menu, select [Run].
2. Enter "D:\MInst.exe", and then click [OK].
Windows Vista, 7, and Server 2008
1. Enter "D:\MInst.exe" in [Start Search] or [Search programs and files] under the [Start] menu.
2. Press the [ENTER] key on the keyboard.
* The CD-ROM drive name is indicated as "D:" in this manual. The CD-ROM drive name may differ depending on the
computer you are using.
If a language selection screen is displayed before the CD-ROM setup screen
Select a language and then click [Next].
6
3
When the following screen appears, select the connection method to a
computer.
For USB Connection
For Network Connection
Click [Next] in [Connect Printer Directly to
Computer].
Click [Next] in [Connect Printer to Computer via
Network].
Windows Server 2003/Server 2008.
This screen is not displayed. Proceed to the following procedure.
4
Click [Install].
7
5
Read the contents of the License Agreement, and then click [Yes].
6
Click [Next].
The following screen appears. Click [Yes].
For USB Connection
Proceed to Step 9.
For Network Connection (Network Model Only)
Proceed to Step 7.
8
7
Select the device to be installed.
(1)Select the device.
(2)Click [Next].
(1)
(2)
If no devices are displayed in [Device List]
Perform the following procedure.
1. Check the following.
••The computer and device are connected via the network.
••The device for wireless LAN connection and the access point are connected.
••The device is turned on.
••The IP address is set correctly.
••The computer and device are on the same subnet.
••Security software has been exited.
2. Click [Update Device List].
If any devices are not displayed by performing the above procedure, perform the following
procedure.
1. Click [Search by IP Address].
2. Enter the IP address of the device to be installed.
See "Confirming IP Address Settings," on p. 33.
If the IP address of the device is between "169.254.1.0 and 169.254.254.255", the IP
address is the one assigned by the AutoIP function.
If an IP address other than link-local addresses is set for the computer, set an IP address
in the same subnet as the computer (other than link-local addresses) also for this
machine manually.
This enables the installer to search for this machine.
e-Manual -> "Setting the IPv4 Address"
3. Click [OK].
If any devices are not displayed by performing the above procedure, click [Display Guide] to solve
the problem.
9
8
Installation starts when clicking [Start].
9
Click [Exit].
For USB Connection
For Network Connection
Next, installation of MF Toolbox starts.
In Windows 2000 Server/Server 2003/2008, MF Toolbox is not installed. Proceed to Step 12.
10
10
Click [Start].
11
Click [Exit].
12
Check that [
] is selected in [Install], and then click [Next].
13
Restart your computer.
(1)Select the [Restart Computer Now (Recommended)] check box.
(2)Click [Restart].
The CD-ROM may be removed once this screen appears.
(1)
(2)
11
In the case of USB connection, connect the USB cable after restarting your computer.
See "USB cable connection (Only when connecting with USB)," on p. 22.
In the case of network connection, check the installation results.
See "Checking the installation results," on p. 23.
Installing with [Custom Installation]
1
Insert the User Software CD-ROM.
2
Click [Custom Installation].
The options to be displayed differ depending on your country or region.
If the above dialog box does not appear
Windows 2000, XP, and Server 2003
1. From the [Start] menu, select [Run].
2. Enter "D:\MInst.exe", and then click [OK].
Windows Vista, 7, and Server 2008
1. Enter "D:\MInst.exe" in [Start Search] or [Search programs and files] under the [Start] menu.
2. Press the [ENTER] key on the keyboard.
* The CD-ROM drive name is indicated as "D:" in this manual. The CD-ROM drive name may differ depending on the
computer you are using.
If a language selection screen is displayed before the CD-ROM setup screen
Select a language and then click [Next].
12
3
When the following screen appears, select the connection method to a
computer.
For USB Connection
For Network Connection
Click [Next] in [Connect Printer Directly to
Computer].
Click [Next] in [Connect Printer to Computer via
Network].
Windows Server 2003/Server 2008.
This screen is not displayed. Proceed to the following procedure.
4
Select the check box for the software to be installed, and then click [Install].
The options to be displayed differ depending on your country or region.
To install the e-Manual, select the [Manuals] check box.
* If [Manuals] does not appear , install the e-Manual from the User Manual CD-ROM supplied with the machine.
13
5
Read the contents of the License Agreement, and then click [Yes].
6
Click [Next].
The following screen appears. Click [Yes].
For USB Connection
Proceed to Step 13.
For Network Connection (Network Model Only)
Proceed to Step 7.
14
7
Select the device to be installed.
(1)Select the device.
(2)Click [Next].
(1)
(2)
If no devices are displayed in [Device List]
Perform the following procedure.
1. Check the following.
••The computer and device are connected via the network.
••The device for wireless LAN connection and the access point are connected.
••The device is turned on.
••The IP address is set correctly.
••The computer and device are on the same subnet.
••Security software has been exited.
2. Click [Update Device List].
If any devices are not displayed by performing the above procedure, perform the following
procedure.
1. Click [Search by IP Address].
2. Enter the IP address of the device to be installed.
See "Confirming IP Address Settings," on p. 33.
If the IP address of the device is between "169.254.1.0 and 169.254.254.255", the IP
address is the one assigned by the AutoIP function.
If an IP address other than link-local addresses is set for the computer, set an IP address
in the same subnet as the computer (other than link-local addresses) also for this
machine manually.
This enables the installer to search for this machine.
e-Manual -> "Setting the IPv4 Address"
3. Click [OK].
If any devices are not displayed by performing the above procedure, click [Display Guide] to solve
the problem.
15
8
Select the function you want to use.
(1)Select the function you want to use (driver to be installed).
(2)Click [Next].
(1)
(2)
9
[Printer]
Select when using the print functions.
[Fax (for Supported Models)]
Select when using the PC fax function. (This function sends
documents or images that were created on a computer directly
as a fax transmission.)
[Scanner]
Select when using the scan functions.
Set the printer or fax information.
(1)Specify the settings for each option as needed.
(2)Click [Next].
Printer information*1
Fax information*2
(1)
(1)
(2)
(2)
*1 Appears if you selected [Printer] in Step 8.
*2 Appears if you selected [Fax (for Supported Models)] in Step 8.
[Printer Name]
Enter a new name if you want to change the printer or fax name.
[Fax Name]
[Use as Shared Printer]
Select the check box to share the printer or fax.
[Use as Shared Fax]
[Shared Name]
16
Change the shared name as needed.
If you selected the [Use as Shared Printer] or [Use as Shared Fax] check box
You can use the following procedure to install the additional driver depending on your
country or region.
1.
Click [Drivers to Add].
2.
Select the operating system displayed in [Drivers to Add].
3.
Click [OK].
The MF driver and MF Toolbox for 64-bit operating systems may not be supplied depending on your country or region.
If a 64-bit operating system is running on a computer on which the installation is being performed, the download installation (installation
from a network) for a client computer on which any of the following 32-bit operating systems is running is not supported due to a
Windows restriction.
- Windows 2000
- Windows XP (on which no service pack or SP1 is installed)
- Windows Server 2003 (on which no service pack is installed)
If you download and install the software on any of the above 32-bit operating systems, you may fail to install the software and may not be
able to open the printing preferences dialog box.
If any of the following 32-bit operating systems is running on a computer on which the installation is being performed, the additional
driver for a 64-bit operating system cannot be installed.
- Windows 2000
- Windows XP (on which no service pack or SP1 is installed)
- Windows Server 2003 (on which no service pack is installed)
10
Installation starts when clicking [Start].
17
11
Select the device you would like to make your default printer.
(1)Select the device you would like to make your default printer.
(2)Click [Next].
This screen appears only when installing the printer driver and fax driver.
(1)
(2)
12
Select to print a test page.
(1)Select the check box to print a test page.
(2)Click [Next].
This screen appears only when installing the printer driver.
(1)
(2)
18
13
Click [Exit].
For USB Connection
For Network Connection
Next, installation of MF Toolbox starts.
In any of the following cases, MF Toolbox is not installed. Proceed to Step 16.
- If you are using Windows 2000 Server, Windows Server 2003, or Windows Server 2008
- If you cleared the [MF Toolbox] check box in Step 4
14
Click [Next].
The screens for specifying a location in which the MF Toolbox is installed and position to which the start
menu is added appear.
Specify the settings in the respective screens, and then click [Next]. Click [Start] in the displayed screen.
19
15
Click [Exit].
The software for which the check box was selected in Step 4 is installed.
Follow the on-screen instructions.
16
Check that [
] is selected in [Install], and then click [Next].
The options to be displayed differ depending on your country or region.
20
17
Restart your computer.
(1)Select the [Restart Computer Now (Recommended)] check box.
(2)Click [Restart].
The CD-ROM may be removed once this screen appears.
(1)
(2)
In the case of USB connection, connect the USB cable after restarting your computer.
See "USB cable connection (Only when connecting with USB)," on p. 22.
In the case of network connection, check the installation results.
See "Checking the installation results," on p. 23.
21
USB cable connection (Only when connecting with USB)
1
Remove the cap (A) on the USB port of the machine.
Remove the cap by pulling out the string.
(A)
2
Connect the USB cable.
••Flat end (A):
••Square end (B):
Connect to the USB port on the computer.
Connect to the USB port on the machine.
(B)
(A)
When a dialog box is displayed
Follow the on-screen instructions and complete the installation.
After the installation, check the installation results.
See "Checking the installation results," on p. 23.
22
Checking the installation results
Check that the MF drivers and MF Toolbox are installed correctly.
Check that the icons for the installed software is added as follows.
Software
Location
Printer driver
[Printers and Faxes], [Printers], or [Devices and
Printers] folder.
Fax driver
(fax model only)
[Printers and Faxes], [Printers], or [Devices and
Printers] folder.
Scanner driver
[Scanners and Cameras] or [Scanners and Cameras
Properties] folder
Icon
For network connection
For USB connection
MF Toolbox
Desktop
Network Scan Utility
(network model only)
Taskbar
23
Installing the MF Drivers Via the WSD Network
When using Windows Vista/7/Server 2008, you can print using the WSD (Web Services on Devices)
protocol.
To use WSD, follow procedures in both “Installing the MF Drivers” and “Setting WSD.”
••When operating in IPv6 environment
You may not install MF Drivers from the CD-ROM setup screen.
Follow the procedures in this section.
••To switch WSD on or off
Use the operation panel on the machine.
e-Manual -> “Selecting the Connection Method (LPD/RAW/WSD)”
Installing the MF Drivers
1
Display the printer folder.
••Windows Vista
From the [Start] menu, select [Control Panel], and then click [Printers].
••Windows 7, and Server 2008
From the [Start] menu, select [Devices and Printers].
2
24
Click [Add a printer].
3
Click [Add a local printer].
4
Check if [LPT1: (Printer Port)] is displayed in [Use an existing port], and then
click [Next].
(1)
(2)
5
Click [Have Disk].
25
6
Insert the User Software CD-ROM.
When the following screen appears, click [Exit].
The options to be displayed differ depending on your country or region.
If [AutoPlay] is displayed
Click [
7
26
] to close the dialog box.
Click [Browse].
8
Open the folder in which the printer driver is.
••For 32-bit
Open [DRIVERS] -> [us_eng] or [uk_eng] -> [32bit] -> [win2k_vista] in the supplied CD-ROM, and then
click [Open].
••For 64-bit
Open [DRIVERS] -> [us_eng] or [uk_eng] -> [x64] -> [Driver] in the supplied CD-ROM, and then click
[Open].
(1)
(2)
If you do not know which of 32-bit or 64-bit system you are using
See “How to Check the Windows Vista/7/Server 2008 Process Version,” on p. 36.
9
Click [OK].
27
10
Select the printer driver you are using, and then click [Next].
(1)
(2)
11
Specify a printer name.
(1)Enter a new name to change the name for the printer.
If [Set as default printer] is displayed, select whether or not to use the machine as default printer. (Windows Vista/Server 2008)
(2)Click [Next].
(1)
(2)
28
→ Installation starts. Wait until the below screen disappears.
If [User Account Control] appears
Click [Yes] or [Continue].
12
Select [Do not share this printer], and then click [Next].
If you want to share the machine, perform the sharing settings after performing settings in “Setting WSD.”
(1)
(2)
29
13
Click [Finish].
If [Set as the default printer] is displayed, select whether or not to use the machine as default printer. (Windows 7/Server 2008 R2)
You may eject the CD-ROM when the below screen appears.
→ The icon is added to the printer folder.
Setting WSD
1
Display the network folder.
••For Windows Vista/Server 2008
Select [Network] from the [Start] menu.
••For Windows 7/Server 2008 R2
Select [Computer] from the [Start] menu, and then click [Network].
30
2
Right-click the machine icon, and then select [Install] from the pop-up
menu.
→ The icon is add to the printer folder. Installation is finished.
If [User Account Control] appears
Click [Yes] or [Continue].
Delete the icon that is added in the step 13 following the procedures below, as the icon will not be used.
(1) Right-click the icon, and then select [Remove device] or [Delete] from the pop-up menu.
(2) Click [Yes].
(3) If [User Account Control] appears, Click [Yes] or [Continue].
31
How to Use the Online Help
In the Online Help, all the functions of the driver software and information about options are
included. If you want to know descriptions of the functions and settings immediately when using the
driver software, make use of the Online Help.
32
How to display
the Help screen
(1) Select [File] -> [Print] from the menu
bar in the application.
(2) Select the printer in [Select Printer] or
[Name] in the [Print] dialog box.
(3) Click [Preferences] or [Properties].
(4) Click [Help].
Searching from
Contents
Click [Contents] in the Help screen, and
then double-click the desired title to
display the information.
Searching with
Index
Click [Index] in the Help screen, and then
double-click the desired keyword from the
list to display the information.
To search for a desired keyword, enter the
keyword directly in the above text box.
The closest keyword is listed below.
Appendix
Confirming IP Address Settings
••If the machine is not connected to the network properly
The IP address will not be displayed.
••When the startup time setting is specified
The IP address, subnet mask, and gateway address will be displayed when the specified time has elapsed.
e-Manual -> "Specifying a Delay Before Establishing the Network Connection"
••When the machine is connected to a switching hub
The machine may not be able to connect to a network even though your network settings are appropriate. In
this case, the startup time of the machine needs to be set to a waiting state.
e-Manual -> "Specifying a Delay Before Establishing the Network Connection"
Confirming IPv4 address settings
1
2
3
Press [
Press [
] (Status Monitor/Cancel).
] or [
] to select <Network Information>, and then press [OK].
Status Monitor/Cancel
TX Job
RX Job
Fax Forwarding Erro...
Network Information
Press [
] or [
] to select <IPv4>, and then press [OK].
Network Information
IPv4
IPv6
Wireless LAN Informa...
IEEE802.1X Error Inf...
33
4
5
Press [
[OK].
] or [
] to select the options you want to confirm, and then press
IPv4
IP Address
Subnet Mask
Gateway Address
Host Name
View the information.
IP Address
192.168.0.225
6
Press [
] (Status Monitor/Cancel) to close the screen.
Confirming IPv6 address settings
1
2
3
34
Press [
Press [
] (Status Monitor/Cancel).
] or [
] to select <Network Information>, and then press [OK].
Status Monitor/Cancel
TX Job
RX Job
Fax Forwarding Erro...
Network Information
Press [
] or [
] to select <IPv6>, and then press [OK].
Network Information
IPv4
IPv6
Wireless LAN Informa...
IEEE802.1X Error Inf...
4
5
Press [
[OK].
] or [
] to select the options you want to confirm, and then press
IPv6
Link-Local Address
Stateless Address 1
Stateless Address 2
Stateless Address 3
View the information.
Link-Local Address
IP Address
Prefix Length
IP Address
1234:5678:9abc:def0::
215
6
Press [
] (Status Monitor/Cancel) to close the screen.
35
How to Check the Windows Vista/7/Server 2008 Processor
Version
1
2
Select [Control Panel] from the [Start] menu.
Display [System].
••Windows Vista/Windows 7/Windows Server 2008 R2
Click [System and Maintenance] or [System and Security] → [System].
••Windows Server 2008
Click [System].
3
Check the processor version.
••For 32-bit version
[32-bit Operating System] is displayed.
••For 64-bit version
[64-bit Operating System] is displayed.
36
Uninstalling the Software
If you do not need the printer driver, fax driver, scanner driver, or MF Toolbox, you can uninstall them
with the following procedure.
If you install the MF drivers via the WSD network, see the “e-Manual” and uninstall the drivers.
Confirm the following before uninstalling the software:
-- You must be have administrative privileges on the computer
-- You should have the installation software (in case you want to re-install the drivers)
-- You have closed all applications on your computer
To uninstall the printer/fax/scanner driver
1
2
From the [Start] menu, click [(All) Programs] -> [Canon] -> [MF5900 Series]
(or [D1300 Series] or [iR 1133]) -> [Uninstall Drivers].
Click [Delete].
3
Click [Yes] to confirm the uninstallation.
37
4
Click [Exit] (or [Restart]).
To uninstall the MF Toolbox
1
2
From the [Start] menu, click [(All) Programs] -> [Canon] -> [MF Toolbox 4.9]
-> [Toolbox Uninstall].
Click [Remove].
3
38
Click [Exit].
USRM1-8783 (01)
© CANON INC. 2011