1
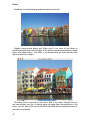
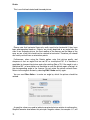
Sample Chapter
From the User’s Manual
GraphicConverter 4.4
Programmed by Thorsten Lemke
Manual by Hagen Henke
Translated by Paul Rowley, Libby Bunn
and Aziz Hashmi
Sales:
Lemke Software GmbH
Erich-Heckel-Ring 8a
D-31228 Peine
www.lemkesoft.com
Tel: +49-5171-72200
Fax:+49-5171-72201
E-mail: [email protected]
Contents
Introduction
Welcome to GraphicConverter . . . . . . . . . . . . . . . . . . . . . . . . . . . . . . . . . . . . . . . . 4
System Requirements . . . . . . . . . . . . . . . . . . . . . . . . . . . . . . . . . . . . . . . . . . . . . . . 4
Installation . . . . . . . . . . . . . . . . . . . . . . . . . . . . . . . . . . . . . . . . . . . . . . . . . . . . . . . . 4
Update . . . . . . . . . . . . . . . . . . . . . . . . . . . . . . . . . . . . . . . . . . . . . . . . . . . . . . . . . . 9
License Key and Registration . . . . . . . . . . . . . . . . . . . . . . . . . . . . . . . . . . . . . . . . 10
Support . . . . . . . . . . . . . . . . . . . . . . . . . . . . . . . . . . . . . . . . . . . . . . . . . . . . . . . . . 12
This Manual . . . . . . . . . . . . . . . . . . . . . . . . . . . . . . . . . . . . . . . . . . . . . . . . . . . . . . 13
Starting the Program and Opening a Picture . . . . . . . . . . . . . . . . . . . . . . . . . . . . 13
Converting a Picture with Save as... . . . . . . . . . . . . . . . . . . . . . . . . . . . . . . . . . . . 15
Saving and Closing . . . . . . . . . . . . . . . . . . . . . . . . . . . . . . . . . . . . . . . . . . . . . . . . 20
Save a Copy as... . . . . . . . . . . . . . . . . . . . . . . . . . . . . . . . . . . . . . . . . . . . . . . . . . 21
Convert . . . . . . . . . . . . . . . . . . . . . . . . . . . . . . . . . . . . . . . . . . . . . . . . . . . . . . . . . 21
Work Environment . . . . . . . . . . . . . . . . . . . . . . . . . . . . . . . . . . . . . . . . . . . . . . . . 32
Internet
Preparing Pictures for the Internet . . . . . . . . . . . . . . . . . . . . . . . . . . . . . . . . . . . . 37
Comparing Pictures . . . . . . . . . . . . . . . . . . . . . . . . . . . . . . . . . . . . . . . . . . . . . . . 41
Pictures in E-mails . . . . . . . . . . . . . . . . . . . . . . . . . . . . . . . . . . . . . . . . . . . . . . . . 43
Slices . . . . . . . . . . . . . . . . . . . . . . . . . . . . . . . . . . . . . . . . . . . . . . . . . . . . . . . . . . 46
Optimizing File Names for the Internet . . . . . . . . . . . . . . . . . . . . . . . . . . . . . . . . . 48
Photo Albums on the Internet . . . . . . . . . . . . . . . . . . . . . . . . . . . . . . . . . . . . . . . . 48
On Paper
Paper Format . . . . . . . . . . . . . . . . . . . . . . . . . . . . . . . . . . . . . . . . . . . . . . . . . . . . 55
Printing . . . . . . . . . . . . . . . . . . . . . . . . . . . . . . . . . . . . . . . . . . . . . . . . . . . . . . . . . 55
Print Catalog . . . . . . . . . . . . . . . . . . . . . . . . . . . . . . . . . . . . . . . . . . . . . . . . . . . . . 58
Print Folder . . . . . . . . . . . . . . . . . . . . . . . . . . . . . . . . . . . . . . . . . . . . . . . . . . . . . . 60
Processing Pictures
Picture Size . . . . . . . . . . . . . . . . . . . . . . . . . . . . . . . . . . . . . . . . . . . . . . . . . . . . . . 61
Scanning with GraphicConverter . . . . . . . . . . . . . . . . . . . . . . . . . . . . . . . . . . . . . 64
Export . . . . . . . . . . . . . . . . . . . . . . . . . . . . . . . . . . . . . . . . . . . . . . . . . . . . . . . . . . 67
Trimming . . . . . . . . . . . . . . . . . . . . . . . . . . . . . . . . . . . . . . . . . . . . . . . . . . . . . . . . 68
Rotate . . . . . . . . . . . . . . . . . . . . . . . . . . . . . . . . . . . . . . . . . . . . . . . . . . . . . . . . . . 69
Unsharp Mask and Sharpen Edges . . . . . . . . . . . . . . . . . . . . . . . . . . . . . . . . . . . . 73
Brightness and Contrast . . . . . . . . . . . . . . . . . . . . . . . . . . . . . . . . . . . . . . . . . . . . 76
Color Correction . . . . . . . . . . . . . . . . . . . . . . . . . . . . . . . . . . . . . . . . . . . . . . . . . . 78
Selecting . . . . . . . . . . . . . . . . . . . . . . . . . . . . . . . . . . . . . . . . . . . . . . . . . . . . . . . . 79
Removing Red Eyes . . . . . . . . . . . . . . . . . . . . . . . . . . . . . . . . . . . . . . . . . . . . . . . 84
Undo . . . . . . . . . . . . . . . . . . . . . . . . . . . . . . . . . . . . . . . . . . . . . . . . . . . . . . . . . . . 86
RGB and CMYK . . . . . . . . . . . . . . . . . . . . . . . . . . . . . . . . . . . . . . . . . . . . . . . . . . 87
Transparent . . . . . . . . . . . . . . . . . . . . . . . . . . . . . . . . . . . . . . . . . . . . . . . . . . . . . . 87
Zoom . . . . . . . . . . . . . . . . . . . . . . . . . . . . . . . . . . . . . . . . . . . . . . . . . . . . . . . . . . . 89
Levels . . . . . . . . . . . . . . . . . . . . . . . . . . . . . . . . . . . . . . . . . . . . . . . . . . . . . . . . . . 92
Colors and Modes . . . . . . . . . . . . . . . . . . . . . . . . . . . . . . . . . . . . . . . . . . . . . . . . 93
Invert . . . . . . . . . . . . . . . . . . . . . . . . . . . . . . . . . . . . . . . . . . . . . . . . . . . . . . . . . . 106
Mirroring . . . . . . . . . . . . . . . . . . . . . . . . . . . . . . . . . . . . . . . . . . . . . . . . . . . . . . . 106
Date Time Stamp . . . . . . . . . . . . . . . . . . . . . . . . . . . . . . . . . . . . . . . . . . . . . . . . . 107
Median Filter . . . . . . . . . . . . . . . . . . . . . . . . . . . . . . . . . . . . . . . . . . . . . . . . . . . . 108
Picture Information . . . . . . . . . . . . . . . . . . . . . . . . . . . . . . . . . . . . . . . . . . . . . . . 109
Histogram . . . . . . . . . . . . . . . . . . . . . . . . . . . . . . . . . . . . . . . . . . . . . . . . . . . . . . 109
Full Screen . . . . . . . . . . . . . . . . . . . . . . . . . . . . . . . . . . . . . . . . . . . . . . . . . . . . . 110
Playback . . . . . . . . . . . . . . . . . . . . . . . . . . . . . . . . . . . . . . . . . . . . . . . . . . . . . . . 110
Put Picture on Desktop . . . . . . . . . . . . . . . . . . . . . . . . . . . . . . . . . . . . . . . . . . . . 110
Banners . . . . . . . . . . . . . . . . . . . . . . . . . . . . . . . . . . . . . . . . . . . . . . . . . . . . . . . . 112
Storyboard . . . . . . . . . . . . . . . . . . . . . . . . . . . . . . . . . . . . . . . . . . . . . . . . . . . . . 116
Gamma Correction . . . . . . . . . . . . . . . . . . . . . . . . . . . . . . . . . . . . . . . . . . . . . . . 118
Plug-In Filters . . . . . . . . . . . . . . . . . . . . . . . . . . . . . . . . . . . . . . . . . . . . . . . . . . . 119
User-defined Filters . . . . . . . . . . . . . . . . . . . . . . . . . . . . . . . . . . . . . . . . . . . . . . 121
Color Permutations . . . . . . . . . . . . . . . . . . . . . . . . . . . . . . . . . . . . . . . . . . . . . . . 121
Vectorize . . . . . . . . . . . . . . . . . . . . . . . . . . . . . . . . . . . . . . . . . . . . . . . . . . . . . . . 127
Alpha Channels . . . . . . . . . . . . . . . . . . . . . . . . . . . . . . . . . . . . . . . . . . . . . . . . . . 128
Video Pictures . . . . . . . . . . . . . . . . . . . . . . . . . . . . . . . . . . . . . . . . . . . . . . . . . . . 130
Layout . . . . . . . . . . . . . . . . . . . . . . . . . . . . . . . . . . . . . . . . . . . . . . . . . . . . . . . . . 132
List . . . . . . . . . . . . . . . . . . . . . . . . . . . . . . . . . . . . . . . . . . . . . . . . . . . . . . . . . . . 135
Copy File into Resource . . . . . . . . . . . . . . . . . . . . . . . . . . . . . . . . . . . . . . . . . . . 137
Invert Black & White GIFs . . . . . . . . . . . . . . . . . . . . . . . . . . . . . . . . . . . . . . . . . . 137
Copy, Cut, Paste, Clear . . . . . . . . . . . . . . . . . . . . . . . . . . . . . . . . . . . . . . . . . . . 137
Text in Pictures . . . . . . . . . . . . . . . . . . . . . . . . . . . . . . . . . . . . . . . . . . . . . . . . . . 141
Painting with GraphicConverter . . . . . . . . . . . . . . . . . . . . . . . . . . . . . . . . . . . . . 143
Windows . . . . . . . . . . . . . . . . . . . . . . . . . . . . . . . . . . . . . . . . . . . . . . . . . . . . . . . 153
Viewing & Sorting
The Browser . . . . . . . . . . . . . . . . . . . . . . . . . . . . . . . . . . . . . . . . . . . . . . . . . . . . 154
Slideshow . . . . . . . . . . . . . . . . . . . . . . . . . . . . . . . . . . . . . . . . . . . . . . . . . . . . . . 163
Special
Batch Function . . . . . . . . . . . . . . . . . . . . . . . . . . . . . . . . . . . . . . . . . . . . . . . . . . 171
IPTC Document Information . . . . . . . . . . . . . . . . . . . . . . . . . . . . . . . . . . . . . . . . 179
Recording Points for Determining Measurements. . . . . . . . . . . . . . . . . . . . . . . . 180
Combining Pictures . . . . . . . . . . . . . . . . . . . . . . . . . . . . . . . . . . . . . . . . . . . . . . . 180
Video Pictures . . . . . . . . . . . . . . . . . . . . . . . . . . . . . . . . . . . . . . . . . . . . . . . . . . . 180
List from STR# Resource . . . . . . . . . . . . . . . . . . . . . . . . . . . . . . . . . . . . . . . . . . 182
Important Formats . . . . . . . . . . . . . . . . . . . . . . . . . . . . . . . . . . . . . . . . . . . . . . . 182
Preferences . . . . . . . . . . . . . . . . . . . . . . . . . . . . . . . . . . . . . . . . . . . . . . . . . . . . . 203
AppleScript . . . . . . . . . . . . . . . . . . . . . . . . . . . . . . . . . . . . . . . . . . . . . . . . . . . . . 229
Quit . . . . . . . . . . . . . . . . . . . . . . . . . . . . . . . . . . . . . . . . . . . . . . . . . . . . . . . . . . . 229
Problems . . . . . . . . . . . . . . . . . . . . . . . . . . . . . . . . . . . . . . . . . . . . . . . . . . . . . . . 229
Shortcuts . . . . . . . . . . . . . . . . . . . . . . . . . . . . . . . . . . . . . . . . . . . . . . . . . . . . . . 230
Supported Formats . . . . . . . . . . . . . . . . . . . . . . . . . . . . . . . . . . . . . . . . . . . . . . . 231
Index . . . . . . . . . . . . . . . . . . . . . . . . . . . . . . . . . . . . . . . . . . . . . . . . . . . . . . . . . . 240
Trimming
Trimming
In most scanner programs the picture being scanned is displayed so poorly in
preview mode that it is worthwhile making the selection rectangle for the area you
want to scan slightly larger. The edges of the picture will then need to be trimmed.
In GraphicConverter it is best to use the selection tool at the top right of the
toolbox. If you cannot see the toolbox, you can call it up by selecting Picture /
Show Toolbox from the menu.
Use the selection tool to place a rectangle as accurately as possible around the
section of the picture that should be left after trimming. The pixels behind the line
also belong to the selected area. Use the handles on the selection lines to adjust
the rectangle. You can adjust the rectangle very accurately by using the center
handles between the corners as they only move one edge. You can work most
precisely when the picture is zoomed to at least 100%.
Finally trim the selected area by selecting Edit / Trim Selection (Command-Y).
The parts of the picture not enclosed in the selection rectangle will be cut away.
The picture will be displayed in a correspondingly minimized window.
You can cancel a selection by pressing Escape or selecting Edit / Unselect from
the menu.
The Edit menu also contains the Smart Trim command. This trims any singlecolor margins leaving you with the actual picture. Unless, for example, the scanned
picture has black or white areas at the edges, you can use this option to easily cut
off the scanned edges without having to set a selection rectangle. Click the center
of the picture section, which is to be kept. Note that GraphicConverter searches for
the color set as the background color as the edge. If you want to delete a white
edge, white needs to be set as the background color and black accordingly if the
edge is black. The foreground and background colors can be set by clicking the
color areas and using the pipette . You will find detailed information on this in the
chapter Foreground and Background Color on Page 143.
68
Rotate
By selecting Edit / Trim Options... you can specify under Sides whether all four
edges of the picture should be trimmed. If, for example, you leave the bottom edge
out, the typical scanner edge will remain there.
If the scanned edge is not quite one color, you can increase the Tolerance. The
larger the entered value, the “more lenient” GraphicConverter will be about patches
in the scanner edges, for example. The correct value will have to be determined a
few times by trial and error. However, before you spend a long time doing this, just
use a selection rectangle.
Rotate
After scanning, the newly acquired picture often needs to be rotated because you
could not fit it in your scanner the right way round. All rotation options are available
in a submenu under Picture / Rotate.
The “A” indicates the position of the picture or a selected part of the picture after
it has been rotated. Other Value with Line changes the mouse cursor to a cross.
You can then drag a helper line along a line in the picture that is supposed to be
“straight”.
Drag the helper line along the side of a house in your picture, for example, and
release the mouse button. Zoom into the section of the picture where you want to
drag the line using the magnifying glass. GraphicConverter will now rotate the
picture automatically so that this line is vertical. The closest alignment is always
selected. The helper line does not stay in the picture.
69
Rotate
The houses in the following example are leaning to the left.
Choose a long vertical house wall. Make sure it is as close to the center as
possible because lines near the edges of the picture tend to be distorted by simple
lenses and zoom lenses. This effect is increased when you take pictures from
above or below the subject.
The mouse cursor turns into a cross with a hole in the center. Through this you
can see whether your line is running along the edge from the brightness of the
pixels. Use this hole at the start and end of the helper line to rotate the picture as
accurately as possible.
70
Rotate
All angles on the helper line that deviate less than plus or minus 45˚ from vertical
will be aligned vertically. All angles that deviate less than plus or minus 45˚ from
horizontal are aligned horizontally. You can therefore also choose a line in the
picture that should actually be horizontal.
The edges of the picture may need to be cropped after rotation as the corners will
now stick out over the original frame.
GraphicConverter enlarges the picture automatically so that the white borders
can be added. Use the selection lines to mark out the picture area to be trimmed
and double-click inside the rectangle or press Return. Select File / Trim Selection
(see Trimming Page 68) has the same results.
Trimming loses parts of the picture. This cannot be avoided. Select the area to
be trimmed carefully so that you do not cut out any important parts of the picture.
71
Rotate
This is our finished rotated and trimmed picture.
Please note that horizontal lines only really need to be horizontal if they have
been photographed head on. Objects are usually depicted at an angle from the
side. In our example picture, the front roofline of the houses and the edge of the
quay are on a line that should not be rotated to horizontal. Therefore you should
use mainly vertical lines as orientation points.
Furthermore, when using the Rotate option, note that picture quality and
sharpness is lost on angles that are not 90˚ or a multiple of 90˚. It is therefore a
good idea to sharpen the picture again after rotating (See p 73). If the angle is not a
multiple of 90˚, an even better way would be to scan the picture again, placing it at
the corresponding angle in the scanner. Do not rotate the picture several times.
Return to the original version by selecting Edit / Undo and try again.
You can use Other Value... to enter an angle by which the picture should be
rotated.
As positive values are used to indicate counterclockwise rotation in mathematics,
GraphicConverter also follows this principle. Negative values, for example –0.7, will
72
Unsharp Mask and Sharpen Edges
therefore rotate the picture clockwise. It is only worth rotating by an angle if you
know the angle. Otherwise use the Other Value with Line option (see above).
The picture quality is not affected if rotated 90˚, 180˚ or 270˚. Larger pictures
require longer processing times as new coordinates have to be calculated for each
pixel. JPEG pictures that you do not want to convert and edit may still be rotated
from within the browser, using the context menu: Select File / Browse Folder...,
click the small picture preview and then Control-click (hold down the Control key
and click) the small picture preview. The picture width needs to be a multiple of 8.
This is normal, however, with pictures made using a digital camera.
The width and height of pictures are swapped in the EXIF information upon
rotation. This is only important if the pictures are transferred back to a digital
camera and then displayed on a television, for example.
The loss of quality with JPEG pictures does not come from the rotation, but from
opening and saving again as a JPEG because the file has to be recompressed
each time it is saved. The compression process causes a loss in quality. Therefore,
it is best to save JPEGs in a lossless format (such as TIFF, Photoshop, etc.) if you
intend to make several changes, saving the image throughout the editing process.
If necessary, you should only create a JPEG version once you have finished editing
the file.
Two further options are available for pictures with 16.7 million colors when rotate
using Other Value: Error Correction and Add Alpha Channel. The Error
Correction option should always be selected because each pixel is calculated on
the basis of the exact color content of the source pixel. This improves the picture
quality especially around the edges.
The Add Alpha Channel option can be used to create an additional alpha
channel. This contains just the picture without the white borders that were added
during rotation as a kind of template. Once an alpha channel has been created, you
cannot create another one. GraphicConverter updates the alpha channel after any
further rotate processes.
An alpha channel is an invisible level of the picture containing information on
shapes and boundaries . In professional DTP (Desk Top Publishing) programs
such as QuarkXPress 4 or InDesign 2, this alpha channel can also be used to hide
the white borders.
Unsharp Mask and Sharpen Edges
If you are using a budget scanner or unfocused pictures, it is always necessary to
sharpen the scanned pictures. In the Effect menu GraphicConverter has the
Unsharp Mask and Sharpen Edges... options. The Sharpen Edges option has
been available in GraphicConverter for a long time and results in slightly more
defined lines than the newer Unsharp Mask option. We recommend that you
73
© 2001 Elbsand Publishers, Hagen Henke. All rights reserved. www.elbsand.de
Sales: Lemke Software, Erich-Heckel-Ring 8a, D-31228 Peine.
www.lemkesoft.com
This book including all parts is protected by copyright. It may not be reproduced in
any form outside of copyright laws without permission from the author. This applies
in particular to photocopying, translation, copying onto microfilm and storage and
processing on electronic systems.
All due care was taken during the compilation of this book. However, errors cannot
be completely ruled out. The author and distributors therefore accept no
responsibility for any program or documentation errors or their consequences.
This manual was written on a Mac using Adobe FrameMaker 6.
Almost all software, hardware and other products or company names mentioned in
this manual are registered trademarks and should be respected as such. The
following list is not necessarily complete.
Apple, the Apple logo, and Macintosh are trademarks of Apple Computer, Inc.,
registered in the United States and other countries. Mac and the Mac OS logo are
trademarks of Apple Computer, Inc.
GIF- and TIFF-LZW Compression/Decompression Licensed under U.S. Patent No.
4.558.302 and foreign counterparts. Photo CD mark licensed from Kodak.
Mercutio MDEF copyright Ramon M. Felciano 1992-1998
Copyright for all pictures in manual and on cover: Hagen Henke except for
Page 217 PCD example picture © AMUG Arizona Mac Users Group Inc. Reginald
Muhl.
Thanks to our proof-readers (who had very little time): Robert Amete, Dave
Burbank, Don Marcus, David Neale, Nicholas Sanders and Jonathan Schwarz.
Contact our translators: [email protected]
Cover design and typesetting: zehnpunkt, Hagen Henke. www.zehnpunkt.de
Version 1.0.5, Lorenzkirch 2002