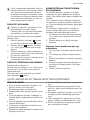
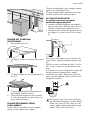
1
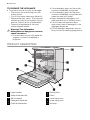
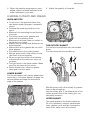
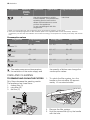
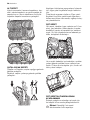
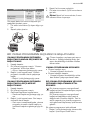
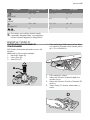
user manual
kullanma kılavuzu
Dishwasher
Bulaşık Makinesi
ESF63012
2 electrolux
Electrolux. Thinking of you.
Share more of our thinking at www.electrolux.com
CONTENTS
Safety information
Product description
Control panel
Use of the appliance
Setting the water softener
Use of dishwasher salt
Use of detergent and rinse aid
Loading cutlery and dishes
2
4
5
6
6
7
8
9
Setting and starting a washing programme
10
Washing programmes
11
Care and cleaning
12
What to do if…
13
Technical data
15
Environment concerns
15
Installation
15
Subject to change without notice
Before the installation and use, read this
manual carefully:
• For your safety and the safety of your
property.
• To help the environment.
• For the correct operation of the appliance.
Always keep these instructions with the appliance also if you move or give it to a different person.
The manufacturer is not responsible if an incorrect installation and use causes damage.
GENERAL SAFETY
• Do not change the specifications of this
appliance. There is the risk of injury and
damage to the appliance.
• Obey the safety instructions from the detergent manufacturer to prevent burns to
eyes, mouth and throat.
• Do not drink the water from the appliance. Particles of detergent can stay in
your appliance.
• Do not keep the appliance door open
without supervision. This to prevent injury
and to fall on an open door.
• Do not sit or stand on the open door.
SAFETY INFORMATION
CHILDREN AND VULNERABLE
PERSONS SAFETY
• Do not let persons, children included,
with reduced physical sensory, reduced
mental functions or lack of experience
and knowledge to use the appliance.
They must have supervision or instruction
for the operation of the appliance by a
person who is responsible for their safety.
• Children must get supervision to make
sure that they do not play with the appliance.
• Keep all packaging away from children.
There is the risk of suffocation or injury.
• Keep all detergents in a safe area. Do not
let the children touch the detergents.
• Keep children and pets away from the
appliance when the door is open.
USE
• The appliance is only for domestic use.
Do not use the appliance for other uses
to prevent injury to persons and damage
to property.
• Only use the appliance to clean accessories that are applicable for dishwashers.
• Do not put flammable products or items
that are wet with flammable products in,
near or on the appliance. Risk of explosion or fire.
• Put the knives and all items with sharp
points in the cutlery basket with their
points down. If not, put in a horizontal
position in the upper basket or in the
knife basket. (Not all models have the
knife basket).
• Use only specified products for dishwashers (detergent, salt, rinse aid).
electrolux 3
• Types of salt that are not specified for
dishwashers can cause damage to the
water softener.
• Fill the appliance with salt before you
start a washing programme. Remaining
salt in the appliance can cause corrosion
or make a hole in the bottom of the appliance.
• Do not fill the rinse aid dispenser with
other products than the rinse aid, (dishwasher cleaning agent, liquid detergent).
This can cause damage to the appliance.
• Make sure that the spray arms can move
freely before you start a washing programme.
• The appliance can release hot steam if
you open the door while a washing programme operates. There is a risk of skin
burns.
• Do not remove the dishes from the appliance until the washing programme is
completed.
CARE AND CLEANING
• Before you clean the appliance, deactivate it and disconnect the mains plug
from the mains socket.
• Do not use flammable products or products that can cause corrosion.
• Do not use the appliance without the filters. Make sure that the installation of the
filters is correct. An incorrect installation
causes unsatisfactory washing results
and damage to the appliance.
• Do not use spray water or steam to clean
the appliance. Risk of electrical shock
and damage to the appliance.
INSTALLATION
• Make sure that the appliance is not damaged. Do not install or connect a damaged appliance, contact the supplier.
• Remove all packaging before you install
and use the appliance.
• Only a qualified person must do the electrical connection, the plumbing and the
installation of the appliance. This to prevent the risks of structural damage or injury.
• Make sure that the mains plug is disconnected from the mains socket during installation.
• Do not drill into the sides of the appliance
to prevent damage to hydraulic components and electrical components.
FROST PRECAUTIONS
• Do not install the appliance where the
temperature is less than 0 °C.
• The manufacturer is not responsible for
frost damage.
WATER CONNECTION
• Use new hoses to connect the appliance
to the water supply. Do not use used hoses.
• Do not connect the appliance to new
pipes or pipes not used for a long time.
Let the water flow for some minutes, then
connect the inlet hose.
• Make sure not to squash or cause damage to the water hoses when you install
the appliance.
• Make sure that the water couplings are
tight to prevent a water leakage.
• The first time you use the appliance,
make sure that the hoses do not have
water leaks.
ELECTRICAL CONNECTION
• The appliance must be earthed.
• Make sure that the electrical information
on the rating plate agrees with the power
supply.
• Always use a correctly installed shockproof socket.
• Do not use multiple plugs and extension
cables. There is a risk of fire.
• Do not replace or change the mains cable. Contact the service centre.
• Make sure not to squash or cause damage to the mains plug and cable behind
the appliance.
• Make sure that there is access to the
mains plug after the installation.
• Do not pull the mains cable to disconnect
the appliance. Always pull the mains
plug.
SERVICE CENTRE
• Only a qualified person can repair or work
on the appliance. Contact the service
centre.
• Use only original spare parts.
4 electrolux
TO DISCARD THE APPLIANCE
• To prevent the risk of injury or damage:
– Disconnect the mains plug from the
mains socket.
– Cut off the mains cable and discard it.
– Remove the door catch. This prevents
children or pets to be closed in the appliance. There is a risk of suffocation.
– Discard the appliance at the local
waste disposal centre.
• If the detergent gets into the mouth,
contact immediately a physician.
• If the detergent gets into the eyes,
contact immediately a physician and
clean the eyes with water.
• Keep dishwasher detergents in a
safe area and out of children touch.
• Do not keep the appliance door
open when there is detergent in the
detergent dispenser.
• Fill the detergent dispenser only before you start a washing programme.
Warning! The dishwasher
detergents are dangerous and can
cause corrosion !
• If an accident occurs with these detergents, contact immediately a
physician.
PRODUCT DESCRIPTION
1
2
3
4
5
Upper basket
Water hardness dial
Salt container
Detergent dispenser
Rinse aid dispenser
6
7
8
9
10
Rating plate
Filters
Lower spray arm
Upper spray arm
Worktop
electrolux 5
CONTROL PANEL
6
7
1
1
2
3
4
5
6
7
2
5
3
4
Programme guide
Programme knob
Start/cancel button
Delay start button
Indicator lights
Programme marker
On/off indicator light
Indicator lights
It comes on when the washing phase or the rinsing phase operates.
Wash
It comes on when the drying phase operates.
Dry
End-of-programme
Salt
It comes on when it is necessary to fill the salt container. Refer
to 'Use of dishwasher salt'.
After you fill the container, the salt indicator light can stay on
for some hours. This does not have an unwanted effect on the
operation of the appliance.
1)
Rinse aid
It comes on when:
• The washing programme is completed.
• You adjust the level of the water softener.
• There is a malfunction of the appliance.
1)
It comes on when it is necessary to fill the rinse aid container.
Refer to 'Use of detergent and rinse aid'.
1) When the salt and/or rinse aid containers are empty, the related indicator lights do not come on while a washing
programme operates.
PROGRAMME KNOB AND ON/OFF
INDICATOR LIGHT
To switch on the appliance and select a
washing programme:
• Turn the programme knob clockwise or
counterclockwise. The programme marker on the programme knob must agree
with one of the washing programmes on
the control panel.
• The on/off indicator light comes on.
To switch off the appliance:
– Turn the programme knob clockwise or
counterclockwise until the programme
marker agrees with the on/off indicator
light.
– The on/off indicator light goes off.
6 electrolux
DELAY START BUTTON
Press this button to delay the start of the
washing programme of three hours. Refer
to 'Setting and starting a washing programme'.
USE OF THE APPLIANCE
1. Be sure that the set level of the water
softener agrees with the water hardness in your area. If not, adjust the water softener.
2. Fill the salt container with dishwasher
salt.
3. Fill the rinse aid dispenser with rinse
aid.
4. Load cutlery and dishes into the appliance.
5. Set the correct washing programme for
the type of load and soil.
6. Fill the detergent dispenser with the
correct quantity of detergent.
7. Start the washing programme.
SETTING THE WATER SOFTENER
The water softener removes minerals and
salts from the water supply. These minerals
and salts can cause damage to the appliance.
Adjust the level of the water softener if this
does not agree with the water hardness in
your area.
Contact your local water authority to know
the water hardness in your area.
Water hardness adjustment
Water hardness
German degrees
(°dH)
French degrees
(TH°)
mmol/l
Clarke degrees
manually
electronically
51 - 70
91 - 125
9,1 - 12,5
64 - 88
2 1)
10
1)
9
43 - 50
76 - 90
7,6 - 9,0
53 - 63
2
37 - 42
65 - 75
6,5 - 7,5
46 - 52
21)
8
29 - 36
51 - 64
5,1 - 6,4
36 - 45
21)
7
23 - 28
40 - 50
4,0 - 5,0
28 - 35
21)
6
19 - 22
33 - 39
3,3 - 3,9
23 - 27
21)
51)
15 - 18
26 - 32
2,6 - 3,2
18 - 22
1
4
11 - 14
19 - 25
1,9 - 2,5
13 - 17
1
3
4 - 10
7 - 18
0,7 - 1,8
5 - 12
1
2
<4
<7
< 0,7
<5
12)
12)
1) Factory position.
2) Do not use salt at this level.
You must adjust the water softener
manually and electronically.
MANUAL ADJUSTMENT
Turn the water hardness dial to the position
1 or 2 (refer to the table).
electrolux 7
ELECTRONIC ADJUSTMENT
1. Press and hold the start/cancel button.
2. Turn the programme knob clockwise
until the programme marker agrees
with the first available washing programme on the control panel.
3. Release the start/cancel button when
the on/off and the start/cancel indicator
lights start to flash.
4. At the same time, the end-of-programme indicator light starts to flash.
The number of flashes shows the current adjustment.
Example: 5 flashes / pause / 5 flashes
= level 5.
USE OF DISHWASHER SALT
How to fill the salt container:
1. Turn the cap counterclockwise and
open the salt container.
2. Fill the salt container with 1 litre of water (only for the first time you fill with
salt).
3. Use the funnel to fill the salt container
with salt.
4. Remove the salt around the opening of
the salt container.
5. Turn the cap clockwise to close the salt
container.
It is correct that water comes out from
the salt container when you fill it with
salt.
5. Press the start/cancel button to change
the adjustment. Each time you press
the start/cancel button, the adjustment
goes to the subsequent level.
6. Switch off the appliance to keep the
operation.
If the water softener is set electronically
to the level 1, the salt indicator light
stays off.
8 electrolux
USE OF DETERGENT AND RINSE AID
1
2 3
8
4
5
The rinse aid dispenser automatically
adds rinse aid during the last rinsing
phase.
6
7
USE OF DETERGENT
To help the environment, do not use
more than the correct quantity of detergent.
Follow the detergent manufacturer recommendations on the detergent packaging.
Do these steps to fill the detergent dispenser:
1. Press the release button 2 to open the
lid 8 of the detergent dispenser.
2. Put the detergent in the dispenser 3 .
3. If the washing programme has a prewash phase, put a small quantity of detergent in the prewash detergent compartment 1 .
4. If you use the detergent tablets, put the
tablet in the detergent dispenser 3 .
5. Close the detergent dispenser. Press
the lid until it locks into position.
Different brands of detergent dissolve
in different times. Some detergent tablets do not have the best cleaning results during short washing programmes. Use long washing programmes when you use the detergent
tablets to fully remove the detergent.
USE OF RINSE AID
Rinse aid makes it possible to dry the
dishes without streaks and stains.
Do these steps to fill the rinse aid dispenser:
1. Press the release button 5 to open the
lid 7 of the rinse aid dispenser.
2. Fill the rinse aid dispenser 4 with rinse
aid. The mark 'max' shows the maximum level.
3. Remove the spilled rinse aid with an
absorbent cloth to prevent too much
foam during the washing programme.
4. Close the rinse aid dispenser. Press the
lid until it locks into position.
ADJUST THE RINSE AID DOSAGE
Factory set: position 4.
You can set the rinse aid dosage between
position 1 (lowest dosage) and position 6
(highest dosage).
Turn the rinse aid selector 6 to increase or
decrease the dosage.
USING COMBI DETERGENT TABLETS
These tablets contain agents as detergent,
rinse aid and dishwasher salt. Some types
of tablets can contain other agents.
When you use tablets, that contain salt and
rinse aid, do not fill the salt container and
rinse aid dispenser. The rinse aid indicator
stays on when the appliance is activated.
Be sure that these tablets are applicable for
the water hardness in your area (refer to the
instructions on the packaging of the products).
1. Adjust the water hardness to the lowest
level. Refer to 'Setting the water softener'.
2. Set the rinse aid dosage to the lowest
position.
Using again separately detergent, salt
and rinse aid
1. Fill the salt container and the rinse aid
dispenser.
2. Adjust the water hardness to the highest
level.
3. Start a washing programme without
dishes.
electrolux 9
4. When the washing programme is completed, adjust the water softener to the
water hardness in your area.
5. Adjust the quantity of rinse aid.
LOADING CUTLERY AND DISHES
HINTS AND TIPS
• Do not put in the appliance items that
can absorb water (sponges, household
cloths).
• Remove the remaining food from the
items.
• Make soft the remaining burned food on
the items.
• Put hollow items (cups, glasses and
pans) with the opening down.
• Make sure that water does not collect in
containers or in bowls.
• Make sure that cutlery and dishes do not
bond together.
• Make sure that the glasses do not touch
other glasses.
• Put small items in the cutlery basket.
• Mix the spoons with other cutlery to prevent them to bond together.
• When you put the items in the baskets,
make sure that the water can touch all
surfaces.
• Put light items in the upper basket. Make
sure that the items do not move.
• Water droplets can collect on plastic
items and non-stick pans.
THE CUTLERY BASKET
Put the forks and spoons with the handles
down.
Put the knives with the handles up.
LOWER BASKET
Put the saucepans, lids, plates, salad bowls
and cutlery in the lower basket. Arrange the
service dishes and large lids around the
edge of the basket.
Mix the spoons with other cutlery to prevent
them to bond together.
Use the cutlery grid. If the dimensions of the
cutlery prevent use of the cutlery grid, you
can easily remove it.
UPPER BASKET
The upper basket is for plates (maximum
24 cm in diameter), saucers, salad bowls,
cups, glasses, pots and lids. Arrange the
items to let water touch all surfaces.
10 electrolux
Caution! Adjust the height before you
load the upper basket.
Maximum height of the dishes in:
Put the glasses with long stems in the cup
racks with the stems up. For longer items,
fold the cup racks up.
the upper
basket
the lower
basket
Higher position
20 cm
31 cm
Lower position
24 cm
27 cm
Do these steps to move the upper basket
to the higher position:
1. Move the front runner stops (A) out.
2. Pull the basket out.
3. Put the basket in the upper position.
4. Put back the front runner stops (A) in
their initial position.
ADJUSTMENT OF THE HEIGHT OF THE
UPPER BASKET
You can put the upper basket in two positions to increase the load flexibility.
Caution! If the basket is in the upper
position, do not put cups on the cup
racks.
SETTING AND STARTING A WASHING PROGRAMME
SELECT AND START A WASHING
PROGRAMME WITHOUT DELAY
START
1. Close the door.
2. Select a washing programme. Refer to
'Washing programmes'.
– The on/off indicator light comes on.
3. Press the start/cancel button. The
washing programme starts automatically.
– The start/cancel indicator light
comes on.
SELECT AND START A WASHING
PROGRAMME WITH DELAY START
1. Close the door.
2. Select a washing programme.
3. Press the delay start button.
– The delay start indicator light comes
on.
4. Press the start/cancel button. The
countdown starts automatically.
– When the countdown is completed,
the washing programme starts automatically and the delay start indicator
light goes off.
The opening of the appliance door interrupts the countdown. When you
close the door, the countdown continues from the point of interruption.
INTERRUPTION OF A WASHING
PROGRAMME
• Open the appliance door.
– The washing programme stops.
electrolux 11
• Close the appliance door.
– The washing programme continues
from the point of interruption.
HOW TO CANCEL A WASHING
PROGRAMME OR A DELAY START
If a washing programme or a delay
start has not started, you can change
the selection.
When a washing programme or a delay
start are in progress, it is not possible
to change the selection. It is necessary
to cancel the washing programme or
the delay start to make a new selection.
How to cancel a washing programme
1. Press and hold the start/cancel button
until the start/cancel indicator light goes
off.
2. Make sure that there is detergent in the
detergent dispenser before you start a
new washing programme.
How to cancel a delay start
1. Press and hold the start/cancel button
until the start/cancel and the delay start
indicator lights go off.
2. Press the start/cancel button to start
the washing programme.
AT THE END OF THE WASHING
PROGRAMME
• The appliance stops automatically.
• The end-of-programme indicator light is
on.
1. Switch off the appliance.
2. Open the appliance door.
3. For better drying results, keep the door
ajar for some minutes.
REMOVE THE ITEMS FROM THE
BASKETS
• Let the dishes become cold before you
remove them from the appliance. Hot
dishes can be easily damaged.
• First remove the items from the lower
basket, then from the upper basket.
• There can be water on the sides and on
the door of the appliance. Stainless steel
becomes cool more quickly than the
dishes.
WASHING PROGRAMMES
Programme
Position of
the programme
knob
Type of soil
Heavy soil
Crockery, cutlery,
pots and pans
Prewash
Wash 70 °C
2 middle rinses
Last rinse
Dry
B
Normal soil
Crockery and cutlery
Prewash
Wash 65 °C
2 middle rinses
Last rinse
Dry
C
Normal or
light soil
Crockery and cutlery
Wash 60 °C
Rinse
D
Normal soil
Crockery and cutlery
Prewash
Wash 50°C
1 middle rinse
Last rinse
Dry
Normal 65°
Quick 60° 1)
Economy 50°
Programme description
A
Intensive 70°
2)
Type of load
12 electrolux
Programme
Position of
the programme
knob
E
Type of soil
Type of load
Use this programme to quickly
rinse the dishes. This prevents the
remaining food to bond on the
dishes and bad odours to come
out from the appliance.
Do not use detergent with this
programme.
Rinse
Programme description
1 cold rinse
1) When you have a light load, this programme gives good washing results in a short time.
2) This is the standard programme for test institutes (refer to the supplied leaflet for test information). With this
programme you have the most efficient use of water and energy consumption for crockery and cutlery with normal
soil.
Consumption values
Programme
Programme time (minute)
Energy (kWh)
Water (litre)
85 - 95
1,8 - 2,0
22 - 25
105 - 115
1,5 - 1,7
23 - 25
30
0,9
9
130 - 140
1,0 - 1,2
14 - 16
12
0,1
5
Intensive 70°
Normal 65°
Quick 60°
Economy 50°
Rinse
The water pressure and temperature,
the variations of the mains supply and
the quantity of dishes can change the
consumption values.
CARE AND CLEANING
TO REMOVE AND CLEAN THE FILTERS
Dirty filters decrease the washing results.
The appliance has three filters:
1. coarse filter (A)
2. microfilter (B)
3. flat filter (C)
1. To unlock the filter system, turn the
handle on the microfilter (B) approximately 1/4 counterclockwise.
A
B
C
2. Remove the filter system.
3. Hold the coarse filter (A) by the handle
with the hole.
electrolux 13
4. Remove the coarse filter (A) from the
microfilter (B).
5. Remove the flat filter (C) from the bottom of the appliance.
D
6. Clean the filters below running water.
7. Put the flat filter (C) to its initial position.
Make sure that it assembles correctly
under the two guides (D).
8. Put the coarse filter (A) in the microfilter
(B) and push the filters together.
9. Put the filter system in position.
10. To lock the filter system, turn the handle on the microfilter (B) clockwise until
it locks in position.
TO CLEAN THE SPRAY ARMS
Do not remove the spray arms.
If the holes in the spray arms become clogged, remove remaining parts of soil with a
thin pointed object.
TO CLEAN THE EXTERNAL SURFACES
Clean the external surfaces of the appliance
and control panel with a moist soft cloth.
Only use neutral detergents.
Do not use abrasive products, abrasive
cleaning pads or solvents (acetone).
WHAT TO DO IF…
The appliance does not start or stops during operation.
First try to find a solution to the problem (refer to the chart). If not, contact the service
centre.
Malfunction
Fault code
Possible cause
The appliance
does not fill with
water.
• The start/cancel indicator
light flashes.
• The end-of-programme
indicator light flashes one
time.
The water tap is
blocked or is furred with
limescale.
Clean the water tap.
The water pressure is
too low.
Contact your local water authority.
The water tap is closed.
Open the water tap.
The filter in the water inlet hose is blocked.
Clean the filter.
The connection of the
water inlet hose is not
correct.
Make sure that the
connection is correct.
The water inlet hose is
damaged.
Make sure that the water inlet hose has no
damages.
There is a blockage in
the sink spigot.
Clean the sink spigot.
The connection of the
water drain hose is not
correct.
Make sure that the
connection is correct.
The appliance
does not drain
the water.
• The start/cancel indicator
light flashes. .
• The end-of-programme
indicator light flashes two
times.
Possible solution
14 electrolux
Malfunction
Fault code
The programme
does not start.
After the check, switch on the appliance.
The programme continues from the point of
interruption.
If the malfunction shows again, contact the
service centre.
For other fault codes, not showed in the
chart, contact the service centre.
The necessary data for the service centre is
on the rating plate.
Possible cause
Possible solution
The water drain hose is
damaged.
Make sure that the water drain hose has no
damages.
The appliance door is
open.
Close the door correctly.
The mains plug is not
connected in.
Put in the mains plug.
Blow out fuse in the
household fuse box.
Replace the fuse.
The delay start is set.
If you want to cancel
the delay start, refer to
'Select and start a
washing programme'.
We recommend that you write the data
here:
Model (MOD.)
....................
Product number (PNC)
....................
Serial number (S.N.)
....................
THE WASHING RESULTS AND DRYING RESULTS ARE NOT SATISFACTORY
Problem
The dishes are not clean.
Limescale particles on the
dishes.
There are streaks, milky stains,
or a bluish layer on glasses and
dishes.
Possible cause
Possible solution
The selected washing programme was not applicable for
the type of load and soil.
Make sure that the washing
programme is applicable for the
type of load and soil.
The baskets were not loaded
correctly, water did not touch
all surfaces.
Load the baskets correctly.
The spray arms could not turn
freely because of incorrect arrangement of the load.
Make sure that an incorrect arrangement of the load does not
cause a blockage of the spray
arms.
The filters are dirty or not assembled and installed correctly.
Make sure that the filters are
clean and correctly assembled
and installed.
The quantity of detergent was
not sufficient or missing.
Make sure that the quantity of
detergent is sufficient.
The salt container is empty.
Fill the salt container with dishwasher salt.
Incorrect water softener adjustment
Adjust the water softener.
The salt container cap is not
closed correctly.
Make sure that the salt container cap is closed correctly.
Rinse aid dosage is too high.
Decrease the rinse aid dosage.
electrolux 15
Problem
Dry water drop stains on
glasses and dishes.
Possible cause
Possible solution
Rinse aid dosage is too low.
Increase the rinse aid dosage.
The detergent can be the
cause.
Use a different brand of detergent.
The dishes are wet.
You have set a washing programme without drying phase
or with a decreased drying
phase.
Let the door stay ajar for some
minutes before you remove the
dishes.
The dishes are wet and dull.
The rinse aid dispenser is empty.
Fill the rinse aid dispenser with
rinse aid.
TECHNICAL DATA
Dimensions
Width
600 mm
Height
850 mm
Depth
Water supply pressure
610 mm
Minimum
0.5 bar (0.05 MPa)
Maximum
8 bar (0.8 MPa)
Water supply 1)
Cold water or hot water
Capacity
Place settings
maximum 60 °C
12
1) Connect the water inlet hose to a water tap with a 3/4'' thread.
The rating plate on the inner edge of
the appliance door shows the electrical
connection data.
photovoltaic panels and aeolian), use a
hot water supply to decrease energy
consumption.
If the hot water comes from alternative
sources of energy, (e.g. solar panels,
ENVIRONMENT CONCERNS
The symbol
on the product or on its
packaging indicates that this product may
not be treated as household waste. Instead
it should be taken to the appropriate
collection point for the recycling of electrical
and electronic equipment. By ensuring this
product is disposed of correctly, you will
help prevent potential negative
consequences for the environment and
human health, which could otherwise be
caused by inappropriate waste handling of
this product. For more detailed information
about recycling of this product, please
contact your local council, your household
waste disposal service or the shop where
you purchased the product.
.
Recycle the materials with the symbol
Put the packaging in applicable containers
to recycle it.
INSTALLATION
INSTALLATION UNDER A COUNTER
Put the appliance adjacent to a water tap
and a water drain.
Remove the appliance worktop to install it
under a sink unit or a kitchen worktop.
Make sure that the dimensions of the recess agree with the dimensions in the picture.
16 electrolux
If the level of the appliance is not correct,
the door catches on the sides of the cabinet.
Loosen or tighten the adjustable feet to adjust the level of the appliance.
WATER DRAIN CONNECTION
Connect the water drain hose to:
• The sink spigot and attach it under the
work surface. This prevents that the
waste water from the sink goes back into
the appliance.
• A stand pipe with vent-hole. The internal
diameter must be minimum 40 mm.
max 85 cm
max 400 cm
HOW TO REMOVE THE APPLIANCE
WORKTOP
1. Remove the rear screws (1).
2. Pull the worktop from the behind of the
appliance (2).
3. Lift the worktop and move it from the
front slots (3).
4. Use the adjustable feet to adjust the
level of the appliance.
5. Install the appliance under the kitchen
worktop. Do not squash or bend the
water hoses during the installation.
TO ADJUST THE LEVEL OF THE
APPLIANCE
A correct level of the appliance lets the door
to close and seal correctly.
min 40 cm
Remove the sink plug when the appliance
drains the water to prevent that the water
goes back into the appliance.
The drain hose extension must not be longer than 2 m. The internal diameter must
not be smaller than the diameter of the
hose.
If you connect the water drain hose to a
trap spigot under the sink, remove the plastic membrane (A). If you do not remove the
membrane, remaining food can cause a
blockage in the drain hose spigot
A safety device impedes the dirty water
to go back into the appliance. If, the
spigot of the sink has a 'non-return
valve', this can cause the appliance to
drain incorrectly. Remove the non-return valve.
electrolux 17
Electrolux. Thinking of you.
Düşüncelerinizi www.electrolux.com.tr adresinden bizimle
daha fazla paylaşın
İÇİNDEKİLER
Güvenlik bilgileri
17 Bir yıkama programının seçilmesi ve
Ürün tanımı
19 başlatılması
25
Kontrol Paneli
20 Yıkama programları
26
Cihazın kullanımı
21 Bakım ve temizlik
27
Su yumuşatıcının ayarlanması
21 Servisi aramadan önce
28
Bulaşık makinesi tuzunun kullanımı
22 Teknik veriler
30
Deterjan ve parlatıcı kullanımı
22 Çevreyle ilgili bilgiler
30
Çatal-bıçaklar ve tabakların yerleştirilmesi
Montaj
30
23
Önceden haber verilmeksizin değişiklik yapma hakkı saklıdır.
GÜVENLİK BİLGİLERİ
Kurulum ve kullanım öncesinde bu kılavuzu
dikkatlice okuyun:
• Kendi emniyetiniz ve mal güvenliğiniz için.
• Çevreye katkıda bulunmak için.
• Cihazın doğru bir şekilde kullanılması için.
Bu kılavuzu, makineyi başka bir yere taşımanız veya farklı bir kişiye vermeniz durumunda da daima beraberinde bulundurun.
Üretici, hatalı kurulum ve kullanım sonucu
ortaya çıkan hasarlardan sorumlu değildir.
ÇOCUKLARIN VE SAVUNMASIZ
KIŞILERIN EMNIYETI
• Fiziksel, duyusal ve mental kapasiteleri
düşük veya makinenin kullanımı hakkında
deneyimi ve bilgisi olmayan kişiler (çocuklar dahil) bu cihazı kullanmamalıdır. Bu kişiler makineyi, güvenliklerinden sorumlu
olan bir kişinin denetimi altında veya cihazın kullanımı hakkında bu kişi tarafından
bilgilendirilmek kaydıyla kullanabilir.
• Çocuklar, cihazla oynamamaları için denetim altında tutulmalıdır.
• Tüm ambalaj malzemelerini çocuklardan
uzak tutun. Nefes alamama veya yaralanma riski vardır.
• Tüm deterjanları emniyetli bir yerde saklayın. Çocukların deterjanlara dokunmasına
izin vermeyin.
• Kapak açıkken, çocukları ve evcil hayvanları makineden uzak tutun.
GENEL GÜVENLIK
• Bu makinenin teknik özelliklerini değiştirmeyin. Yaralanma ve makineye zarar verme riski vardır.
• Gözde, ağızda ve boğazda yanıkları önlemek için deterjan üreticisinin emniyet talimatlarına göre hareket edin.
• Makinedeki suyu içmeyin. Makinenizde
deterjan partikülleri kalabilir.
• Makinenin kapağını başında bulunmadığınız zamanlarda açık bırakmayın. Bu,
yaralanmayı ve açık bir kapak üzerine
düşmeyi önlemek içindir.
• Açık kapak üzerine oturmayın veya basmayın.
KULLANILDIĞI IŞLEMLER
• Bu makine, sadece ev içi kullanım içindir.
Kişilerin yaralanmasına ve mal zararına
engel olmak için makineyi başka amaçlarla kullanmayın.
• Bu cihazı sadece bulaşık makinesinde yıkanabilir aksesuarları temizlemek için kullanın.
• Cihazın içine, üzerine veya yakınına yanıcı
ürünler ya da yanıcı ürünlerle ıslanmış eşyalar koymayın. Patlama veya yangın riski.
• Bıçakları ve sivri uçlu eşyaların tümünü,
sivri uçları aşağı gelecek şekilde çatal-bıçak sepetine koyun. Bu şekilde koyamıyorsanız, yatay bir şekilde üst sepete ve-
18 electrolux
•
•
•
•
•
•
•
ya bıçak sepetine koyun. (Modellerin tümünde bıçak sepeti bulunmaz).
Sadece bulaşık makinelerine özel ürünleri
(deterjan, tuz ve parlatıcı) kullanın.
Bulaşık makinelerine uygun olmayan tuz
tipleri su yumuşatıcının zarar görmesine
neden olabilir.
Bir yıkama programını başlatmadan önce
cihaza tuz koyun. Cihazda kalan tuz paslanmaya neden olabilir veya cihazın altında bir delik açabilir.
Parlatıcı gözüne parlatıcı dışında maddeler (örneğin; bulaşık makinesi temizleme
maddesi, sıvı deterjan) koymayın. Bu durum cihazın zarar görmesine neden olabilir.
Bir yıkama programını başlatmadan önce,
püskürtme kollarının rahatça hareket edebildiğinden emin olun.
Bir yıkama programı çalışırken kapağı
açarsanız cihazdan sıcak buhar çıkışı olabilir. Cilt yanıkları riski vardır.
Yıkama programı tamamlanana kadar cihazdan bulaşıkları çıkarmayın.
BAKIM VE TEMIZLIK
• Cihazı temizlemeden önce, kapatın ve
elektrik fişini prizden çekin.
• Yanıcı ürünler veya korozyona neden olabilen ürünler kullanmayın.
• Cihazı filtreler olmadan kullanmayın. Filtrelerin doğru monte edildiğinden emin olun.
Yanlış bir montaj işlemi, tatmin edici olmayan yıkama sonuçlarına ve cihazın zarar görmesine neden olur.
• Cihazı temizlemek için su spreyi veya buhar kullanmayın. Elektrik çarpması ve cihazın zarar görme riski vardır.
MONTAJ
• Cihazın zarar görmediğinden emin olun.
Hasarlı bir cihazı monte etmeyin veya
bağlamayın, tedarikçi ile temas kurun.
• Cihazı monte etmeden ve kullanmadan
önce tüm ambalajı çıkartın.
• Cihazın elektrik bağlantısını, tesisatını ve
montajını sadece kalifiye bir kişi yapmalıdır. Bunun amacı yapısal hasar veya yaralanma riskinin ortadan kaldırılmasıdır.
• Montaj sırasında elektrik fişinin prizden
çekili olduğundan emin olun.
• Hidrolik bileşenlerin ve elektrikli bileşenlerin zarar görmesini önlemek için, cihazın
yanlarında delik açmayın.
DONMAYA KARŞI ÖNLEMLER
• Cihazı, sıcaklığı 0 °C'den daha az olan
yerlere monte etmeyin.
• Üretici firma donma nedeniyle oluşan zararlardan sorumlu değildir.
SU BAĞLANTISI
• Cihazı su beslemesine bağlamak için yeni
hortumlar kullanın. Eski hortumları kullanmayın.
• Cihazı yeni borulara veya uzun süre kullanılmamış olan borulara bağlamayın. Suyu
birkaç dakika akıttıktan sonra giriş hortumunu bağlayın.
• Cihazın montajını yaparken su hortumlarını ezmemeye veya zarar vermemeye dikkat edin.
• Su kaçağı olmaması için, su bağlantılarının sıkı olduğundan emin olun.
• Cihazı ilk kez kullanırken, hortumlarda su
kaçağı olmadığından emin olun.
ELEKTRIK BAĞLANTISI
• Cihaz topraklanmalıdır.
• Veri etiketindeki elektriksel verilerin elektrik beslemesine uygun olduğundan emin
olun.
• Her zaman doğru monte edilmiş, darbelere dayanıklı bir priz kullanın.
• Priz çoğaltıcıları ve uzatma kablolarını kullanmayın. Yangın riski vardır.
• Elektrik kablosunu yenilemeyin veya
değiştirmeyin. Servis merkezini arayın.
• Cihazın arkasındaki elektrik fişini ve kablosunu ezmemeye veya zarar vermemeye
dikkat edin.
• Montajdan sonra elektrik fişine erişilebildiğinden emin olun.
• Cihazın fişini prizden çıkarmak için elektrik
kablosunu çekmeyin. Her zaman fişten
tutarak çekin.
SERVIS MERKEZI
• Sadece yetkili bir kişi cihaz üzerinde onarım veya çalışma yapabilir. Servis merkezini arayın.
• Sadece orijinal yedek parçalar kullanın.
CIHAZIN ISKARTAYA ÇIKARILMASI
• Yaralanma veya hasar riskini ortadan kaldırmak için:
– Elektrik fişini prizden çekin.
– Elektrik kablosunu kesin ve atın.
electrolux 19
– Kapak mandalını sökün. Bu, çocukların
veya evcil hayvanların cihaz içinde kapalı kalmalarına engel olur. Boğulma
riski söz konusudur.
– Cihazı yerel atık imha merkezine atın.
Uyarı Bulaşık deterjanları tehlikeli
maddelerdir ve korozyona neden
olabilirler!
• Bu deterjanlarla herhangi bir kazanın
meydana gelmesi halinde, hemen bir
doktora danışın.
• Deterjan ağzınıza bulaşırsa, vakit kaybetmeden bir doktora danışın.
• Deterjan gözlerinize bulaşırsa, derhal
bir doktora danışın ve gözlerinizi suyla temizleyin.
• Bulaşık deterjanlarını çocukların erişemeyeceği, güvenli bir yerde tutun.
• Deterjan çekmecesinde deterjan varken cihazın kapağını açık bırakmayın.
• Deterjan çekmecesini ancak bir yıkama programını başlatmadan önce
doldurun.
Üretici / İhracatçı :
ELECTROLUX HOME PRODUCTS
CORPORATION NV.
RAKETSTRAAT 40 / RUE DE LA FUSEE 40
B-1130 BRUSSEL / BRUXELLES
BELGIUM
TEL: +32 2 716 26 00
FAX: +32 2 716 26 01
www.electrolux.com
Kullanım Ömrü Bilgisi :
Kullanım ömrü küçük ev aletlerinde 7 yıl,
diğer beyaz eşya ürünlerinde ise 10 yıldır.
Kullanım ömrü, üretici ve/veya ithalatçı
firmanın cihazınızla ilgili yedek parça temini
ve bakım süresini ifade eder.
ÜRÜN TANIMI
1
2
3
4
5
Üst sepet
Su sertliği ayar düğmesi
Tuz haznesi
Deterjan gözü
Parlatıcı gözü
6
7
8
9
10
Bilgi etiketi
Filtreler
Alt püskürtme kolu
Üst püskürtme kolu
Üst tabla
20 electrolux
KONTROL PANELİ
6
7
1
1
2
3
4
5
6
7
2
5
3
4
Program kılavuzu
Program düğmesi
Başlat / iptal tuşu
Gecikmeli başlatma tuşu
Gösterge lambaları
Program işaretleyici
Açma / kapama gösterge ışığı
Gösterge lambaları
Yıkama veya durulama aşamasına geçildiğinde yanar.
Yıkama
Kurutma aşamasına geçildiğinde yanar.
Kurutma
Program sonu
Tuz
Tuz haznesinin doldurulması gerektiğinde yanar. 'Bulaşık makinesi tuzunun kullanımı' bölümüne bakın.
Hazneyi doldurduktan sonra, tuz gösterge ışığı birkaç saat daha yanmaya devam edebilir. Bu durumun, cihazın çalışması
üzerinde herhangi bir olumsuz etkisi yoktur.
1)
Parlatıcı
Aşağıdaki durumlarda yanar:
• Yıkama programı tamamlandığında.
• Su yumuşatıcının seviyesini ayarladığınızda.
• Cihazda bir arıza olduğunda.
1)
Parlatıcı gözünün doldurulması gerektiğinde yanar. 'Deterjan
ve parlatıcı kullanımı' bölümüne bakın.
1) Tuz ve/veya parlatıcı haznelerinin boş olması durumunda, herhangi bir yıkama programı çalışırken ilgili gösterge
ışıkları yanmaz.
PROGRAM DÜĞMESI VE AÇMA /
KAPAMA GÖSTERGE IŞIĞI
Cihazı açmak ve bir yıkama programını
seçmek için:
• Program düğmesini saat yönünde veya
saat yönünün tersine çevirin. Program
düğmesinin üzerindeki program işaretleyici, kontrol panelindeki yıkama programlarından bir tanesine denk gelmelidir.
• Açma / kapama gösterge ışığı yanar.
Cihazı kapamak için:
– Program işaretleyici açma / kapama gösterge ışığıyla karşılaşıncaya kadar, program düğmesini saat yönünde veya saat
yönünün tersine döndürün.
– Açma / kapama gösterge ışığı söner.
GECIKMELI BAŞLATMA TUŞU
Yıkama programının başlangıcını üç saat
geciktirmek için bu tuşa basın. 'Bir yıkama
electrolux 21
programının ayarlanması ve başlatılması'
bölümüne bakın.
CİHAZIN KULLANIMI
1. Su yumuşatıcının ayarlanan seviyesinin
bölgenizdeki su sertliği ile uyumlu olup
olmadığını kontrol edin. Uyumlu değilse,
su yumuşatıcıyı ayarlayın.
2. Tuz haznesini bulaşık makinesi tuzu ile
doldurun.
3. Parlatıcı gözünü parlatıcı ile doldurun.
4. Bulaşığı cihaza yerleştirin.
5. Bulaşığın tipine ve kirliliğine göre doğru
yıkama programını ayarlayın.
6. Deterjan gözünü doğru miktarda deterjanla doldurun.
7. Yıkama programını başlatın.
SU YUMUŞATICININ AYARLANMASI
Su yumuşatıcı su beslemesindeki mineralleri
ve tuzları giderir. Bu mineraller ve tuzlar makinenizin zarar görmesine neden olabilir.
Bölgenizdeki su sertliği ile uyumlu değilse su
yumuşatıcının seviyesini ayarlayın.
Bölgenizdeki su sertliği konusunda bilgi almak için yerel su idarenize başvurun.
Su sertliği
Su sertliği ayarı
Alman derecesi
(dH°)
Fransız derecesi
(°TH)
mmol/l
Clarke derecesi
manuel
elektronik
51 - 70
91 - 125
9,1 - 12,5
64 - 88
2 1)
10
43 - 50
76 - 90
7,6 - 9,0
53 - 63
2 1)
9
37 - 42
65 - 75
6,5 - 7,5
46 - 52
2
1)
8
29 - 36
51 - 64
5,1 - 6,4
36 - 45
2 1)
7
1)
23 - 28
40 - 50
4,0 - 5,0
28 - 35
2
19 - 22
33 - 39
3,3 - 3,9
23 - 27
2 1)
5 1)
15 - 18
26 - 32
2,6 - 3,2
18 - 22
1
4
11 - 14
19 - 25
1,9 - 2,5
13 - 17
1
3
4 - 10
7 - 18
0,7 - 1,8
5 - 12
1
2
<4
<7
< 0,7
<5
1
2)
1) Fabrika konumu.
2) Bu seviyede tuz kullanmayın.
Su yumuşatıcıyı manuel ve elektronik
olarak ayarlamalısınız.
MANUEL AYARLAMA
Su sertliği ayar düğmesini pozisyon 1 veya
2'ye getirin (tabloya bakın).
ELEKTRONIK AYARLAMA
1. Başlat / iptal tuşunu basılı tutun.
6
1 2)
22 electrolux
2. Program işaretleyici kontrol panelindeki
kullanılabilir ilk yıkama programını gösterene kadar program düğmesini saat
yönünde döndürün.
3. Açma / kapama ve başlat / iptal gösterge ışıkları yanıp sönmeye başladığında
başlat / iptal tuşunu serbest bırakın.
4. Aynı zamanda program sonu gösterge
ışığı yanıp sönmeye başlar. Yanıp sönme sayısı geçerli ayarı gösterir.
Örnek: 5 yanıp sönme / duraklama / 5
yanıp sönme = seviye 5.
5. Ayarı değiştirmek için başlat / iptal tuşuna basın. Başlat / iptal tuşuna her bastığınızda, ayar bir sonraki seviyeye geçer.
6. İşlemi kaydetmek için, cihazı kapayın.
Su yumuşatıcı elektronik olarak seviye
1'e ayarlanmışsa, tuz gösterge ışığı kapalı kalır.
BULAŞIK MAKİNESİ TUZUNUN KULLANIMI
Tuz haznesinin doldurulması:
1. Kapağı saatin tersi yönde çevirin ve tuz
haznesini açın.
2. Tuz haznesine 1 litre su koyun (sadece
ilk defa tuz doldurduğunuzda).
3. Tuz haznesine tuz koymak için huniyi
kullanın.
4. Tuz haznesi deliğinin etrafındaki tuzları
temizleyin.
5. Tuz haznesini kapatmak için kapağı saat yönünde çevirin.
Tuz doldururken, tuz haznesinden suyun taşması normaldir.
DETERJAN VE PARLATICI KULLANIMI
1
2 3
8
4
5
DETERJAN KULLANIMI
6
Çevrenin korunmasına yardımcı olmak
amacıyla, doğru miktarda deterjandan
fazlasını kullanmayın.
Deterjan ambalajı üzerinde verilen deterjan üreticisinin tavsiyelerine uyun.
7
Deterjan gözünü doldurmak için aşağıdaki
işlemleri yapın:
1. Deterjan gözünün kapağını 2 açmak
için serbest bırakma tuşuna 8 basın.
2. Göze deterjan koyun 3 .
3. Yıkama programının ön yıkama aşaması
varsa, ön yıkama deterjan bölmesine az
miktarda deterjan koyun 1 .
4. Deterjan tabletleri kullanacaksanız, tableti deterjan gözüne koyun 3 .
5. Deterjan gözünü kapatın. Kapağa yerine oturuncaya kadar bastırın.
electrolux 23
Farklı markalardaki deterjanlar farklı sürelerde çözünürler. Bazı deterjan tabletleri kısa yıkama programlarında en iyi
temizleme sonuçlarını vermezler. Deterjan tabletlerini kullanırken deterjan kalıntılarını tamamen gidermek için uzun yıkama programlarını kullanın.
PARLATICI KULLANIMI
Parlatıcı, bulaşıkların çizilmeden ve lekelenmeden kurumasını sağlar.
Parlatıcı gözü son durulama aşamasında parlatıcıyı otomatik olarak ekler.
Parlatıcı gözünü doldurmak için aşağıdaki
işlemleri yapın:
1. Parlatıcı gözünün kapağını 5 açmak
için serbest bırakma tuşuna 7 basın.
2. Parlatıcı gözünü 4 parlatıcı ile doldurun. 'max' işareti maksimum seviyeyi
gösterir.
3. Dökülen parlatıcıyı, yıkama programı sırasında aşırı köpük oluşmasını önlemek
için emici bir bezle silin.
4. Parlatıcı gözünü kapatın. Kapağa yerine
oturuncaya kadar bastırın.
PARLATICI DOZUNUN AYARLANMASI
Fabrika ayarı: pozisyon 4.
Parlatıcı dozunu pozisyon 1 (en düşük doz)
ile pozisyon 6 (en yüksek doz) arasında
ayarlayabilirsiniz.
Dozu artırmak veya azaltmak için parlatıcı
ayar düğmesini 6 çevirin.
KOMBI DETERJAN TABLETLERININ
KULLANILMASI
Bu tabletler deterjan, parlatıcı ve bulaşık
makinesi tuzu gibi maddeleri bir arada barındırır. Bazı tablet tipleri başka maddeler de
içerebilir.
Tuz ve parlatıcı içeren tabletler kullanırken,
tuz haznesini ve parlatıcı gözünü doldurmayın. Cihaz etkinleştiğinde parlatıcı göstergesi
açık kalır.
Bu tabletlerin bölgenizdeki su sertliği ile
uyumlu olduğundan emin olun (ürünlerin
ambalajı üzerindeki talimatlara bakın).
1. Su sertliğini en düşük seviyeye ayarlayın.
'Su yumuşatıcının ayarlanması' bölümüne bakın.
2. Parlatıcı dozunu en düşük seviyeye
ayarlayın.
Deterjan, tuz ve parlatıcının ayrı ayrı
kullanılması
1. Tuz haznesini ve parlatıcı gözünü doldurun.
2. Su sertliğini en yüksek seviyeye ayarlayın.
3. Bulaşık koymadan bir yıkama programını
başlatın.
4. Yıkama programı tamamlandığında, su
yumuşatıcıyı bölgenizdeki su sertliğine
ayarlayın.
5. Parlatıcı miktarını ayarlayın.
ÇATAL-BIÇAKLAR VE TABAKLARIN YERLEŞTİRİLMESİ
PRATIK BILGILER
• Suyu emebilen nesneleri (süngerler, toz
bezleri) cihazin içine koymayın.
• Bulaşıklarda kalan yiyecekleri alın.
• Bulaşıklarda kalan yanmış besinleri yumuşatın.
• İçi boş bulaşıkları (kupalar, bardaklar ve
tavalar) ağızları aşağı gelecek şekilde yerleştirin.
• Suyun kaplarda veya çanaklarda birikmemesine dikkat edin.
• Çatal-bıçak ve tabakların birbirlerine yapışmamasını sağlayın.
• Bardakların diğer bardaklara temas etmediğinden emin olun.
• Küçük bulaşıkları çatal-bıçak sepetine koyun.
• Kaşıkların birbirlerine yapışmalarını önlemek için, diğer çatal-bıçaklarla karışık halde koyun.
• Bulaşıkları sepetlere koyarken, suyun tüm
yüzeylere temas edebileceğinden emin
olun.
• Hafif bulaşıkları üst sepete koyun. Bulaşıkların hareket etmediğinden emin olun.
• Plastik bulaşıklarda ve yapışmaz tavalarda su damlaları birikebilir.
24 electrolux
ALT SEPET
Kulplu tencereleri, tencere kapaklarını, tepsileri, salata kaselerini ve çatal-bıçakları alt
sepete koyun. Servis tabaklarını ve büyük
kapakları sepetin kenarlarına yerleştirin.
Kaşıkların birbirlerine yapışmalarını önlemek
için, diğer çatal-bıçaklarla karışık halde koyun.
Çatal-bıçak ızgarasını kullanın. Eğer çatalbıçakların boyutları çatal-bıçak ızgarasının
kullanımına imkan tanımazsa, ızgarayı kolayca çıkarabilirsiniz.
ÜST SEPET
Üst sepet, tabaklar (çapı maksimum 24 cm
olan), çay tabakları, salata kapları, kupalar,
bardaklar, kaplar ve kapaklar için tasarlanmıştır. Su tüm yüzeylere temas edecek şekilde, bulaşıkları düzenleyin.
ÇATAL-BIÇAK SEPETI
Çatalları ve kaşıkları, sapları aşağıya gelecek
şekilde yerleştirin.
Bıçakları, sapları yukarıya gelecek şekilde
yerleştirin.
Uzun ayaklı kadehleri ve bardakları, ayakları
yukarı gelecek şekilde fincan raflarına yerleştirin. Daha uzun bulaşıklar için, fincan raflarını yukarı katlayın.
ÜST SEPETIN YÜKSEKLIĞININ
AYARLANMASI
Bulaşık yerleştirme olanağını artırmak için
üst sepeti iki konumda yerleştirebilirsiniz.
Dikkat Yüksekliği, üst sepeti
doldurmadan önce ayarlayın.
electrolux 25
Maksimum tabak yüksekliği:
üst sepet
için
alt sepet
için
Üst konum
20 cm
31 cm
Alt konum
24 cm
27 cm
3. Sepeti üst konuma yerleştirin.
4. Ön teker tutucularını (A) ilk konumlarına
geri alın.
Dikkat Sepet üst konumda ise, fincan
raflarına fincan koymayın.
Üst sepeti daha üst konuma taşımak için
aşağıdaki işlemleri yapın:
1. Ön teker tutucularını (A) dışarı doğru çekin
2. Sepeti çekip çıkartın.
BİR YIKAMA PROGRAMININ SEÇİLMESİ VE BAŞLATILMASI
YIKAMA PROGRAMININ GECIKMELI
BAŞLATMA OLMADAN SEÇILMESI VE
BAŞLATILMASI
1. Kapağı kapatın.
2. Bir yıkama programını seçin. 'Yıkama
programları' bölümüne bakın.
– Açma / kapama gösterge ışığı yanar.
3. Başlat / iptal tuşuna basın. Yıkama
programı otomatik olarak çalışmaya
başlar.
– Başlat / iptal gösterge ışığı yanar.
YIKAMA PROGRAMININ GECIKMELI
BAŞLATMAYLA SEÇILMESI VE
BAŞLATILMASI
1. Kapağı kapatın.
2. Bir yıkama programını seçin.
3. Gecikmeli başlatma tuşuna basın.
– Gecikmeli başlatma gösterge ışığı yanar.
4. Başlat / iptal tuşuna basın. Geri sayım
otomatik olarak başlar.
– Geri sayım tamamlandığında, yıkama
programı otomatik olarak başlar ve
gecikmeli başlatma gösterge ışığı söner.
Cihazın kapağının açılması geri sayımı
durdurur. Kapağı kapattığınızda, geri
sayım duraklatıldığı noktadan itibaren
devam eder.
YIKAMA PROGRAMININ KESILMESI
• Cihazın kapağını açın.
– Yıkama programı durdurulur.
• Cihazın kapağını kapatın.
– Yıkama programı duraklatıldığı noktadan itibaren çalışmaya devam eder.
BIR YIKAMA PROGRAMININ VEYA BIR
GECIKMELI BAŞLATMANIN IPTAL
EDILMESI
Bir yıkama programı veya gecikmeli
başlatma henüz başlamamışsa, seçimi
değiştirebilirsiniz.
Bir yıkama programı veya gecikmeli
başlatma başladıktan sonra seçimi
değiştirmek mümkün değildir. Yeni bir
seçim yapmak için yıkama programını
veya gecikmeli başlatmayı iptal etmeniz
gerekir.
Bir yıkama programının iptal edilmesi
1. Başlat / iptal gösterge ışığı sönene dek,
başlat / iptal tuşunu basılı tutun.
26 electrolux
2. Yeni bir yıkama programı başlatmadan
önce deterjan gözünde deterjan bulunduğundan emin olun.
2. Cihazın kapağını açın.
3. Daha iyi kurutma sonuçları elde etmek
için kapağı birkaç dakika aralık bırakın.
Gecikmeli başlatmanın iptal edilmesi
1. Başlat / iptal ve gecikmeli başlatma
gösterge ışıkları sönene kadar başlat /
iptal tuşunu basılı tutun.
2. Yıkama programını başlatmak için, başlat / iptal tuşuna basın.
BULAŞIKLARI SEPETLERDEN ALIN.
• Bulaşıkları makineden çıkarmadan önce
soğumalarını bekleyin. Sıcak bulaşıklar
kolayca zarar görebilir.
• Öncelikle alt sepeti sonra üst sepeti boşaltın.
• Makinenin yan kısımlarında ve kapağında
su olabilir. Paslanmaz çelik, tabaklara göre daha çabuk soğur.
YIKAMA PROGRAMININ SONUNDA
• Cihaz otomatik olarak durur.
• Program sonu gösterge ışığı yanar.
1. Cihazı kapayın.
YIKAMA PROGRAMLARI
Program
Program
düğmesinin
konumu
Kirlilik türü
Program tanımı
A
Ağır kirli
Tabaklar, çatal-bıçaklar, tencereler
ve tavalar
Ön Yıkama
Yıkama 70°C
2 ara durulama
Son durulama
Kurutma
B
Normal kirli
Tabaklar ve çatalbıçaklar
Ön Yıkama
Yıkama 65°C
2 ara durulama
Son durulama
Kurutma
C
Normal veya
hafif kirli
Tabaklar ve çatalbıçaklar
Yıkama 60°C
Durulama
D
Normal kirli
Tabaklar ve çatalbıçaklar
Ön Yıkama
Yıkama 50°C
1 ara durulama
Son durulama
Kurutma
E
Bulaşıkları hızlı şekilde durulamak
için bu programı kullanın. Bu, kalan yiyeceklerin tabaklara yapışmasını ve cihazdan kötü kokuların
gelmesini önler.
Bu programda deterjan kullanmayın.
Yoğun 70°
Normal 65°
Hızlı 60°
Bulaşık türü
1)
Ekonomi 50° 2)
Durulama
1 soğuk durulama
1) Bulaşık miktarı az olduğunda, bu program kısa sürede iyi yıkama sonuçları sağlar.
2) Test enstitüleri için standart programdır (test bilgileri için verilen broşüre bakın). Bu programla normal kirli tabaklar
ve çatal-bıçaklar için suyun ve enerji tüketiminin en etkin kullanımına sahip olursunuz.
Tüketim değerleri
Program
Program süresi (dakika)
85 - 95
Yoğun 70°
Enerji (kWh)
1,8 - 2,0
Su (litre)
22 - 25
electrolux 27
Program
Program süresi (dakika)
Enerji (kWh)
Su (litre)
105 - 115
1,5 - 1,7
23 - 25
30
0,9
9
130 - 140
1,0 - 1,2
14 - 16
12
0,1
5
Normal 65°
Hızlı 60°
Ekonomi 50°
Durulama
Su basıncı ve sıcaklığı, elektrik beslemesindeki dalgalanmalar ve bulaşıkların
miktarı tüketim değerlerini değiştirebilir.
BAKIM VE TEMİZLİK
FILTRELERIN ÇIKARILMASI VE
TEMIZLENMESI
Kirli filtreler yıkamadan alınacak sonucu kötüleştirir.
Makinede üç filtre bulunmaktadır:
1. kaba atık filtresi (A)
2. mikro-filtre (B)
3. yassı filtre (C)
1. Filtre sisteminin kilidini açın, mikro-filtrenin kulpunu (B) saatin tersi yönde yaklaşık 1/4 tur döndürün.
A
B
C
2. Filtre sistemini çıkarın.
3. Kaba atık filtresini (A) elinizle delik kısmından tutun.
4. Kaba atık filtresini (A) mikro-filtreden (B)
çıkartın.
5. Yassı filtreyi (C) cihazın tabanından çıkartın.
D
28 electrolux
6. Filtreleri akan suyun altında temizleyin.
7. Yassı filtreyi (C) ilk konumuna yerleştirin.
İki kılavuzun (D) altına tam olarak oturduğundan emin olun.
8. Kaba atık filtresini (A) mikro-filtrenin (B)
içine yerleştirin ve filtreleri birlikte yerine
bastırarak oturtun.
9. Filtre sistemini yerine koyun.
10. Filtre sistemini kilitlemek için, mikro-filtre
(B) yerine oturuncaya kadar mikro-filtrenin kulpunu saat yönünde döndürün.
Püskürtme kollarındaki delikler tıkanırsa, kalan kir parçalarını ince sivri bir cisim ile çıkarın.
DIŞ YÜZEYLERIN TEMIZLENMESI
Makinenin dış yüzeylerini ve kontrol panelini
nemli yumuşak bir bezle temizleyin.
Sadece nötr deterjanlar kullanın.
Aşındırıcı ürünleri, aşındırıcı temizleme bezlerini veya çözücüleri (aseton) kullanmayın.
PÜSKÜRTME KOLLARININ
TEMIZLENMESI
Püskürtme kollarını çıkartmayın.
SERVİSİ ARAMADAN ÖNCE
Cihaz çalışmıyor veya çalışırken bir anda
duruyor.
Sorun
Arıza kodu
Cihaz suyla dolmuyor.
• Başlat / iptal gösterge
ışığı yanıp söner.
• Program sonu gösterge
ışığı bir defa yanıp söner.
Cihaz suyu boşaltmıyor.
Program başlamıyor.
• Başlat / iptal gösterge
ışığı yanıp söner. .
• Program sonu gösterge
ışığı iki defa yanıp söner.
Önce sorun için bir çözüm bulmaya çalışın
(tabloya başvurun). Aksi takdirde, servis
merkezini arayın.
Olası neden
Olası çözüm
Su musluğu tıkalı veya
kireç kaplamıştır.
Su musluğunu temizleyin.
Su basıncı çok düşüktür.
Yerel su idarenize başvurun.
Su musluğu kapalıdır.
Su musluğunu açın.
Su giriş hortumundaki
filtre tıkalıdır.
Filtreyi temizleyin.
Su giriş hortumunun
bağlantısı yanlış yapılmıştır.
Bağlantının düzgün yapıldığından emin olun.
Su giriş hortumu hasar
görmüştür.
Su giriş hortumunda
hasar olmadığından
emin olun.
Lavabo tahliyesinde tıkanma vardır.
Lavabo tahliyesini temizleyin.
Su tahliye hortumunun
bağlantısı düzgün yapılmamıştır.
Bağlantının düzgün yapıldığından emin olun.
Su tahliye hortumu hasar görmüştür.
Su tahliye hortumunda
hasar olmadığından
emin olun.
Cihazın kapağı açıktır.
Kapağı düzgünce kapatın.
Elektrik fişi prize takılı
değildir.
Elektrik fişini takın.
electrolux 29
Sorun
Arıza kodu
Olası neden
Kontrol ettikten sonra cihazı çalıştırın. Program duraklatıldığı noktadan itibaren çalışmaya devam eder.
Arıza tekrarlanırsa yetkili servisi arayın.
Çizelgede gösterilmeyen diğer arıza kodları
için, lütfen yetkili servisi arayın.
Servisler için gerekli bilgiler bilgi etiketinde
bulunmaktadır.
Olası çözüm
Ev sigorta kutusunda sigorta atmıştır.
Sigortayı değiştirin.
Gecikmeli başlatma
ayarlanmıştır.
Gecikmeli başlatmayı
iptal etmek istiyorsanız,
'Bir yıkama programının
seçilmesi ve başlatılması' bölümüne bakın.
Bu verileri aşağıya yazmanızı öneriyoruz:
Model (MOD.)
....................
Ürün numarası (PNC)
....................
Seri numarası (S.N.)
....................
YIKAMA SONUÇLARI VE KURUTMA SONUÇLARI TATMIN EDICI DEĞIL.
Sorun
Bulaşıklar temiz değil.
Olası neden
Muhtemel çözüm
Seçilen yıkama programı bulaşık tipi ve kirlilik derecesi için
uygun değildir.
Seçilen yıkama programının bulaşık tipine ve kirlilik derecesine
uygun olduğundan emin olun.
Sepetler düzgün yüklenmediğinden su tüm yüzeylere temas etmemiştir.
Bulaşıkları sepete doğru şekilde
yerleştirin.
Bulaşıkların yanlış yerleştirilmesinden ötürü püskürtme kolları
rahatça dönemiyordur.
Püskürtme kollarının, bulaşıkların yanlış yerleştirilmesi nedeniyle engellenmediğinden emin
olun.
Filtreler kirlidir veya düzgün birleştirilmemiş ve takılmamıştır.
Filtrelerin temiz ve doğru şekilde
birleştirilip takıldığından emin
olun.
Çok az deterjan kullanılmıştır
veya hiç deterjan kullanılmamıştır.
Deterjan miktarının yeterli olduğundan emin olun.
Tuz haznesi boştur.
Tuz haznesini bulaşık makinesi
tuzu ile doldurun.
Su yumuşatıcı ayarı yanlıştır.
Su yumuşatıcıyı ayarlayın.
Tuz haznesinin kapağı doğru
bir şekilde kapatılmamıştır.
Tuz haznesi kapağının doğru bir
şekilde kapatıldığından emin
olun.
Bardakların ve tabakların üzerinde çizgiler, beyazımsı lekeler
veya mavimsi bir tabaka var.
Parlatıcı dozu çok yüksektir.
Parlatıcı dozunu azaltın.
Bardakların ve tabakların üzerinde kurumuş su damlaları var.
Parlatıcı dozu çok düşüktür.
Parlatıcı dozunu artırın.
Sebebi kullandığınız deterjan
olabilir.
Farklı marka bir deterjan kullanın.
Tabaklar üzerinde kireç kalıntıları var.
30 electrolux
Olası neden
Muhtemel çözüm
Bulaşıklar ıslak.
Sorun
Kurutma aşaması olmayan veya kurutma aşaması kısaltılmış
bir yıkama programı seçilmiştir.
Bulaşıkları makineden çıkarmadan önce, kapağı birkaç dakika
aralık bırakın.
Tabaklar ıslak ve mat.
Parlatıcı gözü boştur.
Parlatıcı gözünü parlatıcı ile doldurun.
TEKNİK VERİLER
Boyutlar
Genişlik
600 mm
Yükseklik
850 mm
Derinlik
Su besleme basıncı
610 mm
Minimum
0,5 bar (0,05 MPa)
Maksimum
8 bar (0,8 MPa)
Su beslemesi 1)
Soğuk su veya sıcak su
Kapasite
Yer ayarları
maksimum 60 °C
12
1) Su giriş hortumunu 3/4" vida dişli bir su musluğuna bağlayın.
Makine kapağının iç kenarındaki bilgi
plakası elektriksel bağlantı verilerini
gösterir.
ve rüzgar) geliyorsa enerji tüketimini
azaltmak için bir sıcak su kaynağını kullanın.
Sıcak su alternatif enerji kaynaklarından
(ör. güneş panelleri, fotovoltaik paneller
ÇEVREYLE İLGİLİ BİLGİLER
Ürünün ya da ambalajının üzerindeki
simgesi, bu ürünün normal ev çöpü gibi
atılmayıp, elektrik ve elektronik cihazların
geri dönüşüm için verildiği özel toplama
noktalarından birine verilmesi gerektiğini
belirtir. Bu ürünün doğru şekilde imha
edilmesine katkıda bulunmakla hem çevreyi,
hem de çevrenizdekilerin sağlığını korumuş
olursunuz. Yanlış şekilde imha ise hem
çevreye hem sağlığa zararlıdır. Bu ürünün
MONTAJ
BIR MUTFAK TEZGAHININ ALTINA
MONTAJ
Cihazı bir su musluğunun ve bir su giderinin
yakınına yerleştirin.
Cihazı bir lavabonun veya mutfak mobilyasının altına monte etmek için, cihazın üst panelini çıkarın.
Yerleştirileceği yerin boyutlarının resimde
gösterilen boyutlara uyduğundan emin olun.
geri dönüşümüne ilişkin daha ayrıntılı bilgileri
belediyenizden, çöp dairenizden veya ürünü
satın almış olduğunuz bayiden
edinebilirsiniz.
EEE Yönetmeliğine Uygundur.
Şu simgeye sahip malzemeler geri dönüştü. Ambalajı geri dönüşüm için uyrülebilir:
gun konteynerlere koyun.
electrolux 31
Cihazın düzlemselliği uygun değilse, kapak,
kabinin yan taraflarına sürter.
Cihazın düzlemselliğini ayarlamak için ayarlanabilir ayakları sıkın ya da gevşetin.
SU TAHLIYE BAĞLANTISI
Su tahliye hortumunu aşağıdaki
şekillerde bağlayabilirsiniz:
• Lavabo tahliyesine bağlayın ve tezgahın
altına monte edin. Böylece, atık suyun lavabodan cihaza akışı engellenmiş olur.
• Havalandırma menfezli bir tezgah borusuna bağlayın. İç çapı en az 40 mm olmalıdır.
max 85 cm
max 400 cm
CIHAZIN ÜST PANELININ
ÇIKARTILMASI
1. Arka vidaları sökün (1).
2. Üst paneli, cihazın arka kısmından çekin
(2).
3. Üst paneli kaldırın ve ön yuvalardan kurtarın (3).
4. Cihazın düzlemselliğini ayarlamak için
ayarlanabilir ayakları kullanın.
5. Cihazı mutfak tezgahının altına yerleştirin. Montaj sırasında su hortumlarını ezmeyin veya bükmeyin.
CIHAZIN DÜZLEMSELLIĞININ
AYARLANMASI
Cihazın düz bir seviyede olması, kapağın
doğru ve tam kapanmasını sağlar.
min 40 cm
Atık suyun cihaza geri akışını önlemek için,
cihaz tahliye yaparken lavabo tapasını çıkarın.
Tahliye hortumu uzatması en fazla 2 m olabilir. İç çapı, hortumun iç çapından az olamaz.
Su tahliye hortumunu süzgeçli bir lavabo altı
tahliye borusuna bağlıyorsanız, plastik
membranı (A) çıkarın. Membranı çıkarmazsanız, yiyecek kalıntıları tahliye hortumunun
süzgecini tıkayabilir.
Bir emniyet aygıtı kirli suyun makineye
geri dönmesini engeller. Lavabo tahliyesinde 'tek yönlü bir valf' varsa, bu valf,
cihazın doğru tahliye yapmasına engel
olabilir. Tek yönlü valfi çıkarın.
www.electrolux.com/shop
156954061-A-272011