1
Unified Data Browser
smar
First in Fieldbus
-
Unified Data
Browser
USER’S MANUAL
MAY / 06
Unified Data
Browser
VERSION 8
TM
FOUNDATION
P V I
E W U D B M E
www.smar.com
Specifications and information are subject to change without notice.
Up-to-date address information is available on our website.
web: www.smar.com/contactus.asp
Table of Contents
TABLE OF CONTENTS
UNIFIED DATA BROWSER............................................................................................................................ 5
INTRODUCTION.............................................................................................................................................................5
STARTING THE UNIFIED BROWSER...........................................................................................................................6
FEATURES OF THE UNIFIED BROWSER....................................................................................................................6
BROWSER USER INTERFACE .....................................................................................................................................7
TOOLBAR............................................................................................................................................................................ 7
TREE CONTROL................................................................................................................................................................. 8
ITEM BROWSER................................................................................................................................................................. 8
ITEM ID FIELD .................................................................................................................................................................... 9
EXTENDED POINT SYNTAX EDITOR.............................................................................................................................. 10
FAVORITES TREE ............................................................................................................................................................ 11
OPERATING THE UNIFIED BROWSER......................................................................................................................12
SINGLE TAG SELECTION MODE .................................................................................................................................... 12
MULTIPLE TAG SELECTION MODE ................................................................................................................................ 13
INTERNET ACCESS TO TAGS: GENBROKER ..........................................................................................................14
BROWSING FOR ITEMS .................................................................................................................................................. 14
OPC TAGS....................................................................................................................................................................14
OPC DATA ACCESS TAGS .............................................................................................................................................. 15
OPC ALARM AND EVENTS TAGS ................................................................................................................................... 16
OPC HISTORICAL DATA ACCESS TAGS........................................................................................................................ 16
ALIASES .......................................................................................................................................................................17
GLOBAL ALIASES............................................................................................................................................................. 18
LANGUAGE ALIASES ....................................................................................................................................................... 18
VARIABLES ..................................................................................................................................................................19
SIMULATION VARIABLES ................................................................................................................................................ 20
BROWSING GRAPHWORX DATA ITEMS ..................................................................................................................20
BROWSING NETWORK NODES.................................................................................................................................21
DATABASE ACCESS ...................................................................................................................................................21
DATABASE ACCESS TAG SYNTAX ...........................................................................................................................23
DATA MINING CONFIGURATION WIZARD ................................................................................................................23
DATABASE CONNECTIONS .......................................................................................................................................25
CREATING A NEW DATABASE CONNECTION .............................................................................................................. 25
DATABASE CONNECTION PROPERTIES .................................................................................................................26
MICROSOFT ACCESS CONNECTION............................................................................................................................. 27
MICROSOFT EXCEL CONNECTION................................................................................................................................ 27
MICROSOFT SQL SERVER CONNECTION .................................................................................................................... 28
ORACLE CONNECTION ................................................................................................................................................... 28
ODBC CONNECTION ....................................................................................................................................................... 29
DATA SOURCES AND DATA MANIPULATORS.........................................................................................................29
DATA SOURCES............................................................................................................................................................... 29
DATA MANIPULATORS .................................................................................................................................................... 29
DO’S AND DON’TS FOR DATA MINING .......................................................................................................................... 30
TROUBLESHOOTING DATA SOURCES AND DATA MANIPULATORS ......................................................................... 30
III
Unified Data Browser
CREATING A NEW DATA SOURCE................................................................................................................................. 31
DATA SOURCE PROPERTIES....................................................................................................................................32
DATABASE TABLES ......................................................................................................................................................... 33
ENABLE WRITES.............................................................................................................................................................. 35
ENABLE INSERTS ............................................................................................................................................................ 35
ENABLE DELETES ........................................................................................................................................................... 35
SQL COMMAND................................................................................................................................................................ 36
CREATING A NEW DATA MANIPULATOR .................................................................................................................37
DATA MANIPULATOR PROPERTIES .........................................................................................................................39
SQL COMMANDS ............................................................................................................................................................. 39
BIND RESULTS................................................................................................................................................................. 41
STORED PROCEDURE .................................................................................................................................................... 41
DATA ITEMS.................................................................................................................................................................43
DATA ITEMS FOR DATA SOURCES................................................................................................................................ 43
DATA ITEMS FOR DATA MANIPULATORS ..................................................................................................................... 44
CREATING A NEW DATA ITEM ..................................................................................................................................45
DATA ITEM PROPERTIES...........................................................................................................................................46
TESTING YOUR DATA TAGS......................................................................................................................................48
IV
Unified Data Browser
UNIFIED DATA BROWSER
Introduction
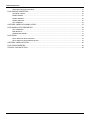
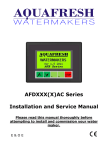
The ProcessView Unified Data Browser, shown in the figure below, is a tool that helps you in
configuring your ProcessView applications, including GraphWorX, TrendWorX, and AlarmWorX.
Using the Unified Browser, you can connect to OPC servers and databases, find the available tags
needed to configure the type of display that you wish to build, and send them to OPC clients. You
can also browse for aliases and variables to help you create your displays.
Unified Data Browser
The Unified Browser allows you to conveniently browse for several basic types of data from a single
location accessible from most ProcessView applications, including:
•
OPC tags
•
Aliases
•
Variables
•
Network nodes
•
Databases
A tag (sometimes called a "point") is a specification that, once sent to a client, will direct your
customized software to perform a desired function. For example, a tag can direct your TrendWorX
application to provide trending information at predetermined time intervals.
Using an intuitive point-and-click interface, the Unified Browser enables you to:
•
Configure OPC Data Access (DA) points (or tags).
•
Obtain OPC Alarm and Events (AE) server information.
•
Configure OPC Historical Data Access (HDA) tags.
•
Data-mine databases, such as Microsoft Access, Microsoft SQL Server, Microsoft Excel, and
Oracle.
5
Unified Data Browser – User’s Manual
The Unified Browser performs the functions listed above for Smar OPC clients and OPC third-party
clients that support drag-and-drop, an OPC specification. To accomplish this, the Browser uses the
OPC interfaces to connect to OPC data servers through COM and DCOM. This connection also
allows the Browser to support network tag configuration without additional user configuration being
necessary.
You can also use the Unified Browser to select from the following types of aliases and variables:
•
Local aliases
•
Global aliases
•
Language aliases
•
Local variables
•
Simulation variables
Starting the Unified Browser
To open the Unified Browser from the Windows Start menu, select Programs > Smar ProcessView
> Tools > OPC Tag Browser.
NOTE
You can also launch the Unified Browser from many dialogs within the various ProcessView
applications.
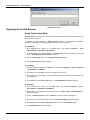
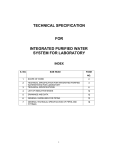
Features of the Unified Browser
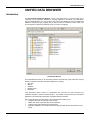
The Unified Browser consists of a single, resizable window with two panes, as shown in the figure
below.
Unified Data Browser
6
Unified Data Browser
Important features of the Unified Browser include:
•
Unified look and feel.
•
Open architecture.
•
Multi-threaded.
•
Multi-tabbed browser interfaces.
•
Resizable window.
•
Movable split bar separating the tree control from the item viewer.
•
The most recent information displayed and the tree location are maintained even after you
have closed the dialog box.
•
The tree control will update a branch's child information by highlighting the branch in the tree
control and clicking the Refresh button.
•
Copying the registry information to the local computer is not necessary for network
configuration.
•
Support for multiple tag selection (available only for specific applications).
Browser User Interface
The interface of the Unified Browser contains the following main components:
•
Toolbar
•
Tree control (left pane)
•
Item browser (right pane)
•
Item ID field (edit box)
Toolbar
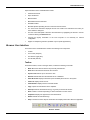
The Browser toolbar, shown in the figure below, contains the following commands:
•
Back: Moves the selection back to the previously selected item.
•
Next: Moves the selection forward to the next item.
•
Up One Level: Moves up one level in the view.
•
Refresh: Reloads data from the selected server or database.
•
Show Error Info: Displays information (when available) about errors in the system.
•
View-List: Displays items as a list.
•
Views-Details: Displays items as a list with details.
•
Copy: Copies the selected item to the clipboard.
•
Enter Up: Adds the selected item ID (e.g. tag name) to the Item ID edit box.
•
New: Creates a new item depending on what is selected in the tree control.
•
Properties: Displays the properties for the selected item.
•
Delete: Deletes the selected item(s).
•
Help: Launches the online help for the Browser and displays information about the application.
Browser Toolbar
7
Unified Data Browser – User’s Manual
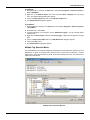
Tree Control
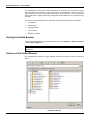
The left pane of the Unified Browser interface presents a hierarchical tree control display of
information, as shown in the figure below. The tree includes information on network location, server
name, group (folder) hierarchy, aliases, and variables. This view also lets you create a tag name
based on server location and group names.
The tree view of the Unified Browser is created "on the fly." "On the fly" means that, when you click
on the OPC server of your choice, the Browser queries the server on the type of hierarchy it
supports and then determines how to display the hierarchy. It will be either a "flat view" (i.e.,
vertically straight up and down) or a "tree view" (i.e., with "branches" descending out of one another)
hierarchy, depending on the type the server supports.
You can connect to OPC servers on both the local computer (My Computer) and on computers
over an intranet (Network Neighborhood) or the Internet. As a result, a remote client PC can
configure tags from the OPC data servers. The only special setup required to support this remote
browsing are network connections. The Favorites tree enables you specify frequently connected
network nodes and data servers.
Unified Browser
Item Browser
The right pane of the Unified Browser displays the items (e.g. OPC servers, tags, aliases, variables,
etc.) for the currently selected item in the tree control, as shown in the figure below.
8
Unified Data Browser
Selecting an Item in the Browser
Item ID Field
At the top of the browser window, this field displays the name of the currently selected item(s), as
shown in the figure below. This field also serves as an edit box where you can manually type in the
names of tags, aliases, variables, etc. Note: On intranet or Internet servers, the node name appears
at the beginning of the tag name. Alternatively, you can manually type the complete tag name in the
Item ID field. Type the tag name in the following format: "\\node name\server name\ item id." For
local servers, type in: "server name\item id".
Selecting an Item in the Browser
9
Unified Data Browser – User’s Manual
Extended Point Syntax Editor
Clicking the … button to the right of the item ID field in the OPC DA tab of the Unified Browser
opens the Extended Point Syntax Editor, as shown in the figure below.
Extended Point Syntax Editor
The Point Extension Syntax (PES) allows for retrieving additional information related to OPC tags,
such as quality and timestamp.
To use the PES:
1.
Prefix your tag name with “tag:”
2.
Postfix your tag name with “#” followed by a PES token.
Valid PES tokens are:
•
quality (returns the OPC quality associated with the tag value)
•
timestamp
(returns the timestamp associated with the tag value)
The following are example expressions using a valid PES request:
•
tag: Smar.Simulator\SimulatePLC.Ramp#timestamp
•
tag: Smar.Simulator\SimulatePLC.Ramp#quality
•
tag:\\pc1\Smar.Simulator\SimulatePLC.Ramp#timestamp
•
tag:\\pc1\Smar.Simulator\SimulatePLC.Ramp#quality
NOTE
Sometimes it may be necessary to enforce the “request data type” to a specific type, such as
“string,” in order to display the extended syntax information in a process point.
For more information, please see the Expression Editor help documentation.
The Extended Point Syntax Editor in the Unified Data Browser helps you build your tags using
point extension syntax. The following fields are available:
10
•
Access Path: Specify a path in the text box.
•
Property: Choose a property from the drop-down list.
•
Array Indices: Specify an array in the text box.
Unified Data Browser
•
Attribute: Select an attribute (e.g. "quality," "timestamp," "valid," or "good quality") from the
drop-down list.
•
Scan Rate Override: Specify a scan rate override in the text box.
•
Rq. Data Type Override: Select a “request data type” override from the drop-down list.
Notice that the tag syntax changes automatically in the edit box at the top of the dialog box as you
make your selections.
Favorites Tree
The Favorites tree enables you to specify frequently connected network nodes and data servers.
Right click the Favorites tree and select New Network Node or New Data Server from the pop-up
menu, as shown in the figure below.
Favorites Tree in Unified Browser
In the Add Network Node dialog box, specify a computer name as shown in the figure below.
Adding a Network Node
In the Add Data Server dialog box, specify a computer name or URL as shown in the figure below.
11
Unified Data Browser – User’s Manual
Adding a Data Server
Operating the Unified Browser
Single Tag Selection Mode
Single Selection mode allows you to select one tag at a time from the server and have it sent to the
client that has requested it.
To operate the Unified Browser in Single Selection mode in the GraphWorX, TrendWorX,
AlarmWorX, DataWorX, and ScriptWorX applications, follow the steps below:
In GraphWorX:
1. Start GraphWorX by clicking on the Start button and selecting Programs > Smar
ProcessView > ProjectWorX > GraphWorX.
2. In the Dynamics menu, select Intrinsics > Process Point, then click anywhere on the blank
screen. The Property Inspector dialog box appears.
3. Click on the Data Tags button on the Property Inspector dialog box.
4. The Unified Browser dialog box appears.
In TrendWorX:
1. Start TrendWorX by clicking on the Start button and selecting Programs > Smar ProcessView
> ProjectWorX > TrendWorX.
2. In the File menu, select New to create a new display on the screen.
3. Double-click on the new display. The Trend Viewer ActiveX Properties dialog box appears. Click
on the Pens tab.
4. On the Pens tab, click the OPC Tags button. The Unified Browser dialog box appears.
In AlarmWorX:
1. Start AlarmWorX by clicking on the Start button and selecting Programs > Smar
ProcessView > ProjectWorX > AlarmWorX.
2. Double-click on the AlarmWorX View ActiveX object. The Alarm Viewer ActiveX Properties
dialog box appears.
3. Click on the Subscription tab. Click the Add button and name the new subscription.
4. Double-click on the new subscription name. The Event Subscription dialog box appears.
5. On the Server tab of the Event Subscription dialog box, click on the Browse button.
6. The Unified Browser dialog box appears.
12
Unified Data Browser
In DataWorX:
1. Start DataWorX by clicking on the Start button and selecting Programs > Smar ProcessView >
Tools > DataWorX.
2. Right-click on the Address Space tree control and select New > Register from the pop-up
menu. The Register Settings dialog box appears.
3. Click on the OPC Outputs tab, then on the Add OPC Output button.
4. The Unified Browser dialog box appears.
In ScriptWorX:
1. Start ScriptWorX by clicking on the Start button and selecting Programs > Smar ProcessView
> ScriptWorX.
2. On the File menu, select New.
3. A window will appear. In the left pane, click on VBA Script Triggers. The list of Scripts folders
will drop down.
4. Right-click on Event Scripts, and then click Insert Trigger. A dialog box will appear in the right
pane.
5. Click on the Expression Editor button. The Edit Expression dialog box appears.
6. Click on the Tags button.
7. The Unified Browser dialog box appears.
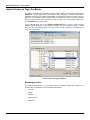
Multiple Tag Selection Mode
The Unified Browser also supports multiple-tag configuration for specific Browser operations in some
applications, as shown in the figure below. Select an item or items from the right pane. To select
multiple items, press and hold down the CTRL button while selecting each item. The information is
added to the Item ID field.
Multiple Items Selected in Browser
13
Unified Data Browser – User’s Manual
Internet Access to Tags: GenBroker
To make the Unified Browser accessible through the Internet, Smar has enhanced ProcessView with
GenBroker, a proven, high-speed communications utility. Employing a network of applications,
GenBroker uses OPC over TCP/IP and SOAP/XML communications channels to achieve real time
and secure communications between Web servers and Web browser clients. Everything except the
method of communication method remains the same as before. For more information, please refer
to the GenBroker help documentation.
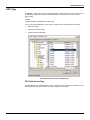
In the Unified Browser, click on the Network Neighborhood tree to view the nodes and tags
available through GenBroker communications channels. Tag names browsed through a remote
server will have the following syntax in the Item Id field: "\\node name\server name\item id," as
shown in the figure below.
Internet Access Through the Browser
Browsing for Items
The Unified browser allows you to conveniently browse for the following basic types of data from a
single location accessible from most ProcessView applications:
14
•
OPC tags
•
Aliases
•
Variables
•
Network nodes
•
Databases
Unified Data Browser
OPC Tags
An OPC tag, or data point, is a data connection between a client and an OPC server. OPC tags can
be used in expressions when the tag is embedded between double brackets, as shown below:
{{tag_name}}
Example:
x={{Smar.Simulator.1\SimulatePLC.PumpSpeed}}
You can use the Unified Browser, shown below, to select from the following types of OPC tags:
•
Data Access (DA)
•
OPC Alarm and Events (AE)
•
Historical Data Access (HDA)
Selecting OPC Tags from the Unified Browser
OPC Data Access Tags
The OPC DA tab of the Unified Browser, shown in the figure below, enables you to browse for OPC
Data Access tags from OPC Data Access servers installed on your system.
15
Unified Data Browser – User’s Manual
Unified Browser: OPC Data Access Tags
OPC Alarm and Events Tags
The OPC AE tab of the Unified Browser, shown in the figure below, enables you to browse for OPC
Alarm and Events tags from OPC Alarm and Events servers installed on your system.
Unified Browser: OPC Alarm and Events Tags
OPC Historical Data Access Tags
The OPC HDA tab of the Unified Browser, shown in the figure below, enables you to browse for
OPC Historical Data Access tags from OPC Historical Data Access servers installed on your
system.
16
Unified Data Browser
Unified Browser: OPC Historical Data Access Tags
Aliases
An alias is a string that represents or describes an object or data point in a display. Both local and
global aliases can be used in expressions. You can browse from the following types of aliases:
•
Local aliases
•
Global aliases
•
Language aliases
Local Aliases
For local aliases within the expression, use the following syntax:
<<local_alias_name>>
Example:
x=<<TankLevel>>
You can use the Unified Browser, shown below, to select local aliases.
Selecting a Local Alias From the Unified Browser
17
Unified Data Browser – User’s Manual
Global Aliases
For global aliases within the expression, use the following syntax:
<#global_alias_name#>
Example:
x=<#RoomTemperature#>
Select a global alias from the Unified Browser, which includes all global aliases in the global alias
database. This eliminates the need to manually type in the alias name. All global aliases that are
configured in the Global Alias Engine Configurator are conveniently available to choose from inside
the browser. The tree control of the Global Alias Engine Configurator is mimicked in the tree control
of the Browser. Select a global alias by double-clicking the alias name (e.g. "Floor" in the figure
below). The alias name appears at the top of the browser, which automatically adds the <# and #>
delimiters to the alias name. Click the OK button.
Selecting a Global Alias From the Unified Browser
Language Aliases
For language aliases within the expression, use the following syntax:
/+language_alias_name+/
Example:
x=/+WaterSystem+/
Select a language alias from the Unified Browser, which includes all languages aliases in the
language database. All language aliases that are configured in the Language Configurator are
conveniently available to choose from inside the browser. The tree control of the Language
Configurator is mimicked in the tree control of the Language Alias Browser. Select a language alias
by double-clicking the alias name, as shown in the figure below. The alias name appears at the top
of the browser, which automatically adds the /+ and +/ delimiters to the alias name. Click the OK
button.
18
Unified Data Browser
Selecting a Language Alias From the Unified Browser
Variables
Variables can be used in expressions. How the variable needs to be referred to depends on the type
of variable. A local variable can be used in expressions when the variable is embedded between
double tildes.
Local Variables
For local variables within the expression, use the following syntax:
~~local_variable_name~~
Example:
x=~~Setpoint~~
You can use the Unified Browser, shown below, to select local variables.
Selecting a Local Variable From the Unified Browser
19
Unified Data Browser – User’s Manual
Simulation Variables
For simulation variables within the expression, use the following syntax:
{{simulation_variable_name}}
x={{gfwsim.random.long}}
You can use the Unified Browser, shown below, to select simulation variables.
Selecting a Simulation Variable From the Unified Browser
Browsing GraphWorX Data Items
The GraphWorX tab of the Unified Browser, shown in the figure below, enables you to browse for
local aliases, local variables, and simulation variables on your system. You can also create a new
GraphWorX display by right-clicking on an item in the tree control and selecting New Display from
the pop-up menu, as shown in the figure below.
To access the Unified Browser in GraphWorX:
1. Start GraphWorX by clicking on the Start button and selecting Programs > Smar ProcessView
> ProjectWorX > GraphWorX.
2. In the Dynamics menu, select Intrinsics > Process Point, then click anywhere on the blank
screen. The Property Inspector dialog box appears.
3. Click on the Data Tags button on the Property Inspector dialog box.
4. The Unified Browser dialog box appears showing the GraphWorX tab, as shown in the figure
below. You can select from local aliases, local variables, and simulation variables.
20
Unified Data Browser
Unified Browser: Browsing GraphWorX Data Items
Browsing Network Nodes
The Network Nodes tab of the Unified Browser, shown in the figure below, enables you to browse
for computers (nodes) on your intranet or LAN.
Unified Browser: Browsing Network Nodes
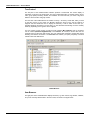
Database Access
The Database Access tab of the Unified Data Browser, shown in the figure below, enables you to
create and browse for databases. The Unified Browser supports data-mining of open databases,
including Microsoft Access, Microsoft SQL Server, Microsoft Excel, Oracle, and ODBC connections.
21
Unified Data Browser – User’s Manual
NOTE
Data Mining is primarily configured in the Data Mining Configurator. For complete information
about data-mining configuration, please see the Data Mining Configurator help documentation.
Unified Browser: Browsing Databases
The Unified Data Browser conveniently has much of the functionality of the Data Mining Configurator
built in to the Database Access tab. The basic purpose of ProcessView data mining is to visualize
data from various data sources, such as a Microsoft Access database, in a customizable, userfriendly display format that enables users to interact with and manipulate the data. The Data Mining
Configurator establishes connections with data sources that can be mined from ProcessView
applications, such as GraphWorX, where users can visualize data. In general, the Data Mining
Configurator enables you to:
•
Connect to databases (i.e. where to get the data).
•
Select data sets to mine within the connected databases (i.e. which group of data within the
connected database).
•
Specify data items to monitor within the chosen data sets (i.e. which values to read from the
selected group of data).
Once you have configured your database connections, you can configure a GraphWorX display in
order to visualize the data. In GraphWorX, the Unified Data Browser enables you to create process
points using data items from your data mining configuration database. Thus, the data mining
configuration database serves as a medium through which data can be channeled from multiple data
sources (e.g. Microsoft Access, Microsoft SQL Server, Microsoft Excel, Oracle, and ODBC data
sources) to a visualization medium (i.e. GraphWorX) where you can view or manipulate the data.
Key features of data mining include:
22
•
Brings database access to any OPC client.
•
Supports many data sources, including Microsoft Access, Microsoft SQL Server, Microsoft
Excel, MSDE, and Oracle.
•
Easy-to use dataset support includes database table access (single field read or write, column
read or write, row read or write, and two-dimensional array read or write) as well as simple SQL
commands.
•
Data manipulators enable access to database stored procedures and execution of complex
SQL commands.
•
Database Connection Wizard.
Unified Data Browser
•
Database object browser.
•
Support for aliasing (one data tag can access multiple database fields).
•
Data Mining (grid) ActiveX control.
•
Data Mining Configurator.
•
Integration of data-mining configuration into Unified Data Browser.
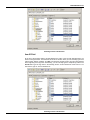
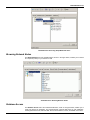
Database Access Tag Syntax
In the Database Access tab of the Unified Data Browser, shown in the figure below, the tree control
is similar to the tree control in the Data Mining Configurator; you can choose from configured data
items from the Employees_By_PID data source connection.
Unified Browser: Browsing Databases
For example, in the figure above the Name_2 item ID has been selected. The full ItemID is:
Smar.DatabaseOPCServer.3\AdministrationDB.Employees_By_PID.Name_2)
Each item ID in the Database Access tab contains the following information:
•
Server name (e.g. Smar.DatabaseOPCServer.3\)
•
Database connection name (e.g. AdministrationDB)
•
Data source name (e.g. Employees_By_PID)
•
Data item name (e.g. Name_2)
For complete information about data items for data sources and data manipulators, please see the
Data Mining Configurator help documentation.
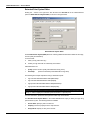
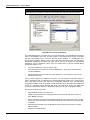
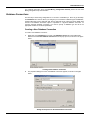
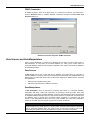
Data Mining Configuration Wizard
The Unified Data Browser provides a Data Mining Configuration Wizard that helps you create and
configure your database connections. To run the Data Mining Configuration Wizard:
1.
Click the Wizard button on the Database Access tab of the Unified Data Browser.
23
Unified Data Browser – User’s Manual
2.
The introduction screen for the Data Mining Wizard appears, as shown in the figure below.
Click the Next button to continue.
Data-Mining Wizard: Welcome Screen
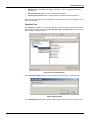
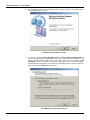
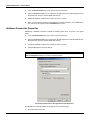
3.
You have two options: Create a New Data Source or Create a New Data Manipulator, as
shown in the figure below. A data source can be use to read data from a database. It can
access a specific database table directly or use a SQL read command to get data. A data
manipulator, which is intended for processing data stored in a connected database,
manipulates data using a SQL write command or by executing a stored procedure. Choose an
option, and then click the Next button to continue.
Data-Mining Wizard: Data Object Options
24
Unified Data Browser
For complete information about the Data-Mining Configuration Wizard, please see the Data
Mining Configurator help documentation
Database Connections
The first step in data-mining configuration is to connect to a database (i.e. where to get the data).
The Databases tree control is where you configure your connections to different types of databases,
including Microsoft Access, Microsoft SQL Server, Microsoft Excel, Oracle and other ODBC data
sources. The Database Connection object is equivalent to a physical database connection. To
correctly configure database connection, you need to specify a database type and fill in the
appropriate number of connection parameters.
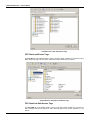
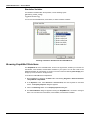
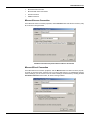
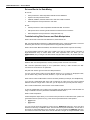
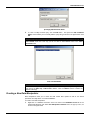
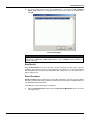
Creating a New Database Connection
To create a new database connection:
1.
Right-click on the Databases tree control of the Database Access tab of the Unified Data
Browser and select New Database Connection from the pop-up menu, as shown in the figure
below.
Creating a New Database Connection
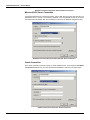
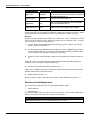
2.
The properties dialog box for the new database connection appears, as shown in the figure
below.
Setting the Properties for the New Database Connection
25
Unified Data Browser – User’s Manual
3.
In the Connection Name field, type a name for the new connection.
4.
Select a Connection Type from the drop-down list (Microsoft Access, Microsoft SQL Server,
Microsoft Excel, Oracle, or another ODBC data source).
5.
Specify the database or data source to which you want to connect.
6.
When you have finished configuring the database connection properties, click the OK button.
The new connection appears under the Databases tree control.
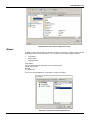
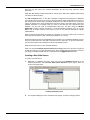
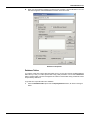
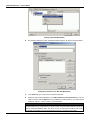
Database Connection Properties
Establishing a database connection requires the following basic steps, as shown in the figures
below:
1.
In the Connection Name field, type a name for the new connection
2.
Select a Connection Type from the drop-down list (Microsoft Access, Microsoft SQL Server,
Microsoft Excel, Oracle, or another ODBC data source).
3.
Specify the database or data source to which you want to connect.
4.
Click the OK button to save your settings.
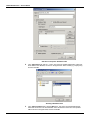
NOTE
You can also click the Advanced button to establish database connections through the Windows
Data Link Properties dialog box, as shown in the figure below.
Connecting to Data Source Through the Data Link Properties
The database connection properties vary slightly with each connection type:
•
26
Microsoft Access Connection
Unified Data Browser
•
Microsoft Excel Connection
•
Microsoft SQL Server Connection
•
Oracle Connection
•
ODBC Connection
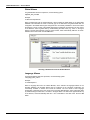
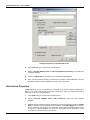
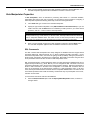
Microsoft Access Connection
In the Microsoft Access connection properties, click the Browse button and select an Access (.mdb)
file, as shown in the figure below.
Database Connection Properties: Microsoft Access Connection
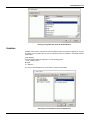
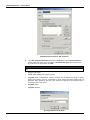
Microsoft Excel Connection
In the Microsoft Excel connection properties, click the Browse button and select an Excel (.xls) file,
as shown in the figure below. If the first row of your Excel data source (e.g. spreadsheet) contains
column headings, you can choose to use the column headings as field names by checking the Use
First Row as Field Names check box, as shown in the figure below.
27
Unified Data Browser – User’s Manual
Database Connection Properties: Microsoft Excel Connection
Microsoft SQL Server Connection
In the Microsoft SQL Server connection properties, select a SQL Server from the drop-down list. The
default SQL server is "(local)." Then select the database on the specified SQL Server file, as shown
in the figure below. By default, SQL Server database connections use Windows integrated security.
Database Connection Properties: Microsoft SQL Server Connection
Oracle Connection
In the Oracle connection properties, specify an Oracle database name. Then supply the User Name
and Password required to log on to the specified Oracle database, as shown in the figure below.
Database Connection Properties: Oracle Connection
28
Unified Data Browser
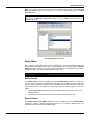
ODBC Connection
An ODBC connection, shown in the figure below, is a connection to a generic, open data source.
Click the Advanced button to establish database connections through the Windows Data Link
Properties dialog box.
Database Connection Properties: ODBC Connection
Data Sources and Data Manipulators
Once you have established a connection to a database, the next step is to select a data source or
data manipulator to mine within the connected database (i.e. which group of data within the
connected database). Data sources and data manipulators work with the data stored in databases
via read/write operations.
Data Sources
A data source can be use to read data from a database. Every data source is connected to
particular database connection. Data sources are designed to periodically read database tables and
display them in an OPC Data Access client. A data source supports two different ways to read data
from a database:
•
Direct access to database table (view)
•
SQL read command based on SELECT statement
Data Manipulators
A data manipulator, which is intended for processing data stored in a connected database,
manipulates data using a SQL write command or by executing a stored procedure. Every data
manipulator is connected to particular database connection. Data manipulator objects are designed
to manipulate database data and structure using stored procedures or simple SQL commands when
the database server or engine does not support stored procedures. In comparison with data
sources, a data manipulator should not return any cursor variables (row sets). Data manipulation
actions are executed upon user request only (there is no polling mechanism).
NOTE
SQL queries in a data manipulator object should be used only for databases that do not support
stored procedures (e.g. Excel, MS Jet). In all other cases, stored procedures/functions should be
used to manipulate database data. The reason for this is that stored procedures offer wider
functionality, and because they are precompiled on the server, execution is much faster.
29
Unified Data Browser – User’s Manual
Do’s and Don’ts for Data Mining
Do not use:
•
Store procedures in data manipulators with MS Access databases.
•
Spaces in stored procedures names.
•
CREATE, INSERT, UPDATE statements in data source SQL command.
•
Data manipulator stored procedures to view data.
Do use:
•
Stored procedures in data manipulators with Microsoft SQL and Oracle.
•
SQL queries when connecting to Microsoft Excel or Microsoft Jet connections.
•
Data manipulator stored procedures to manipulate data only.
Troubleshooting Data Sources and Data Manipulators
When I select 'SQL Command' under Data Source, what should it do?
SQL command will behave similarly to a table-based data source; it will send data from a record set
returned by this command. You can parameterize it using data item parameters.
When I select enable 'Multi-rows Dataset,' what should it do (what should I expect as the result)?
You will get multiple rows from a SQL query or table. In the case of a single column, it will return a
single-dimensional array of values where each value represents one row. When you use
@@Recordset, then you will get a two-dimensional array (like table content) - all columns and rows.
NOTE
One limitation is that 'Multi-rows Datasets' is read-only.
What are SQL Command parameters, and why should I provide more than one of these?
SQL command parameters specify a set of parameters used by a SQL command; the SQL
command can use more than one parameter.
Why and when should I give more than one table parameter?
You may want to locate a table row using different criteria (e.g. if you have an "Employees" table,
you can index it using "name, mid-name, surname," or you can use "personal ID."
When should I check 'Enable Writes'? How are the writes possible (for example, from GraphWorX)?
If you will use a table-based data source with a single-row as output, then every column-oriented
data item will return a single value. In this case, you can request it as a process point and modify it.
After I check 'Enable Writes', when should I check 'Enable Inserts'?
In case the related table row is missing from the table; then after writing it will create this table row
using a combination of known parameters and database default values.
What is a data manipulator?
A data manipulator object allows you to execute stored procedures or stand-alone SQL queries and
get results from them (if there are any). There are two special data items to manipulate it:
•
@@Execute
•
@@Results
You can execute stored procedures by writing into the @@Execute data item, where the value
should be a safe array of VARIANT values. The first value is "request identification," and the rest of
the values are input parameters for this procedure. You will get results from @@Result data item.
The values have a structure similar to the execute data item. It is again an array of VARIANT values
30
Unified Data Browser
where the very first value is the "request identification" and the rest of the values are output
parameters.
What does 'Bind Results' for SQL Command do, and why is the 'Edit' button available? What should
I be able to do with this button?
The SQL Command section in the data manipulator configuration was designed for databases
(such as Microsoft Access) that do not have stored procedures support implemented (or have very
poor support). Then the only way to manipulate the data is to use SQL commands. One command is
used to do specific action, and a resulting SQL command is used to get output values in the same
database transaction. For example, when you insert a new table row into a Microsoft Access
database, you can then read an auto-generated value from the table using the SELECT
@@identity command. Another example is if you will insert/update something; then you can get
back a sum of certain column(s). The range of its use is very wide and depends on specific
implementation.
Where should stored procedures be written? (For example if I connect to SQL Server, should the
stored procedure be written in SQL and already available for us to use it?)
Stored procedures are stored in the database server and allow you to manipulate database content.
They are usually faster than using SQL commands from the client side. To get more information,
you will need to study the documentation for the specific database server.
What should I expect when I check 'Complete Rowset'?
When you check the Complete Rowset (returned as an array) check box, it will return a single row
of data (all columns) in a single-dimensional array. When "Enable Multi-rows Dataset" is checked,
you will get a multi-dimensional array as a result (similar to the @@Recordset data item).
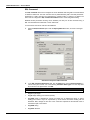
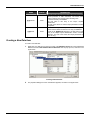
Creating a New Data Source
To create a new data source:
1.
Right-click on a database connection in the tree control of the Database Access tab of the
Unified Data Browser and select New Data Source Definition from the pop-up menu, as
shown in the figure below.
Creating a New Data Source
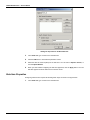
2.
The properties dialog box for the new data source appears, as shown in the figure below.
31
Unified Data Browser – User’s Manual
Setting the Properties for the New Data Source
3.
In the Name field, type a name for the new data source.
4.
Specify a Data Set (Database Table or SQL Command/Stored Procedure) to mine within the
connected database.
5.
Specify an Update Rate (in seconds) to poll for updates from the database.
6.
When you have finished configuring the data source properties, click the OK button. The new
data source appears under the database connection in the tree control.
Data Source Properties
A data source can be use to read data from a database. It can access a specific database table
directly or use a SQL read command to get data. Configuring a data source requires the following
basic steps, as shown in the figures below:
32
1.
In the Name field, type a name for the new data source.
2.
Specify a Data Set (Database Table or SQL Command) to mine within the connected
database.
3.
Database polling properties should be specified for any data source object. Specify an Update
Rate (in seconds) to poll for updates from the database. The Enable Update check box must
also be checked in order to specify an updated rate. When updates are disabled, then the data
mining server scans the database only once when the first data item is requested or on the
user request invoked by refreshing the data item.
Unified Data Browser
4.
When you have finished configuring the data source properties, click the OK button. The new
data source appears under the database connection in the tree control.
Data Source Properties
Database Tables
To configure a data source object with direct table access, you must fill in the fully qualified database
table name (or view). To locate specific table row(s), table parameters can be used. Parameters
define a subset of table columns used together as a filter for returned table row(s). Parameter values
are specified by data items.
To get data from a specific table in the database:
1.
Select the Database Table option under the Specify Data Set section, as shown in the figure
below.
33
Unified Data Browser – User’s Manual
Data Source Properties: Database Table
2.
In the Table Name field, click the … button. This opens the Unified Data Browser, which lists
all the tables in the database, as shown in the figure below. Select a table (e.g. "Employees"),
and then click OK.
Selecting a Database Table
3.
34
In the Table Parameters field, click the Add button. This opens the Unified Data Browser,
which lists all columns in the selected table. Select the desired columns from the specified
table as shown in the figure below, and then clickf OK.
Unified Data Browser
Note: If you want to read more than one row from the selected database table, check the Enable
Multi-rows Dataset check box. This way you do not need to add individual rows to the Table
Parameters field.
NOTE
You can also change the column ordering in the data source configuration by selecting a column
and clicking the Move Up or Move Down buttons. Click the Remove button to delete the
selected column(s).
Selecting a Database Column
Enable Writes
Direct database access allows users to make modifications in the specified database table (may
work for views with limitations given by the connected database server or engine). When the Enable
Writes check box is checked, you can write a value to OPC tags and it will update related records in
the database table. This works for table-based data sources only.
NOTE
Writes are disabled for multi-row datasets.
Enable Inserts
The Enable Inserts check box is available only when the Enable Writes check box is checked. In
case the record is missing in the database table (data tags return VT_EMPTY and Bad quality) then
writing to this tag will create a new record in the database table. Since the table may have more
columns than just the one requested in the data tag, it uses the following criteria to fill in other
values:
•
It uses tag parameters and the actual value to create the record; the rest of the columns use
database defaults.
•
If the data tag is record-based, then it uses all the values passed during the write.
Enable Deletes
The Enable Deletes (on VT_EMPTY value) check box is available only when the Enable Writes
check box is checked. It works for record-based data tags only. If you write VT_EMPTY value, then
it will delete related records from the database table.
35
Unified Data Browser – User’s Manual
SQL Command
The SQL Command data source is designed to access database data using SQL commands based
on SELECT statements. The SQL command can be parameterized by SQL command parameters.
Parameters in a SQL command are represented by question marks (?) and they are filled in the
same order as configured in SQL Command Parameters section of the configuration dialog.
Database stored procedures returning cursor variables (row sets) can be also accessed using a
SQL command based on EXECUTE or CALL statements.
To enter a SQL command to read from the database:
1.
Select the SQL Command option under the Specify Data Set section, as shown in the figure
below.
Data Source Properties: SQL Command
2.
In the SQL Command Parameters field, click the Add button. Enter a Parameter Name (i.e.
column name) and choose one of the following Parameter Data Types from the drop-down
list, as shown in the figure below. Click OK.
NOTE
You can also click the Get Params button to select a parameter from the database.
36
•
VT_I4: 4-byte integer
•
VT_R8: 8-byte floating-point number (double)
•
VT_DATE: Date in OleDateTime format; the DATE type is implemented using an 8-byte
floating-point number. Days are represented by whole number increments starting with 30
December 1899, midnight as time zero. Hour values are expressed as the absolute value of
the fractional part of the number.
•
VT_BSTR: String
•
VT_BOOL: Boolean
Unified Data Browser
Specifying SQL Parameter Name
3.
To view or modify the SQL query, click the Edit button. This opens the SQL Command
Editor, which enables you to manually edit the query string, as shown in the figure below. Click
OK.
NOTE
If you want to read more than one row from the selected database table, check the Enable Multirows Dataset check box. This way you do not need to add individual rows to the Table
Parameters field.
SQL Command Editor
NOTE
You can also change the column ordering in the data source configuration by selecting a column
and clicking the Move Up or Move Down buttons. Click the Remove button to delete the
selected column(s).
Creating a New Data Manipulator
Data manipulators allow you to create and edit custom SQL queries as well as use stored
procedures to modify data in a connected database.
To create a new data manipulator:
1.
Right-click on a database connection in the tree control of the Database Access tab of the
Unified Data Browser and select New Manipulator Definition from the pop-up menu, as
shown in the figure below.
37
Unified Data Browser – User’s Manual
Creating a New Data Manipulator
2.
The properties dialog box for the new data manipulator appears, as shown in the figure below.
Setting the Properties for the New Data Manipulator
3.
In the Name field, type a name for the new data manipulator.
4.
Specify the type of data manipulator to use (SQL Command or Stored Procedure). If you use
a SQL command, click the Edit buttons to create/edit your SQL queries. If you choose stored
procedure, click the … button to select a stored procedure.
NOTE
SQL queries in a data manipulator object should be used only for databases that do not support
stored procedures (e.g. Excel, MS Jet). In all other cases, stored procedures/functions should be
used to manipulate database data. The reason for this is that stored procedures offer wider
functionality, and because they are precompiled on the server, execution is much faster.
38
Unified Data Browser
5.
When you have finished configuring the data manipulator properties, click the OK button. The
new data manipulator appears under the database connection in the tree control.
Data Manipulator Properties
A data manipulator, which is intended for processing data stored in a connected database,
manipulates data using a SQL write command or by executing a stored procedure. Configuring a
data manipulator requires the following basic steps, as shown in the figures below:
1.
In the Name field, type a name for the new data manipulator.
2.
Specify the type of data manipulator to use (SQL Command or Stored Procedure). If you use
a SQL command, click the Edit buttons to create/edit your SQL queries. If you choose stored
procedure, click the … button to select a stored procedure.
NOTE
SQL queries in a data manipulator object should be used only for databases that do not support
stored procedures (e.g. Excel, MS Jet). In all other cases, stored procedures/functions should be
used to manipulate database data. The reason for this is that stored procedures offer wider
functionality, and because they are precompiled on the server, execution is much faster.
3.
When you have finished configuring the data manipulator properties, click the Apply button.
The new data manipulator appears under the database connection in the tree control.
SQL Commands
The SQL command data manipulators are mainly designed for databases that don’t support stored
procedures (MS Excel, partly MS Access, etc.). It allows configuring two SQL commands – one for
actual data manipulation action, the second for getting results (if needed). Setting the parameters is
similar to SQL commands in the data source configuration. Result SQL command is using the same
set of parameters as Execute SQL command in data manipulation action.
SQL queries/commands in a data manipulator object are mainly designed for databases that do not
support stored procedures (e.g. Excel, MS Jet). You can configure two SQL commands: one for the
actual data manipulation action; the second for getting results (if needed). Setting the parameters is
similar to SQL commands in the data source configuration. The Result SQL command uses the
same set of parameters as the Execute SQL command in a data manipulation action. In all other
cases, stored procedures/functions should be used to manipulate database data. The reason for this
is that stored procedures offer wider functionality; and because they are precompiled on the server,
execution is much faster.
To enter a SQL command to read from the database:
1.
Select the SQL Command option under the Specify Data Manipulator section, as shown in
the figure below.
39
Unified Data Browser – User’s Manual
Data Manipulator Properties: SQL Command
2.
In the SQL Command Parameters field, click the Add button. Enter a Parameter Name (i.e.
column name) and choose one of the following Parameter Data Types from the drop-down
list, as shown in the figure below. Click OK.
NOTE
f you have multiple values (parameters) you can bind them by checking the Bind Results check
box.
•
VT_I4: 4-byte integer
•
VT_R8: 8-byte floating-point number (double)
•
VT_DATE: Date in OleDateTime format; the DATE type is implemented using an 8-byte
floating-point number. Days are represented by whole number increments starting with 30
December 1899, midnight as time zero. Hour values are expressed as the absolute value of
the fractional part of the number.
•
VT_BSTR: String
•
VT_BOOL: Boolean
Specifying SQL Parameter Name
40
Unified Data Browser
3.
To view or modify the SQL query, click the Edit button. This opens the SQL Command
Editor, which enables you to manually edit the query string, as shown in the figure below.
Click OK. .
SQL Command Editor
NOTE
You can also change the column ordering in the data source configuration by selecting a column
and clicking the Move Up or Move Down buttons. Click the Remove button to delete the
selected column(s).
Bind Results
When the Bind Results check box is checked, it executes "binding" of a SQL query in the same
transaction and returns its rowset as output parameters. This allows you to read some database
data immediately after executing a data manipulation SQL command (e.g. you can read the ID of a
newly created record).
Stored Procedure
Stored procedures are the preferred way of using data manipulators. They are much more flexible
than SQL commands and usually are faster in processing. Their wide range of capabilities allows for
complex database data manipulation.
To get data from a stored procedure in the database:
1.
Select the Stored Procedure option under the Specify Data Manipulator section, as shown
in the figure below.
41
Unified Data Browser – User’s Manual
Data Manipulator Properties: Stored Procedure
2.
In the Procedure Name field, click the … button. This opens the Unified Data Browser, which
lists all the stored procedures in the database, as shown in the figure below. Select a
procedure, and then click OK.
Selecting a Stored Procedure
42
Unified Data Browser
Data Items
Once you have selected a data set or data manipulator to mine within the connected database, the
next step is to specify which data items to monitor within the chosen data set (i.e. which values to
read from the selected group of data). A data item represents a single value in a data set. There are
two general types of data items:
•
Data items for data sources
•
Data items for data manipulators
Data Items for Data Sources
Two types of data items are used for data sources:
•
Statically defined (preconfigured)
•
Dynamically requested (parameter values are set in runtime)
NOTE
Data items are also accessible as OPC Data Access tags; i.e. they are visible in OPC DA
browsers as ordinary OPC DA tags. The ProgID of the Data Mining server is
Smar.DatabaseOPCServer.3.
Static Data Items
Static data items must be preconfigured and cannot be changed in runtime mode. Basically there
are used two types of static data items:
•
Column-oriented data item: Gets value(s) from the table column specified in the
configuration
•
Record-set oriented data item: Gets the whole table row(s) as an array of VARIANT values
(single or multi-dimensional array).
Dynamic Data Items
Dynamic data items are available under every data source object without being configured. The
syntax of a fully qualified OPC DA tag ID is as follows:
Smar.DatabaseOPCServer.3\DataSourceName<ParameterValues>.DataItemName
where
•
DataSourceName is the name of the data source object in the server configuration.
•
ParameterValues are values for data source parameters delimited with commas (see the
tables below).
•
DataItemName can be one of “<Column Name>”, “@@Recordset”, “@@Refresh”,
“@@LastScanTime” (see the tables below).
DATA TYPE
String (VT_BSTR)
String
“text”
Integer (VT_I4)
4-bytes integer
123
Real (VT_R8)
8-bytes floating-point number
(double)
3.14 or -1.82E-3
Boolean
BOOL (True) or BOOL (False)
8-byte floating-point number
DATETIME(date value)
Boolean
(VT_BOOL)
VT_DATE
DESCRIPTION
VALUE SYNTAX
NOTE
The DATE type is implemented using double-precision numbers. Days are represented by whole
number increments starting with 30 December 1899, midnight as time zero. Hour values are
expressed as the absolute value of the fractional part of the number.
43
Unified Data Browser – User’s Manual
DATA ITEM NAME
ACCESS RIGHTS
DESCRIPTION
@@Column
Read/Write
Can address the only one table column identified
by its name placed into the last section of OPC DA
tag name; delimited by <>.
@@Recordset
Read/Write
Addresses the whole table row.
@@Refresh
Write
Any write forces the data source to re-read data
from connected data source.
@@LastScanTime Read
Returns time of the last data source update.
Dynamic data items can be indexed by parameters configured at the data source level. It allows
changing parameter values dynamically in runtime, e.g. using aliases, variables or scripting.
Examples
Suppose you have a database table “Sample” with columns “PID,” “Name,” “Description” and data
source with name “Sample_by_PID,” referring to this table with one parameter “PID.” The table
does not contain any rows with PID greater than 5.
1.
The OPC DA tag "Smar.DatabaseOPCServer.3\Sample_by_PID<1>.<Name>” accesses the
“Name” column for row with PID = 1.
2.
The OPC DA tag Smar.DatabaseOPCServer.3\Sample_by_PID<1>.@@Recordset” accesses
the whole table row with PID = 1. Table row(s) values are returned in array of VARIANT values
(one or two dimensional - depends on data source configuration).
3.
Inserts into column-oriented data item configured to access table column “Name” with PID set
10:
Writing string “John” into this data item will create a new table row with the following values: PID =
10, Name = “John,” Description = database default value.
4.
Inserts into record set oriented OPC tag with PID set 11:
Writing array of VARIANTs will create a new table row using all values from passed array (overrides
database default values and parameter values).
5.
Deletes table row with PID = 11:
Writing VT_EMPTY value into data item used in previous example will delete row with PID = 11.
Data Items for Data Manipulators
There are two types of data items that can access data manipulator objects:
•
Execute data item
•
Result data item
The data manipulator object executes its action asynchronously; unique request identification is
needed to pair requests and responses, as shown in the table below.
NOTE
ProcessView includes two components for accessing data manipulator objects synchronously:
DBOPCManipulatorWrapper and the Data Manipulator ActiveX control.
44
Unified Data Browser
DATA ITEM
NAME
ACCESS
RIGHTS
@@Execute
Write
@@Result
Read
DESCRIPTION
Writing to this data item executes a data manipulator action
(stored procedure or SQL command). The actual value
written to this tag must conform to the following rules:
It must be an arrary of VARIANTs.
The first value in this array is the unique request
identification.
The rest of the values are used as input parameters for data
manipulator.
Returned values represent responses for execute requests.
All the returned values are stored in an array of VARIANTs.
Similar to the @@Execute data item, the first value in this
array is the unique request identification used in execute
data item. The rest of the values are output parameters (if
there are any).
Creating a New Data Item
To create a new data item:
1.
Right-click on a data source in the tree control of the Database Access tab of the Unified Data
Browser and select New Database Record Definition from the pop-up menu, as shown in the
figure below.
Creating a New Data Item
2.
The properties dialog box for the new data item appears, as shown in the figure below.
45
Unified Data Browser – User’s Manual
Setting the Properties for the New Data Item
3.
In the Name field, type a name for the new data item.
4.
Click the Add button to enter data set parameter values.
5.
Select the data set columns (table) for the data item. You can select a Specific Column, or
use a Complete Rowset.
6.
When you have finished configuring the data item properties, click the Apply button. The new
data item appears under the data source in the tree control.
Data Item Properties
Configuring a data source requires the following basic steps, as shown in the figure below:
1.
46
In the Name field, type a name for the new data item.
Unified Data Browser
Data Item Properties
2.
In the Bind Data Set Parameters field, click the Add button to enter data set parameter
values, as shown in the figure below. Enter a Parameter Value (i.e. column name) and choose
one of the following Value Data Types from the drop-down list.
•
VT_I4: 4-byte integer
•
VT_R8: 8-byte floating-point number (double)
•
VT_DATE: Date in OleDateTime format; the DATE type is implemented using an 8-byte
floating-point number. Days are represented by whole number increments starting with 30
December 1899, midnight as time zero. Hour values are expressed as the absolute value of
the fractional part of the number.
•
VT_BSTR: String
•
VT_BOOL: Boolean
Entering Parameter Value for Data Item
3.
Select the data set columns (table) for the data item. You can select a Specific Column, or
use a Complete Rowset. To choose a specific column, click the … button and browse for a
column name (e.g. "Name") from the list of columns in the database table, as shown in the
figure below.
47
Unified Data Browser – User’s Manual
Specifying Column Name in Data Item
4.
The Parameter Value corresponds to the record number in the database table. For data item
Name_2, the Parameter Value is "2," as shown in the figure above. As you can see in the
figure below, in the Name column, record number "2" corresponds to the second value in the
column. Thus, the value for record number "2" is Russel, which is highlighted in the figure
below. Thus, the Parameter Value for data item Name_2 is resolved as "Russel."
Record Number in Database Table
5.
When you have finished configuring the data item properties, click the Apply button. The new
data item appears under the data source in the tree control.
Testing Your Data Tags
Before you try to connect to data sources and view your data tags, it is highly recommended that
you verify if the tags present inside the display are well configured from the server side. To do that
you have to check the quality of your data tags using OPC DataSpy:
48
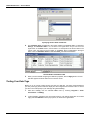
1.
Start OPC DataSpy from the Windows Start menu by selecting Programs > Smar
ProcessView > DataSpy.
2.
In OPC DataSpy, expand the tree control and browse to your data tag. Right-click on the data
tag(s) and select Monitor from the pop-up menu, as shown in the figure below.
Unified Data Browser
Browsing for Data Tags in OPC DataSpy
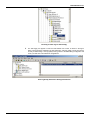
3.
The data tag(s) now appear in under the Data Monitor tree control, as shown in the figure
below. The tag quality is indicated in the right-hand pane. If the tag quality is good, then the tag
is ready for data mining. If the tag quality is bad, go back to the Data Mining Configurator and
check your data source and data item configurations.
Data Tag Quality Indicated in DataSpy Data Monitor
49
Unified Data Browser – User’s Manual
50