1
Q10 Tec rev. 1106
Index
Page
Description of the machine and
of the control panel
Page
2
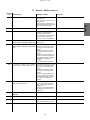
1. Data flow chart - Technician programming 3
Disassembly
Opening front panel
36
6
Coffee group removal
37
2.1 Stop Function 7
2.2 Heating Mode 7
Coffee group repositioning
38
3.
8
Coffee receptacle removal
39
Solubles receptacle removal
40
Grinder group removal
41
Opening the rear panel
42
Key menu - Coffee selection 3.1 Key menu - Milk selection 8
3.2 Key menu - Cappuccino selection 9
3.3 Key menu - Soluble selection 10
3.4 Key menu - Soluble Mix selection Soluble Mix selection
"Mixed Start" function 10
11
Rear panel cover removal
42
3.5 Key menu - Hot water selection 12
Thermostat reset
43
3.6 Key menu - Steam selection 12
4. TEST board 13
Water inlet assembly removal
43
5. Configuration menu 14
Solenoid valve block removal
44
6. Special keys 15
Boiler/heater assembly removal
45
7. Washing options 16
8. Pay per Use 18
Pump assembly removal
46
9. Test menu 19
10. Weighting 21
11. DATA menu: Counters 22
12. DATA menu: Accounting 22
Setting
Display contrast setting
47
13. DATA menu: INFO Serial number Version Setup Entering Standard Data Dip settings 23
23
23
24
24
25
CPU Dip-Switch 48
14. DATA menu: Wash Archive 25
15. DATA menu: MALFUNCTIONS ARCHIVE 26
16. Customer parameters menu Language selection Service time menu Date and time 26
26
27
27
17. Defects - Malfunctions 28
18. Abnormal functioning
(machine and operator) Coffee circuit Milk circuit Washing Components 30
30
31
31
32
1
(rev. 1106)
English
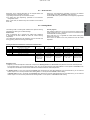
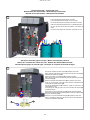
Programming 2.
Q10 Tec rev. 1106
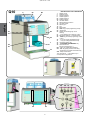
Q10
6
6a
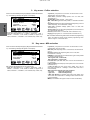
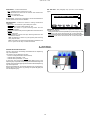
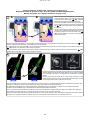
Description of the components
6b
5
English
3
25
12/
13*
39
1
14/
15*
16
1 Delivery spout
3 Selection panel
5 Graphical display
6 Coffee hoppers 1
6a Coffee hoppers 2
6b Soluble hoppers *
12 Hot water button
13 Steam dispensing button *
14 Hot water outlet
15 Steam pipe *
16 Tray
23 Main switch
24 “RES” key (to quit programming mode)
25 Special key
26 Coffee circuit flushing key / short
washing
27 "i" key (displays the number of cycles)
28 Milk circuit wash key - automatic wash
29"PRG" key (to access programming mode/
menu)
30"+" key (to modify parameters/clock)
31"-" key (to modify parameters/clock)
32 Beverage selector key
34 "customer parameters" key
39 Card services slit
(technical programming *)
BK “bean” key (coffee dose variation)
OK"OK" key (stops products from being
dispensed) / Input data confirmation key
SM “Sleep mode” button
The components - * - are applied only in
some produit configurations
23
26
28
27
34
30
29
24
OK
32
32
2
SM
31
BK
Q10 Tec rev. 1106
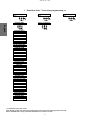
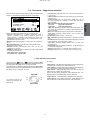
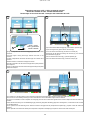
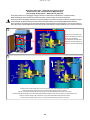
1. Data flow chart - Technician programming (1/3)
To access
menu
press PRG
English
To EXIT menu
press RES
Insert the technician smart card (*)
keY menu
Press
SELECTION
KEY
Type
+
-
Repetition
Coffee
Milk
Cappuccino
Soluble
Mix Soluble
Water dose
Milk dose
Milk dose
Mixer delay
mixed start
Grinder
Emulsion
Coffee start/Milk start
Time mixer
SOLUBLE 1
MM.. coffee dose
HM/FM
Emulsion
Predose mixer
SOLUBLE 2
Start water
Cold milk dose
HM/FM
Predose dispenser
coffee
Water add.
v Mpl cold milk
Cold milk dose
Dispenser delay
milk
Heating mode
v Mpl hot milk
v Mpl cold milk
Dispenser type
Infusion
v Mpl milk HM hot
v Mpl hot milk
tot. time dispenser
Drying
Milk
v Mpl milk HM hot
t on dispenser
Milk
t off dispenser
Water dose
Step H2O
Grinder
H2O delay
MM.. coffee dose
Cycle delay
Start water
Water add.
Heating mode
Infusion
Drying
(*) without the smart card reader:
place the dip 5 of the main CPU board in ON position, then push in the following sequence the OK
button and PRG button. Keep pushed the PRG button for at least 3 seconds
3
Q10 Tec rev. 1106
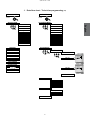
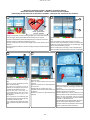
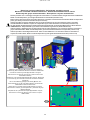
1. Data flow chart - Technician programming (2/3)
configuration
+
Press
-
special key
TESTING
+
Press
-
MANUAL COMMANDS
English
+
-
WEIGHTING
+
Press
+
-
special keyS
Boiler P.
Level sensib.
BOILER
solub. parameters1
solub. parameters2
TURBOSTEAM
MESAUREMENT UNITS
N° grounds
SOFTNER REGENER.
change w. filter
Customer prog.
Bean key
Prog. lock
Paym system
Buzzer
StandBy Leds
WASHING OPTIONS
Stop dispens.
Standard data
DatA IN/OUT
Archive reset
MainTenANCE
pay per use
hardware setup
(*) without the smart card reader:
place the dip 5 of the main CPU board in ON position, then push in the following sequence the OK
button and PRG button. Keep pushed the PRG button for at least 3 seconds
4
-
Q10 Tec rev. 1106
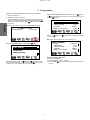
1. Data flow chart - Technician programming (3/3)
custom. parameters
Press
data menu
Press
service time
-
italiano
ON time
OFF time
COunters menu
+
-
Day off
N° milk
N° solub. 1
N° solub. 2
Night ON
N° water
Night OFF
N° steam
WASH 1
N° steam + air
WASH 2
N° t. coffee
WASH 3
N° cycles
WASH 4
N° MM1
WASH 5
N° MM2
accounting
+
COunters+menu
-
english
DEUTSCH
N° coffees
English
+
Date and time
-
FRANCAIS
ESPANOL
Total
Sel. 01
Portugûes
NEDERLANDS
Sel. 02
P CCK
Sel. ...
info
seriel n°
VERSION sw
setup
DIP SETTINGS
wash archive
Required
Performed
partials
malfunct. archive
5
Q10 Tec rev. 1106
2. Programming
How to enter “Programming” menu: there are two possibilities:
Access and modification of sub-menus: Use the "+"
(30) and
(31) keys to position the cursor on the desired line, then press
“-”
the PRG
(29) key.
1) Insert the smart card
2) without the smart card reader:
place the dip 5 of the main CPU board in ON position, then
push in the following sequence the OK button and PRG
(29) button. Keep pushed the PRG
(29) button for at least
+
KEY MENU
Type
1 coffee
repetition 001
Water dose 170
grinder MM1
MM1 cof, dose 047
3 seconds
English
Besides the date and hour, the symbol TECHNICIAN will appear.
10 March 2010
wednesday 15:15:04
Use the "+"
or number.
(30) and “-”
(31) keys also to modify the message
Note: When modifying data, the cursor changes to "".
Display of available menus: Press the PRG
TECHNICAL PROG.
key menu
Configuration
TESTING
weighting
+
KEY MENU
Type
1 coffee
repetition 001
Water dose 170
grinder MM1
MM1 cof, dose 047
(29) key.
+
Exiting the programming menu
There are two possibilities:
1) Press the OK key to confirm changes
2) Press the RES
(24) key to leave settings unchanged and exit
the menu
(30) and “-”
(31) keys to position
Access to menus: Use the "+"
the cursor on the desired line, then press the PRG
(29) key (press
a selection key if the ”SELECT KEY” menu appears).
6
Q10 Tec rev. 1106
2.1 Stop Function
Dispensing of the selected beverage can be stopped before the
programmed dose is reached in two ways:
1) by setting a selection key with the STOP function;
2) by setting the “Stop dispensing” parameter in the machine’s
configuration menu.
Note: in this case, the selection key also functions as the START/
STOP key.
Note: If the “Stop dispensing” parameter is not set in the machine
configuration menu (NO), the OK key stops dispensing
Once the OK button is pushed it does not change the programmed
parameters.
The heating mode is a setting that maintains the optimum brewing
temperature for each type of coffee beverage.
How to program
Nine heating modes (from 0 to 8) can be set in the recipes; active
modes ranging from 0 to 4, those from 5 to 8 are not active and are
associated with the heating mode 0.
Each mode from 0 to 4 regulates the coffee boiler heating time
divided into 5 intervals.
Each interval is related to the time passed from the last coffee
dispensed.
How it works
When a dispensing key is pressed, the coffee boiler resistance
is activated for the time needed to reach the correct brewing
temperature.
The coffee boiler heats when the dispensing cycle is launched and
during grinding, before the brewing phase begins.
Heating modes with related boiler resistance activation times
Interval
1
2
3
4
5
Interval Value
(time passed from last coffee)
From “0” to “2” minutes
From “2” to “5” minutes
From “5” to “10” minutes
From “10” to “20” minutes
More than “20” minutes
Heating mode 0
Heating mode 1
Heating mode 2
Heating mode 3
Heating mode 4
0 seconds
0 seconds
0 seconds
0 seconds
0 seconds
0 seconds
3 seconds
5 seconds
7 seconds
7 seconds
0 seconds
0 seconds
3 seconds
5 seconds
5 seconds
0 seconds
0 seconds
0 seconds
5 seconds
5 seconds
0 seconds
0 seconds
0 seconds
0 seconds
3 seconds
Recommended for
cappuccinos or
beverages with
added water
Typical for single
espressos
Typical for double
espressos
Typical for coffees
with cream
Typical for double
coffees with cream
Examples of use
1) Suppose you want to dispense a coffee with a recipe set for Heating mode 3 and 13 minutes have passed from the last coffee dispensed.
From the table above, you can see that Interval 4 (from 10 to 20 minutes) intersects with Heating Mode 3 on the square of 5 seconds, which
corresponds to the duration that the boiler resistance is activated before the coffee is dispensed.
2) If Heating mode 1 is set in the recipe and 4 minutes have passed from the last coffee dispensed, from the table above, you can see that
Interval 2 (from 2 to 5 minutes) intersects with Heating Mode 1 on the square of 3 seconds of boiler heating.
If Heating mode 1 is set in the recipe and 18 minutes have passed from the last coffee dispensed, from the table above, you can see that
Interval 4 (from 10 to 20 minutes) intersects with Heating Mode 1 on the square of 7 seconds of boiler heating.
7
English
2.2 Heating Mode
Q10 Tec rev. 1106
3. Key menu - Coffee selection
-repetition (it represents the number of distributions of the
selected drink, from 001 to 099);
- water dose (volumetric dosage pulses, from 0 to 999, with
increments of 1);;
-grinder MM...(grinder number - 1 left, 2 right);
- MM... coffee dose (grinde encoder pulses, 0 ÷ 200 with increments
of 1);
- start water (determines if water is added at the beginning or end of
coffee dispensing, can be set before or after);
- water add. (volumetric dosage pulses, from 0 to 999, with
increments of 1);
-heating mode (acts on the brewing temperature, can be set from 0
to 4. See specific paragraph);
- infusion (infusion time: 0 ÷ 6 seconds, with increments of 0.1);
- drying (pod drying time; 0 ÷ 5 seconds, with increments of 0.1).
Press one of the coffee dispensing keys (32) (the relative led will remain
on). The following message will appear on the display:
English
+
KEY MENU
Type
1 coffee
repetition 001
Water dose 170
grinder MM1
MM1 cof, dose 047
The following coffee selection parameters can be modified:
- Type (key personalizing, e.g. 1 coffee, 1 cappuccino, 1 milk, 1
soluble 1, 1 soluble 2, 1 mix soluble, 2 coffees, 2 cappuccini, 2
milks, 2 solubles 1, 2 solubles 2, 2 mix solubles, stop, water, null);
Note: the coffee doses for the grinders set in the technical programming
menu, are subject to change in the customer programming menu
within a range of + 5 of the set value.
3.1 Key menu - Milk selection
Press one of the milk dispensing keys (32) (the relative led will remain
on). The following message will appear on the display:
KEY MENU
Type
1
repetition
Milk dose
Emulsion HM/FM -repetition (it represents the number of distributions of the
selected drink, from 001 to 099);
- Milk dose (milk dispensing time: 0 ÷ 60 seconds, with increments of 0.1);
- Emulsion (foamed milk dispensing time, from 0 to 60, with increments of 1 second);
- HM/FM (this parameter lets you decide which type of milk (frothed
or regular) to dispense first.
YES: regular milk – frothed milk;
NO: frothed milk – regular milk);
- cold milk dose (cold milk dose; from 0 to 20 with increments of
0.1 seconds);
- v Mpl cold milk (cold milk pump motor speed, from 10 to 55% with
increments of 1);
- v Mpl hot milk (hot milk pump motor speed, from 10% to
55% with increments of 1. Setting a value of less than 35% is
recommended);
Milk temperature depends from this parameter:
- low value = high milk temperature;
- high value
= low milk temperature);
- v Mpl milk HM hot (hot (regular) milk pump motor speed, from
10% to 55% with increments of 1. Setting a value of less than 35%
is recommended);
- Milk (choice between two types of milk, if function is activated).
+
milk
001
07.0
07.0
NO
Milk selection parameters that can be changed are:
- Type (key personalizing, e.g. 1 coffee, 1 cappuccino, 1 milk, 1
soluble 1, 1 soluble 2, 1 mix soluble, 2 coffees, 2 cappuccini, 2
milks, 2 solubles 1, 2 solubles 2, 2 mix solubles, stop, water, null);
8
Q10 Tec rev. 1106
3.2 Key menu - Cappuccino selection
Press one of the cappuccino dispensing keys (32) (the relative led will
remain on). The following message will appear on the display:
+
KEY MENU
Type
1 cappuccino
repetition 001
Milk dose
08.0
Coffee start 00
Emulsion 08.0
Cappuccino selection parameters that can be changed are:
- Type (key personalizing, e.g. 1 coffee, 1 cappuccino, 1 milk, 1
soluble 1, 1 soluble 2, 1 mix soluble, 2 coffees, 2 cappuccini, 2
milks, 2 solubles 1, 2 solubles 2, 2 mix solubles, stop, water, null);
-repetition (it represents the number of distributions of the
selected drink, from 001 to 099);
- Milk dose (milk dispensing time: 0 ÷ 60 seconds, with increments of 0.1);
- Milk start/coffee start ** (milk dispensing delayed after coffee dispensing, and vice versa);
-Emulsion (foamed milk dispensing time, from 0 to 60, with
increments of 1 second);
- HM/FM (this parameter lets you decide which type of milk (frothed
or regular) to dispense first.
YES: regular milk – frothed milk;
NO: frothed milk – regular milk);
(**) Start milk/Start coffee function
By setting:
You can use the "+"
(30) and "-"
(31) keys to change the "Start
milk" setting (milk dispensing start delayed after coffee dispensing and
vice versa) from "00" to "99" with "1" second increments.
If over "99" is set, the "Start milk" setting will become the "Start coffee"
setting (coffee dispensing start delayed after the milk dispensing), then
the setting returns to "Start milk" in a cycle.
"Start milk 00" - milk dispensing takes place when the selection key
is pressed. After a few seconds, coffee is dispensed;
"Start milk 99" or at a high setting that exceeds the coffee dispensing
time - milk dispensing starts after coffee is dispensed.
"Start milk 05" - coffee dispensing starts, and 5 seconds after the
selection key is pressed, milk is dispensed.
Note: If the time setting exceeds the coffee dispensing time, milk
dispensing begins immediately after coffee is dispensed.
Start Milk
The default settings for
cappuccino selections are:
Start milk 00.
00
99
99
00
"Start coffee 00" - Coffee dispensing starts after milk is dispensed.
"Start coffee 99" or any setting other than 0 - coffee dispensing will
start 99 seconds (or after the set time) after milk is dispensed.
Start Coffee
9
English
- cold milk dose (cold milk dose; from 0 to 20 with increments of
0.1 seconds);
- v Mpl cold milk (cold milk pump motor speed, from 10 to 55% with
increments of 1);
- v Mpl hot milk (hot milk pump motor speed, from 10% to
55% with increments of 1. Setting a value of less than 35% is
recommended);
Milk temperature depends from this parameter:
- low value = high milk temperature;
- high value
= low milk temperature);
- v Mpl milk HM hot (hot (regular) milk pump motor speed, from
10% to 55% with increments of 1. Setting a value of less than 35%
is recommended);
- Milk (choice between two types of milk, if function is activated);
- water dose (volumetric dosage pulses, from 0 to 999, with
increments of 1);;
-grinder MM...(grinder number - 1 left, 2 right);
- MM... coffee dose (grinde encoder pulses, 0 ÷ 200 with increments
of 1);
- start water (determines if water is added at the beginning or end of
coffee dispensing; can be set before or after);
- water add. (volumetric dosage pulses, from 0 to 999, with
increments of 1);
-heating mode (acts on brewing temperature, can be set from 0 to
4. See specific paragraph);
- infusion (infusion time: 0 ÷ 6 seconds, with increments of 0.1);
- drying (pod drying time; 0 ÷ 5 seconds, with increments of 0.1).
Q10 Tec rev. 1106
3.3 Key menu - Soluble selection
Press one of the soluble dispensing keys (32) (the relative led will
remain on). The following message will appear on the display:
English
-mixer pre-dose (the mixer starts before the Gsol soluble solenoid
valve; can be set between 0.0 and 10.0 with increments of 0.1
seconds);
- pre-dose dispenser (the dispenser starts before the mixer, can be
set between 0 and 10 seconds with increments of 0.1);
- dispenser delay (the dispenser starts after the mixer, can be set
between 0.0 and 5.0 with increments of 0.1 seconds);
-dispenser type (dispenser mode, chosen between two soluble
powder dispensing modes:
continuous: powder is continuously dispensed for a time equal to
the one set at the entry “t tot disp”;
step: powder is dispensed at intervals, where the entry “t on disp”
indicates the powder dispensing phase and the entry “t off disp”
indicates the standby phase);
- tot time dispenser (total dispenser time, between 0 and 30 seconds with increments of 0.1; this is the dispenser dispensing time
corresponding to the total time the dispenser is activated in continuous mode);
- t on dispenser (dispenser activation time, between 0 and 5 seconds, with increments of 0.1; the parameter is only visible in the
step mode);
- t off dispenser (dispenser deactivated time, between 0 and 5
seconds with increments of 0.1; the parameter is only visible in the
step mode);
- step H2O (the Gsol soluble solenoid valve (hydraulic circuit) is activated in steps to modulate the water dose; between 50 and 100%,
with increments of 10);
- H2O delay (dispensing time of just water/steam after the dispenser
activation phase, between 0 and 5 seconds, with increments of
0.1);
- cycle delay (the time set to coincide with the closure of the
dispensing cycle with the return of the machine in standby, ready for
the next dispensing cycle. Can be set between 0 and 20 seconds,
with increments of 0.1).
+
KEY MENU
Type
1 soluble 1
repetition 001
mixer delay
NO
time mixer 09.0
predose mixer
00.0
Soluble selection parameters that can be changed are:
- Type (key personalizing, e.g. 1 coffee, 1 cappuccino, 1 milk, 1
soluble 1, 1 soluble 2, 1 mix soluble, 2 coffees, 2 cappuccini, 2
milks, 2 solubles 1, 2 solubles 2, 2 mix solubles, stop, water, null);
-repetition (it represents the number of distributions of the
selected drink, from 001 to 099);
-mixer delay (YES - NO, enables/disables the “mixer delay
time” function of the SOLUBLE PARAMETERS” entry in the
CONFIGURATION menu. When this function is enabled, the
mixer keeps functioning – for the set time – even after the Gsol
soluble solenoid valve has closed. This parameter allows the mixer
chamber to empty completely);
- mixer time (mixer activation time, between 0 and 30 seconds with
increments of 0.1);
3.4 Key menu - Soluble Mix selection
Press one of the mix soluble dispensing keys (32) (the relative led will
remain on). The following message will appear on the display:
-repetition (it represents the number of distributions of the
selected drink, from 001 to 099);
- mixed start (press the PRG (29) key to access a special screen
where you can program the coffee, milk, and soluble beverage
dispensing sequence to obtain the desired combination.
See “Mixed Start” paragraph on the next page;
- “Soluble 1” (contains all the parameters described in the “Soluble Selection” paragraph, related to the first type of soluble beverage);
- “Soluble 2” (contains all the parameters described in the “Soluble Selection” paragraph, related to the second type of soluble
beverage);
- “coffee” (contains all the parameters described in the “Coffee
Selection” paragraph);
- “MILK” (contains all the parameters described in the “Milk Selection”
paragraph).
+
KEY MENU
Type
1 mix soluble
repetition 001
mixed start
mixer delay
YES
time mixer 09.0
Mix soluble selection parameters that can be changed are:
- Type (key personalizing, e.g. 1 coffee, 1 cappuccino, 1 milk, 1
soluble 1, 1 soluble 2, 1 mix soluble, 2 coffees, 2 cappuccini, 2
milks, 2 solubles 1, 2 solubles 2, 2 mix solubles, stop, water, null);
10
Q10 Tec rev. 1106
Soluble Mix selection - "Mixed Start" function
To modify the described settings (start and step), position the cursor
on the line of the desired beverage and press the PRG
(29)
key. The cursor will appear next to the first line on the display (start
xxxx ):
With the “START COMBO” function, you can program the sequence
of dispensing cycles for coffee, milk and soluble beverages to obtain
the desired combination.
+
key menu
Type
1 mix soluble
repetition
001
mixed Start
mixer delay yes
time mixer
06.0
coffee start
step
00s
1
090
English
07.0S
14.0S
04.0S
When the PRG
following:
(29), key is pressed, the display will show the
coffee start
step
(29) key again to modify the start setting. The
Press the PRG
cursor will turn into .
(30) and “-”
(31) keys to modify the dispensing
Use the "+”
delay for the selected beverage.
Press the OK key to confirm the setting. The effect on the composition
of the final cycle will simultaneously appear on the display:
00s
1
090
07.0S
start caffè
step
14.0S
04.0S
05s
1
090
07.0S
The line on which the cursor is positioned is associated with the coffee
beverage; the following lines refer, respectively, to milk, soluble 1 and
soluble 2.
14.0S
04.0S
The duration of the separate beverage cycles (set in the recipe) is
represented by rectangles, to the right or inside of which shows:
-the pulses, for coffee;
-the total duration in seconds, for milk and soluble beverages.
In this case, the coffee beverage will have a 5 second delay on the
start of the dispensing cycle.
Per modificare il parametro step è necessario posizionare il cursore
sull'omonima riga e premere il tasto PRG
(29); il cursore si
modifica in .
(30) e “-”
(31) è possibile modificare la
Mediante i tasti "+"
sequenza di erogazione della bevanda selezionata.
Premendo il tasto OK si conferma il valore immesso vedendone
contemporaneamente l'effetto sulla composizione del ciclo finale sul
display:
(30) and “-”
(31) keys to position the cursor
Using the "+"
on a beverage, the following parameters are automatically displayed
on the first 2 lines:
-start... (dispensing delay of the selected beverage; can be set between 0 ÷ 90 seconds with increments of 1, or with the OFF option
that disables the corresponding beverage);
-step (dispensing sequence of the beverages:
1, the beverage is dispensed first;
2, the beverage is dispensed second;
3, the beverage is dispensed third;
4, the last beverage that closes the soluble combo cycle).
coffee start
step
05s
4
090
Note: Beverages in the cycle cannot be dispensed simultaneously.
07.0S
14.0S
04.0S
If a coffee beverage replaces soluble beverage 2 in the cycle, it will
no longer be the first to be dispensed, but it will close the cycle.
The other beverages in the soluble combo do not change their dispensing order.
Follow the same steps to modify the other beverages as preferred.
bvv.
11
Q10 Tec rev. 1106
3.5 Key menu - Hot water selection
Press the hot water dispensing key (12). The following message will
appear on the display:
key menu
Type dispens. time
The following hot water selection parameters can be modified:
- type (key personalizing, e.g.: water dosed, water stop, null);
- dispensing time (from 0 to 60, with increments of 0.1 seconds).
water
20.0
+
English
3.6 Key menu - Steam selection
Press the hot water dispensing key (13). The following message will
appear on the display:
key menu
Type dispens. time
The following hot water selection parameters can be modified:
- type (key personalizing, e.g.: steam dosed, steam stop, null);
- dispensing time (from 0 to 60, with increments of 0.1 seconds).
12
steam
20.0
+
Q10 Tec rev. 1106
4. TEST board
During the view of the drinks, by pushing the “i”
(27) button, on
the display will appear the relevant drink parameters while the drink
is delivered by the machine.
On the display will appear, for example:
T ES T
F 2
1
MM 1
0 4 1
D v
1 0 0
F 1
0
MM 2
0 0 0
t G
0 2 0 s
F 3
0
en
1 3 0
P 1 . 6 b a r
T b
The parameters displayed refer to:
F1: Middle limit switch (1 in position)
F2: High limit switch (1 in position)
F3: Low limit switch (1 in position)
MM...: coffee extraction impulses
EN: group encoder
Dv: Volumetric meter impulses
tG: Dispensing time in seconds
P: boiler pressure
13
0 9 3 . 9 C
English
Q10 Tec rev. 1106
5. Configuration menu
N. grounds – refers to number of grounds, from 0 (external container)
to 80.
+
CONFIGURATION
SPECIAL KEYno
special keys
Boiler P.
1.6bar
level sensib. 2
boiler
English
+
CONFIGURATION
softner Regener.
Change w. filter
Customer prog.
NO
bean key
yes
prog. lock
NO
special key (key 25 in the bottom right hand corner of the selection
keypad) – YES/NO.
YES – the key can be set with one of the functions described in
“special keys”.
NO – it is set like all the other dispensing keys.
softner Regeneration - includes the parameters for the softner
regeneration: liters of resin (da 0,1l a 25l), hardness (da 0 a 45 °F).
The standard data for the special key is NO.
Change water filter – When the programmed number of liters
is reached, the screen displays a message saying the filter must be
replaced.
special keys - The key 25 can be personalized with one of the
following functions:
disable (disables key);
stop (stop the dispensing).
II choice (second function, dispensing of a second beverage).
See paragraph “Special keys - Second selection” on the following
pages.
water stop (stop the water dispensing).
Customer programming - YES/ NO.
Bean Key – allows the client to change the coffee dose: YES/NO.
Programming block - programming block: yes/NO.
With the function active (YES) the use of the programming keyboard
and
keys remains always
is allowed with the technician card;
active.
Normally the special key is Disabled.
Boiler P. - indicates the service boiler pressure: 0,6 ÷ 1,7 bar (9 ÷
23 psi).
+
CONFIGURATION
Paym. systemoff
buzzer
yes
StandBy Leds
015
washing options
stop dispens.
yes
Level sensib. - Water Level sensitivity: it indicates the level sensitivity
of the boiler water probe.
The setting range is from 1 to 3 (the value 3 indicates the hightest
probe sensitivity and therefore the machine will refilles the boiler at
the minimum water level variation.
BOILER - The parameter includes 3 sub-menus:
temp. I - coffee boiler operating temperature; can be set between a
minimum of 65 and a maximum of 100° C (149 - 212°F);
temp. II - the temperature added to temperature I; it serves to
guarantee a good quality of coffee right from the first coffee
dispensed after a certain amount of time; can be set between 0
and 10°C (32 - 50°F);
interval - the minimum time that must pass between two dispensing
sessions without increasing the boiler temperature set in temperature
II; can be set between 0 and 20 minutes.
Payment system – permits configuration of payment system, when
connected.
Buzzer - The machine buzzer can be enabled so that a beep is heard
when the keys are pressed.
StandBy Leds - (not active).
+
CONFIGURATION
solub. parameters1
solub. parameters2
turbosteam
MEASUREMENT UNITS
N° grounds
040
WASHING OPTIONS - See paragraph "Washing options" on the
following pages.
Stop Dispensing: YES/ NO
YES - each dispensing key functions as a start/stop key.
This means that when you press the key during the dispensing
phase, it will be interrupted
NO - If the same key is pressed during the dispensing phase, the
repeat function is activated.
+
CONFIGURATION
standard data NO
DATa IN/OUT
Archive resetNO
maintenance
pay per use
soluble 1/2 Parameters - defines the mixer functioning time
after the Gsol soluble solenoid valve has closed; can be set between
0 and 5, with increments of 0.1 seconds.
Can be enabled in the soluble beverage recipes at the entry “mixer
delay”.
turbosteam - emulsion level: 4 levels can be chosen, where 001
is less emulsion and 004 is continuous emulsion.
MEASURING UNIT – includes 2 sub-menus:
Temperature – c an be set to °C Celsius centigrade or °F Fahrenheit
degrees.
Pressure – can be set to bar or psi.
Standard data – loads standard data. YES/NO
14
Q10 Tec rev. 1106
DATA IN/OUT – contains three entries:
Key – indicates the key number from 0 to 60.
Data IN transfer from smart card to machine. OUT transfer from
machine to smart card.
TX/RX – to start data transfer
pay per use - See paragraph "Pay per Use" on the following
pages.
CONFIGURATION
hardware setup
+
Archive reset – zeros the error log (Wash 1 Archive and malfunctions
archive) stored on the machine: YES/NO
MAINTENANCE - contains five entries to setting maintenance
parameters:
Max cycles - the number of cycles initially set: 40,000.
Max days - the number of days initially set: 185.
N° cycles - the number of cycles remaining before the next
maintenance session.
N° days - the number of days remaining before the next maintenance
session.
Reset - options are:
NO, countdown of cycles and days remaining before the next
maintenance session.
YES, the settings for number of cycles (40,000) and remaining
days (185) are reset.
OFF, all controls for programmed maintenance are disabled, and
the “N. cycles” and “N. days” counters are zeroed.
6. Special keys
Second selection
second selection function
Permits a second type of beverage, associated with the dispensing
key, to be dispensed.
This function can be obtained in this way:
- access to Configuration Menu of the machine;
- special key parameter = yes;
- special keys parameter = II choice.
At this point, when the special key is pressed (25) and one of the
dispensing keys is pressed corresponding to the desired beverage and
dosage, the second beverage programmed for the selected dispensing
key will be dispensed.
Recipes associated with the second selections are programmed in
the Key Menu of the machine, by pressing the special key (25) and
then the dispensing key.
25
15
English
hardware setup (parameters for cappuccino versions only) includes 2 sub-menus:
t start (the activation time of the peristaltic pump at the beginning of the
dispensing cycle, which can be set from 00.1 to 20.0 seconds);
t inversion (the activation time of the peristaltic pump at the end of the
dispensing cycle, which can be set from 00.1 to 20.0 seconds).
Q10 Tec rev. 1106
7. Washing options
execution modality
pressed for a
Milk circuit: Keep the milk circuit washing key (28)
few seconds and follow the instructions indicated on the display.
26
pressed for
Coffee circuit: Keep the coffee circuit washing key (26)
a few seconds and follow the instructions indicated on the display.
English
Solubles circuit: Keep the coffee circuit washing (26)
circuit washing (28)
and milk
keys pressed for a few seconds.
28
The cycles can be activated with the same modality also without a
washing demand.
In order to get more detailed information, please consult the machine
use and installation manual.
WASHING OPTIONS - includes seven sub-menus for setting washing
parameters, one of which to program the soluble circuit washing
cycle:
WASHING OPTIONS
autom. washing 20
SOLUB. washing
washing 1
washing 2
washing 3
+
Washing options - Automatic washing
Depending on the selected setting (OFF/3÷99), the automatic wash
is changed.
30" before the timer stops, the LEDs on the keys of beverages with
milk start blinking. The display appears as follows:
Setting "autom. washing OFF":
• timed automatic wash cycle is disabled;
• when the button (28)
cycle is performed.
10 March 2010
wednesday 15:15:04
is pressed, the milk circuit washing
AUTOMATIC WASHING
28
Setting "autom. washing 3...99":
• the timed automatic wash cycle is activated and the set time
interval starts;
• when the button (28)
cycle is performed.
is pressed, the milk circuit washing
During this standby phase:
If the coffee dispensing key is pressed, the counter will start again 30"
from the end of the dispensing cycle (per use);
If a milk/cappuccino key is pressed, the counter will start again from
the set time (3' + 99');
is pressed, the automatic washing cycle will be
If the key (28)
immediately performed.
The cycle starts automatically. The time interval is set between 3 and
99 minutes. The timer starts at the end of each milk dispensing phase.
When the time runs out, the automatic wash cycle begins.
16
Q10 Tec rev. 1106
Washing options - Solubles washing
Includes 2 sub-menus:
+
SOLUB. washing
solub. washing 10
stop solub no
Washing options - Washing 1, 2, 3, 4, 5
- type: indicates type of wash cycle that will be performed. Long wash
(coffee circuit and milk circuit with detergent).
- coffee stop: when the function (YES) is set, if the wash cycle does
not take place within 60' (30' if short washing) from the moment that
the "EXECUTE WASHING GROUP" message appears, the machine
is blocked and all selections for coffee are inhibited.
- milk stop: when the function (YES) is set, if the wash cycle does
not take place within 60' (30' if short washing) from the moment that
the "EXECUTE WASHING milk circuit" message appears, the
machine is blocked and all selections for milk are disabled.
These are wash cycles set at programmable times, each with four
changeable parameters, which are:
WASH 1
hour
type coffee stop
milk stop
00:00
long
YES
YES
+
NOTE: if the "block coffee" and "block milk" entries are set to NO for
the 'WASH 1" cycle, the machine will never be blocked.
In case of lack of washing operations, they will be recorded in the error
"archive" ("i"
(27) button) as PARTIALS washing.
- hour: when the wash cycle must be performed.
"WASH 1" cannot be disabled. It is requested daily at the
programmed hour and within 24 hours..
WASH 2, 3, 4 and 5 can be disabled and set to OFF.
Preset automatic washing cycle (NSF) (no settable)
Function - after each milk cycle has terminated, the timer count-down
starts (max 210'). At the end, "AUTOMATIC WASHING" appears on
the display, with the time remaining before the wash cycle begins.
performed immediately.
Selection block - always inactive. The wash cycle is performed even
if the user does not intervene.
Wash type - with milk or water, completely automatic.
10 March 2010
wednesday 15:15:04
Special conditions
1) with each washing cycle with detergent (at a preset time) or
daily washing cycle:
In this case, the entire circuit is washed. Therefore, during the
first milk dispensing procedure, the circuit is considered free of
residual milk and the timer (210') countdown is not launched.
2) each time the machine is switched off while the timer countdown
(210') is underway:
when the machine is switched on again, if 210' have passed,
once the machine reaches its operating temperature, the preset
automatic washing cycle is launched and cannot be stopped.
AUTOMATIC WASHING
28
Activation - activation is automatic at the end of the remaining 30"
seconds. During this stand-by time:
•
if the coffee dispensing key is pressed, the timer count-down will
start again from 30" seconds before the end of the dispensing
cycle;
•
if the milk/cappuccino dispensing key is pressed, the timer countdown will start from the set up time (210').
•
If the (28)
key is pressed, the automatic wash cycle will be
17
English
- wash solub (soluble wash cycle): the time in minutes after which
the request appears for the soluble beverage wash cycle. Can be
set between 1 and 20 minutes, with increments of 1 minute, or set
to OFF (wash request disabled)..
At the end of each soluble beverage dispensing cycle, the timer
countdown starts. Afterwards the request for a wash cycle message
appears on the display.
- block solub (soluble block): When the function is set (YES), if
the wash cycle is not performed within 60’ from the time when the
message appears, the machine is blocked and prevents all soluble
beverage selections.
Q10 Tec rev. 1106
8. Pay per Use
To enable the count, perform a reset (reset = YES); the entry “N°
select” is the same number as the “MAX select” entry:
This function makes it possible to control the beverages made with
ground coffee. It is activated when a personal numeric code (composed
of 4 numbers) is inserted during the initialization phase with standard
machine data.
English
+
pay per use
MAX select.
20000
N° select.
20000
****
Reset NO
recharge archive
After the function is activated, you must access the “PAY FOR USE”
parameter in the configuration menu. Insert your personal code on the
line with the asterisks * and insert the maximum number of dispensed
beverages at the entry “MAX select.”:
+
pay per use
MAX select.
20000
N° select.
00000
****
Reset NO
recharge archive
From this moment on, after each coffee beverage dispensed, the
number associated with the “N° select” entry is decreased by 1 unit
for a single coffee and 2 units for a double coffee.
When the number 250 is reached, after each beverage dispensed the
display screen shows the remaining number of beverages before the
coffee-based beverages selection is blocked.
Beverages not made with ground coffee can still be dispensed.
The number of dispensed beverages can be set between 0 and 65,000,
with increments of 10.
To enable coffee-based selections again, you must recharge using the
same method described above. Each operation of this type is stored
in the “Recharge archive” entry.
18
Q10 Tec rev. 1106
9. Test menu
TESTInG
Manual commands
Manual controls – permit parts to be manually operated using
(30) and “-”
(31) keys (see paragraph “Manual control
the "+"
panel”)
+
English
Manual control panel
Press the PRG
(29) key on the “MANUAL COMMANDS” line, the following panel will appear on the display:
Panel 1
MC 1 1
MC 2 1
0 0 0
M1
ML 1
0 0 0
M2
EN
L I V
OK
F 1
1
B s
e v c
OF F
F 2
1
DV
RC
OF F
F 3
1
R c
1 . 7 b a r 1 3 0 . 6 RB
P
T i
±
-
-
-
0 1 8 . 8 C
→
PRG
TB
→
Press "+"
(30) or “-”
(31) to display the various
components;
Press PRG
(29) to select the component to move and to
switch to the next panel M2;
Press RES
(24) to quit manual mode.
19
0 0 0
0
0 0 0 0
1
ON
0 8 9 . 6 C
XXX :
RES
Q10 Tec rev. 1106
Panel 2
MC 1 0
MC 2 0
0 0 0
M1
ML 0
0 0 0
M2
EN
OK
F 1
1
B s
e v c
OF F
F 2
1
DV
RC
OF F
F 3
1
R c
English
L I V
1 . 7 b a r 1 3 0 . 6 RB
P
0 1 8 . 8 C
T i
±
-
-
→
RES
TB
Press "+"
(30) or “-”
(31) to activate the components, if they have a direction, use "+"
activations (+Lh/-Rh or +Up/-Down, +Widen/-Narrow the grinders).
Press RES
(24) to return to panel M1.
0
0 0 0 0
1
ON
0 8 9 . 6 C
XXX :
→
0 0 0
(30) and “-”
OF F
(31) to alternate the
Legend
3. xxx
1. F1
F2
F3
Unit limit switch: middle 0/1*
Unit limit switch: high 0/1*
Unit limit switch: low 0/1*
2. MC...
ML
M...
EN LIV
Bs
Dv
RC
Rc
P
RB
Ti
TB
*1, limit switch in position
“No coffee” sensor (1=no coffee)
“No milk” sensor (1=no milk)
Grinder counter
Group Encoder
Water level in boiler
Tray
Volumetric meter, displays incremental count, zeroed on entry of M1 menu
Service Boiler resistance
Grounds drawer
Boiler pressure, displayed in "bar" or "psi".
Boiler resistance
CPU temperature
Boiler temperature, in C° (or F°) defines the moving part that can be accessed.
Here is the table of symbols used to define the moving parts that can be accessed:
MR
Mav
Ecv2
Ech2
MMx2
Mds2
Echv
Echa
MMx
Mds
Esc
El
Ets
Ear
Em
Evc
Eac
G
MP
MM2 MM1 Mpl
motor unit ratiomotor
Coffee suction fan
Not active
Not active
Not active
Soluble 2 dispenser motor
Not active
Water soluble solenoid valve
Soluble mixer motore
Soluble 1 dispenser motor
Service boiler water outlet solenoid valve
Cappuccino maker wash cycle solenoid valve
Steam solenoid valve *
Air solenoid valve
Milk solenoid valve
Boiler load solenoid valve
Hot water solenoid valve
Coffee dispensing solenoid valve
Pump motor
Grinder 2 motor
Grinder 1 motor
Milk pump motor
Parts * are applied only in some product configurations.
20
Q10 Tec rev. 1106
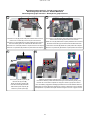
10. Weighting
This menu permits the weighing of the ground coffee.
Place the provided coffee scoop next to the ground coffee chute and
press the selection key that needs checking.
+
TECHNICAL PROG.
key menu
Configuration
TESTING
weighting
When the PRG
the display:
English
(29) key is pressed, the following will appear on
MM1
weighting
000
000
MM2
000
Scoop position
000
After the grinding phase, the following will appear on the display:
Set value
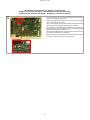
After opening the control panel (A), the power supply is switched off.
Insert the technical key (T) in the special slot (B) to restore normal
functioning:
MM1
weighting
000
000
MM2
047
047
A
B
Ground
coffee value
The value set in the test menu and the ground coffee value must be
the same.
During the grinding phase, make sure that the ground coffee does
not slide off the scoop.
Once the grinding phase has ended, remove the scoop from the
machine and weigh the amount of ground coffee on an accurate
scale. Note: To obtain the real weight, we recommend performing the
coffee grinding phase between 3 and 5 times and then calculating
the average.
(24) key
Once the weighing process is concluded, press the RES
2 times in a row to bring the unit to the standby position and to exit
the programming menu.
T
21
Q10 Tec rev. 1106
11. DATA menu: CoUntERS
Parameters calculated are:
- N. coffee (number of coffee beverages)
- N. milk (number of milk beverages)
- Soluble 1 (number of soluble 1 beverages);
- Soluble 2 (number of soluble 2 beverages);
- N. water (number of times water is dispensed)
- N . steam (number of times steam is dispensed using the
turbosteam function)
- N. steam + air (number of times steam and air are dispensed using
the turbosteam function)
- N. tot coffee (total number of coffee beverages)
- N. cycles (total number of cycles performed)
- MM1 (number of grinding phases performed by the 1 grinder)
- MM2 (number of grinding phases performed by the 2 grinder).
Once you have entered the programming menu, access the DATA
MENU, pressing the “i”
(27) key. The following will be displayed:
English
data menu
counters menu
accounting
INFO
WASH ARCHIVE
malfunct. archive
+
(30) and “-”
(31) keys to position the cursor on
Use the "+"
the COUNTER line, then press the PRG
(29) key. The following
will appear on the display:
COunters menu
N° coffee
N° milk
N° solub. 1
N° solub. 2
N° water
Counters can be zeroed by aligning the cursor on the selected entry,
(29) key, and then pressing the "+"
(30) or
pressing the PRG
“-”
(31) key.
+
25
15
12
10
10
Note: Parameters that cannot be zeroed are:
- N. tot coffee
- N. cycles
12. DATA menu: accounting
data menu
counters menu
accounting
INFO
WASH ARCHIVE
malfunct. archive
Placing the cursor on the various selections, the led associated to the
key remains ignited:
+
+
counters menu
Total:
125348
Sel. 01
40254
Sel. 02
32005
Sel. 03
10258
Sel. 04
9820
Use the “+”
(30) and “-”
(31) keys to position the cursor on the
accounting line, then press the PRG
(29) key. The following
will appear on the display:
accounting
counters menu
+
+
counters menu
Total:
125348
Sel. 01
40254
Sel. 02
32005
Sel. 03
10258
Sel. 04
9820
Pressing again the PRG
(29) key, on the display will appear the
number of all dispensings performed and the number of dispensing
for each selection key:
+
COunters menu
Total:
125348
Sel. 01
40254
Sel. 02
32005
Sel. 03
10258
Sel. 04
9820
Note: If the machine has no counting system, the total number and
numbers of the selections made are zeroed with the Counting and
Director cards or with Dipswitch 4 in the ON position
22
Q10 Tec rev. 1106
13. DATA menu: INFO
data menu
counters menu
accounting
INFO
WASH ARCHIVE
malfunct. archive
+
English
Serial number
(29) key on the “serial n.” line. The following will
Press the PRG
appear on the display.
Use the "+"
(30) and “-”
(31) keys to position the cursor on
the INFO line, then press the PRG
(29) key. The following will be
displayed.
INFO
serial n°
version sw
setup
dip settings
serial number
1234567
+
+
Version
The sub-menu of the Version entry shows the memory display version
and, if present, also the remote control:
When the PRG
(29) key is pressed when the cursor is on each of
the two lines, besides showing the version, it also displays the data
for the revision and memory date.
+
version
display
038.00.d0
computer 038.T0.D0
telec.
version
display
rev.
datE
038.00.d0
00
27/01/2011
+
23
Q10 Tec rev. 1106
Setup
The “Setup” entry displays the setup settings introduced during the
Data Standard insertion phase:
English
standard datA
M0 - standard
1 GR - Mpl GEAR
1 Capp. - H2O NO
Menu 1 - OK YES
Solub1 YES - H2O
Solub2 YES
SPEC. keys NO
Entering Standard Data
Then:
- Switch on the machine again
- Reset date and time, and reset the desired language, if needed:
Before performing this operation, switch off the machine and position
dipswitch 1 on display screen = ON, then switch on the machine.
If the procedure described above is not performed (dip1=ON), this
message will appear on the display:
******************
NEW SOFTWARE VERSION
load
STANDARD DATA
******************
press
When inputting the Standard Data, you are prompted to input data
regarding model and type of machine.
+
customer parameters
SERVICE TIME
ITALIANO
ENGLISH
DEUTSCH
FRANCAIS
(34) key:
press the PRG
(29) key:
- configuration: STANDARD, SELF 1, SELF 2;
service time
Date and time
ON time
OFF time
Day off
Night ON
+
03:00
03:00
none
02:00
- h20: water from delivery spout, YES / no;
- type: coffee, 1 Cappuccino;
press again the PRG
- Pipe: type of pipe, OFF (disable), AS (turbosteam),
(29) key:
VAP (steam), H2O (water);
- special key: YES / no.
- pay per use: YES / no;
- soluble 1: soluble 1 beverage, YES / no;
- reset maintenance parameters:
- soluble 2: soluble 2 beverage, YES / no;
press the PRG
- menù: different types of drinks,1/2.
Using the "+"
(30) and “-”
then press the PRG
+
Date and time
Year
10
Month
04 APR
Date
21 WED
Hour
17
Minutes
12
(29) key:
(31) keys, select the parameters,
(29) to confirm the details.
TECHNICAL PROG.
key menu
Configuration
TESTING
weighting
+
After this operation, switch off the machine and reset the dipswitch
1 display screen to OFF.
press again the PRG
(29) key:
- zero the error and wash log.
24
+
CONFIGURATION
standard data NO
DATa IN/OUT
Archive resetNO
maintenance
pay per use
Q10 Tec rev. 1106
Dip settings
The “dip setting” entry displays the dipswitch settings.
Under standard conditions, the dip-switches are positioned on OFF.
ON
1 2 3 4 5 6 7 8
OFF
For more details, please consult the technical manual at the "Setting
- CPU Dip-Switch" paragraph.
14. DATA menu: Wash Archive
data menu
counters menu
accounting
INFO
WASH ARCHIVE
malfunct. archive
Press the PRG
display:
+
Pushing the PRG
(29) button when the cursor is on the
"PARTIALS" line, on the display will appear:
Req.
00004
00000
00000
00000
00000
Wash 1
2
3
4
5
Perf.
00003
00000
00000
00000
00000
(29) key, the following message appears on the
NOTE: If the wash cycles requested occur during the timeout, under
the entry "PARTIALS" you will also see a list of the last 10 "failed" wash
cycles, with progressive number, date and wash number.
The first line refers to the most recent date.
+
WASH ARCHIVE
Required
00005
Performed
00005
partials
+
WASH ARCHIVE
Required
00005
Performed
00005
partials
01 10 SET 2010
- 1
02 08 SET 2010
- 2
The parameters for the WASH ARCHIVE log that can appear on the
display are:
- Requests: number of wash cycles that have been requested by the
machine. - Executed: number of wash cycles that were performed within the
timeout time of 60'.
- PARtials: in this parameter are collected all the relevant details
of the 5 washing cycles: wash cycles requested by the machine,
wash number, number of washing cycles executed.
Use the "+"
(30) and “-”
(31) keys to scroll through the failed wash
cycles, then press the RES
(24) key to pass to another menu.
25
English
- DIP 1 = OFF -ON Input of standard data
- DIP 2 = OFF
- DIP 3 = OFF -ON Simulation of engineer's card
- DIP 4 = OFF -ON Simulation of bookkeeping's card
- DIP 5 = OFF -ON allows keys sequence to enter programming
- DIP 6 = OFF
- DIP 7 = OFF
- DIP 8 = OFF
dip settings
Q10 Tec rev. 1106
15. DATA menu: MALFUNCTIONS ARCHIVE
data menu
counters menu
accounting
INFO
WASH ARCHIVE
malfunct. archive
+
If the PRG
(29) key is pressed again, the details page is accessed.
The following appears on the display:
- day and hour when the error occurred
- machine status when the error occurred
English
MALFUNCTION DETAIL
Monday
25/10/10 13:36:25
066 GR1
GR: coffee
If the PRG
(29) key is pressed when the cursor is on the “error
log” line, the following appears on the display:
MALFUNC. ARCHIVE
01
066
00012:25
02
066
00000:03
03
003
00001:30
04
003
00000:00
05
003
00000:30
The figures appearing after the “error code” indicate, in hours and
minutes, the time that has passed since the last recorded error.
16. Customer parameters menu
To access "Customer parameters" press
message will appear on the display:
+
customer parameters
SERVICE TIME
ITALIANO
ENGLISH
DEUTSCH
FRANCAIS
(34) key; the following
Language selection
+
customer parameters
SERVICE TIME
ITALIANO
ENGLISH
DEUTSCH
FRANCAIS
To display the messages in a different language from that set, after
entering into Programming mode, position the cursor on the desired
(30) and "-"
(31) keys and then
language by pressing the "+"
pressing the PRG
(29) key. The machine will restart with the
messages provided in the selected language.
The display (5) provides a choice of the following languages.:
Italian, English, German, French, Spanish, Portuguese, Dutch,
Japanese and Russian.
26
Q10 Tec rev. 1106
Service time menu
Pressing the PRG
the display:
"Wash 1" and "Washes 2 ÷ 5"
These are scheduled washes that are independent of the wash cycles
related to the switching on and switching off phases.
At the set hour, the messages "Execute washing group",
"Execute washing milk circuit" appear, according to the
programmed washing.
After having positioned the cursor on the line to be changed and after
(29), the following message will appear on
+
03:00
03:00
none
02:00
(29) key, change the value using the "+"
having pressed the PRG
(30) and "-"
(31) keys. Then press the "OK" key to confirm.
Repeat the above operations to change the other wash scheduling
times.
"Wash 1"
When this function is requested, a long wash cycle is performed (milk
circuit and coffee circuit) as described in the "Cleaning operations"
paragraph of the user manual.
The following service time parameters can be modified:
-ON time (time the machine switches on);
-OFF time (time the machine switches off);
- day off (day on which the enterprise is closed);
-Night ON (start time for evening beverage price: only when payment
system is connected);
-Night OFF (end time for evening beverage price: only when payment
system is connected);
- Wash 1 (request - every 24 hrs - at the programmed hour; cannot be disabled);
- Wash 2 ÷ 5 (hour of scheduled washes from 2 to 5)
NOTE: Wash 1 cannot be disabled. It is requested daily at the
programmed hour, and always within 24 hours.
"Washes 2 ÷ 5"
If the set hour for these wash cycles occurs when the machine is
switched off, the request will be canceled.
NOTE: Set OFF against the time so as to not activate these wash
cycles.
OFF is displayed press the "-"
(31) key the indicated time is
"00:00".
General indications
If there is no day off (i.e. the enterprise never closes), enter “none”
for the “day off” item.
Enter the same time for the “ON time” and “OFF time” parameters
(for example:
ON time
22:00
OFF time
22:00)
if the automatic switch on/switch off function is not required and you
wish to manually switch the machine on and off.
For more details, please consult at the "Configuration menu - wash
options" paragraph.
Date and time
To modify the date and hour, press the PRG
(29) key for the
corresponding line. The following message will appear:
Use the "+"
(30) and "-"
(31) keys to move the cursor (black
line) to the entry to be modified, then press the PRG
(29) key. The
and it becomes possible to change
cursor will turn into an arrow
(30) and "-"
the number for the selected entry by using the "+"
(31) keys.
Once the operation is completed, press the RES
(24) key to
confirm the data.
Note: the cursor changes back to black line.
Repeat the operation described above to modify other parameters.
+
Date and time
Year
10
Month
04 APR
Date
21 WED
Hour
17
Minutes
12
27
English
service time
Date and time
ON time
OFF time
Day off
Night ON
Q10 Tec rev. 1106
17. Defects - Malfunctions (1/2)
MALFUN.
Code
002
English
003
DESCRIPTION
POSSIBLE CAUSES
Coffee group piston descent timeout during • The motor group is malfunctioning
the repositioning phase after one minute in • There is a foreign body inside the
the grinding position.
chamber.
• The tray has been removed.
• The coffee grounds drawer has
been removed
The coffee group piston did not reach the
dispensing zone, but the compression
sensor has intervened
• The coffee group is malfunctioning
• The ground coffee dose is more
than maximum amount allowed.
• There is a foreign body inside the
chamber
007
The coffee group piston has reached the • The fastening screw is loose and
dispensing zone, but the positioning timeout the group is being pulled in an
has intervened because the compression abnormal way by the motor crank.
sensor and the limit switch sensor did not • T h e c o m p r e s s i o n s e n s o r i s
commute.
malfunctioning.
• The limit switch signal is lost
008
The coffee group does not move
009
The coffee group piston has not reached the • T h e c o m p r e s s i o n s e n s o r i s
dispensing zone and the positioning timeout malfunctioning.
was reached because the compression • The limit switch signal is lost.
sensor did not intervene.
• The fastening screw is loose and
the group is being pulled in an
abnormal way by the motor crank
011
MM1 grinder encoder impulses are not • The grinder is blocked.
read
• The grinder is malfunctioning.
• The encoder is malfunctioning.
MM2 grinder encoder impulses are not • T h e e n c o d e r p h o t o c e l l w a s
read
incorrectly installed
021
• T h e c o f f e e g r o u p m o t o r i s
malfunctioning.
• The movement is requested while
the coffee grounds drawer is
absent.
• The movement is requested while
tray is absent
025
No power to group, solenoid valve, milk • The switching power supply is
pump.
malfunctioning.
• The wiring is disconnected.
• There has been a power outage.
041
The overcurrent alarm sounds when the • There is excessive stress during
milk pump starts
functioning.
• The gear pump (MRL/MRC) is
malfunctioning
051
The boiler temperature is not working
• T h e s e n s o r i s e l e c t r i c a l l y
disconnected.
• The sensor is malfunctioning.
• There is a CPU card malfunction
052
Boiler heating timeout
• The resettable safety thermostat
has intervened.
• The heating element has been
disconnected.
• The Triac card is malfunctioning.
• The heating element wiring and/or
Triac control is disconnected
056
The boiler temperature sensor is not working. • T h e t e m p e r a t u r e s e n s o r i s
Value is out of range.
malfunctioning.
• The temperature sensor wiring is
disconnected.
• There is a CPU card malfunction
28
SOLUTIONS
Q10 Tec rev. 1106
17. Defects - Malfunctions (2/2)
MALFUN.
COD
DESCRIPTION
POSSIBLE CAUSES
Heating boiler timeout
• The resettable safety thermostat
has intervened.
• The heating element has been
disconnected.
• The Triac card is malfunctioning.
• The heating element wiring and/or
Triac control is disconnected
058
Overpressure alarm in boiler
• The Triac card is malfunctioning
059
Boiler filling timeout
• The water supply has been cut off.
• The EVC is malfunctioning or
electrically disconnected.
• The check valve is malfunctioning.
• The check valve filter is dirty.
• There is a CPU card malfunction.
064
The machine dispenses in limit switch • The ground coffee dose is below
position, without signaling compression nominal value
066
No reading of coffee circuit volumetric • The water supply has been cut off.
counter pulses during the dispensing • The volumetric counter is malfuncycle.
ctioning or is electrically disconnected.
• The G solenoid valve is malfunctioning or is electrically disconnected.
• The pump is malfunctioning (only
in case of intake from reservoir)
• The check valve filter is clogged.
• The coffee group filters are
clogged.
• The coffee grounds are too fine
067
No reading of coffee circuit volumetric • The water supply has been cut off.
counter pulses during the washing cycle.
• The volumetric counter is malfunctioning or is electrically disconnected.
• The G solenoid valve is malfunctioning or is electrically disconnected.
• The pump is malfunctioning (only
in case of intake from reservoir)
• The check valve filter is clogged.
• The coffee group filters are
clogged
068
The coffee group racks are unhooked, • The coffee grounds are too
making the group unstable.
coarse, the infusion time is too
long, or input group pressure is
below 4 bar.
• The group rack is malfunctioning.
• The coffee group motor is malfunctioning
070
Wrong data reading by RAM clock or by • There is a card malfunction
EEPROM
071
Dead clock buffer battery
• Replace the battery
098
Error log and washing log reset
• Initialization has begun for the error log and washing log structure
099
Default data loading
29
English
057
SOLUTIONS
Q10 Tec rev. 1106
18. Abnormal functioning (machine and operator)
Coffee circuit
DESCRIPTION
POSSIBLE CAUSES
SOLUTIONS
English
The machine does not dispense the • The nominal boiler temperature has not
requested beverages
been reached.
• There is no coffee.
• The coffee receptacles are closed or
obstructed.
• The group was not installed correctly.
• The outlet tube from the group in the coffee
dispenser nozzle was not installed correctly
The coffee receptacle cannot
positioned correctly in the machine
be • Remove any coffee grounds on the top
panel of the machine or in the upper part of
the grinders.
• Check that the receptacle doors are closed.
• Check that the receptacle blocking pin is in
the “open” position.
The group does not move correctly
• Check the correct installation of the group:
the connecting rod button must be inserted
in the crank slot.
• The fastening pin must be correctly locked
The beverage temperature is too low/too • The boiler temperature is incorrect.
• The heating method is incorrect.
high
• The safety thermostats have intervened.
• The temperature probe is malfunctioning
Ground coffee residues on the group and/ • The MM1/MM2 coffee nozzles are
unprotected.
or on the main door
• The coffee grounds are ground too
coarsely
Bubbles forming and/or bad texture
• Air is seeping from the dispensing nozzle.
• There are water residues inside coffee
circuit tubes. The tubes are incorrectly
lodged inside the machine
Uneven coloring
• There are coffee residues inside the tubes
after dispensing. Perform the coffee circuit
washing cycle
No or partial dispensing from nozzle
• There are problems with the water supply/
inlet.
• There is a volumetric counter anomaly.
• The tube exiting the dispensing group is
partially clogged
Water dripping from dispenser nozzle • The coffee receptacles are empty.
(excluding washing cycle)
• The coffee receptacles are clogged/
blocked.
• Inefficient machine discharge: Check that
circuit is clean and intact
30
Q10 Tec rev. 1106
18. Abnormal functioning (machine and operator)
Milk circuit
DESCRIPTION
POSSIBLE CAUSES
SOLUTIONS
English
The machine does not dispense the • The nominal boiler temperature has not
requested beverages
been reached.
• There is no milk.
• The intake tube was incorrectly positioned
in the milk container.
• The milk intake tube is clogged/blocked.
• The start settings are incorrect.
• The gear pump is malfunctioning
The milk and/or concentrated chocolate • The air flow regulator is malfunctioning.
dosage are different from the nominal • The gear pump PWM setting is incorrect.
dose
• The gear pump is malfunctioning.
• The switching power supply output voltage
≠ 24.5 V
Too low beverage temperature
• The EM solenoid valve anti-suction cycle failed.
• The solenoid valve is malfunctioning or
disconnected.
• There are limescale deposits inside the
heat exchanger
Steam from the steam nozzle enters the • There is no milk in the refrigerator.
refrigerator.
• The milk intake tube is clogged/blocked
The milk temperature is too hot compared • The milk temperature inside the refrigerator
to set temperature; there is boiling inside is higher than 5° C, the reference
the steam nozzle
temperature for the machine setting.
• The milk intake tube is clogged/blocked
The milk is not frothed
• The EAR solenoid valve is malfunctioning
or disconnected electrically
The milk circuit remains full of products • The water supply is cut off.
after dispensing
• The inversion setting is incorrect.
• The EL solenoid valve is malfunctioning or
disconnected
There are water residues in the washing • The inversion setting is incorrect.
circuits after dispensing
• The EL solenoid valve is malfunctioning or
disconnected
There is a combination of water/steam • There is no water in the washing tray.
in the cup at the start of the dispensing • The milk intake tube is clogged/blocked
cycle
18. Abnormal functioning (machine and operator)
Washing
DESCRIPTION
POSSIBLE CAUSES
SOLUTIONS
After the washing sequence starts, the • The steam boiler or water boiler has not
machine remains in standby for almost a reached the correct temperature/pressure
minute
Il lavaggio caffè dura più del normale
• The coffee filters may be clogged
Fuoriuscita di vapore dal montalatte • Esaurimento acqua contenuto nella
ed immissione di vapore all’interno del vaschetta di lavaggio
frigorifero.
• Il tubo di aspirazione latte è ostruito/
occluso
31
Q10 Tec rev. 1106
18. Abnormal functioning (machine and operator)
Components
DESCRIPTION
POSSIBLE CAUSES
SOLUTIONS
There is dampness in the receptacles or • The steam intake fan is malfunctioning
inside the front panel
• The back or front doors not closed properly English
The coffee grounds drawer has water • The grinder settings for the coffee dose are
inside
incorrect
• The drying temperature is too low
• The top piston OR is worn
The coffee grounds drawer has grounds • The ground coffee dose is higher than
underneath the group (left part)
maximum dose allowed
The dispensing group receptacle is • Triac grinder has short-circuited
clogged with coffee; the dispensing group • The setting for the ground coffee dose is
is blocked and “full” of coffee.
incorrect and higher than the maximum
Total blockage of the tube can mechanically capacity of the coffee group
block the grinder blade.
The machine does not switch on
The water boiler and steam
temperature do not increase
• The display panel is not closed correctly
• There is no electrical power supply
• The ON/OFF switch is off or malfunctioning
boiler • The wiring is disconnected/malfunctioning
• The safety thermostats have intervened
• The Triac has short-circuited
The display is off
• The display card is malfunctioning
• The switching power supply is malfunctioning
• The wiring is disconnected
The programming keypad is not working • The programming block is enabled
• The programming keypad card key switch
is malfunctioning
• The wiring is disconnected
The Selection keypad is not working
• The key on the keypad is disabled
• The programming keypad card key switch
is malfunctioning
• The wiring is disconnected
The LED key on the Selection keypad is • The key on the keypad is disabled
• The programming keypad card key switch
not working
is malfunctioning
• The wiring is disconnected
There is no lighting on the machine work • The lighting LEDs are malfunctioning
• The wiring is disconnected
surface
The Safety valve has intervened
• There is an anomalous reading by the
boiler pressure sensor (tube blocked,
sensor malfunction, etc.)
• The boiler is flooded
• The level sensor is malfunctioning
There is liquid dripping from the machine • The seal on the draining tray connector is
worn
base
• The tray is incorrectly inserted in the
machine
There are noticeable variations in the • The dispenser nozzle is set at the incorrect
temperature and quality of the beverages height
The beverages spill outside of the cups • The cups are incorrectly positioned
during dispensing
32
Q10 Tec rev. 1106
18. Abnormal functioning (machine and operator)
Components
DESCRIPTION
Continuous removed tray warning
POSSIBLE CAUSES
SOLUTIONS
• The tray micro switches are malfunctioning
• The wiring is disconnected
When the tray is removed, liquid always • The connector seal is worn
drips from the outlet connector
• The tray was removed after dispensing/
washing cycle without letting the system
have time to correctly drain the fluids
33
English
Continuous removed coffee grounds tray • The coffee grounds tray micro switches is
warning
stuck/malfunctioning
• The wiring is disconnected
Q10 Tec rev. 1106
English
34
Q10 Tec rev. 1106
I
Avvisi importanti
ATTENZIONE! Questi capitoli del manuale sono ad uso del personale tecnico qualificato e
autorizzato.
Togliere tensione alla macchina prima di eseguire tutte le operazioni (*).
GB
important warnings
WARNING! These chapters in the manual are to be used by qualified, authorized technical staff.
Switch off the power to the machine before performing these steps.
F
Avis importants
ATTENTION! Ces chapitres du manuel sont à l’usage du personnel technique qualifié et autorisé.
Débrancher la machine avant d’effectuer toutes les opérations.
D
wichtige Warnungen
ZU BEACHTEN! Diese Kapitel des Handbuches wenden sich an qualifizierte und offiziell befugte
Fachtechniker.
Vor Ausführung gleich welcher Arbeitsschritte die Spannungsversorgung der Maschine
unterbrechen.
E
advertencias importantes
ATENCIÓN! Estos capítulos del manual son para su uso por parte del personal técnico cualificado
y autorizado.
Desconectar la tensión de la máquina antes de efectuar todas las operaciones.
P
avisos importantes
ATENÇÃO! Estes capítulos do manual são para serem utilizados pelo pessoal técnico qualificado
e autorizado.
Retirar a tensão à máquina antes de executar todas as operações.
(*) Gli interventi sul gruppo caffè richiedono operazioni da effettuare con macchina accesa.
(*) Any work performed on the coffee group must be done with the machine switched on.
(*) Les interventions sur le groupe de café requièrent des opérations devant être effectuées lorsque la machine
est allumée.
(*) Die auf die Kaffeeabgabeeinheit bezogenen Arbeitsschritte müssen bei eingeschalteter Maschine ausgeführt
werden.
(*) Las intervenciones en el grupo café requieren operaciones que se tienen que efectuar con la máquina
encendida.
(*) As intervenções no grupo café exigem operações a efectuar com a máquina acesa.
35
Q10 Tec rev. 1106
Apertura cruscotto, pannello frontale - Opening front panel
Ouverture du tableau de bord, du panneau frontal - Öffnen der Armaturentafel (Frontpaneel)
Apertura del panel de mandos, panel frontal - Abertura do quadro de comandos, painel dianteiro
1
Aprire la serratura (A) e il cruscotto comandi (B).
A
Open the lock (A) and the control panel (B). Ouvrir la serrure (A) et le tableau de bord (B).
Die Verriegelung (A) und die Armaturentafel (B) öffnen.
Abrir la cerradura (A) y el panel de mandos (B).
B
Abrir a fechadura (A) e o painel de comandos (B).
2
3
16
Alzare il becco erogatore (1). - Raise the dispensing nozzle (1).
Rimuovere la bacinella (16). - Remove the tray (16).
Lever le bec de débit (1). - Das Ausflußstück (1) anheben.
Retirer la bassine (16). - Die Wanne (16) herausnehmen.
Levantar la boquilla erogadora (1). - Levantar o bico distribuidor (1).
Desmontar la bandeja (16). - Remover o tabuleiro (16).
4
Premere il perno di chiusura (C) e aprire parzialmente il
pannello frontale (E). Scollegare il tubo caffè dal becco
erogatore e, se presenti, i tubi solubili e acqua dal becco,
quindi aprire completamente il pannello frontale (E).
Press the closing pin (C) and partially open the front panel (E).
Disconnect the coffee tube from the dispensing nozzle and,
if present, the tubes for soluble beverages and water from
the nozzle, then completely open the front panel (E).
C
Appuyer sur le pivot de fermeture (C) et ouvrir partiellement
le panneau frontal (E). Débrancher le tuyau de café du bec
de débit et, si besoin est, les tuyaux des solubles et de
l’eau du bec, puis appuyer complètement sur le panneau
frontal (E).
E
Auf den Sperrstift (C) drücken und das Frontpaneel (E)
teilweise öffnen. Die Kaffeeleitung und (sofern präsent)
die Leitungen für lösliche Produkte und Wasser vom
Ausflußstück abziehen, anschließend kann das Frontpaneel
(E) ganz geöffnet werden.
Presionar el perno de cierre (C) y abrir parcialmente el panel frontal (Y). Desconectar el tubo de café de la boquilla erogadora y, si están instalados,
los tubos de los productos solubles y del agua de la boquilla, por último abrir completamente el panel frontal (Y).
Premir o pino de fecho (C) e abrir parcialmente o painel dianteiro (E). Desconectar o tubo do café do bico distribuidor e, se presentes, os tubos
dos solúveis e da água do bico, e por fim abrir completamente o painel dianteiro (E).
36
Q10 Tec rev. 1106
Rimozione gruppo caffè - Coffee group removal
Retrait du groupe de café - Ausbau Kaffeeabgabeeinheit
Desmontaje del grupo café - Remoção do grupo café
Per facilitare il riposizionamento del gruppo caffè accendere la macchina e premere il tasto
“sleep mode”
(SM); attendere qualche secondo, quindi rispegnere la macchina. Prima
di procedere con lo smontaggio scollegare dal gruppo caffè i tubi idraulici e i connettori
elettrici, posizionati rispettivamente nei punti 1 e 2 della figura a lato.
To make it easier to reposition the coffee group, switch on the machine and press the “Sleep
Mode” key
(SM). Wait a few seconds and then switch off the machine. Before removal,
disconnect the water tubes and electric connectors from the coffee group positioned
respectively at points 1 and 2 in the figure opposite.
1
2
Pour faciliter le repositionnement du groupe de café, mettre la machine en marche et appuyer
sur la touche “sleep mode”
(SM); attendre quelques secondes puis éteindre à nouveau la
machine. Avant de procéder au montage, débrancher du groupe de café les tuyaux hydrauliques
et les prises électriques, placés respectivement aux points 1 et 2 de la figure ci-contre.
Zur Vereinfachung des erneuten Einbaus der Kaffeeabgabeeinheit die Maschine einschalten
und die Taste “sleep mode”
(SM) drücken; einige Sekunden abwarten und die Maschine
erneut ausschalten. Vor dem Ausbau die Wasserleitungen und die elektrischen Steckverbinder
(siehe Punkte 1 und 2 u der seitl. Abb. ) von der Kaffeeabgabeeinheit abziehen.
Para facilitar la instalación del grupo café, encender la máquina y presionar la tecla “sleep
mode”
(SM); esperar unos segundos y luego apagar la máquina. Antes de realizar el
desmontaje desconectar del grupo café los tubos hidráulicos y los conectores eléctricos,
situados respectivamente en los puntos 1 y 2 de la figura que está al lado.
Para facilitar o reposicionamento do grupo café acender a máquina e premir a tecla “sleep
mode”
(SM); aguardar alguns segundos e seguidamente voltar a desligar a máquina. Antes
de proceder à desmontagem desconectar do grupo café os tubos hidráulicos e os conectores
eléctricos, posicionados respectivamente nos pontos 1 e 2 da figura ao lado.
1
Rimuovere la copertura (G) del
gruppo.
Remove the cover (G) on the group. .
Retirer la couverture (G) du groupe.
Die Abdeckung (G) der Kaffeeabgabeeinheit
abnehmen.
Quitar la cubierta (G) del grupo.
Remover a cobertura (G) do grupo.
g
2
f
Svitare la vite di fissaggio (F) ed estrarre il gruppo. - Unscrew the fastening screws (F) and remove the group.
Dévisser la vis de fixation (F) et extraire le groupe. - Die Schraube (F) lösen und die Einheit herausnehmen.
Destornillar el tornillo de fijación (F) y desmontar el grupo. - Desaparafusar o parafuso de fixação (F) e extrair o grupo.
37
Q10 Tec rev. 1106
Riposizionamento gruppo caffè - Coffee group repositioning
Repositionnement du groupe de café - Erneuter Einbau der Kaffeeabgabeeinheit
Montaje del grupo café - Reposicionamento do grupo café
1
A
B
Qualora la manovella motore (M) non si trovasse nella
corretta posizione (figura B), accendere la macchina
e premere il tasto “sleep mode”
(SM); attendere
qualche secondo, quindi rispegnere la macchina.
If the motor crank (M) is not in the correct position (Figure
B), switch on the machine and press the “Sleep Mode”
key
(SM). Wait a few seconds and then switch off
the machine.
Au cas où la manivelle du moteur (M) ne se trouverait
pas dans la bonne position (figure B), mettre la machine
en marche et appuyer sur la touche “sleep mode”
(SM); attendre quelques secondes, puis éteindre à
nouveau la machine.
M
Sollte sich die Motorwelle (M) nicht in der korrekten Position befinden (Abb. B), die Maschine einschalten und die Taste “sleep mode”
drücken; einige Sekunden abwarten und die Maschine erneut ausschalten
(SM)
En el caso de que la manivela motor (M) no se encontrase en la correcta posición (figura B), encender la máquina y pulsar la tecla “sleep mode”
(SM); esperar unos segundos y luego empujar la máquina.
Caso a manivela do motor (M) não se encontre na posição correcta (figura B), acender a máquina e premir a tecla “sleep mode”
aguardar alguns segundos e por fim voltar a desligar a máquina.
(SM);
2
G
Portare manualmente la manovella del gruppo (G) a fine corsa (attenersi alla
targhetta adesiva posizionata all’interno della macchina); quindi procedere
con il montaggio del gruppo e il collegamento di tubi idraulici e connettori
elettrici.
Manually bring the group crank (G) to a stop (follow instructions on the
adhesive plate inside the machine). Proceed with assembling the group and
connecting the water tubes and electrical connectors.
Amener manuellement la manivelle du groupe (G) en fin de course (s’en tenir à la plaquette adhésive placée à l’intérieur de la machine); puis
procéder au montage du groupe et au branchement des tuyaux hydrauliques et des prises électriques.
Die Welle der Einheit (G) bis zum Anschlag positionieren (siehe Klebeschuld im Innenbereich der Maschine); anschließend die Einheit
einsetzen und die Wasserleitungen und die elektrischen Steckverbinder wieder anschließen.
Colocar manualmente la manivela del grupo (G) en el final de carrera (atenerse a la tarjeta adhesiva colocada en el interior de la máquina);
luego realizar el montaje del grupo y la conexión de los tubos hidráulicos y los conectores eléctricos.
Deslocar manualmente a manivela do grupo (G) até alcançar o fim de corrida (respeitar o que consta da placa adesiva posicionada no interior
da máquina); em seguida proceder à montagem do grupo e à conexão dos tubos hidráulicos e dos conectores eléctricos.
38
Q10 Tec rev. 1106
Rimozione tramogge caffè - Coffee receptacle removal
Retrait des trémies de café - Ausbau Kaffeetrichter
Desmontaje de las tolvas de café - Remoção das tremonhas do café
1
2
C
H
T
chiuso - closed
fermé - geschlossen
cerrado - fechado
Aprire la serratura della tramoggia (T) e rimuovere il coperchio (C).
Open the hopper lock (T) and remove the cover (C).
Ouvrir la serrure de la trémie (T) et retirer le couvercle (C).
Spingere il dispositivo di chiusura tramoggia (H) verso il retro della
macchina.
Entsperren Sie die Sperrvorrichtung des Trichters (T), und nehmen
Sie die Abdeckung (C) ab.
Push the hopper closing device (H) towards the back of the
machine.
Abrir la cerradura de la tolva (T) y quitar la tapadera (C).
Abrir a fechadura da tremonha (T) e remover a tampa (C).
Pousser le dispositif de fermeture de trémie (H) vers l’arrière de la
machine.
Schieben Sie den Trichterverschluß (H) nach hinten.
Empujar el dispositivo de cierre de la tolva (H) hacia la parte posterior
de la máquina.
Empurrar o dispositivo de fecho da tremonha (H) em direcção da parte
traseira da máquina.
3
F
Con l’ausilio di un utensile ruotare in senso antiorario il dispositivo di fissaggio (F) e separare la tramoggia caffè dalla macchina.
Use a tool to turn the fastening device (F) counter-clockwise and remove the coffee hopper from the machine.
Au moyen d’un ustensile, tourner le dispositif de serrage (F) dans le sens contraire des aiguilles d’une montre et séparer la trémie de café de la
machine.
Drehen Sie die Vorrichtung zur Trichterbefestigung (F) mit einem geeigneten Werkzeug gegen den Uhrzeigersinn, und nehmen Sie den Trichter
von der Maschine ab.
Con la ayuda de una herramienta girar en sentido contrario a las agujas del reloj el dispositivo de fijación (F) y separar la tolva de café de la
máquina.
Com a ajuda de uma ferramenta rodear para a esquerda o dispositivo de fixação (F) e separar a tremonha do café da máquina.
39
Q10 Tec rev. 1106
Rimozione tramogge solubili - Solubles receptacle removal
Retrait des trémies de solubles - Ausbau Trichter lösliche Produkte
Desmontaje de las tolvas de los productos solubles - Remoção das tremonhas dos solúveis
1
2
Cs
Hs
Ts
chiuso - closed
fermé - geschlossen
cerrado - fechado
Spingere il dispositivo di chiusura tramoggia (Hs) verso il retro della macchina.
Push the hopper closing device (Hs) towards the back of the machine.
Pousser le dispositif de fermeture de trémie (Hs) vers l’arrière de la machine.
Aprire la serratura della tramoggia (Ts) e rimuovere il coperchio
(Cs).
Schieben Sie den Trichterverschluß (Hs) nach hinten.
Open the hopper lock (Ts) and remove the cover (Cs).
Empujar el dispositivo de cierre de la tolva (Hs) hacia la parte posterior de la
máquina.
Ouvrir la serrure de la trémie (Ts) et retirer le couvercle (Cs).
Empurrar o dispositivo de fecho da tremonha (Hs) em direcção da parte traseira
da máquina.
Entsperren Sie die Sperrvorrichtung des Trichters (Ts), und
nehmen Sie die Abdeckung (Cs) ab.
Abrir la cerradura de la tolva (Ts) y quitar la tapadera (Cs).
Abrir a fechadura da tremonha (Ts) e remover a tampa (Cs).
3
4
5
Fs
Con l’ausilio di un utensile ruotare in
senso antiorario il dispositivo di fissaggio
(Fs).
Use a tool to turn the fastening device
(Fs) counter-clockwise.
Au moyen d’un ustensile, tourner le
dispositif de serrage (Fs) dans le sens
contraire des aiguilles d’une montre.
D r e h e n S i e d i e Vo r r i c h t u n g z u r
Trichterbefestigung (Fs) mit einem
geeigneten Werkzeug gegen den
Uhrzeigersinn.
Spostare la tramoggia verso la parte anteriore
della macchina.
Move the hopper towards the front of the
machine.
Déplacer la trémie vers la partie antérieure
de la machine.
Schieben Sie den Trichter nach vorne.
Sollevare leggermente la parte posteriore della
tramoggia e separare la tramoggia solubile dalla
macchina.
Desplazar la tolva hacia la parte anterior de
la máquina.
Slightly raise the rear of the hopper and remove the
solubles hopper from the machine.
Deslocar a tremonha na parte dianteira da
máquina.
Soulever légèrement la partie postérieure de la
trémie et séparer la trémie soluble de la machine.
Heben Sie den rückseitigen Teil des Trichters
leicht an, und nehmen Sie den Trichter für lösliche
Produkte von der Maschine ab.
Con la ayuda de una herramienta girar
en sentido contrario a las agujas del reloj
el dispositivo de fijación (Fs).
Levantar ligeramente la parte posterior de la tolva y
separar la tolva para solubles de la máquina.
Com a ajuda de uma ferramenta rodear
para a esquerda o dispositivo de fixação
(Fs).
Levantar levemente a parte traseira da tremonha e
separar a tremonha solúvel da máquina.
40
Q10 Tec rev. 1106
Rimozione gruppo macinini - Grinder group removal
Retrait du groupe des moulins - Ausbau Mahlwerk
Desmontaje del grupo molinillos - Remoção do grupo moinhos
1
2
P
A
Rimuovere le 2 viti (P) situate nella parte posteriore della macchina.
Rimuovere le 3 viti (A) situate nella parte anteriore della macchina.
Remove the 2 screws (P) at the back of the machine.
Remove the 3 screws (A) on the front part of the machine.
Retirer les 2 vis (P) situées dans la partie postérieure de la machine.
Retirer les 3 vis (A) situées dans la partie antérieure de la machine.
Die beiden Schrauben (P) auf der Rückseite der Maschine lösen.
Die 3 Schrauben (A) auf der Vorderseite der Maschine lösen.
Desmontar los 2 tornillos (P) situados en la parte posterior de la máquina.
Desmontar los 3 tornillos (A) situados en la parte anterior de la máquina.
Remover os 2 parafusos (P) situados na parte posterior da máquina.
Remover os 3 parafusos (A) situados na parte anterior da máquina.
3
4
S
Rimuovere il pannello superiore (S).
Remove the top panel (S).
Retirer le panneau supérieur (S).
Das obere Paneel (S) abnehmen.
Desmontar el panel superior (S).
Remover o painel superior (S).
Svitare le viti di fissaggio indicate in figura e rimuovere il gruppo macinini.
Unscrew the fastening screws indicated in the figure and remove the grinder group.
Dévisser les vis de fixation indiquées sur la figure et retirer le groupe des moulins.
Die in der Abbildung angegebenen Befestigungsschrauben lösen und das Mahlwerk abnehmen.
Destornillar los tornillos de fijación indicados en la figura y desmontar el grupo molinillos.
Desaparafusar os parafusos de fixação indicados na figura e remover o grupo moinhos.
41
Q10 Tec rev. 1106
Apertura pannello posteriore - Opening the rear panel
Ouverture du panneau supérieur - Öffnen rückseitiges Paneel
Apertura del panel posterior - Abertura do painel posterior
1
Rimuovere le 2 viti (Q) situate nella parte
posteriore della macchina e aprire il pannello.
Remove the 2 screws (Q) at the back of the
machine and open the panel.
Retirer les 2 vis (Q) situées dans la partie
postérieure de la machine et ouvrir le panneau.
Die beiden Schrauben (Q) auf der Rückseite der
Maschine lösen und das Paneel öffnen.
Q
Desmontar los 2 tornillos (Q) situados en la parte
posterior de la máquina y abrir el panel.
Remover os 2 parafusos (Q) situados na parte
posterior da máquina e abrir o painel.
Rimozione copertura pannello posteriore - Rear panel cover removal
Retrait de la couverture du panneau postérieur - Ausbau Abdeckung rückseitiges Paneel
Desmontaje de la cubierta del panel posterior - Remoção da cobertura do painel posterior
1
Svitare le viti di fissaggio indicate in figura.
Unscrew the fastening screws indicated in the figure.
Dévisser les vis de fixation indiquées sur la figure.
Die in der Abbildung angegebenen Befestigungsschrauben lösen.
Destornillar los tornillos de fijación indicados en la figura.
Desaparafusar os parafusos de fixação indicados na figura.
2
R
Rimuovere la copertura del pannello posteriore (R). - Remove the cover to the rear panel (R).
Retirer la couverture du panneau postérieur (R). - Die Abdeckung des rückseitigen Paneels (R) abnehmen.
Desmontar la cubierta del panel posterior (R). - Remover a cobertura do painel posterior (R).
42
Q10 Tec rev. 1106
Riarmo termostati - Thermostat reset
Réarmement des thermostats - Rücksetzung Thermostate
Rearme de los termostatos - Rearme dos termóstatos
1
In caso di intervento del termostato, riarmare.
In case of thermostat intervention, switch on again.
En cas d'intervention du thermostat, brancher de nouveau.
Falls der Thermostat ausgelöst wird, ihn wiederienschalten.
En caso de intervención del thermostato, reencender de
nuevo.
En caso de incarvenção do termostato, reacender de novo.
Rimozione assieme ingresso acqua - Water inlet assembly removal
Retrait de l’ensemble de l’entrée de l’eau - Ausbau der Einheit Wassereinlauf
Desmontaje del grupo de entrada agua - Remoção do conjunto da entrada da água
1
Rimuovere l’assieme ingresso acqua (W) tirandolo verso l’alto.
Nota: l’estrazione del filtro (F) può avvenire anche senza lo smontaggio
dell’assieme ingresso acqua (W).
Remove the water inlet assembly (W) by pulling it upward.
Note: the filter (F) can be removed even without dismantling the water
inlet assembly (W).
Retirer l’ensemble de l’entrée de l’eau (W) en le tirant vers le haut.
Note: on peut extraire le filtre (F) sans démonter obligatoirement
l’ensemble de l’entrée de l’eau (W).
Die Einheit Wassereinlauf (W) ausbauen, indem sie nach oben hin
herausgezogen wird.
Anmerkung: Der Filter (F) kann auch ohne Ausbau der Einheit (W)
ausgebaut werden.
Desmontar el grupo de entrada agua (W) tirando de él hacia arriba.
Nota: la extracción del filtro (F) se puede realizar incluso sin el desmontaje
del grupo entrada agua (W).
Remover o conjunto da entrada da água (W) puxando-o para cima.
Nota: a extracção do filtro (F) pode ocorrer mesmo sem desmontar o
conjunto da entrada da água (W).
F
W
43
Q10 Tec rev. 1106
Rimozione blocco EV - Solenoid valve block removal
Retrait du bloc EV - Ausbau Einheit Magnetventile
Desmontaje del bloque EV - Remoção do grupo EV
Prima di procedere con lo smontaggio scollegare dal blocco elettrovalvole i tubi idraulici e i connettori elettrici.
Before dismantling, disconnect the water tubes and electric connectors from the solenoid valve block.
Avant de procéder au démontage, débrancher les tuyaux hydrauliques et les prises électriques du bloc des soupapes électriques.
Vor dem Ausbau die Wasserleitungen und die elektrischen Steckverbinder von der Einheit Magnetventile abziehen.
Antes de realizar el desmontaje, hay que desconectar del bloque de electroválvulas los tubos hidráulicos y los conectores eléctricos.
Antes de proceder à desmontagem desconectar do grupo das electroválvulas os tubos hidráulicos e os conectores eléctricos.
1
Rimuovere la vite di fermo (V).
Remove the fastening screws (V).
Retirer la vis d’arrêt (V).
Die Feststellschraube (V) lösen.
Desmontar el tornillo de fijación (V).
Remover os parafusos de bloqueio (V).
V
2
S
Estrarre la spina di bloccaggio (S) e rimuovere il gruppo elettrovalvole tirandolo verso l’alto.
Remove the lock pin (S) and remove the solenoid valve group by pulling it upward.
Extraire la cheville de blocage (S) et ôter le groupe de soupapes électriques en le tirant vers le haut.
Den Sperrstift (S) herausziehen und die Einheit Magnetventile ausbauen, indem sie nach oben hin herausgezogen wird.
Quitar la clavija de bloqueo (S) y desmontar el grupo electroválvulas tirando de él hacia arriba.
Extrair a ficha de bloqueio (S) e remover o grupo das electroválvulas puxando-o para cima.
44
Q10 Tec rev. 1106
Rimozione assieme caldaia/boiler - Boiler/heater assembly removal
Retrait de l’ensemble chaudière/chauffe-eau - Ausbau Einheit Wasserkessel / Boiler
Desmontaje del grupo caldera/calentador - Remoção do conjunto caldeira/boiler
Prima di procedere con lo smontaggio scollegare tutti i tubi idraulici e i connettori elettrici collegati all’assieme caldaia/boiler.
NOTA: la sonda temperatura (T) è collegata direttamente alla scheda CPU (connettore Y14).
Before removal, disconnect all the water tubes and electric connectors connected to the boiler/heater. NOTE: the temperature
probe (T) is directly connected to the CPU card (Y14 connector).
Avant de procéder au montage, débrancher tous les tuyaux hydrauliques et les prises électriques reliés à l’ensemble
chaudière/chauffe-eau. NOTE : le capteur de la température (T) est reliée directement à la carte CPU (connecteur Y14).
Vor dem Ausbau die Wasserleitungen und die elektrischen Steckverbinder von der Einheit Wasserkessel / Boiler abziehen.
ANMERKUNG: Der Temperaturfühler (T) ist direkt an der CPU-Karte angeschlossen (Steckverbinder Y14).
Antes de realizar el desmontaje hay que desconectar todos los tubos hidráulicos y los conectores eléctricos conectados al
grupo caldera/calentador. NOTA: la sonda temperatura (T) está conectada directamente a la tarjeta CPU (conector Y14).
Antes de proceder à desmontagem desconectar todos os tubos hidráulicos e os conectores eléctricos conectados ao
conjunto da caldeira /boiler. NOTA: a sonda da temperatura (T) está ligada directamente à ficha CPU (conector Y14).
1
T
B
Svitare le 3 viti di fissaggio (B) indicate in figura, scollegare il
connettore (T) dalla scheda CPU ed estrarre l’assieme caldaia/boiler.
Unscrew the 3 fastening screws (B) indicated in the figure.
Disconnect the connector (T) from the CPU card and remove the
boiler/heater assembly.
Dévisser les 3 vis de fixation (B) indiquées dans la figure, débrancher
le connecteur (T) de la carte CPU et extraire l’ensemble chaudière/
chauffe-eau.
Die 3 in der Abbildung gezeigten Schrauben (B) lösen, den
Steckverbinder (T) von der CPU-Karte abziehen und die Einheit
Wasserkessel / Boiler herausnehmen.
Destornillar los 3 tornillos de fijación (B) indicados en la figura,
desconectar el conector (T) de la tarjeta CPU y desmontar el grupo
caldera/calentador.
Desparafusar os 3 parafusos de fixação (B) indicados na figura,
desconectar o conector (T) da ficha CPU e extrair o conjunto
caldeira /boiler.
y14
45
Q10 Tec rev. 1106
Rimozione assieme pompe - Pump assembly removal
Retrait de l’ensemble pompes - Ausbau Pumpeneinheit
Desmontaje del grupo bombas - Remoção do conjunto das bombas
Prima di procedere con lo smontaggio scollegare tutti i tubi idraulici e i connettori elettrici collegati all’assieme pompe.
Before removal, disconnect all the water tubes and electric connectors connected to the pump assembly.
Avant de procéder au montage, débrancher tous les tuyaux hydrauliques et les prises électriques reliés à l’ensemble pompes.
Vor dem Ausbau die Wasserleitungen und die elektrischen Steckverbinder von der Pumpeneinheit abziehen.
Antes de realizar el desmontaje hay que desconectar todos los tubos hidráulicos y los conectores eléctricos conectados al grupo bombas.
Antes de proceder à desmontagem desconectar todos os tubos hidráulicos e os conectores eléctricos conectados ao conjunto das bombas.
1
Svitare le 3 viti di fissaggio indicate in figura e rimuovere l’assieme pompe.
Unscrew the 3 fastening screws indicated in the figure and remove the pump assembly.
Dévisser les 3 vis de fixation indiquées dans la figure et retirer l’ensemble pompes.
Die 3 in der Abbildung gezeigten Schrauben lösen und die Pumpeneinheit herausnehmen.
Destornillar los 3 tornillos de fijación indicados en la figura y desmontar el grupo bombas.
Desaparafusar os 3 parafusos de fixação indicados na figura e remover o conjunto das bombas.
46
Q10 Tec rev. 1106
Regolazione contrasto display - Display contrast setting
Reglage du contraste du display - Einstellung des kontrasts der Display
Regulación del contraste del display - Reglage do contraste do display
1
Agire sul trimmer (D) posto sulla scheda elettronica affinchè sul display
si leggano i messaggi in modo chiaro.
Adjust trimmer (D) located on the electronic card until the messages
may be clearly read on the display.
Agir sur le trimmer (D) plaçé sur la fiche électronique afin de pouvoir
lire clairement les messages qui apparaissent sur le display.
Stellen Sie den auf der Elektronikkarte installierten Reger (D) so ein,
daß die Meldungen auf der Anzeige in gutem Kontrast abgebildet
werden und gut abgelesen werden können.
Utilizar el trimmer (D) situado en la tarjeta electrónica para que se lean
los mensajes claramente en el visualizador.
Utilizar o trimmer (D) colocado sobre a ficha electrónica para que sobre
o mostrador se leiam as mensagens de modo claro.
D
47
Q10 Tec rev. 1106
Dip-Switch CPU - CPU Dip-Switch
Dip-Switch CPU - Dip-Switch CPU
Dip-Switch-Schalter CPU - Dip-Switch CPU
1
o
Attenzione!
Il cambiamento di posizione dei Dip-Switch deve essere effettuato
RIGOROSAMENTE a macchina SPENTA.
Nelle condizioni standard i Dip-Switch sono posizionati su OFF.
Agendo sui Dip-Switch (O) si attivano le seguenti funzioni:
- DIP 1 =
OFF - ON inserimento dati standard (*)
- DIP 2 =
OFF
- DIP 3 =
OFF - ON simulazione chiave tecnico
- DIP 4 =
OFF - ON contabilità
- DIP 5 =
OFF - ON abilitazione sequenza tasti per ingresso in programmazione
- DIP 6 =
OFF
- DIP 7 =
OFF
- DIP 8 =
OFF
Achtung:
Die Verstellung der Dip-Switch-Schalter darf nur bei
ABGESCHALTETER Maschine vorgenommen werden!
Bei normalen Betriebsbedingungen müssen die Dip-Switch-Schalter
auf OFF gestellt sein. Nachstehend werden die Funktionen bei
entsprechender Einstellung der Dip-Switch-Schalter (O) aufgeführt:
- DIP 1 =
OFF - ON Eingabe Standarddaten (*)
- DIP 2 =
OFF
- DIP 3 =
OFF - ON Simulation Monteurschlüssel
- DIP 4 =
OFF - ON Buchführung
- DIP 5 =
OFF - ON ermächtigen Sie die Anschlagsequenz, um in Programmierung hineinzugehen
- DIP 6 =
OFF
- DIP 7 =
OFF
- DIP 8 =
OFF
(*) Al termine delle operazioni di inserimento dati standard, riportare il
DIP 1 sulla posizione OFF.
(*) Nach Abschluß der Eingabe der Standarddaten muß der DipSwitch-Schalter 1 auf OFF zurückgestellt werden.
CAUTION!
When changing the position of the Dip-Switch, the machine
MUST BE SWITCHED OFF.
Under standard conditions, the dip-switches are positioned on OFF.
The dip-switches (O) have the following functions:
- DIP 1 =
OFF - ON Input of standard (*) data
- DIP 2 =
OFF
- DIP 3 =
OFF - ON Simulation of engineer’s key
- DIP 4 =
OFF - ON Bookkeeping
- DIP 5 =
OFF - ON allows keys sequence to enter programming
- DIP 6 =
OFF
- DIP 7 =
OFF
- DIP 8 =
OFF
¡Atención!
El cambio de posición de los Dip-switch (O) se tiene que efectuar RIGUROSAMENTE con la máquina APAGADA.
En condiciones estándares los Dip-switch están colocados en OFF.
Por medio de los Dip-Switch (O) se activan las siguientes funciones:
- DIP 1 =
OFF - ON introducción datos estándares (*)
- DIP 2 =
OFF
- DIP 3 =
OFF -
- DIP 4 =
OFF -
- DIP 5 =
OFF - - DIP 6 =
OFF
- DIP 7 =
OFF
- DIP 8 =
OFF
(*) Upon completion of the standard data input operations, position
DIP 1 to OFF again.
ON simulación llave técnico
ON contabilidad
ON habilita la secuencia de teclas para entrar en programación
(*) Al final de las operaciones de introducción datos estándares, restablecer el DIP 1 a la posición OFF.
Attention!
Le changement de position des Dip-Switch doit être
RIGOUREUSEMENT effectué lorsque la machine est ETEINTE.
En phase de standard, les Dip-Switch sont plaçés sur OFF.
Utiliser les Dip-Switch (O) pour activer les fonctions suivante:
- DIP 1 =
OFF - ON introduction informations standard (*)
- DIP 2 =
OFF
- DIP 3 =
OFF - ON simulation clef technique
- DIP 4 =
OFF - ON comptabilité
- DIP 5 =
OFF - ON habilite la séquence de touches pour entrer en programmation
- DIP 6 =
OFF
- DIP 7 =
OFF
- DIP 8 =
OFF
Atenção!
A mudança de posição dos Dip-Switch deverá ser efectuada
RIGOROSAMENTE com a máquina DESLIGADA.
Nas condições standard os Dip-Switch estão posicionados em OFF.
Actuando nos Dip-Switch (O) activam-se as funções a seguir indicadas:
- DIP 1 =
OFF - ON introdução dados standard (*)
- DIP 2 =
OFF
- DIP 3 =
OFF - ON simulação chave técnico
- DIP 4 =
OFF - ON contabilidade
- DIP 5 =
OFF - ON habilita a sequência das teclas para entrar em programação
- DIP 6 =
OFF
- DIP 7 =
OFF
- DIP 8 =
OFF
(*) à la fin des opérations d’introduction des informations standard,
remettre le DIP 1 sur la position OFF.
(*) No fim das operações de introdução dos dados standard, recolocar o DIP 1 na posição OFF.
48