1
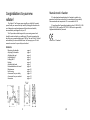
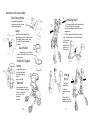
This is the way your new
rollator works
Volaris S7
Volaris Sweden AB
Baldersvägen 38, SE-332 35 Gislaved, Sweden
Telephone +46 371-189 80 Fax +46 371-189 82
E-mail: [email protected] Internet: www.volaris.se
16
Art. No. # 81 104 02-02
091020
User Manual Volaris S7
1
Art. no. 1 422 150
Congratulations to your new
rollator!
Manufactured in Sweden
S7 is developed and manufactured in Sweden to enable us to
guarantee for function and quality. It is manufactured from carefully
chosen material and components. S7 is recoverable to 95 %.
The Volaris S7 will in many ways simplify your daily life. Acquaint
yourself with your new rollator by carefully studying the directions for
use. Adequate use and maintenance will provide more benefits,
increased safety and longer life of your S7.
The S7 provides excellent support for your moving around and
should be used exclusively as a walking aid. The seat is guaranteed to
be able to carry people weighing up to 140 kg. The size of the S7, folded
and unfolded, you can see further down. You can equip your S7 with
several accessories for your safety and comfort.
S7 complies with all prevailing standards such as SS-EN 1441, SS-EN
1985, SS-EN 12182 as well as ISO 11199-2:2005 and is approved by
Hjælpemiddelinstituttet, Denmark.
Volaris S7 is CE-marked
Contents
Mounting the handles
Adjusting the handles
Adjusting the seat
Unfolding the S7
Folding the S7
Braking
Adjusting the brake
Recommendations for travel
Maintenance
Fault tracing
Accessories for your safety
Accessories for your comfort
Guarantee
page
page
page
page
page
page
page
page
page
page
page
page
page
3
4
4
5
5
6
7
8
10
11
12
13
14
738
460/480/520/560/600
760-1000
440
590
2
230
15
Guarantee
Mounting the Handles
Volaris grants two years guarantee on the S7. The
guarantee, however, does not cover wear parts like
handles, wires and wheels. Further the guarantee is not
valid, if the rollator has been exposed to abnormal
handling or has been altered without our consent.
When delivering directly to the customer we normally supply the S7
with loose handles in order to allow for a less spacious transport
package. In case you have received the S7 from an aid agency the
handles are already mounted.
Take out
the S7 from
the cardboard
box. Insert the
handles into
the tubes as shown
in the sketch. The
handle should point
backwards. Check
that the wire is
situated on the outside.
Fix the handles by means of the
provided screws as shown by the sketch.
14
3
Adjusting the height of the handles
By pulling the orange-coloured button you
can adjust the height of the handles to
between 100 and 76 cm.
Stand close to the S7. The height is
correct, when your hands are on level with
the handles. After some time you will find
out, if you want further adjustments. The
purpose is that you feel comfortable when
you walk with your S7.
Accessories for your Comfort
Bottle Holder
Holder of plastic-covered steelwire for bottle.
Accommodates 0.5 litre tins and bottles. Suspended
on handle.
Anatomic Handgrip
Handle for anatomic support
of the hand. Distributes the
pressure against the palm.
To be mounted on top of
the existing handles.
Fabric Bag
Adjustment of seat height
A soft fabric bag of woven nylon. Can
remain even when the rollator is
folded.
Easy to take off. Can be laundered.
Change one side at a time.
Pull out the orange-coloured
button underneath the seat.
At the same time lift the seat or
push it down to the required height.
Feel that the button makes “click”
again. This means the seat is now
locked.
Repeat the procedure on the
other side.
Net Basket
A sturdy basket of metallic
net. Easy to hook upon the
S7. Carrying handles.
It is important that the seat is in
horizontal position, before you use
the rollator again. Push down the
centre plate in the seat.
4
Tray
White-coloured tray, to be
placed on the seat of the
rollator.
13
Accessories for your safety
Slow Down Brake
A brake with adjustable
continuous friction, can be
mounted afterwards.
1
Unfolding the S7
1. Grip one handle with one hand and
tilt the S7 slightly in the same
direction causing the wheel lift a few
centimetres.
2
Lamp
2. Pull at the grey handle on the other
side. A spring helps you to unfold the S7.
Will be attached around the
handle tubes. Red rear light, white
front light. Battery driven. Easy
to take off, easy to change
battery.
3. Push down
the centre
plate on the
seat to lock
the rollator.
Cane Holder
3
Two parts to be on screwed
in place. Holds stick, crunch or drip
rack in place.
Holder for Oxygen
Bottle
Sturdy steel basket
to be hooked onto
the seat including
holder.
Easy to take off.
Backrest
Strong support for your
back providing a feeling of
safety. Fastened by
two screws onto
existing
holders.
12
1
Folding
the S7
Take away
the basket.
1.Lift the
orange-coloured
strip.
2. Press the S7
together with the
handles on the side.
5
2
2
Braking
Lubricating the Wire
Parking Brake
After the cleaning lubricate the braking wire up at the handle and
down at the rear wheel. Lift the travelling brake handle and apply a few
drops of oil on the wire showing above the adjusting screw. Lubricate
also the wire inside the spring at the rear wheel.
The parking brake is activated by
turning the orange-coloured lever in
forward direction and lock it by a click.
The brake is released by
turning the lever straight upward until
you hear a clicking sound. See the
sketches.
Travelling Brake
The brake is
activated by
upward
pushing the
bottomside
of the
handles.
Fault Tracing
If the rollator pulls to the right or to the left, check that all wheels
rotate smoothly and that the wheel forks turn easily. Check that wheels
and forks are tightened properly. Make sure that no dirt is gathered
between the wheels and the brake shoes
If the Brake does not work :
• Make sure the wire gets down from the brake handle and is fixed
to the brake arm.
• Check that, when braking, the brake arm is pressed against the
wheel and there is no dirt between the brake arm and the wheel.
• Adjust the wire.
No or unequal braking action
Make sure the brake wire is fixed in handle and brake arm. Check
that the spring at the brake arm is not broken. Check when braking that
the brake shoe is pressed against the wheel, equally on both sides.
Adjust the wire, see page 7.
6
11
Maintenance
It is for your benefit to maintain the S7 well. It will last longer.
Adjusting the brake to obtain correct function
1
The braking power can be
adjusted by changing the length
of the wire.
Cleaning
Leniently remove the dirt using a moist cloth and detergent.
1. Turn up the parking brake.
2. Loosen the locking nut as shown
by the sketch.
3. Slacken the adjusting screw, if you
want to increase the braking power.
2
3
Screw home the adjusting screw , if you
want to reduce the braking power.
4. Check the distance between the brake shoe and the wheel. The
distance should be approx. 2 mm. If you adjust the brake too tight the
parking brake will be unnecessarily stiff to apply.
5. Tighten the locking nut again.
2m
m
Make sure that no dirt is gathered between the wheels and the
brake shoes. Dirt might jeopardize the braking power.
Flushing from above by means of jet cleaning or a garden hose is
recommended. Wipe dry afterwards.
10
7
Recommendations for Travel
Learn the ”scissor technique”.
The S7 is built with a ”Comfort Frame” which makes it pass gently
across uneven parts of the way. If you have to pass a larger obstacle or
to get onto a pavement, you can obtain help by the tilting aid sitting on
the rear wheels.
Push diagonally towards the obstacle. Brake one side. Tilt the S7
slightly backwards making the front wheels lift. Lift the front wheels
over the obstacle. It works fast once you have learnt the lesson.
Step upon one of the
pedals and lift the rollator by
the handles at the same time.
For your safety!
Before you sit down on the S7,
apply the parking brake!
Do not lift by the seat when
you pass an obstacle. The
rollator will then collapse!
8
Note! Never have anybody
sitting on the seat when pushing the rollator.
9
Maintenance
It is for your benefit to maintain the S7 well. It will last longer.
Adjusting the brake to obtain correct function
1
The braking power can be
adjusted by changing the length
of the wire.
Cleaning
Leniently remove the dirt using a moist cloth and detergent.
1. Turn up the parking brake.
2. Loosen the locking nut as shown
by the sketch.
3. Slacken the adjusting screw, if you
want to increase the braking power.
2
3
Screw home the adjusting screw , if you
want to reduce the braking power.
4. Check the distance between the brake shoe and the wheel. The
distance should be approx. 2 mm. If you adjust the brake too tight the
parking brake will be unnecessarily stiff to apply.
5. Tighten the locking nut again.
2m
m
Make sure that no dirt is gathered between the wheels and the
brake shoes. Dirt might jeopardize the braking power.
Flushing from above by means of jet cleaning or a garden hose is
recommended. Wipe dry afterwards.
10
7
Braking
Lubricating the Wire
Parking Brake
After the cleaning lubricate the braking wire up at the handle and
down at the rear wheel. Lift the travelling brake handle and apply a few
drops of oil on the wire showing above the adjusting screw. Lubricate
also the wire inside the spring at the rear wheel.
The parking brake is activated by
turning the orange-coloured lever in
forward direction and lock it by a click.
The brake is released by
turning the lever straight upward until
you hear a clicking sound. See the
sketches.
Travelling Brake
The brake is
activated by
upward
pushing the
bottomside
of the
handles.
Fault Tracing
If the rollator pulls to the right or to the left, check that all wheels
rotate smoothly and that the wheel forks turn easily. Check that wheels
and forks are tightened properly. Make sure that no dirt is gathered
between the wheels and the brake shoes
If the Brake does not work :
• Make sure the wire gets down from the brake handle and is fixed
to the brake arm.
• Check that, when braking, the brake arm is pressed against the
wheel and there is no dirt between the brake arm and the wheel.
• Adjust the wire.
No or unequal braking action
Make sure the brake wire is fixed in handle and brake arm. Check
that the spring at the brake arm is not broken. Check when braking that
the brake shoe is pressed against the wheel, equally on both sides.
Adjust the wire, see page 7.
6
11
Accessories for your safety
Slow Down Brake
A brake with adjustable
continuous friction, can be
mounted afterwards.
1
Unfolding the S7
1. Grip one handle with one hand and
tilt the S7 slightly in the same
direction causing the wheel lift a few
centimetres.
2
Lamp
2. Pull at the grey handle on the other
side. A spring helps you to unfold the S7.
Will be attached around the
handle tubes. Red rear light, white
front light. Battery driven. Easy
to take off, easy to change
battery.
3. Push down
the centre
plate on the
seat to lock
the rollator.
Cane Holder
3
Two parts to be on screwed
in place. Holds stick, crunch or drip
rack in place.
Holder for Oxygen
Bottle
Sturdy steel basket
to be hooked onto
the seat including
holder.
Easy to take off.
Backrest
Strong support for your
back providing a feeling of
safety. Fastened by
two screws onto
existing
holders.
12
1
Folding
the S7
Take away
the basket.
1.Lift the
orange-coloured
strip.
2. Press the S7
together with the
handles on the side.
5
2
2
Adjusting the height of the handles
By pulling the orange-coloured button you
can adjust the height of the handles to
between 100 and 76 cm.
Stand close to the S7. The height is
correct, when your hands are on level with
the handles. After some time you will find
out, if you want further adjustments. The
purpose is that you feel comfortable when
you walk with your S7.
Accessories for your Comfort
Bottle Holder
Holder of plastic-covered steelwire for bottle.
Accommodates 0.5 litre tins and bottles. Suspended
on handle.
Anatomic Handgrip
Handle for anatomic support
of the hand. Distributes the
pressure against the palm.
To be mounted on top of
the existing handles.
Fabric Bag
Adjustment of seat height
A soft fabric bag of woven nylon. Can
remain even when the rollator is
folded.
Easy to take off. Can be laundered.
Change one side at a time.
Pull out the orange-coloured
button underneath the seat.
At the same time lift the seat or
push it down to the required height.
Feel that the button makes “click”
again. This means the seat is now
locked.
Repeat the procedure on the
other side.
Net Basket
A sturdy basket of metallic
net. Easy to hook upon the
S7. Carrying handles.
It is important that the seat is in
horizontal position, before you use
the rollator again. Push down the
centre plate in the seat.
4
Tray
White-coloured tray, to be
placed on the seat of the
rollator.
13
Guarantee
Mounting the Handles
Volaris grants two years guarantee on the S7. The
guarantee, however, does not cover wear parts like
handles, wires and wheels. Further the guarantee is not
valid, if the rollator has been exposed to abnormal
handling or has been altered without our consent.
When delivering directly to the customer we normally supply the S7
with loose handles in order to allow for a less spacious transport
package. In case you have received the S7 from an aid agency the
handles are already mounted.
Take out
the S7 from
the cardboard
box. Insert the
handles into
the tubes as shown
in the sketch. The
handle should point
backwards. Check
that the wire is
situated on the outside.
Fix the handles by means of the
provided screws as shown by the sketch.
14
3
Congratulations to your new
rollator!
Manufactured in Sweden
S7 is developed and manufactured in Sweden to enable us to
guarantee for function and quality. It is manufactured from carefully
chosen material and components. S7 is recoverable to 95 %.
The Volaris S7 will in many ways simplify your daily life. Acquaint
yourself with your new rollator by carefully studying the directions for
use. Adequate use and maintenance will provide more benefits,
increased safety and longer life of your S7.
The S7 provides excellent support for your moving around and
should be used exclusively as a walking aid. The seat is guaranteed to
be able to carry people weighing up to 140 kg. The size of the S7, folded
and unfolded, you can see further down. You can equip your S7 with
several accessories for your safety and comfort.
S7 complies with all prevailing standards such as SS-EN 1441, SS-EN
1985, SS-EN 12182 as well as ISO 11199-2:2005 and is approved by
Hjælpemiddelinstituttet, Denmark.
Volaris S7 is CE-marked
Contents
Mounting the handles
Adjusting the handles
Adjusting the seat
Unfolding the S7
Folding the S7
Braking
Adjusting the brake
Recommendations for travel
Maintenance
Fault tracing
Accessories for your safety
Accessories for your comfort
Guarantee
page
page
page
page
page
page
page
page
page
page
page
page
page
3
4
4
5
5
6
7
8
10
11
12
13
14
738
460/480/520/560/600
760-1000
440
590
2
230
15
This is the way your new
rollator works
Volaris S7
Volaris Sweden AB
Baldersvägen 38, SE-332 35 Gislaved, Sweden
Telephone +46 371-189 80 Fax +46 371-189 82
E-mail: [email protected] Internet: www.volaris.se
16
Art. No. # 81 104 02-02
091020
User Manual Volaris S7
1
Art. no. 1 422 150