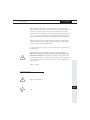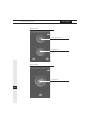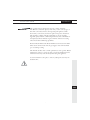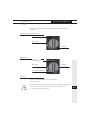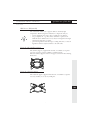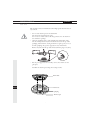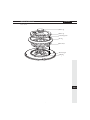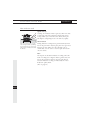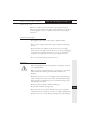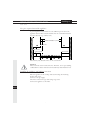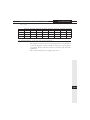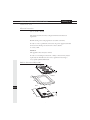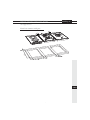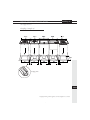
1
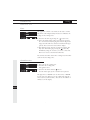
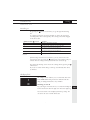
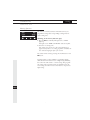
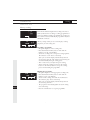
HG3111M
WO3111M
HI3171M
handleiding notice d'utilisation Anleitung manual
CONTENTS
contents
GB
User Manual
Gas hob . . . . . . . . . . . . . . . . . . . . . . . . . . . . . . . . . . . . . . . . . . . . . . GB 4
Induction hob . . . . . . . . . . . . . . . . . . . . . . . . . . . . . . . . . . . . . . . . GB 16
Installation Instructions
Gas hob . . . . . . . . . . . . . . . . . . . . . . . . . . . . . . . . . . . . . . . . . . . . . GB 32
Induction hob . . . . . . . . . . . . . . . . . . . . . . . . . . . . . . . . . . . . . . . . GB 40
PREFACE
description
This manual describes how to make optimum use of the hob. The
manual has been arranged as follows: the first part provides information
about the two-burner gas hob and the wok hob. This is followed by
information on the induction hob. This manual contains information on
how to operate the hob, which pans are suitable and how the appliance
works. The manual also includes cooking tables and maintenance tips.
The safety instructions that apply during installation are found in the
‘Installation Instructions” chapter. This chapter will first deal with the
gas hob, followed by the induction hob.
Store the manual in a safe place so that any subsequent users may also
benefit from it.
The manual also serves as a reference for the service department.
Therefore, please paste the data card in the space provided at the
back of the manual. Where applicable, the data card supplied with a
conversion kit should also be pasted here. The data cards contain all the
information that the service department needs to respond adequately to
your questions.
Happy cooking!
Pictograms used
important information
GB3
tip
YOUR GAS HOB
description
HG3111M
Semi-rapid burner
Rapid burner
WO3111M
Wok burner
GB4
YOUR GAS HOB
introduction
This gas hob has been designed for the true cooking enthusiast.
The differences in burner capacity mean that you can cook any type of
dish. The control buttons have an integrated spark iginition, which
means that you need only one hand to ignite and operate the burners.
This appliance complies with all requirements set by the Cooking
Approval quality mark. It combines high efficiency with a minimum of
incompletely burned combustion gases. This hob offers short heating
times and excellent simmering capabilities.
Both the HG3111M and the WO3111M have been fitted with a flame
failure device which ensures that the gas supply is shut off if the flame
goes out during cooking.
This manual describes how to make optimum use of the gas hob. Besides
information on how to operate the hob, you will also find background
information that may come in handy when using this appliance.
Store this manual in a safe place so that any subsequent users may also
benefit from it.
GB5
SAFETY
what you should pay attention to
Gas hob
Ensure that there is adequate ventilation during use
– Keep natural ventilation openings open.
– When using your hob for longer periods, extra ventilation is
necessary. For instance open a window or install a mechanical fan.
Use the hob only for preparing dishes
– The appliance is not suitable for heating spaces.
Never flambé underneath an extractor hood
– The high flames may cause a fire, even if the
fan is switched off.
Burner parts get very hot during use and take some time to cool
down
– Do not touch them and avoid contact with non-heat-resistant
materials.
– Never immerse hot burner parts and pan supports in cold water.
Rapid cooling may damage the enamel.
There should always be at least a 2 cm distance between the pan to a
knob or a non-heat-resistant wall.
– At shorter distances the high temperatures may cause the knobs or
the wall to discolour and/or distort.
Always use pan supports and suitable cooking utensils
– Always place the pan on the pan support. Placing a pan directly on
the burner head may lead to dangerous situations.
– Aluminium trays or foil are not suitable as cooking utensils. They
may burn into the burners and pan supports.
GB6
Installing burner parts and pan supports
– The cooking hob can only function properly when the burner parts
have been assembled using guide ridges.
– Ensure that the pan supports lie properly against each other and flat
on the glass plate. Only then may the pans be positioned stably.
OPERATION
igniting and adjusting
Gas hob
Every burner may be adjusted continuously between the full and low
positions.
Semi-rapid and rapid burners
0-setting
burner indication
high setting
low setting
Wok burner
0-setting
burner indication
high setting
low setting
low setting outer ring wok
Controls
Press the control knob and turn it anticlockwise.
The burner ignites.
When using an appliance that has been fitted with a flame failure device,
you need to press and hold the knob for a few seconds in order
to activate the flame failure device.
GB7
COMFORTABLE COOKING
optimum use of the hob
Gas hob
– Ensure that the flames always remain underneath the pan. Flames
playing around the pan will lead to loss of energy. Also the handles
may get too hot to handle.
Always use pans with a base diameter of 12 cm or more. Smaller pans
are not stable.
WRONG
RIGHT
– It is best to use the rapid burner or the wok burner when frying, stirfrying, boiling large quantities and deep-frying. Use the low setting of
the semi-rapid burner or the wok burner for cooking sauces,
simmering and boiling. The high setting will make the burner large
enough for boiling.
– Always keep the lid on the pan while cooking. This will reduce the
use of energy by up to 50%.
– Use pans with flat, clean and dry bases. Flat-based pans are stabler
and a clean base will transfer the heat more effectively to the food.
GB8
COMFORTABLE COOKING
optimum use of the hob
Gas hob
Wok burner (WO3111M)
The wok burner enables you to prepare dishes at extremely high
temperatures. When using the wok burner, it is important that you
– cut the ingredients into strips, slices or small pieces in advance,
– use good quality oil, e.g. olive, maize, sunflower or peanut oil. A
small amount is sufficient. Do not use butter or margarine. The high
temperatures will cause it to burn.
– put in the ingredients with the longest cooking times first, so that all
ingredients will be ready and al dente at the same time.
Using the wok auxiliary support
The auxiliary support (supplied with the hob, or available as a separate
accessory) is used to properly stabilize a round-based wok.
Place the auxiliary support on the wok support as shown in the following
illustration.
Using the reduction support
The reduction support (supplied with the hob, or available as a separate
accessory) enables you to use very small pans.
GB9
MAINTENANCE
general
Gas hob
This appliance has been manufactured from high-grade materials that are
easy to clean.
– Do not clean burner parts in the dishwasher.
The detergent may damage the parts.
Do not use too much water as this may penetrate into the burner or
the ventilation openings.
– Clean the sparkplug with a cloth preferably. Be careful when doing
this. Too much pressure may alter the distance between the tip of the
sparkplug and the burner, causing the burner to ignite poorly or not at
all. The sparkplug only operates properly in a dry environment.
Remove any dirt from the tip with a fine brush if the plug is very dirty.
– Put the pan supports down vertically, do not shove them over the
glass plate.
Assemble the burner parts using the locating notches.
Burner head
GB10
Burner base
Sparkplug
Thermocouple
MAINTENANCE
general
Gas hob
Burner cap
Burner cap
Positioning notch
Air ring
Burner head
Thermocouple
Sparkplug
GB11
MAINTENANCE
general
Gas hob
General
– Regular maintenance directly after use prevents spilled food from
creating stubborn stains that are hard to clean. Use a mild cleaning
agent.
– Start by cleaning the control knobs, the burners and the pan supports
and finish with the glass plate. This prevents the glass plate from
getting dirty again during cleaning.
Stubborn stains on enamel (pan supports, burner heads)
Stubborn stains are best removed with a non-abrasive cream or a soft
sponge. Never use scouring powder, scouring pads, sharp objects or
aggressive cleaning agents.
Stubborn stains on the glass plate
Clean the glass plate with a special cleaning agent for ceramic hobs.
Water stains or limescale are best removed with a non-abrasive limescale
remover like vinegar.
Cleaning removable burner parts
The removable burner parts (including the wok burner) are best cleaned
with a mild cleaning product and a soft cloth.
Soak stubbornly stained parts in hot suds. Never use scouring powder,
pads, sharp objects or aggressive cleaning agents.
Brass wok burner parts
A number of parts of the wok burner are made of brass. It is normal for
the brass to change colour because of the high temperatures that occur
when using the wok.
GB12
MAINTENANCE
general
Gas hob
Keradur® burner bases
The burner bases have a unique Keradur® surface coating.
The special dirt-repelling coating contains a ceramic filling which makes
cleaning easier and enhances the durability of the burners considerably.
The burner bases are best cleaned with a mild cleaning product and a soft
cloth.
ATAG Shine
Atag supplies a range of cleaning agents under the name of ATAG Shine.
You may order these on www.hps.nl.
This site also contains several tips on cleaning and operating the appliance.
GB13
FAULTS
table
Gas hob
If the appliance does not work properly, it does not automatically
mean that it is defective.
Always check for the following situations:
fault
cause
solution
It smells of gas near the appliance.
– A burner has been turned on but
not ignited.
– The coupling of a bottled gasappliance has become undone.
– Close the tap and wait a few minutes before re-igniting.
– Tighten the coupling.
A burner does not ignite.
– Plug not in socket.
– Fuse defective/fuse in
meter cabinet switched off
– Sparkplug dirty/damp.
– Burner parts incorrectly installed.
– Push the plug into the socket.
– Fit a new fuse or switch the automatic fuse back on.
– Clean and dry the sparkplug.
– Assemble the burner parts using
the centering ridges.
– Clean and dry the burner parts.
Ensure that the outflow holes are
open.
– Open the main gas tap.
– Check with your gas supplier.
– Connect a new gas bottle or have
the tank refilled.
– Check if the gas used is suitable for
the appliance.
– Press and hold the control knob
long and deep enough between the
high and low settings.
– Burner parts dirty or damp.
– Main gas tap closed.
– Problem with the gas grid.
– Gas bottle or tank empty.
– Wrong type of gas used (when
using bottled gas).
– Control knob not pressed and held
long or deep enough.
The burner does not burn evenly.
– Burner parts incorrectly installed.
– Burner parts dirty or damp.
– Wrong type of gas used (when
using bottled gas).
The burner goes out after igniting.
GB14
– Control knob not pressed and held
long enough (appliances with
flame failure device).
– Assemble the burner parts using
the centering ridges.
– Clean and dry the burner parts.
Ensure that the outflow holes are
open.
– Check if the gas used is suitable for
the appliance.
– Press and hold the control knob
for at least 5 seconds.
Contact the service department in case of faults.
Consult the guarantee card that came with the hob or visit
www.hps.nl.
This appliance may only be connected by a qualified installer!
YOUR INDUCTION HOB
description
Cooking zone Ø18, 50-2800W
Cooking zone Ø18, 50-2800W
childproof
cooking zone
lock indicator indicator
cooking
settings display
on/off button
front cooking zone
rear cooking zone
‘memory’ button
timer display
timer button
cooking programme playing
cooking programme recording
time set
cooking settings
GB15
YOUR INDUCTION HOB
introduction
How induction works
Quick and easy
Cooking on an induction hob is quite easy. The zones have
a wide range and can be adjusted accurately. The lowest
setting enables you to melt chocolate directly in the pan.
The highest setting brings food to the boil very rapidly.
The coil (1) in the hob (2) generates a magnetic field (3). Placing
an iron-based pan (4) on the coil,
will generate an induction current
in the base.
Safe and clean
During induction cooking heat is generated directly in the
base of the pan. This is why the glass plate never gets hotter
than the pan base. This is not only safer than a gas or
ceramic hob, it is also easier to clean as spills do not burn
onto the surface.
Pans
Not all pans are suitable for induction cooking. Since this
form of cooking uses a magnetic field to generate heat, the
base of the pan must be ferrous. Use only pans that are
suited for induction cooking, as indicated by the “Class
Induction” quality mark.
(Also see page 26)
GB16
SAFETY INSTRUCTIONS
what you should pay attention to
Induction hob
Induction cooking is very safe. The hob has been fitted with various
safety devices like a residual heat indicator and maximum cut-out. Yet, as
with any appliance, there are a number of matters that you should pay
attention to.
Connection and repair
- This appliance may only be connected by a qualified installer.
- Never open the casing yourself Only a service technician is allowed to
do this.
- Always disconnect the appliance from the electronic power supply
before you start any repair work. We advise you to do so by unplugging
the appliance, by switching off any fuses or, in case of a permanent
connection, by setting the switch in the power supply lead to zero.
- Do not use the hob in temperatures below 5 °C.
During use
- This cooking appliance has been designed for household use. Only use
it for preparing dishes.
- When you use the hob for the first time, you will notice a “new smell”.
This is normal. By ventilating the kitchen this smell will soon
disappear.
- Remember that if you use one of the higher settings, the heating time
will be extremely short. Never leave the hob unattended when using a
high setting. If a programme has been set (automatic heating), it will
automatically power down.
- Ensure that there is adequate ventilation during use.
Keep natural ventilation openings open.
- Ensure that pans do not boil dry. The hob itself is protected against
overheating, but the pan will get so hot that it could get damaged. The
guarantee does not cover any damage resulting from a pan boiling dry.
GB17
SAFETY INSTRUCTIONS
what you should pay attention to
Induction hob
- Do not use the cooking area for storing items.
- Keep a few centimetres’ distance between the hob and the contents
of the drawer.
- Do not store anything combustible in the drawer underneath the hob.
- Ensure that the flexes of electrical appliances, e.g. a mixer, do not
touch the hot cooking zone.
- The zones heat up during use and remain hot for a while after
switching off. Keep young children away from the hob during and
immediately after cooking.
- Fat and oil are combustible when overheated. Do not stand too close to
the pan. Should oil catch fire, never try to extinguish the fire with
water. Immediately put a lid on the pan and switch off the cooking
zone.
- Never flambé underneath the extractor hood. The high flames could
cause a fire, even if the extractor hood has been switched off.
- However strong the ceramic top may be, it is not unbreakable.
For instance, dropping a spice jar or a pointed utensil on it, could
cause it to crack.
- Do not us a hob that contains cracks. Switch off the appliance
immediately, unplug it to avoid electrical shocks and call the service
department.
- Do not place any metal objects like baking trays, biscuit tins, saucepan
lids or cutlery on the cooking zone. They could heat up very rapidly
and cause serious burns.
GB18
- Keep magnetizable objects (credit cards, bank cards, diskettes, etc.)
away from the appliance. We advise anyone wearing a pacemaker to
consult their cardiologist before using an induction hob.
- Never use a pressure cleaner or a steam cleaner to clean the hob.
OPERATION
setting
Induction hob
Switching on
1. Put a pan on the cooking zone.
2. Press the on/off button.
A horizontal line appears in the display. If you do not
select a setting after switching on, the zone will switch to
‘standby’.
Setting heat
1. Press the + or - button.
The hob immediately goes to setting 6.
2. Select a higher or a lower setting by pressing the + or buttons again.
Switching off
Press the on/off button again.
The hob switches off.
The residual heat indicator may indicate that the zone is still
hot.
Residual heat indicator
After the hob has been used intensively, the relevant zone may
take a few minutes to cool down. As long as this is the case,
you will see an “H” in the display.
Special settings
Setting 11 (wok setting)
This setting is ideal for frying meat or preparing stir-fried
dishes.
Setting b (boost)
The boost setting is intended for brining water to the boil
rapidly. This setting is too high for heating butter or milk.
GB19
OPERATION
setting
Induction hob
Timer
The appliance contains a clock that can be used as a timer.
The timer works independently and does not influence the
settings of the cooking zones.
1. Switch on the time by pressing the
button once.
2. Select the preferred time (max. 3.59 hours) by pressing
the + and - buttons. By keeping these buttons depressed
longer, the time will move forward or backward in larger
periods. You see the time selected in the display.
3. You will hear a bleep after the set time has expired. You
may turn off this bleep by pressing the
button. By
immediately using the + button, you can set a new time.
There is no need to switch off the timer first.
You can have the timer switch off a cooking zone. The timer
works for both cooking zones.
Countdown timer
1. Put a pan on the cooking zone.
2. Switch on the cooking zone.
The appliance starts.
3. Switch on the timer with the
button.
Press the button again for the countdown timer function.
The light next to ‘FRONT’ (for the front zone) or ‘REAR’
(for the rear zone) lights up. Set the coking time with the +
and - buttons 3.59 hours max.). You can see the number of
minutes set in the display.
GB20
OPERATION
setting
Induction hob
Switching on
By pressing the button several times, you go through the following
list:
A cooking zone that has not been switched on, cannot be selected for
switching off by timer. Consequently, this cooking zone will be skipped
in the above table.
number of times
0
1
2
3
4
pressed
reaction
Clock is off; displays are dark
Clock as timer
Clock switches off front zone after the time
set (if the zone has been switched on)
Clock switches off rear zone after the time
set (if the zone has been switched on)
Clock is off; displays are dark
Etcetera
If both cooking zones have been switched on, you may choose between the
front and rear zone by pressing the
button again. You will hear a bleep to
indicate that the cooking time has finished. The zone will switch off.
You switch off the bleep at the end of the cooking time by pressing the
timer button.
If you do not switch off the bleep, it will stop automatically after about
30 minutes.
Childproof loc k
The childproof lock enables you to lock the hob after it has
been switched off . This prevents the unintentional switching on during maintenance or by children.
Switching on and off
Lay your finger on the button for 3 seconds. The childproof
lock is switched on when the light over the button lights up.
You cannot switch on the childproof lock during cooking. You
can still use the timer with the hob locked.
GB21
OPERATION
setting
Induction hob
Memory function
The hob has a memory function. This function lets you
programme settings and corresponding cooking times for
each cooking zone.
Switching on the memory function (play)
1. Press the M button briefly. The light next to ‘PLAY’
lights up.
The lights next to ‘REAR’ and ‘FRONT’ will start to flash.
2. Switch on a cooking zone.
The cooking zone swiches on in the setting that has been
programmed. If there is no cooking programme available, the
zone will switch off again after a few seconds.
You switch off the zone by pressing the on/off button or the
M button.
If a high setting is selected during a programme playing
while another zone has been set to a high setting manually,
this other zone will switch to a lower setting. The programme settings take precedence. If the programme lowers the
zone setting, the other zone does not return to the previous
high setting.
GB22
OPERATION
setting
Induction hob
Memory function
Programming the memory function (record)
1. Press the ‘memory’ button M until the light next to
‘RECORD’ lights up.
The lights next to ‘REAR’ and ‘FRONT’ will start to flash
and the clock display indicates
.
2. Switch on the cooking zone for which you wish to record
a programme.
3. Select a setting with the + or - buttons.
The setting selected and the cooking time are now being
recorded. You may record several cooking settings after another (max. 38).
When during a recording setting 38 settings have been
recorded, the next step recorded will automatically be the
end of the recording.
4. You finish recording the programme by pressing the
on/off button or the ‘memory’ button M.
When recording a new programme any existing programme
will be erased.
The settings and cooking times selected are stored in memory. To activate the recorded programme, use the ‘PLAY’
function to switch on the memory.
You may record 1 programme for each zone.
GB23
OPERATION
setting
Induction hob
Memory cooking
Both the left-hand and right-hand cooking zones have a
memory function for recording a cooking programme for
each zone. When recording a programme the settings you
select will be saved automatically. A programme may last a
maximum of 4 hours.
Memory cooking enables you to record and play a cooking
programme for each cooking zone.
Recording a programme
- Fill a pan and put it on the cooking zone.
- Press and hold the memory button “M” until the
indicator “record” starts flashing.
- Switch the cooking zone to the power setting required.
The indicator “record” burns continuously.
After a few seconds the display will alternately show the
selected setting and “rE”. The cooking times and settings are
saved automatically during the cooking process.
- The +/- button lets you adjust the power setting.
- At the end of the cooking process press the on/off
button or the memory button tot stop the cooking
process and recording the programme.
GB24
Running the programme
- Fill a pan and put it on the appropriate cooking zone.
- Press and hold the memory button “M” until the
indicator “play” starts flashing.
- Switch on the cooking zone with the on/off button.
The indicator “play” burns continuously.
After a few seconds the display will alternately show the
selected setting and “PL”.
- The programme automatically follows the stored cooking
times and settings.
- Press the on/off button to stop the programme.
OPERATION
setting
Induction hob
Switching off the bleep
Every time you press a button, you hear a bleep. To switch
off this bleep:
1. Switch the front cooking zone on and off again.
2. Within 3 seconds press the ’-’ buttons simultaneously
for both zones.
A sound will confirm the change. To switch on the bleep
again, repeat the procedure.
Synchrocontrol
Your hob has a synchrocontrol feature. If you have an
ATAG WS411S extractor hood installed over the hob, it will
automatically switch on and off with the hob.
Using front and rear zones simultaneously
Two cooking zones in a row are controlled by one generator.
The generator divides the power over the two zones. Up to
setting 6 this has no consequences. From setting 7 onwards
the other cooking zone is automatically limited. You will be
notified of this by the “ticking” sound coming from the
appliance.
Is you wish to switch one of the zones to a higher setting,
you must first switch the other one to a lower setting.
1st zone
6
7
10
11
b(oost)
2nd zone
b(oost)
11
10
7
6
GB25
USE
it only takes a minute to get used to
Induction hob
Induction cooking is fast
At first you will be surprised by the speed of the hob. At
higher settings especially, food and liquids are brought to
the boil very rapidly. It is best not to leave pans unattended
to avoid them boiling over or dry.
The power level adjusts automatically
Induction cooking only uses the part of the zone that is
directly underneath the pan. If you use a small pan on a
large zone, the power will adjust automatically to the
diameter of the pan. This means that there will be less
power so that it will take longer for the contents of the pan
There is no heat loss and the han- to come to the boil.
dles stay cool during induction
cooking.
Minimum pan diameter
The diameter of a pan must be 12 cm at least. The best
results are achieved when using a pan with the same
diameter as the cooking zone. If a pan is too small, the
cooking zone will not switch on.
Attention
- Grains of sand may cause permanent scratches on the glass
plate. Therefore always make sure that the base of pan is
clean before you put it on the cooking zone. Also lift a
pan before moving it.
- Do not use the hob as a worktop.
- Always keep a lid on the pan to avoid loss of energy.
GB26
Always lift pans, never shove them
over the cooking zone.
PANS
optimum use of the hob
Induction hob
Induction cooking requires pans of a particular quality. Pans
that have already been used on a gas hob, are no longer suitable
for induction cooking.
For electric and induction cooking only use pans with bases that
are:
- at least 2.25 mm thick;
- flat.
The best pans are those with the “Class Induction” quality
mark. Use a magnet to check if your pans are suitable. Pans that
attract the magnet, are suitable for induction cooking.
Suitable
Special stainless steel pans
Class Induction
Hard-wearing enamelled pans
Enamelled cast-iron pans
Unsuitable
Earthenware
Stainless steel
Porcelain
Copper
Plastic
Aluminium
Attention
Be careful with thin, enamelled steel pans:
- At higher settings the enamel may break off if the pan gets
too dry.
- The high power level may easily cause the base of the pan to
deform.
Attention
Never use pans with deformed bases. A convex or concave base
may impair the overheating protection function. This may cause
the hob to crack and the pan base to melt.
Any damage resulting from the use of unsuitable pans or pans
boiling dry, is not covered by the guarantee.
Pressure cookers
Pressure cookers are ideal for induction cooking. The short
reaction time of the cooking zone brings the cooker up to
pressure very quickly. The cooking process stops as soon as you
switch off the cooking zone.
GB27
COOKING SETTINGS
optimum use of the hob
Induction hob
Because the right settings depend on the quantity and the
ingredients of the dish and on the pan, the table below is
intended as a guideline only.
Use the highest setting to:
- bring food or liquid to the boil quickly;
- shrink greens;
- blanch vegetables;
- heat oil and fat;
- fry steaks (rare, underdone);
- bring a pressure cooker up to pressure;
- make puddings and custards.
Use a slightly lower setting to:
- sear meats;
- fry flatfish, thin fillets of fish;
- fry boiled potatoes;
- cook blended soups and sauces;
- fry omelettes;
- fry steaks (medium);
- deep-fry foods (dependent on temperature and quantity).
Use a setting slightly above medium to:
- fry boiled potatoes;
- fry thick slices of breaded meat:
- fry thin cuts of meat until cooked;
- pot roast large cuts of meat;
- fry bacon (fat);
- fry raw potatoes;
- fry French toast;
- fry breaded fish;
- fry thin slices of breaded meat;
- fry omelettes.
Use the medium setting to:
- thoroughly cook large quantities;
- defrost hard vegetables such as French beans.
GB28
Use the lower settings to:
- make stock;
- stew fruit;
- stew meats;
- thoroughly cook foods;
- simmer vegetables;
MAINTENANCE
cleaning
Induction hob
Daily cleaning
Although food spills cannot burn into the glass plate, we
nevertheless recommend that you clean the hob immediately
after use. For daily cleaning it is best to use a mild cleaning
agent and a damp cloth.
Dry with kitchen paper or a dry tea towel.
Stubborn stains
Stubborn stains can also be removed with a mild cleaning
agent such as washing-up liquid. Remove water stains and
limescale with vinegar. Metal marks (caused by sliding pans)
are often difficult to remove.
Special cleaning products are available for this purpose.
Food spills are best removed with a glass scraper.
Also use a glass scraper for removing melted plastic and
sugar.
Not suitable
Never use abrasives. They leave scratches in which dirt and
lime can accumulate.
Never use anything sharp like steel wool or scourers.
Activate the childproof lock before you start cleaning the
hob.
ATAG supplies a range of cleaning agents under the name
of ATAG Shine. You may order these on www.hps.nl.
This site also contains several tips on cleaning and operating
the appliance.
GB29
FAULTS
general
Induction hob
Check the guarantee card or www.hps.nl for the service
department telephone number.
Whenever you notice a crack (however small) in the glass plate,
switch off the hob immediately, unplug the hob, turn off the
fuse switch(es) in the meter cabinet or, if you have a permanent
connection, set the switch in the power supply lead to zero.
Contact the service department.
Noises in the base of the pan
While cooking, you may hear a rattling noise coming from the
base of the pan. This is quite harmless. The noise is caused by
the effect the high power has on the base of the pan.
You may reduce the noise by switching to a lower setting.
GB30
FAULTS
table
Induction hob
Symptom
Possible cause
Solution
Text appears in the display when the
hob is first activated.
This is the standard set-up routine
Normal operation.
The fan continues to run for a few
minutes after the hob has
been switched off.
The hob is cooling down.
Normal operation.
A slight smell is noticeable the first few
times the hob is used.
The new hob is heating up.
This is normal and will disappear after
you have used the hob a few times.
Ventilate your kitchen.
There is a soft ticking noise coming
from the hob.
This is caused by the division of the
power between the front and rear
zones. A soft rattling noise may also
occur at lower settings.
Normal operation.
The pans produce noise during cooking.
This is caused by the energy flowing
from the hob to the pan.
At high settings this is normal for certain pans. It will not damage the pans
or the hob.
After you have switched on
the hob, the display keeps
flashing.
The pan used is not suitable for induction cooking or its base diameter is less
than 12 cm.
Use a good pan, see page 26.
A cooking zone suddenly stops working and you hear a bleep.
The preset time has
ended.
Switch off the bleep using the + or –
buttons on the timer.
The hob does not work and
nothing appears in the display.
No power supply due to defective
cable or wrong connection.
Check the fuse or the electric switch (if
there is no plug).
One of the fuses blows as soon as the
hob is switched on.
Hob wrongly
connected.
Check the electrical connection.
Fault code F00, F01....F11.
A button has been pressed and held
too long or there is an object lying on
the button.
Remove object. Switch on the hob
again.
Fault code FA.
The hob has been wrongly connected
or the mains voltage is too low.
Check the connection. Contact your
electricity supplier if the problem persists.
Fault code F0 - F6.
Defective generator.
Contact the service department.
Fault code F8.
The hob has overheated.
The hob has been switched off due to
overheating. Let the hob cool down
and use a lower setting.
Fault code F99.
You have pressed 2 or more buttons
simultaneously.
Press 1 button at a time.
Continuous bleep.
The hob has been wrongly connected
or the mains voltage is too high.
Have your connection changed.
GB31
INSTALLATION INSTRUCTIONS
general
Gas hob
This appliance may only be fitted by a Corgi-registered installer.
Attention
The data card indicates the type of gas and the country for which the
appliance has been designed.
This is a category 3 appliance.
Gas connection
The gas connection must comply with all national and local regulations.
We recommend that the hob be connected by means of a fixed pipe.
Connecting the hob with a specially designed safety hose is also
permitted.
Only pipes that are entirely made of metal may be used behind an oven.
Attention
Safety hoses may not be bent and must not come into contact with any
moving parts of the kitchen unit.
The connection tap for the hob must be positioned in such a way that it
is always easily accessible.
Before you start using the appliance for the first time, check the
connections for gas leaks using soapy water.
GB32
INSTALLATION INSTRUCTIONS
general
Gas hob
Electrical connection
230 V - 50 Hz - 0,6 VA
The electrical connection must comply with all national and local
regulations.
Wall-mounting socket and plug must be accessible at all times.
In order to create a permanent connection, the power supply lead should
be fitted with a multi-pole switch with a contact distance of at least 3
mm.
Attention
This appliance must always be earthed.
In order to avoid any dangerous situations, a faulty connection cable may
only be replaced by the manufacturer, the service organization it belongs
to or by equally qualified individuals.
GB33
INSTALLATION INSTRUCTIONS
building in
Gas hob
Preparing the hob
1/2” ISO (straight)
1/2” ISO 228
(conical)
Sealing ring
1/2” ISO (straight)
1/2” ISO 228
(straight)
only for France
Sealing ring
Fit the elbow supplied to the appliance’s gas connection.
A
GB34
Remove the protective foil of the sealing strip (A) and tape the strip in
the groove of the aluminium profiles or on the edge of the glass plate. Do
not tape the sealing strip along the corner. Instead, cut 4 pieces that fit
tightly together in the corners.
INSTALLATION INSTRUCTIONS
building in
Gas hob
Cutting an opening in the worktop
Cut the opening in the worktop. This should be done very accurately
(consult the built-in dimensions).
In case of a wooden worktop, coat the sawn surfaces of the worktop with
sealing varnish to prevent swelling of the worktop by moisture.
Attachment points for mounting brackets
Threaded hole
screw
worktop
Thin worktops
Thick worktops
GB35
INSTALLATION INSTRUCTIONS
building in
Gas hob
Built-in dimensions HG3111M
1*) attachment point mounting bracket
Gas connection
330
522
47
voorzijde
Front
min.50
490
290
Front
voorzijde
1*
1*
1*
1*
GB36
480
G1/2"
1*
280
INSTALLATION INSTRUCTIONS
building in
Gas hob
Built-in dimensions WO3111M
Gas connection
Front
Front
GB37
INSTALLATION INSTRUCTIONS
building in
Gas hob
Free space required around the appliance
A gas hob generates heat. Therefore, leave sufficient space between the
appliance and non-heat-resistant materials. Also be careful with materials
that may discolour (e.g. stainless steel).
number of modulos x 330 mm
min 650 mm
min 450 mm
min 100 mm
min 100 mm
The hob may only be built in next to one vertical wall.
Attention
The bottom side of the hob becomes hot. Therefore, do not put anything
combustible in a drawer that has been fitted directly underneath the hob.
Installing the appliance and making connections
Place the appliance in the worktop and attach it using the mounting
brackets and screws.
Connect to the gas supply.
Check the connection for gas leaks using soapy water.
Connect the appliance to the mains.
GB38
INSTALLATION INSTRUCTIONS
gas information
Gas hob
G25/25 mbar
G20/20 mbar
G25/20 mbar
G30/29 mbar
G31/29 mbar
G31/37 mbar
burner type
(kW)
(kW)
(kW)
(kW / g/h)
(kW / g/h)
(kW / g/h)
G30/50 mbar
(kW / g/h)
G31/50 mbar
(kW / g/h)
normal
2.00
2.00
1.80
1.60 / 115
1.41 / 101
1.60 / 115
2.00 / 144
1.76 / 127
strong
3.00
3.00
2.70
2.30 / 166
2.02 / 146
2.30 / 166
2.70 / 194
2.38 / 171
wok
5.70
5.70
5.00
5.00 / 360
4.40 / 317
5.00 / 360
5.50 / 396
4.75 / 342
The HG3111M type is the only type fit to be built in
This appliance is fitted for the use of natural gas. There is a set available to
convert this appliance to make it suitable for other types of gas and other
gas pressures. You may order this conversion set from the sales and service
organization.
The conversion instructions are supplied with the set.
GB39
INSTALLATION INSTRUCTIONS
building in
Induction hob
Electrical connection
230 V - 50 Hz - 2800W
The electrical connection must comply with all national and local
regulations.
Wall-mounting socket and plug must be accessible at all times.
In order to create a permanent connection, the power supply lead should
be fitted with a multi-pole switch with a contact distance
of at least 3 mm.
Attention
This appliance must always be earthed.
In order to avoid dangerous situations, a faulty connection may only be
replaced by the manufacturer, the service organization it belongs to
or by equally qualified individuals.
Built-in dimensions HI3171M
Front
Front
GB40
INSTALLATION INSTRUCTIONS
building in
All appliances
Fitted-unit situation with space
GB41
INSTALLATION INSTRUCTIONS
building in
All appliances
Coupling (example 1)
Coupling profile *
GB42
* Coupling for making certain that appliances are mounted tightly next to each other.
INSTALLATION INSTRUCTIONS
building in
All appliances
Coupling (example 2)
Coupling profile *
GB43
* Coupling for making certain that appliances are mounted tightly next to each other.
INSTALLATION INSTRUCTIONS
building in
Induction hob
1. Check that the kitchen unit and the cut-out meet the
dimension and ventilation requirements.
VARNISH
2. If necessary, treat the sawn ends of synthetic or wooden worktops
with sealing varnish, to prevent swelling of the worktop by
moisture.
3. Turn the hob upside down and place it on the worktop.
4. Remove the protective foil from the sealing tape and tape the strip
in the groove of the aluminium profiles or on the edge of the glass
plate. Do not tape the sealing strip along the corners. Instead, cut
4 pieces that fit tightly together in the corners.
GB44
INSTALLATION INSTRUCTIONS
building in
Induction hob
5. Turn the hob over and place it in the cut-out.
6. Attach the hob using the mounting brackets supplied.
For worktops up to 40 mm in thickness, place filler blocks
between the brackets and the worktop. The screws
should be screwed into the threaded holes.
7. Connect the appliance to the mains. A short bleep will be
heard and the displays will light up briefly.
The hob is now ready for use.
Directly after switching on the hob, the fan will activate briefly. The
hob will perform a self-test. This will take a few seconds.
GB45
INSTALLATION INSTRUCTIONS
building in
Induction hob
Ventilation
The electronics in this appliance need cooling. If there is insufficient air circulation, the hob will switch off after a short while.
There are ventilation holes in the bottom side of the hob. Cool
air needs to be sucked into the hob through these holes. The
outlet holes are situated on the front and bottom sides of the
hob.
Building in the appliance over an oven or a drawer
The appliance needs to be sufficiently ventilated.
GB46
INSTALLATION INSTRUCTIONS
building in
Induction hob
Building in the appliance over an oven or a drawer
thickness worktop
building-in heigh
hob
max.
height
oven
If the hob is to be installed over an oven, the recess needs to be a
certain size. This size is dependent on:
- thickness of the worktop;
- building-in height of the hob (refer to table);
- maximum height of the oven (not including the control panel).
The correct recess size is the maximum size of the oven plus the
building-in height of the hob, minus the thickness of the worktop.
recess size
GB47
APPENDIX
safety
Saftey of the induction hob
1. A sensor continuously monitors the temperature of the hob’s
components. If the temperature gets too high, the hob’s power is
automatically reduced.
2. The cooking process stops automatically when you remove the pan
from the hob. You are nevertheless advised to make it a habit to
always switch off the hob or cooking zone after use to avoid
switching the appliance on by accident.
3. Each cooking zone has been fitted with a sensor that continuously
monitors the temperature of the pan’s base to avoid the risk of
overheating should a pan boil dry.
4. Small objects, such as a pan smaller than 12 cm, a fork or a spoon,
are not recognised by the hob as a pan. The zone’s display will flash
“0” and the hob will not switch on.
Cooking time limiter (maximum cut-out)
Maximum cut-out is a safety function incorporated in your hob. It
activates automatically if you forget to switch off the hob after use.
Cooking setting
1 and 2
3, 4 and 5
6, 7 and 8
9
10
11 and b(oost)
GB48
The cooking zone automatically
switches off after:
9 hours
5 hours
4 hours
3 hours
2 hours
1 hour
APPENDIX
disposal of packaging and appliance
All appliances
This appliance has been constructed from durable materials.
The packaging of this appliance is recyclable. It could have been made
from:
• cardboard;
• paper;
• polythene foil (PE);
• CFK-free polystyrene (PS-hard foam);
• polypropylene tape (PP).
These materials should be disposed of in a responsible manner, in
accordance with government regulations.
The identification card contains the picture of a dustbin with a cross
through it.
This means that at the end of its working life, the appliance may not be
disposed of as household refuse but must be handed in at a special refuse
collection centre run by the local authority or must be given to a dealer
providing this service.
Segregated processing of household appliances such as this hob, avoids
any negative effects on the environment and public health that might
otherwise occur. This process also enables the recovery of the materials
used in the production of this appliance, thus realising considerable
savings in terms of raw materials and energy.
To draw attention to the fact that the segragated processing of electric
household appliances is compulsory, this appliance carries the symbol of
a crossed-out dustbin.
GB49
plak hier het toestel-identificatieplaatje
placez ici la plaque d'identification de l'appareil
kleben Sie hier das Gerätetypenschild ein
stick the appliance identification card here
Dit plaatje bevindt zich aan de bovenzijde van het toestel.
Cette plaque se trouve sur le dessus de l'appareil.
Dieses Schild befindet sich an der Oberseite des Gerätes.
This card is located on the top of the appliance.
plak hier het ombouw-identificatieplaatje (indien van toepassing)
placez ici la plaque d'identification relative à la conversion (en cas d'application)
kleben Sie hier das Umbautypenschild ein (wenn zutreffend)
stick the conversion identification card here (where applicable)
Dit plaatje bevindt zich in de ombouwset (indien van toepassing).
Cette plaque se trouve dans le jeu de conversion (en cas d'application).
Dieses Schild befindet sich im Umbausatz (wenn zutreffend).
This card is supplied with the conversion kit (where applicable).
Adressen en telefoonnummers van de serviceorganisatie vindt u op de garantiekaart.
Les adresses et les numéros de téléphone du service après-vente se trouvent sur la carte de garantie.
Adressen und Telefonnummern der Kundendienstorganisation finden Sie auf der Garantiekarte.
You will find the addresses and phone numbers of the service organisation on the guarantee card.
50
art.nr. 700002117000
Houd, wanneer u contact opneemt met de serviceafdeling, de productiecode (PCODE)
en het volledige itemnummer (ITEMNR) bij de hand.
En cas de contact avec le service après-vente, ayez auprès de vous
le code de production (CODEP) et le numéro complet de l'article (ARTICLENO).
Halten Sie den Produktionscode (PCODE) und die vollständige Itemnummer
(ITEMNR) bereit, wenn Sie mit der Kundendienstabteilung Kontakt aufnehmen.
When contacting the service department, have the production code (PCODE)
and complete item number (ITEMNR) to hand.